

DuraLabel 900 User Manual
USER’S GUIDE
Graphic Products, Inc. | 800.788.5572
DuraLabel.com
|
GraphicProducts.com
9000

Minimum System Requirements
Operating System: Windows 2000 SP4, XP SP2, Vista, 7
Memory: 128 MB RAM
Hard Drive: 100 MB
Additional Requirements: IT Administrator Privileges
Supplies
DuraLabel supplies and the DuraLabel® 9000 printer have been optimized for
compatibility and print quality. Use only DuraLabel supplies from Graphic Products
with your DuraLabel 9000 printer.
©2008 - 2013 Graphic Products, Inc. All Rights Reserved
1
800.788.5572 DuraLabel.com
INTRODUCTION
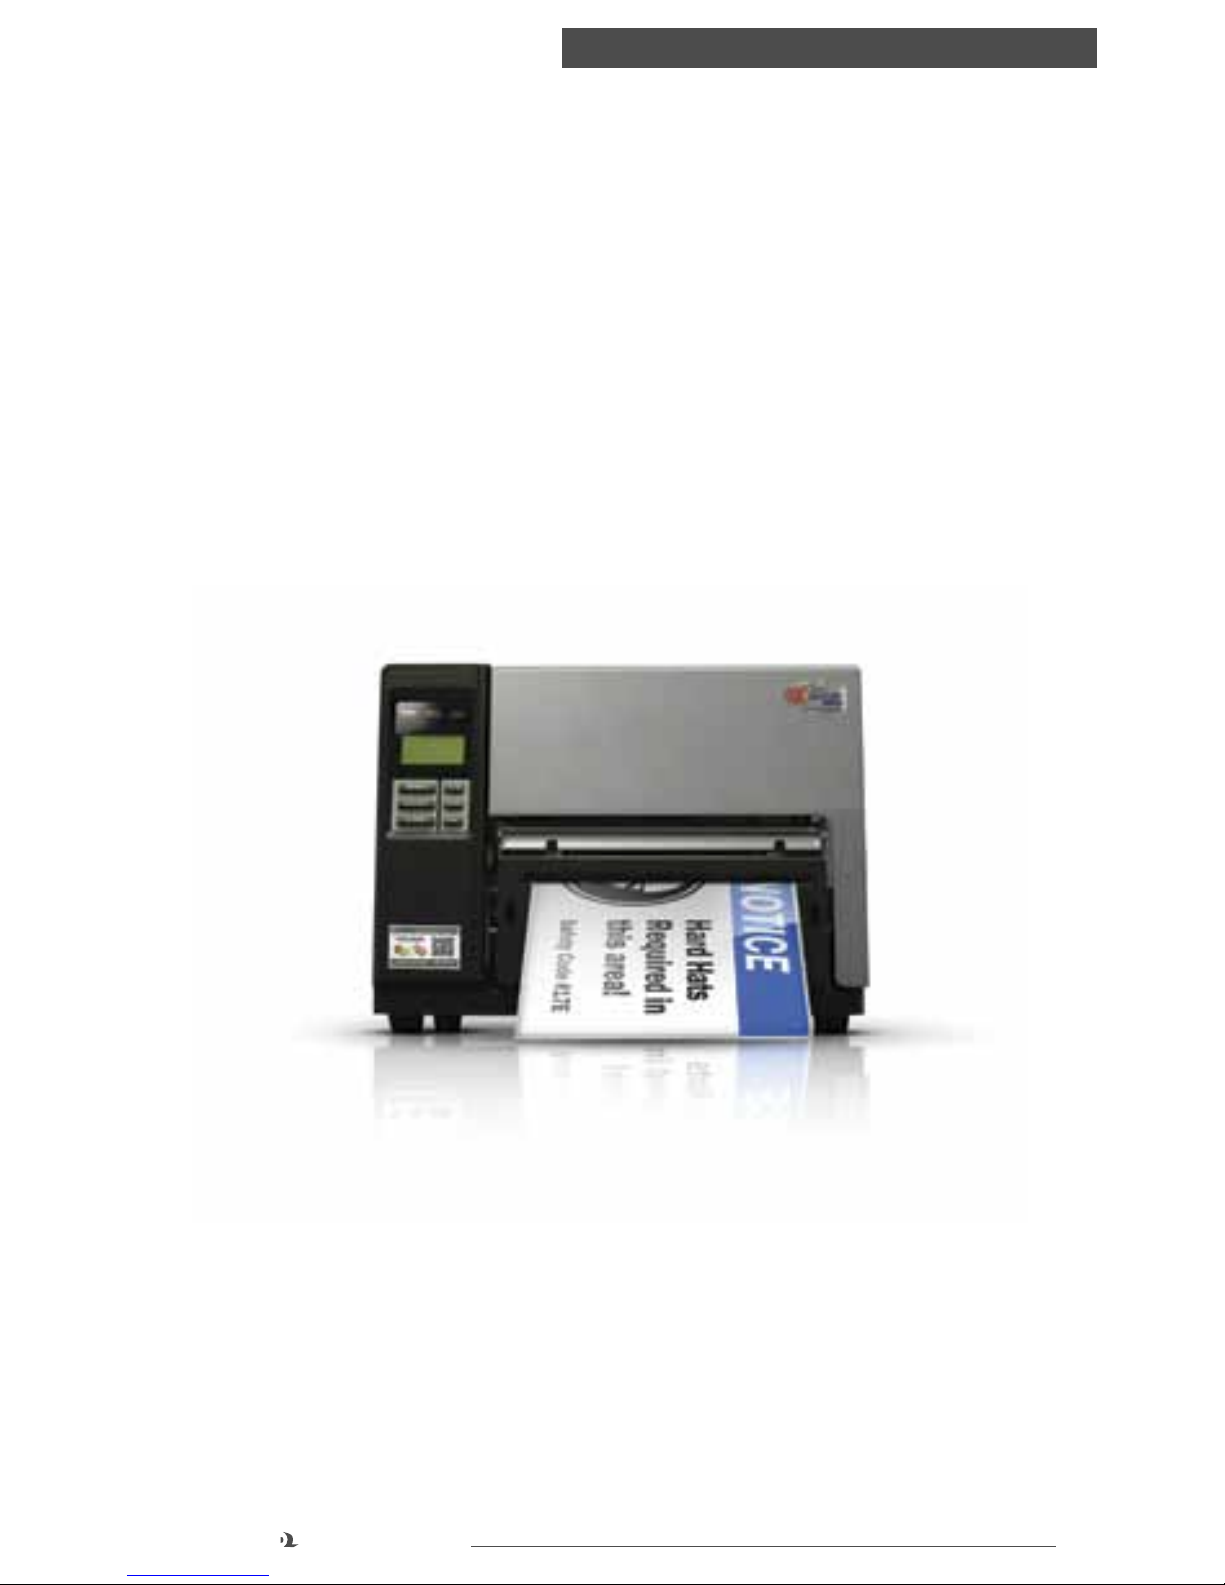
1. Introduction
Congratulations on the purchase of your DuraLabel 9000 thermal transfer printer.
This guide will have you printing professional-quality labels and signs in no time!
The DuraSuite Labeling Software included with your printer expands your creative
abilities, simplifies safety compliance and lets you produce labels and signs for
virtually any application. Refer to the enclosed DuraSuite Labeling Software User’s
Guide for complete information.
Call us at 800.788.5572 with any questions about your DuraLabel 9000 printer.
We’re here to help with all your label and sign-making needs.

2
DuraLabel.com 800.788.5572
CONTENTS
2. Table of Contents
1. Introduction ............................................................................................................... 1
2. Table of Contents ...................................................................................................... 2
3. Warranty ..................................................................................................................... 4
4. Loading the Printer ................................................................................................... 5
4.1 Printer Parts ........................................................................................................... 5
4.2 Supplies ................................................................................................................. 6
4.3 Loading Vinyl Supply ............................................................................................. 6
4.4 Printer Ribbon Parts ..............................................................................................9
4.5 Loading Ribbon ................................................................................................... 10
5. Connecting the Printer ...........................................................................................13
5.1 Inserting the Installation CD ...............................................................................13
5.2 Using a USB Cable ..............................................................................................13
5.3 Using a Parallel Cable .........................................................................................15
5.4 Upgrading a Driver ..............................................................................................18
6. Configuring Printer Drivers .....................................................................................19
6.1 Continuous Vinyl Printing Instructions ...............................................................19
6.2 Die-Cut Label Printing Instructions ....................................................................20
6.2.1 Label Supply Calibration ..........................................................................20
6.2.2 Driver Settings ..........................................................................................20
6.2.3 Media Sensor Adjustment for Die-Cut Labels with Headers ................21
6.2.4 Media Sensor Adjustment for RTK Color Bar Die-Cut Labels ...............22
6.3 B Mark Label Printing Instructions ....................................................................22
6.3.1 Label Supply Calibration ..........................................................................22
6.3.2 Driver Settings ..........................................................................................23
6.3.3 Adjusting the B Mark Media Sensor .......................................................23
6.4 Cutting Labels in Intervals ..................................................................................23
6.5 Adjusting Print Speed .........................................................................................24
6.6 Adjusting Darkness .............................................................................................24
7. Installing DuraSuite Labeling Software ................................................................ 24
8. Label Creation .........................................................................................................25
8.1 Label Creation with Your Word Processor .........................................................25
8.1.1 Using Templates .......................................................................................25
8.1.2 Setting up a Microsoft Word Document .................................................25

3
800.788.5572 DuraLabel.com
CONTENTS
9. Label Design ............................................................................................................ 26
9.1 Text Boxes ............................................................................................................26
9.1.1 Changing Text Box Size ............................................................................26
9.1.2 Positioning Text Boxes .............................................................................27
9.2 Graphics ...............................................................................................................28
9.3 Barcodes .............................................................................................................. 29
9.3.1 Activating dBest Barcodes Toolbar Template in Microsoft Word ..........29
9.3.2 Using the dBest Barcodes Toolbar .........................................................30
9.3.3 Creating a Barcode Using the dBest Barcodes Toolbar ........................30
9.4 Merging Information, Sequencing Labels .........................................................30
9.4.1 Creating an Excel Spreadsheet ...............................................................30
10. Configuring Ethernet Card ...................................................................................35
10.1 Setting an Ethernet Port using the Diagnostic Tool .......................................35
10.2 Installing a Driver for the Ethernet Port ..........................................................35
10.3 Manually Configuring the IP Address ..............................................................38
10.4 Setting a Static IP .............................................................................................38
11. Cleaning and General Maintenance ................................................................... 39
11.1 Print Head .......................................................................................................... 39
11.2 Cutter .................................................................................................................40
11.3 Platen Roller ...................................................................................................... 41
12. Troubleshooting .....................................................................................................42
12.1 Speckles Appear Throughout Label .................................................................42
12.2 Solid Printed Line Appears Across Entire Label .............................................42
12.3 Fading of Text/Graphics Occurs During Printing ............................................42
12.4 Hash Marks Appear Throughout Printing ........................................................42
12.5 Unprinted Horizontal Lines Appear ..................................................................43
12.6 LED Flashes Between Green “ON-LINE” and Red “ERROR” ..........................43
12.7 Printer is Printing Labels but not Cutting Them .............................................43
12.8 Receive a "No Ribbon" Error Message ............................................................44
12.9 Receive a "No Paper" or "Paper Jam" Error Message ....................................44
12.10 Printer Cuts Labels Off-Center or into the Next Label ..................................45
12.11 Wrinkles Appear on Half of Label ..................................................................45
13. Specifications ........................................................................................................48

4
DuraLabel.com 800.788.5572
WARRANT Y
3. Warranty
Graphic Products DuraLabel printers are warrantied
to be free from defects in materials or workmanship
for a period of three years from the date of purchase.
Within this period, Graphic Products, Inc. will, at its
sole option, repair or replace any components which
fail in normal use. Such repairs or replacement will be made at no charge to the
purchaser for parts or labor, provided that the purchaser shall be responsible for
any transportation cost. This warranty does not cover loss, damages from accident,
or equipment or parts which have been misused, altered, neglected, carelessly
handled, used for purpose other than those for which the printer was manufactured,
or damages resulting from unauthorized service.
NOTE: Repairs have a 90 day warranty. If the unit sent in is still under its original
warranty, then the new warranty is 90 days or to the end of the original warranty,
depending upon which is longer.
The Warranties and remedies contained herein are exclusive and in lieu of all other
warranties whether express, implied or statutory, including any liability arising under
any warranty of merchantability or fitness for a particular purpose, statutory or
otherwise. This warranty gives the purchaser specific legal rights, which may vary
from state to state.
In no event shall Graphic Products be liable for any incidental, special, indirect or
consequential damages, whether resulting from the use, misuse or inability to use
the product for any reason including defect. Some states do not allow the exclusion
of incidental or consequential damages, so the above limitation may not apply in all
areas.
Graphic Products retains the exclusive right within all warranty periods to repair,
replace the product or offer a full refund of the purchase price at its sole discretion.
Such remedy shall be the purchaser’s sole and exclusive remedy for any breach of
warranty.
General maintenance and cleaning of the DuraLabel printer is the purchaser’s
responsibility and is not covered by the warranty. Expendable items or parts such as
label supply and ribbon are not covered by this warranty.
NOTE: Some DuraLabel printers require specific preparation such as removal of
battery or power supply before shipping. Please contact your Graphic Products
representatives to ensure correct return procedure: call 800.788.5572 or visit
www.GraphicProducts.com. Graphic Products, Inc. shall not be responsible for any
loss or damages incurred during shipping.
5
800.788.5572 DuraLabel.com
LOADING THE PRINTER
A
B
D
C
F
G
H
I
L
E
J
K
4. Loading the Printer
DuraLabel ribbon and vinyl supplies have been optimized for compatibility and print
quality. Only authorized DuraLabel supplies from Graphic Products will print correctly
in the DuraLabel 9000 printer.
An instructional video demonstrating how to load DuraLabel ribbon and supplies is
included on your installation CD.
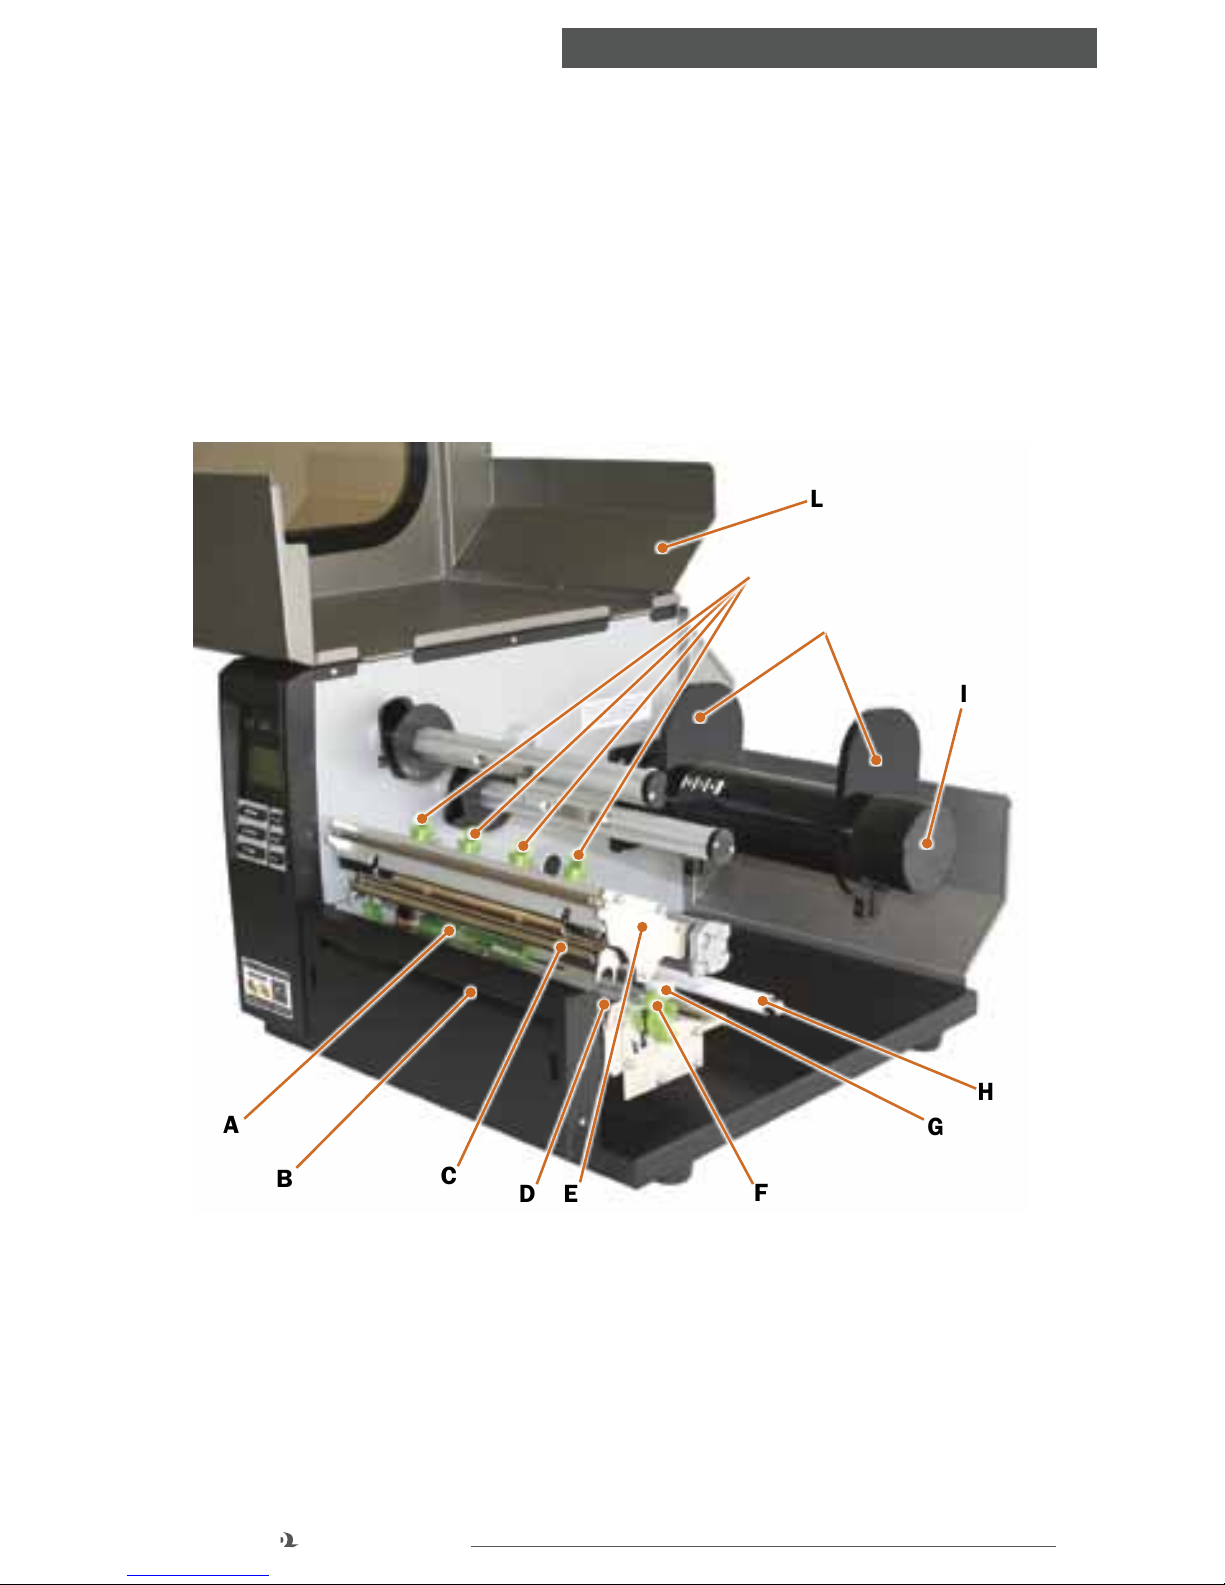
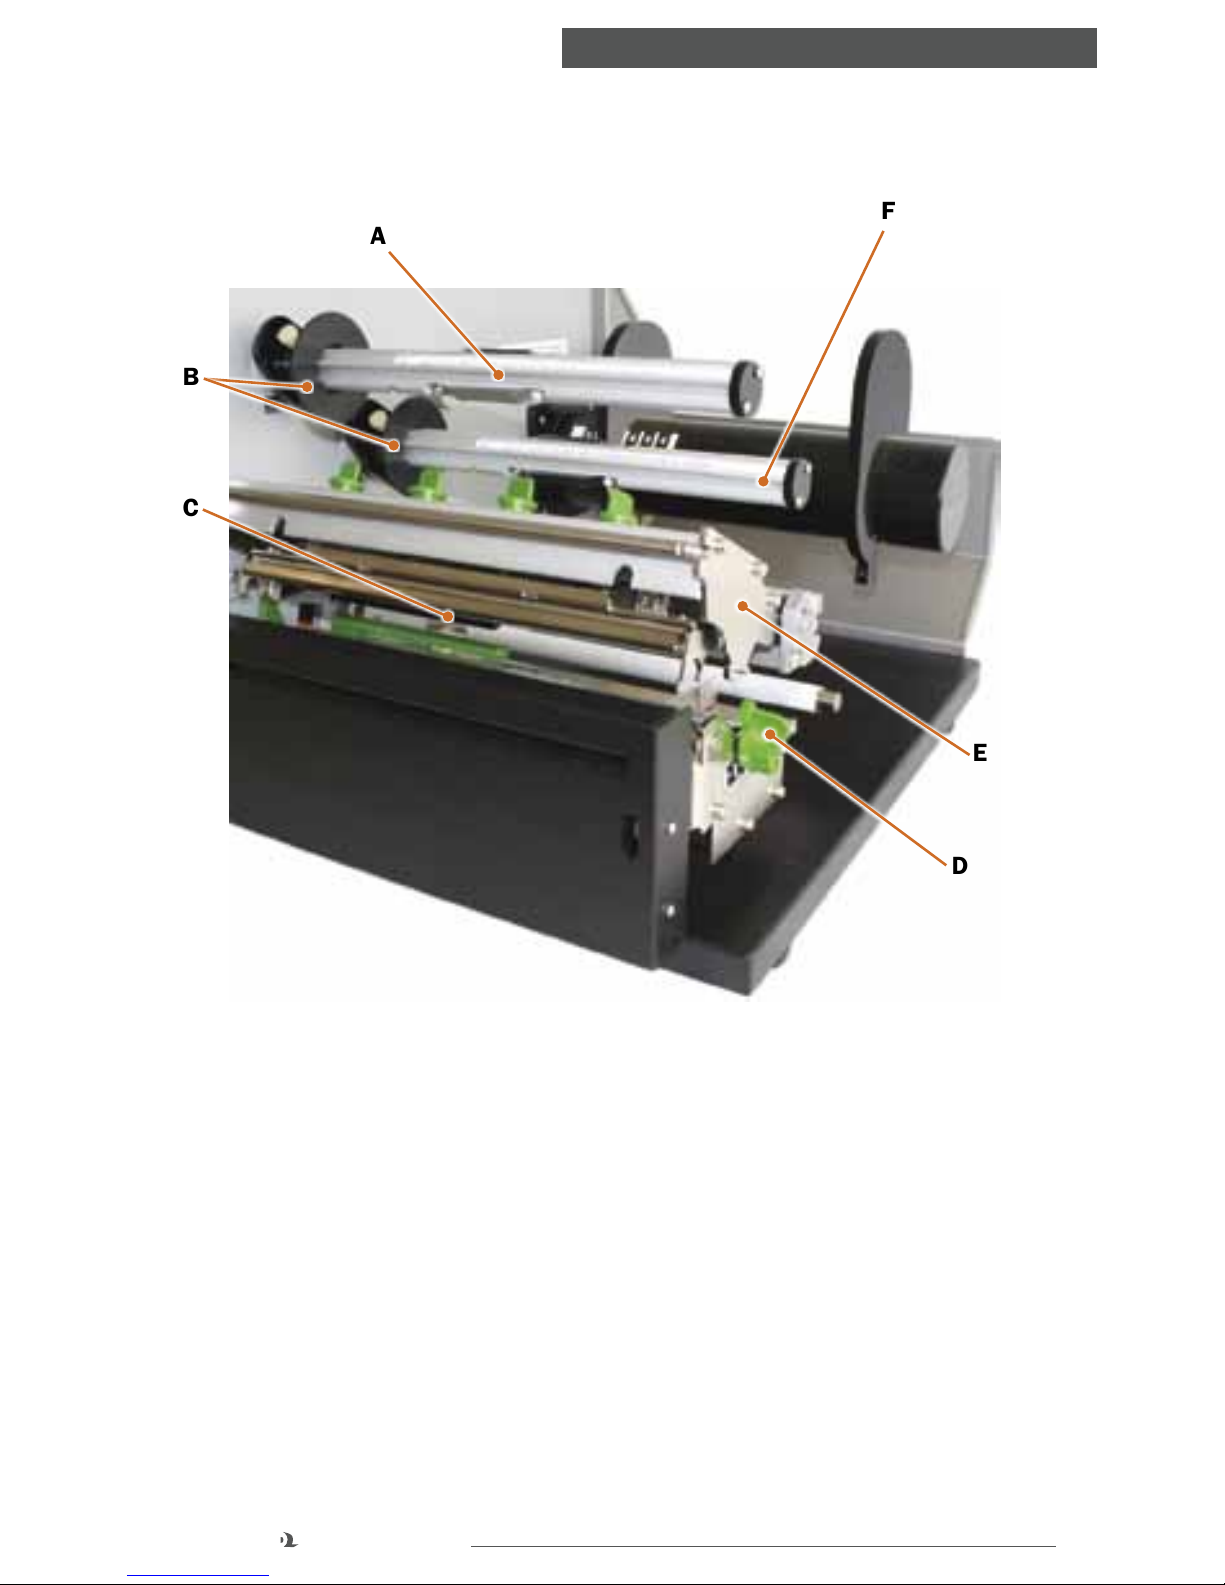
4.1. Printer Parts
FIGURE 1 DuraLabel 9000 Printer Parts
A. Media Sensor (green)
B. Printed Label Opening
C. Print Head
D. Platen Roller (black)
E. Print Head Mechanism
F. Print Head Release Lever (green)
G. Adjustable Media Guides (white)
H. Media Guide Bar (metal)
I. Supply Bar
J. Supply Guides
K. Adjustable Pressure Knobs (green)
L. Printer Cover
6
DuraLabel.com 800.788.5572
LOADING THE PRINTER
4.2 Supplies
The DuraLabel 9000 ribbon and other media have been optimized for compatibility
and print quality. Only authorized supplies from Graphic Products will print correctly
in the DuraLabel 9000.
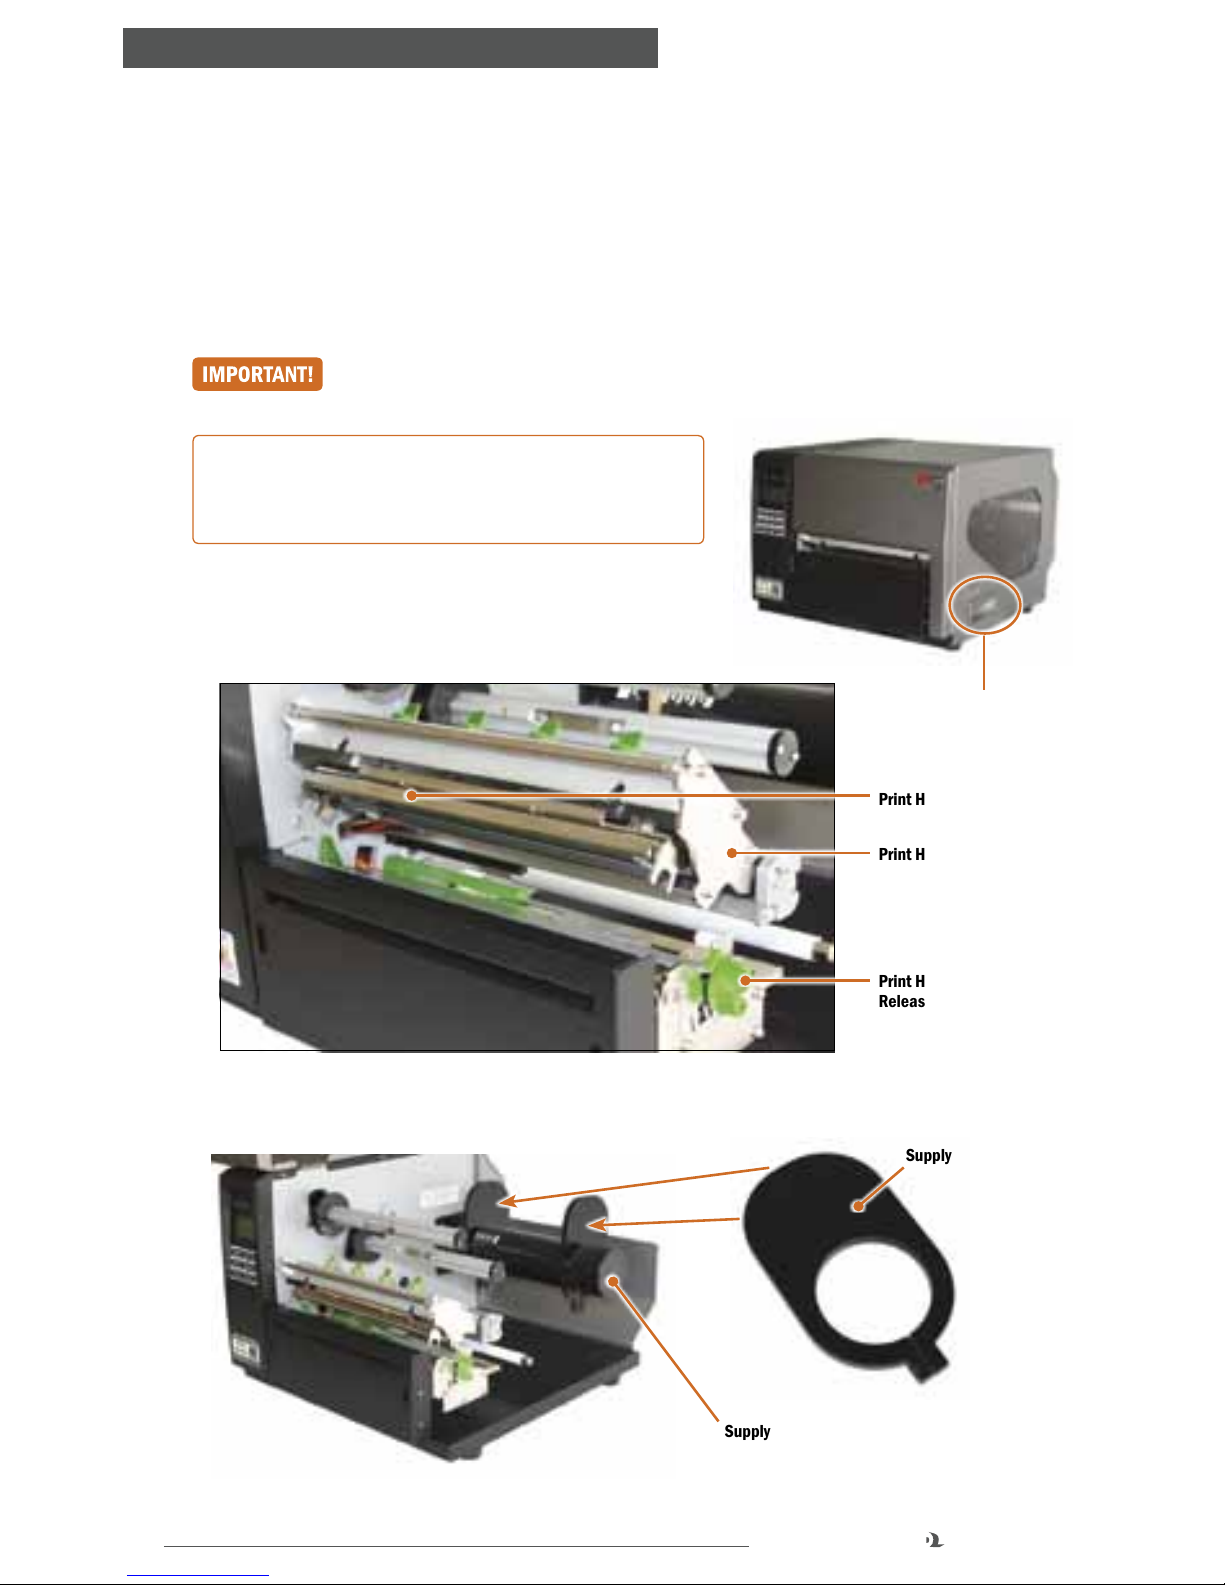
4.3 Loading Vinyl Supply
Always turn the printer OFF when loading supplies. Always wait at least
5 seconds before turning power back ON.
NOTE: Watch a demonstration of supply loading,
viewable from your DuraLabel 9000 CD or at
DuraLabel.com/duralabel-videos.
A. Open the printer cover by lifting up on the handle.
B. Push the green print head release lever to pop up
the print head mechanism.
C.
Handle on
Printer Cover
Print Head
Print Head Mechanism
Print Head
Release Lever
FIGURE 2 Print head mechanism in the upright position
Supply Guide
Supply Bar
FIGURE 3 Supply guides on supply bar
Remove and set aside the outside supply guide from the supply bar.

7
800.788.5572 DuraLabel.com
LOADING THE PRINTER
FIGURE 4 The inside supply guide is set for 6"
label supply.
Adjustable Media
Guides (white)
Platen Roller
Print Head Mechanism
Supply Guides
Supply Bar
Media
Guide Bar
D. Adjust the inside supply guide to cover the
number corresponding to the size of label
supply being loaded (see photo below).
E. Place the label supply onto the supply bar.
NOTE: Label supply should roll over the top
and toward the front of the printer.
F. Fit the outside supply guide onto the label bar, against the label supply but with
enough room for the label supply to rotate with ease.
Supply Guides
Supply Bar
Label Stock/Vinyl Supply
FIGURE 5 Loaded supply and outside supply guide placed on supply bar
FIGURE 6 Loaded vinyl supply moving right to left.
G. Pull the leading edge of the label supply and thread it under the media guide bar
and through the adjustable media guides.
8
DuraLabel.com 800.788.5572
LOADING THE PRINTER
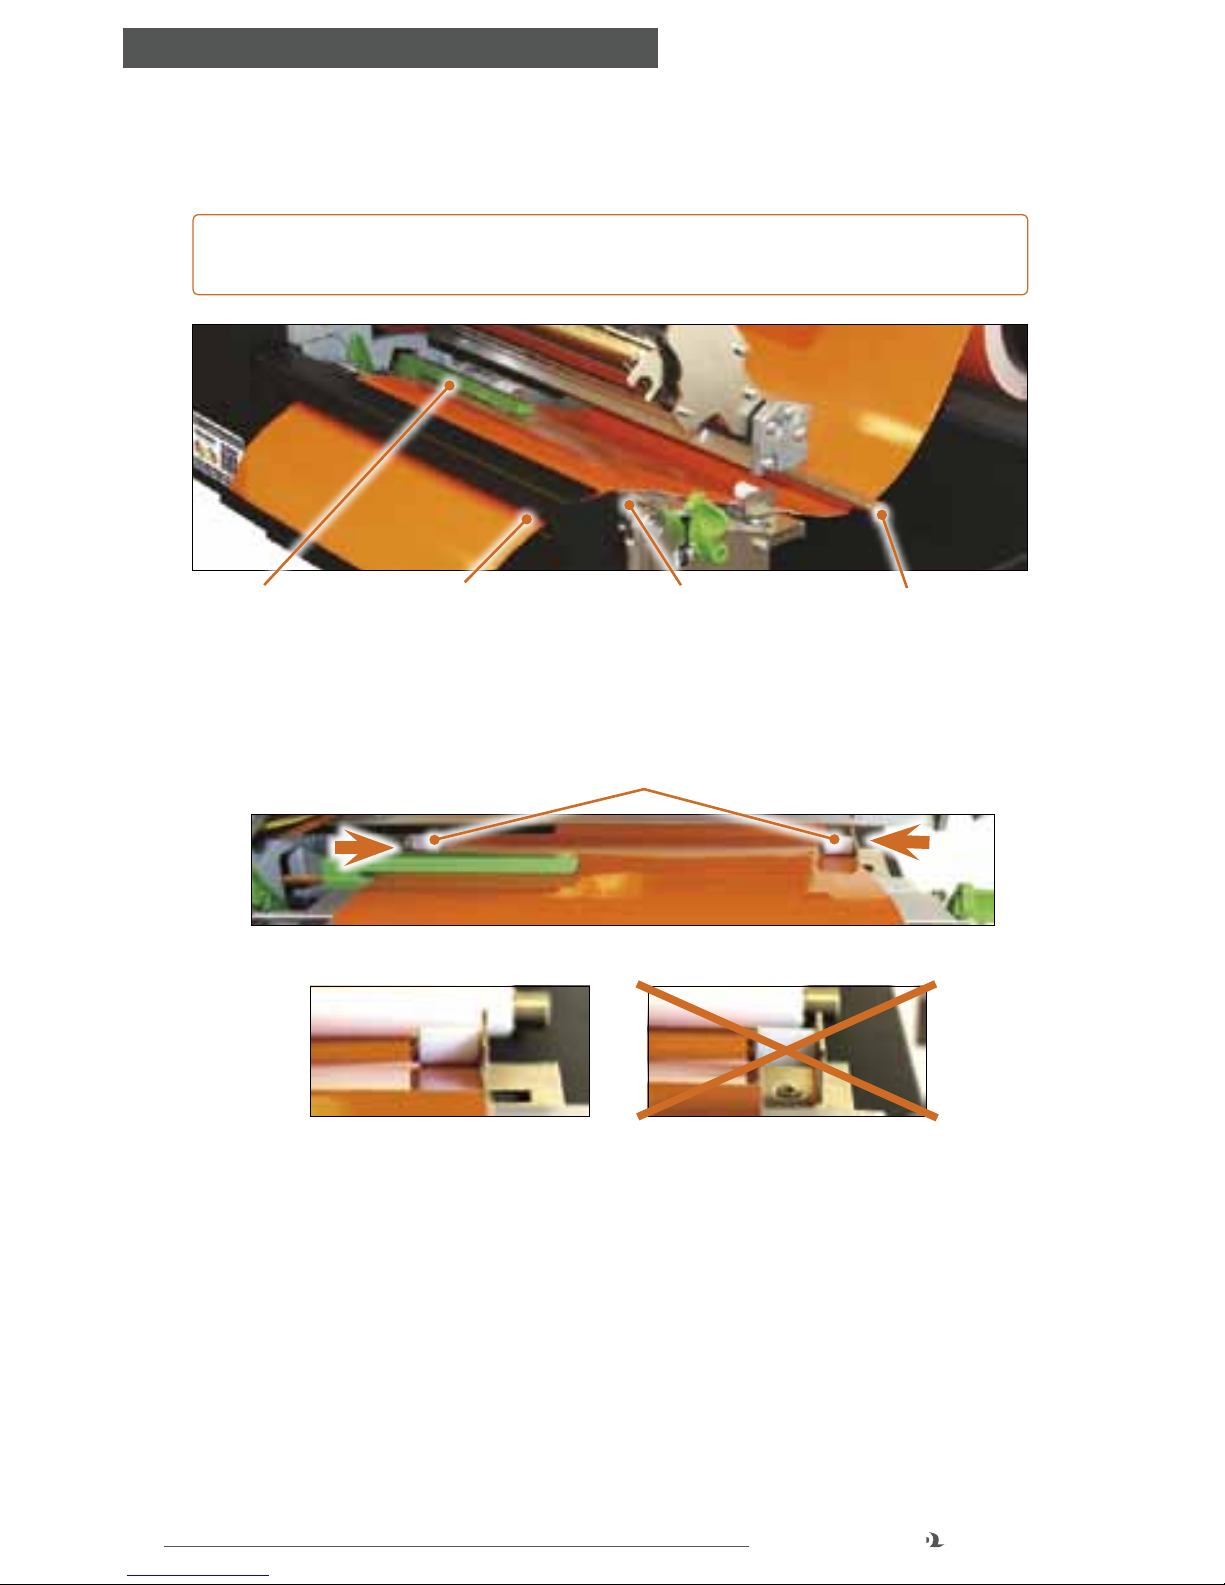
H. Pull the label supply over the black platen roller and through the printed label
opening.
NOTE: Make sure the label supply threads under the green media sensor, located
under the print head.
FIGURE 7 Vinyl properly loaded
FIGURE 8 Adjustable media guides tted to width of vinyl supply
Adjustable Media Guides (white)
FIGURE 9 Guide tted correctly
FIGURE 10 Guide not tted correctly
I. Move the adjustable media guides to fit the width of the label supply, securing the
label supply in place.
Media Guide BarPrinted Label Opening Platen Roller (black)Media Sensor (green)
9
800.788.5572 DuraLabel.com
LOADING THE PRINTER
4.4 Printer Ribbon Parts
B
C
A
D
E
F
FIGURE 1 DuraLabel 9000 Parts for Loading Ribbon
A. Ribbon Rewind Spindle (front)
B. Ribbon Guides
C. Ribbon Sensor (black)
D. Print Head Release Lever (green)
E. Print Head Mechanism
F. Ribbon Spindle (back)
10
DuraLabel.com 800.788.5572
LOADING THE PRINTER
4.5 Loading Ribbon
Always turn the printer OFF when loading supplies. Always wait at least
5 seconds before turning power back ON.
A. Set ribbon spindle guides based on loaded ribbon size.
a. For 4.33" ribbon,
move each ribbon
guide to the line
indicated on the
ribbon spindle
and tighten the
screw on the top
of each ribbon
guide.
b. For 8.66" ribbon, move the ribbon guides against the inside printer wall.
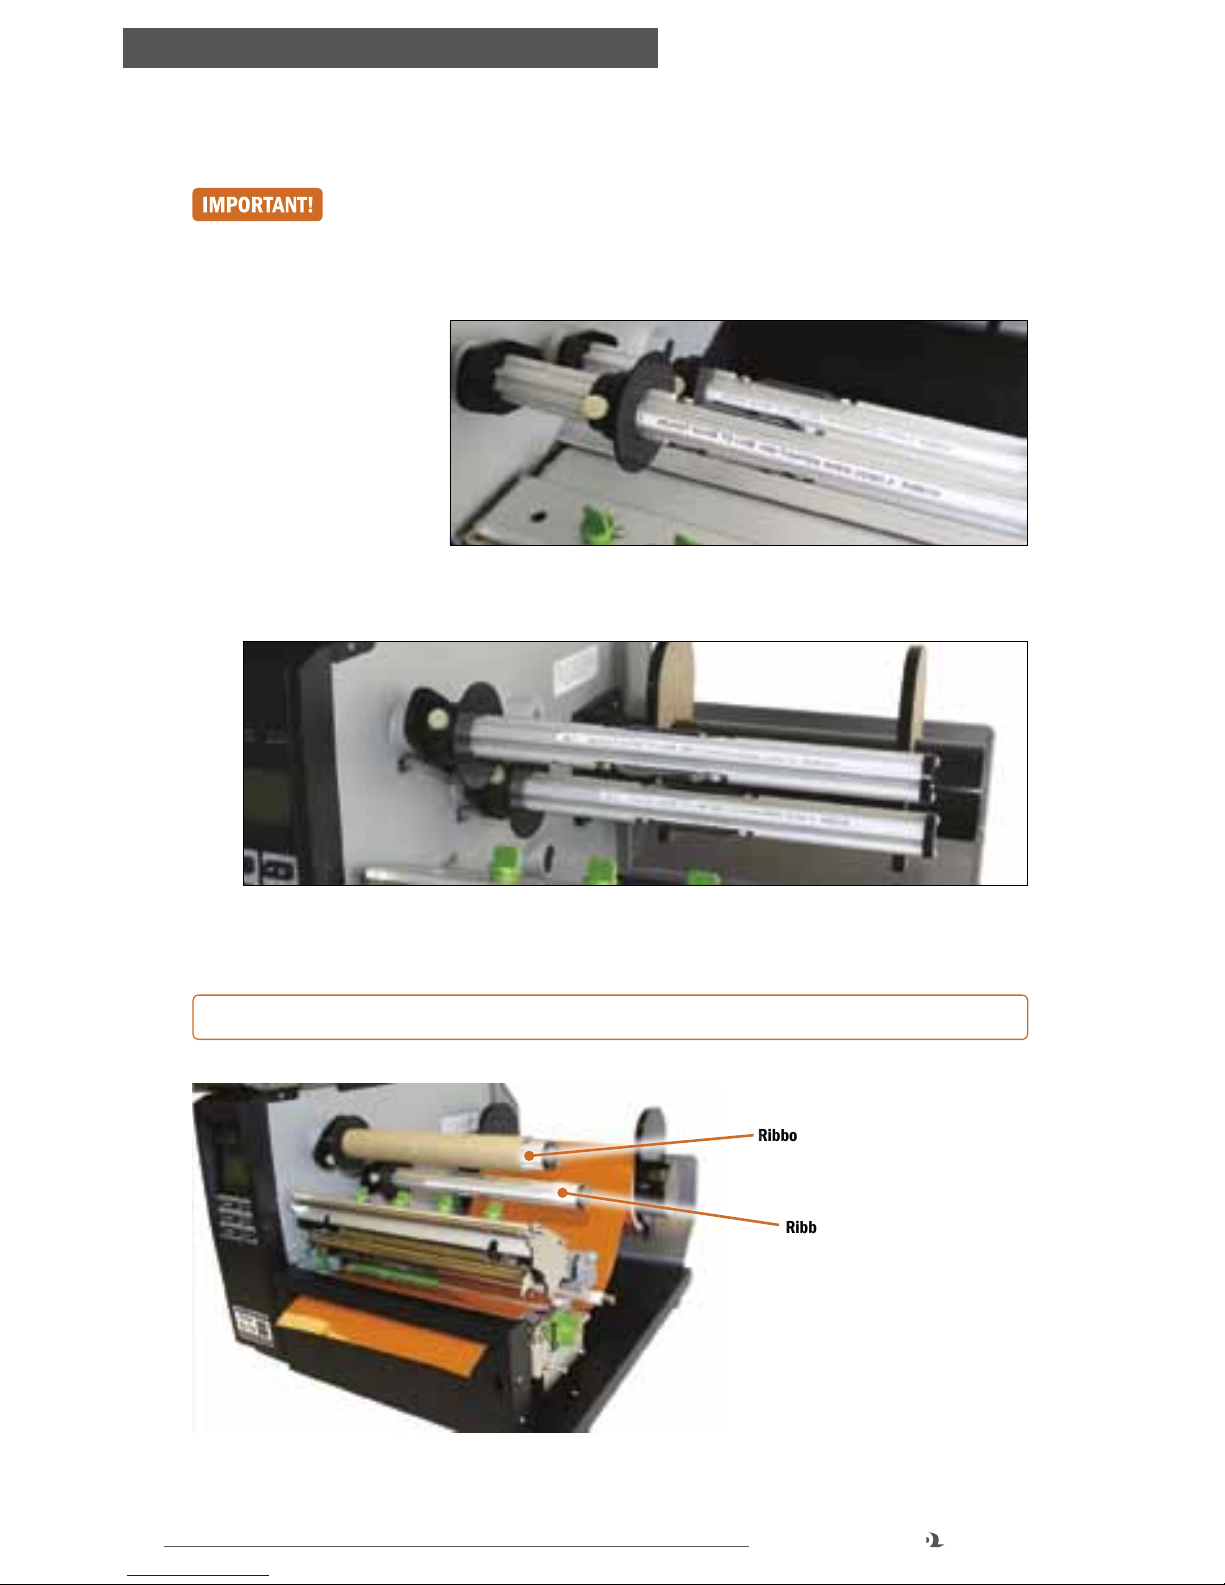
B. Slide an empty supply core onto the front ribbon rewind spindle.
NOTE: Make sure the empty supply core is ush against the ribbon guide.
FIGURE 1 Guides for 4.33" ribbon
FIGURE 2 Guides for 8.66" ribbon
FIGURE 3 Empty supply core applied to front ribbon rewind spindle
Ribbon Rewind Spindle
Ribbon Spindle
11
800.788.5572 DuraLabel.com
LOADING THE PRINTER
C. Slide a ribbon supply roll onto the ribbon spindle, flush against ribbon guide, with
the leading edge hanging down toward the back of printer.
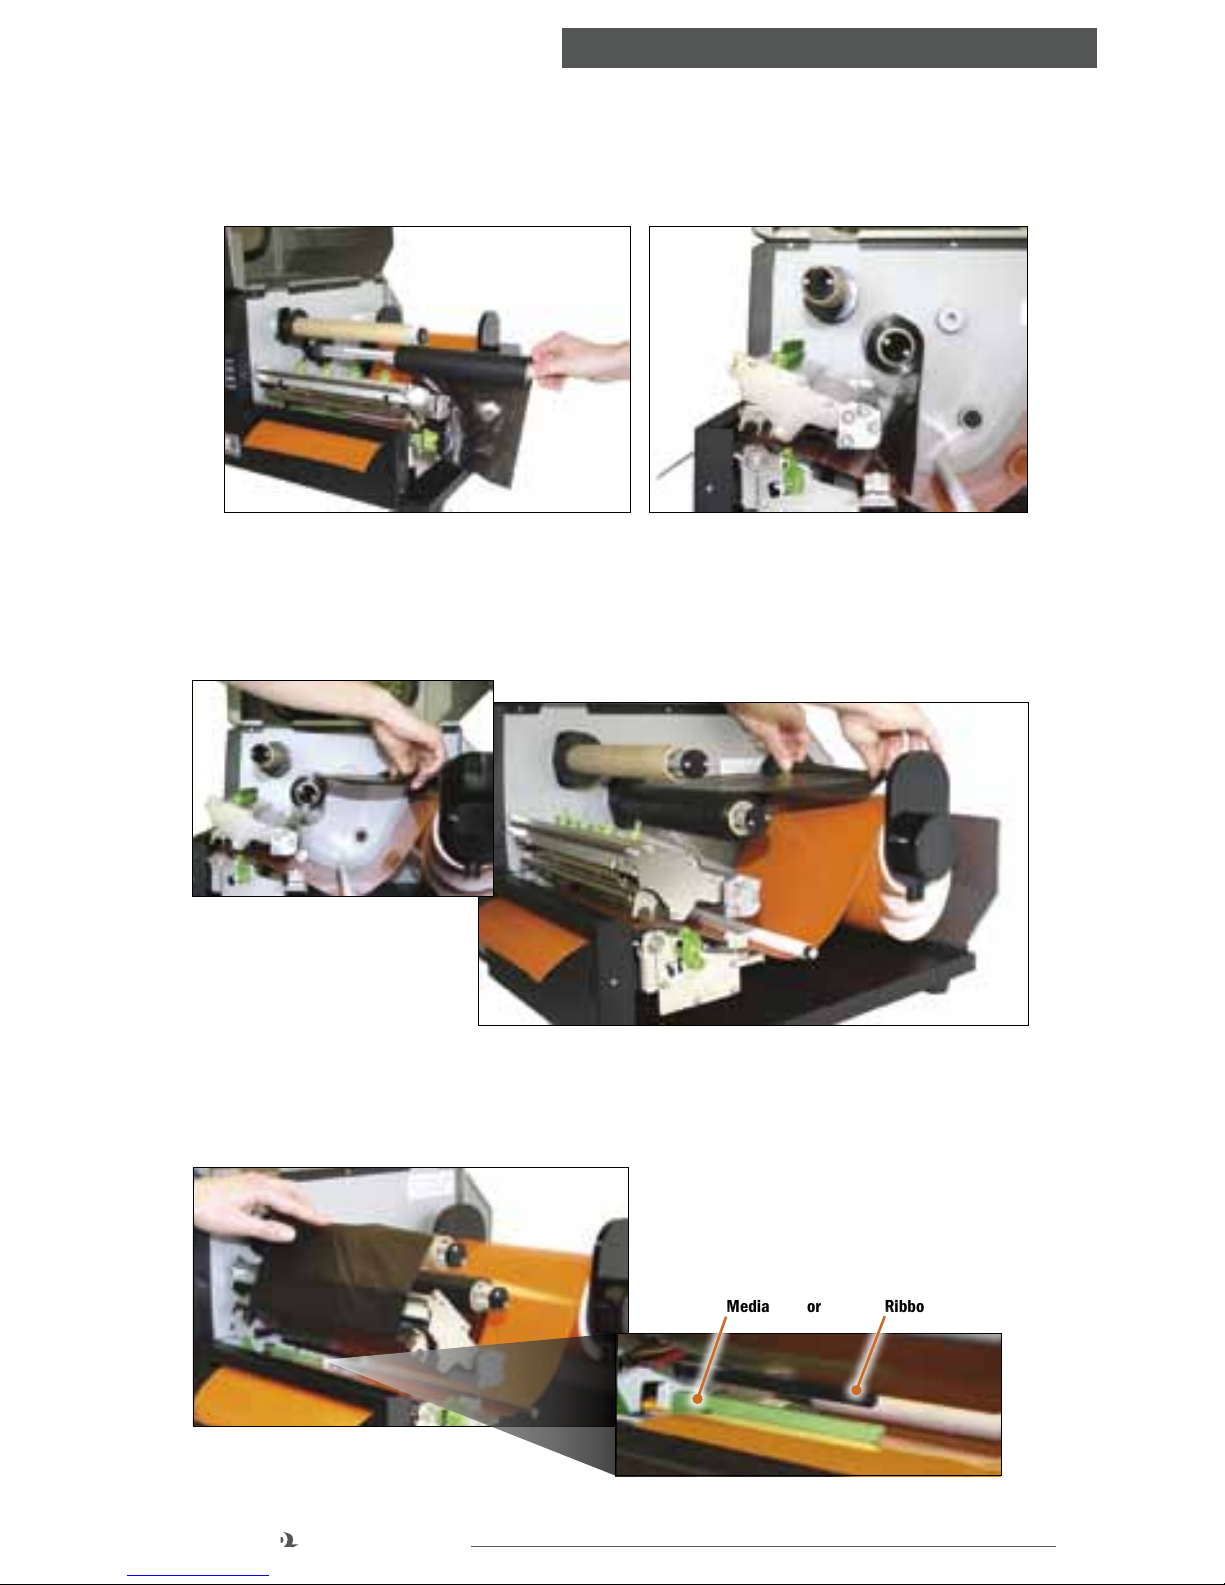
D. Pull the leading edge of the ribbon supply toward the back of the printer to
provide enough ribbon to go through the printer.
E. Pull it down and thread it underneath the print head mechanism and above the
ribbon sensor (black bar above green media sensor).
FIGURE 7 Ribbon supply pulled to back of printer
FIGURE 4 Ribbon supply being placed on ribbon spindle FIGURE 5 Loaded ribbon supply on ribbon spindle
FIGURE 6 Ribbon supply being pulled
toward back of printer
FIGURE 9
FIGURE 8 Ribbon being threaded underneath the
print head mechanism and above the ribbon sensor.
Media Sensor Ribbon Sensor
12
DuraLabel.com 800.788.5572
LOADING THE PRINTER
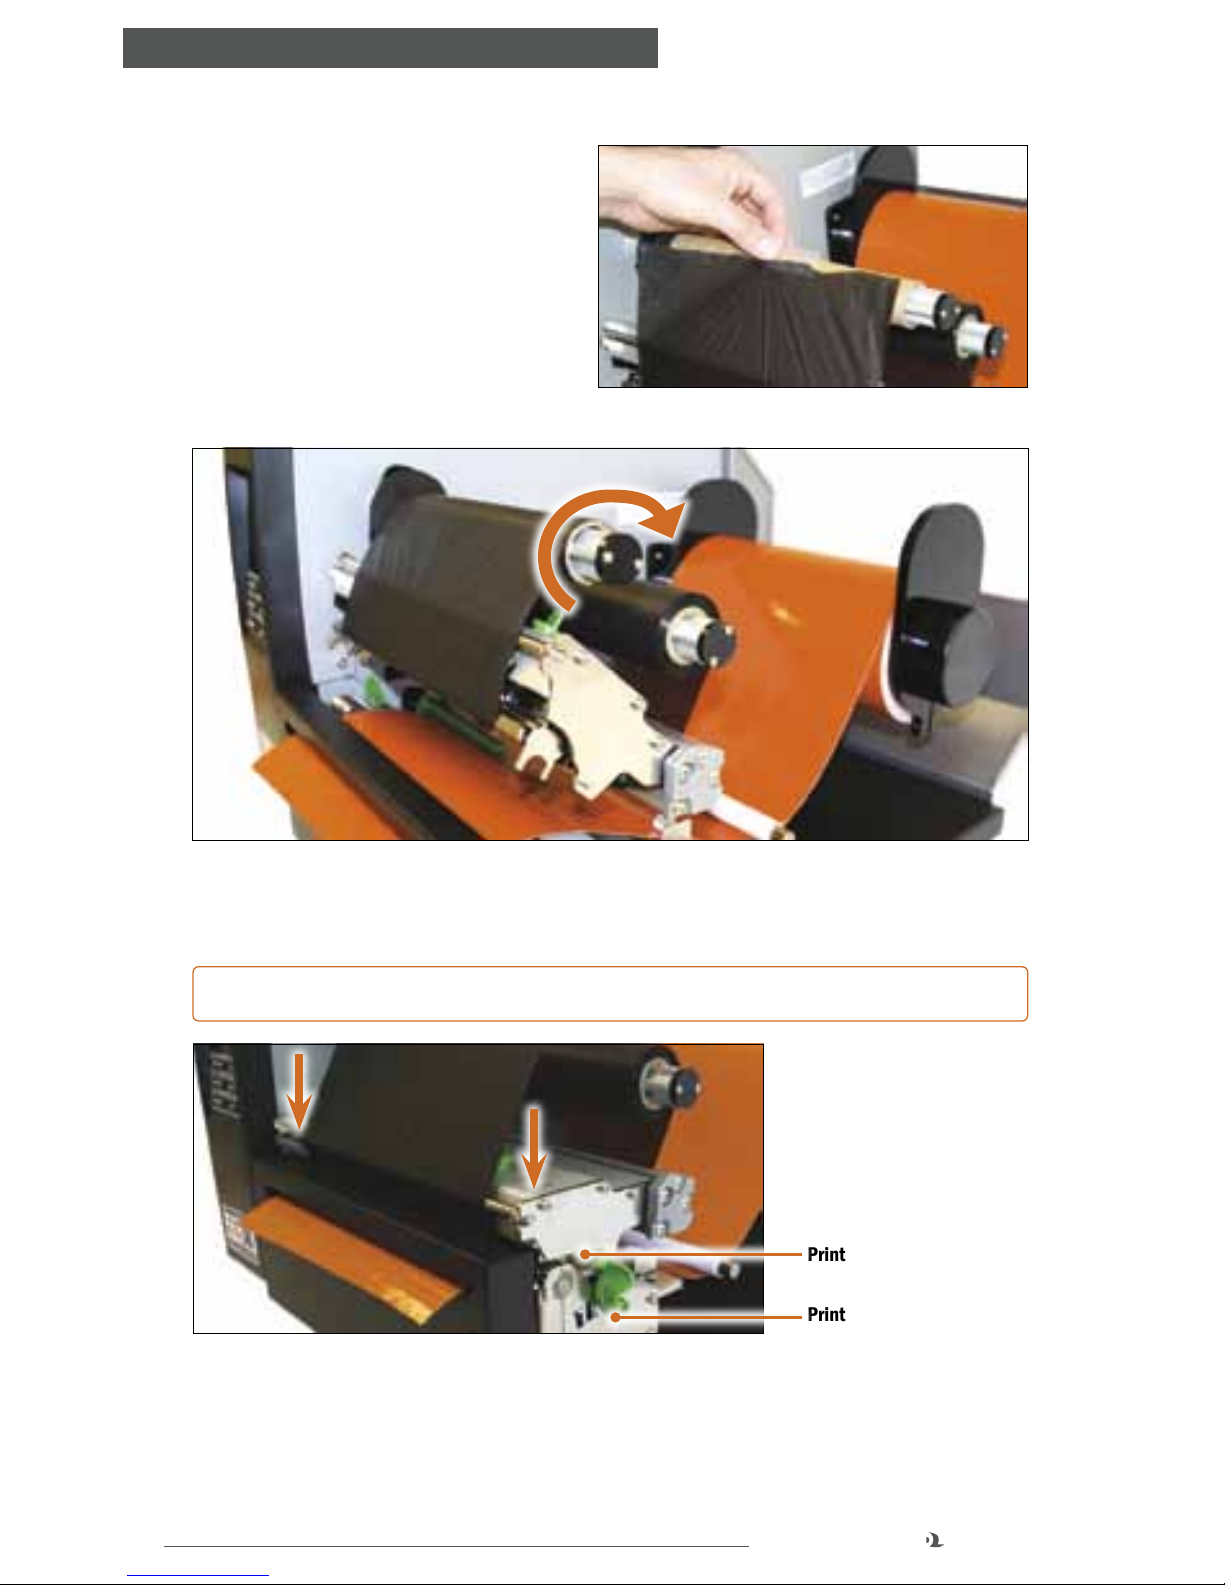
F. Tape the end of the ribbon supply
to the front of the empty supply
core.
G. Roll the ribbon rewind spindle
clockwise a few times toward the
back of the printer to tighten the
ribbon and remove flaws and
fingerprints.
FIGURE 10 Ribbon being taped to front of supply core
FIGURE 11 Ribbon supply tightened
H. Press down to close, with a hand on each side of the print head mechanism.
NOTE: Make sure the print head release lever latches closed.
I. Close the printer cover.
J. Turn the printer ON.
Print Head Mechanism
Print Head Release Lever
FIGURE 12 Closed print head mechanism
13
800.788.5572 DuraLabel.com
CONNECTING THE PRINTER
5. Connecting the Printer
Connect the power supply from the DuraLabel 9000 printer to an electrical outlet.
Connect the USB or parallel cable from the DuraLabel 9000 to your PC and power
ON the printer.
5.1 Inserting the Installation CD
Before inserting the installation CD, refer to the instructions for the type of cable
you’re using. When using a USB cable, follow instructions in Section 5.2, Using a
USB Cable. When using a parallel cable, follow instructions in Section 5.3, Using a
Parallel Cable.
NOTE: When printing RTK, arc ash and other die-cut or B Mark labels, you must
set up the printer driver and printer. Refer to Section 6.2, Die-Cut Label Printing
Instructions, or Section 6.3, B Mark Label Printing Instructions.
5.2 Using a USB Cable
NOTE: You may need IT administrator privileges to install a driver.
NOTE: The following instructions are only for those using a USB cable. Skip to
Section 5.3, Using a Parallel Cable, if installing manually.
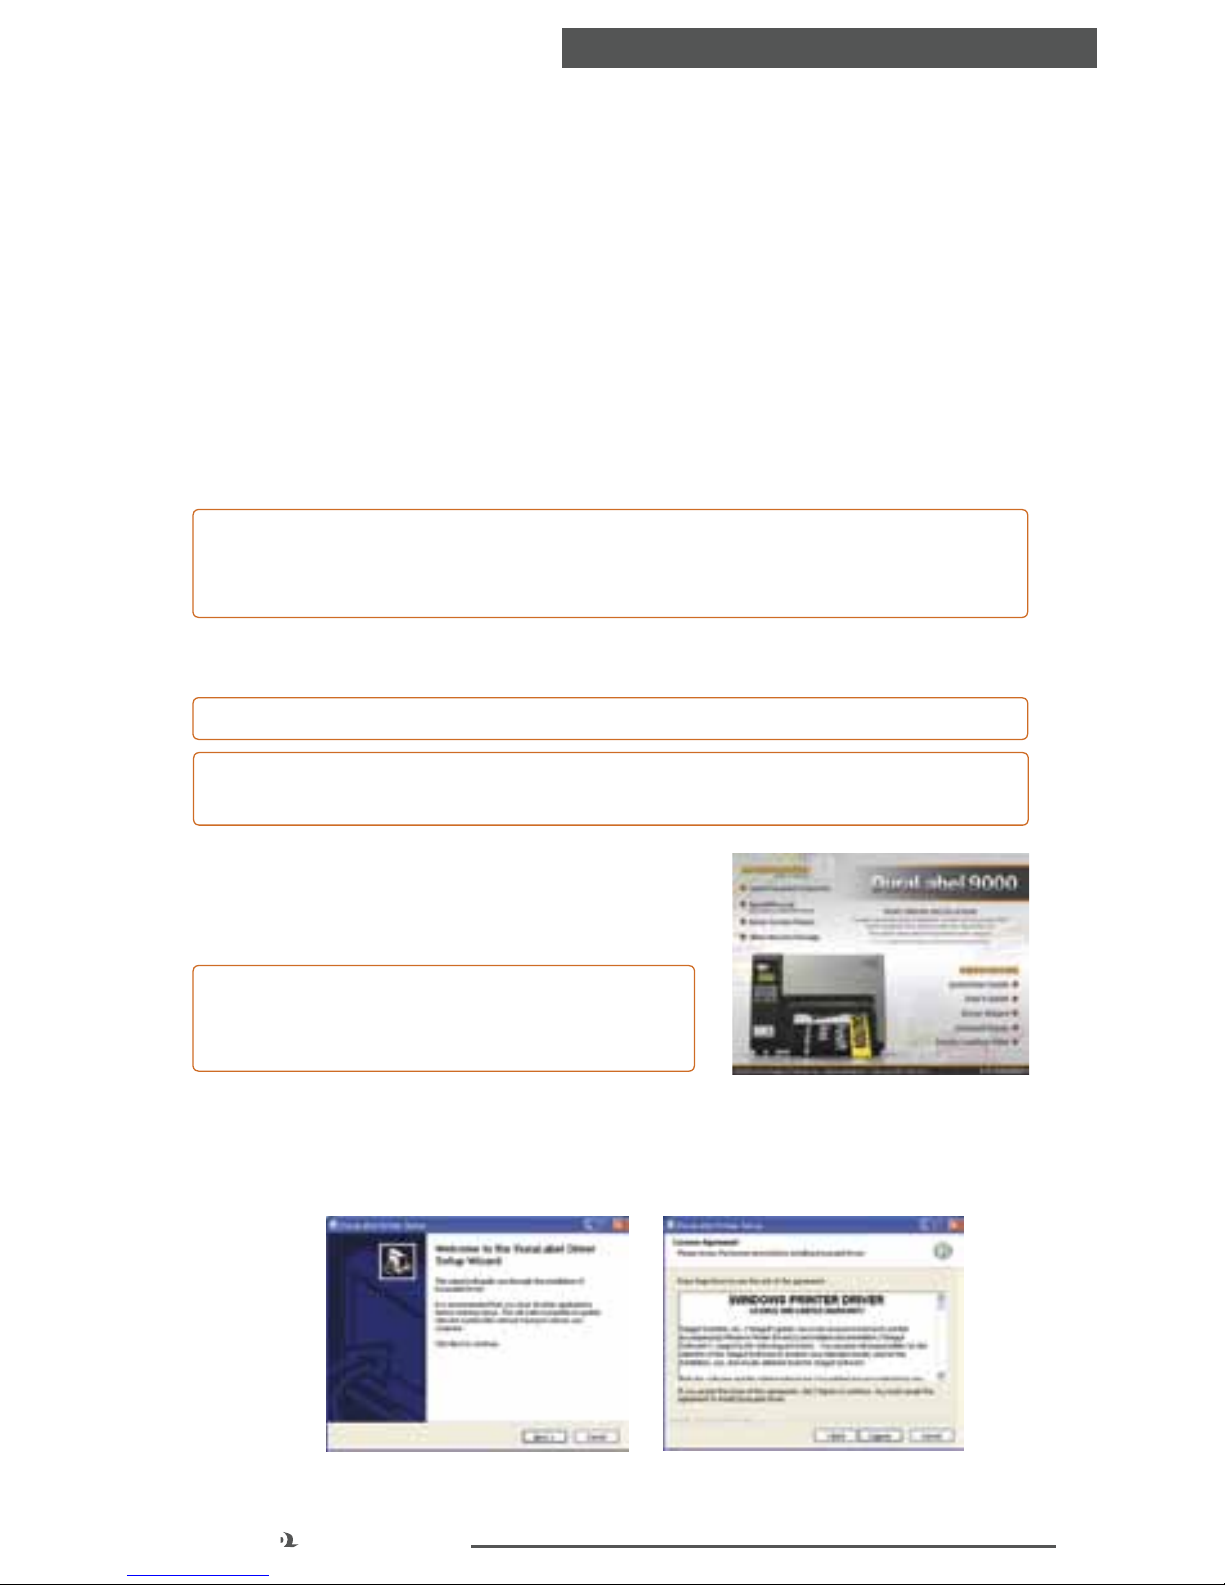
A. Insert the DuraLabel 9000 Installation CD in
your computer’s disk drive. A DuraLabel 9000
startup screen appears.
NOTE: If the CD does not run automatically, go to
Start > Computer and double-click on your CD/
DVD drive, which should show the DLP icon.
B. Click on Driver Wizard, then click Next in the Driver Wizard window that appears.
C. Click I Agree on the Windows Printer Driver License Agreement window that
appears.
FIGURE 1 DuraLabel 9000 Startup Screen
FIGURE 2 DuraLabel Driver Setup Wizard
FIGURE 3 Windows Printer Driver License
Agreement
14
DuraLabel.com 800.788.5572
CONNECTING THE PRINTER
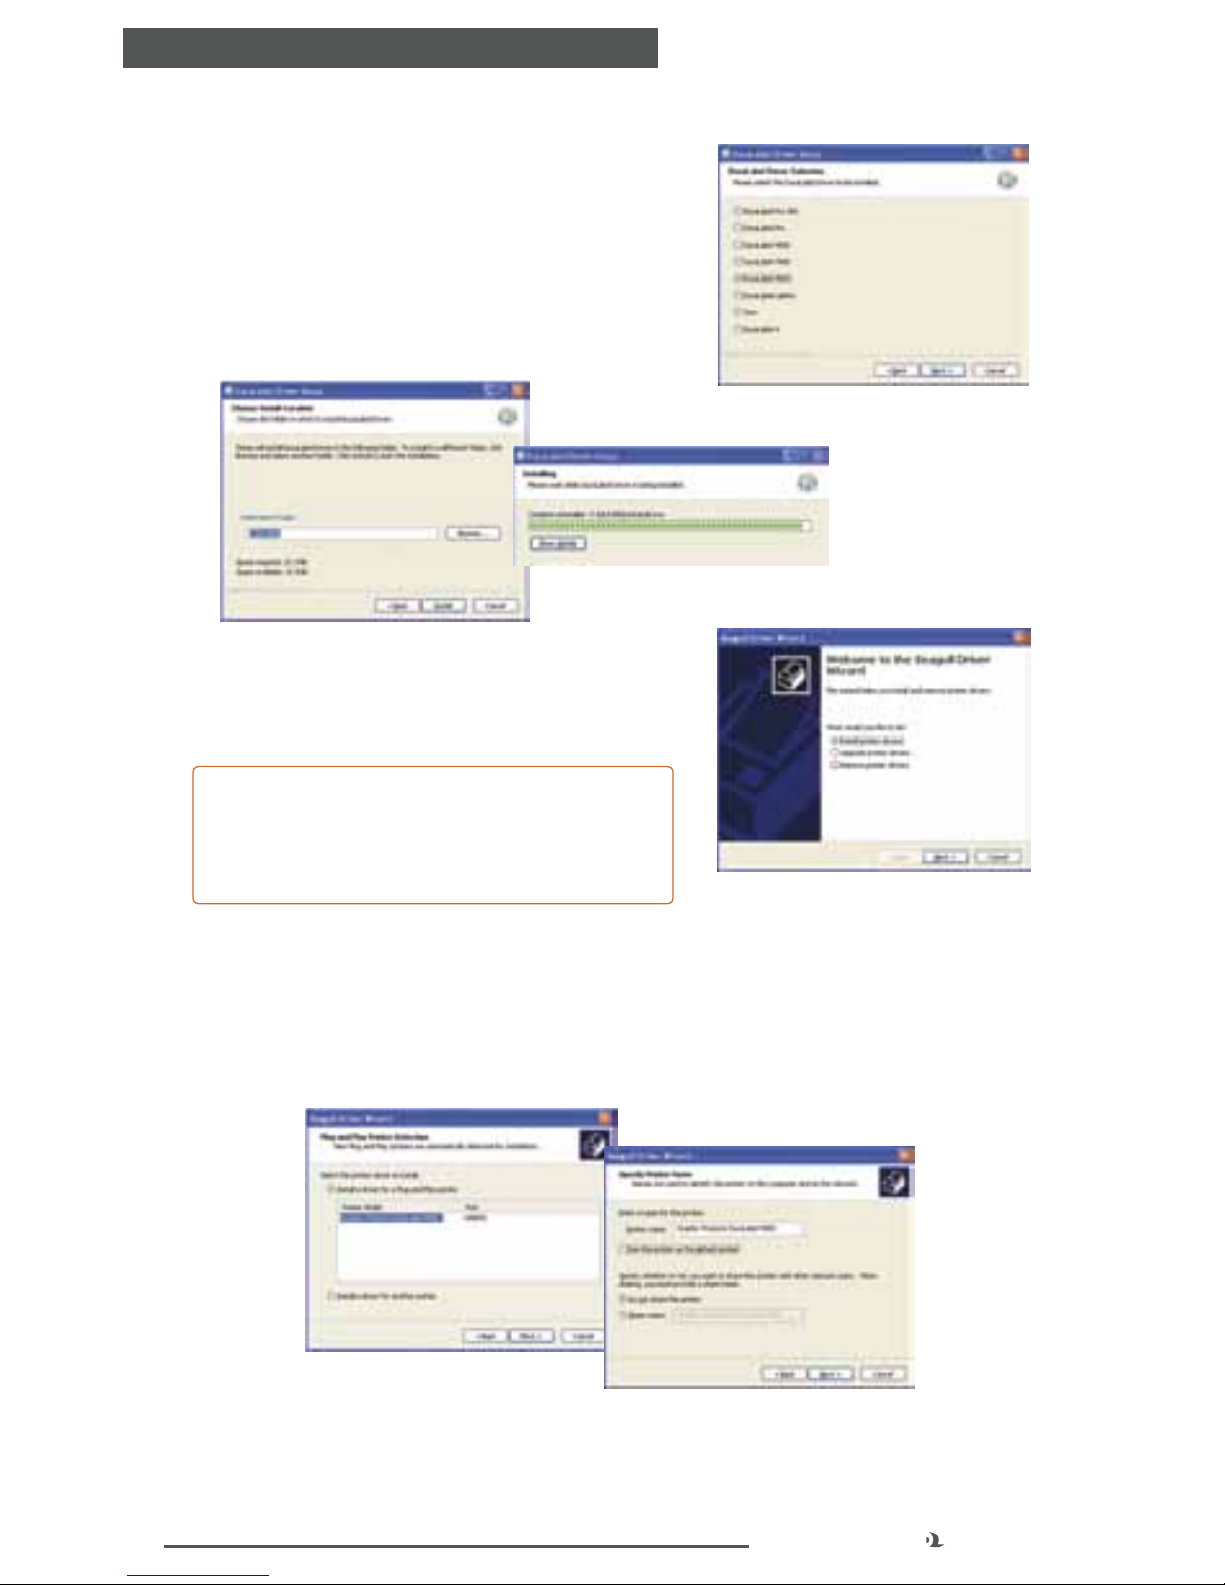
D. Select DuraLabel 9000 and click Next on
the DuraLabel Driver Selection window that
appears.
E. Choose the install location and click Install
on the Choose Install Location window
that appears. An Installing window shows
installation progress.
F. Select Install printer drivers* on the Driver
Wizard window that appears and click Next.
*NOTE: You will receive a notice if a previous
driver is found that should be removed. Please
refer to Section 5.4, Upgrading a Driver, for
instructions on uninstalling a driver.
G. A Plug and Play Detection window appears. Highlight Graphic Products DuraLabel
9000 and click Next.
H. Enter printer name in the Printer name field in the Specify Printer Name window
that opens; set it as the default printer by checking the box below the Printer
name field. Choose a sharing option, then click Next.
FIGURE 4 Selecting a DuraLabel Driver
FIGURE 5 Driver Install Location Window
FIGURE 6 Installing Window
FIGURE 7 Install Printer Driver Window
FIGURE 8 Install Driver for a Plug and
Play Printer.
FIGURE 9 Specify Printer Name and Default
and Sharing Status.
 Loading...