

Page 1
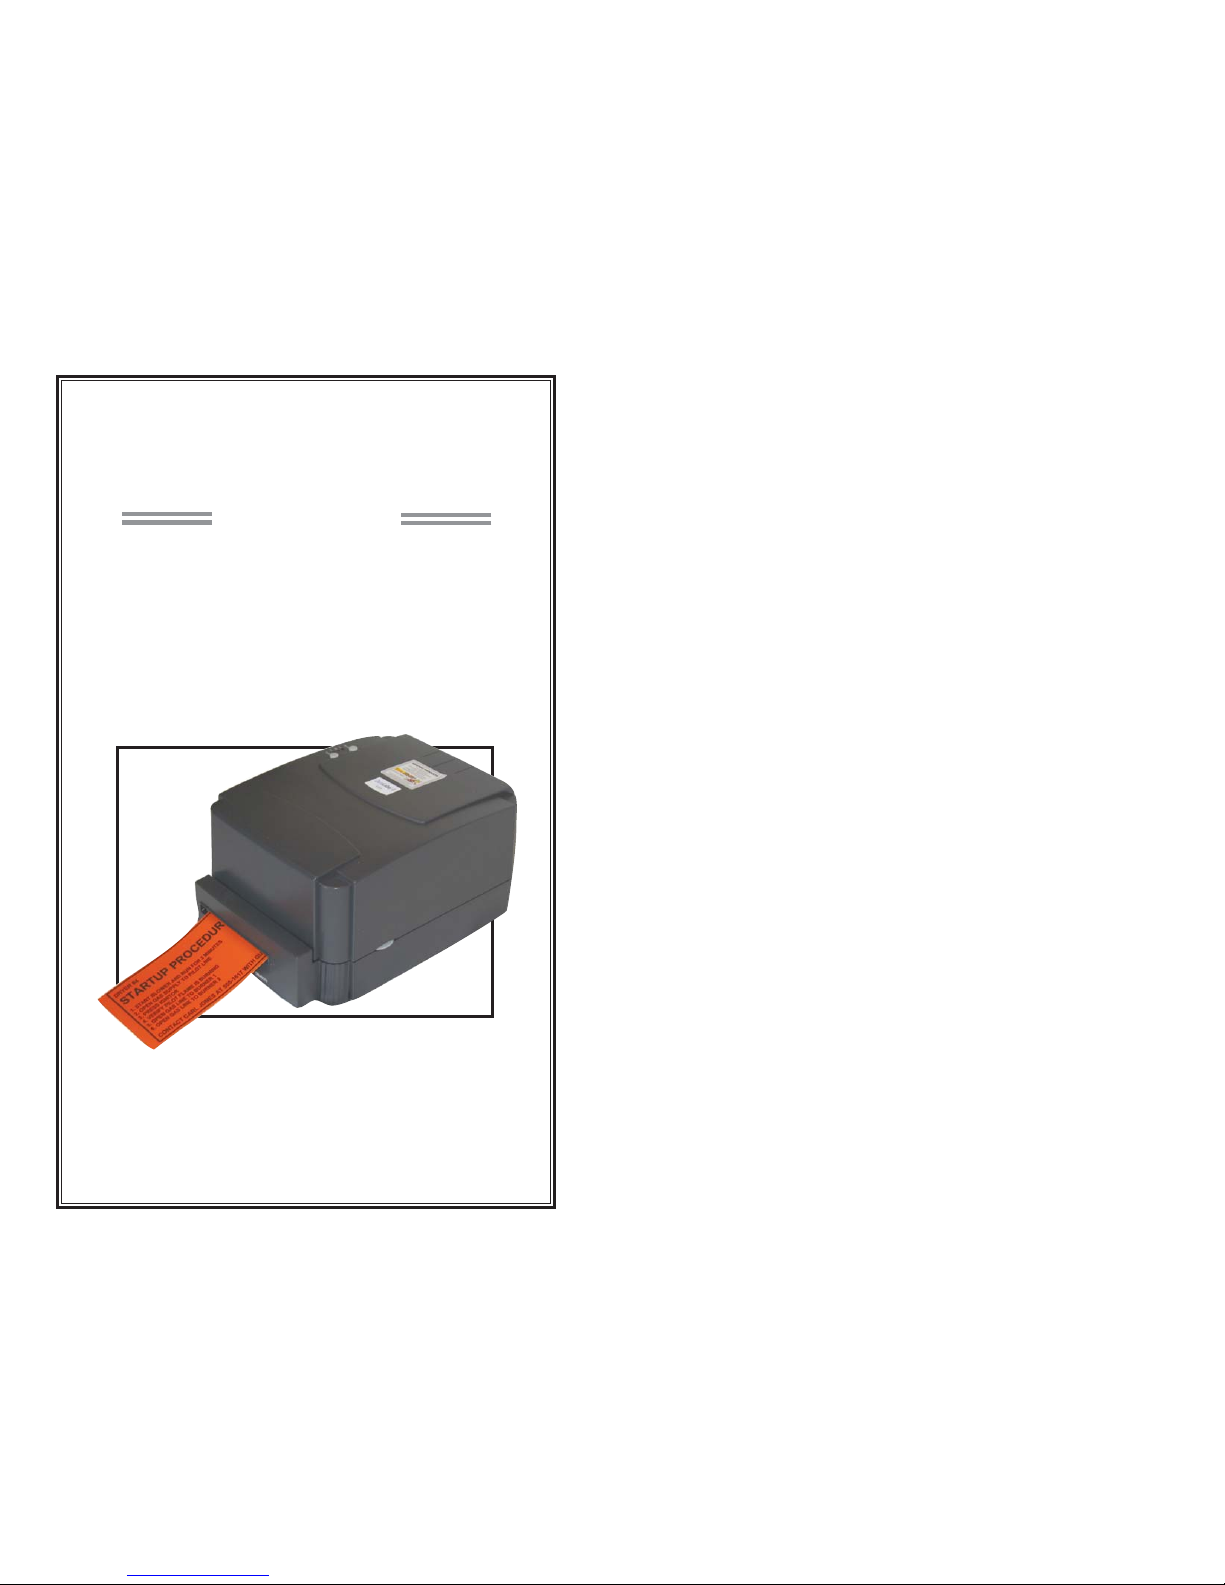
DuraLabel 4 TTP
User’s Guide
Page 2

INTRODUCTION
Welcome...
And congratulations on the purchase of your new DuraLabel 4 Thermal Transfer
Printer! We've included this guide to get you printing as quickly as possible.
In this guide you'll find information on setting up your printer, configuring your
software, and creating custom labels. We know that all topics cannot be addressed
in any document, and are ready to answer your questions. If you have any
questions or concerns, make sure to give us a call!
Graphic Products, Inc.
1-800-788-5572
1
CONTENTS
Getting Started ...................................
Prepare the Printer .........................
Install the Printer Drivers ...............
Driver Configuration .......................
Load Supplies......................................
Ribbon..............................................
Label Media.....................................
Label Creation ....................................
Using Templates .............................
Setting up the Document ...............
Select the Printer ............................
Optimize the Print Properties ........
Changing the Page Setup ..............
Orientation ......................................
Label Design ......................................
Text ..................................................
Graphics ..........................................
Symbols ...........................................
Barcodes .........................................
Sequencing .....................................
Importing from Excel.......................
Cleaning the Print Head & Cutter......
Extensive Cleaning of Cutter...........
2
2
3-8
9-13
14
15-18
19-22
23
24
24
24
25-27
27
28
29
29-30
31-32
33-34
35-36
37-40
41-46
47-48
49-56
Page 3
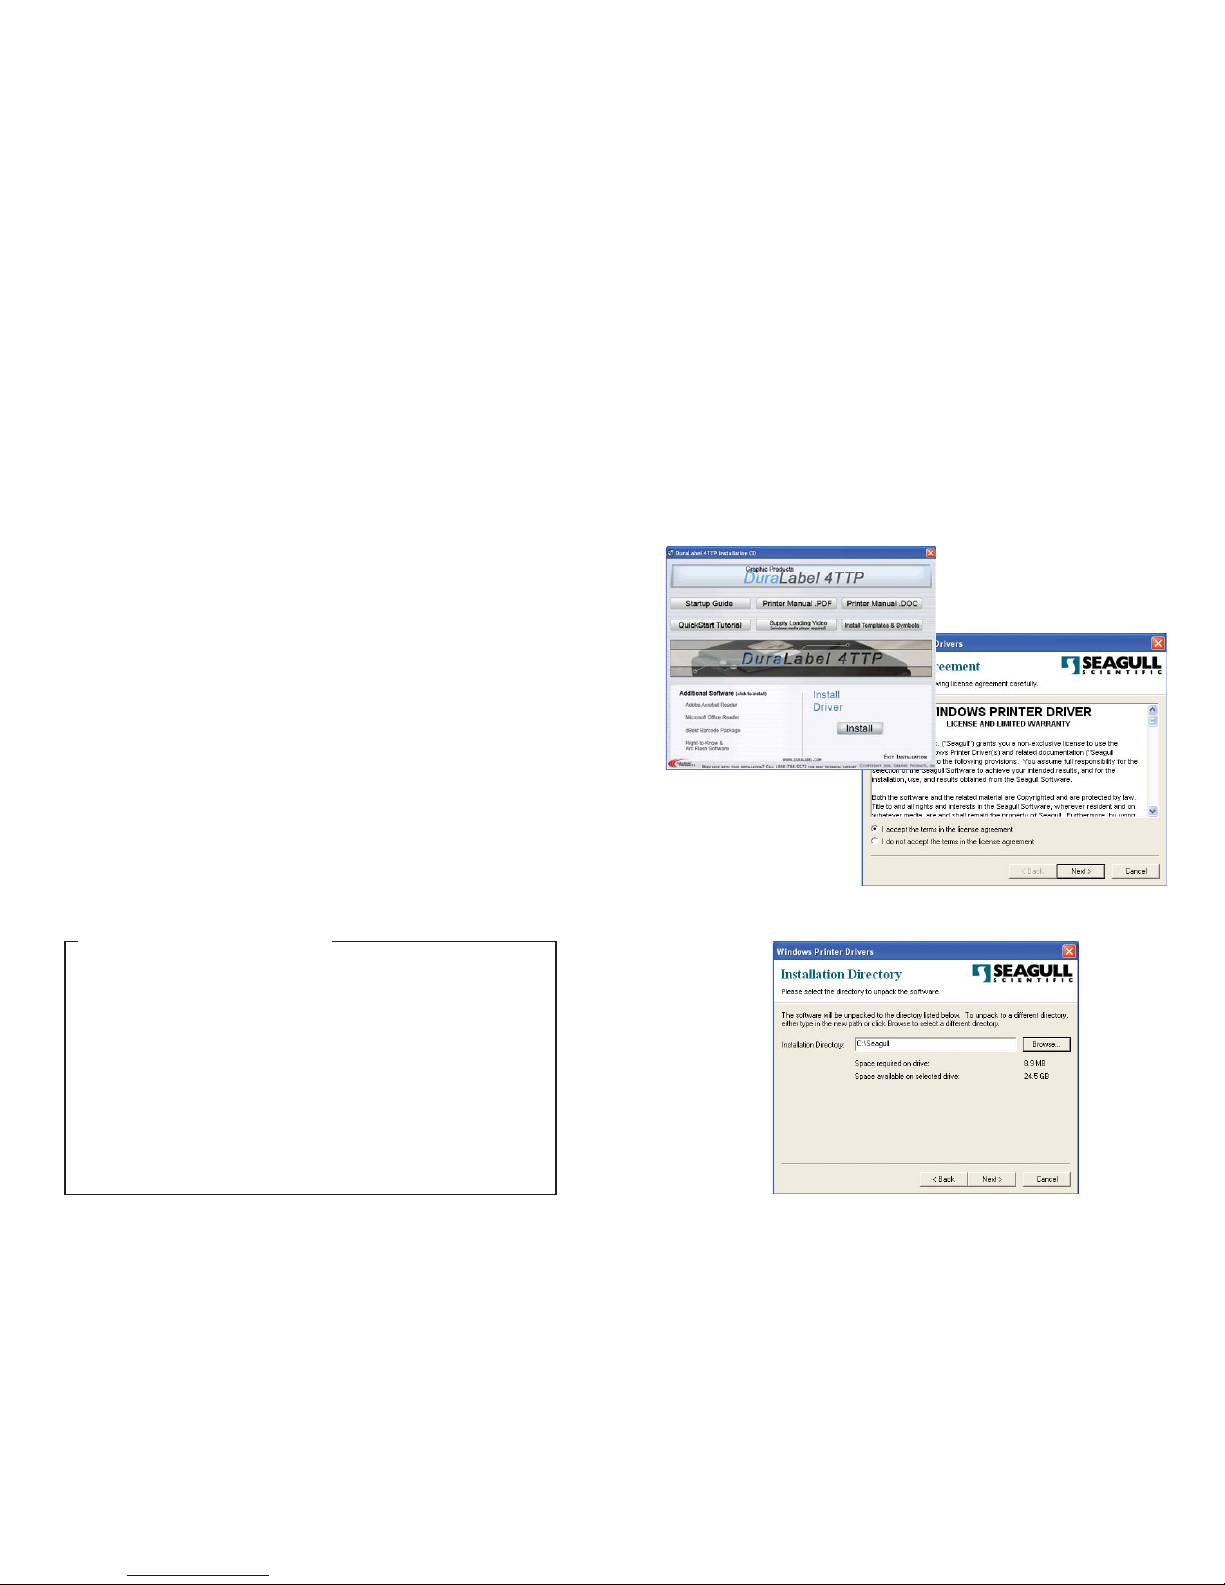
Installing the Printer Driver for:
Windows 2000/Windows XP/Windows NT
IIMMPPOORRTTAANNTT::
You must have administrative rights in order to perform this installation.
To begin, click Install at the bottom right corner of your DuraLabel 4TTP Installation
CD screen. This will bring up a License Agreement window. On the next window,
accept the terms of the license agreement and click Next.
Verify the installation directory chosen. The default is “C:\Seagull”
3
GETTING STARTED
Prepare the printer
Instructions for unpacking, loading supplies and connecting your printer are located
in the User’s Manual (in printed or electronic form). There is also an instructional
video included on he CD which shows you how to load supplies. Please read and
follow those instructions carefully before continuing.
Note: To view the electronic version of the manual you will need a corresponding document viewer (PDF or
DOC). Two suitable viewers are included on the installation CD - Adobe Acrobat Reader and Microsoft Word
Viewer.
Install the printer drivers
With the DuraLabel 4 connected and powered on you are ready to install the printer
drivers and software. When you place the CD in the drive, it should autorun within a
few seconds.* When the autorun begins, the DuraLabel 4 menu will appear on your
screen. Click on the button Install Driver.
The program will now guide you through the installation of your printer driver.
Note: Find out your Windows version by right-clicking on the My Computer icon (located on your
desktop). Select the Properties option. Your Windows version is located under the System heading.
*If the CD does not autorun you may need to manually install your printer drivers. To manually install, dou-
ble-click on the CD.
2
After you’ve installed the drivers, click the Install RTK Software button on the
DuraLabel 4 startup screen, and the RTK Software will be installed on your
computer. When the installation screen opens, you can click More Information
to see more info on the installation process or simply click Automatic Install to
begin.
To use the RTK Software, the print driver and the DuraLabel 4 itself must be set
up. See the introduction section of the help page in the software and follow
the directions there. To align the printing and cutting of the labels, see the
problem solving section of the help page for clear instructions.
If you plan to print RTK labels:
Page 4
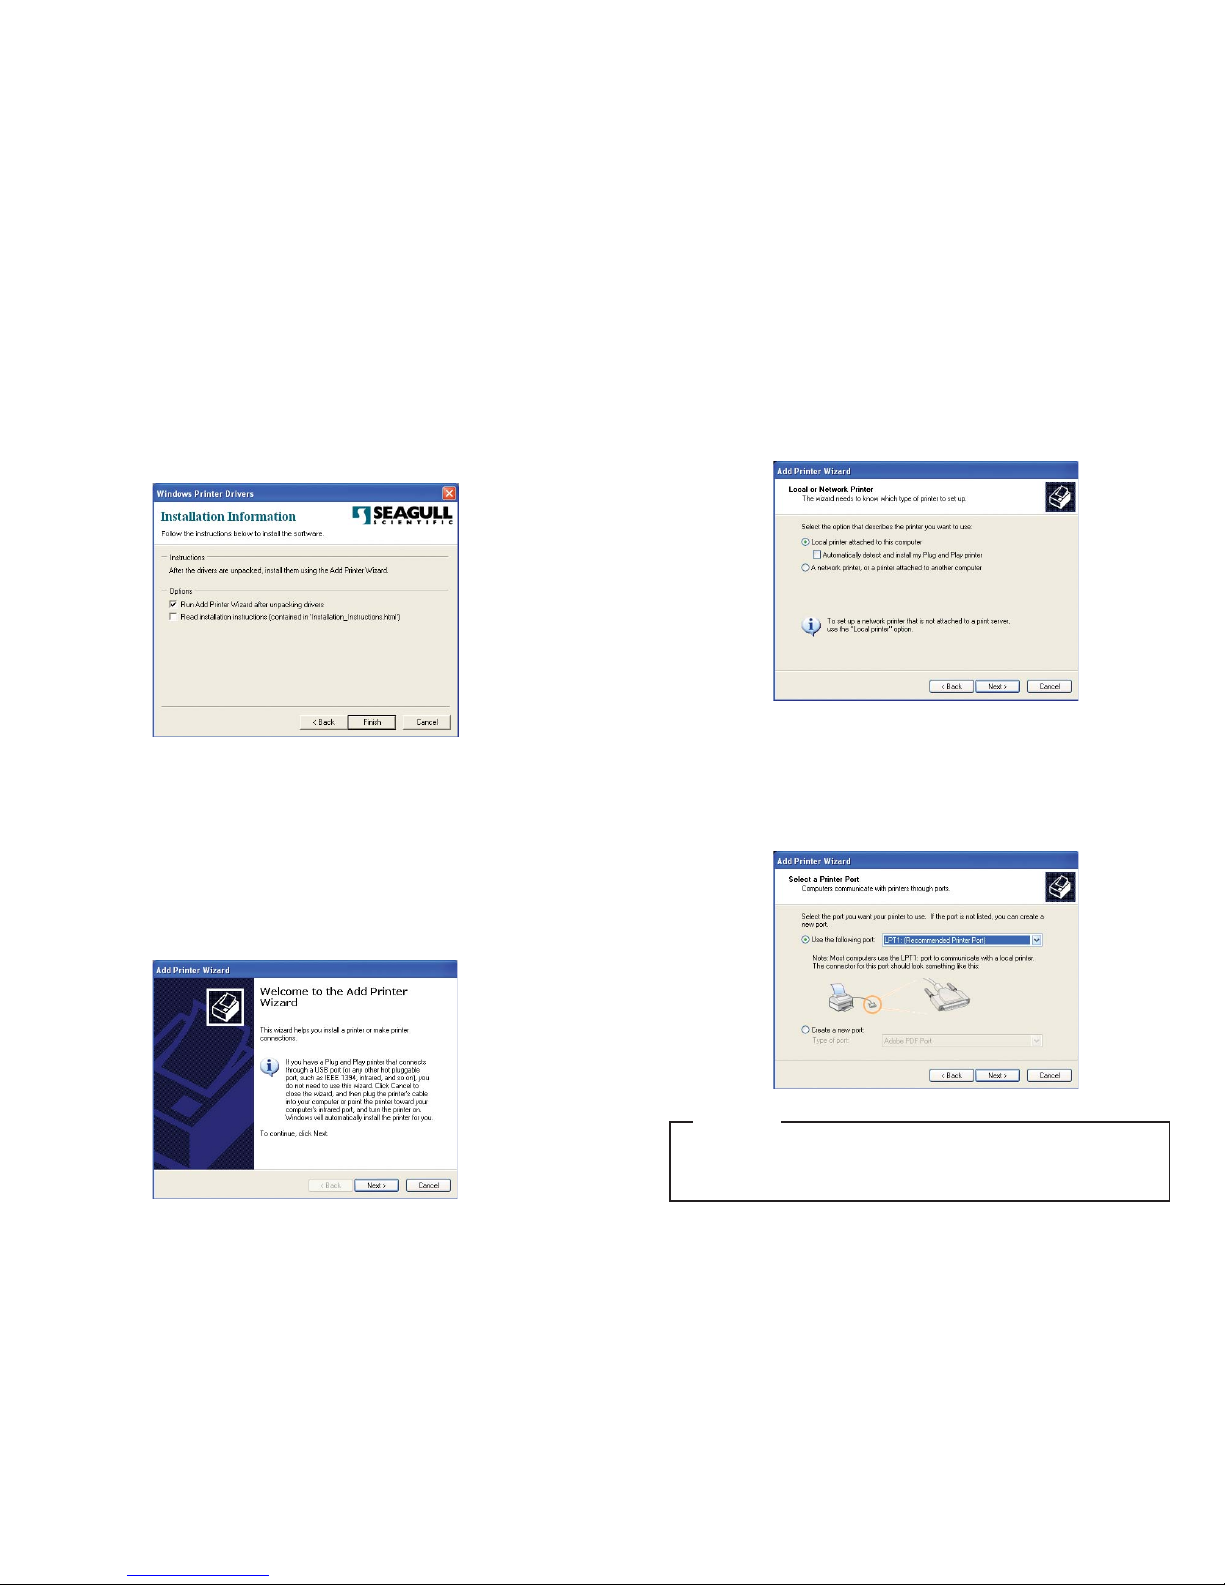
Select either Local or Network for your printer driver. If you select Local, make sure
the “Automatically detect and install my Plug and Play printer,” is unchecked.
Select the port you would like your printer use.
If you are going to print RTK labels, see the setup instructions in the RTK software
documentation. See Introduction on the Help Menu page.
RTK LABELS
5
Select any options desired on the final screen and uncheck the second option,
“Read Installation Instructions,” then click Finish.
To Add Printer
IIMMPPOORRTTAANNTT::
You must have administrative rights in order to add a printer under Windows XP.
An “Add Printer Wizard” window should have appeared on your screen; click Next.
4
Page 5
OOPPTTIIOONNAALL::
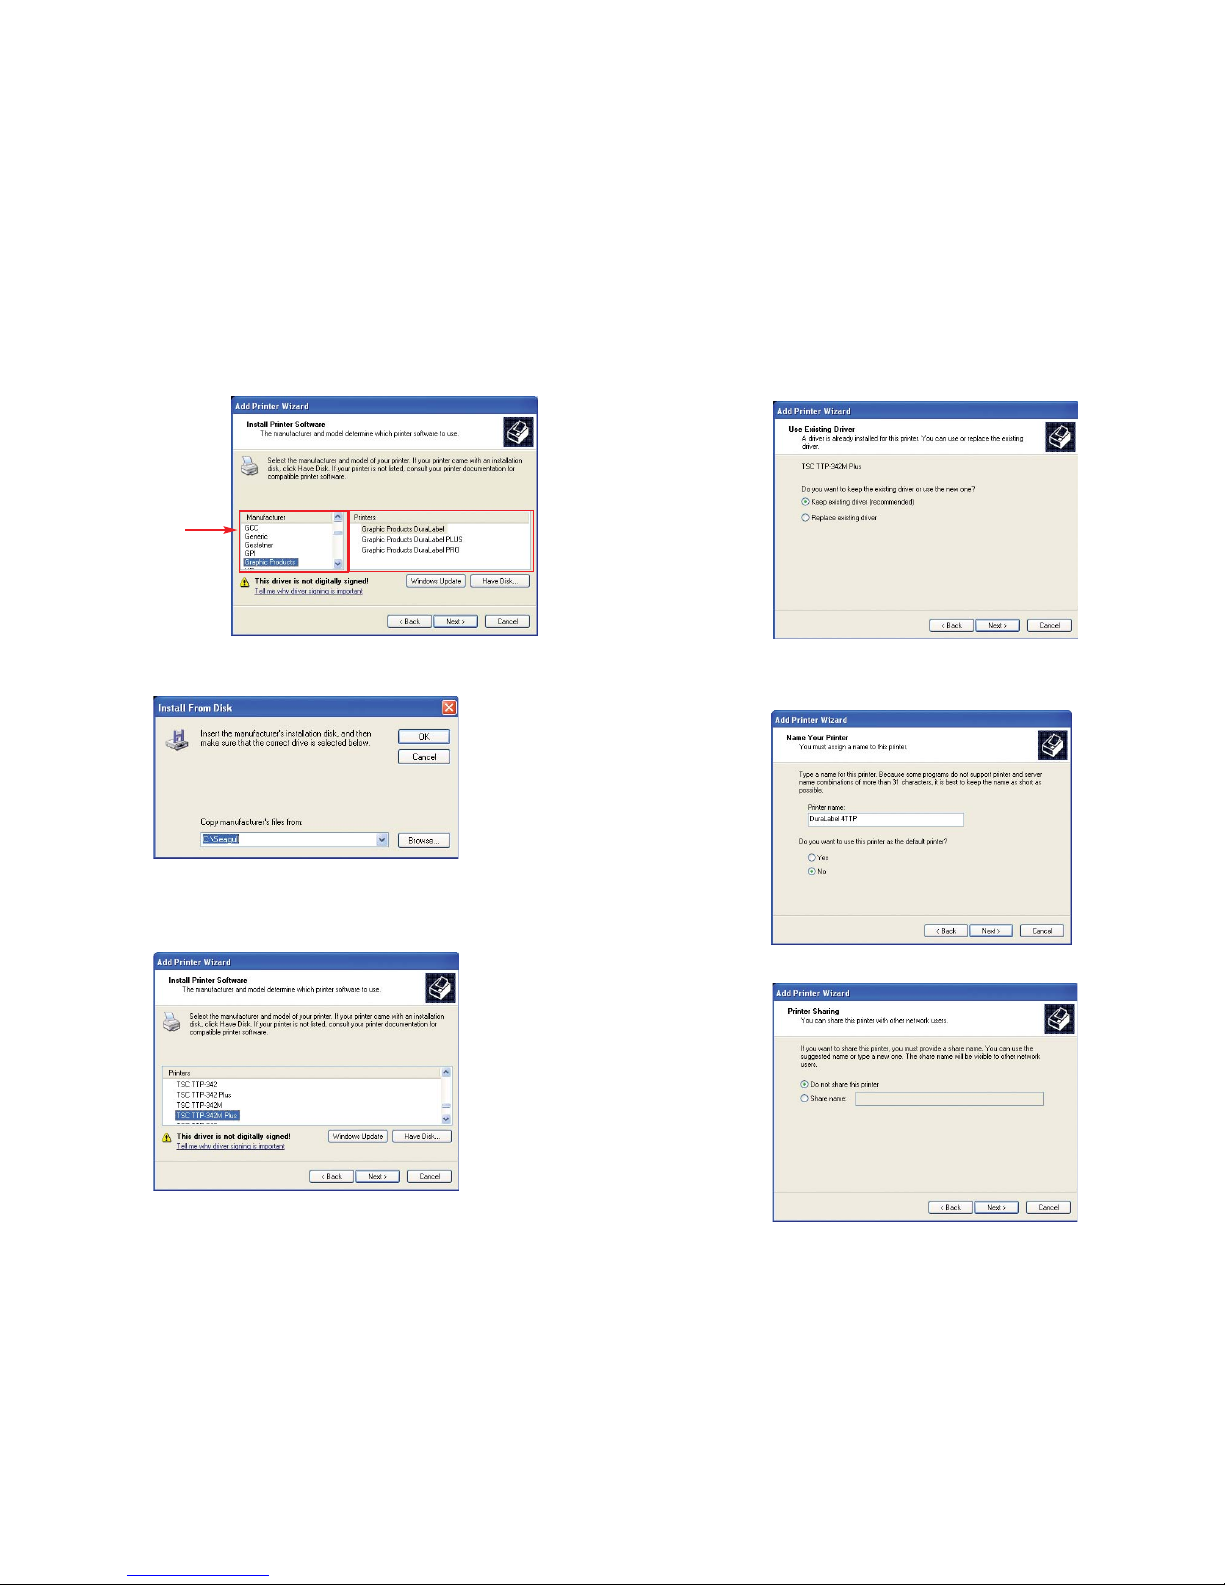
If you had previous Seagull Scientific drivers installed, click “Replace existing driver.”
Enter DuraLabel 4TTP for the printer name and select Yes if you want it to be set as
your default printer, then click Next.
Decide if you would like to share the printer with other network users, then click
Next.
7
*IMPORTANT! Click on Have Disk, not “next.”
In the space provided, type “C:\Seagull” and click OK.
Select the TSC TTP-342M Plus for the printer and then click Next.
6
The listings in these
boxes will differ with each
user and will not match
what you see here.
Page 6
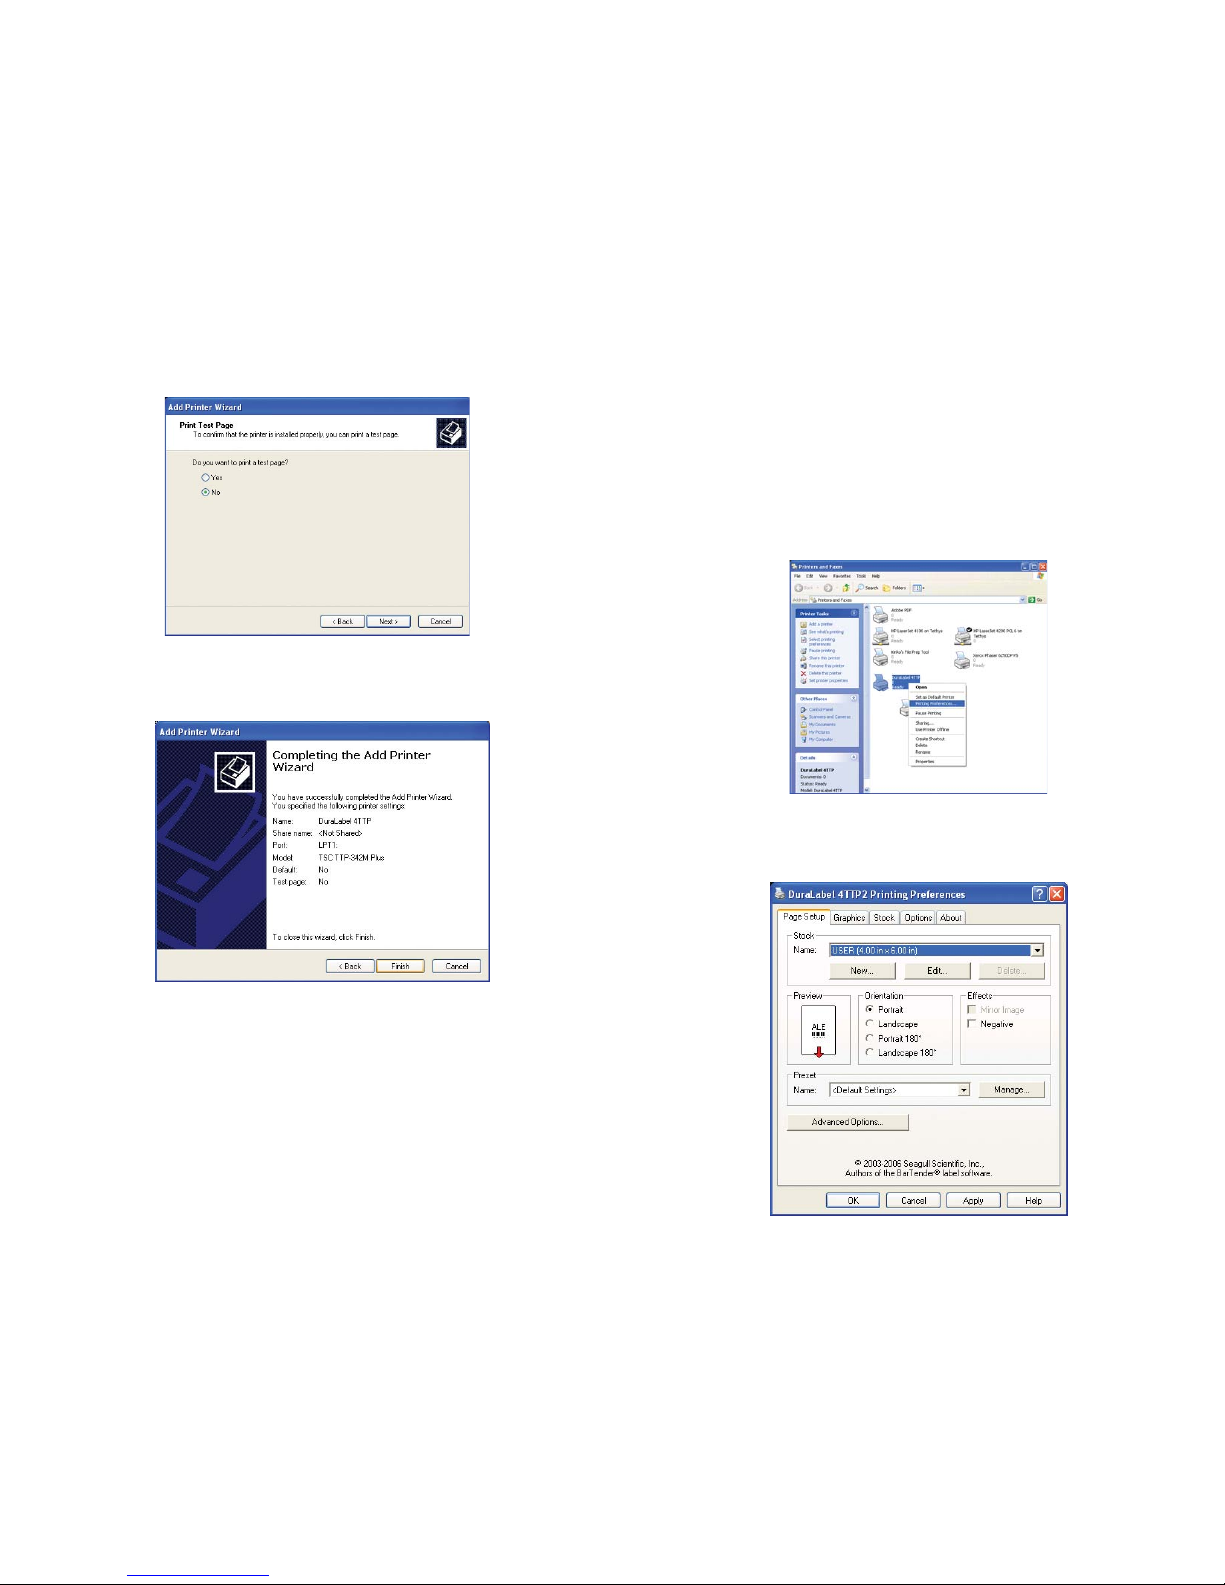
Configure the Windows 2000/Windows XP/Windows NT
Printer Driver
IMPORTANT!
Perform the driver configuration before opening the
document you wish to print.
The following instructions are for printing on continuous rolls of vinyl. To begin,
access the DuraLabel 4TTP Printer Properties by clicking the Start >> Settings >>
Printers. This will bring up the Printers folder:
Right-click on the DuraLabel 4TTP and select Printing Preferences from the drop-
down menu. This will bring up the DuraLabel 4 TTP Printing Preferences. Click on
the
Page Setup
Tab.
9
Choose if you would like a test print to ensure proper installation, then click Next.
Make sure your settings are correct , if so select Finish otherwise select Back and
change to the correct settings.
A dialog box will appear regarding Hardware Installation, click Continue Anyway.
Your driver should be installed and you should be ready to set up for printing.
8
Page 7
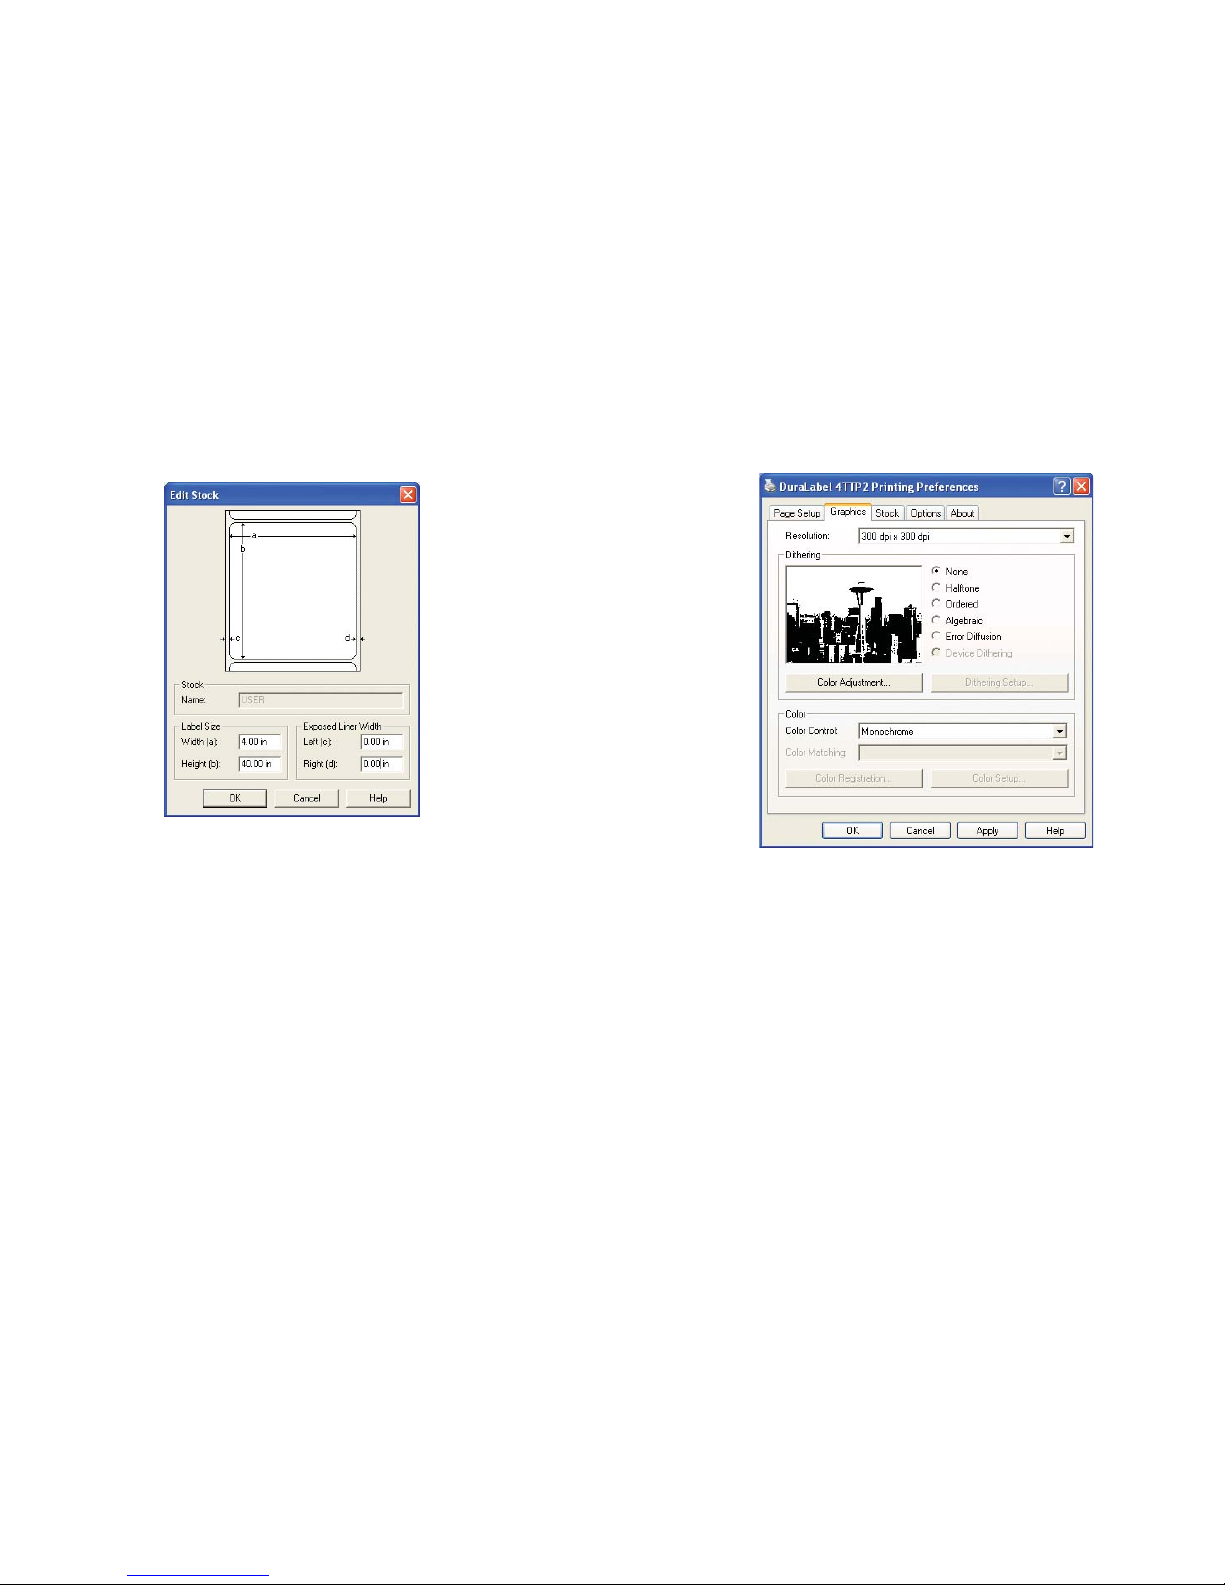
The Graphics Tab under Dithering allows you to adjust the contrast of colors. Do not
apply dithering to monochrome (one color or no gray) sections of printing because it
may appear fuzzy. Select None then click Apply when all settings have been made.
1110
Under Stocks, select “USER (4.00 in x 6.00 in)” and click Edit. This brings up the
Edit Stock dialog box.
Set the Label Width and Label Height to 4.00 x 40.00. Take note of the Exposed
Liner Width measurements, as they should be set to “0” if printing on continuous
rolls of media. Click OK when finished. You can use this stock when printing any
label that is 4.00 by 40.00 in. or smaller.
Since you won’t need the other stock sizes, select and delete each one using the
delete button. You should now have one stock named “USER (4.00 in x 40.00 in).”
Page 8
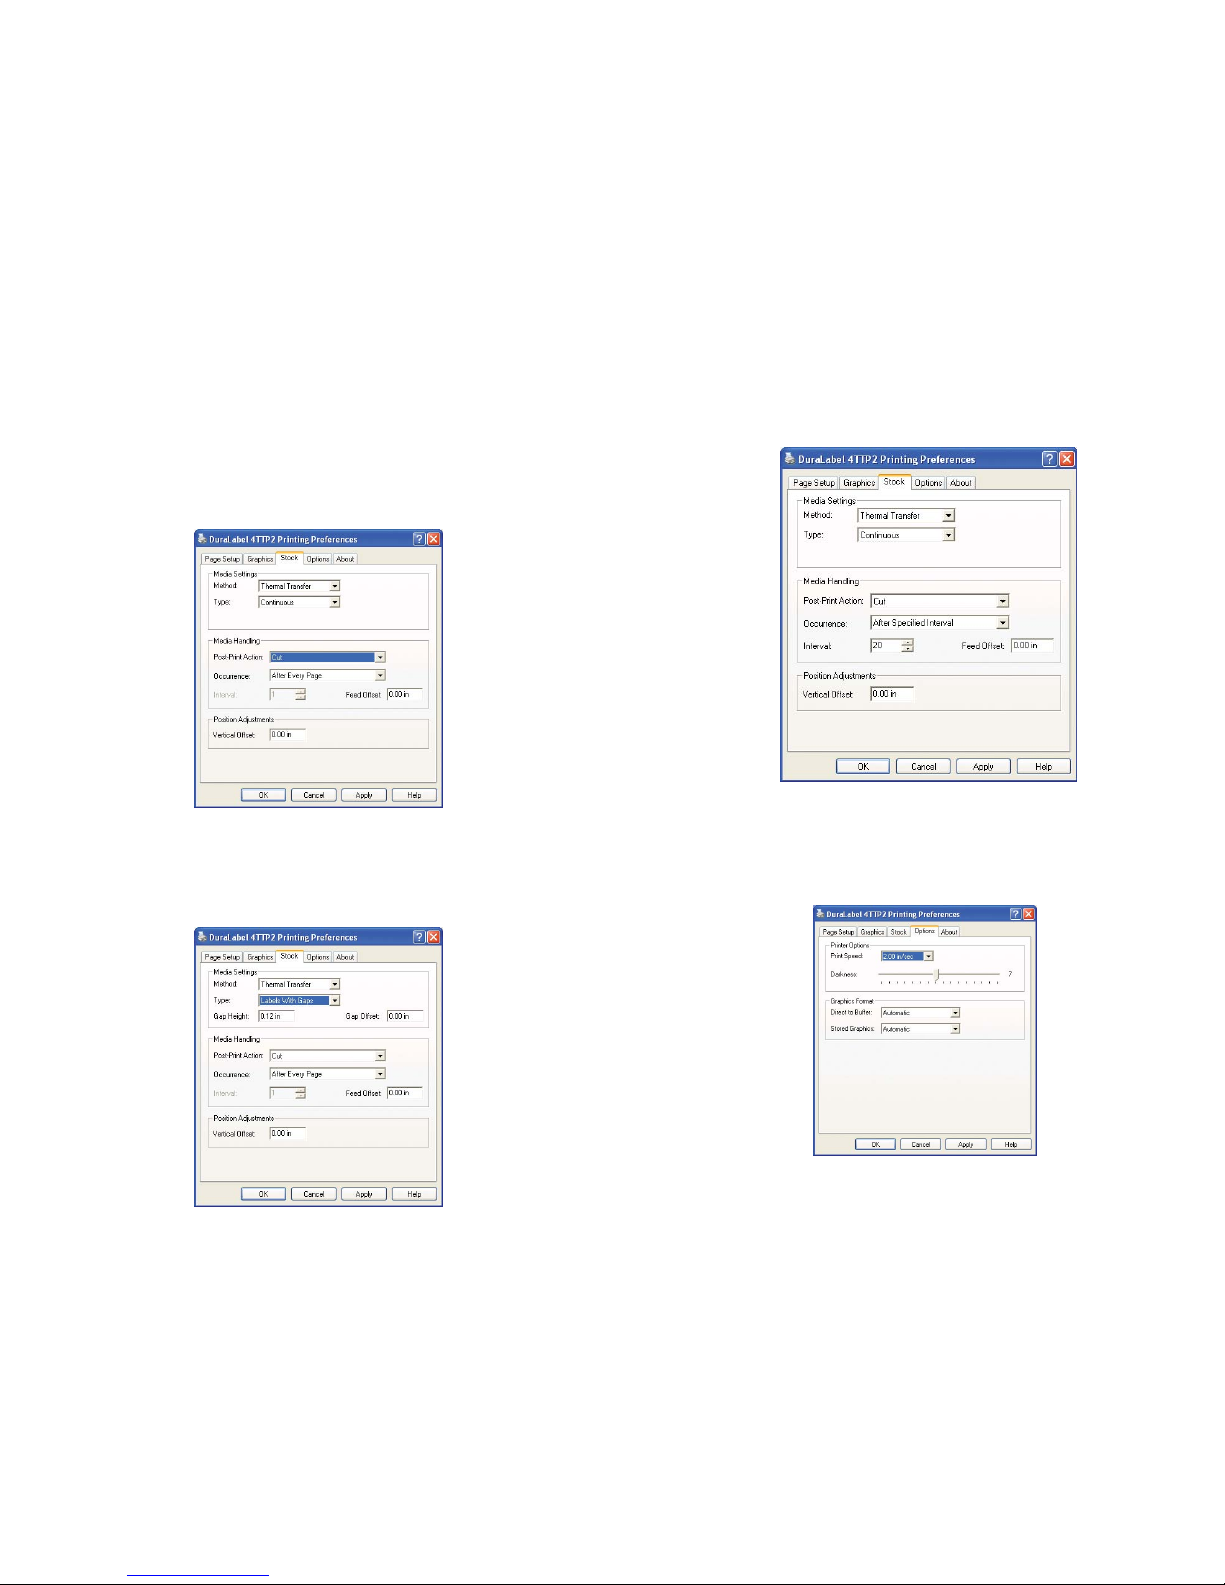
To cut labels in intervals, you may do so by setting the “Occurrence” to After
Specified Interval under the Stocks Tab. Set the Interval to the number of labels
needed. Click Apply to save your settings.
Adjusting the Print Speed and Darkness
Print Speed is adjusted in increments of .5”/sec. from 1.0 to 2.0”/sec. The
Darkness is adjusted from 0 to 15 in increments of 1. The Graphics Format settings
should not be adjusted. Leave them at Automatic.
When finished with your settings, click OK.
Your driver is now set-up and you are ready to create your labels!
13
To set the cutter, select the Stock Tab. Set the Media Settings “Type” to Continuous.
In order for the automatic cutter to cut after each label, under Media Handling next
to “Post-Print Action” select Cut and then next to “occurrence” select After Every
Page. These settings may be later adjusted to your specifications in the Printer
Properties as you are printing your labels. Select Apply on the bottom of the Printing
Preferences window.
To set up for printing on die-cut labels your settings will be set differently under the
Stocks Tab. For die-cut labels with the 1/8” gap, the settings should be as
follows: “Method” should be set to Thermal Transfer and the “Type” should be set to
Labels With Gaps, “Gap Height” set to 0.12 (default) and “Gap Offset” to 0 (default).
12
Page 9
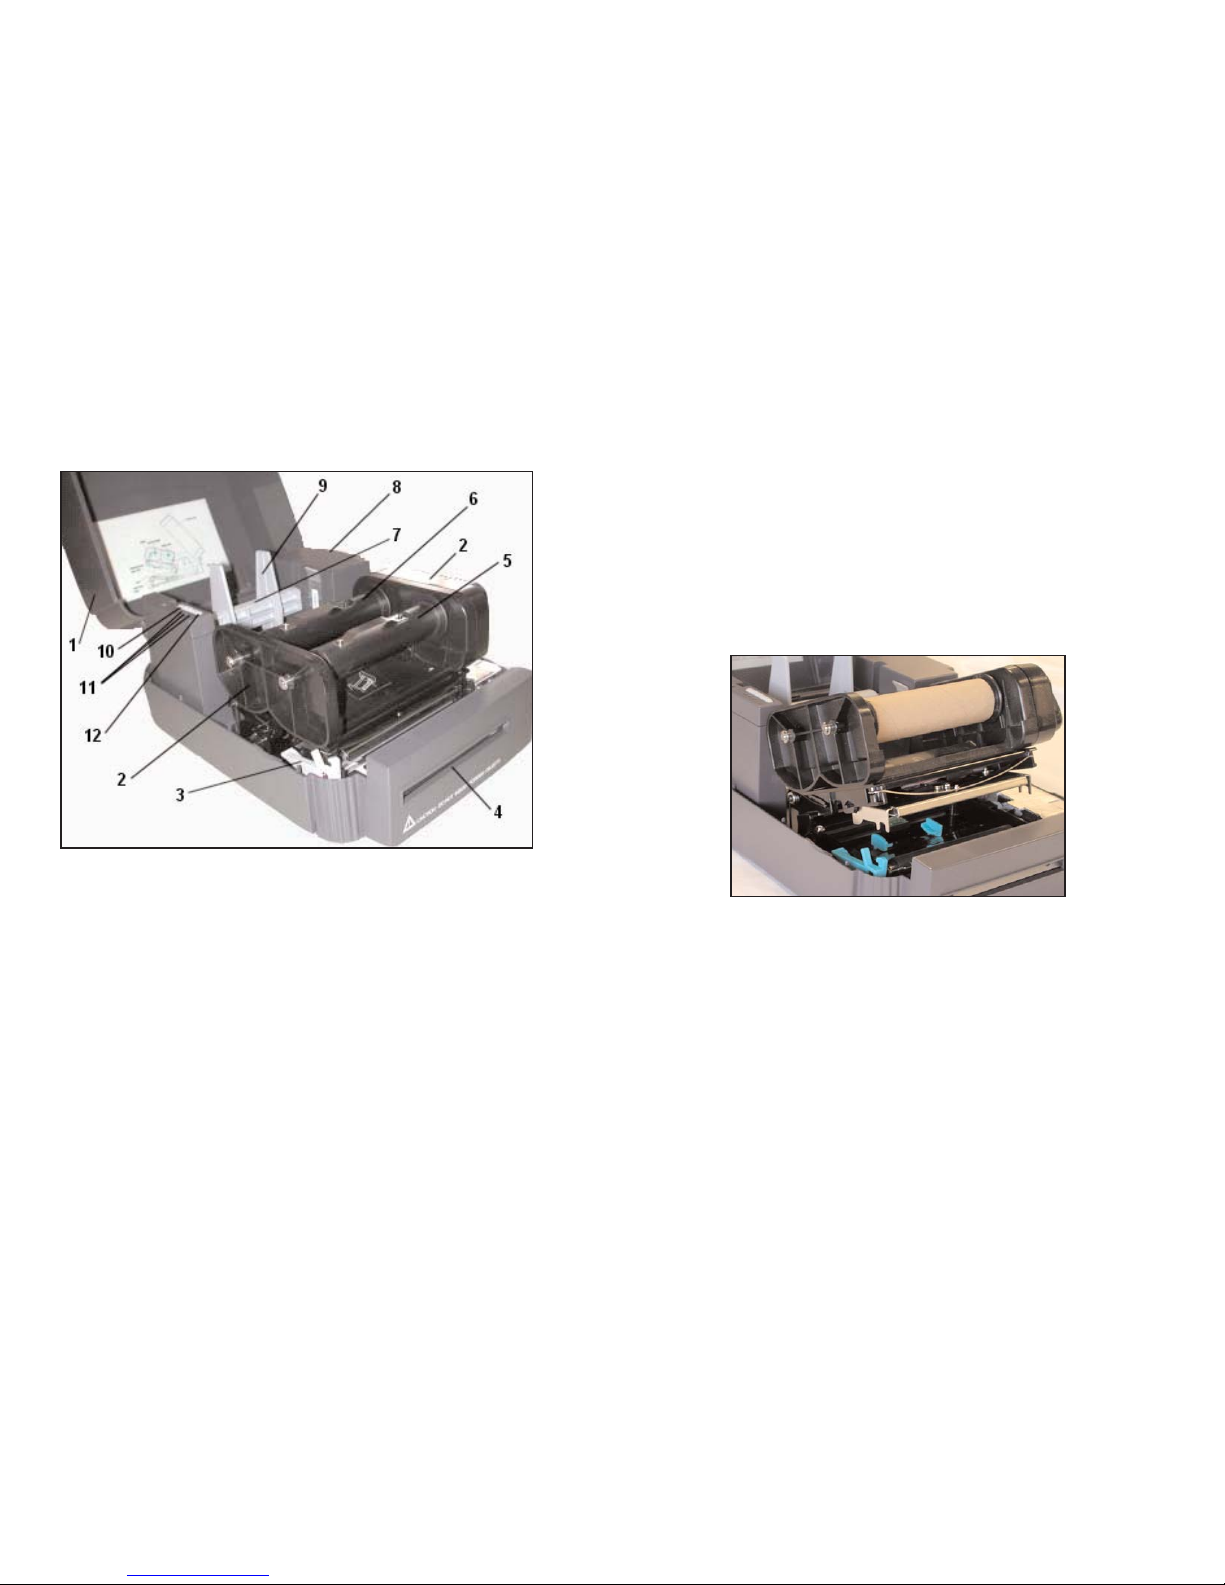
Loading of Ribbon
*Please view our supply loading video online at www.DuraLabel.com
1) With the lid open and the front of the machine is facing forward, open the
Ribbon Mechanism
(2, pg. 14) by pulling the
Printer Carriage Release Lever
(3, pg.
14) forward, until the
Ribbon Mechanism
pops up.
2) Take the
Ribbon Rewind Spindl
e
(5, pg. 14) off and place an empty core on, then
with the flange of the
Ribbon Rewind Spindle
on the right-hand side, first put the
left side of the Ribbon Supply Spindle in the provided spot of the
Ribbon
Mechanism
and then the right side (with flange).
15
Figure 2.
Ribbon Mechanism in open position with a core applied to the Ribbon
Rewind Spindle.
Load Supplies
Structure of DuraLabel 4 TTP
Figure 1. Interior view
1. Printer Cover (in open position)
2. Ribbon Mechanism
3. Printer Carriage Release Lever
4. Printed Label Opening
5. Ribbon Rewind Spindle
6. Ribbon Supply Spindle
7. Label Supply Roll Spindle
8. Memory Module Slot (with cover on)
9. Fixing Tabs
10. PAUSE Button
11. PWR., ON_LINE, ERR. Indicators
12. FEED Button
14
Page 10
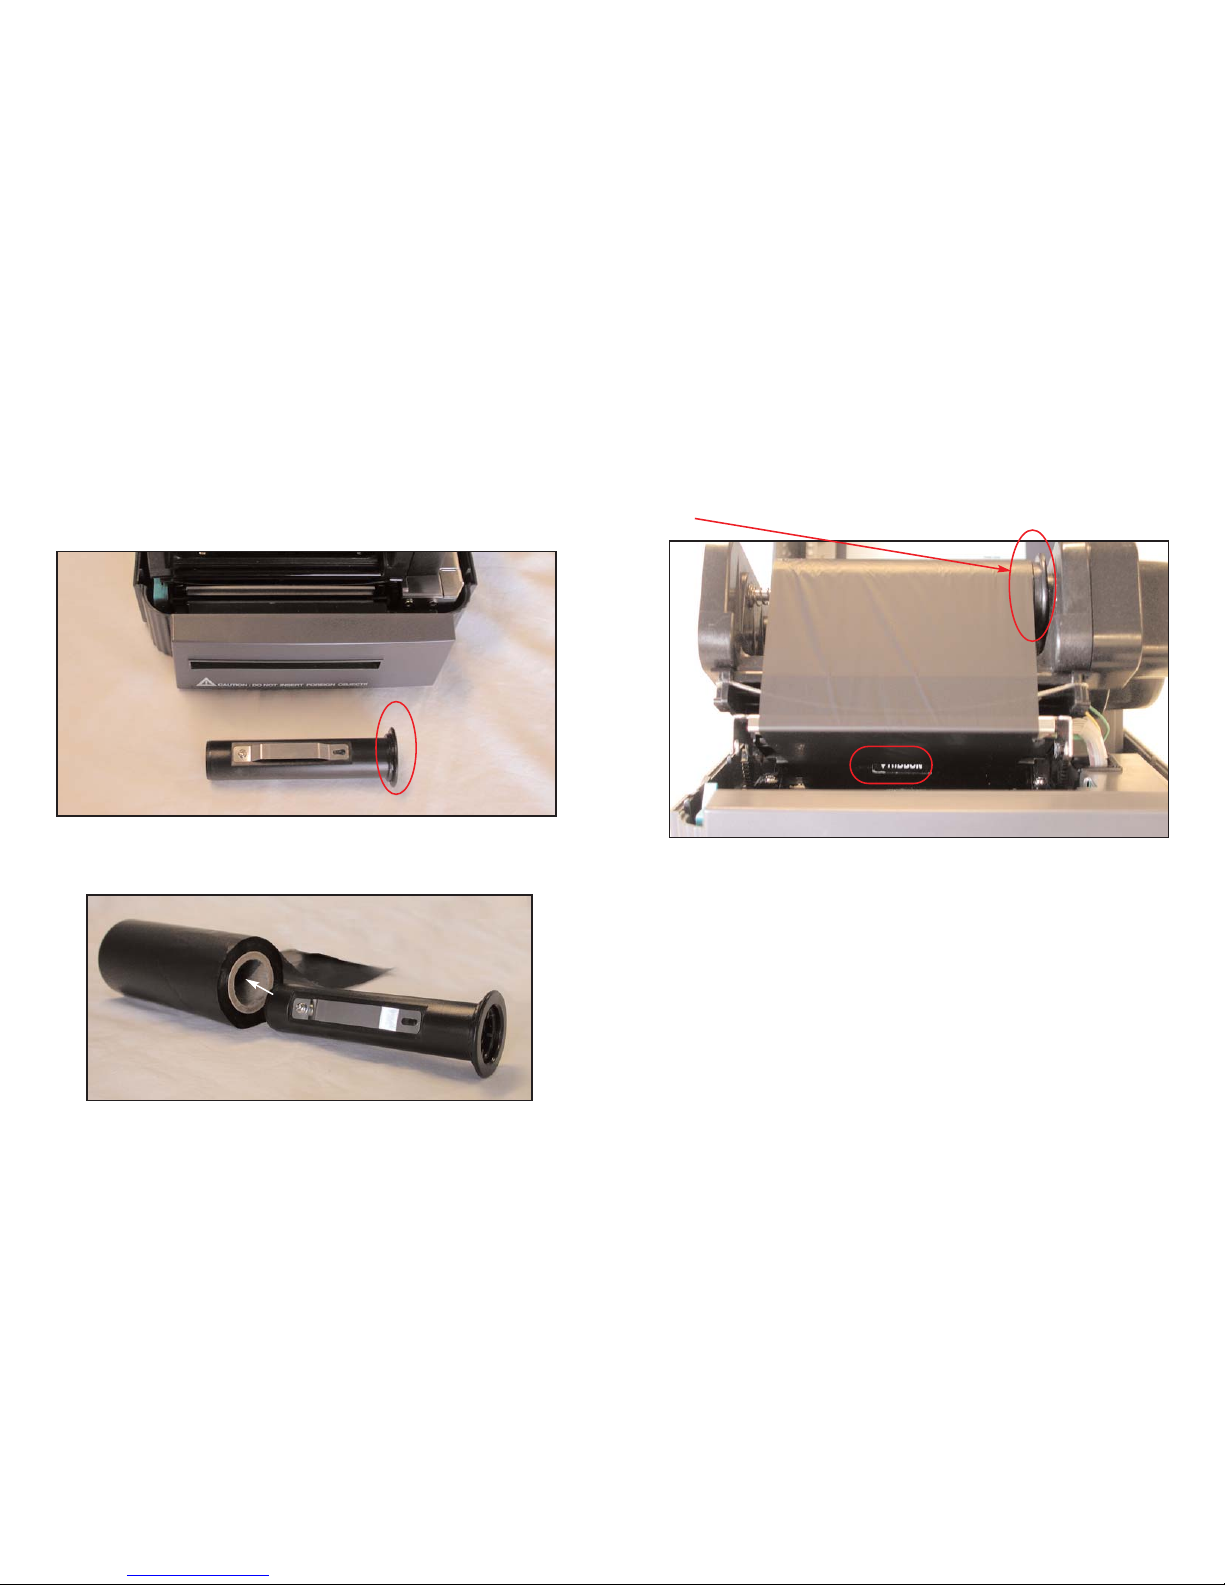
5) Thread the
Ribbon Supply
underneath the
Ribbon Mechanism
.
Flange
of the Spindle is on the right-hand side of the machine.
*TIP:
Look under the
Ribbon Mechanism
to make sure the
Ribbon Supply
is not cov-
ering the word ‘RIBBON’ that is on the inside of the machine under the Ribbon
Mechanism..
Figure 5.
Ribbon Supply applied correctly.
17
3) Take the
Ribbon Supply Spindle
(6, pg. 14) with the flange on the right side and
put the
Ribbon Supply
on it with the
Ribbon Supply
facing towards the back of the
machine and extending over the top of the
Ribbon Supply Spindle
.
4) With the
Ribbon Supply
facing towards the back of the machine and the flange of
the
Ribbon Supply Spindle
is on the right side, first put the left side of the Ribbon
Supply Spindle in the provided spot of the
Ribbon Mechanism
and then the right
side (with flange).
Figure 3.
Flange of the Spindle should be on the right-hand side of the machine
as demonstrated above.
Figure 4.
Step 3 Loading of Ribbon Supply on the Ribbon Supply Spindle.
White arrow demonstrates which end of the Ribbon Supply Spindle is inserted into
the Ribbon Supply.
16
Page 11
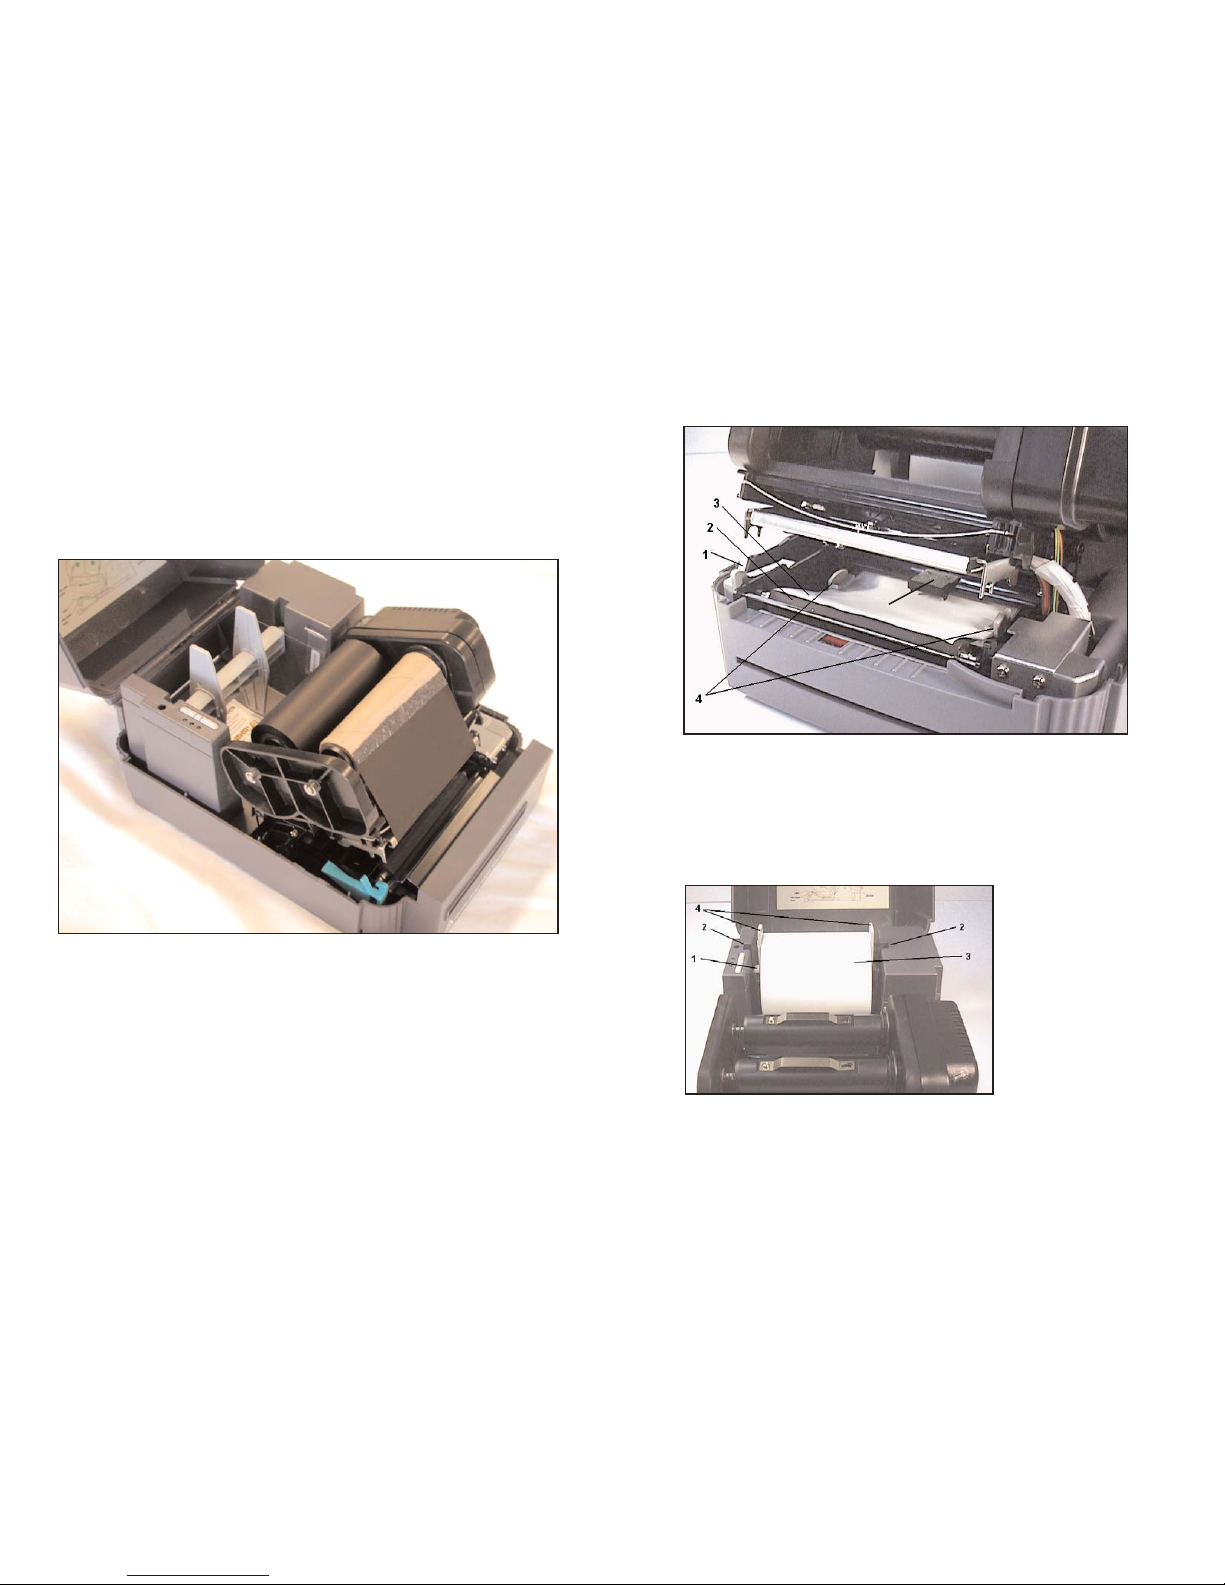
Structure of DuraLabel 4 TTP
Figure 7. Feed labels through adjustable label guide
1. Printer Carriage Release Lever
2. Platen
3. Label Media
4. Adjustable Label Guide
5. Media/Vinyl Sensor
19
Figure 8. Feed labels through adjustable label guide
1. Label Supply Roll Spindle
2. Label Roll Mount
3. Label Roll
4. Fixing Tabs
6) Tape the entire length of the end of the
Ribbon Supply
to the core on the
Rewind
Ribbon Spindle
and roll the
Ribbon Rewind Spindle
forward a few times to secure
the
Ribbon Supply
around the
Ribbon Rewind Spindl
e
and to eliminate any wrinkles,
fingerprints or flaws.
The
Ribbon Supply
should be in place and ready for
Label Media
to be inserted.
Figure 6.
Ribbon Supply taped to the Ribbon Rewind core.
18
5
Page 12
4) Thread the Label Media under the
Ribbon Mechanism
and through the
Printed
Label Opening
(#4, pg. 14) and leave a little excess Media out the other side.
5) Adjust the
Adjustable Label Guides
(Fig. 7, #4, pg. 19), to hold the
Label Media
in
place.
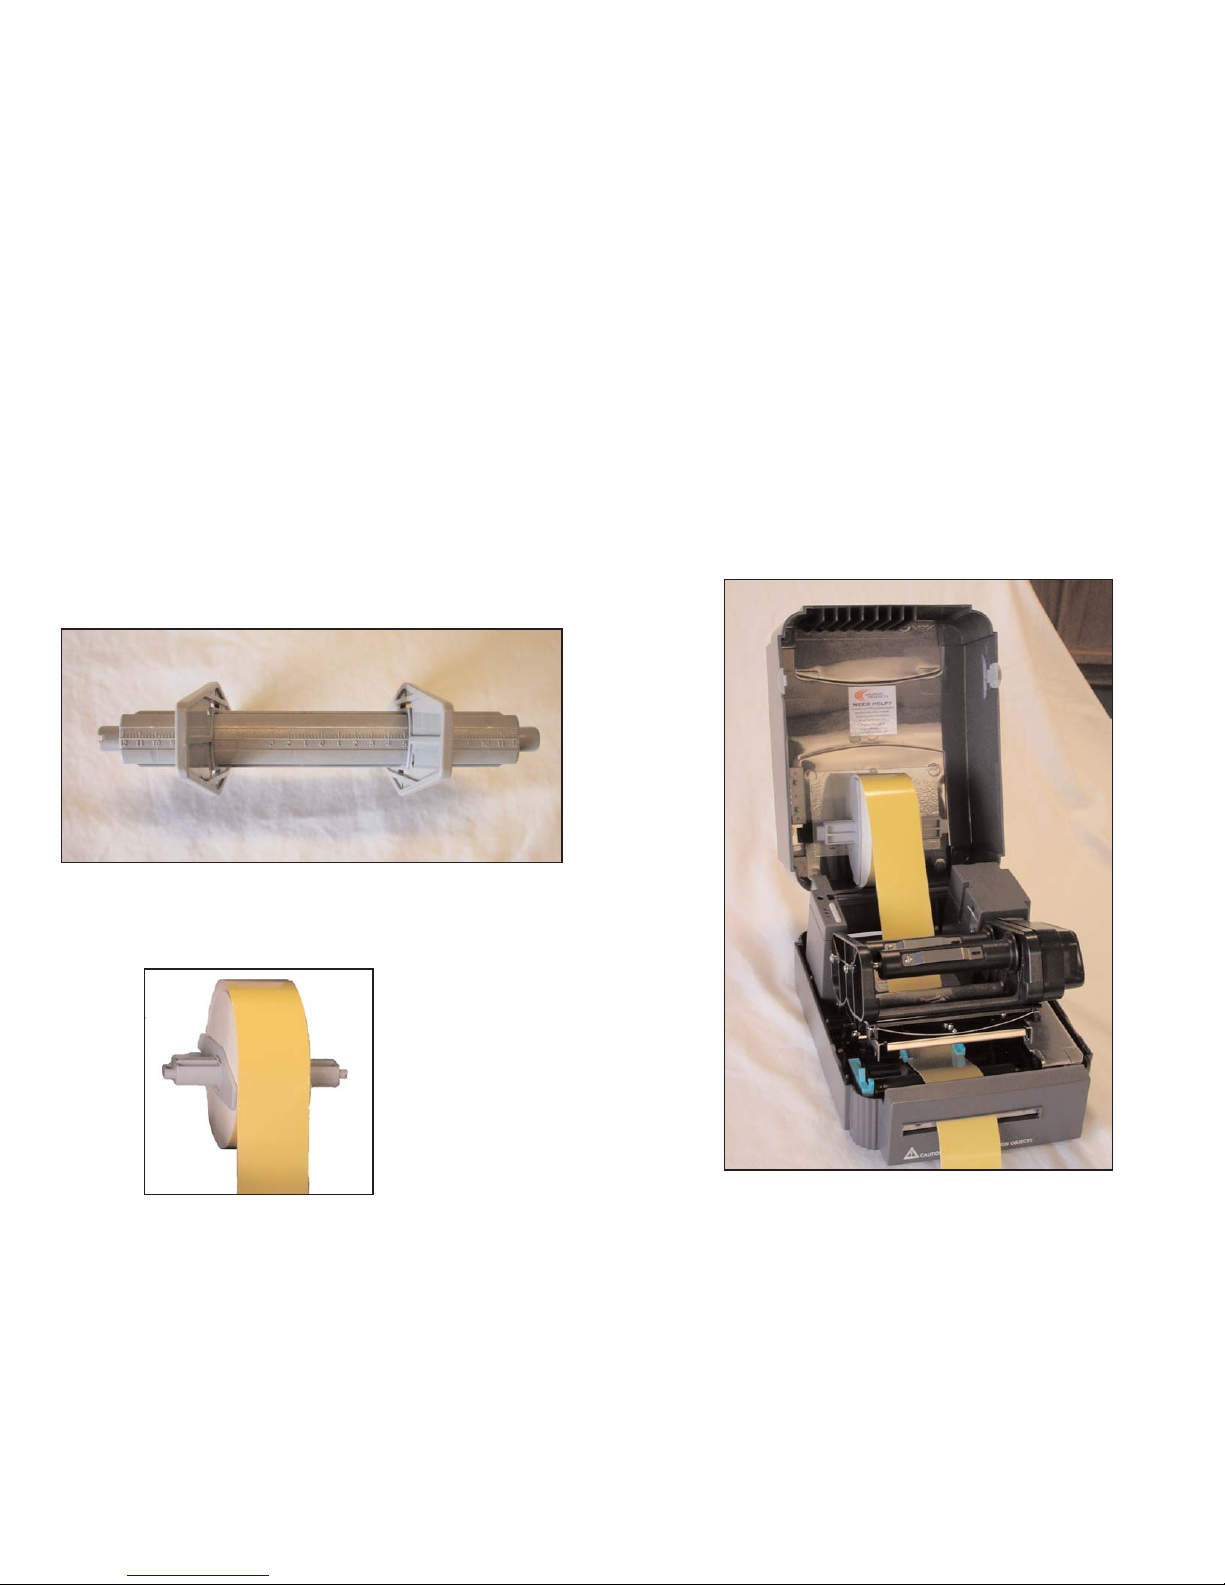
*TIP
: If there is not enough room to thread the
Label M
edia
under the
Ribbon
Mechanism
, set the Label Media on the lid, in the back of the machine. This will
allow more room to guide
Label Media
under the
Ribbon Mechanism
.
21
Figure 11.
Label Media resting on the cover to allow more room during loading.
Loading of Label Media
*Please view our supply loading video online at www.DuraLabel.com
1) With the lid open and the front of the machine is facing forward, open the
Ribbon Mechanism
(#2, pg. 14) by pulling the
Printer Release Lever
(Fig. 7, #1, pg.
19) forward, if not already opened.
2) Load the
Label Media
(Fig. 7, #3, pg. 19) on the
Label Supply Roll Spindle
(#7,
pg. 14)
and center the
Label Media
using the measuring units on the spindle and
hold it in place by adjusting the
Fixing Tabs
(#9, pg. 14).
Figure 9.
Label Supply Spindle with 2 Fixing Tabs
3) With
Label Media
facing forward and extending over the top of the roll, place the
Label Supply Roll Spindle
back in the
Label Roll
Mount
(Fig. 8, #2, pg. 19) spaces.
Figure 10.
Correct direction
of Label Media
20
Page 13
LABEL CREATION
Before We Begin...
This documentation describes how to make standard labels. If you are printing RTK
labels, please see the RTK software documentation. The RTK documentation was
installed on your computer when the RTK software was installed.
The examples in this tutorial were tested with Microsoft Word 2000. Some varia-
tions may occur with different versions of Word, or with different word processors,
but the basic principles will be the same. The DuraLabel 4 TTP is designed to work
with virtually all Windows software, and should work with the software packages
that you already have installed on your computer.
All portions of this tutorial assume that the DuraLabel 4 TTP has been properly
installed and is connected in the online mode. Please see the installation guide for
more information before proceeding with this tutorial.
Label Creation With Your Word Processor...
Many have invested in high-end word processing software that is never used to its
full potential. Today's word processors come packed with features and capabilities
that far surpass the average users needs. Advanced page layouts, graphic
manipulation and printing options are only the beginning of what most word
processors have to offer.
The DuraLabel 4 TTP operates off of a standard Windows printer driver that makes
the printer accessible from a wide variety of software packages. Many printers will
only work with expensive, proprietary software that is often buggy and overpriced.
With the DuraLabel 4 you will be able to use the software that you are familiar with,
and get the most out of an investment you've already made.
In this tutorial we will show you how to use Microsoft Word to create and print
custom labels and signs. If you have further questions concerning your software
package, or label creation in general, please refer to the contact information near
the end of this tutorial.
23
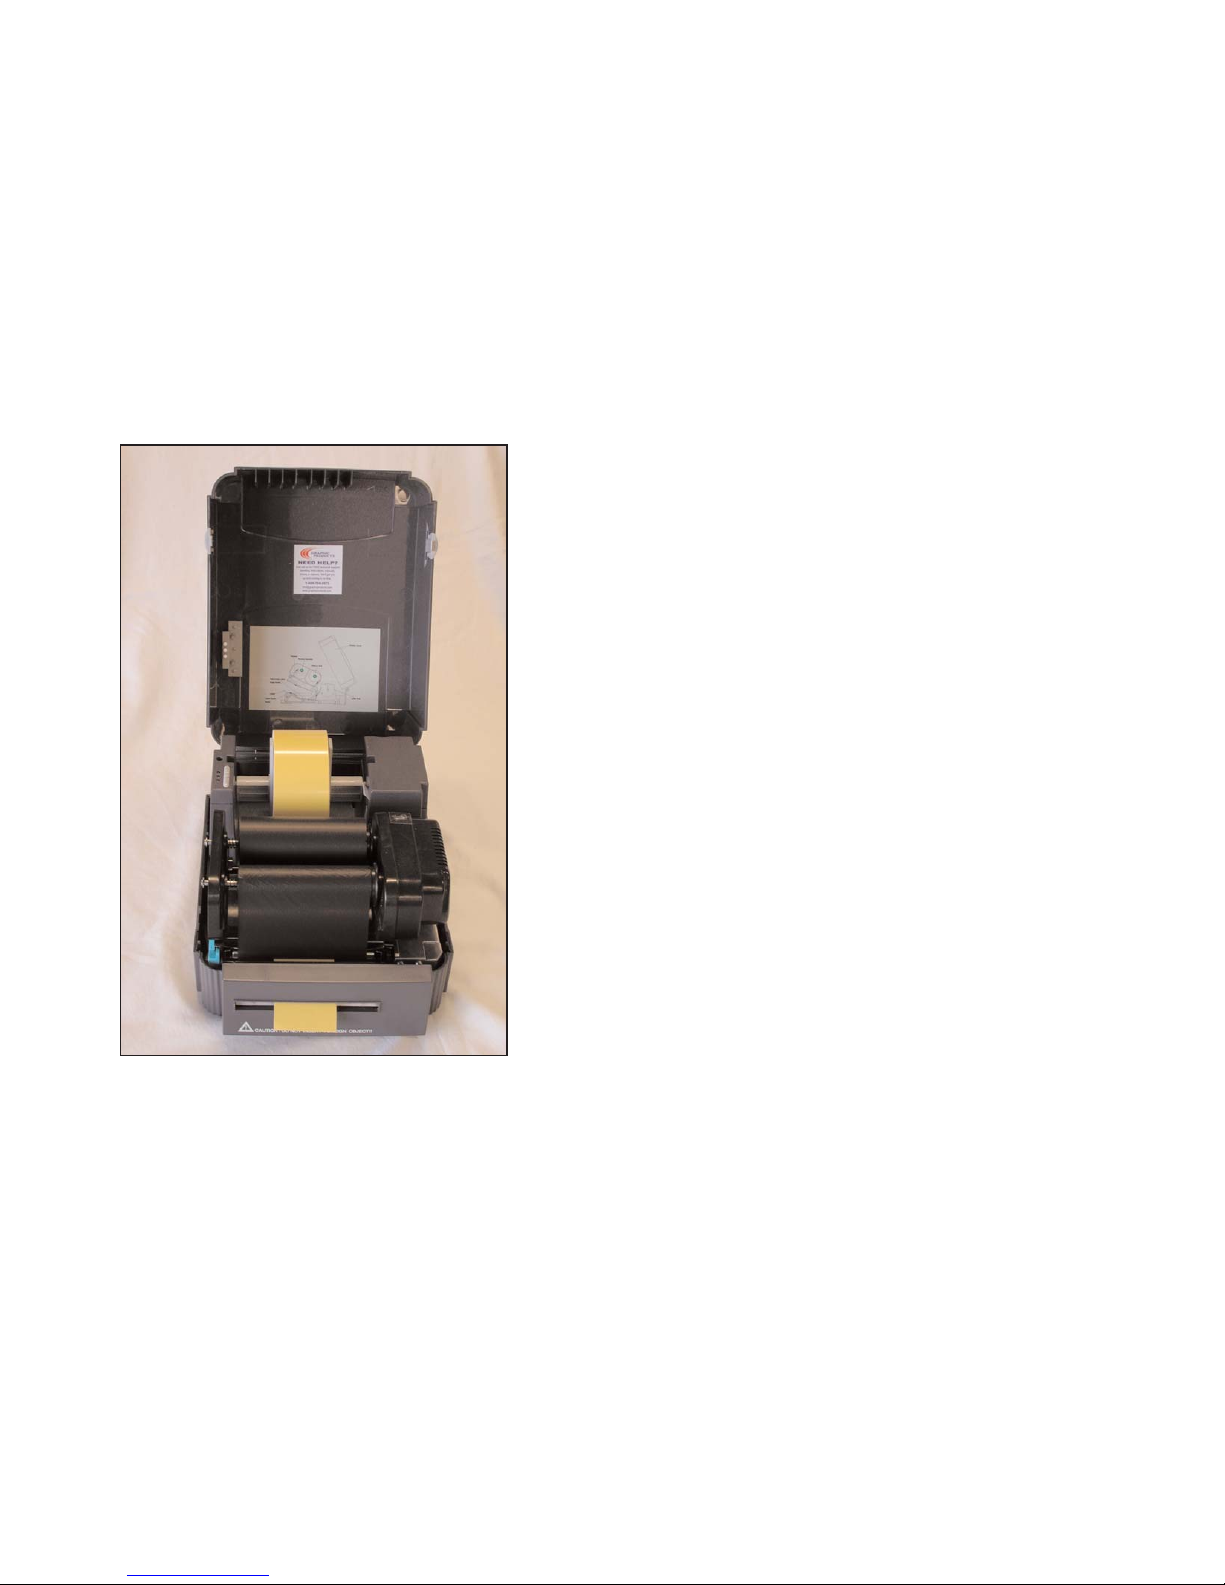
6) Press the
Ribbon Mechanism
down until the
Printer Carriage Release Lever
(Fig.
7, #1, pg. 19) locks it into place.
The supplies should be loaded and the printer should be ready to print.
22
Figure 12.
Printer loaded properly with Ribbon Supply and Label Media.
Page 14
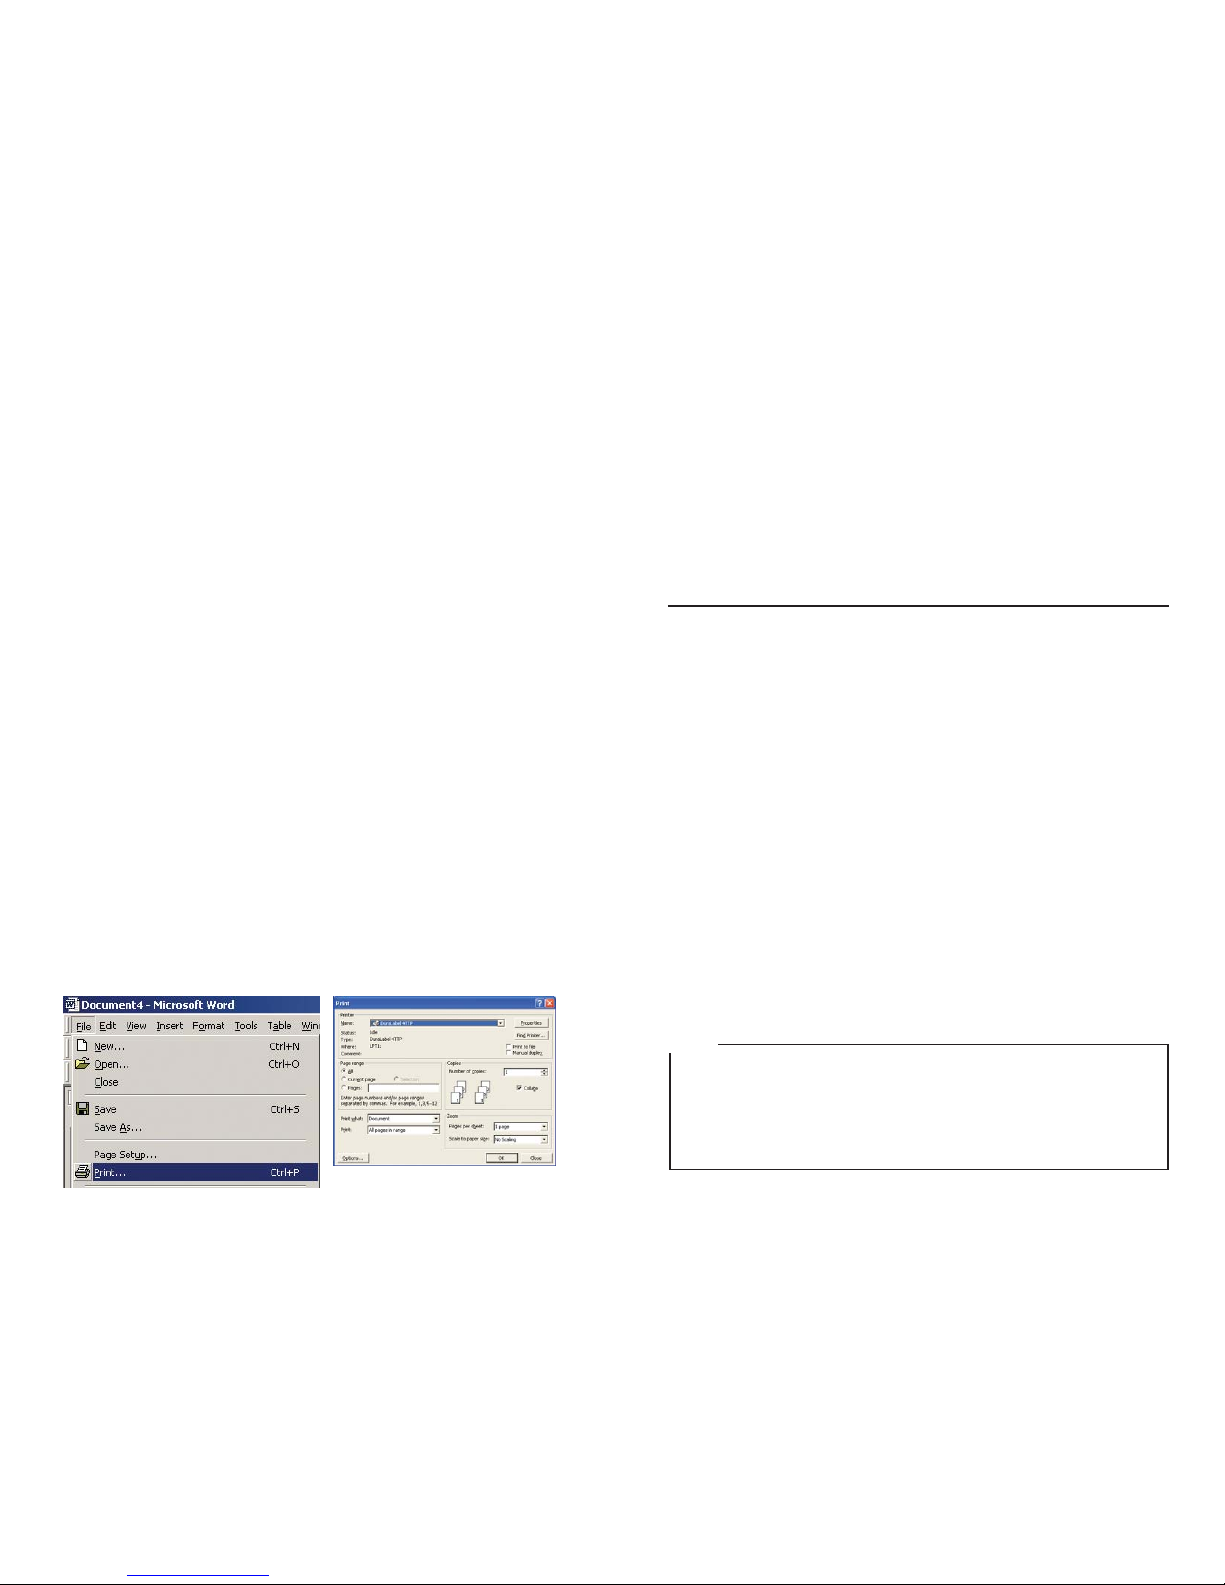
25
In the print dialog simply locate the pull-down selection and choose the DuraLabel
4 TTP as your printer. Click Close to continue.
Optimize the Print Properties
When you installed your DuraLabel 4TTP, carefully following this Quick Start Guide
(pages 3-13), you set some default print settings. At some point, you may need to
override these settings to optimize the DuraLabel 4TTP for printing with certain rib-
bons or a specialty tape supply. Also, you may not want the DuraLabel 4TTP to
automatically cut every label.
To Change the speed and density settings:
To change the speed and density settings, you need to open the Print Properties,
from there select the Options Tab. You change your speed and darkness settings.
Set the Speed and Density as you did when you initially configured your driver
pages 9-13 from the Quick Start Guide, but use new settings.
You may find that changing these settings for certain types of supplies is optimal. For a
label with mainly text and not a lot of large, dark areas, you may want to drop the dark-
ness down to 5 or 6. If you have large areas of solid color to print, you may need to
increase the darkness to 8 or higher.. You'll have to experiment to get the desired quality,
but 8 is a good median to accommodate most labels.
NOTE
Using the Templates Provided on the DuraLabel 4 CD
We have provided a variety of templates on the DuraLabel 4 CD to help get you
printing labels in no time. To get to these templates, you should install from the
start-up screen on your CD. This should only take a minute or two.
Click on Install Templates and Symbols on the start-up screen, then follow the
instructions. The Templates will install to your My Documents folder on your
computer.
After installation is complete, templates and symbols will be located in a folder
called DuraLabel4TTP in your My Documents folder.
Now, when you want to use a template, just open Microsoft Word. Select Open
then browse the Templates folder. There are a variety of templates for you to
choose from, all of which are setup to print correctly on the DuraLabel 4 TTP. Just
customize the label to your specifications and PRINT!
Setting up a new document in MicroSoft Word
Once you open a new or existing document, you must change the paper size and
margins. Word processors will default to 8.5" x 11", but changing these settings is
generally very simple. The steps are outlined for Word below:
1. Select the printer
Before you make any changes to the page layout you must first select the DuraLabel
4TTP as your printer. The word processor communicates with the selected printer
driver to determine if margin and other settings are within the printers limits. To
select the DuraLabel 4 click on the File menu, then the Print selection:
24
Page 15
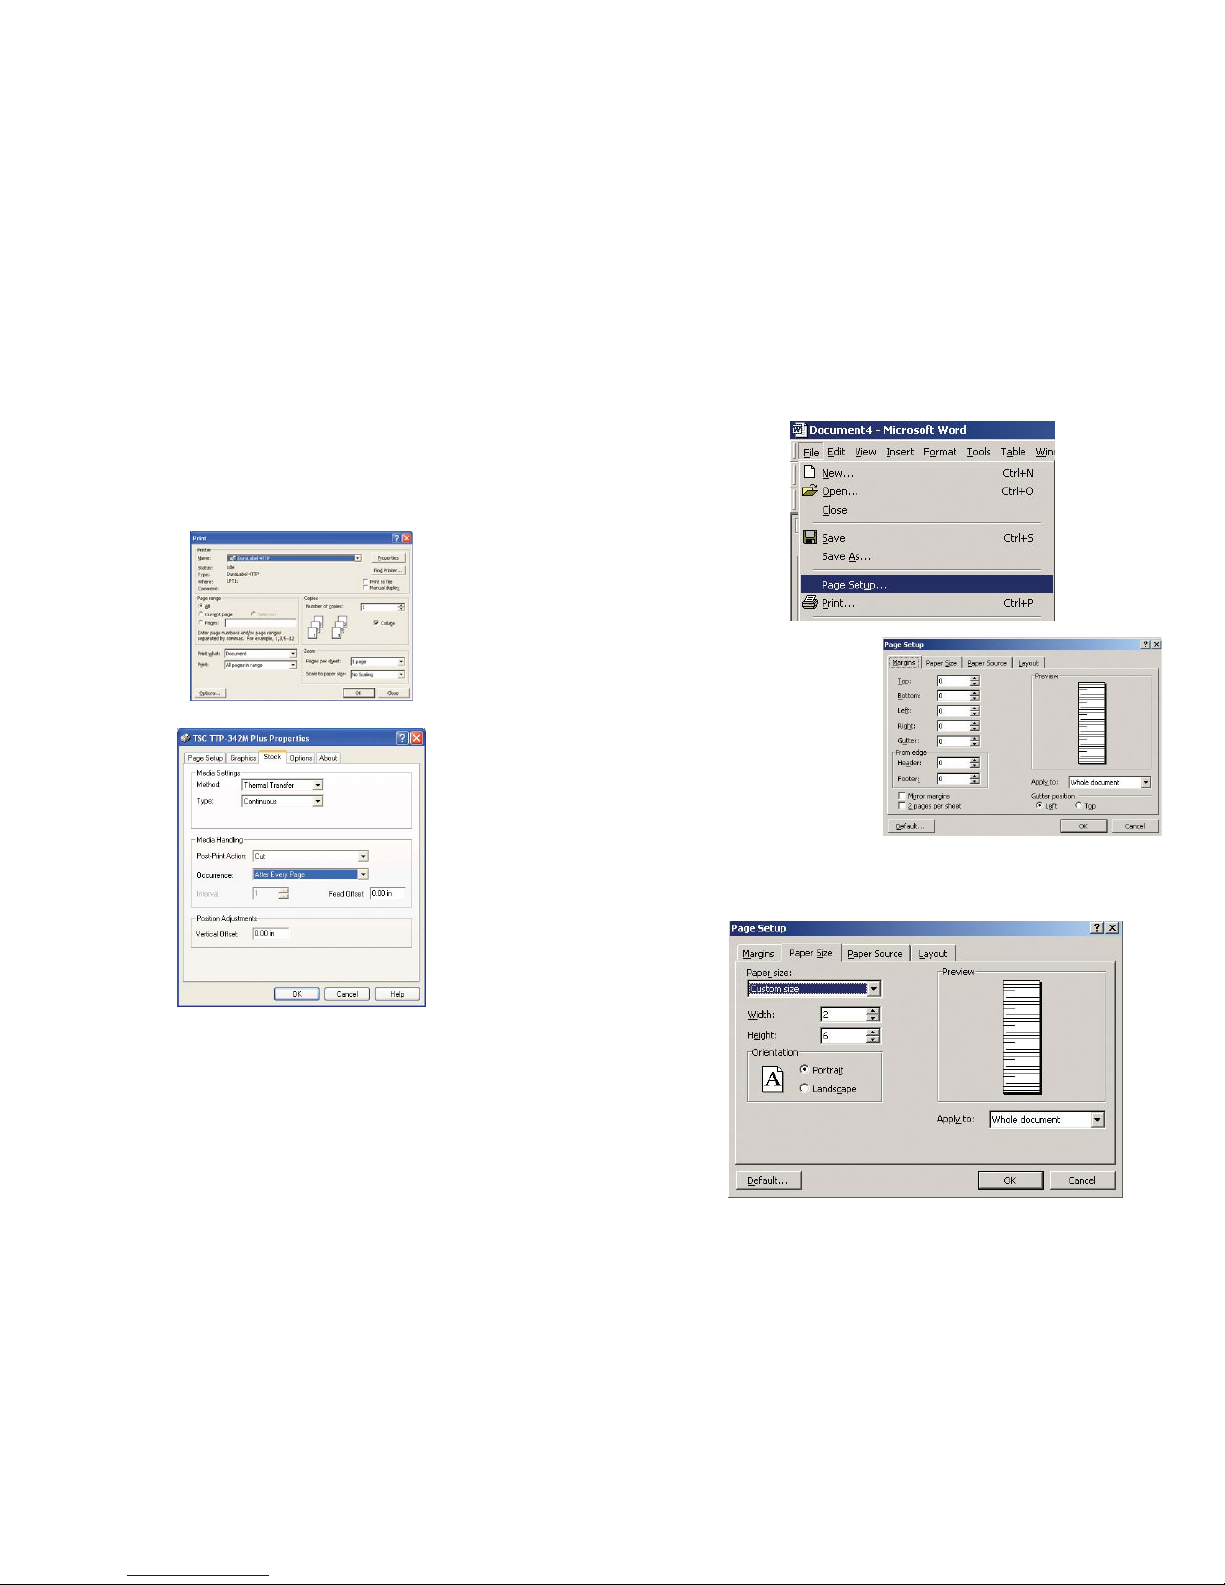
2. Changing the Page Setup in Microsoft Word
Click on the File menu, then the Page Setup selection:
Now click the Margins tab. Set all
of your margins and edges to 0.
This will allow you to print on the
entire area of your tape.
Select the Paper Size tab. Set your paper size to the size of the label you wish to create.
Either the width or the height should match the width of the tape supply you have loaded
in the machine
27
To Change the Automatic Cutter Setting:
You can change the automatic cutter settings without going back into the printer
driver.
Go to File >> Print , then click on the Properties button next to DuraLabel 4 TTP.
A new dialog will open which allows you to change the cutter options.
If you do not want to cut between labels select None under Options. If you want to
cut between labels, select Cut every and enter 1 in the Labels box.
Click OK in the Properties dialog to save your new settings.
26
Page 16
LABEL DESIGN
Working With Text
Working with text for label creation is only slightly different from working with text in
a normal document. In a document, text can be treated as a whole; formatting, lay-
out and design can be universal. With a label, each section of text has to be handled
separately.
Titles will have to be moved and adjusted, portions of text will have to be moved
around independently and with more detail than in a normal document. In a
document it is sufficient to have most text single or double-spaced; in a label you
may want to move text only a few millimeters, or several centimeters.
Text Boxes
A text box is simply a positionable, formattable box that contains text. The box can
have borders and can be filled with different colors, or it can have no borders and
be transparent. All of these features make text boxes ideal for label creation.
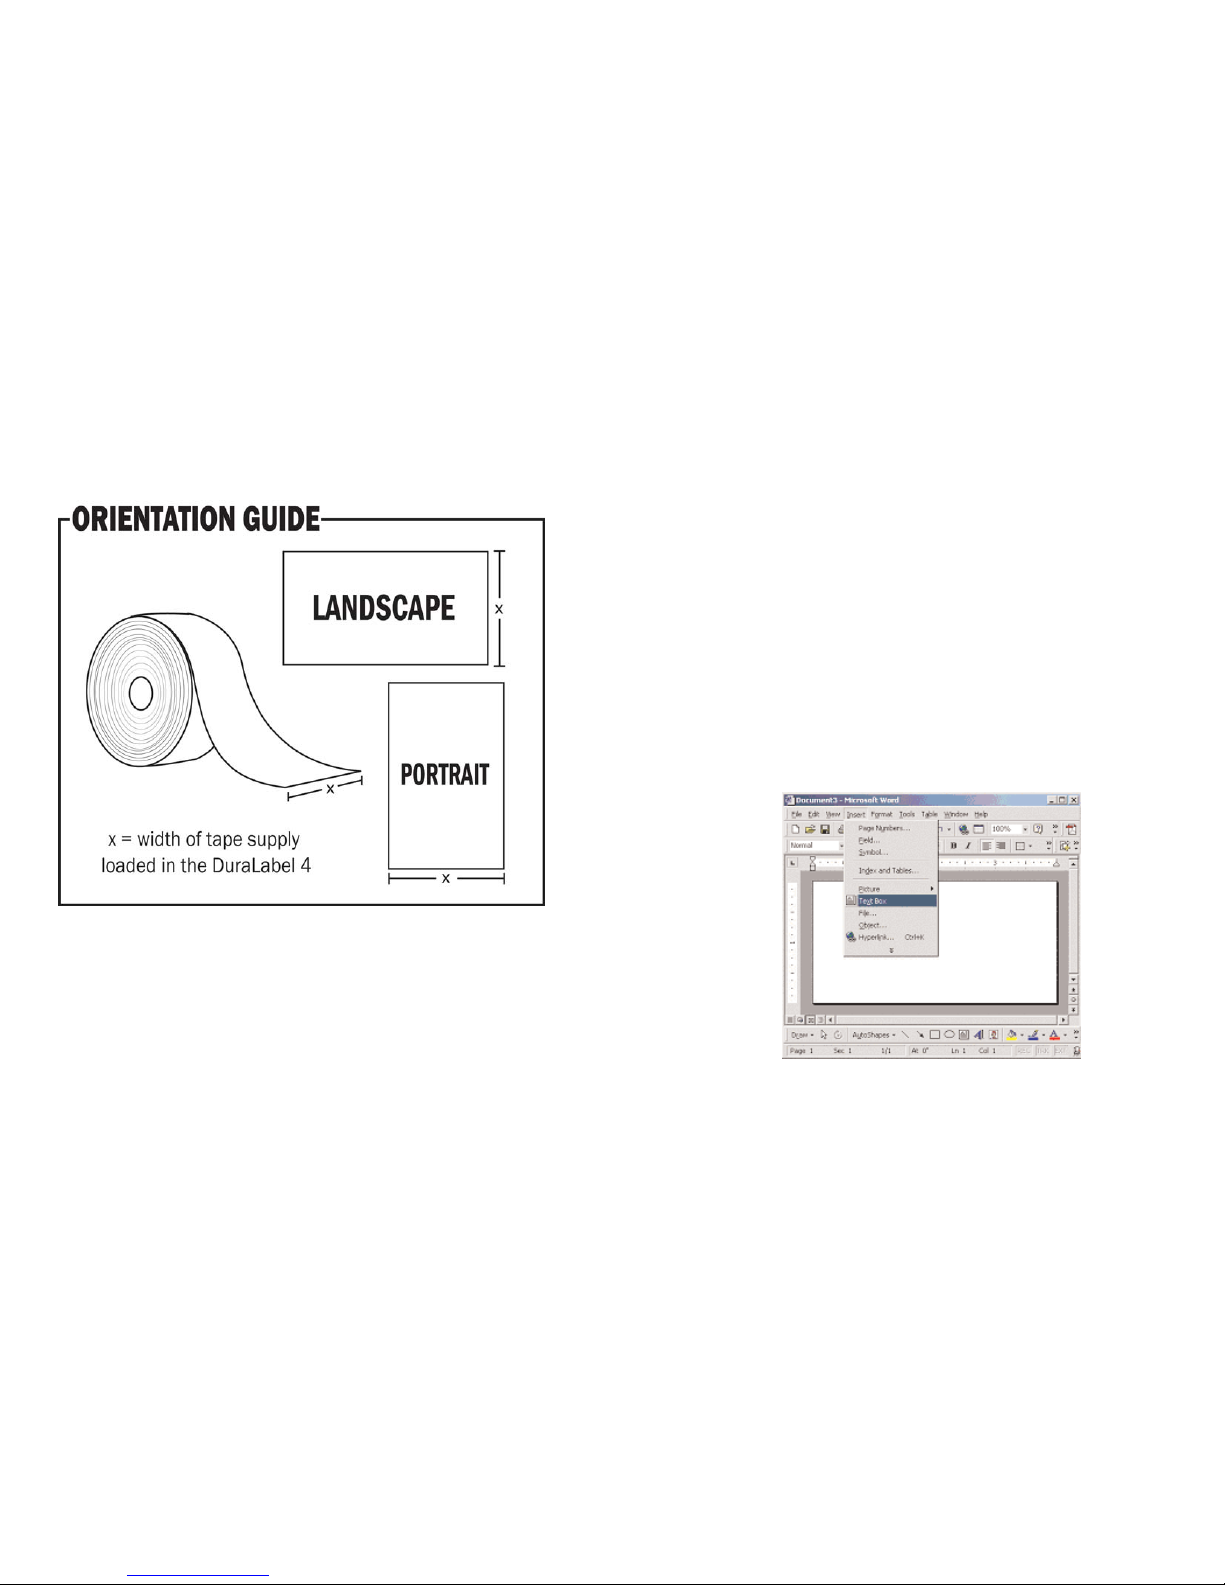
In MS Word add a text box with the following steps. Click on Insert >>> Text Box.
Next, holding down the left mouse button, drag (in the document window) the
square handles on the border of the text box until it is the desired size. You can
scale and position text boxes with ease.
29
Orientation
Create the label with the width and height of the Label. If the width of the label is
the width of the tape installed in the printer, then set the orientation to Portrait. If
the height of the label is the width of the tape installed in the printer, set the
orientation to Landscape.
Click OK to commit your changes. With your document properties set correctly you're
ready to move on to label creation!
28
Page 17
31
Working with Graphics
Drawing Tools
Many word processors have built-in drawing tools. You can use these tools to
enhance the look of your labels. Designs can be as complex as you desire, but col-
ors should be kept to black and white. Black and white will give you the best con-
trast, and the best printing output. Actual print color depends on the ribbon and
tape loaded in the DuraLabel 4 and is unaffected by the colors shown on your
screen.
Images
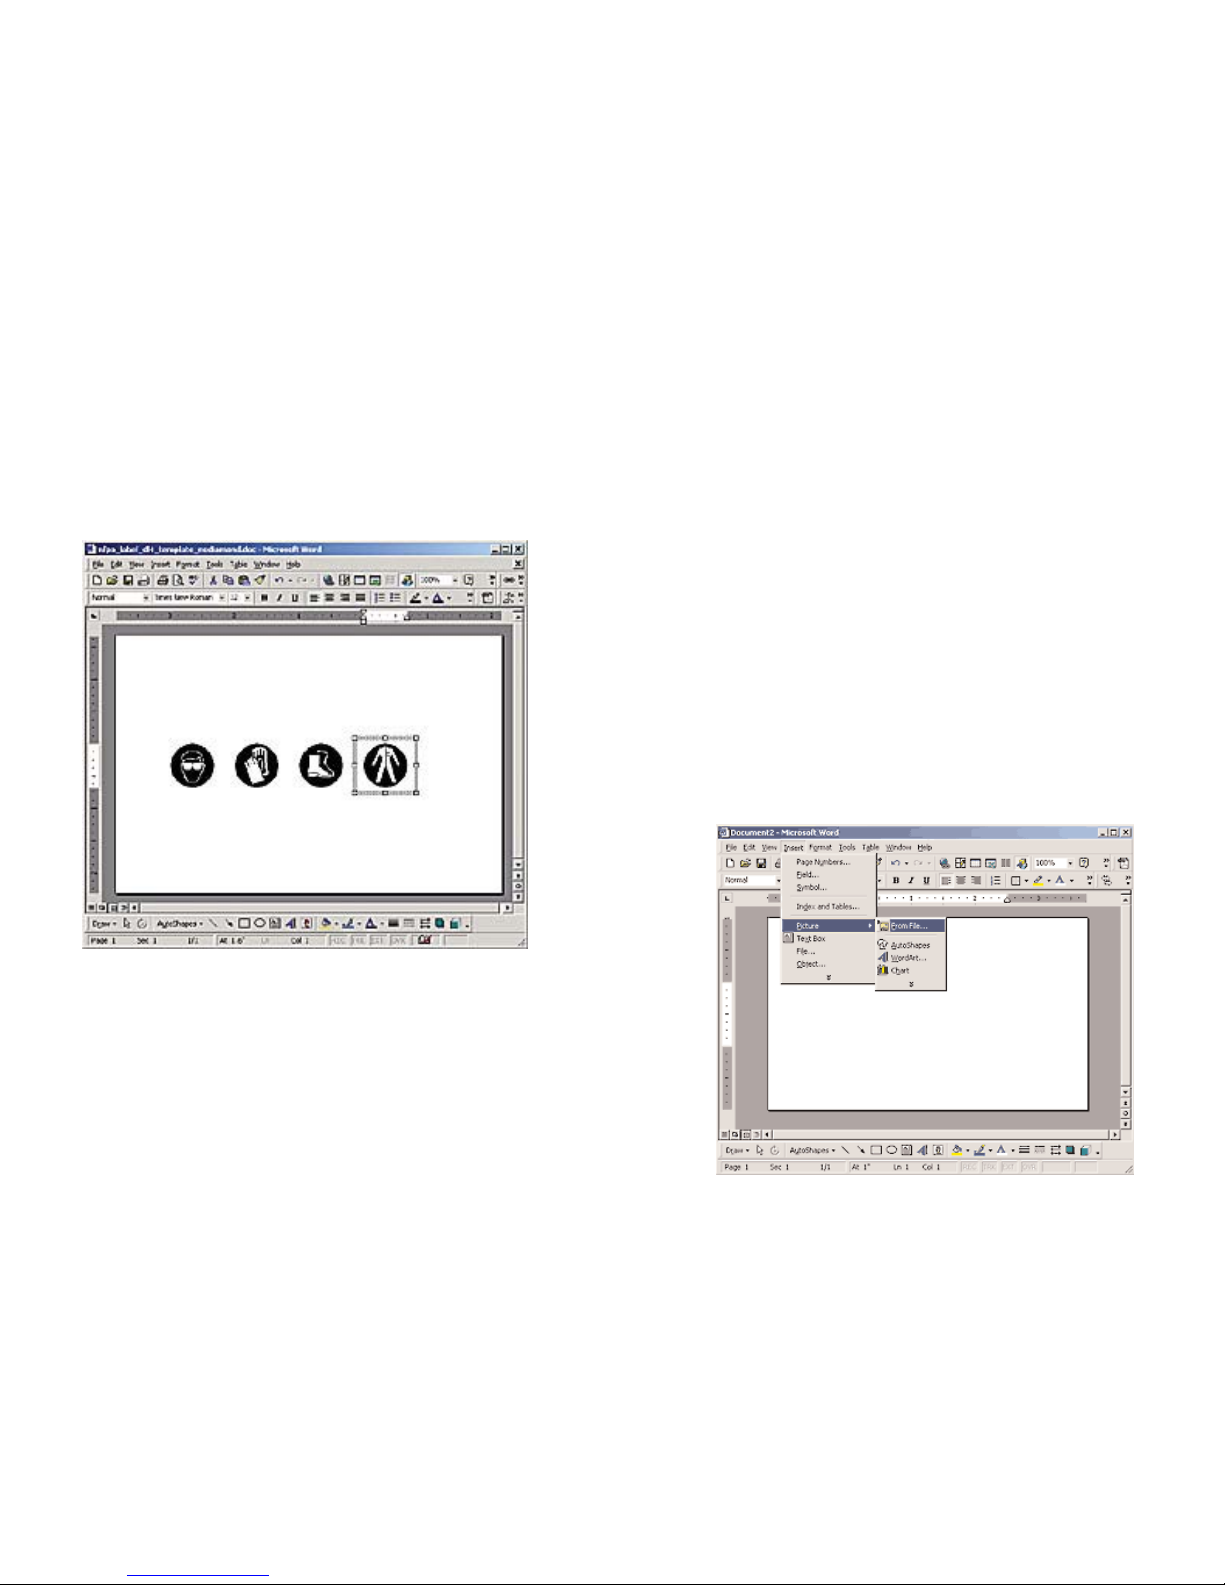
To insert a picture into a Word Document, first create a new text box so you can
insert the picture into the text box (this allows the image to be moved). Once you’ve
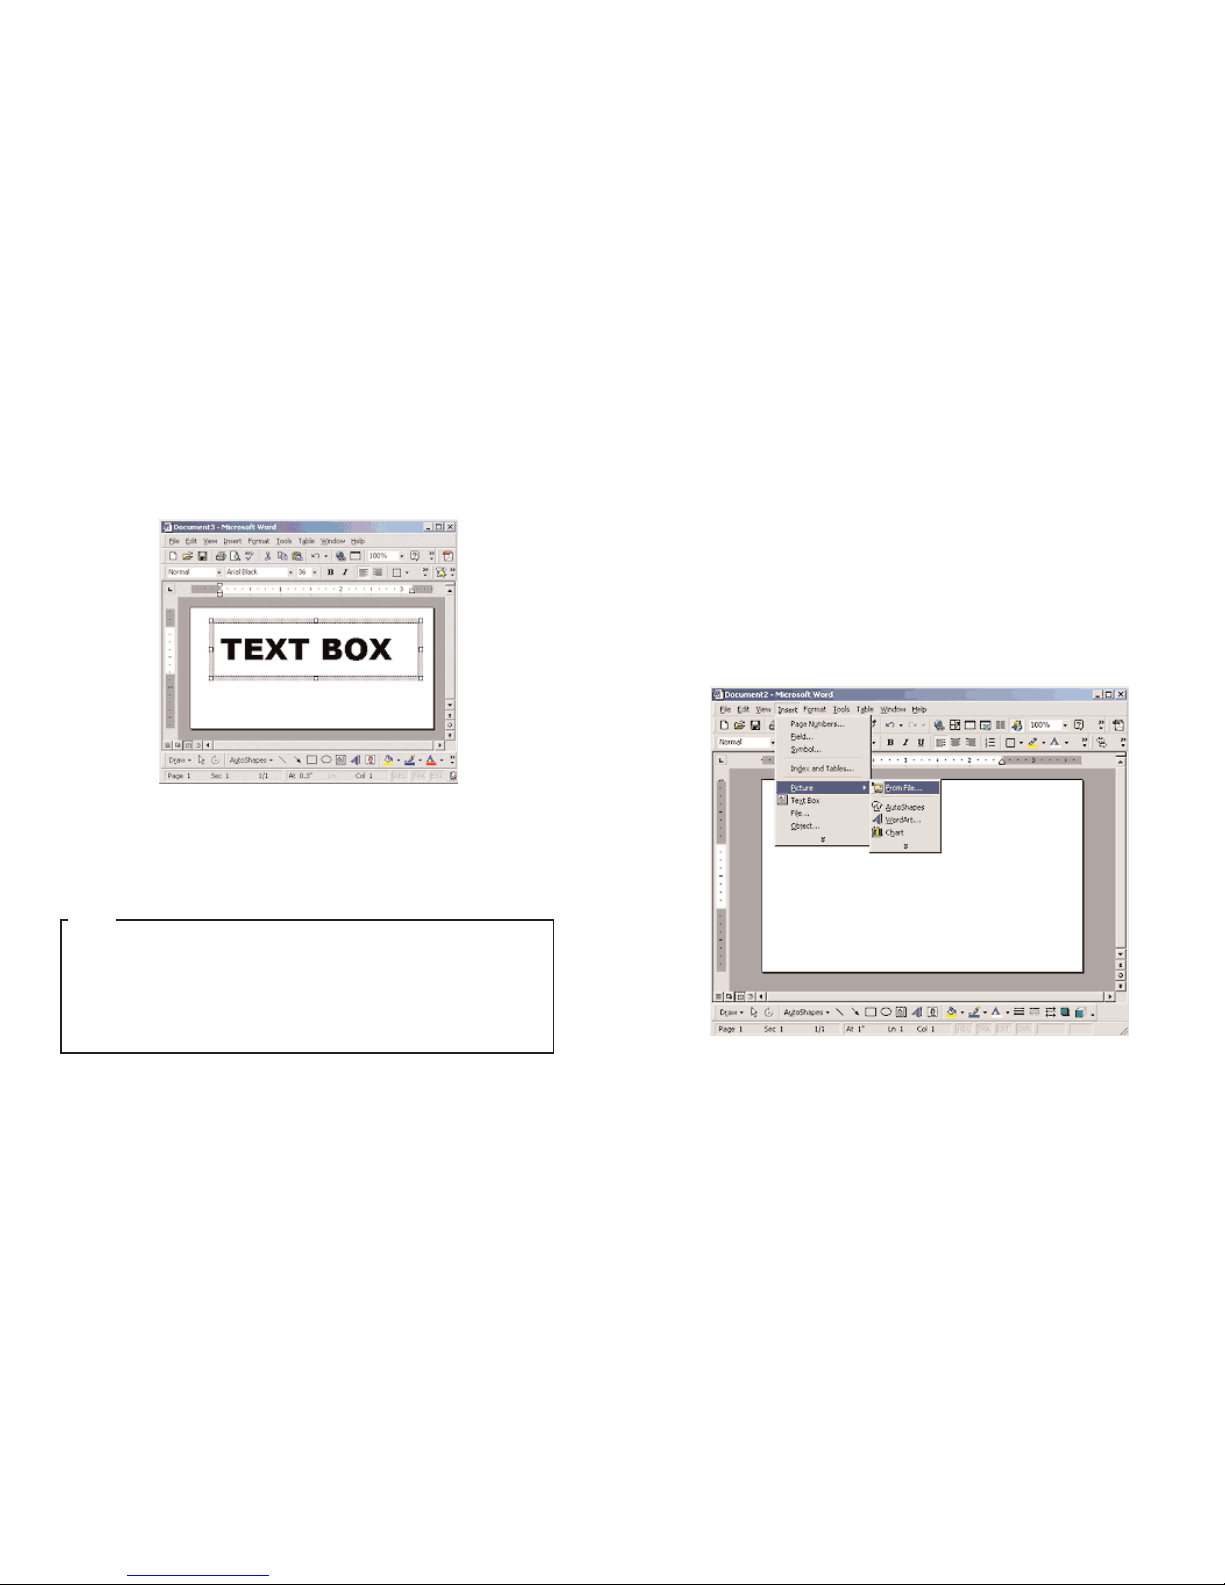
created a text box, select it by clicking inside the box, then click on Insert >>>
Picture >>> From File, then choose the location of the file you desire to insert.
Insert symbols by browsing to the Symbols folder on the DuraLabel CD. The picture
is automatically placed in your Word document. Change the size by dragging the cor-
ner of the box to the desired size.
Format the text inside the box to any size and style, then position the box for the
desired layout. Initially, the text box will have a border around it. To get rid of the
border, double-click the text box. When you do this, the Format Text Box dialog will
appear. Click the Colors & Lines tab. Click the Color drop-down menu under Line
and select No Color. Then, click OK, and the border will be gone.
30
If you choose not to use text boxes for your text, you will still be able to print your label,
but formatting problems may prevent you from getting the results you desire.
Information on the text box tool is available through your word processors help file.
Consult the help file for more detailed information on using text boxes.
NOTE
Page 18
33
Symbols
Symbols can be used on labels and signage to get your point across visually. When
safety is a concern, it is important to have a language that is universal, and
symbols accomplish just that.
For your convenience we've included more than 300 ready-to-use symbols, which
are divided by category, on your DuraLabel 4 CD. Just choose a symbol, insert it
into your document, then print a visually appealing and informative label or sign. To
view or print a list of all of the included symbols, browse to the symbols folder on
the CD. A PDF of all of the symbols in their respective categories is included in that
folder.
Inserting Symbols
Insert symbols into an MS Word document by clicking on Insert >>> Picture >>>
From File. From that window, browse to the My Documents folder. If you have
already installed the symbols from the CD (they automatically install when you
install the templates), there will be a folder inside your My Documents folder called
DuraLabel4TTP.
You can insert other objects, graphics, and clip art from the same pulldown menu.
When working with images it is important to remember the type of printer you are
using. Images should be formatted so that your printing output matches the
capabilities of the printer. The DuraLabel 4 TTP is designed for label creation, and
has a monochromatic output (meaning it can only print one color at a time).
With Word it is easy to make your images print in monochrome. Once the image is
inserted into the document simply double-click on it and select the Picture tab.
Under the Image Control section choose the Color pull-down menu and select
Black and White. Your image will be instantly converted to a format that the
DuraLabel 4 can handle.
32
Page 19
35
Barcodes
The barcode program we have included easily displays and prints barcodes from
your Windows based word processing program. Install the dBest Barcode Package
from the CD. When the CD startup screen appears upon inserting the CD in the CD
drive, simply click on Install dBest Barcode Package and follow the on-screen
instructions.
You can get all of the technical information about the included barcodes in the
Barcode Font Library >>> Programmers Guide once the barcode software is installed.
Activate the dBest Barcodes Toolbar Template in Microsof t Word
1) Open the MS Word document in which you would like to create your barcodes.
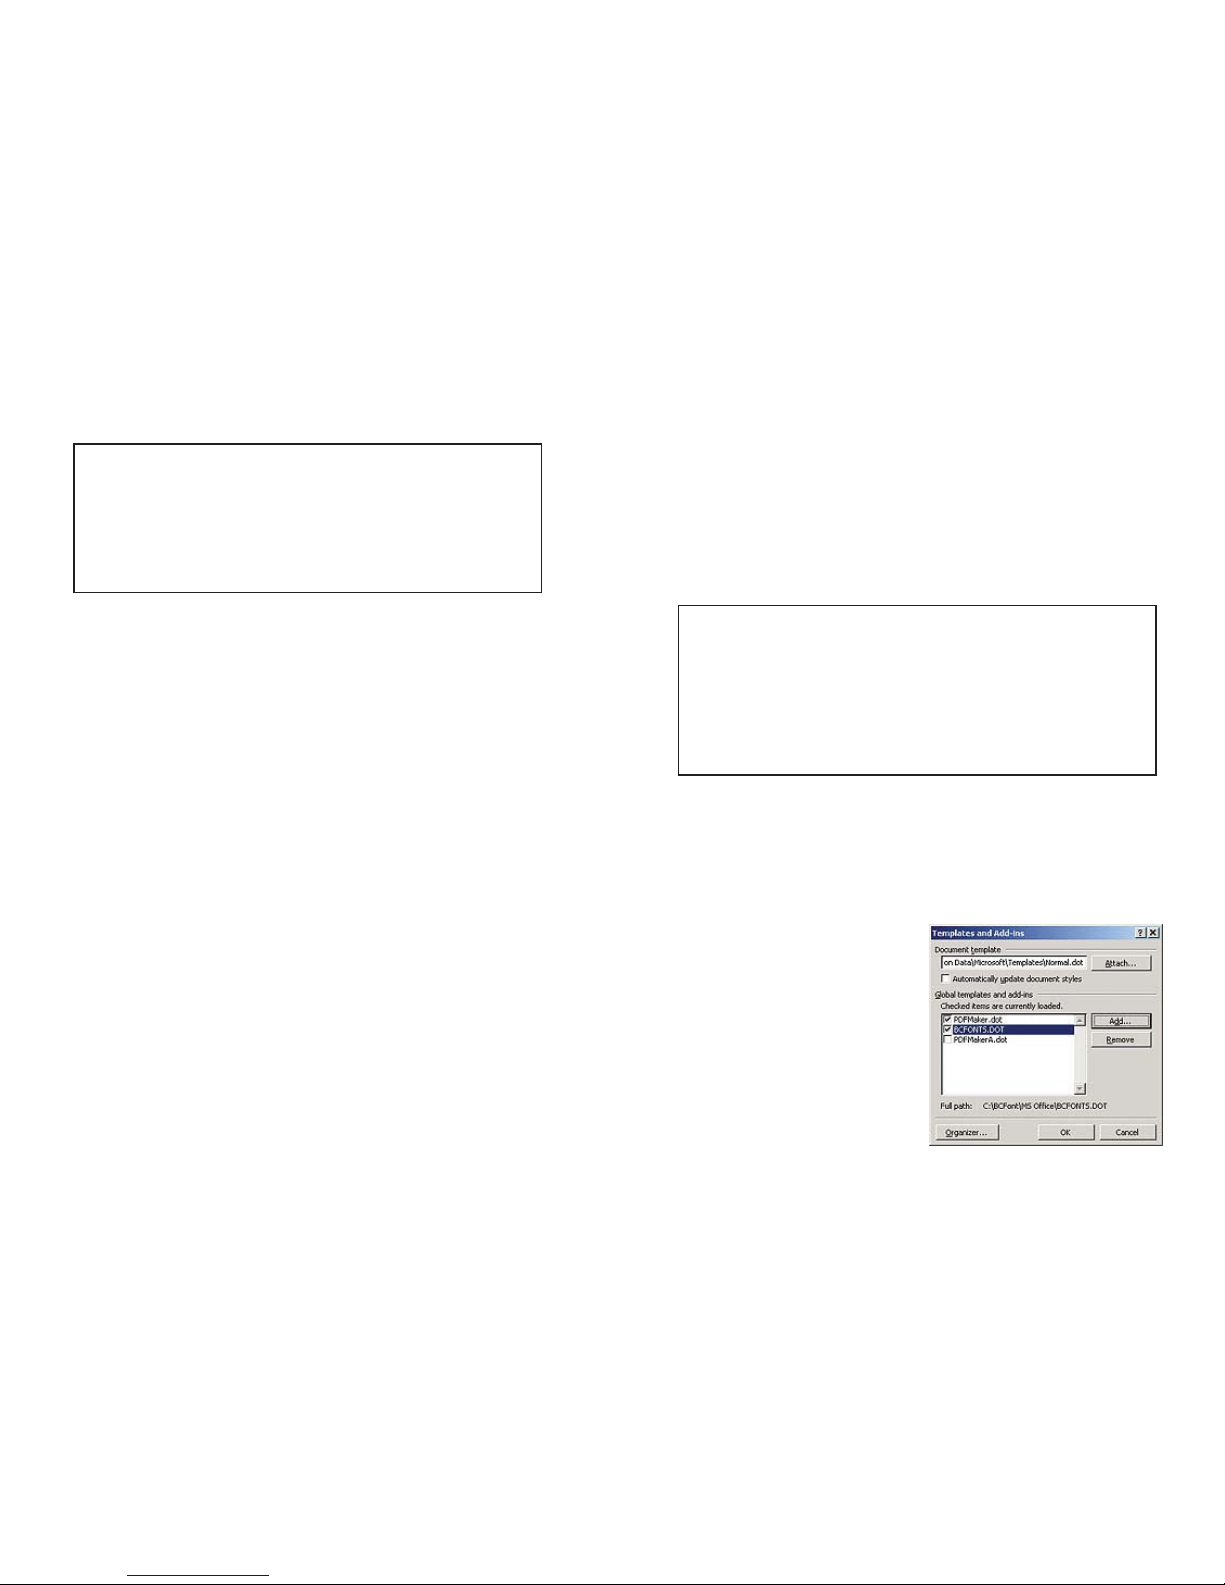
2) Go To the top menu bar in MS Word. Select: Tools >>Templates and Add-Ins
3) A window will appear showing a list of
Global Templates and Add-Ins.
Click the ADD button and locate the
bcfonts.dot in the bcfont main
directory(C:\bcfont\msoffice\).
4) Select the bcfonts.dot and Click OK.
The bcfonts.dot file should appear in
the Global Templates and Add-Ins
list with the check box selected. If
the box is not selected, then select it.
5) Click OK to exit, returning to your
document. The toolbar should
appear within your work space.
The dBest Barcode Font Library supports 11 standard barcode styles: Code 39;
Extended Code 39, Interleaved 2/5; Code 128; UCC 128; Codabar; UPC A and E formats, EAN 8 and 13 formats and PostNet. Each barcode style supports a different set
of ASCII characters and is used for different situations or industrial applications. For
instance: Code 39 supports uppercase characters, numeric characters and a few incidental characters while Interleaved 2/5 only supports numeric data, but does so in a
compressed format. You should choose which barcode style to use in your application
based upon the type of data you need to support or by other requirements placed upon
your application.
The symbols folder is located there. Just choose the symbol you want from that
folder and insert into your document.
Once your symbol is inserted into your text document, you can resize and move it to
your desired layout.
Helpful Hint:
When trying to determine the size of your label or the size of the symbol you place
on it, take into consideration the distance from which the sign or label will be
viewed. You should make the symbol large enough that a viewer can comprehend it
from as far away as deemed necessary.
34
To Install the Symbols, insert the DuraLabel 4 TTP CD into your CD drive. When
the startup screen appears, simply click the “Install Templates and Symbols”
button, follow the on screen directions, and they will be automatically installed in
your My Documents folder. You can browse to that folder at any time to use the
symbols or templates.
Page 20
Sequencing
How to do Number Sequencing using Word and Excel.
Sequencing is most commonly used to increment a numeric value to be used in
labels for wire wrapping. With the use of an Excel spreadsheet template as well as a
Word template (included on your install CD):
1) Open an existing template on the DuraLabel CD or start a new Word
document.
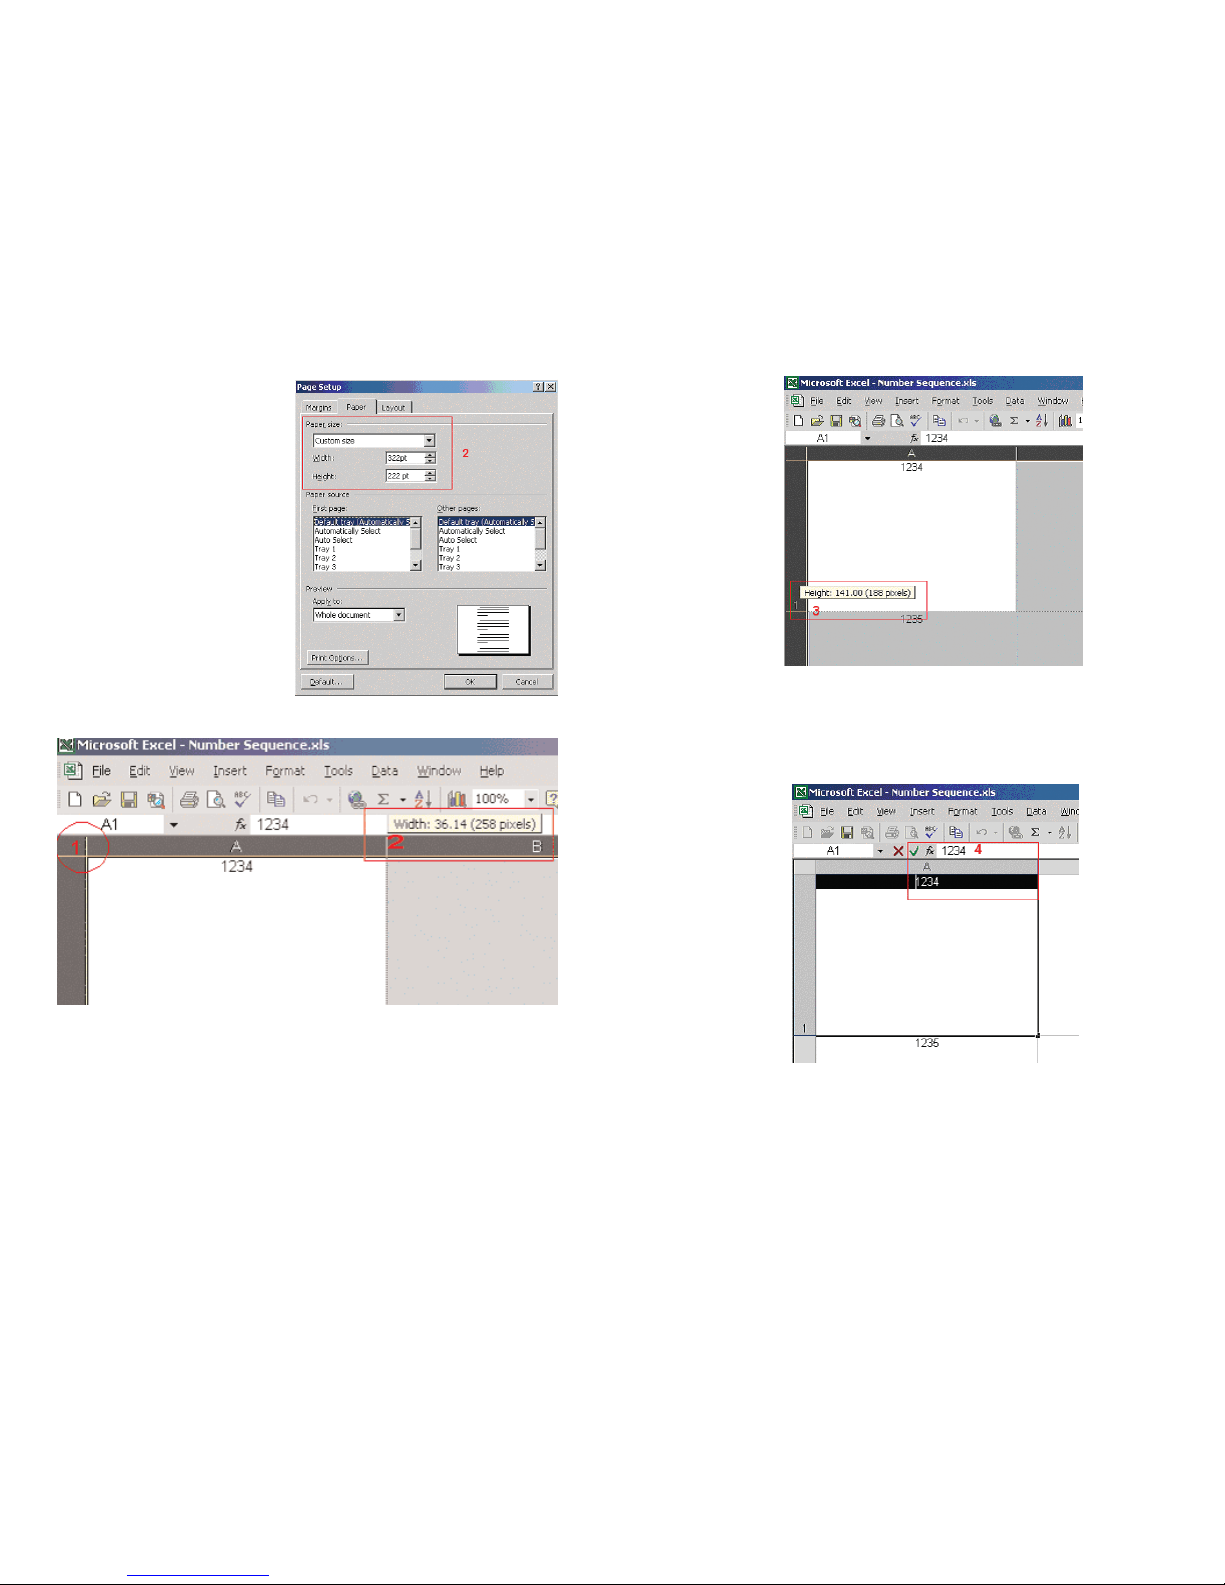
2) Because Excel uses Pixel measurement instead of inches, you will want to set
this to match in word. Go to Tools menu >>> Options to bring up the property sheet
for Word. Click on the General tab, and locate the option to change the unit of
measure. See #1. Change it to Point as this is the same as pixel
(1" = 72 points, 2" = 144 points, 3" = 216 points, 4” = 288 points, etc.).
3) Next go to File >>> Page Setup and click on the Paper tab. If you started from a
supplied template, make note of the width and height of the page as you will need
to use these values to set the cell size in the Excel template. See #2.
If you're starting from scratch, set the width and height to the desired size of the
label.
37
If you do not see the dBest Barcodes Toolbar, you need to run the toolbar as a
macro, refer to the following:
1) Go to the top menu bar in MS Word. Select: Tools >> Macro >>Macros
2) A window will appear with a list: Macros in: All Active Templates & Documents.
3) Select: Barcode Toolbar and Click Run
Note: To force the toolbar to display every time you start Word, go to Start >>>
Search >>> For Files and Folders and type in BCFONT. Click OK. Once the file is
found, right click it and choose “copy.” Next, go to the C:/Program
Files/Microsoft Office/Office/Start up/ folder, right click inside of the folder, and
choose “paste.”
Using the dBest Barcodes Toolbar
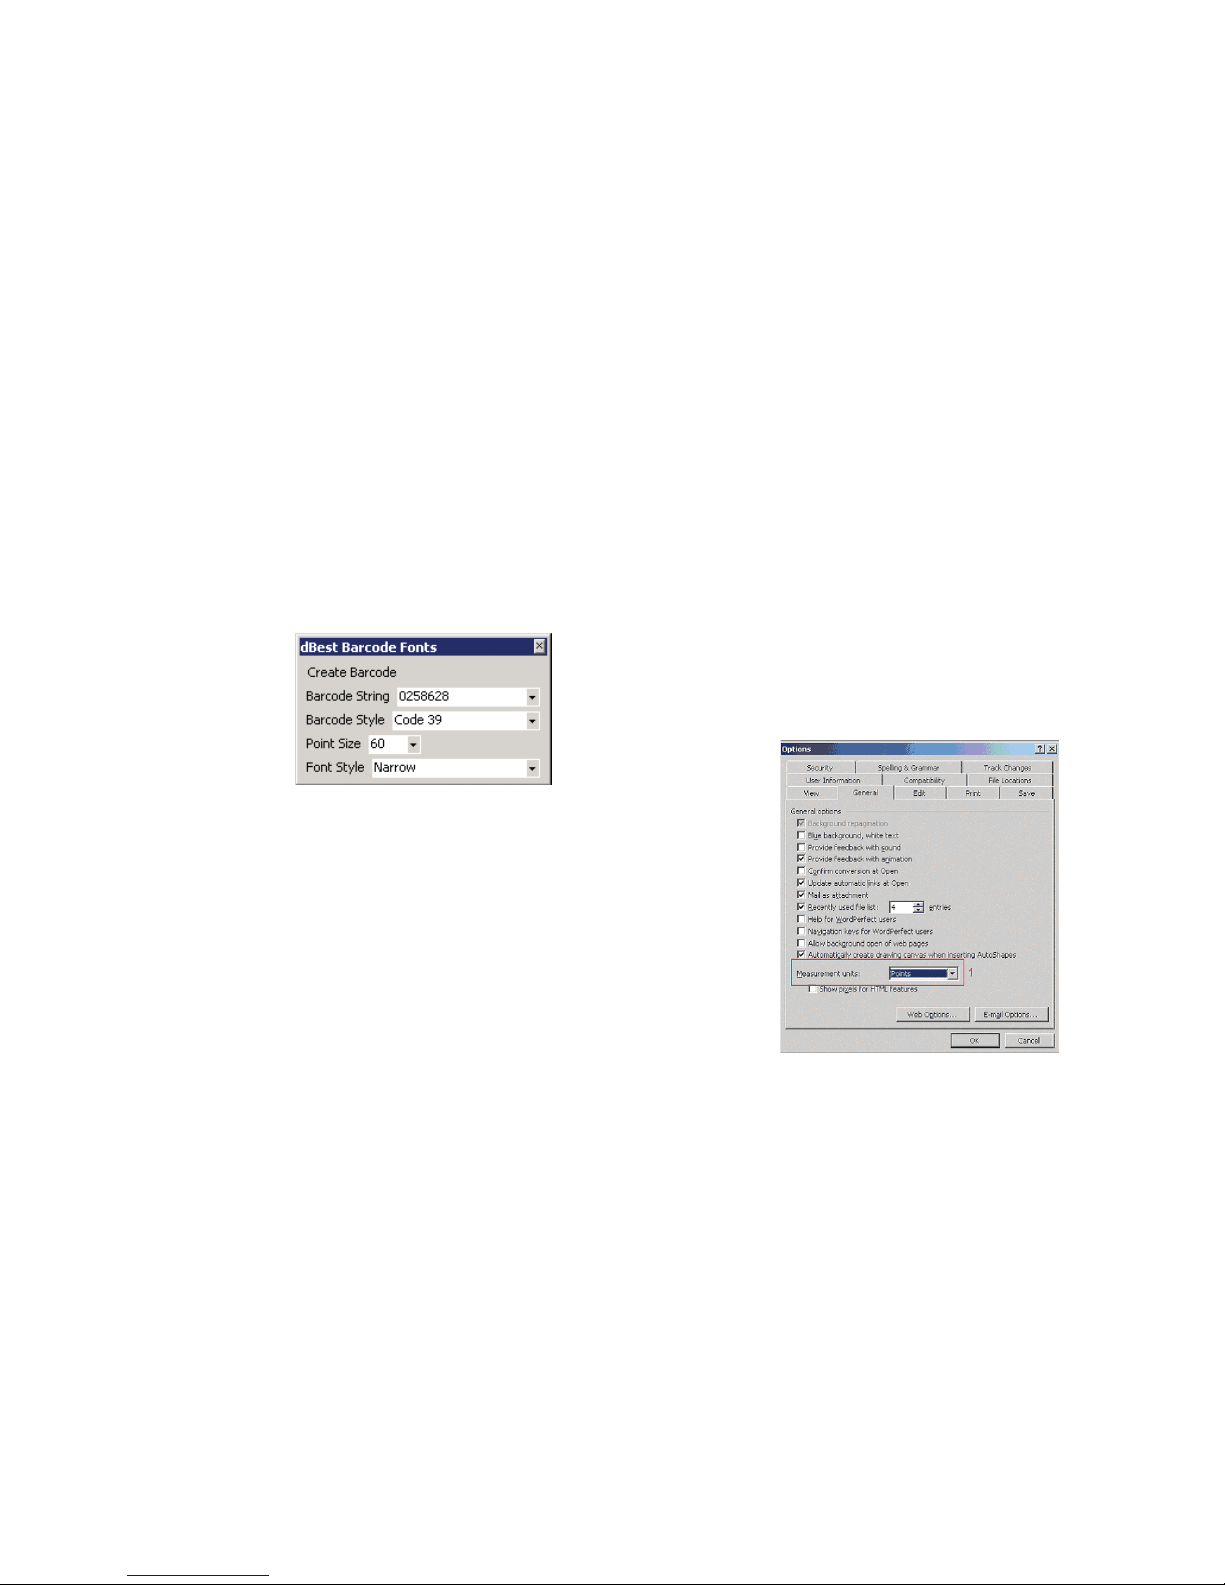
The Barcode String is where you can
type in the characters for the barcode
you wish to create. After typing in the
new barcode information, hit the Enter
key to save the information, or it will
revert back to the previous Barcode
String. The Barcode String pull down
menu displays previous strings that
have been used.
The Barcode Style pull down menu allows you to select a variety of barcode styles
supported by the dBest Barcodes Font Library.
The Point Size pull down menu determines the size of the barcode. You can enter
custom sizes by typing in the size and hitting the enter key to save the size.
The Font Style pull down menu allows you to select six different font widths for
each supported Barcode Style: three high density and three normal density widths.
Creating a Barcode Using the dBest Barcodes Toolbar
Once you have selected the necessary fields on the toolbar, you are ready to
create a barcode to place within your MS Word document.
1) Place your cursor where you want the barcode to appear (you can do this
inside a text box if you wish).
2) Go to the dBest Barcodes Toolbar. Click Create Barcode. The barcode will
appear where you placed your cursor.
36
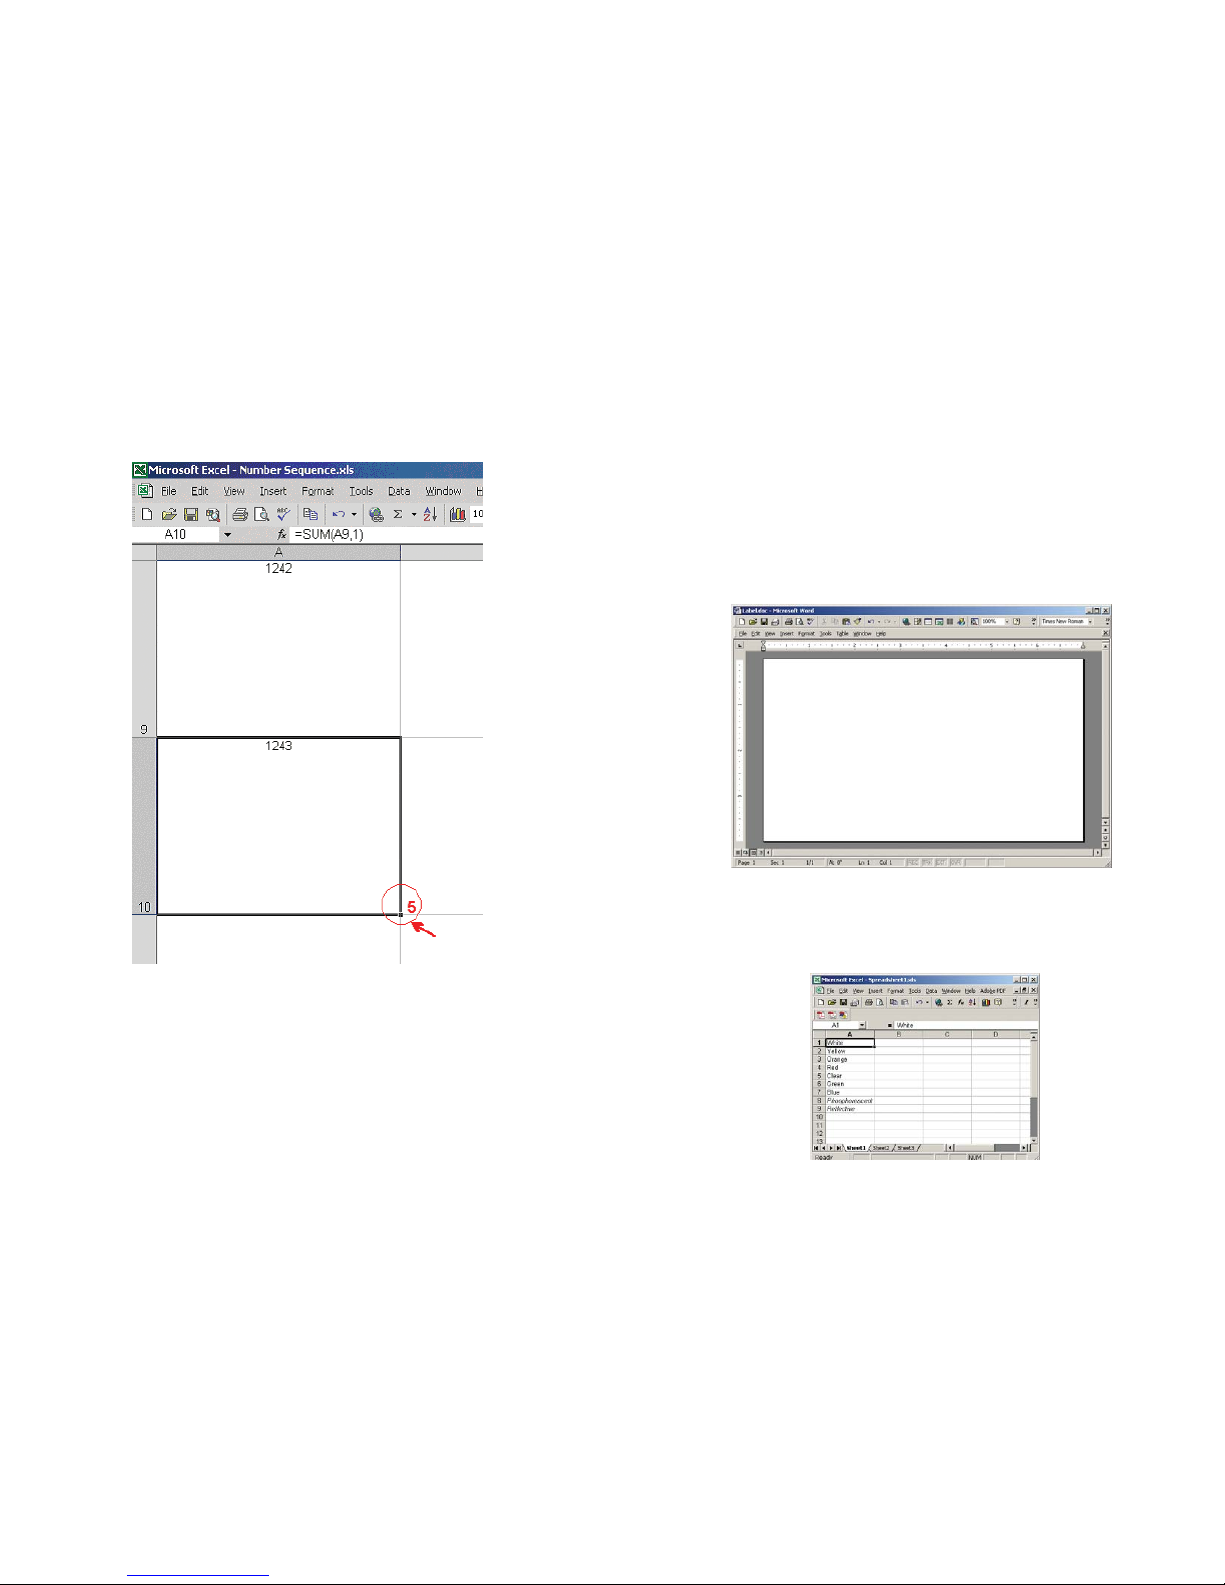
Page 21
4) Now that you have the correct size matching your label, change the value in the
first cell (column A, row 1) and enter any static text you want. Leave it blank for
none. In the next cell (column B, row 1) enter the number you would like to
increment. See #4. The next cell (column C, row 1) enter the value you would like to
increment by. Default is 1.
After setting this, you should see the increment in each cell below cell 1. In this
example, the cells have only been incremented 10 times. However, to increment
further, simply left-click on cell 10 to highlight it, then left-click and hold on the
small point in the lower right corner of the cell and drag down over how many cells
you want to increment. See #5. Example: to increment the value 100 times, drag
the cells down to the 100th row.
39
Now that you have the desired label
size, its time to add the text to it.
Keeping Word open, browse to the pro-
vided Excel template: Number
Sequence.xls
This is a predefined template with the
formula already in place to increment
a numeric value by one.
1) Open the existing Excel template
Number Sequence.xls
2) First, format the cells to match the
size of label you have. Click on the
upper left corner of the spreadsheet to highlight the entire document. See # 1.
3) Next, left-click and hold the column line between A and B. See #2. You can see a
small box pops up giving you the pixel size of the width. You will want to set that
value to the same width as your label. Do the same for the Row Height. See #3.
38
Page 22
Importing from Excel Spreadsheets
How to transfer Excel spreadsheet information into a Word label
Note:
These instructions are for users of Windows 2000. If you are using Windows
XP, please follow the directions on page 37.
A. Merging One Column from a Spreadsheet to a Label:
1) First, make sure the Excel file you are going to merge has been saved.
2) Open up the Word Document with the label template.
3) Alter the font in Word to the size of your choosing.
4)
Open up the Excel file you intend to merge into the Word label.
41
Once you're satisfied with the amount of increments and cell span, its time to copy
this into your Word template. Go back to the word document that you previously
created. !!Remember!! The page layout of the Word template must match the cell
size you specified in your Excel template.
Select the entire Column you just created by clicking on the top header of the cell. In
this case, the "A". Go to Edit >>> Copy, to copy the entire column. Now switch over
to your Word document, click anywhere inside your predefined page and go to Edit
>>> Paste.
If the cells don't paste in exactly to the measurements of your label, adjust the mar-
gins so that they encompass the entire label.
You should be ready to print.
40
Page 23
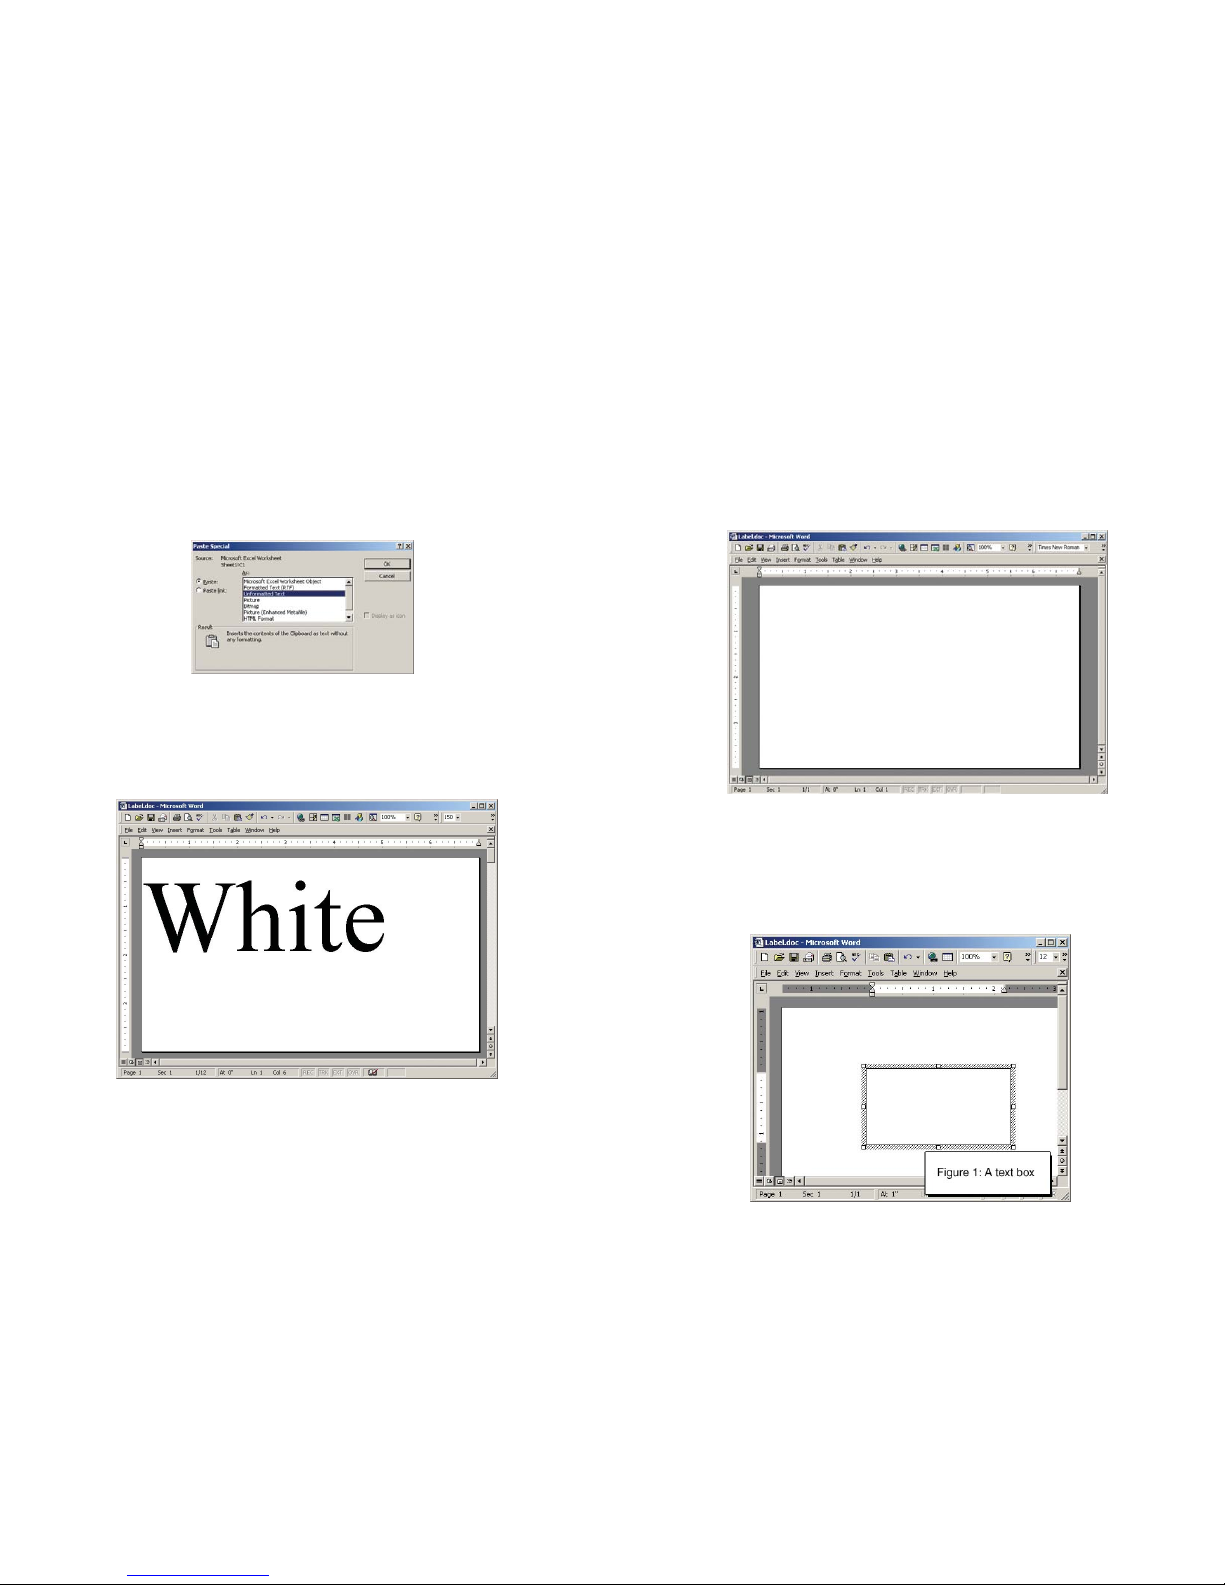
B. Merging Multiple Columns from a Spreadsheet to a Label:
1) Open the saved Excel document you plan to merge into Word.
2) Open your blank label template within Word.
3) On the toolbar on top of Word, click on
Insert,
then click
Text box
.
4)
Use the crosshair cursor. Click in the field of the document. A text box will appear.
5)
Resize the text box to your preference.
(See
Figure 1, below)
43
5)
Click on column header A, right click the mouse, and select
Copy
.
6)
Toggle (
Alt-TTab
) over to the Word document and find the
Edit
button on the
Windows Tool Bar (top left of screen) and then click and select
Paste Special.
7)
Next, select
Unformatted Text
and click
OK.
8)
The Excel column should now be in the Word label. You are now ready to print
your labels.
42
Page 24
17)
At the bottom, click the
Files of Type
dropdown menu.
18)
Click on the
All Files
item, then find the file name of the Excel document you
plan to merge into Word.
19)
Note -- make sure you are looking in your
My Documents
folder.
20)
Double-click on the correct Excel document.
21)
On the next box you see, “ENTIRE WORKBOOK” will be blue highlighted. Click
OK.
22)
You will then see a pop up box with a question mark. Click OK.
23)
On your Word document, click on
Tools,
then
Mail merge
.
24)
Click on
Create
, then
Form Letters
, then click
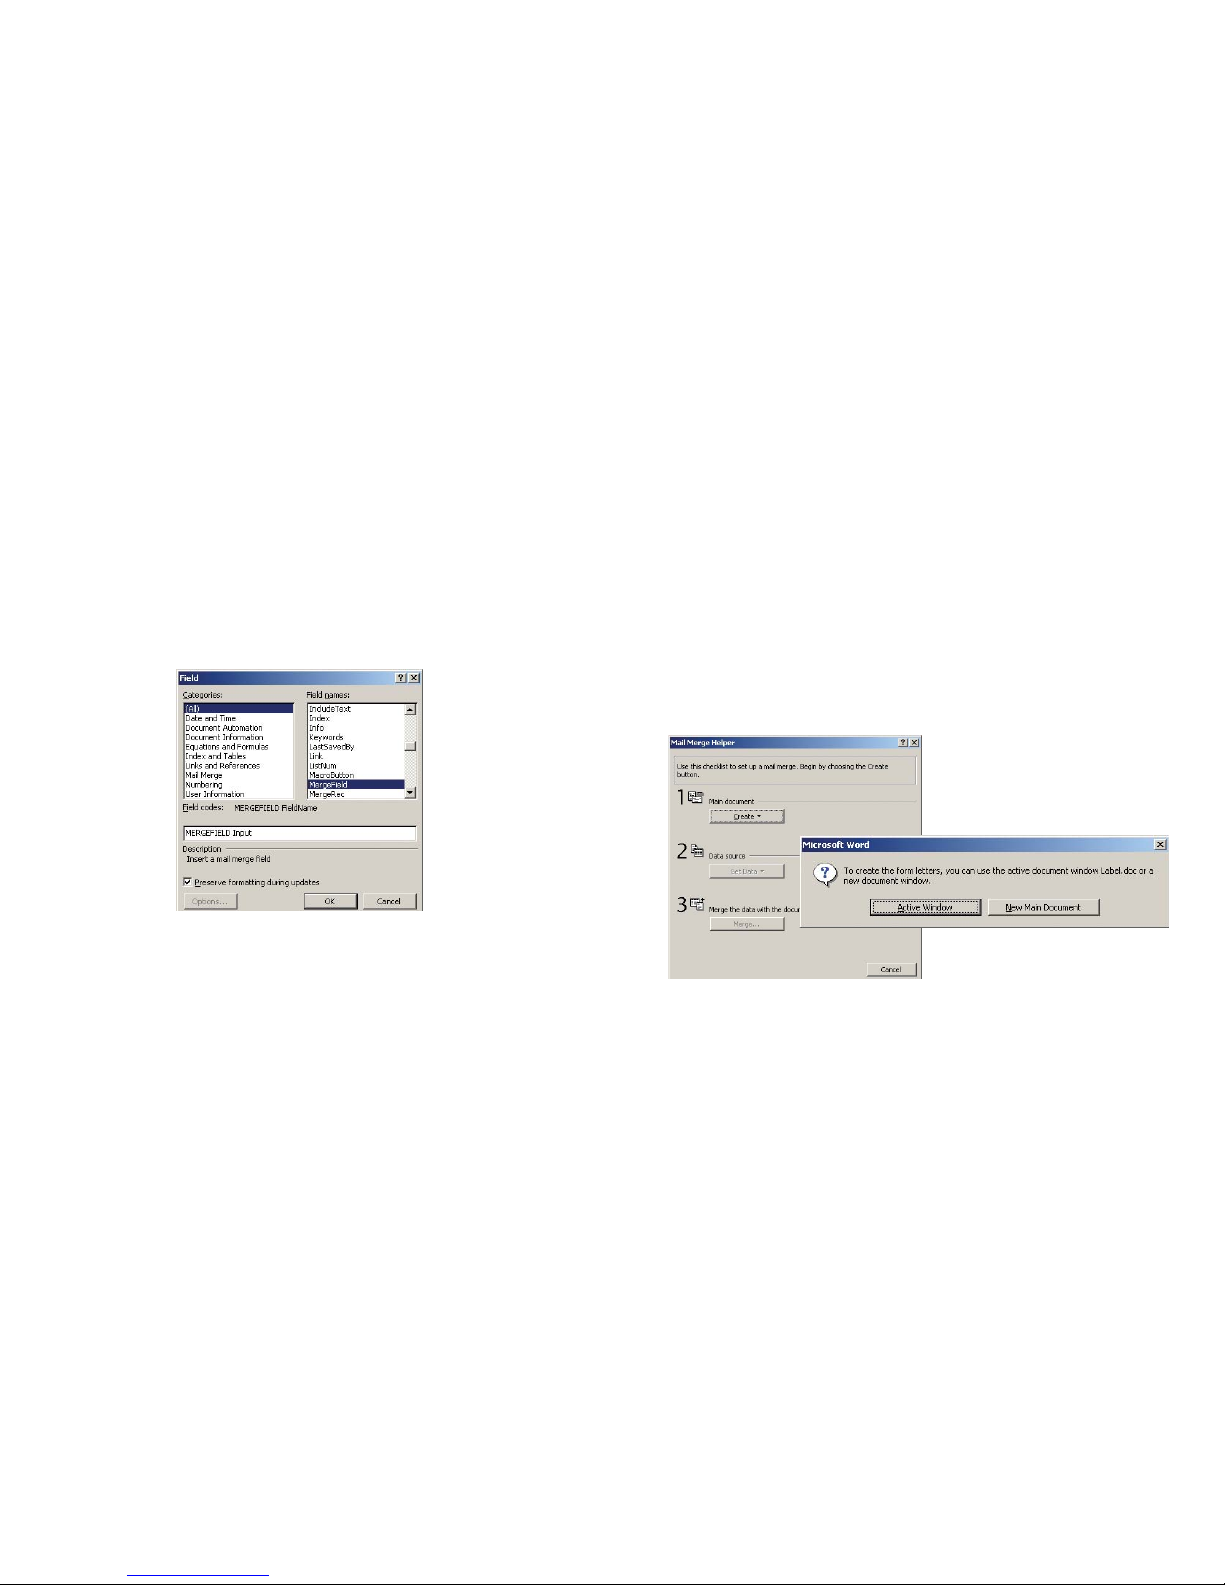
Active Window. (See below)
25)
Click on
Get Data
, then click on
Open Data Source
.
26)
At the bottom, you will see
Files of Type
.
27)
Click on the drop down of
All Files
at the bottom.
28)
Find and
double-cclick
on the file name of your Excel document.
29)
Click OK.
45
6)
When the text cursor is blinking in the text box, click on the
Insert
menu and
select
Field
.
7)
The box on the left should remain with the blue highlighting of the word “All”.
8)
On the right column, move the cursor so the blue highlight is over
MergeField
.
9)
In the long horizontal box below, “MERGEFIELD” will appear.
10)
Put a space after “MERGEFIELD” then type in the column heading from your
Excel document that you will want to merge into the label (i.e., “Input”).
11)
It will then look like this: “MERGEFIELD Input”
(See below)
12)
Click OKand the box will vanish.
13)
At this point, you should have the word “Input” (for example) in your text box.
14)
Create an additional text box(es) within the label and repeat steps 3-12 for each
additional cell you plan to transfer from the Excel document into the Word label.
15)
Close the Excel document.
16)
On the word toolbar, click on
Tools
then
Merge docu
ments
.
44
Page 25
Cleaning the Print Head
It is recommended to clean the cutter and print head after every 2 rolls of vinyl
used. To do so, please follow these procedures
.
1)
Turn OFF the printer.
1)
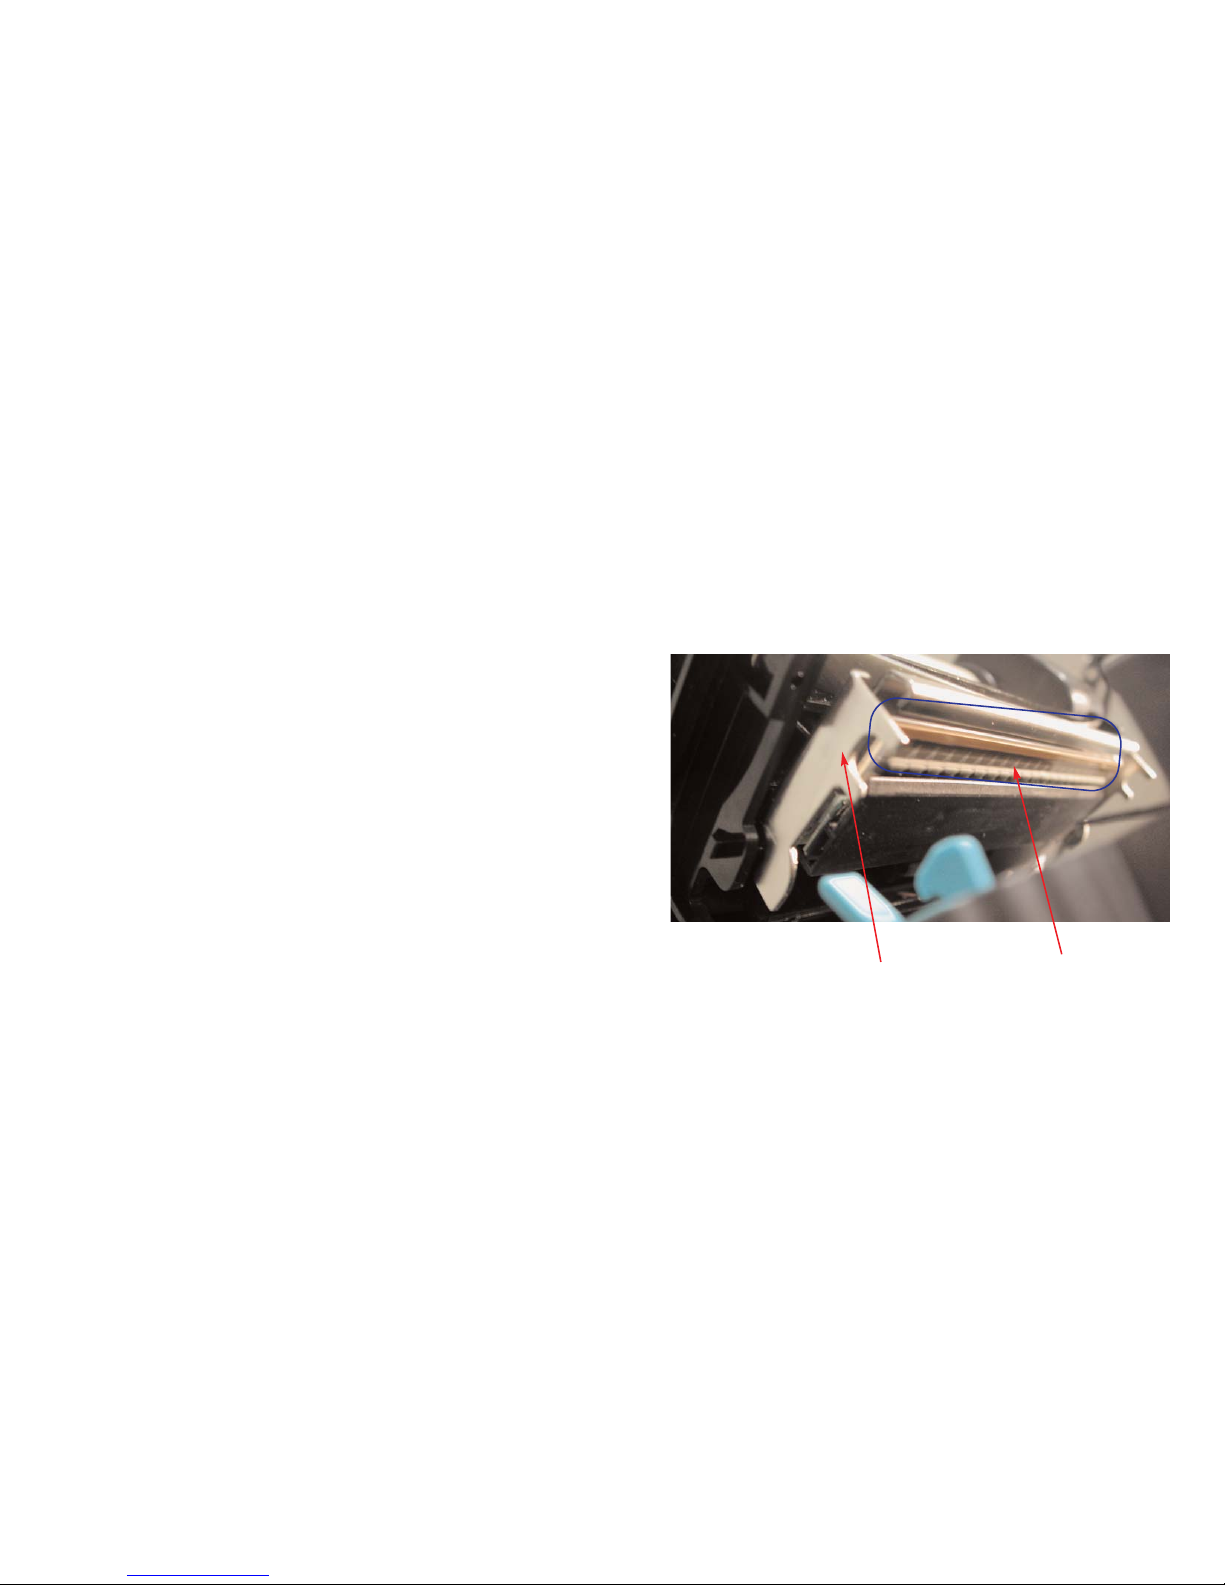
With the cover opened, pull the Printer Carriage Release Lever towards you to pop
the Ribbon Mechanism up.
2)
This exposes the print head allowing you to clean.
Figure 1.
Print head exposed.
3)
Take a cleaning swab in between your thumb and fore finger and squeeze it until
it snaps. This will release alcohol to the tip of the swab.
4)
Clean the entire print head thoroughly, removing any built up material, using the
soft end of the cleaning swab.
Print Head
Metal Casing
47
30)
Click
Merge
.
31)
Click
Merge
and the document will merge from Excel to Word.
You are now finished.
Help is also available under the Word Toolbar. Click on
Help
and type in “Merge from
Excel to Word”, then click on
Search
. Then click the option
Use mail merge...
46
Page 26
Extensive Cleaning of the Cutter
How to Disassemble the Cutter
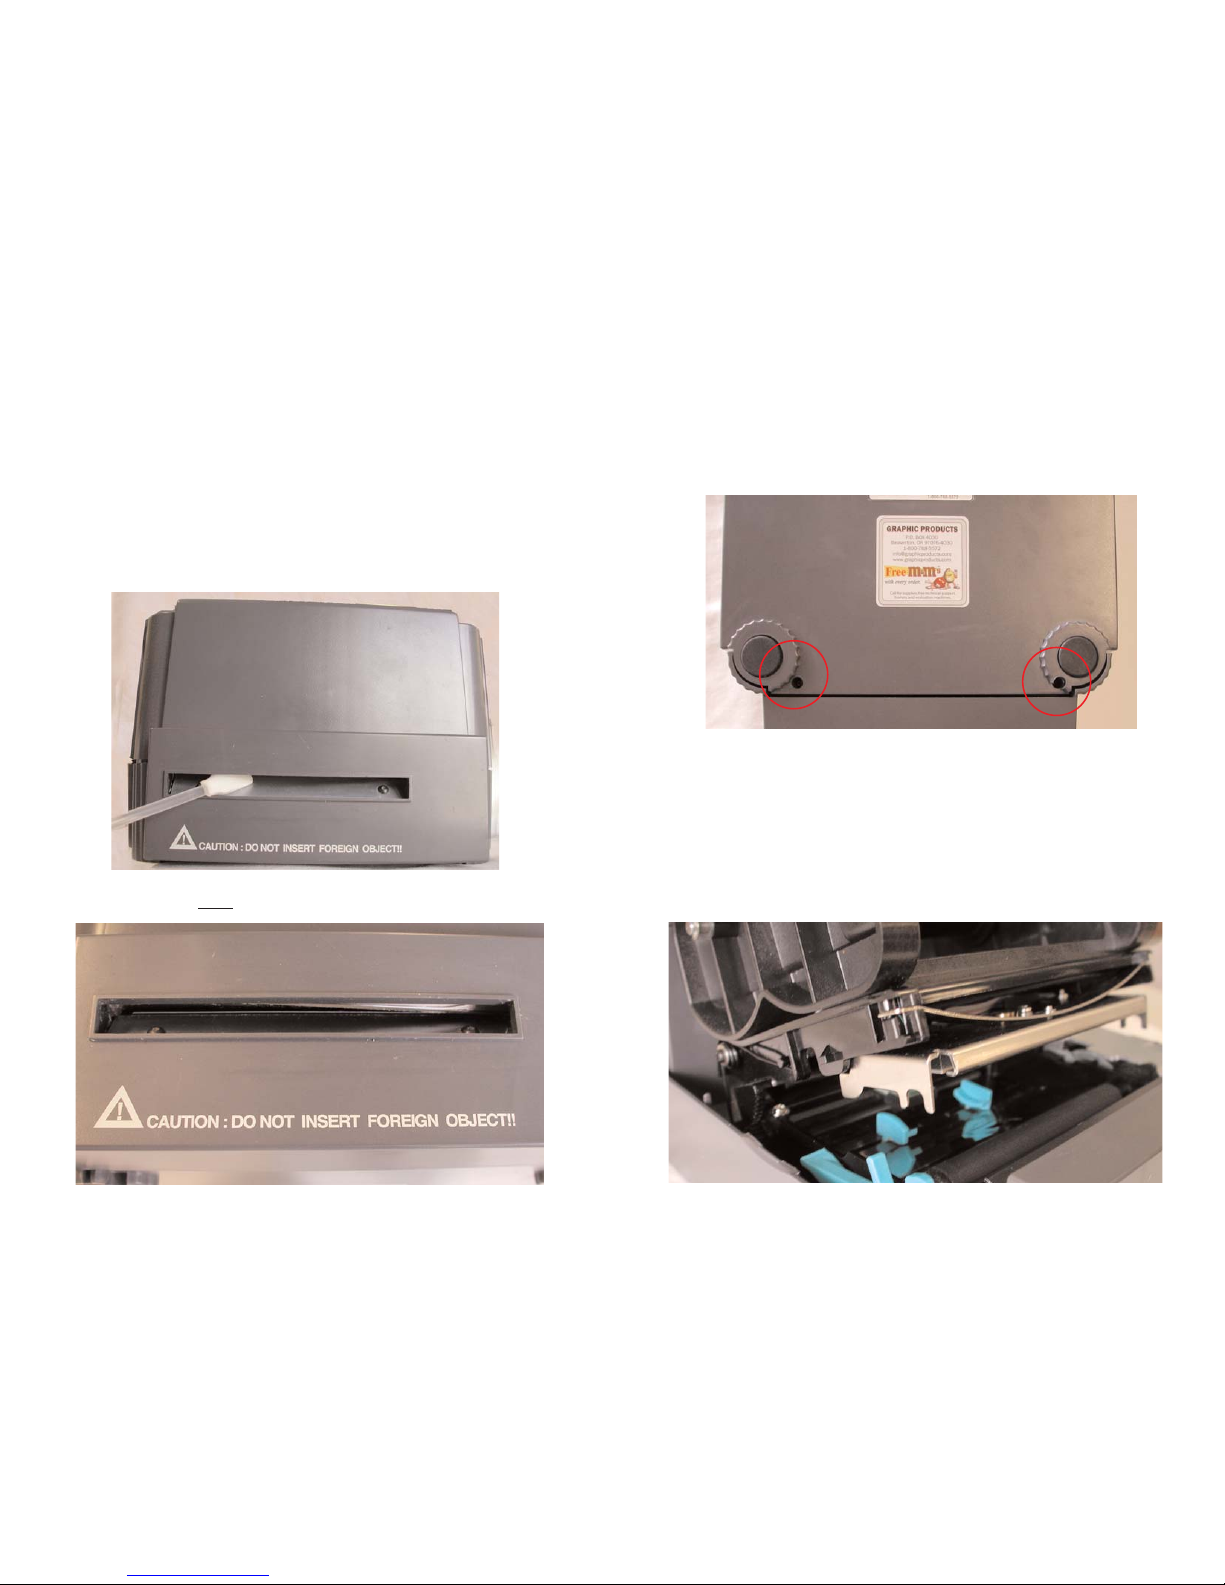
It’s recommended to extensively clean the cutter after every 20 rolls of vinyl.
*Please take note of how things are taken apart for easy assembly.
1)
While machine is OFF and unplugged, turn the machine upside down on its’ back.
Figure 1.
Underside of machine.
2)
Unscrew and take out the 2 visible screws on the underside of the machine,
which are closest to the cutter mechanism and put them aside.
3)
Turn the machine right side up and open the cover.
4)
Pull the Printer Carriage Release Lever towards you, to release the Ribbon
Mechanism.
Figure 2.
Inside of machine.
49
Cleaning the Cutter
1)
With the front of the machine facing forward, turn the machine OFF and unplug it
for safety.
2)
Take a cleaning swab in between your thumb and fore finger and squeeze it until
it snaps. This will release alcohol to the tip of the swab.
3)
Clean as far back as your swab will reach in the cutter and remove all glue and
vinyl that has built up through the use of the machine.
Figure 2.
Swab cleaning the Cutter
Cleaning swab is the ONLY foreign object that can be inserted in the cutter.
Figure 3.
Closeup of cutter in gray casing
48
Page 27
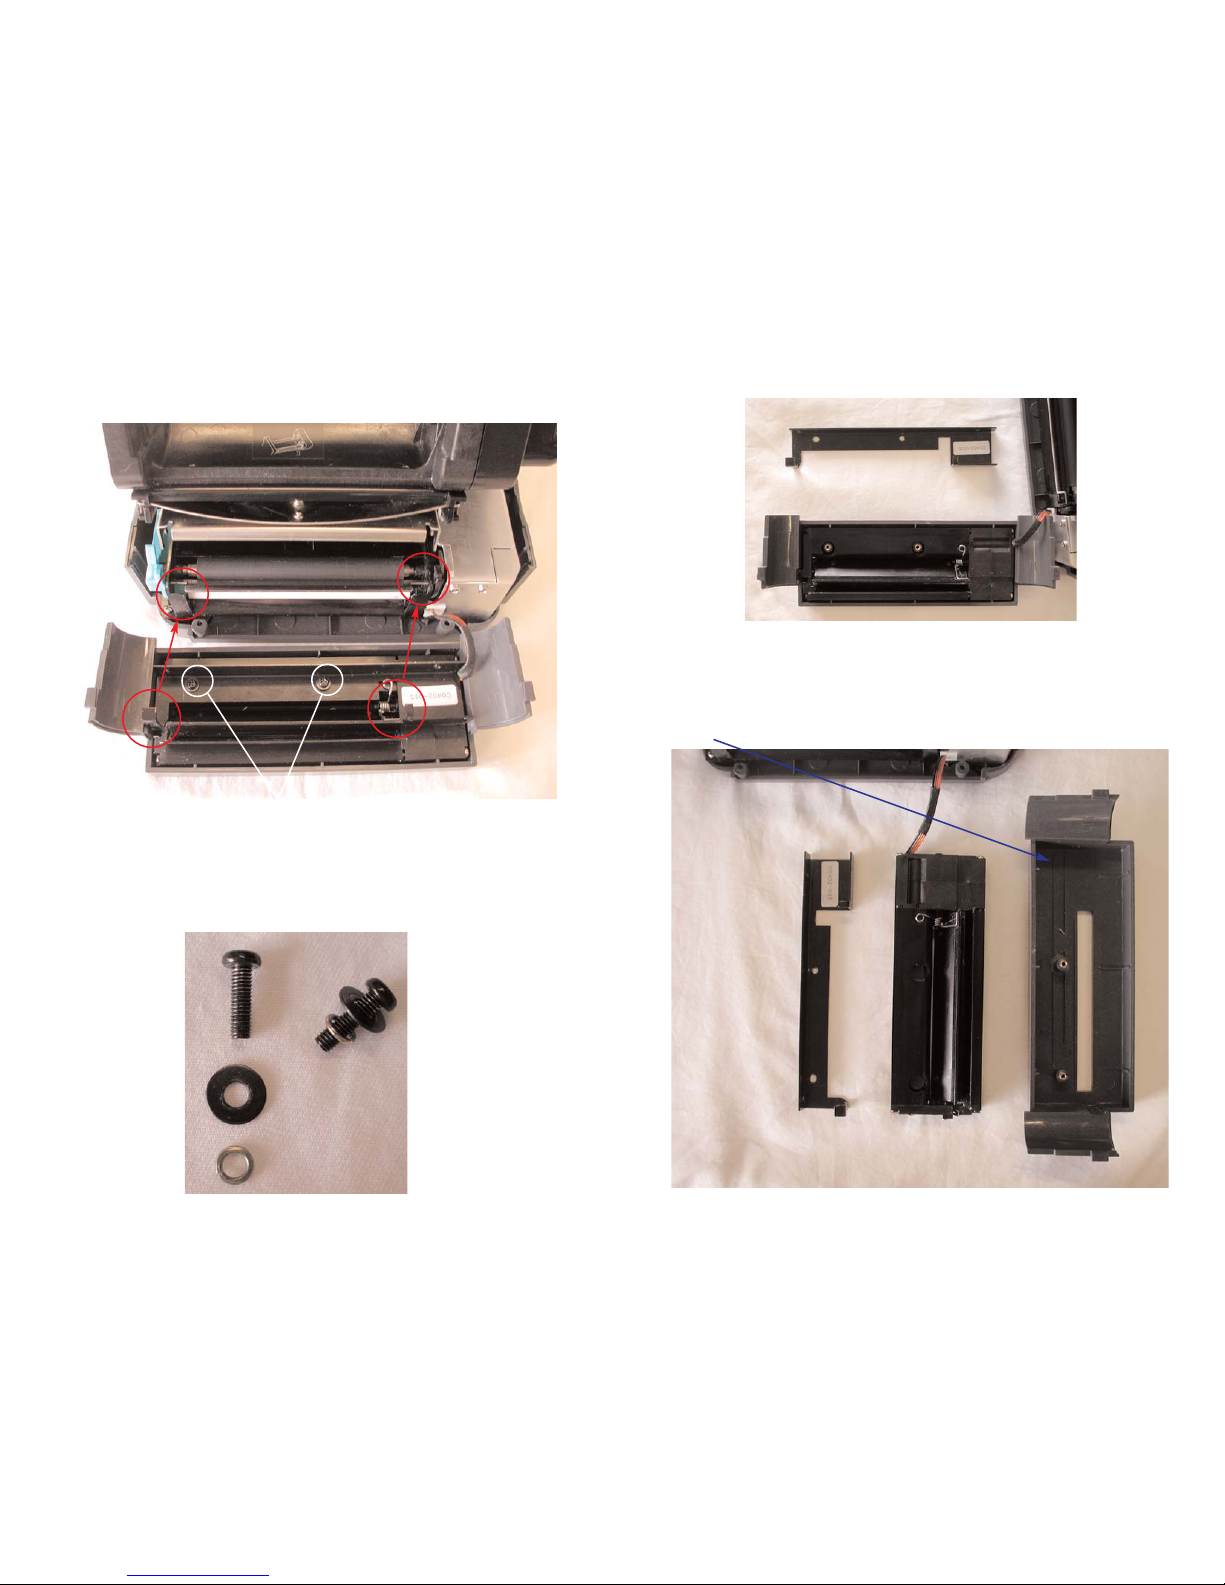
7)
Lift the black metal bar off and put aside, until finished cleaning.
Figure 5.
Black bar lifted off the cutter.
8)
Gently and very slightly, pull up on the visible wires (gray, black, brown, orange, &
red) that are connecting the cutter mechanism to the the machine, until it lifts up.
Then slowly wiggle the cutter until it comes loose and allows you to take it out of the
gray casing/cover of the cutter mechanism.
Figure 6.
Cutter disassembled.
51
5)
Lift the whole casing of the cutter mechanism straight up and then towards you,
to detach the cutter mechanism from the 2 hooks that hold it in place.
Figure 3.
Cutter mechanism is dismantled from machine. Red circles indicates the
hooks in step 5. White circles point out the screws in step 6.
6)
Take out the 2 visible screws on the inside of the cutter mechanism, that are now
exposed.
*Be careful, as there are 2 separate washers with each of the insid
e
screws.
Figure 4.
Screws and washers from the inside of the cutter.
50
Page 28
Extensive Cleaning of the Cutter
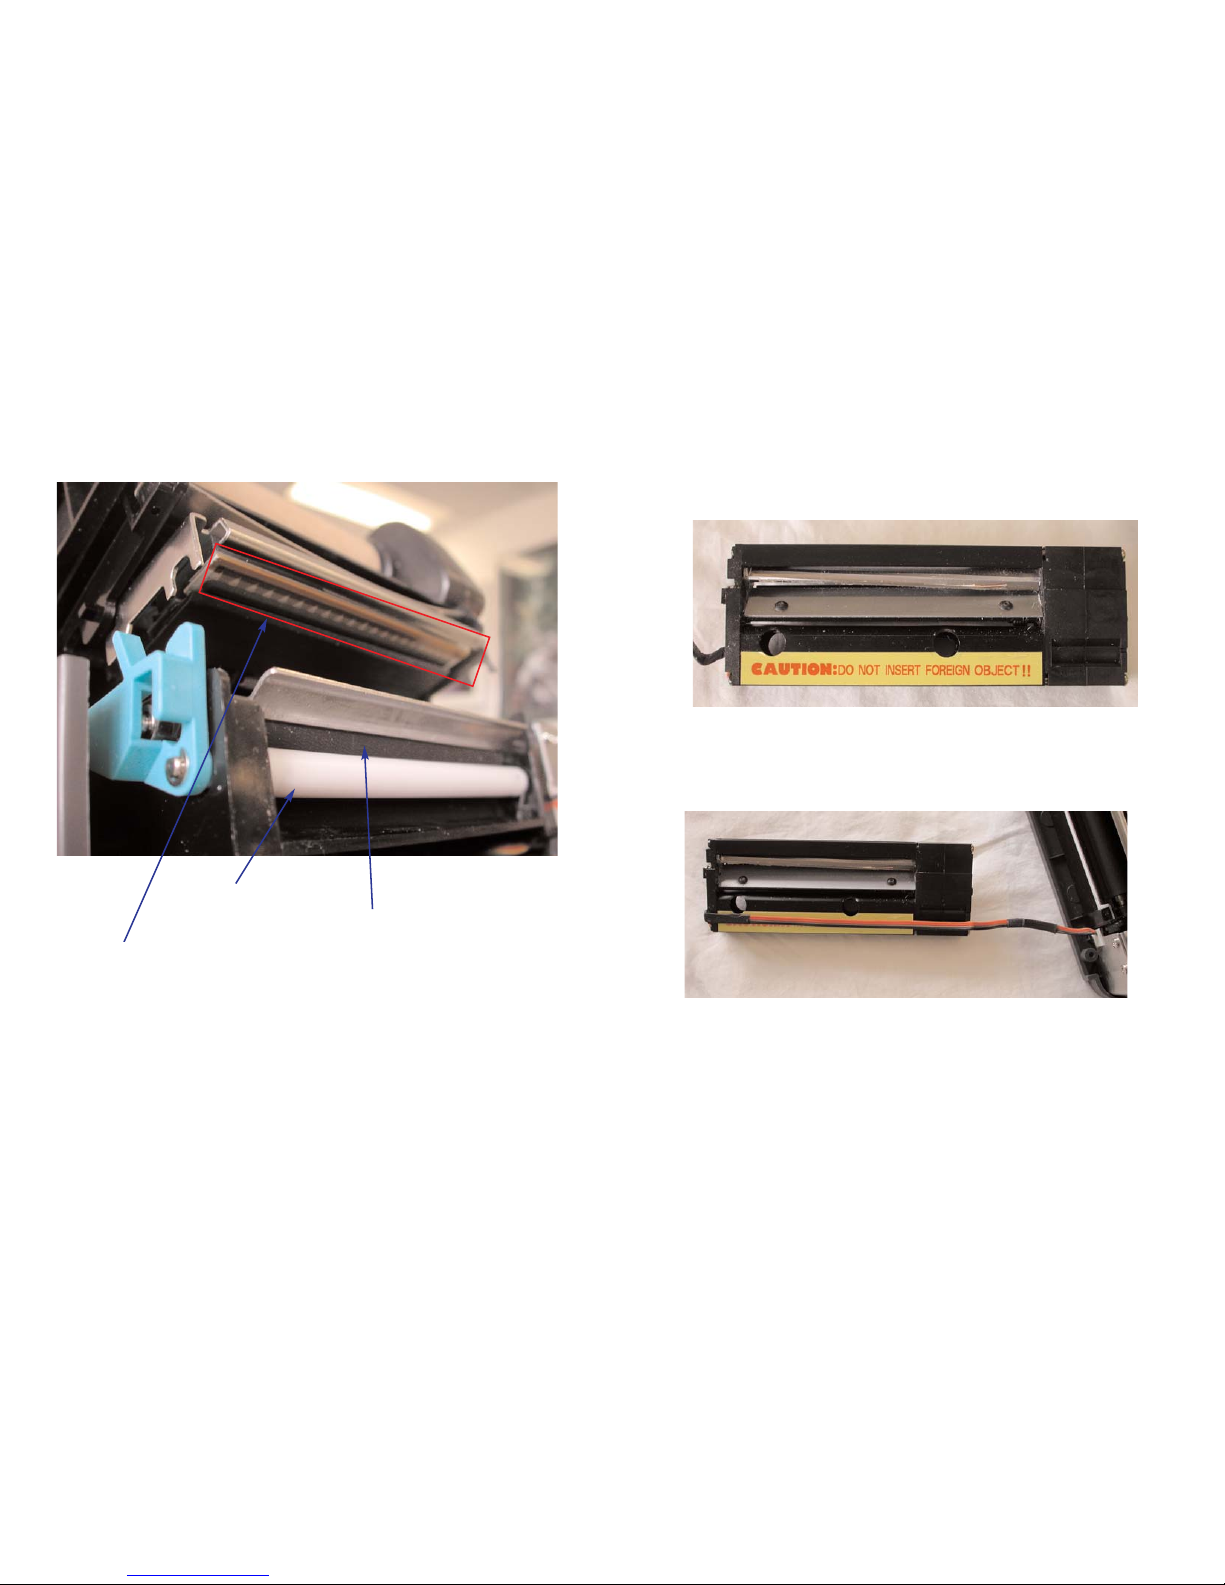
How to Assemble the cutter.
1)
With the wires pressed flat against the bottom of the cutter, in front of the yellow
label, ”CAUTION: DO NOT INSERT FOREIGN OBJECT!!” on the cutter.
Figure 1.
CAUTION label on the inside of the cutter.
Figure 2.
Wires correctly in front of the cutter.
53
9)
Now you are able to clean the cutter from all sides and angles. Make sure to
clean all visible glue and/or vinyl that has built up.
* It’s a good idea to clean the Print Head, Platen, the white roller and
the black roller, when they are easy to access.
Print Head
White roller
Platen (black roller)
52
Page 29
4)
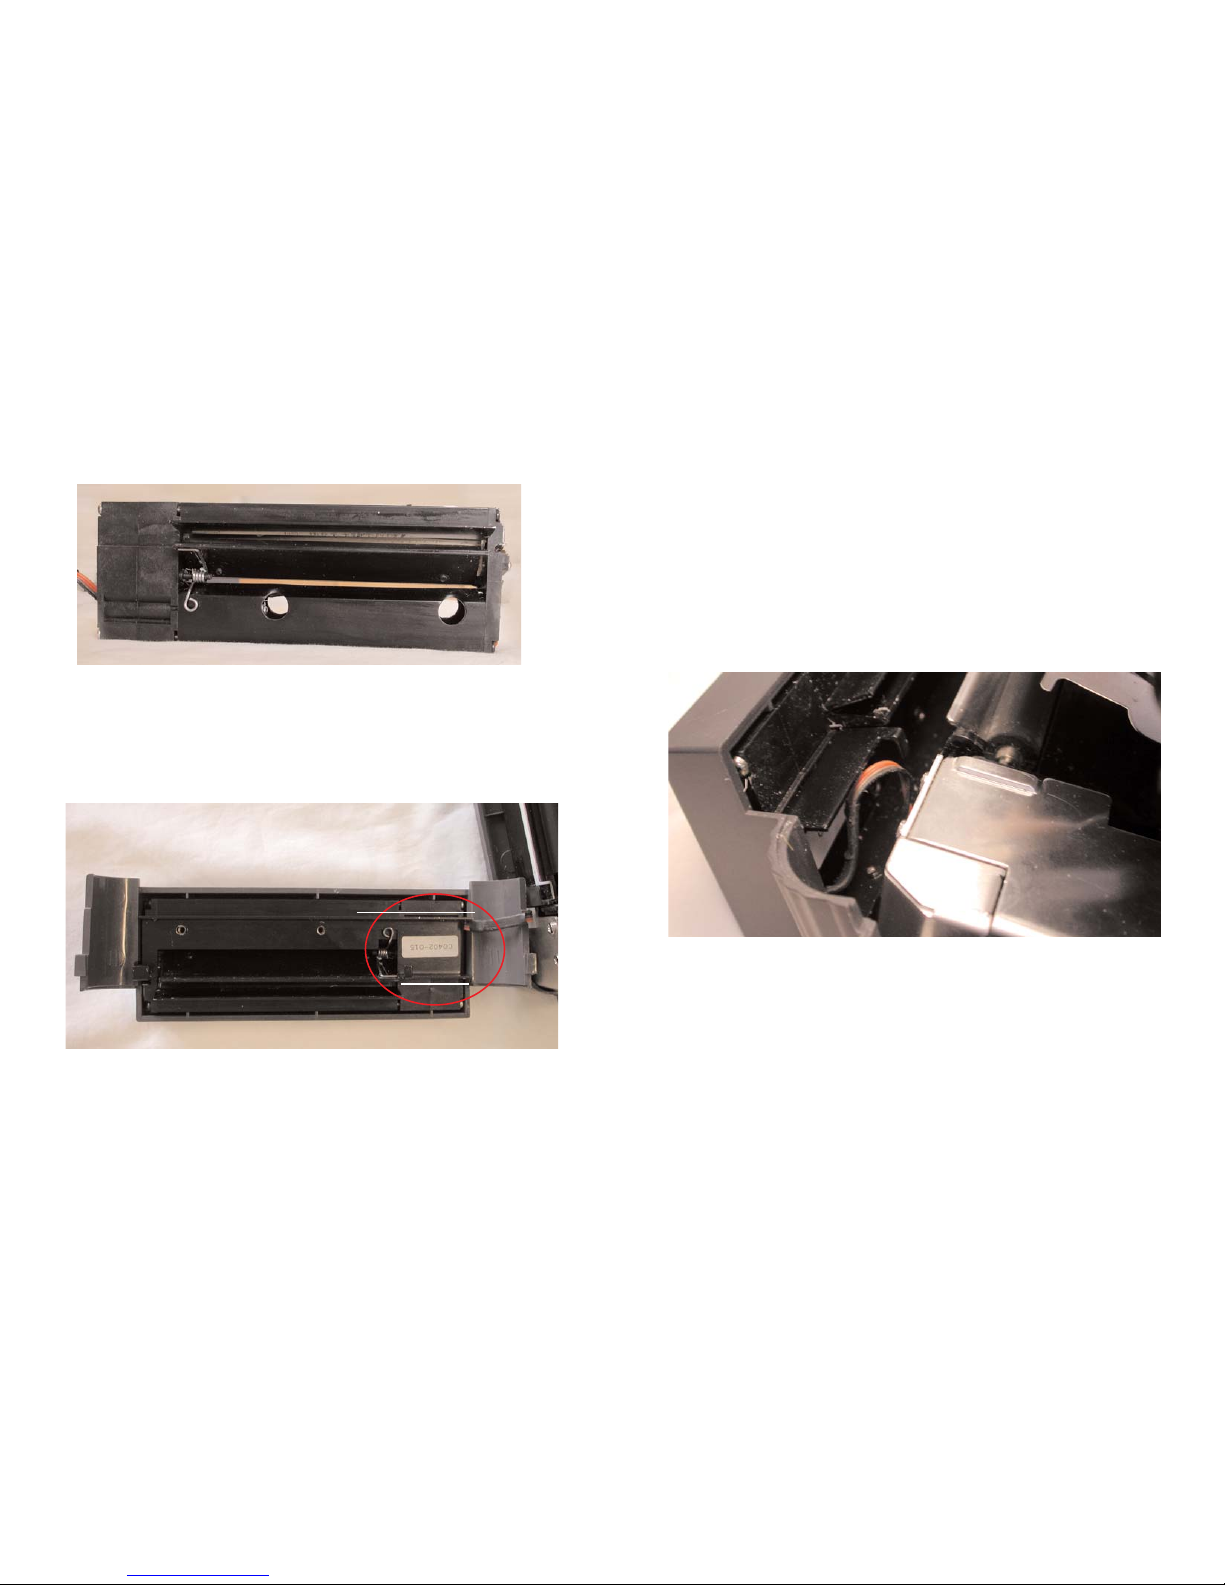
Put the black bar back on the cutter mechanism and line the holes up to be able
to put the 2 screws with the washers back in place.
5)
Screw the 2 screws with the washers back in the cutter mechanism.
6)
Affix the cutter mechanism back on the machine with by the 2 hooks on pg. 49,
step 5.
* Make sure the wires are between the 2 protruding lips of the black bar, oth
erwise
it will pinch the wires.
Figure 5.
Wires are in between the 2 protruding lips of the black bar.
55
2)
Match the holes in the cutter with the holes in the gray casing/lid of the cutter
mechanism.
* Make sure the wires are not in front of the holes.
Figure 3.
Holes are clear of any wires.
3)
With the wires and yellow “CAUTION” label facing down and holes lining up, care-
fully put the cutter back in the gray casing/lid of the cutter mechanism.
Figure 4.
Wires are in between the 2 protruding sides of black bar.
54
Page 30
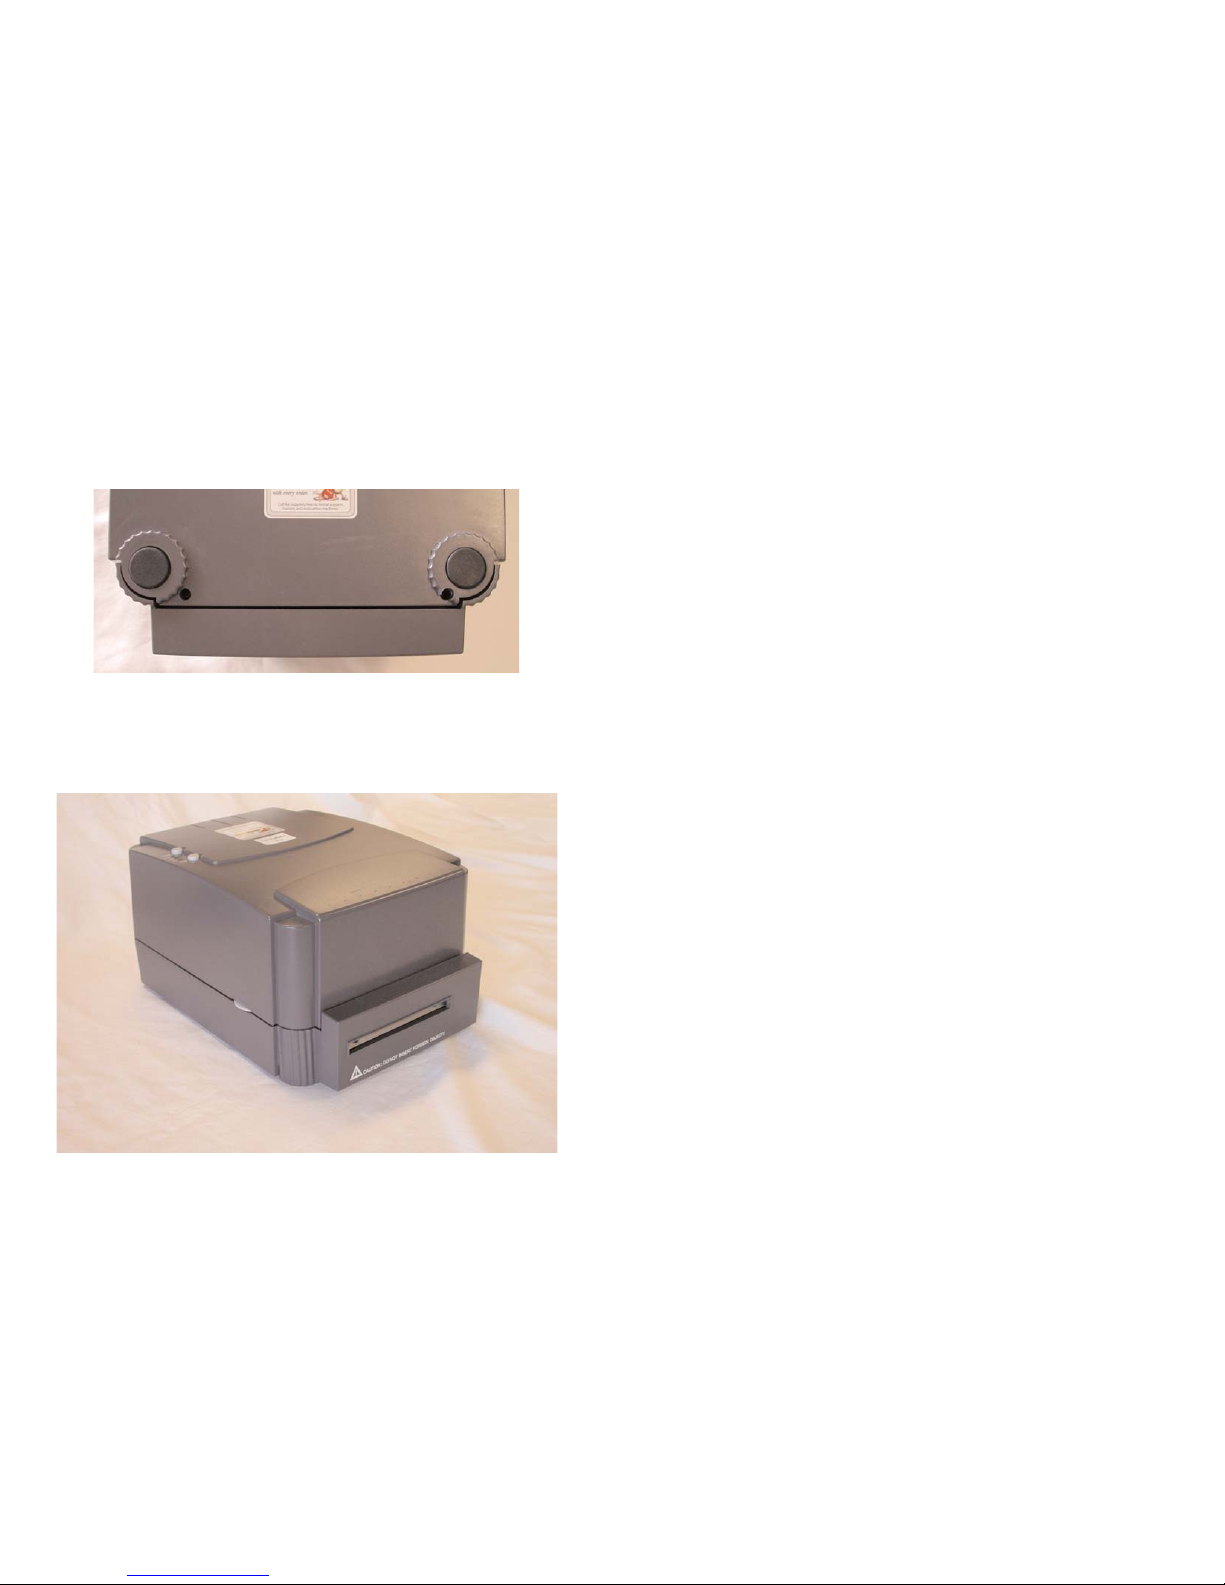
7)
Once cutter mechanism is in place and attached to the machine as a whole unit;
turn the machine back upside down.
8)
Screw the 2 outside screws back in the appropriate slots on the machine to hold
the cutter in place.
Figure 6.
Underside of machine
9)
Turn the machine in the upright position, plug the machine in, turn it on and it’s
ready to print.
Figure 7.
Machine in upright position with cover closed.
56
Page 31

503-644-5572
1-800-788-5572
Fax: 503-646-0183
Graphic Products
P.O. Box 4030
Beaverton, OR 97076
www.DuraLabel.com
Copyright 2007 Graphic Products, Inc. v. 2.10
 Loading...