

Page 1
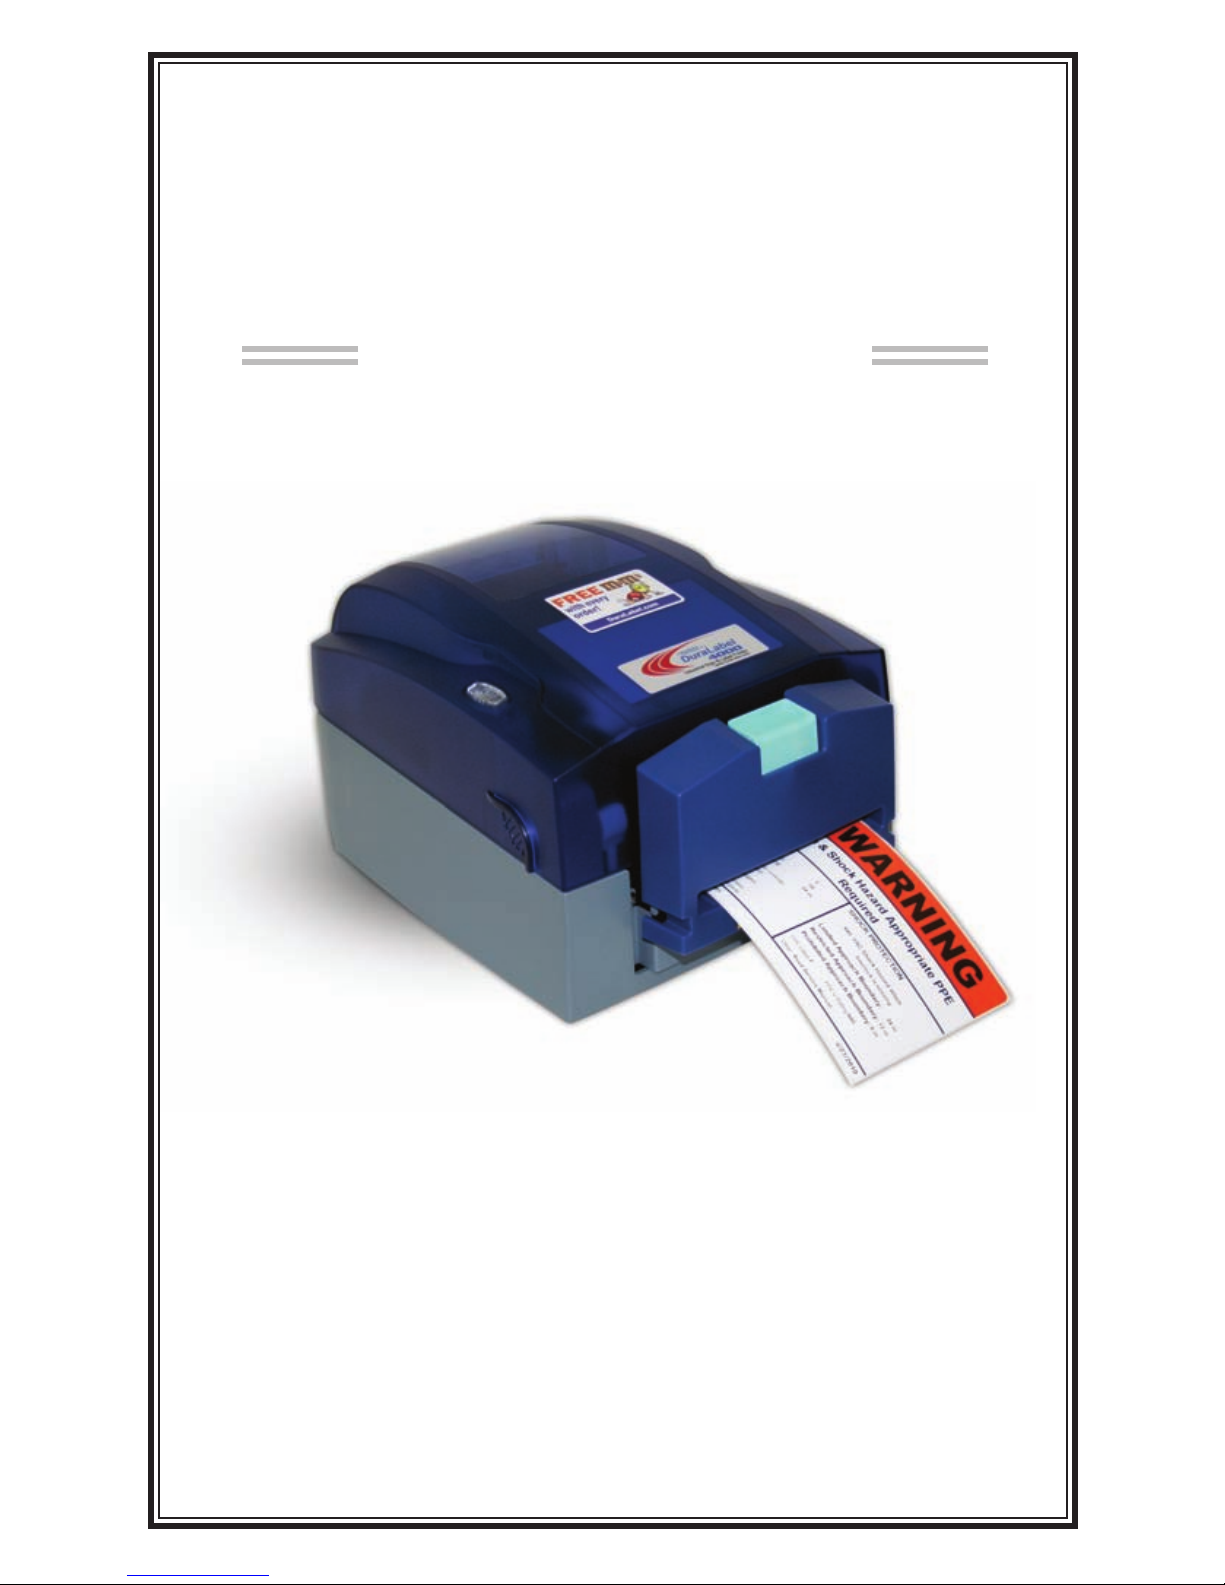
QuickStart Guide
Graphic Products, Inc.
1-800-788-5572
Local: 503-644-5572
www.DuraLabel.com
www.GraphicProducts.com
E-mail: info@GraphicProducts.com
DuraLabel
®
4000
Read Me
First!
Page 2

©2010 Graphic Products, Inc.
Minimum System Requirements
Operating System — Windows: 2000 SP4, XP SP2, Vista and 7
Memory — 128 MB RAM
Additional Requirements — USB 1.1 or 2.0 and IT administrative privileges
Page 3

- 1 -
INTRODUCTION
Congratulations on your new purchase of the DuraLabel 4000! This QuickStart
Guide is included to get you printing as quickly as possible.
With this guide you will learn how to set up your printer, load supplies and print
labels.
The ribbon and various print media for the DuraLabel 4000 have been optimized
for compatibility and print quality. Only authorized supplies from Graphic
Products will print correctly in the DuraLabel 4000.
If you need further assistance setting up your printer, please refer to the
DuraLabel 4000 User's Guide (included on the installation CD), visit
www.DuraLabel.com or give us a call.
Graphic Products, Inc.
1-800-788-5572
CONTENTS
1. Upgrade Driver ............................................................. pg. 2
2. Load Printer
................................................................. pg. 2
Printer Inside Parts
.................................................... pg. 3
Load Label Supply
..................................................... pg. 4
Printer Ribbon Parts
.................................................. pg. 5
Load Ribbon
............................................................... pg. 6
3. Connect Printer
............................................................pg. 8
4. Install Using USB Cable
............................................... pg. 8
5. Set Up to Print
............................................................. pg. 9
Continuos Label Stock
............................................... pg. 9
Die-Cut Label Stock
...................................................pg. 9
Please contact us for all your labeling needs. From standardized to
custom labels, we’re ready to provide the labeling supplies you require.
Call 1-800-788-5572 today to get your labeling problems solved.
Page 4

- 2 -
**IMPORTANT** For Upgrading from an existing DuraLabel driver installation!
1. UPGRADE DRIVER
In order to upgrade DuraLabel printer drivers the previous driver will need to be
uninstalled. Please follow these steps:
1. Insert the installation CD into the CD-ROM.
2. Press the Uninstall Driver button on the installation screen.
3. Click Remove printer drivers and click Next.
4. Click Use advanced printer driver removal options and click Next.
5. Check all existing DuraLabel printers and click Next.
6. Check all existing DuraLabel drivers and click Next.
7. Check all existing DuraLabel components and click Next.
8. Check the files associated with the deleted items you wish to remove and
click Next.
9. Check through the list provided and click Finish.
10. Click Restart.
The DuraLabel 4000 printer driver may now be installed. Begin with page 8,
Step 3 “Connect Printer” of the QuickStart Guide.
IMPORTANT! Always turn OFF the printer when loading supplies. Always wait at least 5
seconds before turning ON the power.
2. LOAD PRINTER
See the “Load Printer” section in the 4000 User's Guide for a more detailed
explanation of supply loading.
The ribbon and various print media for the DuraLabel 4000 have been optimized
for compatibility and print quality. Only authorized supplies from Graphic
Products will print correctly in the DuraLabel 4000.
Page 5
- 3 -
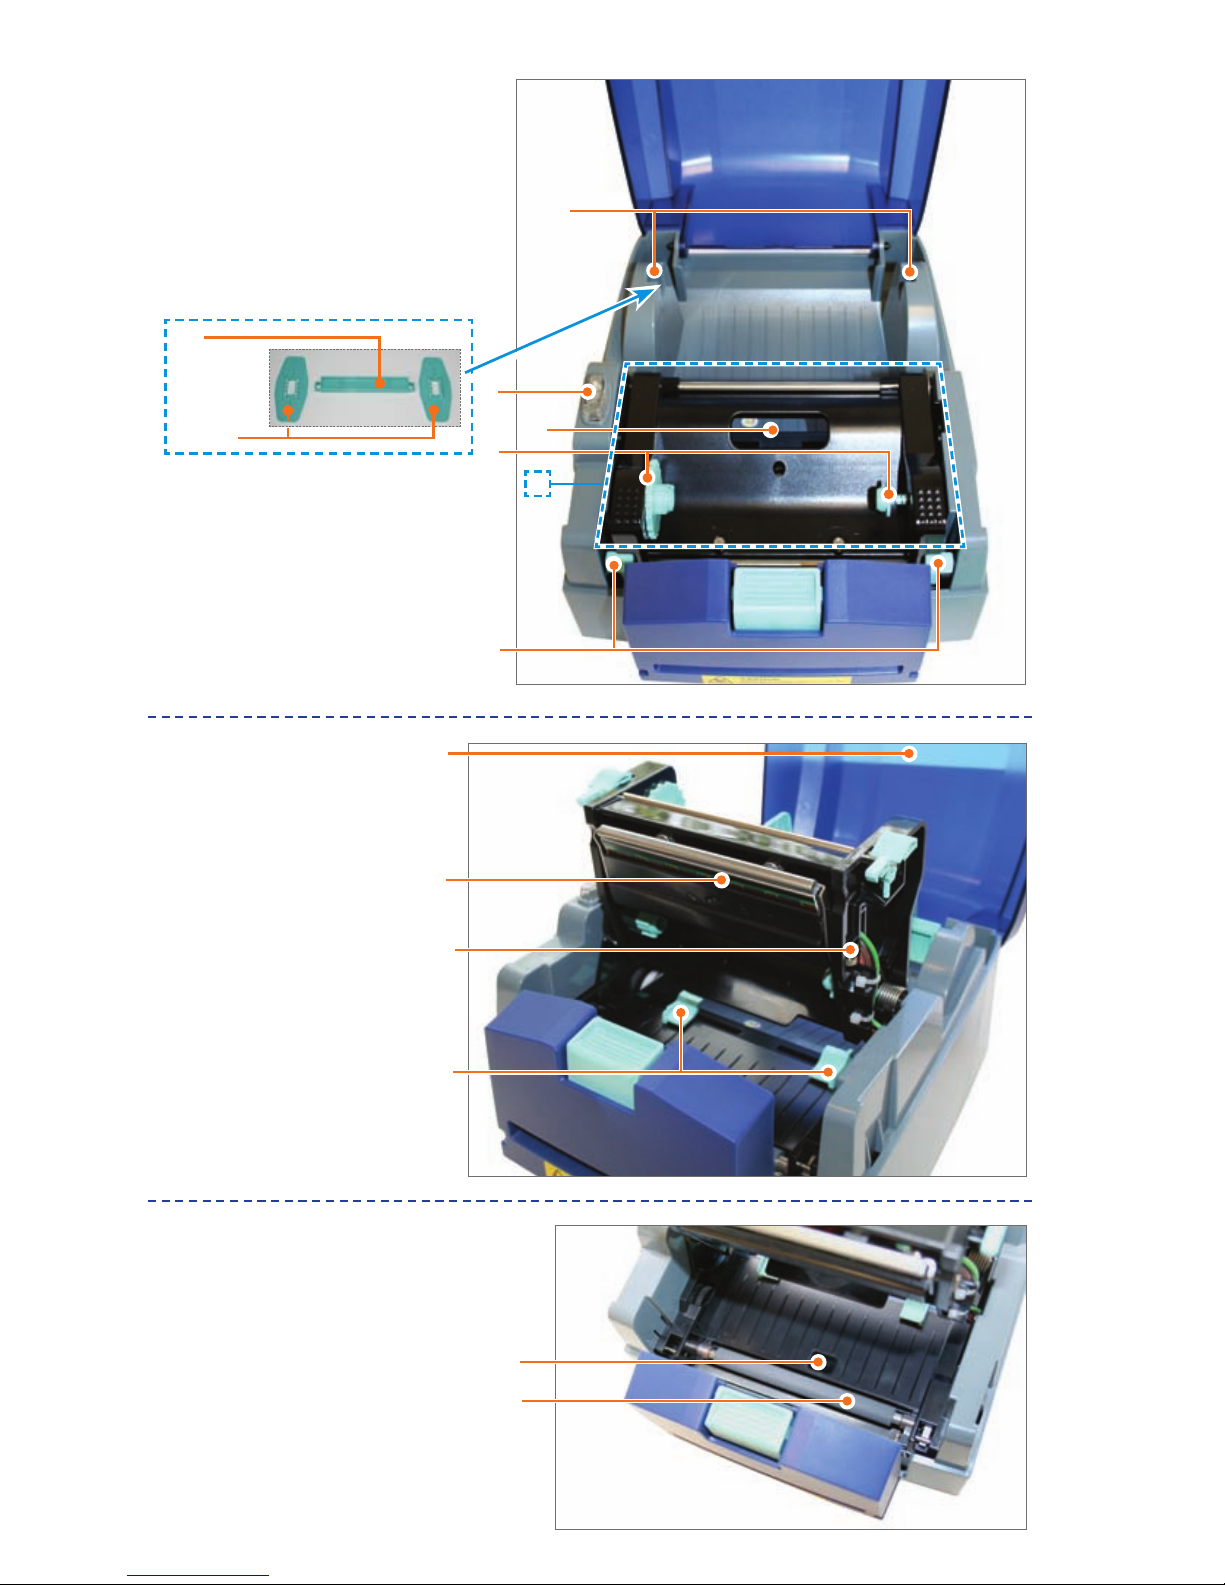
Printer Inside Parts
2. LED Light
3. Ribbon Observing Window
4. Ribbon Rewind Wheel
5. Print Carriage (outlined)
6. Locking Levers
7. Printer Cover
8. Thermal Print Head
9. Print Line Adjustment Gear
10. Label Guides
12. Label Sensor
13. Platen Roller
1c
4
2
3
1
6
13
12
7
8
9
10
5
1a
1b
1. Label Supply Spindle (outlined)
1a. Supply Shaft
1b. Label Stop Plates (2)
1c. Label Mount Slots (2)
Page 6
- 4 -
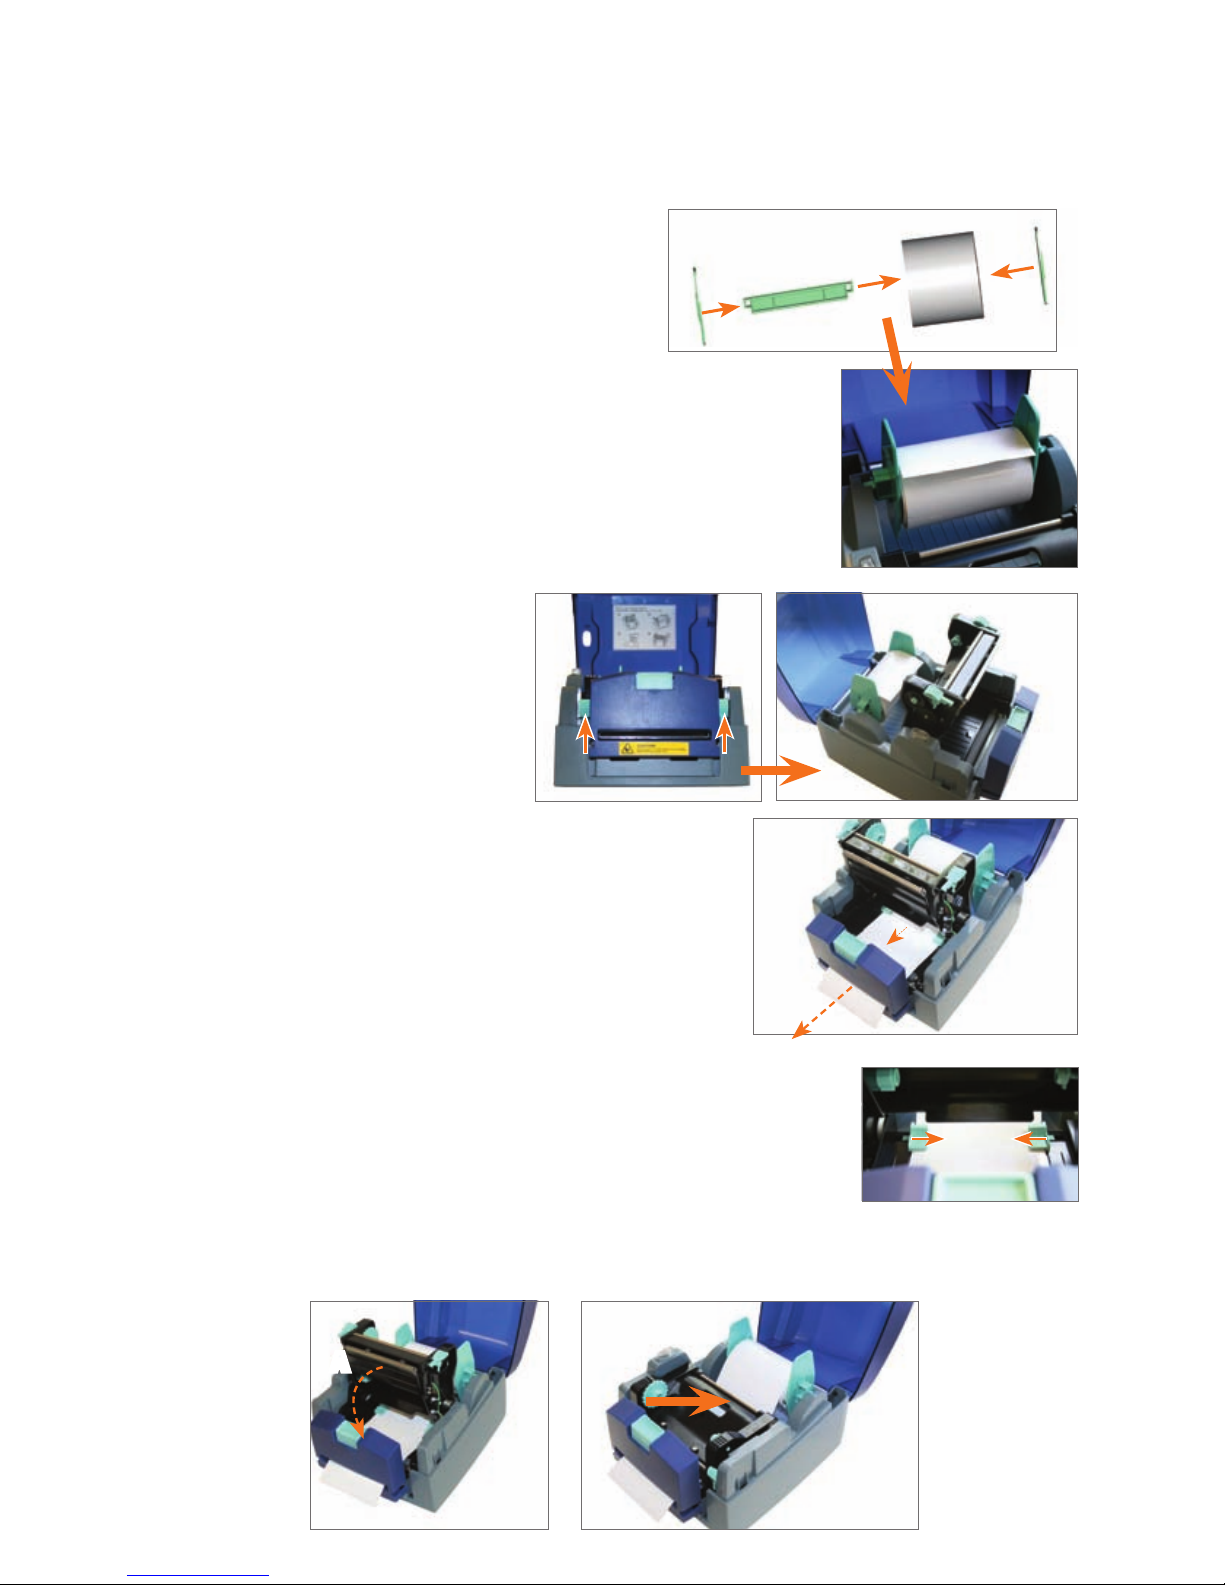
Load Label Supply
IMPORTANT! Always turn OFF the power first!
1. Open the printer cover.
2. Place the label supply onto the supply
shaft and assemble the label stop
plates on each end of the supply shaft.
3. With the label supply extending over the top, towards
the front of the printer, place the loaded label supply spindle in the label mount slots at the back of the
printer.
4. Press the locking levers
inward, and then lift up the
print carriage.
5. Feed the end of the label supply under the
print carriage and through the manual cutter
module, leaving an inch or two of label supply
visible outside of the printer.
6. Align the label guides to the edge of the label supply by
sliding both label guides toward the label supply at the
same time.
7. Close the printing carriage (
A) by gently pressing down until it locks into place.
A
Page 7
- 5 -
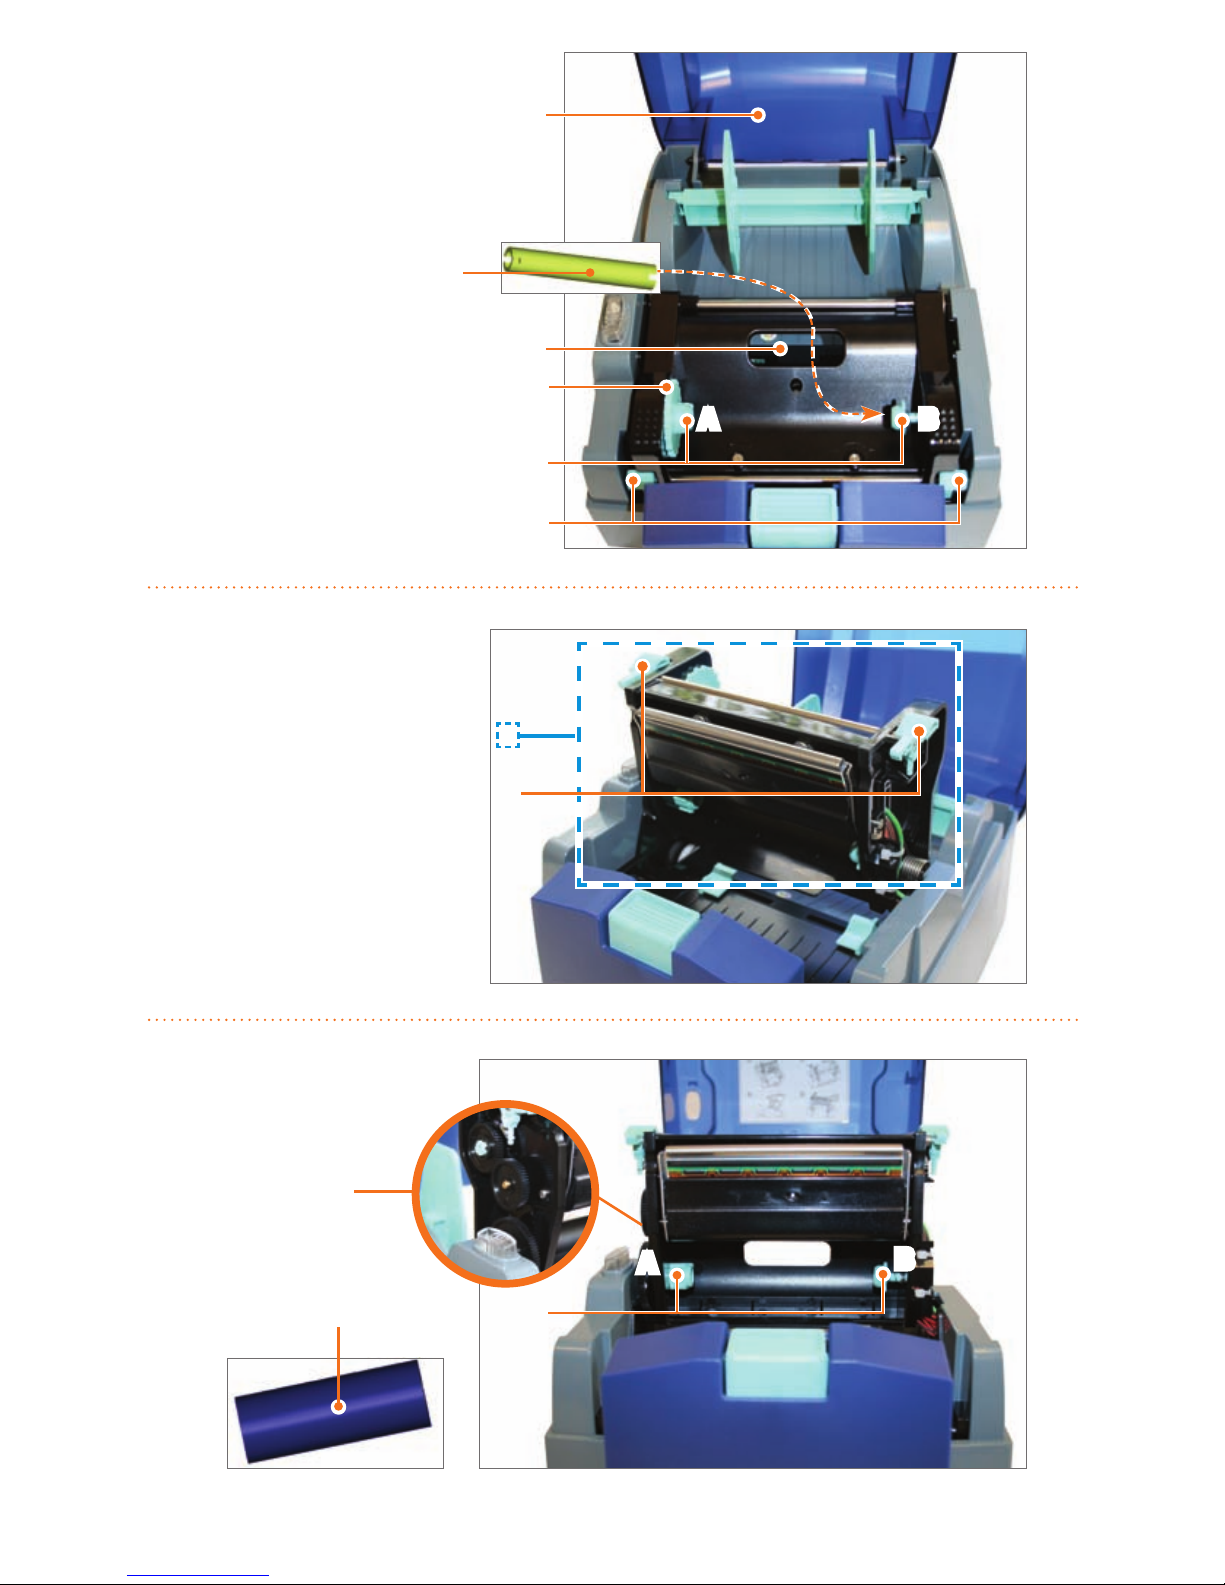
Printer Ribbon Parts
1. Printer Cover
2. Ribbon Rewind Core
3. Ribbon Observing Window
4. Ribbon Rewind Wheel
5. Ribbon Rewind Holders (A & B)
6. Locking Levers
5
6
8
7
1
2
3
4
10 11
9
BA
A
B
7. Print Carriage (outlined)
8. Locking Levers
9. Ribbon Wheels (3)
10. Ribbon
11. Ribbon Holders (A & B)
Page 8
- 6 -
Load Ribbon
IMPORTANT! Always turn OFF the power first!
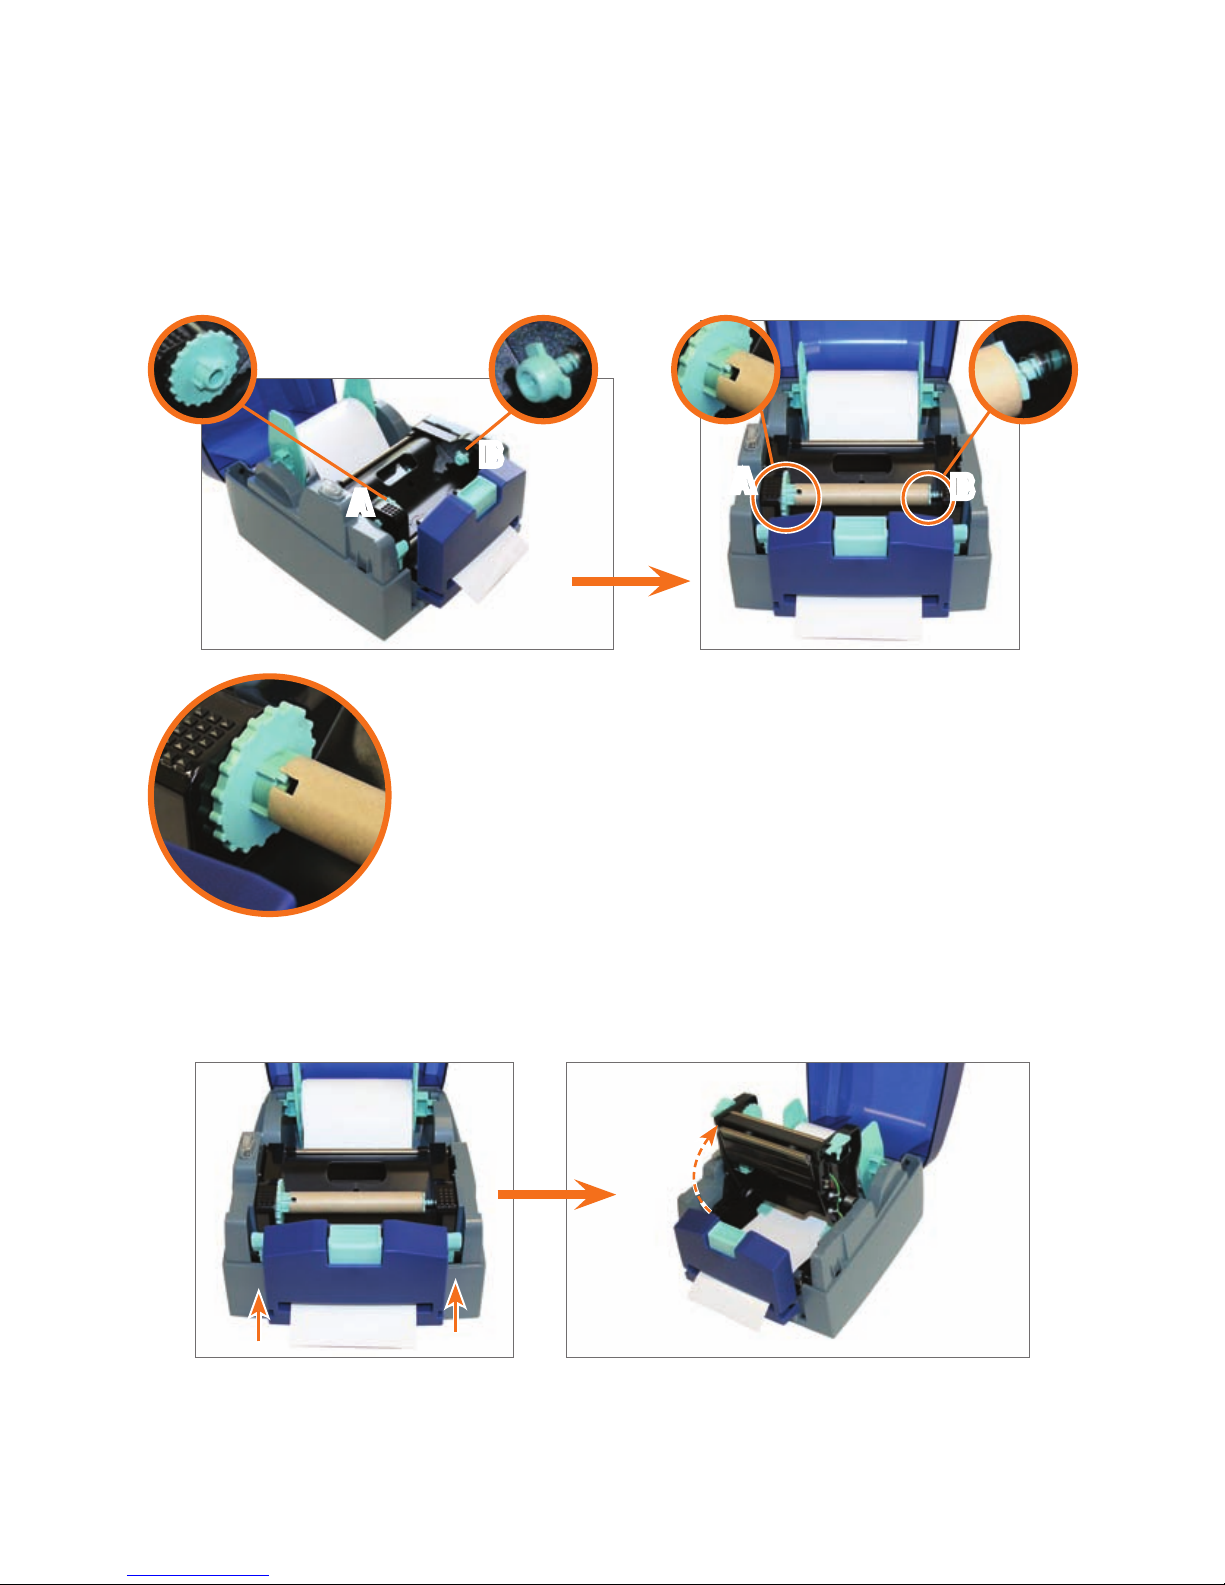
1. With the printer cover open, install one end of the ribbon rewind core onto
ribbon rewind holder
A, located inside right. Install the other end of the ribbon
rewind core onto ribbon rewind holder
B, located inside left.
NOTE: Make sure to align the notch on the ribbon rewind core with
the notch on ribbon rewind holder A. You may rotate the ribbon
rewind wheel to help align the ribbon rewind core.
2. Press the locking levers inward; then lift up on the print carriage.
B
A
B
A
Page 9
- 7 -
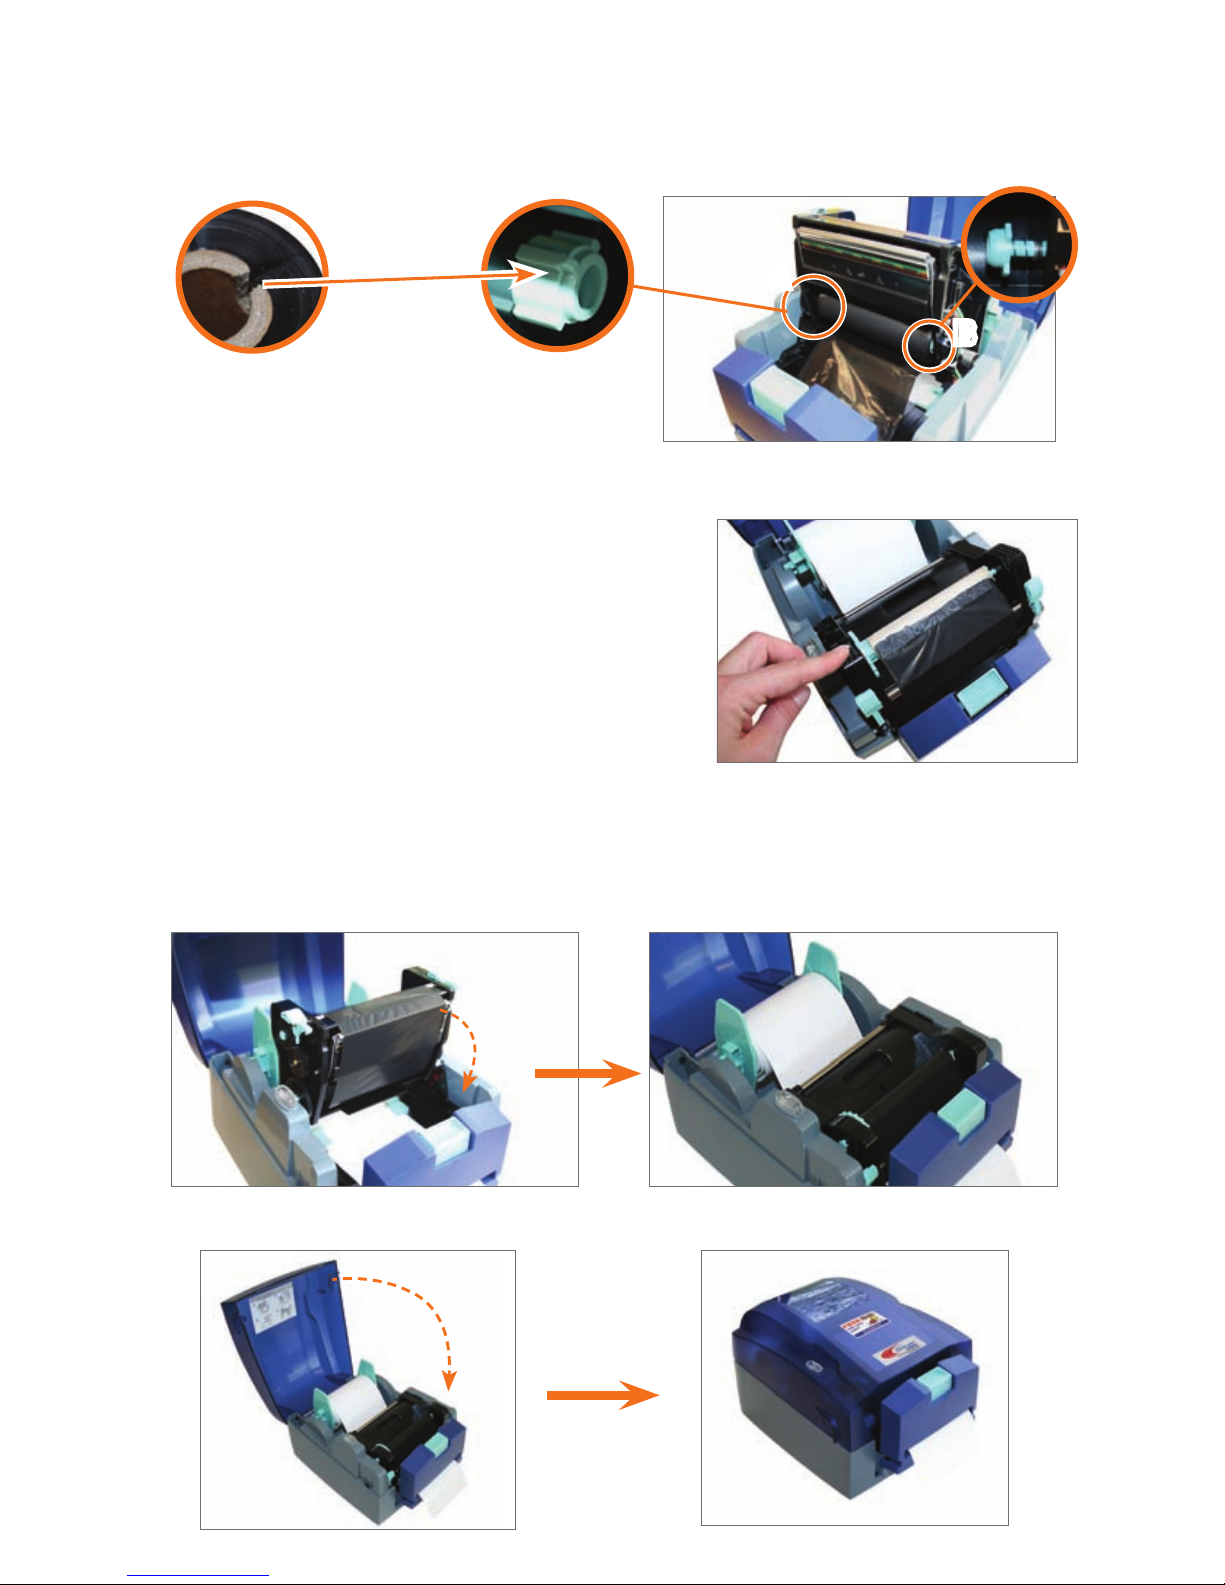
3. Hold the ribbon so that the loose end of the ribbon falls to the rear of the
printer, then install one end of the ribbon onto ribbon holder (
B), located
inside right; then install the other end of the ribbon onto ribbon holder (
A),
located inside left.
NOTE: When installing the ribbon, make
sure to align the ribbon wheel with the notch
on the ribbon holders. You may rotate the
ribbon rewind wheel to help align the ribbon, as shown in the figure below.
4. Extend the ribbon back over the “top” of
the print carriage and, using a small piece
of tape, adhere the ribbon onto the ribbon
rewind core.
5. Rotate the center ribbon rewind wheel clockwise; toward the back of the
printer to make the ribbon tight and smooth.
6. Close the print carriage.
7. Close the printer cover.
B
A
A
B
Page 10
- 8 -
3. CONNECT PRINTER
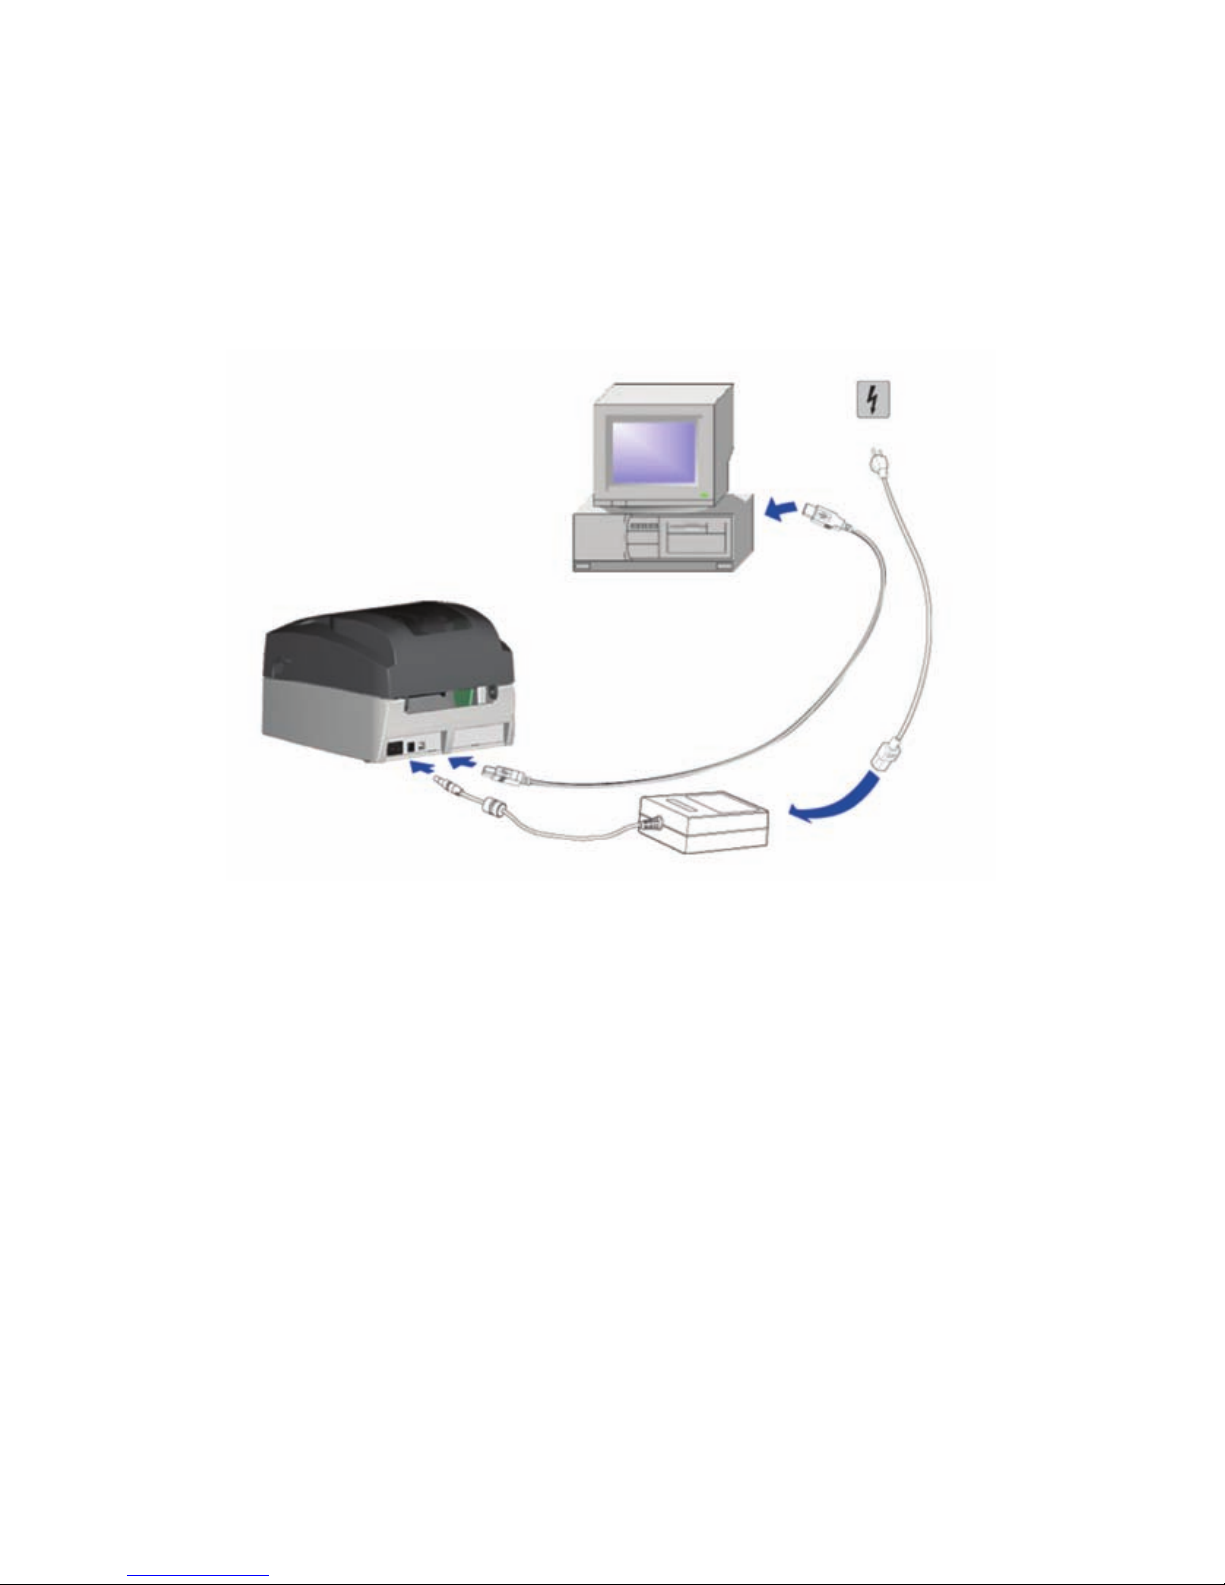
IMPORTANT! These steps must be done in the order below!
1. Insert DuraLabel 4000 Installation CD into the CD-ROM drive.
2. Connect the power supply.
3. Connect the DuraLabel 4000 to your PC using the USB cable.
4. Turn on the DuraLabel 4000. (The power switch is located on the back of
the printer)
4. INSTALL USING USB CABLE
IMPORTANT! You must have administrative rights in order to perform this installation.
1. A “Found New Hardware” window may appear. If so, select No, not this time
then click Next.
2. Select Install the software automatically (Recommended) and click Next.
3. A window may appear showing the progress of searching for the files.
4. If a hardware installation window appears, click Continue Anyway.
5. A screen may appear showing the progress of copying the files.
6. Click Finish to Completing the Found New Hardware Wizard.
Page 11
- 9 -
5. SET UP TO PRINT
When printing labels it is easier to start with an existing template and make
modifications than to create a new label from scratch. On the CD splash screen,
click on “Install Templates & Symbols”.
IMPORTANT! Perform these changes before opening the document you wish to print.
Continuous Label Stock
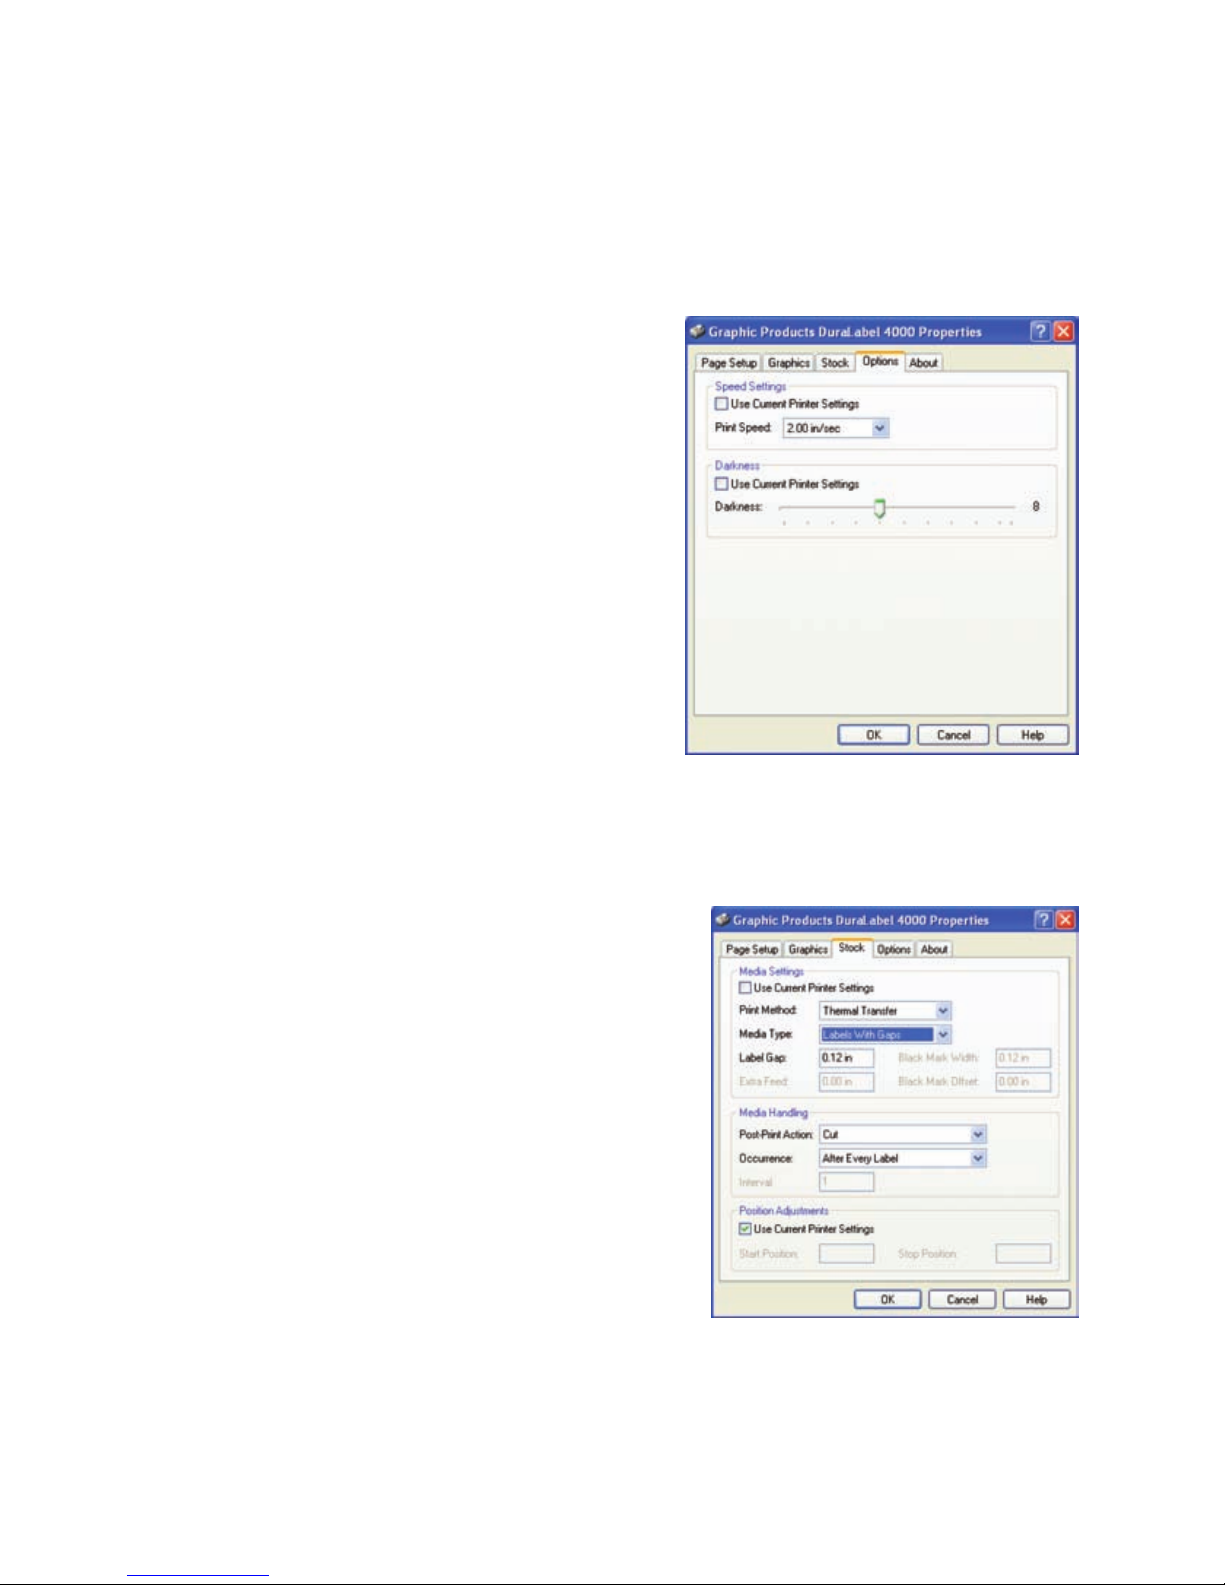
The Default Printing Preferences on your
DuraLabel 4000 should be at the proper
settings for printing on continuous vinyl and
should require no adjustments.
To change settings:
1. Select START >> PRINTERS and FAXES.
2. Right-click on “DuraLabel 4000” and
select Printing Preferences.
3. On the Option tab you can adjust the
speed and darkness to optimize print
quality depending on the ribbon and
vinyl supply.
Die-Cut Label Stock (Arc Flash, RTK, NFPA, & Notice)
When printing on die-cut labels you need to calibrate the gap sensor and make
adjustments in the print driver.
To calibrate the gap sensor:
1. Turn off the printer and wait 5 seconds.
2. Hold down the FEED/STATUS button and
turn it back on. The feed/status button will
blink green twice, switch to solid red, then
begin to blink red.
3. Release the button while it’s blinking red.
Labels will feed through the printer and the
gap sensor will be calibrated.
To set up the driver for die-cut label stock:
1. Select START >> PRINTERS and FAXES.
2. Right-click on “DuraLabel 4000” and select Printing Preferences.
3. On the Stock tab under Media Settings change the Media Type to Labels with
Gaps. (If you do not want to cut between every label, under Media Handling
change the Post-Print Action to “None”.)
4. Click OK after you have made your changes.
Page 12

www.DuraLabel.com
© 2010, Graphic Products, Inc. All Rights Reserved
1-800-788-5572
v. 1.0 - 5/11/10
P.O. Box 4030
Beaverton, OR 97076
 Loading...