

Page 1
Version 2
Page 2
Read this instruction manual fully so as to become completely familiar with the features of
this product before operating. Failure to operate this product correctly could result in
damage to the product, personal property and cause serious injury. This is a sophisticated
hobby product and is NOT a toy. It must always be operated with caution, common sense
and some basic mechanical ability. This manual provides instructions as to the assembly,
safe operation and maintenance of this hobby product. It is highly recommended that you
follow and read fully the instructions and warnings stated in this manual including safety,
assembly, set-up and flying guidelines in order to operate this product correctly and avoid
damage or serious injury.
As the user of this product you and you alone are responsible for operating it in a manner
that does not endanger yourself and others around you or result in damage to the product or
property of others. This product is operated via a radio controlled system that in some cases
can be subject to interference from sources outside of your control. Interference may result
in a momentary loss of control so it is always recommended that this product be used in a
suitably open outdoor space.
- This is a radio controlled flying model and as such must always be flown with caution and
care. This is not a toy.
Ugly Stick brief was to design a model for intermediate to advanced pilots.
- The
- Alway exercise great caution when using the recommended battery to power this product.
For full safety notes and operating procedures, please see information provided by your
battery supplier.
- Take great care when connecting/disconnecting the battery. See battery supplier for full
safety procedures.
- Never power up the model in confined spaces and always keep the propeller clear of
obstructions.
- This product is not a toy. Children must be accompanied by an adult at all times if operating
this product.
- Only fly this model in an open area away from crowds, people, buildings, tree's, power lines
and obstructions.
- Always put safety first when operating this model and consider the warnings stated above.
- The supplier/manufacturer accepts no responsibility for damage or injury caused through
the use of the product. Not suitable for children under the age of 14. THIS IS NOT A TOY.
Page 3

Contents
Introduction
Specifications
Contents of box
Required to complete
Assembly
Setting up your model
Model flying precautions
Pre-flight checks
Flying the Ugly Stik
UglyStik tips
Spare parts listing
Trouble shooting
Contact information
1
1
2
2
3-7
7-9
10
11
12
13
14
15
16
Page 4
Version 2
INTRODUCTION:
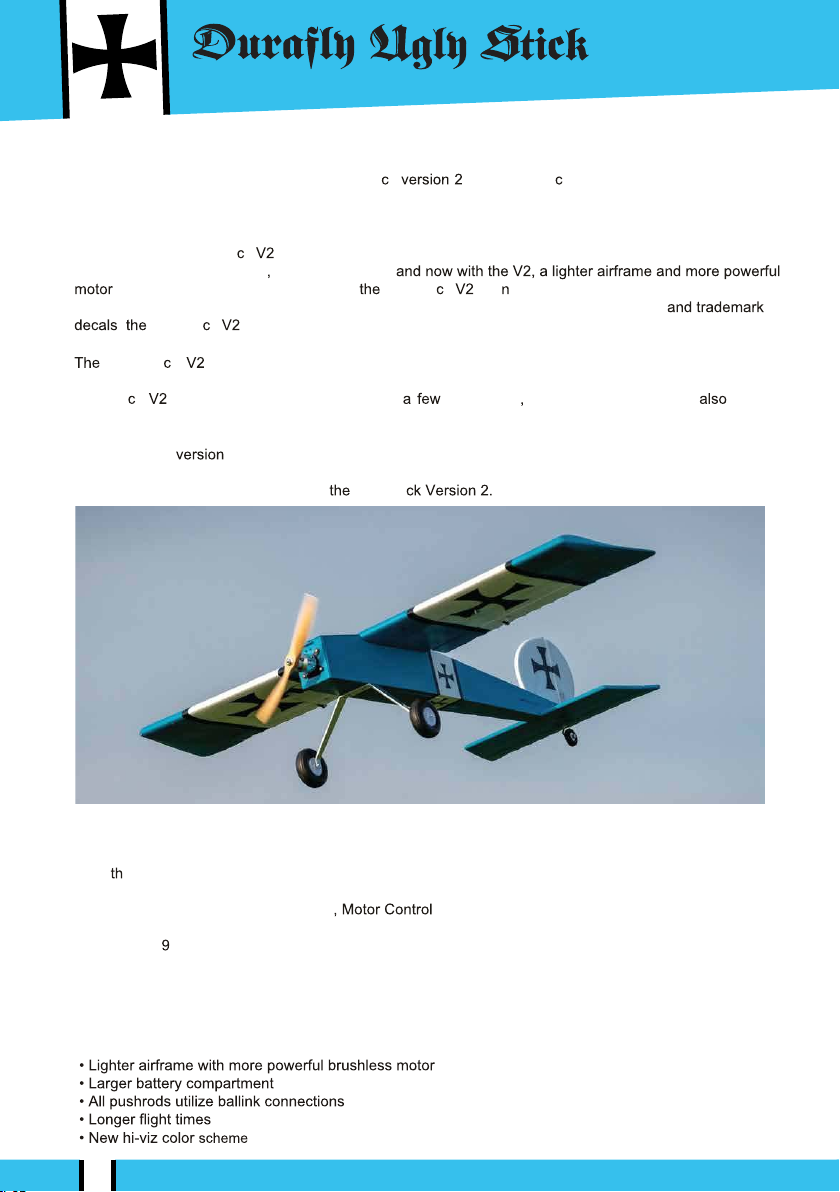
Thank you for purchasing the Durafly Ugly Sti k . The Ugly Sti k design has been a popular nitro
sports model for almost half a century and this iconic airframe is known throughout the RC world for its
exceptional flight characteristics and charming yet simple lines.
With the Durafly Ugly Sti
benefit of modern electronics EPO construction
. No building, no tuning, no cleaning! Ugly Sti k is a impressively authentic electric PnF
interpretation of this classic RC subject. From the perfectly captured outline of the design
, Ugly Sti k from Durafly has it all.
Ugly Sti k comes with all electronics pre-installed, all major components assembled for you
and a full compliment of tools and accessories included. No glue is provided, as none is needed! The
Ugly Sti k bolts and screws together in just easy steps multiple access hatches allow for
easy access to all internal electronics.
With this latest
the air and a great conversation piece on the ground, thanks to the ultra high level of design and
authenticity Durafly has achieved with Ugly Sti
k , you too can now experience what made this great model a classic, but with
you’ll be rewarded with an extremely well balanced and enjoyable sports model in
SPECIFICATIONS:
Wingspan: 1100mm (43.3”)
Leng : 950mm (37.4”)
Flying weight: 1050g (37oz)
Controls: 4 channel (Ailerons, Elevator , Rudder) ESC:
Durafly 30amp (pre-installed)
Motor: 3536 00kv Brushless outrunner (pre-installed)
Prop: Durafly wooden 10x6
Battery recommended: 2600-3000mah 11.1v 3S Lipo
Radio System: Min 4 channel Rx and Tx required.
V2 Features:
1
Page 5
CONTENTS OF BOX:
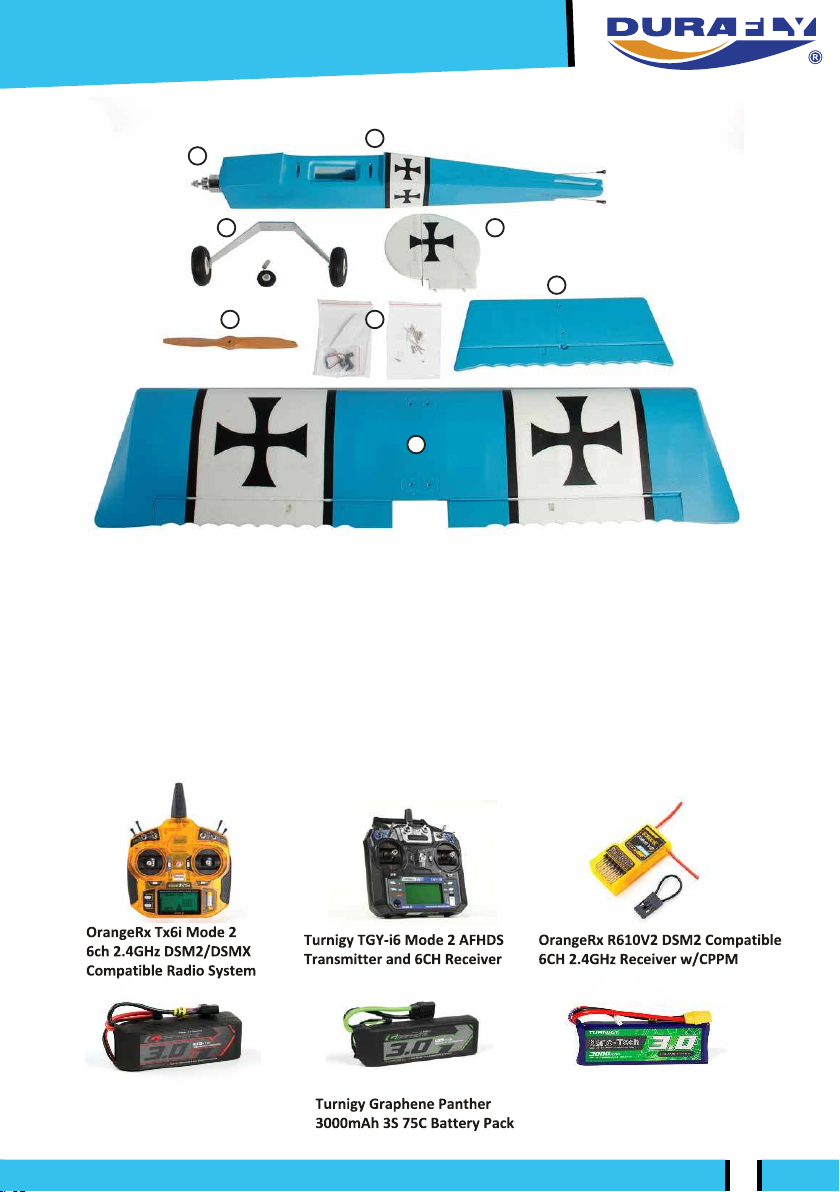
1
2
3
1. Motor
2. Fuselage
3. Landing Gear
4. Propeller
4
6
8
5. Vertical Stab
6. Accessories Set
7. Horizontal Stab
8. Main Wing
5
7
REQUIRED TO COMPLETE MODEL:
In its ‘Plug n Fly’ format the Ugly Stick V2 requires some additional electronic
components to get it flight ready. Durafly recommends the products below for
optimum performance and great value. Available at hobbyking.com
Turnigy Graphene Professional
3000mAh 3S 15C Battery Pack
Turnigy Nano-Tech 3000mAh
3S 70C Battery Pack
2
Page 6
Version 2
ASSEMBLY:
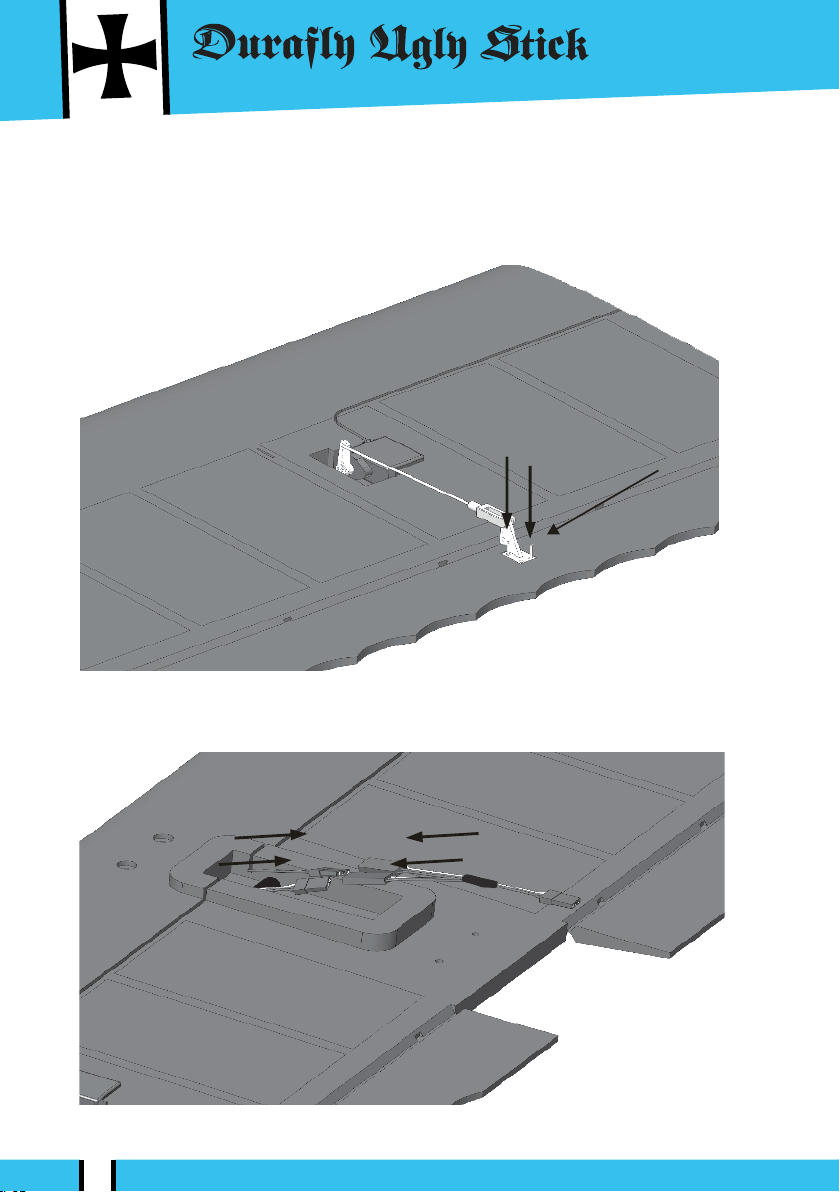
1. Locate the bag marked ‘Aileron’ and install aileron control horns and rods for
each side of the wing as shown. Ensure the servo horn is at 90 degrees to the wing
when installing the control rod.
M1.7 x 10mm
2. Now connect the supplied Y-lead to the aileron servos and set the wing aside for later.
3
Page 7
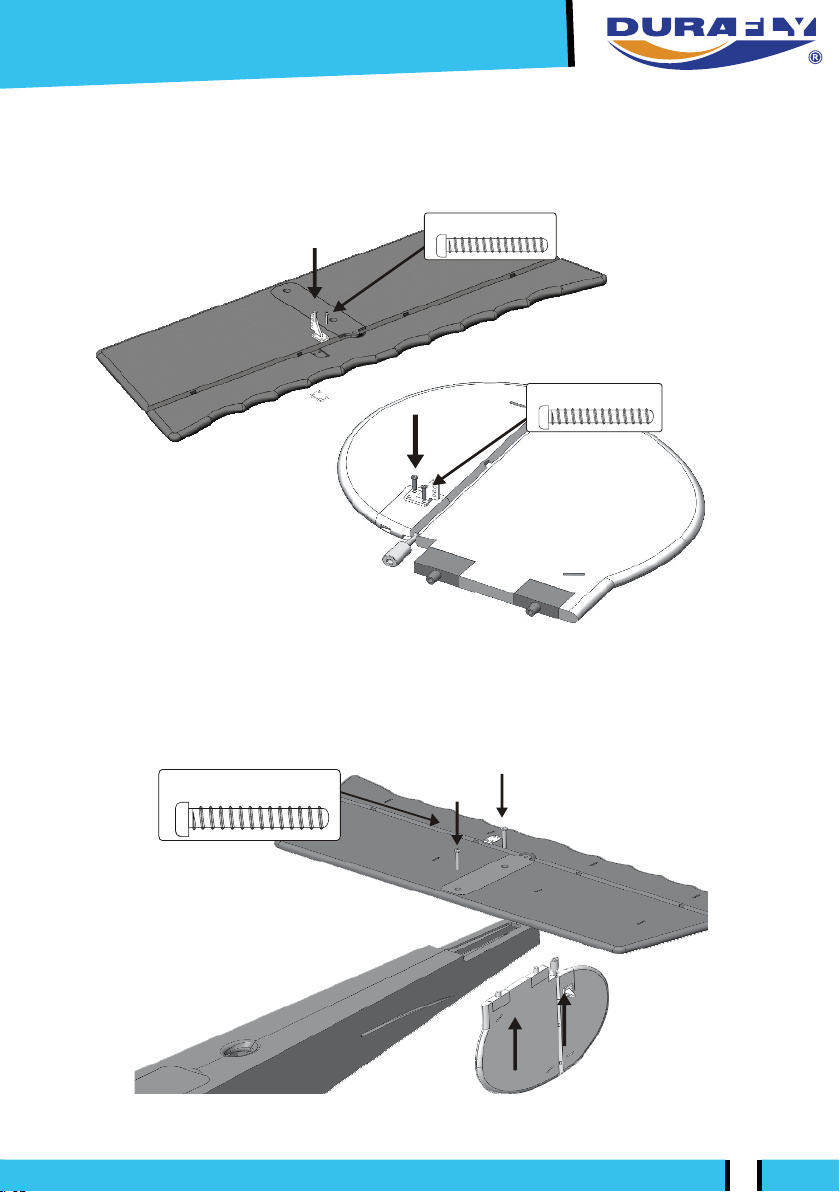
3. Following the illustration below, screw the remaining control horns to both the
elevator and rudder control surfaces until firmly installed.
M1.7 x 10mm
M1.7 x 10mm
4. Turn the fuselage over and with the supplied screws, secure the horizontal and
vertical tail plane to the rear of the fuselage as shown. Connect the pre-installed
control rods to the control horns. Ensure the tail is firmly secured and aligned.
M3.0 x 15mm
4
Page 8
Version 2
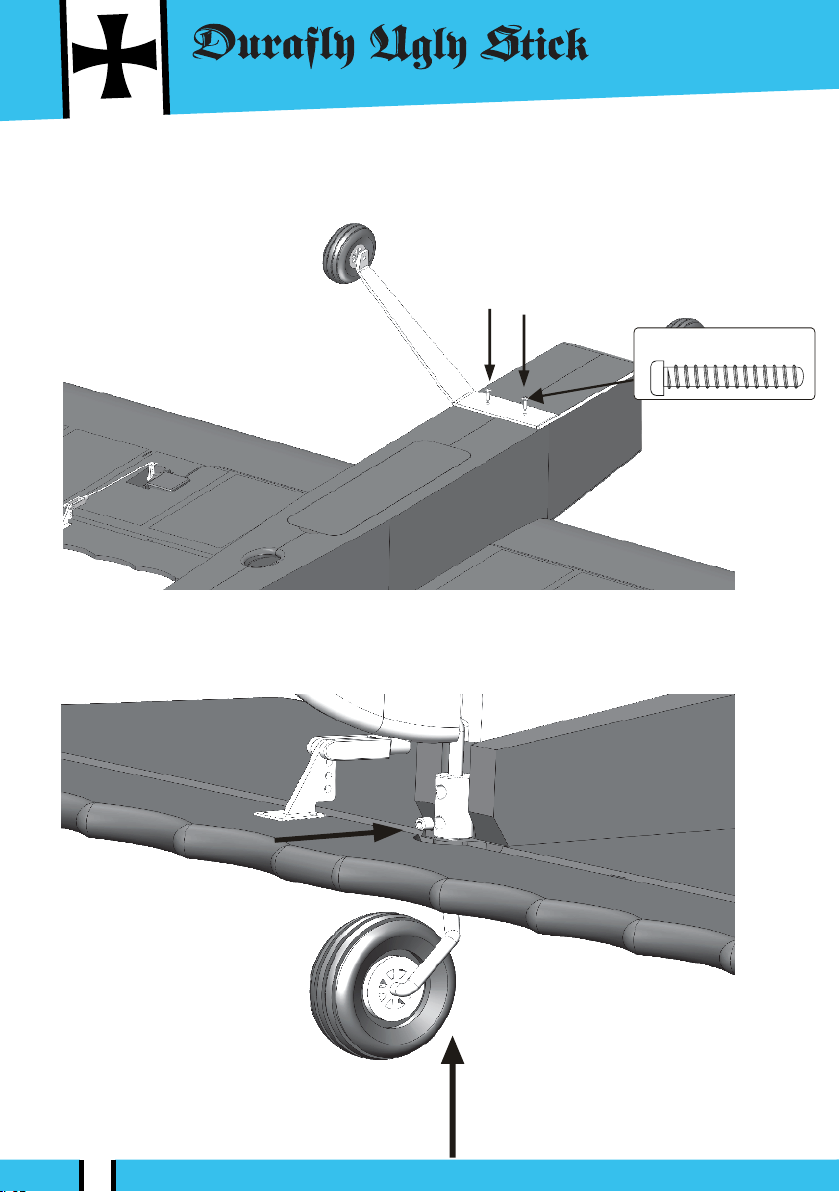
5. With the supplied M2.6x10mm screws, attach the landing gear to the plastic plate
on the underside of the fuselage. Screw down firmly to avoid any play at the
mounting point.
M2.6 x 10mm
6. Install the tail wheel up through the elevator and tighten into the metal collet with
the supplied hex tool as shown. Ensure the tail wheel is directly inline with the
rudder when secured.
5
Page 9
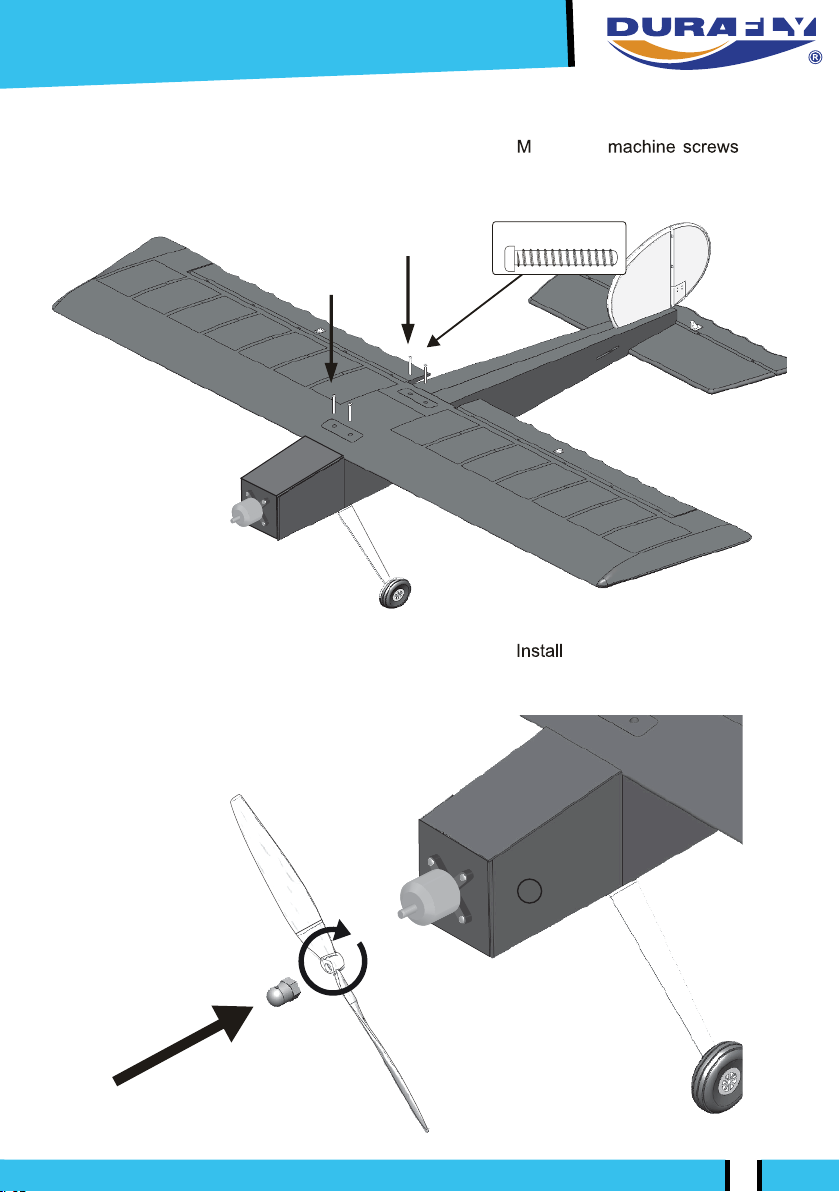
7. Now mount the wing to the fuselage using the four 3x30mm
provided. Make sure no servo wires are caught between the wing and the
fuselage when the two are tightened together.
M3 x 30mm
8. The final stage of assembly is to mount the propeller. the propeller onto the
motor shaft and firmly tighten into place (see note below before doing this).
6
Page 10
Version 2
Assembly of your Durafly Ugly Stick V2 is now complete.
Before you move onto the final set-up of the model, we suggest
you perform a final check on all screws, bolts and components to
ensure all are secure and firmly in place.
SETTING UP YOUR MODEL:
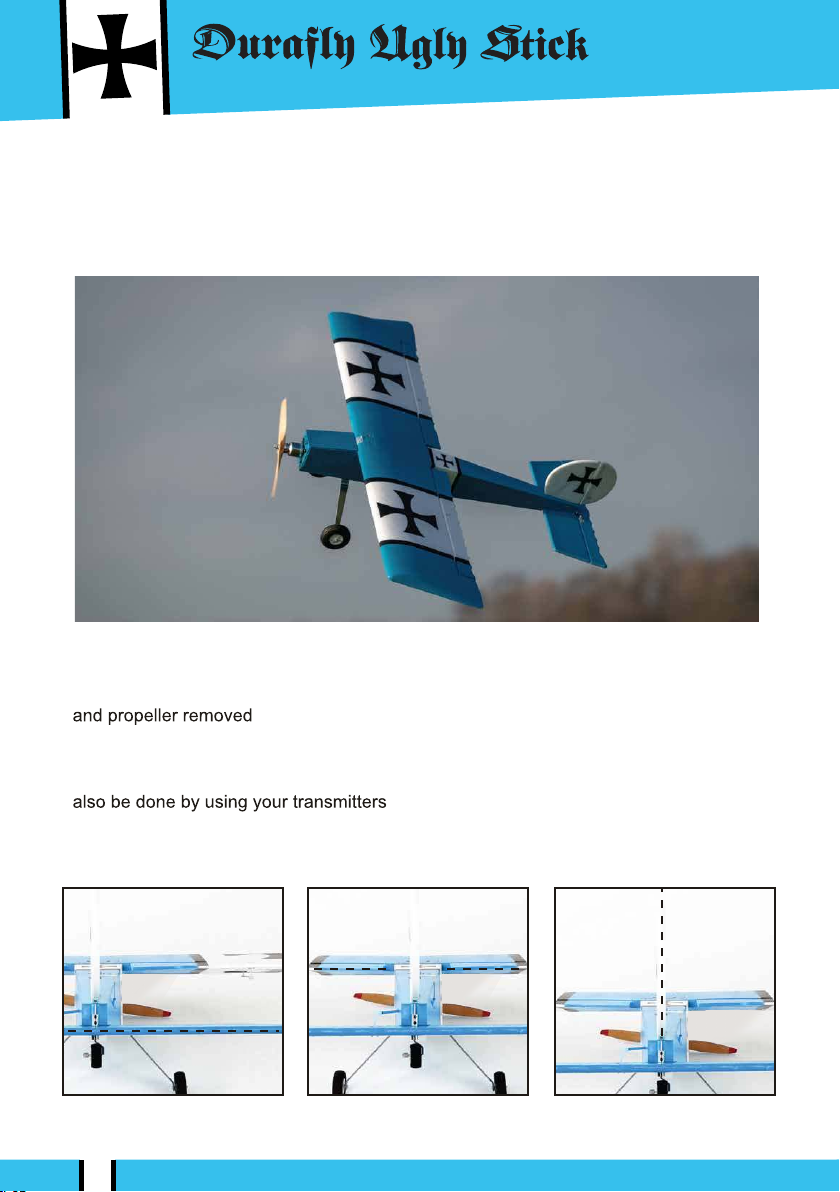
1. With your receiver installed and all servos plugged into their corresponding channels,
(see note below) connect the flight battery to the ESC to power
up the model. With the model now armed, ensure all servos are centered and all control
surfaces are level. If not, adjust by turning the control clevis’s by hand accordingly until
the control surfaces are level as shown. If using a computer transmitter fine tuning can
sub trim function.
Note: For safety reasons, it is advised that this is done with the prop removed from the
model.
Ailerons Elevator Rudder
7
Page 11
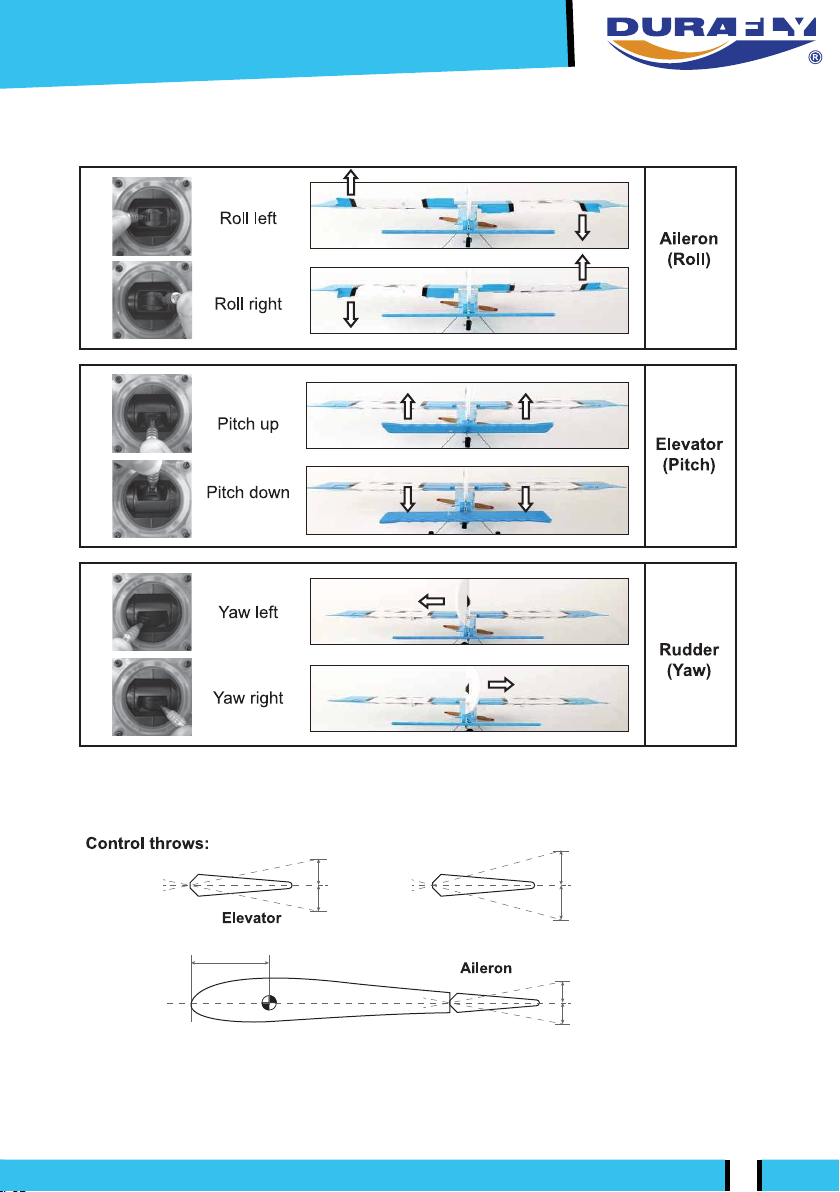
2. Check all control surfaces are moving in the correct direction with the applicable
stick input (see below)
3. The Durafly Ugly Stick V2 handles very well in flight but requires setting up
beforehand. Please follow the recommended settings below for good all round flight
performance
10-20mm
10-20mm
Rudder
65-68mm
* Elevator ‘low rates’ 10mm ‘high rates’ 20mm in either direction from neutral.
* Aileron ‘low rates’ 10mm ‘high rates’ 18mm in either direction from neutral.
* Rudder ‘low rates’ 12mm ‘high rates’ 18mm in either direction from neutral
10-18mm
10-18mm
12-18mm
12-18mm
8
Page 12
Version 2
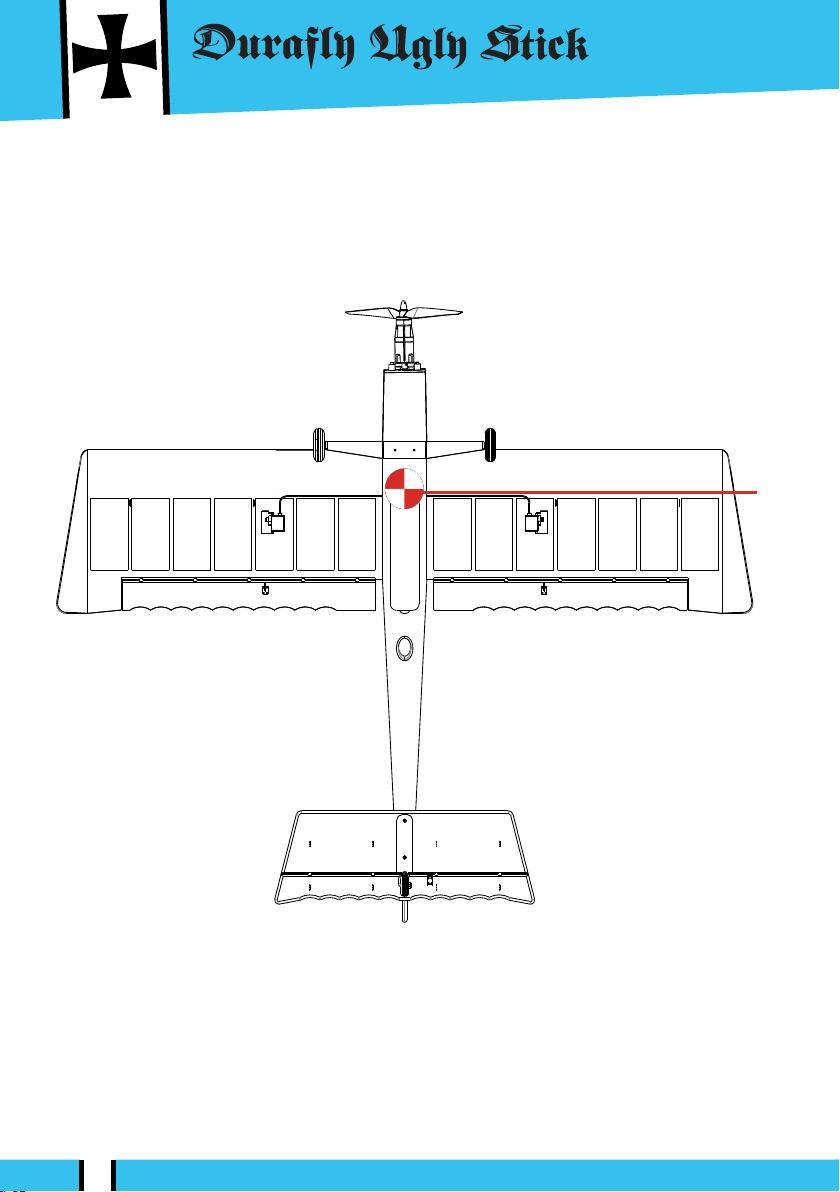
4.Suggested center of gravity (CG) for the Ugly Stick V2 is approximately 65-68mm
from the leading edge of wing (on the aileron servo wire). We recommend the heaviest
3s pack you can fit in the Ugly Stick, you will need at least a 2600mah 3S, a Graphene
Panther 3000mah is ideal, even then you may need to add a small amount of weight
to the nose to get the model to balance.
CG Location:
CG 65-68mm ~ from leading edge
65--68mm
With assembly and set-up now complete your Durafly Ugly Stick V2
should now be ready for flight. However we recommend you read
and follow the advice given in the following stages of this manual
before flying your model.
9
Page 13

MODEL FLYING PRECAUTIONS.
- Select your flying area carefully and always choose an open space that
is unobstructed from trees and buildings and is away from crowded
areas. Avoid flying in areas where there are roads, electric or telephone
poles and wires, water or within close proximity of full size air traffic.
- Do not fly the model in poor weather such as high winds, low visibility,
inclement temperatures or in rain or storms.
- Never attempt to catch the model whilst it's flying. Even a slow moving
model can cause harm or injury to yourself or others and risks damaging
the model.
- This model is recommended for children no younger than 14yrs of age.
All children no matter what age should always be supervised by a
capable and responsible adult when operating this model.
- Always unplug your model battery when not in use, never leave the
battery installed in the model.
- Remember to keep clear of the propeller at all times when your flight
battery is connected.
- Before flying always turn on your transmitter first, only then plug in your
flight battery.
- After flying always unplug the flight battery first, then switch off your
transmitter.
- Exercise caution when charging your batteries, follow in full your
battery manufacturers safety guidelines when doing so.
10
Page 14

Version 2
PRE-FLIGHT CHECKS:
Always range check your model before any flight (especially when flying a new model
for the first time). Follow your radio manufacturers guidelines for performing this
check.
2. Check that all screw/bolts and mounting points are firmly secured, including control
horns and clevises.
3. Only fly with fully charged batteries (both in your radio transmitter and model).
Failure to do so could result in loss of control, damage to the model and/or
persons/property around you. Check your batteries are fully charged.
4. With the model powered up (transmitter on first, then receiver/model) check that all
control surfaces are free from damage/obstructions and check that they move freely
with no snagging and in the correct directions.
Inspect the model and prop for any damage that may have occurred during transit
and listen for any unusual sounds from the electronics
do not fly.
With the model held securely and the prop free of obstructions, increase the throttle
just slightly to confirm the rotation of the prop is correct. The model should want to
pull straight forward with throttle.
If this is your first flight with the model double check the C/G is at the correct
position. If not adjust battery position inside model accordingly.
If you are an inexperienced model pilot seek the help and assistance of an
experienced pilot to perform these final checks and to test fly the model for you.
when powered up. If in doubt,
11
Page 15

FLYING THE UGLY STICK V2:
The Durafly Ugly Stick V2 not only looks as good as the original, but flies just as well,
capturing perfectly those excellent flight qualities that established the Ugly Stick as such
a popular RC sports flyer all those years ago.
The Ugly Stick V2 requires no special flying considerations as it is such a well mannered
sports model suitable for both novice and experienced flyer's alike. The model has a
good range of speed and is just as happy flying at low throttle as she is at high. At the
lower end of the speed range the Ugly Stick exhibits no bad stall tendencies and can be
flown comfortably at half throttle if desired. However when you wish to experience the full
flying capabilities of the Ugly Stick V2, full throttle flying is even more fun and all manner
of sports aerobatic maneuvers are achievable with the model.
Thanks to the steerable tail wheel and the wide stance of the main gear, the Ugly Stick
V2 handles very well on the ground and take off is always very straight and controlled
either on paved or grass surfaces. With good acceleration and plenty of power your Ugly
Stick V2 will be airborne within a few feet and with less than 3/4 throttle. Once in the air
you’ll be rewarded with an airframe that goes exactly where you point it and tracks very
true in flight. Eve. If required the Ugly Stick V2 can also be hand launched with ease at
full throttle and with nothing more than a over arm launch from standing.
Flight times on the recommended 2600-3000mah 3S lipo will range from 8 to 12 minutes
or even longer depending on your use of throttle and with its low current draw, the power
system will be barely warm to the touch after each flight. When it is time to land, the Ugly
Stick V2 is comfort-able in either a power on or power off approach, depending on your
preference and circumstance. The model will glide power off and you’ll remain
comfortably in control in either situation all the way down.
Happy flying and thank you for choosing Durafly.
12
Page 16
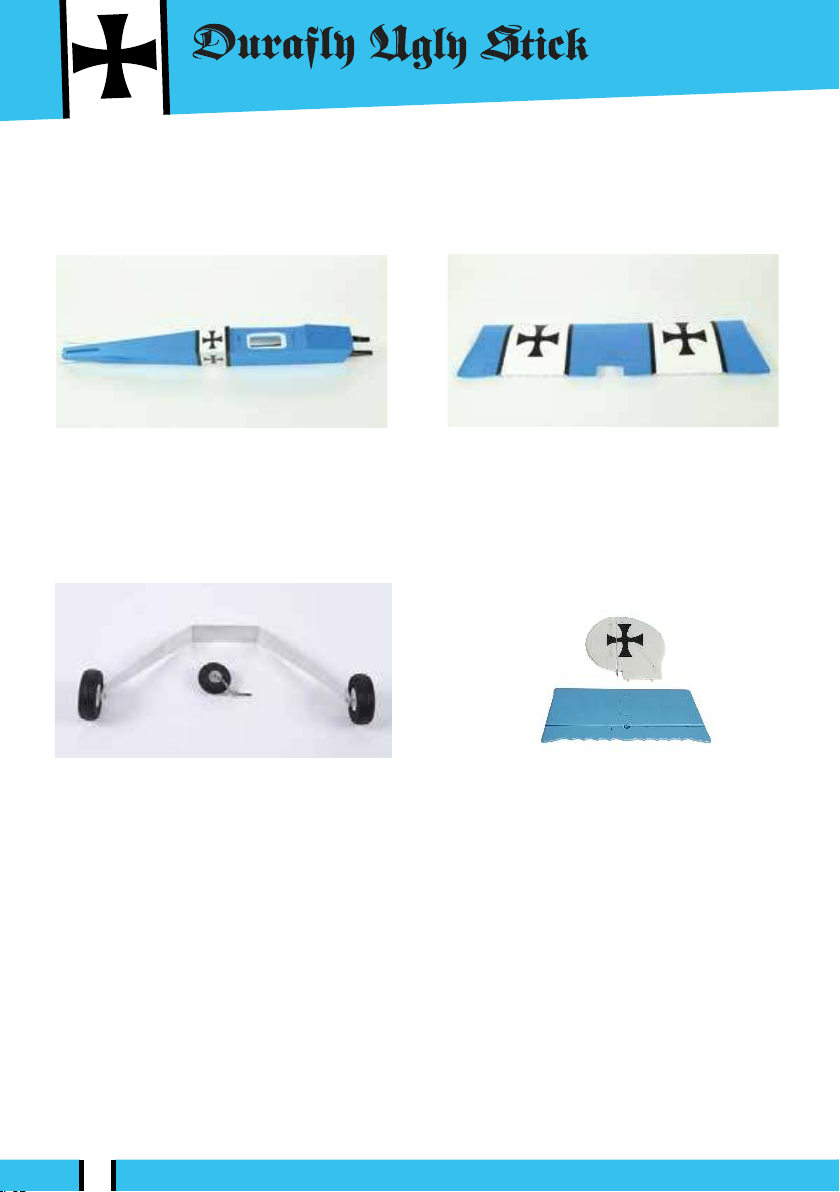
SPARE PARTS LISTING:
Version 2
Fuselage
9306000503-0
Landing gear
9306000505-0
Main wing
9306000506-0
Horizontal stabilizer &
fin
9306000504-0
13
Page 17
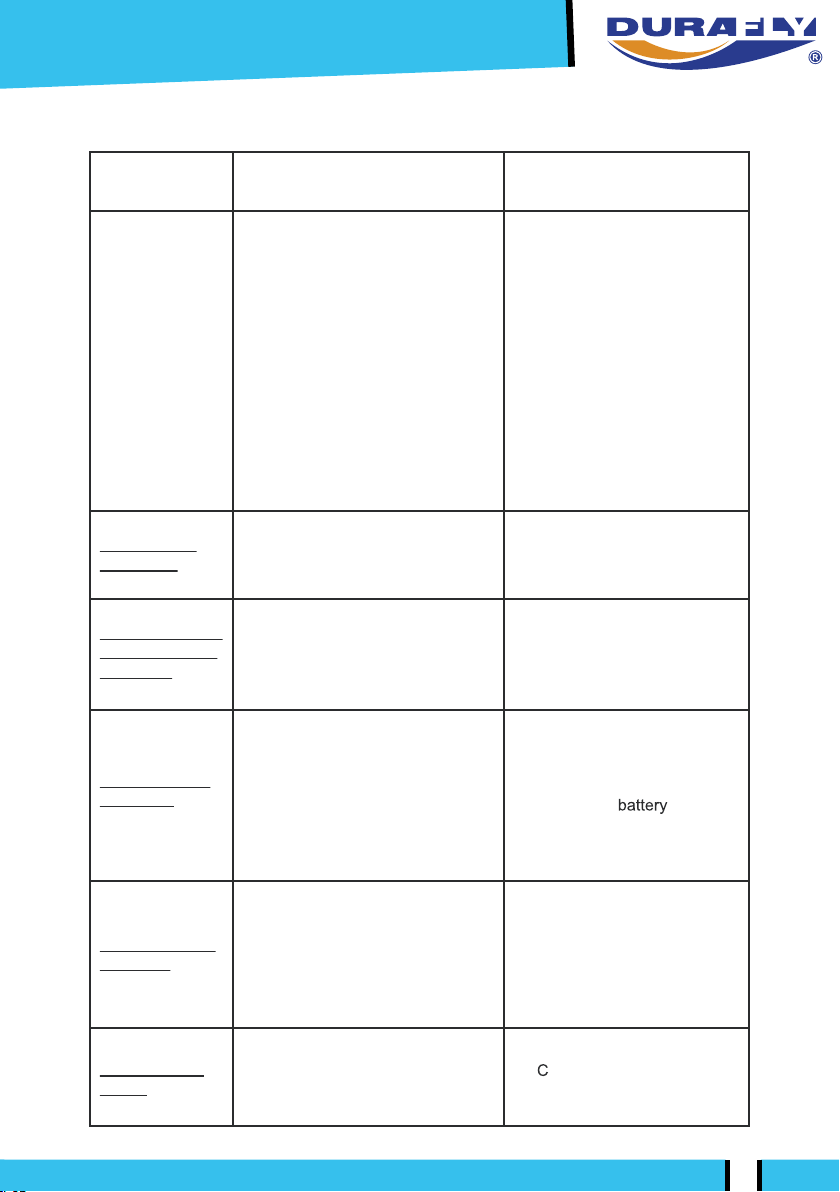
TROUBLE SHOOTING:
Problem Cause Solution
Motor does
not run
Model moves
backwards
Control surfaces
not moving with
stick input
Model does not
fly straight
1. Battery is not fully charged.
2. Transmitter battery low.
3. Motors not connected.
4. The motor is damaged.
5. Receiver is not bound to Tx.
6. ESC in set-up mode.
1. Prop installed backwards
1. The servo lead is connected
to Rx incorrectly.
2. The servo is damaged.
1. Control surfaces not centered.
2. CG is not in the correct position.
1.Charge the batteries.
2. Install a full charged battery.
3. Check for connection
between the ESC and
motor.
4. Replace motor.
5. Consult Radio manual and
go through bind procedure
again.
6. Hold model and move
throttle to full postion then
back down to idle.
1. Turn the prop around .
1. Make sure the servo leads
are connect properly.
2. Replace servo.
1. Adjust the trims on the
transmitter.
2. Re-position
suggested.
as
Model does not
climb well
Limited Radio
Range
1. The battery is not fully charged.
2. Elevator servo is reversed.
3. CG too far forward.
1. Transmitter/Receiver batteries
are flat.
1. Charge the battery.
2. Change servo direction
via Tx.
3. Move battery backwards.
harge/replace batteries.
1.
14
 Loading...