

Page 1
Dury 1100mm Supermine
Please read this manual carefully before operating this plane.
Page 2
Page 3
CONTENTS
Page 4
Durafly 1100mm Supermarine
SPITFIRE MK2A
INTRODUCTION:
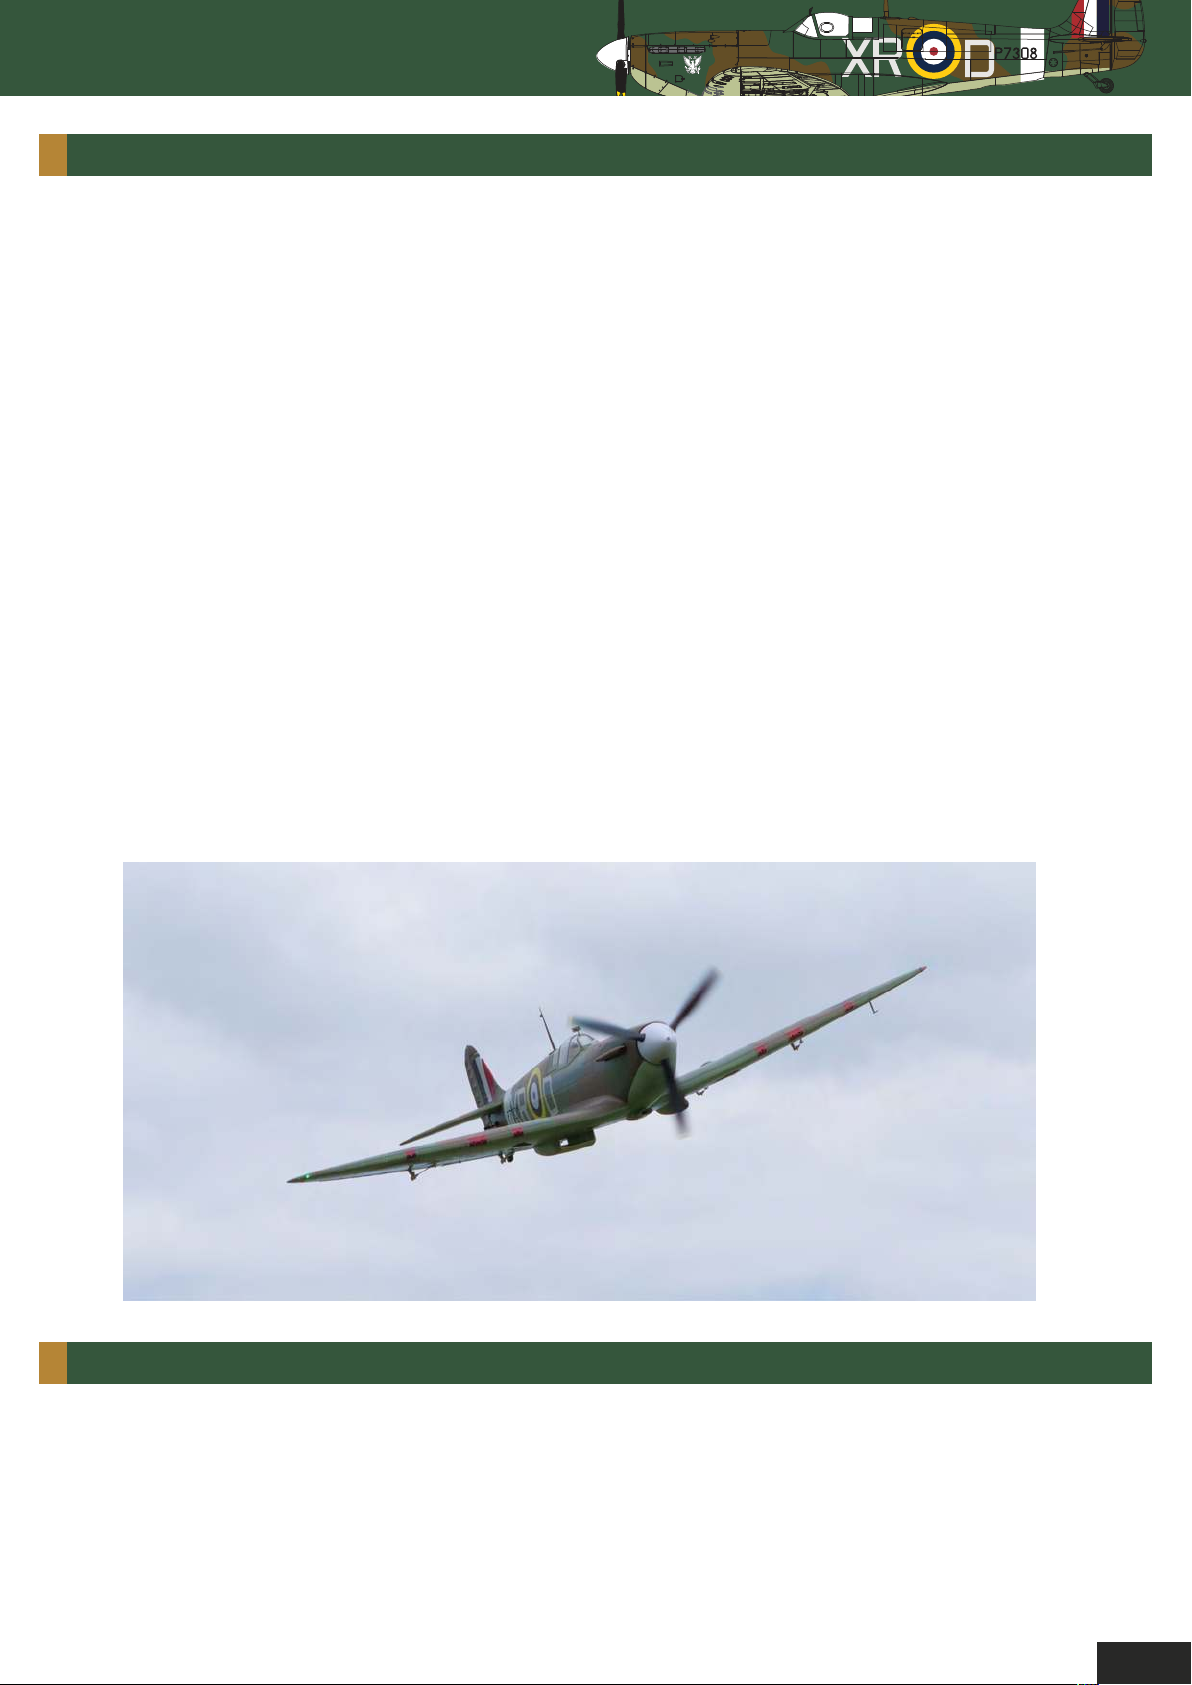
The Supermarine Spitfire is THE defining aircraft of WW2, the Mk2a was one of the early versions
that defined this incredible airplane. The Mk2a was equipped with the new Merlin XII engine and
either a De Havilland or Rotol propeller which together produced an extra 120hp over the the
Mk1a set-up. During the darkest days of the war, the Spitfire, more than any other aircraft then or
since, along with the pilots that flew it, came to symbolize the struggle and triumph of a nation
over adversity. This struggle was the "Battle of Britain", those pilots were "The Few" and the
triumph was the Spitfire!
Durafly’s Mk2a Spitfire P7308 represents a Spitfire that was flown by Squadron No 71, this was
one of the Eagle Squadrons that were formed in the early days of WWII. These fighter squadrons
were formed using volunteer pilots from the United States prior to America's entry into the war in
December 1941. Spitfire P7308 is now operated under the care of "The Fighter Collection" based
at Duxford in England, and its other claim to fame is that it flew in the making of the 1969 film
"Battle of Britian". The attention to detail in this PNF model is matched only by its superb
performance and grace in the air. The Mk2a is designed purely for a 4S set-up unlike previous
marque's, but it still boasts a range of features you have come to expect from Durafly. These
features include, retractable landing gear, faithfully reproduced split flaps, scale outline, fine
surface detail and finish, LED lighting system, and authentic scale decals.
Very simply, you will not find a better rendition of a Spitfire Mk2a at this scale from anyone other
than Durafly. It will appeal to both British and American model airplane pilots for its tribute of a
Spitfire flown by one of the extrordinary Eagle Squadrons that were formed using eager, young
Americans, who wanted to help make a difference, particularly during the "Battle of Britain".
SPECIFICATION:
• Wingspan:1100mm (43.3”)
• Length: 1000mm
• Flying weight: 1600g (56.4 oz)
• Motor: Aerostar 3636 770Kv brushless outrunner
• Battery: 2200mah 4S 40C
• Radio: 5-6 channel RC required
• Flying weight: 1300g (45oz)
• Servos: 6 x 9g
• Prop: 3 blade 11.25x7
1
Page 5
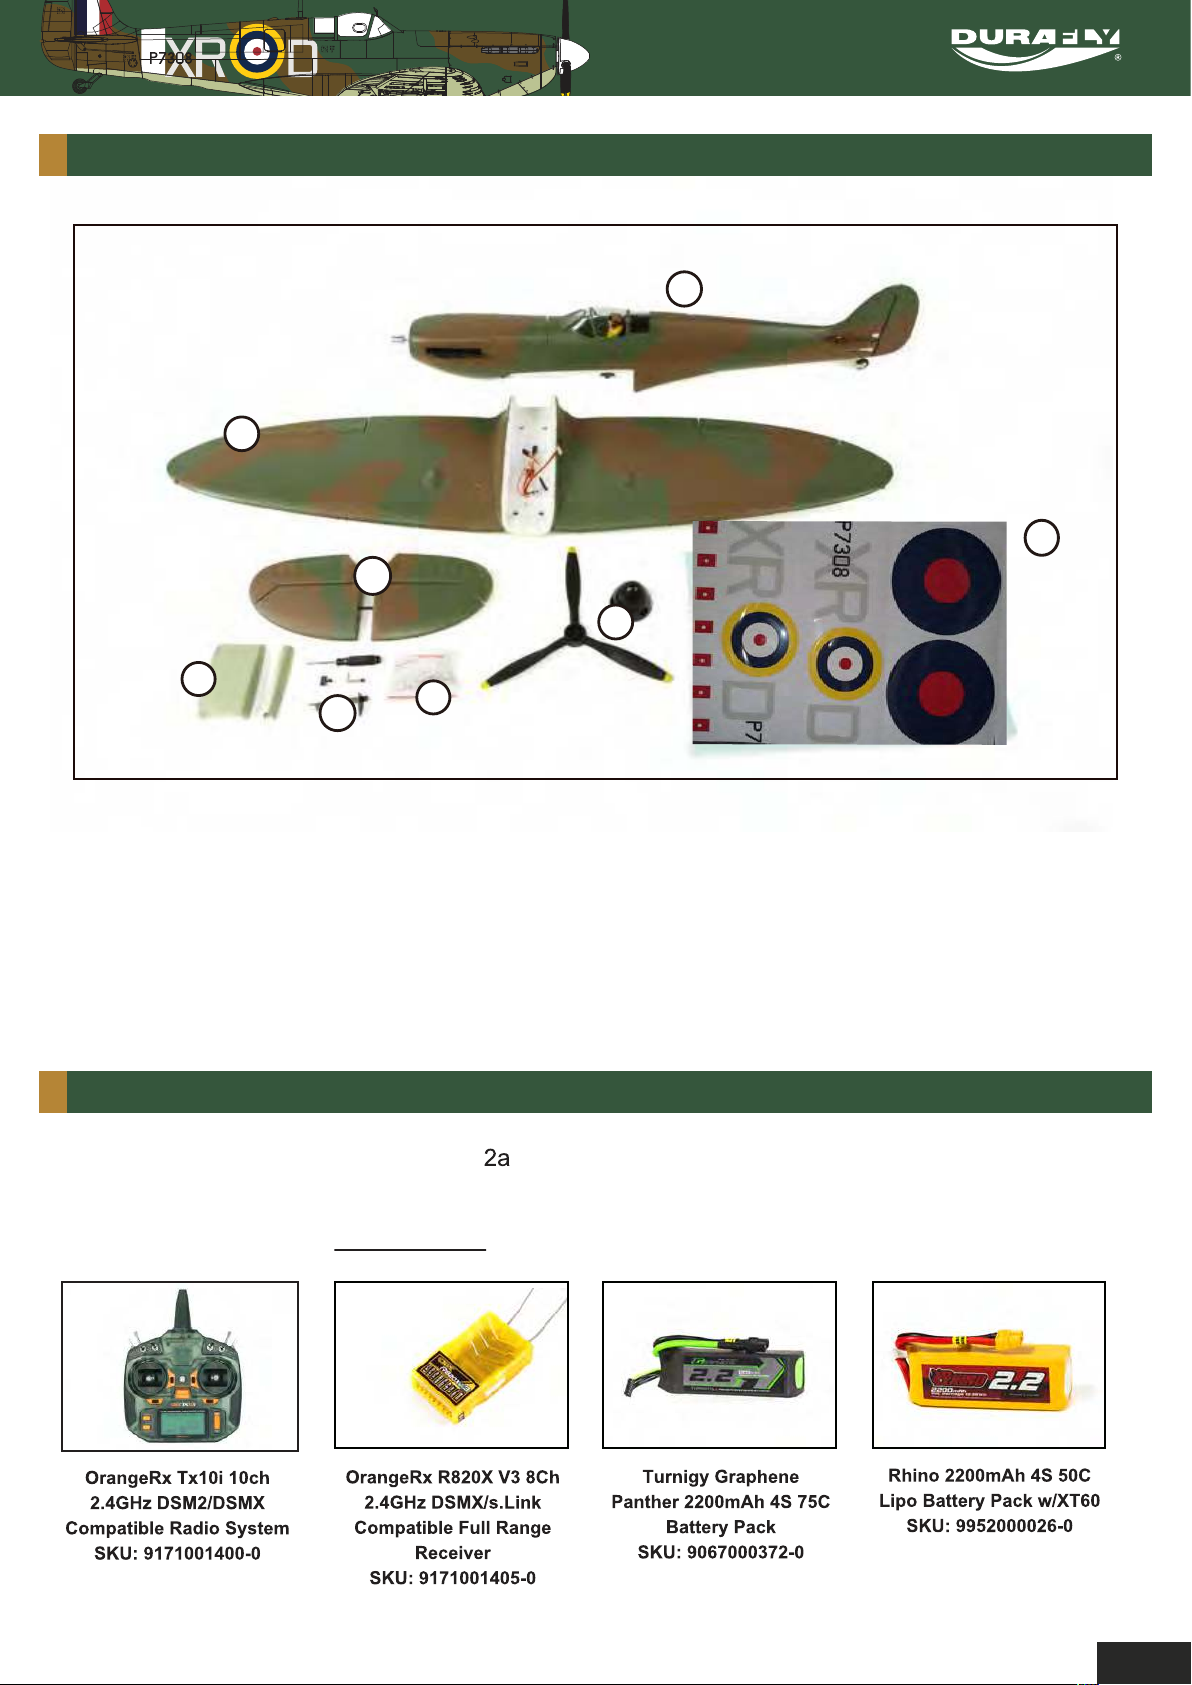
CONTENTS:
1
2
8
3
7
4
6
5
1. Main wing.
2. Fuselage.
3. Horizontal Stabilizer/Spar
4. Wing Radiators
REQUIRED TO COMPLETE MODEL:
In its ‘Plug n Fly’ format the Spitfire Mk will still require some additional electronic components
to get it ‘flight ready’. Durafly recommends the products below for optimum performance and
great value. Available at
hobbyking.com
5. Scale Plastic Parts
6. Control Accessories/Hardware.
7. Prop/Spinner.
8. Decal Sheet.
2
Page 6
Durafly 1100mm Supermarine
SPITFIRE MK2A
NOTE:
ecommended BEFORE you begin assembly of the
model. Please refer to ‘Decal application’ on pages 1
illustrated guide on how to apply, and the separate guide for their positions.
ASSEMBLY:
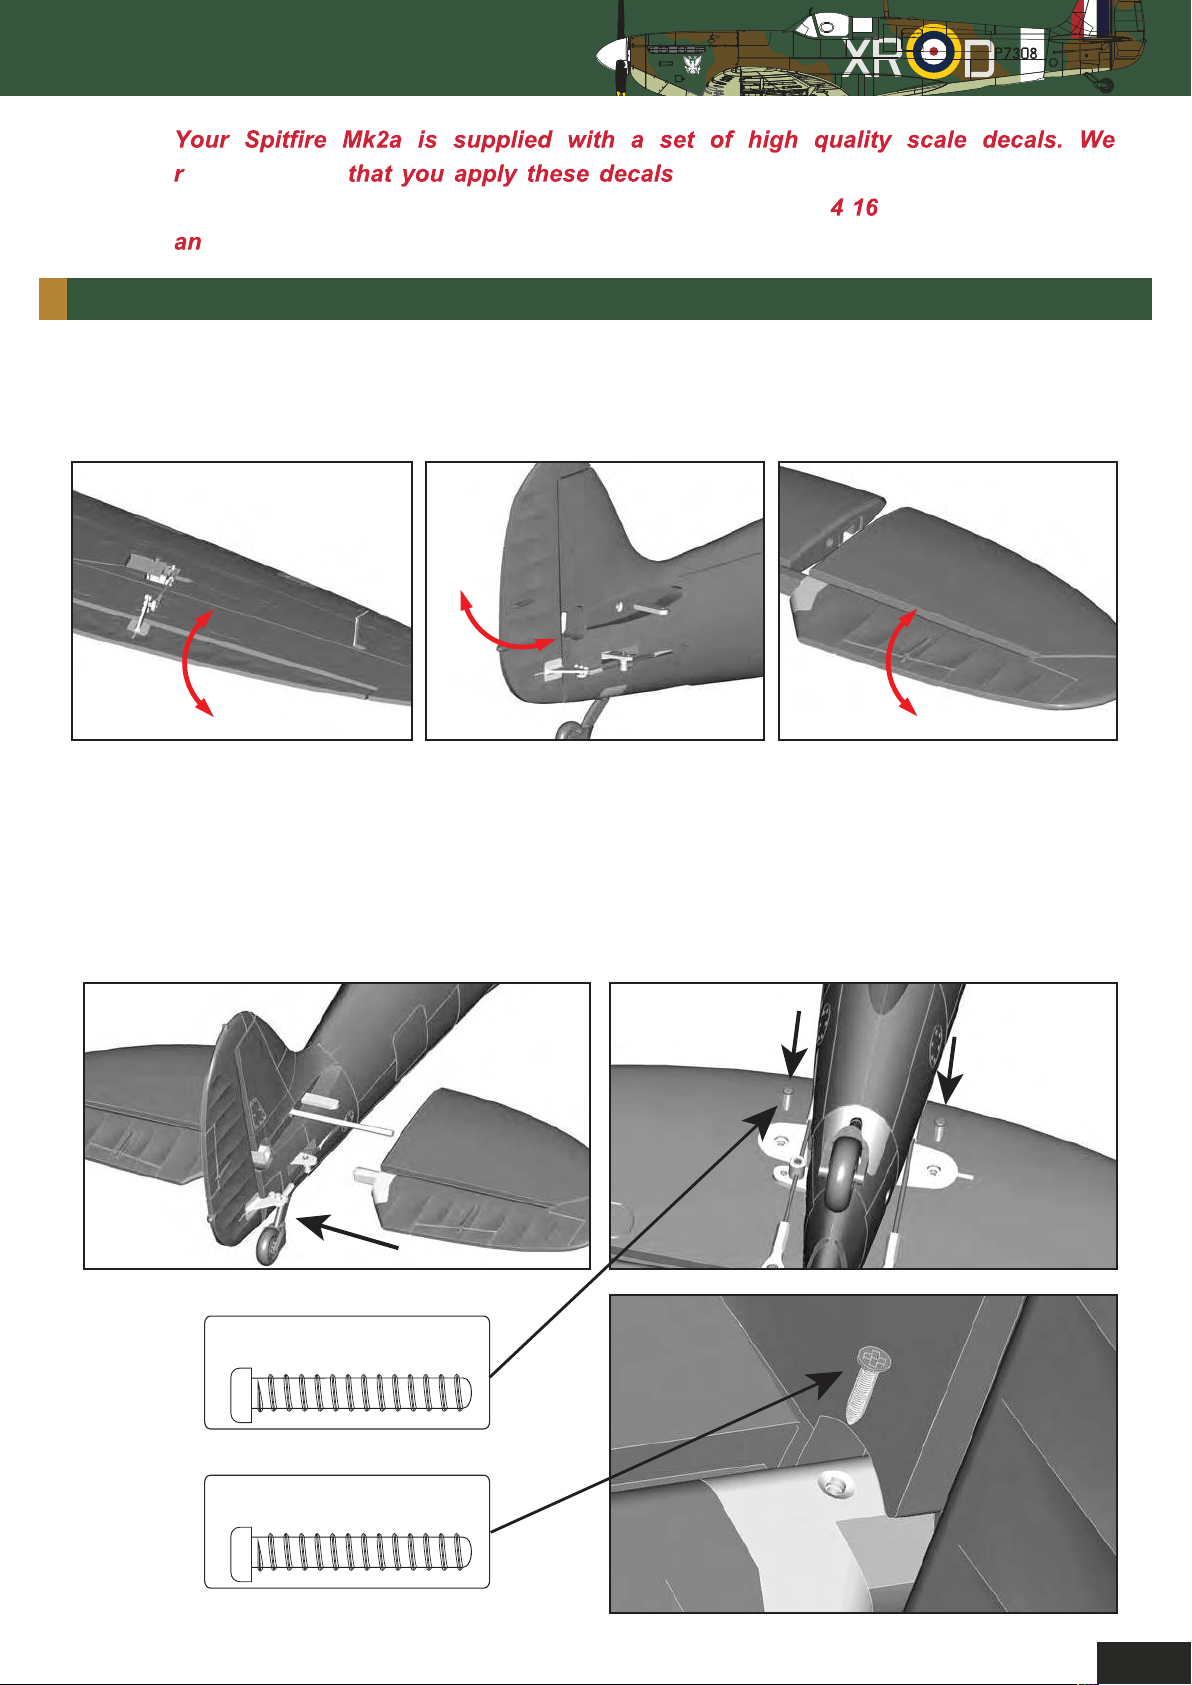
1. Out of the box your Spitfire comes with reinforced foam hinges. However before assembly can
begin, each hinge line must be flexed back and forth 5-6 times to reduce tension and load on the
servo. Do this for all control surfaces before continuing.
- of this manual for
2. Insert one half of the carbon tail spar into one of the horizontal tail pieces before sliding this half
into the tail slot of the fuselage. Now install the remaining tail piece (A). Secure both halves in
place with the supplied 2.3x6mm screws (B) and the elevator join with the single 1.7x6mm screw
(C). This installation is self aligning, but do double check to ensure equal alignment to the vertical
tail and wing.
A. B.
C.
2.3x6mm
1.7x6mm
3
Page 7
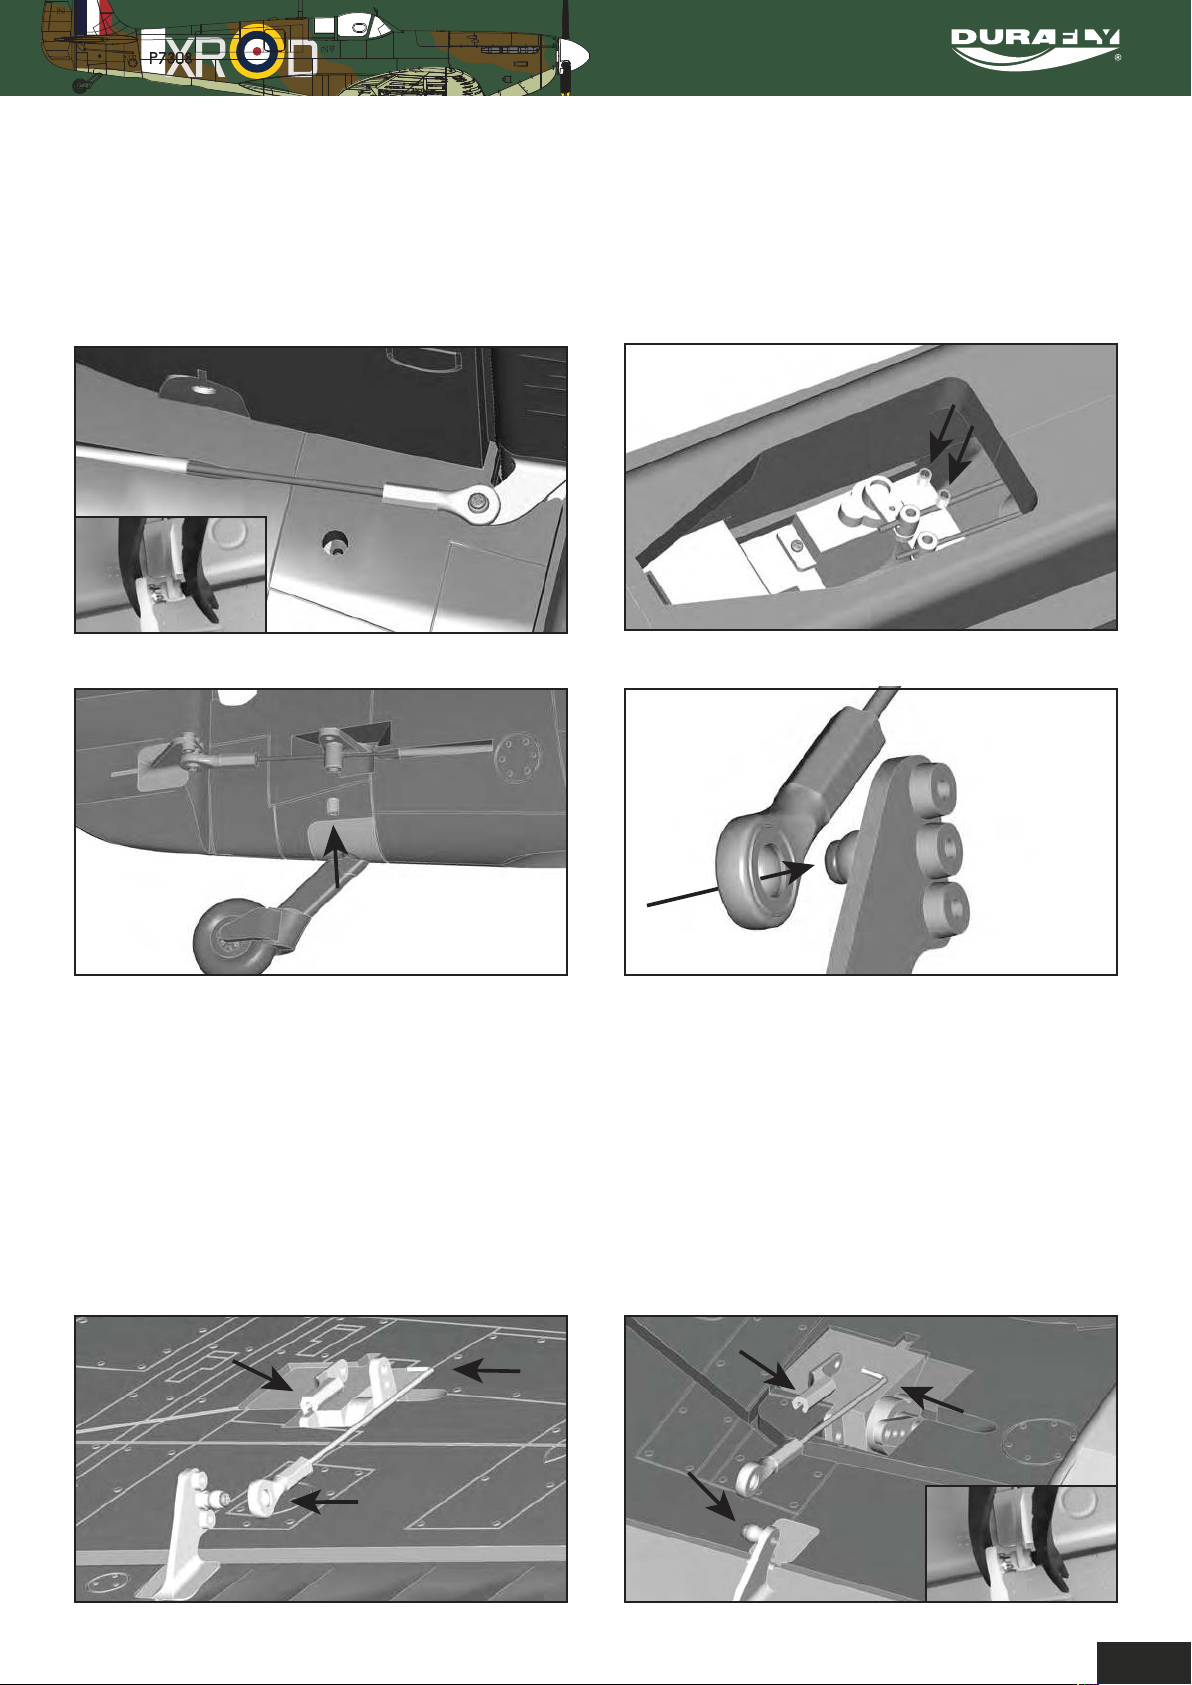
3. Using a pair of pliers (ball link pliers preferably) connect the elevator push rod to the elevator
control horn (A). To ensure both the elevator and rudder are neutral (with the servos centered)
loosen the grub screw of the piano wire fastener until both surfaces and slide the push rods until
both are neutral if required (B). The steerable tail wheel can be adjusted the same way (C).
Tighten all firmly when done.
A.
C.
B.
Note: Each ball link has a faint circle molded on one side.This
denotes the side that should be connected to the ball joint.
4. With the aileron control horns at 90 degrees to the wing surface (neutral) insert the aileron
push rod into the top hole of the control horn. Secure in place with the plastic keeper and then
connect the ball link to the ball join using pliers (A). Repeat this same process for the flaps, the
exception being that the flap servo horns must be positioned as far rearwards as possible.
This will give a flap neutral position with the push rods connected (B).
A.
B.
4
Page 8
Durafly 1100mm Supermarine
SPITFIRE MK2A
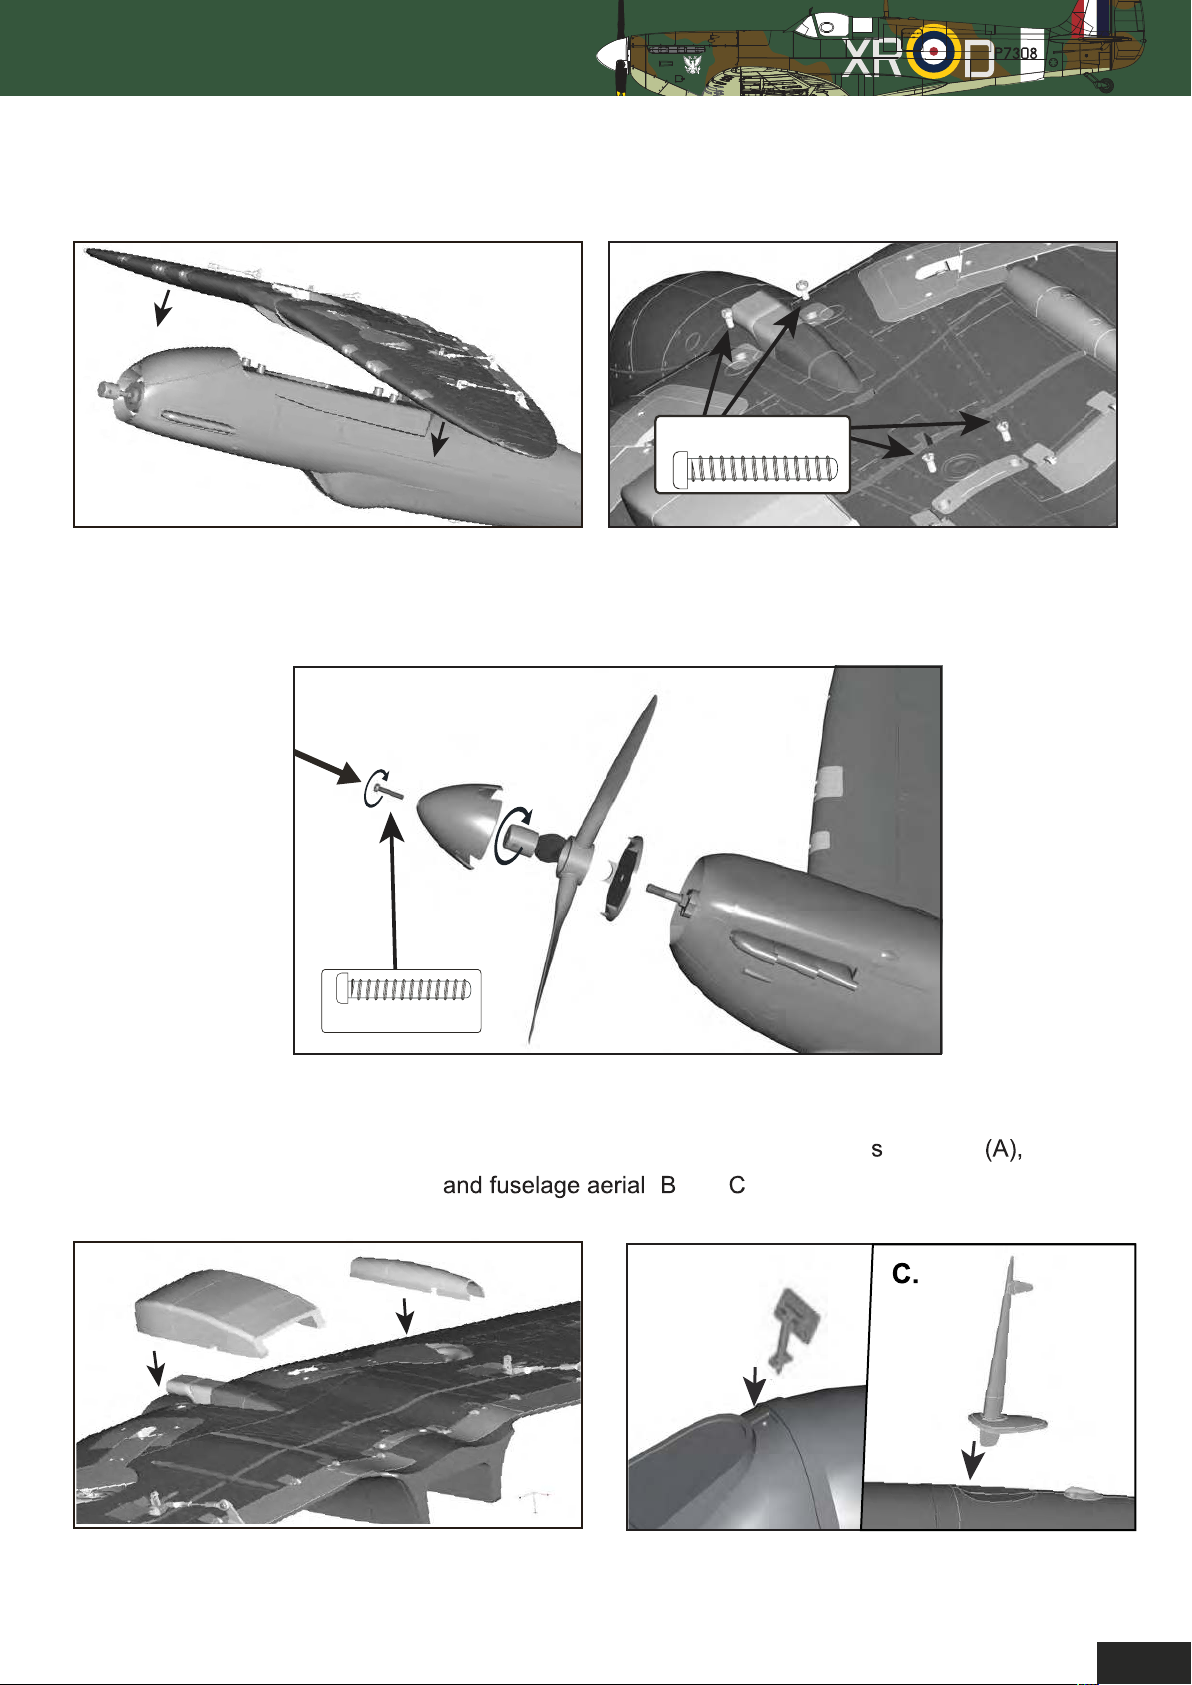
5. Offer the wing up to the fuselage and ensure the servo wires pass through into the battery area
of the fuselage (A). Check again that no servo wires are caught between the wing and fuselage
before securing in place using the four 3x10mm bolts supplied (B)
B.
A.
3x10mm
6. Slide the spinner back plate onto the motor shaft making sure the ‘hex’ shape opening at the
rear of the plate fits over the ‘hex’ on the base of the shaft. This is followed by the prop and prop
nut. Tighten the prop nut then finally screw the spinner in place.
3 x 20 mm
Note: It is recommended that you balance the prop and spinner before
installing for optimum performance and efficiency.
7. With a small amount of contact glue, secure the under wing radiator
along with the cockpit mirror ( and ).
in place
A.
B.
5
Page 9
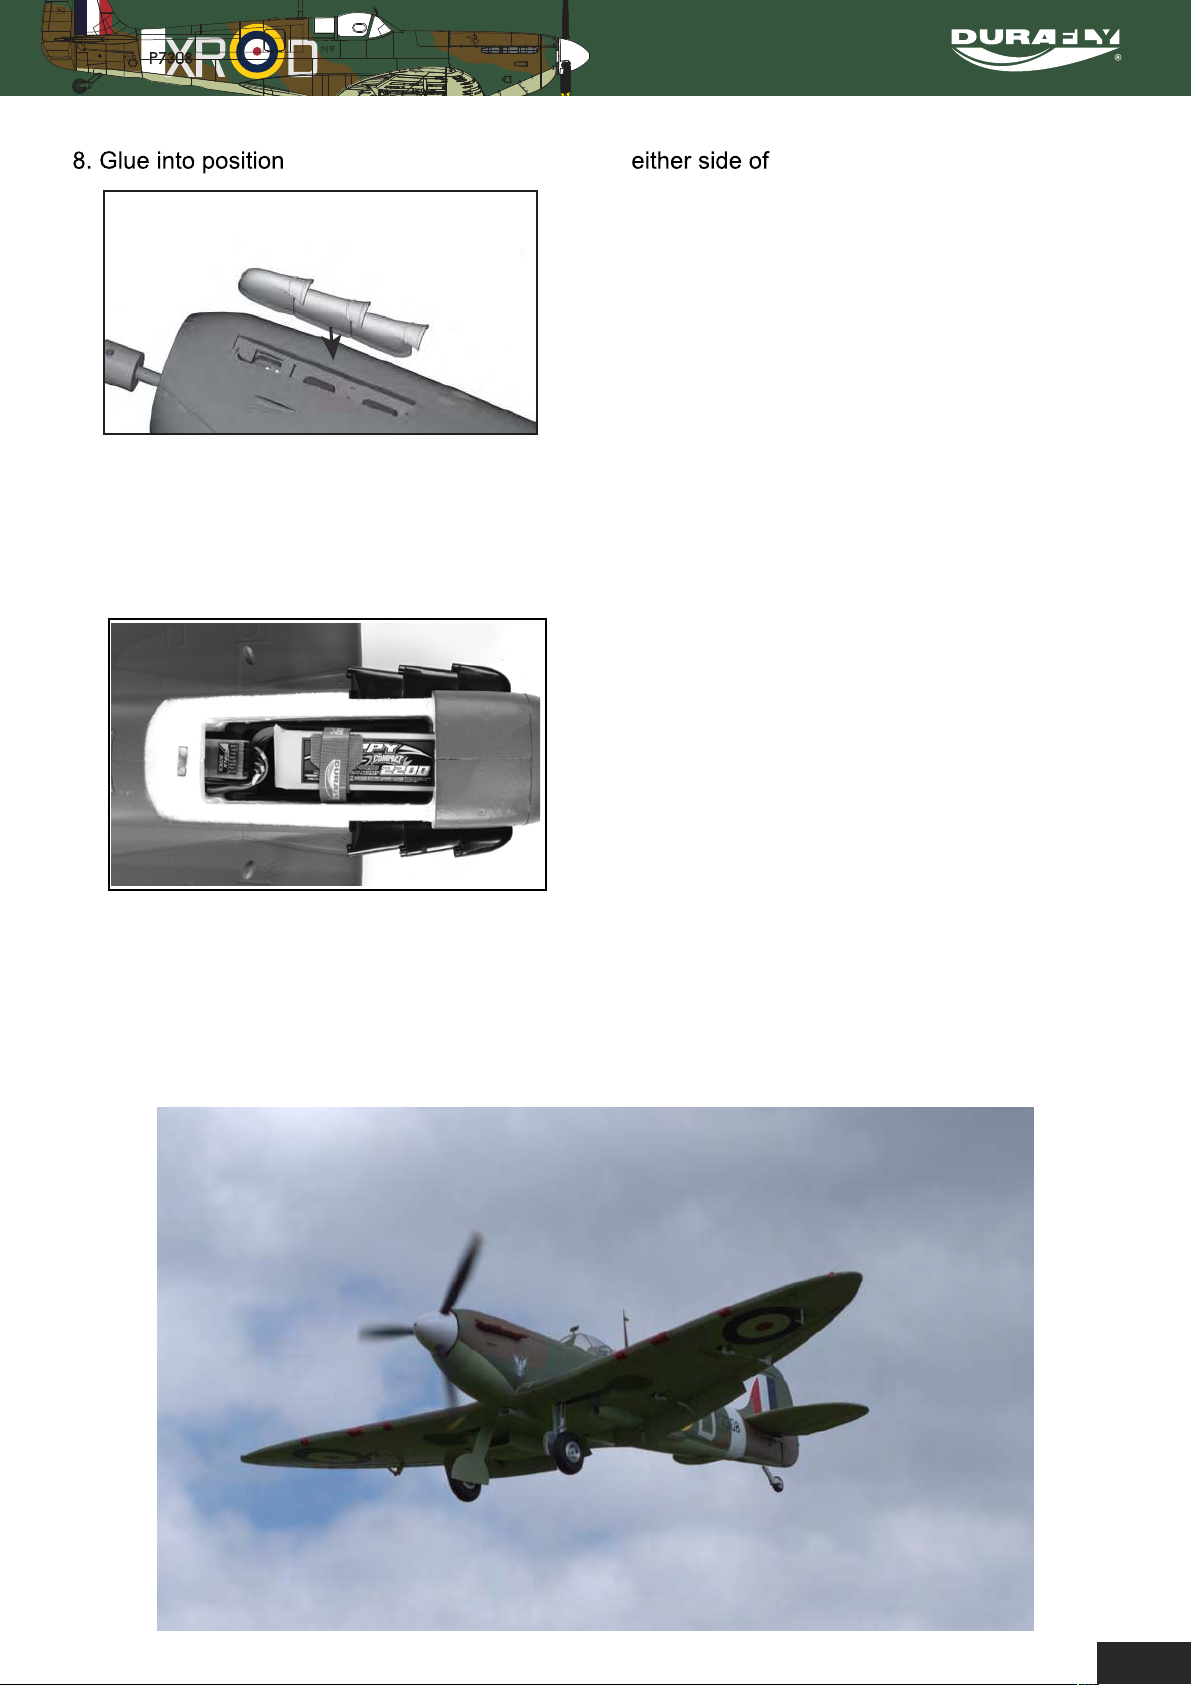
the fish tail exhaust stacks onto the fuselage.
A.
Install you choice of 6 channel receiver (Orange X620 shown) in approximately the area shown
9.
below. Ensure all wires are held away from the servo horns. Also shown is the exact location of
a 40C 2200mah 4S lipo (as far forwards as possible) to achieve the correct CG as detailed in the
following pages.
Note: The fuselage LED shares a Y-lead with
the gear servo from the wing. Be sure to
connect the LED lead before attaching the
wing.
Congratulations, basic assembly of your Spitfire
Mk2a is now complete. Please perform a final
check on all screws, bolts and components,
ensuring all are secure and firmly in place.
6
Page 10
Durafly 1100mm Supermarine
SPITFIRE MK2A
SETTING UP YOUR MODEL:
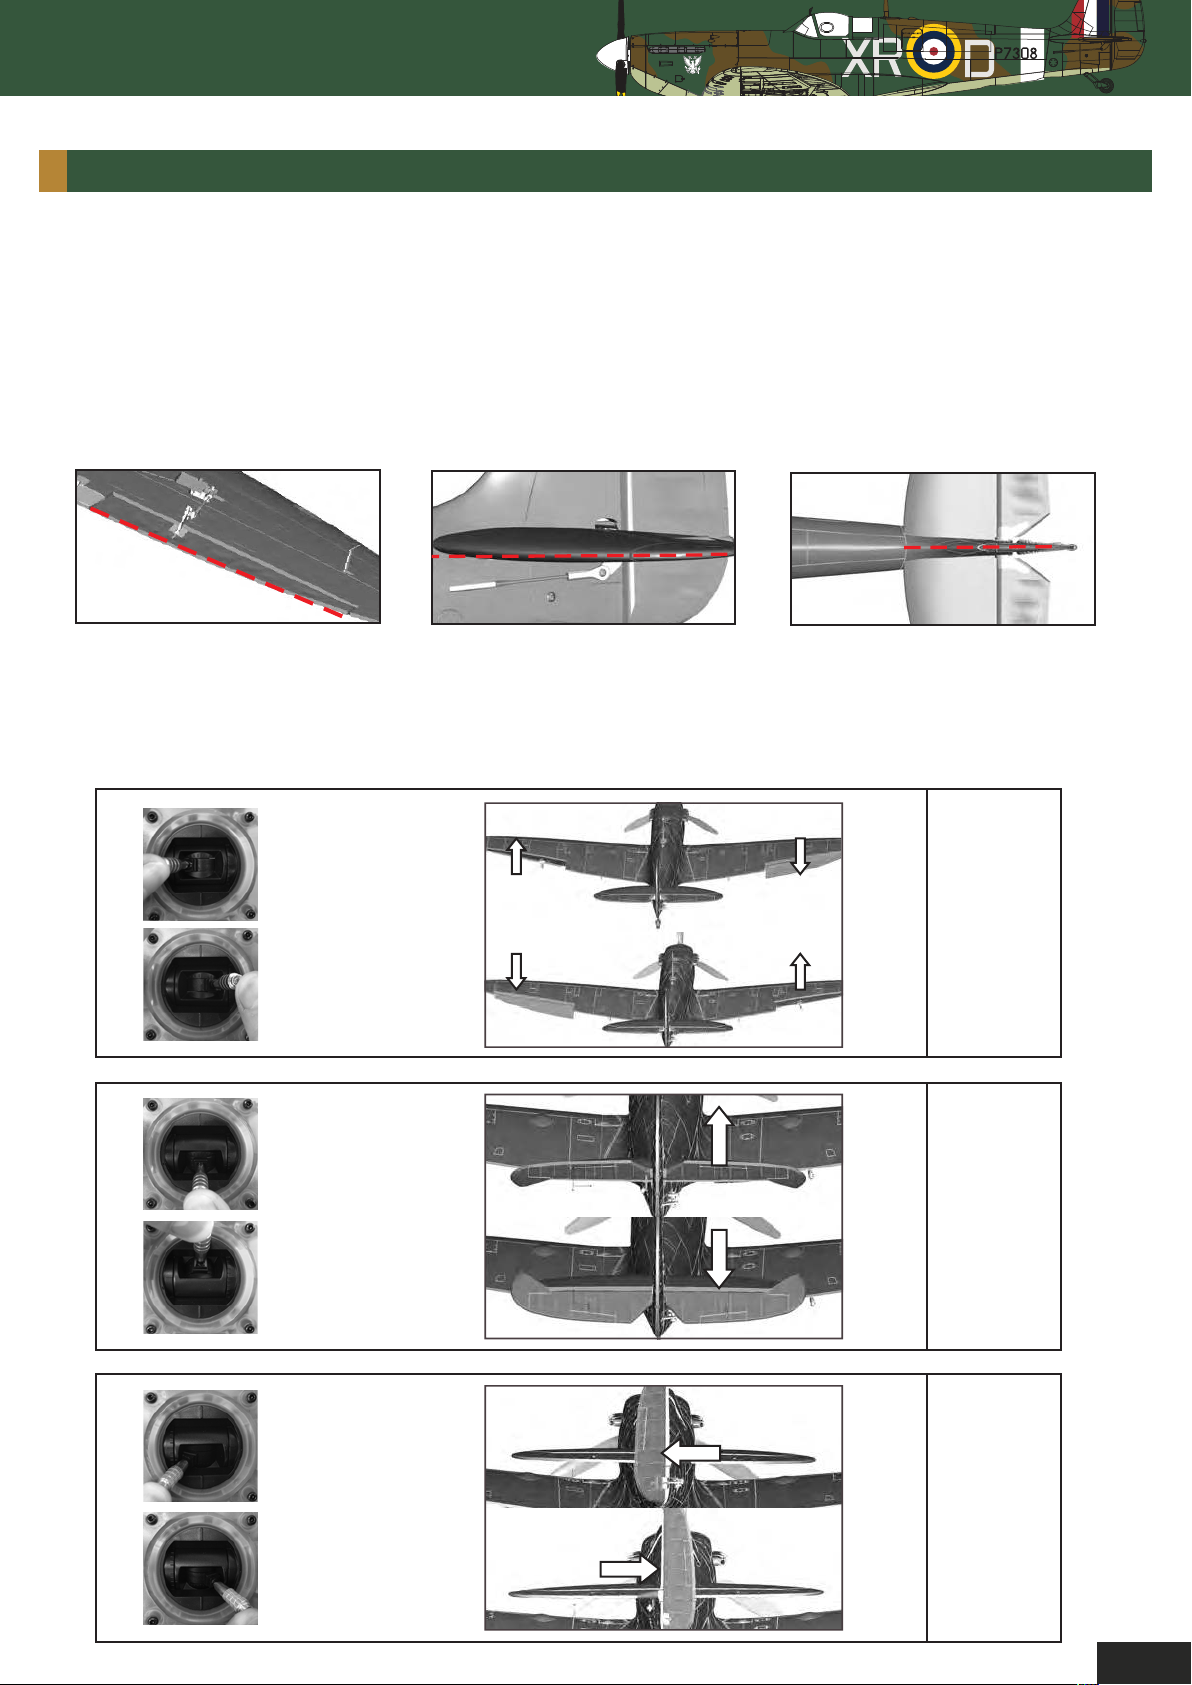
1. With your receiver installed and all servos plugged into their corresponding channels, connect
the flight battery to the ESC to power up the electronics. With the model now armed, ensure all
servos are centered and all control surfaces are level. If not, adjust by turning the control clevis’s
hand accordingly until the control surfaces are level as shown.
Note: For safety reasons, it is advised that this is done with the prop removed from the
model.
Ailerons
Elevator
Rudder
by
2. Check all control surfaces are moving in the correct direction with the applicable
stick input (see below)
Roll left
Roll right
Pitch up
Pitch down
Yaw lef t
Aileron
(Roll)
Elevator
(Pitch)
Yaw right
Rudder
(Yaw)
7
Page 11
3. The Spitfire Mk handles very well in flight and that’s not down to good design alone, but a good
pre-flight set-up too. Before you fly your Spitfire please follow the recommended settings below
for optimum handling and performance.
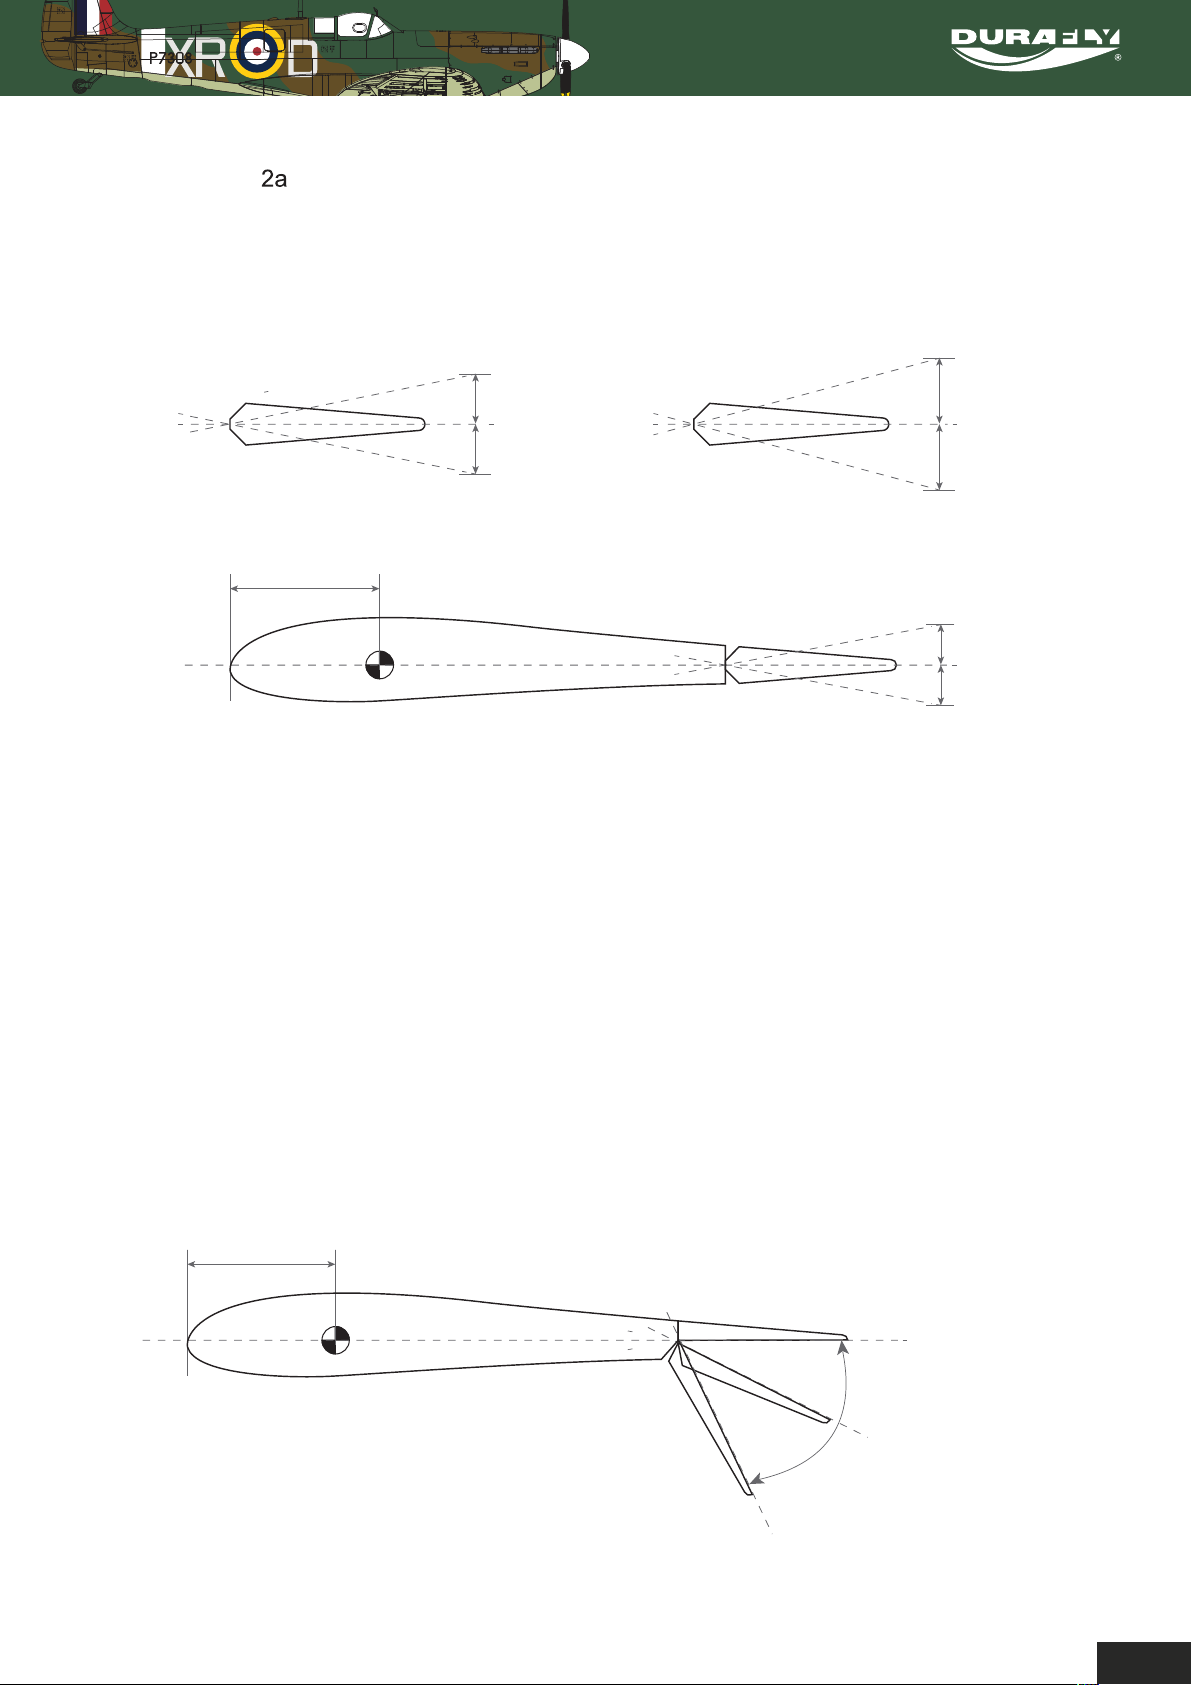
Control throws:
15-35mm
15-35mm
Elevator
65mm~
10-20mm
10-20mm
Rudder
Aileron
14-22mm
14-22mm
*Elevator ‘low rates’ 10mm ‘high rates’ 20mm in either direction from neutral.
*Rudder ‘low rates’ 15mm ‘high rates’ 35mm in either direction from neutral.
*Aileron ‘low rates’ 14mm ‘high rates’ 22mm in either direction from neutral.
4. Flaps on the Spitfire should be set for 3 stages (up/no flap, mid flap and full flap). Either via your
radio or mechanically by turning the clevis’s on the flap control rod (or via both in most cases), set
mid flap to approximately 40°degrees and full flaps to approximately 87° degrees to the wing. In
the ‘up/no flap’ position ensure the flaps close fully without straining either servo. Also ensure that
both flaps deploy equally at every stage.
65mm~
Flaps
Half 40 degrees
Full 87 degrees
98
Page 12
Durafly 1100mm Supermarine
SPITFIRE MK2A
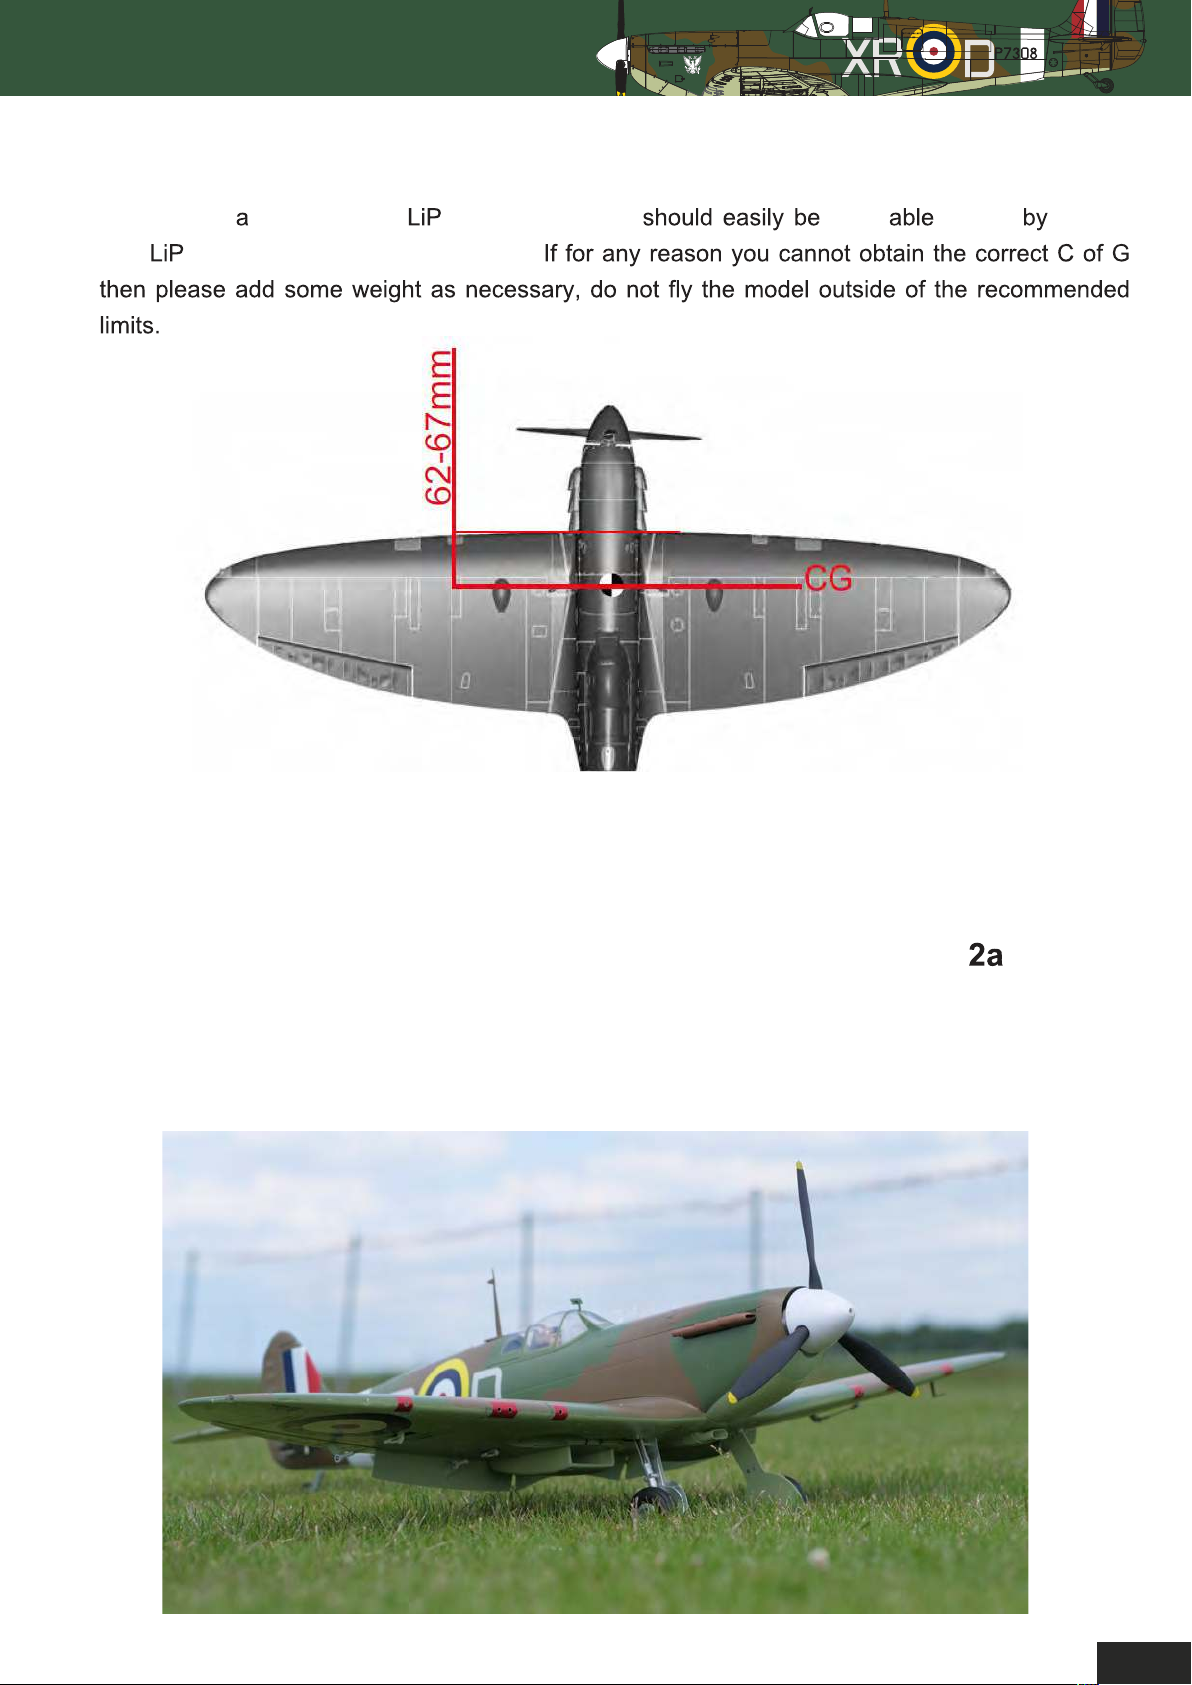
5. The center gravity (CG) for the Spitfire is approximately 62-67mm from the leading edge of the
wing. Using
the o as far forward as possible.
2200mah 4S o, the correct CG attain simply putting
CG 62-67mm when measured from the
leading edge of the wing at the root.
Measure with the gear retracted and the
model inverted.
With assembly and set-up now complete, your Durafly Mk Spitfire
should now be ready for flight. However we recommend you read
and follow the advice given in the following pages of this
manual before flying.
9
Page 13

MODEL FLYING PRECAUTIONS:
Select your flight area carefully. Always choose an open space that is unobstructed from trees
and buildings and away from crowed areas. Avoid flying in area’s with roads, electric/telephone
poles/wires and water near by or within close proximity to full size air traffic.
Do not fly this model in poor weather. High winds, low visibility, inclement temperatures, rain and
storms are to be avoided.
Never attempt to catch this model whilst in flight. Even a slow moving model can cause harm to
yourself and/other and risks damage to the model.
This model is recommended for children no younger than 14 year old. All children, no matter what
age, should always be supervised by a capable and responsible adult when operating this model.
Always unplug your model battery when not in use. Never leave the battery installed in the model.
Remember to keep clear of the propeller at all times when your flight battery is connected.
Before flying, always turn on your transmitter first then plug your flight battery into the model.
After flying, always unplug your flight battery first then turn off your radio transmitter.
Exercise caution when charging your batteries and follow in full your battery manufactures safety
guideline when doing so.
PRE-FLIGHT CHECKS:
1. Always range check your model before any flight (especially when flying a new model for the first
time). Follow your radio manufacturers guidelines for performing this check.
2. Check all screw/bolts and mounting points are firmly secured, including control horns and
clevises.
3. Only fly with fully charged batteries (both in your radio and model). Failure to do so could result
in loss of control, damage to the model and/or persons/property around you. Check your
batteries are fully charged.
4. With the model powered up (
free from damage/obstructions, moving in the correct directions and freely with stick input.
5. Inspect the model and prop for any damage that may have occurred during transit and listen for
any unusual sounds from the electronics when powered up. If in doubt, do not fly.
transmitter on first, then receiver/model) check that all surface are
6. With the model held securely and the prop free of obstructions, increase the throttle just slightly
to confirm the rotations of the prop is correct. The model should want to pull straight forward with
throttle.
7. If this is your first flight with the model double check the C/G is at the correct position. If not adjust
battery position inside model accordingly.
8. If you are an inexperienced model pilot seek the help and assistance of an experienced pilot to
perform these final checks and to test fly the model for you.
10
Page 14
Durafly 1100mm Supermarine
SPITFIRE MK2A
FLYING YOUR SPITFIRE MK2a:
7
11
Page 15
SPITFIRE MK2A TIPS:
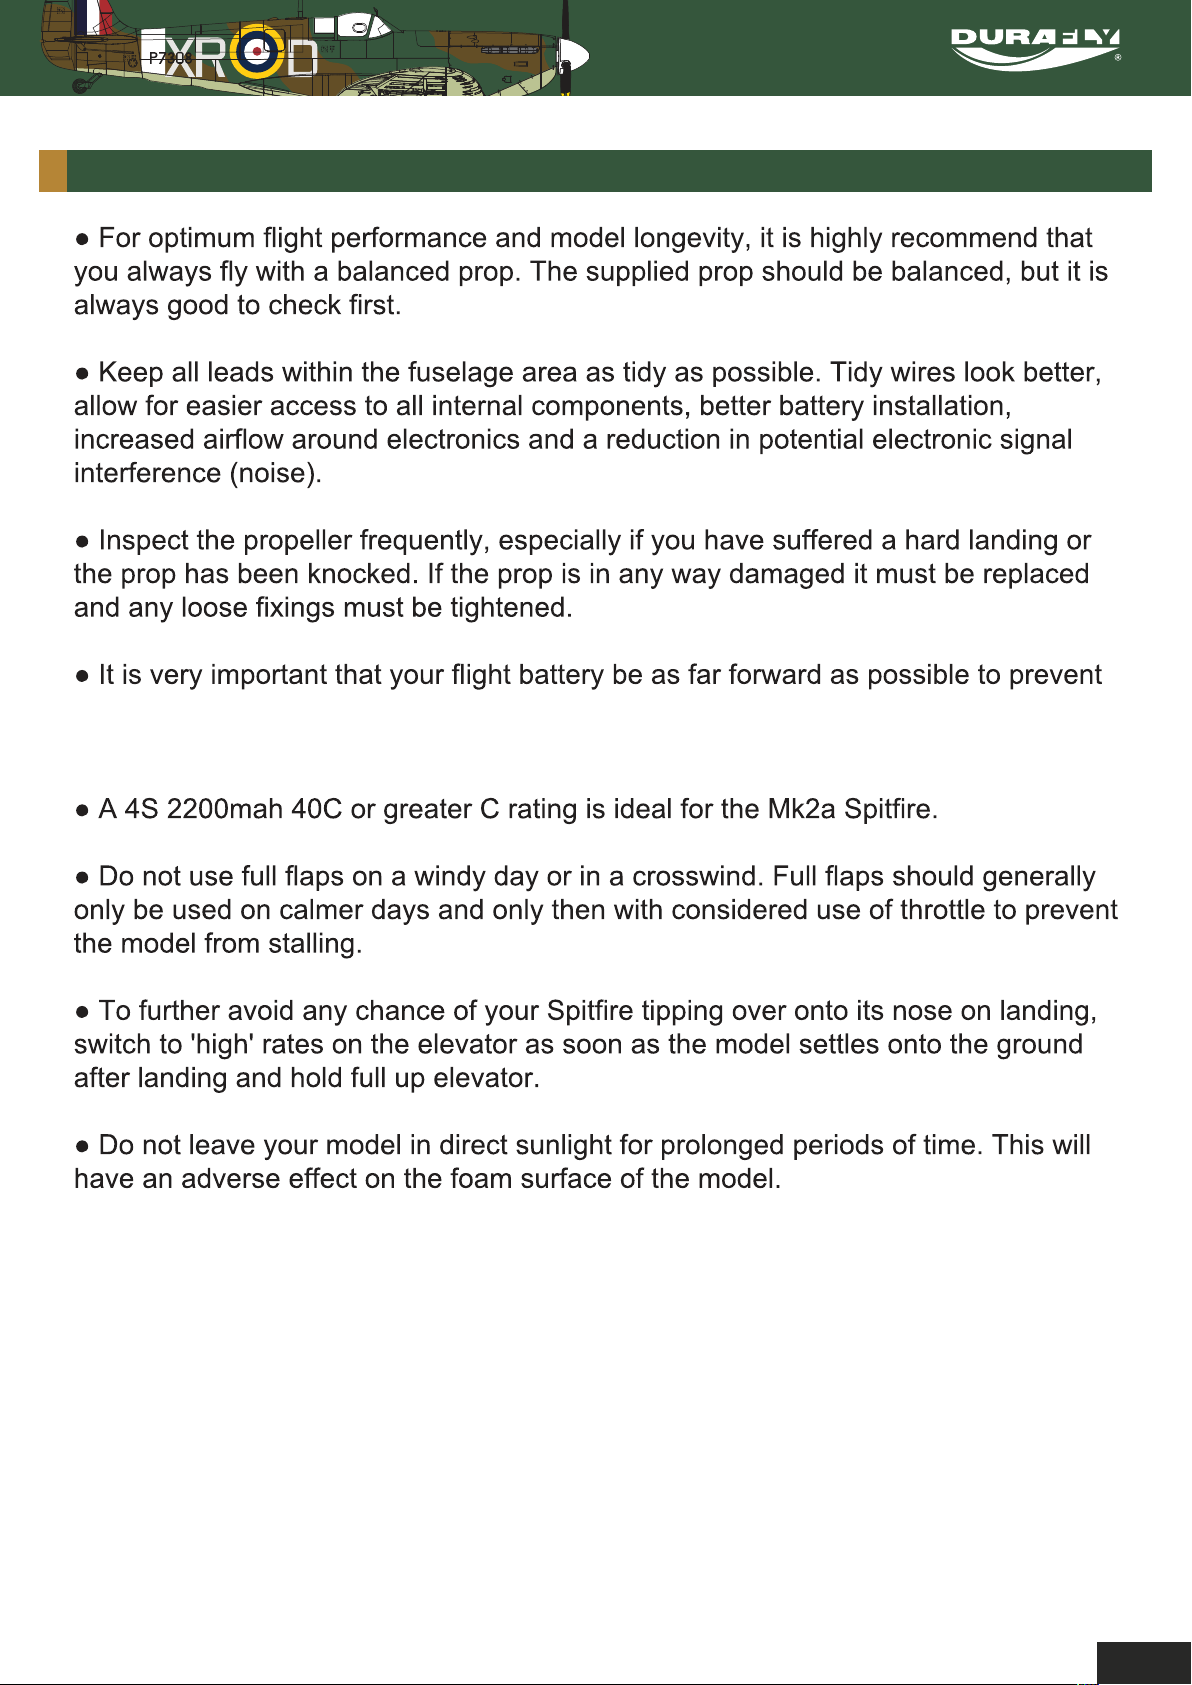
the Spitfire from flying tail heavy. Ensure you follow exactly the guidelines for CG, and
set-up, shown on pages 7, 8, and 9 before flying your Spitfire.
Thank you again for purchasing the Durafly Spitfire Mk2a. We hope
you’ll have many happy days of flying and look forward to bringing
you more Durafly models in the future.
Don’t forget, spare parts are available for this model,
please see the next page for details.
12
Page 16
Durafly 1100mm Supermarine
Durafly 1100mm Supermarine
SPITFIRE MK2A
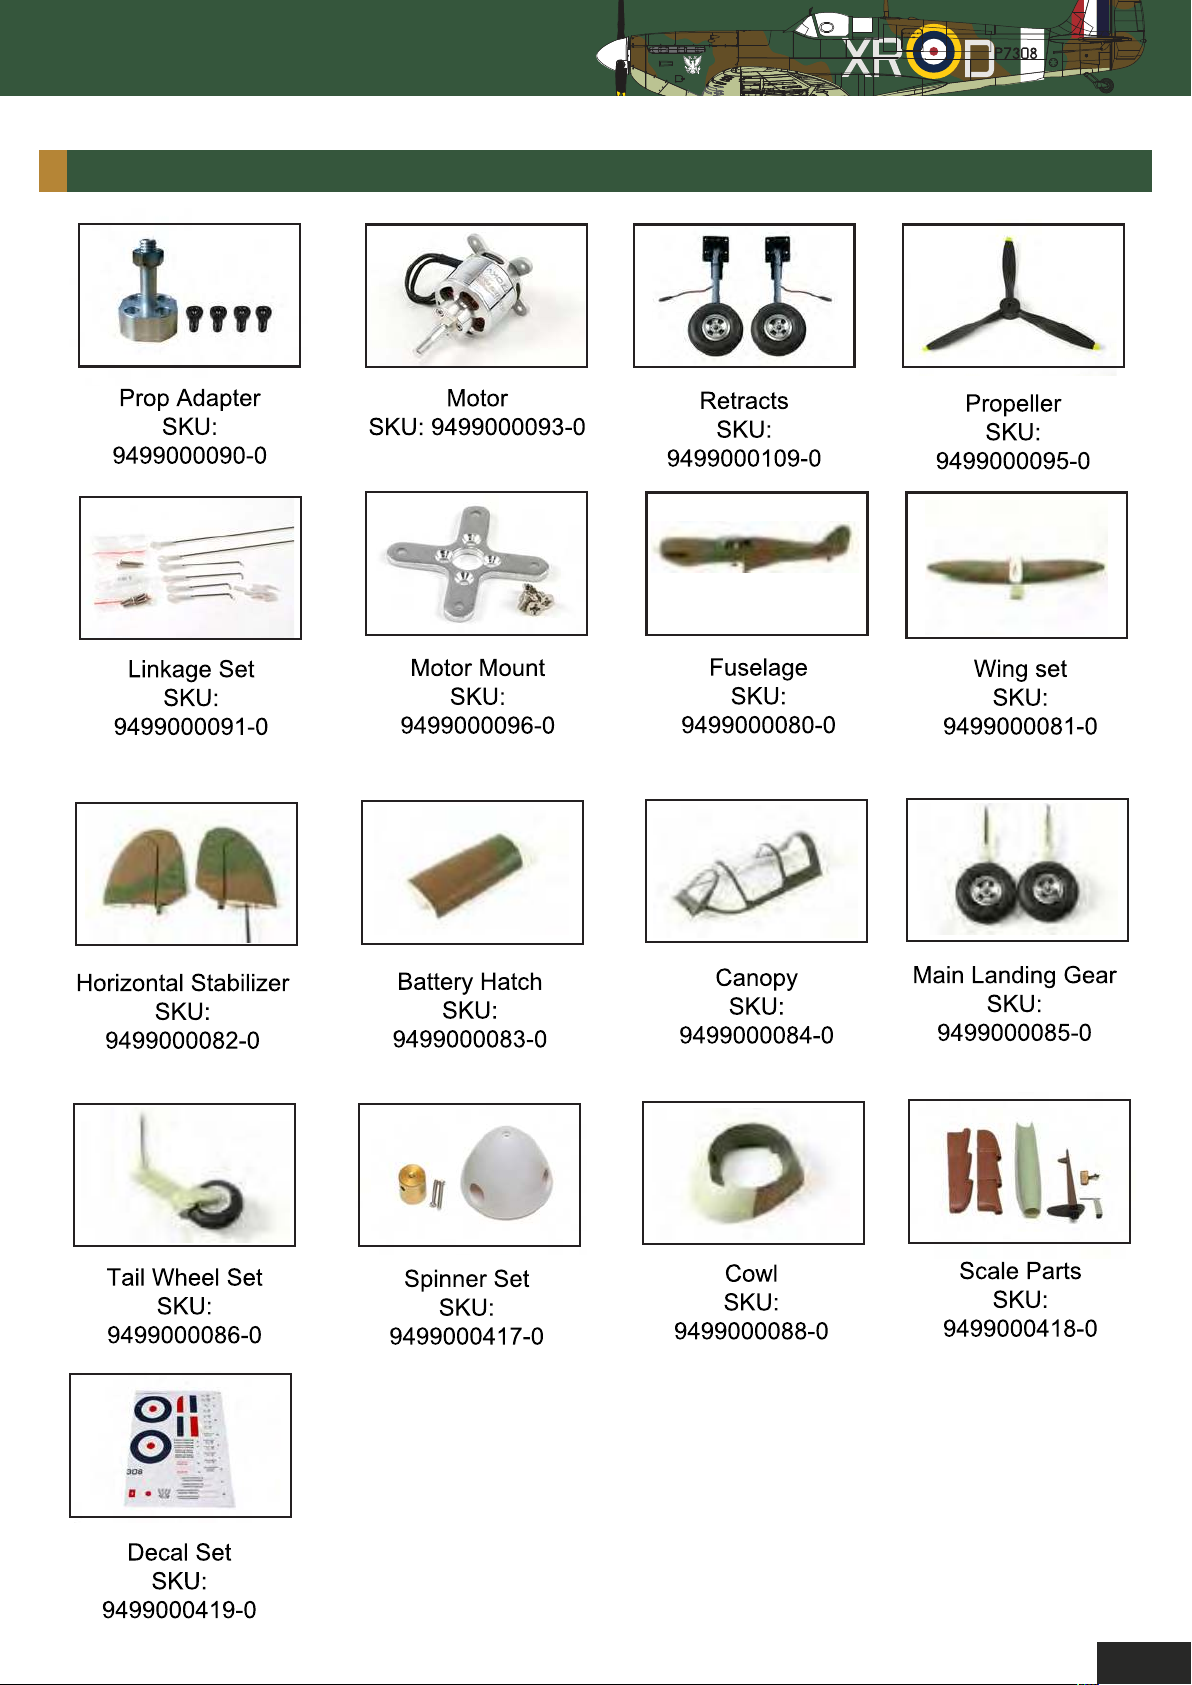
SPARE PARTS:
Spitfire Mk
13
Page 17
DECAL APPLICATION GUIDELINES:
Applying the supplied decals will take you longer than assembling the model. This is because great
care must be taken when doing so. Please follow carefully the guidelines below to achieve the best
possible finish on your Spitfire Mk
Note:
* The decals supplied are vinyl type decals and are supported on a clear adhesives fronting
film. These require care and attention when applying so please follow the below guidelines
and the techniques outlined for the best results.
tudy the
Sep rate the decal you wish to apply (decals are grouped according to their layout on the model)
from the main sheet. The entire decal sheet (including the paper backing) is pre-cut for you so you
can sep
rate each group of decals as required.
.
Before lifting from the paper, rub the surface of the clear protective film/fronting to ensure all of
the decal sticks to it. This will ensure the marking lifts fully off the backing paper intact.
Peel the front off of the sheet ensuring the entire decal lifts with it.
Position the decals/ carefully on the model then gently rub (using a dry cloth) the decal in
place, rubbing from the center of the decal outwards, to avoid wrinkles and air bubbles.
If air bubbles are present, use the tip of a sharp blade to make a small hole in the bubble then rub
over it again to push the air out.
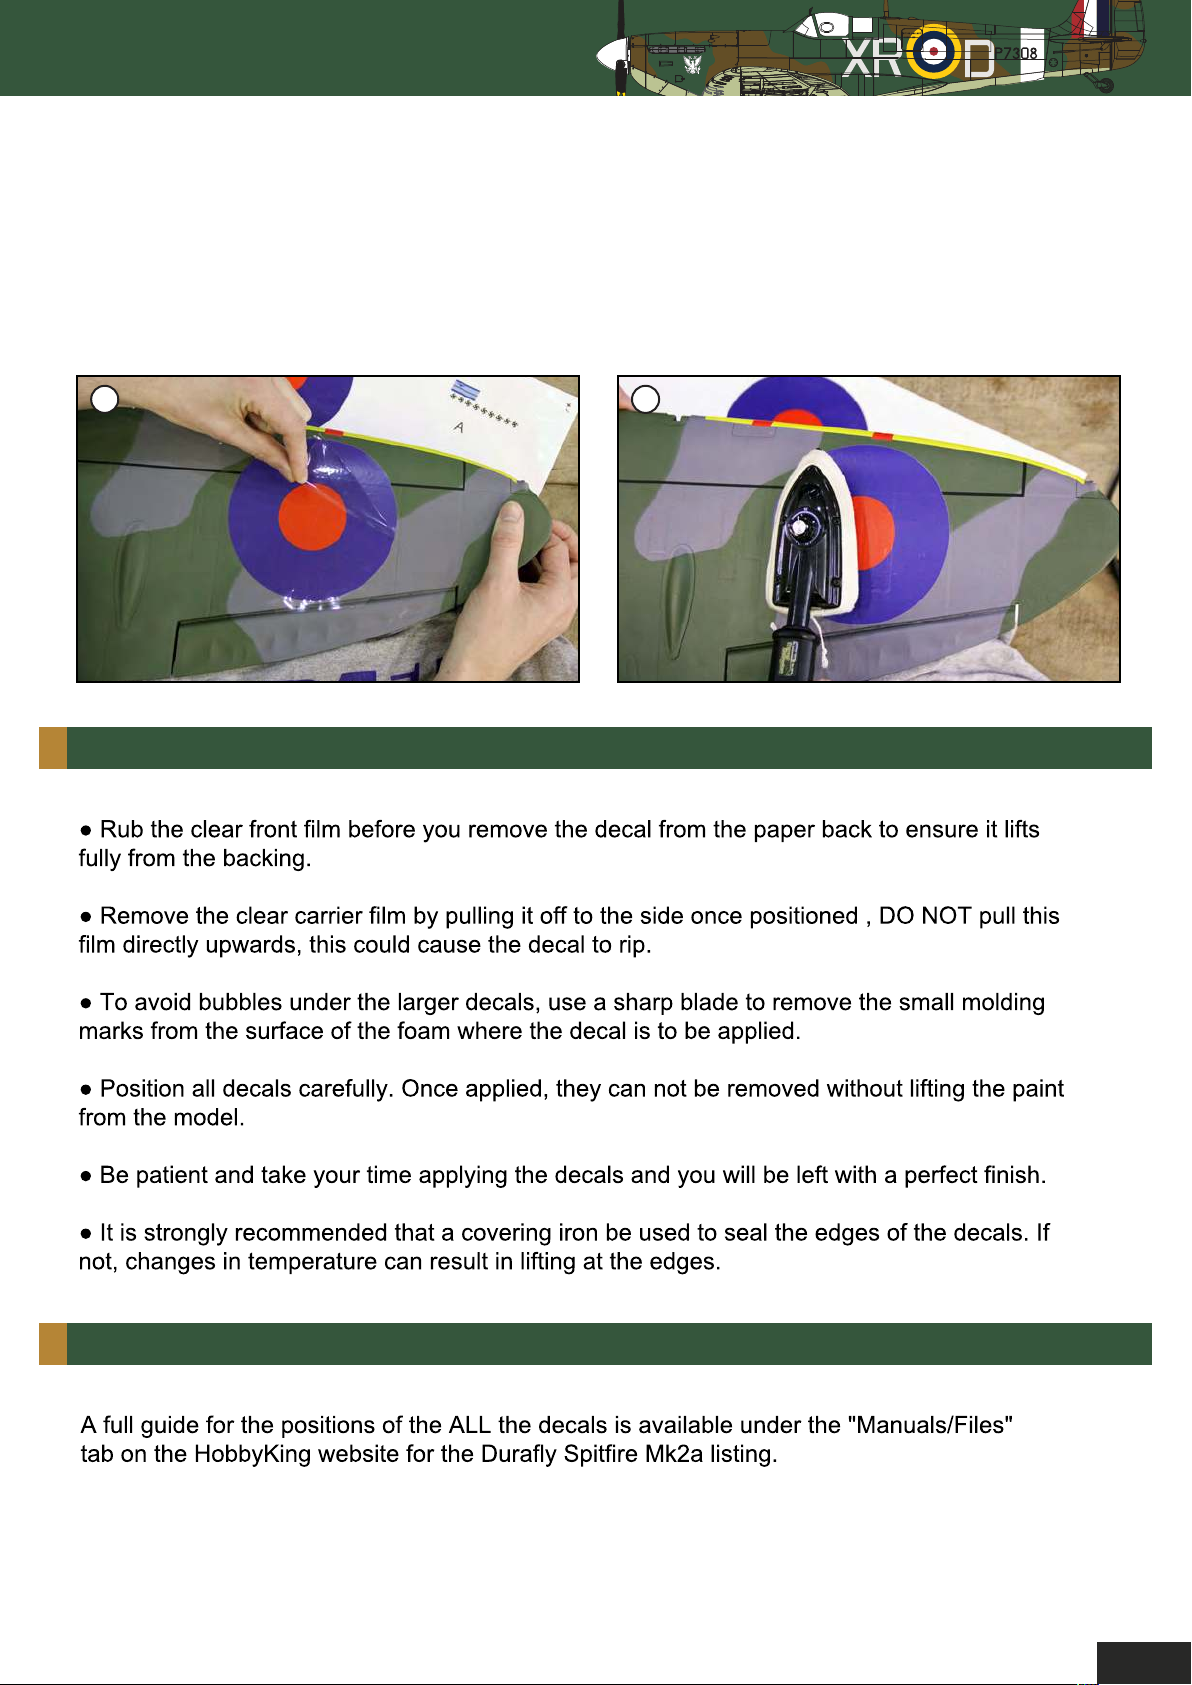
Once the decal is firmly rubbed down and any air bubbles are removed, you can slowly remove
the front clear protective film. DO NOT pull this clear film upwards to remove it, instead pull the
film slowly off to the side. This will ensure the decal doesn’t lift up from the surface of the model
when you remove the clear film. See picture A.
Very gently rub the decal again with a cloth now that the clear film is removed to ensure all edges
are firmly stuck down.
14
Page 18
Durafly 1100mm Supermarine
SPITFIRE MK2A
9.
Finally the use of a covering iron is STRONGLY recommended to seal the decals to the painted
foam surface and prevent them from lifting at the edges over time. Set the iron to a low temperature
and gently run the iron lightly over the surface of the decal as illustrated on the following page. Use
of a cloth to cover the head of the iron is recommended to help prevent damage to the foam and the
decal. A household iron can be used if no covering iron is available. See picture B.
A
DECAL TIPS:
B
DECAL POSITIONS:
15
Page 19
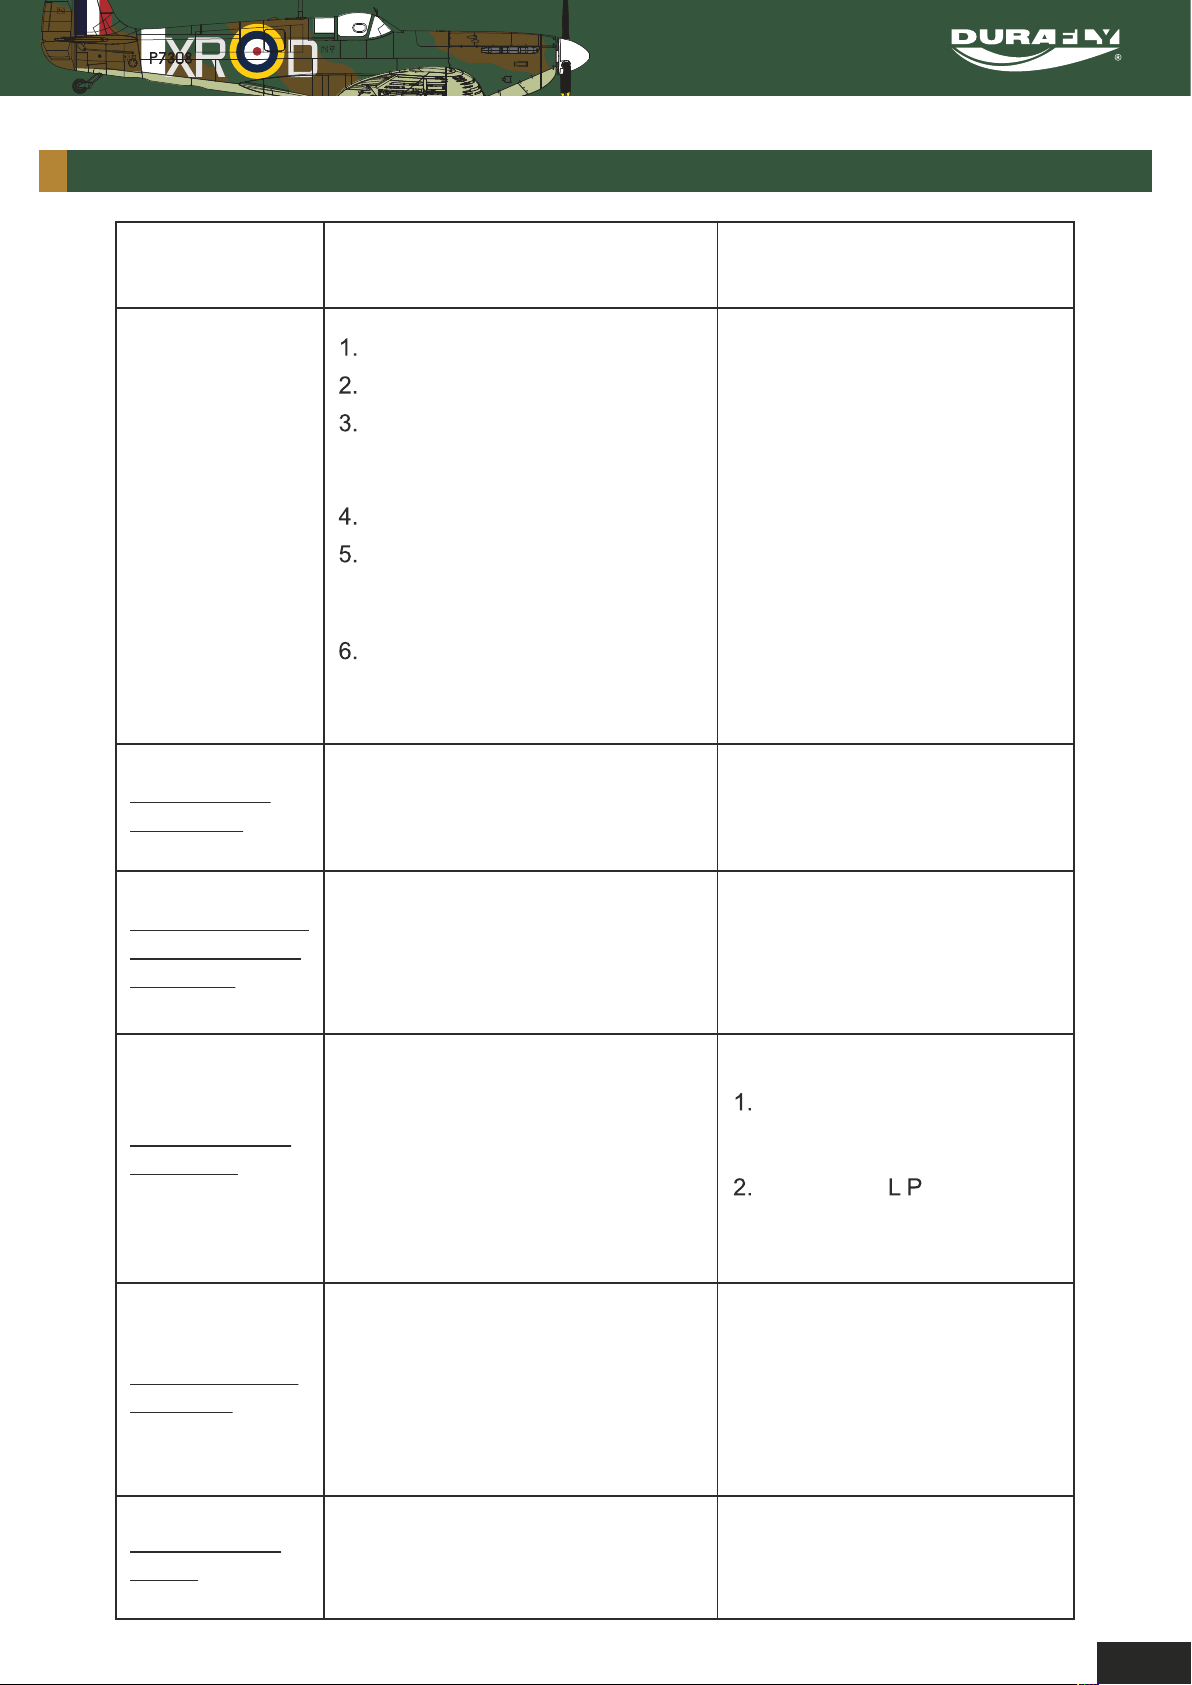
TROUBLE SHOOTING:
Problem Cause Solution
Motor does
not turn
Motor turns in
reverse direction
Control surfaces
not moving with
stick input
Battery is not fully charged.
Transmitter battery low.
Motor not connected.
The motor is damaged.
Receiver is not bound to Tx.
ESC in set-up mode.
1. Motor/esc connection error 1. Swap around any 2 of the 3
1. The servo lead is connected
to Rx incorrectly.
2. The servo is damaged.
1. Charge the batteries.
2. Install a full charged battery.
3. Check for connection
between the ESC and motor.
4. Replace motor.
5. Consult Radio manual and
go through bind procedure
again.
6. Hold model and move
throttle to full position then
back down to idle.
ESC/motor wire connections
1. Make sure the servo leads
are connect properly.
2. Replace servo.
Model does not
fly straight
Model does not
climb well
Limited Radio
Range
1. Control surfaces not centered.
CoG is not in the correct position.
2.
1. The battery is not fully charged.
2. Elevator servo is reversed.
3. CG too far backwards.
1. Transmitter/Receiver batteries
are flat.
Adjust the trims on the
transmitter.
Re-position i o as
suggested.
1. Charge the battery.
2. Change servo direction via Tx.
3. Move battery forwards.
1. charge/replace batteries.
16
Page 20
Durafly 1100mm Supermarine
SPITFIRE MK2A
If you wish to contact us directly please email:
9
Page 21

UK REP
EC REP
APEX CE SPECIALISTS LIMITED
M1 4HT, UK
APEX CE SPECIALISTS LIMITED
 Loading...