

Page 1
INSTRUCTION MANUAL
DURAFLY PRIME TUNDRA 1200MM
PLUG AND FLY VERSION
Please read this m anual carefully before operating this plane.
Page 2
WARNING
Read this instruction manual fully so as to become completely familiar with the features of the product before
operating. Failure to operate this product correctly could result in damage to the product, personal property
and cause serious injury. This is a sophisticated hobby product and is NOT a toy. It must always be operated
with caution, common sense and some basic mechanical ability. This manual provides instructions on the
assembly, safe operation and maintenance of this hobby product. It is highly recommended that you read and
follow fully the instructions and warnings stated in this manual including safety, assembly, set-up and flying
guidelines in order to operate this product correctly and avoid damage or serious injury.
SAFETY PRECAUTIONS
As the user of this product you and you alone are responsible for operating it in a manner that does not
endanger yourself and others around you or result in damage to the product or property of others. This product
is operated via a radio controlled system that in some cases can be subject to interference from sources
outside of your control. Interference may result in a momentary loss of control so it is always recommended
that this product be used in a suitable open outdoors space.
• This is a radio controlled flying model and as such must always be flown with caution, this is NOT a toy.
• The H-King J3 Swiss Cub brief was to design a model for low hours to intermediate pilots.
• Always exercise great caution when using the recommended battery to power this product. For full safety
notes and operating procedures please read the information provided by your battery supplier.
• Take great care when connecting/disconnecting the battery. Once again see your battery suppliers informtion
for the full safety procedures.
• Never power up the model in a confined space and always keep the propeller clear of obstructions, clothing
and parts of your body.
• This product is not a toy, children must be accompanied by an adult at all times when operating this product.
• Only fly this model in an open area away from crowds, people, buildings, trees, power lines, roads, airports
and other obstructions.
• Always put safety first when operating this model and consider the warnings stated above.
• The supplier/manufacturer accepts no responsibility for damage or injury caused through the use of this
product. A reminder that it is not suitable for children under the age of 14. THIS IS NOT A TOY.
Page 3

DURAFLY PRIME TUNDRA 1200MM
PLUG AND FLY VERSION
INTRODUCTION:
Introduction:
Thank you for purchasing the Prime Tundra, it is yet another addition to the extremely popular Tundra
series of STOL (Short Take Off and Landing) airplanes from Durafly, but this one is aimed primarily,
but not exclusively at the novice. It is also the perfect STOL trainer for those that want to get into this
style of flying as it inherits the excellent STOL flying characteristics of the Tundra lineage including the
large Tundra style flaps, it's a lot of fun for the seasoned Tundra fans to! It is the most stable Tundra to
date even without a gyro, but coupled with the pre-installed ORX 3-axis gyro it is taken to another
level. The Prime Tundra is the perfect choice for a very first RC airplane due to its rugged and simple
lightweight construction, fast and easy assembly with no gluing, but mainly because of its superb, and
very benign handling characteristics, making it the most stable and sedate of the Tundra family.
The PT1200 is supplied with the exact same tried and tested big wheels from the original Tundra
which makes them perfect for every type of surface, be it a runway or a mountain track. This makes
the Prime Tundra a very versatile aircraft, and that versatility extends to the wing mounting system
too. The PT1200 is supplied with a 'Bolt or Band' wing mounting option. We recommend using the
elastic band on wings if you are a novice and the bolt on system for those more experienced fliers.
Another great feature is that it has the option for floats making it perfect as your first choice of
floatplane.
This version of the Prime Tundra is supplied PNF (Plug N Fly), this means it comes complete with the
3-Axis ORX gyro, motor, ESC, 6 digital servos, propeller (all these are pre-installed at the factory), and
an accessory pack. You will need to supply your own Transmitter and Receiver, a flight battery, and a
flight battery charger.
So if you are looking at starting RC model flying then look no further than the Prime Tundra, it is the
perfect choice. But also, the Prime Tundra is a fantastic sports aerobatic/STOL plane with a flight
envelope that will appeal to the most discerning pilot. Learning to fly has just become a lot more fun
for novices and their instructors with the Prime Tundra.
SPECIFICATIONS:
Wing span: 1200mm (47.2”)
Length: 950mm (37.4”)
Flying weight: 950g (33.5oz)
Controls: 6-Channels (Throttle, Ailerons, Elevator, Rudder, Flaps, and
Gyro) ESC: Aerostar RVS 30A Brushless
Motor: 3025 1000kV Brushless Outrunner
Propeller: 10”x6”
Servos: 6 x 9g Digital
Battery: 1300~1400mAh 11.1V 3S LiPo 25C or more (not supplied)
1
Page 4
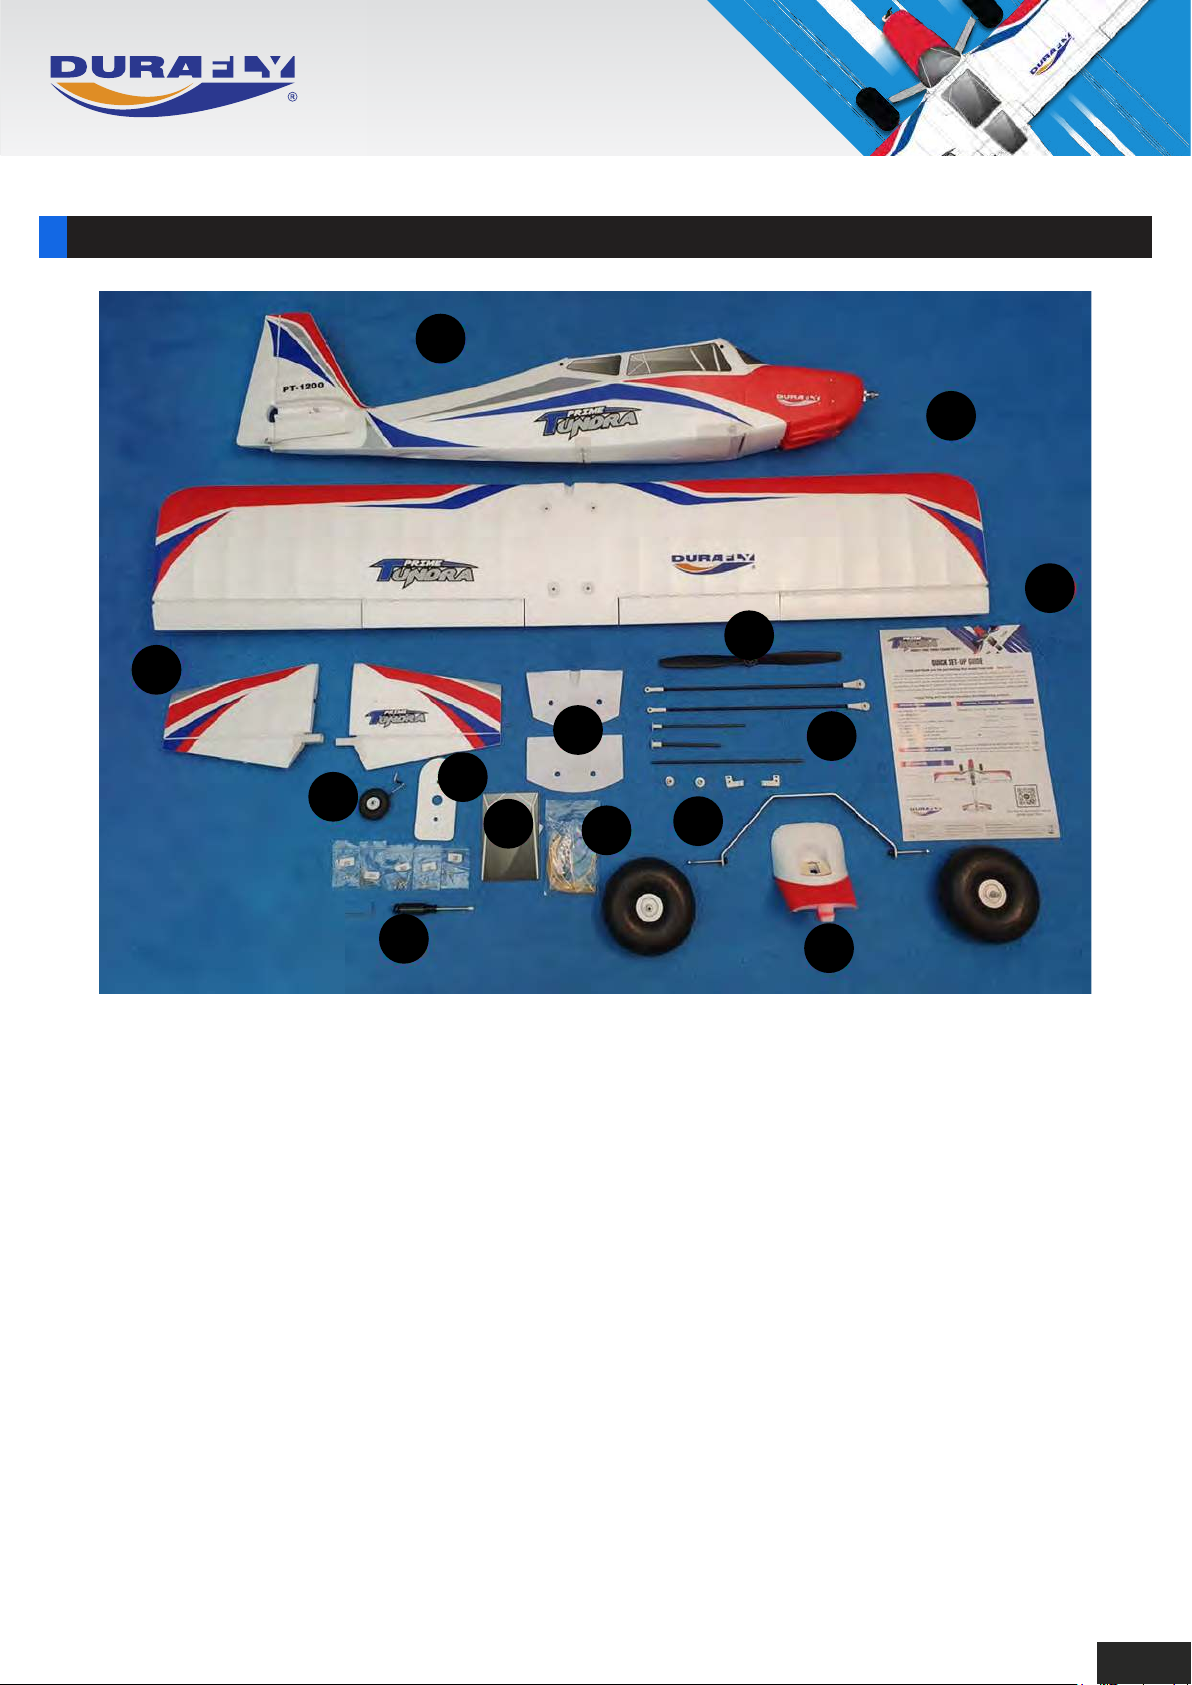
CONTENT:
3
1
2
10
5
9
1. Fuselage
2. Wing
3. Horizontal Stabilizer
4. Wing protectors
5. 10x6 Propeller
6. U/C and Wheels
14
11
12
4
13
6
7
8
8. FPV Canopy
9. Tailwheel
10. Quick Start Guide
11. Foam Support for Optional Candy Dropper
12. Cabin Window Sticker
13. Wing Bands, "R" Clips and Bind Plug
7. Wing Struts and Wing Dowels
14. Accessories, Screws, and Tools
2
Page 5
DURAFLY PRIME TUNDRA 1200MM
PLUG AND FLY VERSION
ASSEMBLY:
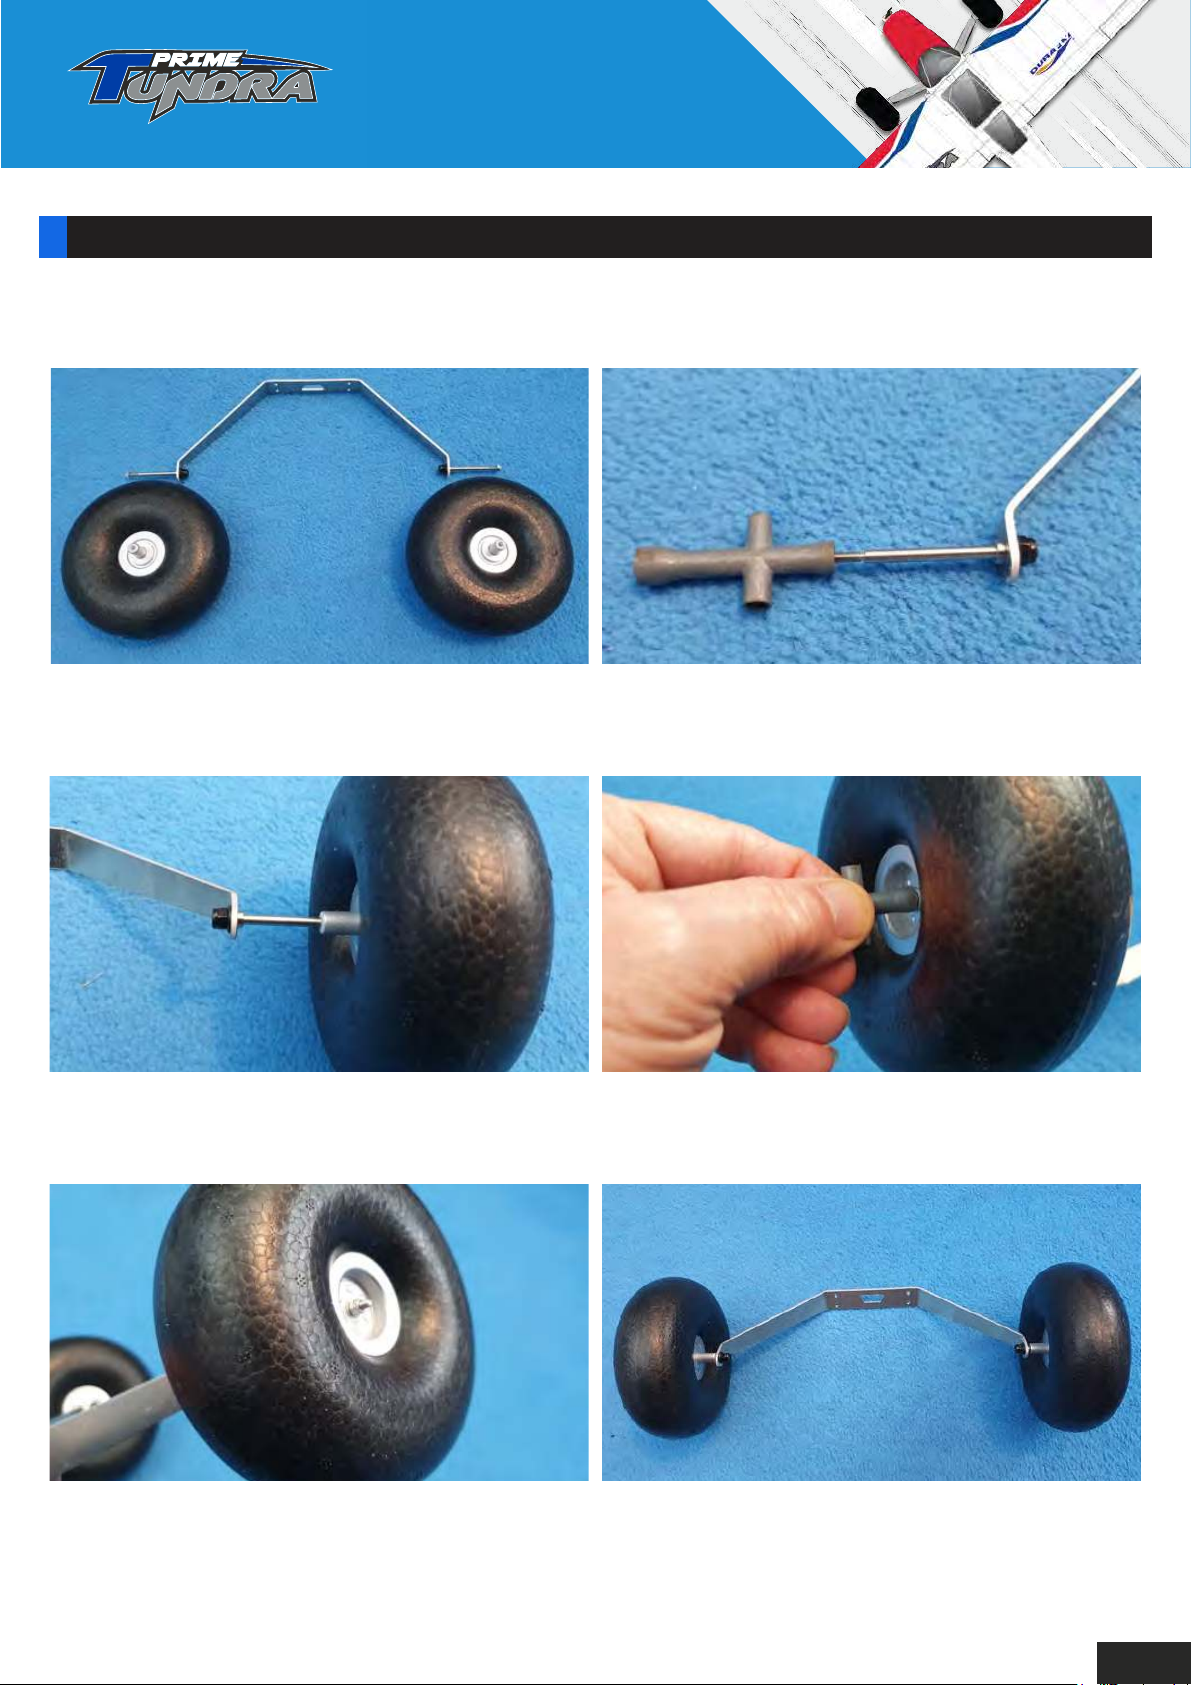
Step 1: U/C Assembly and Fitting.
1.Identify the parts shown above for the U/C
assembly.
3.Slide a wheel on to one of the axles, ensure
the long spigot slides on first as shown.
2.Use a box spanner or similar to undo the lock
nuts on the axle.
4.Re-fit the lock nut using your spanner.
5.Tighten the nut so that there is no slop, but
the wheel spins freely on the axle.
6.Repeat the process for the other wheel.
3
Page 6
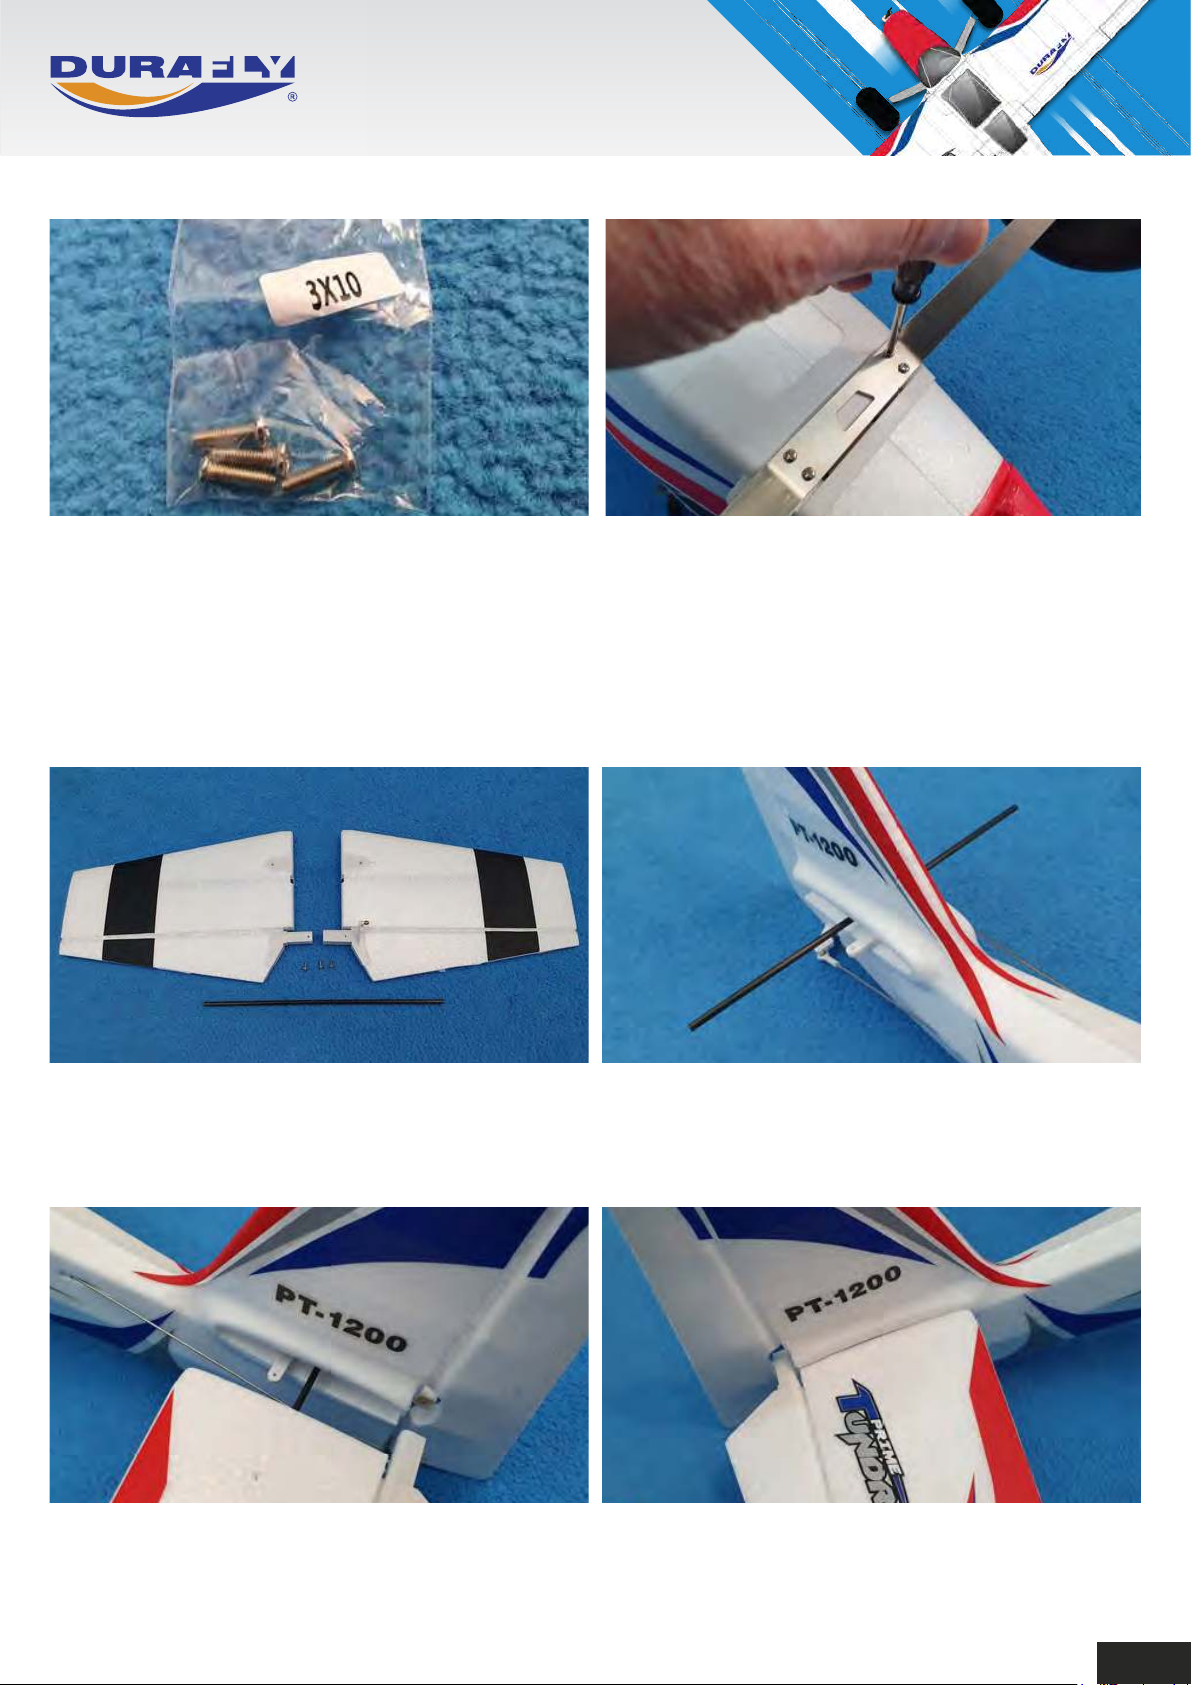
7.Identify the pack of four 3x10mm machine
screws.
8.Using the 3x10mm screws, attach the U/C
assembly to the bottom of the fuselage. Please
note the direction of the cut out in the center.
Step 2: Attachment of the Horizontal Stabilizer
and Tailwheel.
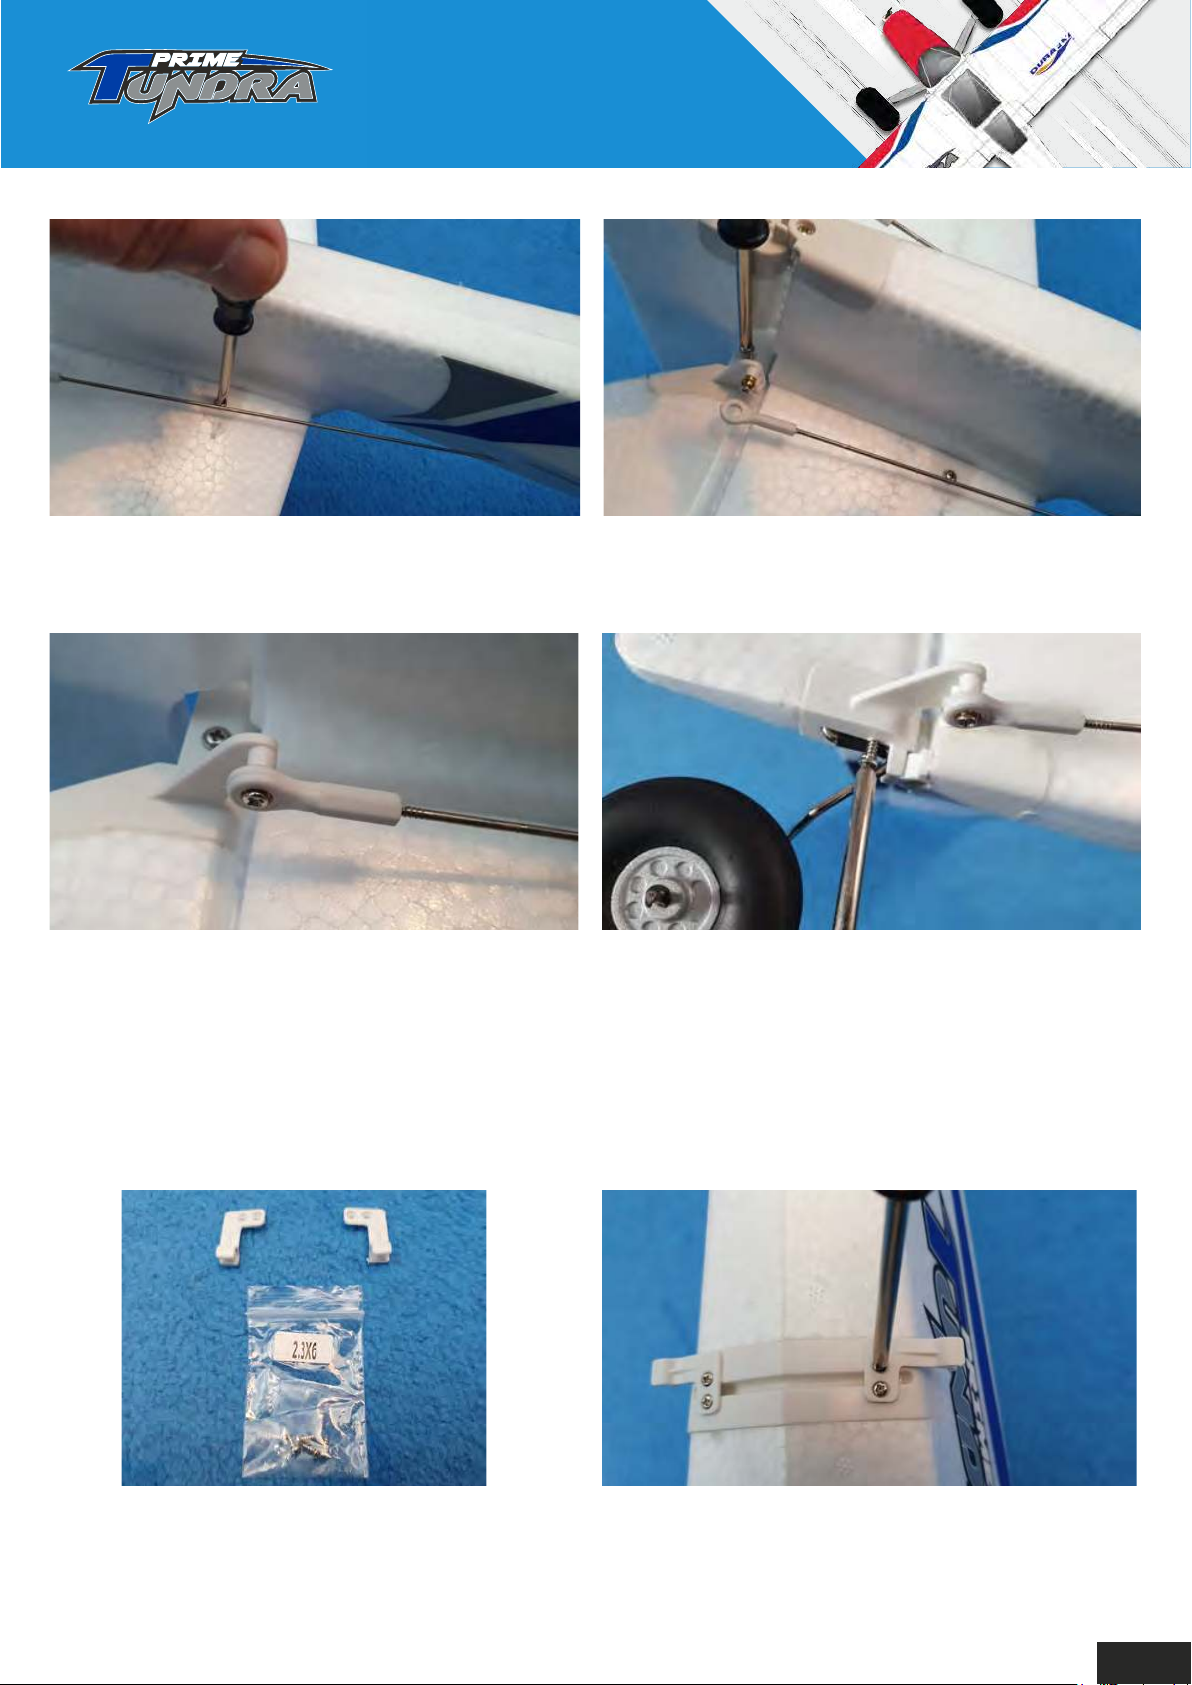
1.Identify the parts for the horizontal stabilizer.
2 x horizontal stabilizer halves, 1 x 210x3mm
carbon rod, 3 x 2.6x8mm self tapping screws
with molded on washers.
3.Slide one half onto the carbon rod. 4.Repeat for the other side, ensure that the two
2.Slide the 210x3mm carbon rod through the
hole in the rear of the fuselage.
elevator joiners slide inside each other as you
do this.
4
Page 7
DURAFLY PRIME TUNDRA 1200MM
PLUG AND FLY VERSION
5.Using two of the 2.3x8mm self tapping
screws, secure the two stabilizer halves to
the rear of the fuselage.
7.Clip the ballink on the pushrod onto the ball
that is attached to the control horn. If the
elevator requires adjustment to ensure it is
neutral, this will be covered later in the set-up
part of the manual.
6.Using the third 2.3x8mm self tapping screw,
secure the joint between the two elevator
halves.
8.Firmly push the tailwheel assembly into place
in the bottom of the rudder. Secure with two
2.3x10mm self tapping screws.
Step 3: Wing Strut Assembly.
1.Identify the parts for the wing strut travel
retainers. Two off retainers and four off
2.6x6mm self tapping screws.
2.Mount the wing strut retainers using the four
2.6x6mm self tapping screws.
5
Page 8
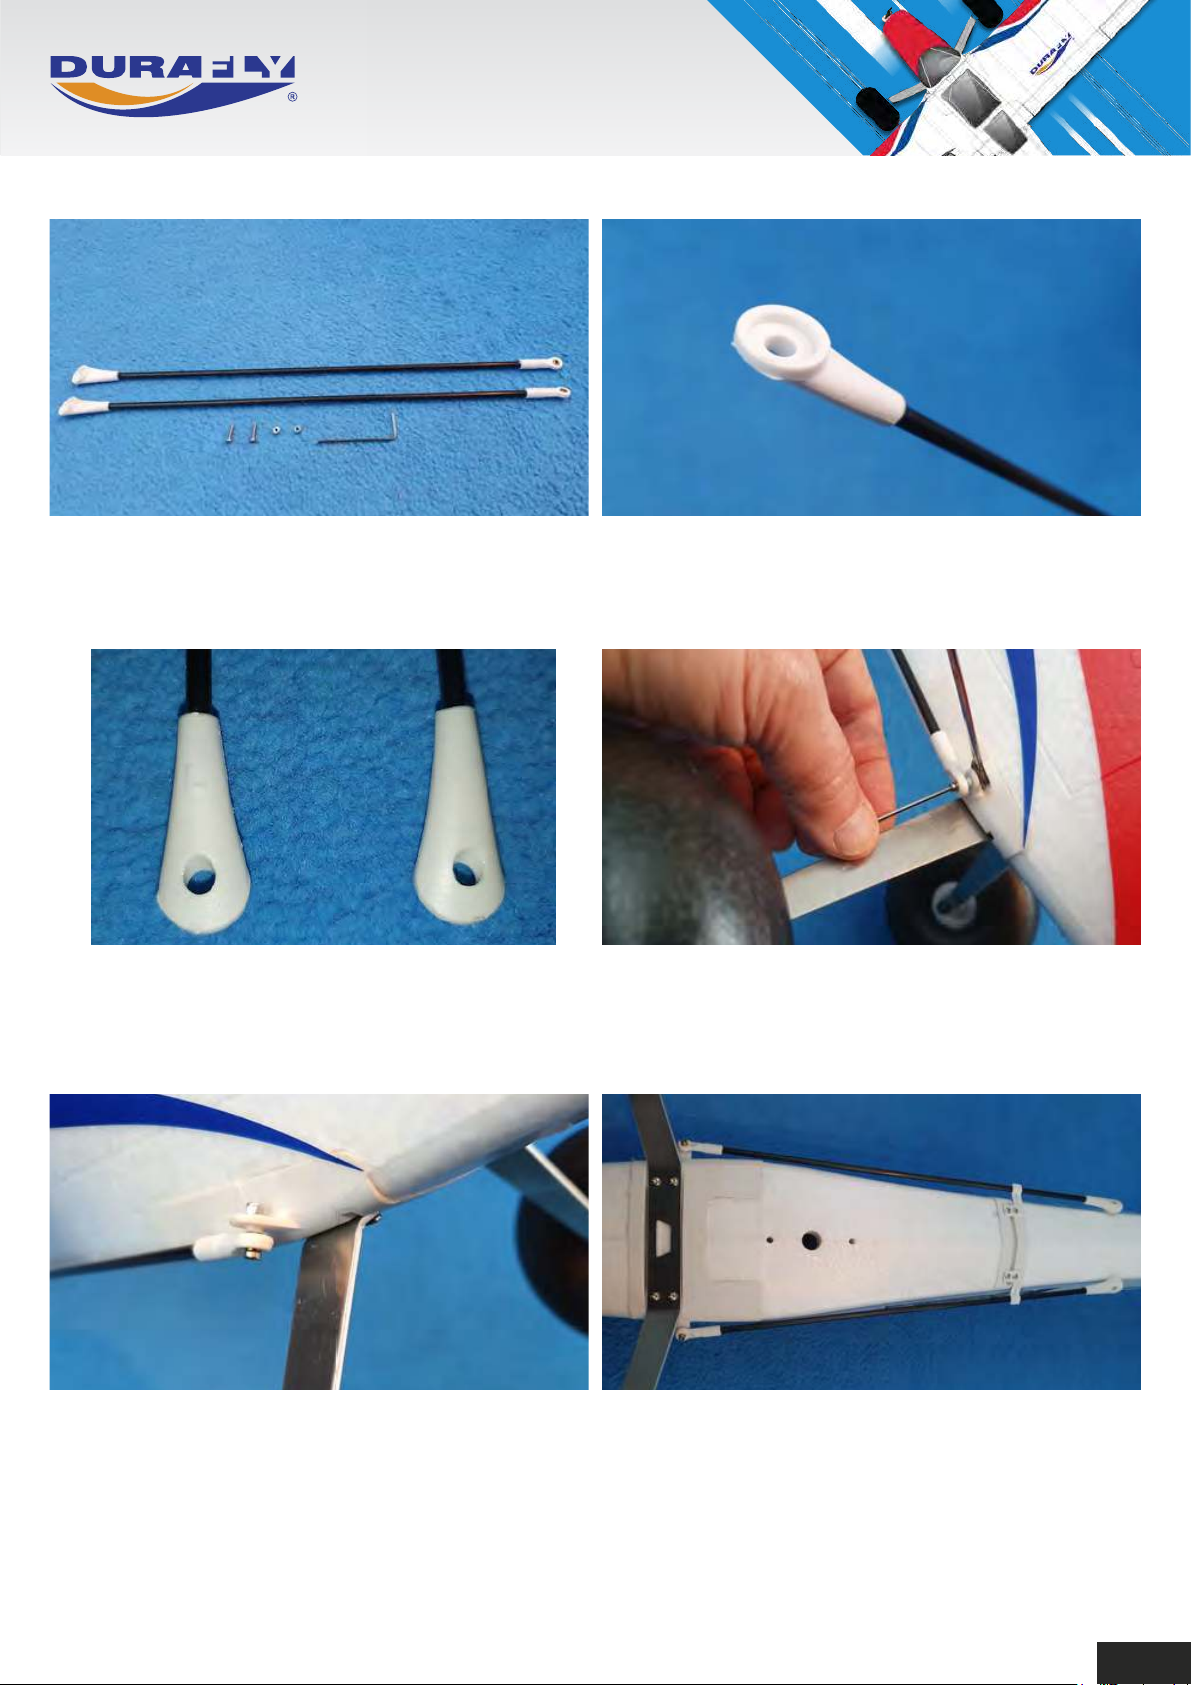
3.Next stage is to attach the wing struts to the
fuselage using the two M2x10mm screws and
lock nuts.
4.Ensure that you attach the wing struts so that
the large dished end faces the underneath of
the wing.
5.Also the struts are handed with one marked
with an "L". This strut goes on the left hand
side looking from the rear.
7.Ensure that the strut goes on the underneath
of the strut attachment and also the head of
the bolt is underneath with the nut on the top.
6.Attach the struts using the M2x10mm bolts
using the supplied hex key and a spanner or
thin nosed pliers.
8.Above shows the struts in the stowed/ travel
position. Note: You can tighten the M2 nuts
and bolts as the struts will swivel on the
ballink.
6
Page 9
DURAFLY PRIME TUNDRA 1200MM
PLUG AND FLY VERSION
Step 4: Wing Assembly.
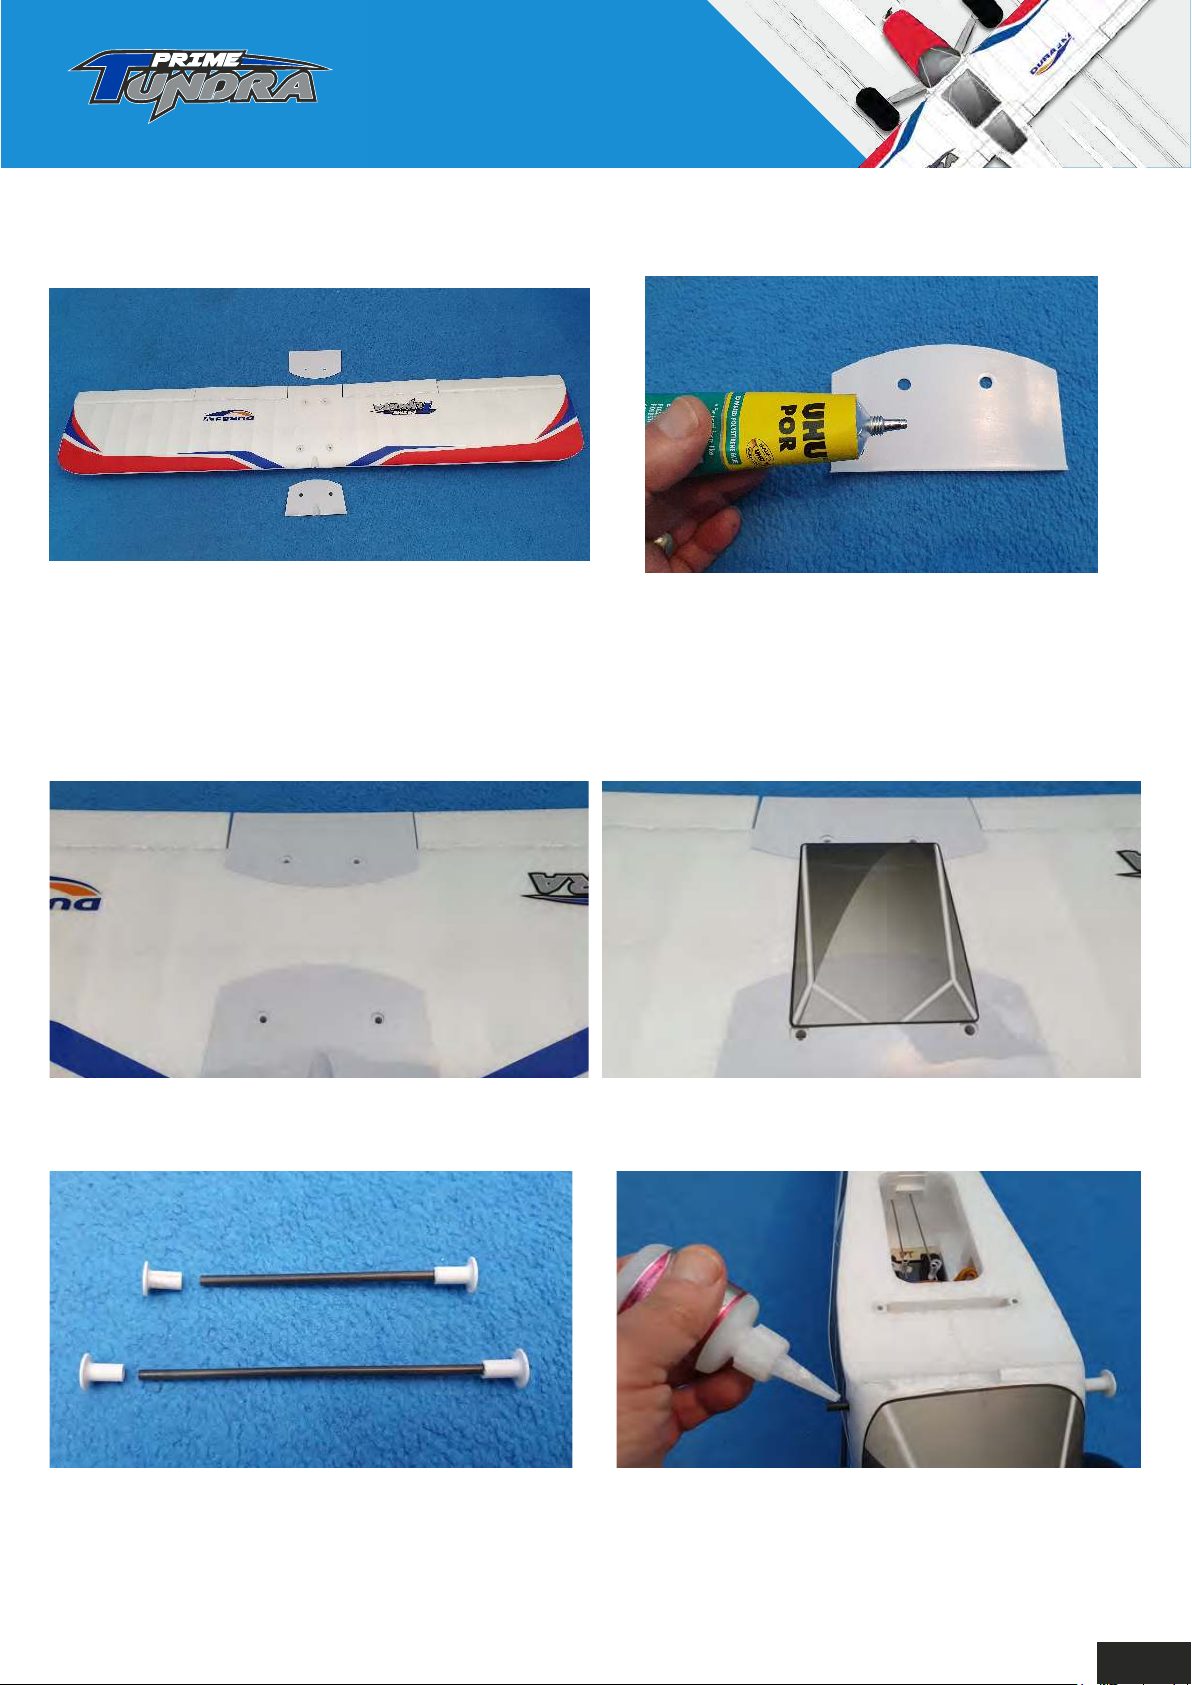
1.For this step you need the wing and the two
plastic wing protectors. If you are using the
bandon wing system then you must use both
protectors. If using the bolt-on system then
you do not have to use them if you do not
want to.
3.Plastic protectors glued into their correct
positions.
2.If you have elected to use the band-on
method, then use a good quality glue such as
UHU Por to glue the protectors to the wing.
4.At this point you can stick the dummy window
to the center of the wing.
5.If using the band-on method then select this
wing retaining dowel set. The long one goes
to the front, and the short one to the rear.
6.Slide the carbon rod with the band retainer on
one end through the fuselage. Use a small
drop of CA glue to secure the second plastic
band retainer into place.
7
Page 10
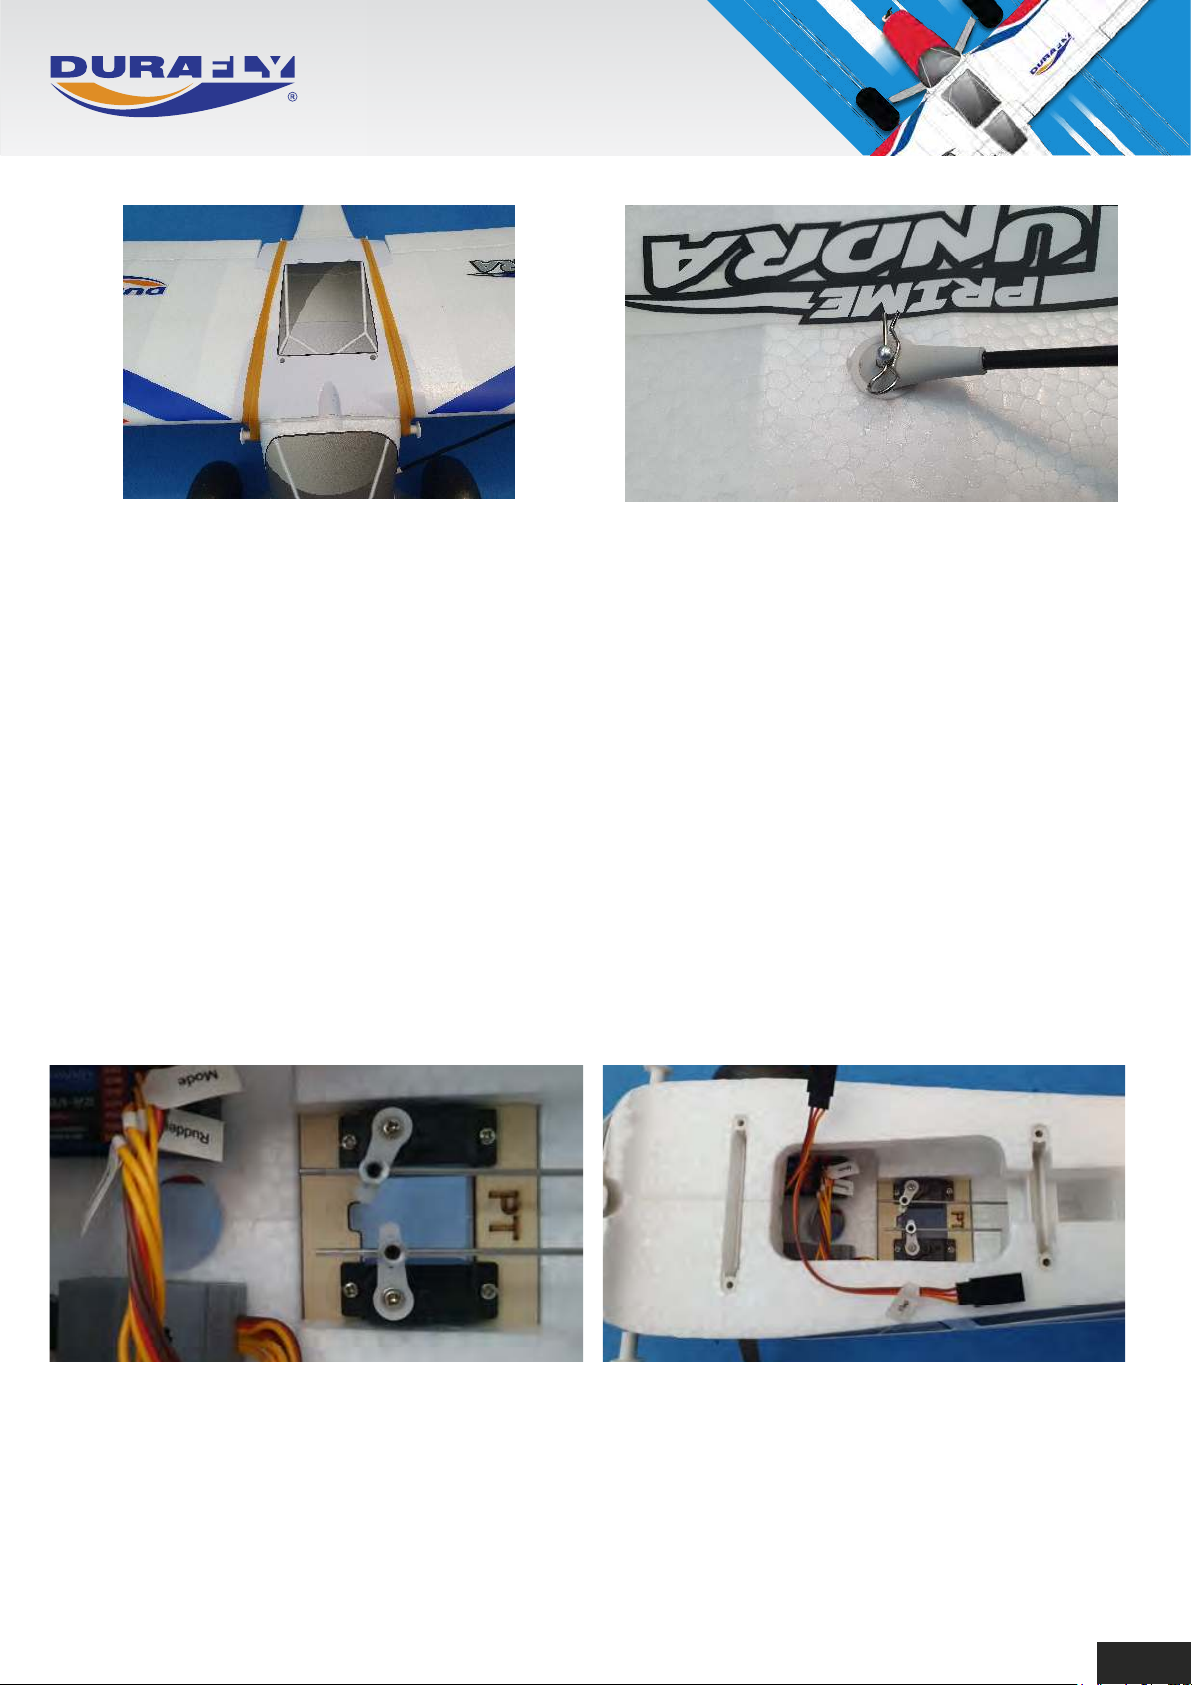
7.When using the band-on method it is best to
use 4 bands for safety. If you only received 3
bands with your Prime Tundra then any good
quality rubber bands can be used. If bolting
the wing on then use the supplied
M2.5x16mm machine screws..
Note: The basic construction of the Prime Tundra is complete, the next step is setting up the radio
and then fitting the propeller. To proceed to the next step you will need to remove the wings. Also for
the next steps the propeller must NOT be installed on the motor.
8.When assembling the wing to fly, push the
end of the strut over the metal spigot sticking
out of the wing and retain with the supplied
"R" clip. Slide the "R" clips on from the
leading edge side of the fixing as shown.
Step 5: Setting up the Radio and Servos.
This being the Plug N Fly version of the Prime Tundra no transmitter or receiver is supplied, you will
be required to supply your own. For the ease of explanation and simplicity when setting up the radio
we have shown the Turnigy T6A-V2 transmitter and receiver in the following steps. For other radio's,
you will need to consult your manufacturers instruction booklet for binding and setting up, etc. For the
next 6 steps, please remove the wing from the fuselage.
1. Connect the aileron Y lead to the gyro.
Then connect the aileron, elevator, rudder,
throttle, and gyro mode leads from the gyro
to the corresponding channels on your
receiver. The gyro mode lead needs to go to
a 3 position switched auxiliary channel.
Note: If your transmitter has the ability to be able to select a 2 position switch for arming/disarming the
throttle then we recommend you do this at this point. Consult your Tx manual to see if this option is
available.
2.The flap servo Y lead is connected directly to
the receiver, it does not pass through the
gyro. This needs to go to an auxiliary channel
that is operated with a 3 position switch.
8
Page 11
DURAFLY PRIME TUNDRA 1200MM
PLUG AND FLY VERSION
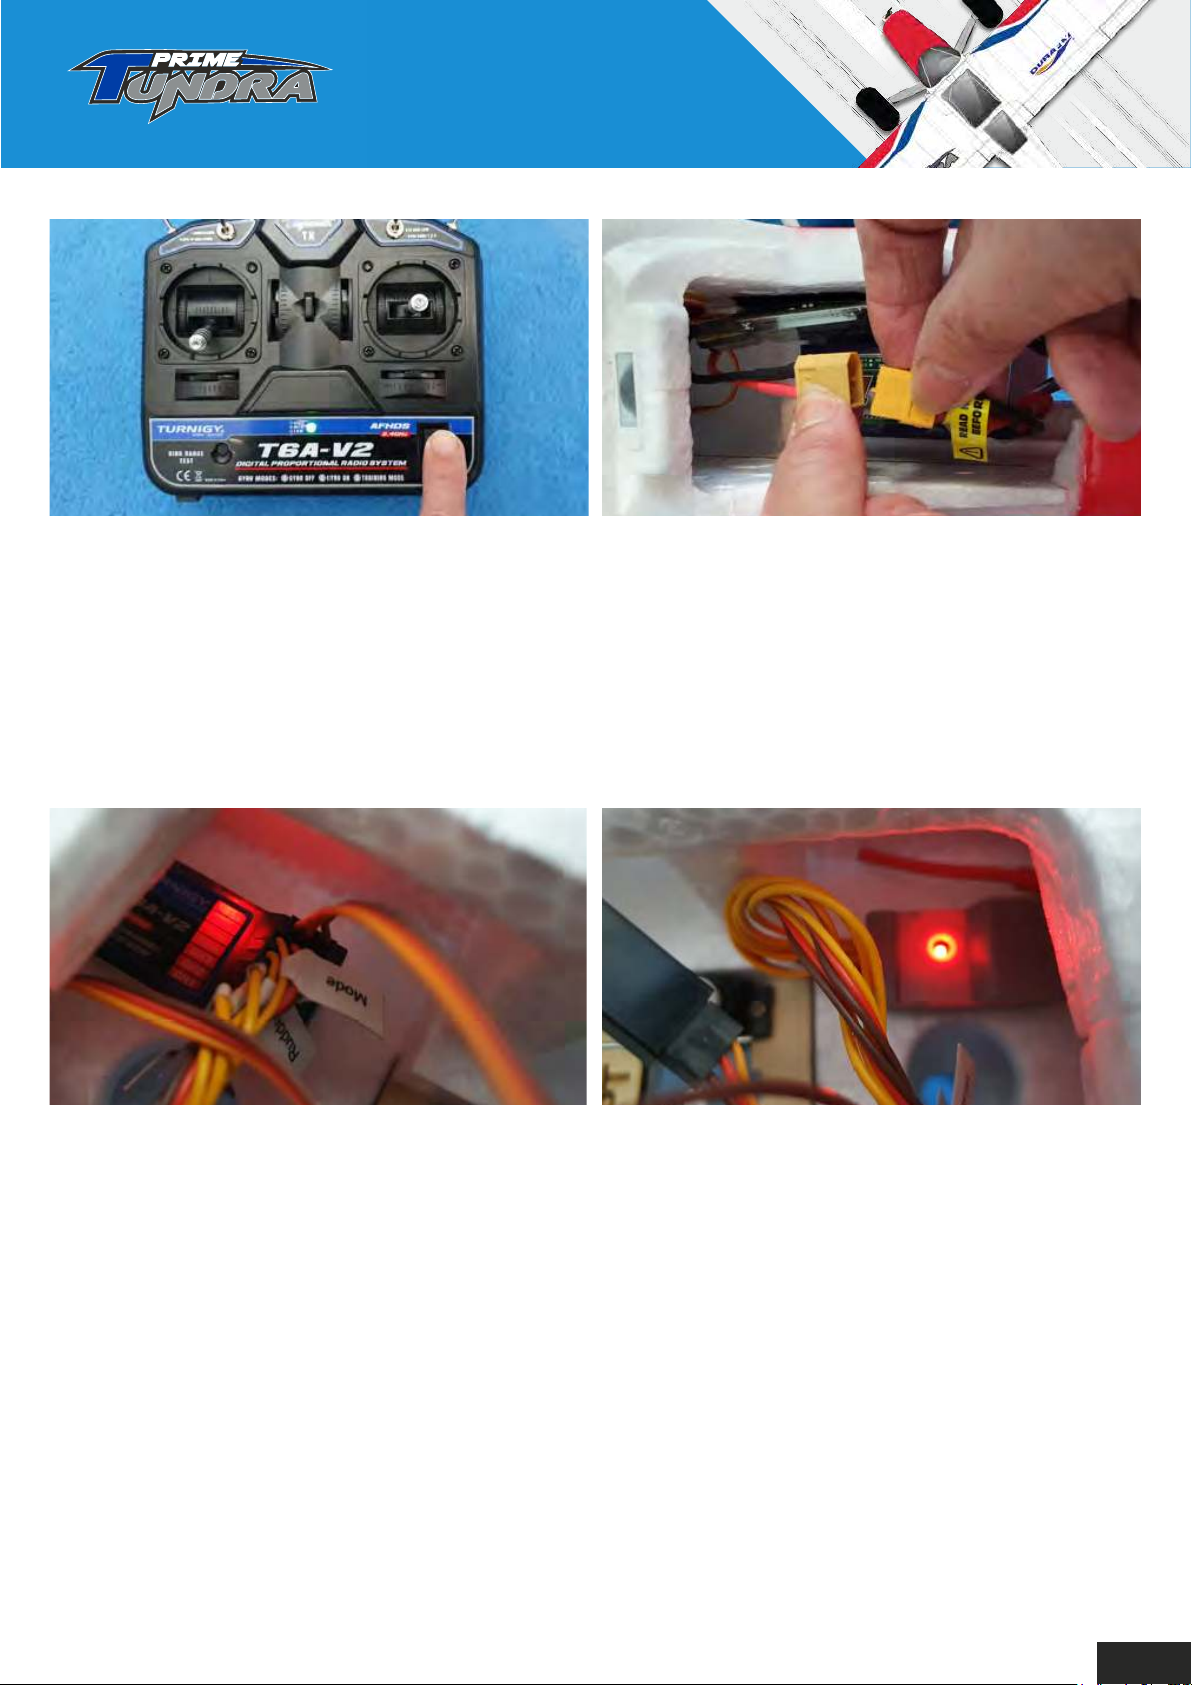
3. Before switching your transmitter on, ensure
that the throttle stick is fully down and throttle
trim is in the middle position as shown on the
T6A. Also, if you have programmed a throttle
disarming switch, ensure it is in the disarm
position, the gyro switch can be in any position.
Now switch the transmitter on, and ensure your
battery indicator is in the green.
4.Now connect your 3S (11.1V) LiPo battery
into the speed controller XT60 connector.
Once the battery has been connected, do not
move the model until the gyro has initialized.
During the initialization process the ESC will
emit a series of beeps then will go silent. The
servo arms will move several times then
return to neutral, the gyro is now calibrated
and ready to use.
5. If your transmitter and receiver bind together
successfully your receiver should show an
indication via an LED that it has safely bound.
The the elevator and rudder servos should
operate normally when you move the sticks on
the transmitter. Now flick the motor arming
switch to armed, or gently open the throttle and
check that the motor runs ok. This activates the
gyro, the gyro will not operate unless the motor
has been armed, or given a short blip of throttle.
Once initially armed it can be disarmed, or
throttle closed, and the gyro will carry on
working.
6. When the transmitter and receiver have
bound together and the gyro has initialized, the
gyro light will be doing one of the following,
depending on the position of your chosen
auxiliary switch. Position 1 should be with the
switch fully up and this will give a slow flashing
light, this means the gyro is off. With the switch
in the middle, position 2, the light will flash
quickly, meaning the gyro is on. With the switch
fully down, position 3, the light will stay on,
meaning the gyro is in training mode. You may
need to adjust your transmitters servo reversing,
end points, and sub trims to obtain the correct
light sequences on the chosen auxiliary channel.
Once again, you will need to consult your Tx
manual on how to make these adjustments.
9
Page 12
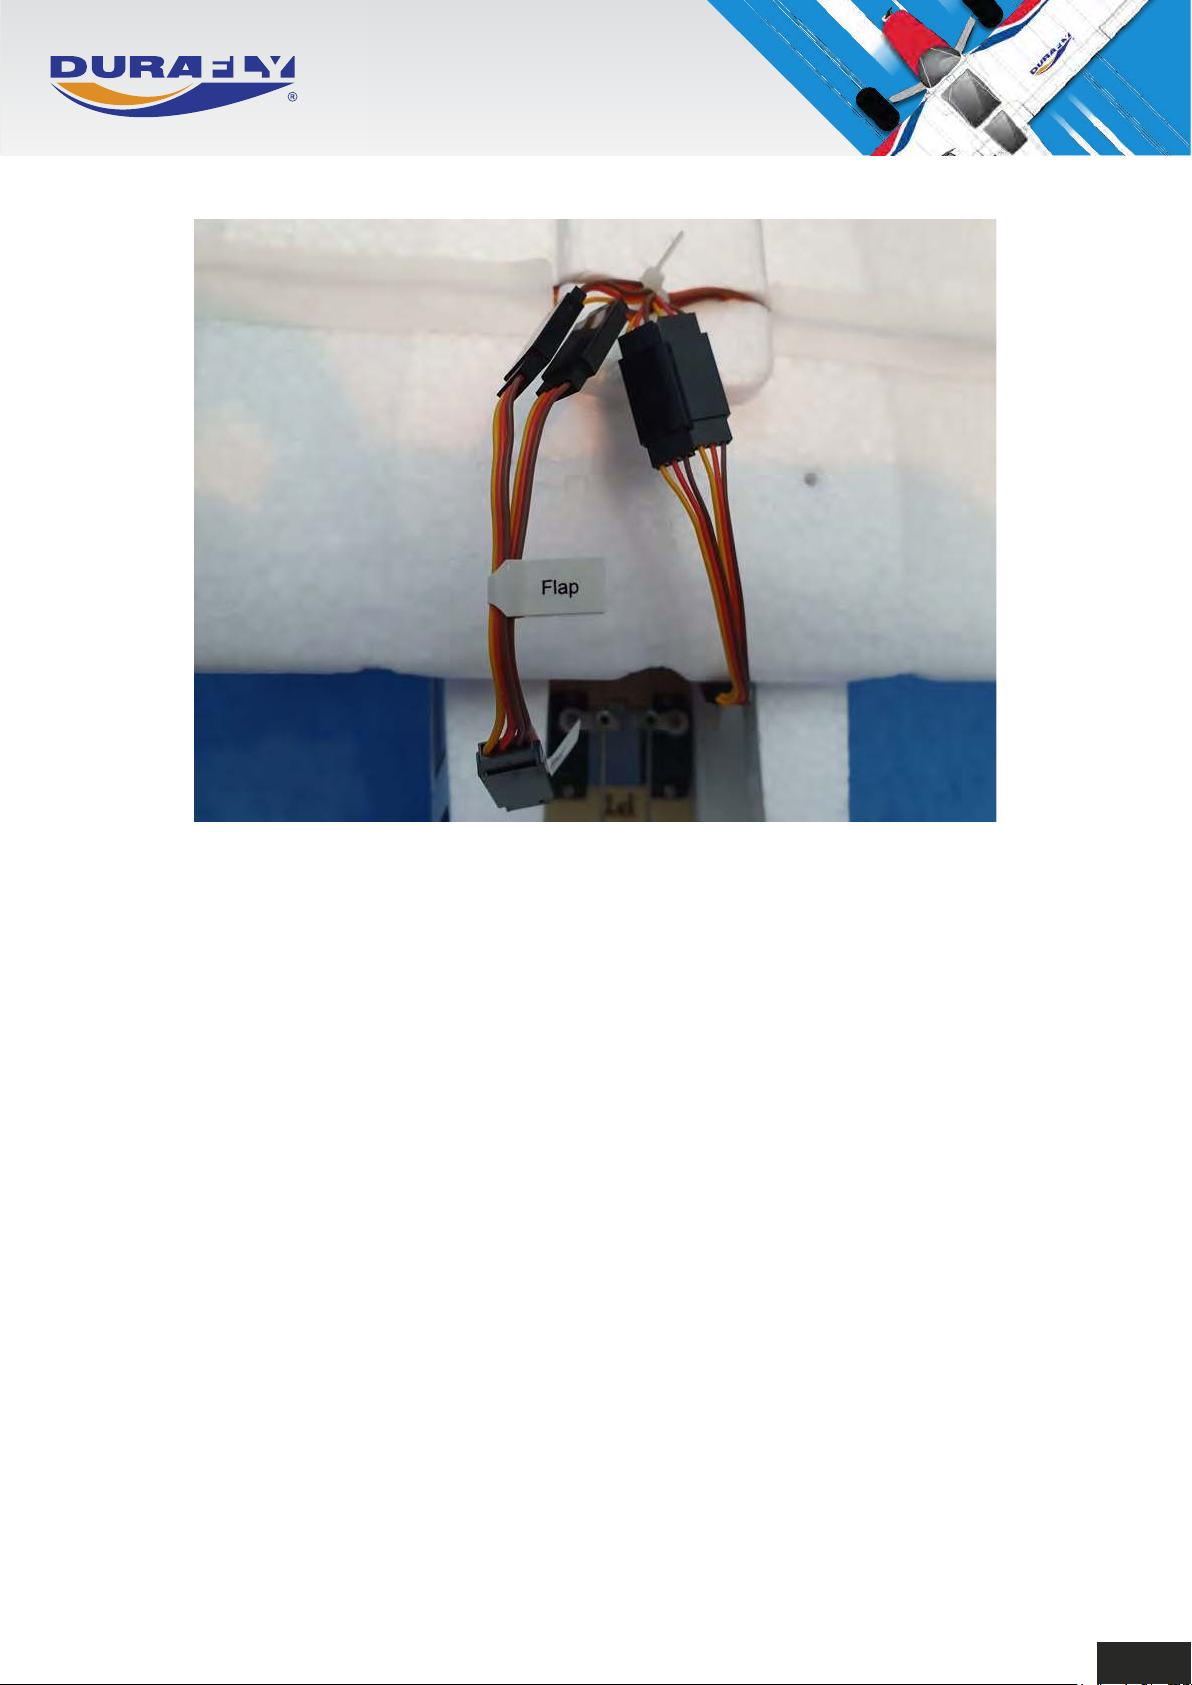
7.The wing can now be re-attached to the fuselage using either the bands or the bolts. Before
you actually fit the wing back on you need to connect the two "Y" leads that are connected to
the wing servos. Connect these "Y" leads which should be labeled "Flap" and "Aileron" to the
corresponding extension leads that are plugged into the receiver. Ensure these connectors are
fully mated so that they cannot come apart, tuck the wires away safely, then attach the wings.
8.At this point we need to check that the flap servos and aileron servos are functioning correctly.
9.Switch everything on as previously instructed, once the system has initialized, check that the
flaps are working by using the 3 position flap switch on the transmitter. Next check that the
ailerons are working correctly when you move the aileron control stick.
Note: See the next page of this manual for the direction the controls should move when
control inputs are put in with the transmitter control sticks.
10
Page 13
DURAFLY PRIME TUNDRA 1200MM
READY TO FLY VERSION
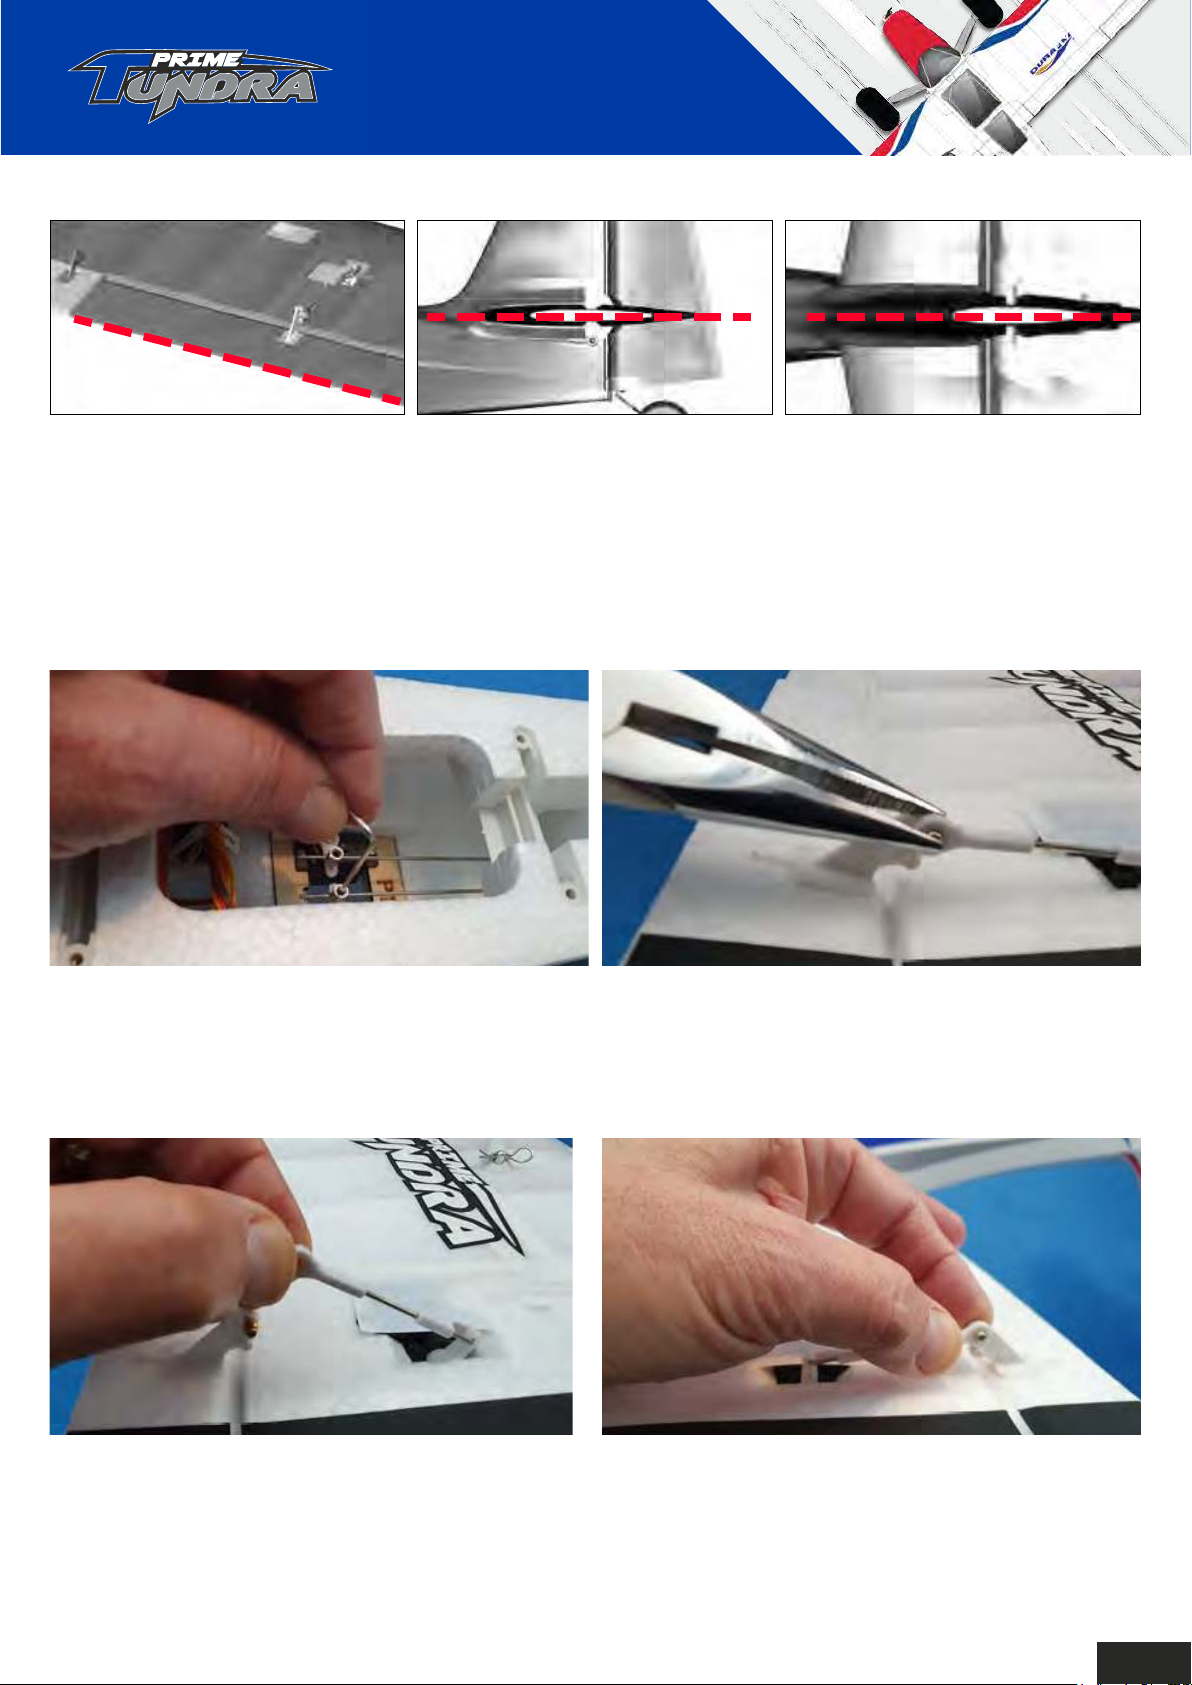
Aileron Elevator Rudder
10. Your Prime Tundra now needs to be set up so that all control surfaces are set at neutral. With the
system switched on and the gyro initialized the control surfaces should all be in their neutral position.
Ensure when you do this that the gyro is off, and all the trimmers on your transmitter are also in their
neutral position. If for any reason a control surface is not at neutral, you will need `to do one of the
following.
11.For the rudder or elevator, use the supplied
hex-key. Slacken the grub screw in the servo
connector, move the control surface to
neutral and re-tighten.
13.Adjust the ball link as necessary by turning it
clockwise, or anti-clockwise
12.For the flaps or ailerons, gently ease the ball
link off of the ball with a pair of long nosed
pliers. Be careful not to damage or break the
control horn.
14.Just using your fingers, carefully, but firmly
snap the ball link back onto the ball. Use a
finger behind the control horn to support it as
you do this.
11
Page 14
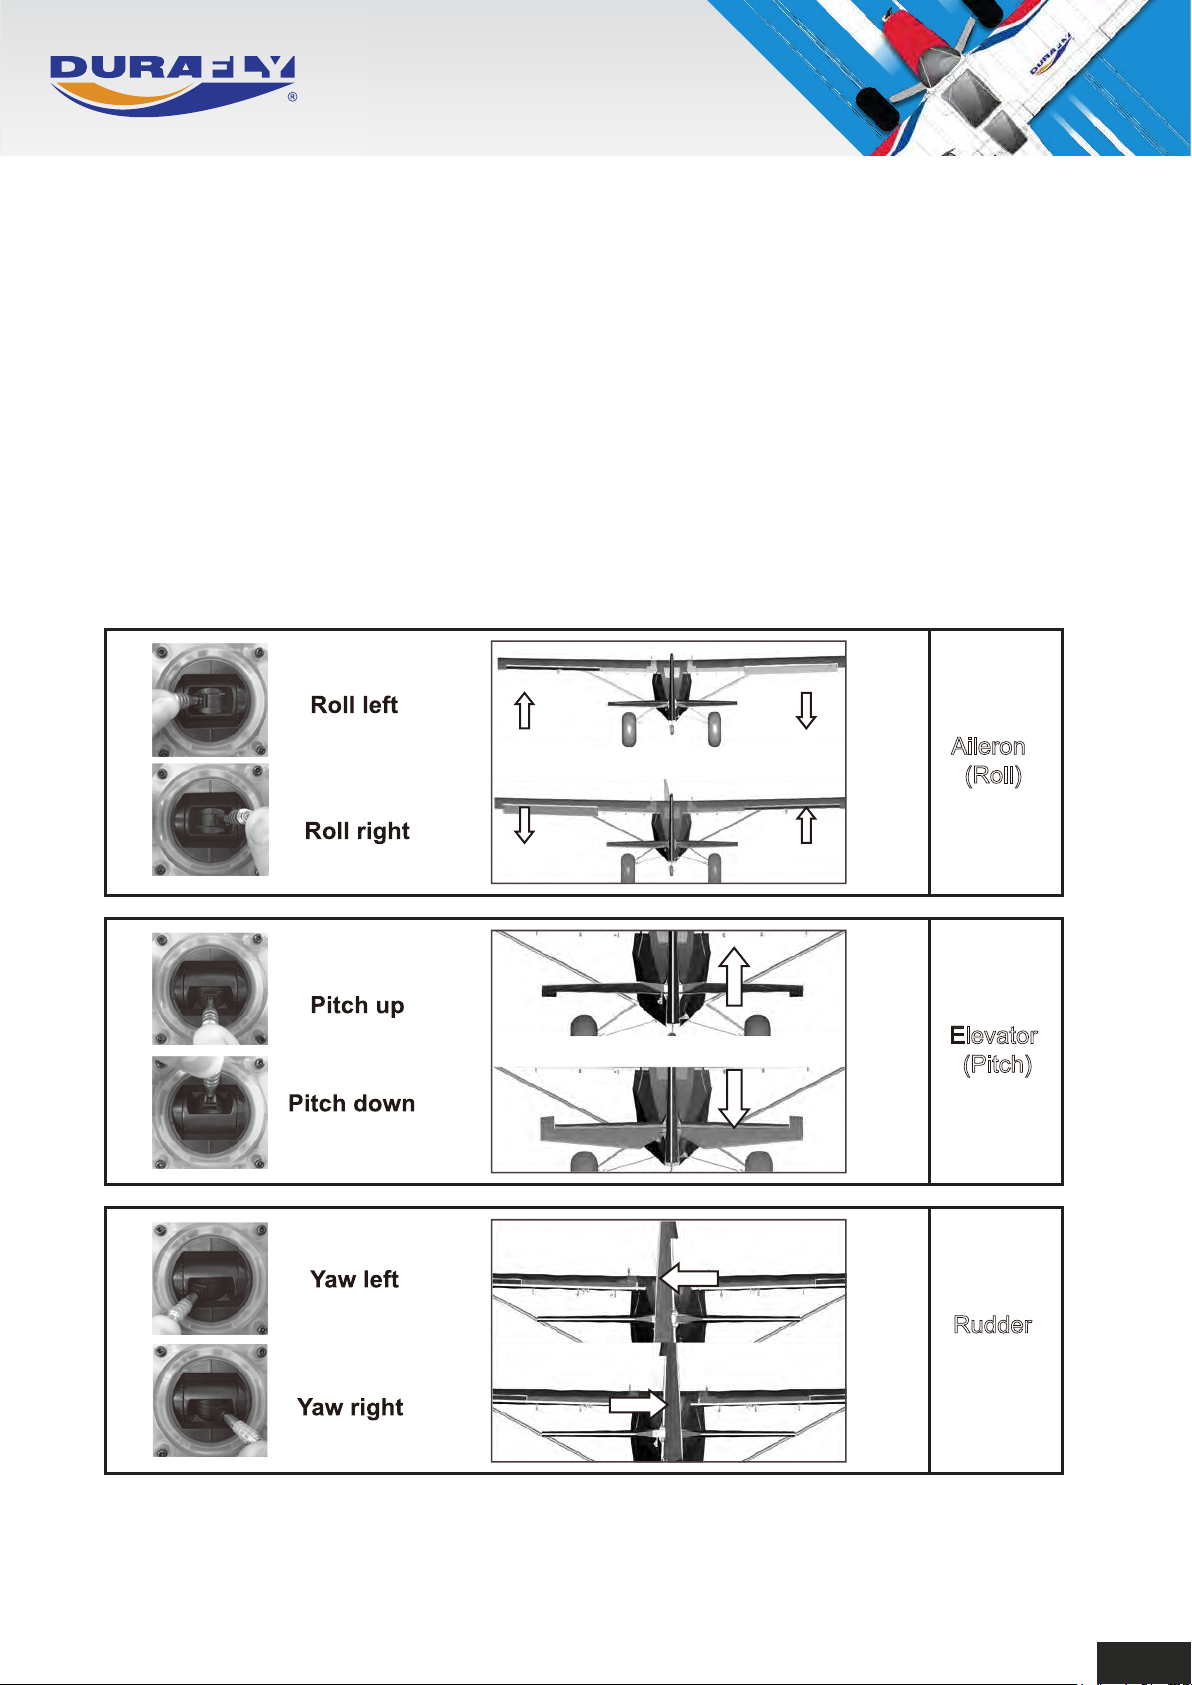
15.Now we need to check that the controls are working in the correct direction, see below.
Roll Left: Move the aileron stick to the left, the left aileron should go up.
Roll Right: Move the aileron stick to the right, the right aileron should go up.
Pitch Up: Move the elevator stick down, the elevator should go up.
Pitch Down: Move the elevator stick up, the elevator should go down.
Yaw Left: Move the rudder stick left, the rudder should move to the left.
Yaw Right: Move the rudder stick right, the rudder should move to the right.
Aileron
(Roll)
Elevator
(Pitch)
Rudder
(Yaw)
12
Page 15
DURAFLY PRIME TUNDRA 1200MM
PLUG AND FLY VERSION
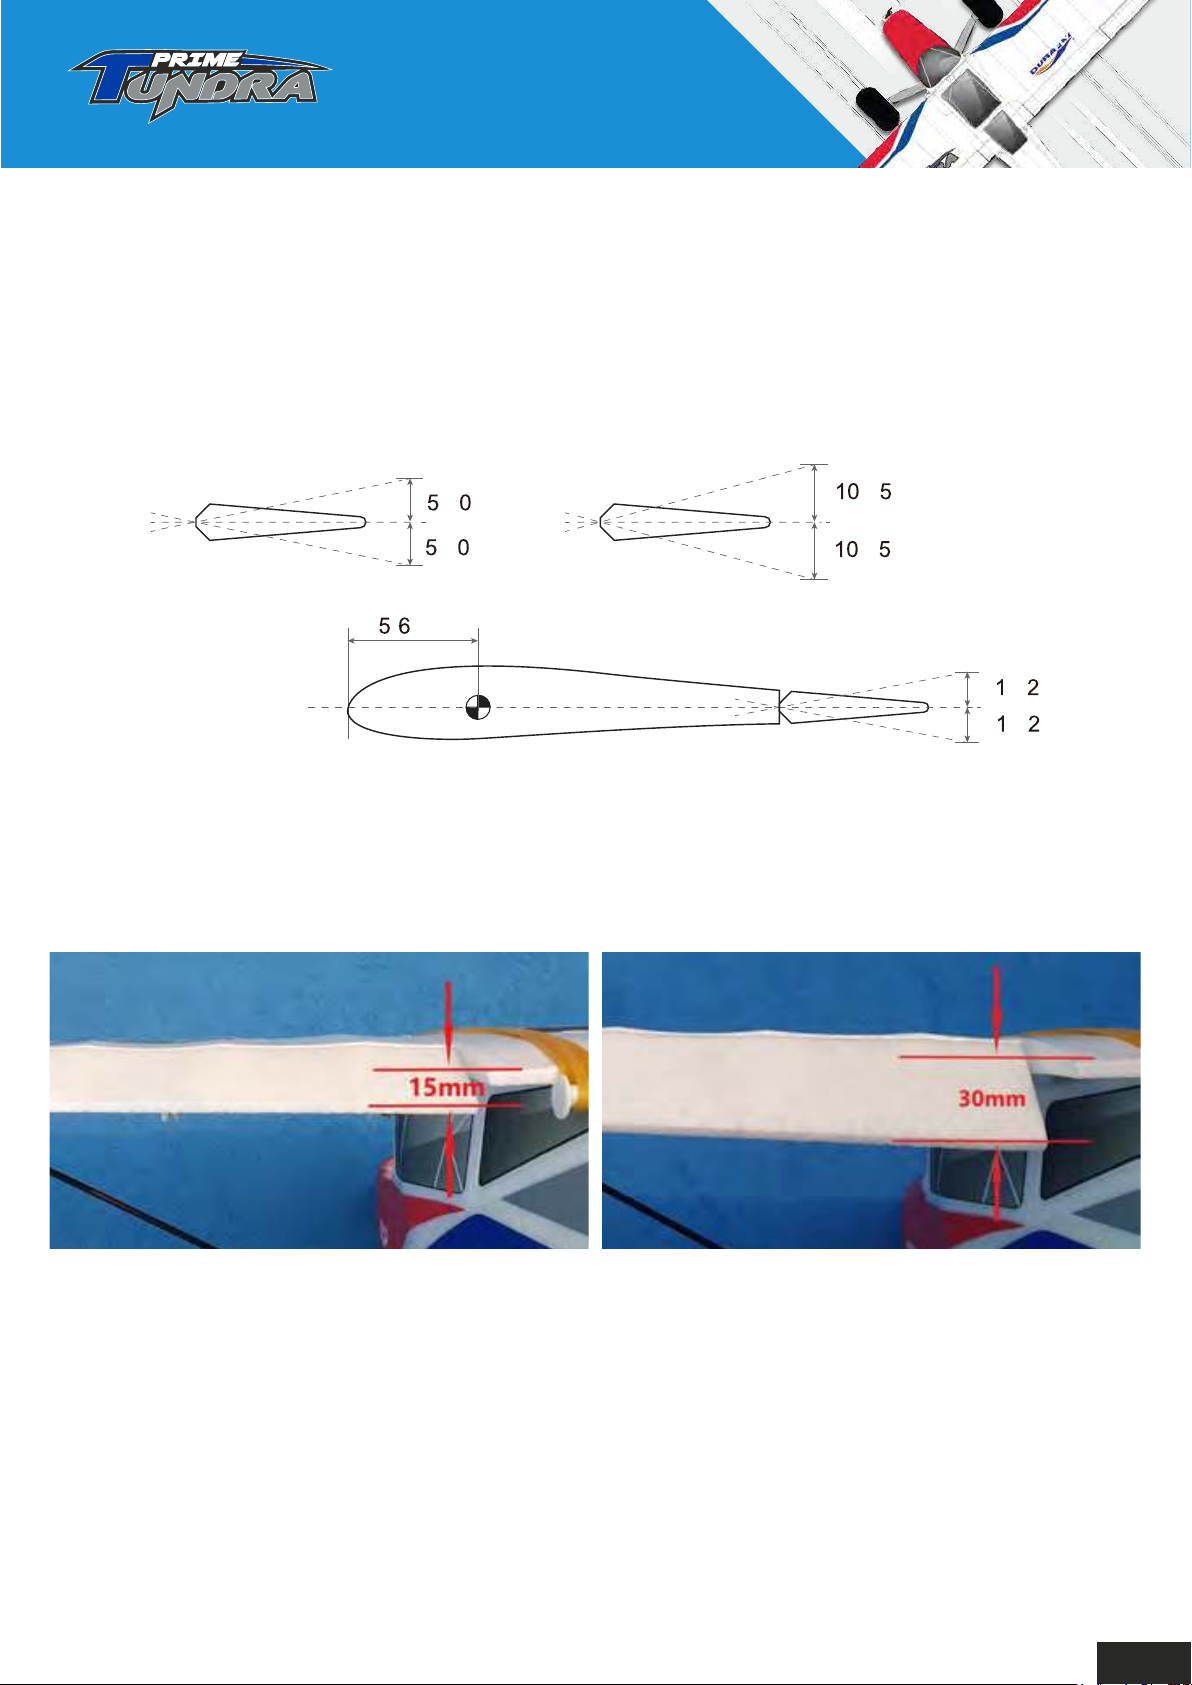
16. You will now need to set the control throws, these should be as follows. The lower figure is with
the D/R (Dual Rates) switched on, and the higher figure with the rates switched off. If you are not
sure how to set the Dual Rates, please consult your transmitter manual. Do these checks with the
gyro in the off position.
-1 mm
-1 mm
Elevator
- 0mm
5
Note: Measure the elevator throws at the end nearest the rudder.
Measure the rudder throws at the base of the rudder. The ailerons as they are a constant
chord so can be measured either end.
Rudder
-1 mm
-1 mm
Aileron
1 -2 mm
1 -2 mm
Mid flaps should measure around 15mm
from the fully up position.
Measure the flaps at the inboard end, the end nearest the fuselage.
Full flaps should measure around 30mm
from the fully up position.
13
Page 16

6. Checking the gyro settings.
1. You now need to check that the gyro is functioning correctly.
2. Move the gyro switch down into the "Training Mode", this is the switch in the fully down
position. Now smartly roll the wings left and right, you should then see the ailerons moving in the
opposite direction to the rolling moment. Then smartly pitch the nose of the plane up and down,
you should then see the elevator servo moving the elevator in the opposite direction of the
pitching. Then move the nose sharply left and right, the rudder servo should then put the opposite
rudder command in. If you find it difficult to see which way a surface is moving, gently hold the
surface, then as you move the model, you should be able to feel the servo moving in the opposite
direction. When the gyro is in "Training Mode" this limits the amount of roll, pitch, and yaw you
can subject the model to. You can put a full control command in, and the model will only respond
up to a certain angle. Also this mode will self right the model if it starts to spiral out of control. Just
let go of the sticks, close the throttle, and the gyro will do the rest.
3. With the switch is in the middle position, "Gyro On" , perform the same actions as above, the
servos will still move but to a lesser degree. In this mode the gyro will still be assisting your flying
and helping smooth things out, but it does not limit the roll, pitch, and yaw angles, or will it self
right as quickly. In this mode you will be able to perform simple aerobatics when you are ready.
4. Now put the switch into the "Gyro Off" position, now when you perform this test, the servos
should not move at all. So in this mode you will get no gyro assist at all, this mode is only for
experienced flyers.
5. Once these checks are complete, leave the transmitter switched on and disconnect the flight
battery. Once the battery has been disconnected you can then turn off the transmitter. Never
have the flight battery plugged in and the transmitter switched off, this is dangerous.
6. So a quick recap on the switching on, switching off process. Always switch the transmitter on
first and check that the switches, trims and throttle stick are in their correct positions, only then
plug in the flight battery. Once you have finished testing or flying, disconnect the flight battery
first, and only then switch off the transmitter.
14
Page 17
DURAFLY PRIME TUNDRA 1200MM
PLUG AND FLY VERSION
Step 7: Fitting the Propeller.
Now you have finished setting up the radio, gyro, and servos, you can install the propeller
onto the motor shaft.
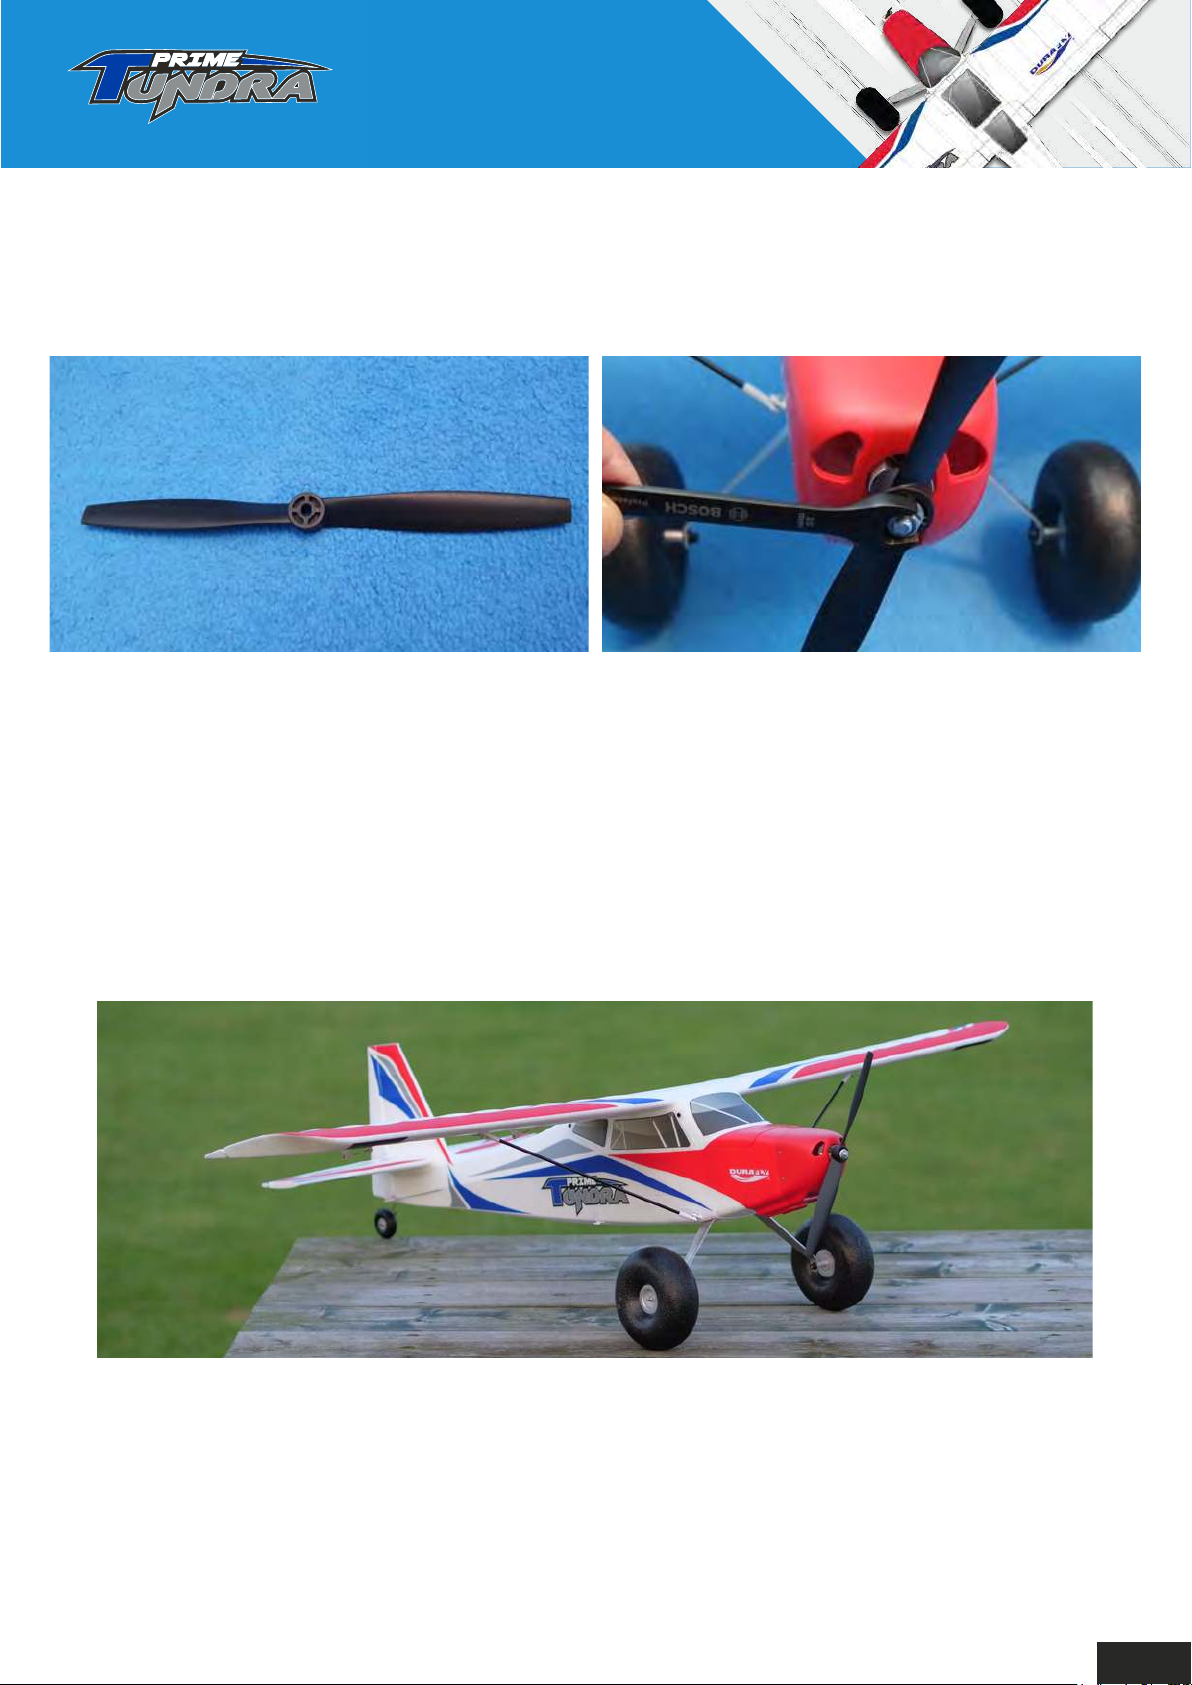
1.Please ensure you fit the propeller the correct
way around. The picture above shows the
front of the propeller, so this of course should
face forwards, in the direction of flight.
Note: Now the propeller has been fitted, please be extremely careful when switching the model
on, ensure that the transmitter is set correctly before switching on and connecting the battery.
2.Remove the prop nut from the motor
shaft,slide the propeller onto the shaft and
replace the nut. Please make sure that the
molded on washer of the nut goes up against
the face of the propeller. Once finger
tightened, use a spanner to tighten the nut,
please do not overtighten otherwise you may
snap the shaft.
Your Prime Tundra is now ready
for checking the CG and its first flight.
15
Page 18
Step 8: Battery Installation and Setting CG.
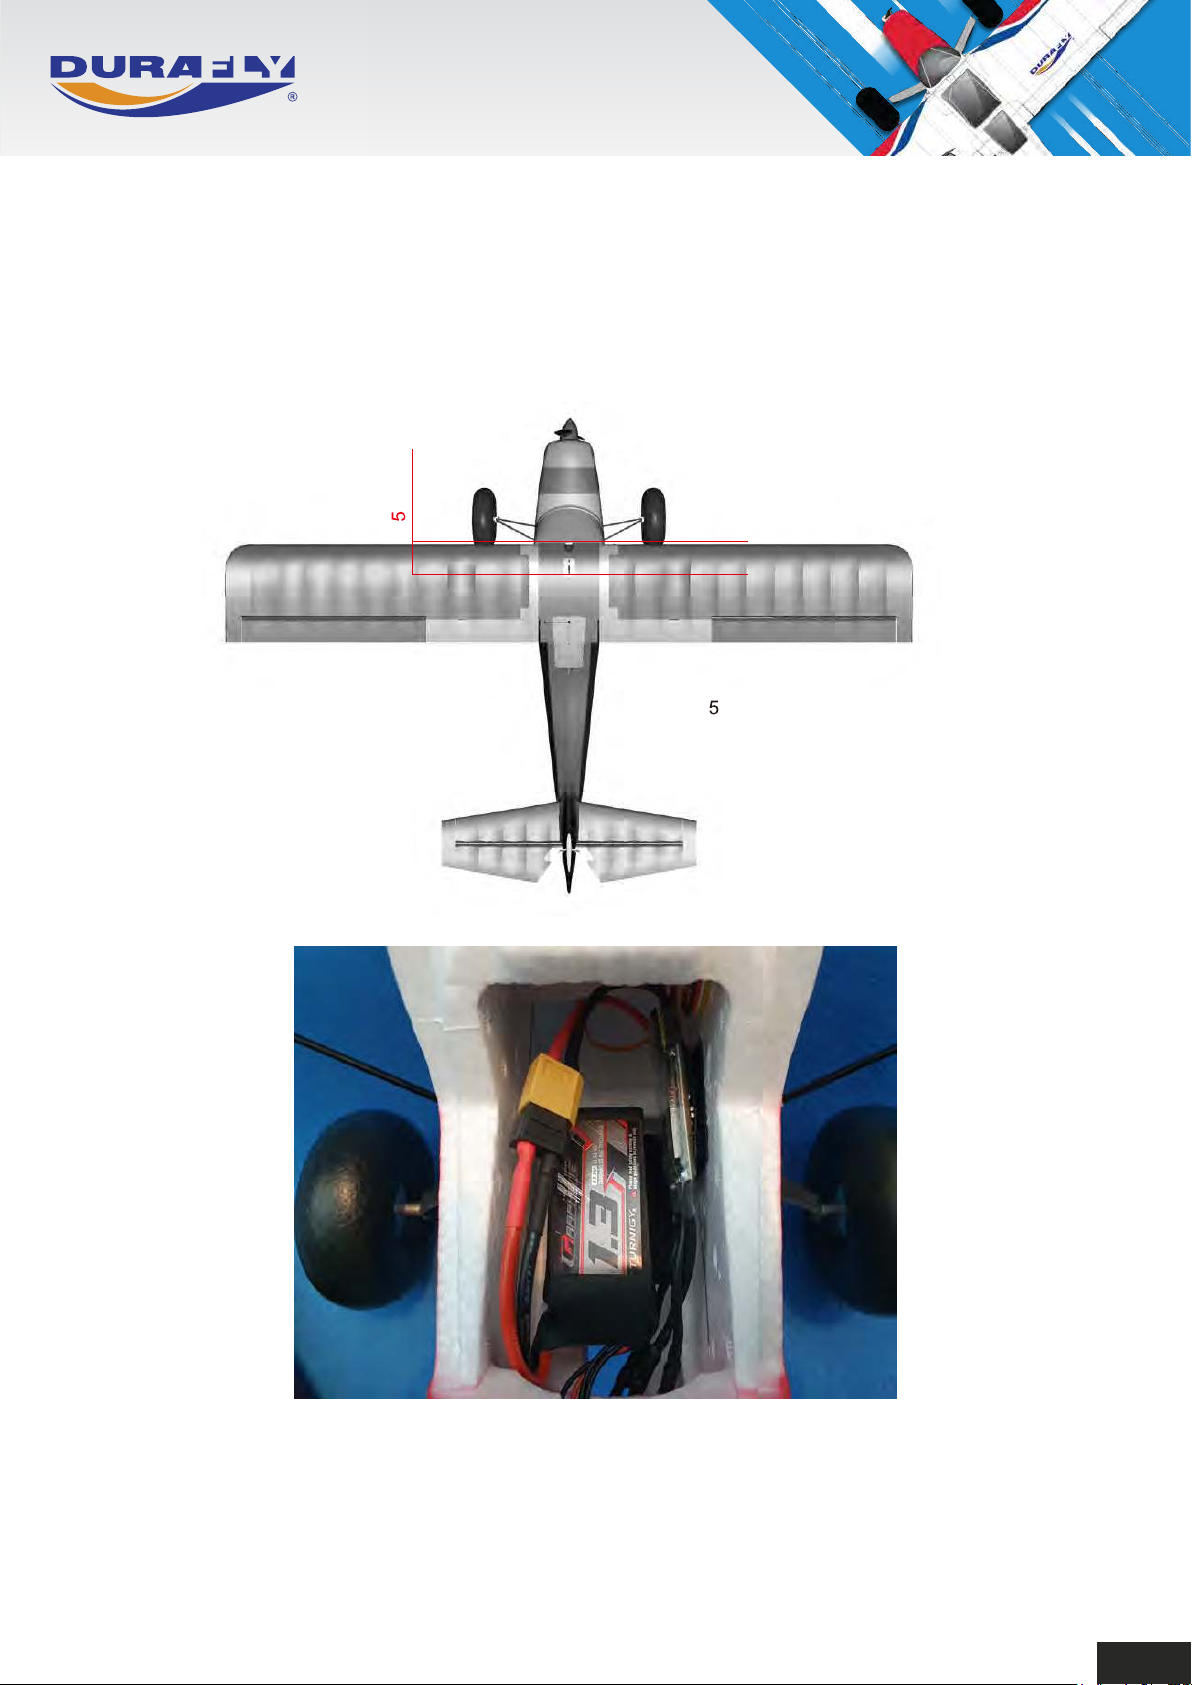
1. The recommended center of gravity (CG) for the Prime Tundra should be approximately 55-60mm from the
leading edge of the wing. This should be easily achieved if you use a 1300~1400mAh 3S LiPo battery
weighing between 110~125g. Ensure it is up against the foam ledge in the battery compartment as shown in
the picture below. Once the position of the battery is determine, secure it in place with the supplied hook and
loop tape.
-60mm
5
CG
CG 5 -60mm from leading edge.
2.This picture shows the battery position, as mentioned above, ensure the battery touches the ledge
at the rear of the battery compartment. With the battery in this position you should easily achieve the
correct CG. Also at this point, fix the Aerostar ESC (Electronic Speed Controller) to the side of the
fuselage with the supplied hook and loop tape.
16
Page 19

DURAFLY PRIME TUNDRA 1200MM
PLUG AND FLY VERSION
9: Flying the Prime Tundra.
Once all the above has been done, you should be ready to fly the Prime Tundra for the first time,
then we highly recommend that you enlist the help of an experienced RC pilot by joining a local
model flying club. Here you should find a wealth of experience and knowledge from fellow
members to help you in getting into the air within a frame work and environment that is both safe
and organised. If the above option is not available to you then the guidelines provided here should
be considered essential reading before flying the PT1200. Also we highly recommend that you
read them before flying within the confines of a club environment too, so please read and follow
these steps very carefully. The Prime Tundra is super stable when the gyro is in training mode, but
flying an RC model for the very first time on your own does need to be done carefully and
methodically.
1. Choose a day when the wind is light, ideally 5mph (8kph) or less. Choose your flying area
carefully as mentioned in the "Safety Precautions" at the beginning of this manual. As a reminder,
choose an open area of reasonably short grass that is away from roads, railway lines, trees, power
lines, buildings, and most importantly people, especially crowds. Also, you should be at least 3
miles (5km) away from a full-size airport or airfield, and you should limit your height to 400ft and
below. Once you are satisfied that your flying area reaches the above criteria you are ready to fly.
2. Check the model over to make sure that no damage has happened on the trip to your flying site.
Check the linkages, wing fixings, tail, and U/C for security. Check that the propeller has not suffered
any damage, and is secure on the motor shaft.
3. Now you are ready to switch the model on as recommended earlier in the manual. Switch on the
transmitter, check the positions of the trims and switches, then plug in the flight battery. The most
important one to remember is the motor disarming switch, also please remember to keep the model
still as the gyro goes through its initialization phase.
4. Once the gyro has initialized, move the control sticks to check the servos and that the control
surfaces are moving correctly and in the right sense. This means that with the aileron stick left, the
left aileron goes up, the elevator stick down, the elevator goes up, the rudder stick right, the rudder
moves right.
5. Now we need to do a range test of the radio system, we recommend that you do this before the
first flight every time you go out to fly, and not just before test-flying a new model. It is best to get a
helper to restrain the model on the ground whilst you perform this check just in case the motor
inadvertently starts up. It shouldn't with the motor switch in the disarm position, but it is always best
to play safe. Walk away with the transmitter for about 25-30 paces, then press the range test button
on the bottom left of the transmitter. With the button pressed (this reduces the power of the
transmitter) move the sticks about and check that the servos are functioning correctly. You can
always as well test the motor, but please make sure your helper who is holding the model is aware
and is clear of the propeller. If your radio system fails this test then do not fly. It may be that the
batteries in the transmitter are low, if so, install fresh batteries, then try again.
17
Page 20

6. When you have completed a satisfactory range test, return to the model and the flying area. Face
the model into the wind and stand a few paces behind it, do a final control check. Disarm the motor,
ensure the gyro switch is in training mode, and the rate switch is in low rates, you may also need to
hold in some up elevator if the grass is a bit long. When ready, smoothly open the throttle up to full
power, slowly ease off the up elevator if you have some in as the model accelerates. The model will
accelerate quite quickly and the gyro should keep it running straight and true, when the Prime
Tundra has enough airspeed it should lift off into a steady climb all by itself. You may need to help it
take-off with a small dab of up elevator, especially if the grass is a bit long.
7. Climb out steadily to around 100-150ft then throttle back to about 50-60% power. Before it gets
too far away, initiate a gentle turn either left or right back towards the take-off area. In the training
mode, the gyro will limit the amount of roll, and the gyro will also help to hold the nose up in the turn.
One of the things beginners struggle with in the early stages of learning to fly is "Orientation", this is
the ability what is happening with the model and which way it may be flying. For this reason, do not
fly the model too far away, or too high. Another thing to remember is that when the model flies
towards you the aileron/rudder controls will appear to be reversed. As an example, when the model
is flying towards you and you initiate a left turn, the model will turn to its left, but to you, the model will
turn right. This takes practice to get used to, but it will come with time, so make good use of the gyro
stabilization in the early stages of learning. A good little tip here is, if you want to straighten the
model up as it flies towards you, then move the stick in the direction of whichever wing is low. If as it
flies towards you the right-wing drops (model is now trying to turn left), push the stick to the right to
straighten. If the left-wing drops (the model is now trying to turn right), push the stick to the
left.Tundra has enough airspeed it should lift off into a steady climb all by itself. You may need to
help it take-off with a small dab of up elevator, especially if the grass is a bit long.
8. You may at this point need to trim the model to fly in a straight and level. At about 50%throttle the
model should fly, hands-off, straight, and level, it shouldn't be turning left or right, or climbing or
diving. If it is gently turning to the left, move the aileron trim to the right a bit until it flies straight, if it is
turning right, then move the trim left. If it is climbing, move the elevator trim up towards the top of the
transmitter until it stops climbing, if it is diving, then move the elevator trim down. If the model
appears to be flying a little bit sideways (crabbing), then it is most probably being caused by the
rudder trim. If the nose is pointing slightly left, then adjust the rudder trim to the right, then of course
the opposite if the nose is to the right. You may then need to readjust the aileron trim to get the
model to fly straight.Do these trim adjustments a little bit at a time and allow the model to settle in the
newly trimmed position before adjusting it anymore.
9. Now that you have the model trimmed nicely for straight and level flight, experiment doing gentle
turns left and right. The gyro will help with the turns, but if you can, try and hold in a little bit of up
elevator as you are turning, take this out when you straighten up. Always try to keep the model
upwind and in front of you, never let it get behind you and downwind. The height you fly at is
controlled by the amount of power you are using and not by the elevator. If the model keeps gaining
height, then close the throttle a small amount until it stops climbing. If it keeps losing height then
open the throttle a little bit until it maintains the height you want to fly at. You may find that in some
conditions, especially sunny days when the warm air is rising, you may have to constantly adjust the
throttle to maintain your chosen height..
18
Page 21
DURAFLY PRIME TUNDRA 1200MM
PLUG AND FLY VERSION
Please remember, if when you are flying and you get into a muddle, the gyro is there to help you. If
this happens, just let go of the control sticks, reduce the throttle, and let the model sort itself out.
Once the model is flying straight and level again, ease the throttle back to around 50% and carefully
bring it back to the flying area if it has drifted away.
10. The next thing we need to think about before the battery gets too low is the landing. A good
landing comes from doing a good, well-controlled circuit and a steady final approach to the landing
area. We do not recommend that you use the flaps until you have a lot more experience under your
belt.
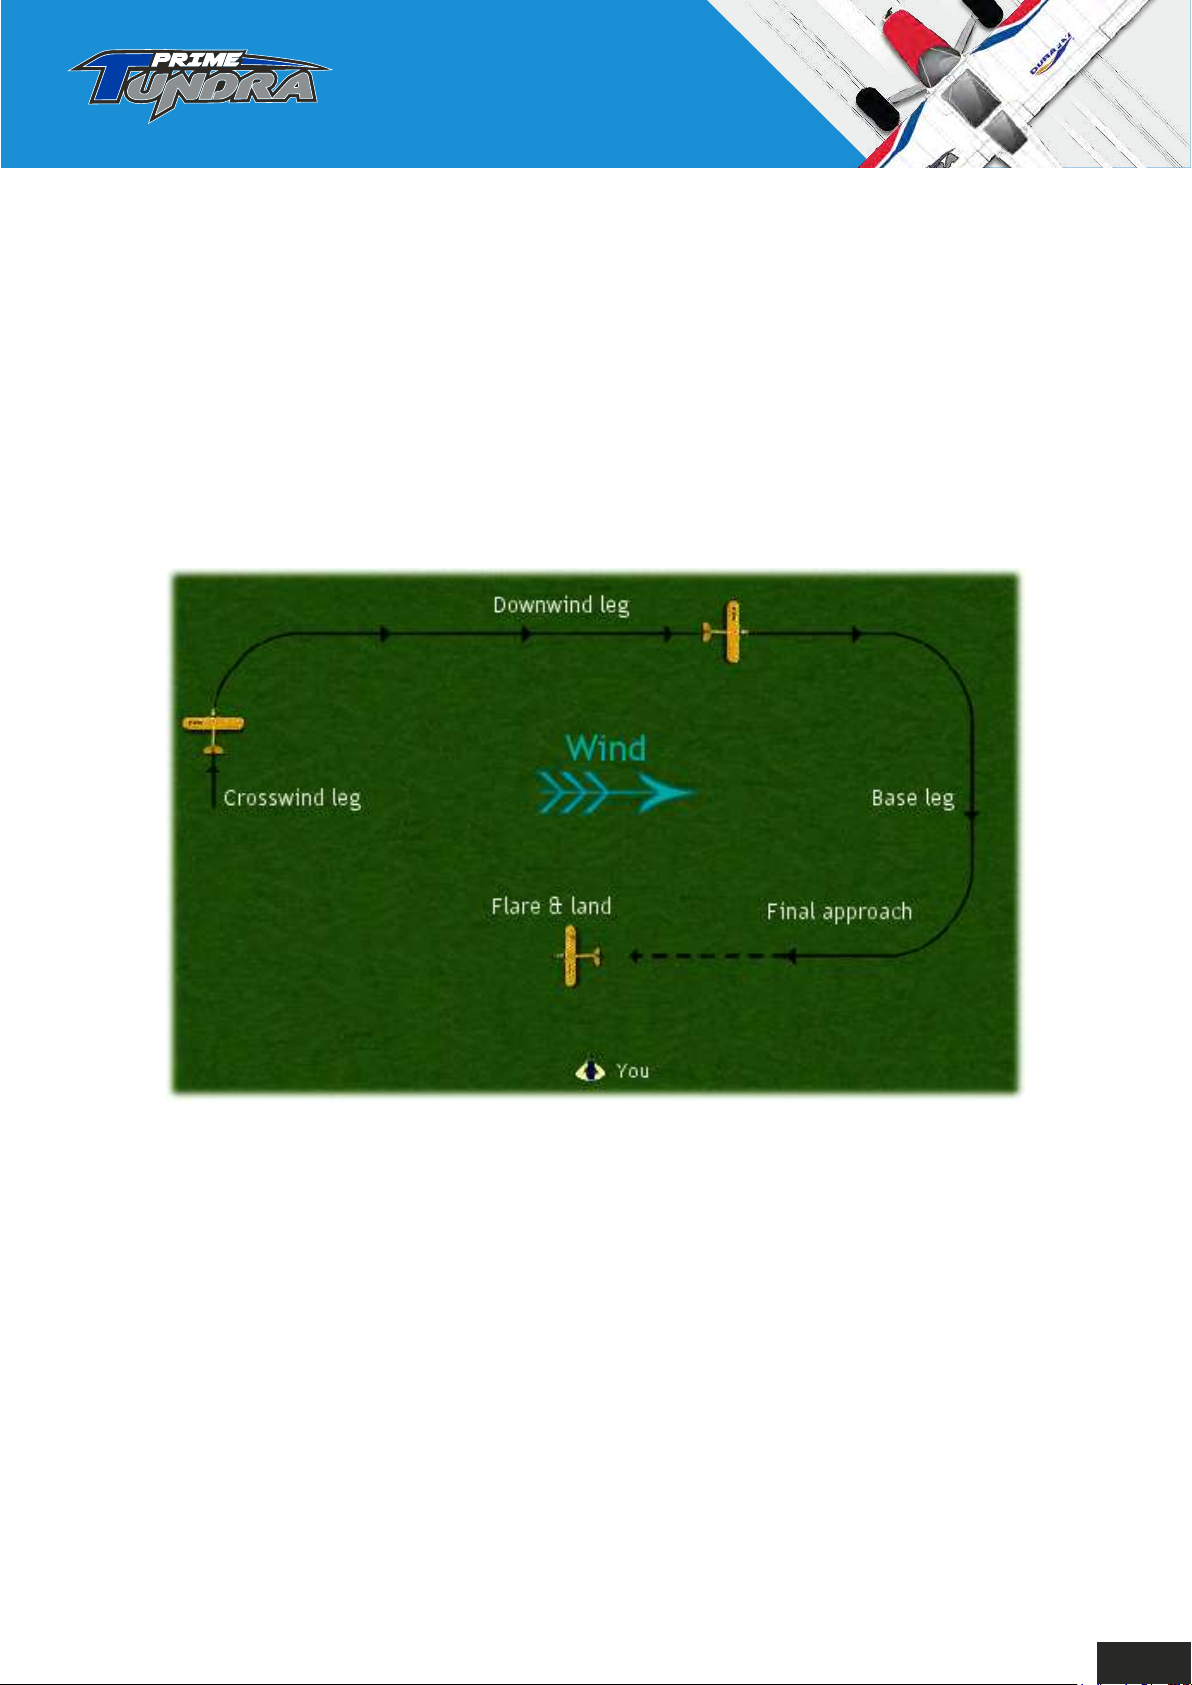
Example of a typical right hand circuit, approach, and landing.
11. For the purposes of this exercise we will do a right hand circuit, see the illustration above.
Start your circuit well upwind and in front of the landing area at about 100ft flying from left to right,
you should have no more than 50% throttle on at this point. Now turn the model right to join the
downwind leg, fly parallel to the landing strip down the right-hand side, you can reduce the
throttle slightly as you fly downwind to reduce the height a little. Once you are just past the
landing area, make a 90 turn onto the base leg, reduce the throttle to about 30% when
established on the base leg to lose a bit more height. Once you are almost in line with the landing
area, do another 90 turn back into wind and onto the final approach. Now reduce power some
more until you get a steady rate of descent, if at this point you think you will overshoot your
landing area (land well beyond it) reduce power a bit more, if you think you will undershoot the
landing area (land before it) increase power a little bit. Once you have a steady rate of descent
and it looks like you will land somewhere close to your chosen area just leave things alone, the
gyro will keep the plane straight and level.
19
Page 22

Also at this point remember that the elevator controls the speed of the model. If you are flying
too slowly then lower the nose using the elevator, if you are flying too fast then raise the nose
slightly, again using the elevator. When you are between 1-2ft (50cm) above the ground, close
the throttle completely and the model will land itself. If you can, just before the model touches
down, ease in a bit of up-elevator to flare to a perfect 3 point landing, that's when the main
wheels and tail wheel touch the ground together.
12. Once the model has stopped, disarm the motor straight away with the switch and go and
retrieve it. Remember then to disconnect the battery first, before switching off the transmitter.
Well done, that is your first flight of the Prime Tundra complete.
Points to remember.
1. Do not fly too far away, as it is then difficult to see what the model is doing.
2. Do not fly too far downwind or behind yourself.
3. Remember that the power controls your height, and the elevator controls your speed.
4. If things start to go wrong, neutralize (or let go of) the control sticks, reduce the throttle, and
wait for the model to return to level flight. If you struggle to get it sorted, or it has got too far away
from you to know what it is doing, then just close the throttle completely, leave the control sticks
alone, and the model will sort itself and will land safely. For this reason, choose your flying area
carefully, if this happens you do not want it to land in the top of a tree or hit some wires, etc.
Dual Rates.
Once you have had a couple of flights using low rates, then you can experiment with using high
rates. To start with, take-off as normal with the switch in low rates, and the gyro in training mode.
Once you are trimmed out and flying around at height, move the switch to the high rate position.
You will now find that the model is quite a bit more responsive, so be careful with the amount of
control input you use. Once you are ready to fly the circuit, switch back to low rates.
Then when you feel comfortable flying with high rates you can attempt taking off with the switch
in this position. If that goes well and you are comfortable with it, then you can try a circuit and
landing with high rates.
The secret of learning to fly an RC model is to take things step-by-step, do not try to run before
you can walk. Do not try to do too much in one flight, build up to doing things slowly.
20
Page 23

DURAFLY PRIME TUNDRA 1200MM
PLUG AND FLY VERSION
Using Flaps.
When you feel you are ready, the time will come when you want to use the flaps. Using flaps is great
fun and a big feature of the Tundra series of models. Flaps help shorten the take-off and landing,
enable the model to fly slower, and will help you make steeper approaches to land. As with the dual
rates, you need to build up slowly to using the flaps. Once again, after you have taken off with the gyro
in training mode, and are settled in with generally flying about you are ready to give the flaps ago.
Before you select the flaps, make sure you are at 50% throttle or less, then move the flap switch to the
middle (half flap) position. The nose will pitch up slightly, the slower the model is flying, the less this
will happen, don't worry too much about this pitching up, the gyro will very quickly correct this for you.
However, it may be necessary to retrim the elevator slightly at this point to retain level flight.
Once the model has settled down it should be flying a bit slower, now get used to flying it around in
this configuration. If you feel comfortable, then try some dummy approaches to land and some slow
flypasts over the take-off area. When you want to move the flaps back to the up position, only do this
at a reasonable height. The reason being is that once you select flaps up, the nose will go down and
the speed will increase slightly, the gyro will compensate once again but you do not want to be too low
when doing this. Once again you may need to retrim the elevator as necessary to achieve level flight.
So when you feel ready, try a take-off using half flap, this is with the flap switch in the middle position
on the transmitter. You will notice that it takes off in a much shorter distance, and also gains height
over a shorter distance. This is perfect when you are able to fly at smaller sites that have bushes etc
you may need to climb over. Then try a circuit and landing using half flap, you will be able to fly a
slightly tighter circuit, and will have a slighter steeper, slower final approach. You will notice that you
will need a little more power due to the extra drag and increase in lift from the flaps.
After several flights, and once you are really used to flying with half flaps set, the time comes to try full
flap with the switch in the fully down position. Once again, get used to flying on full flap at a safe height
until you feel ready to try a final approach. We don't recommend using full flap for take-off, it is not
necessary, half flaps is more than enough. Full flap gives you nearly all drag and very little extra lift,
hence why we do not recommend it for take-off, only in the circuit and for landing.
Do not switch into full flap in one hit, select half flap, wait a second for the model to settle and the gyro
to compensate, then select full flap. Straightaway you will notice it is a bit like putting a handbrake on,
you will see the model slow up and you will need a bit more power to overcome the drag, retrim the
elevator as necessary. Once again, get used to flying with the model in this configuration, keep the
turns gentle, and use the throttle as necessary.
Now try some dummy circuits and approaches, be a bit higher than normal, select half flap for the
downwind leg, base leg, and onto the final approach, once established on final approach select full
flap. Straightaway you will see that the final approach angle is much steeper (great for flying over an
obstacle on the approach) be ready to control the descent with throttle and the airspeed with the
elevator.
21
Page 24
Then initiate a go-round by smoothly opening the throttle, select half flap, and climb away into
wind. Do this 2 or 3 times until you feel really comfortable using full flaps on the approach. Now
start your circuit at the normal height and go for a full flap landing, the Prime Tundra really does
this well, especially with the gyro in training mode. As mentioned before, the approach will be
steeper, a bit slower, and the landing run very much shorter. Just remember that when you flare
to land, the speed will drop off very much quicker so be ready for this, and do not flare too high
off the ground.
Advanced Flying.
Now you are happily flying around, taking off and landing, using the flaps, etc, all with the gyro
in training mode, it is time to have a go with it in the "Gyro On" mode. Again, as above, do this
for the first time at a safe height to get used to flying in this mode. You will now notice that there
are no limits to the amount of roll, pitch, and yaw you can use. The gyro will still be giving you
some stabilization but it will not self right as quickly, so be careful. Just try some gentle then
steeper turns and get used to the different and more precise feel of the model. Again, just build
up to using this mode slowly, don't use it for take-off and landing until you feel really comfortable
with it.
Once happy with flying in this mode you can try some gentle aerobatics. Perform these at a
safe height and a safe distance away, but not so far that you can't see what your model is doing
properly.
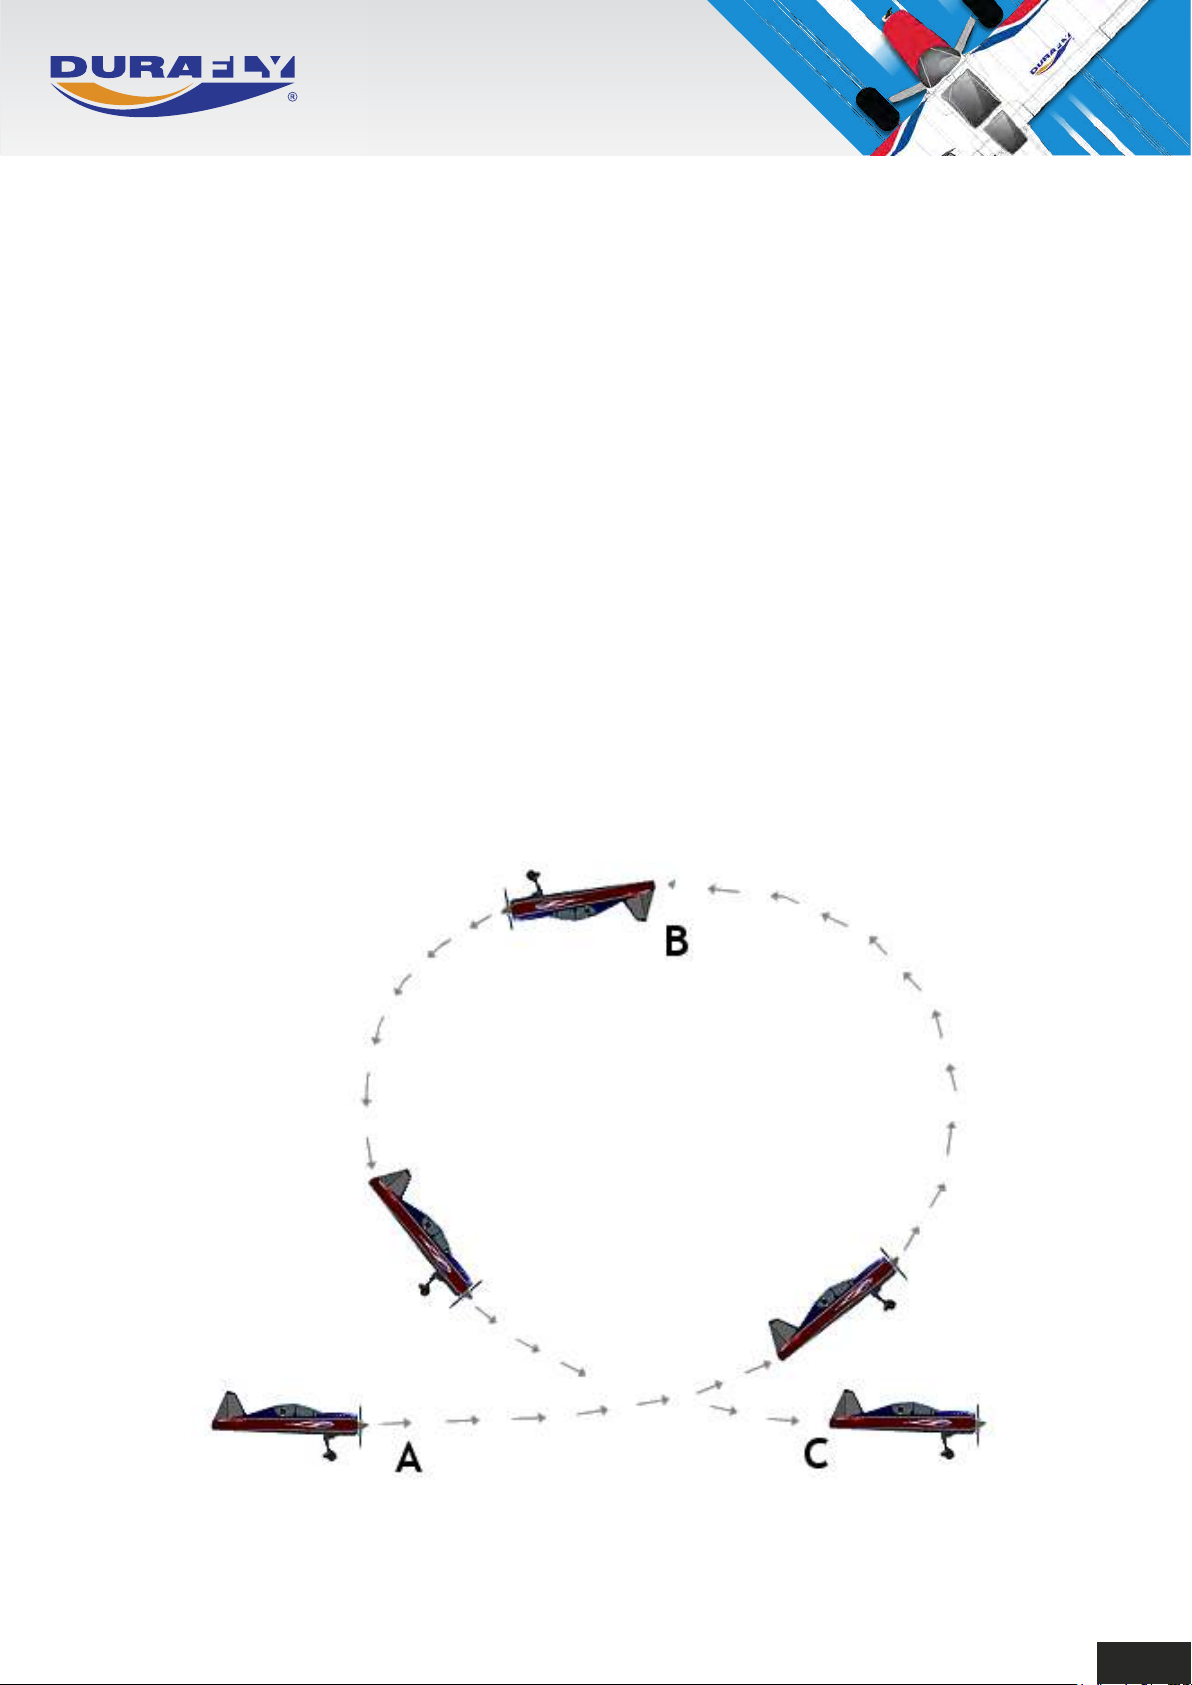
The Inside Loop.
22
Page 25
DURAFLY PRIME TUNDRA 1200MM
PLUG AND FLY VERSION
Flying the Inside Loop.
The inside loop is the easiest of all the aerobatic maneuvers to fly. Start by flying straight and
level in to wind, no lower say than 75-100ft.
Apply full power and, at point A in the picture above, pull back on the elevator stick to start a
climb - not too much, be gentle but precise. Keep the power on, your Prime Tundra will go into
a vertical climb. Let it keep going until it starts to roll over onto its back, point B in the picture.
At this point, close the throttle to about 50% or less and keep holding the elevator stick back,
adjusting it as necessary to maintain a tidy circular path. At point C in the picture, level out the
airplane by returning the elevator to neutral and increasing power to exit the loop, fly straight
and level back into wind.
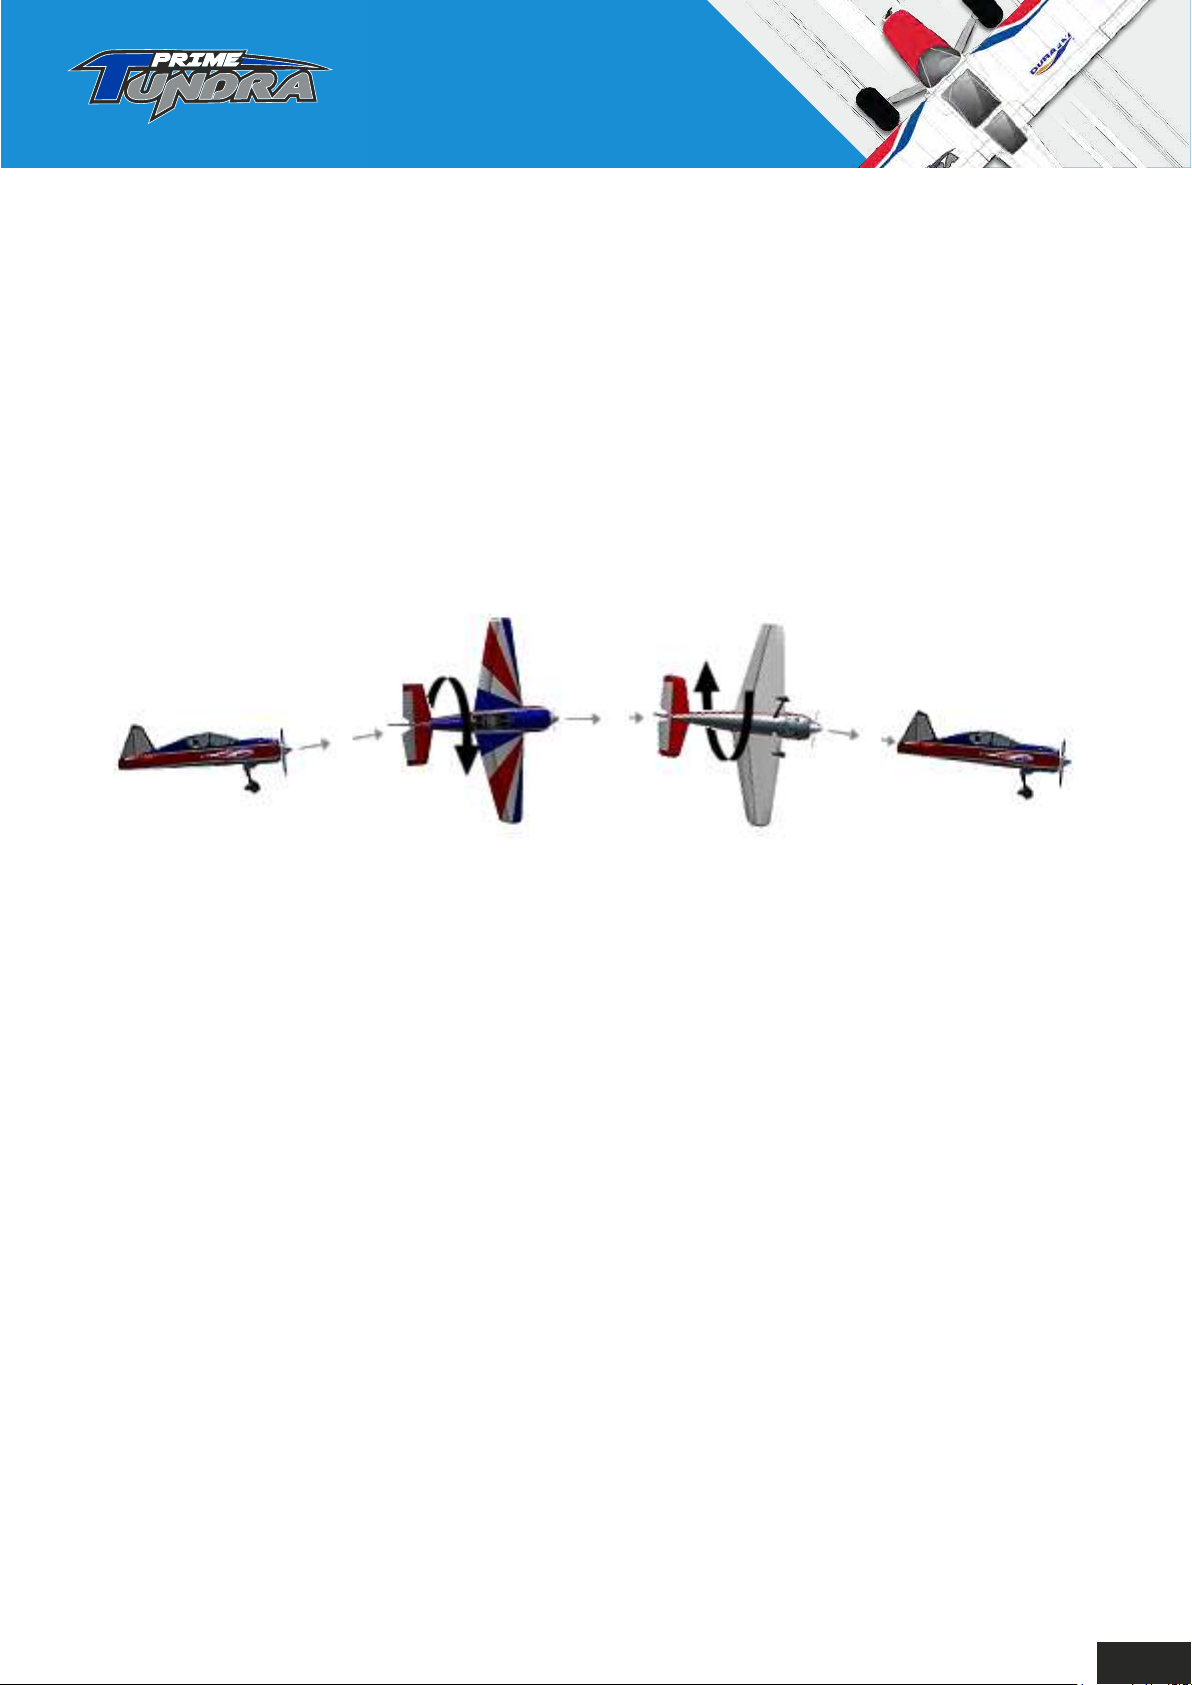
The Axial Roll.
Flying the Axial Roll.
Once again, start by flying straight and level into wind, no lower say than 75-100ft, and at about
60-70% throttle. To begin a roll, here we will explain a right hand roll, apply a very small amount
of up-elevator, then release the elevator, a split second later apply full right aileron. There is no
need to adjust the power, keep the throttle stick where it is throughout the roll. As you apply the
aileron, the model will start to roll about its longitudinal axis. Keep the aileron stick in the same
position until the model is back up the right way, return the aileron stick to neutral and resume
straight and level flight.
When you have done this a few times we can tidy the roll up and make it a bit more axial by
using some down elevator when the model is upside down (inverted). So entry to the roll is
exactly the same until you get to the inverted position, at this point apply a small amount of down
elevator. This will hold the nose up and will prevent any loss of height as the model performs the
roll. As the model starts to return to the right way up, neutralize the elevator, but keep the
ailerons on until the roll is complete, and the wings are level once again.
23
Page 26
Gyro Off Mode.
Before you go any further with aerobatics, we highly recommend that you learn to fly the
PT1200 with the gyro in the "Gyro Off" mode. This way you will not be relying on
electronics and technology to help you fly, but purely your own skills.
Once you are proficient in flying with the gyro off, there are quite a few more maneuvers
the Prime Tundra can perform, but we will not go into those in this manual. There is plenty
of good videos and illustrations on the internet for the more advanced aerobatics, but as
mentioned at the very start of this manual, we would much prefer you learn, and be taught
more advanced maneuvers by an experienced club pilot in a club environment.
Another feature of the Durafly Tundra series is the option to fit floats, the Prime Tundra is
no exception. Flying off of water is great fun and highly recommended. Further on in this
manual we show the optional floats, and explain how to fly your Prime Tundra from your
local lake, or waterway that permits model flying.
We hope you enjoy flying your Durafly Prime Tundra.
Prime Tundra Option Parts:
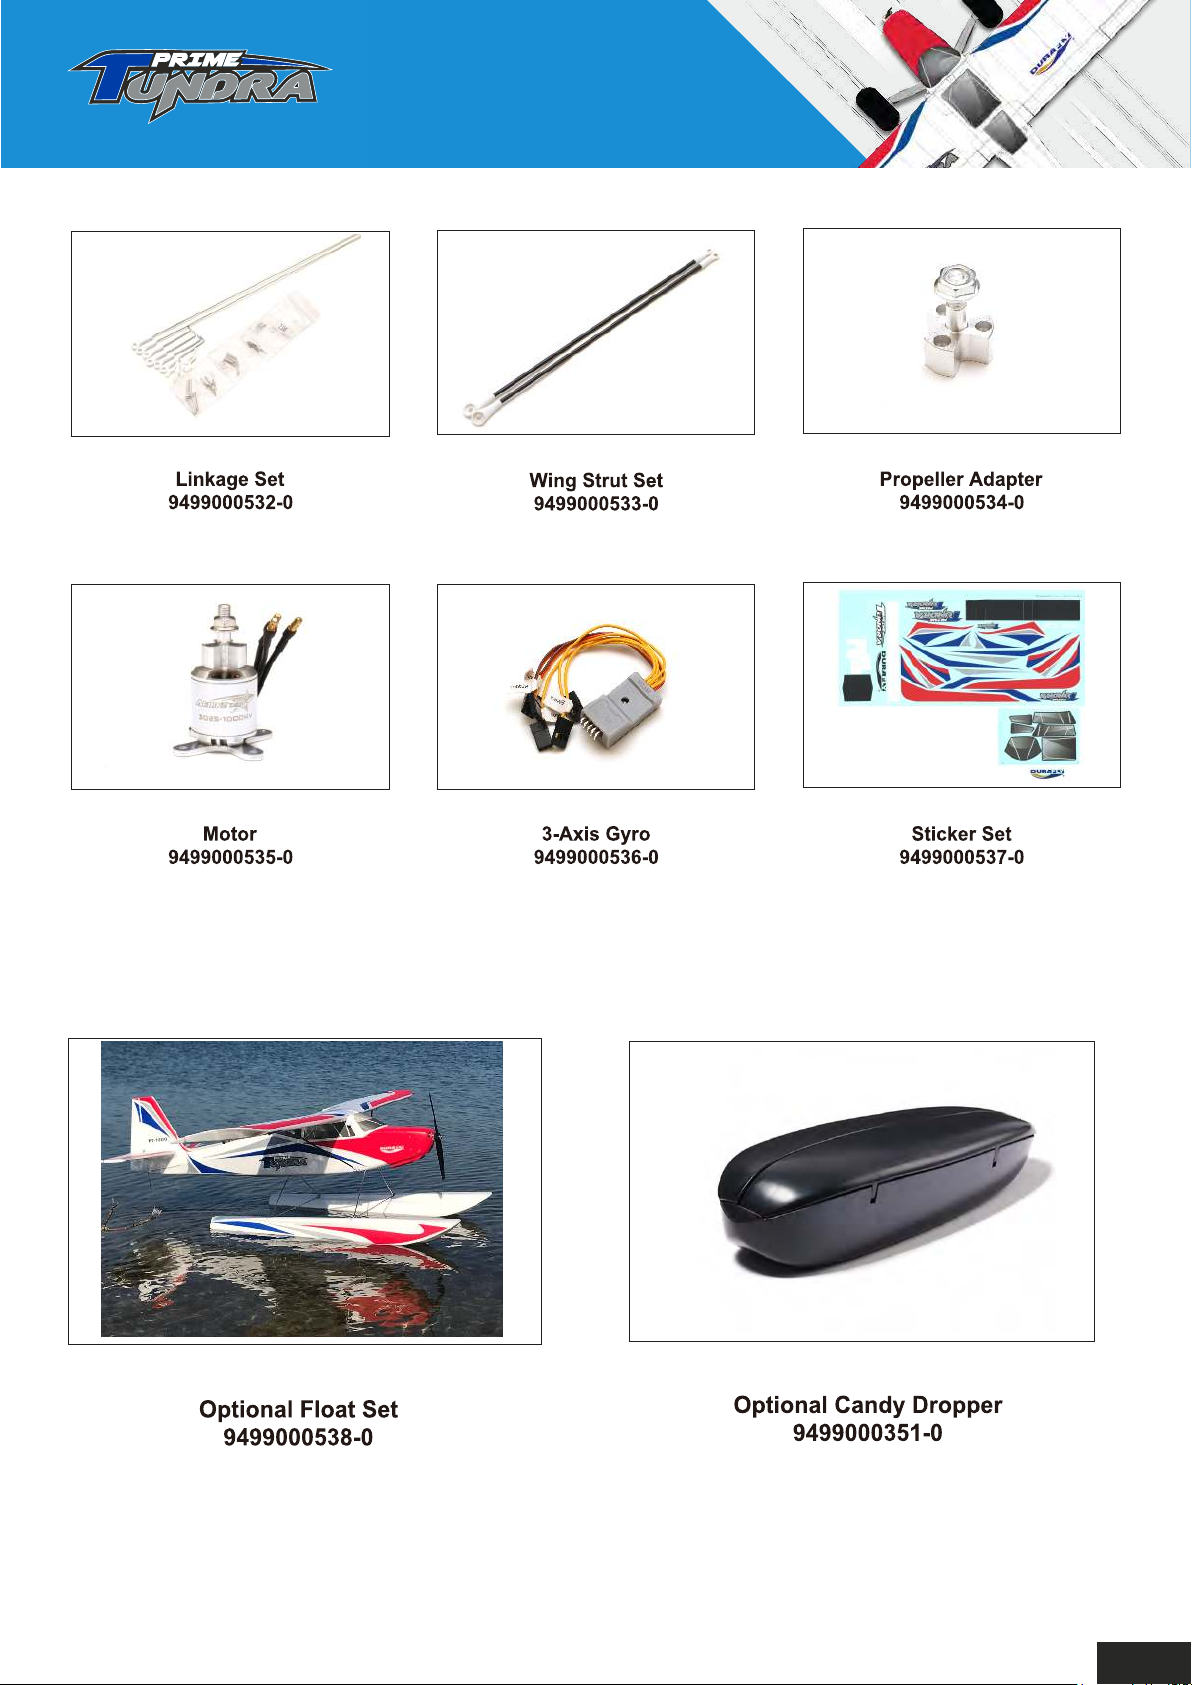
Think about adding either the optional Floats, or the optional Candy Dropper. Both are very
easy and straightforward to fit, and the support for the Candy Dropper is supplied with your
Prime Tundra.
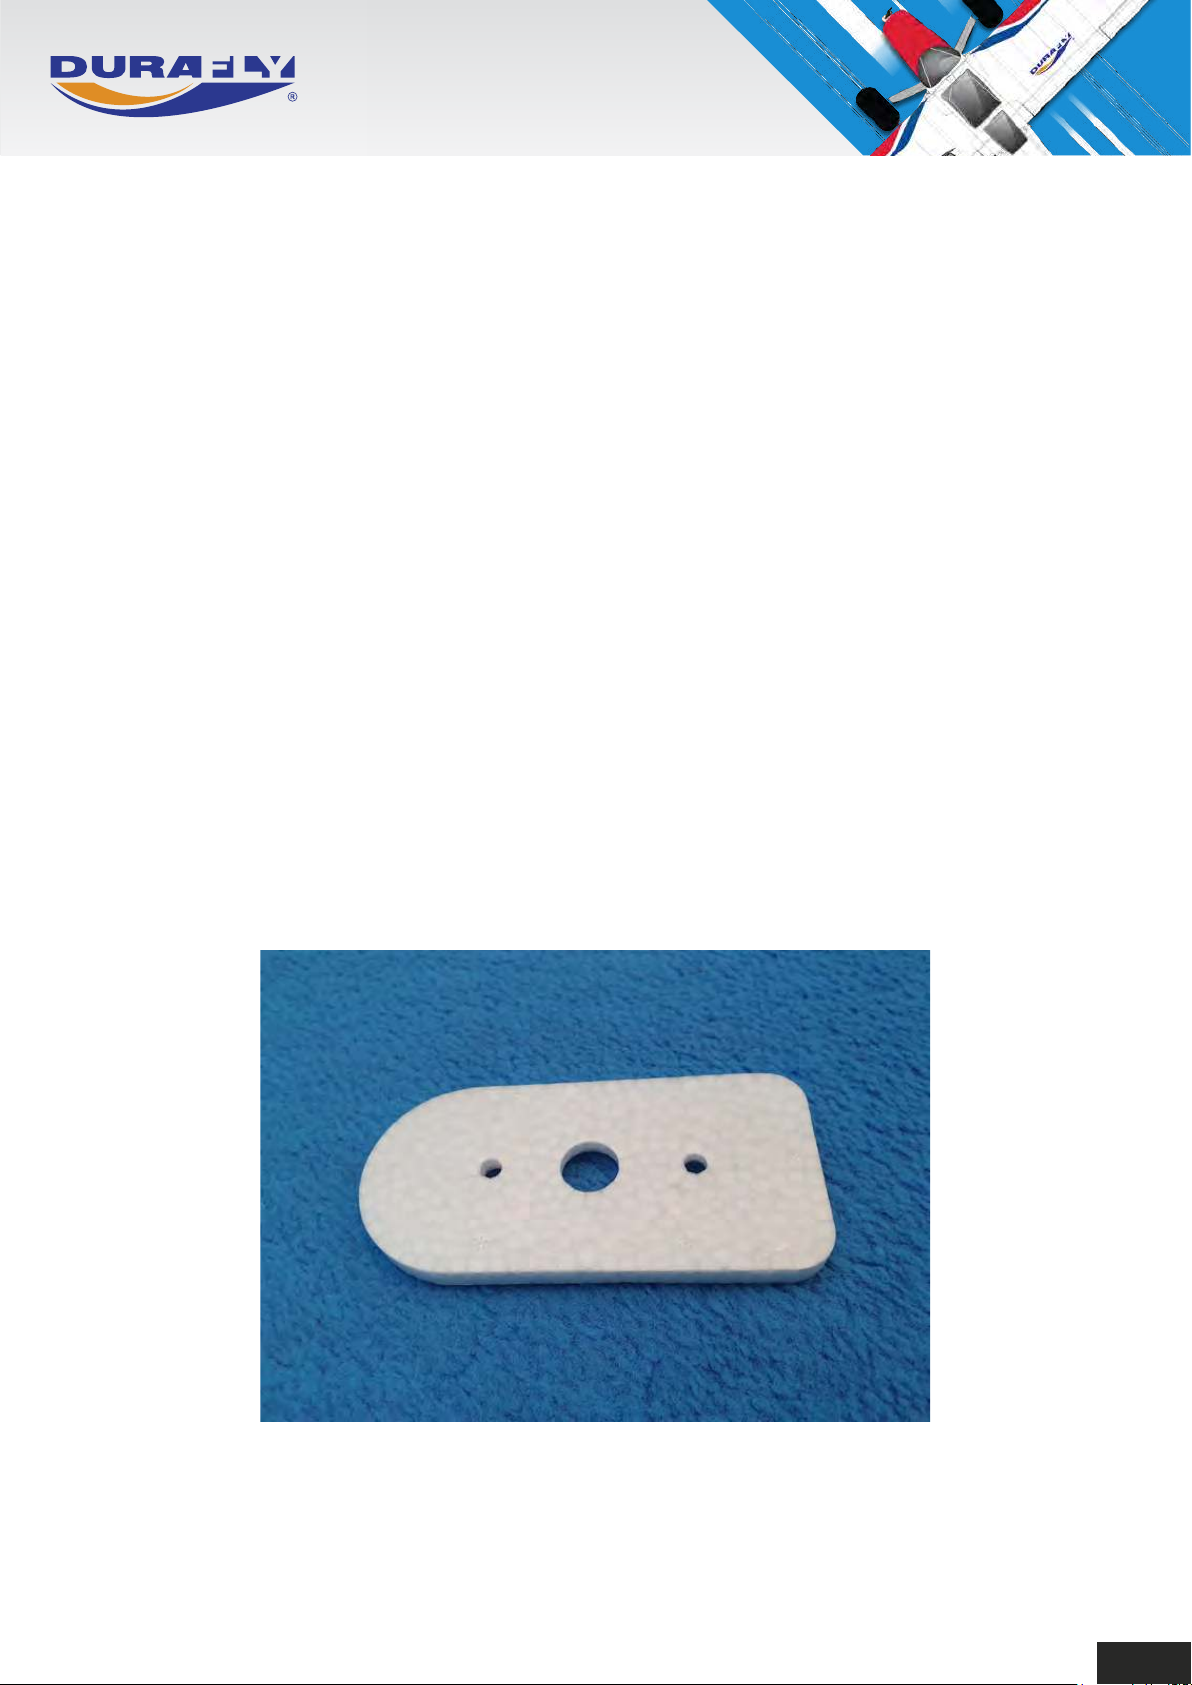
Optional Candy Dropper Mount
24
Page 27
DURAFLY PRIME TUNDRA 1200MM
PLUG AND FLY VERSION
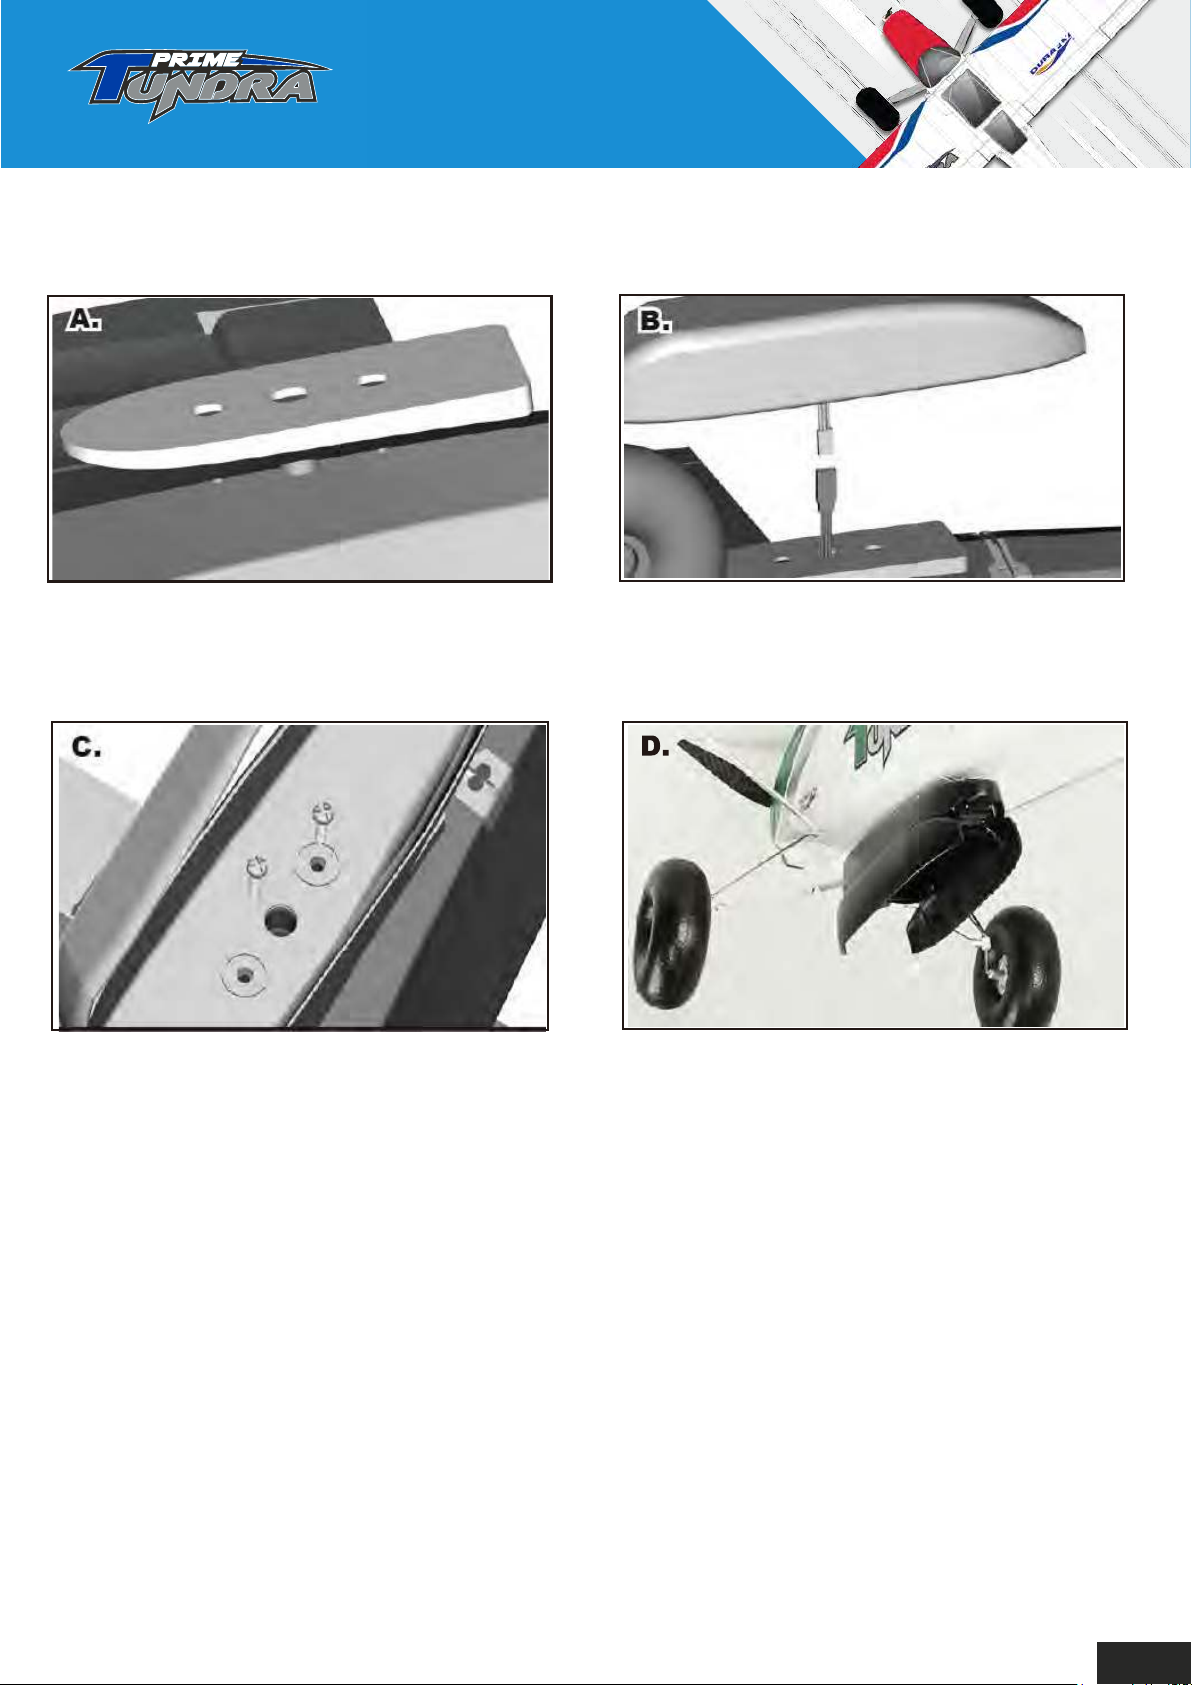
Fitting the Optional Candy Dropper.
A.Position the foam support over the mounting
holes on the underside of the fuselage.
C.Secure the Candy Dropper using the
supplied bolts.
Please Note: This optional part has been designed for dropping candy only, or other very light in
weight items. Do not drop any items that are heavy enough to maim or injure anyone, and do not drop
items directly over people. When candy dropping, drop the candy in the designated area away from
the crowd, then invite the people in once the model is clear of the area.
B.Feed the Y lead for the Candy Dropper
through the center hole and connect to a
spare channel in your Rx.
D.The finished Candy Dropper installation.
25
Page 28
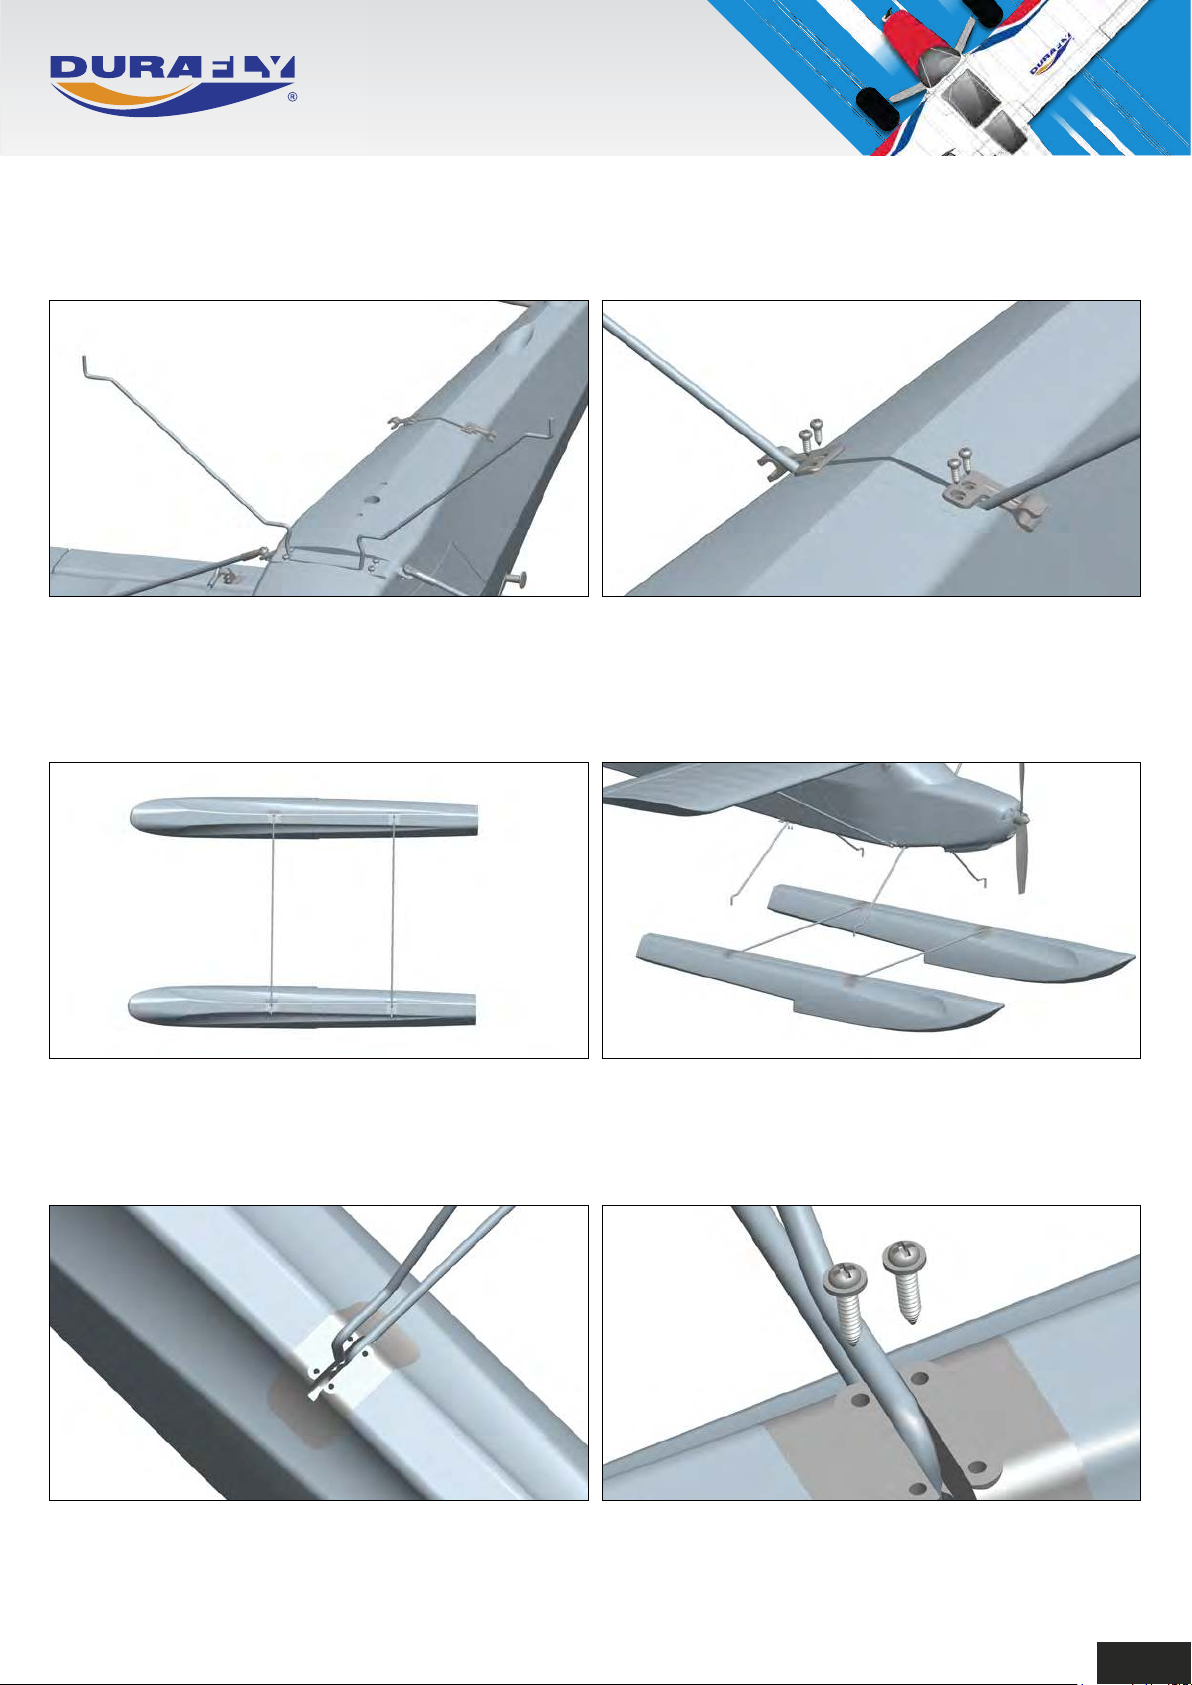
Fitting the Optional Floats.
1.Remove the wheeled landing gear and
replace the screws. Clip into the slot the front
float support legs.
3.Slot the float cross braces into the inside
holes of the float front and rear mounting
points.
2.Unscrew the strut retaining clips at the rear,
slot in the rear float support legs, and replace
the retaining clips.
4.With the floats assembly on a flat surface,
lower the Prime Tundra onto the floats.
5.Push the float support legs into the outer
holes of the float mounting points.
6.Use the supplied M2 x 8mm screws to retain
the supports to the floats.
26
Page 29
DURAFLY PRIME TUNDRA 1200MM
PLUG AND FLY VERSION
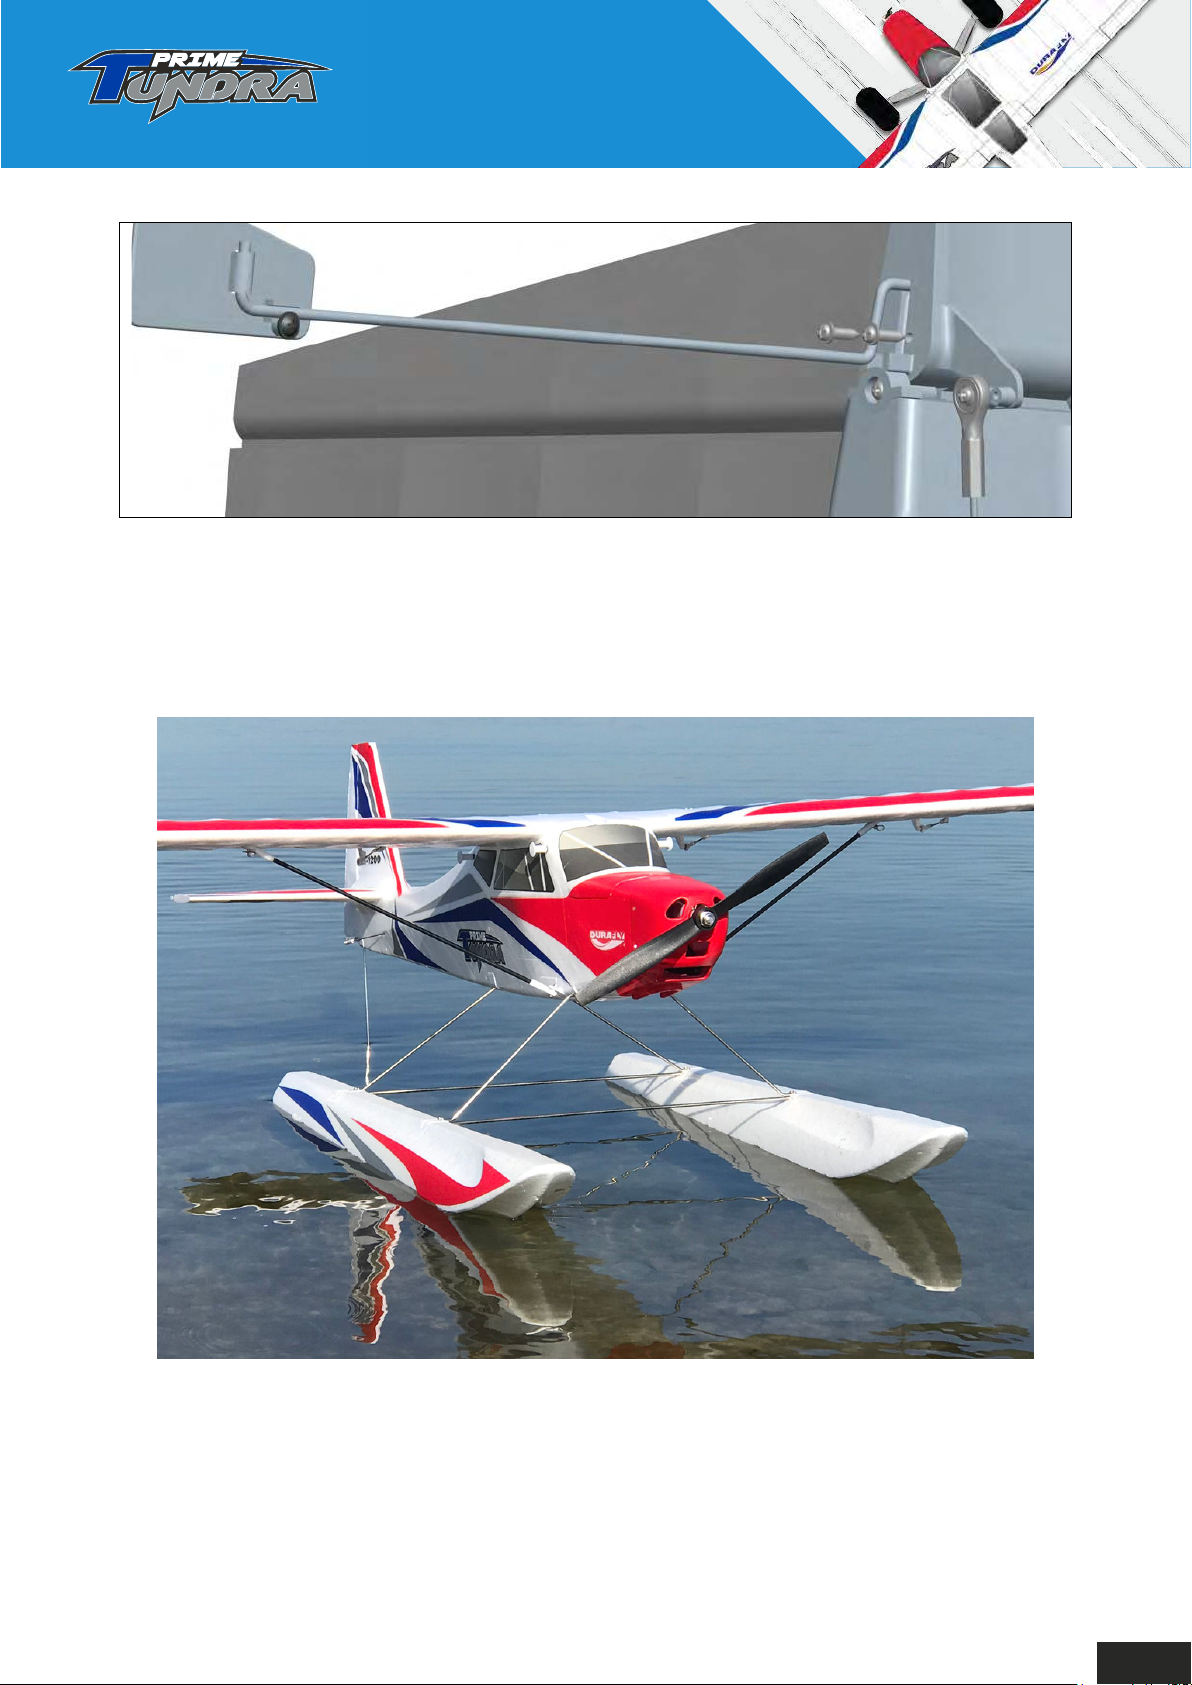
7.Although not always required, a water rudder does help with steering in less than calm
water. conditions. Simply remove the tail wheel and replace with the supplied water
rudder. Both tail wheel and water rudder mount in exactly the same way.
27
Page 30
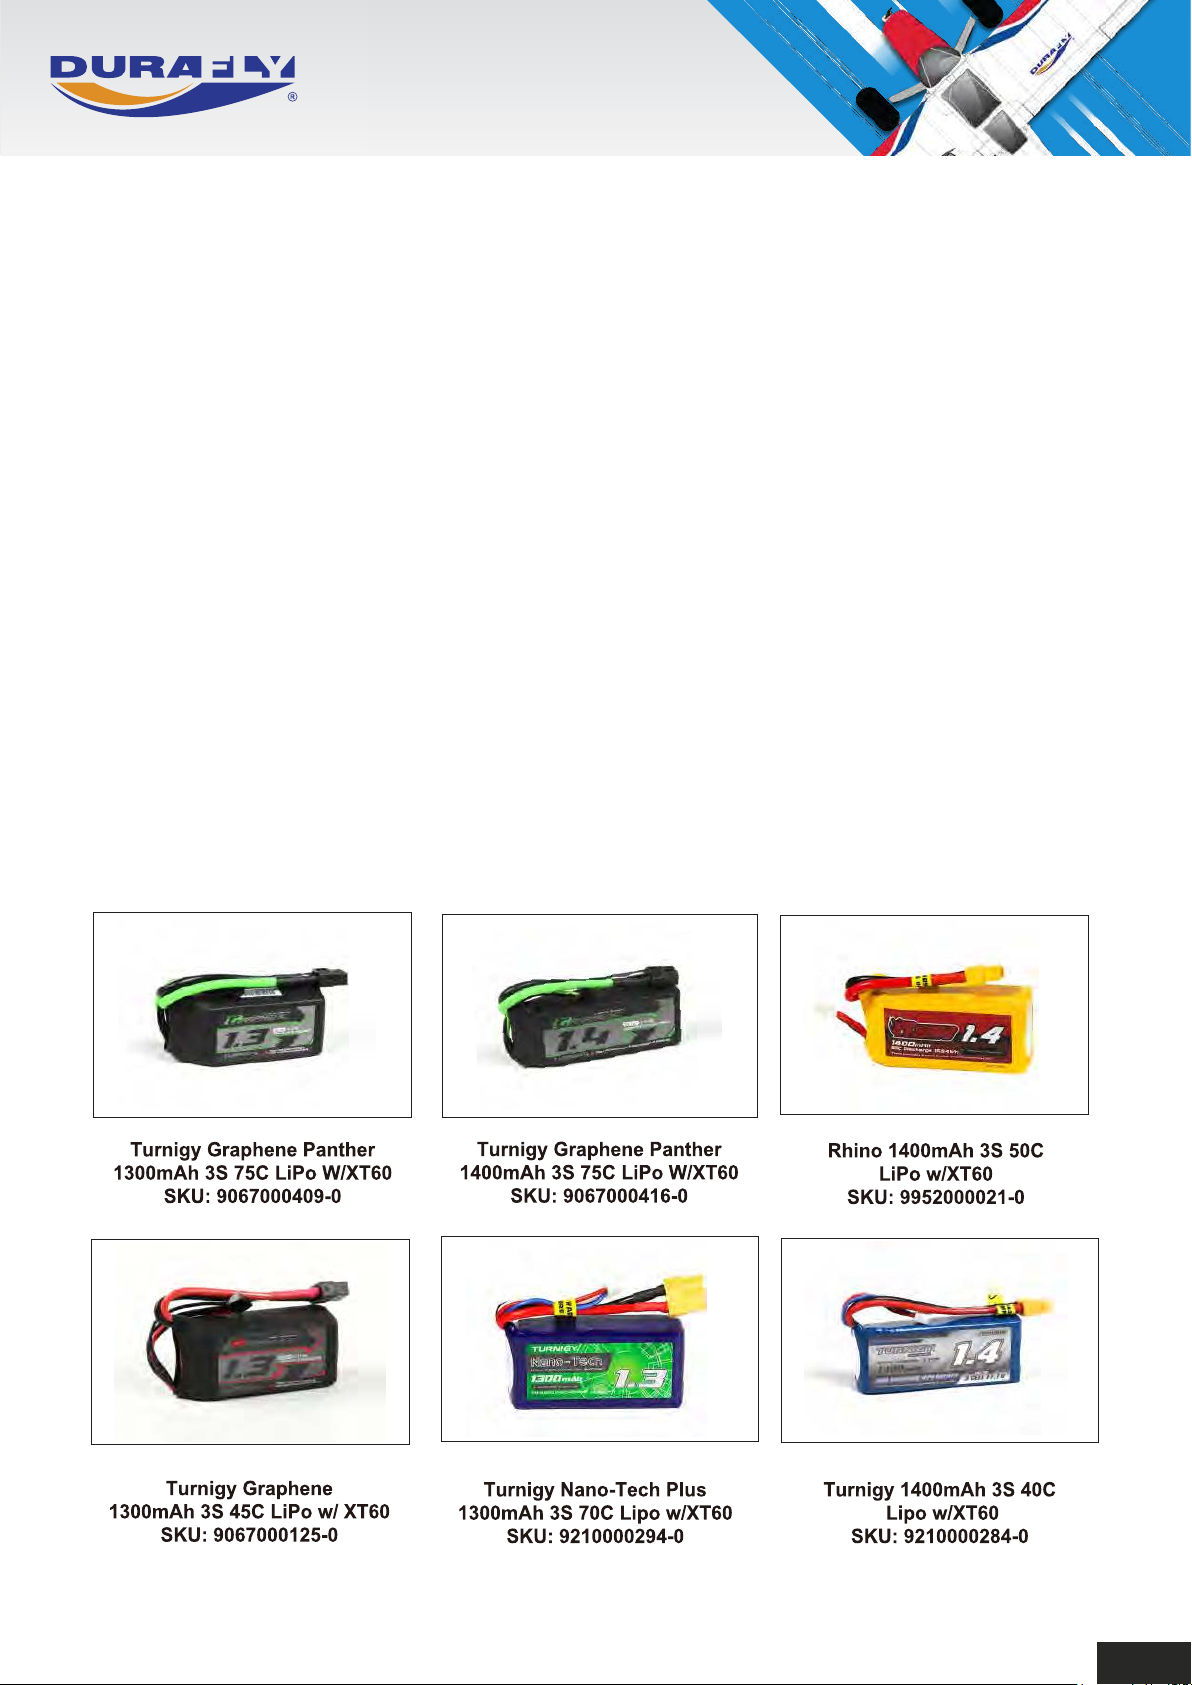
Flying your Prime Tundra from water
Just as flying from land, select your flying area careful, avoid small areas of water with trees, etc,
choose a nice size lake if you can. Please also remember that you will need to either obtain
permission from the owner of the area, or use an area that is already designated for model flying.
Due to the water rudder taxiing the Prime Tundra is very easy. Place the model in the water and
check the controls and ensure they are functioning and operating in the correct direction. Once
satisfied all the controls are working as they should, apply some up elevator and then a small
amount of power to get the Prime Tundra moving across the water. Taxy out to the take off area
and line it up into wind. Apply full up elevator and smoothly advance the throttle, keeping the
Prime Tundra straight with rudder and the wings level with ailerons. Once on the step reduce the
elevator so that the model balances on the step, then when ready the Prime Tundra will lift itself off
and climb away.
Landing on the water is also very easy, apply flaps if conditions allow and line up with the landing
area into wind. Fly a normal circuit as you would when flying from the land, reduce power on final
approach to about 15-20% so that you have a gentle descent, round out about 1 or 2ft above the
water, take the power off and flare enough so that the step touches first in a slightly nose up
attitude, the Prime Tundra will then very quickly settle onto the water. Taxy back using some up
elevator and small amounts of power.
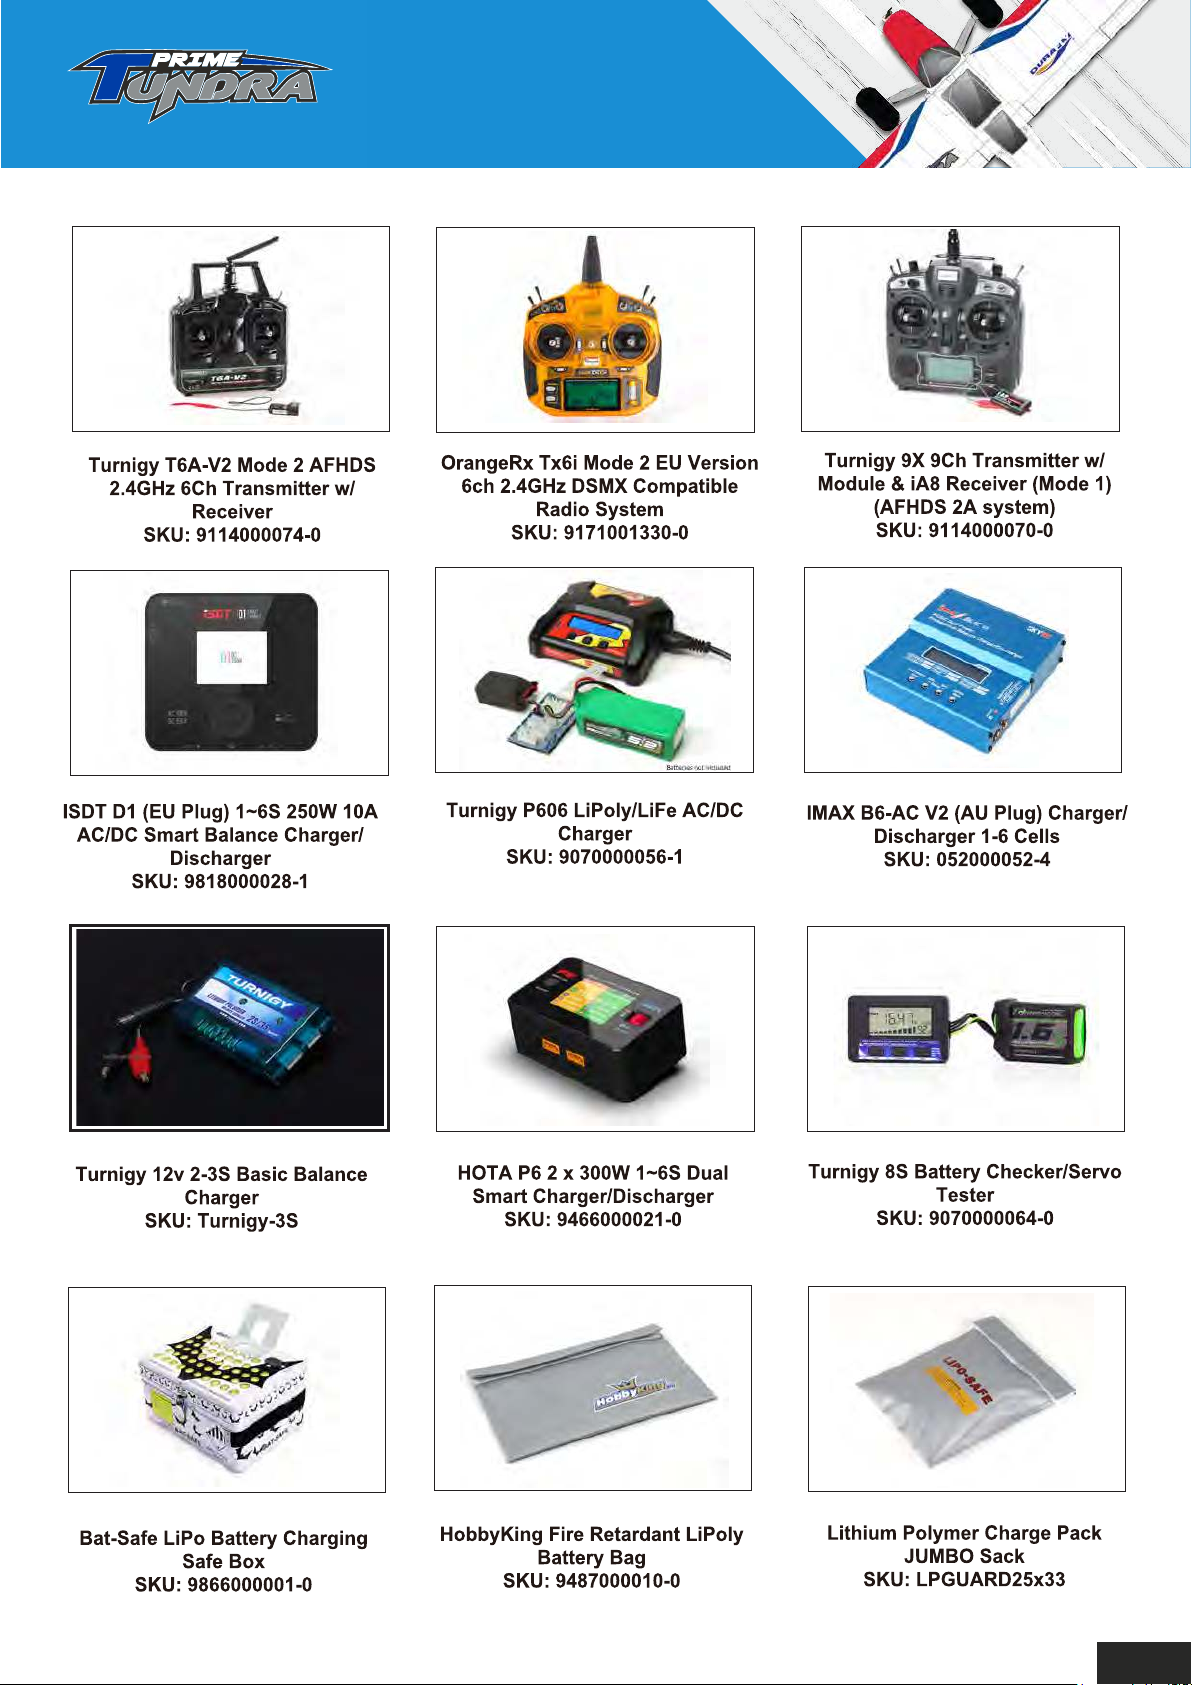
Recommended Accessories.
28
Page 31
DURAFLY PRIME TUNDRA 1200MM
PLUG AND FLY VERSION
29
Page 32
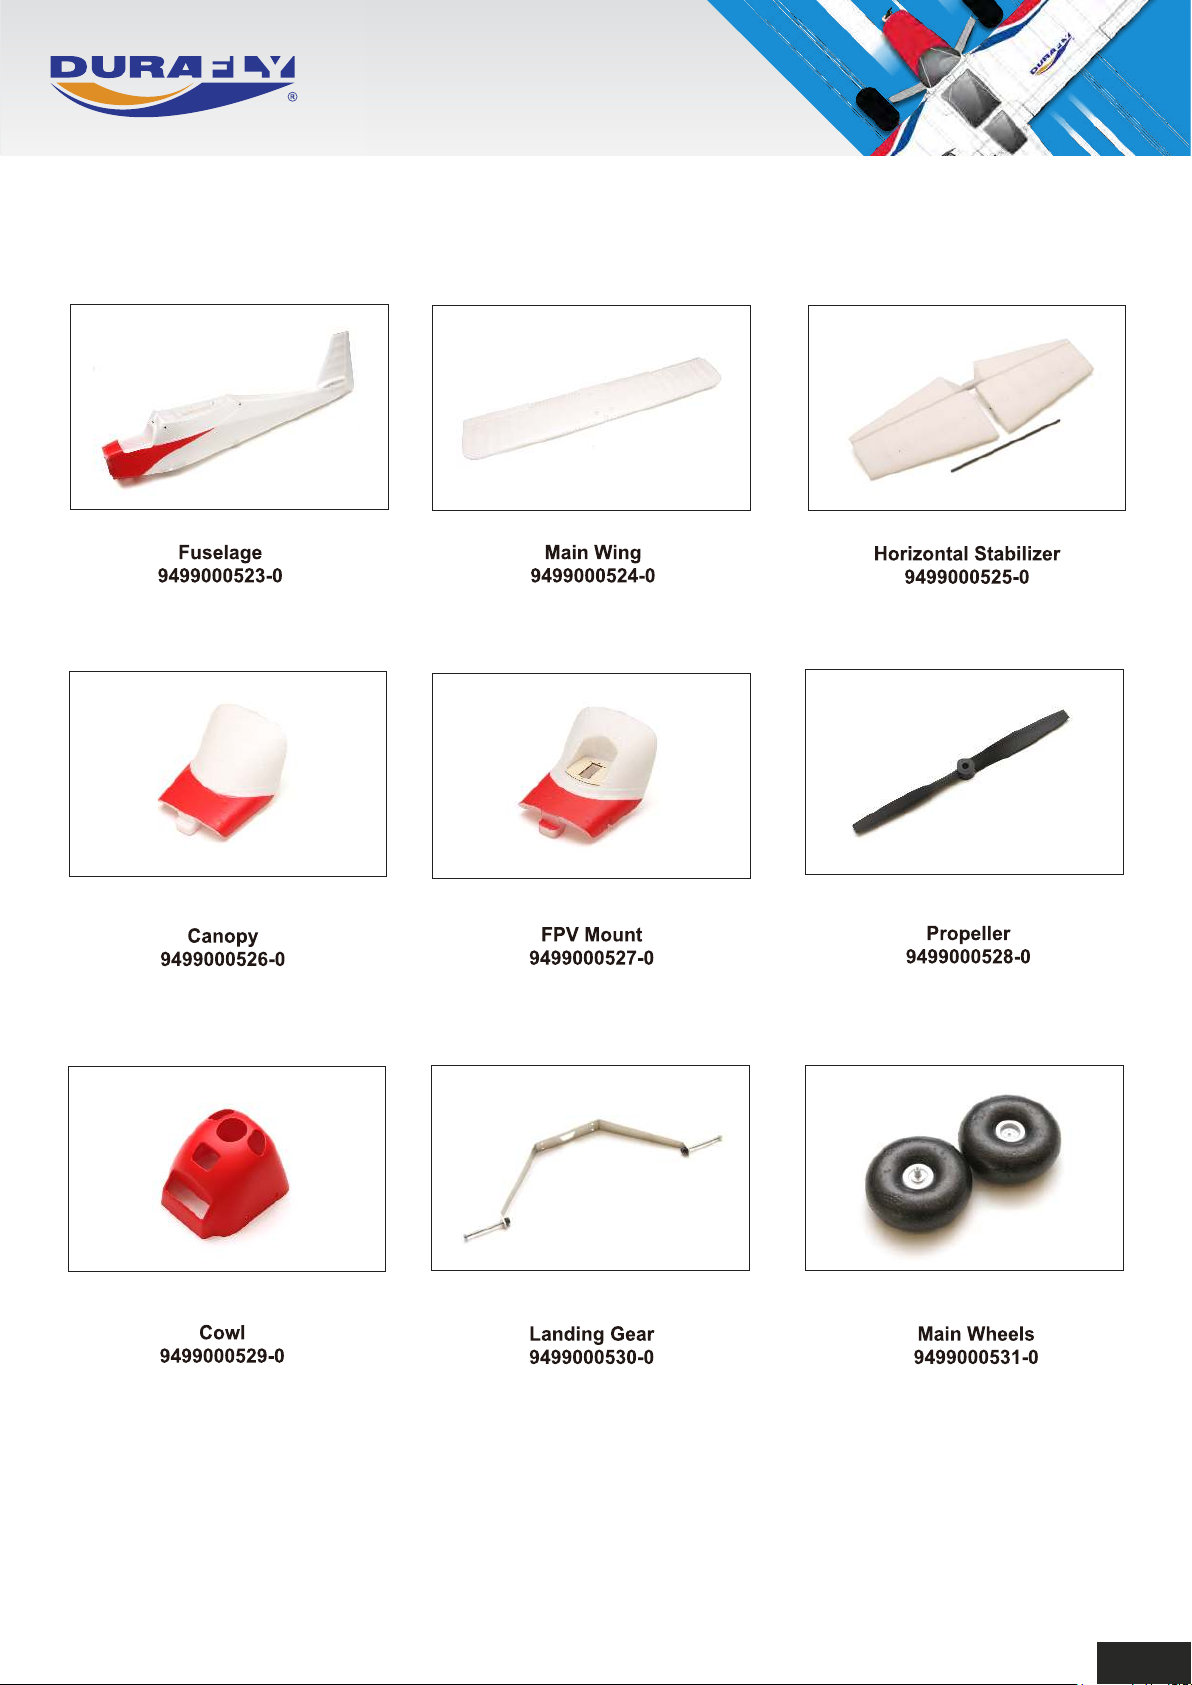
Spare Parts.
30
Page 33
DURAFLY PRIME TUNDRA 1200MM
PLUG AND FLY VERSION
Optional Accessories.
31
Page 34
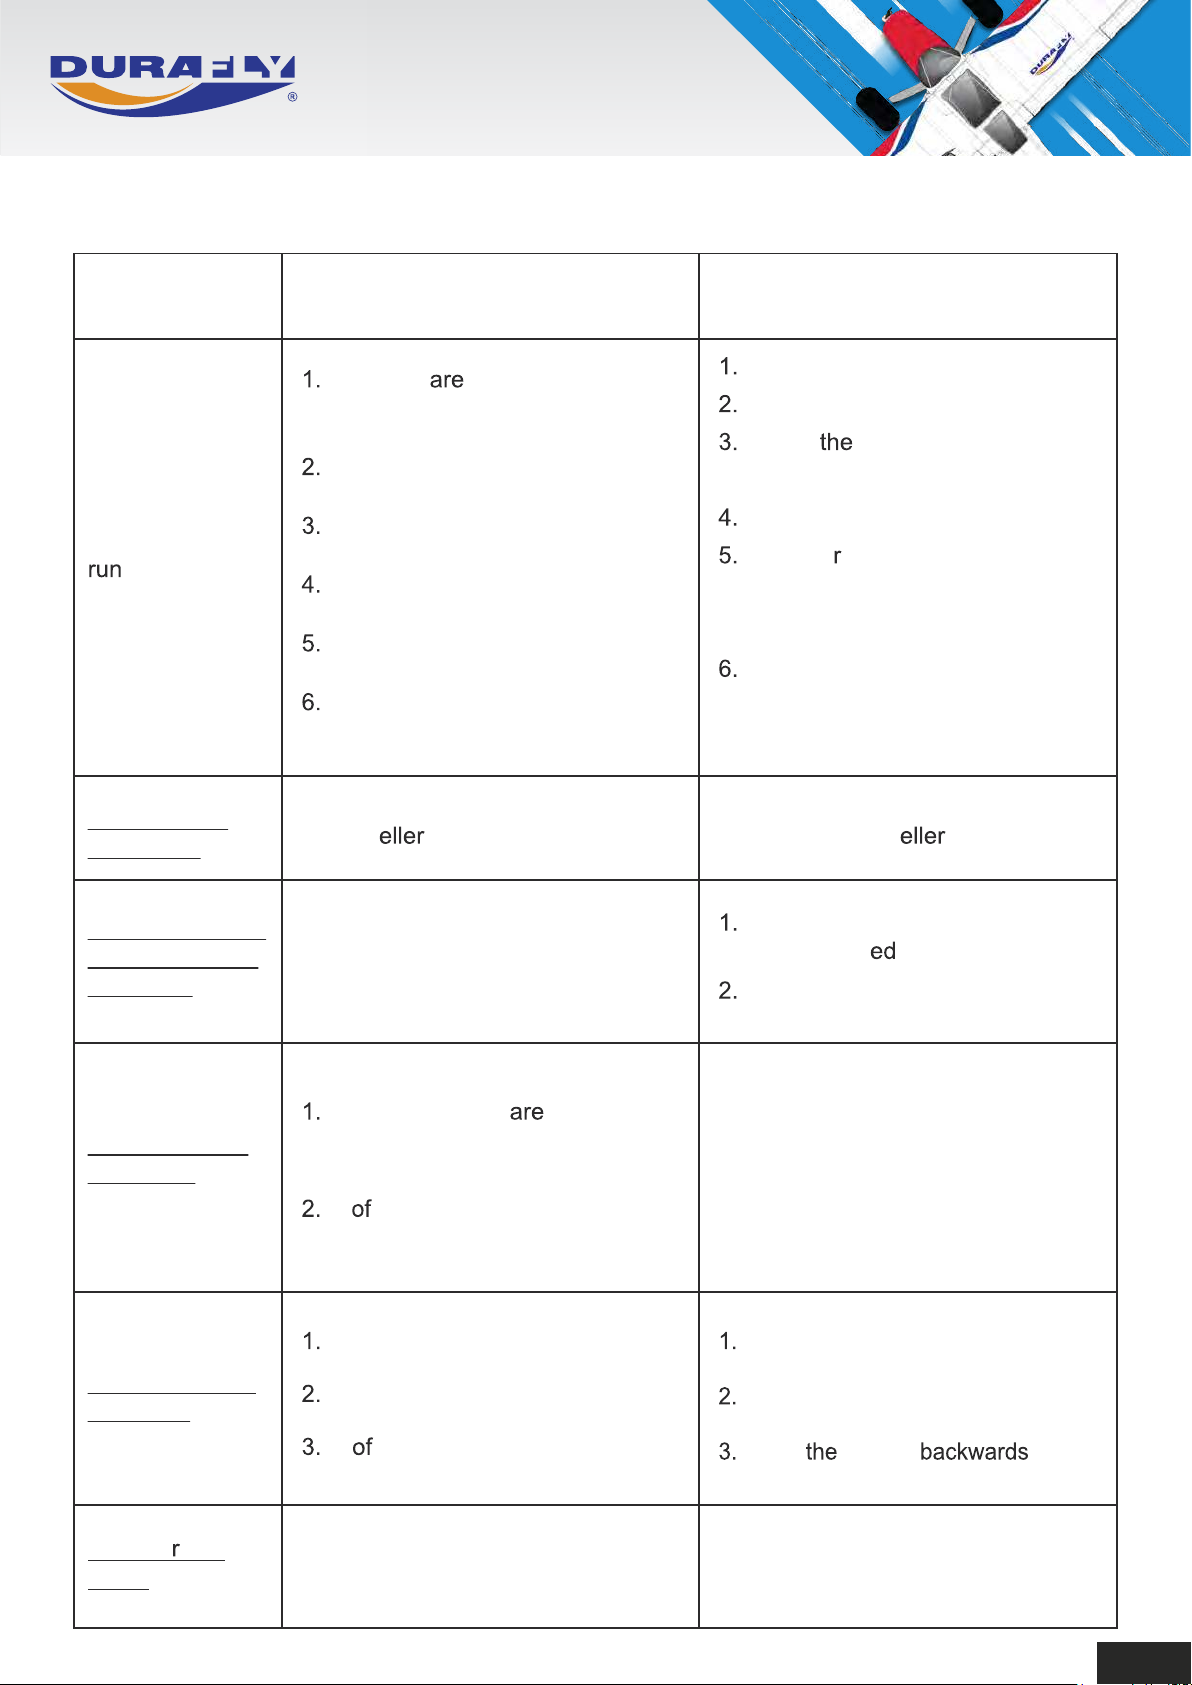
Trouble Shooting:
Problem Cause Solution
Motor does not
Model moves
backwards
Control surfaces
not moving with
stick input
Batteries not fully
charged.
Transmitter battery low.
Motor not connected.
The motor is damaged.
Receiver is not bound to Tx.
ESC in set-up mode.
installed backwards
1. The servo lead is connected
to Rx incorrectly.
2. The servo is damaged.
Charge the batteries.
Install a charged battery.
Check connection
between the ESC and motor.
Replace motor.
Consult adio manual and
go through bind procedure
again.
Hold model and move
throttle to full position then
back down to idle.
1. Swap the prop around.1. Prop
Make sure the servo leads
are connect
Replace servo.
properly.
Model does not
fly straight
Model does not
climb well
Limited adio
ange
Control surfaces not
centered.
C G is not in the correct
position.
The battery is not fully charged.
Elevator servo is reversed.
C G too far backwards.
1. Transmitter/Receiver batteries
are flat.
1. Adjust the trims on the
transmitter.
2. Re-position LiPo as
suggested.
Charge the battery.
Change servo direction via Tx.
Move battery
1. Charge/replace batteries.
32
Page 35
Information:
DURAFLY PRIME TUNDRA 1200MM
PLUG AND FLY VERSION
Notes:
.
33
Page 36

UK REP
EC REP
APEX CE SPECIALISTS LIMITED
M1 4HT, UK
APEX CE SPECIALISTS LIMITED
 Loading...