

Page 1
INSTRUCTION MANUAL
Page 2
Read this instruction manual fully so as to become completely familiar with the features of
this product before operating. Failure to operate this product correctly could result in
damage to the product, personal property and cause serious injury. This is a sophisticated
hobby product and is NOT a toy. It must always be operated with caution, common sense
and some basic mechanical ability. This manual provides instructions as the the assembly,
safe operation and maintainence of this hobby product. It is highly reccommneded that you
follow and read fully the instructions and warnings stated in this manual including safety,
assembly, set-up and flying guidelines in order to operate this product correctly and avoid
damage or serious injury.
As the user of this product you and you alone are responsible for operating it in a manner
that does not endanger yourself and others around you or result in damage to the product or
property of others. This product is operated via a radio controlled system that in some cases
can be subject to interference from sources outside of your control. Interference may result
in a momentary loss of control so it is always recommended that this product be used in a
suitably open outdoors space.
- This is a radio controlled flying model and as such must always be flown with caution and
care. This is not a toy.
- The
Ugly Stick Brief
is designed for intermediate to advanced pilots.
- Alway exersie great caution when using the recommended battery to power this product.
For full safety notes and operating procedures, please see information provided by your
battery supplier.
- Take great care when connecting/disconnecting the battery. See battery supplier for full
safty procedures.
- Never power up the
model in confined spaces and always keep the props clear of
obstructions.
- This product is not a toy. Children must be accompanied by an adult at all times if operating
this product.
- Only fly this model in an open area away from crowds, people, buildings, tree's, power lines
and obstructions.
- Always put safety first when operating this model and consider the warnings stated above.
- The supplier/manufacturer accepts no responsibility for damage or injury caused through
the use of the product. Not suitable for children under the age of 14. THIS IS NOT A TOY.
1
Page 3
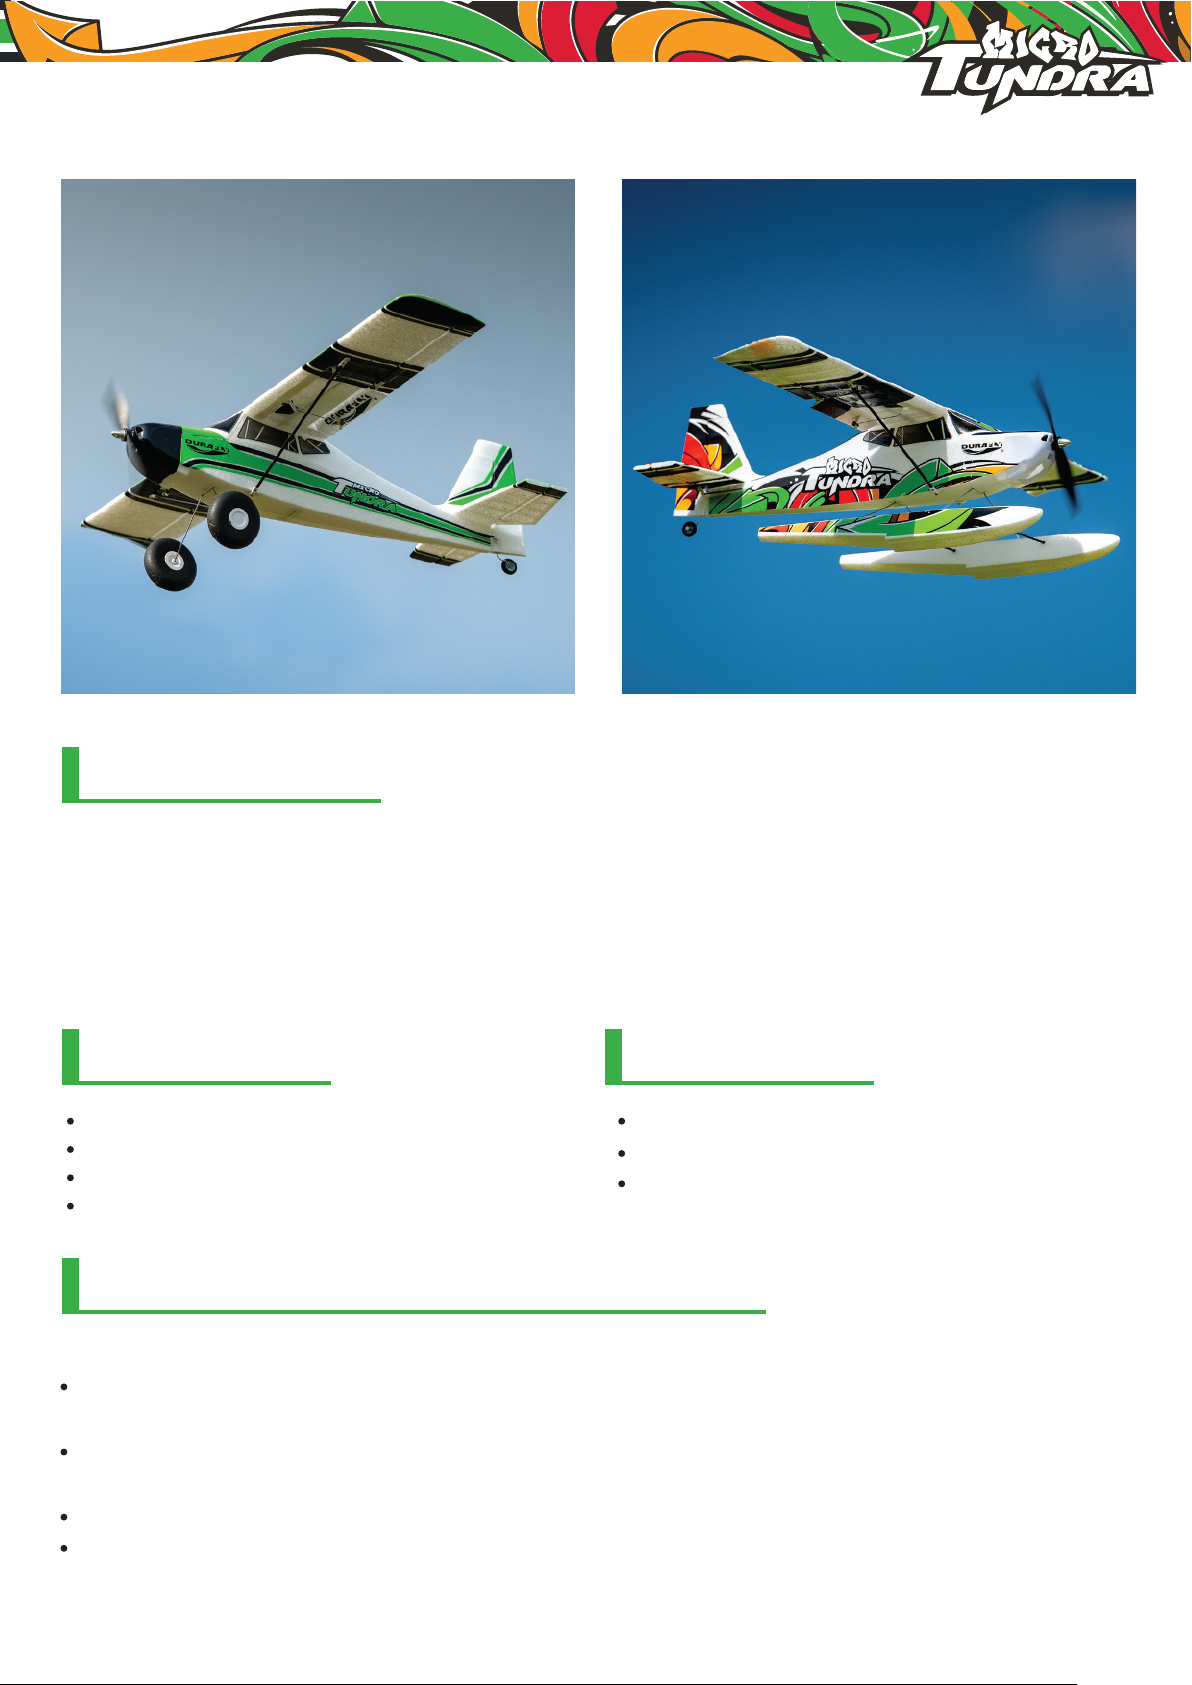
Micro Tundra
(Green Version)
SAFETY PRECAUTIONS
Micro Tundra
(Grafitti Version)
Your Durafly Micro Tundra PNF should not be considered a toy, but rather a sophisticated, working
model that functions very much like a full-size airplane. Because of its performance capabilities, the
Micro Tundra PNF, if not assembled and operated correctly, could possibly cause injury to yourself
or spectators and damage to property.
IMPORTANT!!! Two of the most important things you can do to preserve the radio-controlled aircraft
hobby are to avoid flying near full-scale aircraft and avoid flying near or over groups of people.
INCLUDED ITEMS:
1 x 1106 2350KV brushless motor
1 x 6A brushless ESC
6 x 2g servos
1 x 6x4 2Blade Propeller
SPECIFICATIONS:
Wingspan: 635mm (25")
Length: 430mm (17")
Flying weight: 145g (without battery)
ADDITIONAL ELECTRONICS REQUIRED TO COMPLETE:
The Durafly Micro Tundra PNF requires;
A 5-6 channel transmitter and a mini receiver with Molex 1.25 connectors.
Or;
A 5-6 channel transmitter and mini receiver with STD JR type connectors and 5 x Molex 1.25 female
to JR male adapters.
A 350~500mAh 7.4V LiPo or 7.6V LiHv battery pack
A LiPo compatible charger for LiPo or LiHv batteries.
2
Page 4
The Micro Tundra continues the lineage of the Tundra and Grand Tundra series of Durafly aircraft.
It is available in 2 color schemes, either the "Classic Green" or the slightly more outrageous and
colorful "Graffiti". Both look good and can be flown with either a standard wheel U/C or with floats
and water rudder, both versions are supplied in the box. Its small size makes it perfect for "Back
Yard Bush" flying.
The Micro Tundra comes in the usual Durafy Plug N Fly format so it has the motor, ESC and 6 micro
servo's preinstalled, these also include pre-fitted pushrods. You will require a 5/6ch micro receiver
with Molex 1.25 connectors or a 5/6ch micro receiver with standard JR type connectors and then
use adapters (see recommended items at the end of the manual). The Micro Tundra has working
flaps which are unusual for such a small model, they are really helpful and great fun for landing in
tight places. The large main wheels finish off the Tundra look and enable it to easily take off and
land on most surfaces. Swap the wheels for the supplied floats and the tailwheel for the water
rudder and ponds, streams and other small waterways become your playground.
Assembly is very straightforward so you will be flying very soon after opening the box. All of us at
Durafly hope you enjoy the assembly and the flying of your Micro Tundra.
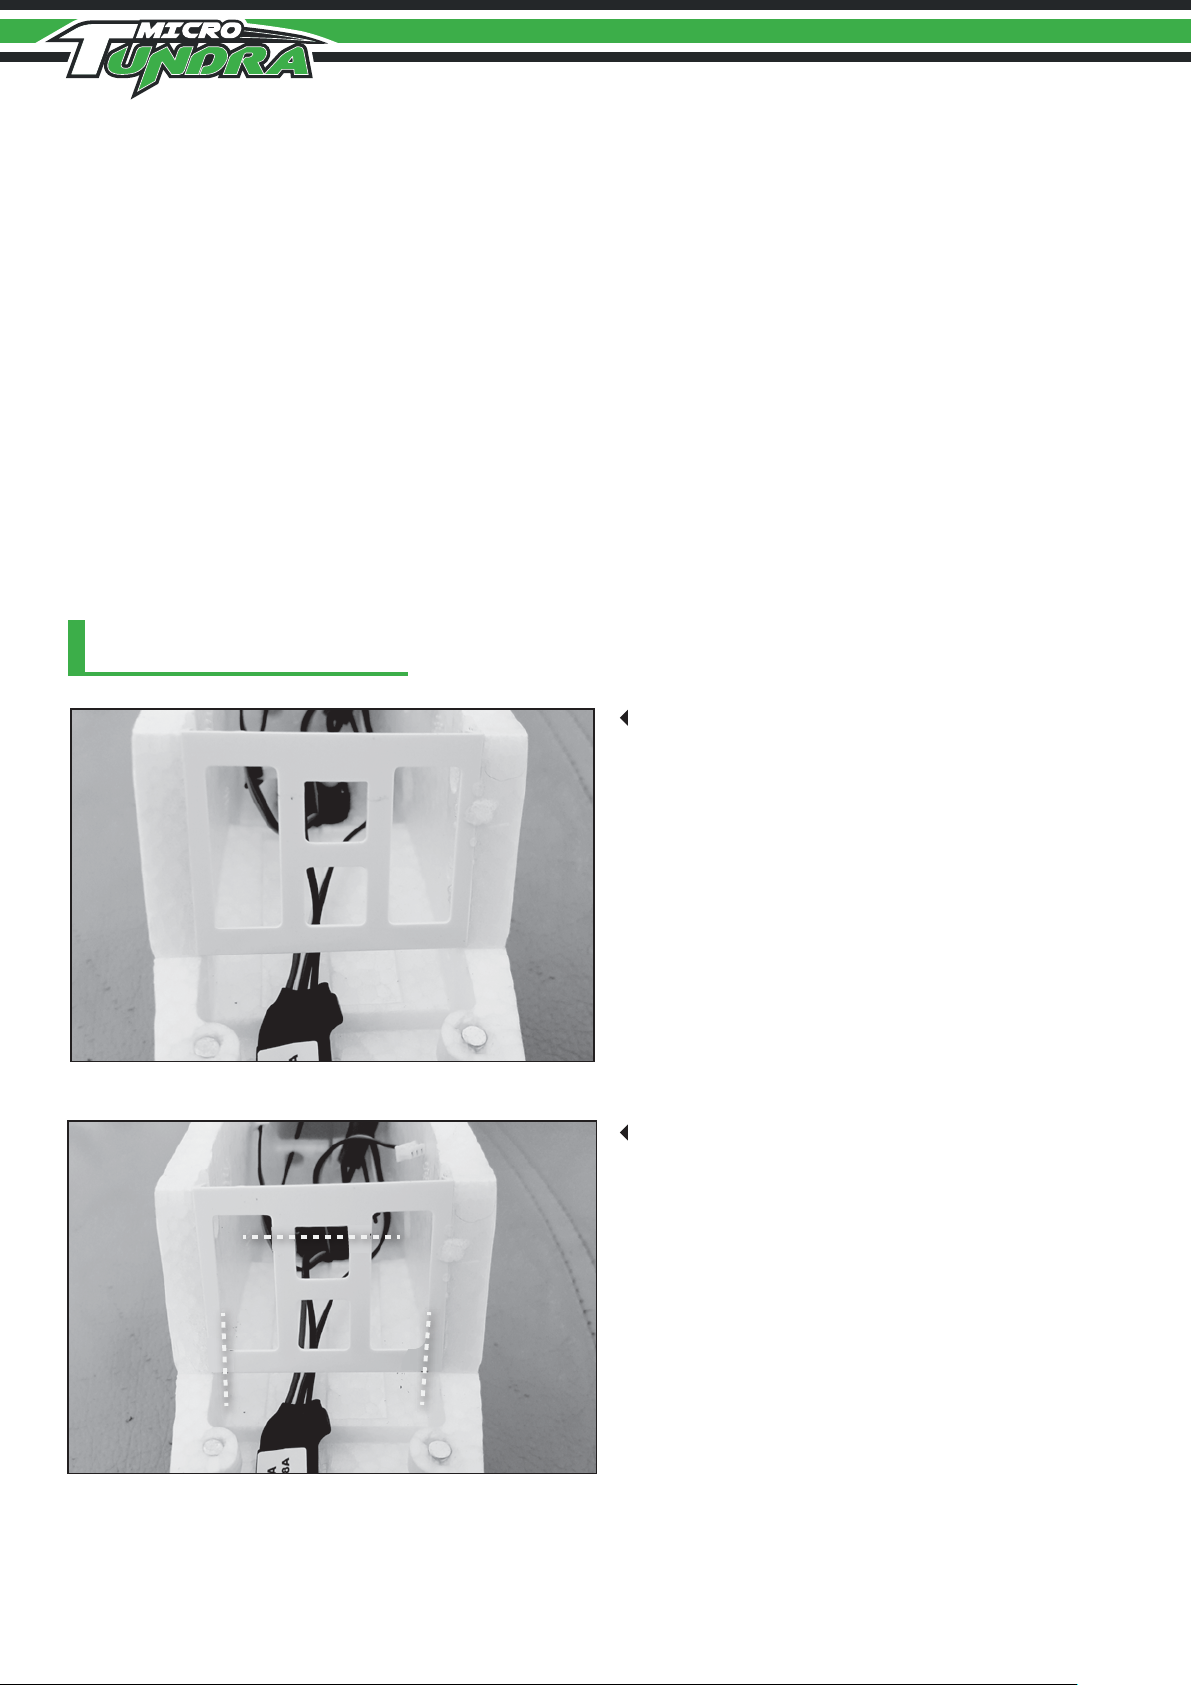
ASSEMBLE THE MODEL
Before you start the assembly we recommend
that you remove some of the plastic from the
former at the front of the servo/receiver bay. By
doing this it allows more room for access and it
does not remove any strength from the model.
Mark the former using a felt tip or pencil at the
points as shown in the image on the left.
3
Page 5
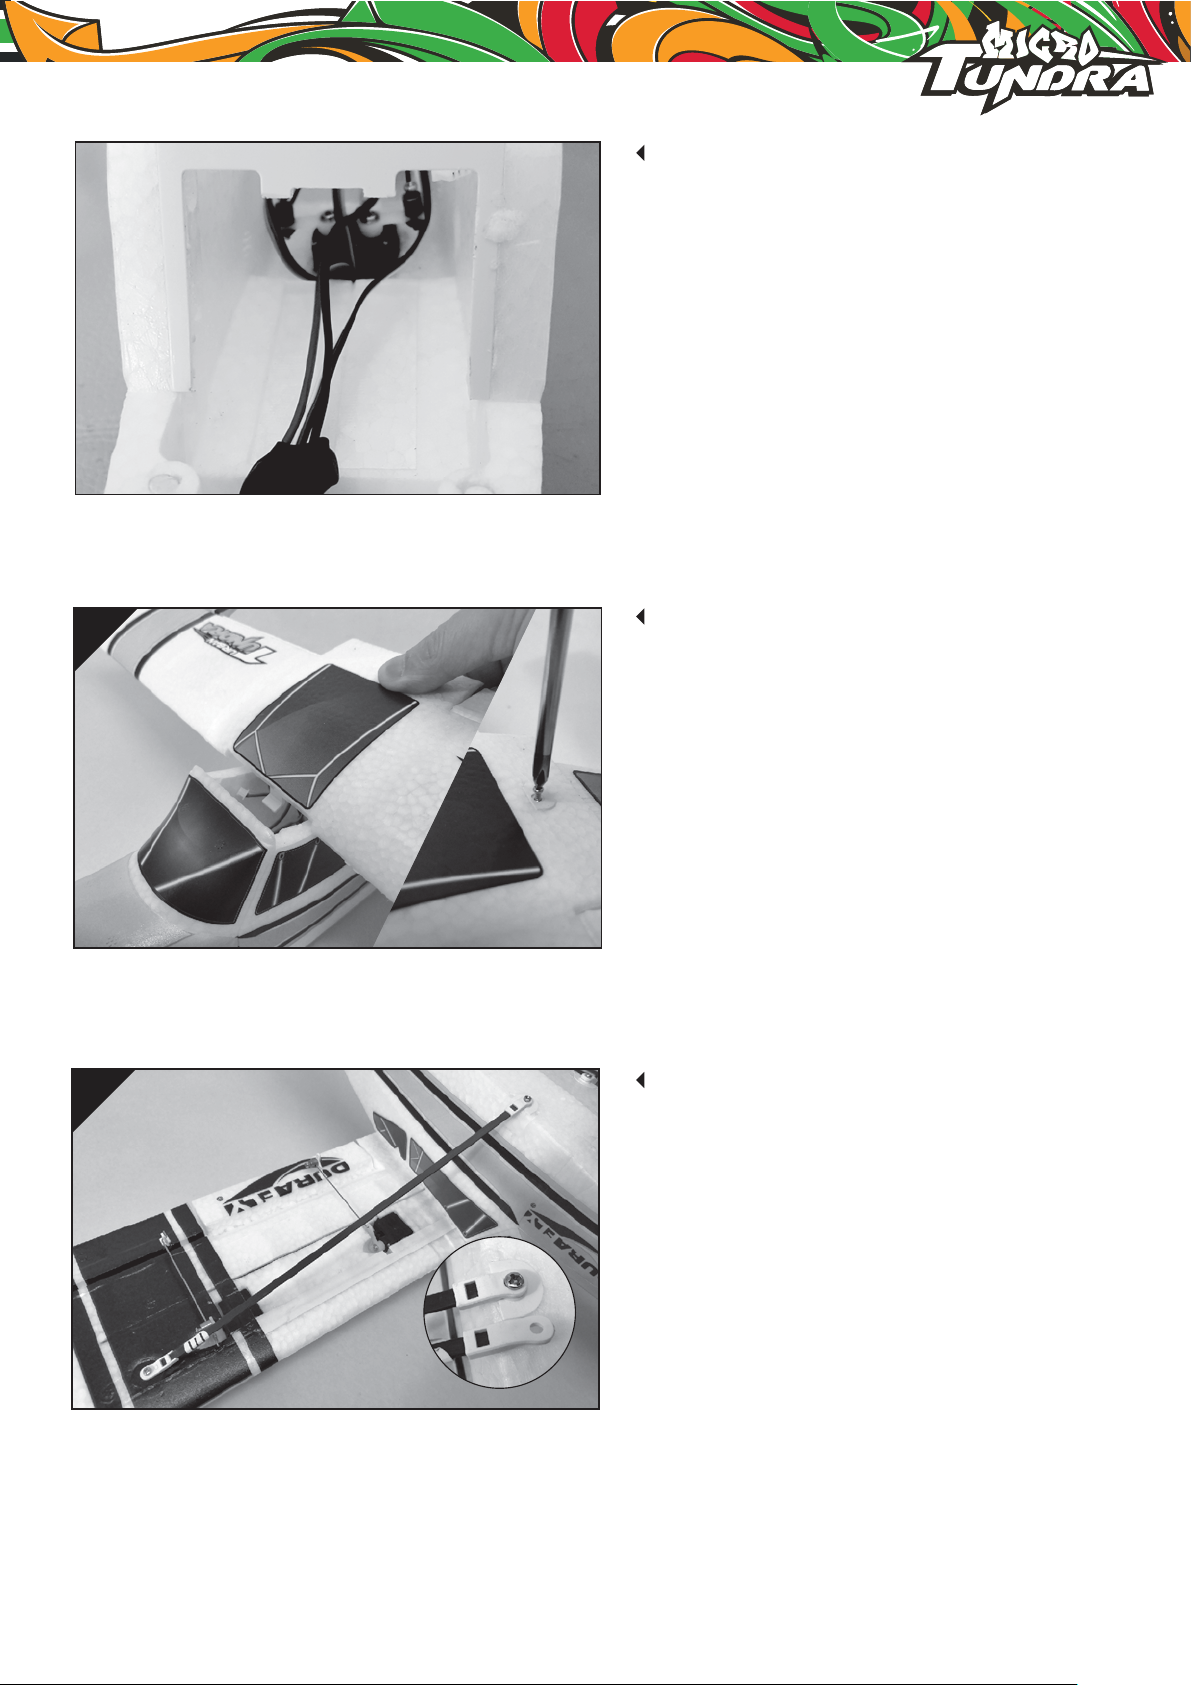
Use a sharp modelling knife to carefully cut
1
2
through the plastic. Ensure you leave a
slight notch at the top as shown so that the
locator on the front of the wing cannot move
side to side when the wing is in position.
Plug the servo and ESC connectors into the
receiver, be careful to plug the connectors
in correctly. Secure the receiver to the
inside of fuselage with either hook and loop
or double-sided tape. Insert the front wing
locator into the notch in the plastic former
and use the supplied self-tapping screw to
attach the wing. A small amount of contact
glue can be used between the fuselage and
the wing for extra strength and security.
Install the wing struts using the self-tapping
screws provided to secure the struts to the
fuselage and the wing. Make sure the
longer plastic connector is attached to the
wing and the shorter one attached to the
fuselage.
4
Page 6
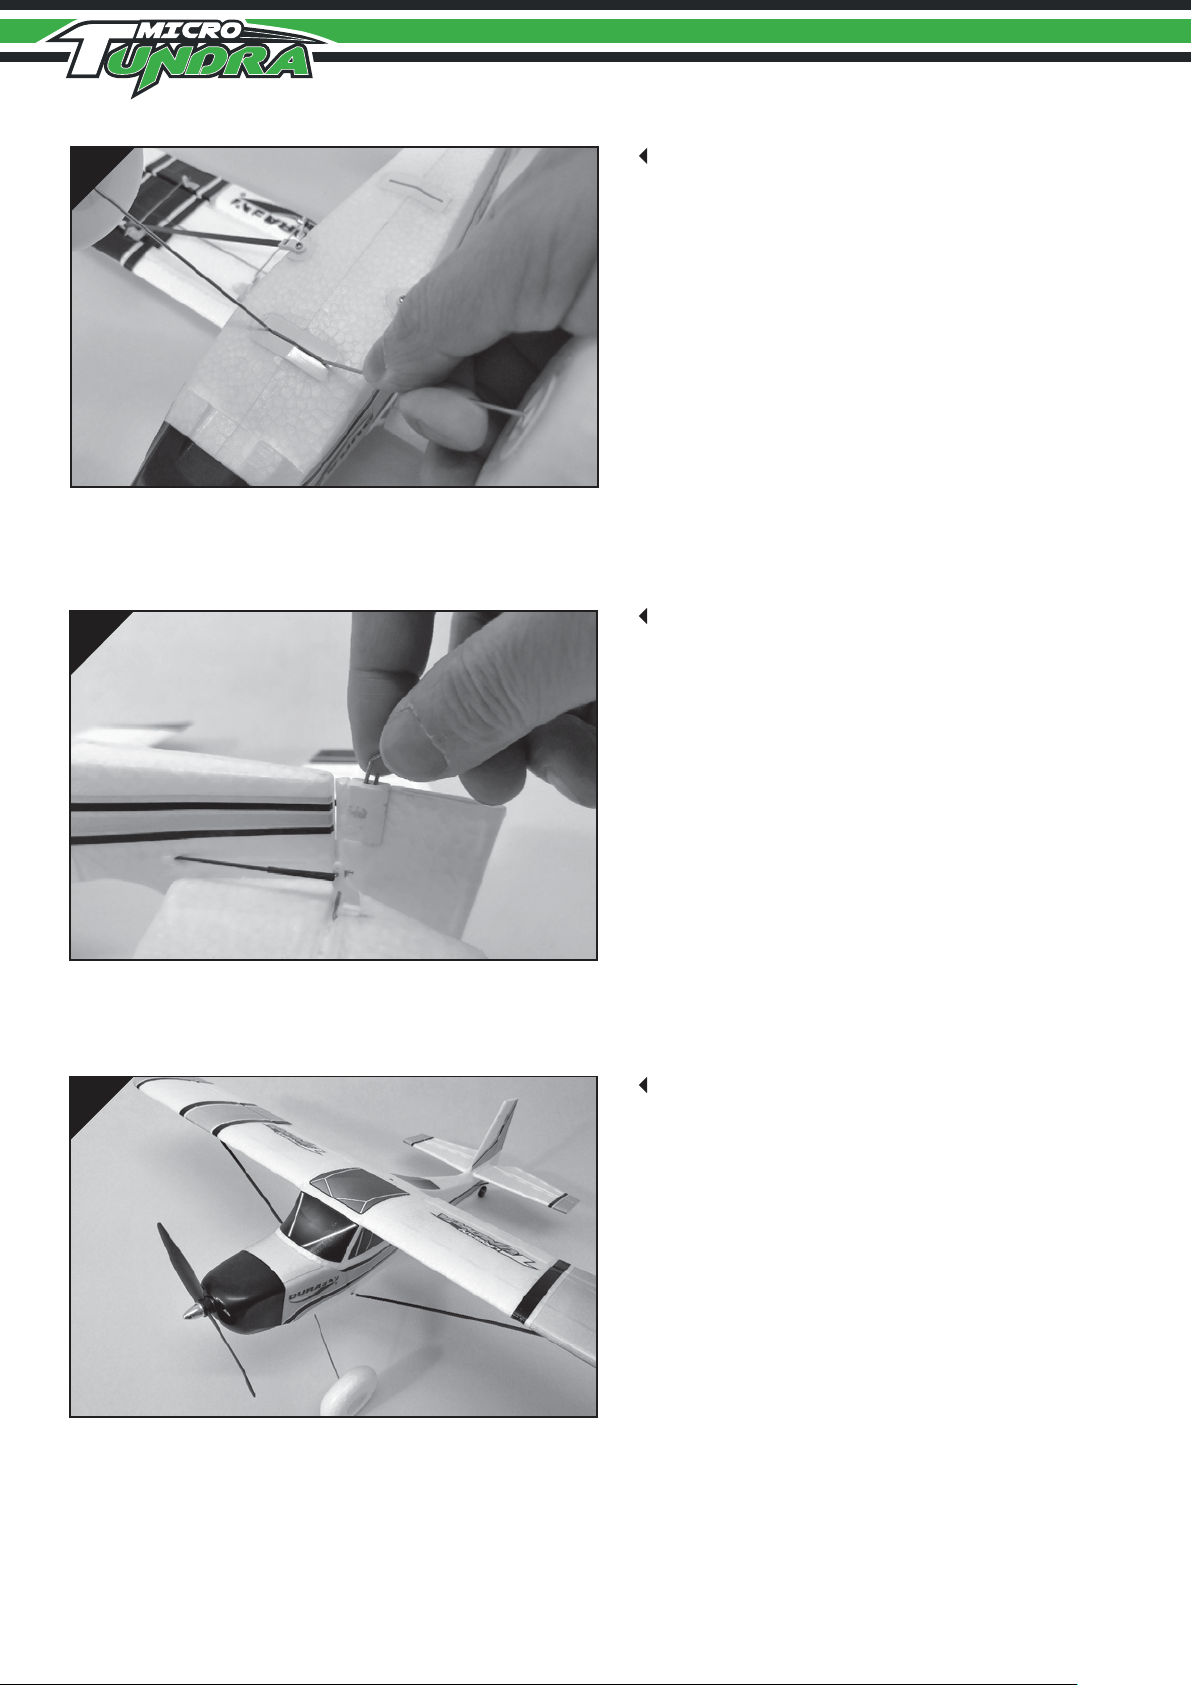
Insert the main landing gear into the slot
345
marked "C" at the front of the fuselage.
Squeeze the U/C legs together slightly and
fit one side of the top into the slot, then push
the other side in until it is fully home.
Insert the tailwheel assembly into the socket
in the bottom of the rudder. Be careful as this
is quite a tight fit, support the rudder with one
hand whilst pushing the tailwheel into the slot
with the other.
IInstall the propeller onto the motor shaft then
retain with the aluminum spinner. Screw the
spinner onto the shaft with a small tommy bar
through the hole in the front.
5
Page 7
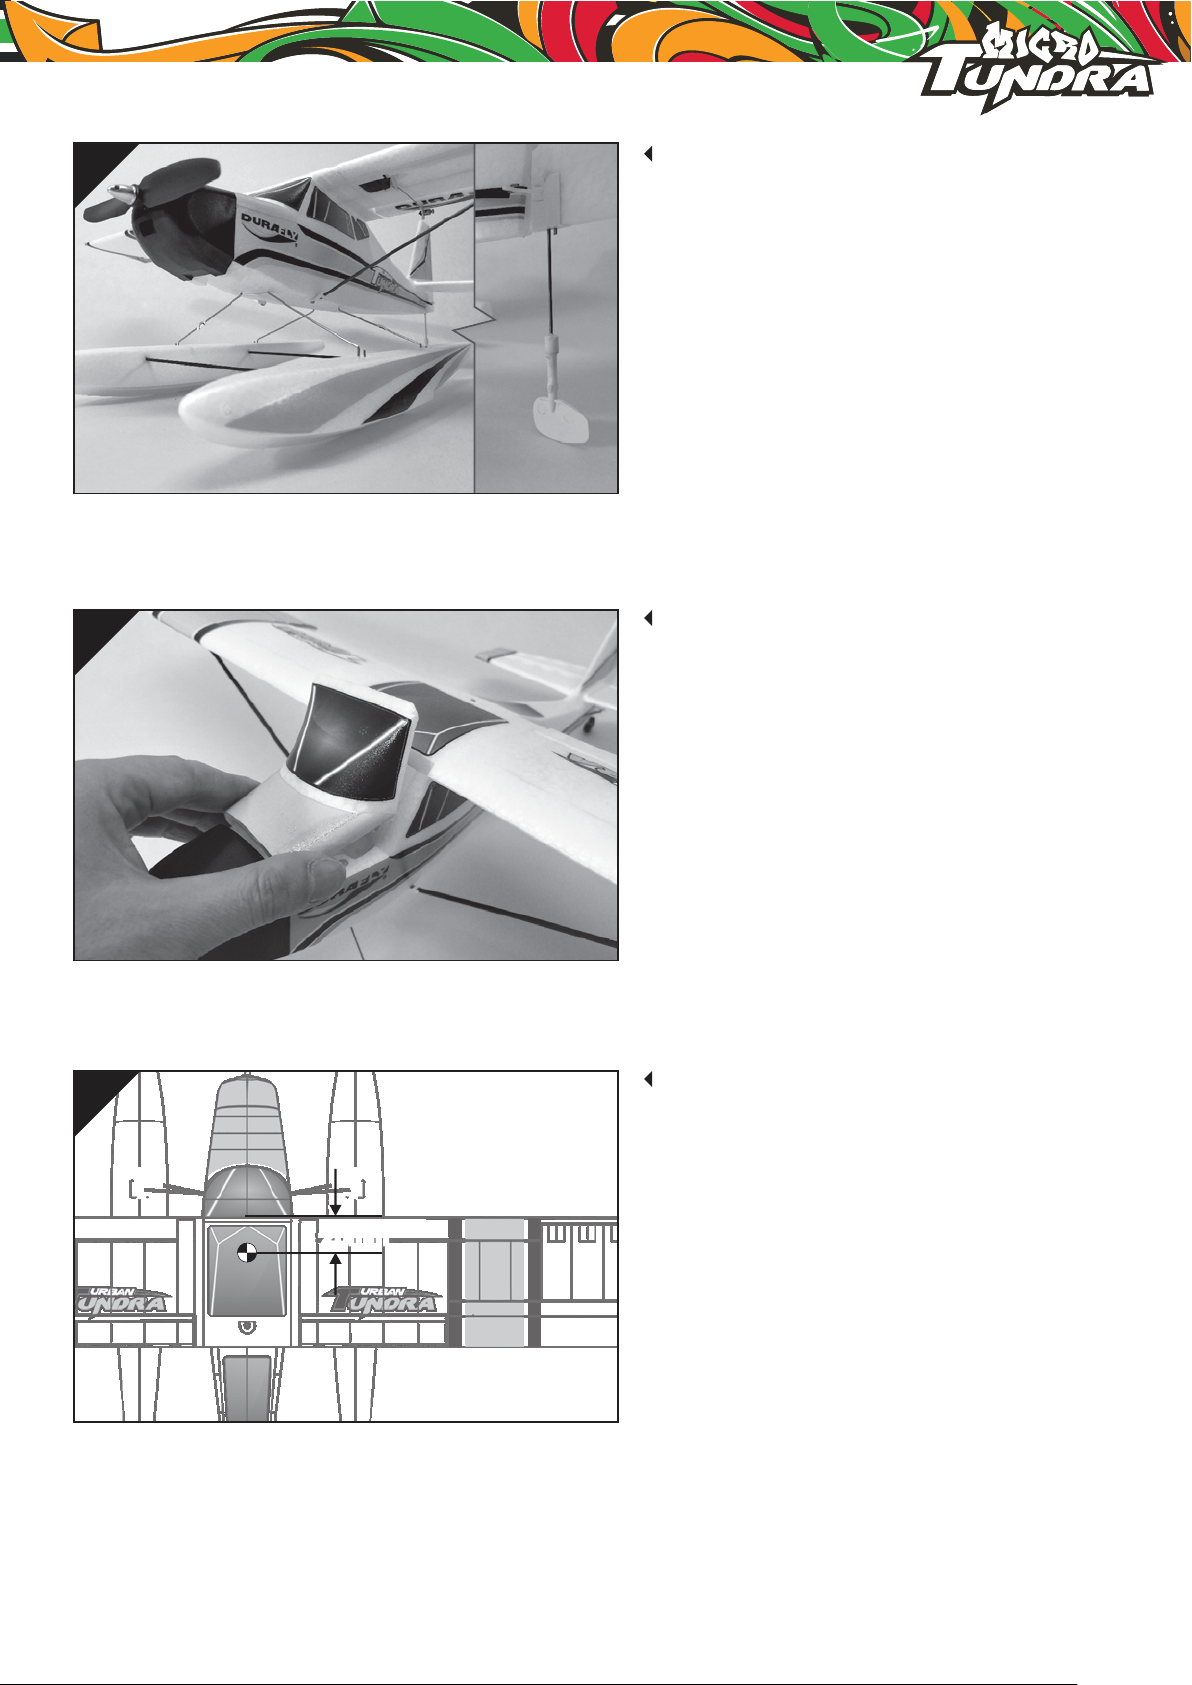
6
7
If you wish to fly this model off of water at
anytime then remove the main landing gear.
The floats use 2 slightly shorter attachment
wires and one goes in point "C" at the front
and the other at point "D" towards the rear.
The floats then just slot onto the bottom of
these wires. You will then need to remove
the tailwheel in the rudder and replace this
with the water rudder.
Once you have determined the position of
your battery under the front hatch secure with
hook and loop tape. Bind your transmitter to
the receiver and check the direction of the
control surfaces. Below are some recommendations for control throw settings.
8
Move the battery fore or aft to obtain the
correct balance point of 26mm from the
leading edge of the wing.
26mm26mm
6
Page 8
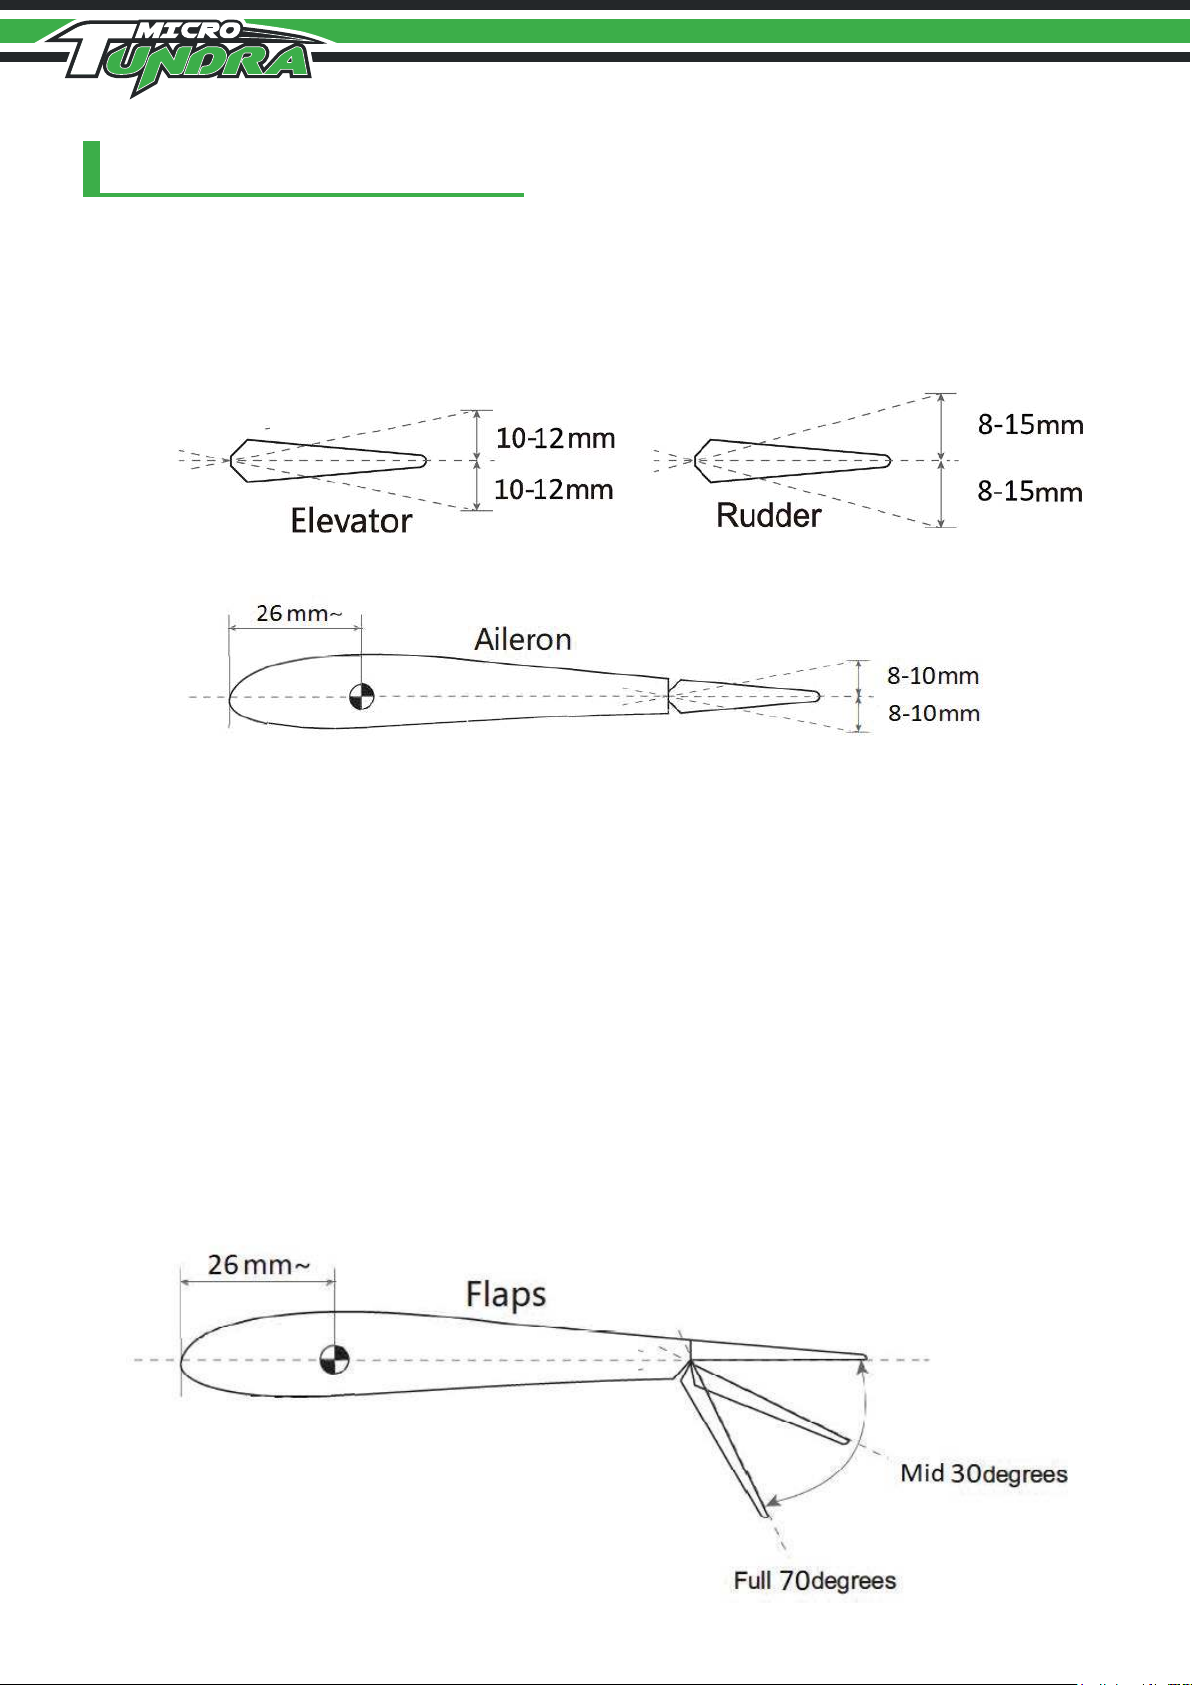
SUGGESTED CONTROL THROWS:
These are a good place to start for initial flights, once you have flown the Micro Tundra a few
times you can adjust as necessary to suit your own flying style.
Control throws:
_
_
_
*Elevator 'low rates' 8mm 'high rates' 10-12mm in either direction from neutral.
*Rudder 'low rates' 6mm 'high rates' 10-15mm in either direction from neutral.
*Aileron 'low rates' 6mm 'high rates' 8-10mm in either direction from neutral.
Note: When setting the ailerons set them 1mm up from neutral to create a slight reflex.
This improves the slow flight characteristics by reducing any tip stalling tendencies.
Flaps on the Micro Tundra should be set for 3 stages (up/no flap, mid flap and full flap).
Either via your radio or mechanically by adjusting the length of the flap control rod (or via
both in most cases). Set mid flap to approximately 30°degrees and full flaps to
approximately 70° degrees to the wing, ensure that both flaps deploy equally at every stage.
If your radio has the ability to do this we recommend mixing some down elevator in when
you select full flap, about 3-4mm works very well with 70° of flap.
Flaps
Half 40 degrees
7
Page 9

MODEL FLYING PRECAUTIONS
• Select your flight area carefully. Always choose an open space that is unobstructed from trees
and buildings and away from crowed areas. Avoid flying in area's with roads, electric/telephone
poles/wires and water near by or within close proximity to full size air traffic.
• Do not fly this model in poor weather. High winds, low visibility, inclement temperatures, rain
and storms are to be avoided.
• Never attempt to catch this model whilst in flight. Even a slow moving model can cause harm
to yourself and/other and risks damage to the model.
• This model is recommended for children no younger than 14 year old. All children, no matter
what age, should always be supervised by a capable and responsible adult when operating
this model.
• Always unplug your model battery when not in use. Never leave the battery installed in the
model.
• Remember to keep clear of the propeller at all times when your flight battery is connected.
• Before flying, always turn on your transmitter first then plug your flight battery into the model.
• After flying, always unplug your flight battery first then turn off your radio transmitter.
• Exercise caution when charging your batteries and follow in full your battery manufactures
safety guideline when doing so.
PRE-FLIGHT CHECKS
1. Always range check your model before any flight (especially when flying a new model for the
first time). Follow your radio manufacturers guidelines for performing this check.
2. Check all screw/bolts and mounting points are firmly secured, including control horns and
clevises.
3. Only fly with fully charged batteries (both in your radio and model). Failure to do so could
result in loss of control, damage to the model and/or persons/property around you. Check
your batteries are fully charged.
4. With the model powered up (Transmitter on first, then receiver/model) check that all surface
are free from damage/obstructions, moving in the correct directions and freely with stick input.
5. Inspect the model and prop for any damage that may have occurred during transit and listen
for any unusual sounds from the electronics when powered up. If in doubt, do not fly.
6. With the model held securely and the prop free of obstructions, increase the throttle just
slightly to confirm the rotations of the prop is correct. The model should want to pull straight
forward with throttle.
7. If this is your first flight with the model double check the C/G is at the correct position. If not
adjust battery position inside model accordingly.
8. If you are an inexperienced model pilot seek the help and assistance of an experienced pilot
to perform these final checks and to test fly the model for you.
8
Page 10

FLYING THE MICRO TUNDRA
The Micro Tundra is relatively straightforward to fly for pilots with a bit of experience. After you
have completed your pre-flight checks and completed a range check either place it on the ground
facing into wind or get ready to hand launch. If taking off from the ground hold in a small amount
of up elevator and smoothly open the throttle to full, ensure you keep the model straight by using
the rudder to steer. The Micro Tundra will very quickly leave the ground and start climbing. If
hand launching hold the model on the fuselage under the wing at shoulder height, open the
throttle to full and smoothly throw the model slightly nose up into wind, it will climb away quickly
and from the hand launch.
Once in the air climb out straight into wind and to a safe height then throttle back to about
50-60%, remember this is a small model so don't fly it too far away. Fly some gentle circuits and
when you are happy with these try the flaps and get used to flying the model slowly. As
mentioned in the set-up when full flap is selected the Micro Tundra will tend to put its nose up and
the airspeed will decay rapidly so you need to apply down elevator to stop it doing this.
Once you are used to the flaps then get ready for a landing, remember a good circuit ends up
with a good landing. Fly a nice square circuit at 50-60% throttle and end up lined up into wind
slightly downwind of your landing area and about 50ft of height is about right at this point. Throttle
back to about 25% and select full flap, be ready to apply some down elevator (if you have mixed
this into your transmitter this makes life much easier) the Micro Tundra will settle into a nice
descent to the landing area, keep the wings level during the approach using the ailerons, rudder
can be used as well to keep the model heading straight into wind. Adjust the throttle slightly up or
down if you are overshooting or undershooting your landing area. When just above the ground
close the throttle completely and apply just a small amount of up eleva-tor and the Micro Tundra
will land very gently. If you hand launched the model due to flying off of long grass or
meadowland then the Micro Tundra will gently land back onto the rough ground without any harm
due to its slow landing speed and light weight.
Once you have test flown the model, check it over for anything that may have come loose and
make any adjustments to the controls etc before flying again. If you are using a 7.6V LiHv battery
then we recommend that you allow the motor to cool for about 5 minutes or longer before fitting
another battery and flying again. Flying the Micro Tundra slowly is great fun, once you are used
to the model try taking off and flying around with mid flap selected, it's great fun.
The Micro Tundra does all the usual aerobatics such as loops and rolls, it will fly inverted as well
but requires quite a bit of down elevator to keep it level. Due to the nose high attitude when flying
inverted it will tend to slow down so please watch for this if flying low whilst invert-ed. It spins like
a little top and stops instantly when the controls are centralized plus it will do quite nice flick rolls.
All in all it is great fun to fly and is perfect for "Back Yard Bush" flying.
Thanks again for purchasing the Durafly Micro Tundra. We hope you'll have many
happy days of flying and look forward to bringing you more Durafly models in the
near future.
Spare parts are available for this model, please see the next pages for details.
9
Page 11
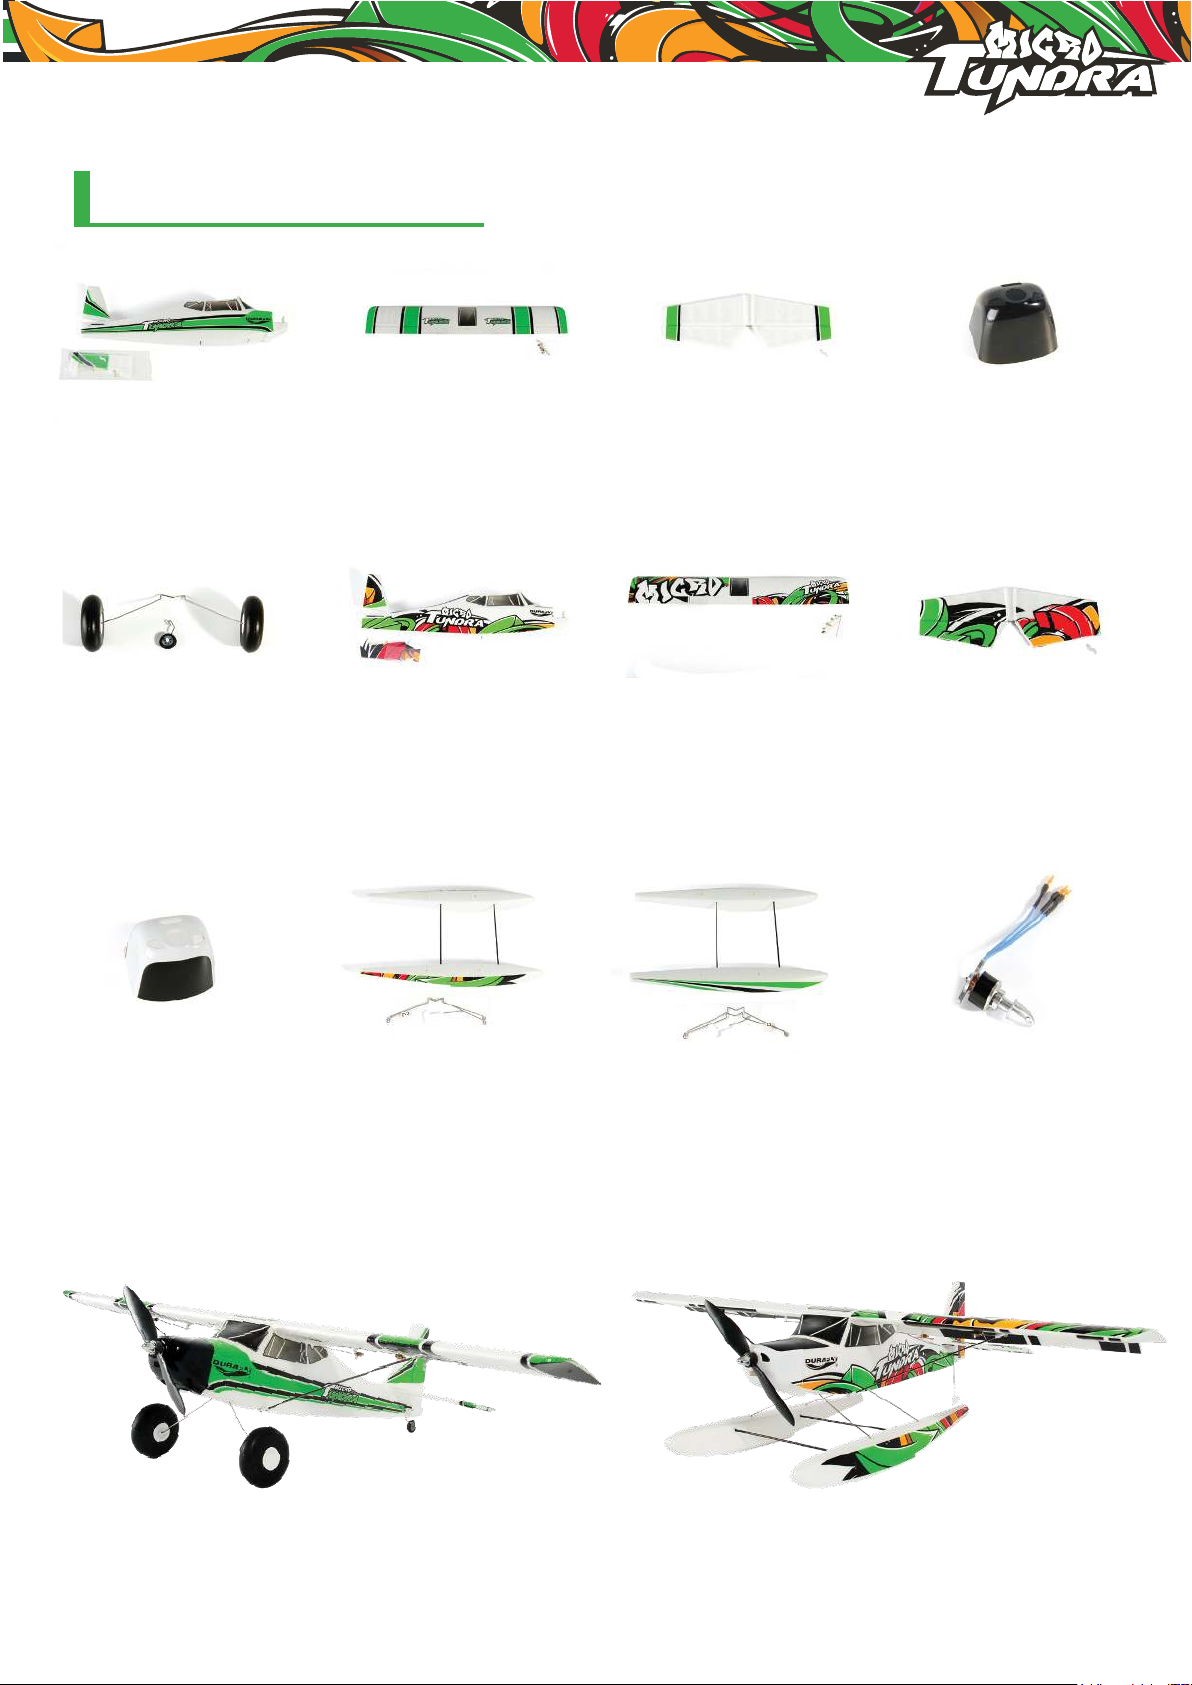
MICRO TUNDRA SPARE PARTS
Fuselage and
Rudder (Green)
Part No.
9898000016-0
U/C Set
Part No.
9898000020-0
Main Wing
(Green)
Part No.
9898000017-0
Fuselage and
Rudder (Grafitti)
Part No.
9898000022-0
Horizontal Tail
(Green)
Part No.
9898000018-0
Main Wing
(Grafitti)
Part No.
9898000023-0
Cowling (Green)
Part No.
9898000019-0
Horizontal Tail
(Grafitti)
Part No.
9898000024-0
Cowling (Grafitti)
Part No.
9898000025-0
Float Set (Grafitti)
Part No.
9898000026-0
Float Set (Green)
Part No.
9898000028-0
Brushless Motor
Part No.
9898000027-0
10
Page 12
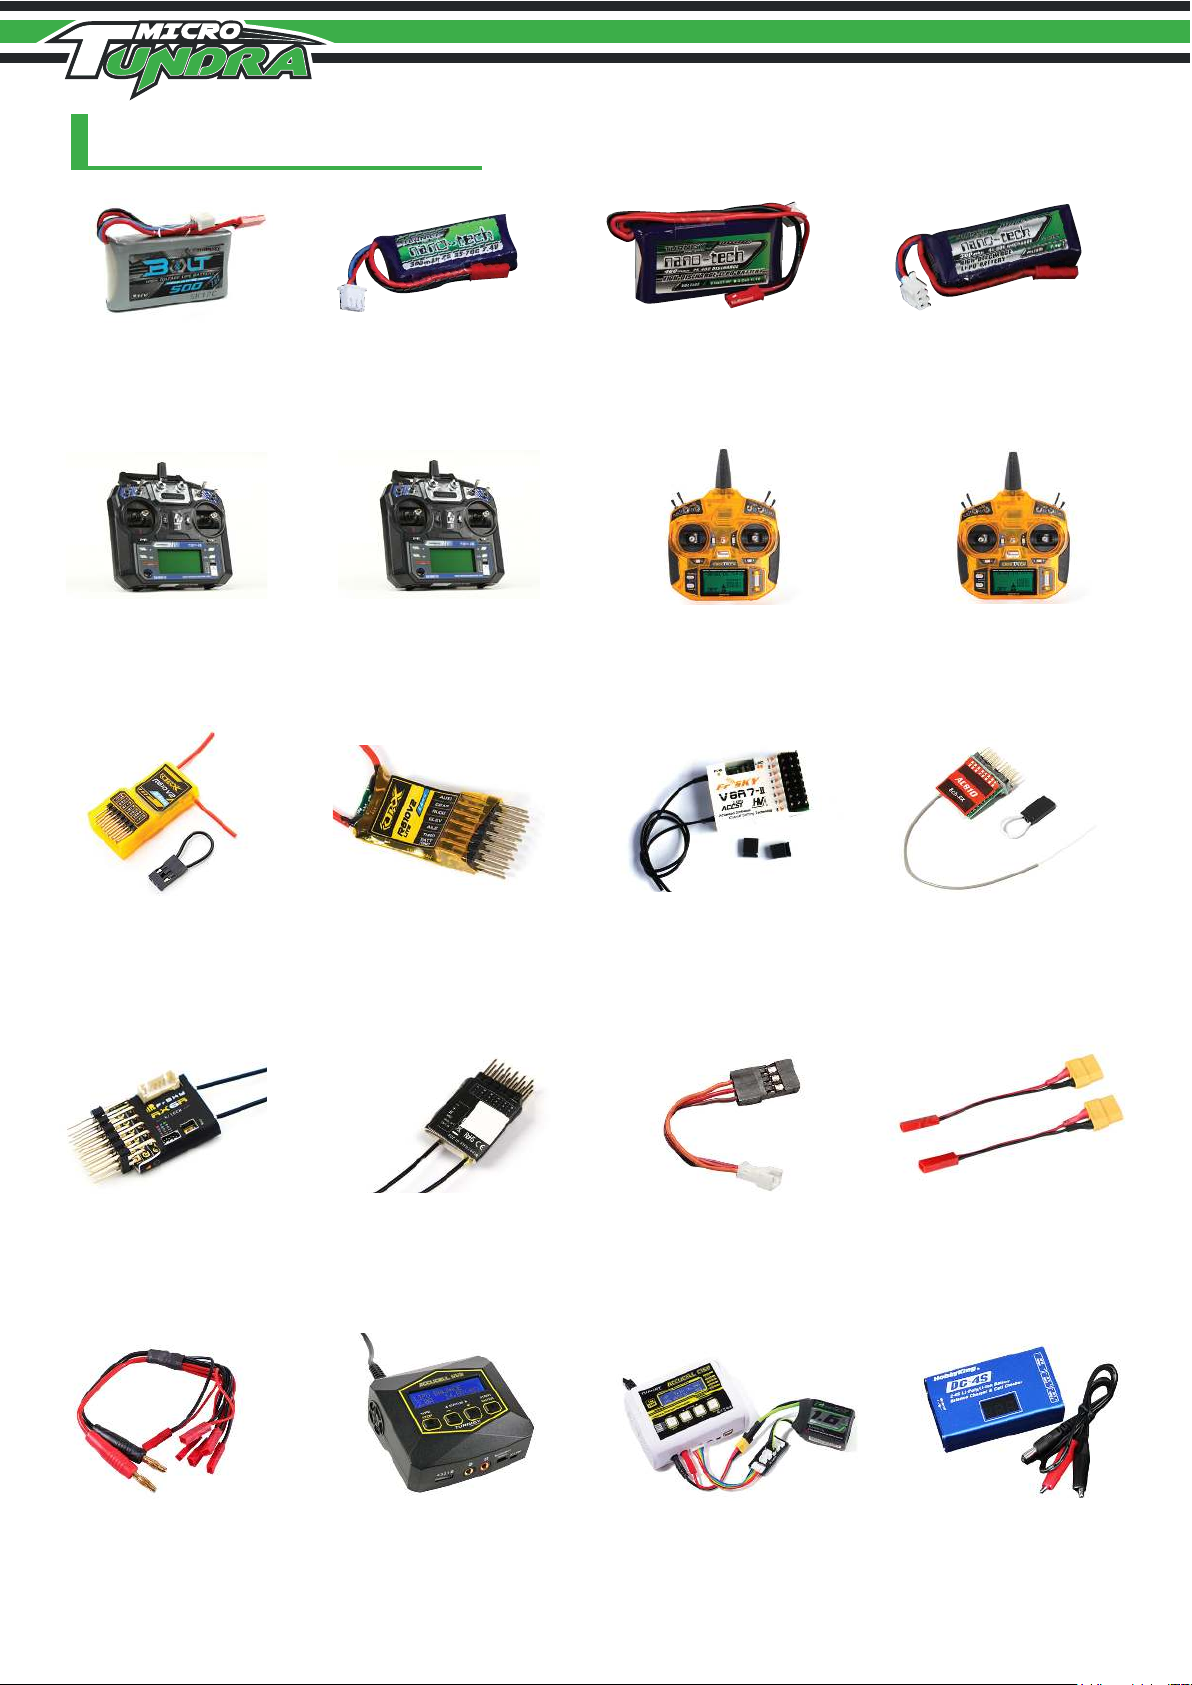
RECOMMENDED ACCESSORIES
Turnigy Bolt
500mAh 2S
Part No.
9210000152-0
Turnigy TGY-i6 Mode
2 AFHDS Transmitter
Part No.
9114000020-0
OrangeRx R610V2
DSM2 Compatible 6CH
Part No.
9171001390-0
Turnigy nano-tech
300mAh 2S
Part No.
9210000020
Turnigy TGY-i6 Mode
1 AFHDS Transmitter
Part No.
9114000019-0
OrangeRx R610V2 Lite
DSM2 Compatible 6CH
Part No.
9171001382-0
Turnigy nano-tech
460mAh
Part No.
N460.2S.25
OrangeRx Tx6i Mode 2
EU Version
Part No.
9171001330-0
FrSky V8R7-II 2.4Ghz
7CH Receiver
Part No.
V8R7-HV
Turnigy nano-tech
300mah 2S
Part No.
9210000082
OrangeRx Tx6i Mode 1
Int'l Version
Part No.
9171001327-0
7CH FRSKY ACCST
(Compatible Receiver)
Part No.
458000003-0
FrSky RX6R 2.4GHz ACCST
6/16CH Micro Receiver Part
Part No.
9236000167-0
4mm Banana Plug
with 6 x JST Plug
Part No.
MINIJSTCCPX6
FrSky RX6R 2.4GHz ACCST
6/16CH Micro Receiver
Part No.
9236000166-0
Turnigy Accucell S60
AC Charger
Part No.
9052000138-1
Female Molex 1.25 to Male
JR Servo Adapter Lead
Part No.
258000005
Turnigy Accucell C150
AC/DC 10A
Part No.
995900001-3
11
XT-60 to JST
Charging Adapter
Part No.
FXT60-MJST
Hobbyking® DC2-4S
Balance Charger
Part No.
9331000001
Page 13
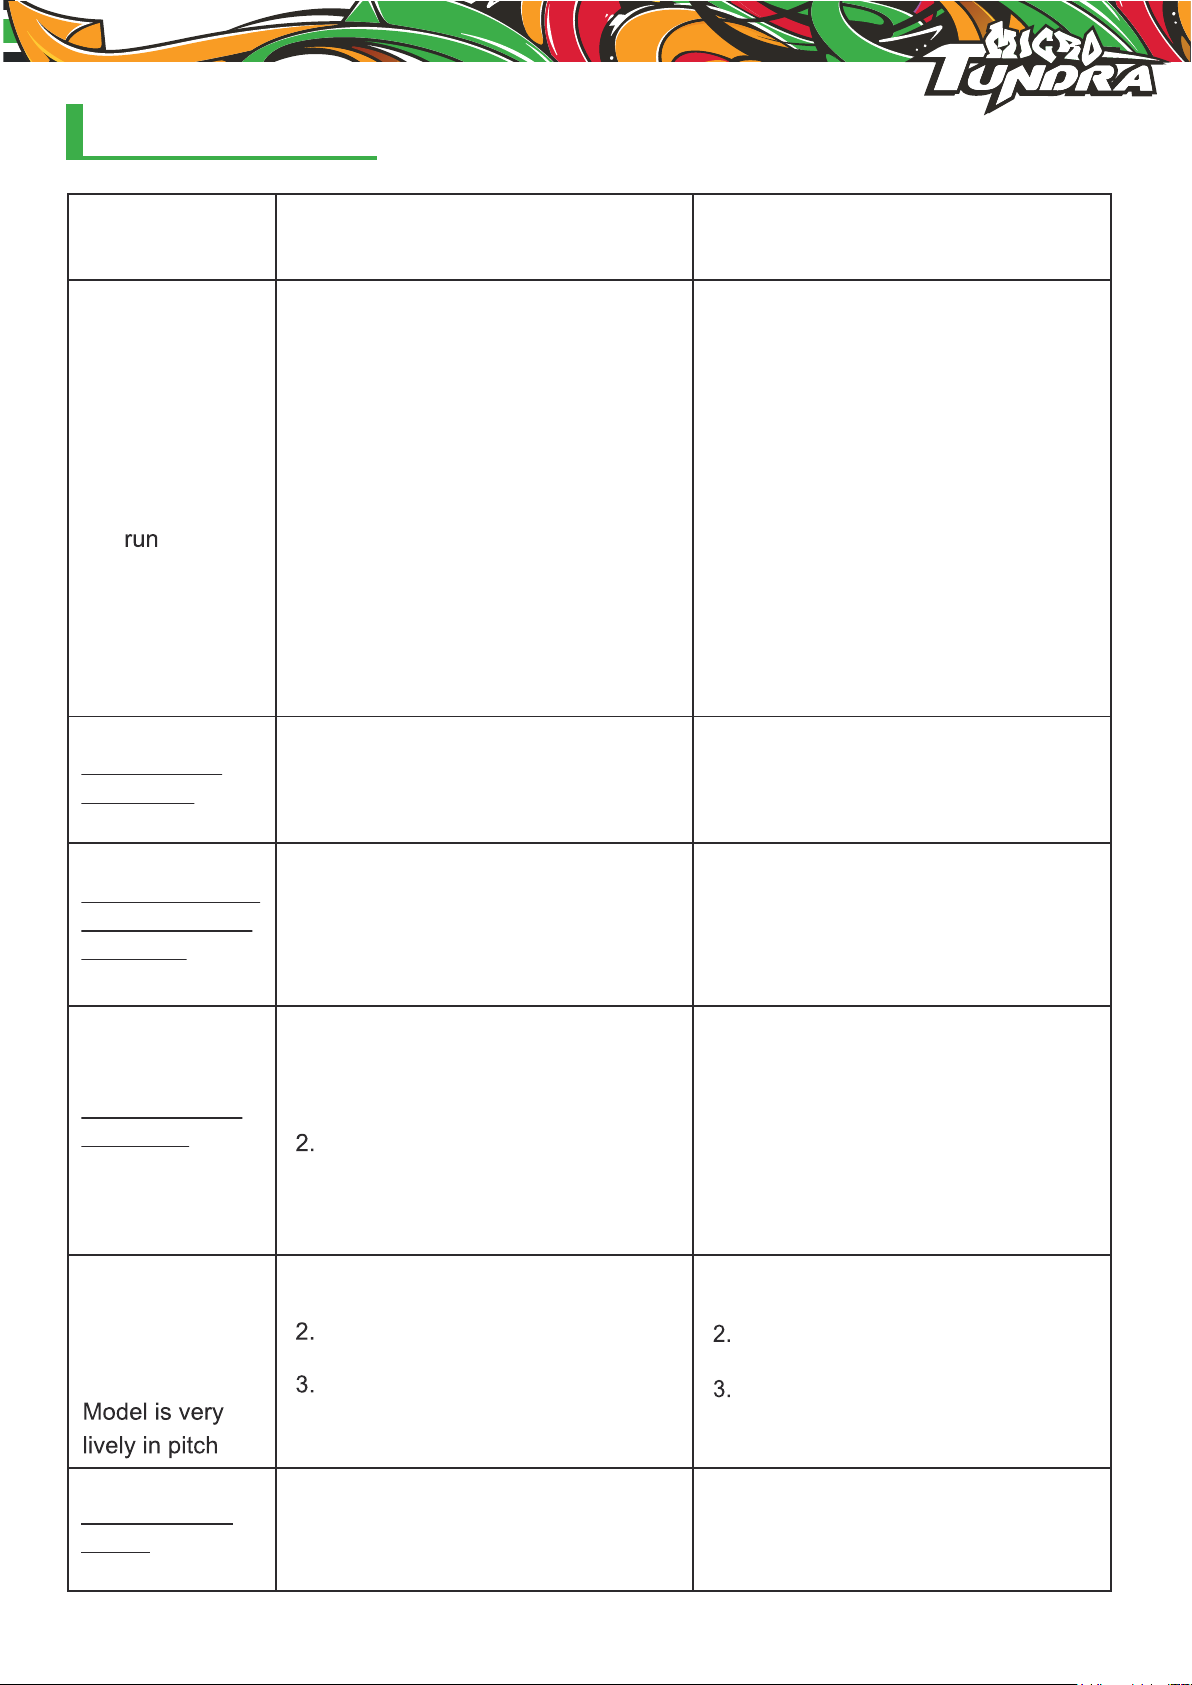
trouble shooting:
Problem Cause Solution
Motor
does not
Model moves
backwards
Control surfaces
not moving with
stick input
1. Batteries is not fully charged.
2. Transmitter battery low.
3. Motor not connected.
4. The motor is damaged.
5. Receiver is not bound to Tx.
6. ESC in set-up mode.
1. Prop installed backwards 1. Swap the prop around.
1. The servo lead is connected
2. The servo is damaged.
to Rx incorrectly.
1. Charge the batteries.
2. Install a charged battery.
3. Check for connection
between the ESC and motor.
4. Replace motor.
5. Consult Radio manual and
go through bind procedure
again.
6. Hold model and move
throttle to full position then
back down to idle.
1. Make sure the servo leads
are connect properly.
2. Replace servo.
Model does not
fly straight
Model does not
climb well
Limited Radio
Range
1. Control surfaces not centered.
C/G is not in the correct position.
1. The battery is not fully charged.
Elevator servo is reversed.
C/G too far forwards.
1. C/G too far backwards.
1. Transmitter/Receiver batteries
are flat.
1. Adjust the trims on the
transmitter.
2. Re-position LiPo as
suggested.
1. Charge the battery.
Change servo direction via Tx.
Move battery backwards.
1. Move battery forwards
1. Charge/replace batteries.
12
Page 14
durafly.com
facebook.com/durafly
 Loading...