

Page 1
Instruction Manual
Page 2

CONTENTS
Introduction
Specification
Required to complete model
warnings
Assembly
Setting up the model
Model flying precautions
Pre-flight checks
Flying the Junior
General flight tips
Spare parts listing
Trouble shooting
3
3
3 - 4
4
5 - 9
10 - 12
13
14
15
16
17
18
Contact
19
2
Page 3

JUNIOR
Introduction
Thank you for purchasing this Durafly Retro series 'Junior' model. The Junior is the world's first truly 'Plug
and Fly' model that is based on a classic 'Vintage' design of yesteryear. While a classic design, this model
comes with all the benefits and convenience of a modern day electric powered EPO model. The Junior
perfectly captures the essence of Vintage flight and design. With its charismatic outline, beautifully simulated
'built up construction' and classic finish. However, unlike traditional built up models, construction time has
been reduced to an absolute minimum thanks to the Plug and fly nature of the Junior.
This retro series model, like the Pioneer before it, comes with all electronics, control horns and push rods
pre-installed and all components pre-assembled. No glue is provided, as none is needed! The Junior simply
screws/bolts together with great ease and simplicity, being ready for flight in a very short space of time due to
its low part count. Even the undercarriage comes pre-assembled for you. The wing is easily removable for
transport and the battery and electronics are easily accessible too through the high quality plastic moulded
battery hatch.
With the Retro series Junior, you'll be rewarded with an extremely relaxing model to both build and fly, with
all the levels of quality and value you've come to love from a Durafly model. Look out for more 'Retro' series
models coming soon from Durafly.
Specification
Wingspan: 1100 mm /43.3 in.
Length: 765 mm / 30.1 in.
Weight: 695 g / 24.5 oz
Propeller
:8x6(Two blade propeller)
Servo’s: 4 x 9g (included)
Recommended radio system: 4CH
Battery: 11.1V, 1300 mAh Li-Po
ESC: 20A Brushless (included)
Motor: DST-1100 (included)
3
EN FR GER
Page 4
Required to complete model
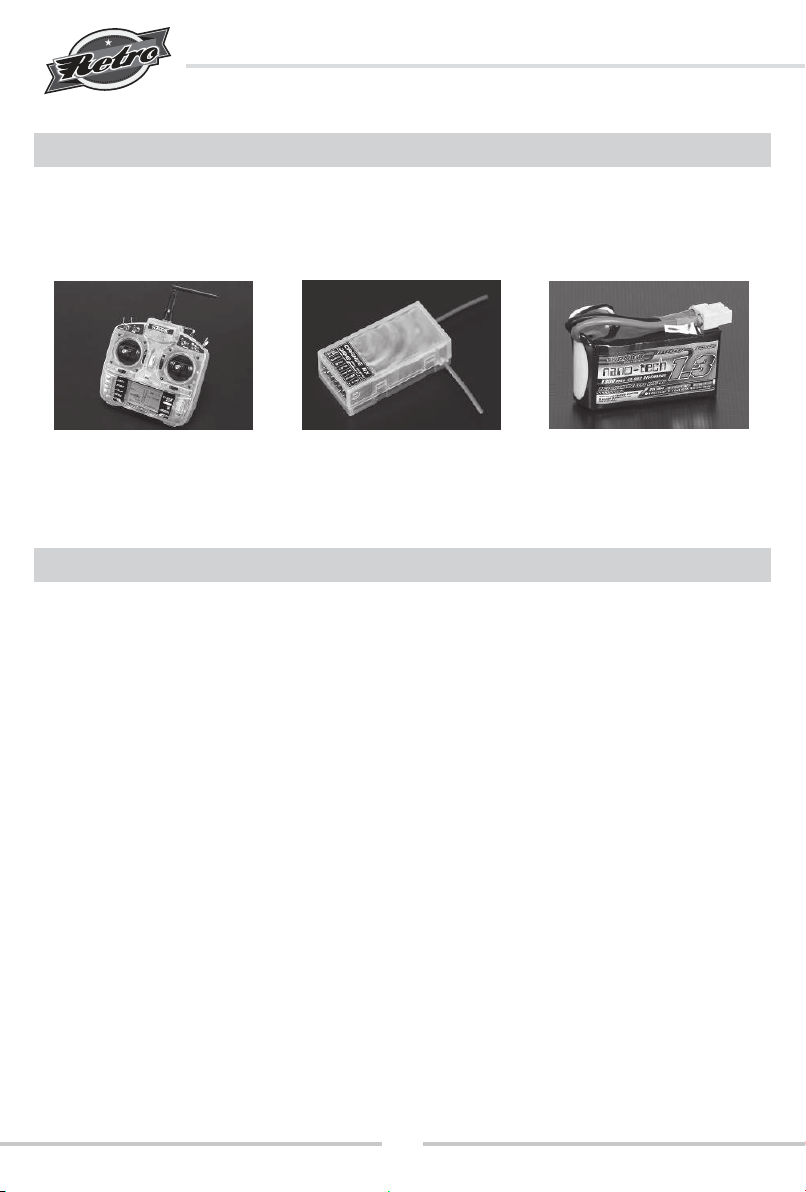
Being in a 'Plug n Fly' format, the Junior will still require some additional electronic components to be ready
for flight. Durafly recommends these Turnigy products below from HobbyKing.com for ease of installation,
optimum performance and great value. Available directly from HobbyKing.com
OrangeRx T-SIX 2.4GHz 6CH
Programmable Transmitter:
Part No. 9403000001
OrangeRx R615 6Ch 2.4Ghz
Receiver:
PartNo. R615
-Turnigy nano-tech 1300mAh
3S Lipo:
Part No. N1300.3S.45
Warning
Please pay close attention to the warnings and guidance outlined in this manual. Failure to do so could
*
result in damage to the product, property and cause serious injury. Durafly shall not be held responsible
for any damage or harm caused by the misuse of its products.
This model is not a toy. Please use it with care and consideration to all around you. Special considerations
*
must be given to any national/local by-laws and restrictions when looking to fly this model. If unsure,
seek assistance from you national governing body for model flying.
This model is for advanced beginners, intermediate and advanced model pilots alike. It is highly
*
recommend that you seek the assistance of an seasoned model pilot if you have any doubts over you
ability to fly this model safely.
Age recommendation: not for children under 14 years old. This product is not intended for use by
*
children of any age without direct the supervision of a responsible adult.
This model uses a recommend Lithium Polymer battery (not supplied) to power all airborne electronics.
*
Read carefully the operating guide lines and safety instructions supplied with your choice of battery.
*
4
Page 5
Assembly
JUNIOR
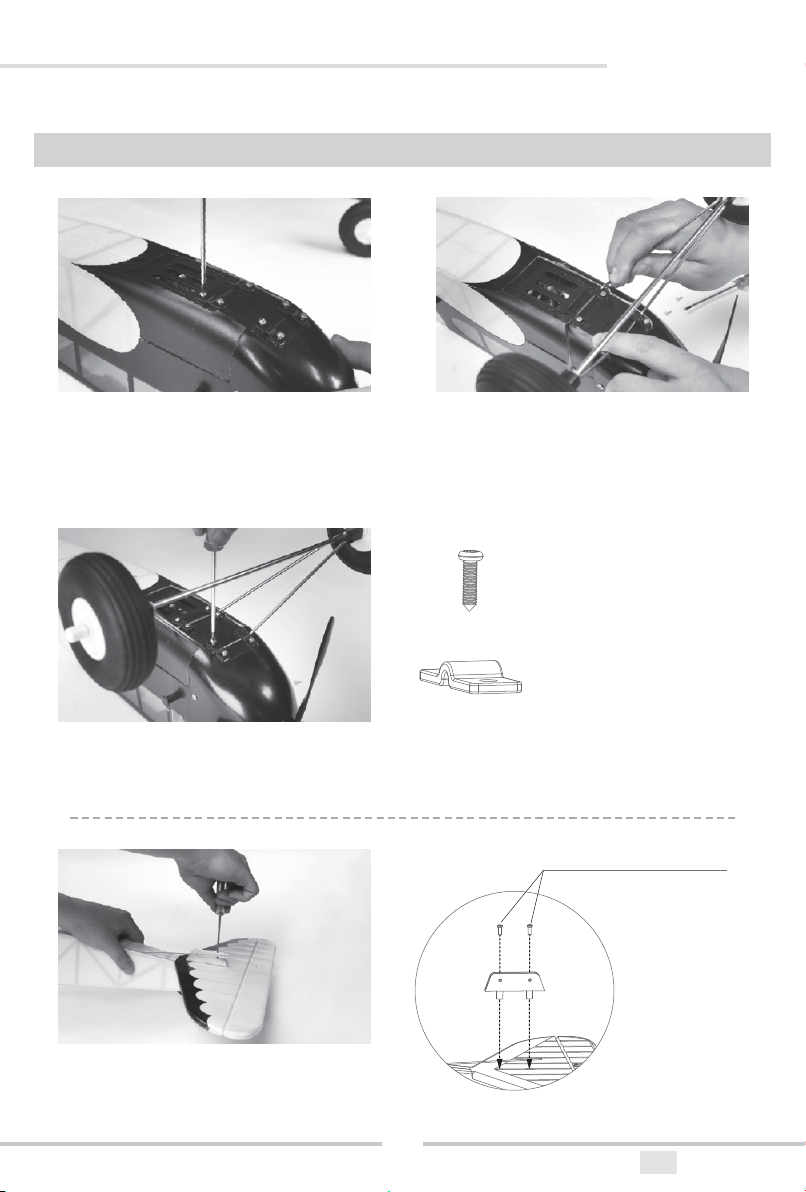
Temporarily remove the undercarriage mounting
1.
plates and screws from the bottom of the
fuselage using the supplied screw driver, as
shown.
Using the mounting plates and screws you've
3.
just removed, mount the undercarriage firmly
in place using the screw driver as shown.
Locate the pre-assembled undercarriage and
2.
place in the moulded slots on the fuselage
underside as shown.
'x 8 PA2x8x3mm screws'
'x 4 Mounting plates'
'x 2 PA2.5x8x4mm screws'
Install the horizontal stabilizer to the tail as
4.
shown, using the screws detailed.
5
EN FR GER
Page 6
Assembly
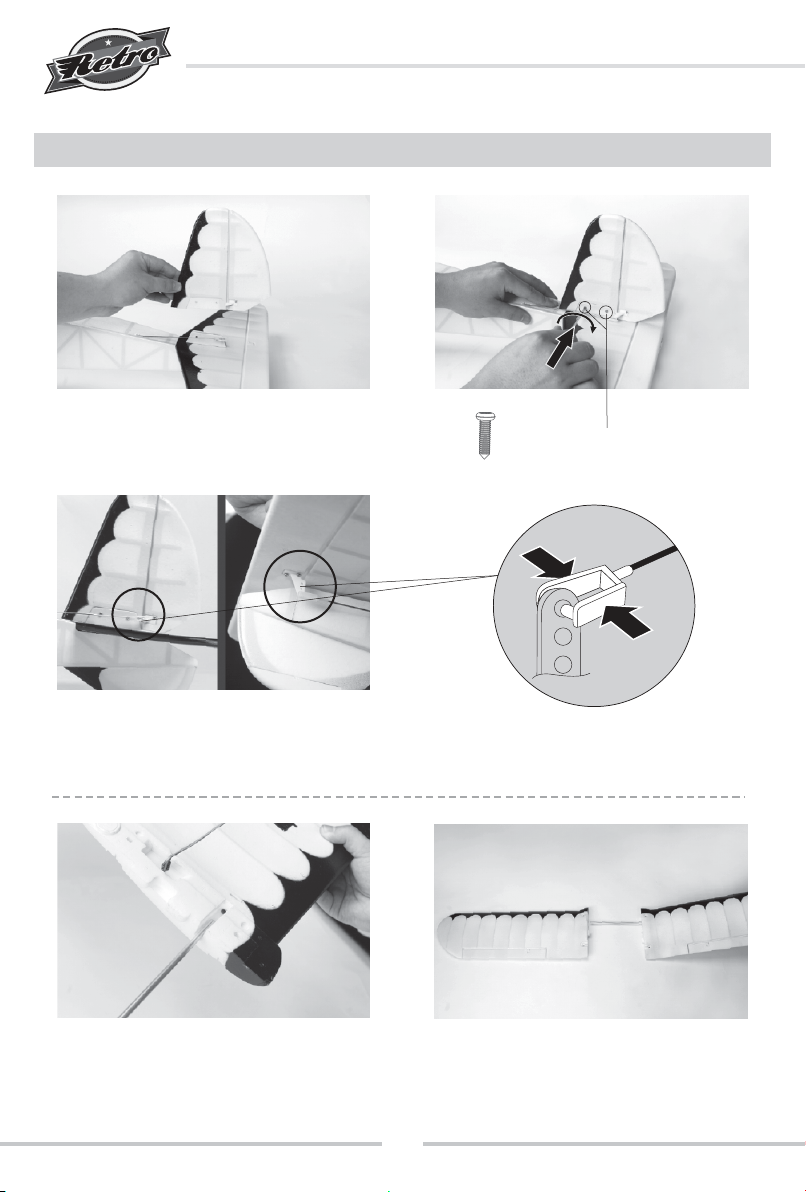
Install the vertical stabilizer to the tail as shown,
5.
using the screws detailed.
Now connect the pre-installed push rod
6.
clevises to the tail control horns as shown.
'x 2 PA2.5x8x4.5mm screws'
Insert the aluminum dihedral spar into one
7.
side of a wing panel as shown.
Insert the remaining wing panel onto the
8.
spar and push together, ensuring both panels
are level with each other at the center.
6
Page 7
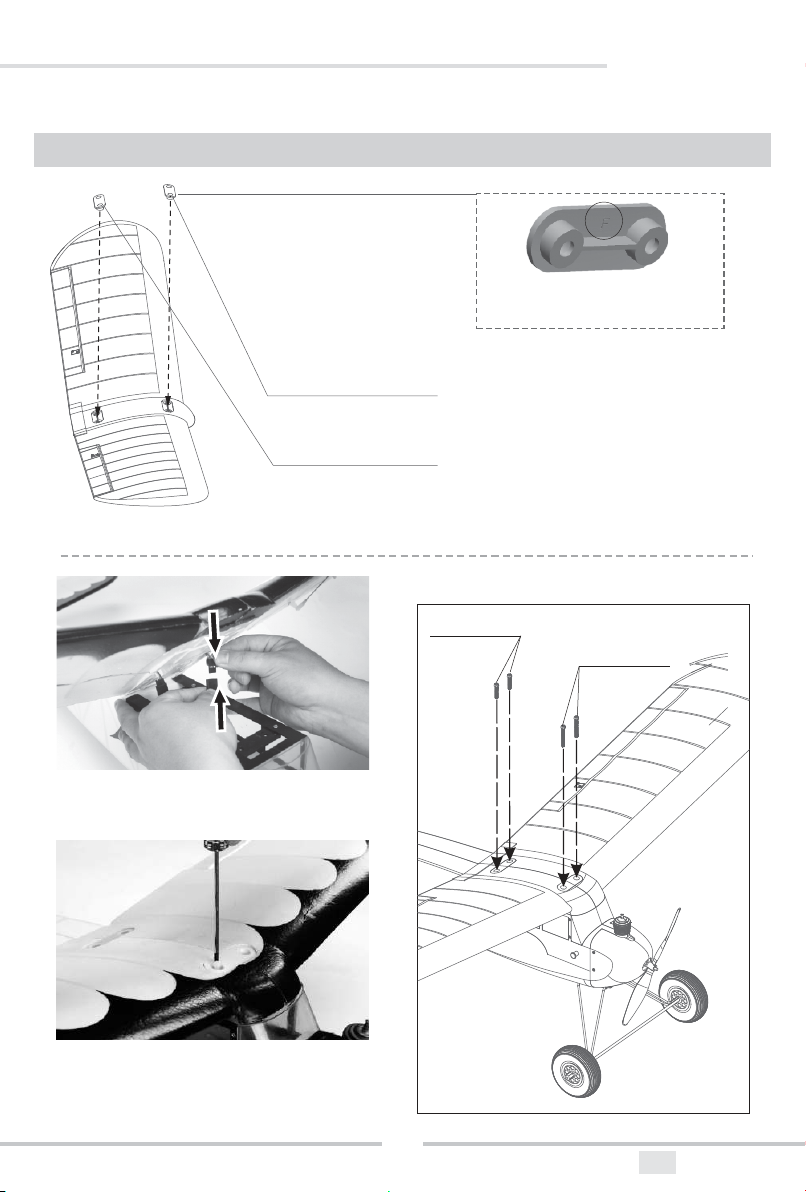
Assembly
Mounting Plate(Front)
JUNIOR
Note : F
“ ”
fro nt connec tor.
Mounting Plate
9. Locate and install the wing mounting plate as shown. Make note of the correct orientation of these.
Connect the aileron servo's to the
10.
pre-installed Y-lead in the fuselage.
(Rear)
PM4*20MM
PM4*30MM
11.
Now secure the wing to the fuselage using the
supplied nylon wing bolts, 20mm bolts for the
rear, 30mm bolts for the front.
7
EN FR GER
Page 8
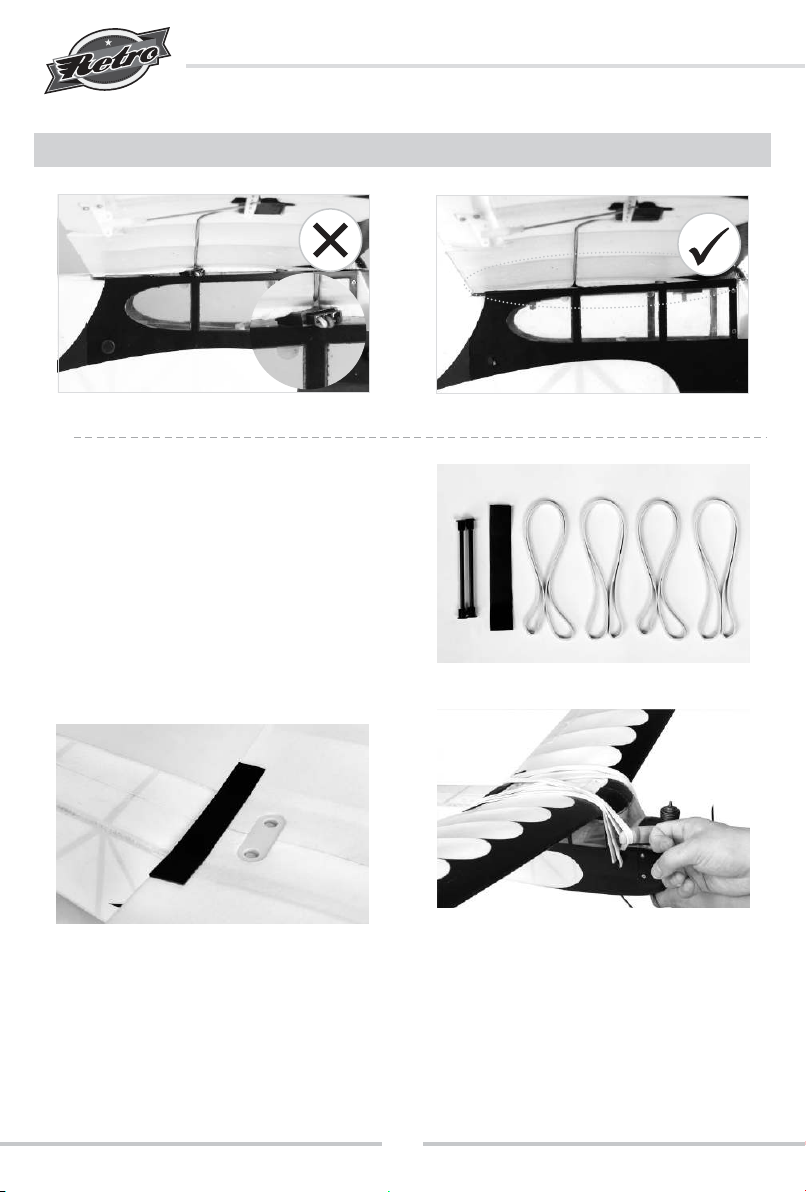
Assembly
Ensure that no servo wires are caught between the wing and the fuselage.
*Optional Wing Bands.
The Junior comes with optionl wing mounting
rubber bands and pre-installed pegs for a truly
authentic look. Please note, this wing mounting
system is not functional and should only be used
in conjunction with the wing mounting bolts
detailed previously.
With the wing bolted to the fuselage, place
11A*. Holding the trailing edge protector in
the plastic trailing edge protector as
shown.
*11B.
place, attach the wing bands to the rear
band peg, stretch up over the trailing
edge of the wing, pull forwards and
secure to the front band peg as shown.
8
Page 9
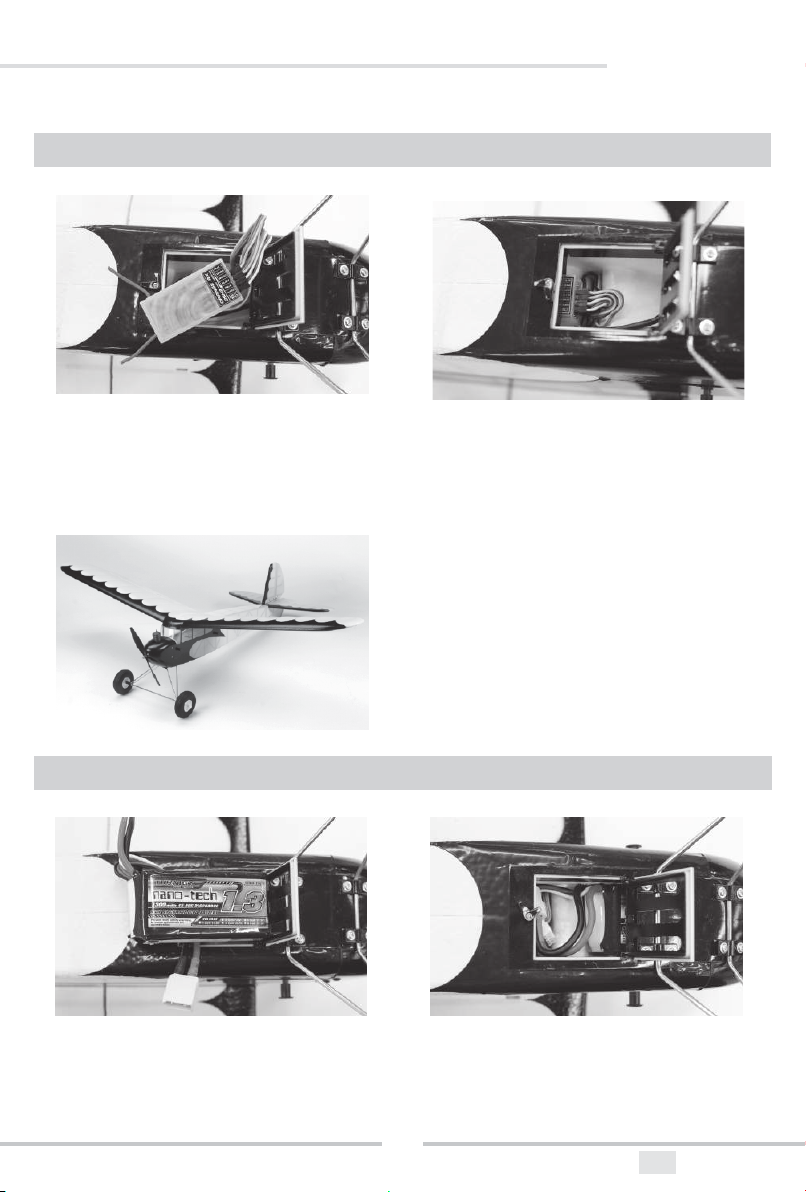
Assembly
JUNIOR
With the model turned over and the battery
12. 13.
access hatch open, connect all servo wires in
the order stipulated by your receiver
manufacturer. A Hobbyking OrangeRx R615
is shown and recommended.
Model assembly is now complete. Now
perform a final check on all crews/bolts
etc, ensuring that all are secure and
firmly in place.
Battery installation (for flight)
Then install your receiver in the moulded
pocket under the servo's by pushing it
rewards as shown. (OrangeRx R615 shown).
- To install your battery simply insert as shown here (NanoTech 1300mah 3S lipo recommended and
shown). Note: Only fully insert your battery in the model when you are out flying. And remember, never
power your model up without the transmitter turn on first.
9
EN FR GER
Page 10
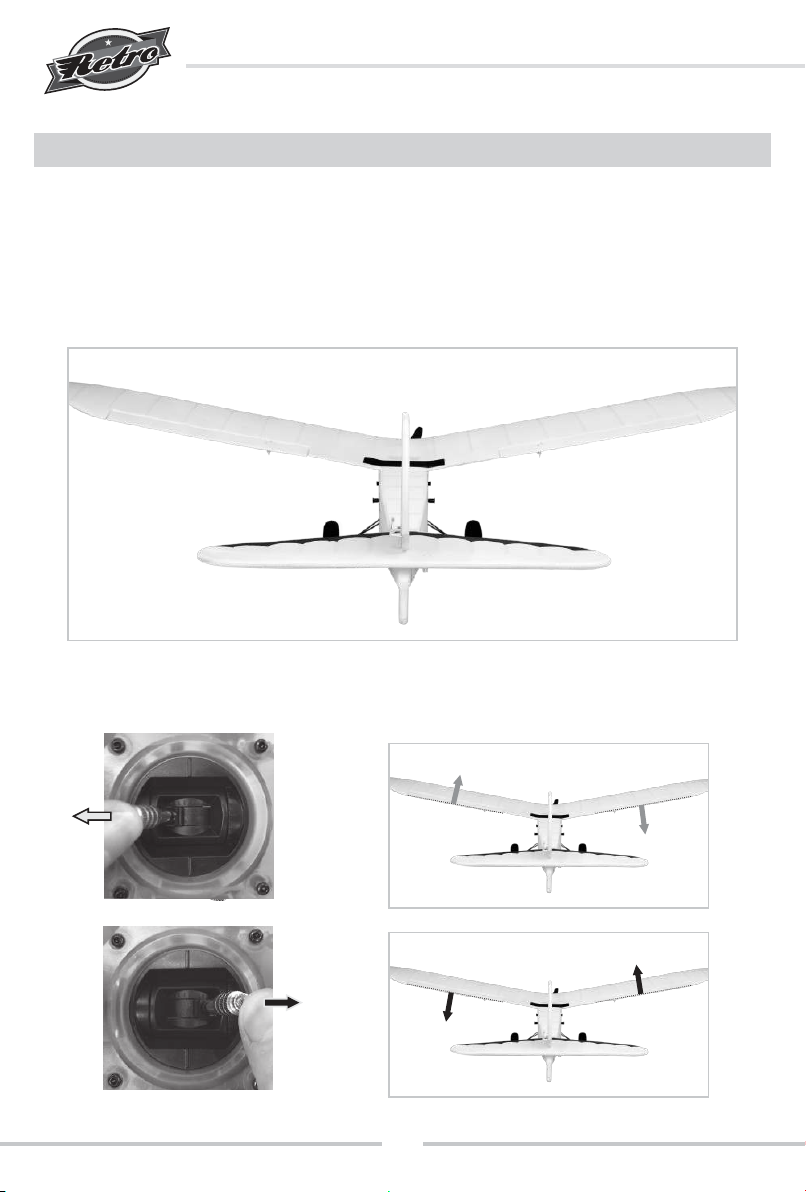
Setting up the model
1.
Once you have established a connection between
your receiver and transmitter, turn on your
transmitter followed by your receiver (by connecting
your 1300mah 3s lipo to the speed controller (ESC).
Also, ensure the battery is fully charged.
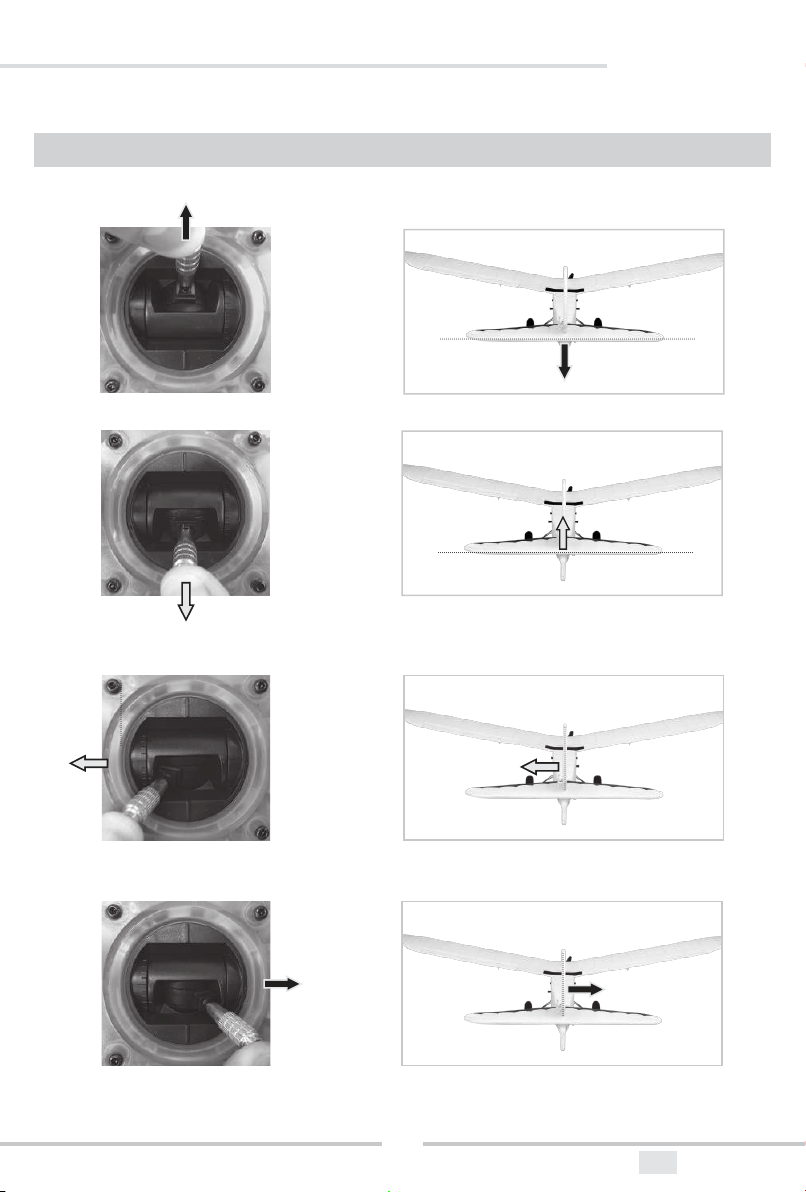
Ensure that control surfaces are moving in the correct direction with corresponding stick inputs as
3.
shown. If not, please reverse the servo direction via the settings menu of your radio.
2. Now that the electronics are powered up
and the servo's centered, ensure that all
control surfaces are level, if not, adjust by
turning the control clevis's accordingly until
the control surfaces are level as shown below.
LEFT
AILERON
RIGHT
AILERON
10
Page 11
Setting up the model
JUNIOR
DOWN
ELEVATOR
UP
ELEVATOR
LEFT
RUDDER
RIGHT
RUDDER
11
EN FR GER
Page 12
Setting up the model
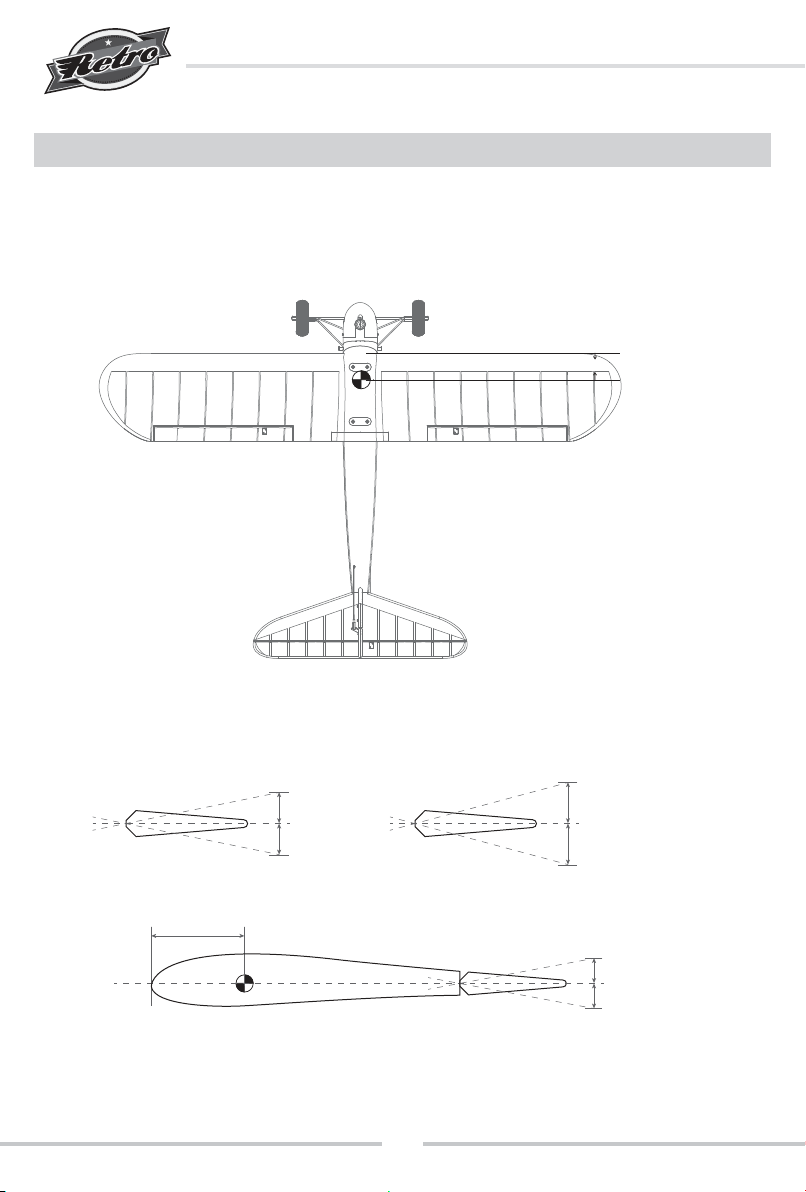
The suggested CG for the Junior is approximately 55-60 mm from the leading edge of the wing. With a
4.
1300mah 3S lipo installed, the model should balance between these points. The C/G given makes for a
truly authentic vintage model flying experience, though you maybe want to adjust this later to better suit
your own flying style.
55 - 60 mm
(CG Location)
5.
The Junior is a very mild mannered model in flight when set-up correctly, the recommended throw settings
here reflect this.
Control throws
10 -12 mm
10 -12 mm
Elevator
55-60 mm ~
* Elevator low rates 10mm, high 12mm in either direction from neutral. (travel, 120% up and 100% down)
* Aileron low rates 6mm, high rates 8mm in either direction from neutral.
* Rudder low rates 20m, high 25mm in either direction from neutral.
Rudder
Aileron
12
20 -25 mm
20 -25 mm
6 - 8 mm
6 - 8mm
Page 13
Model flying precautions
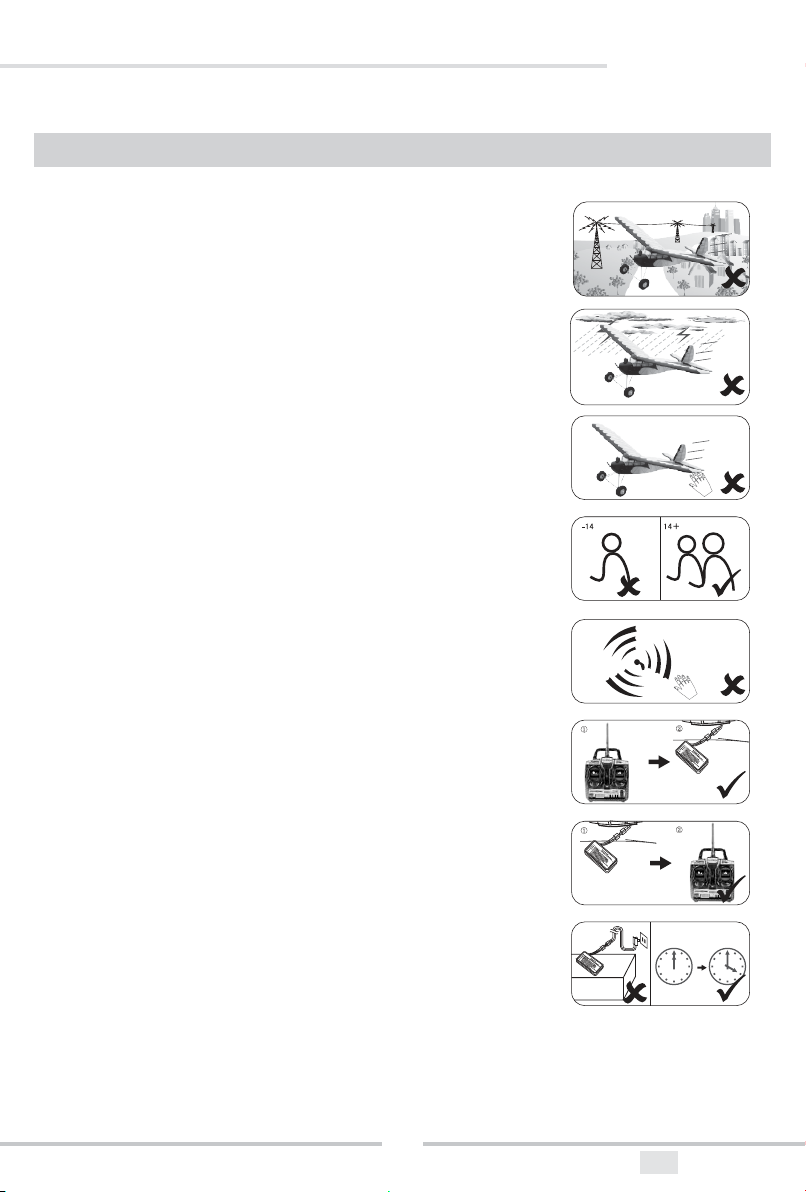
Select your flight area carefully. Always choose an open space that is
*
unobstructed but tree's and buildings and away from crowed area's. Avoid
flying in area's with roads, electric/telephone poles /wires and water near by
or within close proximity to full size air traffic.
Do not fly this model in poor weather. High winds, low visibility, inclement
*
temperatures, rain and storms are to be avoided.
Never attempt to catch this model whilst in flight. Even a slow moving model
*
can cause harm to yourself and/ others and risks damage to the model.
This model is recommended for children no younger than 14 years old. All
*
children, not matter what age, should always be supervised by a capable and
responsible adult when operating this model.
JUNIOR
Always unplug your model battery when not in use. Never leave the battery
*
installed in the model.
Please remember to keep clear of the propeller at all times when your model
*
flight battery is connected.
Before flying, always turn on your transmitter first, then plug your flight
*
battery into the model.
After flying, always unplug your battery first, then turn off your radio
*
transmitter.
Take caution when charging your batteries and follow in full your battery
manufacturers safety guideline
when doing so.
13
Flammables
EN FR GER
Page 14

Before flying
1.
Always range check your model before any flight (especially when flying a new model for the first time).
Follow your radio manufacturers guideline for performing this check.
2.
Check all screw/bolts and mounting points are firmly secured, including control horns and clevis's.
3.
Only fly with a fully charged batteries (both in your radio and model). Failure to do so could result in loss
of control, damage to the model and/or persons/property around you. Check your batteries are fully
charged.
4.
With the model powered up (Transmitter on first, then receiver/model) check that all surface are free from
damage/obstructions, moving in the correct directions and freely with stick input.
5.
Inspect the model and prop for any damage that may have occurred during transit and listen for any
unusual sounds from the electronics when powered up. If in doubt, do not fly.
6.
With the model held securely and the prop free of obstruction, increase the throttle just slightly to confirm
the rotation of the prop is correct. From the rear it should be seen to rotate in a clockwise direction.
7.
If this is your first flight with the model, double check the C/G is at the correct position. If not, adjust
battery position inside model accordingly.
8.
If you are an inexperienced model pilot, seek the help and assistance of an experienced pilot to perform
these final checks and to test fly the model for you.
14
Page 15

JUNIOR
Flying the Junior
The Junior is very true to its vintage heritage in the air. She is easy to fly, doing so very gracefully, particularly
in calm winds, at reduced speeds and with the smallest of stick inputs. Due to the high level of dihedral in the
wing, the Junior is more suited to the lower throttle ranges and should require only minimal aileron input
throughout the flight. For the best flying experience, use the rudder and elevator predominantly to control the
model in the air and fly at 2/3rds throttle or below. The Junior is every bit the free flight model in design, and
as such, will almost fly by itself in the right conditions. In addition to this, with its very low current draw and
need for only low throttle inputs, you can expect flight times in excess of 20 minutes with a fully charged
NanoTech 1300mah 3S lipo (or equivalent).
Take off requires little more than three quarters throttle. With this in mind, care should be taken to increase
throttle slowly during taking off, letting the model climb out with minimal up elevator input. The high lift
configuration of the model will have the Junior airborne in a very short distance. Be ready to correct any
rolling/yawing after take off with rudder first, then aileron where necessary. Alternatively, you may hand
launch the model. Simply grip the fuselage at the C/G position, increase the throttle to just above 3/4’s, and
launch the model level into wind with a firm toss, holding in a small amount of up elevator as you do. Trim
the model as required, then enjoy the model at its best, low and slow with plenty of wide yawing turns.
If you wish to push the Junior, it will perform basic aerobatic maneuvers, loops and stall turns all being
possible with only a slight increase in throttle and stick movements. For landings simply line the model up
into wind and with a very low throttle setting, the Junior will transcend into a perfect controlled decent, still
being completely controllable should you need to adjust its course. Just before touch down, reduce the
throttle further whilst flaring the model with an increased amount of up elevator input just before the wheels
touch down. With the fixed tail skid, ground control/taxing is possible, but you'll be flying quicker if you walk
out and collect the model from the landing strip!
Happy flying and thank you for choosing Durafly.
15
EN FR GER
Page 16

Junior Flying tips
It is generally not recommended to fly the Junior in winds of 10mph or more. Though the model will
*
handle these stronger wind conditions, the Junior is best suited to, and most enjoyable in, those lazy
calm afternoon's for which its predecessors where originally designed.
Too much aileron input can result in a less enjoyable flying experience. Due to the high angle of dihedral
*
in the wings, its is recommended that the ailerons are used only when needed for general flying. The
rudder is much more authorative and controlled.
It is not recommended to fly the model at full throttle constantly. The layout out and design of the Junior
*
is much more suited to flying at a throttle setting no high that 3/4, as is common with models of this
vintage design.
A high rate setting on the rudder is suggested for improved ground handling. As the Junior has a fixed
*
tail skid, you'll want as much rudder movement on the ground as possible.
Due to the low demands on the power system to keep the Junior flying comfortably, long flight times can
*
be expected off of a single 3S battery. Take 4 or 5 Nanotech 1300mah lipo’s from Hobbyking and you’ll
be able to fly all afternoon without the need to charge.
A small optional 25g weight has been added to the box. The Junior flies very much like the Vintage
*
model it was inspired by without this weight, but if you wish to bring the CG forward a little, we suggest
using this weight. To install, simply remove the cowl and glue the weight firmly inplace with a hot glue
gun or other suitable glue.
Thank you again for purchasing this Retro series Junior from Duralfy. We hope you have many happy, lazy
summer afternoon's flying it. Don't forget, spare parts are available for this model, please see oppersite for
details.
16
Page 17
Spare parts listing
JUNIOR
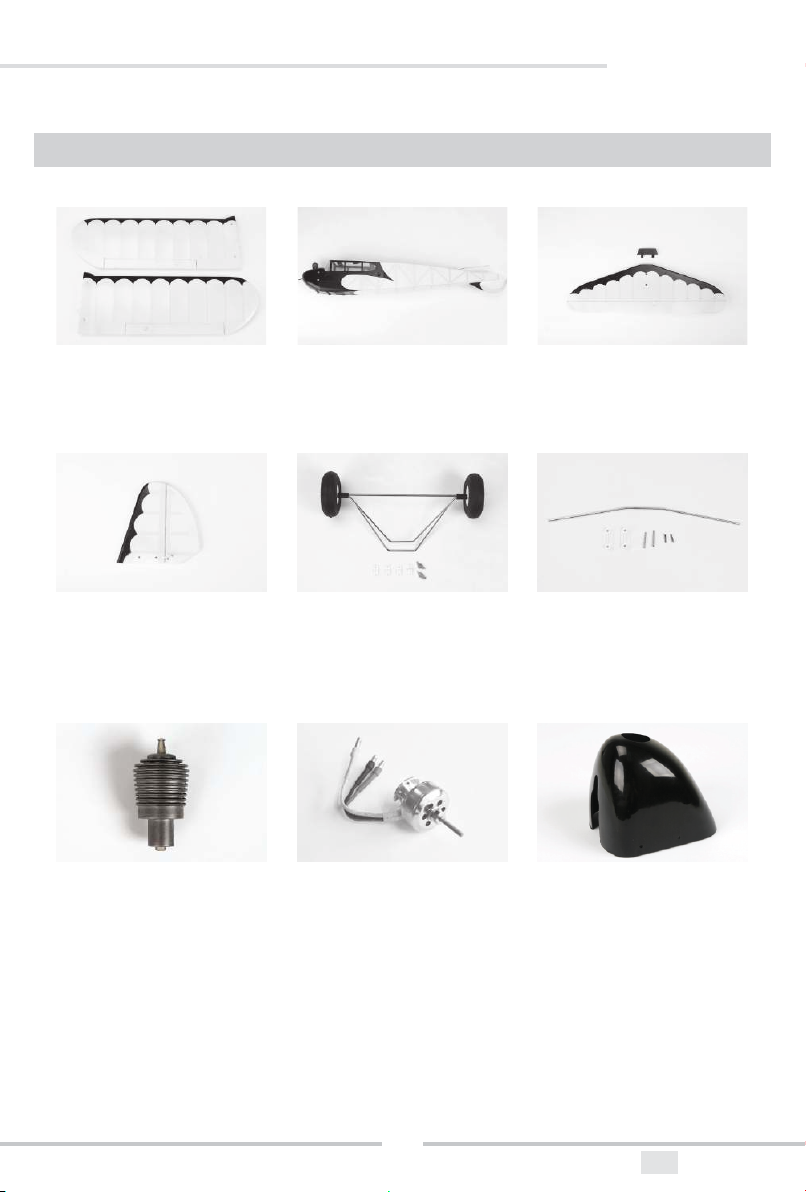
Wing Set
No.:041000156-0
Vertical stabilizer/rudder
No.:041000157-0
Dummy Motor
No.:041000162-0
Fuselage
No.:041000155-0
Undercarriage Set
No.:041000159-0
Motor DST-1100
No.: 9031000158
Horizontal stabilizer/
elevator and tail mount
No.: 041000158-0
Wing accessories
No.:041000160-0
Cowl
No.:041000161-0
- Spare parts are avaible directly from hobbyking.com
17
EN FR GER
Page 18

Trouble shooting
Problem Cause Solution
Motor does
not run
Control surfaces
not moving with
stick input
Can not fly
straight
Does not climb
1. Battery is not fully charged.
2. Transmitter battery low.
3. Motor wires not connected.
4. The motor does not work due to
impact or damage.
5. The frequency binding of the
radio system has failed.
6.Throttle protection (lock signal
of throttle channel)..
1. The servo cable is plugged
correctly.
2.The servo is damaged
1.The rudder is not in the center
position of the airframe
2.The main wing is not fixed in
the center position of the airframe.
1. The battery is not fully charged.
2. Elevator servo is reversed.
3. CG too far backwards
1. Charge the batteries.
2. Install a full charged battery.
3. Check for connection between
the ESC and motor.
4. Replace motor.
5. Consult Radio manual and go
through bind procedure again.
6.push the throttle joy-stick to
its Zero position.
1. Check the connection of
the servo cable.
2. Replace servo.
1. Adjust the trim switch on
the transmitter.
2.Re-possition the main wing.
1. Charge the battery.
2. Change servo direction via Tx.
3. Move battery forwards
Limited Radio
range
Transmitter/Receiver batteries are flat Install new batteries
18
Page 19

JUNIOR
Contact
For more information on this model and the entire range from Durafly please visit us at Durafly.com or see
our Facebook page Facebook.com/durafly. For your next Durafly purchase, be sure to visit hobbyking.com"
Notes:
19
EN FR GER
Page 20

 Loading...