

Page 1

INSTRUCTION MANUAL
Please read this manual carefully before operating this plane.
Page 2

WARNING
Read this instruction manual fully so as to become completely familiar with the features of the product before
operating. Failure to operate this product correctly could result in damage to the product, personal property
and cause serious injury. This is a sophisticated hobby product and is NOT a toy. It must always be operated
with caution, common sense and some basic mechanical ability. This manual provides instructions on the
assembly, safe operation and maintenance of this hobby product. It is highly recommended that you read and
follow fully the instructions and warnings stated in this manual including safety, assembly, set-up and flying
guidelines in order to operate this product correctly and avoid damage or serious injury.
SAFETY PRECAUTIONS
As the user of this product you and you alone are responsible for operating it in a manner that does not
endanger yourself and others around you or result in damage to the product or property of others. This product
is operated via a radio controlled system that in some cases can be subject to interference from sources
outside of your control. Interference may result in a momentary loss of control so it is always recommended
that this product be used in a suitable open outdoors space.
• This is a radio controlled flying model and as such must always be flown with caution, this is NOT a toy.
• The H-King J3 Swiss Cub brief was to design a model for low hours to intermediate pilots.
• Always exercise great caution when using the recommended battery to power this product. For full safety
notes and operating procedures please read the information provided by your battery supplier.
• Take great care when connecting/disconnecting the battery. Once again see your battery suppliers informtion
for the full safety procedures.
• Never power up the model in a confined space and always keep the propeller clear of obstructions, clothing
and parts of your body.
• This product is not a toy, children must be accompanied by an adult at all times when operating this product.
• Only fly this model in an open area away from crowds, people, buildings, trees, power lines, roads, airports
and other obstructions.
• Always put safety first when operating this model and consider the warnings stated above.
• The supplier/manufacturer accepts no responsibility for damage or injury caused through the use of this
product. A reminder that it is not suitable for children under the age of 14. THIS IS NOT A TOY.
Page 3

INTRODUCTION:
Forged by Kings in a distant realm, the legendary Excalibur has proven to be a force to be reckoned
with, it is now available in an updated version which includes a brand new eye-catching color scheme,
extra carbon and glass fiber reinforcement, and
arrived!
The Excalibur V2 is the perfect marriage of modern design and materials, with rock solid engineering
and performance. The entire model features carefully positioned carbon and glass fibre reinforcement
through-out, super smooth EPO foam for the lowest drag possible, quick connect PCB wing plugs,
efficient ball links on all surfaces, and a simple
screw together assembly.
This, is all wrapped up in the sleekest looking hotliner to date. The Excalibur's forward swept wing and
V-tail design coupled with the mighty pre-installed high torque power system, impresses at every level.
It is these lasting impressions from which legends are born.
Whether on the slope or at the field, rule the sky with the Durafly Excalibur V2.
an improved propeller assembly, the Excalibur V2 has
FEATURES:
- Wing span: 1600mm(63.5”)
- Length: 1010mm(40.1”)
- Flying weight: 1320g(46.6oz)
- Controls: 4 Channels - Ailerons,Elevator,Rudder (V-Tail),Throttle.
- ESC: Aerostar 60amp Brushless ESC.
- Motor: 3542 800kv Brushless outrunner
- Prop: Aerostar Folding Carbon 13x8
- Battery: 1800-2200mAh, 4S LiPo, 40-65C.
- Radio system: Minimum 4 channel Rx and Tx required with V tail mixing.
- Servos: 4 x 9g high torque.
1
Page 4
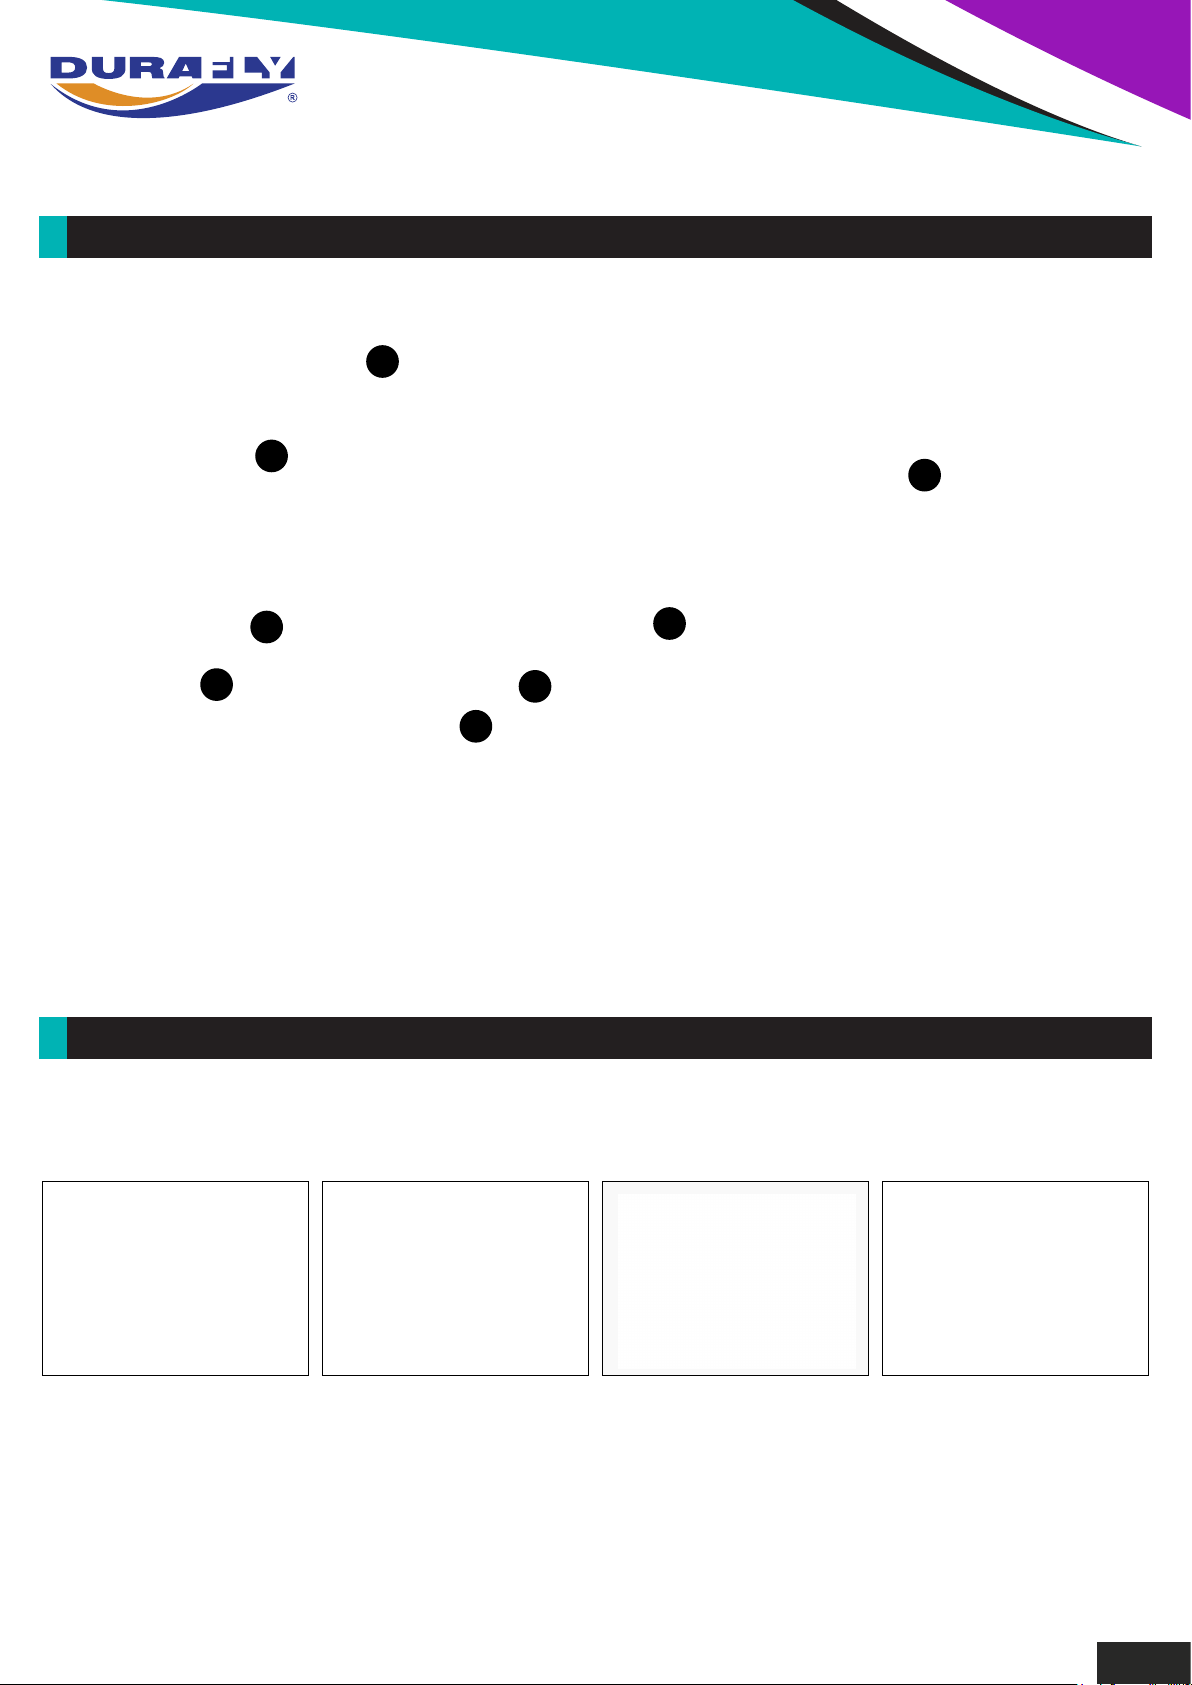
CONTENT:
2
1
1
5
7
6
4
1. Main wing panels
2. Fuselage
3. V-tail stabilizer
4. Control & mounting accessories
8
3
5. Prop and spinner assembly
6. Upper tail plate
7. Slope nose cone
8. Wing spars
REQUIRED TO COMPLETE MODEL:
In its ‘Plug n Fly’ format the Excalibur V2 will still require some additional electronic components to get it ‘flight
ready’. Durafly recommends the products below for optimum performance and great value. Available at
Hobbyking.com. If you are viewing this manual on-line, click
OrangeRx Tx6i 6ch
2.4GHz DSMX
Compatible Radio System
SKU: 9171001330-0
OrangeRx R620X V3
6Ch 2.4GHz DSMX/s
Full Range Receiver
SKU: 9171001391-0
ZIPPY Compact
2200mAh
4s 60c Lipo Pack
SKU: 9067000030-0
Rhino 2200mAh 4S
50C Lipo Battery Pack
w/XT60
SKU: 9952000026-0
2
Page 5
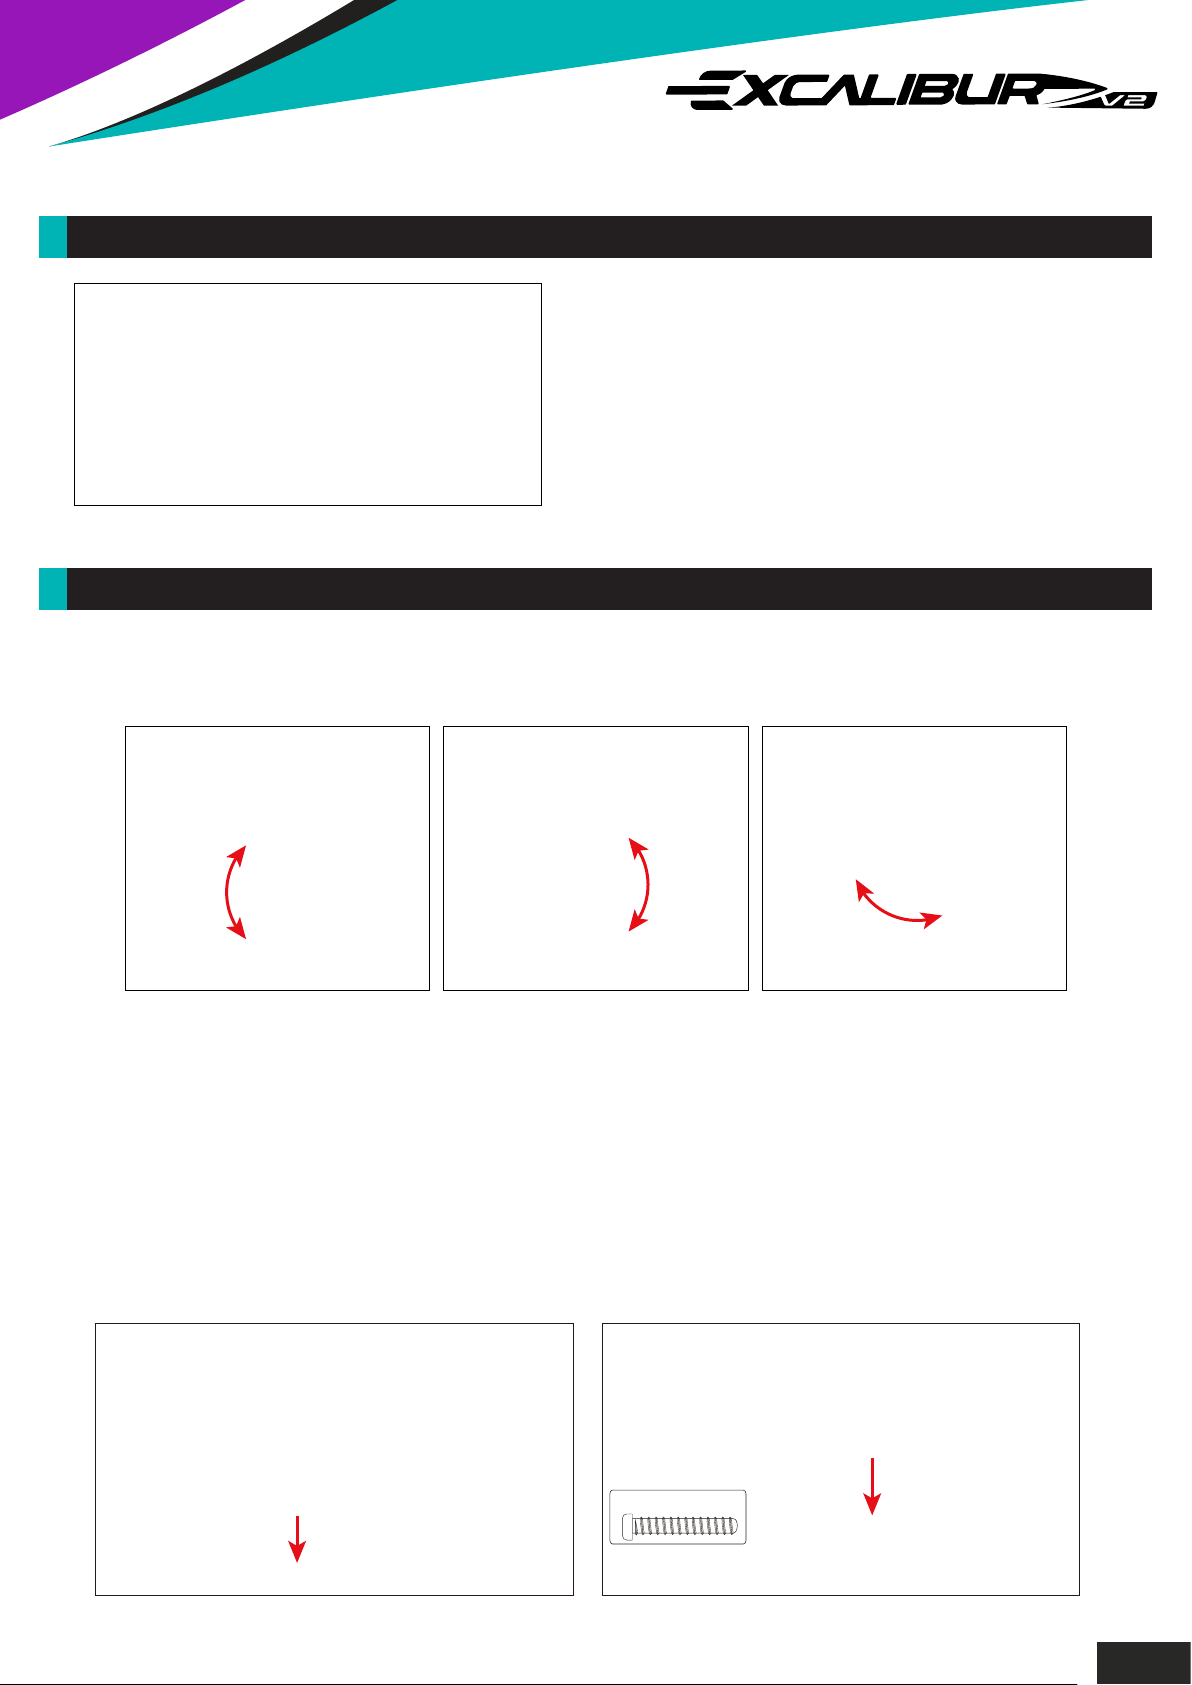
FPV CANOPY:
The ‘FPV canopy hatch’ is a free to download 3D file
of the canopy from the files tab of the listing for those
that with to 3D print their own canopy and FPV the
Excalibur V2.
FPV canopy 3D file for printing. Download for free here.
ASSEMBLY (PNF):
1.Out of the box your Excalibur V2 comes with reinforced foam hinges. However before assembly can
begin, each hinge line must be flexed back and forth 5-6 times to reduce tension and load on the servo.
Do this for all control surfaces before continuing.
.Test and center each tail servo then carefully install each tail half into the the housing at the rear of the
2
fuselage. Connect the servos to the extension leads and ensure they are pushed forward into the
fuselage when fitting the tail, this is to achieve the perfect fit as shown (A). With the tail now correctly in
place, add the top tail mounting plate and secure using the supplied 2.3x6mm screws (B). Turn the tail
over and repeat this process (C). Finally locate and install the tail servo horns and control rods (D). Do
this for all control surfaces before continuing.
Note:
- For max strength and security, UHU glue can be used in addition to supplied screws when installing the tail.
- When connecting ball links, the side with the ring molded on, is the side pressed onto the ball.
- Use of heat shrink or sticky tape is recommended to keep the extension/servo lead connections
A.
B.
2.3x6mm
secure.
3
Page 6
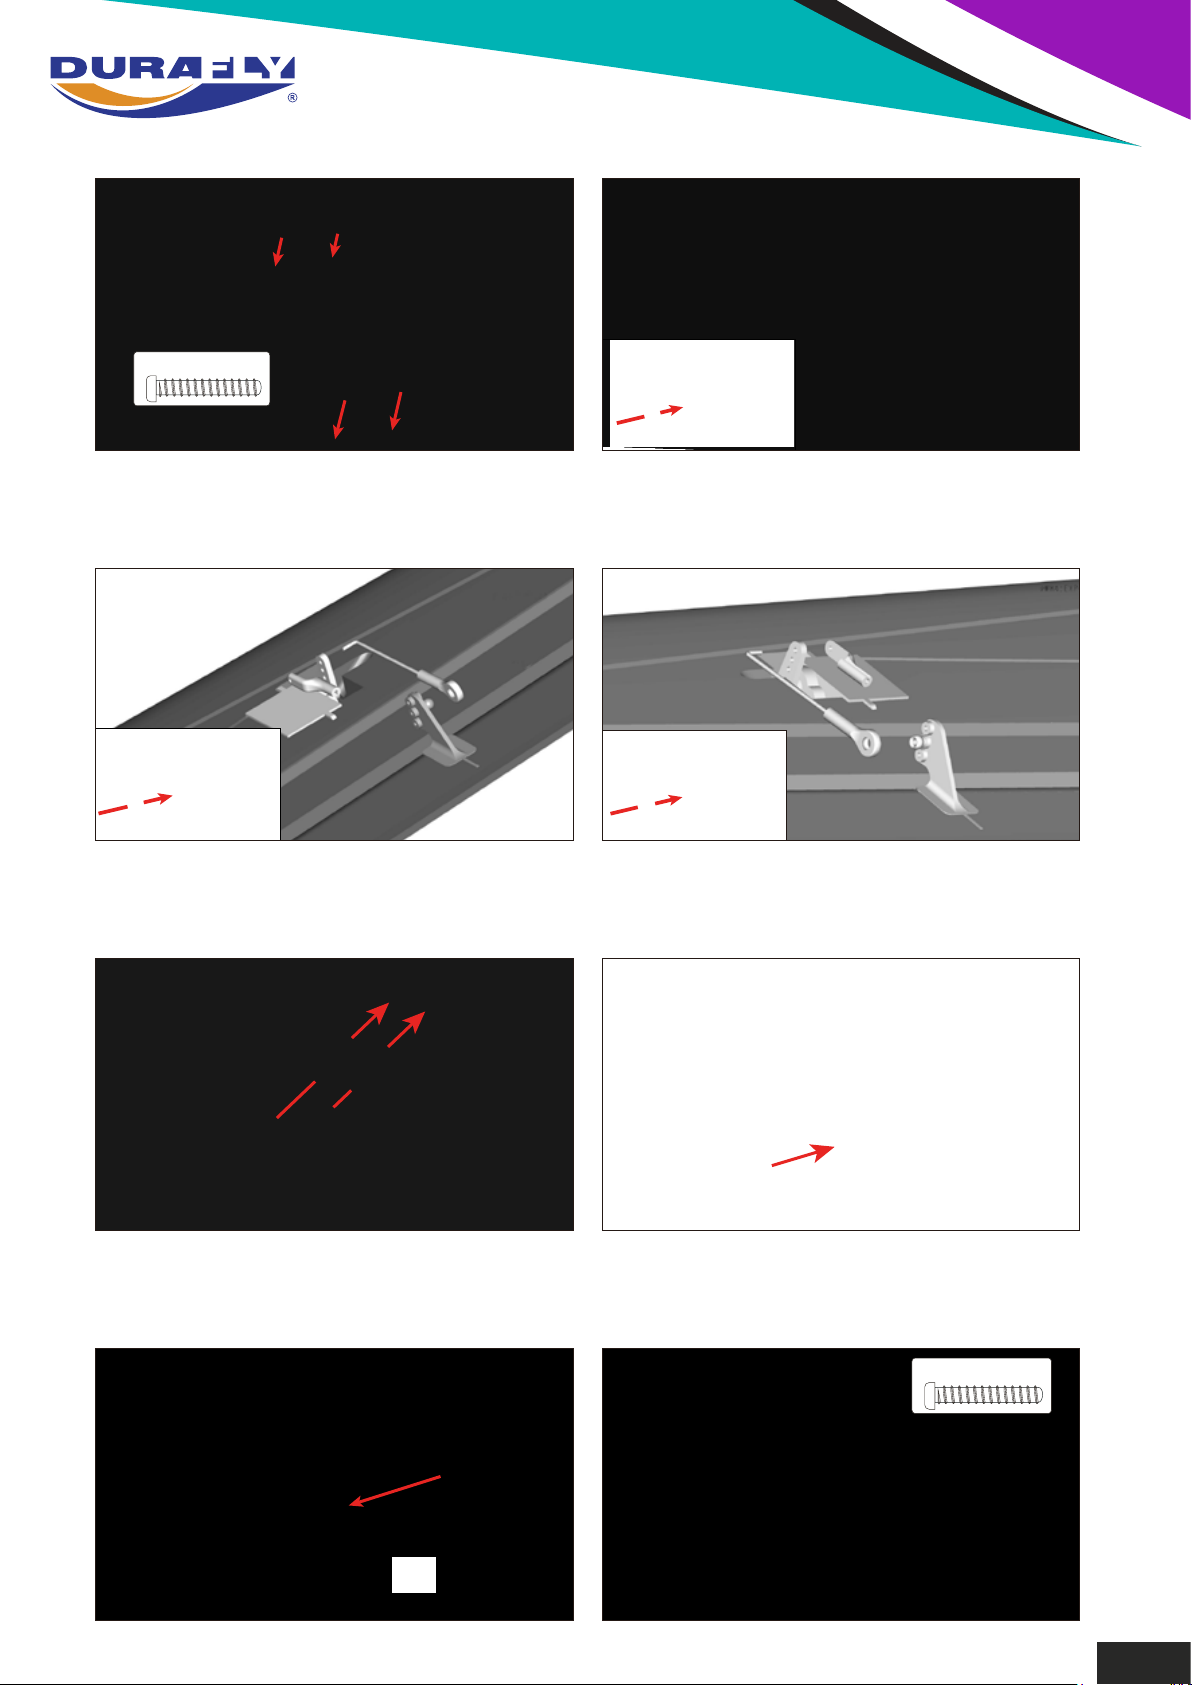
C.
2.3x6mm
3.Center the aileron servos and connect the ball link to the ball end on each control horn. Use the quick
keeper to secure the rod to the servo horn as show (A,B). Screw or unscrew the ball link as required to
get the aileron level with the wing trailing edge with the servo centered.
D.
A.
4.Push the supplied carbon wing joining spars into the slots of the fuselage (A), longer one at the front,
and the shorter one at the rear. Ensure the spars do not catch on any wires when passing through the
fuselage. Once inserted, ensure both are centered as show (B).
A.
B.
B.
.Maintaining their aligned position, slide one wing panel onto the spars and into place on the fuselage.
5
Handle with care, as you may need a good firm push to get the wing fully into position. Repeat with the
remaining panel (A). With both panels firmly in place, secure with four of the 2.5x6mm screws as shown (B).
A.
B.
2. x6mm
4
Page 7
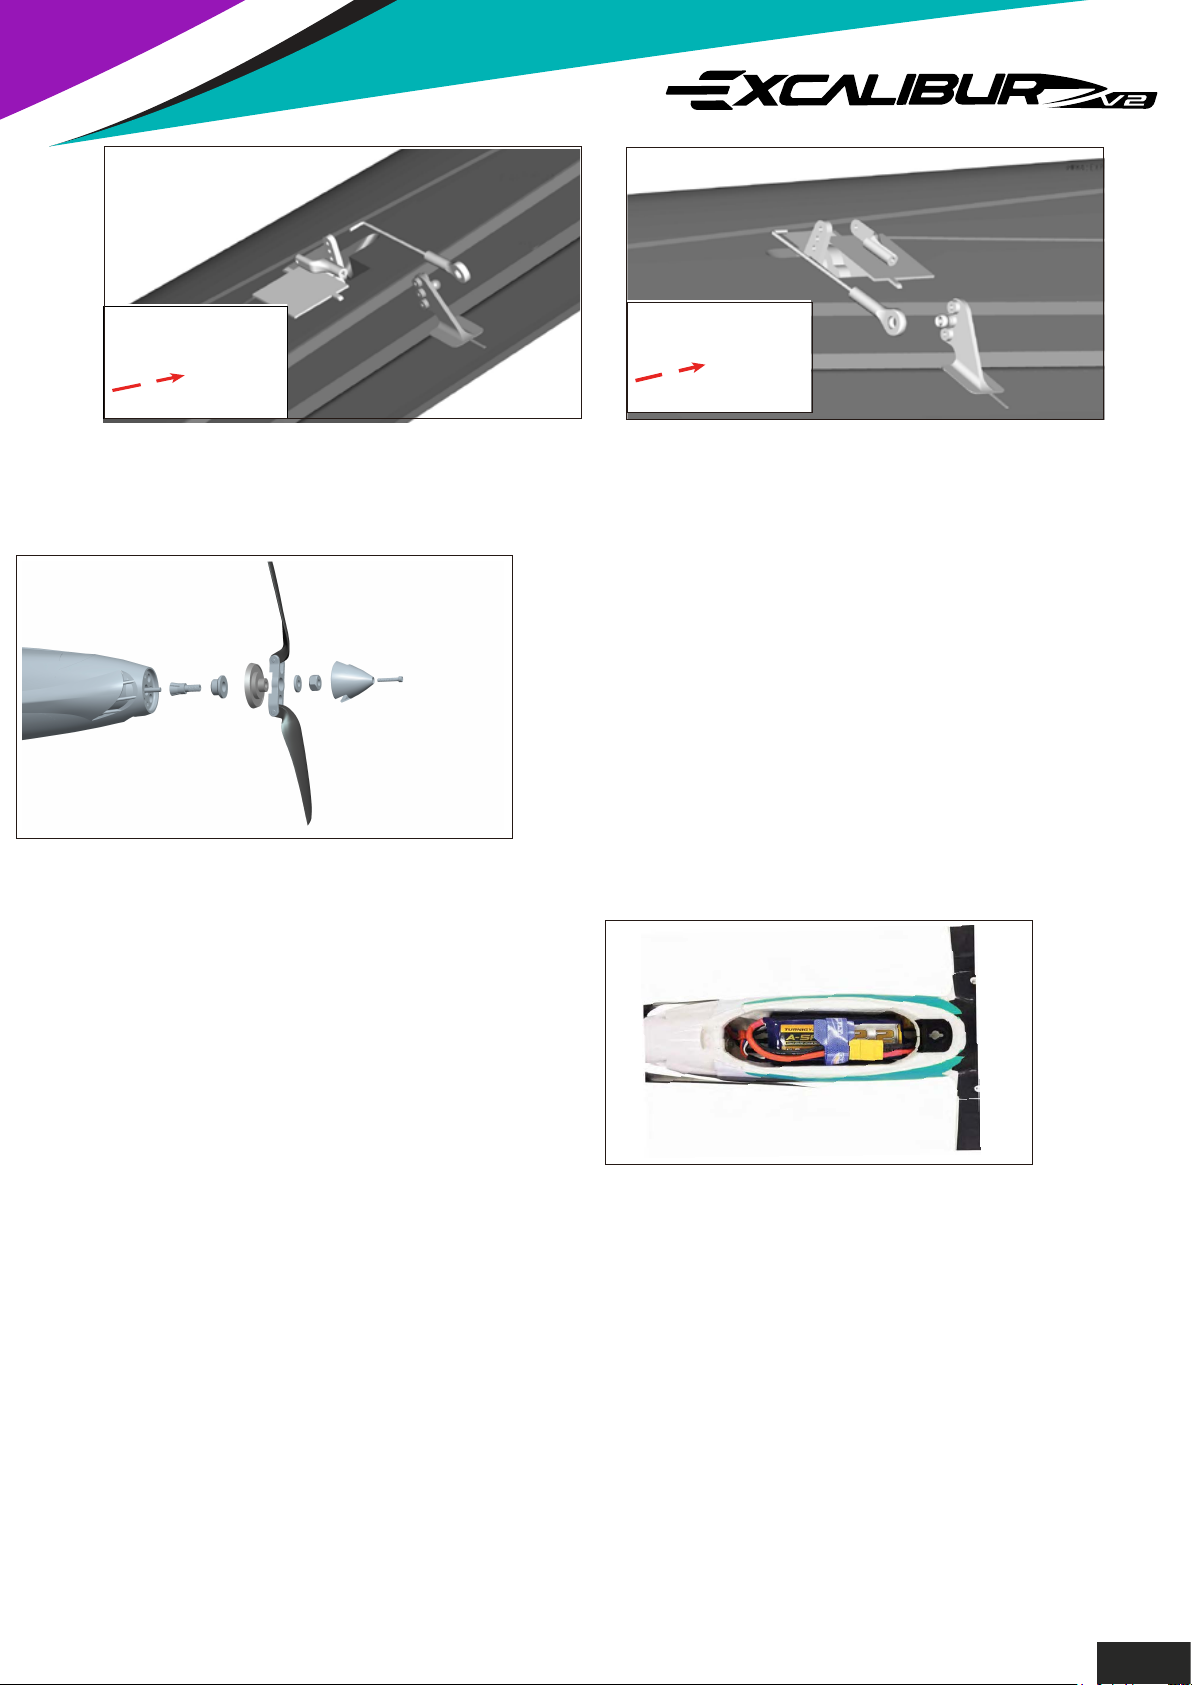
A.
B.
6. Set the aileron servos to neutral and ensure the arms are vertical as shown. Connect the
aileron pushrods to the servo arm using the supplied quick-keepers. Adjust the ball link if
necessary by turning clockwise, or anti-clockwise, then snap the ball link onto the ball.
7. Fit each prop blade to the center-hub using the hexscrews supplied, do not over-tighten, they should be free
enough to fold. Assemble the motor adapter, spinner
backplate, and center-hub onto the motor shaft. Fit the
washer and nut, and tighten the assembly so that it is firmly
locked onto the shaft. Attach the spinner using the supplied
screw.
8.The final stage of assembly is to install your
choice of 4-6ch receiver, the smaller the
better. With all servo leads connected, the
receiver can be inserted under the wing
leading edge and secured as desired. Your
1800-2200mah 4S lipo is installed as shown
below. This is also the best location to
achieve the correct CG.
Congratulations,
Basic assembly of your Excalibur V2 is now complete.
Please perform a final check on all screws, bolts and components,
ensuring all are secureand firmly in place.
Note:
- The propeller should be balanced out of the box, however it is
recommended a final balance check be carried out before
attaching it to the model. A well balanced prop will greatly increase
all round performance and efficiency of the model in flight.
5
Page 8
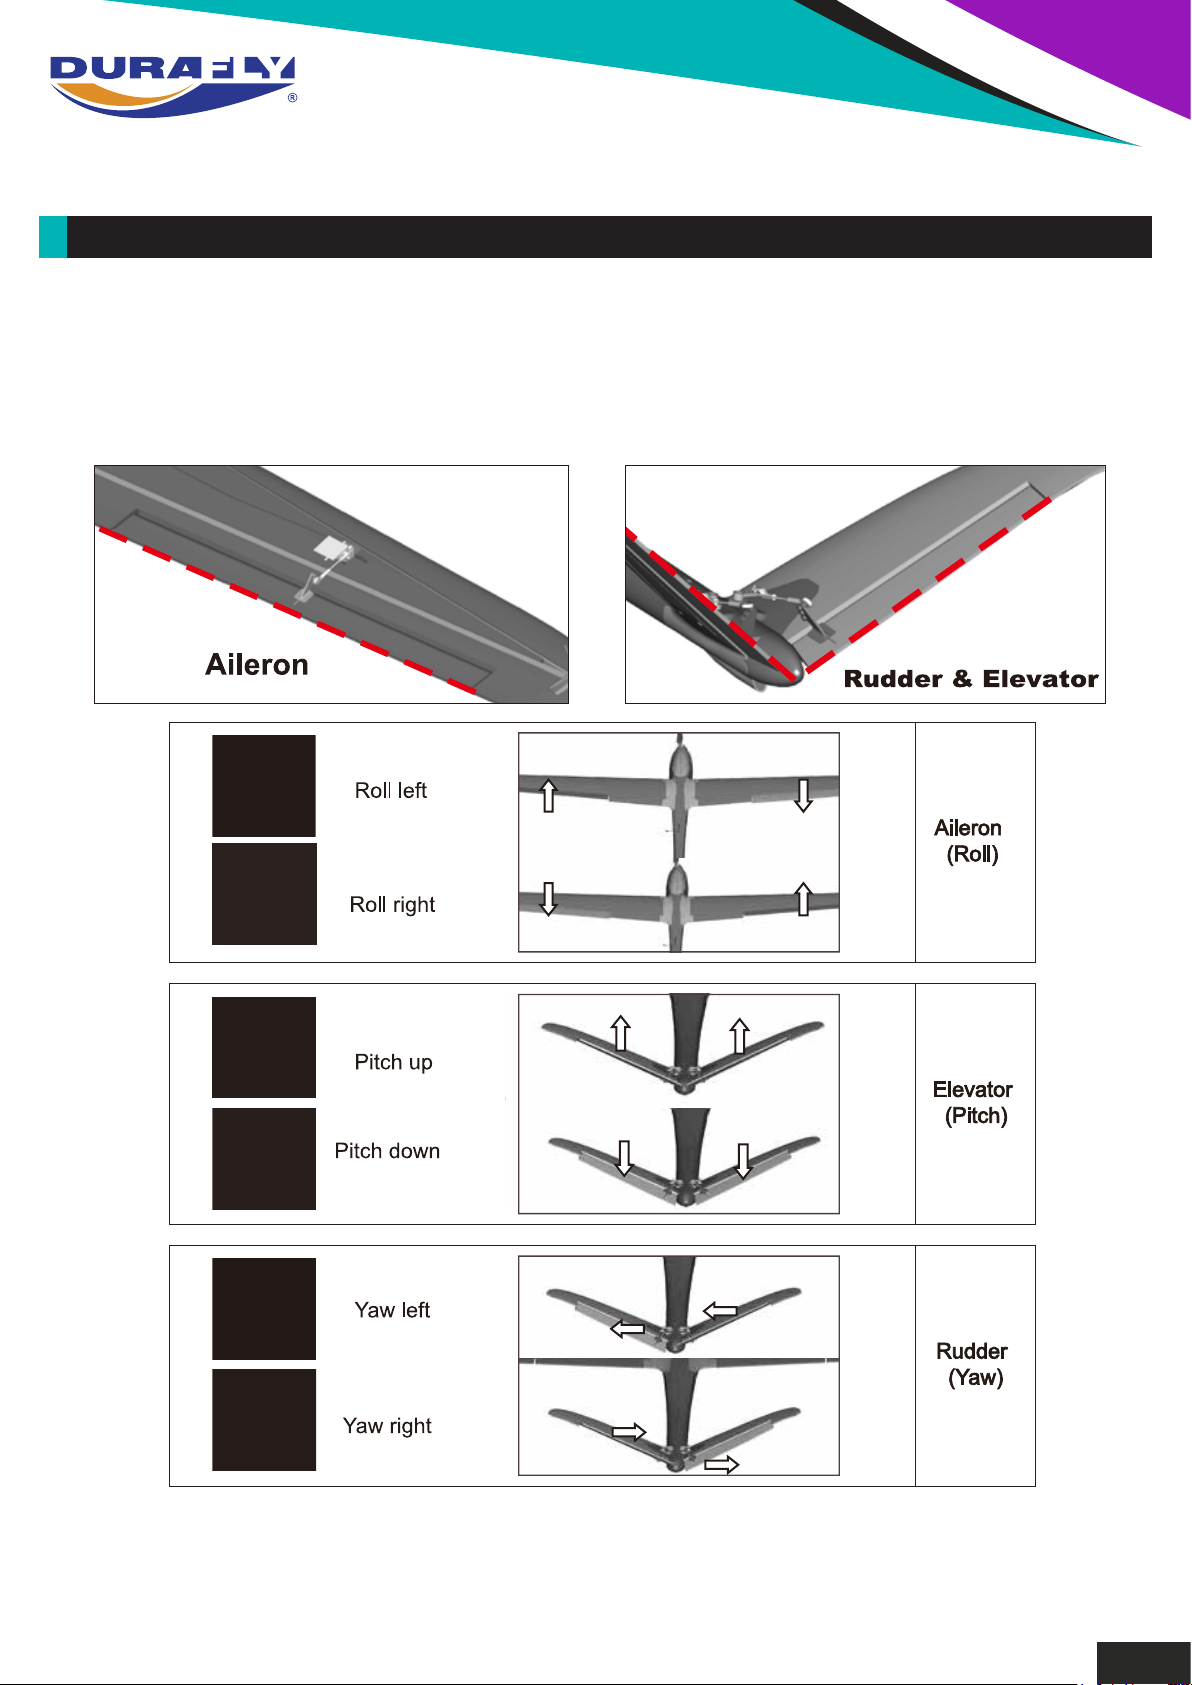
SETTING UP YOUR MODEL:
1.With your receiver installed and servos plugged into their corresponding channels, connect the flight
battery to the ESC to power up the electronics. With the model now armed, ensure all servos are
centered and al control surfacees are level. If not, adjust by turning the control clevis’s by hand
accordingly until the control surfaces are level as shown.
Note:
For Safely reasons, it is advised that this is done with the prop removed from the model.
2.The Excalibur V2 handles exceptionally well in flight, and that's not down to a good design alone, but a
good pre-flight set-up as well. Before you fly your Excalibur V2, please follow the recommended settings
as shown below for optimum handling and performance.
6
Page 9
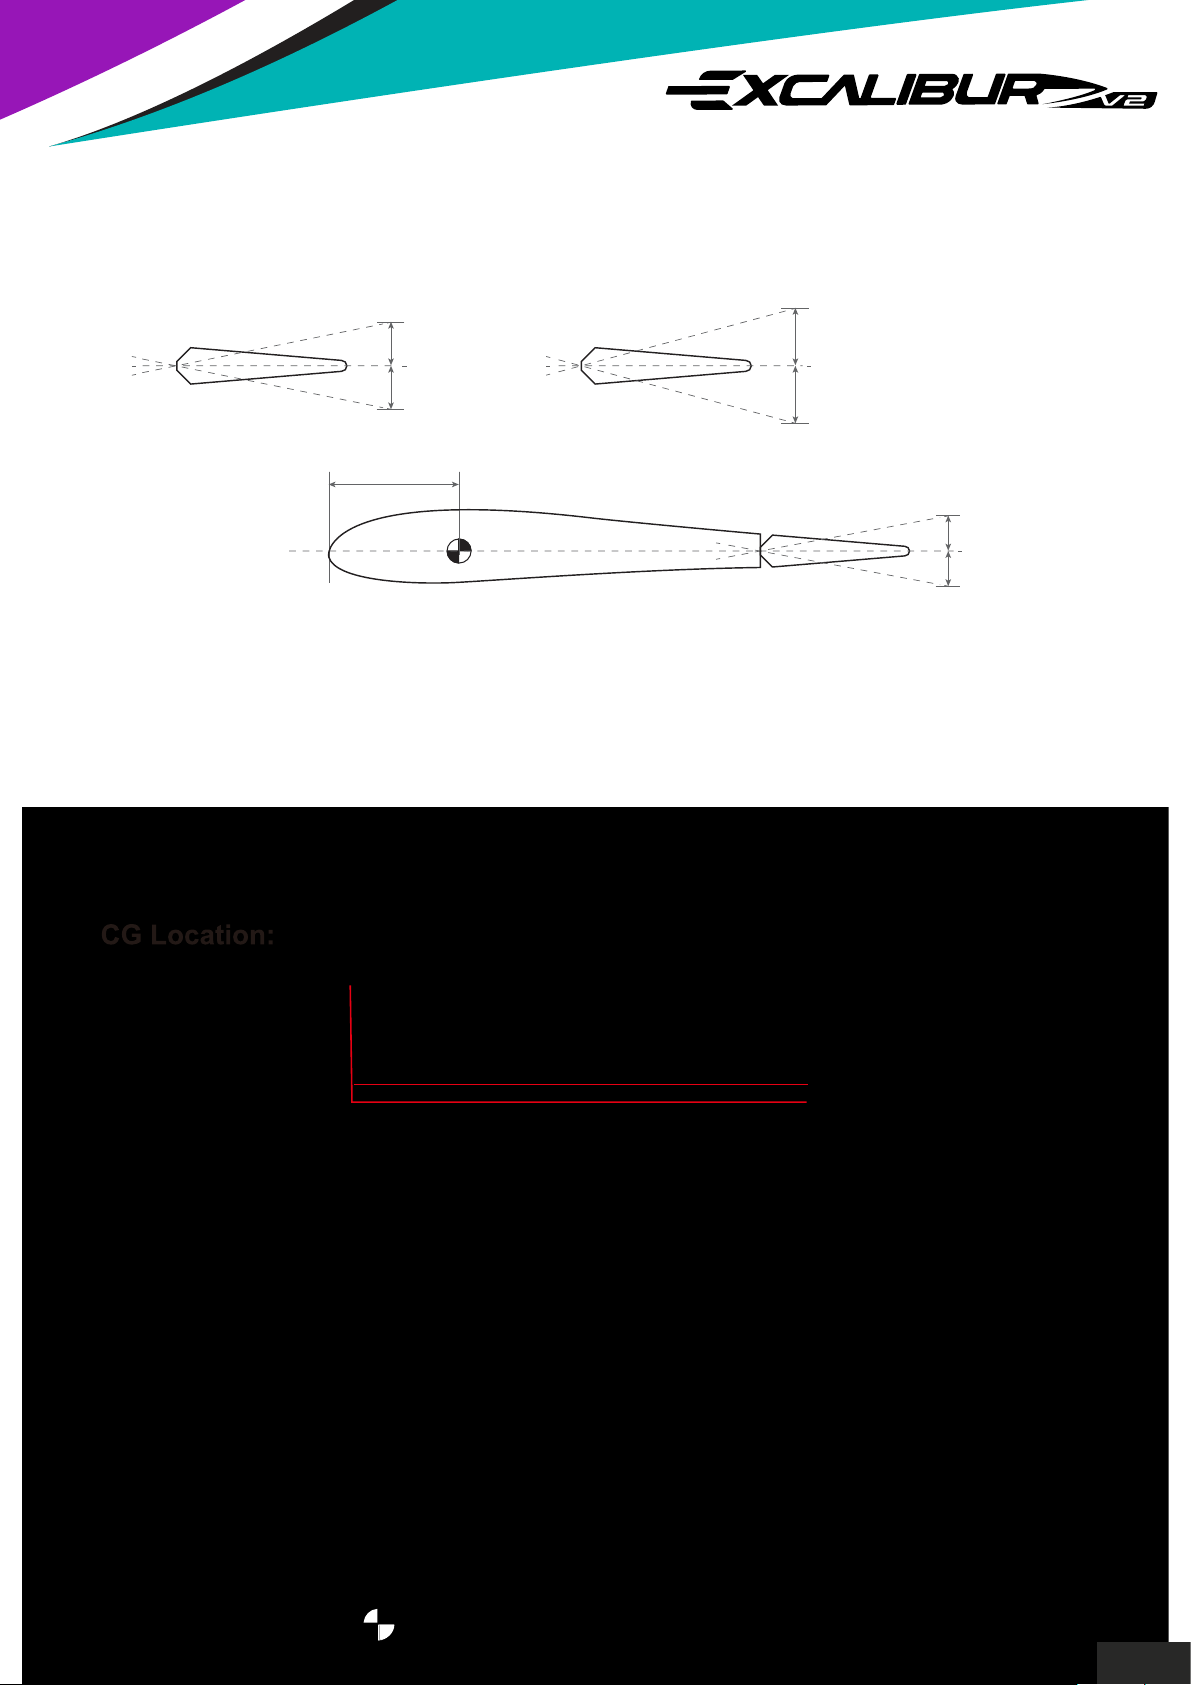
CONTROL THROWS:
6-10mm
6-10mm
6-12mm
6-12mm
Elevator
Rudder
20-25mm~
Aileron
10-15mm
10-15mm
*Elevator ‘low rates’ 6mm ‘high rates’ 10mm in either direction from neutral.
*Rudder ‘low rates’ 6mm ‘high rates’ 12mm in either direction from neutral.
*Aileron ‘low rates’ 10mm ‘high rates’ 15mm in either direction from neutral.
3.The recommended center gravity (CG) for the Excalibur V2 is approximately 20-25mm from the wings
leading edge when measured along the plastic of the wing fairing at the center. Your Excalibur V2 should
balance within this range when using anything from a 1800mAh to a 2200mAh 4S 40-65C LiPo batterry
when installed directly under the canopy hatch.
20-25mm from center leading edge.
7
Page 10
ADDITIONAL PARTS INCLUDED:
Your Excalibur V2 comes with several additional plastic parts included in the box, ‘Slope nose
cone’ and fuselage ‘Crash kit’. Both are detailed below:.
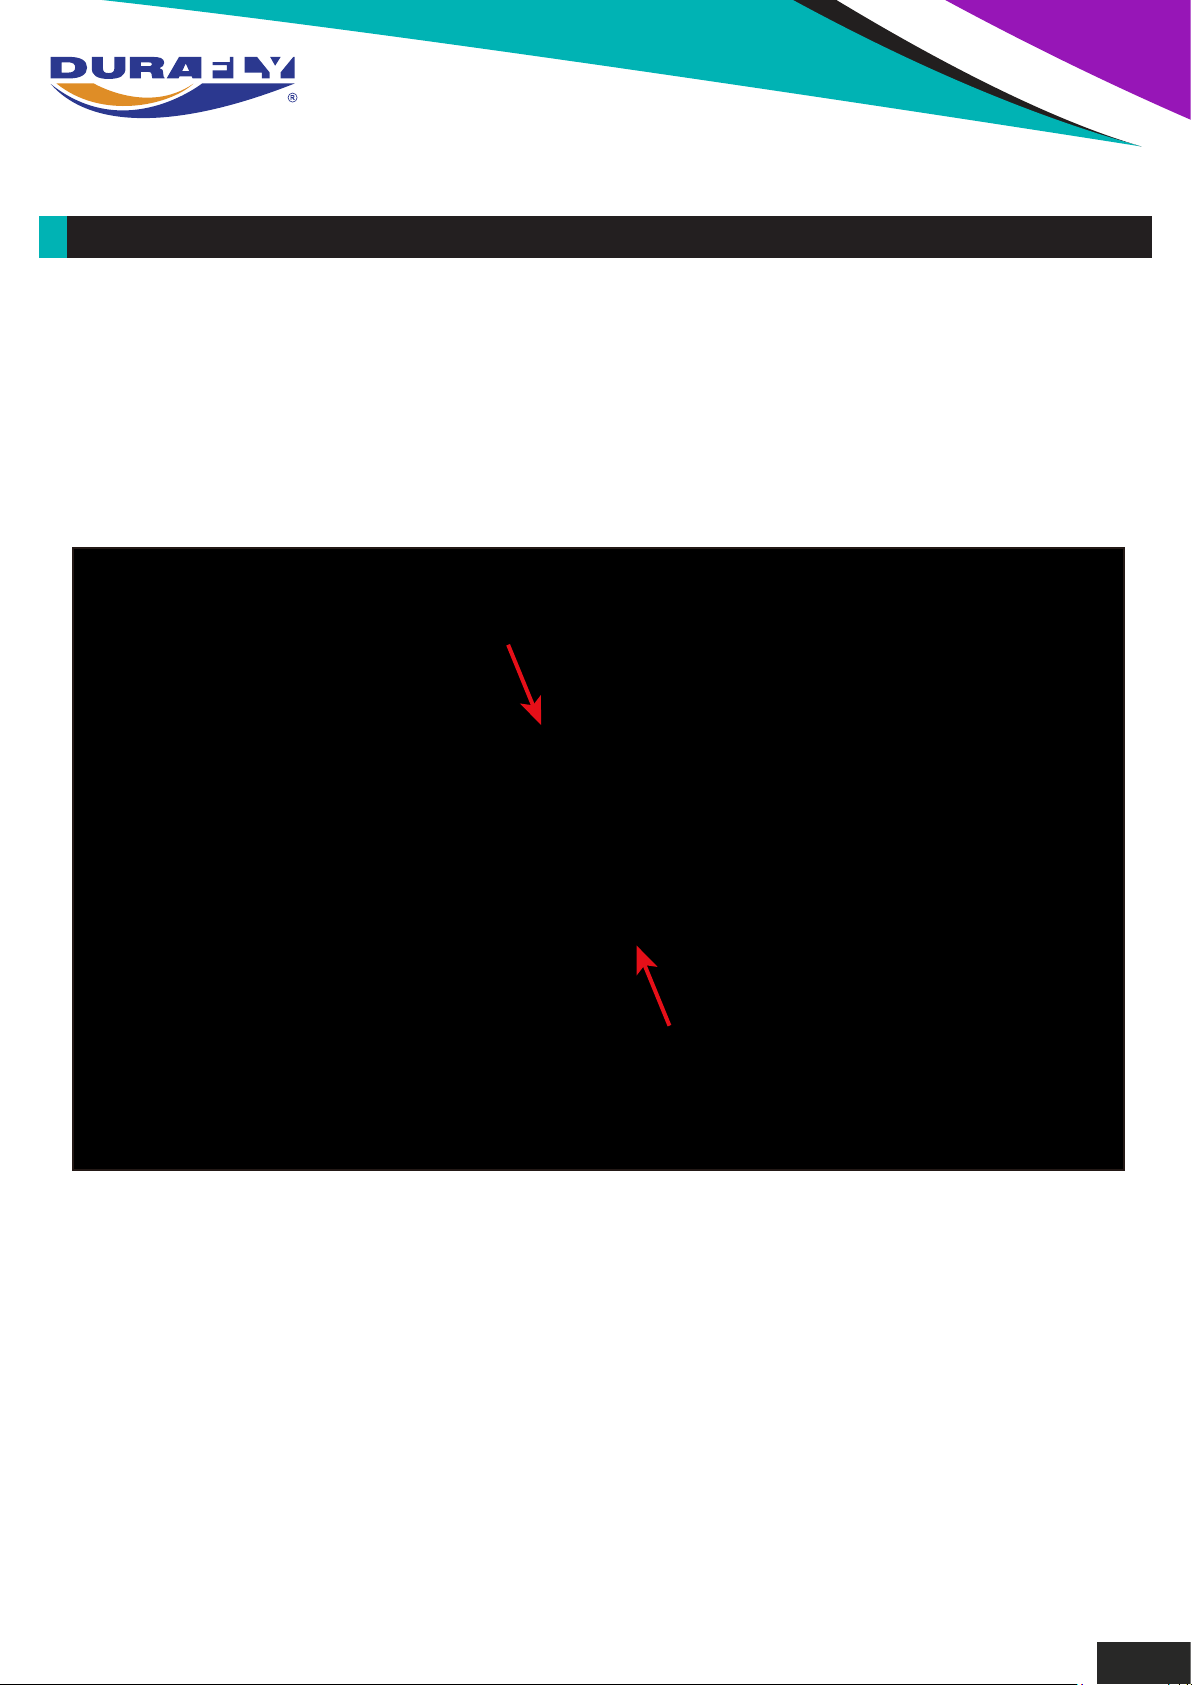
1.In the event of a hard crash or ground loop etc, you may find the ‘fuselage patch kit’ parts helpful if you
find any evidence of a split or crack in the foam around the frontal fuselage area. These are designed to
act as a temporary fix however. Its always best to replace the fuselage entirely, though these should see
you through while you wait for the new fuselage to arrive. Using contact type glue (UHU recommended)
and following the shape of the fuselage, glue the side panels in place as shown below (A) and leave until
the glue has fully cured.
A.
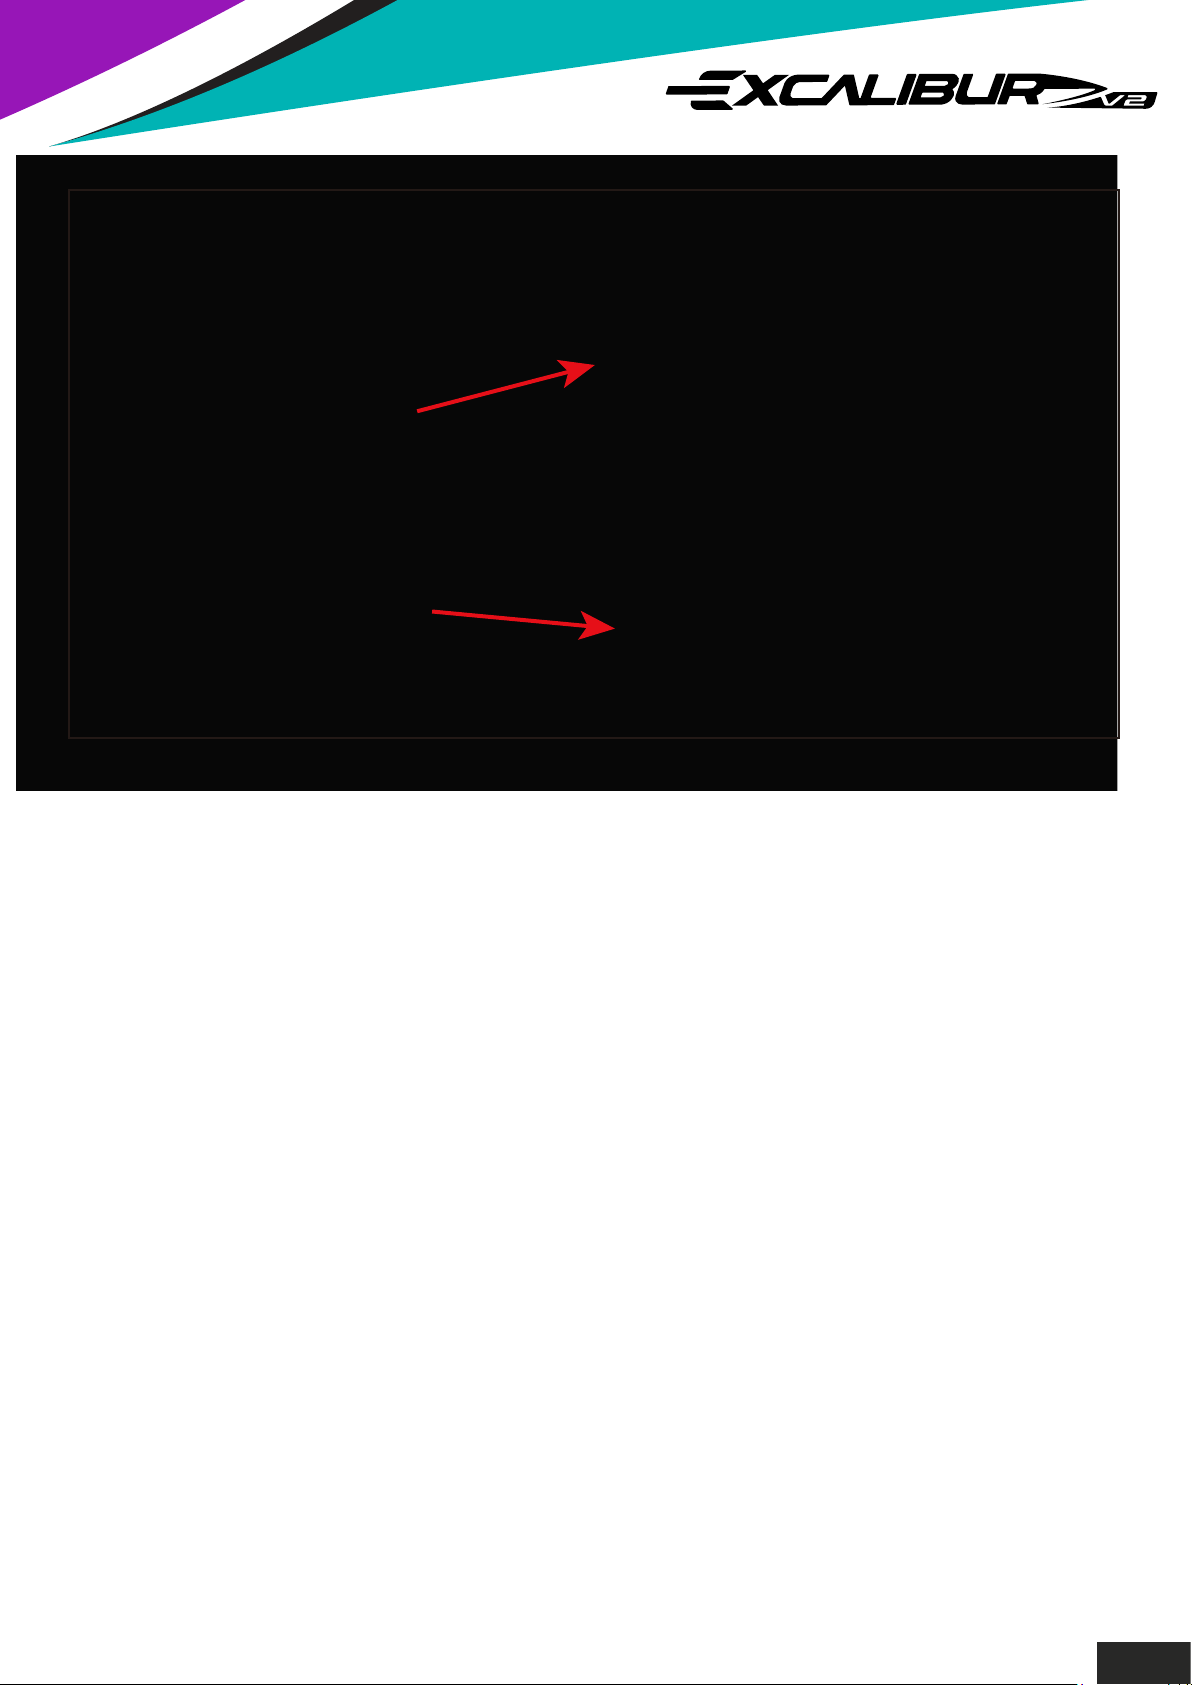
2.If you are fortunate enough to have access to a good moderate to strong wind slope site, you will
definitely want to slope the Excalibur V2. In fact after you slope soar it you may never want to fly it with
power again! To help streamline the Excalibur V2 and turn it into a sloping dream machine, we’ve
included a slope nose cone. Simply remove the prop and spinner and position the nose cone over the
front of the fuselage and secure in place with some clear tape (A). You can even use your regular
powered flight LiPo to run the BEC of the ESC.
8
Page 11
A.
With assembly and set-up now complete, your Durafly Excalibur V2
should now be ready for flight. However we recommend your read
and follow the advice given in the following pages of
this manual before flying your model.
9
Page 12

ADDITIONAL PARTS INCLUDED:
● Select your flight area carefully. Always choose an open space that is unobstructed from trees and
buildings and away from crowded areas. Avoid flying in area’s with roads, electric/telephone poles/wires
and water near by or within close proximity to full size air traffic.
● Do not fly this model in poor weather. High winds, low visibility, inclement temperatures, rain and storms
are to be avoided.
● Never attempt to catch this model whilst in flight. Even a slow moving model can cause harm to yourself
and others, and risks damage to the model.
● This model is recommended for children no younger than 14 year old. All children, no matter what age,
should always be supervised by a capable and responsible adult when operating this model.
● Always unplug your model battery when not in use. Never leave the battery installed in the model.
● Remember to keep clear of the propeller at all times when your flight battery is connected.
● Before flying, always turn on your transmitter first then plug your flight battery into the model.
● After flying, always unplug your flight battery first then turn off your radio transmitter.
● Exercise caution when charging your batteries, and follow in full your battery manufacturers safety
guidelines when doing so.
PRE-FLIGHT CHECKS
1. Always range check your model before any flight (especially when flying a new model for the first
time). Follow your radio manufacturers guidelines for performing this check.
2. Check that all screws and mounting points are firmly secured, including control horns,
quick-keepers, and ball links.
3. Only fly with fully charged batteries (both in your radio and model). Failure to do so could result
in loss of control, damage
batteries are fully charged.
4. With the model powered up (transmitter on first, then receiver/model) check that all surface are
free from damage/obstructions, moving in the correct directions and freely with stick input.
5. Inspect the model and prop for any damage that may have occurred during transit and listen for
any unusual sounds from the electronics when powered up. If in doubt, do not fly.
6. With the model held securely and the prop free of obstructions, increase the throttle just slightly
to confirm the rotation of the prop is correct. The model should want to pull straight forward with
throttle.
to the model and/or persons/property around you. Check your
7. If this is your first flight with the model double check that the C/G is in the correct position. If not
adjust battery position inside the model accordingly.
8. If you are an inexperienced model pilot seek the help and assistance of an experienced pilot to
perform these final checks and to test fly the model for you.
10
Page 13

ADDITIONAL PARTS INCLUDED:
The Durafly Excalibur V2 is both an easy and impressive aircraft to fly and has no special
considerations when it comes to flying. But, do make sure you’ve followed the set-up guidelines
and recommendations in this manual thoroughly for the best flying experience.
As powered gliders go, the Excalibur V2 is in fact an extremely versatile air frame. Out of the
box you will already have an abundance of climb, maneuverability, and power on the supplied
upgraded13x8 propeller. See the Excalibur V2 really push the boundaries as an impressive hot
liner! An 1800-2200mah 4S will give flight times from 4 minutes of continual powered flight, or
up to 15mins with mixed throttle flying. Mixed throttle flying is really where it's at with the
Excalibur V2. Full power climbs will get you to the cloud base in seconds, and a quick flick of
the sticks has you coming back down again in either a powered or none powered dive, either
way it will be blisteringly fast and rock solid all the way. Or, remove the prop completely and
you've got yourself a ready to run high energy slope machine with the included optional slope
nose cone, the set-up is exactly the same.
When it does come to time to land, the Excalibur V2 does as all good gliders should and that's
glide. So to bleed speed and reduce height when landing, fly an 'S' type approach or mix
flapperons into your model. The Excalibur V2 will remain responsive throughout the speed
range, all the way down to the ground.
EXCALIBUR TIPS:
● For optimum flight performance/model longevity, it is highly recommend that you always fly with
a balanced prop. The supplied prop should be balanced, but it’s always good to check first.
● Keep all leads within the fuselage area as tidy as possible. Tidy wires look better, allow for easier
access to all internal components, better battery installation, increased airflow around electronics
and a reduction in potential electronic signal interference (noise).
11
Page 14
● Do not leave your model in direct sunlight for prolonged periods of time. This will have an
adverse effect on the foam surface of the model.
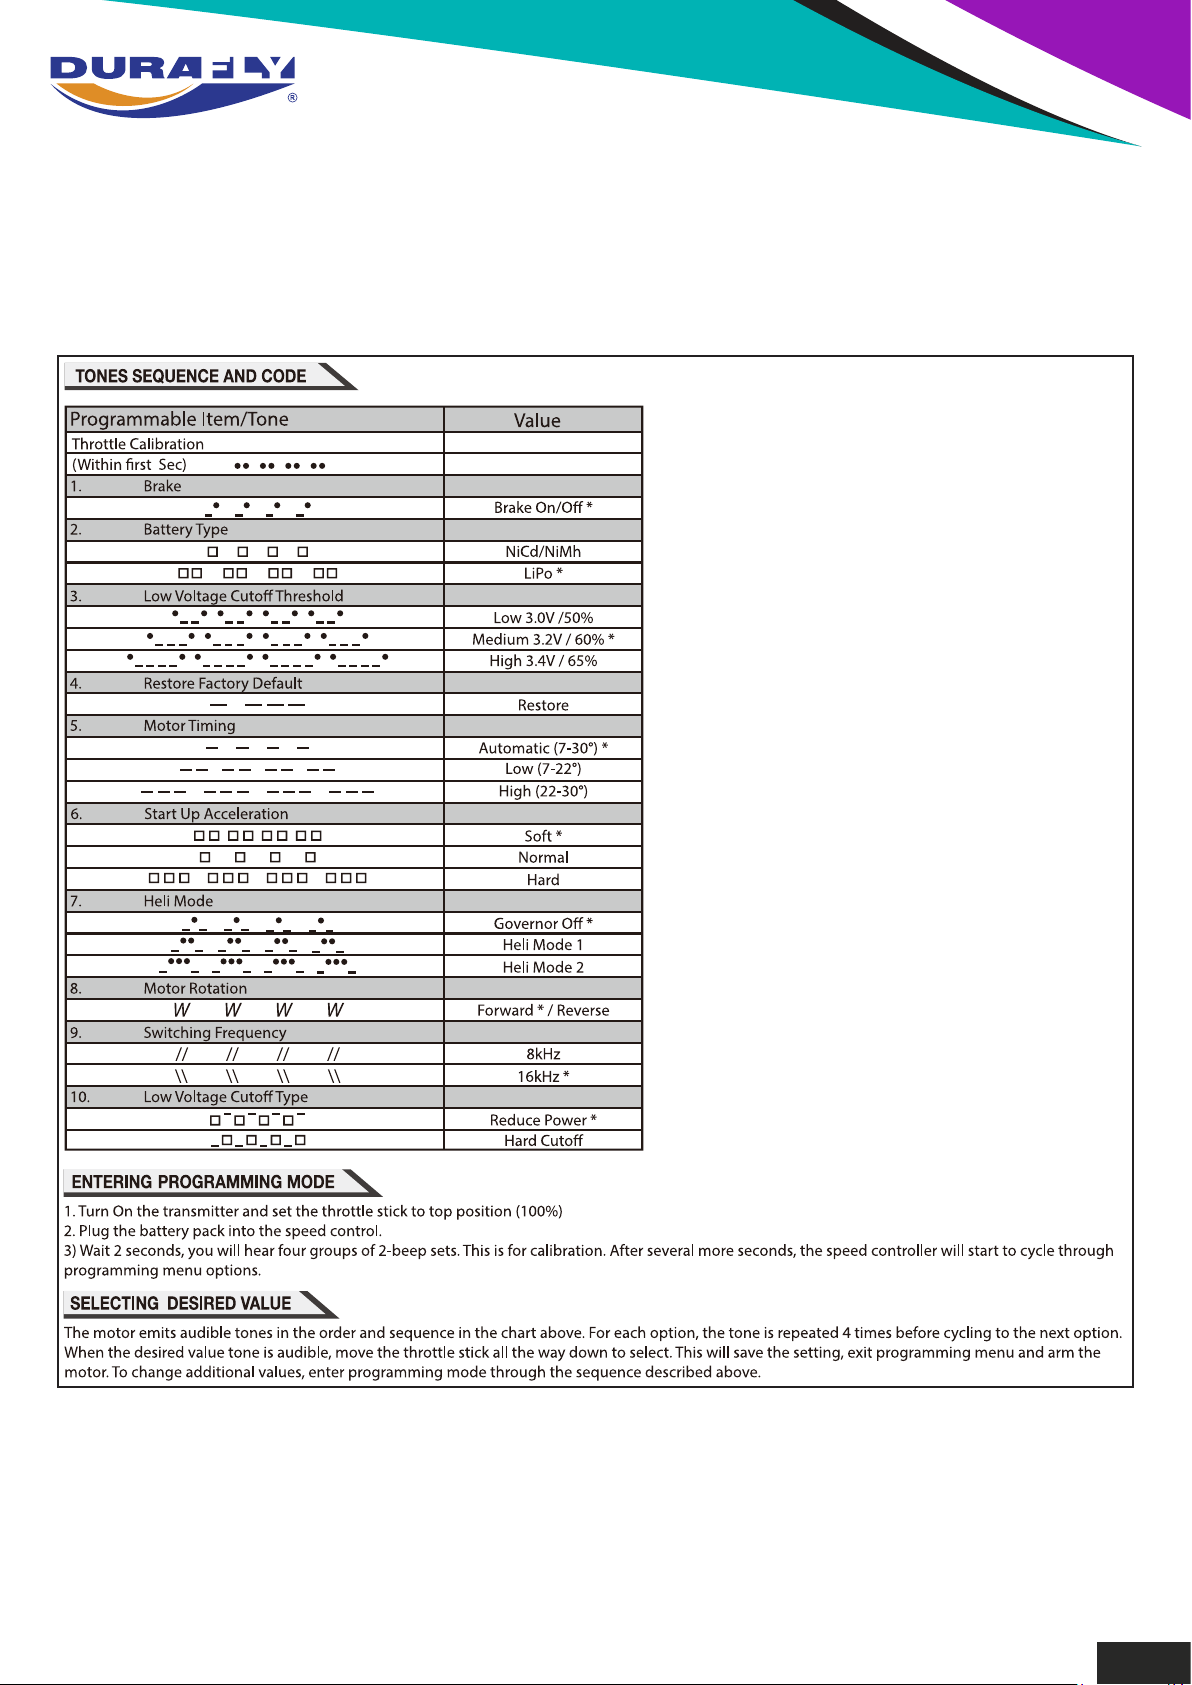
● Set ‘Brake On’ on the ESC if it is not done so already out of the box. The prop will not fold if the
brake is not set to ‘On’. To set the brake ‘on’ use the Durafly or Aerostar programming card (see
spare parts listing) or follow the below instructions:
Thank you again for purchasing the Durafly Excalibur,
we know you’ll enjoy it immensely.
Don’t forget, spare parts are available for this model,
please see opposite for details.
12
Page 15
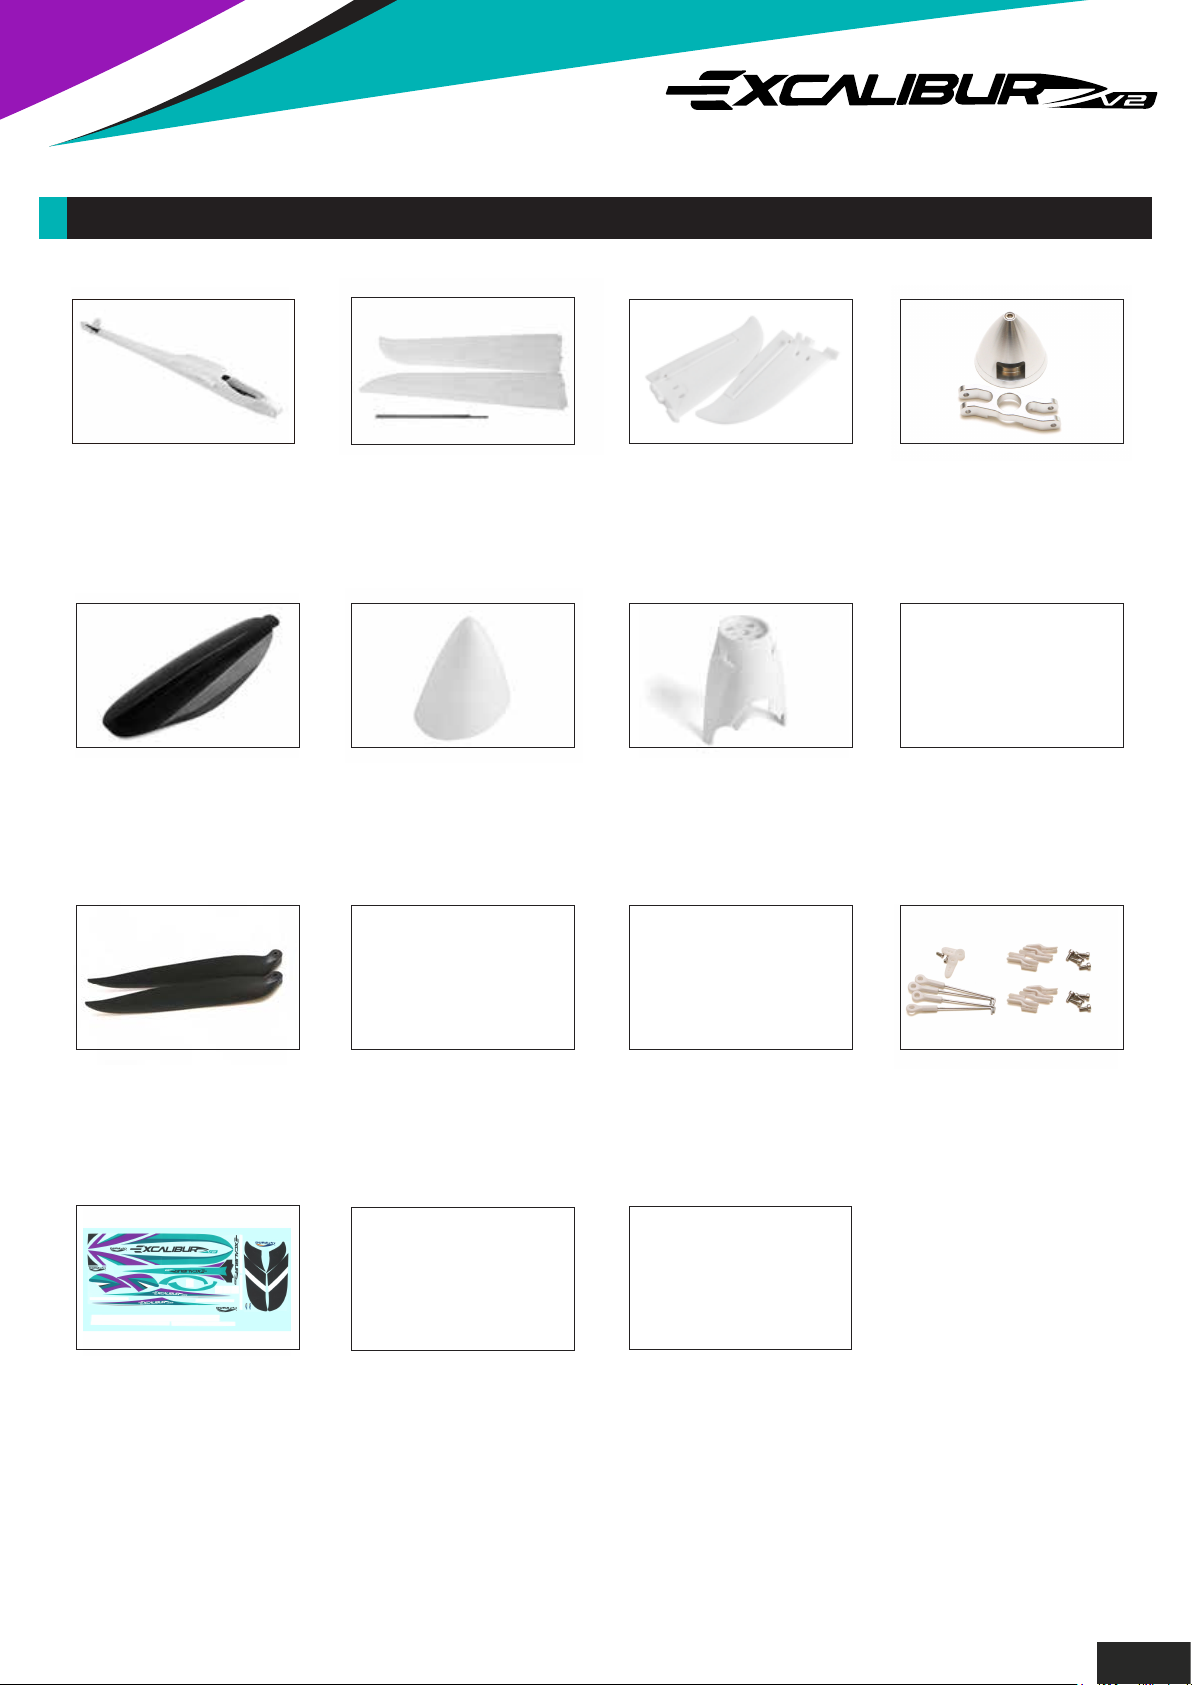
SPARE PARTS LISTING:
Fuselage
Part No:
SKU:9499000410-0
Canopy/hatch
Part No:
SKU: 9499000130-0
Main Wing Set
Part No:
SKU: 9499000412-0
Slope Nose Cone
Part No:
SKU: 9499000132-0
V-Tail Set
Part No:
SKU: 9499000129-0
Cowl
Part No:
SKU: 9499000133-0
Spinner
Part No:
SKU: 9499000413-0
Top Tail Plate
Part No:
SKU: 9499000134-0
13x8 Prop Blades
SKU: 9499000414-0
Part No:
Decal Set
Part No:
SKU: 9499000411-0
Aerostar 3542-800KV
Brushless Motor
Part No: SKU: 9499000136-0
Durafly ESC card
Part No:
SKU: 9164000024-0
Prop Adapter
Part No:
SKU: 9499000137-0
Aerostar ESC card
Part No:
SKU: 9164000041-0
Control Accessory Set
Part No:
SKU: 9499000415-0
13
Page 16
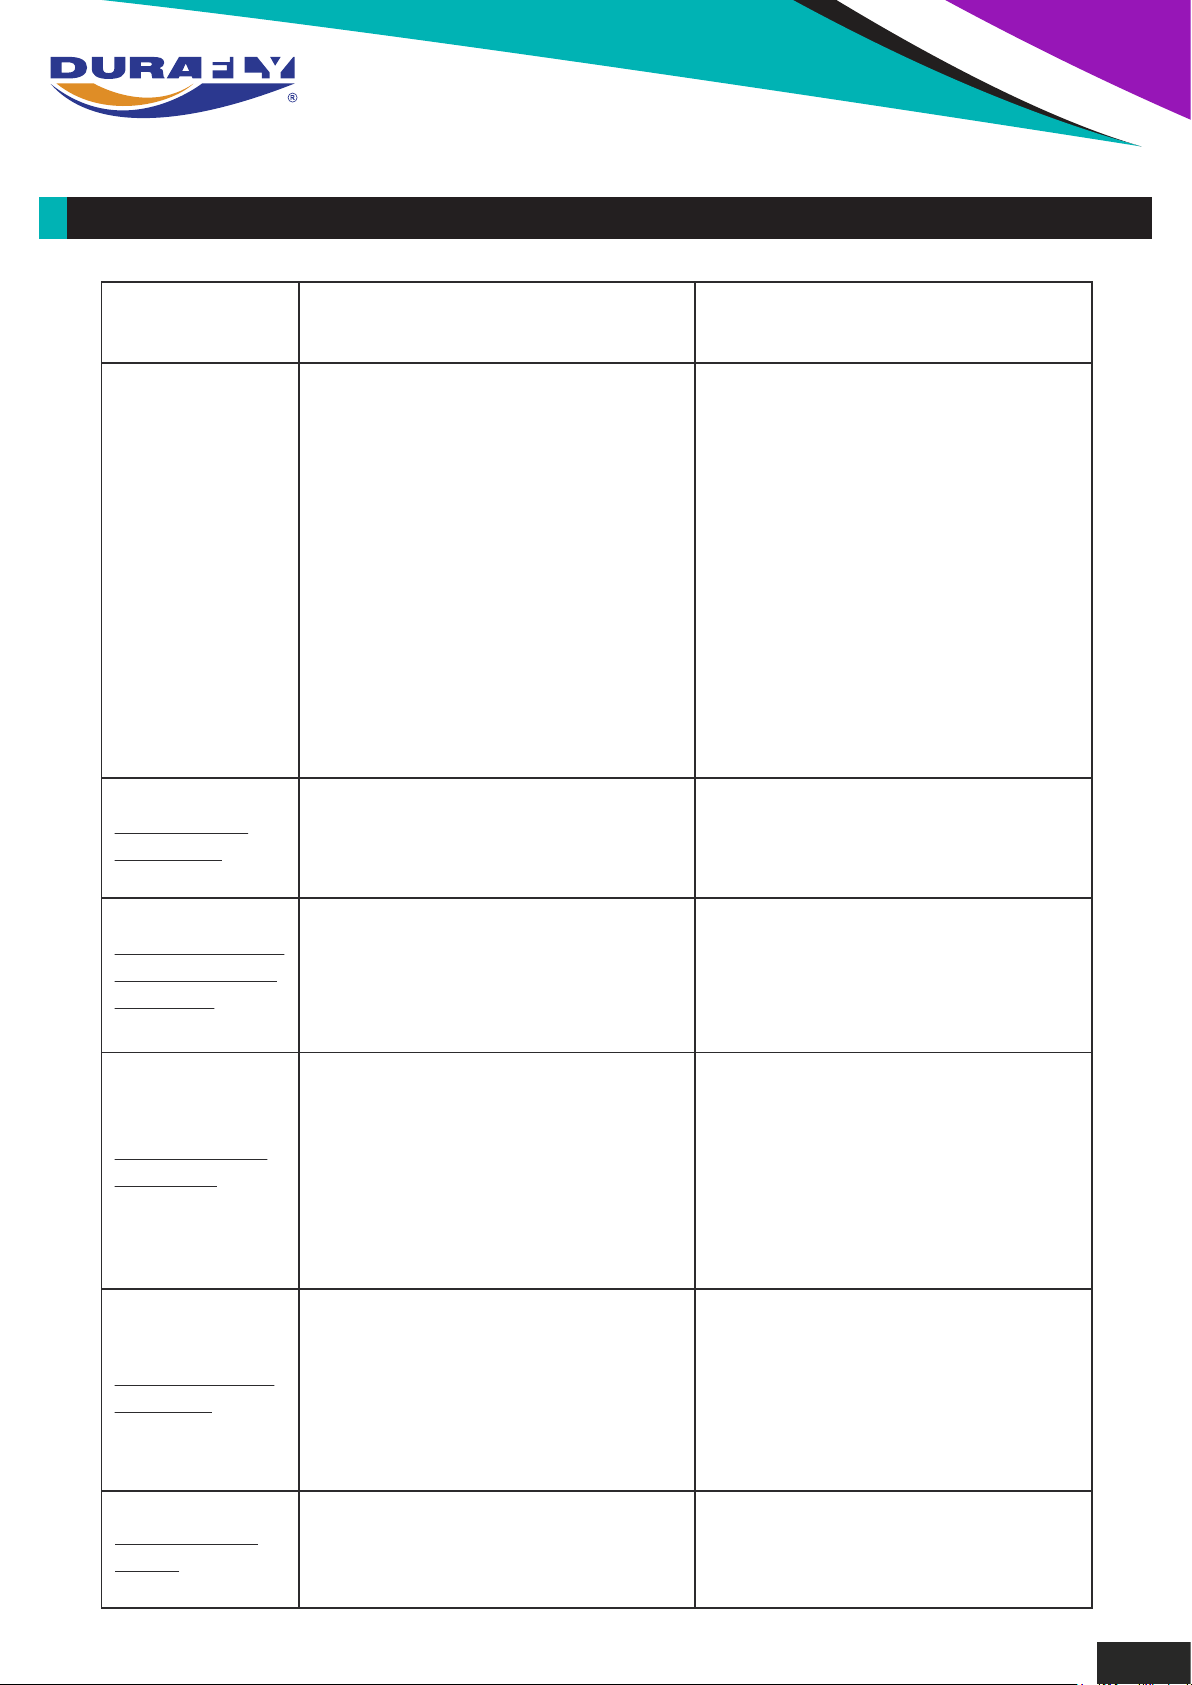
TROUBLE SHOOTING:
Problem Cause Solution
Motor does
not turn
Model moves
backwards
Control surfaces
not moving with
stick input
1. Battery is not fully charged.
2. Transmitter battery low.
3. Motors not connected.
4. The motor is damaged.
5. Receiver is not bound to Tx.
6. ESC in set-up mode.
1. Prop installed backwards 1. Swap the props around.
1. The servo lead is connected
to Rx incorrectly.
2. The servo is damaged.
1. Charge the batteries.
2. Install a full charged battery.
3. Check for connection
between the ESC and motor.
4. Replace motor.
5. Consult Radio manual and
go through bind procedure
again.
6.
Hold model and move
throttle to full position then
back down to idle.
1. Make sure the servo leads
are connect properly.
2. Replace servo.
Model does not
fly straight
Model does not
climb well
Limited Radio
Range
1. Control surfaces not centered.
CoG is not in the correct position.
2.
1. The battery is not fully charged.
2. Elevator servo is reversed.
3. CG too far backwards.
1. Transmitter/Receiver batteries
are flat.
1. Adjust the trims on the
transmitter.
2. Re-position lipo as
suggested.
1. Charge the battery.
2. Change servo direction via Tx.
3. Move battery forwards.
1. charge/replace batteries.
14
Page 17

UK REP
EC REP
APEX CE SPECIALISTS LIMITED
M1 4HT, UK
APEX CE SPECIALISTS LIMITED
 Loading...