

Page 1
18MM34100
Page 2
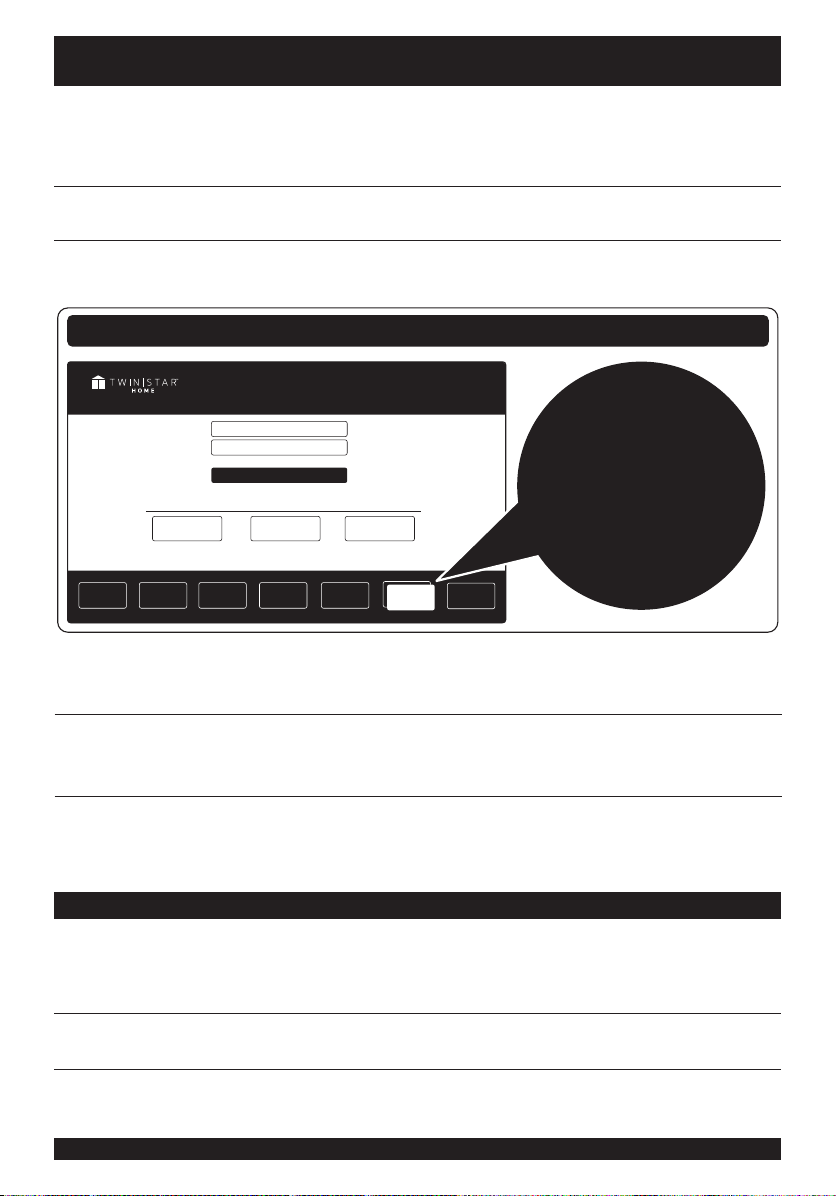
REGISTER YOUR NEW PURCHASE online!
INSCRIRE VOTRE NOUVEL ACHAT • REGISTRAR SU NUEVA COMPRA
Thank you for purchasing our product. Please take a moment to
visit tsicustomerservice.com to register your new purchase:
Merci d’avoir acheté ce produit. Veuillez prendre un court instant pour vous
rendre sur tsicustomerservice.com et enregistrer votre nouvel achat :
Gracias por adquirir nuestro producto. Tómese un momento para visitar
tsicustomerservice.com y registrar su nueva adquisición:
tsicustomerservice.com
Customer Service Portal
Twin-Star Customer Service online resource to Order Parts,
Login
Product
Manuals
New Registration
Product Registration, and to request Product and General Information
log in >
FAQs Help Videos
Manufacturer
Warranty
Order
Tracking
Product
Registration
Retailers
Returns
DON’T FORGET TO
REGISTER YOUR PRODUCT
ONLINE TO RECEIVE SPECIAL
OFFERS, TIPS AND MORE!
N’OUBLIEZ PAS D’ENREGISTRER VOTRE PRODUIT EN LIGNE
AFIN DE RECEVOIR DES OFFRES SPÉCIALES,
DES CONSEILS ET PLUS ENCORE!
NO OLVIDE REGISTRAR SU PRODUCTO EN LÍNEA
PARA RECIBIR OFERTAS ESPECIALES,
CONSEJOS Y MÁS!
When registering your product, be sure to sign up for our updates to receive important service information and helpful tips.
We value your privacy and will never share your personal information with other organizations. The information you submit is
used only for providing product related services to you.
Lorsque vous enregistrez votre produit, assurez-vous de vous inscrire à nos mises à jour an de recevoir d’importantes
informations concernant les services et de précieux conseils. Nous accordons de l’importance à votre vie privée et nous ne
communiquerons jamais vos informations personnelles à d’autres organisations. Les informations que vous fournissez sont
utilisées uniquement pour vous offrir des services en lien avec les produits.
Si vous n’êtes pas en mesure d’effectuer l’enregistrement, conservez votre preuve d’achat pour le remplacement de pièces.
Cuando registre su producto, asegúrese de suscribirse para recibir actualizaciones importantes sobre el servicio y consejos
útiles. Valoramos su privacidad y no compartiremos su información personal con otras organizaciones. La información que
envíe se usará solo para proporcionarle servicios relacionados con el producto.
DEPENDABLE CUSTOMER SERVICE • SERVICE À LA CLIENTÈLE • ATENCIÓN AL CLIENTE CONFIABLE FIABLE
Questions?
Call customer service Monday to Friday 8:30 am – 5:30 pm EST.
Appelez le service à la clientèle Lundi – Vendredi 8h30 – 17h30 (HNE)
Llame al servicio de atención al cliente. De lunes a viernes de 8:30 a.m. a 5:30 p.m.(hora estándar del este)
18MM34100REV1.0
|
Des questions?
1.800.318.9373
2
|
¿Tiene preguntas?
Page 3

PRODUCT DETAILS AND NOTES
DÉTAILS ET NOTES DU PRODUIT/DETALLES DEL PRODUCTO Y NOTAS
Place of purchase/Lieu de l’achat/Lugar de compra:
Date of purchase/Date de l’achat/Fecha de compra:
Model #/No de modèle/Número de modelo:
Notes/Remarque/Notas:
3
18MM34100REV1.0
Page 4
SAFETY
INFORMATION
INFORMATION
DE SÉCURITÉ
INFORMACIÓN DE
SEGURIDAD
Please read and understand this
entire manual before attempting
to assemble, operate or install the
product.
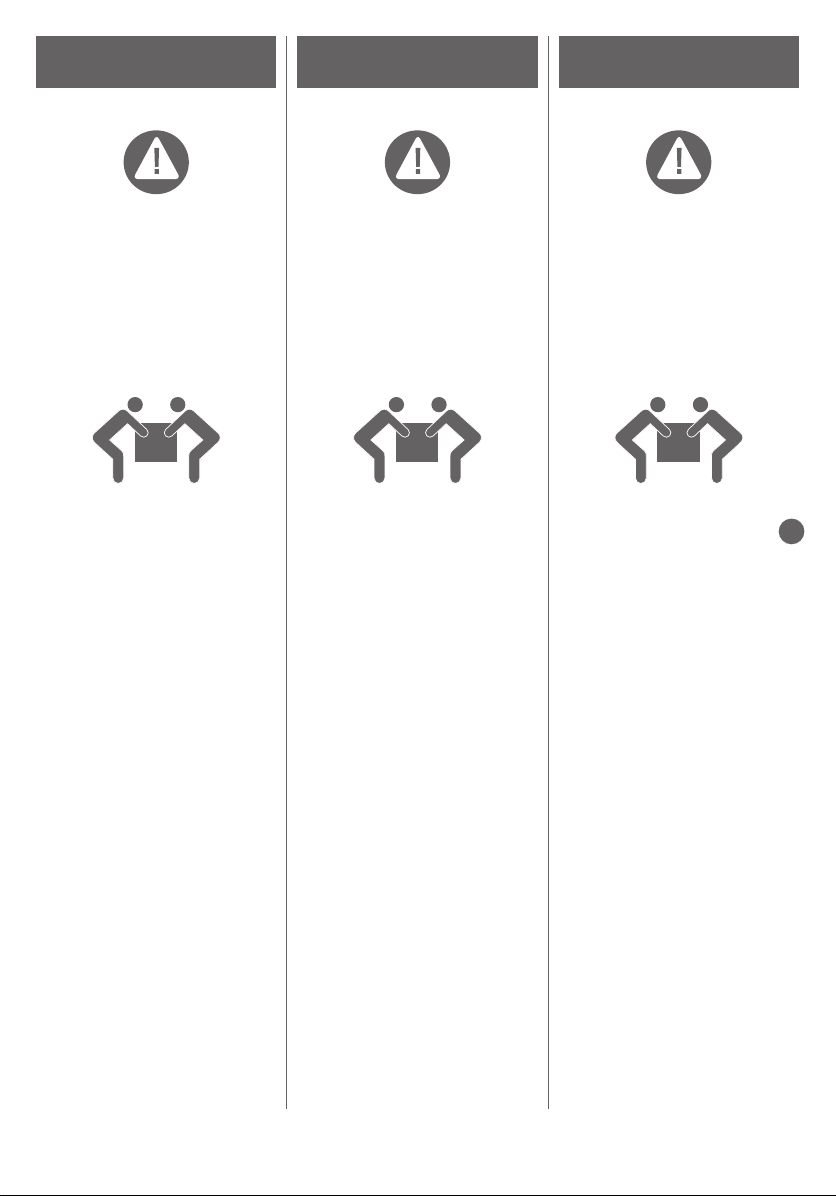
WARNING
• Some steps are more easily handled
with two adults.
CAUTION
• Before assembly and/or installation,
carefully unwrap all parts.
• Locate and set aside the hardware
kit before discarding packaging.
• Use care when assembling your
new product. Take your time and
follow assembly instructions closely.
Assurez-vous de lire et de comprendre
l’intégralité du présent manuel avant
de tenter d’assembler, d’utiliser ou
d’installer le produit.
AVERTISSEMENT
• Certaines étapes sont plus facilesà
effectuer avec l’aide.
MISE EN GARDE
• Avant l’assemblage et/ou
l’installation, vous devez déballer
minutieusement toutes les pièces.
• Localisez et mettez de côté le jeu
de quincaillerie avant de jeter
l’emballage.
• Soyez vigilant lorsque vous
assemblez le nouveau produit.
Prenez votre temps et suivez
attentivement ces instructions.
Lea y comprenda completamente
este manual antes de intentar
ensamblar, usar o instalar el
producto.
ADVERTENCIA
• Algunos de los pasos se pueden
realizar con mayor facilidad entre
dos adultos.
PRECAUCIÓN
• Antes del ensamblaje y/o
instalación, desenvuelva
cuidadosamente todas las piezas.
• Localice y separe el equipo de
accesorios antes de desechar el
embalaje.
• Tenga cuidado al ensamblar
el nuevo producto. Tómese su
tiempo y siga detenidamente las
instrucciones de ensamblaje.
I
18MM34100REV1.0
4
Page 5
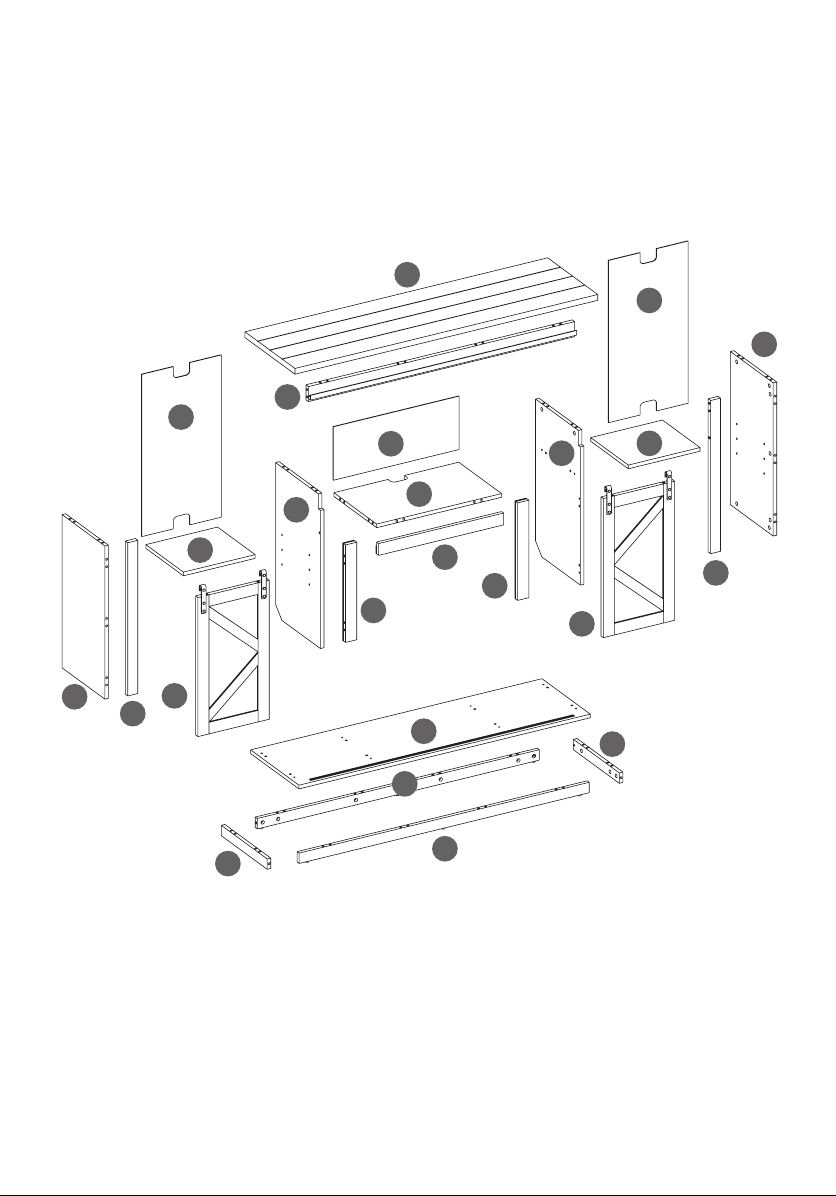
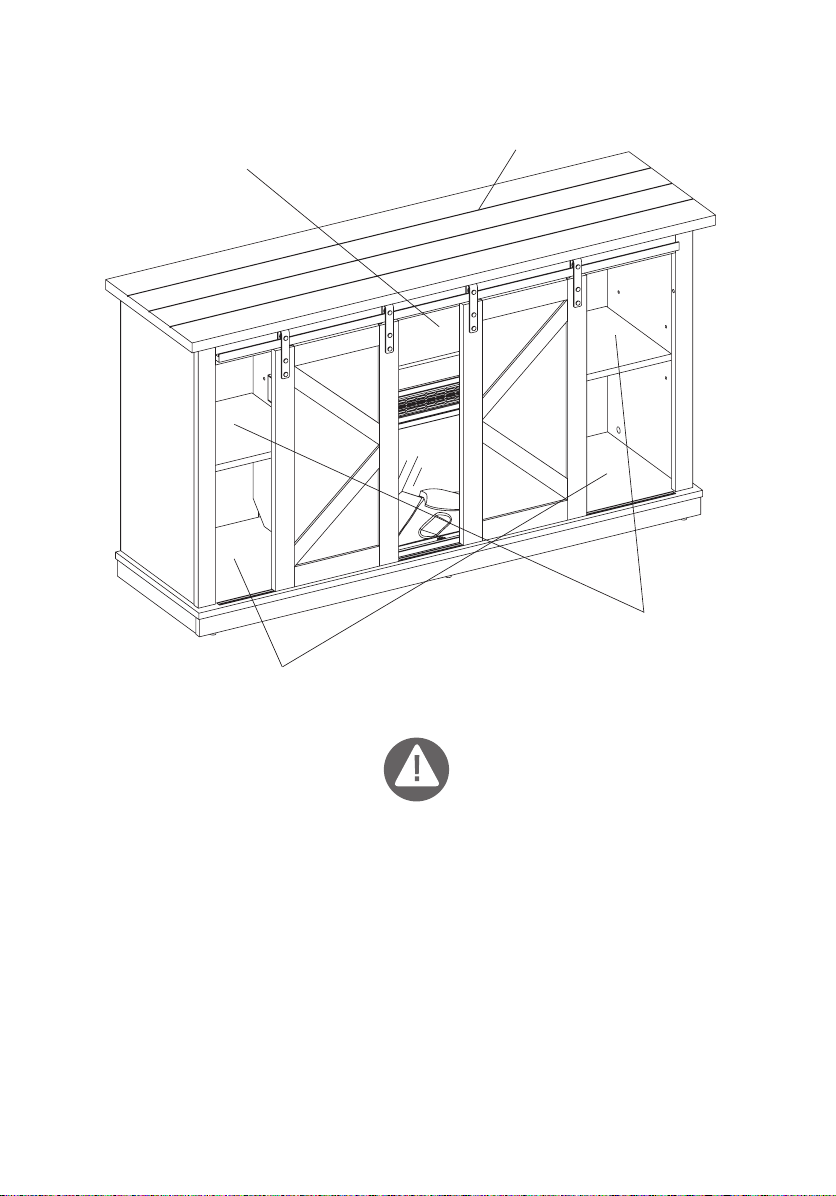
G
I
F
K
I
J
C
H
B
H
E
L
D
Q
R
P
M
O
N
A
T
U
S
V
5
18MM34100REV1.0
Page 6
MAXIMUM LOAD
9.1 kg / 20 lb
CHARGE MAXIMALE DE
9.1 kg / 20 lb
CARGA MÁXIMA
9.1 kg / 20 lb
MAXIMUM LOAD
13.6 kg / 30 lb
CHARGE MAXIMALE DE
13.6 kg / 30 lb
CARGA MÁXIMA
13.6 kg / 30 lb
MAXIMUM LOAD
34 kg / 75 lb
CHARGE MAXIMALE DE
34 kg / 75 lb
CARGA MÁXIMA
34 kg / 75 lb
MAXIMUM LOAD
6.8 kg / 15 lb
CHARGE MAXIMALE DE
6.8 kg / 15 lb
CARGA MÁXIMA
6.8 kg / 15 lb
For use with most at panel televisions weighing 34 kg / 75 lb or less. Usage with televisions or loads heavier
than the maximum weights specied may result in instability causing tip over resulting in death or serious injury.
ATTENTION
WARNING
Destiné à la plupart des téléviseurs à écran at panel pesant 34 kg / 75 lb ou moins. L’utilisation avec des
téléviseurs ou des charges dont le poids dépasse les valeurs spéciées peut entraîner l’instabilité et le
basculement pouvant provoquer la mort ou des blessures graves.
PRECAUCIÓN
Para usar con la mayoría de televisiones de at panel, con peso de 34 kg / 75 lb o inferior. Colocar televisores
o cargas mayores que los pesos máximos especicados puede generar inestabilidad y, en consecuencia,
desplomes que pueden causar la muerte o lesiones graves.
18MM34100REV1.0
6
Page 7
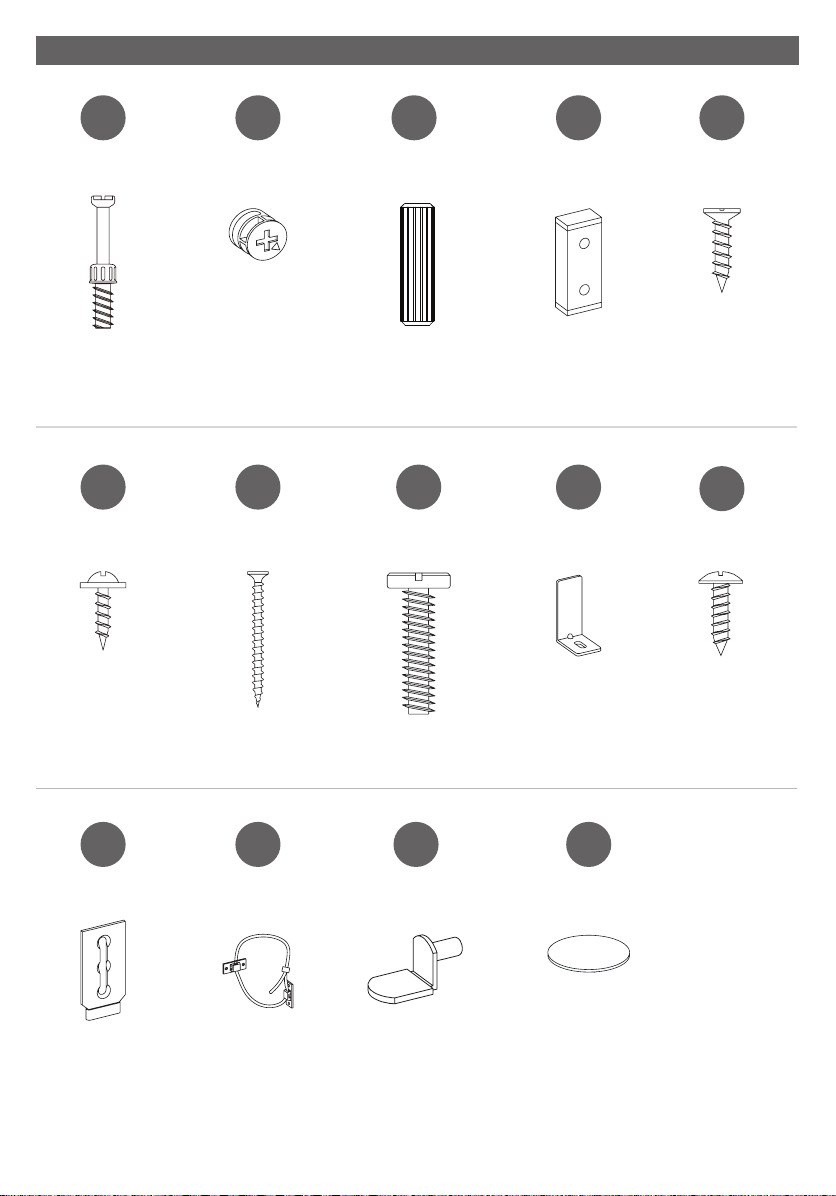
HARDWARE/QUINCAILLERIE/FERRETERÍA
AA EE
[x48]
PH-KDBZNC001
FF
[x36]
BB
[x48]
PH-KDCZNC001
GG
[x4]
CC
[x52]
Ø8x30mm
PH-DWLNTL001 Plate
HH
[x4]
DD
[x4]
II
[x2]
[x6]
Ø3.5x15mm
PH-SCRNKL008
JJ
[x2]
Ø3x12mm
PH-SCRBLK007 PH-BKTBLK007
KK MM NNLL
[x2] [x8] [x18][x1]
PH-BDGBLK001
Ø4x50mm
PH-SCRBLK006
PH-BKTWHT003
Ø6.3x25mm
PH-SPNPCSPLB2 PH-KDPBRW001
7
Ø4x15mm
PH-SCRBLK009
18MM34100REV1.0
Page 8

ATTENTION: Follow instructions in the order they are given below. This will ensure that your product is properly
assembled.
ATTENTION : Suivre les instructions dans l’ordre donné ci-dessous. Cela vous assurera d’assembler
correctement le produit.
ATENCIÓN: Siga las instrucciones en el orden que se indica a continuación. Esto asegurará que su producto
se ensamble correctamente.
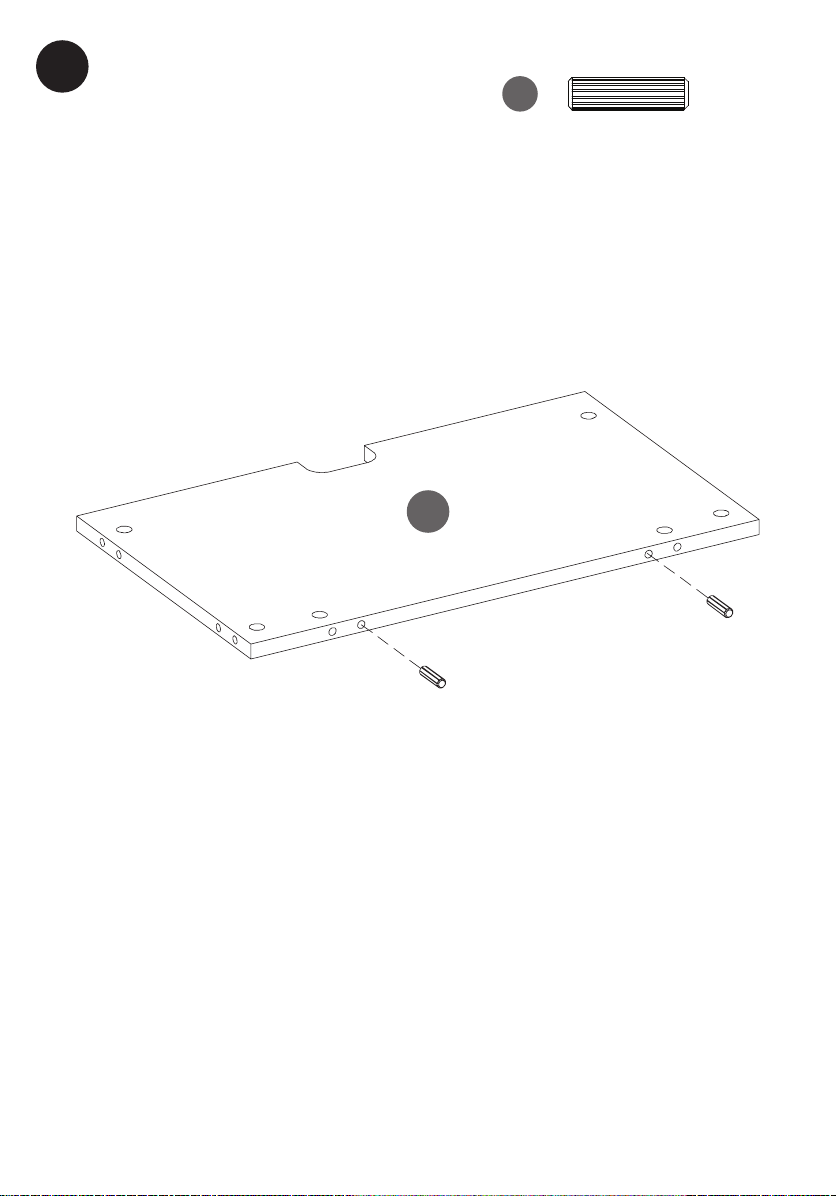
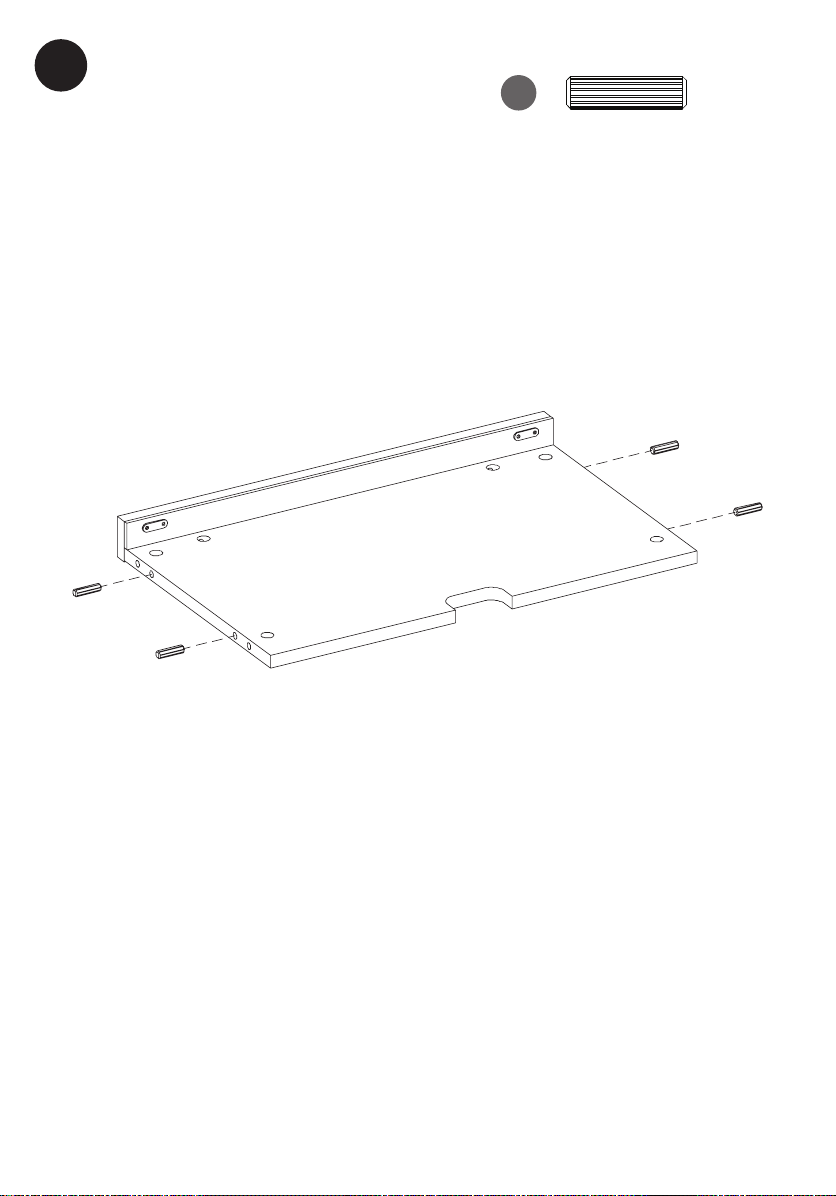
1
AA
[x2]
18MM34100REV1.0
Q
8
Page 9
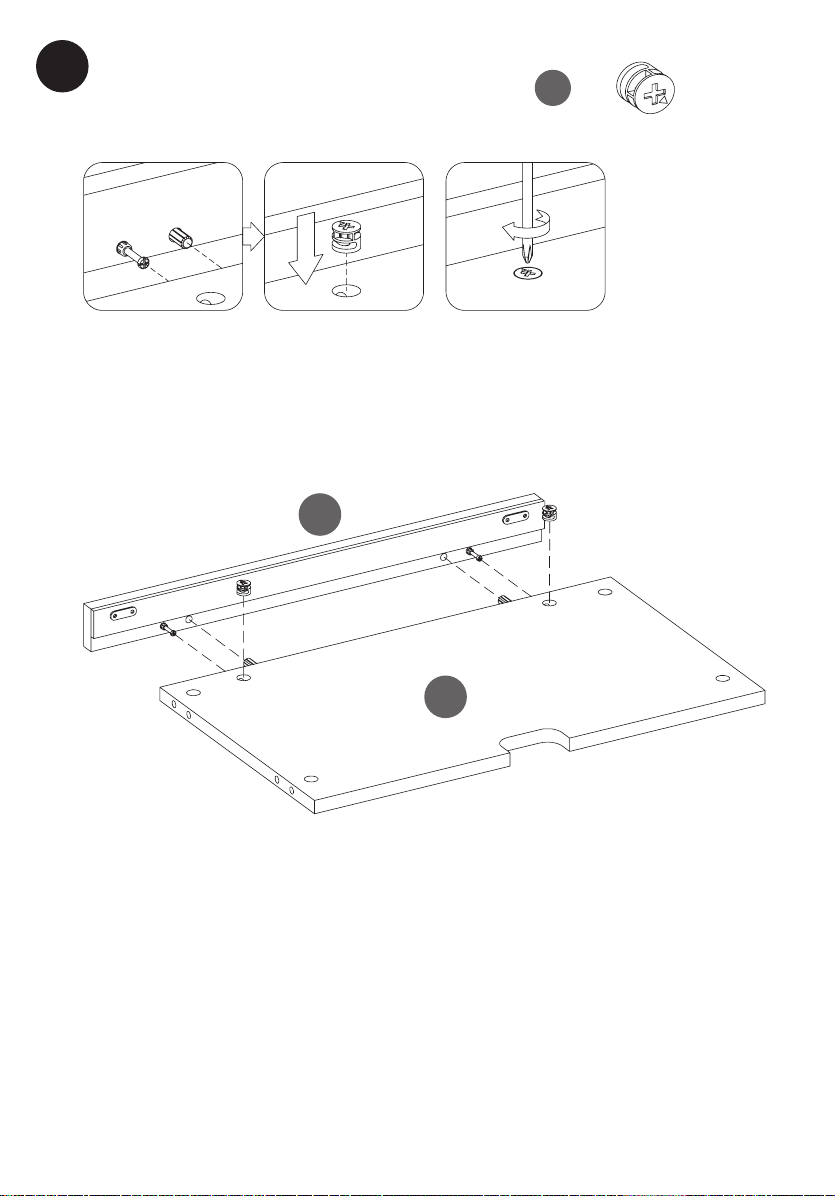
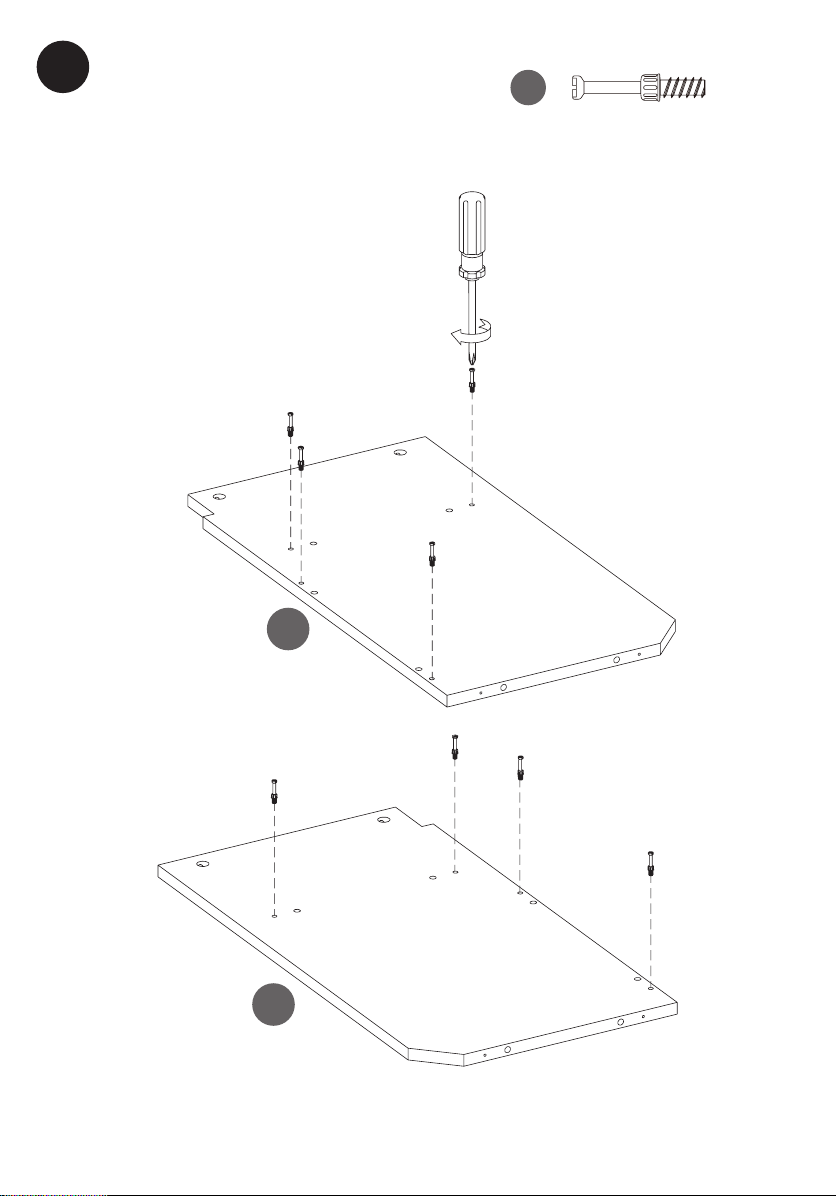
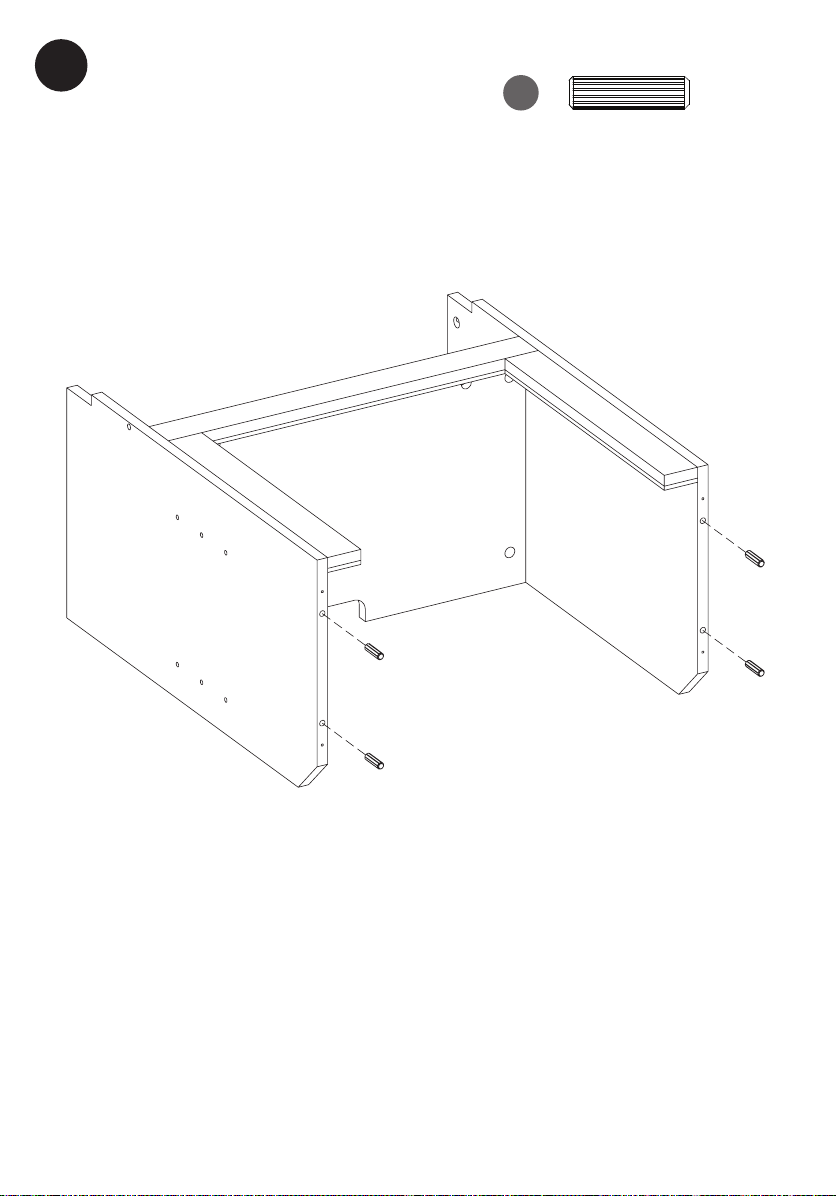
2
CC
D
[x2]
9
18MM34100REV1.0
Page 10
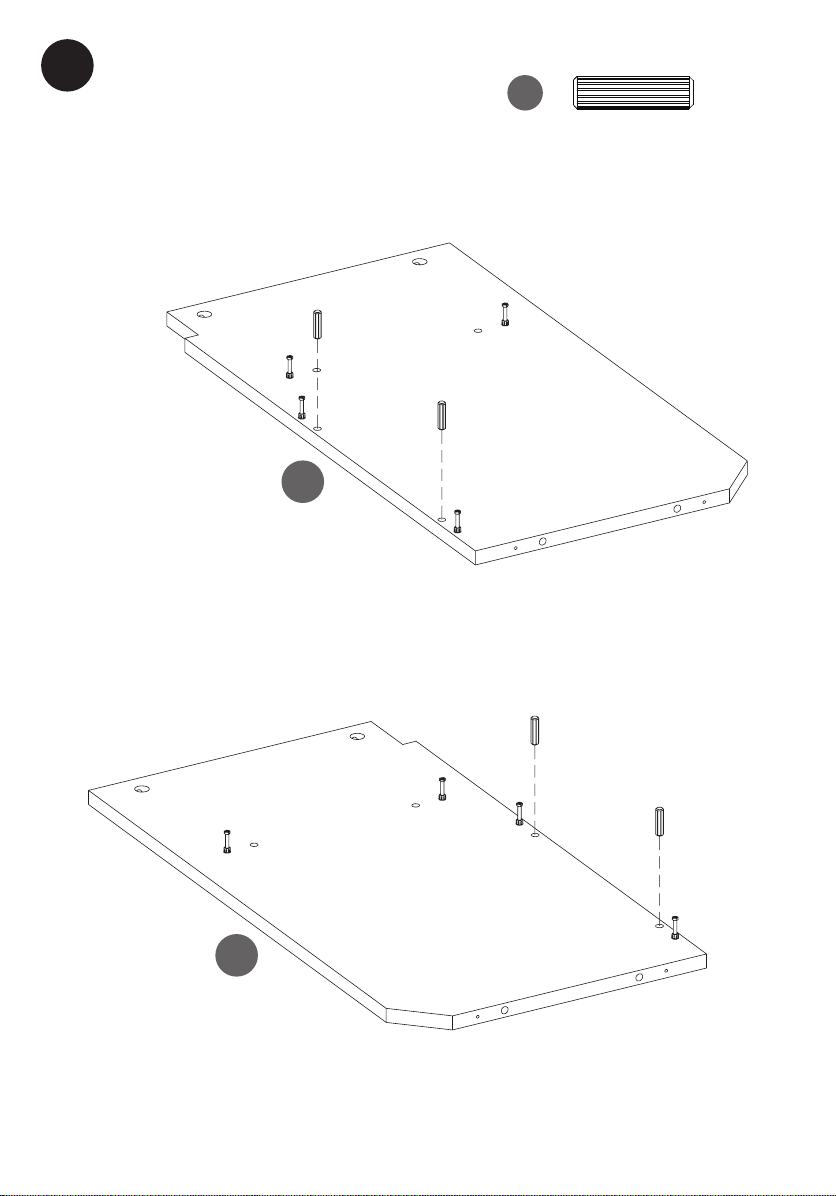
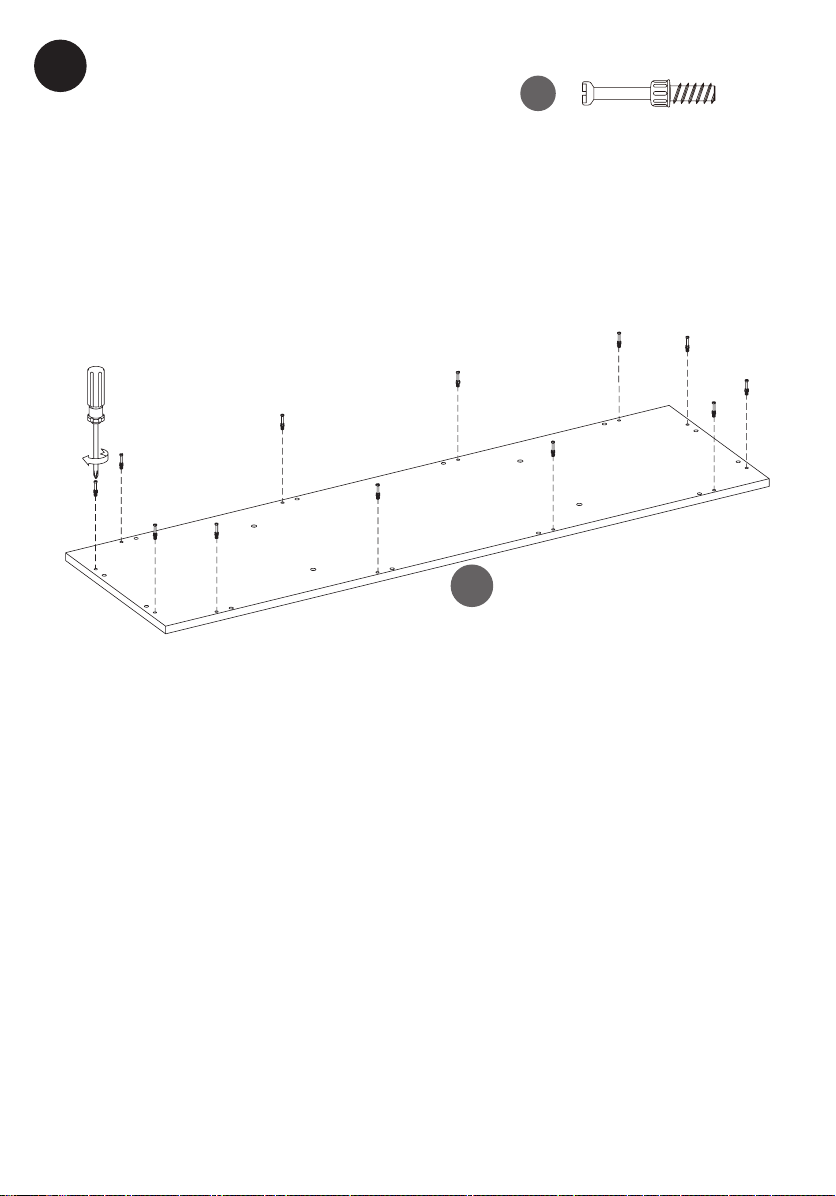
3
BB
Q
[x2]
18MM34100REV1.0
D
10
Page 11
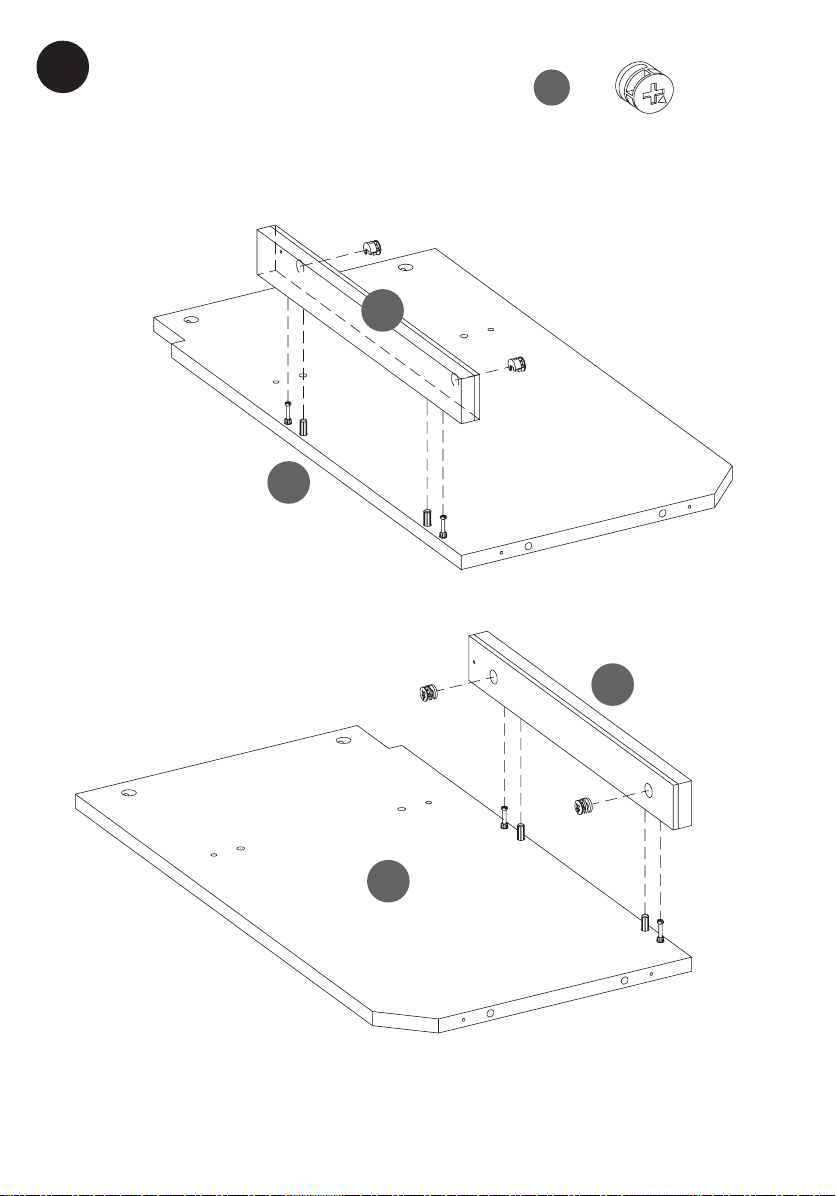
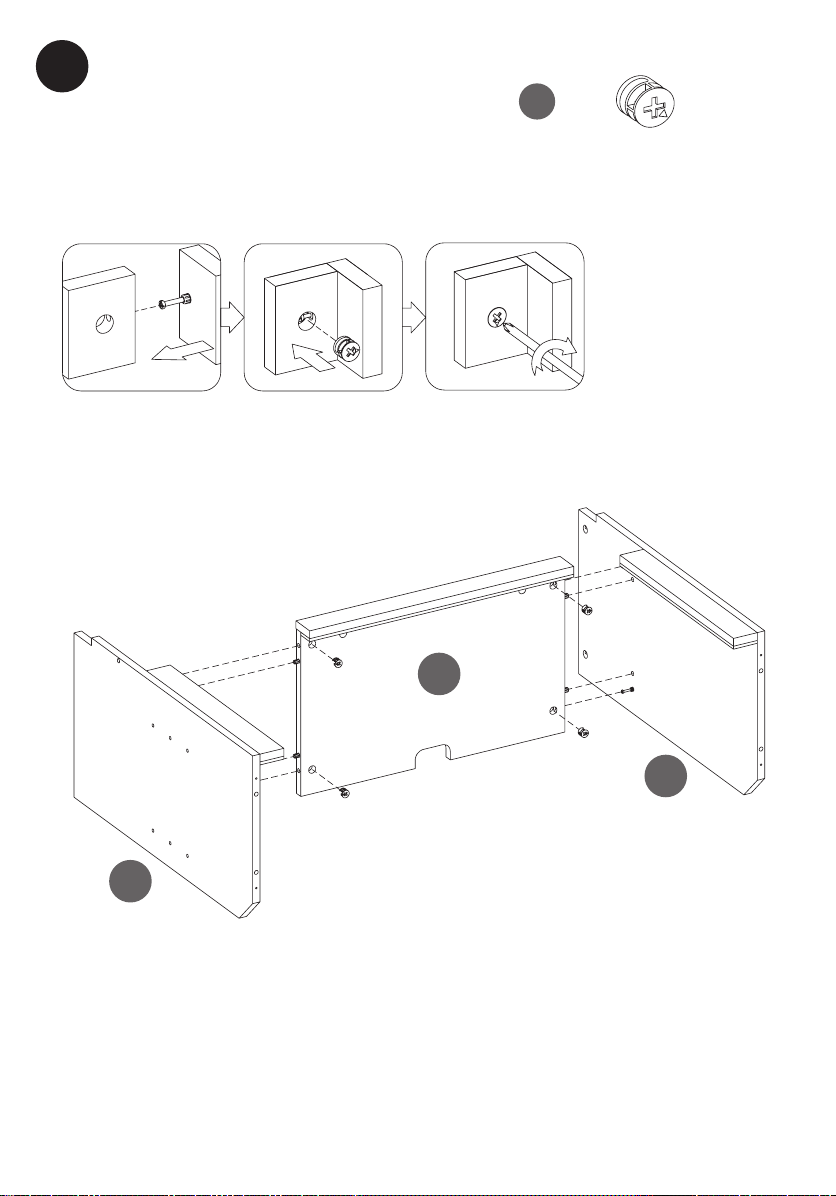
4
CC
[x4]
11
18MM34100REV1.0
Page 12
5
AA
B
[x8]
18MM34100REV1.0
C
12
Page 13
6
CC
B
[x4]
C
13
18MM34100REV1.0
Page 14
7
BB
P
B
[x4]
18MM34100REV1.0
R
C
14
Page 15
8
BB
[x4]
D
C
B
15
18MM34100REV1.0
Page 16
9
CC
[x4]
18MM34100REV1.0
16
Page 17
10
AA
A
[x12]
17
18MM34100REV1.0
Page 18

11
GG
A
[x4]
18MM34100REV1.0
18
Page 19

12
AA
[x2]
T
S
19
18MM34100REV1.0
Page 20

13
BB
U
[x2]
T
S
18MM34100REV1.0
20
Page 21

14
AA
V
[x2]
21
18MM34100REV1.0
Page 22

15
BB
V
[x2]
18MM34100REV1.0
22
Page 23

16
CC
[x12]
23
18MM34100REV1.0
Page 24

17
BB
[x12]
18MM34100REV1.0
24
Page 25

18
AA
[x4]
CC
[x4]
25
18MM34100REV1.0
Page 26

19
AA
CC
[x6]
[x6]
18MM34100REV1.0
N O
26
Page 27

20
BB
[x6]
E
N
O
F
27
18MM34100REV1.0
Page 28

21
BB
F
[x4]
E
18MM34100REV1.0
28
Page 29

22
CC
K
[x4]
29
18MM34100REV1.0
Page 30

23
K
18MM34100REV1.0
30
Page 31

24
16
FF
[x4]
31
18MM34100REV1.0
Page 32

25
CC
[x12]
18MM34100REV1.0
32
Page 33

26
AA
G
[x12]
33
18MM34100REV1.0
Page 34

27
BB
G
[x12]
18MM34100REV1.0
34
Page 35

28
NN
[x18]
35
18MM34100REV1.0
Page 36

29
L
18MM34100REV1.0
M
36
Page 37

30
EE
KK
[x6]
[x2]
37
18MM34100REV1.0
Page 38

31
DD
HH
[x2]
[x4]
18MM34100REV1.0
38
Page 39

32
FF
J
[x32]
I
I
39
18MM34100REV1.0
Page 40

33
MM
H
H
[x8]
18MM34100REV1.0
40
Page 41

READ BEFORE INSERT INSTALLATION
LIRE AVANT D’INSTALLER LE FOYER
LEA ANTES DE LA INSTALACIÓN DEL HOGAR
PLEASE READ ALL “ELECTRIC FIREPLACE
INSERT” INSTRUCTIONS PRIOR TO
INSTALLING ELECTRIC INSERT IN YOUR
COMPLETED FIREPLACE MANTEL.
INSTALL THE INSERT IN YOUR FIREPLACE
CLOSE TO ITS FINAL POSITION.
Lift insert carefully into the back of the
unit and center in the insert opening.
Do not drag insert as it may scratch
your unit.
MOVE YOUR COMPLETED UNIT ONLY
SHORT DISTANCES. MOVE COMPLETED
UNIT WITH GREAT CARE. IT TAKES TWO
PEOPLE TO MOVE COMPLETED UNIT
INTO ITS FINAL POSITION.
34
VEUILLEZ LIRE TOUTES LES
INSTRUCTIONS D’INSTALLATION DU
FOYER ÉLECTRIQUE ENCASTRABLE
AVANT D’INSTALLER LE FOYER DANS
LE MANTEAU, UNE FOIS CELUI-CI
ASSEMBLÉ. INSTALLEZ LE FOYER DANS
L’ESPACE PRÉVU, PRÈS DE SA POSITION
FINALE.
Soulevez doucement le foyer
encastrable pour le déposer par
l’arrière du manteau, dans le centre
de l’ouverture de celui-ci. Ne pas tirer
le foyer encastrable sur la base/âtre
car cela pourrait égratigner la base
du manteau.
NE DÉPLACEZ LE FOYER ENTIÈREMENT
MONTÉ QUE SUR DE COURTES
DISTANCES. DÉPLACEZ. L’UNITÉ MONTÉE
AVEC SOIN. IL FAUT DEUX PERSONNES
POUR DÉPLACER L’UNITÉ MONTÉE ET LA
METTRE EN PLACE.
LEA ATENTAMENTE TODAS LAS
INSTRUCCIONES DEL “HOGAR
ELÉCTRICO” ANTES DE SU INSTALACIÓN
EN LA CHIMENEA DECORATIVA.
UBIQUE EL HOGAR ELÉCTRICO EN LA
POSICIÓN DEFINITIVA DENTRO DE LA
CHIMENEA.
Levante el hogar cuidadosamente,
colóquelo en la parte posterior de la
unidad y céntrelo en la abertura de
la chimenea. No empuje el hogar
desde su Base dado que la unidad
se puede dañar.
MUEVA LA UNIDAD COMPLETA
SÓLO EN DISTANCIAS CORTAS
MUEVA LA UNIDAD COMPLETA CON
MUCHO CUIDADO. SE NECESITAN
DOS PERSONAS PARA DESPLAZAR
LA UNIDAD COMPLETA AL LUGAR
DEFINITIVO QUE VA A OCUPAR..
41
18MM34100REV1.0
Page 42

35
II
JJ
[x2]
[x2]
18MM34100REV1.0
42
Page 43

36
Wall Stud
Poteau Mural
Montante De
Madera
LL
[x1]
Warning: You must install the tip restraint hardware to help prevent any accidents or damage to the unit.
We strongly recommend attaching the tip restraint hardware to a wall stud and your unit. For all other wall
types, please visit your local hardware store to obtain the proper hardware.
Avertissement: Il est nécessaire d’installer les pièces d’arrimage anti basculement pour prévenir les
accidents ou les dommages à l’unité. « Nous vous recommandons fortement de xer le support avec
« Nous vous recommandons fortement de xer le support avec retenue anti-basculement à un poteau
mural et à votre unité. » En ce qui concerne tous les autres types de murs, veuillez visiter votre quincaillerie
pour obtenir les articles appropriés.
Advertencia: Debe instalar el Herraje contra Caídas para evitar accidentes o que se dañe la unidad.
«Recomendamos enfáticamente sujetar el extremo de la herramienta de retención a un perno de pared
y su unidad». Respecto de todos los demás tipos de pared, vaya a su ferretería local para obtener las
herramientas adecuadas.
43
18MM34100REV1.0
Page 44

CARE /
MAINTENANCE
SOIN /
ENTRETIEN
CUIDADO /
MANTENIMIENTO
Care and Maintenance
• Use a soft, clean cloth that will not
scratch the surface when dusting.
• Use of furniture polish is not
necessary. Should you choose to
use polish, test rst in an
inconspicuous area.
• Using solvents of any kind on your
furniture may damage the nish.
• Never use water to clean your
furniture as it may cause damage
to the nish.
• Always use coasters under
beverage glasses and owerpots.
• Liquid spills should be removed
immediately, as it may damage the
furniture. Use a soft, clean cloth and
blot the spill gently. Avoid rubbing.
• Always use protective pads under
hot dishes and plates. Heat can
cause chemical changes that may
create spotting within the furniture.
Further advice about wood
furniture care
It is best to keep your furniture in
a climate-controlled environment.
Temperature and humidity changes
can cause fading, warping, shrinking
and splitting of wood. It is advised
to keep furniture away from direct
sunlight as sun may damage the
nish. Proper care and cleaning
at home will extend the life of your
purchase.
Soin / Entretien
• Lors de l’époussetage, utilisez
un chiffon doux et propre qui
n’égratigne pas la surface.
• Il n’est pas nécessaire d’utiliser
du poli à meuble. Si vous décidiez
d’utiliser du poli à meuble, veuillez
d’abord en faire l’essai dans un
endroit moins en évidence.
• L’utilisation de solvant de quelque
sorte sur votre ameublement peut
endommager le ni.
• Ne jamais utiliser d’eau pour
nettoyer votre ameublement car
cela peut endommager le ni.
• Utilisez toujours des dessous de
verre sous les verres/tasses des
breuvages et sous les pots à eur.
• Tout déversement de liquide
doit être enlevé immédiatement
car cela peut endommager
l’ameublement. Utilisez un chiffon
doux et propre et éponger
délicatement le déversement. Évitez
de frotter.
• Utilisez toujours des tampons
protecteurs sous les plats et les
assiettes chaudes. La chaleur
peut causer des changements
chimiques qui peuvent créer des
taches sur l’ameublement.
Conseils supplémentaires
pour l’entretien de meubles
en bois
Il est préférable de garder vos
meubles dans un environnement
climatisé. Les changements de
température et d’humidité peuvent
décolorer, déformer, rétracter et
fendiller le bois. Il est conseillé de
garder les meubles à l’abri de
la lumière directe du soleil car
cela pourrait endommager le ni.
L’entretien et le nettoyage appropriés
à domicile prolongeront la vie de
votre achat.
Cuidado / Mantenimiento
• Use un paño suave y limpio que no
raye la supercie cuando elimine el
polvo.
• El uso de cera para muebles no es
necesario. Si elige utilizar la cera,
realice primero una prueba en un
área discreta.
• Usar solventes de cualquier
clase en sus muebles puede dañar
el acabado.
• Nunca utilice agua para limpiar
sus muebles, ya que puede causar
daños en el acabado.
• Siempre utilice posavasos para
colocar los vasos de bebidas y las
macetas.
• Los derrames de líquidos se deben
de secar inmediatamente, ya que
pueden dañar el mueble. Use un
paño suave y limpio y seque el
derrame con cuidado. Evite frotar.
• Siempre utilice almohadillas
protectoras debajo de los platos
y vajillas calientes. El calor puede
causar cambios químicos los
cuales pueden crear manchas en
los muebles.
Consejos adicionales
sobre el cuidado de los
muebles de madera
Lo mejor es mantener sus muebles en
un ambiente con clima controlado.
Los cambios de temperatura y
humedad pueden hacer que la
madera se decolore, se combe,
se encoja y se parta. Se aconseja
mantener los muebles alejados
de la luz solar directa, ya que esta
puede dañar el acabado. El cuidado
y la limpieza adecuados en casa
extenderán la vida útil de su compra.
We hope you enjoy your purchase
for many years. Thank you for your
purchase!
18MM34100REV1.0
Nous espérons que vous apprécierez
votre achat pendant de nombreuses
années. Nous vous remercions pour
votre achat!
44
Esperamos que disfrute de su compra
durante muchos años. ¡Gracias por
su compra!
Page 45

INSTALLED REPLACEMENT PARTS 18MM34100
PIÈCES DE REMPLACEMENT INSTALLÉES 18MM34100
PIEZAS DE REPUESTO INSTALADAS 18MM34100
PP
[x6]
PH-GLDBRW001
TT
[x4]
Barn Door Roller
RRQQ SS
[x8][x4] [x8]
Ø6.3x12mm
Ø15mmPH-PLTBLK001
PH-PLTBLK002
45
18MM34100REV1.0
Page 46

GETTING STARTED
1. Remove the product identication sticker from the front of the insert.
Model / Modèle / Modelo: 18II332FGL-S
SN #: AB-12345-A
!
le service
Keep this number for service!
e numéro pour
Gardez c
a este número para servicio!
Manteg
Product Identication Sticker
2. Attach the Product Identication Sticker to the Manual below for future reference. This information is used for product
registration and also is necessary for customer service.
Attach Product Identication Sticker Here
3. Go to tsicustomerservice.com
for product warranty registration. If you are unable to complete registration save your proof of purchase for warranty
purposes.
PRODUCT SPECIFICATIONS
VOLTAGE 120V~, 60 Hz
AMPS 12.5 Amps
WATTS 1500 Watts
B080
46
Page 47

IMPORTANT INSTRUCTIONS
When using electrical appliances, basic precautions should always be followed to
reduce the risk of re, electrical shock, and injury to persons including the following:
1. Read all instructions before using this appliance.
2.
DANGER – High temperatures may be generated under certain abnormal
conditions. Do not partially or fully cover or obstruct the front of this heater.
WARNING: In order to avoid overheating, do not cover the heater.
3. CAUTION: Never leave the heater operating unattended. Extreme caution is
necessary if unsupervised children or invalids are nearby.
4. The appliance is not to be used by children or persons with reduced physical,
sensory or mental capabilities, or lack of experience and knowledge, unless they
have been given supervision or instruction.
5. Always unplug this appliance when not in use.
6. Do not operate any heater with a damaged cord or plug or after the appliance
malfunctions, or if it has been dropped or damaged in any manner.
7. If the supply cord is damaged, it must be replaced by the manufacturer, its
service agent or similarly qualied persons in order to avoid a hazard.
8. Do not use outdoors.
9. This heater is not intended for use in bathrooms, laundry areas and similar indoor
locations. Never locate this appliance where it may fall into a bathtub or other
water container.
10. Do not run cord under carpeting. Do not cover cord with throw rugs, runners or
the like. Arrange cord away from trafc areas and where it will not be tripped
over.
11.
To disconnect this appliance, turn controls to the off position, then remove plug
from outlet.
12. This product is equipped with a polarized plug (one blade is wider than
the other blade). To reduce the risk of electrical shock, this plug will t into
a polarized outlet only one way. This is a safety feature. Avoid the use of an
extension cord because of the risk of overheating the cord and the risk of re.
Extension cords are for temporary use only. If an extension cord must be used,
it must be UL/CSA certied, rated at 15A (1875W),125V maximum with14AWG
minimum and constructed of two current carrying conductors with ground. A
heavy duty extension cord with the shortest length possible for the connection
is recommended and must not be longer than 50 ft. (15.2m ). Do not coil or
cover the extension cord. Caution: To prevent electric shock, match wide blade
of plug to wide slot and fully insert.
47
B080
Page 48

This appliance, when installed, must be electrically grounded in accordance
13.
with local codes or, in the absence of local codes, with the current CSA C22.1
Canadian Electrical Code or for U.S.A. installations, follow local codes and the
National Electrical Code, ANSI/NFPA NO.70.
14.
Do not insert or allow foreign objects to enter any ventilation or exhaust opening
as this may cause an electric shock or re, or damage the appliance.
15. To prevent a possible re, do not block air intakes or exhaust in any manner. Do
not use on soft surfaces, like a bed, where opening may become blocked.
16. This appliance has hot and arcing or sparking parts inside. Do not use it in areas
where gasoline, paint or ammable liquids are used or stored. This replace
should not be used as a drying rack for clothing. Christmas stockings or
decorations should not be hung in the area of it.
17. Use this appliance only as described in the manual. Any other use not
recommended by the manufacturer may cause re, electric shock or injury to
persons.
18. This heater may include a visual alarm to warn that parts of the heater are
getting excessively hot. If the alarm ashes immediately turn the heater off
and inspect for any objects on or adjacent to the heater that may cause high
temperatures. DO NOT OPERATE THE HEATER WITH THE ALARM FLASHING!
B080
SAVE THESE INSTRUCTIONS
48
Page 49

OPERATION INSTRUCTIONS
Control Panel
The heater can be operated by either the remote control or the control panel.
49
B080
Page 50

FUNCTION
ICON
DESCRIPTION
POWER
FLAME
HEATER
The power button supplies power
to all of the replace functions. The
power button will put the insert in
a standby mode. This will turn off all
functions at once, but will hold the
settings in the memory. By pressing
the Power button again, the unit will
turn on with the retained settings.
With the power on, press and hold
the Power button on the control
panel for 10 seconds to disable or
re-enable the heater function. Once
disabled or re-enabled, the ember
bed lights will ash multiple times.
Before the heater powers off, the fan
will continue to run for a period of
time to cool down the internal parts.
There are 5 brightness levels that can
be selected.
Settings F5 - F1 decrease in
brightness
The replace contains three infrared
quartz heating elements.
The thermostat setting range is 62°F
- 82°F (17°C - 27°C) or continuously
ON. To set ame effect so that it works
without heat, press the heater button
until the display shows “00”.
The thermostat is adjustable by 2°F
or 1°C increments.
The up and down buttons “ ”
on the remote will increase /
decrease temperature setting.
To change between °F and °C, press
and hold the HEATER button on the
control panel for 3 seconds.
TIMER Pressing the timer button will
B080
50
cycle through the timer settings:
30 minutes, 1 Hour, 2H, 3H, 4H, 5H,
6H, 7H, 8H, 9H and OFF (00).
Page 51

SAFER SENSOR™
This product is equipped with a
Safer Sensor™; an advanced safety
device that helps prevent heaters
from being accidently covered or
blocked causing a potentially unsafe
condition.
The SAFER SENSOR detects if an
object is too close to the front of
the heater potentially obstructing
the air outlet. If blocked, the control
panel will ash“ ”icon and the
heater will be turned off. Once the
object has been moved and after
user presses the power button, “ ”
will disappear and the unit will be
back on the previous setting with the
heat on.
51
B080
Page 52

TROUBLESHOOTING
PROBLEM ROOT CAUSE CORRECTIVE ACTION
Display shows “ ”
Display shows “ ”
Display shows “ ”
Display shows “ ” The heater air outlet is blocked. Verify there is a 3 foot clear space in
Heater does not
blow warm air.
The thermostat sensor
is broken or disconnected.
The thermostat sensor
is broken.
Manual Reset overheat protection
has triggered.
Cool down cycle
Unplug the replace, remove the
back panel of the replace and
check that the thermostat is plugged
into the main circuit board. If this
does not solve the problem, contact
customer service for a replacement
thermostat sensor.
Contact customer service for a
replacement thermostat sensor.
Inspect the heater and check
that the air inlets and outlets are
not blocked as this may cause
overheating. Unplug the heater for
30 minutes and allow it to cool down.
Re-plug and operate, but monitor the
heater for signs of overheating. If the
problem persists, discontinue use of
the heater and contact customer
service.
front of the heater air outlet.
Normal operation. Heater will
continue to run for several minutes
before shutting down. Times will vary
based on temperatures. During this
time cool air will blow.
No power, logs do not glow. No power to the unit
Flame effect turned offLogs glow, but no ame effect.
Heater does not blow warm air.
B080
Thermostat setting is preventing
heater from turning on.
52
Check that unit is plugged into a
standard 120V outlet. Press power
button several times, make sure power
is set at “ON” position.
Press ame button several times.
Adjust the temperature settings
to ensure that the thermostat is
set higher than the current room
temperature.
Page 53

Remote control is not working.
Poor signal Operate remote transmitter at a slow
measured pace. Press the remote
control buttons with an even motion
and gentle pressure. Repeatedly
pressing buttons in rapid succession
may cause the transmitter to
malfunction.
Remote control is not working.
Flame effect works, but heater
function does not and the ember
bed ashes when the heater button
is pressed.
Remote control is not working.
Distance
The heater is disabled.
No batteries
Operate the remote at a distance
less than 20 feet from the front of the
appliance; point the remote
at the control panel.
With the power on, press and hold
the POWER button on the control
panel for 10 seconds. Once reenabled the ember bed lights will
ash multiple times.
Change the remote batteries.
CARE AND MAINTENANCE
• The motors used on the fan and the ame generator assembly are pre-lubricated for extended bearing life and
require no further lubrication. However, we recommend periodic cleaning/vacuuming of the fan/heater.
• Clean the trim using a soft cloth, slightly dampened with citrus oil based product and buff with a clean soft cloth.
DO NOT use brass polish or household cleaners as these products will damage the metal trim. Citrus oil based
products can be obtained at supermarkets or hardware stores.
• Make sure the unit is turned OFF and unplugged before cleaning the heater or replace.
53
B080
Page 54

REPLACEMENT PARTS
AA
[x1]
Remote Control
P115
DD
[x1]
Flame Circuit Board
Y15-C73-P40
GG
[x1]
Emberbed with Log
Y15-S145-P02B01
JJ
[x1]
BB
[x1]
Flame Generator Drive Motor
P10-6-Q
EE
[x1]
Thermostat Sensor
INS-NTC
HH
[x1]
Front Panel With Frame
Y15-S145-P27
CC
[x1]
Heater/Blower Assembly
Y15-C72-P01
FF
[x1]
Emberbed Circuit Board
Y15-S145-P44E
II
[x1]
Control Panel Circuit Board
Y16-C86-P32S
Main Circuit Board
Y15-C70-P15
B080
54
Page 55

FCC/IC INFORMATION
Warning: Changes or modications to this unit not expressly approved by the party responsible for compliance could
void user’s authority to operate the equipment.
NOTE: This equipment has been tested and found to comply with the limits for Class B digital device, pursuant to part
15 of the FCC Rules. These limits are designed to provide reasonable protection against harmful interference in a
residential installation. This equipment generates, uses, and can radiate radio frequency energy and, if not installed and
used in accordance with the instructions, may cause harmful interference to radio communications.
However, there is no guarantee that interference will not occur in a particular installation. If this equipment does cause
harmful interference to radio or television reception, which can be determined by turning the equipment off and on,
the user is encouraged to try to correct the interference by one or more of the following measures:
• Reorient or relocate the receiving antenna.
• Increase the separation between the equipment and the receiver.
• Connect the equipment into an outlet on a circuit different from that to which the receiver is connected.
• Consult the dealer or an experienced radio/TV technician for help.
This device complies with Part 15 of the FCC Rules. Operation is subject to the following two conditions:
(1) This device may not cause harmful interference, and
(2) This device must accept any interference received, including interference that may cause undesired operation.
This Class B digital apparatus complies with Canadian ICES-003.
BATTERY REPLACEMENT
1. The battery compartment is located on the back end of the remote control.
2. Press and slide the battery door open and remove the old battery.
3. Insert 2 AAA batteries, checking that the + and - sides of the battery match inside the battery compartment.
4. Replace the battery compartment door.
NOTE: Battery disposal
Please always dispose of batteries
at a suitable recycling point.
AAA 1.5V
AAA 1.5V
CAUTION:
• For best results, use 2pcs AAA alkaline batteries.
• Install only new batteries of the same type in your product.
• Failure to insert batteries in the correct polarity, as indicated in the battery compartment, may shorten the life of the
batteries or cause batteries to leak.
• Do not mix old and new batteries.
• Do not mix Alkaline, Standard (Carbon-Zinc) or Rechargeable (Nickel Cadmium) or (Nickel Metal Hydride) batteries.
• Danger of explosion if battery is incorrectly replaced.
• Do not ingest batteries.
• Batteries should be recycled or disposed of as per state and local guidelines.
DISPOSAL OF USED BATTERIES
Battery may contain hazardous substances which could endanger the environment and human health. Used batteries
shall not be treated as municipal waste, but left at the appropriate collection point for recycling. For more information
about collection and recycling of used batteries, please contact your local municipality or waste disposal service.
55
B080
Page 56

1-YEAR LIMITED WARRANTY
The manufacturer warrants that your new Electric Fireplace is free from manufacturing and material defects for a
period of one year from date of purchase, subject to the following conditions and limitations.
1. Install and operate this appliance in accordance with the installation and operating instructions furnished with the
product at all times. Any unauthorized repair, alteration, willful abuse, accident, or misuse of the product shall nullify
this warranty.
2. This warranty is non-transferable, and is made to the original owner, provided that the purchase was made through
an authorized supplier of the product.
3. The warranty is limited to the repair or replacement of part(s) found to be defective in material or workmanship,
provided that such part(s) have been subjected to normal conditions of use and service, after said defect is
conrmed by the manufacturer’s inspection.
4. The manufacturer may, at its discretion, fully discharge all obligations with respect to this warranty by refunding the
wholesale price of the defective part(s).
5. Any installation, labor, construction, transportation, or other related costs/expenses arising from defective part(s),
repair, replacement, or otherwise of same, will not be covered by this warranty, nor shall the manufacturer assume
responsibility for same.
6. The owner/user assumes all other risks, if any, including the risk of any direct, indirect or consequential loss or
damage arising out of the use, or inability to use the product, except as provided by law.
7. All other warranties – expressed or implied –with respect to the product, its components and accessories, or any
obligations/liabilities on the part of the manufacturer are hereby expressly excluded.
8. The manufacturer neither assumes, nor authorizes any third party to assume on its behalf, any other liabilities with
respect to the sale of the product.
9. The warranties as outlined within this document do not apply to non accessories used in conjunction with the
installation of this product.
10. This warranty gives you specic legal rights, and you may also have other rights which vary from state to state.
This warranty is void if:
a. The replace is subjected to prolonged periods of dampness or condensation.
b. Any unauthorized alteration, willful abuse, accident, or misuse of the product.
c. You do not have the original receipt of purchase.
B080
56
Page 57

CUSTOMER SERVICE
tsicustomerservice.com
For Customer Service
Call 1-800-318-9373
Questions?
Our Consumer Service department is available Monday – Friday 8:30 am – 5:30 pm EST.
We can help you with assembly and if necessary, replace damaged/missing parts.
IMPORTANT:
Before contacting Customer Service, please have this information available:
• Serial Number
• Model Number
• Sales Receipt or Proof of Purchase
Manufactured and distributed by Twin-Star International, Inc., under license from Duraame, Inc.
duraame, the ame symbol and logo are registered trademarks of Duraame, Inc.
Fabriqué et distribué par Twin-Star International, Inc., s’effectue sous licence.
duraame et le logo de amme de duraame sont des marques déposées de Duraame, Inc.
Elaborado y distribuido por Twin-Star International, Inc., utilizada con licencia.
El duraame y la insignia de la llama del duraame son marcas registradas de Duraame, Inc.
1-800-318-9373
tsicustomerservice.com
© 2019, Twin-Star International, Inc. Delray Beach, FL 33445
Made in Vietnam
57
B080
 Loading...