

Page 1
R
LED MONITOR USER’S MANUAL
MODEL NO.:185LD
Read th i s manual before ope r ation
Page 2
Features........................................................................... 1
Inside the box...................................................................1
Connection of LED monitor to PC.....................................1
Operation of monitor........................................................2
How to use On Screen Display (OSD)...............................2
OSD shortcut key .........................................
........................................................................4
.......
Menu
..................3
Optimal screen resolution settings.....................................5
Safety precautions............................................................6
Operational climate requirements
......................................6
Cleaning and Maintenance of LED monitor........................ 6
Troubleshooting............................................................... 7
Uniformity and related compliance................................... 7
Installation disassembling wall mounting and adjusting the
\ \
viewing angle...................................................................8
Page 3
Features
The LED monitor pr ov id es a b ri gh t, cl ear a nd vivid c ol or display and does not em it ra di at io n a s c an be ge nerated b y
common CRT mon it ors.
Auto setting.
Meets th e ene rg y savin g st an da rd of VESA DPMS . A ll ow s u se r d ef in ed auto pow er off tim er f or ad di ti on al
- -
energ y sa vi ng s.
Numer ic c ha ra ct er s mo ot hi ng function.
Meets Wind ow s 9X /M E/ 20 00 /X P/ Vista/7 plug & play specificatio ns .
User-friendly functions/OSD interface.
Plug and play: Co mp li an t wi th t he VESA standard, suppor ts t he D DC 2B s ta nd ar d.
Inside the b ox
Befor e u np ac ki ng you
r LE D m on itor, mak e s ur e you h av e a sta bl e a nd cle ar workspa ce up on whi ch you can p la ce you r
monit or a nd c om pu te r.
1 pc
LED M onito r
Use r s M anual'
1 co py
1 pc
VGA sig nal cab le
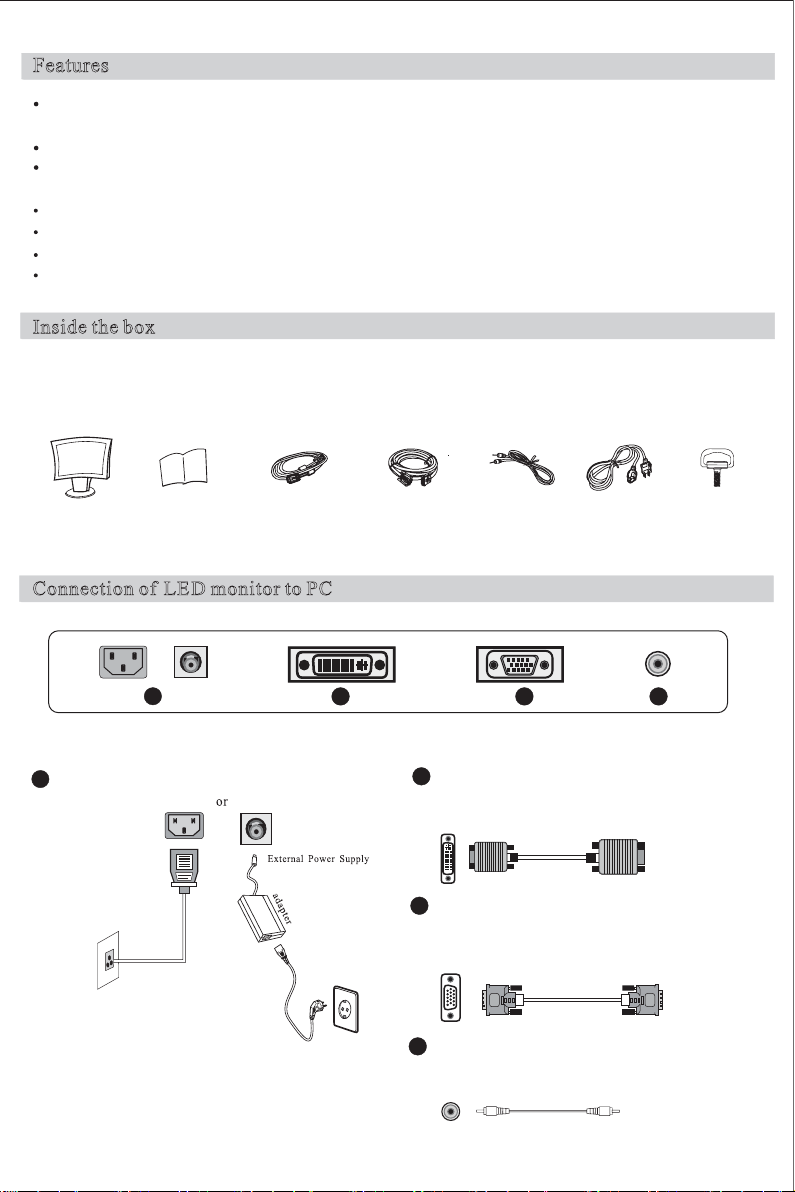
Connecti on of LE D monitor to PC
or
1
1
Built -in Pow er
2
1 pc
DVI s ignal c able
1 pc
Aud io cabl e
1 pc
Pow er cord
3 4
Connect the DV I ca bl e to the DVI In po rt on the back
2
of the LED monitor.
VGA i nt er fa ce
3
Connect th e s ig na l cable t o t he 15-pin D -S UB port
on the ba ck o f ba ck o f th e LE D monitor.
1 pc
Man ual scr ew
Audio int er fa ce
4
Conne ct the au di o cable o f
io p or t on t he back of the PC.
-1-
the LE D monitor to th e aud
Page 4
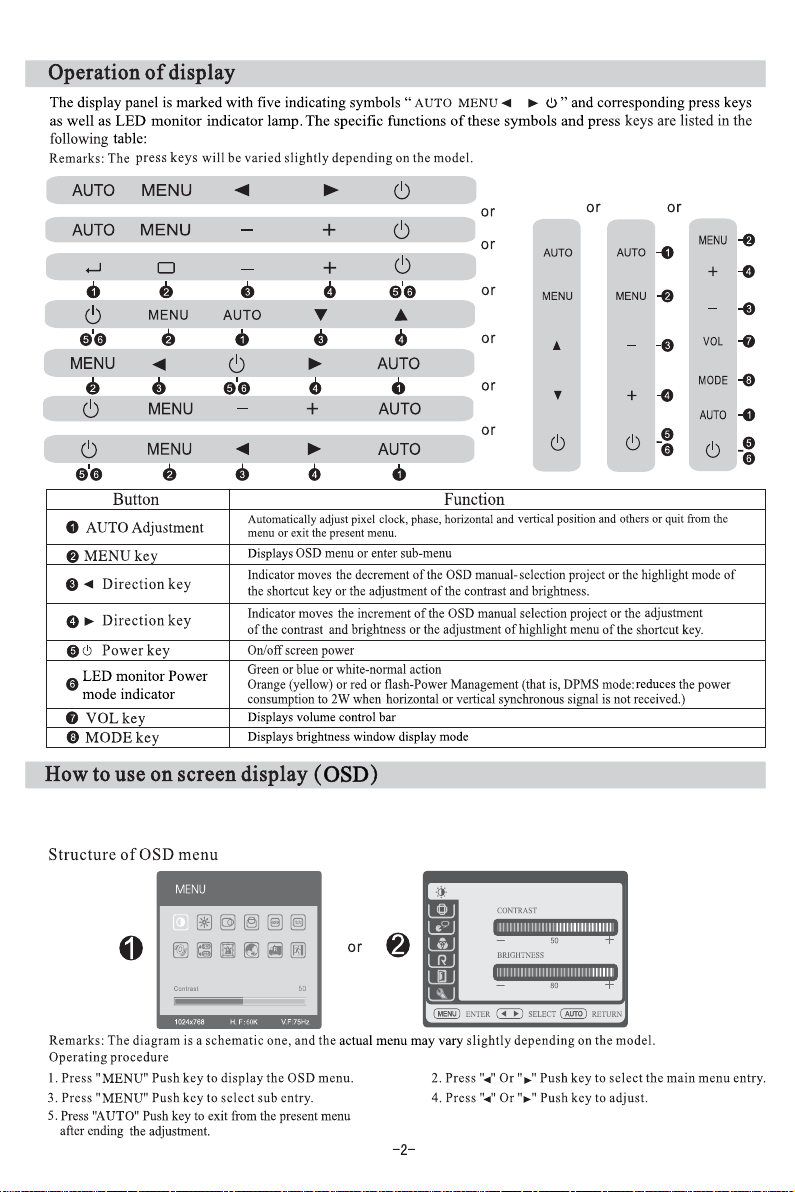
The on screen display (OSD) function lets you adjust the display quality of the monitor according to your needs.
(Remarks: Please ensure that the monitor is turned on and that the sync signal input cable is attached to your computer
before making adjustments.)
Page 5
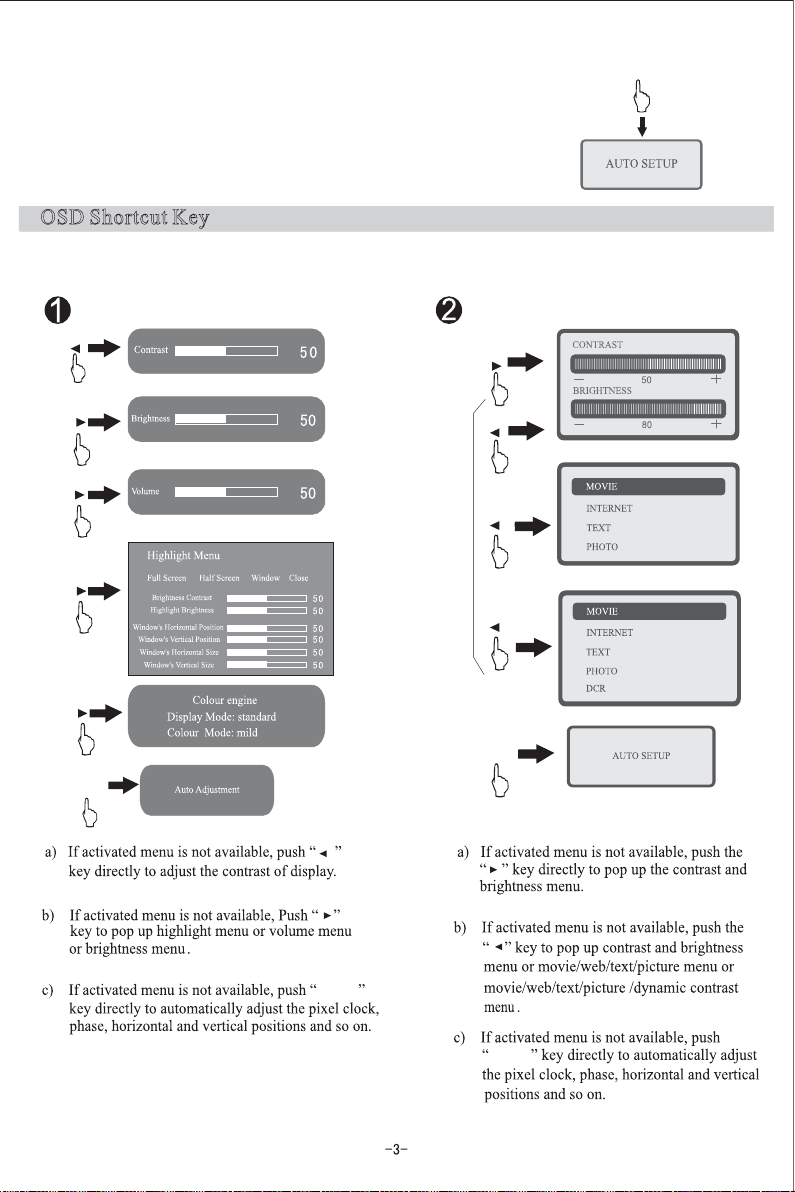
Auto adjustment
1. Press the key with [AUTO] o n th e displa y panel.
2. Auto adjustment wi ll begin. OS D w il l b e displayed automaticall y. I t w il l
complete th e ad justmen t abou t 10 s econds late r.
Remarks: No e ff ec t wi ll be available for the functio n ad justmen t un de r DV I
mode since th e digita l sign al i s very s tandar d.
OSD Shortcut Key
OSD Shortcu t ke y (Remarks : Th e menu function may diff er s light ly depen ding o n th e model.)
This functi on allow s us er s to adjus t co mm on ly u se d menu s su ch a s “b ri gh tness” and “contrast”.
or
or
or
or
AUTO
AUTO
or
AUTO
AUTO
AUTO
Page 6
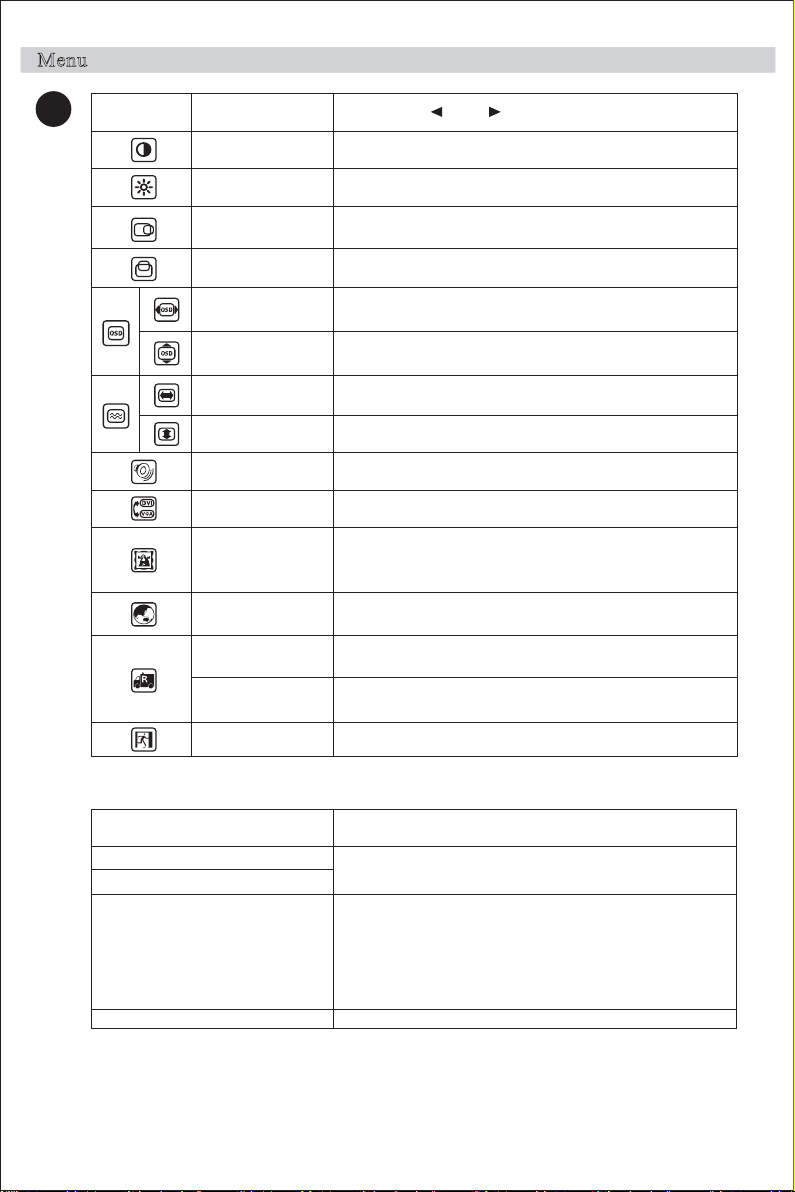
Menu
Sub-me nu
1
Function name
Contrast
Brightness
Horizont al
position
Vertical p osition Scree n pictur e ca n move u p or d ow n.
OSD horizontal
position
OSD vertica l
position
Clock
Phase
Volum e
Input selecti on A/D or D/A con ve rs io n.
Color adjustmen t
Language
Recover the mode
in the facto ry
Scree n si ze
adjustment
Quit
After pr es s and“ ”butto n“ ”
Adjust the co ntra st o f th e picture .
Adjust the br ig ht ness o f th e pi ct ur e.
Scree n pictur e ca n move lef t or r ig ht .
Adjust the horizont al orientatio n of t he men u.
Adjust the vertica l or ientation o f th e menu .
Adjust the Clock frequency of pixel
Adjust th e ph as e of p ix el c lo ck
Adjust the volu me .
Preset temp er at ur e in t he f acto ry (930 0K)( 7500 K) (6 500k )
USER: User- defi ne d co lo r temperature
AUTO: Au to mati c co lo r adjustment.
Six langu ag es : Si m
German, Ita li an , Sp an is h.
Reset settings to the factory default.
Switch betwe en w id e sc re en d is pl ay a nd
common displa y.
Quit the OS D me nu
plified Chi ne se , En gl is h, F re nc h,
Highli gh t Menu
Function Name
Full Scre en Hig hl ig ht
Half Sc re en H ighlig ht
Window Highlight
Close
Notes: Menu function types an d function names may va ry sligh tly depending on th e model .
Sub-fu nction
Hi ghl igh t con tra st
Highlig ht b ri gh tnes s
Highlig ht c on tr as t
Highlig ht b ri gh tnes s
Window's Horizontal Po si ti on
Window's Verti ca l Po si ti on
Window's Horizontal Si ze
Window's Verti ca l Si ze
-4-
Page 7
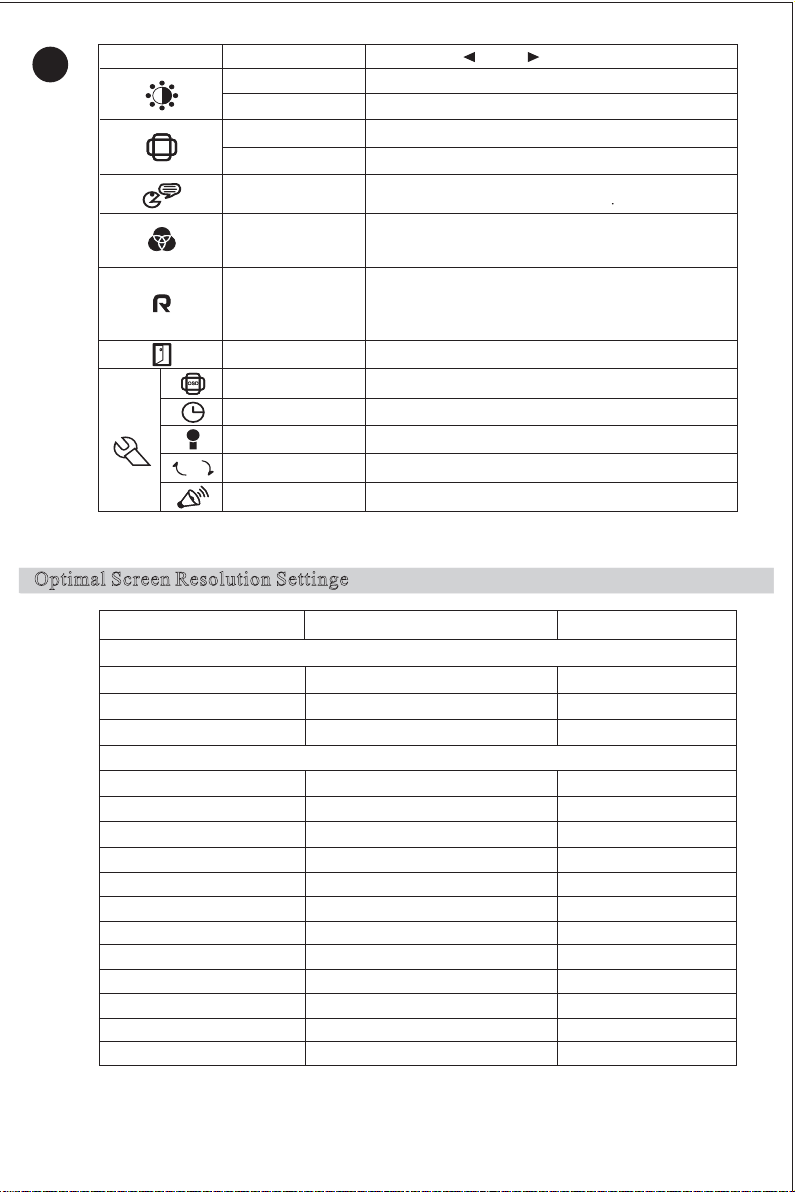
VGA
DVI
Function name
Contrast
Brightness
Horizont al p osition
Vertical p osition
Language
Color adjustm en t
AUTO
Recover defau lt
settings
Quit
OSD position
Phase clo ck
Information
Output conversion
Volume
2
Sub-me nu
Notes: Some menu functions may not be available depending on signal type used under normal
operation.
Optimal Sc reen Resolution Settinge
After pres s and “ ”button“ ”
Adjust the co ntra st o f th e picture .
Adjust the br ig ht ness o f th e pi ct ur e.
Adjust display orientation to the left or right.
Adjust screen orientation up or down.
English , Si mp li fi ed C hi ne se , Ko rean , Tur ki sh , French,
German, Ita li an , Sp an is h, Rus si an , an d Ja pa ne se .
Warm c olor temperature, cold temperatur e
USER: User- defi ne d co lo r temperature
AUTO: Au to ma ti c co lor adjustment.
Automatically
Switching fun ct io n betwe en w id e sc re en d is pl ay a nd
common displa y to r ecove r th e de faul t settin gs i n th e
factory.
Quit the OSD me nu .
Horizontal and vertical a dj ustment
Adjustment of p ha se a nd freque nc y.
Resolutio n in fo rm at io n.
VGA/DVI conversi on .
Volum e ad justment .
detects the re solu tion
Inch
15
17
19
15
17
18.5
19
20
20.1
21.5
21.6
22
23
23.6
24
Remarks: Th e re solution may vary s light ly dependi ng o n th e model.
The optima l re solu tion Frame Rate
4 : 3 Mode
1024x76 8
1280x10 24
1280x10 24
Wide Mode
66
13 x76 8
1280x72 0
6
136 x768
1440x90 0
1600x90 0
1680x10 50
1680x10 50 o r 19 20 x1 08 0
1680x10 50 o r 19 20 x1 08 0
1680x10 50
1920x10 80
1920x10 80
1920x12 00
-5-
60Hz
60Hz
60Hz
60Hz
60Hz
60Hz
60Hz
60Hz
60Hz
60Hz
60Hz
60Hz
60Hz
60Hz
60Hz
Page 8
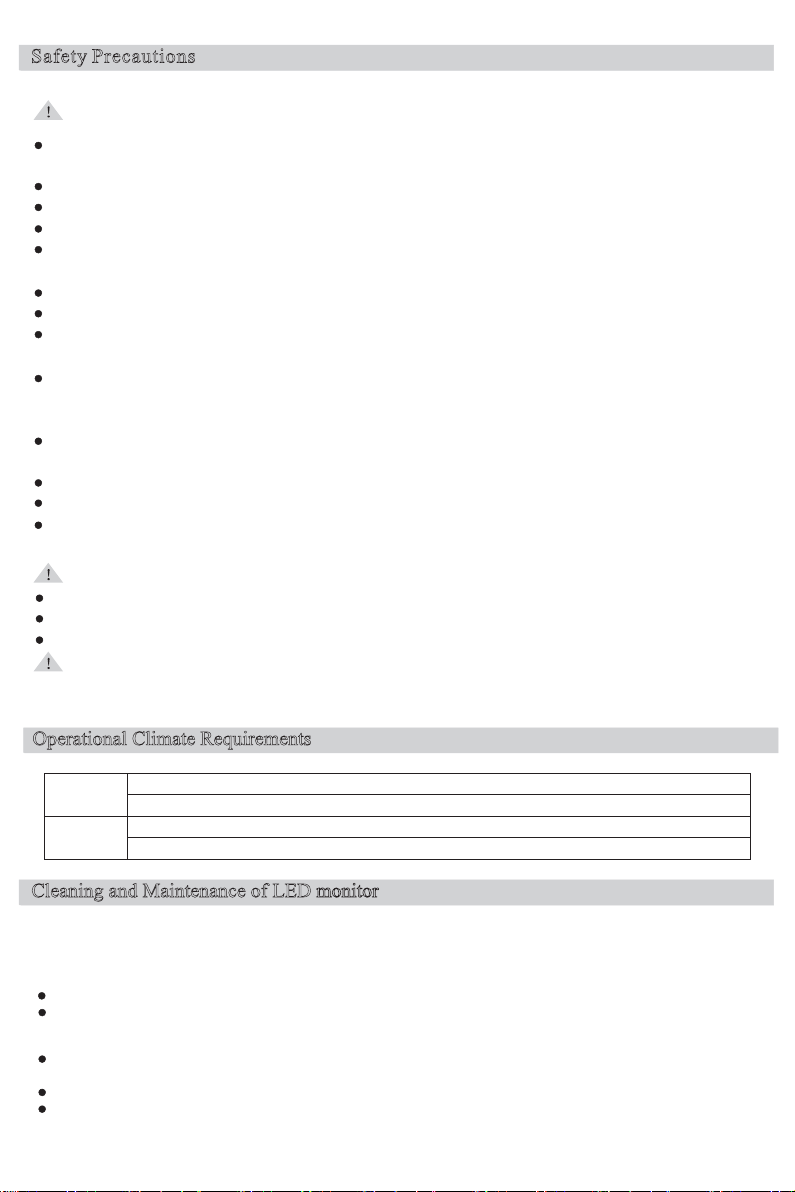
Safety Pre cautions
Please rea d th e followi ng i nstruction s to a vo id a f ir e or electr ic shock leading to injury or damag e of pro pe rt y.
Caution:
Always o pe ra te the LE D monitor wit h t he desig na te d power sup pl y. To gu ar an te e p ro tectio n, we s tr on gl y recommend
that yo u should install a surg e protector devic e betwe en t he mai n powe r ou tlet a nd AC power supply or AC ad ap te r.
Remove the po we r pl ug i n case o f an y ab normalit y (e .g . noise, smoke or smell).
Always keep the LED
Never ope ra te t he L ED
Alway s keep t he L ED
at leas t 4 in . (10cm) aw ay fro m th e wall .
Do not disc on nect t he pow er c or d wh il e us in g th e mo ni to r.
Do not ex cessiv el y be nd t he p lu g an d wi re n or place heavy objects upon them, whic h coul d caus e damag e.
Please discon ne ct th e pow er if the d
electric shocks a nd a bnor ma l po we r su pp ly v oltage .
Be s ur e to contact an a uthorize d S er vice Cente r when installin g y ou r monit
low temper atures , h ig h humidi ty, ex pose d to chemica l substances or wher e i t operate s for 2 4 h ou rs such a s a t
airport s, t ra in s tation s, etc . Fail ur e to d o so m ay c au se s er io us d amage to your monitor.
Do no t insert an y foreign or metal objects , such as wire o r pen/pe ncil, or any flammabl e objects suc h as pa pe r or
matches, into any v en t, headp ho ne p or t, AV port s or o th er i np ut s..
Keep th e plas ti c pack aging/ ba g ou t of t he r each of children.
When viewing a f ix ed s cr ee n fo r an e xtende d peri od of time, residual image or blurrine ss m ay
Change the mo de to energ y saving mo de or set a screen sav er to ch an gi ng picture when a wa y f ro m t he mo ni tor f or
an extended p er io d of time .
Attention:
Always hold t he plu g bo dy t o pu ll o ut t he p lu g.
To handle or clea n th e LED
Never tou ch t he p lu g wi th a w et h an d.
Others
To prevent ey e s tr ain, d o n ot ope ra te in a dar k r oom or against a bright back gr ou nd . For the be st vis ua l c om fort , be
sure to tak e a re st o f 10 min utes p er h ou r when view in g th e monitor for long period s of time .
monitor
aw ay fro m moisture.
monitor
in cas e of ligh tning o r st orm.
monitor
well ve ntilated . Neve r bl oc k th e ventilation grooves or ve nt s. K ee p th e LE D
isplay is n ot us ed for a lon g p er io d s o a s t o p re ve nt damage r es ul te d f ro m
or i n a locatio n with heav y d us t, hig h or
monitor
, switch off t he L ED
monitor
an d un plug t he mon itor fro m th e po we r source .
appear.
monitor
Operational Climate Requirements
Operating
Storage
Cleaning and Maintenance of LED
Do NOT us e an y so lv en t li st ed below to avoid any damage to th e LE D
Diluent, sp ra y cleane r, corrosi ve clean er, acid or alkaline solven t, v olatil e oil, w ax , be nzene .
Casing
Do not us e ru bb er o r plas ti c produ ct t o wi pe t he casing to avoid any peeling paint o f th e casi ng .
Wipe the casing using a clot h wi th a littl e neutra l cleane r, an d th en d ry i t us in g a dr y cloth.
monitor
LED
The display shall b e du st ed o ff periodically with a piece of clean sof t cloth t o ke ep clean . Any f lu id m ay
damage the di spla y.
Never wip e th e sc re en usi ng p ap er o r a hard s ubstance .
Make su re t o un pl ug t he p ow er c or d before clean ing the product.
Temper ature:50°F 104°F 10 40~ ( ~ )°C °C
Humidity:10 % 8 0 non condensing~ , -%
Temper ature:-4°F 113°F 2 0 45 C~ (- ~ )°C °
Humidity:5% 85 no n c on dens in g~ , -%
monitor
pane l
-6-
monitor
and the cas in g.
Page 9
Troubleshooting
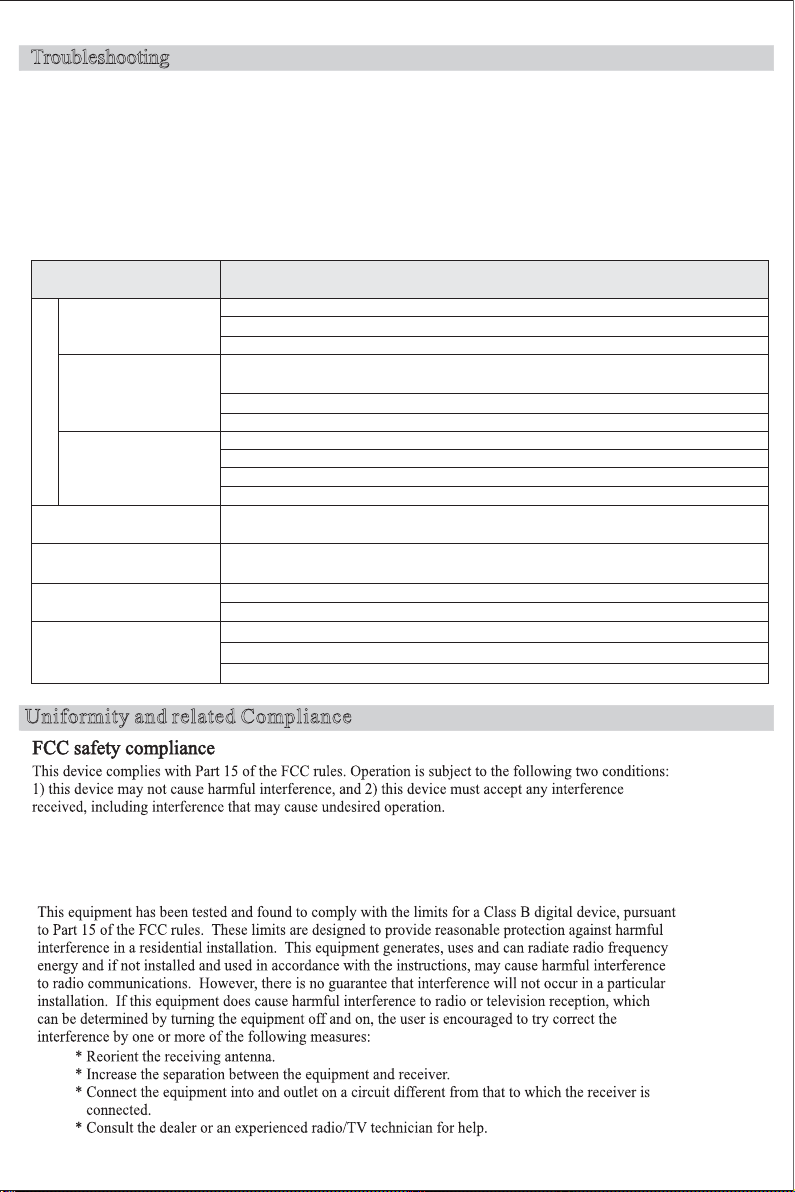
The follow in g si tu ation s ar e no rm al a nd do not indicate a quality issue .
1.The g ra ph s ho wn m ay d ev ia te d epending on the PC type w he n yo u tu rn o n th e LE D monitor fo r th e fi rs t time . Plea se
adjus t it acco rd in g to t he o pe rati on i nstructions of LED monitor.
2 .The sc reen may flash when you t ur n on t he L ED monitor for the fi rs t time . Switch off t he powe r an d tu rn i t on again
to co nfirm the fl as hi ng h as cea se d.
3.The b rightne ss o f th e sc re en m ay v ar y depending on the gra ph ic a ppli ed t o th e PC d es kt op.
In case o f ab no rm al o pe rati on o f th e LED monitor, perform troubles ho ot in g accor di ng t o th e pr ocedures descri be d in
the table below. In case that the fault i s n ot listed in t he table , do n ot operat e th e LE D monitor , an d c ontact th e d eale r
or local serv ic e cen te r fo r fu rt her help.
<Troubleshooting>
Symptoms
a)T he p ow er i nd icato r
is not br ig ht
egami yalpsid oN
b)The power indicator is
green or blue or white
c)The power indicator
is orange (yellow) or red
or flash
Dis pl ay ed r es ul t to o dark
or too br ig ht
Dis pl ay ed r es ul t is n ot
pos itiv e cente r
in the
Dis play ed ima ge jitte re d
Displ ay n ot s yn ch ro no us
Is the po we r co rd plu gg ed t o the socke t fi rm ly ?
Is the po we r sw it ch t ur ne d on ?
Is the AC so ck et w it h power? Please t es t th e ou tl et w it h another electri ca l item .
Pleas e pr es s th e ke yp ad o r mouse if you ha ve activ at ed t he s creen saver
pro gr am w it ho ut ima ge .
Pleas e incr ea se ( Co ntrast) o r ( Br ightn es s)
Che ck i f th e sign al r es olutio n of computer is wit hi n th e sp ecif ication s of display?
Pleas e pr es s th e ke yp ad o r mouse if the disp la y is u nd er p ower manageme nt m od e.
Is the compute r po we r tu rn ed o n?
Is the sign al cab le p ro pe rl y inserte d?
Che ck i f th e sign al r es olutio n of computer is wit hi n th e sp ecif ication s of display?
Check if th e imag e outpu t of comput er i s within the specificatio ns o f di spla y?
Che ck i f th e sign al r es olutio n of computer is wit hi n th e sp ecif icatio ns of display ?
Che ck i f th e vo ltag e is w ithin the specif icatio ns ?
Che ck i f th e si gn al r esolution of compute r is w ithi n th e sp ecif ications of displ ay ?
Is the si gn al cab le p ro perly inserte d?
Che ck i f th e sign al r es olutio n of computer is wit hi n th e sp ecif ication s of display?
Check if th e imag e ou tp ut o f computer is w it hi n th e sp ecif ications of displ ay ?
Check
Uniformity and related Compliance
FCC Caution : Any changes or modifications not expressly approved by the party responsible for
FCC Caution : Any changes or modifications not expressly approved by the party responsible for
compliance could void the user’s authority to operate this equipment .
-7-
Page 10
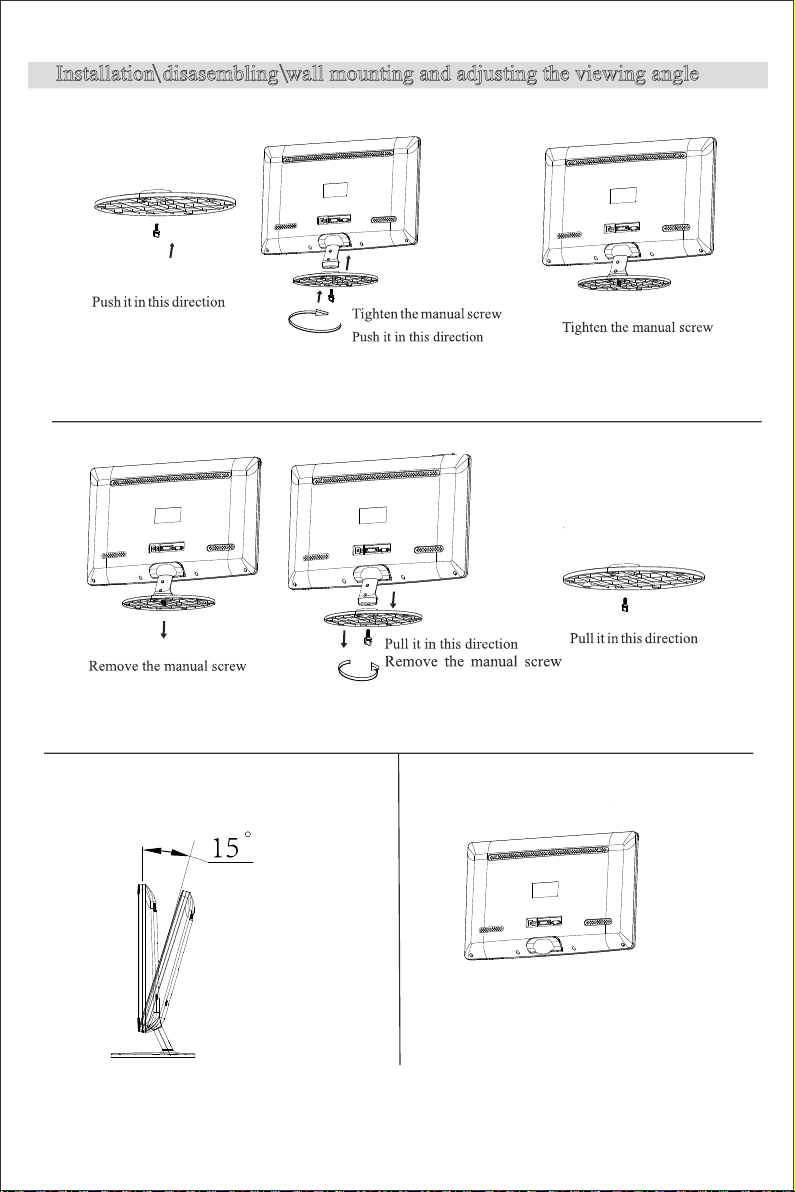
Installation disasembling wall mounting and adjusting the viewing angle\ \
① ② ③
① ② ③
Viewing angle
Wall Mounting
VESA Standard 75x75mm
- 8 -
 Loading...