

Page 1

®
INSTALLATION INSTRUCTIONS
INSTRUCCIONES DE INSTALACIÓN
Premier Faucet Mount
Model Series WFFM100
Montaje En Grifo Premier
Modelo serie WFFM100
1
V.4.1
Page 2

®
INSTALLATION INSTRUCTIONS
premier faucet mount
Model Series WFFM100
PROPER INSTALLATION: Please read all instructions, specifications, and
precautions before installing and using your water filter system.
Information & Assistance
www.waterfiltration.DuPont.com
866-709-2086 Toll Free 800-441-7515
For Service Requests For Safety & Health Questions
& Product Information
Protect Plus, LLC • Hickory, NC 28601 USA
WFFM100
2
Page 3
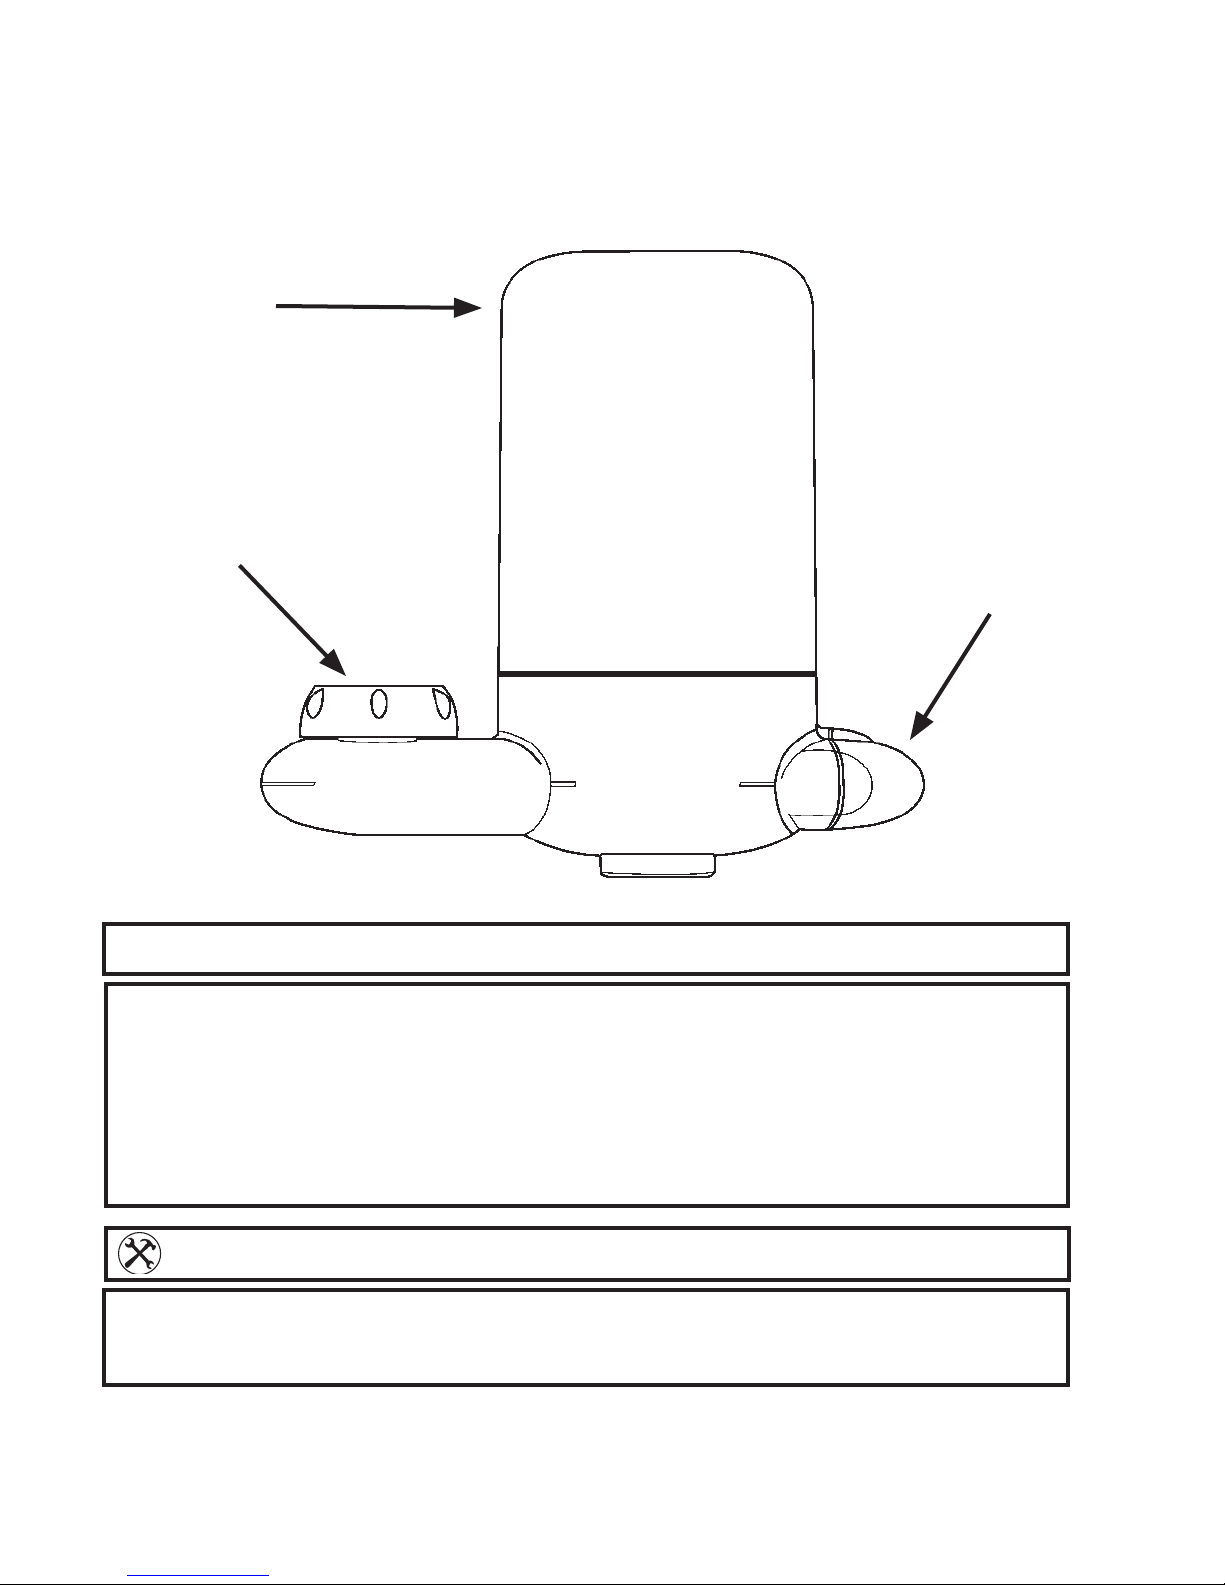
Components and Features
Filter Cartridge Cover
Mounting Nut
Selector
PARTS & HARDWARE INCLUDED
• One (1) Premier Faucet Mount
• One (1) High Protection/High Capacity Faucet Mount Filter
• Two (2) Faucet Adapters
• Two (2) Washers
• Plumbing Tape
TOOLS & MATERIALS NEEDED
• Pliers for removing old aerator (if it cannot be removed by hand).
• Coin for tightening faucet adapter.
3
V.4.1
Page 4

Installation
Step
1
Remove Aerator From Faucet
Unscrew the aerator. Remove any washers from your faucet. Clean the threads to
remove any rust or scale.
Outside
Threads
Inside
Threads
WFFM100
4
Page 5
Installation
Step
2
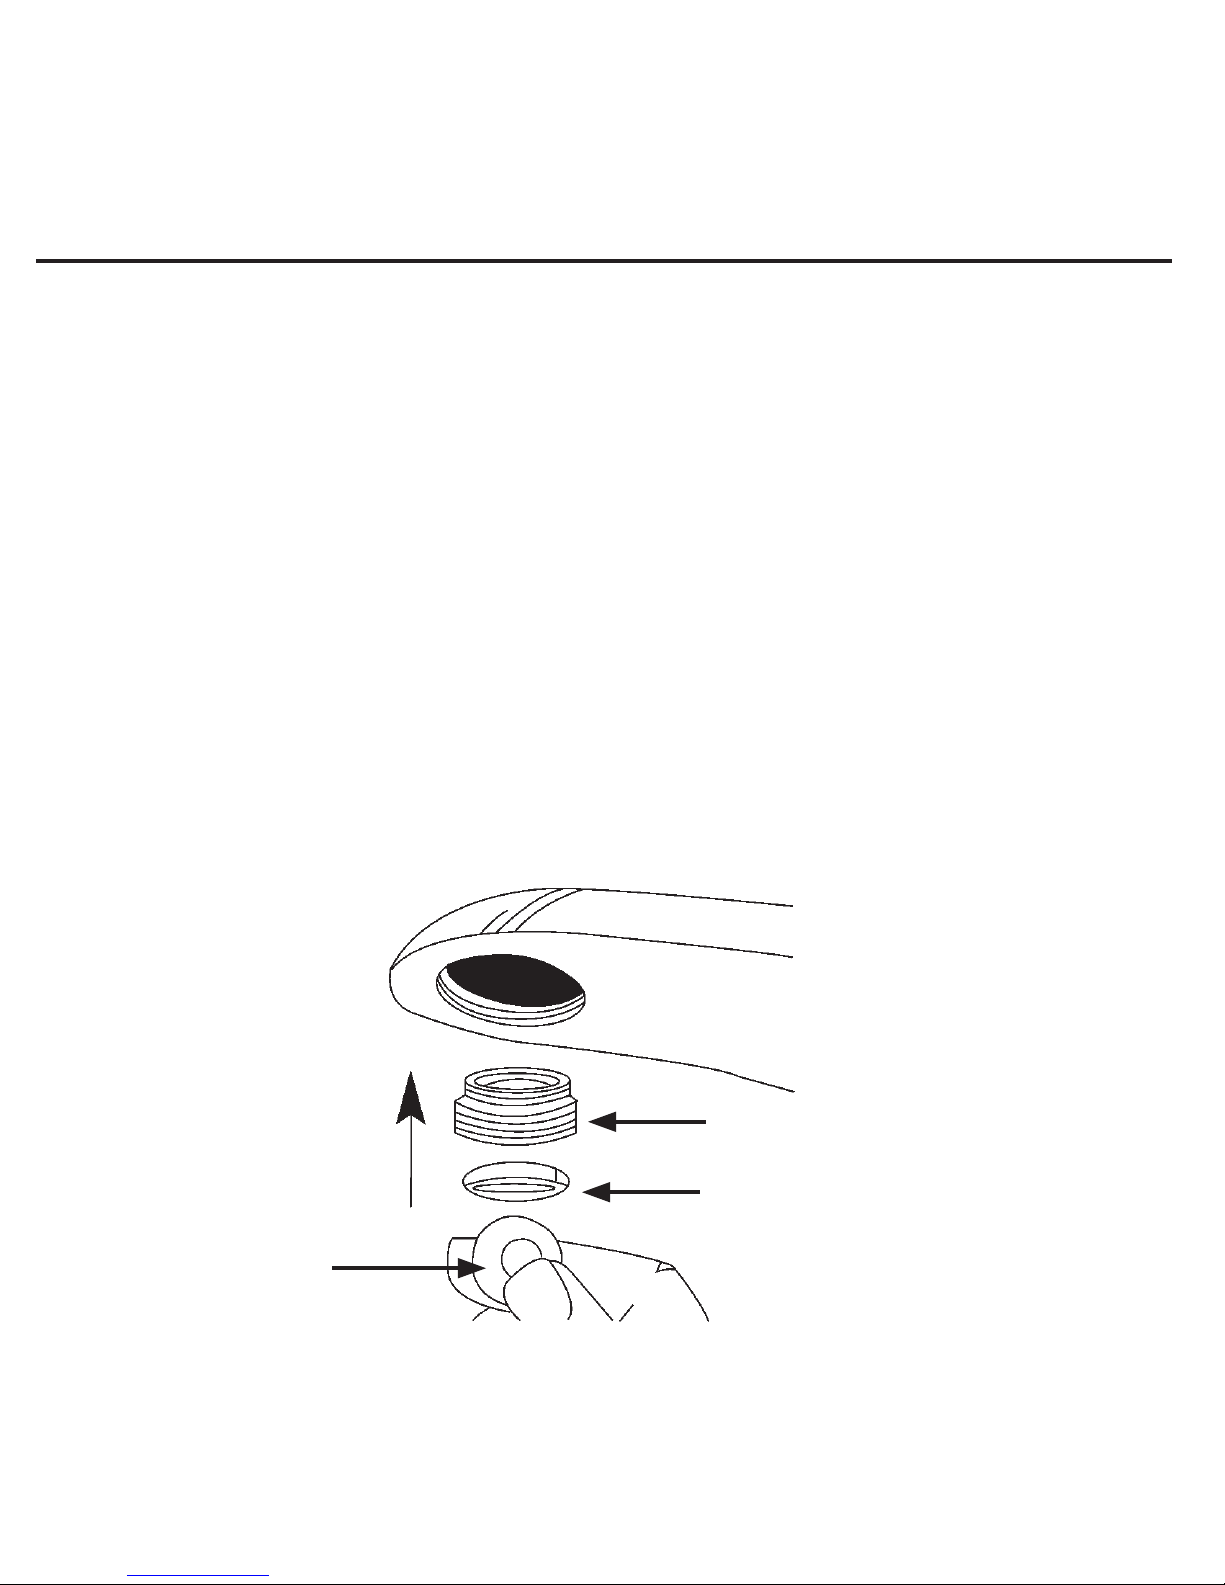
Determine The Need For An Adapter
If there are threads on the outside of the faucet - Proceed to Step 3.
If there are threads on the inside of the faucet:
Select the adapter and washer that fit your faucet. Place the washer into
the recessed end of the adapter. Apply plumbing tape (provided) to the
threads on both ends of the adapter. The tape acts as an extra seal and
strengthens the connection. Screw the adapter into the faucet. Hand
tighten. A coin may be inserted into the notch in the bottom of the adapter
to help tighten it by an additional 1/2 turn.
Adapter
Washer
Plumbing Tape
NOTE: Washers are different thicknesses - use the washer that best fits your faucet.
5
V.4.1
Page 6
Installation
Step
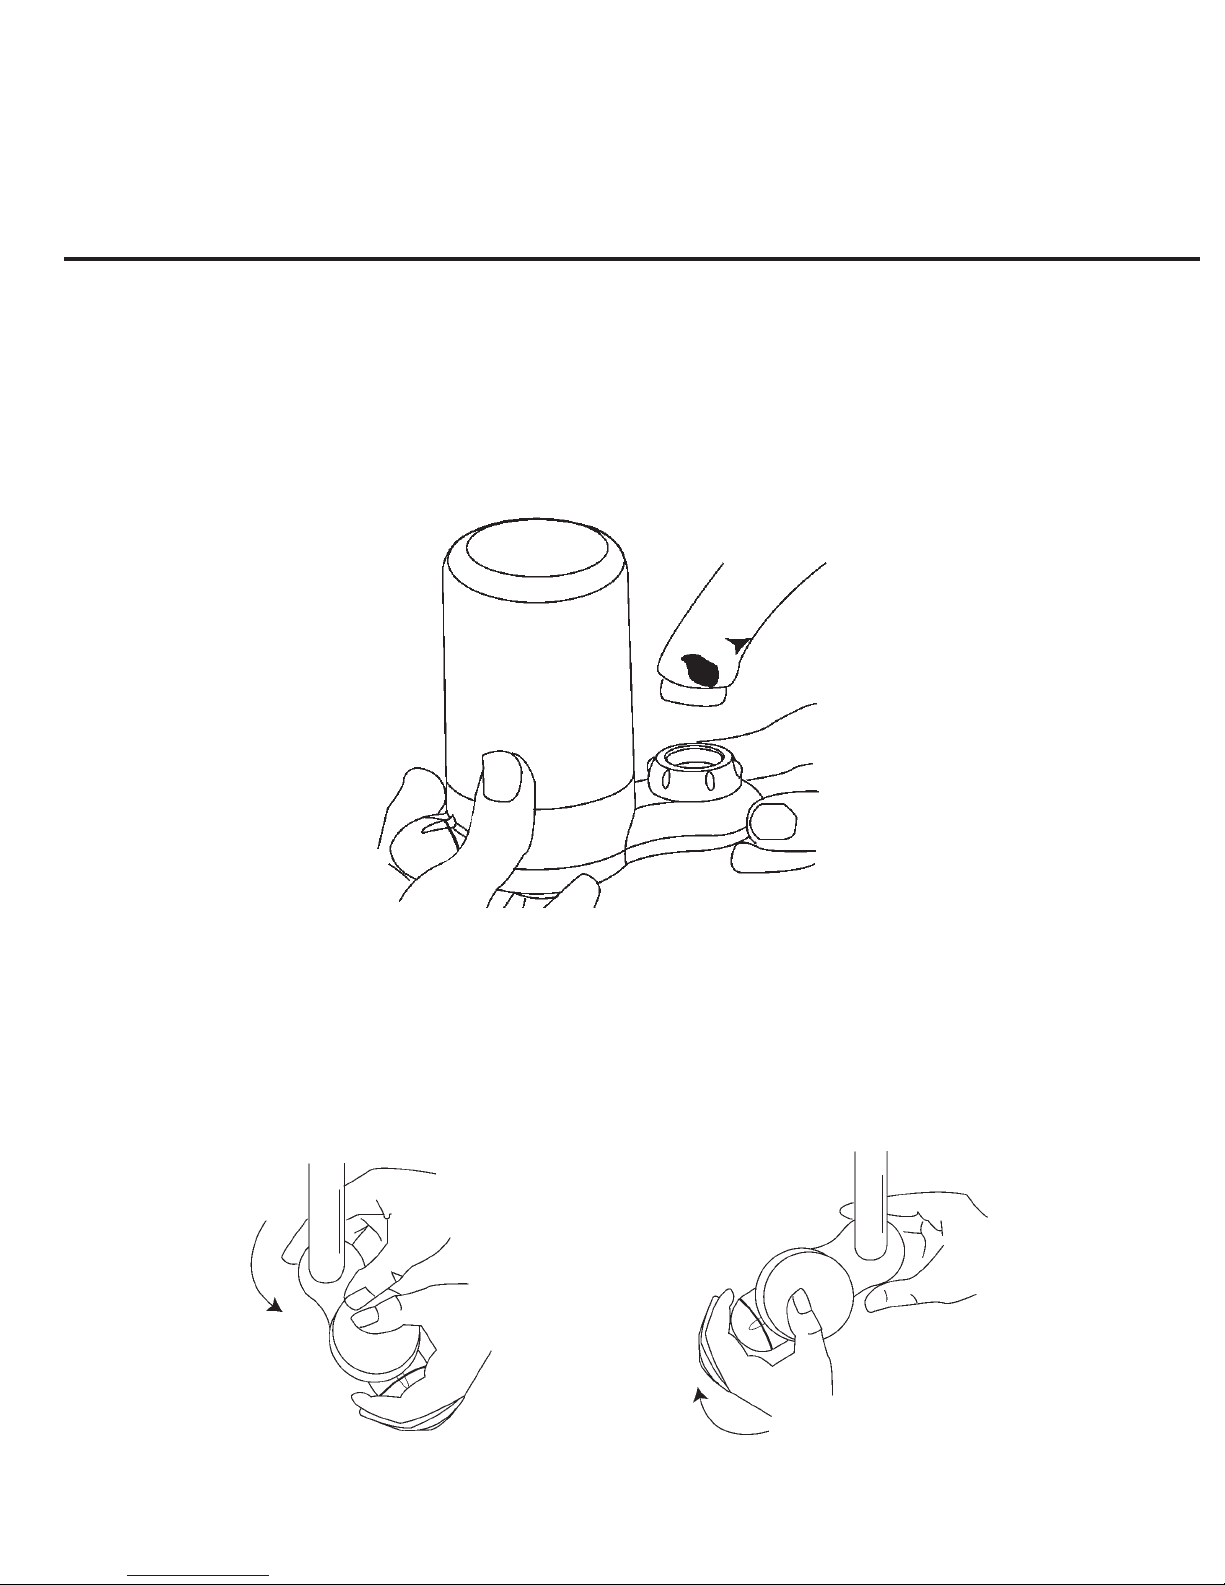
Attach The Filter To Your Faucet
Position the filter system so that the unit is on the left side of your faucet. Attach the
threaded mounting nut to the faucet and turn until hand tight.
3
The lter assembly may be moved back and forth while holding the mounting nut to
help tighten the faucet mount.
WFFM100
6
Page 7

Installation
Step
4
Install The Filter Cartridge
Open the lter cartridge package and remove the cartridge. Open the lter cover by
unscrewing it. Insert the cartridge into the housing. Align ports in bottom of cartridge
with ports in base of faucet mount. Push in until snug. Reattach the filter cover.
NOTE: Filtered water ow is typically less than half that of unltered water. Water
ows through the lter media at a controlled rate to assure contaminant reduction
and improve taste.
HELPFUL HINT: Always support the bottom of the faucet mount when removing or
inserting lter cartridges. This helps keep the seal with the faucet intact and
prevents damage to the unit.
7
V.4.1
Page 8

Installation
Step
5
Flush The Filter
Turn the filter selector to the filtered water setting. Turn on the cold water tap
for 5 minutes to ush the lter cartridge. Do not drink or use the ltered water during
the ush cycle. The ush will remove any carbon dust and prepare the
filter for use.
This ush will remove any carbon particles and activate the lter for use. It is normal
to see some black carbon particles rinsed from the lter during the initial ush. The
ush does not affect the cartridge life. The cartridge included with this system is
good for up to 100 gallons of water. Please refer to the Replacement Cartridge section for expected life of your filter and contaminant reductions.
Water Temp < 100F/38C
Do Not Filter Hot Water
WFFM100
8
Page 9

Instructions For Use
1. The DuPont™ Faucet Mount Filter is now ready for use.
2. You can choose two types of water from your faucet depending on your need
and the position of the selector.
3. The horizontal position allows water to ow past the cartridge and provides
unltered water. Use this setting for hot water and for unltered cold water,
such as for washing hands.
4. The vertical position is for a stream of ltered water. Use this position for ltered
water used for drinking and for cooking.
NOTE: Your lter cartridge will last approximately 3-4 months if it is ltering munincipal water,
well water will reduce the life of a filter.
NOTE: Filtered water ow is typically less than half that of unltered water. Water ows through
the filter media at a controlled rate to assure contaminant reduction and improve taste.
9
V.4.1
Page 10

SAFETY & HAZARD WARNINGS
• These lters are not water puriers. Do not use with water that is
microbiologically unsafe or of unknown quality without adequate
disinfection before or after the system. Systems certified for Cyst
reduction may be used on disinfected waters that may contain filterable
Cysts.
• This unit is not designed to lter sulfur (rotten egg odor). Use of carbon
filters to treat sulfur may intensify taste/odor problems.
• Please comply with all state and local regulations regarding the installation
of water treatment devices.
• The contaminants or other substances reduced by the water lter device
are not necessarily in your water.
Operation/Maintenance Data
These units are intended for non-commercial use. They should be used only in ambient air
temperature of between 35 degrees F / 2 degrees C and 100 degrees F / 38 degrees C. Placement of these units in direct sunlight or use of electrical heating equipment on these units
must be avoided. Replace filter cartridge when and as directed in the installation/operation
instructions included with each cartridge. Replacement filter cartridges are available at retail
outlets or online.
Replacement Cartridges
DuPont™ Premier Faucet Mount WFFM100 Series
Usage and quality of water in your incoming water line affect the life of lter cartridges
and determine when the cartridge should be changed. Cartridges should be replaced
sooner if water pressure at the faucet begins to drop noticeably or if the filter fails to
perform satisfactorily.
All DuPont™ Faucet Mount Cartridges and DuPont™ Faucet Mount Systems are inter-
changeable. All DuPont™ cartridges are designed to lter water in any similar DuPont™
system. A filter cartridge’s stated reduction capacity is tied to the cartridge’s performance
within a specific filtration system for which is it has been tested and certified. Please see
the Performance Data Sheet for the certied performance of specic systems with stated
cartridges.
Original System Certification
Premier Faucet Mount
WFFM100 Series
Electronic Metered Deluxe Faucet Mount
WFFM350 Series
Cartridge Model Number/
System Sold With
WFFMC100
WFFMC300
WFFM100
10
Page 11

®
INSTRUCCIONES DE INSTALACIÓN
Montaje En Grifo Premier
Modelo serie WF-FM100
INSTALACIÓN CORRECTA: Antes de instalar y usar su sistema de filtrado de
agua, lea todas las instrucciones, especificaciones y precauciones.
Información y asistencia
www.waterfiltration.DuPont.com
866-709-2086 Toll Free 800-441-7515
Para solicitudes de servicio Para formular preguntas sobre salud
e información de producto y seguridad
Protect Plus, LLC • Hickory, NC 28601 USA
11
V.4.1
Page 12

Componentes y características
Tapa del cartucho
del filtro
Tuerca de montaje
Selector
PIEZAS Y ELEMENTOS DE MONTAJE INCLUIDOS
• Un (1) Montaje en grifo Premier
• Un (1) ltro para montaje en grifo de alta protección/alta capacidad
• Dos (2) adaptadores de grifo
• Dos (2) arandelas
• Cinta para cañerías
HERRAMIENTAS Y MATERIALES
NECESARIOS PARA LA INSTALACIÓN
• Pinzas para retirar el aireador usado (si no se puede quitar con
la mano).
• Moneda para apretar el adaptador para grifo.
WFFM100
12
Page 13

Instalación
Paso
1
Retire el aireador del grifo
Desenrosque el aireador. Retire las arandelas que pueda haber en su grifo. Limpie la
rosca para eliminar el óxido o el sarro.
Rosca
exterior
Rosca
interior
13
V.4.1
Page 14

Instalación
Paso
2
Determine la necesidad de adaptador
Si hay rosca en la parte exterior del grifo, continúe con el paso 3.
Si hay rosca en la parte interior del grifo:
Seleccione el adaptador y la arandela que se adapten a su grifo. Coloque
la arandela en el extremo rebajado del adaptador. Aplique la cinta para
cañerías (provista) a las roscas de ambos extremos del adaptador. La
cinta actúa como sello adicional y refuerza la conexión. Enrosque el
adaptador al grifo. Apriételo con la mano. Puede insertar una moneda en
la muesca de la parte inferior del adaptador para ayudar a apretarlo una ?
vuelta adicional.
Adaptador
Arandela
Cinta para cañerías
NOTA: Las arandelas son diversos gruesos - utilice la arandela esa los mejores ajustes su grifo.
WFFM100
14
Page 15

Instalación
Paso
Fije el filtro al grifo
Posicione el sistema de filtro de modo que la unidad quede del lado izquierdo del
grifo. Coloque la tuerca de montaje roscada en el grifo y hágala girar con la mano
hasta que quede apretada.
3
El conjunto del filtro se puede mover hacia delante y atrás mientras se sostiene la
tuerca de montaje, para ayudar a apretar en montaje del filtro.
15
V.4.1
Page 16

Instalación
Paso
4
Instale el cartucho del filtro
Abra el paquete del cartucho del filtro y retírelo. Abra la tapa del filtro
desenroscándola. Inserte el cartucho en el alojamiento. Alinee los puertos en
la parte inferior del cartucho con los puertos en la base del montaje del grifo.
Presiónelo hasta que quede correctamente ajustado. Coloque nuevamente la tapa
del filtro.
NOTA: Asegúrese de que las echas del cartucho se alineen con las echas de la
base del montaje del grifo. Corrientes con los medios de filtro a una tarifa controlada
para asegurar la reducción del contaminante y para mejorar gusto.
CONSEJO IMPORTANTE: Soporte siempre la parte inferior del montaje en grifo
cuando retira o inserta cartuchos de filtro. Esto ayuda a mantener intacto el sello
con el grifo y evita daños a la unidad.
WFFM100
16
Page 17

Instalación
Paso
5
Lave el filtro
Gire el selector de filtro a la posición de agua filtrada. Deje correr agua fría durante
5 minutos para lavar el cartucho del ltro. No beba o use el agua ltrada durante el
ciclo de lavado. El lavado eliminará las posibles partículas de carbón y preparará el
filtro para su uso.
Este lavado eliminará las posibles partículas de carbón y activará el filtro para su
uso. Es normal ver algunas partículas de carbón enjuagadas del filtro durante el
lavado inicial. El lavado no altera la vida útil del cartucho. El cartucho incluido con
este sistema funciona para hasta 100 galones (379 l) de agua. Consulte en la sección
sobre el reemplazo del cartucho la vida útil esperada de su filtro y las reducciones
concomitantes.
Temp del agua <
100°F/38°C
No filtre agua caliente
17
V.4.1
Page 18

Instrucciones de uso
1. El filtro para montaje en grifo DuPont™ está ahora listo para usar.
2. Puede elegir dos tipos de agua de su grifo dependiendo de sus
necesidades y de la posición del selector.
3. La posición horizontal permite que el agua uya sin pasar por el cartucho y
proporciona agua sin ltrar. Use este ajuste para agua caliente y agua fría sin
filtrar, tal como para lavarse las manos.
4. La posición vertical es para obtener un chorro de agua ltrada. Use esta
posición para el agua filtrada que se emplea para beber y cocinar.
NOTA: Su cartucho de ltro durará aproximadamente 3-4 meses si está ltrando el agua
munincipal, agua bien reducirá la vida de un filtro.
NOTA: El caudal de agua ltrada es habitualmente menor que la mitad del caudal sin ltrar. El
agua circula a través del medio de filtro con un caudal controlado a fin de asegurar la reducción
de contaminantes y mejorar el sabor.
WFFM100
18
Page 19

• Estos ltros no son puricadores de agua. No use este producto con agua
microbiológicamente insegura o de calidad desconocida sin una desinfección adecuada
antes o después del sistema. Los sistemas certificados en relación con la reducción de
cistes se pueden usar en aguas desinfectadas que pueden contener cistes filtrables.
• Esta unidad no está diseñada para ltrar azufre (olor a huevos podridos). El uso de ltros
de carbón para tratar el azufre puede intensicar los problemas de sabor y olor.
• Cumpla todas las regulaciones estatales y locales relativas a la instalación de dispositivos
de tratamiento de agua.
• Los contaminantes u otra sustancias reducidas por este ltro no están
necesariamente presentes en el agua que usted usa.
ADVERTENCIAS SOBRE SEGURIDAD Y RIESGOS
Datos de operación y mantenimiento
Estas unidades están diseñadas para uso no comercial. Deben usarse únicamente con tem-
peraturas de aire ambiental entre 35 grados F (2 grados C) y 100 grados F (38 grados C). Debe
evitarse colocar estas unidades bajo la luz solar directa o usar equipos calefactores eléctricos
en las mismas. Reemplace el cartucho del ltro cuando y como se explica en las instrucciones
de instalación y operación incluidas con el cartucho. Los cartuchos de ltro de reemplazo
están disponibles en las tiendas minoristas.
Reemplazo de cartuchos
Primero ministro Faucet Mount WF-FM100 Series De DuPont™
El consumo y la calidad del agua de su línea de suministro entrante afectan a la vida útil
de los cartuchos de ltro y determinan cuándo deben reemplazarse. Los cartuchos deben
reemplazarse anticipadamente si la presión de agua en el grifo comienza a decaer percep-
tiblemente o si el filtro no funciona satisfactoriamente.
Todos los cartuchos para montaje en grifo DuPont™ y los sistemas para montaje en grifo
DuPont™ son intercambiables. Todos los cartuchos DuPont™ están diseñados para ltrar
agua en cualquier sistema DuPont™ similar. La reducción de capacidad indicada para el
cartucho de ltro está ligada al funcionamiento del cartucho dentro de un sistema de ltrado
específico para el que ha sido probado y certificado. Consulte en la Hoja de datos de funcionamiento los datos certificados de los sistemas específicos con los cartuchos indicados.
Certificación del sistema original
Montaje en grifo Premier
Serie WF-FM100
Montaje en grifo Deluxe con medición electrónica
Serie WF-FM350
19
Número de modelo del cartucho/
El sistema se vende con
WFFMC100
WFFMC300
V.4.1
Page 20

Smarter Choices for a Cleaner World
Elecciones más inteligentes para un mundo más limpio
Creating better products for you and
your family is what you can expect
from DuPont. The product inside this
package was created adhering to
high standards in quality, efficacy and
low environmental impact.
La creación de mejores productos
para usted y su familia es lo que puede
esperarse de DuPont. El producto que
contiene este paquete se creó cumpliendo
exigentes normas de calidad, eficacia y
bajo impacto ambiental.
Independently Tested
and Certified to Improve
Taste and Water Quality
Mejora del sabor y calidad
probadas y certificadas en
forma independiente
© 2011 Protect Plus, LLC. The DuPont Oval Logo®, DuPont™, The miracles of
science™ are trademarks or registered trademarks of E. I. du Pont de Nemours and
Company or its affiliates. All rights reserved.
©2011 Protect Plus, LLC. El logotipo DuPont Oval Logo®, DuPont™, The miracles of science™ son
marcas de fábrica o marcas registradas de E. I. du Pont de Nemours and Company o sus aliadas. Todos
los derechos reservados.
WFFM100
20
 Loading...