

Duplo Duprinter DP-203, Duprinter DP-205, Duprinter DP-205A, Duprinter DP-203A Instruction Manual
Page 1

For this machine to be used safely, it MUST be
operated correctly and serviced regularly. Therefore,
read this Instruction manual thoroughly before using
the machine.
Keep this manual in a safe place where it can be consulted at any time.
DUPLO CORPORATION
DUPRINTER
DP-203 /203A ,DP-205 /205A
Instruction Manual
Ver.1
Page 2

Complies with the provisions defined by the regulations listed below.
EC Low Voltage Directive ( 73 / 23 / EEC )
EC Electromagnetic Compatibility Directive ( 89 / 336 / EEC )
Copyright 2004
DUPLO SEIKO CORPORATION
All Rights Reserved
Page 3

- 1 -
Introduction
Thank you for your purchase of the
DUPRINTER DP-203
22
/ 203A22, DP-20522/ 205A
22
.
To ensure safe and efficient prolonged use of this machine, read and thoroughly unders
tand
this manual before using this machine. After using this manual, be sure to keep it in a
place to handy reference.
PLEASE NOTE
In the interest of upgrading our products, specifications and other data given in this
manual are subject to change without notice. If the manual contains anything that you
do not understand, contact the manufacturer for clarification.
Precautions for printing and duplicating
There are restrictions on what you may print on the printer.
Please be aware that there are some printed materials that are illegal
even to possess.
1. Printed matters banned by law
¡¡
Paper money, currency, government bonds and national and local
bonds cannot be duplicated, even if they are stamped with the
"sample" seal.
¡¡
Paper money, currency and bonds, etc. that are valid in foreign
country cannot be duplicated.
¡¡
Unused postage stamps and postcards cannot be duplicated
without governmental consent.
¡¡
Government-issued papers pertaining to stamps, liquor and sales
tax laws cannot be duplicated.
2. Printed matters that need caution
¡¡
Private-issued securities(stocks, bills and checks, etc.), passes and
tickets needs caution in duplicating unless a business is
duplicating them for needed amounts for their business needs.
¡¡
Government-issued passports, public-and private-issued driver`s
licenses, permits, identifications, food stamps, etc. will need
caution in duplicating.
3. Copyrighted materials
Books, music, artwork, prints, maps, diagrams, movies, photography,
etc. are banned from duplicating outside the limits of private home
use and their related non-sale usage.
Page 4

4
. Various functions 24
3
. Platemaking and printing procedure 19
2
. Easy printing 17
Safety Precautions 44
- 2 -
Contents
Making plates of text/photographs ………24
Adjusting the plate darkness ………………24
Changing the printing speed ………………25
Adjusting the printing position ……………25
Setting the enlargement and reduction …26
Setting the document size …………………27
Changing the image quality
in photograph mode………………………28
Entering the number of sets ………………29
Setting the number of copies
for separate documents …………………31
Using a thick or thin paper
(Adjusting the feeder pressure) ………33
When using a thick paper and/
or misfeed occurs …………………………33
When using a thin paper and/or
double feed occurs ………………………33
Confidential safeguard function……………34
To set confidential safeguard function ……34
To clear ………………………………………34
On-Line Print Function
(model :
DP-203A
22
/ 205A
22
only) ……35
Drum unit ……………………………………36
Changing the drum unit ……………………36
Setting the drum unit ………………………37
Tape cluster setting the tape cluster ……39
Setting the paper tray ………………………19
Setting the paper stacker …………………20
Turning the power on ………………………21
Checking the control panel …………………21
Setting the document ………………………22
Pressing the platemaking key ……………22
Entering the number of printed copies……23
Pressing the print key ………………………23
Easy printing …………………………………17
1
. Before using the machine 11
Part names and their functions ……………11
Control panel …………………………………14
Printing process………………………………16
Page 5

6
. Troubleshooting 46
5
. Replacing of consumable 40
- 3 -
Changing the ink pack………………………40
Changing the master roll……………………42
Changing the master ejection core ………45
OK Monitor……………………………………46
Removing a left paper jam
(feed tray side) ……………………………51
Removing a right paper jam
(print tray side) …………………………52
Removing a master(eject error) ……………54
Removing a master(set error)………………56
Removing a jammed document ……………58
Trouble shooting for machine malfunction
…59
2
3
4
5
1
6
7
8
7
. Maintenance and inspection 60
Maintenance …………………………………60 Total counter …………………………………61
8
. Specifications 62
Specifications …………………………………62 Original document/
copy paper specification …………………63
Page 6

- 4 -
Safety Precautions
Various symbols and pictures are used in this manual and on the stickers affixed
to the machine. These symbols and pictures provide warnings and instructions to
prevent danger to you or other personnel, and to prevent damage to office
property. The meanings of these symbols and pictures are explained below.
Indicates a high degree of potential danger. If the warning is
ignored, death or serious injury may result.
Indicates a medium degree of potential danger. If the
caution is ignored, medium injury or damage to property
may result.
WARNING:
CAUTION:
A circle with a line through it indicates a prohibited action. The particular
act prohibited
is indicated by a picture inside the circle. (In the example
shown here, the prohibited act is disassembly.)
A black disc indicates an instruction, or sometimes a prohibited action.
The instruction
itself is indicated by pictorial symbols drawn in white on
the disc. (In the example shown here, the instruction is "Remove the
plug from the outlet.")
About Machine Safety
Examples of pictorial symbols
Page 7

- 5 -
Safety Precautions
WARNING
¡¡
If the machine is used after foreign matter (metal fragments,
water, or other liquid) has gotten inside the machine, fire or
electrical shock can result.
aa
Turn the main unit`s power switch to OFF.
Pull the power plug from the outlet.
Contact the sales distributor (or maintenance service
company).
¡¡
If the machine is used after heat, smoke, strange smell, or other
abnormality is detected, fire or electrical shock can result.
aa
Turn the main unit`s power switch to OFF.
Pull the power plug from the outlet.
Contact the sales distributor (or maintenance service
company).
¡¡
Use only the power cord that is provided among the
accessories.
Insert the power cord plug firmly into the socket, so that
proper electrical contact is effected.
aa
Use of any other power cord could result in imperfect
grounding.
If grounding is imperfect and electrical leakage occurs, fire or
electric shock could result.
Page 8

¡¡
Do not modify the machine.
Fire or electrical shock can result.
¡¡
Do not remove the rear lid, cabinet, or cover from the
machine.
The interior contains high-voltage parts, which can cause
electrical shock.
¡¡
Do not remove or insert the power plug if your hands are wet.
You can get electrically shocked.
¡¡
Do not damage, break, or modify the power cord.
Do not place heavy objects on it, yank it, or unreasonably
bend it.
Fire or electrical shock can result.
- 6 -
WARNING
Page 9

¡¡
Do not insert or drop metal, burnable material, or other matter
through the ventilation holes into the machine interior.
Fire or electrical shock can result.
¡¡
Do not place flower vases, flowerpots, cups, or water
containers (including metal containers) on top of the
machine.
Fire or electrical shock can result if the liquid spills.
¡¡
Do not use a source voltage other than that specified.
Do not connect multiple loads to a single outlet.
Fire or electrical shock can result.
¡¡
Before cleaning, pull the power plug from the outlet.
¡¡
Prevent water and neutral cleansers from getting inside the
machine.
This action prevents not only breakdowns but electrical shock.
Maintenance
aa
Refer to page 60
- 7 -
Safety Precautions
WARNING
Page 10

¡¡
Before moving the machine, pull the power plug from the
outlet.
If the cord is damaged, fire or electrical shock can result.
¡¡
Pull the power plug itself, not the cord.
If you yank the cord, you can damage it (cause exposed
conductor, disconnection, etc.), resulting in fire or electrical
shock.
¡¡
Do not place the machine in an unstable position, such as on
an unsteady support or sloping area.
If the machine drops or falls over, a person could get injured.
¡¡
Do not place the machine in a humid or dusty area.
Fire or electrical shock can result.
- 8 -
WARNING
Page 11

- 9 -
Safety Precautions
1Caution Sticker 1M7-T3060
e
¡¡
Keep the WARNING and CAUTION stickers clean at all times.If stickers become
damaged or come off, replace them with new ones.
J3-T3200
q
Warning
¡Do not remove this cover. The
inside of the printer contains
movable cutting instruments,
contact with which could result
in injury.
w
L5-T3020
Do NOT touch the drum or rollers
when you operate the jog switch.
Do NOT put hands Inside
machine while it is operatung.
Hands could get caught up
or crushed.
WARNING
No. Parts No. Name Q´ty
q
J3-T3200 Warning Sticker 1 1
w
L5-T3020 Warning Sticker 2 1
Locations of warning stickers
e
M7-T3060
CAUTION
Page 12

- 10 -
Introduces instructions for correct operation of the machine.
If these instructions are ignored, the machine my not be able
to operate at optimum performance, or may break down.
Introduces information that is useful for operation and
maintenance of the machine, or information about the
machine’s performance, etc.
IMPORTANT
:
Note
:
Conventions Used in this Manual
Indicates a high degree of potential danger. If the warning is
ignored, death or serious injury may result.
Indicates a medium degree of potential danger. If the
caution is ignored, medium injury or damage to property
may result.
WARNING:
CAUTION:
GUIDE TO THIS MANUAL
Page 13

Before using the machine
1
MACHINE EXTERIORS
DOCUMENT RECEIVING TRAY
DOCUMENT GUIDE
DOCUMENT TRAY
SUPPORT TRAY
SUPPORT TRAY
CONTROL PANEL
FRONT COVER
INK PACK HOLDER RELEASE LEVER
DRUM HANDLE
FRONT COVER
DRUM UNIT
INK PACK
DRUM SECURING LEVER
POWER SWITCH
SUPPORT TRAY
DOCUMENT
TRAY
PAPER TRAY
ADF
¡¡
This lever is lock or unlocks the drum
in stopping the drum position.
- 11 -
Parts Names and Their Function
1. Before using the machine
Page 14

DOCUMENT RECEIVING TRAY
THERMAL HEAD ESCAPE LEVER
ROLL MASTER
MASTER HOLDER
FEED PRESSURE LEVER
PAPER TRAY
PAPER GUIDE
GUIDE LOCK SCREW
PAPER SET LEVER
PAPER FEED ROLLER
MASTER SET SWITCH
- 12 -
Page 15

Before using the machine
1
JOG SWITCH
PAPER STRIPPER FINGER
MASTER EJECTION CORE
DOCUMENT TRAY
MASTER EJECTION BOX
PAPER STACKER GUIDE
PAPER RECEIVING TRAY
MASTER EJECTION BOX
LID RELEASE LEVER
MASTER EJECTION BOX
RELEASE LEVER
PAPER EJECTION ROLLER
JUMP PLATE
PAPER STOPPER
- 13 -
Page 16

- 14 -
CONTROL PANEL
No. Components Functions
q
“
PLATE MAKING " key Starts plate making.
w
“
PRINT " key
Starts printing.This will not start plate making.When the tape cluster
have been installed,plate making will start automatically after end of
printing if the document is placed on the ADF.
e
“
TEST PRINT " key Prints one copy.This is used to check the image position and contrast.
r
“
STOP " key
Stops printing.If this key is pressed while the machine is stopped,the
number of copies and plates will be displayed.
t
“
ALL CLEAR " key
Returns the control panel settings back to the standard mode.Hold
down for at least 0.5 second.
y
Key pad Used for entering the number of prints.
u
“="
key
Enters the number of prints and number of sets.To enter the number of
prints per document after a clear,press the =key.
i
“
CLEAR " key Clears the display to “0" .Clears the number of prints only.
o
LCD panel
Displays number of prints and other machine settings.Displays error
messages when error is occurred.
!0
“
SELECT " key Selects magnification and other functions.
!8 !6 @0 o
!0!1!2!3!4!5!7!9
Page 17

- 15 -
Before using the machine
1
No. Components Functions
!1
“
MODE " key Switches between normal mode and function mode.
!2
“
TEXT/PHOTOGRAPH " key
Each press of this key switches between the text mode and photograph mode.
!3
Document mode indicator
lamp
The lamp for the specified document mode lights.
!4
“
PLATE DARKNESS ADJUSTMENT
"
key
The plate darkness is adjusted with this key.
!5
Plate darkness indicator
lamp
The lamp for the specified plate darkness lights.
!6
“
PRINTING SPEED ADJUSTMENT
"
key
The printing speed is adjusted with these keys.
!7
Printing speed indicator
lamp
The lamp for the specified printing speed lights.
!8
“
PRINTING POSITION ADJUSTMENT
"
key
The printing position(vertical) is adjusted with these keys.
!9
Printing position indicator
lamp
The lamp for the specified printing position lights.
@0
OK Monitor Indicates errors,LED to indicate the machine area.
ye q
rwtui
Page 18

- 16 -
"Printing"
In the "printing" process, the paper which is separated from the stack by the paper feed roller
and the paper separator unit are pressed to the drum by the pressure roller. There are small
holes in the image area of the master that is attached to the drum and ink that seeps from the
hole is transferred to the paper. The paper is separated from the drum unit by the stripper
finger. The paper is delivered to the paper receiving tray.
Printing Process
The DUPRINTER goes through a process of"platemaking" and "printing".
"Platemaking"
In the "platemaking" process, the old master on the drum is removed while the thermal head
creates the scanned image on new master and loads it on the drum.
DRUM
UNIT
ROLL MASTER
THERMAL HEAD
PAPER FEED ROLLER
PAPER
INK
DRUM UNIT
PAPER SEPARATOR UNIT
PRESSURE ROLLER
PAPER EJECTION ROLLER
PAPER STRIPPER FINGER
PAPER RECEIVING TRAY
MASTER EJECTION
BOX
Page 19

- 17 -
Easy Printing
1
2. Easy Printing
Preparation
Platemaking
Printing
Open the paper tray, set the paper,
and adjust the paper guide. (See page 19.)
1
Open the paper receiving tray; then adjust the paper stacker
guide, paper stopper, and jump plate. (See page 20.)
2
Turn on the power; then check the indication on the control
panel. (See page 21.)
3
Set the original document face down in the ADF; then adjust
the document guide. (See page 22.)
4
Press the PLATE MAKING key. One test-print will be
produced. (See page 22.)
5
Check the finished product. (See page 22.)
6
Enter the number of printed copies. (See page 23.)
7
Press the PRINT key. The number of copies entered will
be printed. (See page 23.)
8
2
Page 20

- 18 -
MEMO
Page 21

- 19 -
Platemaking and printing procedure
3
3. Platemaking and printing procedure
Setting the Paper Tray
Open the paper tray toward you Open
the paper tray toward you.
1
Lower the paper set lever.
2
Place the paper in the tray, and adjust
the paper guide to the width of the
paper.
3
Raise the paper set lever.
4
PAPER TRAY
PAPER SET LEVER
PAPER
PAPER SET LEVER
PAPER GUIDE
Page 22
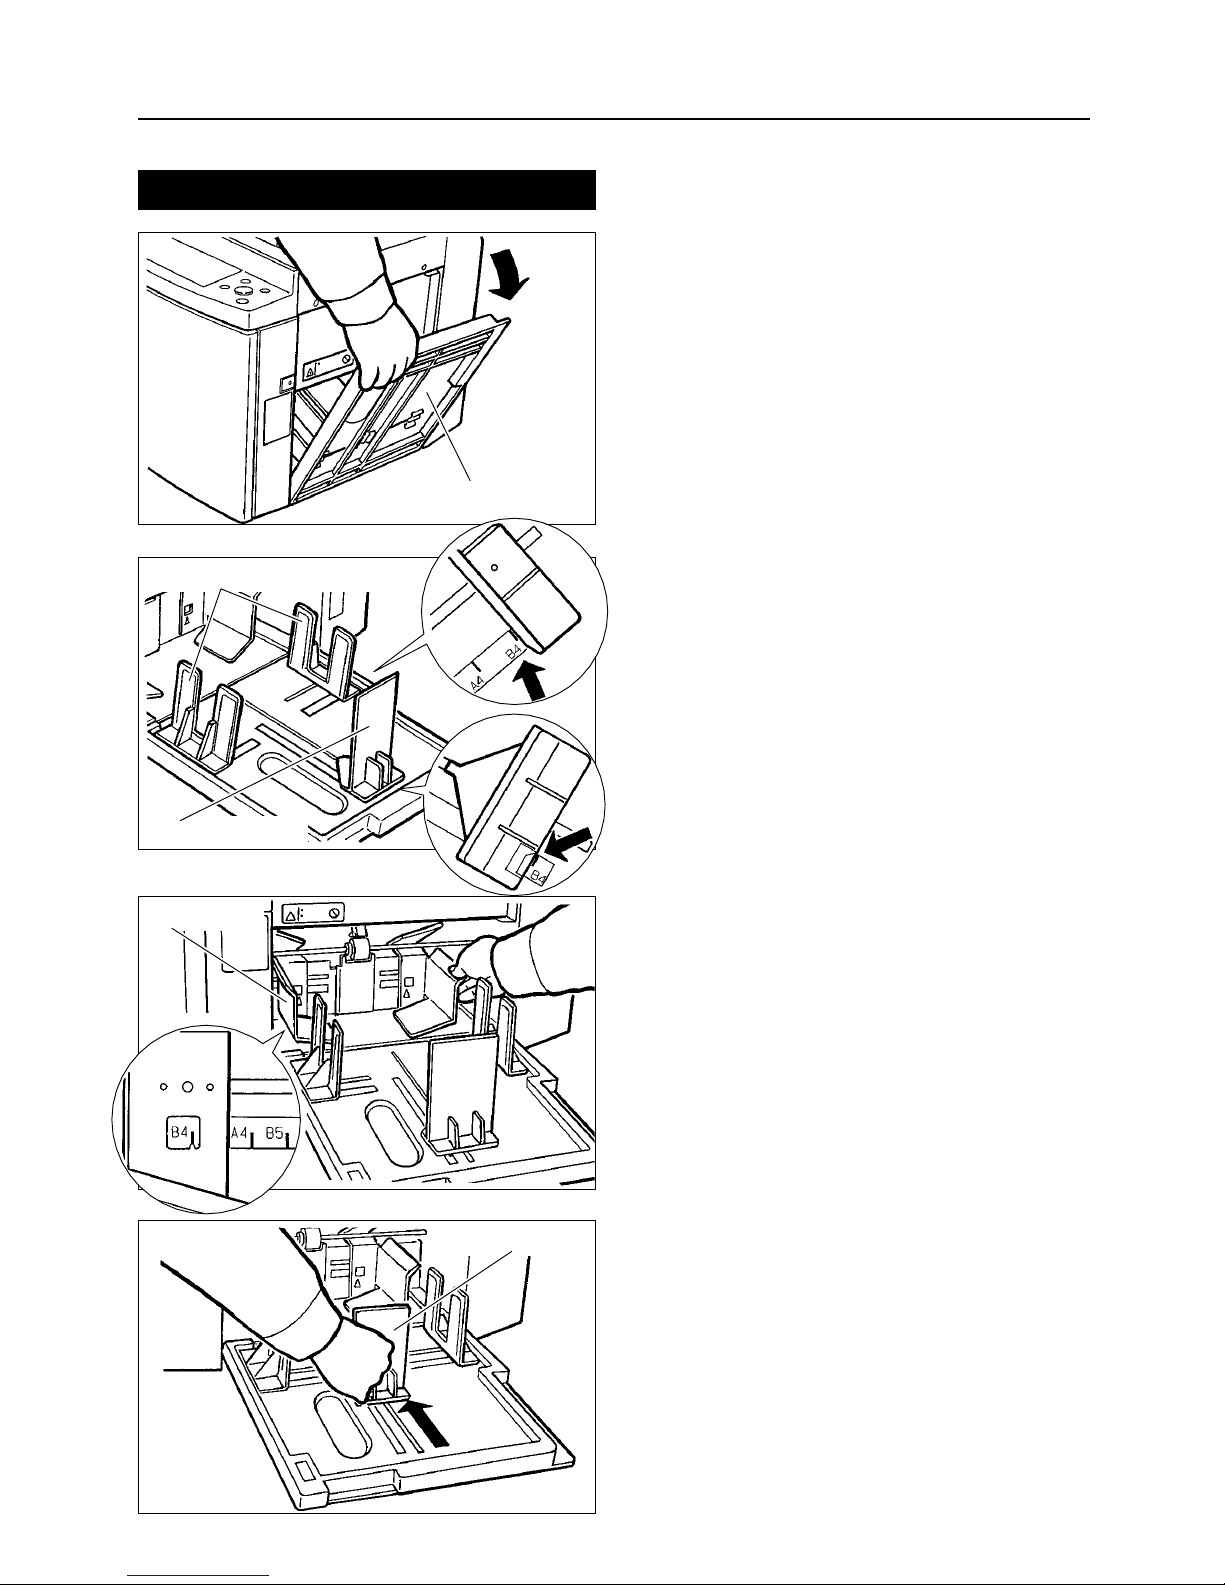
- 20 -
Open the paper receiving tray.
1
Adjust the paper stacker guide and
paper stopper to the paper size marking.
2
Adjust the jump plate to the paper size
marking.
3
¡¡
After using the machine, push the paper
stopper inward as far as it will go, and
close the paper receiving tray back up.
Turning on the Power
Setting the Paper Stacker
PAPER RECEIVING
TRAY
PAPER STACKER GUIDE
PAPER STOPPER
JUMP PLATE
PAPER STOPPER
Page 23

- 21 -
Platemaking and printing procedure
3
Turning the power on
Turn the power switch to ON. The
power switch is ON when " I ", and OFF
when " K ".
1
Checking the Control Panel
Check the control panel. When the
power is ON, the control panel displays
the initial settings.
Magnification,
document
, and
plate darkness
can be changed as
needed.
¡¡
When the magnification is 100%, no
indication will appear on the liquid crystal
display (LCD).
¡¡
When the number of copies is set at 0, the
LCD will not indicate "0."
Note
:
1
POWER SWITCH
0sht 1set
ON OFF
Page 24

- 22 -
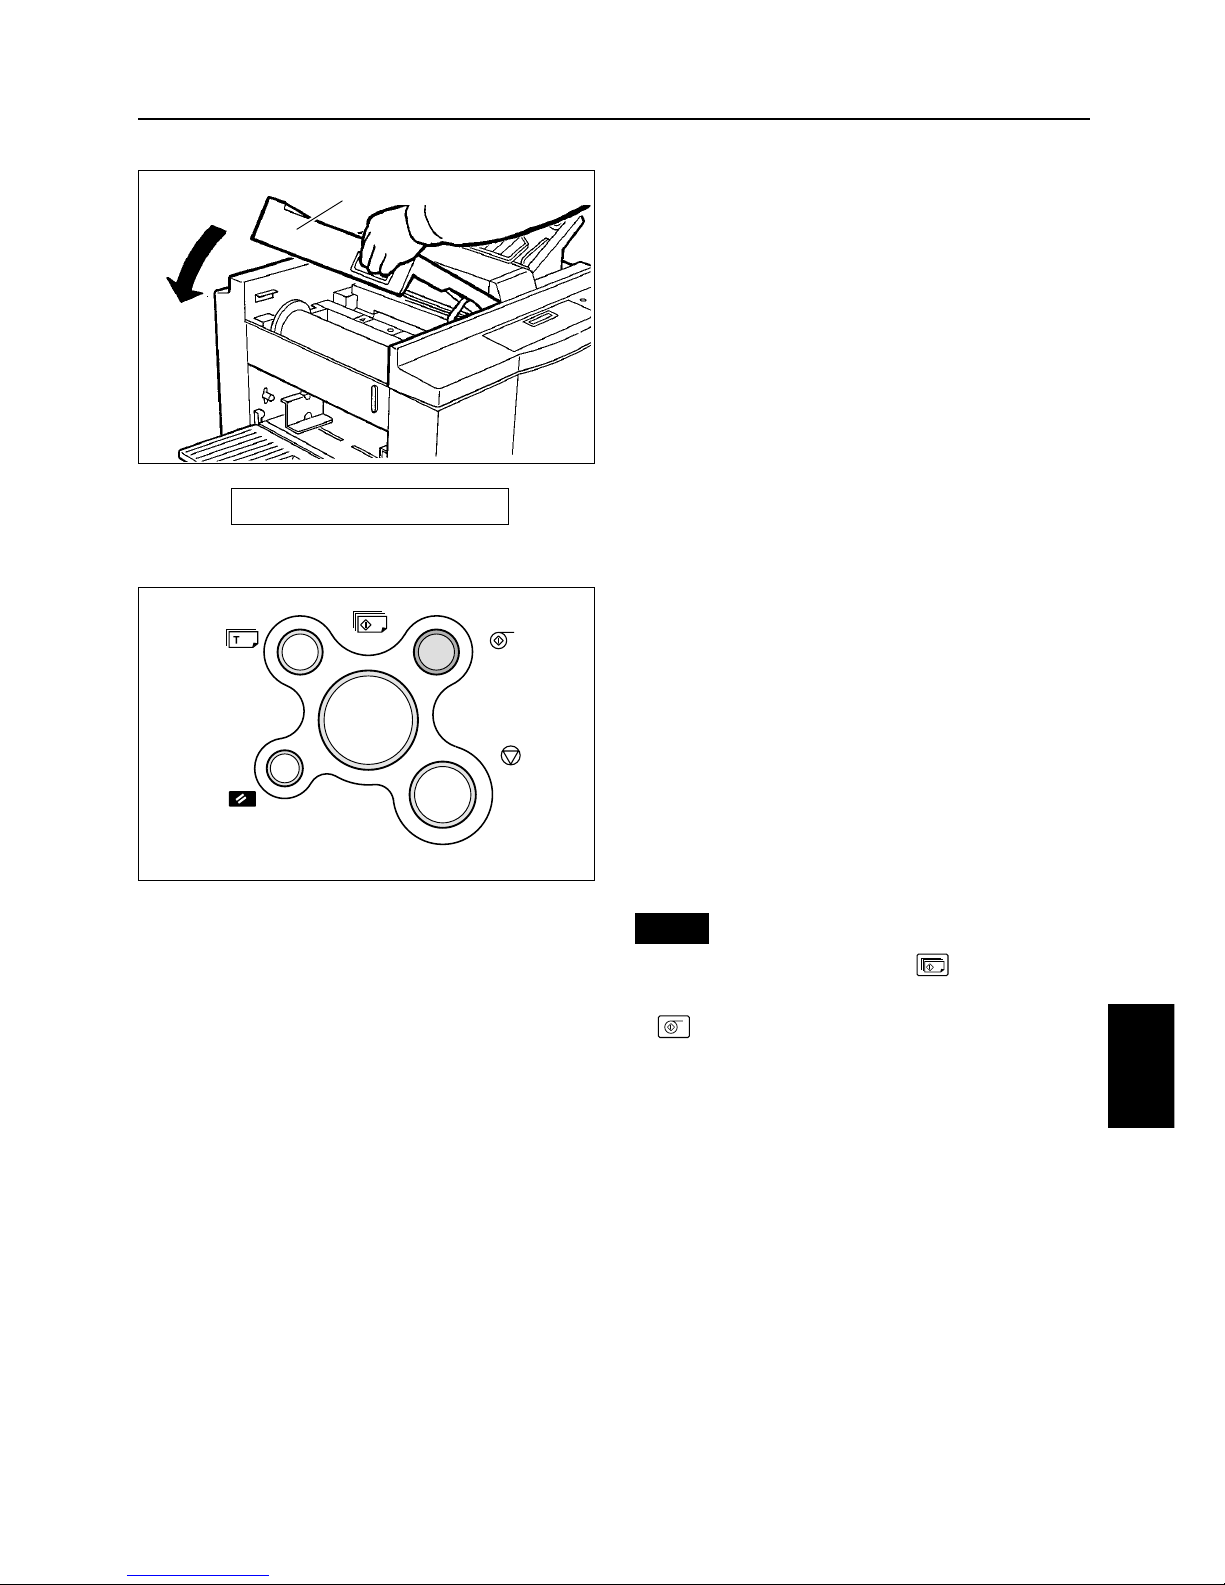
Setting the Document
Adjust the document guide to the size of
the document; then set the document
face down.
¡¡
Up to 10 original documents can be set at
one time.
¡¡
Set the DOCUMENT SIZE.
(See page 62 and 63.)
Note
:
2
Pressing the Platemaking Key
Press the
PLATE MAKING
key. The
document will be automatically
forwarded and platemaking will begin.
When platemaking is finished, one test
print will be produced.
Check the finished product. Check the
registration and copy quality.
1
2
¡¡
If the following settings are changed, return the document to the original position and make the plate again.
Magnification
a
100%, 94%, 86%, 81%, 70%, 115%, 122%, 141%
(A/B size specifications)
100%, 94%, 77%, 74%, 64%, 121%, 129%, 141%
(Inch size specifications)
Document mode
a
Text / Photograph
Plate darkness
a
Auto / Darker / Lighter
Photo mode
a
Dark / Soft
AUTO
S
¡¡
Magnification See page
26
¡¡
Document mode See page
24
¡¡
Plate darkness See page
24
¡¡
Photo mode See page
28
Open the support tray.
1
SUPPORT TRAY
Page 25

- 23 -
Platemaking and printing procedure
3
0sht 1set
Entering the Number of Printed Copies
Using the number keys, enter the
number of copies you want to print.
1
Example:If you enter 1, 2, 3, and 4, the LCD
will look like this:
a
To enter numbers of sets : See page 29.
a
To enter numbers of copies for separate
documents : See page 31.
Pressing the Print Key
Press the
PRINT
key. When the
entered number of copies has been
printed, the machine will stop.
¡¡
When the following documents are in the
ADF, platemaking / printing will be
automatically executed.
Note
:
1
KEY PAD
1234sht 1set
Page 26

- 24 -
4. Various functions
Press the
DOCUMENT
key; then select
TEXT
or
PHOTOGRAPH .
: TEXT
TEXT
is appropriate for documents
containing characters only, and for blackand-white photograph documents that have
undergone dot processing.
: PHOTOGRAPH
PHOTOGRAPH
is appropriate for photograph
documents and color documents.
¡¡
You can change the image quality of
photograph mode. (See page 28.)
Note
:
S
S
Making Plates of Text / Photographs
Adjusting the Plate Darkness
There are three plate darkness settings; you
may select the desired darkness.
: STANDARD
Reads the darkness of the document, and
automatically makes plates with the optimal
darkness.
: DARKER
Makes plates darker.
: LIGHTER
Makes plates lighter.
STD
Page 27

- 25 -
Various functions
4
Changing the Printing Speed
Press or for print speeds.
FASTER : 120shts/min
STANDARD : 80shts/min
SLOWER : 60shts/min
Adjusting the Printing Position
Press or of the
PRINTING POSITION
key.
Print image moves up.
Print image moves down.
¡¡
Adjustments of up to approximately
20mm (from top to bottom) can be made.
¡¡
The lamp changes one position when a
shift of about 3mm is made.
Note
:
Page 28

- 26 -
Setting the Enlargement and Reduction
Press the
MODE
key and switch to
the enlargement and reduction selection
display.
1
Press the
SELECT
key; then select
the desired enlargement and reduction.
2
¡¡
Each time you press the key, the display
changes as shown in the figure below.
Magnification Display
A / B size Specifications Inch size Specifications
Press the
MODE
key and return to
the main display. The enlargement and
reduction is shown to the right of the
number of copies.
Example: If you select a reduction of 64%:
3
0sht 1set 64%
Enlargement and Reduction
Main Display
1. ZOOM
1 0 0 %
9 4 %
8 6 %
8 1 %
7 0 %
1 4 1 %
1 2 2 %
1 1 5 %
1 0 0 %
9 4 %
7 7 %
7 4 %
6 4 %
1 4 1 %
1 2 9 %
1 2 1 %
Page 29

- 27 -
Various functions
4
Setting the Document Size
Press the
MODE
key and switch to
the document size selection display.
1
Press the
SELECT
key; then select
the document size.
2
¡¡
Each time you press the key, the display
changes as shown in the figure below.
Document Size Display
Press the
MODE
key and return to
the main display.
3
A / B size Specifications Inch size Specifications
Document Size
2.DOCUMENT SIZE
Main Display
Osht 1set
B 4
A 4
B 5
A 5
P O S T
A 4
B 5
A 5
P O S T
1 0 9 1 4
L G
L T
S T
P O S T
L G
L T
S T
P O S T
DP - 205 / 205A DP - 203
/
203A DP - 205 / 205A DP - 203 / 203A
Page 30
- 28 -
Changing the Image Quality in
Photograph Mode
Photograph Mode Image Quality
Image Quality
3. PHOTO MODE
NORMAL
dd
DARK
dd
SOFT
Press the
MODE
key and switch to
photograph mode (indicated in image
quality selection display).
1
Press the
SELECT
key; then select
the image quality.
2
¡¡
Each time you press the key, the display
changes as shown in the left-hand
figure.
DARK
Darkens the half-tone light areas.
SOFT
Softens the outline`s highlighting.
Press the
MODE
key and return to
the main display.
3
Main Display
Osht 1set
Page 31

- 29 -
Various functions
4
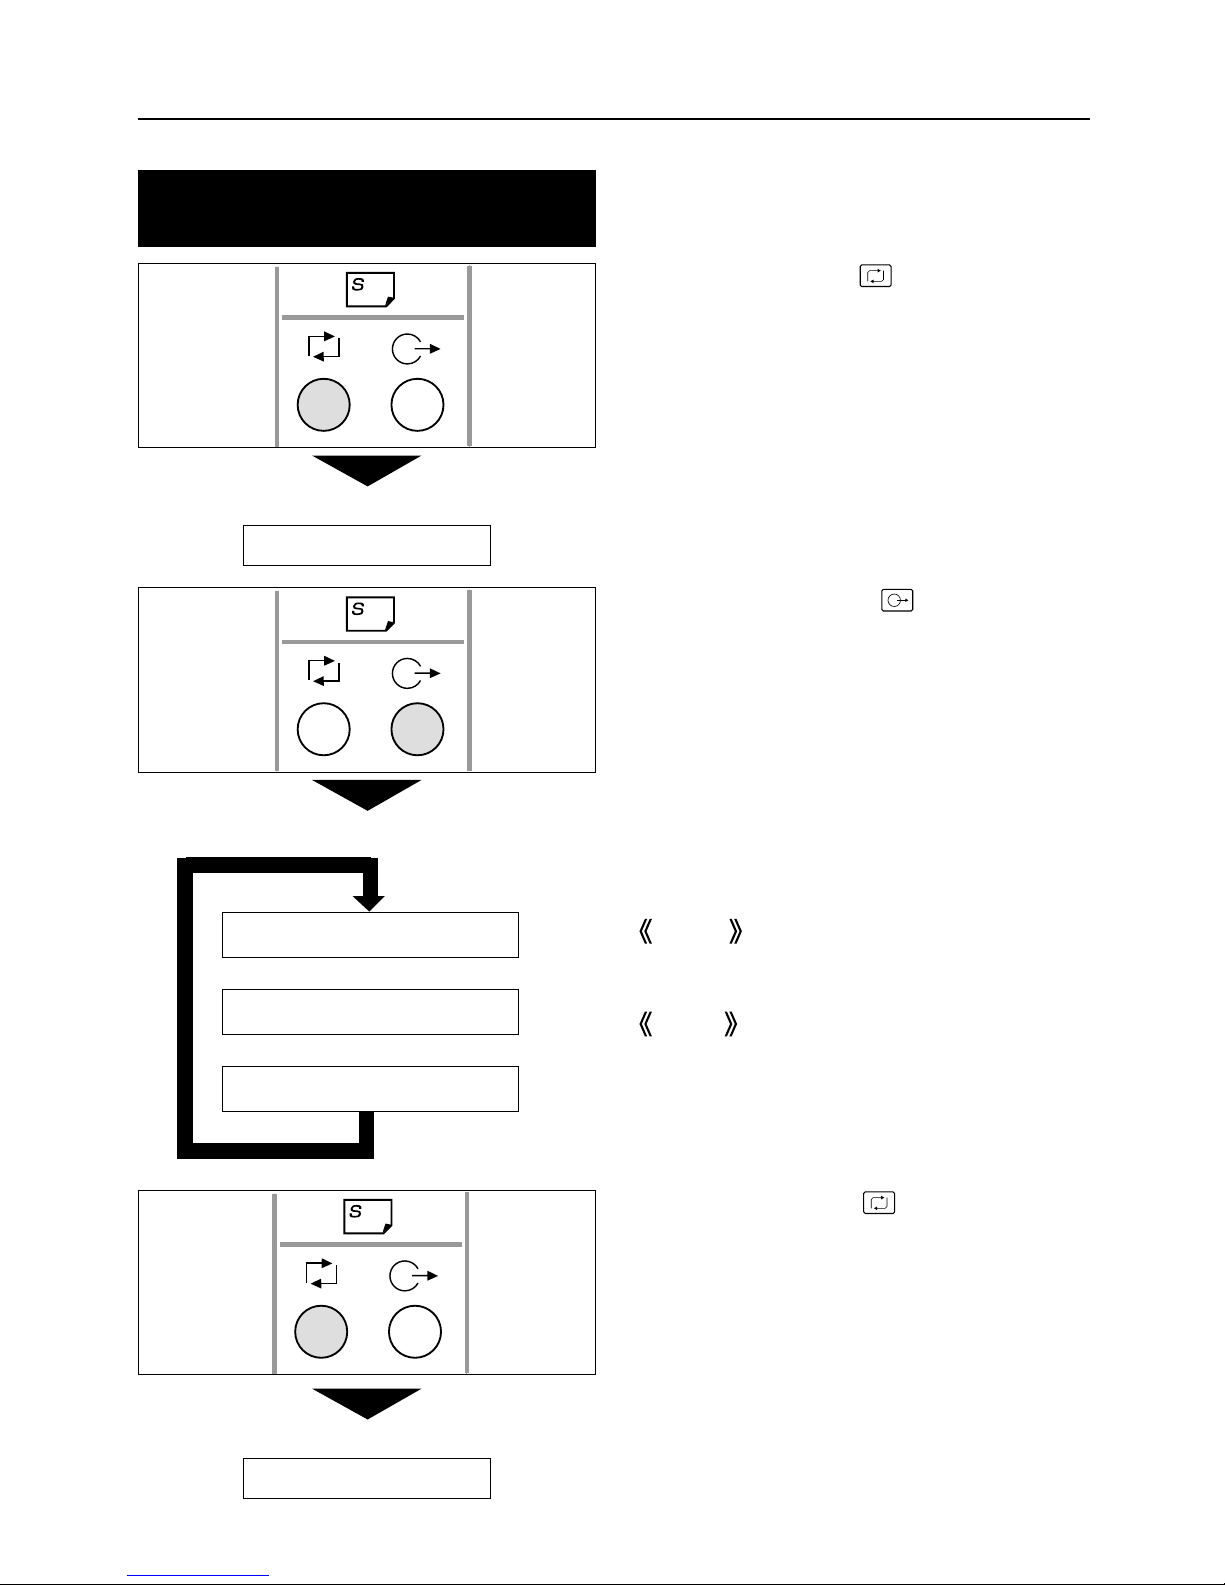
Entering the Number of Sets
Press the
CLEAR
key to clear the
main displayed.
C
1
Using the number keys, enter the
desired number of copies.
2
Press the
=
key.
3
Example: If you enter 1, 2, 3, and 4,
the LCD will look like this:
Main Display
0sht 1set
Main Display
1234sht 1set
Main Display
1234sht 0set
Page 32

- 30 -
Using the number keys, enter the
desired number of sets.
4
Example: If you enter 5, the LCD will
look like this:
Press the
=
key.
5
¡¡
When continuously inputting, repeat steps
2
thru 5.
¡¡
Up to 15 original documents can be entered.
¡¡
Printing stops after one set of copies are finished. Press the PRINT key to
restart printing. (Using the optional tape cluster permits continuous printing.).
¡¡
If two or more documents are set in the ADF,after all copies entered are
printed, platemaking and printing of the next document is automatically
executed.
Main Display
1234sht 5set
Main Display
1234sht 5set
Note
:
Page 33
- 31 -
Various functions
4
0sht 1set
Setting the Number of Copies for
Separate Documents
Press the
CLEAR
key to clear the
main displayed.
C
1
Press the
=
key, and the indication
will flash.
2
Using the number keys, enter the
desired number of copies. Starting from
the document set at the top of the ADF,
enter the number of copies.
3
Example: If you enter 1, 2, 3, and 4,
the LCD will look like this:
Main Display
0sht 1set
Main Display
Main Display
1234sht 1set
Page 34

- 32 -
Press the
=
key.
4
Using the number keys, enter the
desired number of sets.
5
Press the
=
key.
6
Example : If you enter 5, the LCD will
look like this:
Main Display
1234sht 5set
Main Display
1234sht 0set
Main Display
1234sht 5set
¡¡
Repeat steps
2
thru 6(for numbers of original documents only).
¡¡
Up to 15 original documents can be entered.
¡¡
Printing starts from the last group entered.
¡¡
Printing stops after one set`s copies are finished. Press the PRINT key to
restart printing. (Using the optional tape cluster permits continuous printing.)
¡¡
After one document is printed, platemaking and printing of the next document
is automatically executed.
Note
:
Page 35

- 33 -
Various functions
4
Using a thick or thin paper(Adjusting the feeder pressure)
Adjust the feed pressure if you encounter a feeding error with thick or thin paper:
When using a thick paper and / or
Misfeed occurs
Set the feed pressure lever to
"HEAVY PAPER".
When using a thin paper and / or
Double feed occurs
Set the feed pressure lever to
"LIGHT PAPER".
¡¡
After the printing.
Please return the pressure lever to
"NORMAL PAPER"
for the next person.
Note
:
HEAVY
PAPER
NORMAL
PAPER
LIGHT
PAPER
FEED
PRESSURE
Page 36

- 34 -
Confidential safeguard function
By a simple procedure, the Printer can be programmed to confidential documentation.
¡¡
When confidential safeguard is set, printing can not be performed with
PRINT
or
TEST
PRINT
keys.
¡¡
Turning power off will not turn the confidential safeguard off.
¡¡
Even with the confidential safeguard is on, plate making still functions.
Normal operation other than print or test print, can be performed.
¡¡
Once the plate is made, the confidential safeguard will be cleared.
To Set Confidential Safeguard Function
Press and hold the
CLEAR
key, and
press the
STOP
key.
Beep tone will sound when confidential
safeguard is set.
To verify that confidential safeguard is
working. Hit
PRINT
or
TEST PRINT
key and it will not print with confidential
safeguard on.
C
PLS MAKE MASTER
To Clear
Press
PLATEMAKING
key.
Once the plate making is performed, the
confidential safeguard is automatically
turned off.
Page 37

- 35 -
Various functions
4
On-Line Print Function (model : DP-205A
22
only)
Set the size of the printing paper.
aa
See page 27
2
Connect the cable from the computer
into the printer as left figure.
3
Firmly fasten the locks on both sides of
the connector.
5
CONNECTOR
LOCK
¡¡
When platemaking ends and printing
starts,you can again use the keys on the
control panel.
Note
:
¡¡
For details on connection and settings, and refer to the Printer Driver Operation Manual.
IMPORTANT
:
Check that the top menu is displayed.
1
This function allows you to make prints of documents directly from on-line data from personal computers.
Insert the cable from the computer into
the connector on the printer.
4
Use the print command of the computer
applications according to the manual.
Refer to the Printer Driver Operation
Manual about operation.
Platemaking and printing start automatically.
6
CABLE
DUPRINTER
(REAR SIDE)
LOCK
On-line Print Function
Page 38

- 36 -
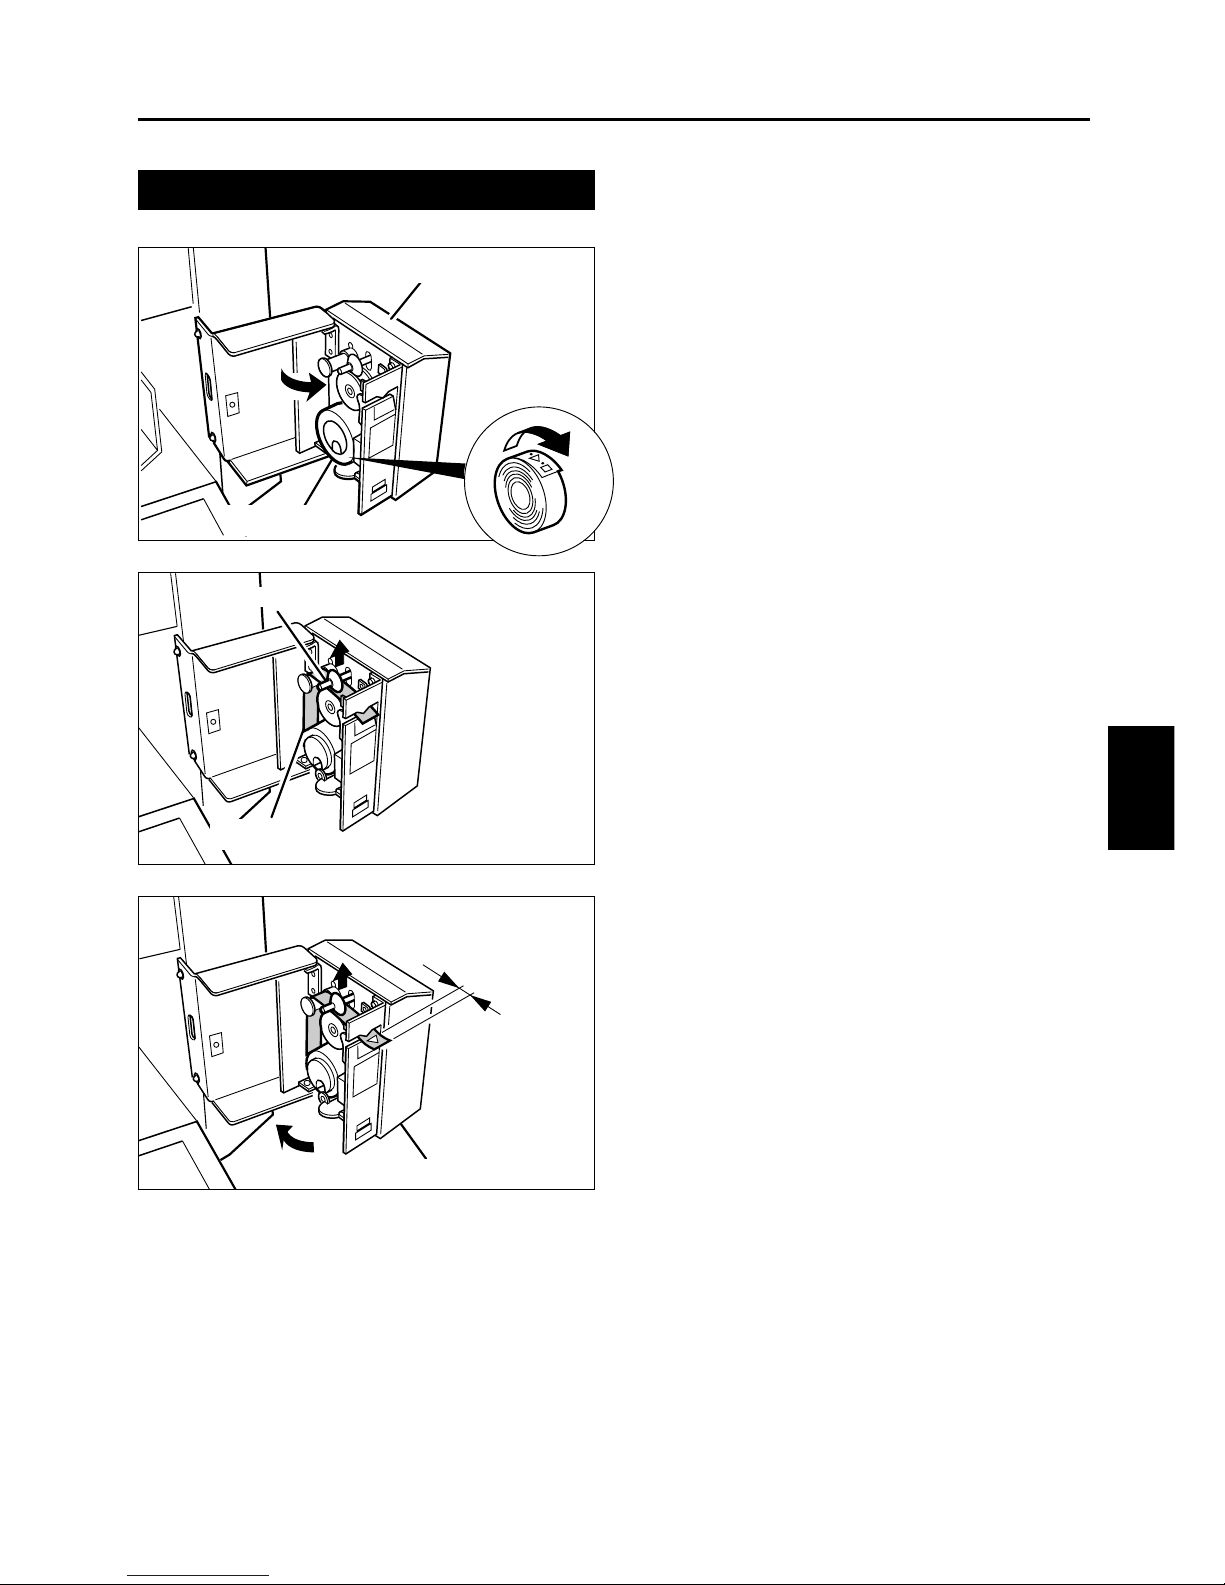
Changing the drum unit
Drum unit
Press the
JOG switch.
Hold down until the drum stops with a beep.
1
WARNING
¡¡
Do NOT touch the drum or rollers when
you operate the jog switch.
¡¡
Do NOT put hands inside machine while
it is operating.
Hands could get caught up or crushed.
Open the front cover.
2
Lift up the drum securing lever.
While lifting the lever up, pull out the
drum handle toward you, pulling it
straight out until it stops.
3
Taking the upper drum shaft with your
other hand, slightly lift up the front of the
drum and pull the drum out toward you.
4
JOG SWITCH
FRONT COVER
DRUM SECURING LEVER
q Upper drum shaft
w
e
CAUTION
¡¡
Do not touch the drum surface; the
ink will get on your clothes.
¡¡
Hold the drum level and place it on a
flat, solid surface.
Page 39

- 37 -
Various functions
4
Setting the drum unit
Hold the drum level and place the drum
guide roller onto the rail in the machine.
1
Holding the front up slightly, push in
about 10cm.
2
Hold the drum level and push it in
gently until it stops.
3
Lift the drum securing lever toward you
while pushing the drum in.
4
ROLLER
RAIL
DRUM
DRUM SECURING LEVER
Page 40

- 38 -
Push down the securing lever tightly
with the drum inside the machine.
5
Close the front cover.
6
Press the
JOG switch.
Keep pressing until the drum stops with
a beep.
7
WARNING
¡¡
Do NOT touch the drum or rollers when
you operate the jog switch.
¡¡
Do NOT put hands inside machine
while it is operating.
Hands could get caught up or crushed.
DRUM SECURING LEVER
FRONT COVER
JOG SWITCH
Slowly and gently
CAUTION
¡¡
Avoid pressing and damaging the drum
surface with fingers etc.
It can stain your clothes, and the warp in
the drum surface may cause bad prints.
¡¡
Always place the drum unit on flat and
stable surface.
Otherwise, the drum surface may be
damaged or warped and may cause bad
prints.
Page 41
- 39 -
Various functions
4
Setting the tape cluster
Tape cluster
Open the tape cluster body.
1
Lift up the lever and pass the tape
through the slot.
3
Make about
1cm
of tape protrude out of
the slot.
4
Tape cluster body
CLUSTER TAPE
1cm
COVER
Lever
CLUSTER TAPE
Install the new tape.
Make sure it will wind off in the correct
direction.
2
Swing the tape cluster body back in.
a
For sectional printing, see p.29,
"Entering the Number of sets"
5
Page 42

- 40 -
Changing the ink pack
Open the front cover.
1
Hold the ink pack holder release lever
and pull it toward you.
2
Pull up and remove the empty ink pack.
3
Twist open the cap of the new ink pack.
4
FRONT COVER
HOLDER RELEASE LEVER
INK PACK
INK PACK
INK PACK
¡¡
Do NOT leave an uncapped INK PACK for
a period longer then necessary.
IMPORTANT
:
5. Replacing of consumable
Page 43

- 41 -
Replacing of consumable
5
Insert the ink pack so that the groove on the
LIP fits into the "U" groove of the holder.
5
Push the ink pack to the set line on the
ink pack.
6
Push the side of the holder in with the
palm of your hand.
7
Close the front cover.
8
LIP
"u" GROOVE OF HOLDER
SET LINE
INK PACK
FRONT COVER
INK PACK INK PACK
HOLDER HOLDER
CAUTION
¡¡
Do not operate the machine without
setting the ink pack.
Page 44

- 42 -
MASTERHOLDER
Open the document receiving tray.
1
Remove the master roll to pull up.
3
Remove the master holder from the
master roll.
4
Turn the master holder toward you while
pushing the thermal head escape lever.
Pull out the master.
2
Changing the master roll
DOCUMENT RECEIVING TRAY
THERMAL HEAD ESCAPE LEVER
MASTER HOLDER
WARNING
¡¡
Do not remove the cover affixed with
Warning Label 1.
Personnel can get injured by the
movable cutter installed inside.
Page 45

- 43 -
Replacing of consumable
5
¡¡
Do not peel off the yellow label.
IMPORTANT
:
MASTERROLL
Take out a new master roll from a bag.
5
Insert the master roll into the machine
so that the green line on the roll is facing
the control panel.
7
Insert the master holders deeply into
both ends of the master roll. (Holders are
interchangeable.)
6
Peel off the seal.
8
GREEN LINE
YELLOW LABEL
SEAL
Page 46

- 44 -
Push the
master set switch.
The master will be pulled in, and cut
automatically.
If the master does not go in, push the
yellow label slightly back.
10
Pull out the master and insert the arrow
on the yellow label until it contacts the
roller.
9
¡¡
If the master is wrinkled:push and hold the
master set switch
again, and push down
the
thermal head escape lever
2 or 3 times.
¡¡
When the master stops, make sure that
you remove the trimmed piece of the
master.
IMPORTANT
:
Remove the trimmed piece of the
master.
11
Close the document receiving tray
gently.
12
¡¡
The cutter will operate and stop after the
master is cut.
Remove the cut piece left inside the
machine.
IMPORTANT
:
MASTER SET SWITCH
THERMAL HEAD
ESCAPE LEVER
YELLOW LABEL
DOCUMENT RECEIVING TRAY
Page 47

- 45 -
Replacing of consumable
5
Open the paper receiving tray.(See page
20
.)
Push the master ejection box release
lever. The master ejection box will open.
Open the box all the way until it stops.
1
Open the lid up by pushing the release
lever of the master ejection box lid.
2
Pull out the core and discard it by holding
the edges of the master ejection core.
3
Insert a new master ejection core and close
the master ejection box lid.Gently push
the master ejection box lid until it locks.
Close the master ejection box, and push
until it locks.
4
Changing the master ejection core
MASTER EJECTION BOX
RELEASE LEVER
MASTER EJECTION BOX
LID RELEASE LEVER
MASTER EJECTION BOX
MASTER EJECTION CORE
MASTER EJECTION CORE
CAUTION
¡¡
There is ink on the master ejection
core; take care not to get it on your
clothing.
Page 48

- 46 -
6.
Troubleshooting
OK MONITOR
When a disposable part needs a replacement or the operator`s help is necessary due to an error,
the display will show a message and the
OK MONITOR
will show the area that needs attention.
CHANGE INK
There is no ink. Replace the old ink pack with a new one.
See p.40, "Changing the ink pack" for more details.
CHANGE MASTER
There is no master. Replace the master roll with a new one.
See p.42, "Changing the master roll" for more details.
EJECT.ROLL FULL
The master ejection core is full. Replace the core with a new
one. See p.45, "Changing the master ejection core" for more
details.
LOAD PRINT PAPER
There is no printing paper.
See p.19, "Setting the paper tray" for more details.
SET PAPER TRAY
The paper tray is not set. To set, lift the paper set lever.
Page 49

- 47 -
Troubleshooting
6
NO DRUM
There is no drum or it is installed incorrectly. Set the drum
unit on the machine.
See p.37"Setting the drum unit" for more details.
ADF OPEN
The ADF cover is open. Close the cover.
TOP COVER OPEN
Document receiving tray is open. close the receiving tray.
FRONT COVER OPEN
Front cover is open. Close the cover.
ADF COVER
DOCUMENT RECEIVING TRAY
FRONT COVER
Page 50

- 48 -
PAPER LEFT JAM
Check the feeder side and remove the jammed paper.Follow
the instructions on p.51, "Removing a left paper jam (feed
tray side)".
PAPER RIGHT JAM
Check the delivery side and remove the jammed paper.
Follow the instructions on p.52, "Removing a right paper jam
(print tray side)".
MAST.EJECT ERROR
There is an old master on the drum. Remove all the masters
on the drum.
See p.54, "Removing the master(ejection error)" for more
details.
MASTER SET ERROR
There is an error during master Setting. Open the top cover
and remove the master that is left in the machine.
See p.56, "Removing a master (set error)" for more details.
ADF JAM
The document is jammed on the ADF. Remove the jammed
document in the ADF.
Page 51

- 49 -
Troubleshooting
6
--- WAIT ---
MASTER MAKING
Printer is not ready. Please wait with the power
on. If the message remains after a few minutes,
turn the power off and contact your service
person.
Appears while platemaking is in progress. Please
wait until platemaking is finished.
-- PRINTING --
Appears if you press while printing is not
finished. Please finish printing. When you want
to make a plate, press
CLEAR
and then
PLATEMAKING
.
C
PLS MAKE MASTER
Execute platemaking. Appears after you press
PRINT
and
TEST-PRINT
in the
following situations: qwhen in confidential
safeguard mode, or wright after master set
error, or eright after distribution error.
SET KEYCARD
Insert the card into the keycard counter. If you
do not insert the card while the keycard counter
is connected, the printer cannot be operated.
Page 52

- 50 -
DRUM LOCK
Drum does not rotate. Turn off the power and
contact your service person.
CUTTER LOCK
Master cutter does not operate. Turn off the
power and contact your service person.
POWER(T.H)NG
Thermal head power is abnormal. Turn off the
power, wait for a few seconds, and then turn on
the power again. If this indication appears again,
turn off the power and contact your service
person.
ONLINE ERROR
Communication error occurred during on-line
platemaking. Check the connection cord and
retry. Turn off the power, wait for a few seconds,
and then turn on the power again. If this
indication appears again, turn off the power and
contact your service person.
Page 53

- 51 -
Troubleshooting
6
PAPER LEFT JAM.
If this message is indicated in the display
panel check the feeder side and remove the
jammed paper by following these steps:
Removing a left paper jam (feed tray side)
Push down the paper set lever to down
the paper tray.
1
Pull out the jammed paper as shown in
the diagram.
2
Press the
JOG switch
until the drum
stops with a beep.
3
WARNING
¡¡
Do NOT touch the drum or rollers when
you operate the jog switch.
¡¡
Do NOT put hands inside machine
while it is operating.
Hands could get caught up or crushed.
PAPER SET LEVER
JOG SWITCH
Page 54

- 52 -
PAPER RIGHT JAM.
If this message is indicated in the error
display panel check the delivery side and
remove the jammed paper by following these
steps:
Removing a right paper jam (print tray side)
Push the master ejection box release
lever. The box will open toward you.
1
Remove the jammed paper.
Eject the paper that is printed halfway
by pressing the
JOG switch.
2
Paper adhering to drum
Press the
JOG switch
to find the edge of
the paper; stop the drum at the position
shown in the diagram.
1
WARNING
¡¡
Do NOT touch the drum or rollers when
you operate the jog switch.
¡¡
Do NOT put hands inside machine
while it is operating.
Hands could get caught up or crushed.
JOG SWITCH
MASTER EJECTION BOX
RELEASE LEVER
MASTER EJECTION BOX
Page 55

- 53 -
Troubleshooting
6
Peel off the paper from the drum.
2
Pull the paper toward the ejection side
while pressing the
JOG switch
to peel
the paper off.
3
Press the
JOG switch
until the drum
stops with a beep.
4
Close the master ejection box until it is
locked.
5
DRUM
JOG SWITCH
JOG SWITCH
MASTER
EJECTION BOX
CAUTION
¡¡
Make sure that the peeled paper do
not stick to your clothing.
Page 56

- 54 -
MAST.EJECT ERROR
If this message is indicated in the error
display panel, there is an old master on the
printing drum. Remove it by following these
steps:
Removing a master (eject error)
Push the master ejection box release
lever. The box will open toward you;
continue opening until the box stops.
1
Press the
JOG switch
to stop the drum at
a position shown in the diagram.
2
WARNING
¡¡
Do NOT touch the drum or rollers when
you operate the jog switch.
¡¡
Do NOT put hands inside machine
while it is operating.
Hands could get caught up or crushed.
Lift the lever toward you.
The master clamp will open and the edge
of the master will be released from the
clamp.
If the master is stuck, release it by hand.
3
MASTER CRAMP
LEVER
JOG SWITCH
w REMOVE MASTER
e CLOSE THE CLAMP
q OPEN THE
CLAMP
MASTER EJECTION BOX
RELEASE LEVER
MASTER EJECTION BOX
Page 57

- 55 -
Troubleshooting
6
Pull the front end of the master toward
you and press the
JOG switch
intermittently.
Continue until the master peels off.
4
Press the
JOG switch
until the drum
stops with a beep.
5
WARNING
¡¡
Do NOT touch the drum or rollers when
you operate the jog switch.
¡¡
Do NOT put hands inside machine
while it is operating.
Hands could get caught up or crushed.
Close the master ejection box until it is
locked.
6
Make a plate again.
7
JOG SWITCH
JOG SWITCH
MASTER
EJECTION BOX
CAUTION
¡¡
Discard the old master, making sure
that it does not touch your clothing.
Page 58

- 56 -
Removing a master (set error)
MASTER SET ERROR
If this message is indicated in the error display panel, remove the master and remake
the plate by following these steps:
Open the document receiving tray.
1
Remove the master out of the machine.
2
DOCUMENT RECEIVING TRAY
Page 59
- 57 -
Troubleshooting
6
PLS MAKE MASTER
Close the document receiving tray
gently. Verify that the OK monitor
indicator has switched off.
3
Make the master and print again.
4
¡¡
If you press the
PRINT
key without
executing platemaking,
PLS PLATEMAKING
key will be displayed.
Note
:
DOCUMENT RECEIVING TRAY
Page 60

- 58 -
Removing a jammed document
ADF JAM
If this message is indicated in the error display panel, check the ADF and remove the
jammed document by following these steps:
Pull out the jammed document as shown
in the diagram.
2
Close the ADF cover gently.
3
Open the ADF cover.
1
ADF COVER
Page 61

- 59 -
Troubleshooting
6
Trouble shooting for machine malfunction
The machine doesn't TURN ON.
Is power plug inserted?
Insert the power
plug securely.
Is power switch ON?
Turn the power
switch ON.
Cannot make plates / print
Is a Massage displayed on
the ERROR DISPLAY?
Is the OK MONITOR lamp lit?
See "OK MONITOR"
on page 46.
Please contact your service person.
YES
YES
YES
NO
NO
NO
Page 62

- 60 -
¡¡
Before cleaning, pull the power plug from the outlet.
¡¡
Prevent water and neutral cleansers from getting inside
the machine. This action prevents not only breakdowns
but electrical shock.
Clean the exterior as described in the
following procedure. Tightly wring a soft
cloth that has been soaked in water or
neutral detergent, and wipe dirt from the
surface.
Then, using a dry soft cloth, wipe away
remaining moisture.
Dust and clean the machine at least once a
week to avoid breakdowns.
Before cleaning, turn the power switch to
OFF and then pull out the power plug.
To clean the reader glass, use a dry soft cloth
and lightly wipe off any dirt.
WARNING
Alcohol
thinner
7.
Maintenance and inspection
Maintenance
Page 63

- 61 -
Maintenance and inspection
7
P1234500 F.12345
Example : Print amount, 1,234,500
Platemaking amount, 12,345
Total amount of print and platemaking can be shown on display panel.
Press the
STOP
key while the Machine
is stopped. Print and platemaking amount
will be shown on Display Panel.
Total counter will appear while
STOP
key is being pressed.
Total counter
Page 64

- 62 -
Product name / Model No.
Model Table top
Platemaking method Thermal digital system
Platemaking time 27 seconds (A4, same size)
Resolution 11.8 dot/mm (300dpi)
Scanning method ADF / movable document
ADF capacity 10 sheets (64g/m
2
,17 Ib)
Document type Sheets
Image reading size 250mm 9350mm
Document size
MAX. 271mm 9382mm, 10.6"915"
M I N. 100mm 9148mm, 4" 96"
Document weight 64g/m
2
4
128g/m
2
, 17Ib 434Ib
Image area
A/B size : 250mm 9 350mm
Paper capacity
(Feed and receiving trays)
500Sheets (64g/m
2
, 17 Ib)
Paper size
MAX. 271mm 9382mm, 10.6"915"
M I N . 100mm 9148mm, 4"96"
Paper weight 53g/m
2
4
210g/m
2
, 14 Ib 456 Ib
Printing speed 120 pages/minute (60 4120 pages/minute , 3 steps adjustment)
Reduction size
A / B size : 141%,122%,115%,94%, 86%, 81%, 70%
Inch size : 141%,129%,121%,94%, 77%, 74%, 64%
Printing position adjustment 20mm, 13/16"(Top4bottom direction total adjustment)
Image modes Text mode, Photograph mode
Contrast control 3 steps
Ink supply method Full automatic control
Color printing Drum unit exchange control (600cc)
Master feeder Roll master automatic feed
Plate ejection Complete automatic ejection plate rolling method
Option
¡
Drum units
¡
Tape cluster
¡
I/F kit (mountable to
DP-205 / 203
only) :
Compatible with an IEEE1284 compliant bi-directional parallel interface only
Power source
120V Type; 120V
±
10%, 60Hz, 2.0A
230V Type; 230V
±
10%, 50Hz, 1.2A
Size of machine
Closed 600mm(W)
9
598mm(D)
9
524mm(H)
23.6"(W) 9 23.5"(D) 9 20.6"(H)
Opened 1004mm(W)
9
598mm(D)
9
600mm(H)
39.5"(W) 9 23.5"(D) 9 23.6"(H)
Weight 68kg
Operating temp. 10tC 430tC
On-line
DP-205A / 203A
includes as standard equipment :
Compatible with Windows 95/98/Me ,Windows 2000/XP professional/home edition
A/B size : 204mm 9 288mm
Inch size : 10" 9 13.8" Inch size :
8" 9 13.6" (204mm 9 347mm )
DUPRINTER DP-205 / DP-205A DUPRINTER DP-203 / DP-203A
8. Specifications
Specifications
Page 65

- 63 -
Specifications
8
88
Acceptable Document
¡¡
Document Weight: 64g/m
2
4
128g/m
2
, 17Ib434Ib
¡¡
Document Size: MAX. 271mm 9382mm, 10.6" 915"
MIN. 100mm 9148mm 4" 96"
¡¡
ADF Capacity: 10sheets (64g/m
2
, 17Ib)
88
Acceptable Copy paper
¡¡
Copy Paper Weight: 53g/m
2
4
210g/m
2
, 14Ib456Ib
¡¡
Copy Paper Size: MAX. 271mm 9382mm, 10.6" 915"
MIN. 100mm 9148mm 4" 96"
¡¡
Copy Paper Capacity: (Feed and Receiving Trays) 500Sheets (64g/m
2
, 17Ib)
Do not place the following types of documents in the ADF:
¡¡
Documents with tears or large binding holes.
¡¡
Severely curls documents or documents with sharp folds.
¡¡
Clipped or stapled documents.
¡¡
Carbon-backed paper or other documents which might not feed smoothly.
¡¡
Transparencies and other highly transparent documents.
Note
:
Do not use the following types of Copy Paper:
¡¡
Copy paper with tears or large binding holes.
¡¡
Severely curled paper or paper with sharp folds.
¡¡
Clipped or stapled paper.
¡¡
Carbon-backed paper or other paper which might not feed smoothly.
¡¡
Coat paper or other copy paper that does not absorb ink well.
Note
:
Original document/Copy paper Specification
Page 66

- 64 -
MEMO
Page 67

J8-Y1320 2004. 10
Duplo building, 1-6, Oyama 4 chome, Sagamihara, Kanagawa 229-1180,Japan
TEL : +81-42-775-3602
FAX : +81-42-775-3606
E-mail : info@duplo.com
DUPLO CORPORATION
 Loading...