

Page 1
DUPRINTER
DP-J450
Instruction Manual
For this machine to be used safely, it MUST be operated correctly
and serviced regularly. Therefore, read this instruction manual
thoroughly before using the machine.
Page 2

i
■ Introduction
Thank you for your purchase of the DUPRINTER DP-J450.
To ensure safe and efficient prolonged use of this machine, read and thoroughly understand this
manual before using this machine.
After using this manual, be sure to keep it in a place for handy reference.
●Macintosh and Mac OS are trademarks of Apple Computer, Inc., registered in the U.S. and
other countries.
●Microsoft, Windows NT, Windows 2000, Windows XP and Windows Vista are trademarks of
Microsoft Corporation, registered in the U.S. and other countries.
Precautions for printing and duplicating
There are restrictions on what you may print on the printer.
Please be aware that there are some printed materials that are illegal even to possess.
1. Printed matters banned by law
● Paper money, currency, government bonds and national and local bonds cannot be
duplicated, even if they are stamped with the “sample” seal.
● Paper money, currency and bonds, etc. that are valid in foreign country cannot be duplicated.
● Unused postage stamps and postcards cannot be duplicated without governmental consent.
● Government-issued papers pertaining to stamps, liquor and sales tax laws cannot be
duplicated.
2. Printed matters that require caution
● Printed-issued securities (stocks, bills and checks, etc.), passes and tickets require caution in
duplicating unless a business is duplicating them for required number for their own business
needs.
● Government-issued passports, public- and private-issued driver’s licenses, permits, IDs,
passes, food stamps, etc. require caution in duplicating.
3. Copyrighted materials
● Books, music, artwork, prints, maps, diagrams, movies, photography, etc. are banned from
duplicating outside the limits of private home use and their related non-sale usage.
PLEASE NOTE
In the interest of upgrading our products, specifications and other data given in this manual are
subject to change without notice. If the manual contains anything that you do not understand,
contact the manufacturer for clarification.
As an ENERGY STAR® Partner, we have determined that these
products meet the ENERGY STAR Guidelines for energy efficiency.
Page 3
ii
Page 4

iii
MEMO
Page 5

iv
Notes on Safety (Please Read and Observe)
Safety Precautions
Various symbols and pictures are used in this manual and on the labels affixed to the machine.
These symbols and pictures provide warnings and instructions to prevent danger to you or other
personnel, and to prevent damage to office property.
The meanings of these symbols and pictures are explained below.
WARNING
Indicate a high degree of potential danger. If the warning is ignored, death or serious injury may
result.
CAUTION
Indicate a medium degree of potential danger. If the caution is ignored, medium injury or
damaged to property may result.
<Examples of Pictorial Symbols>
A circle with a line through it indicates a prohibited action.
The particular act prohibited is indicated by a picture inside the circle.
(In the example shown here, the prohibited act is disassembly.)
A black disc indicates an instruction, or sometimes a prohibited action.
The instruction itself is indicated by pictorial symbols drawn in white on the disc.
(In the example shown here, the instruction is ‘Remove the plug from the outlet.’
● Precautions for use
WARNING
● If the machine is used after foreign matter (metal fragments, water, or liquid) has
entered the machine, this may result in fire or electric shock.
→ Turn the main unit’s power switch OFF, and then remove the power plug from the
outlet. Contact the sales distributor.
● If the machine is used after heat, smoke, strange smell, or other abnormality is
detected, this may result in fire or electric shock.
→ Turn the main unit’s power switch OFF, and then remove the power plug from the
outlet. Contact the sales distributor.
● Do not insert or drop metal, flammable material, or other matter through the
ventilation holes into the machine interior.
→ Doing so may result in fire or electric shock.
● Do not place flower vases, flowerpots, cups, or water containers (including metal
containers) on top of the machine.
→ Fire or electric shock may result if liquid spills inside the machine.
Page 6
v
CAUTION
● Some paper may cause paper dust in the machine. Keep clean the machine and
sufficient ventilation.
● Caution for Grounding (Be sure to use the supplied power cord)
WARNING
● Use only the power cord that is provided among the accessories.
Insert the power cord plug firmly into the socket, so that proper electrical contact is
effected.
→ Use of any other power cord could result in imperfect grounding.
If grounding is imperfect and electrical leakage occurs, fire or electric shock could
result.
● Caution for Power Supply and Power Cord
WARNING
● Do not use a source voltage other than that specified.
Do not connect two or more loads to a single outlet.
→ Doing so may result in fire or electric shock.
● Do not remove or insert the power plug with wet hands.
→ Doing so may result in electric shock.
● Do not damage, break, or modify the power cord.
Do not place heavy objects on, tug, or unnecessarily bend the power cord.
→ Doing so may result in fire or electric shock.
WARNING
● Remove the power plug itself, not the cord.
→ Tugging the cord may damage it (expose conductors, or cause disconnections,
etc.), resulting in fire or electric shock.
Page 7

vi
● Prohibition of Disassembly or Modification
WARNING
● Do not modify the machine.
→ Doing so may result in fire or electric shock.
● Do not remove the rear lid, cabinet, or covers from the machine.
→ The inside of the machine contains high-voltage parts, which may cause electric
shock.
● Caution for Location
WARNING
● Do not place the machine in a humid or dusty area.
→ Doing so may result in fire or electric shock.
● Once the machine is in position, secure in place using the casters.
→ If the machine falls over, this could result in personal injury.
CAUTION
● Before moving the machine, remove the power plug from the outlet.
→ If the cord is damaged, this may result in fire or electric shock.
● Do not place the machine in an unstable position, such as on an unsteady support
or sloping area.
→ If the machine is dropped or falls over, this could result in personal injury.
● Do not place the machine in a place subject to direct sunlight or heating equipment
such as a stove.
→ It may degrade ink quality and affect printing. The machine also may
malfunction.
● Avoid placing the machine in a place subject to high or low temperature or high
humidity.
→ The paper absorbs moisture and it may cause paper jam or creasing.
Page 8

vii
WARNING
● Install the machine on the optional cabinet.
● Do not use any other desks or table than optional cabinet.
● Do not place the machine on the desk.
→ If the machine is dropped or falls over, this could result in personal injury.
● Notes on Ink
CAUTION
● If ink gets into eyes or mouth, immediately wash it away with water and contact a
doctor.
● If ink comes into contact to skin, immediately wash it away with soap and water.
● Keep ink away from children.
Storage conditions:
● Store in a cool and dry place avoiding direct sun light.
Adequate storage temperature: from -5 to 40 degrees (C)
● Never put ink pack close to fire.
Page 9
viii
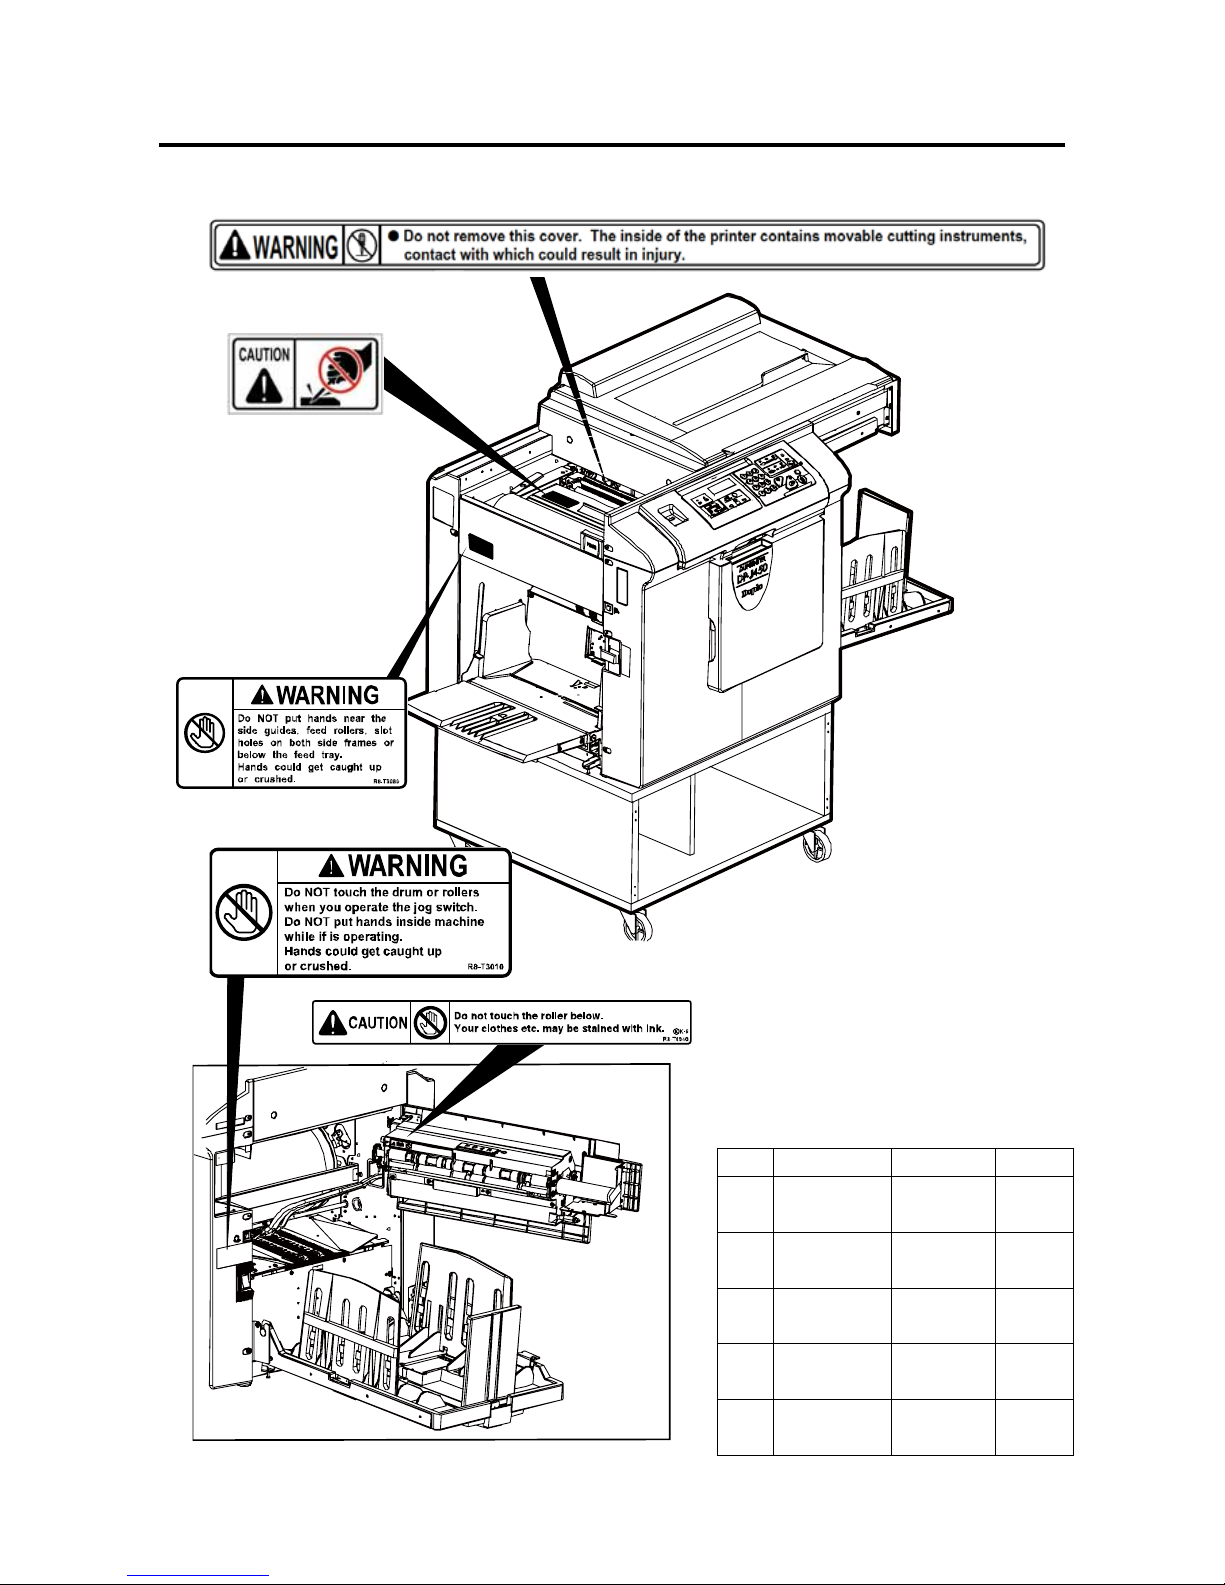
■Locations of Warning Labels
Keep the WARNING and CAUTION labels clean at all times. If labels become damaged or
come off, please call our service person.
NO. Parts No. Name Q’ty
1 L1-T3060 Warning
label
1
2 M7-T3060 Caution
label
1
3 R8-T3080 Warning
label
1
4 R8-T3010 Warning
label
1
5 R8-T3040 Caution
label
1
1
2
4
5
3
Page 10

ix
Contents
Introduction - Notes on Safety
Introduction ····························································································································· i
Notes on Safety ····················································································································· iv
Locations of Warning Labels ································································································ viii
Before Use
■Part Names and Their Functions ······················································································ 2
●Printer Appearance (including options) ··········································································· 2
●Inside of Printer ················································································································· 3
●Outside / Inside of Print Output Side ··············································································· 4
●Control Panel ····················································································································· 5
●Display Screen ·················································································································· 6
■Turning Power ON/OFF ····································································································· 7
●Turning Power ON ············································································································ 7
●Turning Power OFF ·········································································································· 7
■Standard Mode ···················································································································· 8
■Document / Printing Paper Specifications ········································································ 9
●Acceptable Documents········································································································ 9
●Acceptable Printing Paper ······························································································· 9
■How Master Making and Printing are Performed ···························································· 10
●Master Making ·················································································································· 10
●Printing ······························································································································· 10
Basic Operations
■Preparing for Printing ········································································································· 12
●How to Set Papers ··········································································································· 12
●How to Supply or Change Paper While Printing ··························································· 13
●How to Set the Print Tray ································································································· 14
■Loading Documents ··········································································································· 15
●Loading Document on Document Glass Plate ······························································ 15
●Loading Document in Automatic Document Feeder (ADF) (Optional)··························· 16
■Basic Printing ······················································································································· 17
●Printing Using Basic Functions ························································································ 17
■Adjusting Print Position ······································································································· 19
●Print Position Adjustment Function ················································································· 19
■Adjusting Print Speed ········································································································· 20
●Print Speed Adjustment Function ··················································································· 20
Printing with Useful Functions
■Selecting Master Making Size ··························································································· 22
●Master Making Size ········································································································· 22
Page 11

x
■Enlargement / Reduction ··································································································· 24
●Enlargement / Reduction from standard-size documents to standard-size paper ······· 24
●Minor Reduction ··············································································································· 26
●Free Zoom ······················································································································· 28
■Adjusting Darkness ··········································································································· 30
●Master Darkness ·············································································································· 30
■Selecting Document Type ································································································· 32
●TEXT, TEXT/PHOTO, PHOTO ····················································································· 32
Printing with Various Functions
■Batch Print / Sequential Batch Print ·················································································· 35
●Type of Batch Prints············································································································ 35
How to Enter the Numeric Values for Batch Print ··························································· 36
How to Enter the Numeric Values for Sequential Batch Print
[Available only with ADF installed]················································································ 38
●Dividing Sections with Tape
[Available only with tape cluster unit installed]···························································· 39
■Multiple Printing ·················································································································· 40
●Multiple Printing on One Page ······················································································· 40
●2-in-1 Layout (Available only with ADF installed) ························································· 44
■Shadow Erasure ················································································································ 47
●Shadow Erasure ············································································································· 47
●Area of Shadow Erasure ································································································ 47
■Memory Mode ···················································································································· 50
●Saving / Retrieving / Confirming settings·········································································· 50
●Saving Settings ·················································································································· 50
●Retrieving Settings ············································································································ 52
●Clearing Settings ············································································································· 54
■Confidential Safeguard ······································································································ 56
■Adjusting Paper Feed Length ···························································································· 58
■Auto Sleep ······························································································································ 60
Replacing Consumables
■
Replacing Ink Pack ············································································································ 63
■Replacing Master Roll ··········································································································· 65
■Disposing of Used Master ···································································································· 68
■Replacing Drum Unit ·········································································································· 70
Troubleshooting
■
Troubleshooting ·················································································································· 73
●If trouble occurs ················································································································ 73
●When messages appear ································································································ 74
■When ‘PAPER EXIT JAM’ is displayed················································································ 78
Maintenance
■
Daily Maintenance ············································································································· 80
Specifications
■
Specifications ······················································································································ 82
Page 12

1
Before Use
Page 13
2
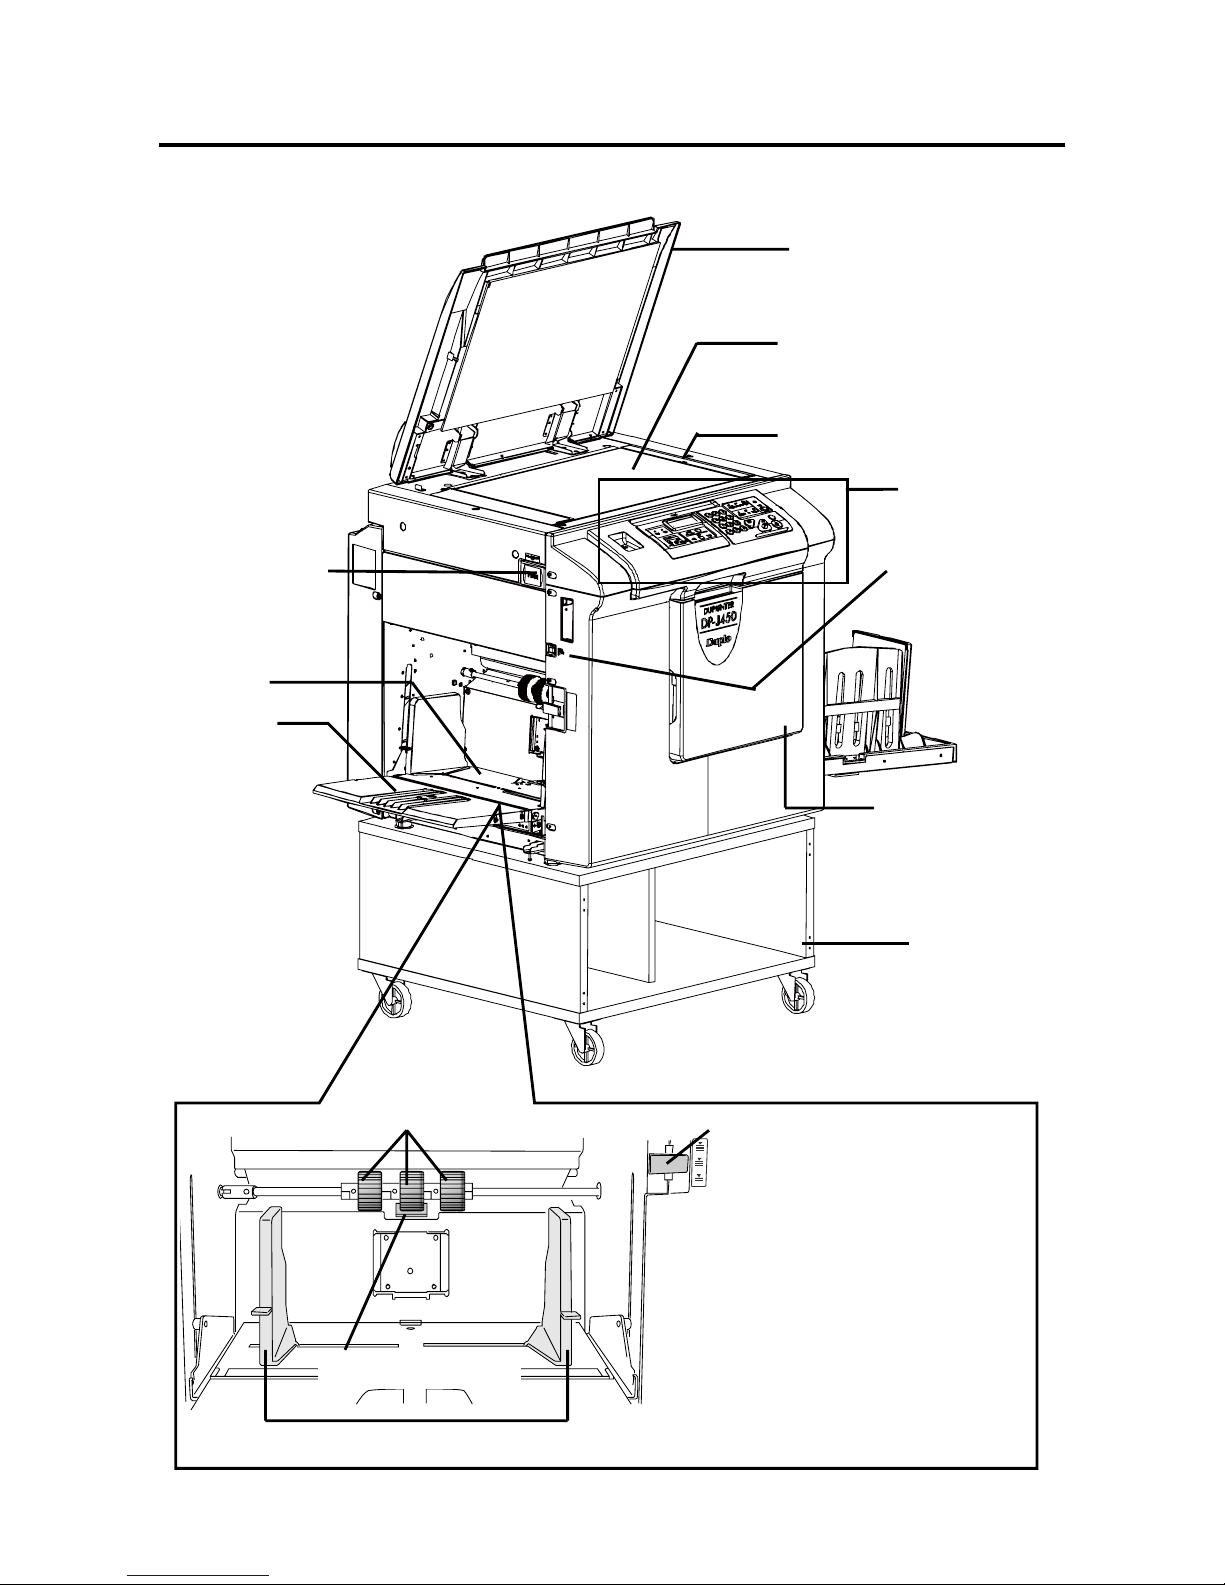
■ Part Names and Their Functions
● Printer Appearance (including options)
Scanner cover
Keeps the document in contac
t
with the document glass plate.
Glass
The document is placed on
this glass.
Scale
Control panel
Feed tray
Support
tray
Scanner open
Front cover
Open this cover t
o
replace the ink pack and
drum unit.
Cabinet
Feed tray descend
switch
Press to lower the
feed tray.
Paper feed roller
Paper separator
Side guides
Feed pressure adjuster lever
Use to adjust paper feed
pressure.
Page 14

3
● Inside of Printer
Master cover
Cutter Master roll
Master cover
release lever
Scanner unit
Drum handle
Ink holder
Ink pack
Master set lever
Page 15

4
● Outside / Inside of Print Output Side
Connectors (Optional)
Print tray
Paper stacker
guide
A
djust these according to
the paper size.
Paper stopper
A
djust it according t
o
the paper size.
Key card counter
(Optional)
Master ejection section
Master ejection core
Use to dispose of used master.
JOG switch
Power switch
Master ejection box
release button
Master ejection box
cover release lever
Press to open the master
ejection box cover.
Page 16
5
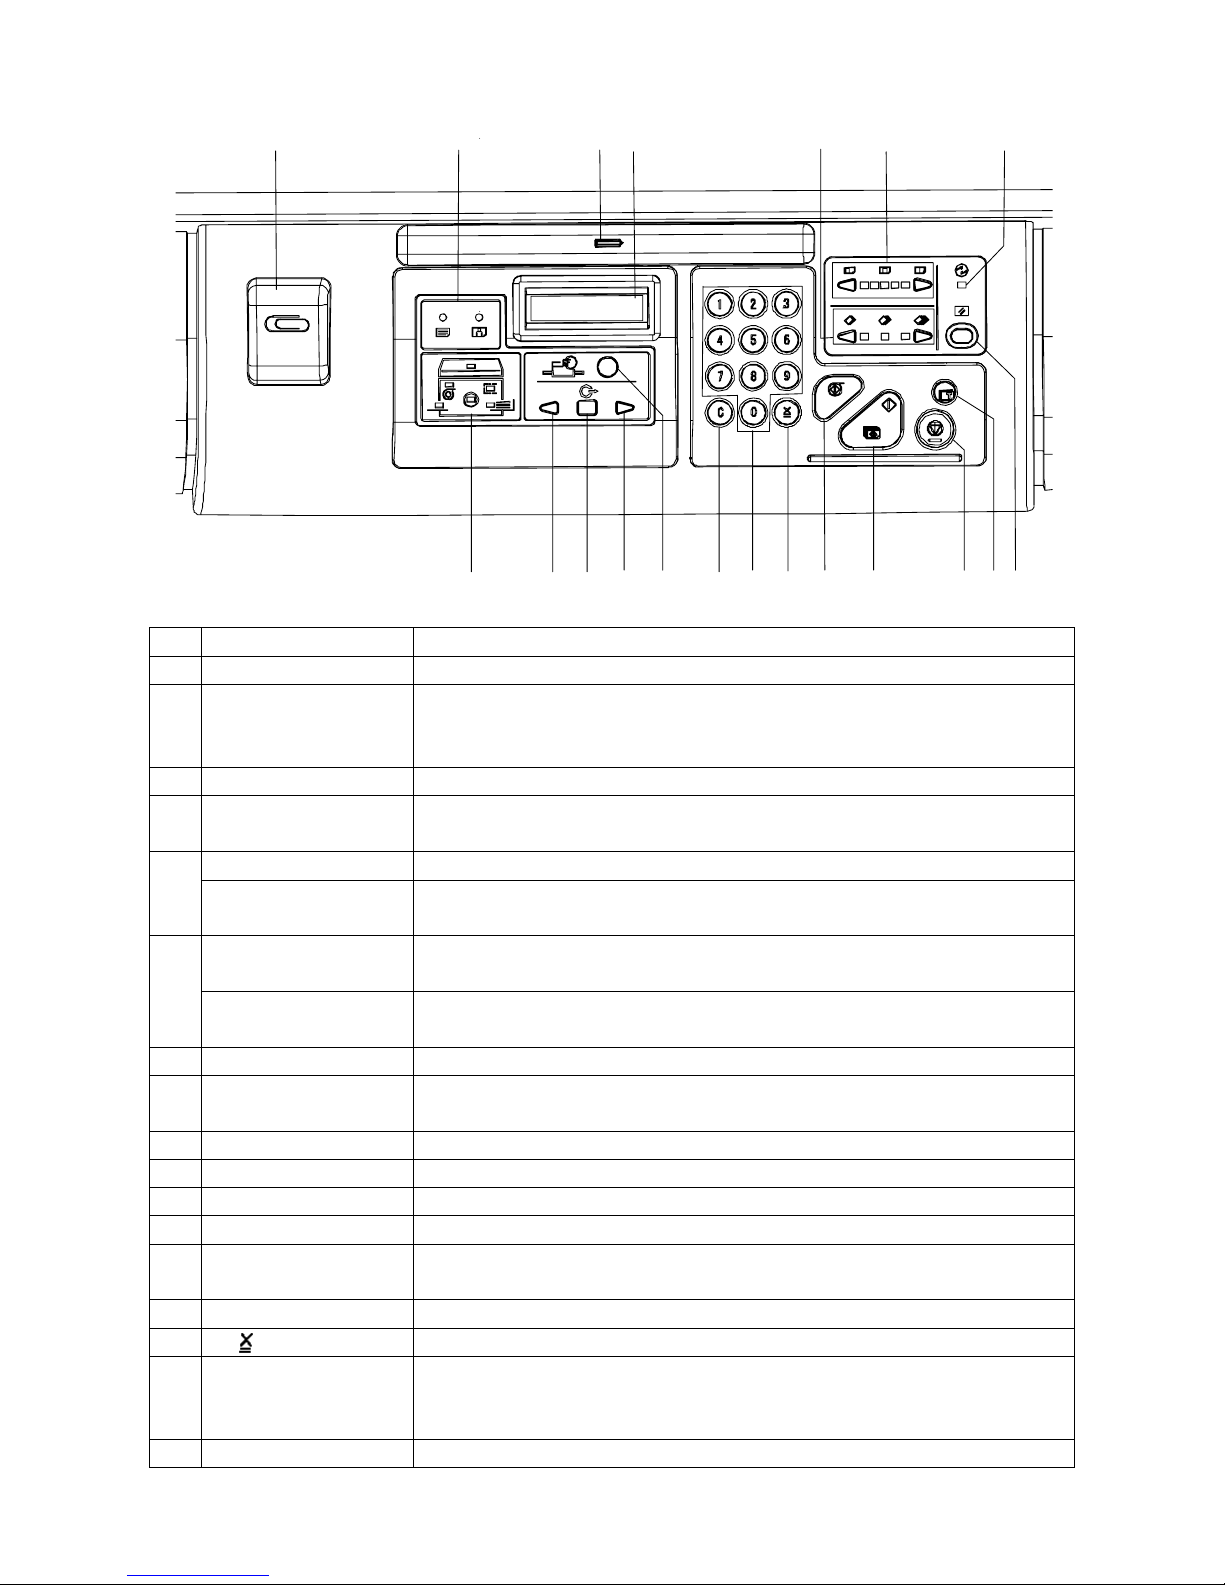
● Control Panel
No. Name Function
1 Clip holder
2 Document mode
indicator lamp
The lamp of the selected mode lights. (text, photograph,
text/photograph)
Both lamps light when text/photograph mode is selected.
3 Pen holder
4 LCD Panel Displays current settings such as number of printed sheet.
Displays error messages in case of error.
PRINT SPEED keys Controls print speed. 5
Print speed indicator
lamp
The lamp of the specified print speed lights.
PRINT POSITION
keys
Controls print position (vertical).
6
Print position
indicator lamp
The lamp of the specified print position lights.
7 SLEEP lamp Lights up when the machine is in SLEEP status.
8 OK monitor
Flashes to display the content of the trouble and lights to indicate the
part that caused the trouble in the machine.
9 ARROW Key (Left) Selects function.
10 Select Key Fixes selected function.
11 ARROW Key (Right) Selects function.
12 FUNCTION key Switches to function mode.
13 CLEAR key Returns the print volume to 0.
Other settings on the control panel are not changed.
14 NUMERIC keys Enters the print volume.
15 key Enters the print and group number in batch printing.
16 MASTER MAKING
key
Starts making a master. Master making cannot be performed during
printing.
Clear the number of print before master making.
17 PRINT key Starts printing. This key does not start making a master.
1234567
891011121314151617181920
Page 17
6
18 STOP key Stops printing.
When this key is pressed during making a master, the machine stops
after making a master.
19 TEST PRINT key Prints 1 copy to check the image position and density.
20 RESET key Returns setting to standard mode. Setting not stored is cleared.
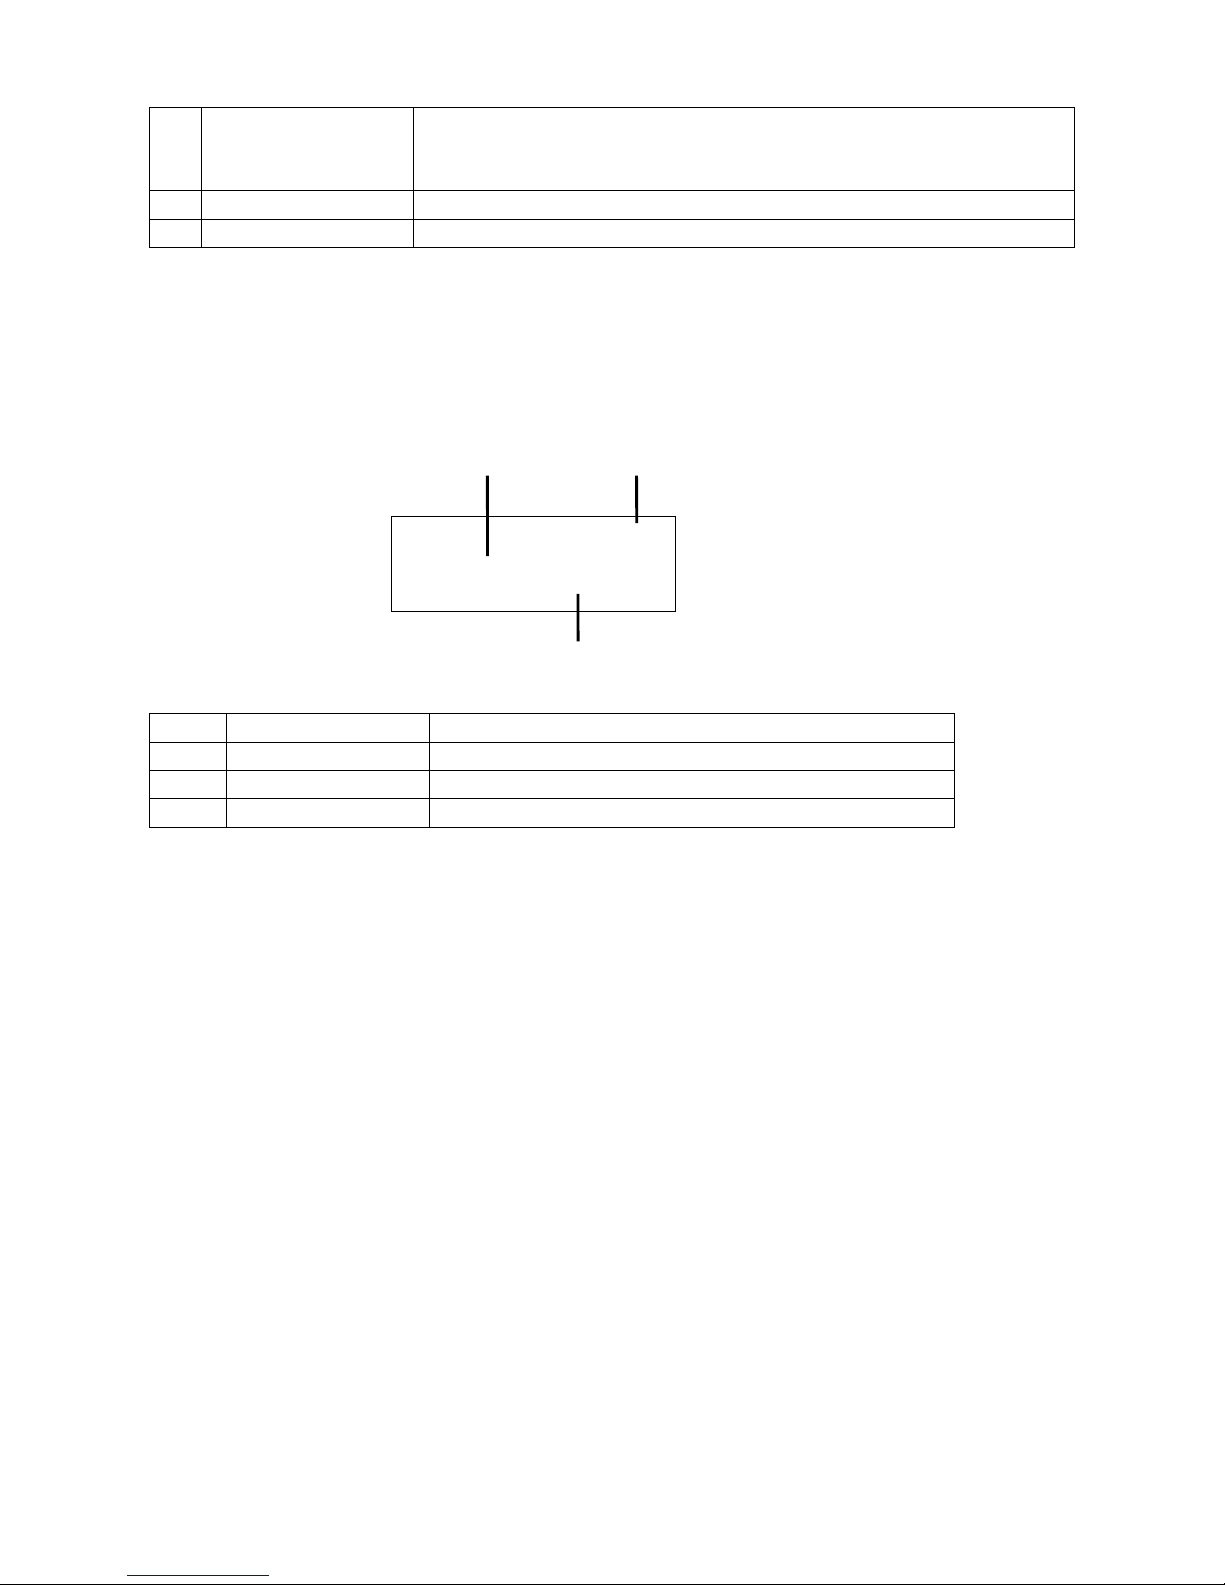
● Display Screen
The operation status or messages appear on the LCD panel.
No. Name Function
1 Print count
Displays the number of prints to be made.
2 Zoom ratio
Displays the selected ratio. (enlargement/reduction)
3 Sets
Displays the number of sets to be printed.
100 %
0 s h t 1 s e t
1
3
2
Page 18
7
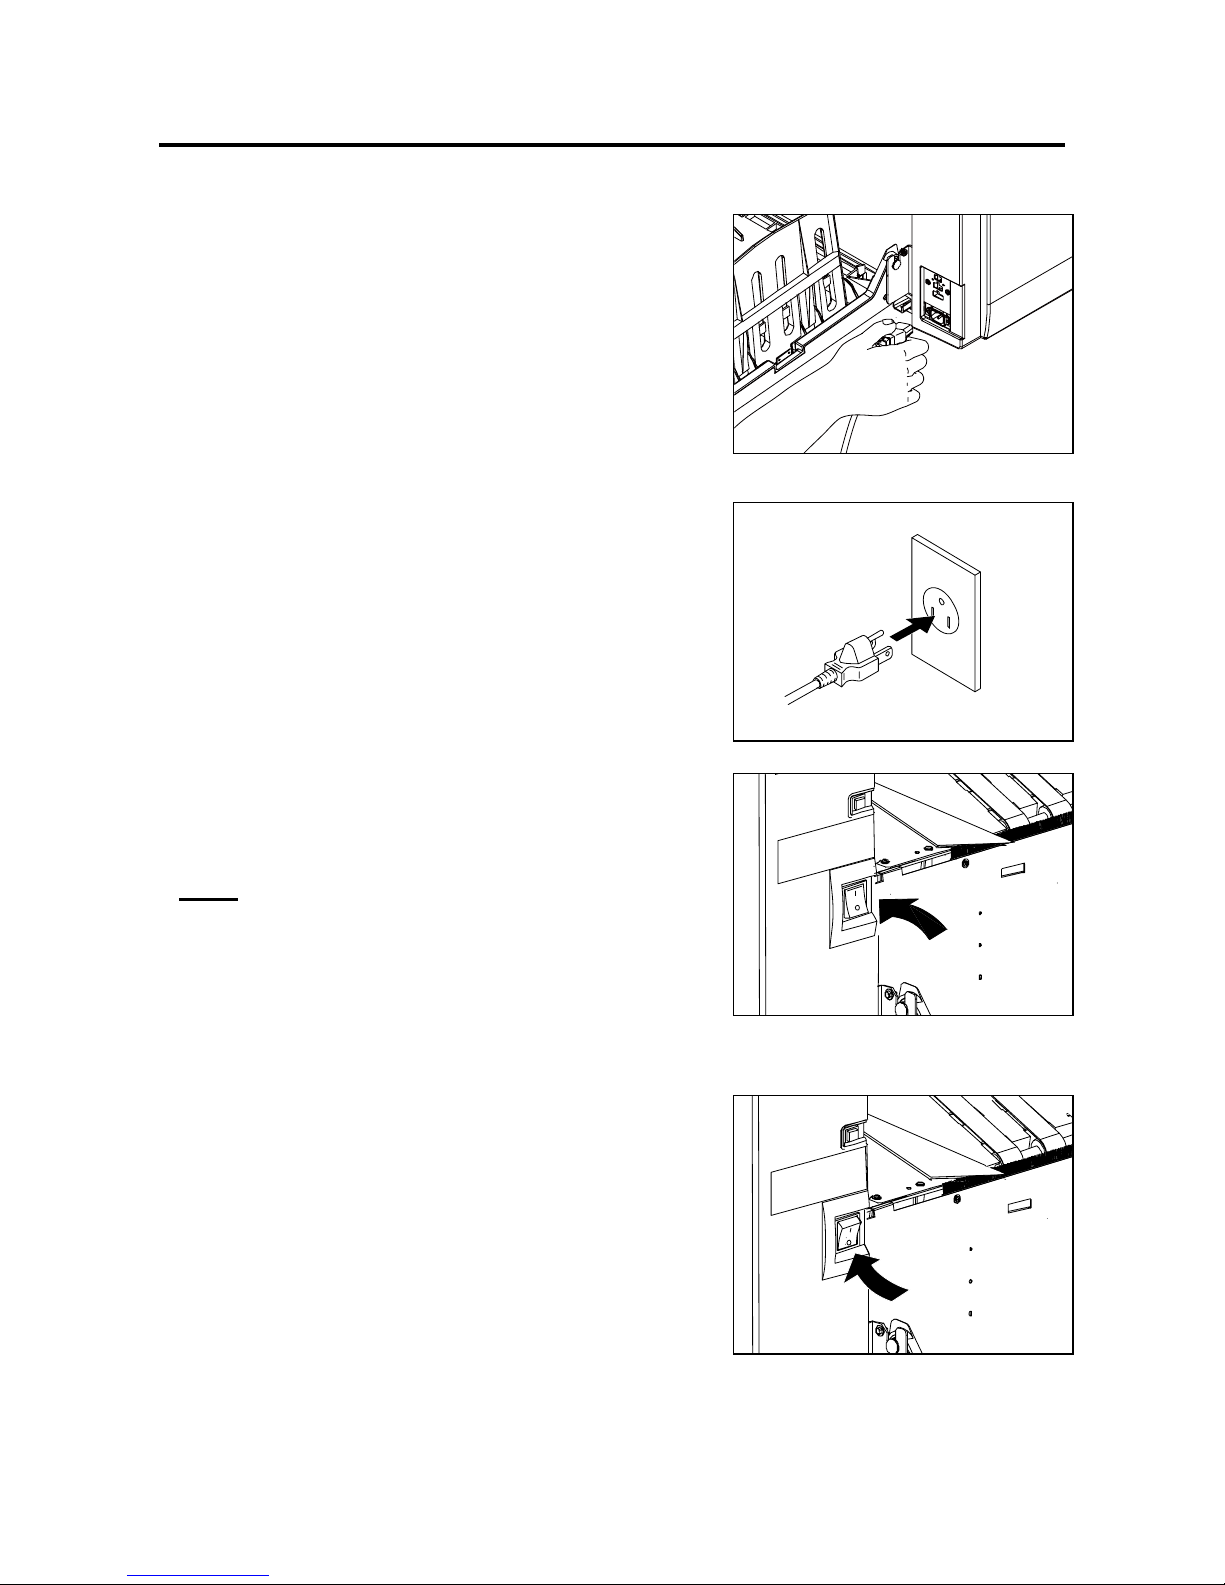
■ Turning Power ON/OFF
● Turning Power ON
1. Connect the “female plug” of the power supply cord to the
“inlet”.
2. Connect the “male plug” of the power supply cord to the
“outlet”.
3. Press the “I” side on the “power switch”.
The printer is ready when the initial screen appears on the
LCD panel. “Standard Mode” is set for each function.
NOTE: Standard Mode → See page 8.
● Turning Power OFF
1. Press the “O” side on the “power switch”.
The printer is turned off and the panel display goes out.
Page 19

8
■ Standard Mode
When the printer power is first turned ON or the RESET key is pressed, the functions are reset to
standard mode.
Standard mode settings are as follows:
The settings are different if the default settings are changed.
Print quantity : 0
Print position : Center lamp indicating standard print position lights up.
Print speed : Center lamp indicating standard print speed lights up.
Zoom : 100%
X94% : OFF
Document mode : TEXT
Master size : A3
Scan darkness : ±0
Multiple printing : OFF
Shadow Erasure : OFF
Page 20

9
■ Document / Printing Paper Specifications
● Acceptable Documents
● Document glass plate
* Sheet documents and books not exceeding 10kg
* Size: 297mm × 432mm (max.)
● Automatic document feeder (ADF)(optional)
* Document thickness : 64gsm - 128gsm
* Document size : 297mm × 432mm (max.)
100mm × 148mm (min.)
* Stacking capacity in document tray : 100 sheets (64gsm), 85 sheets (80gsm)
● The following types of document cannot be used with the ADF (Automatic Document
Feeder):
* Documents with large file-binding holes
* Documents with staples or paper clips attached
* Documents with markedly curling ends/sides, or marked folds
* Documents with tears or rough edge
* Chemically treated documents such as thermal paper, carbon paper and so on
* Highly transparent documents such as OHP film, tracing paper and so on
* Documents which surface is slippery such as art paper, coated paper and so on
* Documents with correction fluid, glue and so on
* Documents with smaller pieces of glued paper
● Always use documents of the same size.
● If you load documents of different lengths, the printer may not operate correctly.
● Acceptable Printing Paper
● Feed tray / Print tray
* Paper thickness : 53gsm – 210gsm
* Paper size : 297mm × 432mm (max. ) (Main unit can feed/eject 320mm×450mm. Stacker
tray does not cover paper size larger than 297x432.)
100mm × 150mm (min.)
* Paper stacking capacity: Feed tray: 1250 sheets (64gsm), 1000 sheets (80gsm)
Print tray : 1250 sheets (64gsm), 1000 sheets (80gsm)
Height of sheets loaded should not exceed140mm.
Recycled paper of 100% recycled pulp with different basis weight can be used.
● The following types of paper cannot be used.
* Documents with large file-binding holes
* Documents with staples or paper clips attached
* Documents with markedly curling ends/sides, or marked folds
* Documents with tears or rough edge
* Chemically treated documents such as thermal paper, carbon paper, stickers and so on
* Highly transparent documents such as OHP film, tracing paper and so on
* Documents with correction fluid, glue and so on
* Documents with smaller pieces of glued paper
Page 21
10
■ How Master Making and Printing are Performed
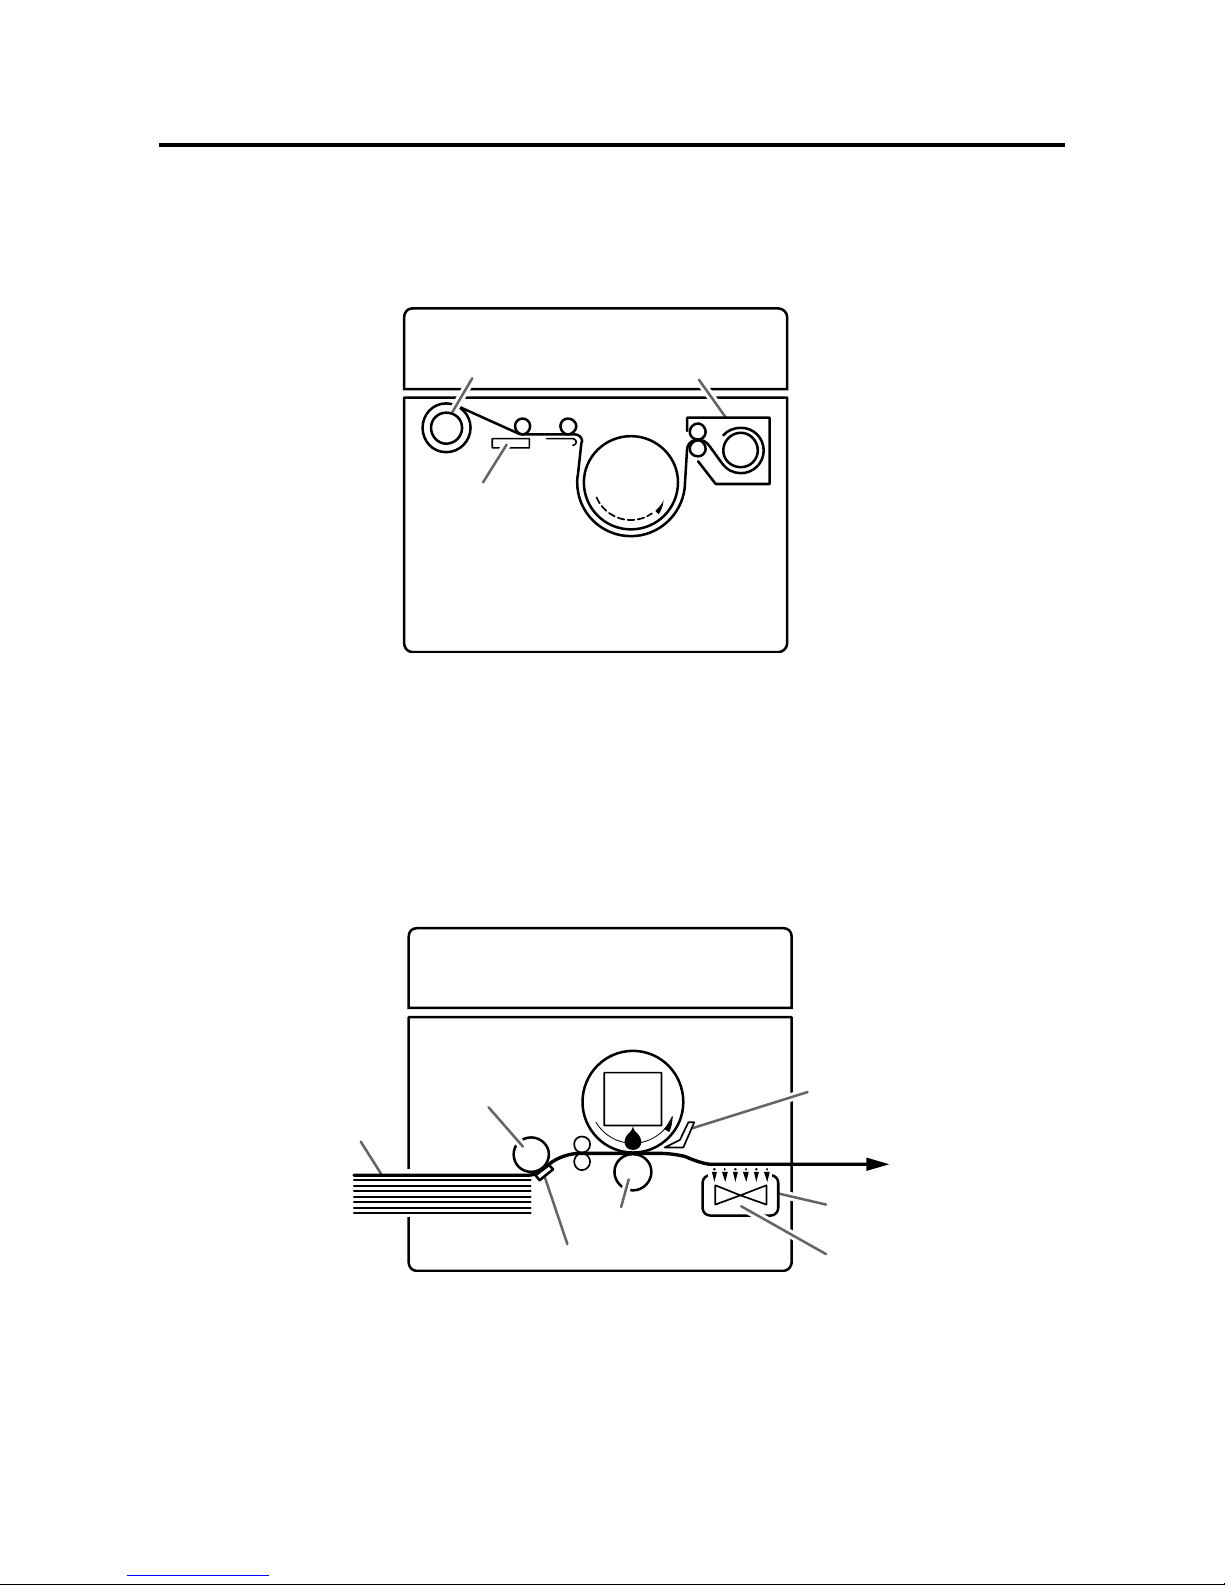
● Master Making
In the “master making” process, the old master on the drum is removed while the thermal head
creates the scanned image on the new master and transfers it onto the drum.
● Printing
In the “printing” process, paper separated from the stack by the feeder roller and paper separator
unit is pressed against the drum unit by the press roller. There are small holes over only the
image area of the master that is attached to the drum, and ink that seeps from these holes is
transferred to the paper. The paper is then peeled from the master by the paper stripper finger.
The paper is directed onto the paper ejection belt by a fan unit and discharged from the machine.
Master roll
Thermal head
Drum
unit
Master ejection box
Drum unit
Paper stripper finge
r
Press roller
Paper separator unit
Fan unit
Paper ejection bel
t
Feeder roller
Paper
Ink
Page 22

11
Basic Operations
Page 23
12
■ Preparing for Printing
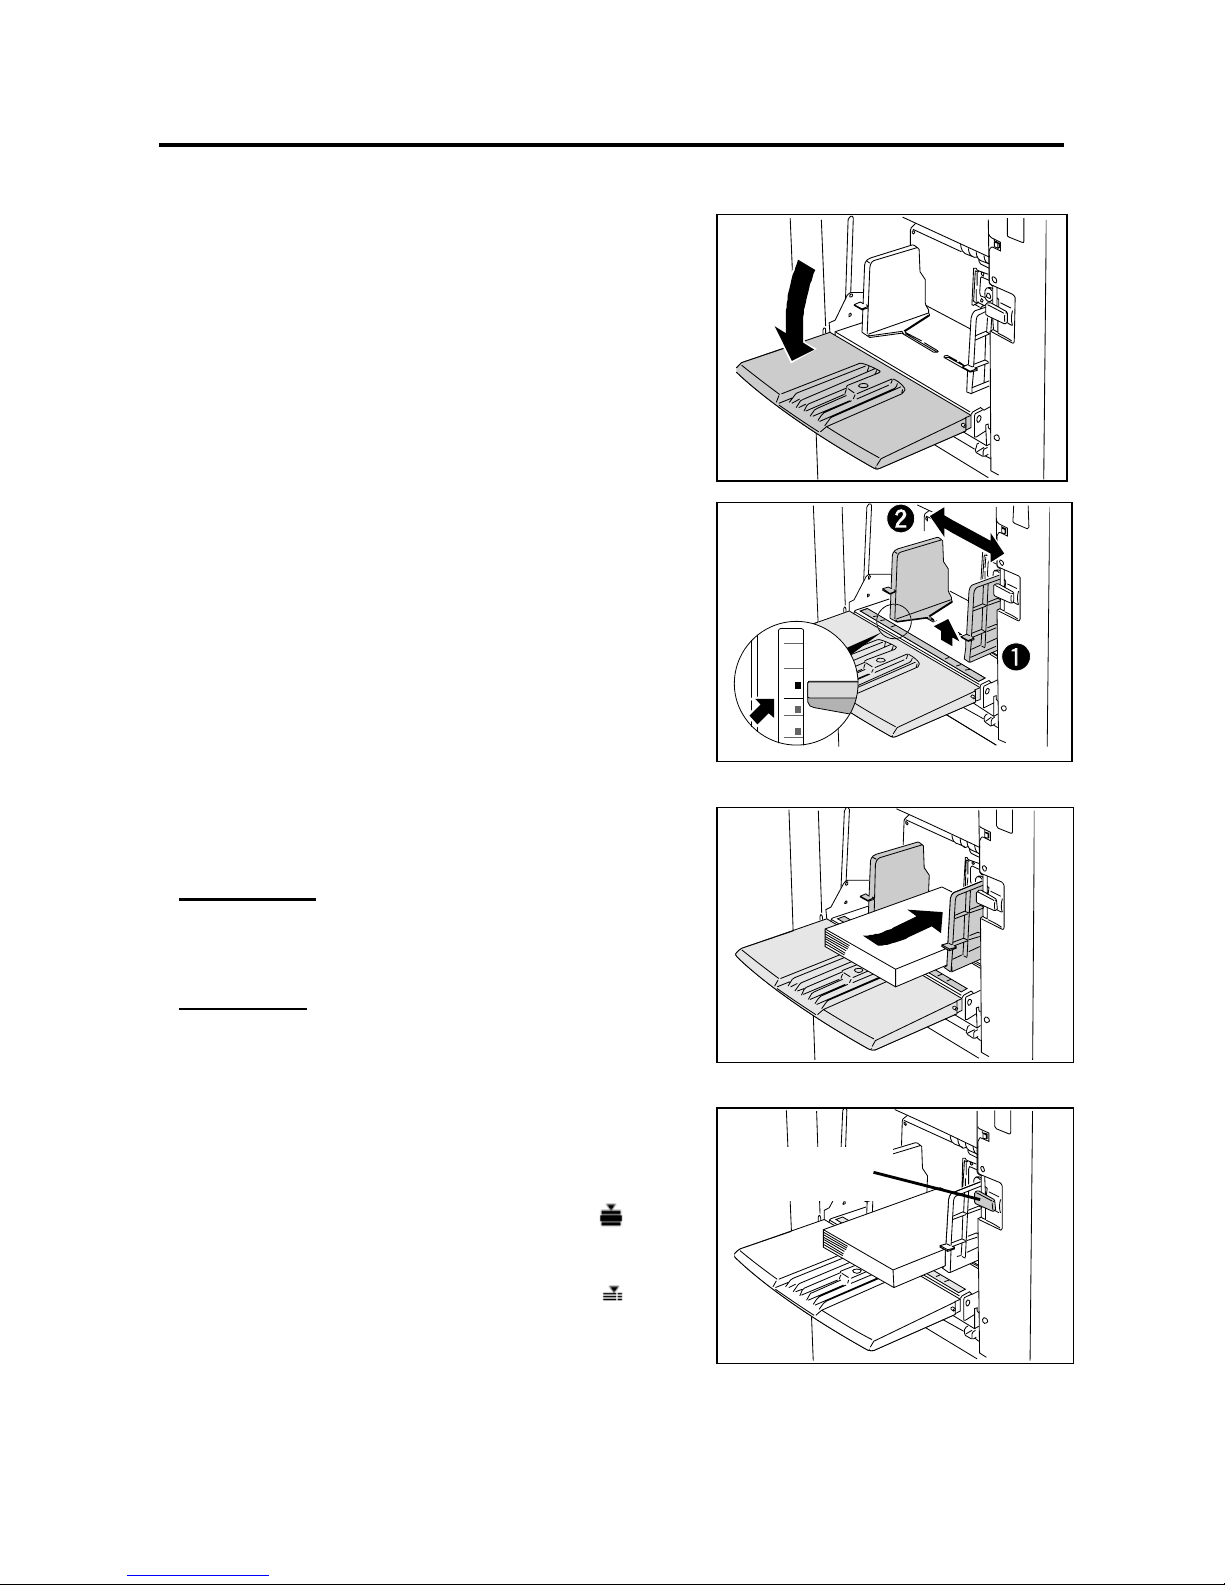
● How to Set Papers
1. Open the “support tray”.
2. Adjust the “side guide” according to the paper size.
3. Fan sheets and align them.
4. Put the sheets between the “side guides” and push them
to the inside.
REFERENCE:
About 1250 sheets of 64gsm high-quality paper can be
loaded.
IMPORTANT:
Height of sheets loaded should not exceed 140mm.
5. Adjust the “feed pressure adjuster lever” to the paper
thickness.
If no paper is fed:
Adjust the “feed pressure adjuster lever” to (HIGH).
If 2 sheets are fed:
Adjust the “feed pressure adjuster lever” to (LOW).
Feed pressure
adjuster lever
B5
A5
A4
B4
A3 / A4
/
A5
B5
R
R
R
Page 24

13
● How to Supply or Change Paper While Printing
If paper runs out during printing or when you change paper, press the “feed tray descend switch” to
lower the “feed tray”.
1. Make sure that the machine stops.
If printing is in process, press the STOP key.
2. Press the “feed tray descend switch”.
The “feed tray” is lowered for the time that the “feed tray
descend switch” is pressed.
REFERENCE:
When paper runs out or papers in the feed tray are
removed, the feed tray is automatically lowered.
3. Follow the steps 2, 3, and 4 in “How to Set Papers” (page 12).
IMPORTANT:
y When supplying different-size paper, set the “paper stacker guides“ and “paper
stopper“ again.
y When supplying paper of different quality, adjust the “feed pressure adjuster lever“ and
“separation pressure adjuster knob“.
Feed tray
descend
switch
Page 25
14
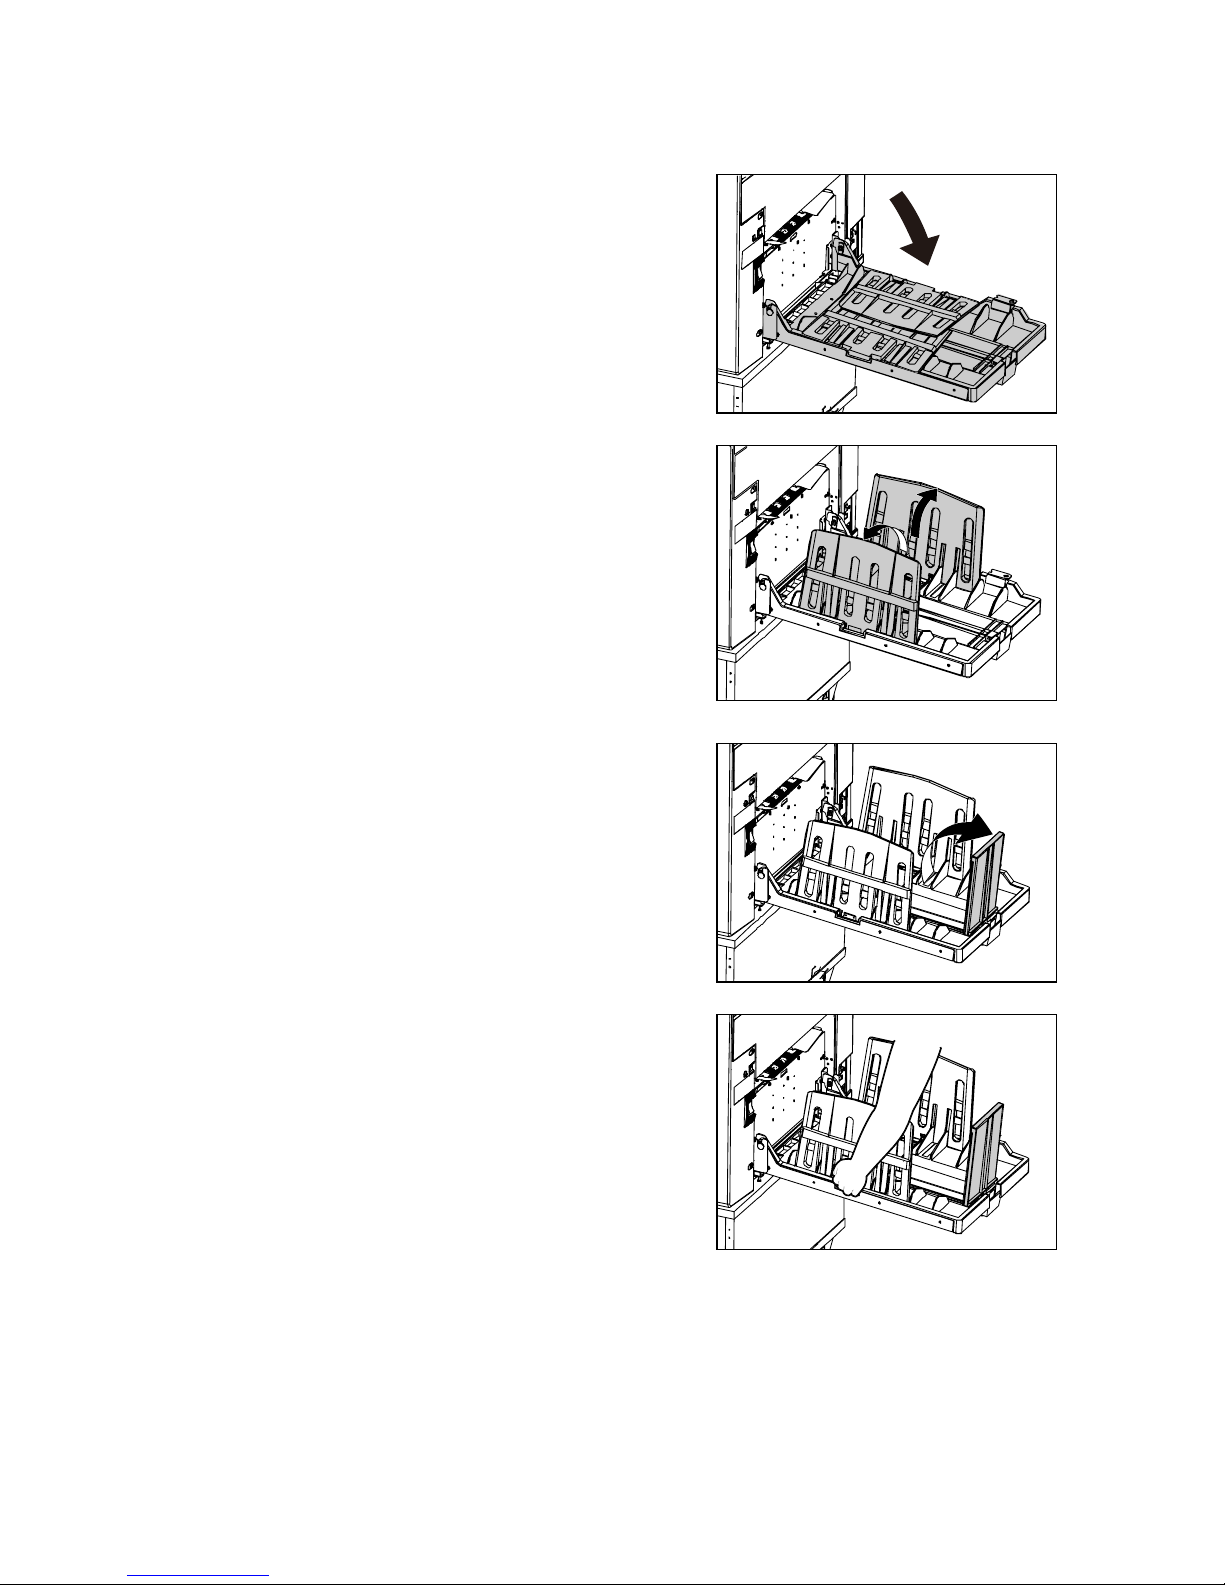
● How to Set the Print Tray
1. Open out the “print tray”.
2. Open out the “paper stacker guides”.
3. Open out the “paper stopper”.
4. Adjust the “paper stacker guides” and “paper stopper”
to the size of the printing paper.
Page 26

15
■ Loading Documents
● Loading Document on Document Glass Plate
The document can be loaded in the “portrait” or landscape” position.
IMPORTANT:
y A4, B5, and A5-size documents can be loaded in the “portrait” or landscape” position.
y Use the landscape position when enlarging or reducing from standard-size documents
to standard-size paper, such as A4 to A3.
y A3 and B4 documents can only be loaded in the landscape position.
►How to Load Document
1. Gently open the “scanner cover”.
2. Place the “document face down” on the document
glass plate, aligned with the guide (scale).
REFERENCE:
When you load a non standard-size document,
place it with the center of the document aligned
with the arrow on the guide (scale).
3. Gently close the “scanner cover”.
IMPORTANT:
When you place a thick document such as a book on the document glass plate, take care
not to force the scanner cover as this may damage the document glass plate with a risk of
personal injury.
Document
Scale
Scanner cover
Printing
face down
●Portrait
(
Ver tic al) Placement
●Landscape(Lateral) Placement
Page 27

16
● Loading Document in Automatic Document Feeder (ADF) (Optional)
Load documents that consist of a series of sheets to be printed in the ADF.
When one or more documents are loaded in the ADF, master making and printing are
automatically repeated until the document tray is empty.
IMPORTANT:
ADF mode is automatically selected when a document is loaded in the ADF.
The ADF then takes priority over the document glass plate in the master making process.
The document can be loaded in the “portrait” or landscape” position.
IMPORTANT:
y A4, B5, and A5-size documents can be loaded in the “portrait” or landscape” position.
y Use landscape position when enlarging or reducing from standard-size documents to
standard-size paper, such as A4 to A3.
y A3 and B4 documents can only be loaded in the landscape position.
y Shadow erasure function cannot be available with the ADF.
►How to Load Document
1. Align the “document guides” with the marks for the size
of document to be loaded in the ADF.
2. Place the “document” with printing face up in the
document tray. Master making starts with the top
document in the tray.
IMPORTANT:
Do not attempt to remove or add to the documents in
the document tray while master making and printing
are in progress.
●Portrait
(
Ver tic al
)
Placement ●Landsca
pe(
Lateral) Placement
Printing
face up
Document Tray
Document size
Document Guides
Page 28

17
■ Basic Printing
● Printing Using Basic Functions
1. Press the “I” side on the “power switch”.
NOTE: Turning Power ON/OFF → See page 7.
2. Load paper.
NOTE: Preparing for Printing → See page 12.
3. Load the document.
NOTE: Loading Documents → See page 15.
4. Set the “print tray”.
NOTE: How to Set the Print Tray → See page 14.
5. Make sure that initial screen appears on the LCD panel.
6. Set functions.
7. Press the MASTER MAKING key.
When the master has been made, one test print is
automatically made.
IMPORTANT:
y The test print is for verification purposes only and
may be fainter than the final print.
y You can enter the number of desired prints before
pressing the MASTER MAKING key to
immediately print the required number of copies.
8. Check the printing finish.
0 s h t 1 s e t
100 %
Page 29

18
9. Use the NUMERIC keys to enter the “number of prints”.
REFERENCE:
y You can specify up to 9999 prints.
y If you desire to change the “number of prints“, press
the CLEAR key and then enter the correct number.
10. Press the PRINT key.
The print run starts and the count displayed on the LCD
panel is decremented by one for each print made.
The printed pages are output to the “print tray”.
REFERENCE:
When you desire to stop a print run, press the STOP
key. To restart the print run, press the PRINT key
again.
11. When printing multiple documents, repeat the steps
3 to 10.
Page 30

19
■ Adjusting Print Position
● Print Position Adjustment Function
After master making has finished, you can fine-tune the position of the printed image ±15mm in
the vertical direction.
REFERENCE:
● Pressing and holding the or PRINT POSITION key continuously adjusts print
position. The print position indicator lamps change for each approximately 3mm change
in the print position
Use the (LOW) or (HIGH) key to select the optimum print speed.
● You can adjust the print speed while the machine is printing.
►How to Set Print Position Adjustment Function
1. Press the or PRINT POSITION key
to adjust print position.
● To move print position to the left (paper feed
direction), press the key.
The print position indicator lamp moves to the left.
● To move print position to the right (paper ejection
direction), press the key.
The print position indicator lamp moves to the right.
REFERENCE:
To return to the default setting, use one of the following two methods:
● Press the or key repeatedly until the print position indicator lamp moves to the
center.
● Press the RESET key.
In this case, all settings are reset to standard mode.
Do not press the RESET key while printing.
PRINT POSITION keys
Page 31

20
■ Adjusting Print Speed
● Print Speed Adjustment Function
Print speed can be adjusted in 3 steps between 60 pages and 120 pages per minute.
The default setting when the power is turned ON is about 90 pages per minute (standard
speed).
NOTES:
● Paper jam may occur more frequently and the paper stacking may deteriorate at high and
low speeds with certain types of paper and with certain image.
Use the (LOW) or (HIGH) key to select the optimum print speed.
● You can adjust the print speed while the machine is printing.
►How to Set Print Speed Adjustment Function
1. Press the (LOW) or (HIGH) key to adjust
speed.
REFERENCE:
To return to the default setting (about 90 pages per minute), use one of the following two methods:
● Press the (LOW) or (HIGH) key repeatedly until the speed indicator lamp moves to
the center.
● Press the RESET key.
In this case, all settings are reset to standard mode.
Do not press the RESET key while printing.
LOW key HIGH key
Page 32

21
Printing with Useful Functions
Page 33

22
■ Selecting Master Making Size
●Master Making Size
The following shows the image size that can be scanned for Master Making.
IMPORTANT:
● When you do not select a Master Making Size and print to a smaller paper, the internal
parts of the machine and the print may be soiled.
● You will not obtain the correct layout when you start multiple printing with a wrong-
sized paper selected.
►How to Select Master Making Size
1. Press the FUNCTION key.
2. Press the ARROW key (right) several
times to display the “MASTER SIZE”
screen (Master Making Size setting screen).
MASTER SIZE
A3
About 8mm cannot be printed.
This margin is known as the top margin.
B
A
Paper siz e A( 1 %) B ( 1 %)
A3 291mm 414mm
A4(R ) 204mm 291mm
A4 291mm 204mm
B4 251mm 358mm
A5(R) 204mm 142mm
A5 142mm 204mm
B5(R) 251mm 176mm
B5 176mm 251mm
Paper siz e A( 1 %) B ( 1 %)
LDG 273mm 426mm
LT(R ) 210mm 273mm
LT 273mm 210mm
LGL 210mm 350mm
MA X 291mm 414mm
ST(R) 134mm 210mm
ST 210mm 134mm
European U.S.
Page 34

23
3. Press the SELECT key.
4. Select the desired size by pressing the ARROW key (right).
Each time the ARROW key (right) is pressed, the arrow moves as follows.
European paper size
→ A3 → B4 → A4R → B5R → A5R → POST CARD → A4 → B5 → A5 → MAX
U.S. paper size
→ 11×17 → 8.5×14 → 8.5×11 → 5.5×8.5 → 4×6 → 11×8.5 → 8.5×5.5 → MAX
5. Press the SELECT key.
The desired master size is set.
6. Press the FUNCTION key.
Stand-by screen appears.
REFERENCE:
To return to the default setting, use one of the following two methods:
● Return to the MASTER SIZE screen (Master Making Size setting screen) and select
“A3”/“11×17”.
● Press the RESET key. In this case, all settings are reset to standard mode.
M A S T E R S I Z E
→ 1 1 × 1 7
→ A 3 B 4 A 4 R
M A S T E R S I Z E
MASTER SIZE
A4R
Page 35

24
■ Enlargement and Reduction
● Enlargement / Reduction from standard-size documents to standard-size
paper
Enlargement
You can make a copy that is enlarged from
standard-size document to standard-size paper.
European paper sizes
141% A4R→A3 / B5R→B4 / A5R→A4R
122% A4R→B4 / A5R→B5R
115% B4→A3 / B5R→A4R
U.S. paper sizes
154% 5.5 x 8.5 →8.5 x 14
129% 8.5 x 14 →11 x 17
121% 8.5 x 14 →11 x 17
Reduction
You can make a copy that is reduced from
standard-size document to standard-size paper.
European paper sizes
86% A3→B4 / A4R→B5R
81% B4→A4R / B5R→A5R
70% A3→A4R / B4 →B5R / A4R→A 5R
U.S. paper sizes
77% 11 x 17→8.5 x 14
64% 11 x 17→8.5 x 11 / 8.5 x 11→5.5 x 8.5
50% 11 x 17→5.5 x 8.5
►How to Set Enlargement/Reduction (from Standard-Size Document to Standard-Size Paper)
1. Proceed with steps 1 to 5 of the sequence described in “Basic Printing”.
“Basic Printing”. → See page 17.
2. Press the FUNCTION key.
A
A
A
A
115%
122%
141%
A
A
A
A
121%
129%
154%
A
A
A
A
86%
81%
70%
A
A
A
A
77%
64%
50%
Page 36

25
3. Press the ARROW key (right) several
times to display the ZOOM screen
(Rratio setting screen).
4. Press the SELECT key.
5. Select the desired ratio by pressing the ARROW key (right) or ARROW key (left).
Each time the ARROW key (left or right) is pressed, the arrow moves as follows.
European paper sizes
→ 141% → 122%→ 115%→ 100%→ 86%→ 81%→ 70%
U.S. paper sizes
→ 154% → 129%→ 121%→ 100%→ 77%→ 64%→ 50%
6. Press the SELECT key.
The desired ratio is set.
7. Press the FUNCTION key.
Stand-by screen appears.
REFERENCE:
To return to “100%”, use one of the following two methods:
● Return to the ZOOM screen (Ratio setting screen) and select “100%”.
● Press the RESET key. In this case, all settings are reset to standard mode.
ZOOM
100%
Z O O M
→ 1 0 0% 77%
Z O O M
→ 1 0 0% 86%
ZOOM
86%
Page 37

26
● Minor Reduction
The copy is printed at 94% size of the document.
Minor reduction is used when you desire to make a
binding margin or the document has text or
illustrations in non-master making area.
IMPORTANT:
Select MINOR REDUCTION before master
making.
►How to Set Minor Reduction
1. Proceed with steps 1 to 5 of the sequence described in “Basic Printing”.
“Basic Printing”. → See page 17.
2. Press the FUNCTION key.
3. Press the ARROW key (right) several
times to display the x94% setting screen.
4. Press the SELECT key.
5. Select ON by pressing the ARROW key (left).
X 9 4 %
→ O N O F F
A4 document A4 printout
A
A
94%
(94 %)
X94%
OFF
X 9 4 %
O N →O F F
Page 38

27
6. Press the SELECT key.
The desired ratio, x94%, is set.
7. Press the FUNCTION key.
Stand-by screen appears.
REFERENCE:
To return to “100%”, use one of the following two methods:
● Return to the x94% setting screen and select OFF.
● Press the RESET key. In this case, all settings are reset to standard mode.
X94%
ON
Page 39

28
● Free Zoom
You can set a zoom ratio between 50 % and 200%
in 1% steps.
IMPORTANT:
Select “FREE ZOOM” before master making.
►How to Set Free Zoom
1. Proceed with steps 1 to 5 of the sequence described in “Basic Printing”.
“Basic Printing”. → See page 17.
2. Press the FUNCTION key.
3. Press the ARROW key (right) several
times to display the FREE ZOOM screen
(Free Zoom setting screen).
4. Press the SELECT key.
5. Select the current setting ratio by pressing
the ARROW key (left).
(Default setting is OFF.)
6. Enter enlargement ratio / reduction ratio
by pressing the NUMERIC keys.
FREE ZOOM
OFF
F R E E Z O O M
1 0 0 % → O F F
F R E E Z O O M
→ 1 0 0 % → O F F
A
A
%05%002
A
Document
Page 40

29
7. Press the SELECT key.
The entered values are fixed.
8. Press the FUNCTION key.
Stand-by screen appears.
REFERENCE:
To return to “100%”, use one of the following two methods:
● Return to the FREE ZOOM screen (Free Zoom setting screen) and select OFF.
● Press the RESET key. In this case, all settings are reset to standard mode.
REFERENCE:
Text and lines may appear jagged at high zoom ratios.
FREE ZOOM
7 0 %
Page 41

30
■ Adjusting Darkness
● Master Darkness
Master darkness can be adjusted in 5 steps.
When the color of the document is light:
→ adjust the master darkness darker by pressing the ARROW key (right).
When the color of the documents is dark:
→ adjust the master darkness lighter by pressing the ARROW key (left).
IMPORTANT:
Set master darkness before master making.
When master darkness is changed, start from master making.
►How to Set Master Darkness
1. Proceed with steps 1 to 5 of the sequence described in “Basic Printing”.
“Basic Printing”. → See page 17.
2. Press the FUNCTION key.
3. Press the ARROW key (right) several
times to display the MASTER DARKNESS screen
(Master Darkness setting screen).
4. Press the SELECT key.
5. Select the desired MASTER DARKNESS by
pressing the ARROW key (right) or ARROW
key (left). Each time the ARROW key (left or right)
is pressed, the arrow moves as follows.
→ -2 → -1 → +/-0 → +1 → +2
● When the color of the document is light,
adjust the master darkness darker by pressing
the ARROW key (right).
MASTER DARKNESS
±0
M A S T E R D A R K N E S S
−1 →± 0
M A S T E R D A R K N E S S
→−1 ± 0
Page 42

31
● When the color of the documents is dark,
adjust the master darkness lighter by pressing the ARROW key (left).
● Default setting is +/-0.
6. Press the SELECT key.
The desired Master Darkness is set.
7. Press the FUNCTION key.
Stand-by screen appears.
REFERENCE:
To return to standard, use one of the following methods:
● Return to the MASTER DARKNESS screen (Master Darkness setting screen) and select +/-0.
● Press the RESET key. In this case, all settings are reset to standard mode.
MASTER DARKNESS
−1
Page 43

32
■ Selecting Document Type
● TEXT, TEXT/PHOTO, PHOTO
This function includes three modes for enhancing text and photographic documents.
TEXT : Enhances the printing of text documents.
TEXT/PHOTO : Enhances the printing of documents with both text and photographs.
PHOTO : Enhances the printing of the subtle gradations of photographs and light
images from color documents.
IMPORTANT:
Set “TEXT, TEXT/PHOTO, PHOTO” before starting master making.
►How to Set Document Type
1. Proceed with steps 1 to 5 of the sequence described in “Basic Printing”.
“Basic Printing” → See page 17.
2. Press the FUNCTION key.
3. Press the ARROW key (right) several
times to display the IMAGE MODE screen
(Document Type setting screen).
4. Press the SELECT key.
5. Select the desired IMAGE MODE by
pressing the ARROW key (right) or
ARROW key (left).
Each time the ARROW key (left or right) is
pressed, the arrow moves as follows.
→ TEXT → TEXT/PHOTO → PHOTO
● Default setting is TEXT.
IMAGE MODE
TEXT
I M A G E MODE
→ T E X T
I M A G E M O D E
→ P H O T O
Page 44

33
6. Press the SELECT key.
The desired Image Mode is set.
7. Press the FUNCTION key.
Stand-by screen appears.
REFERENCE:
To return to standard, use one of the following methods:
● Return to the IMAGE MODE screen (Document Type setting screen) and select TEXT.
● Press the RESET key. In this case, all settings are reset to standard mode.
IMAGE MODE
PHOTO
Page 45

34
Printing with Various Functions
Page 46

35
■ Batch Print / Sequential Batch Print
● Type of Batch Prints
● Batch Print
Only the specified number of sets is printed with the specified number of prints taken as one
set. You can enter up to 15 groups of number of prints x number of sets.
The machine with tape cluster (option) inserts the tape after each set of prints.
IMPORTANT:
Set “batch print” before starting master making.
● Sequential Batch Print (with ADF installed)
This function changes the number of prints made from each document. You can enter up to
15 groups of number of prints x number of sets.
IMPORTANT:
Set “sequential batch print” before starting master making.
Document 1st set 2nd set 3rd set
3 copies x 2 sets 3 copies x 3 sets 2 copies x 4 sets
A
C
C
C
B
B
A
A AA
Document 1st document 2nd document 3rd document
3 copies x 2 sets 3 copies x 3 sets 2 copies x 4 sets
A
C
C
C
B
B
A
A AA
Page 47

36
►How to Enter the Numeric Values for Batch Print
1. Proceed with steps 1 to 5 of the sequence described in
“Basic Printing”.
Basic Printing → See page 17.
2. Enter the number of prints using the NUMERIC keys.
y If you make a mistake,
start over again by pressing the CLEAR key
and start from the beginning. When you press the
CLEAR key, both the number of prints and the
number of sets are cancelled.
3. Press the key.
The number of prints is set.
4. Enter the number of sets using the NUMERIC keys.
y If you make a mistake,
start over again by pressing the CLEAR key
and start from the beginning. When you press the
CLEAR key, both the number of prints and the
number of sets are cancelled.
5. Press the key.
The number of sets is set.
6. Repeat the steps 2 to 5.
Up to 15 sets can be entered.
7. Press the MASTER MAKING key.
Printing starts from the last-entered print and set
quantities, and stops after the first set of printouts.
8. When a set of print is completed, printing stops.
Insert interleaving paper as a mark, or remove the
printed papers.
Page 48

37
9. Press the PRINT key.
Printing starts again.
10. Repeat the steps 8 and 9 until the entered sets are
completed.
IMPORTANT:
● The MASTER MAKING key will not work until all the sets have been printed.
● Press the STOP key and then the CLEAR key to abort the print run.
REFERENCE:
Using the optional tape cluster, you can successively perform collating of prints.
Page 49

38
►How to Enter the Numeric Values for Sequential Batch Print
(Available only with ADF installed)
1. Proceed with steps 1 to 5 of the sequence described in
“Basic Printing”.
Basic Printing → See page 17.
2. Press the key.
The number of prints/sets blinks and the machine enters sequential batch setting mode.
3. Enter the number of prints using the NUMERIC keys.
y If you make a mistake,
start over again by pressing the CLEAR key
and start from the beginning. When you press the
CLEAR key, both the number of prints and the
number of sets are cancelled.
4. Press the key.
The number of prints is set.
5. Enter the number of sets using the NUMERIC keys.
y If you make a mistake,
start over again by pressing the CLEAR key
and start from the beginning. When you press the
CLEAR key, both the number of prints and the
number of sets are cancelled.
6. Press the key.
The number of sets is set.
7. Repeat the steps 3 to 6.
Up to 15 sets can be entered.
8. Press the MASTER MAKING key.
Printing starts from the last-entered print and set quantities,
and stops after the first set of printouts.
IMPORTANT:
Load the document for ‘the last-entered number of prints
and sets’ uppermost and the document for ‘the firstentered number of prints and sets’ at the bottom.
9. When a set of print is completed, printing stops.
Insert interleaving paper as a mark, or remove the printed
papers.
Page 50

39
10. Press the PRINT key.
Printing starts again.
11. Repeat the steps 9 and 10.
12. After the print run for the first document has completed,
master making for the second document is performed
automatically and printing starts.
13. Repeat the steps 9 through 11 until the entered sets are
completed.
IMPORTANT:
● The MASTER MAKING key will not work until all
the sets have been printed.
● Press the STOP key and then the CLEAR key
to abort the print run.
REFERENCE:
Using the optional ADF and optional tape cluster, you can
successively perform the master making and collating of
prints of multiple documents.
● Dividing Sections with Tape [Available only with Tape Cluster Unit installed]
Only the specified number of sets is printed with the specified number of prints taken as one set.
Paper tape is inserted when printing of each set is completed. You can enter up to 15 groups
of number of prints x number of sets.
IMPORTANT:
The optional tape cluster is required for dividing sections with tape.
When using this function, refer to the Instruction Manual for the “Tape Cluster”.
Page 51

40
■ Multiple Printing
● Multiple Printing on One Page
This mode allows you to print multiple copies of the document on one page and two different
documents on one page.
Multiple Printing
This mode prints multiple copies of the document on one page.
2-in-1 Layout (Option: available only with ADF installed)
This mode prints two different document pages on one page.
If you do not install the ADF (automatic document feeder), this mode is not available.
A
A
A
AA
AA
AA
AA
AA
AA
Document
2 images
4
images
8
images
Page 52

41
This mode allows you to print 2, 4, or 8 copies of the
document on one page.
If you are reducing or enlarging, refer to the right
diagram to select the zoom ratio and the orientation
of the document.
● Copying A4 to A3 (2 prints on one page)
● Copying A4 to A3 (4 prints on one page)
A4
LT
A4
LT
A4
LT
A4
LT
A4
LT
Landscape
Placement
Zoom ratio:
50
%
A
3/ LTD
A7
(B8)
A6
(B7)
A5
(B6)
ST
A4
(B5)
LT
A4
LT
A4
LT
A4
LT
Portrait
Placement
Zoom ratio:
100%
A
3/ LTD
Page 53

42
►How to Set Multiple Printing
1. Proceed with steps 1 to 5 of the sequence described in
“Basic Printing”.
Basic Printing → See page 17.
2. Press the FUNCTION key.
3. Press the ARROW key (right) several
times to display the MULTI EXPOSURE
screen (Multi Printing setting screen).
4. Press the SELECT key.
5. Select the desired MULTI EXPOSURE by
pressing the ARROW key (right) or
ARROW key (left).
Each time the ARROW key (left or right) is pressed,
the arrow moves as follows.
→ OFF → 2-UP → 4-UP → 8-UP → 2 IN 1
REFERENCE:
● If an optional ADF is not installed, “2 IN 1” is not displayed.
● If an optional ADF is installed, “2 IN 1” can be selected.
● Default setting is OFF.
6. Press the SELECT key.
The desired exposure is set.
MULTI EXPOSURE
OFF
M U L T I E X P O S U R E
→ O F F
M U L T I E X P O S U R E
→ 2−U P
MULTI EXPOSURE
2−UP
Page 54

43
7. Press the FUNCTION key.
Stand-by screen appears.
REFERENCE:
If you return to standard: use one of the following methods.
● Return to the MULTI EXPOSURE screen (Multi Printing setting screen) and then select OFF.
● Press the RESET key. In this case, all settings are reset to standard mode.
Page 55

44
● 2-in-1 Layout (Available only with ADF installed)
Two-in-one (2-in 1) mode allows you to print two small documents on one page and also easily
print for creating booklets that will be saddle stitched.
When you use 2-in-1 mode, the layout is as follows:
IMPORTANT:
● Select “2-in-1 Layout” before starting master making.
● You cannot use 2-in-1 mode unless the optional ADF is installed.
● Always load the documents in the ADF.
● If you are printing the documents at 100%, select a printing paper that is the size of
the two documents.
● When you enlarge or reduce two documents size by side, select a zoom ratio so that
the documents fit exactly on one page.
● Note the following when using 2-in-1 layout mode:
* You must load the document in the ADF in portrait orientation.
* You must select a master size and zoom ratio that will accommodate two
documents.
* Correct layout may not be obtainable with other than standard size papers.
Document Printout 1 Printout 2
(even number)
B A D C
3
4
1
2
3
41
2
Document Printout 1 Printout 2 Printout 3
(odd number)
B A D C E
1
2
3
4
51
2
3
4
5
Page 56

45
►How to Set 2-in-1 Layout
1. Proceed with steps 1 to 5 of the sequence described in
“Basic Printing”.
Basic Printing → See page 17.
2. Press the FUNCTION key.
3. Press the ARROW key (right) several
times to display the MULTI EXPOSURE screen
(Multi Printing setting screen).
4. Press the SELECT key.
5. Select “2 IN 1” by pressing the ARROW key
(right).
Each time the ARROW key (right) is pressed,
the arrow moves as follows.
→ OFF → 2-UP → 4-UP → 8-UP → 2 IN 1
* Default setting is OFF.
6. Press the SELECT key.
7. Press the FUNCTION key.
Stand-by screen appears.
MULTI EXPOSURE
OFF
M U L T I E X P O S U R E
→ O F F
M U L T I E X P O S U R E
→ 2 I N 1
MULTI EXPOSURE
2IN1
Page 57

46
REFERENCE:
If you return to standard: use one of the following methods.
● Return to the MULTI EXPOSURE screen (Multi Printing setting screen) and then select OFF.
● Press the RESET key. In this case, all settings are reset to standard mode.
If you experience problems with layout, check the followings:
● Document orientation
● Document size, paper size, zoom ratio
Page 58

47
■ Shadow Erasure
● Shadow Erasure
This mode erases the shadows caused by the book binding when printing an open spread from
a book or other folded document.
It also erases the shadow around the periphery of the document.
IMPORTANT:
● Select “SHADOW ERASURE” before starting master making.
● This function is not available with the ADF (Automatic Document Feeder) installed.
● Area of Shadow Erasure
IMPORTANT:
When you select “No Shadow Erasure”, the
shadow is erased from approximately 3mm
around the periphery of the document.
The margin at the printed leading edge is for
removing the paper from the drum.
This leading edge section is 6 to 8mm.
The shadow erasure dimensions are as shown
in the right illustration.
PO
O P
Document
W
ithoutshadow
erasure
2mm
2mm
2mm
3mm
6mm
6-8mm
6-8mm
15mm
6mm
6mm
3mm
With shadow erasure
Without shadow erasure
Page 59

48
►How to Set Shadow Erasure
1. Proceed with steps 1 to 5 of the sequence described in
“Basic Printing”.
Basic Printing → See page 17.
2. Press the FUNCTION key.
3. Press the ARROW key (right) several
times to display the SHADOW ERASURE screen
(Shadow Erasure setting screen).
4. Press the SELECT key.
5. Select the desired SHADOW ERASURE by
pressing the ARROW key (right) or
ARROW key (left).
Each time the ARROW key (left or right) is pressed,
the arrow moves as follows.
European paper sizes
→ OFF → A3 → B4 → A4R → B5R → A5R → Postcard
U.S. paper sizes
→ OFF → 11 x17 → 8.5 x14 → 8.5 x11 → 5.5 x 8.5 → 4 x 6
● Default setting is OFF.
6. Press the SELECT key.
SHADOW ERASURE
OFF
S H A D O W E R A S U R E
→ O F F
S H A D O W E R A S U R E
→ A 3 B4 A 4 R
SHADOW ERASURE
A3
Page 60

49
7. Press the FUNCTION key.
Stand-by screen appears.
REFERENCE:
If you return to standard: use one of the following methods.
● Return to the SHADOW ERASURE screen (Shadow Erasure setting screen) and then select
OFF.
● Press the RESET key. In this case, all settings are reset to standard mode.
Page 61

50
■ Memory Mode
● Saving / Retrieving / Confirming Settings
You can save master making setting and print setting. And you can also retrieve the settings
saved and perform master making and printing.
● Saving Settings
The following settings are saved:
y Number of prints (including sets) y ZOOM /FREE ZOOM ratio
y MASTER SIZE y x94%
y MASTER DARKNESS y PRINT SPEED
y IMAGE MODE y PRINT POSITION
y BOOK SHADOW ERASURE y MULTI EXPOSURE
● The memory function allows you to save nine sets of settings.
● These settings are stored in memory even when the power is turned OFF.
►How to Save Settings
1. Proceed with steps 1 to 5 of the sequence described in
“Basic Printing”.
Basic Printing → See page 17.
2. Check that the LCD panel displays the settings to be saved.
3. Press the FUNCTION key.
4. Press the ARROW key (right) several
times to display the MEMORY MODE screen
(Memory Mode setting screen).
5. Press the SELECT key.
MEMORY MODE
M E M O R Y M O D E
→ R E T R I E V E
Page 62

51
6. Select “SAVE” by pressing the ARROW key
(right).
Each time the ARROW key (right) is pressed,
the arrow moves as follows.
→ RETRIEVE → SAVE → CLEAR → CANCEL
7. Press the SELECT key.
Number selecting screen appears.
8. Select the desired number to save by pressing
the NUMERIC keys.
You can save nine sets of settings in 1 through 9.
“C” is cancel.
REFERENCE:
Saved memory number flashes.
Select a memory number which does not flash to
save setting.
9. The setting is saved.
IMPORTANT:
Any previous settings stored in the memory
channel will be deleted when you save new settings.
10. Press the FUNCTION key.
Stand-by screen appears.
M E M O R Y M O D E
→ S A V E
S A V I N G
1 2 3 4 5 6 7 8 9 C
MEMORY MODE
Page 63

52
● Retrieving Settings
You can retrieve the settings saved and perform master making and printing.
Also, you can add and change the data when needed.
This change is temporally and changed setting is not saved.
►How to Retrieve Settings
1. Proceed with steps 1 to 5 of the sequence described in
“Basic Printing”.
Basic Printing → See page 17.
2. Press the FUNCTION key.
3. Press the ARROW key (right) several
times to display the MEMORY MODE screen
(Memory Mode setting screen).
4. Press the SELECT key.
5. Select “RETRIEVE” by pressing the
ARROW key (right).
Each time the ARROW key (right) is pressed,
the arrow moves as follows.
→ RETRIEVE → SAVE → CLEAR → CANCEL
6. Press the SELECT key.
Number selecting screen appears.
MEMORY MODE
M E M O R Y M O D E
→ R E T R I E V E
R E T R I E V I N G
1 2 3 4 5 6 7 8 9 C
M E M O R Y M O D E
→ R E T R I E V E
Page 64

53
7. Enter the desired number to retrieve by pressing
the NUMERIC keys.
Saved memory number flashes.
Select a memory number which flashes.
8. The saved setting is retrieved.
9. Press the FUNCTION key.
The saved setting is displayed.
IMPORTANT:
Even retrieved setting is changed, saved setting is not changed.
MEMORY MODE
Page 65

54
● Clearing Settings
You can clear the settings saved.
►How to Clear Settings
1. Proceed with steps 1 to 5 of the sequence described in
“Basic Printing”.
Basic Printing → See page 17.
2. Press the FUNCTION key.
3. Press the ARROW key (right) several
times to display the MEMORY MODE screen
(Memory Mode setting screen).
4. Press the SELECT key.
5. Select “CLEAR” by pressing the ARROW
key (right).
Each time the ARROW key (right) is pressed,
the arrow moves as follows.
→ RETRIEVE → SAVE → CLEAR → CANCEL
6. Press the SELECT key.
M E M O R Y M O D E
→ R E T R I E V E
M E M O R Y M O D E
→ C L E A R
C L E A R I N G
1 2 3 4 5 6 7 8 9 C
MEMORY MODE
Page 66

55
7. Enter the desired number to clear by pressing
the NUMERIC keys.
Saved memory number flashes.
Select a memory number which flashes.
8. The saved setting is cleared.
9. Press the FUNCTION key.
Stand-by screen appears.
MEMORY MODE
Page 67

56
■ Confidential Safeguard
● Confidential Safeguard
Confidential safeguard function, which prevents printing unless master making has been
competed, is a simple means of prohibiting others from printing sensitive documents.
IMPORTANT:
● When confidential safeguard function is ON, printing cannot be performed with the
PRINT key or TEST PRINT key. Other operations can be performed as normal.
● Turning the power OFF does not turn confidential safeguard function OFF.
● Once master making is carried out, confidential safeguard function is cleared.
● Master making still functions even if confidential safeguard function is ON.
►How to Set Confidential Safeguard Function
1. After master making and printing are completed, press the FUNCTION key.
2. Press the ARROW key (right) several times to
display the CONFIDENTIAL screen (Confidential
Safeguard setting screen).
3. Press the SELECT key.
4. Press the ARROW key (left) to select ON.
→ ON → CANCEL
CONFIDENTIAL
C O N F I D E N T I A L
→ O N
C O N F I D E N T I A L
→ C A N C E L
Page 68

57
5. Press the SELECT key.
6. Press the FUNCTION key.
Stand-by screen appears.
7. Press the PRINT key and the TEST PRINT key to check no print is made.
REFERENCE:
● While the Confidential Safeguard function is ON,
the message “PLEASE MAKE MASTER” is
displayed on the LCD panel when you press the
PRINT key or the TEST PRINT key.
● When you desire to cancel the Confidential
Safeguard function, make a master by pressing the
MASTER MAKING key.
IMPORTANT:
While the Confidential Safeguard function is ON, this function is not set to OFF unless
making a master.
P L E A S E M A K E M A S T E R
CONFIDENTIAL
Page 69

58
■ Adjusting Paper Feed Length
● Adjusting Paper Feed Length
Paper feed length can be adjusted in 5 steps.
When no paper is fed, adjust the paper feed length by pressing the ARROW key (right).
When paper folds occur, adjust the paper feed length by pressing the ARROW key (left).
IMPORTANT:
Adjusting paper feed length may be needed depending on paper.
►How to Adjust Paper Feed Length
1. Proceed with steps 1 to 5 of the sequence described in
“Basic Printing”.
Basic Printing → See page 17.
2. Press the FUNCTION key.
3. Press the ARROW key (right) or ARROW
key (left) several times to display the PAPER FEED
LENGTH screen (Paper Feed Length setting screen).
4. Press the SELECT key.
5. Select desired paper feed length by pressing the
ARROW key (right) or ARROW key (left).
Each time the ARROW key (left or right) is pressed,
The arrow moves as follows.
→ -2 → -1 → +/-0 → +1 → +2
When no paper is fed, adjust the paper feed length by pressing the ARROW key (right).
When paper folds occur, adjust the paper feed length by pressing the ARROW key (left).
* Default setting is +/-0.
PAPER FEED LENGTH
±0
P A P E R F E E D L E N G T H
−1 →± 0
P A P E R F E E D L E N G T H
→−1 ± 0
Page 70

59
6. Press the SELECT key.
The desired paper feed length is set.
7. Press the FUNCTION key.
Stand-by screen appears.
REFERENCE:
To return to standard:
Return to the PAPER FEED LENGTH screen (Paper Feed Length setting screen) and select +/-0.
PAPER FEED LENGTH
±0
Page 71

60
■ Auto Sleep
● Auto Sleep Mode
This function automatically turns off the LCD panel when the LCD panel is not operated for a
specified period of time. (This reduces standby power consumption.)
The specified time of period can be set between 1 to 99 minutes.
Default setting is 5 minutes.
REFERENCE:
The machine returns to normal mode from Auto Sleep mode by pressing the NUMERIC key or
any other key.
►How to Set Auto Sleep Mode
1. Press the FUNCTION key.
2. Press the ARROW key (right) several times to
display the AUTO SLEEP screen (Auto Sleep
setting screen).
3. Press the SELECT key.
4. Enter the desired time to set by pressing the
NUMERIC keys.
The specified time of period can be set between
1 to 99 minutes.
● Default setting is 5 minutes.
Example: When you desire to set “15 minutes”,
enter “1” and “5”.
AUTO SLEEP
5MIN
A U T O S L E E P
→ 5 M I N
Page 72

61
5. Press the SELECT key.
The entered values are fixed.
6. Press the FUNCTION key.
Stand-by screen appears.
REFERENCE:
If you return to standard:
Return to the AUTO SLEEP screen (Auto Sleep setting screen) and then set 5MIN.
AUTO SLEEP
15MIN
Page 73

62
Replacing Consumables
Use consumables such as master roll, ink pack and so on designed only for this machine.
Improper use of consumables may cause malfunction and/or trouble of the machine.
Page 74

63
■ Replacing Ink Pack
● Replacing Ink Pack
The message “NO INK” is displayed on the LCD panel when the remaining ink is low.
Replace the ink pack according to the following procedure.
IMPORTANT:
● Use an ink pack designed only for this machine.
● Be sure to set the ink pack. Do not operate the machine without an ink pack.
● Dispose of used ink pack according to local environmental regulations.
►How to Replace Ink Pack
1. Open the “front cover”.
2. Grasp the “ink pack holder” and pull it down.
3. Lift out the “empty ink pack”
NO INK
Page 75

64
4. Insert an “ink pack” so that the “groove on the lip” fits
onto the “U” groove of the “holder”.
5. Push the “ink pack holder” back.
6. Close the “front cover”.
Page 76

65
■ Replacing Master Roll
● Replacing Master Roll
The message “NO MASTER” is displayed on the LCD panel when the master roll is used up.
Replace the master roll according to the following procedure.
IMPORTANT:
● Use a master roll designed only for this machine.
● Do not put anything heavy on the master roll box.
Master may be scratched and it causes the machine not to perform master making
normally.
● Do not leave the master roll taken out from the master roll box as it is.
Foreign materials may attach to the surface of the master and cause the machine not
to perform master making normally.
● Keep the master out of direct sunlight, high/low temperature, and high/low humidity.
►How to Replace Master Roll
1. Press the “scanner open button” to slide the scanner
unit.
2. Press the “master cover release lever”.
The master cover will open up.
NO MASTER
Page 77

66
3. Lift out the used master roll.
CAUTION:
Do not remove the cover affixed with Warning Label.
Personnel may be injured by the movable cutter
inside the machine.
IMPORTANT:
Do not touch the heat generator of thermal head.
Doing so may cause damages, leading to a
malfunction of master making.
4. Take out a “new master roll” from the bag.
5. Insert the “master roll” in the direction shown in the figure
on the right.
6. Peel off and pull out the seal.
(Check that a black line is on the operation side.)
7. Pull out the “master”, insert it under the “bar”, and align
its leading edge with the “set line”.
Page 78

67
8. Close the “master cover”.
9. Push the “master set lever”.
The master will be pulled in automatically.
IMPORTANT:
If the master is not pulled in, open the master
cover and gently press the master in as far as
possible to set again.
10. Slide the “scanner unit” to return it to its original
position.
Master set leve
r
Page 79

68
■ Disposing of Used Master
● Disposing of Used Master
The message “USED MASTER FULL” is displayed on the LCD panel when the master ejection
core is full. Dispose of used master wound onto the ejection core according to the following
procedure.
IMPORTANT:
● Use a master ejection core designed only for this machine.
● If you use a security master ejection box, please contact the administrator of machine.
►How to Dispose of Used Master
1. Open the “master ejection box release button” to open
the “master ejection box”.
2. Open the “master ejection box cover” while pressing
the “master ejection box cover release button”.
USED MASTER FULL
Page 80

69
3. Take out the “master ejection core” and simply dispose of
it.
IMPORTANT:
Ink adheres to the master ejection core (used master).
Take care to prevent ink from getting onto your clothing.
4. Insert a new “master ejection core”.
5. Gently close the “master ejection box cover”, and press
it in until it locks in place.
6. Close the “master ejection box”, and press it in until it
locks in place.
Page 81

70
■ Replacing Drum Unit
● Replacing Drum Unit
● Avoid pressing and damaging the drum surface with fingers etc. It can stain your clothes,
and the warp in the drum surface may cause bad prints.
● Always place the drum unit on flat and stable surface. Otherwise, the drum surface may
be damaged or warped and may cause bad prints.
►How to Replace Drum Unit
1. Press and hold the “JOG switch” until he drum comes
to a stop with a beep.
2. Open the “front cover”.
3. Pull out the “drum unit” towards you while holding the
“drum unit handle” until it comes to a stop.
● Do not touch the drum or rollers when you
operate the JOG switch.
● Do not put your hands or fingers inside the
machine while it is operating. Your hands may
be pulled in or nipped.
WARNING
Page 82

71
4. Grip the “upper drum shaft” with your other hand, and
pull the drum out towards you while slightly lifting near
end of the “drum”.
5. Hold the “drum” level and place the
“drum guide roller” onto the “rail” in the machine.
6. Hold the “drum” level and press it in gently until it
comes to a stop.
7. Close the “front cover”.
Page 83

72
Troubleshooting
Page 84

73
■ Troubleshooting
● If trouble occurs
If trouble occurs, find the same phenomenon and message in the following table and deal with it
before contacting our service person.
If the problem still persists, then contact our service person.
Phenomenon Check Point Solution
Is the power cord unplugged
from the outlet or inlet of the
machine?
Plug in the power cord properly
(outlet/inlet of the machine).
The machine does not start
when the power switch is
turned on.
Is the machine in AUTO SLEEP
mode?
Press any of the keys.
AUTO SLEEP mode is
cancelled and the machine will
be available.
Is the document set correctly?
(printing face down?)
Set the document with printing
face down.
When you use the automatic
document feeder (ADF), set the
document with printing face up.
Is the master roll set properly?
(right side up?)
Set the master roll properly.
There is no printing on the
ejected paper.
Is the print paper winding on the
drum?
Remove the paper on the drum.
Paper is winding on the drum. Is there all black part on the
upper part of the document?
If there is all black part on the
upper part of the document, the
paper is not easily ejected.
Set the document up side down
and perform master making
again.
Is the glass clean?
Clean the class with dry soft
cloth.
Is the surface of the drum
clean?
Pull out the drum and remove
foreign material on the drum
surface if any.
If foreign material is between the
drum and master, peel off the
master and remove it. Then,
set the drum and perform
master making again.
Some part of printing is missing.
Is master size set? Set master size.
Page 85

74
● When messages appear
Error messages are displayed on the LCD panel. When a message appears, follow the
instructions below. Error messages are displayed in one of two ways, either by text or by
number.
Message Cause and Solution
Cause: There is no paper on the feed tray.
Solution: Load the feed tray with papers.
Cause: Paper jam has occurred in the feed tray side.
Solution: Lower the feed tray and remove the
jammed paper.
If paper jam often occurs in the feed tray
side, adjust feed pressure.
Cause : Paper jam has occurred in the print tray side.
Solution: Press the JOG switch and remove the
jammed paper.
Solution: Pull out the drum and remove the paper
from the drum.
Cause: There is no master.
Solution: Set a new master roll.
Cause: The master roll cover is open.
Solution: Close the master roll cover.
Cause: A trouble has occurred in the process of
master making.
Solution: Remove the remained master in the master
feed section and set master roll properly.
Cause: The scanner is open.
Solution: Gently close the scanner.
PAPER FEED JAM
NO PAPER
SCANNER OPEN
MASTER SET ERROR
MASTER COVER OPEN
NO MASTER
PAPER EXIT JAM
Page 86

75
Message Cause and Solution
Cause: The front cover is open.
Solution: Gently close the front cover.
Cause: Master remains on the drum.
Solution 1: Pull out the drum and remove the master
from the drum.
Solution 2: Open the master ejection box and
remove the master.
Reference: This message is displayed when master
making is performed without master on
the drum.
Cause: The master ejection core is full.
Solution: Remove the used master.
Cause: The master ejection box is open.
Solution: Gently close the master ejection box.
Cause: No used master core in the master ejection
box.
Solution: Set a master ejection core.
Cause: A drum unit is not set.
Solution: Set a drum unit.
Cause: There is no ink.
Solution: Replace ink pack with a new one.
NO INK
DRUM NOT SET
FRONT-COVER OPEN
MASTER EJECT ERROR
USED MASTER FULL
CLOSE MASTER
EJECTION BO
X
NO USED MASTER
CORE
Page 87

76
Message Cause and Solution
Cause: Cannot print.
Solution: This message is displayed if you press the
PRINT key or TEST PRINT key
without making a master immediately
after a master setting error or when
confidential safeguard function is “ON”.
Cause: Printing is not complete.
Solution: Either press the PRINT key to resume
printing or press the CLEAR key to
clear the counter.
Cause: A master is being made.
Solution: Wait until it is completed.
Cause: The printer is not ready.
Solution: Wait a while with the power turned ON.
If this message does not disappear after
several minutes, turn the power OFF and
contact service person.
Cause: An error has occurred inside of the machine.
Solution: Take note of error code (EXXX).
Turn off the power and then turn on the
power again. If the problem still persists, turn
off the power and contact our service
person. If contact information is displayed in
the LCD panel, follow it. Explain the error
code (EXXX) and details of the error to the
service person.
- - PRINTING - -
PLEASE MAKE MASTER
- - SCANNING - -
- - WAIT - -
E x x x CALL SERVICE
Page 88

77
Machine with keycard counter installed.
Refer to the Instruction Manual of the keycard counter for the details.
Message Cause and Solution
Cause: Keycard is not inserted.
Solution: Insert a department card in the keycard
counter.
Cause: Readout of card failed.
Solution: Check inserting direction of the card and
reinsert the card.
Machine with automatic document feeder (ADF) installed
Message Cause and Solution
Cause: Paper jam has occurred in the ADF.
Solution: Remov the jammed paper.
Cause: The ADF cover is open.
Solution: Close the ADF cover.
SET KEYCARD
CARD READ ERROR
ADF PAPER JAM
ADF OPEN
Page 89

78
■ When ‘PAPER EXIT JAM’ is displayed
When a paper jams in the print tray side, ’ PAPER EXIT JAM ’ is displayed on the LCD panel.
Follow the procedure below to remove the jammed paper.
►How to Remove Jammed Paper
1. Push the “master ejection box release button” to open
the “master ejection box”.
2. Press the JOG switch and remove the jammed paper.
● Do not touch the drum or rollers when you
operate the JOG switch.
● Do not put your hands or fingers inside the
machine while it is operating. Your hands may
be pulled in or nipped.
JOG switch
WARNING
Page 90

79
Maintenance
Page 91

80
■ Daily Maintenance
● How to maintain the machine
Check the machine periodically to maintain its performance.
WARNING
● Before cleaning, be sure to turn the power off, wait
until the machine cools off and unplug the power
cord. Otherwise, fire or electric shock may occur.
● Never remove covers on the machine or modify
them.
● Do not spill water or any liquid inside of the machine.
It may cause or fire or electric shock. If it happens,
contact our service person.
Clean the exterior in the following procedures.
1. Use soft cloth with water or mild detergent.
2. Wipe the exterior.
3. Wipe off the liquid with dry soft cloth.
● Gently wipe off the dust on the glass with dry soft cloth.
● Gently wipe off the dust on the LCD panel with dry soft cloth. Never use wet cloth. It may cause
damage.
WARNING
● Never use alcohol or solvent cleaner. It may tarnish
or damage the exterior finish.
● Do not put diluted petroleum or insecticide.
It may cause fire.
Dust accumulation may cause the machine to malfunction. Clean it periodically.
Contact our dealer as for cleaning of inside of the machine.
Page 92

81
Specifications
Page 93

82
■ Specifications
Model name DP-J450
Model Floor stand model
Master making method Thermal digital master making
Master making interval 23 sec. (A4, 100%)
Resolution
(Pel path dir.) x
(line progression dir.)
Scan (input) resolution:300dpi×600 dpi
Print (output) resolution:300dpi×600 dpi
(Master punch density:600dpi×600dpi)
Scanning method Flat bed scanner (ADF: optional)
Optional ADF
Document weight
64 - 128gsm
Optional ADF
Capacity
100 sheets (64gsm), 85 sheets (20lb), 80 sheets (80gsm)
Printing method Stencil print
Document type Sheets, book (max. weight: 10kg)
Document size Max. 297mm×432mm
(with optional ADF: Min. 100mm×148mm)
Scanning area 291mm×426mm
Image area (max.) 290mm×422mm
(11.4’ x 16.6’)
Feeding capacity 1,250 sheets (64gsm)
(1,000 sheets (80gsm))
Height of 1,250 sheets loaded should not exceed 140mm.
Print tray capacity 1,250 sheets (64gsm)
(1,000 sheets (80gsm))
Paper size Max.: 297mm×432mm
(Main unit can feed/exit 320mm×450mm. Stacker tray does not cover
paper size larger than 297x432.)
Min.: 100mm×150mm
(50mm×150mm is possible with some limitations including no vertical
registration adjustment, attaching plastic guide on separator etc.)
Paper weight 53gsm - 210gsm (45kg-180kg)
13lb (Bond) – 110b (Index)
Print speed 60 - 120 ppm (3-steps )
Zoom <A/B size spec>
100%
Margin adjust 94%
Preset reduction/enlargement: 70, 81, 86, 115, 122, 141%
Custom scaling: 50 - 200% (by 1% increment)
<Inch size spec>
100%
Margin adjust 94%
Preset reduction/enlargement: 50, 64, 77, 121, 129, 154%
Custom scaling: 50 - 200% (by 1% increment)
Vertical: Electrical +/-15mm Print position
adjustment
Horizontal: Manual +/-10mm
Image mode Text (default), Photo, Text/Photo
Page 94

83
Density control Master density: 5 steps
Ink supply Automatic control (1000ml)
Color print By replacing drum unit
Master feeding method Roll master automatic feed (220 masters / roll)
Master ejection
method
Automatic ejection / roll-up method (used master capacity: 55 masters)
Display panel Small graphic LCD
144×32 dots
backlight
Control panel
languages
Japanese
English
French
German
Spanish
Italian
Russian
Chinese(simplified)
Korean
Thai
Polish
Other function Standard function:
Feed pressure adjustment (3 steps)
Batch printing (no ON/OFF choice)
Master making size choice
Multiple printing (2,4, and 8 up)
Book shadow erasure
Memory function
Confidential safeguard
Auto sleep (control panel light:off)
Color separation (equipped in the optional printer driver)
Detection Print tray detection
Master roll detection
Used master roll full detection
Ink detection
Online Optional USB interface (USB 2.0 Full-speed)
(USB cable must be 3m or shorter.)
Printer driver must be installed in computer.
Windows 2000 Professional
Windows XP Professional/Home Edition
Windows Vista x 86 (32 bits)
Mac OSX (10.3 or 10.4)
Optional network sever FS-100U (USB LAN unit)
Windows 98/Me
Windows NT4.0
Windows 2000 Professional
Windows XP Professional/Home Edition
Windows Vista x86 (32 bits)
Mac OS9
Mac OSX (10.3 or 10.4) (Power PC/Intel)
Page 95

84
Options Automatic document feeder (S4-ADF)
Drum unit
Key card counter (KEY-10)
Tape cluster (TAP-13)
Master box security lock
Cabinet
Cabinet door
Cabinet (drawer type)
Cabinet (drum storage type)
USB interface
USB LAN Unit (FS-100U)
Heavy paper kit
Adjustable jump plate
Power source 100-240V, 50/60Hz, 1.8-0.8A
Power consumption
(25 degree (c))
5% coverage
document
Master making 65W
Max. 165W
Stand by 22W
Sleeping 21W
Dimensions In use: 1351mm(W) x 688mm(D) x 1080mm(H)
Folded: 782mm(W) x 688mm(D) x 1080mm(H)
With optional ADF installed:
In use: 1351mm(W) x 688mm(D) x 1222mm(H)
Folded: 782mm(W) x 688mm(D) x 1222mm(H)
With optional drawer-type cabinet
In use: 1351mm(W) x 708mm(D) x 1125mm(H)
Folded: 782mm(W) x 708mm(D) x 1125mm(H)
Weight Main unit 92kg, With ADF: 96kg
(when packed: 105kg)
Operating temperature 10 - 30 degree (C)
(50-86 degree (F))
Specifications are subject to change without prior notice.
Page 96

85
■ MEMO
Page 97

86
1st printing : JUNE 2008
Issued by : DUPLO CORPORATION
PRINTED IN JAPAN
Reproduction prohibited
Page 98

1
DUPLO CORPORATION
Duplo building, 1-6, Oyama 4 chome, Sagamihara, Kanagawa 229-1180, Japan
PHONE: +81-42-775-3602
FAX: +81-42-775-3606
E-mail: info@duplo.com
S8-Y1010 2008.06
 Loading...