

Page 1

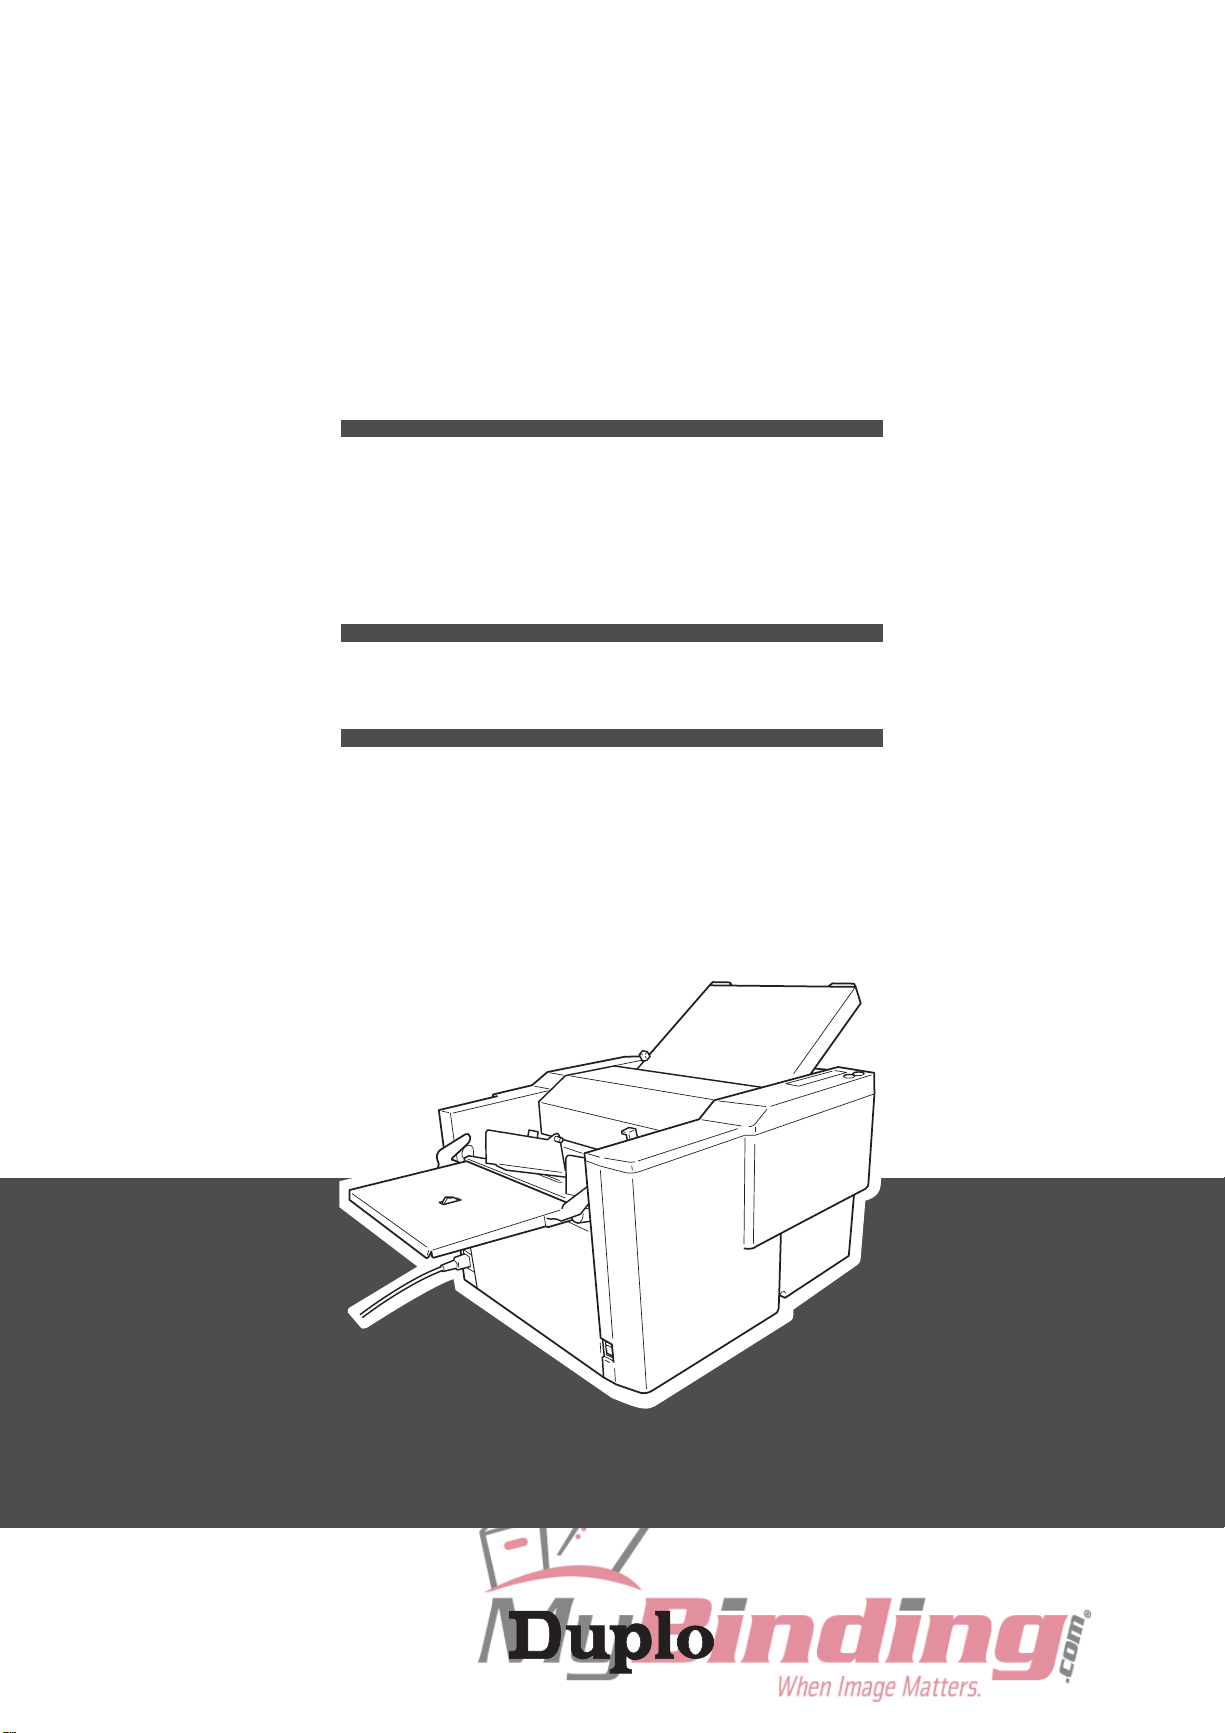
Duplo DF-920
Automatic Tabletop
Paper Folder
Instruction Manual
Page 2
PAPER FOLDER
DF-920
INSTRUCTION MANUAL
[120 V]
Page 3

This equipment has been tested and found to comply with the limits for a Class B digital device, pursuant to Part 15 of the FCC
Rules. These limits are designed to provide reasonable protection against harmful interference in a residential installation. This
equipment generates, uses and can radiate radio frequency energy and, if not installed and used in accordance with the
instructions, may cause harmful interference to radio communications. However, there is no guarantee that interference will not
occur in a particular installation. If this equipment does cause harmful interference to radio or television reception, which can be
determined by turning the equipment off and on, the user is encouraged to try to correct the interference by one or more of the
following measures:
– Reorient or relocate the receiving antenna.
– Increase the separation between the equipment and receiver.
– Connect the equipment into an outlet on a circuit different from that to which the receiver is connected.
– Consult the dealer or an experienced radio/TV technician for help.
Page 4

INTRODUCTION
Thank you for purchasing this Duplo equipment.
To ensure correct usage, please read this instruction manual thoroughly, especially the section
Safety Precautions.
The aim of this instruction manual is safe and proper use. For this reason, users of this equipment
for purposes or by methods other than those described in this manual and users who remodel this
equipment for their own reasons are asked to ensure safety in use at their own responsibility.
After reading, please keep this instruction manual handy for future reference.
ABOUT THIS INSTRUCTION MANUAL
This instruction manual describes the functions of the equipment. It is composed of the following
chapters.
It can be read from the required pages in use of this equipment.
Safety (p.3 to 6)
◆
This chapter describes user safety, such as precautions in use of this equipment, etc.
Outline (p.7 to 17)
◆
This chapter describes what users need to know about this equipment before using it.
Basic Operations (p.18 to 25)
◆
This chapter describes the most basic paper folding operation.
Correcting Folding Misalignment (p.26 to 31)
◆
This chapter describes how to correct folding misalignment of folded paper.
Applied Use (p.32 to 44)
◆
This chapter outlines applied paper folding operations such as standard folding of non-standard
paper, custom folding, and cross folding, etc.
Others (p.45 to 59)
◆
This chapter describes additional functions, error messages, troubleshooting guide, etc.
1
Page 5
TABLE OF CONTENTS
Safety
◆
1. Safety Precautions.............................................3
Caution Label Location ........................................5
2. Installation Precautions ....................................5
2-1. Installation Location ...................................5
2-2. Precautions in Moving the Unit ..................5
3. Usage Precautions.............................................6
3-1. Power Supply.............................................6
3-2. Operating Environment.............................. 6
3-3. Storage Conditions .................................... 6
3-4. Maintenance .............................................. 6
Outline
◆
4. Installation ..........................................................7
4-1. Standard Accessories................................ 7
4-2. Installation Procedure ................................8
5. Names and Operation of Parts .........................11
5-1. External Parts ............................................ 11
5-2. Internal Parts .............................................12
6. Control Panel......................................................14
6-1. Names and Operation of Control Panel..... 14
6-2. Description of LCD.....................................16
6-3. Energy Saving Mode Function...................17
6-4. Types of Buzzer Sounds............................17
Applied Use
◆
11. Standard Folding of Non-standard Paper........32
11-1. Paper Size Restrictions .............................32
11-2. Operation Procedure .................................32
12. Custom Folding..................................................35
12-1. Paper Size Restrictions .............................35
12-2. Operation Procedure .................................35
13. Cross Folding..................................................... 38
13-1. Cross Folding Methods..............................38
13-2. Precautions on Cross Folding....................38
13-3. Cross Folding of Standard Paper ..............39
13-4. Cross Folding of Non-standard Paper ....... 40
13-5. Cross Folding Paper at the Desired
Folding Position ......................................... 40
14. Using Art Paper and Coated Paper .................. 41
14-1. Characteristics of Art Paper and Coated
Paper ......................................................... 41
14-2. Operation Procedure .................................41
15. Using Special Paper ..........................................42
15-1. Double Folding Thick Paper ......................42
15-2. Using Recycled Paper ............................... 42
15-3. Folding Small Size Paper ..........................43
16. Stacker Roller..................................................... 44
16-1. Changing the Stacker Roller Position ........44
16-2. Changing the Stacker Roller Height ..........44
Basic Operations
◆
7. Precautions Prior to Use ...................................18
7-1. Paper Used................................................ 18
7-2. Precautions on Stacking Paper .................19
7-3. Automatic Detection of Paper Size ............19
7-4. Automatic Rise/Descent of the Paper
Feed Tray ..................................................20
7-5. Checking the Front/Back, Top/End of
Paper ......................................................... 20
7-6. Using the “QUICK START” ........................21
8. Paper Folding Methods ..................................... 21
9. Standard Folding of Standard Paper ...............22
9-1. Standard Paper..........................................22
9-2. Standard Folding Modes............................22
9-3. Operation Procedure .................................22
Correcting Folding Misalignment
◆
10. Folding Misalignment ........................................26
10-1. Correcting Folding Misalignment Along
Sides of Paper ........................................... 26
10-2. Correcting Folding Misalignment Along
Vertical Length of Paper ............................ 27
10-3. Correcting Deformed Folding.....................31
Others
◆
17. Additional Functions ......................................... 45
17-1. Interval Function ........................................ 45
17-2. Folding Stopper Operation Mode Setting
Function .....................................................46
18. When Paper Jamming Occurs ..........................48
18-1.
When Paper Jams at Paper Feed Section...
18-2.
When Paper Jams Near Paper Feed Ring ...
18-3. When Paper Jams Inside Folding Plate.....49
18-4.
When Paper Winds Around Folding Roller ...
18-5. When Paper Jams Near Folding Plate 1 ...50
18-6. When Paper Jams Near Folding Plate 2 ...51
18-7. When Paper Jams at Paper Ejection
Section.......................................................52
19. Error Messages..................................................53
20. Troubleshooting.................................................54
21. Cleaning the Unit ...............................................56
21-1. Cleaning the Folding Rollers......................56
21-2. Cleaning the Paper Feed Rings.................57
21-3. Cleaning the Paper Separator ................... 57
21-4. Cleaning the Paper Feed Inlet Sensor.......57
21-5.
Cleaning the Paper Ejection Outlet Sensor ...
22. Specifications.....................................................59
48
48
49
58
2
Page 6
1. SAFETY PRECAUTIONS
Always observe the cautions and warnings given below to prevent personal injury or property
damage.
The degree of danger and damage that could occur is indicated on two levels by the
following marks.
WARNING : Ignoring this mark could result in the possibility of serious injury or
!
even death.
CAUTION : Ignoring this mark could result in the possibility of injury or physical
!
damage.
The following graphic symbols indicate the various types of action to be performed or
avoided.
This graphic symbol indicates a forbidden action.
means “Do not disassemble.”
means “Do not touch.”
This graphic symbol indicates actions that must be performed.
means “Disconnect the power plug.”
!
WARNING:
Do not place metal objects or vessels containing liquids on top of the unit. The entry of any
metal object or liquid could result in a fire or an electrical shock.
Do not insert any metal or easily-combustible object inside this unit. This could result in a fire
or an electrical shock.
Do not touch or insert foreign objects into any rotating part during operation. This could
result in injury.
Do not remove the cover or back panel. This unit contains high-voltage components that
could cause an electrical shock.
Do not disassemble, modify or repair this unit. There is a danger of fire, electrical shock or
injury. Contact your dealer when repairs are necessary.
Use only the power supply voltage specified on the main nameplate. Using other voltages
could result in a fire or an electrical shock.
Keep this unit and the power cord away from heaters and heater vents. Excessive heat could
melt the cover or power cord covering, and result in a fire or an electrical shock.
Do not use solvent inside or near the unit (e.g. when cleaning the unit). Such solvents may
damage the rubber rollers and resin inside the unit, resulting in malfunctions.
(Continued on the next page)
3
Page 7
SAFETY PRECAUTIONS (continued)
Make sure that the combined power consumption of the appliances to be connected does not
exceed the capacity rating of the power outlets or plug receptacles. Exceeding the capacity
rating could cause the power outlets, plug receptacles, or power extension cords to overheat
and catch a fire.
Remove any dust that accumulates on the power plug prongs and the surface of the plug from
which the prongs extend. Accumulated dust could result in a fire.
If any foreign object such as metal or liquid should enter this unit, immediately turn the unit
off at the power switch and disconnect the power plug from the power outlet. Failure to do
so could result in a fire or an electrical shock. Contact your dealer immediately.
Do not damage the power cord or power plug. (Do not scratch, alter, bend, twist, pull or place
heavy objects on the power cord or power plug.)
This could result in damage, a fire or an electrical shock.
Always grip the plug when disconnecting the power plug from the power outlet. Forcibly
pulling on the power cord could cause damage, resulting in a fire or an electrical shock.
!
CAUTION:
Do not handle the power plug with wet hands. This could result in an electrical shock.
Before cleaning this unit, turn the unit off at the power switch and disconnect the power plug
from the power outlet. Accidental operation of the unit during cleaning could result in injury.
Do not touch the power switch with wet hands. Otherwise electric hazards may occur.
Do not use flammable sprays inside or near the unit (e.g. when cleaning the unit). Such
flammable gas may ignite and cause a fire or combustion.
Keep away long hair, ties, jewelry and loose clothing. This could result in injury.
Do not put fingers inside during operation. This could result in injury.
Always disconnect the power plug from the power outlet when the unit is not to be used for
an extended period. Failure to do so could result in a fire due to leakage current if the
insulation should deteriorate.
Install this unit on a level, stable stand or floor, with sufficient space around it. Failure to do
so could result in the unit overturning and causing injury.
Do not install this unit in a location where there is excessive humidity or where contact with
water is possible. Poor choice of location could result in deterioration of the insulation, a fire
or an electrical shock.
Disconnect the power plug from the power outlet before attempting to move this unit. Failure
to do so could result in power cord damage, a fire or an electrical shock.
4
Page 8
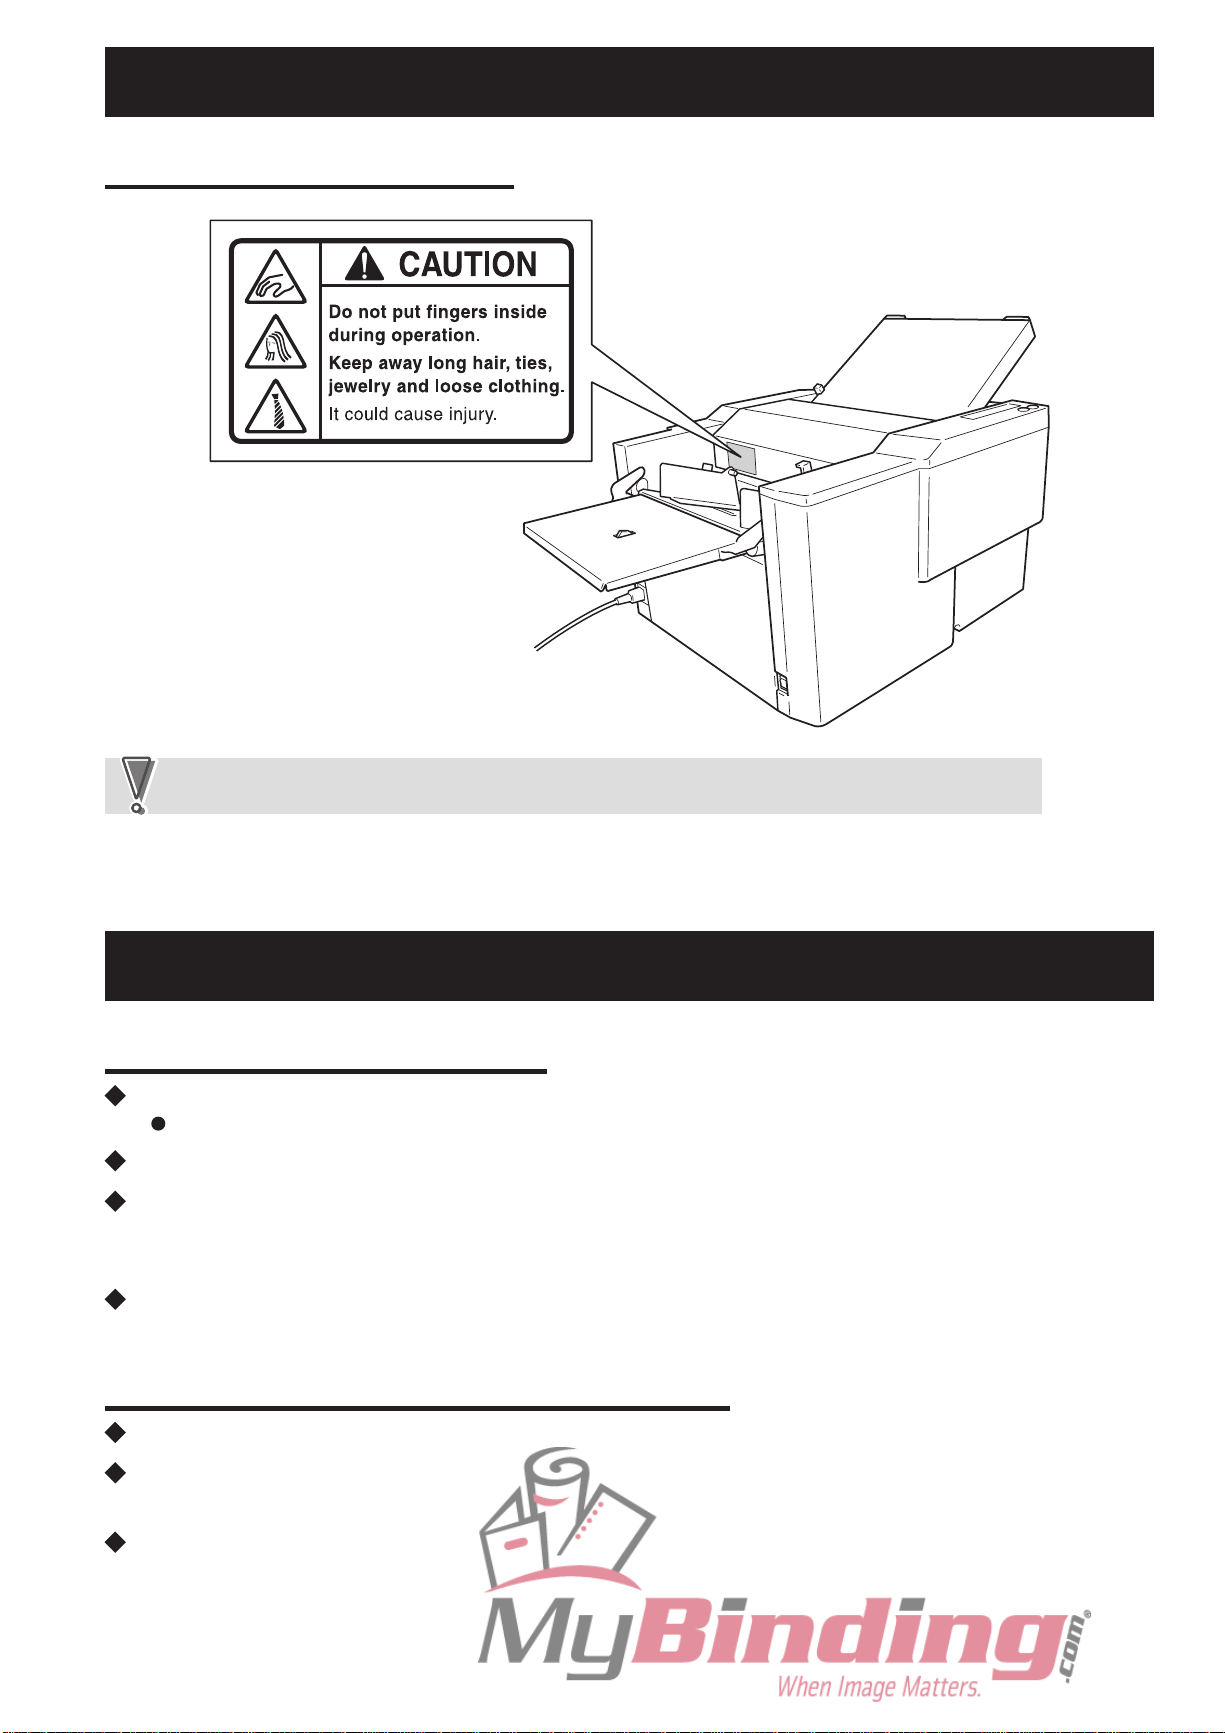
Caution Label Location
The caution label is pasted on the unit to ensure the safety of users. Do not remove nor change it.
NoteNote
If the label becomes dirty, damaged, or lost, be sure to contact your nearest dealer for a new one.
2. INSTALLATION PRECAUTIONS
2-1. Installation Location
Install the unit on a table which can tolerate its weight. The mass of the unit is as follows.
96 lb
Install the unit close to a power outlet.
The unit may make loud sounds while operating according to the processing speed and paper
used due to its paper-folding mechanism. Therefore install it where it will not disturb the office
environment.
Refer to “1. SAFETY PRECAUTIONS” (
☞
p.3, 4).
2-2. Precautions in Moving the Unit
As the unit weights 96 lb, when moving it, it should be held at the base by two persons.
When moving the unit with folding plates 1 and 2 removed, make sure the folding plates are not
subject to shock. Otherwise, the folding plates may damage, resulting in poor folding accuracy.
Arrange the power cord carefully so that it does not get stepped on, and damage as a result.
5
Page 9
3. USAGE PRECAUTIONS
3-1. Power Supply
This equipment shall be installed near the socket-outlet where the plug on the power supply
cord is easily accessible.
Make sure the power supply used is always within the following range.
100 to 240 V AC, 50/60 Hz
When you power other appliances from the same AC outlet, make sure that the combined
power consumption does not exceed the power supply capacity.
Rated power of this equipment: 1.4 to 0.7 A (95 W)
3-2. Operating Environment
Operate this unit in the following environment:
– where the temperature range is between 41 and
95°F,
– where the humidity range is between 20 and
80% RH (no dew condensation),
– which is not subject to direct sunlight,
– which is subject to little or no vibration,
– where there are no harmful chemicals,
– which is reasonably free from dust,
– which is free from air-borne salt, and
– where the equipment is not exposed to water.
3-3. Storage Conditions
Store this unit in the following environment:
– where the temperature range is between 14 and
122°F,
– where the humidity range is between 10 and
85% RH (no dew condensation),
– which is not subject to direct sunlight,
– which is subject to little or no vibration,
– where there are no harmful chemicals,
– which is reasonably free from dust,
– which is free from air-borne salt, and
– where the equipment is not exposed to water.
3-4. Maintenance
To protect the special features of this unit, the customer should never apply oil or grease to the
parts. Please contact your dealer in case of any problem.
!
WARNING
Do not use flammable sprays or solvent inside or near the unit (e.g. when cleaning the
unit). Such flammable gas may ignite and cause a fire or combustion. Such solvents may
damage the rubber rollers and resin inside the unit, resulting in malfunctions.
6
Page 10

4. INSTALLATION
4-1. Standard Accessories
Confirm that the following parts are provided.
qw e
No.
q
w
e
r
r
t
PAPER FOLDER
INSTRUCTION MANUAL
Name Qty. Remarks
Folding plate 1 1
Folding plate 2 1
Cross folding guide 1
Power cord 1
DF-920
[120 V]
Auxiliary part for cross folding
t
Instruction manual 1
This manual
7
Page 11
4. INSTALLATION
4-2. Installation Procedure
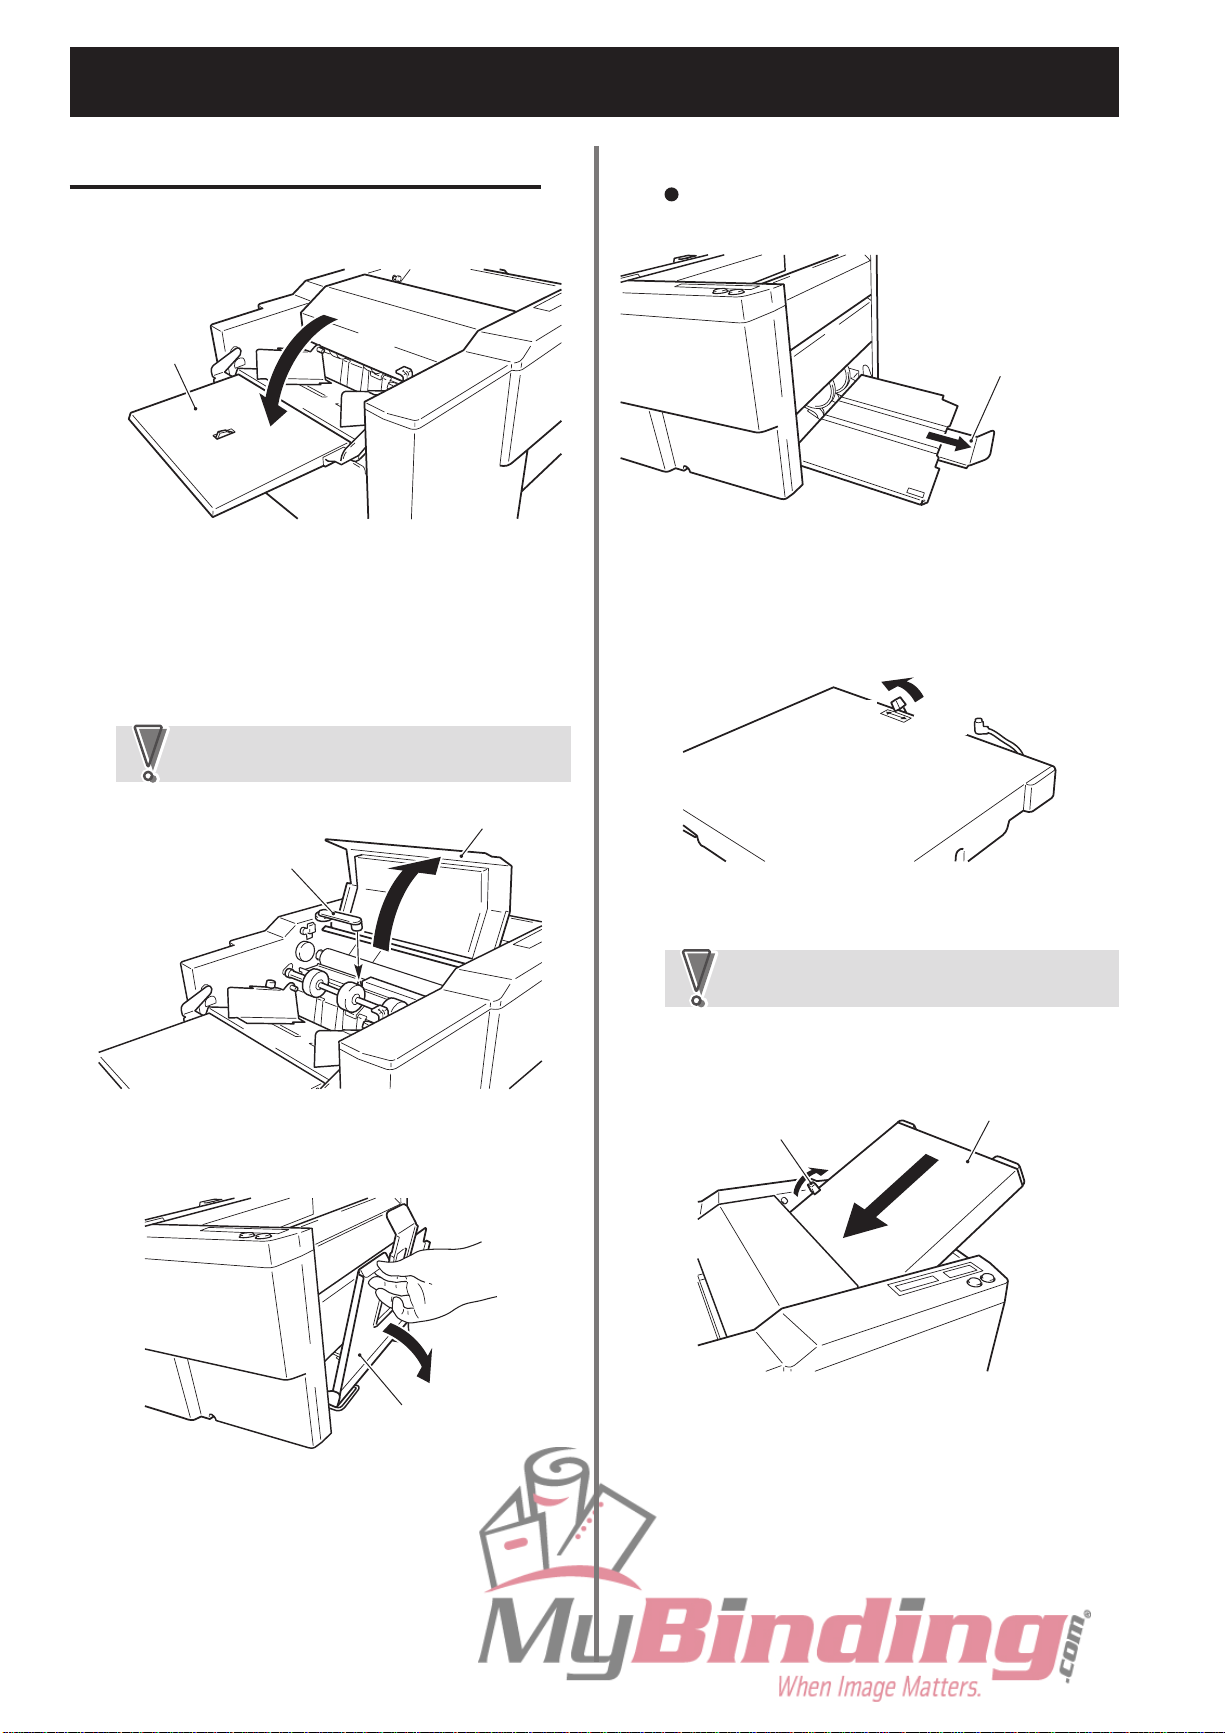
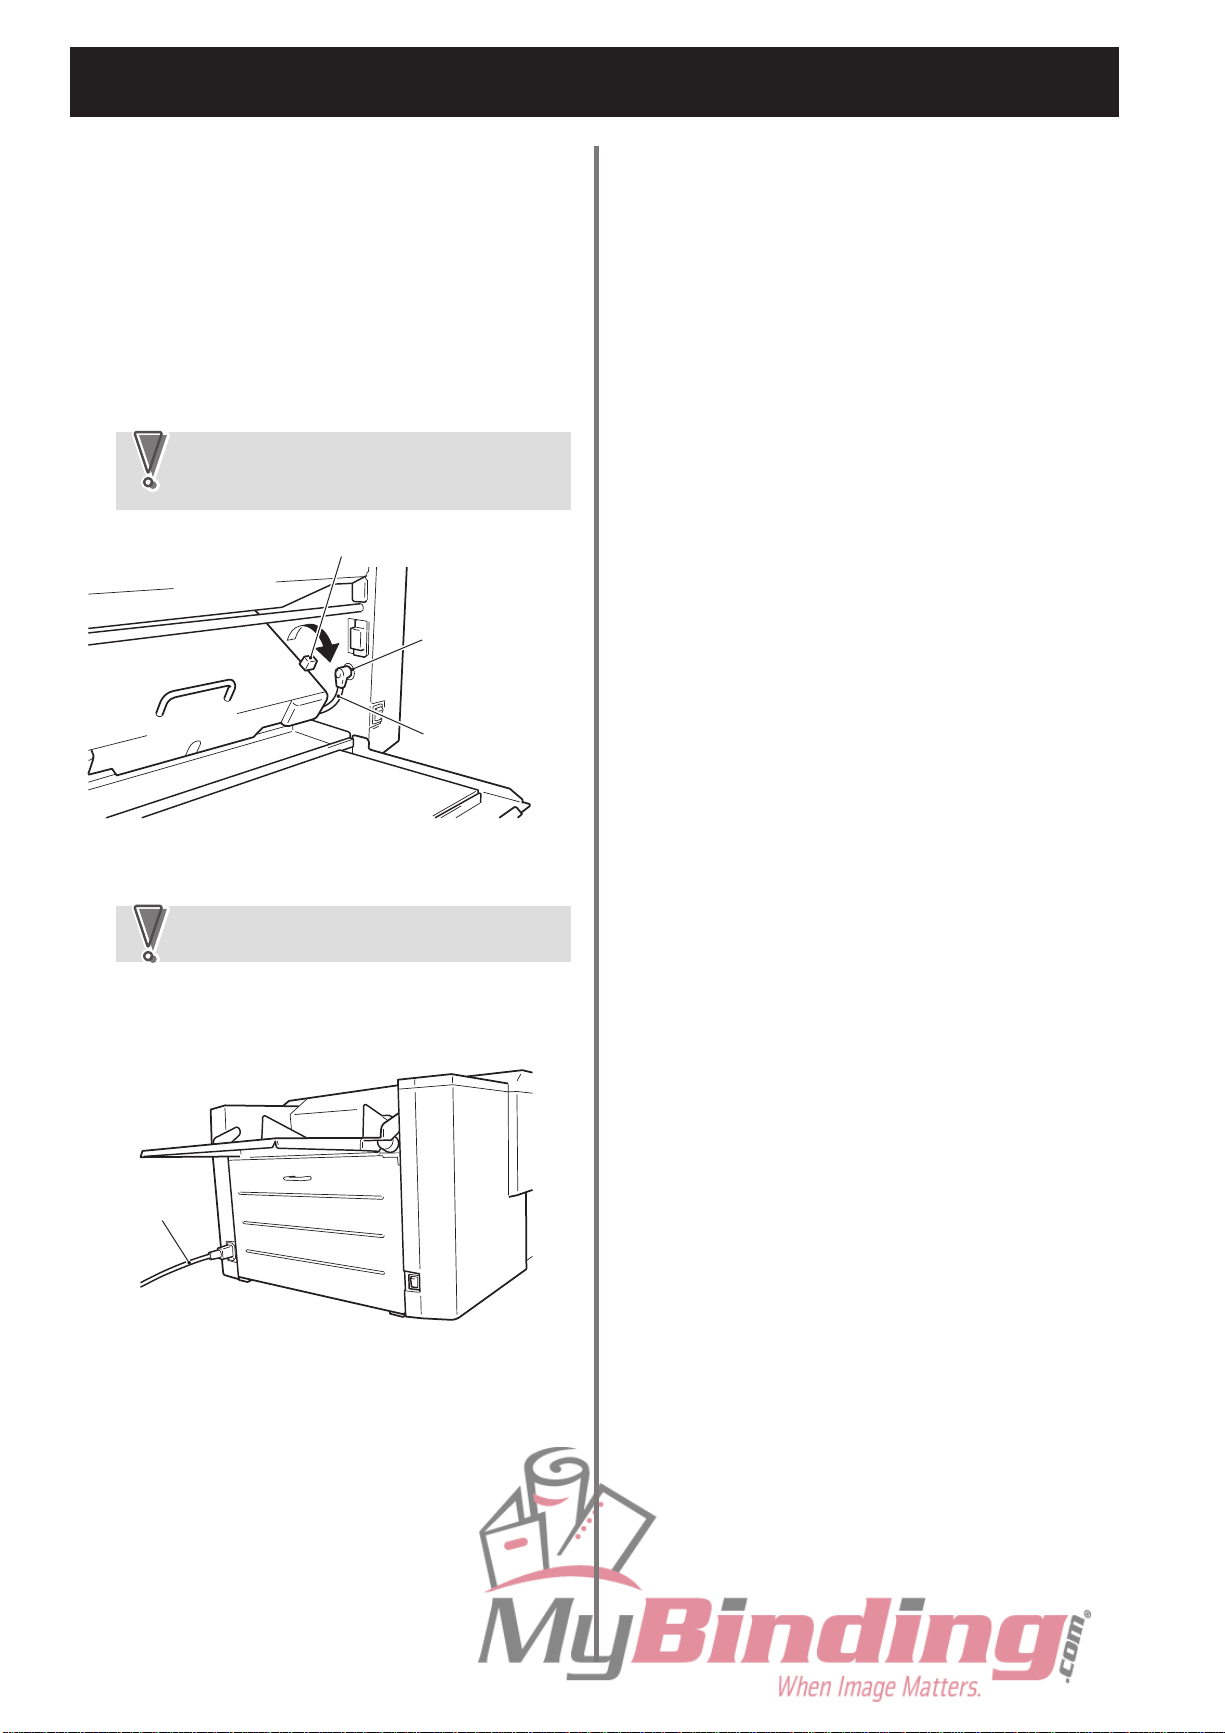
Open the auxiliary paper feed tray.
1
Extend the paper receiving stopper.
4
Adjust the stopper according to the paper size and
folded shape.
Auxiliary paper
feed tray
Open the top cover, and place the
2
cross folding guide as shown in the
figure.
After setting, close the top cover
properly.
If the top cover is open, the unit will not
NoteNote
operate.
Top cover
Cross folding guide
Paper receiving stopper
Attach folding plate 1.
5
q Push the lock lever on folding plate 1 towards
“UNLOCK”.
UNLOCK
LOCK
Open the paper receiving tray.
3
Paper receiving tray
w Insert folding plate 1 into the unit.
When inserting the folding plate, be sure to
NoteNote
hold it with both hands.
e Push the lock lever towards “LOCK”, and
secure folding plate 1.
Lock lever
Folding plate 1
8
Page 12
4. INSTALLATION
r Open the top cover, rotate the jam correction
knob to check that folding plate 1 is properly
secured. If the knob rotates smoothly, it means
that folding plate 1 is secured.
Top cover
Jam correction knob
t Connect control cord 1 of folding plate 1 to the
No.1 connector.
Be sure to turn off the power before
NoteNote
connecting or disconnecting the control
cord. Otherwise the unit will malfunction.
w Push the lock lever on folding plate 2 towards
“UNLOCK”.
UNLOCK
LOCK
e Push in folding plate 2 along the set guide to the
“2 ( )” mark. The safety stopper locks at this
position.
Be sure to insert the folding plate holding
NoteNote
the handle with both hands.
1
2
Folding plate 2
Attach folding plate 2.
6
q Open the side cover.
Set guide
Control cord 1
No.1 connector
r While slightly lifting folding plate 2 with the
handle, push in it to the “1 ( )” mark.
1
2
Folding plate 2
Side cover
9
Page 13
4. INSTALLATION
t Push the lock lever towards “LOCK”, and
secure folding plate 2.
y Move folding plate 2 up and down with the
handle to check that it is secured.
u Open the top cover, rotate the jam correction
knob to check that folding plate 2 is properly
secured again. If the knob rotates smoothly, it
means that folding plate 2 is secured.
i Connect control cord 2 of folding plate 2 to the
No.2 connector.
Be sure to turn off the power before
NoteNote
connecting or disconnecting the control
cord. Otherwise the unit will malfunction.
Lock lever
No.2 connector
o Close the side cover properly.
If the side cover is open, the unit will not
NoteNote
operate.
Connect the power cord to the unit.
7
Power cord
Control cord 2
Insert the power plug into the outlet.
8
10
Page 14
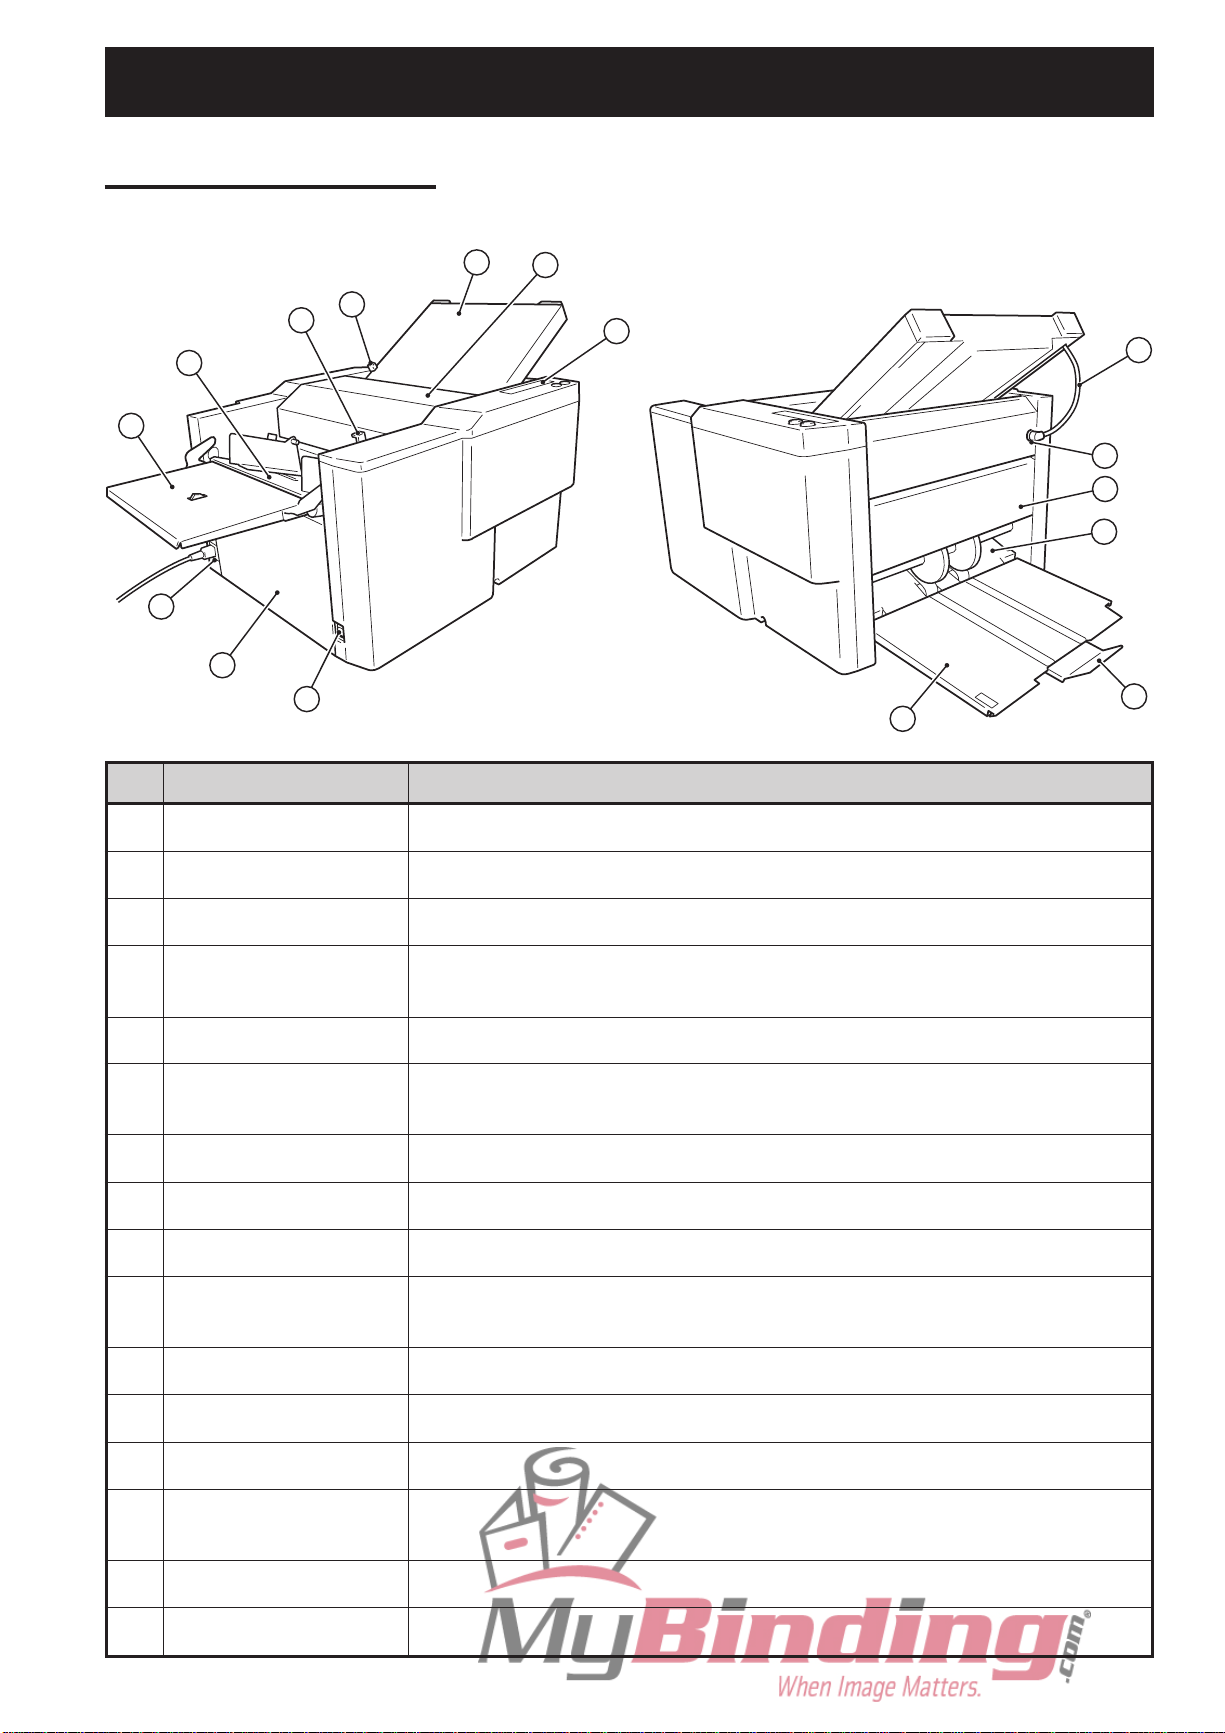
5. NAMES AND OPERATION OF PARTS
5-1. External Parts
<Paper feed side>
1
10
4
5
6
9
8
7
2
<Paper ejection side>
3
16
11
12
14
13
15
No.
q
Folding plate 1
Top cover
w
Control panel
e
Paper feed pressure
r
adjusting lever
Paper feed tray
t
Auxiliary paper feed
y
tray
Power switch
u
Side cover
i
Power inlet
o
Folding plate 1 lock
!0
lever
Name
Operation
Guide plate for deciding the paper folding position
Safety cover to prevent the user from touching the moving parts
For operating the unit
For adjusting the paper feed pressure
For stacking the paper to be folded
For ensuring paper are stacked on the paper feed tray properly
For turning on/off the power
For reducing operating sounds
For connecting external power
For securing folding plate 1
Control cord 1
!1
No.1 connector
!2
Paper ejection section
!3
Paper ejection section
!4
cover
Paper receiving stopper
!5
Paper receiving tray
!6
For controlling folding plate 1
For inserting control cord 1
Section which ejects folded paper from the unit
For reducing operating sounds from the paper ejection section
For aligning ejected paper
For receiving folded paper ejected out
11
Page 15

5. NAMES AND OPERATION OF PARTS
23
22
24
5-2. Internal Parts
<Inside side cover>
18
19
21
17
<Inside paper ejection section cover>
20
No. Name Operation
!7
Folding plate 2
!8
Folding plate 2 handle
Guide plate for deciding the paper folding position
For attaching/removing folding plate 2
Folding plate 2 lock
!9
lever
Control cord 2
@0
No.2 connector
@1
Stacker roller
@2
Stacker support
@3
Stacker belt
@4
For securing folding plate 2
For controlling folding plate 2
For inserting control cord 2
Functions together with the stacker belt to eject folded paper from the unit.
For supporting the stacker roller. The height of the roller can be adjusted.
For ejecting folded paper from the unit
12
Page 16
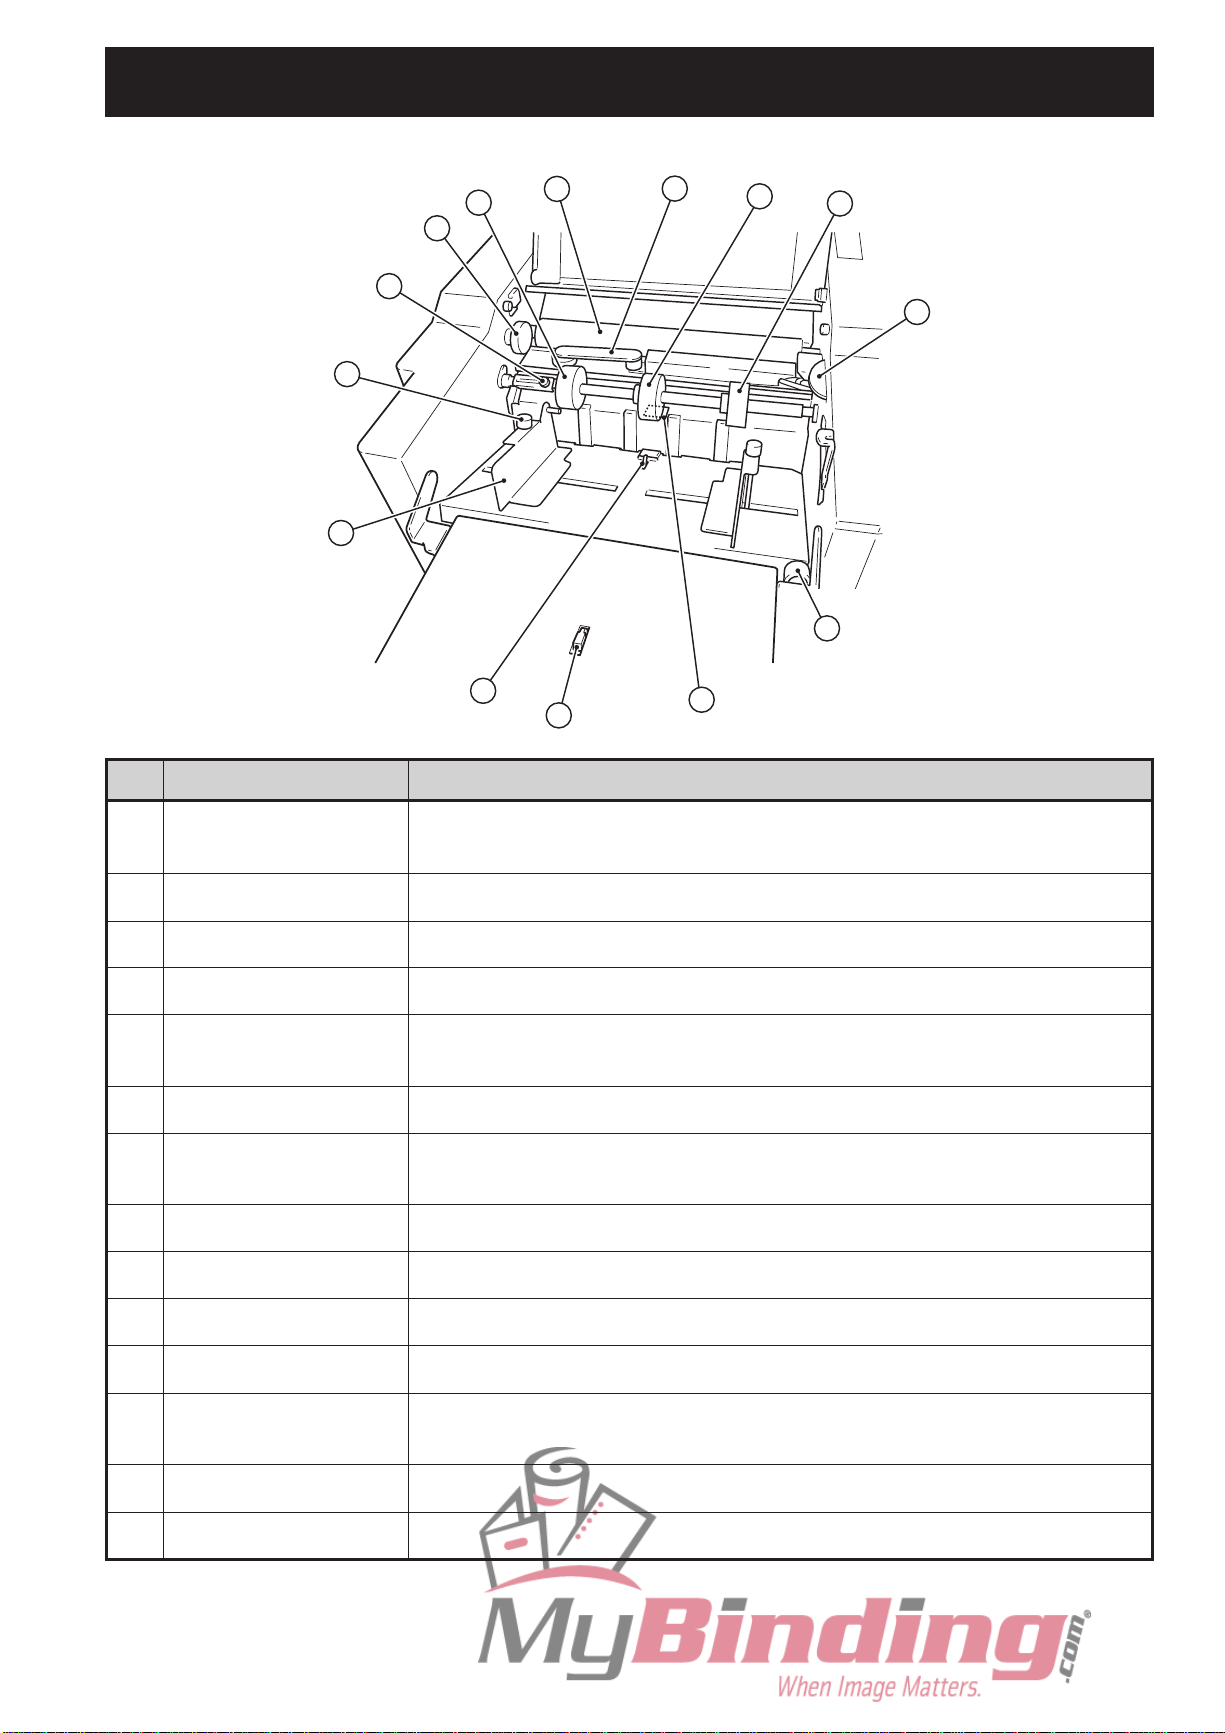
<Inside top cover>
31
25
27
34
35
28
5. NAMES AND OPERATION OF PARTS
26
30
29
36
37
No.
@5
Jam correction knob
Cross folding guide
@6
Set knob
@7
Folding roller
@8
Auxiliary paper feed
@9
ring
Paper feed ring
#0
Auxiliary paper feed
#1
ring (movable)
Paper switch 1
#2
Name
32
33
38
Operation
For rotating the folding rollers when paper has jammed inside the unit or when
cleaning the unit
For holding down the folded paper when cross folding
Screw for securing the auxiliary paper feed ring (movable)
For folding paper
For holding down curled paper for reliable paper feed
For feeding paper
Movable according to the paper size in cross folding
For detecting the presence of paper
Paper switch 2
#3
Guide fixing screw
#4
Paper feed guide
#5
Separating pressure
#6
adjusting dial
Skew correction knob
#7
Paper separator
#8
For detecting the presence of legal size paper
For securing the paper feed guide
For holding paper stacked on the paper feed tray firmly
For adjusting the paper separating pressure
For correcting skewed paper feed
For separating paper
13
Page 17

6. CONTROL PANEL
6-1. Names and Operation of Control Panel
13
14 15 16
12
11
10
8
9
No. Name Operation
7 6 5
3 2 1
4
Start key
q
Stop key
w
Test key
e
No. of sheets/Paper
r
length key
Clear key
t
Numerical keys (0 to 9)
y
Speed key
u
Folding plate 1 folding
i
stopper adjusting key
Press to start paper folding.
Press to stop paper folding.
Press to test fold two sheets of paper.
Press to switch between the mode for entering the number of sheets to be
processed and that for entering the paper length.
When entering the paper length, register the value entered with this key.
Press to change or erase the number of sheets to be processed or paper length
entered.
Press to enter the number of sheets to be processed or paper length.
Press to select the processing speed from five levels.
The processing speed needs to be changed according to the size and thickness
of the paper used.
Pressing the “+” key increases the speed. Pressing the “–” key decreases the
speed.
Press to adjust the position (folding position) of the folding stopper of folding
plate 1.
Every time the “+” key on the right is pressed, the folding stopper moves in
direction A shown in the figure on the next page. Every time the “–” key on the
left is pressed, the folding stopper moves in direction B shown in the figure on
the next page.
The folding stopper moves by 0.005" every time the key is pressed. Pressing this
key continuously moves the folding stopper continuously within the range set.
If the paper is more than ±0.2" of standard paper size, take it to be non-standard
size paper instead of adjusting the folding position with this key.
eSee
“ Correction range” (☞p.27)
14
Folding plate 2 folding
o
stopper adjusting key
Press to adjust the position (folding position) of the folding stopper of folding
plate 2.
Every time the “+” key on the left is pressed, the folding stopper moves in
direction A shown in the figure on the next page. Every time the “–” key on the
right is pressed, the folding stopper moves in direction B shown in the figure on
the next page.
The other functions are the same as the i Folding plate 1 folding stopper
adjusting key.
Page 18
No. Name Operation
6. CONTROL PANEL
!0
Adjustment registration
key
!1
Custom folding
registration key
!2
Custom folding
registration lamp
!3
Folding mode key
If the position of the folding stopper has been finely adjusted in standard folding
operations, the adjustment value can be registered with this key.
A total of 30 different adjustment values can be registered (6 standard folding
modes × 5 standard paper sizes). The registered data is preserved even after the
power is turned off.
To erase the registered data, select the paper size and folding mode to be
erased. Next press this key until the buzzer sounds “pi.pi...” for about two
seconds, and then press it continuously for another two seconds until the buzzer
sounds “pi...”. (Four seconds in total)
Press to register the position of the folding stopper and stacker roller which have
been moved when using custom folding modes.
Up to two individual paper folding modes can be registered for custom folding.
The registered data is preserved even after the power is turned off.
To erase the registered data, continue pressing the custom folding registration
key “1” or “2” registering the data to be erased until the buzzer sounds “pi...”.
When this lamp is lit, it means that the custom folding mode is registered.
The custom folding mode cannot be selected if it has not been registered with the
!1 Custom folding registration key.
Press to select the folding mode from six standard folding modes.
When the power is turned on, the lamp of the single-folding mode lights up. Each
time this key is pressed, the folding mode lamp lights up in order towards the
right.
If a custom folding mode is registered with the !1 Custom folding registration
key, the custom folding mode can be selected.
!4
Standard folding lamp
!5
Liquid crystal display
(LCD)
!6
Numerical display
(Counter)
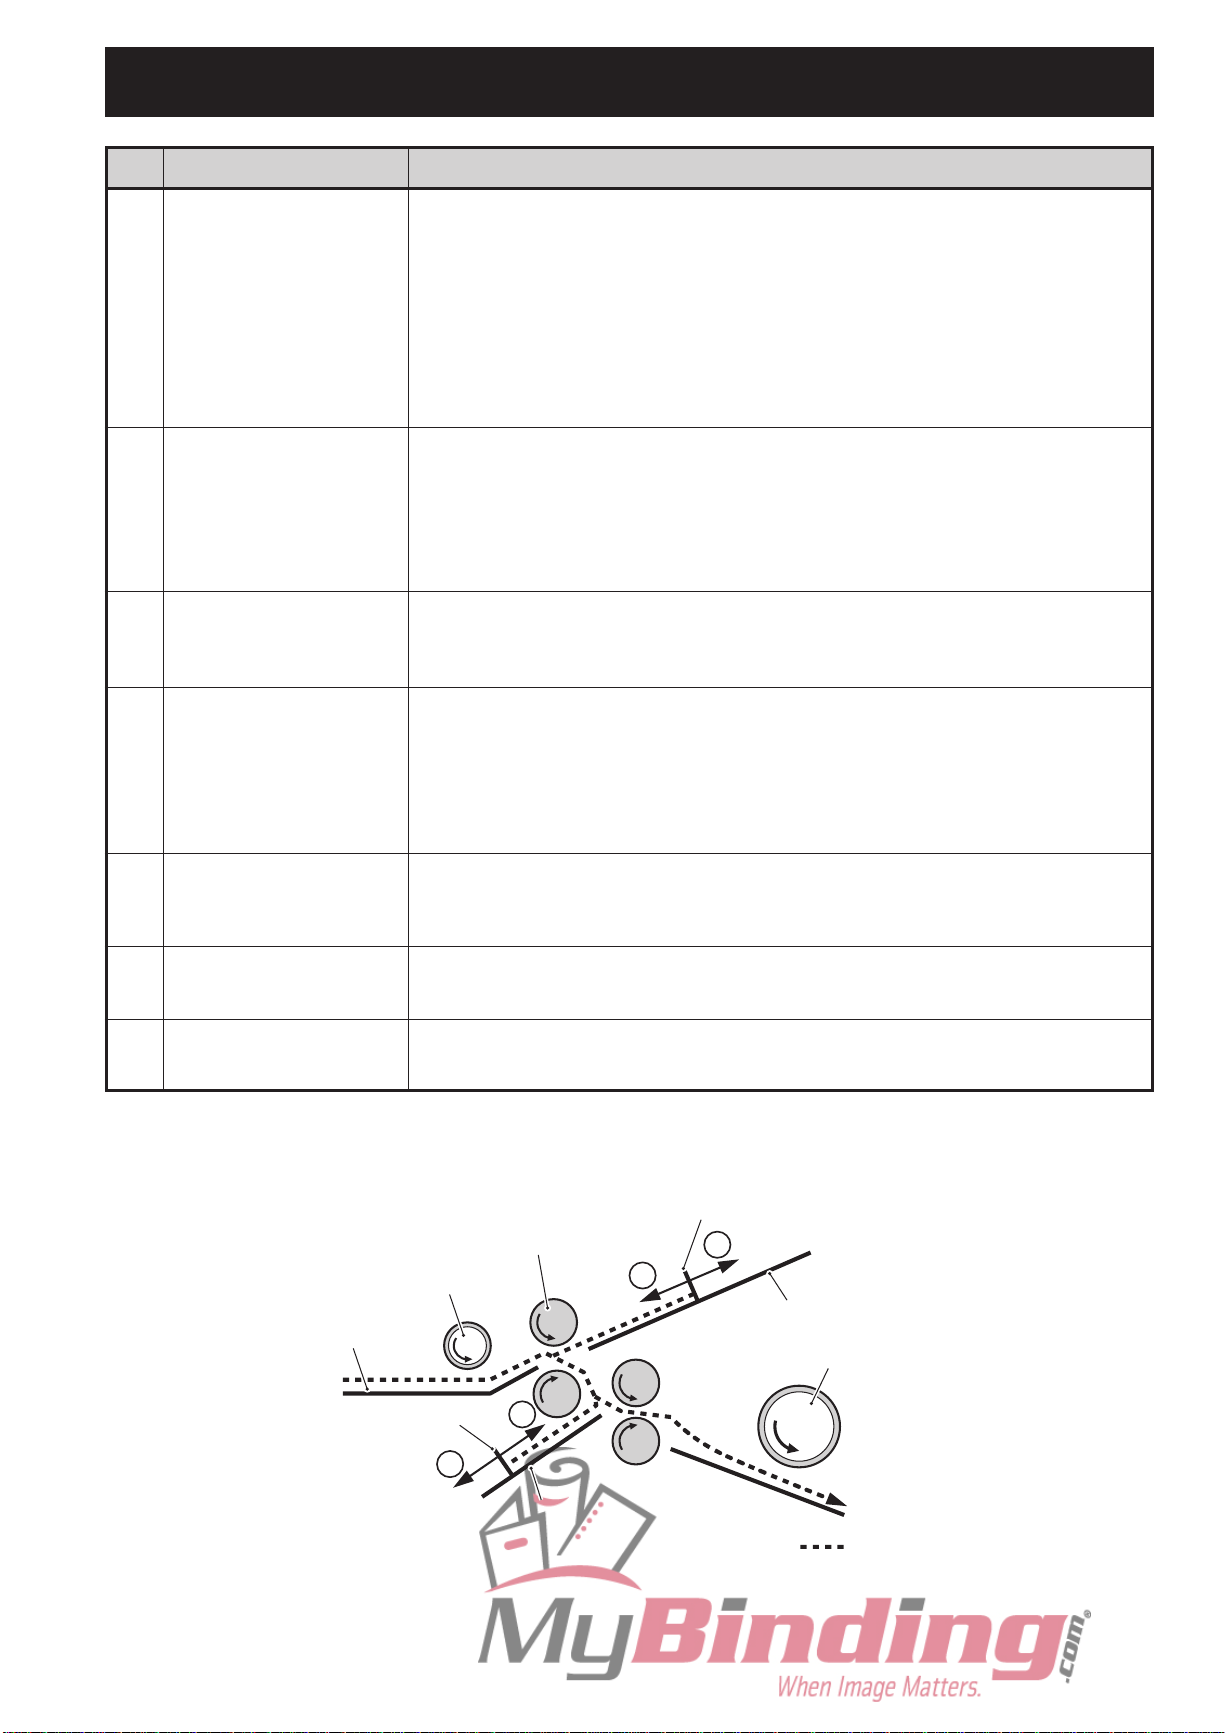
Paper feed ring
Paper feed tray
Folding stopper
Displays the folding mode selected from six standard folding modes.
When a folding mode registered with the folding stopper position adjustment
value is selected, the corresponding lamp blinks.
Displays the size of standard paper stacked on the paper feed tray (LGR to INV),
paper length registered, and error messages.
Displays the paper length or number of sheets to be processed entered with the
numerical keys.
<Outline of paper folder>
Folding stopper
Folding rollers 1 to 4
B
A
Folding plate 1
1
Stacker roller
2
B
3
4
A
Folding plate 2
Flow of paper
15
Page 19
6. CONTROL PANEL
6-2. Description of LCD
(1) Example of LCD message in standard paper/standard folding
LTR +.O3O/-.O4O
STAND BY I
The “LTR” displayed at the top left of the screen indicates the paper size.
“+.030” indicates that the folding stopper of folding plate 1 is set 0.03" from the
automatically set position in direction A shown in the figure on the previous
page.
“–.040” indicates that the folding stopper of folding plate 2 is set 0.04" from the
automatically set position in direction B shown in the figure on the previous
page.
The “STAND BY” displayed at the bottom is the area where messages are
displayed.
When “I” or “REF” is displayed at the bottom right and “FIX” is displayed at the top
left, it means that these additional functions are currently being used.
“17. ADDITIONAL FUNCTIONS” (☞p.45)
eSee
(2) Example of LCD message in standard paper/standard folding (single folding)
LTR .OOO/ ···
STAND BY
As folding plate 2 is not used in single folding, the display area of the folding
stopper of folding plate 2 shows “· · ·”.
This indicates that the folding stopper of folding plate 2 is at the home position*.
* Home position means the starting position of the folding stoppers of folding plates 1 and 2.
(3) Example of LCD message in non-standard paper/standard folding
12.O +.O4O/-.O5O
STAND BY
“12.0” displayed at the top left of the screen indicates the paper length (unit:
inch).
“+.040” indicates that the folding stopper of folding plate 1 is set 0.04" from the
automatically set position in direction A shown in the figure on the previous
page.
“–.050” indicates that the folding stopper of folding plate 2 is set 0.05" from the
automatically set position in direction B shown in the figure on the previous
page.
(4) Example of LCD message in custom folding
CF-1 5.5O/2.75
STAND BY
Length of
folded plane
The “CF-1” displayed at the top left of the screen indicates that custom folding
mode 1 is selected.
“5.50” indicates that the length of the folded plane by folding plate 1 (see left
figure) will be about 5.5".
“2.75” indicates that the length of the folded plane by folding plate 2 will be about
2.75".
The value displayed by the LCD is an approximate, and the actual folded size
NoteNote
may differ according to the thickness and characteristics of the paper used.
16
Page 20

6. CONTROL PANEL
6-3. Energy Saving Mode Function
This unit has the following two functions for saving energy.
(1) Backlight automatic OFF function of LCD
The backlight of the LCD will go off automatically if the unit is not used for a certain period of time.
At shipment, the backlight is set to go off in 30 seconds.
(2) Power still ON alert function
If the unit is not used for a certain period of time, the buzzer will sound to indicate that the unit power is on.
NoteNote
At shipment, this function is set to OFF. To set it ON (enabled), contact your nearest dealer.
6-4. Types of Buzzer Sounds
This unit sounds the verification buzzer when keys on the control panel are pressed or when paper
has run out on the paper feed tray. The different types of buzzer are as follows.
“Pi”
Normal operating sound when the numerical key is entered, etc.
“Pi.Pi.Pi”
Warning buzzer to indicate operation error or that paper has run out.
“Pi...Pi...”
Indicates that the stop key has been pressed or the entered number of sheets to be processed has been reached.
“Pi.Pi...”
Indicates that a registration procedure (paper length registration, standard folding correction registration, custom
folding registration, etc.) has been completed.
“Pi...Pi...Pi...”
Indicates that problems such as paper jamming have occurred.
“Pi...”
Indicates that a registered value has been cleared.
17
Page 21

7. PRECAUTIONS PRIOR TO USE
The following explains precautions to be understood prior to using this unit.
7-1. Paper Used
If using folded or curled paper, flatten first prior to use.
NoteNote
Always pile up paper when storing. Also do not store paper in humid places.
Make sure that the printing ink on the paper has dried completely prior to use.
Otherwise, the ink will dirty the paper feed ring and folding roller, and this will not only lead to reduced folding
performance, but the ink will also adhere to and dirty the folded paper.
Use paper that has been cut at right angles.
Otherwise, problems such as folding misalignment will result.
Fan paper just copied or printed well
prior to use.
Paper just copied or printed contains considerable
static electricity, and if not fanned well, problems
such as double-feed will result.
In some cases, paper may not be fed smoothly into the folding plate due to the environment (temperature,
NoteNote
humidity), paper thickness, paper type, paper grain direction, paper states (curled, etc.), and processing speed,
etc., and as a result, the paper may not be folded properly.
In such cases, lower the processing speed, or improve the paper states (curled, etc.) before use.
18
Page 22

7-2. Precautions on Stacking Paper
7. PRECAUTIONS PRIOR TO USE
Do not stack paper on the paper feed tray
with the left and right sides of the paper
unaligned or some sheets protruding
out.
This unit has an automatic standard paper size
detection function. It automatically detects paper size
at the paper feed guides.
Therefore, if paper is protruding out from the left or
right side, it is unable to detect paper size accurately
and may determine standard paper as non-standard.
It may also result in problems such as paper feed
errors and folding misalignment, etc.
Be sure to align paper neatly when stacking.
Do not stack paper on the paper feed tray
with the lead and trail edges unaligned or
some sheets protruding out.
This will result in unstable paper feed, and result in
problems such as paper feed errors and folding
misalignment, etc.
Be sure to align paper neatly when stacking.
<Paper unaligned on
the left and right sides>
<Paper properly aligned>
<Paper unaligned at
the lead and trail edges>
7-3. Automatic Detection of Paper Size
Five standard paper sizes can automatically be detected by this unit: LGR, LGL, LTR, STMT,
and INV.
For paper to be automatically detected, paper must be set in the short edge feeding direction.
For some paper, stacking paper on the paper feed tray in the long edge feeding direction will result in paper
NoteNote
size detection error.
(For example, if LTR paper is stacked in the long edge feeding direction on the paper feed tray, it will be
detected as LGR size.)
When paper is stacked on the paper feed tray according to the corresponding paper size on the
tray scale, and the paper feed guides are secured at the scale position, the paper size is
automatically detected. The detectable range is within ±0.28".
When paper size is detected, it will be displayed at the top left of the LCD.
Fixing screw
Paper feed guides
Example of
LTR paper
Paper size
LTR .OOO/ .OOO
STAND BY
19
Page 23

7. PRECAUTIONS PRIOR TO USE
7-4. Automatic Rise/Descent of the Paper Feed Tray
When paper is stacked on the paper feed tray, the paper feed guides are set, and the start or
test key is pressed, the paper feed tray rises automatically.
When using large or heavy paper, the paper feed tray may not be able to rise due to the weight of the paper. In
NoteNote
such cases, stack less paper.
Paper feed guides
The paper feed tray descends automatically when paper is removed from the paper feed tray.
It will also descends automatically when paper runs out on the paper feed tray during a folding
operation.
Raising/lowering paper feed tray manually
To raise the paper feed tray, press the “+” key of the folding
plate 1 folding stopper adjusting key while pressing the stop
key. To lower, press the “–” key.
7-5. Checking the Front/Back, Top/End of Paper
Check how the paper was placed on the paper feed tray (front/back, top/end), because this will
affect the folding misalignment which may occur.
<Example> When paper with a white front and black back is finished in the following folding
modes
A
Lead edge of paper: A
Paper feed
direction
Single folding
B
Single-folded paper
Trail edge of paper: B
20
Paper stacked on
paper feed tray
Letter folding
A
B
Letter-folded paper
Page 24

7. PRECAUTIONS PRIOR TO USE
7-6. Using the “QUICK START”
The QUICK START at the end of this manual outlines the most common paper folding procedure
standard folding of standard paper to facilitate use of this unit, after having read this instruction
manual once.
Use it as follows.
Enlarge pages 1/2 and 2/2 of the QUICK START on a copy machine, and paste them on the wall
in front of the unit for reference when operating this unit.
Copy pages 1/2 and 2/2 in the same size, and place them in a plastic file for reference when
operating this unit.
NoteNote
When adding comments or changing the contents of the QUICK START, give consideration to safety.
8. PAPER FOLDING METHODS
The paper folding methods of this unit can broadly be divided into the following three types.
(1) Standard folding of standard paper
This is the basic paper folding operation of this unit. With this method, the “standard paper” designated by this
unit is set to the standard folding mode displayed on the control panel and paper folding is performed.
(2) Standard folding of non-standard paper (folding by entering paper length)
With this method, the length of paper other than the standard paper designated by this unit (this is called “nonstandard paper”) is registered, this paper is set to the standard folding mode displayed on the control panel, and
paper folding is performed. The length of the paper registered is calculated to match the standard folding mode,
and the positions (folding positions) of the folding stoppers of the folding plates are automatically set.
(3) Custom folding
Set the positions (folding positions) of the folding stoppers of folding plates 1 and 2 manually. As the stopper
position (folding position) can be specified, it allows non-standard folding to be performed freely.
There are certain restrictions (unfoldable areas) according to the paper length, folding plate length, etc. for the
NoteNote
above methods. For specific details of folding methods and restrictions, refer to the following chapters on
folding methods.
“9. STANDARD FOLDING OF STANDARD PAPER” (
“11. STANDARD FOLDING OF NON-STANDARD PAPER” (
“12. CUSTOM FOLDING” (
☞
☞
☞
p.22)
p.32)
p.35)
21
Page 25

9. STANDARD FOLDING OF STANDARD PAPER
Standard folding of standard paper is the basic operation of this unit.
9-1. Standard Paper
The standard paper designated by this unit
consists of the following five types: LGR, LGL,
LTR, STMT, and INV.
All of these sizes are valid only when stacked
on the paper feed tray in the short edge
feeding direction.
The above standard paper may not be usable for
NoteNote
certain paper thickness in some cases.
(Refer to “22. SPECIFICATIONS” (☞p.59).)
9-2. Standard Folding Modes
Six standard folding modes are available as shown below.
Single fold Double fold Irregular
accordion fold
Letter fold
Paper size L × W
Ledger (LGR) 17" × 11"
Legal (LGL) 14" × 8.5"
Letter (LTR) 11" × 8.5"
Statement (STMT) 8.5" × 7"
Invoice (INV) 8.5" × 5.5"
Accordion
fold
Brochure
fold
9-3. Operation Procedure
Turn on the power switch.
1
!
WARNING
Do not touch the power switch with
wet hands. Otherwise electric
hazards may occur.
Stack paper on the paper feed tray.
2
Do not overstack paper. Paper can be stacked up to a
height of approx. 1.8".
Push in the paper until the lead edge touches the
paper feed inlet lightly.
Power switch
ON
OFF
Max. stacking amount: Approx. 1.8"
22
Page 26

Move the paper feed guides to the
3
corresponding paper size on the paper
feed tray scale. Tighten the fixing
screws to secure.
The left and right paper feed guides move together.
Be sure to tighten the fixing screws of the left and right
paper feed guides. Otherwise, the guides will move
while the unit is operating, causing folding
misalignment along the sides of the paper.
Be sure to adjust the paper feed guides to the paper
feed tray scales. If the guides are positioned
incorrectly, the automatic paper size detection
function will not work, and the test key and start key,
etc. will not operate.
Do not press the paper with the paper feed
NoteNote
guides too strongly. Otherwise, paper feed
errors such as mis-feed will occur.
9. STANDARD FOLDING OF STANDARD PAPER
Fixing screw
Paper feed
guides
Example of
LTR paper
Check the paper size displayed at the
4
top left of the LCD.
Paper size will not be displayed even if standard paper
size is used if the paper feed guides are not set at the
designated positions.
Set the paper feed guides at the correct positions.
When set to the standard folding of non-standard
paper, the top left of the LCD will show values in inch.
For details on standard folding of non-
eSee
standard paper, refer to “11. STANDARD
FOLDING OF NON-STANDARD PAPER”
p.32).
(
☞
When set to the custom folding, the automatic paper
size detection function will not work and the paper size
will not be displayed.
“CF-1” or “CF-2” is displayed on the top left of the
LCD.
For details on custom folding, refer to “12.
eSee
CUSTOM FOLDING” (
Press the folding mode key to select
5
☞
p.35).
the folding mode.
<LCD message in standard paper/standard folding>
LTR .OOO/ .OOO
STAND BY
<LCD message in non-standard paper/standard folding>
12.O .OOO/ .OOO
STAND BY
<LCD message in custom folding>
CF-1 5.5O/2.75
STAND BY
For details of LCD messages, refer to “6-2.
eSee
Description of LCD” (
Custom folding
registration lamp
p.16).
☞
Standard folding lamp
Each time the folding mode key is pressed, the
standard folding lamp lights up in order from the
leftmost single folding lamp towards the right.
If custom folding data is registered, the custom folding
registration lamp will automatically light up after the
standard folding lamp.
If not registered, it will not light up.
23
Page 27

9. STANDARD FOLDING OF STANDARD PAPER
Set the paper feed pressure adjusting
6
lever to “0”.
Move the adjusting lever to the left and right while
pulling upwards.
If paper slips and mis-feed occurs, increase the paper
feed pressure by one from “0” to “1”.
Paper feed pressure increases as the scale value
increases.
If several sheets of paper are fed at the same time
(double-feed), decrease the paper feed pressure by
one from “0” to “–1”.
Open the top cover, and set the
7
separating pressure adjusting dial to
“0”.
After setting, close the top cover.
If several sheets of paper are fed at the same time
(double-feed), increase the paper separating pressure
gradually in steps of 0.5.
Paper separating pressure increases as the scale
value increases.
Top cover
Paper feed pressure adjusting lever
-1 1 2 3 4 5 6
0
3
4
2
5
1
6
0
Separating pressure adjusting dial
6
Press the speed key to set the
8
processing speed.
When using thin and flimsy paper, setting the
maximum processing speed causes problems such as
paper jam and deformed folding. Set a lower
processing speed.
When the power is turned on, the last processing
speed used is displayed.
Press the test key to perform test folding.
9
When the test key is pressed, “WAIT” is displayed on the LCD, and the folding stopper starts moving to the set position.
When it completes moving, the message changes to “TEST RUN”, and test folding starts.
Test folding feeds two sheets of paper and allows the finish to be checked.
Test folded paper are not counted in the number of sheets processed.
If the unit does not start even if the test key is pressed, the automatic paper size detection function may not
NoteNote
be working. Check if the paper feed guides are at the appropriate paper size on the scale.
When the automatic paper size detection function starts working, the paper size will be displayed on the
LCD.
(Refer to “7-3. Automatic Detection of Paper Size” (☞p.19).)
24
Folded paper
Page 28

9. STANDARD FOLDING OF STANDARD PAPER
Check the finish of test folding.
10
Check for folding misalignment using the second test
folded sample.
If folding problems occur, refer to the following pages
according to the folded state.
Folding misalignment along the vertical
length of the paper................................... (
Folding misalignment along the sides of
the paper ................................................. (
Deformed folding ..................................... (
Select the method of using the counter.
11
The counter can be used in two ways: subtract count and add count.
Enter the number of sheets to be processed using the numerical keys first before beginning operations. In this case, the
counter will be set to the subtract count method. (A period is displayed at the bottom right where the count is displayed.)
If the clear key is pressed to clear the counter to “0” before beginning operations, the counter will be set to the add count
method.
Up to four digits (9999) can be displayed.
☞
☞
☞
p.27)
p.26)
p.31)
<Normal folding>
<Folding misalignment along
vertical length of paper>
<Deformed folding>
<Folding misalignment
along sides of paper>
<Counter display for “Subtract count method”> <Counter display for “Add count method”>
Period
The following description is based on the subtract count method.
Press the numerical keys to enter the
12
number of sheets to be processed.
Press the start key to start folding.
13
To cancel operations halfway through, press the stop
key. Pressing the start key another time resumes
operations.
When the number entered is reached in folding
operations, the buzzer sounds “pi...pi...”, and paper
feed will stop automatically.
If the paper feed tray runs out of paper, the buzzer
sounds “pi.pi.pi”, and the unit will stop automatically.
25
Page 29

10. FOLDING MISALIGNMENT
Depending on the paper type, thickness, printing state, processing speed, etc., paper of the same
size may be folded differently and folding misalignment may occur.
Folding misalignment consists of two types; “folding misalignment along the sides of the paper”
and “folding misalignment along the vertical length of the paper”. Other than this, “deformed
folding” may also occur due to paper characteristics, etc.
The following describes how to correct folding misalignments and deformed folding.
Rotate the skew correction knob and
10-1. Correcting Folding Misalignment
Along Sides of Paper
When the folded paper is misaligned along
the sides as shown in the figure due to slight
misalignment when the paper was trimmed,
paper printing state, dirty folding roller, etc.,
correct using the skew correction knob of the
paper feed tray.
1
adjust.
When the folding misalignment is as shown in Figure
A, rotate the knob to the right (clockwise).
<Folding
misalignment A>
<Example of folding misalignment along sides of paper>
Folding misalignment at this part
Paper ejection direction
Before adjusting with the skew correction
knob, check that the paper feed guides are
set correctly. Gaps between the paper and
paper feed guides will cause folding
misalignment along the sides to occur
easily.
Fixing screw
Paper feed guides
Paper ejection
direction
Skew correction knob
When the folding misalignment is as shown in Figure
B, rotate the knob to the left (counter-clockwise).
<Folding
misalignment B>
Paper ejection
direction
After completing folding operations,
2
Skew correction knob
return the skew correction knob to the
standard position.
26
The position at which the round hole of the paper feed
tray and pin match is the standard position.
<Standard
position>
Round hole
Pin
Skew correction knob
Page 30

10. FOLDING MISALIGNMENT
10-2. Correcting Folding Misalignment Along Vertical Length of Paper
When the folded paper is misaligned along
the vertical length as shown in the figure due
to the paper thickness, type, printing state,
<Example of folding misalignment along
vertical length of paper>
Folding misalignment
at this part
etc., adjust the positions of the folding
stoppers of folding plates 1 and 2 to correct
the misalignment.
Paper ejection direction
Adjust the positions of the folding stoppers using the folding stopper adjusting keys of folding
plates 1 and 2 on the control panel.
Pressing the “+” key moves the folding stoppers of folding plates 1 and 2 in the A direction of the
figure. Pressing the “–” key moves in the B direction of the figure.
Each press moves the folding stopper by 0.005".
(One folding stopper is provided inside folding plates 1 and 2 respectively. Folding stoppers
cannot be seen from outside.)
Values corrected by the folding stopper adjusting keys are displayed at the top of the LCD.
Folding stopper
Folding plate 1
folding stopper adjusting key
Folding plate 2
folding stopper adjusting key
Paper feed ring
Paper feed tray
Folding stopper
Folding rollers 1 to 4
1
2
B
LTR +.O3O/-.O4O
STAND BY
A
Folding plate 2
Corrected values can be registered using the adjustment registration key.
eSee
“ Adjustment registration procedure” (☞p.30)
Corrected values cannot be registered in the standard folding of non-standard paper. To register the folding
NoteNote
stopper position, use the custom folding registration function.
Correction range
A
B
Folding plate 1
Stacker roller
3
4
Flow of paper
For standard folding, the adjustable range
using the folding stopper adjusting key is
within ±0.2" from the center of the paper.
If set exceeding ±0.2", the LCD shows “OUT
OF CORRECT”, and the folding stoppers
will stop at the ±0.2" position of the
adjustable range.
Correction by the “+” key
Within +0.2"
Paper
Center
Correction by the “–” key
Within –0.2"
Conveyance direction
27
Page 31

10. FOLDING MISALIGNMENT
Correction restrictions
The positions of the folding stoppers of folding plates 1 and 2 may not be adjustable to ±0.2"
according to the length of the paper used. This restriction is due to the length of the paper and
length of folding plates 1 and 2.
The restricted folding plate and correction details differ according to the folding mode and paper
length. Refer to the following table.
Folding
mode
Double fold
Irregular
accordion fold
Letter fold
Accordion
fold
Brochure fold
*Range of paper length which cannot be corrected to ±0.2". The correction value differs according to the paper length.
If the correction value is within the restricted
range when this correction value is set using
Minimum paper length
that can be used
7.2"
7.2"
5.6"
5.6"
5.1"
Restricted range of
paper length*
7.2" to 8.1"
7.2" to 7.4"
7.2" to 8.1"
5.6" to 6.0"
5.6" to 6.1"
16.8" to 17.0"
16.7" to 17.0"
Restricted folding plate and
correction details
Correction by “–” key of folding plate 2
Correction by “–” key of folding plate 1
Correction by “–” key of folding plate 2
Correction by “–” key of folding plate 2
Correction by “–” key of folding plate 2
Correction by “+” key of folding plate 1
Correction by “+” key of folding plate 2
LTR +.O3O/ ···
OUT OF CORRECT
the folding stopper adjusting key, the buzzer
sounds “pi.pi.pi” and the LCD displays “OUT
OF CORRECT”.
The message then changes to “STAND BY”.
Set a valid correction value using the folding
stopper adjusting key.
28
Page 32

10. FOLDING MISALIGNMENT
Example of correcting folding misalignment along vertical length of paper by folding mode
Correct folding misalignment along the vertical
length of the paper in standard folding using
the folding stopper adjusting keys of folding
Folding plate 1
folding stopper adjusting key
plates 1 and 2, referring to the following
example.
The positions of the “+” and “–” folding stopper
NoteNote
adjusting keys of folding plates 1 and 2 are
located opposite to each other.
Folding plate 2
folding stopper adjusting key
Adjusting key of folding plate 1
Folding mode Correction method
A
Single foldDouble fold
Ejection direction
A
Ejection direction
A
Irregular
Ejection direction
accordion fold
A
Letter foldAccordion foldBrochure fold
Ejection direction
State of
folded plane A
A is long
A is short
A is long
A is short
A is long
A is short
A is long
A is short
A is long
Press the “+” key.
Press the “–” key.
Press the “+” key.
Press the “–” key.
Press the “–” key.
Press the “+” key.
Press the “+” key.
Press the “–” key.
Press the “–” key.
Adjusting key of folding plate 2
Folding mode Correction method
∗ Folding plate 2 is not used in single folding.
Single foldDouble fold
B
Ejection direction
B
Irregular
Ejection direction
accordion fold
B
Letter foldAccordion foldBrochure fold
Ejection direction
B
State of
folded plane B
B is long
B is short
B is long
B is short
B is long
B is short
B is long
Press the “–” key.
Press the “+” key.
Press the “–” key.
Press the “+” key.
Press the “+” key.
Press the “–” key.
Press the “+” key.
A
Ejection direction
A
Ejection direction
A is short
A is long
A is short
Press the “+” key.
Press the “+” key.
Press the “–” key.
Ejection direction
B
Ejection direction
B is short
B is long
B is short
Press the “–” key.
Press the “+” key.
Press the “–” key.
The folding stopper moves by 0.005" every time the folding stopper adjusting key is pressed.
Pressing the adjusting key continuously moves the folding stopper continuously within the
range set.
The standard adjustable range is within ±0.2". Some paper may not be correctable in this range
due to restrictions.
eSee
“ Correction restrictions” (☞p.28)
When correction of more than ±0.2" from the standard paper size is required, consider such
paper as non-standard paper.
eSee
“11. STANDARD FOLDING OF NON-STANDARD PAPER” (☞p.32)
29
Page 33

10. FOLDING MISALIGNMENT
Adjustment registration procedure
The adjustment value of folding misalignment along the vertical length of the paper can be
registered using the adjustment registration key.
A total of 30 different adjustment values can be registered (6 standard folding modes × 5
standard paper sizes (LGR, LGL, LTR, STMT, and INV)).
By registering adjustment, no adjustments need to be performed when performing folding
operations under the same conditions (paper, folding mode, processing speed, etc.) as those at
registration.
The adjustment registration function cannot be used for standard folding of non-standard paper and custom
NoteNote
folding. Use the custom folding registration function.
Stack paper on the paper feed tray, and
1
set the paper feed guides.
Fixing screw
Paper feed guides
Press the folding mode key to select
2
the folding mode.
Each time the folding mode key is pressed, the
standard folding lamp lights up in order towards the
right. Folding modes whose lamps are blinking
indicate that adjustment registration has been
performed.
Standard folding lamp
Check for folding misalignment along
4
the vertical length of the paper from the
test folding results.
Check for folding misalignment using the second test
folded sample.
Folded paper
Correct folding misalignment along the
5
vertical length of the paper using the
folding stopper adjusting keys of
folding plates 1 and 2. (
☞
p.27)
Press the test key to perform test
3
folding.
Test folded paper are not counted in the number of
sheets processed.
30
After adjusting the folding
6
misalignment, press the adjustment
registration key until the buzzer
sounds “pi.pi...” (about two seconds).
When adjustment registration completes, the lamp of
the folding mode selected stops lighting and starts to
blink.
The adjustment value data registered is preserved
even after the power is turned off.
Blinking (End of adjustment registration)
Page 34

10. FOLDING MISALIGNMENT
Correcting adjustment registration data
When the registration data of the paper size and folding mode
to be corrected is set again and registered according to the
above steps 1 to 6, the previous data will be rewritten.
Erasing adjustment registration data
Display the registration data of the paper size and folding
mode to be erased, and press the adjustment registration
key until the buzzer sounds “pi.pi...” for about two seconds,
and continue pressing for another two seconds until the
buzzer sounds “pi...” (total four seconds).
When the registration data is erased, the lamp of the folding
mode selected stops blinking and lights up.
The adjustment registration data must be erased
NoteNote
by registered paper size and folding mode. The
data cannot be erased for all sizes and modes
together.
Lit (When adjustment registration is erased)
(1) Is appropriate paper within the
specifications used?
Do not use paper outside the specifications.
Particularly, deformed folding occurs frequently in
the use of thin, flimsy paper not appropriate for the
paper folder.
“22. SPECIFICATIONS” (☞p.59)
eSee
(2) Is the processing speed too fast?
Lower the processing speed when deformed
folding occurs for thin and flimsy paper.
(3) Was the paper fanned appropriately
prior to stacking on the paper feed
tray?
Fan paper well prior to stacking.
10-3. Correcting Deformed
Folding
The paper fed to the folding plates may be
folded without reaching the folding stoppers
inside the folding plates due to the using
environment (temperature, humidity), paper
thickness, paper type, paper grain direction,
paper state such as curling, processing speed,
etc., resulting in deformed folding.
If this occurs, check the following.
<Example of deformed folding>
(4) Is the paper stacked correctly on the
paper feed tray?
Stack paper on the paper feed tray after aligning
well, and set the paper feed guides at the correct
positions. Also tighten the fixing screws of the
paper feed guides firmly.
Fixing screw
Paper feed guides
31
Page 35

11. STANDARD FOLDING OF NON-STANDARD PAPER
Standard folding of non-standard paper is the process of registering the length of non-standard
paper, setting the paper to a standard folding mode (six types) displayed on the control panel.
Non-standard paper
Paper other than the five standard paper specified by this unit LGR, LGL, LTR, STMT, and INV are called non-standard paper.
Standard paper size is the size of the paper stacked on the paper feed tray in the short edge feeding direction.
NoteNote
Standard paper which is stacked on the paper feed tray in the long edge feeding direction is considered nonstandard paper.
Standard folding
Six standard folding modes are available as shown below.
Single fold Double fold Irregular
accordion fold
11-1. Paper Size Restrictions
Paper sizes which can be used are the sizes
within the range shown on the right.
( ) shows the minimum foldable size under
conditions given.
“15-3. Folding Small Size Paper” (☞p.43)
eSee
The paper sizes which can be used may vary
NoteNote
with the paper type, thickness, and printing
state.
11-2. Operation Procedure
Stack paper on the paper feed tray, and
1
set the paper feed guides.
Letter fold Accordion
fold
Paper feed direction
Paper
Width: 5.1" (3.0") to 11.7"
Fixing screw
Brochure
fold
Length: 7.2" (5.1") to 17.0"
Paper feed guides
32
Page 36

11. STANDARD FOLDING OF NON-STANDARD PAPER
Press the No. of sheets/Paper length
2
key to switch from the mode for
entering the number of sheets to be
processed to the mode for entering the
paper length.
When switched to the mode for entering the paper
length, the LCD shows “REGISTER LENGTH” and the
numerical display shows “L. 0”.
Using non-standard paper in settings for
NoteNote
standard paper will result in detection
errors due to the priority functioning of the
automatic paper size detection, and the
unit will not operate.
Measure the length of the non-standard
3
paper used, and enter the length using
the numerical keys.
The paper length which can be entered ranges from
5.1" to 17.0".
If the value entered exceeds the allowable range, the
buzzer sounds “pi.pi.pi”, and the LCD shows “TOO
LONG” or “TOO SHORT”.
.OOO/ .OOO
REGISTER LENGTH
.OOO/ .OOO
TOO LONG
If the paper length has already been
NoteNote
entered, press the clear key to clear this
value before entering the length with the
numerical keys.
Register the entered paper length.
4
After entering the paper length, continue pressing the
No. of sheets/Paper length key until the buzzer
sounds “pi.pi...” (about two seconds).
When registration completes, the value entered is
shown on the LCD in inch. The numerical display
switches to number of sheets to be processed.
The paper length data registered is erased
NoteNote
when the power is turned off.
To save the registered data, set the refold
mode or folding stopper fixed mode.
(Refer to “17-2. Folding Stopper Operation
Mode Setting Function” (
☞
.OOO/ .OOO
REGISTER LENGTH
p.46).)
12.O .OOO/ .OOO
STAND BY
33
Page 37

11. STANDARD FOLDING OF NON-STANDARD PAPER
Press the folding mode key to select
5
the folding mode.
The registered paper length is calculated to match the
selected standard folding mode, and the positions
(folding positions) of the folding stoppers of folding
plates 1 and 2 are calculated.
Press the test key to perform test
6
folding.
The folding stoppers of folding plates 1 and 2 move to
the folding positions calculated in step 5, and test
folding starts.
Test folded paper are not counted in the number of
sheets processed.
Check the finish of test folding.
7
Check the finish using the second test folded sample.
When folding misalignment occurs, refer to “10.
FOLDING MISALIGNMENT” (
In the standard folding of non-standard
NoteNote
paper, the positions of the folding stoppers
can be adjusted, but the adjustment values
cannot be registered. To register the
positions of the folding stoppers, use the
custom folding registration function.
(Refer to “12. CUSTOM FOLDING”
p.35).)
(
☞
☞
p.26).
Folded paper
Other steps are the same as standard folding of standard paper.
“9. STANDARD FOLDING OF STANDARD PAPER” (☞p.22)
eSee
To return to standard paper standard folding
settings
Press the No. of sheets/Paper length key.
The paper size displayed in inch at the top left of the LCD
disappears.
STAND BY
.OOO/ .OOO
34
Page 38

12. CUSTOM FOLDING
Custom folding is the method of folding paper
by setting the positions (folding positions) of
the folding stoppers of folding plates 1 and 2
manually. As the folding position can be
specified, folding methods not available with
standard folding can be performed freely.
<Standard single folding> <Example of
custom single folding>
12-1. Paper Size Restrictions
Paper sizes which can be used are the sizes
within the range shown below.
( ) shows the minimum foldable size under
conditions given.
The paper sizes which can be used may vary
NoteNote
with the paper type, thickness, and printing
state.
Paper feed direction
12-2. Operation Procedure
The following describes the custom folding
procedure taking accordion fold as an
example.
Prepare a sample of the required
1
accordion fold manually with the paper
used.
Measure the dimensions of the folded
2
planes A and B of the sample, and
folded paper length C.
C (4.33")
B
(3.74")
Press the custom folding registration
3
key 1 or 2 until the buzzer sounds
“pi.pi...” (about two seconds) to switch
to the custom folding mode.
A
(3.35")
Paper feed
direction
Paper
Width: 5.1" (3.0") to 11.7"
Length: 7.2" (5.1") to 17.0"
However, the length of the folded plane (see
figure below) which can be folded by folding
plates 1 and 2 is restricted.
Folding plate 1: 1.65" to 12.79"
Folding plate 2: 0"*/1.85" to 8.54"
* As folding plate 2 is not used in single folding, it is 0".
Length of
folded plane
Be sure to press the custom folding
NoteNote
registration key before starting custom
folding settings.
Stack paper on the paper feed tray, and
4
set the paper feed guides.
Fixing screw
Paper feed guides
Incorrectly measuring the paper length or
NoteNote
setting the folding stopper position can cause
paper jamming inside the folding plate. If paper
jams, refer to “18-3. When Paper Jams Inside
Folding Plate” (
☞
p.49).
35
Page 39

12. CUSTOM FOLDING
Set the folding stopper positions of
5
folding plates 1 and 2.
Press the “+” key of the folding plate 1 folding stopper
adjusting key and move the folding stopper to the
measured dimensions A (3.35") of the sample.
Press the “+” key of the folding plate 2 folding stopper
adjusting key and move the folding stopper to the
measured dimensions B (3.74") of the sample.
The position moved to by the folding stopper is
displayed in inch on the LCD.
Set the position of the stacker roller.
6
The position of the stacker roller needs to be changed
according to the folded paper length.
Selecting and pressing a numerical key (1 to 6) while
pressing the stop key moves the stacker roller to the
position set.
Refer to the following table for approximate set
positions.
In this example, the folded paper length C is 4.33".
Therefore press the numerical key 3 while pressing
the stop key.
CF-1 3.35/3.74
STAND BY
Paper ejection section cover
Stacker roller
Approximate stacker roller set position
Numerical
key setting
1
2
3
4
5
6
Checking the stacker roller position
Press the No. of sheets/Paper length key while pressing
the stop key. The LCD shows the position of the stacker
roller in the value set using the numerical key.
Folded paper
length
To 3.35"
3.36" to 4.13"
4.14" to 4.72"
4.73" to 5.31"
5.32" to 5.91"
From 5.92"
CF-1 3.35/3.74
STAND BY
CF-1 3.35/3.74
STACKER ROLLER:3
Opening/closing the paper ejection section cover
Set the position of the stacker roller by opening the paper ejection section cover, and checking the movement of the stacker
roller visually.
After setting, be sure to close the paper ejection section cover. If not closed, operating the test key or start key shows
“DELIVERY COVER” on the LCD, and this unit will not operate.
36
Page 40

Press the test key to perform test
7
folding.
Test folded paper are not counted in the number of
sheets processed.
Check the finish of test folding.
8
Check the finish using the second test folded sample.
If the folding position needs to be adjusted, set the
position of the folding stopper again using the folding
stopper adjusting keys of folding plates 1 and 2.
If paper is not ejected smoothly, change the position of
the stacker roller.
12. CUSTOM FOLDING
Folded paper
After completing all settings, register
9
the custom folding setting.
Continue pressing the custom folding registration key
1 or 2 until the buzzer sounds “pi.pi...” (about two
seconds).
The registered data is preserved even after the power
is turned off.
Other steps are the same as standard folding of standard paper.
“9. STANDARD FOLDING OF STANDARD PAPER” (☞p.22)
eSee
37
Page 41

13. CROSS FOLDING
Cross folding is folding single-folded paper
another time as shown in the figure. Many
cross folding styles are available according to
settings.
<Cross single folding>
<Single folding>
<Cross brochure folding>
13-1. Cross Folding Methods
The following three cross folding methods are
available on this unit.
13-2. Precautions on Cross
Folding
Pay attention to the following in cross folding.
The maximum thickness of paper used is
28 lb.
The maximum thickness depends on conditions such
as using environment (temperature, humidity), paper
size, paper type, paper grain direction, paper printing
state, etc.
Press along the folded line of singlefolded paper with the fingers.
If the folded line is not folded properly, paper feed will
be unstable.
(1) Cross folding of standard paper
Standard paper consists of five types LGR, LGL,
LTR, STMT, and INV (short edge feeding of paper)
and is paper whose size can be automatically
detected.
(2) Cross folding of non-standard paper
Non-standard paper is paper other than standard
paper specified by this unit. It is paper within the
following size range.
( ) shows the minimum foldable size under
conditions given.
Paper feed direction
Paper
Width: 5.1" (3.0") to 11.7"
Length: 7.2" (5.1") to 17.0"
Paper ∑ dent and folding misalignment along the
NoteNote
sides of the paper may occur if the folded line of
single-folded paper is not folded properly or
according to the using environment
(temperature, humidity), paper thickness, paper
size, paper type, paper grain direction, etc. This
is not a malfunction of the unit.
∑ dent
(3) Cross folding of paper at desired
folding position
This is the cross folding of standard and nonstandard paper at the desired folding position.
Both standard and non-standard paper are
processed in the same way, and the folding
position is registered in the custom folding mode.
38
Page 42

13-3. Cross Folding of
Standard Paper
13. CROSS FOLDING
Open the top cover, move the auxiliary
4
paper feed ring (movable) to the folded
line of the paper, and secure it.
The following describes the cross folding of
standard paper, taking cross single folding
shown in the figure as an example.
Cross folding
Single fold standard paper according
1
to the procedure of “9. STANDARD
FOLDING OF STANDARD PAPER”
(
p.22).
☞
To prevent folding misalignment along
2
the sides of the paper and feed paper
smoothly, fold the folded line of the
single-folded paper firmly with the
fingers.
Move the auxiliary paper feed ring by loosening the set
knob. After moving, tighten the set knob to secure.
Auxiliary paper feed ring
Set knob
Set the separating pressure adjusting
5
dial to “0”.
Set the paper separating pressure as low as possible.
Setting it high will cause the single-folded paper to
open during paper feed, resulting in paper feed error.
Paper separating pressure decreases as the scale
value decreases.
(movable)
Top cover
Stack the single-folded paper on the
3
paper feed tray with the folded line
facing the left, and set the paper feed
guides.
Do not stack too many sheets of paper on the paper
feed tray, the amount of which should be about half
the height of the paper feed guide (approx. 1.0").
Push in the paper until the lead edge touches the
paper feed inlet lightly.
Paper feed
direction
Max. stacking
amount:
Approx. 1.0"
Paper feed guides
Set the paper feed pressure adjusting
6
lever to “3”.
Set the paper feed pressure within the “3” to “5” range
on the scale.
If paper slips and mis-feed occurs, increase the paper
feed pressure to “4” or “5”.
Paper feed pressure increases as the scale value
increases.
Attach the cross folding guide stored
7
inside the top cover to the paper feed
guide on the left side.
Paper feed guide
Cross folding guide
39
Page 43

13. CROSS FOLDING
Close the top cover.
8
Place the weight roller of the cross
9
folding guide on the folded line.
To replenish paper, lift the cross folding
NoteNote
guide.
Weight roller
Set the folding mode to single folding,
10
perform test folding, and check the
finish.
Other steps are the same as standard folding
of standard paper.
“9. STANDARD FOLDING OF STANDARD
eSee
PAPER” (
☞
p.22)
Press the No. of sheets/Paper length
4
key until the buzzer sounds “pi.pi...”
(about two seconds), to register the
paper length.
Perform steps 2 to 10 of “13-3. Cross
5
Folding of Standard Paper” (
Other steps are the same as standard folding
of standard paper.
“9. STANDARD FOLDING OF STANDARD
eSee
PAPER” (
☞
p.22)
☞
p.39).
13-5. Cross Folding Paper at
the Desired Folding Position
After registering custom folding
1
according to the procedure of “12.
CUSTOM FOLDING” (
fold paper in the custom folding mode.
Set the folding plate 1 folding stopper
NoteNote
position as desired when registering
custom folding. Set the folding plate 2
folding stopper position to 0" as folding
plate 2 is not used in single folding.
p.35), single
☞
13-4. Cross Folding of
Non-standard Paper
Single fold non-standard paper
1
according to the procedure of “11.
STANDARD FOLDING OF NONSTANDARD PAPER” (
Press the No. of sheets/Paper length
2
key and switch to the mode for entering
paper length.
Measure the length of the single-folded
3
paper, and enter the length using the
numerical keys.
Paper feed direction
☞
p.32).
Register the single-folded paper for
2
custom folding at the desired folding
position according to the procedure of
“12. CUSTOM FOLDING” (
again.
Perform steps 2 to 10 of “13-3. Cross
3
Folding of Standard Paper” (
Other steps are the same as standard folding
of standard paper.
“9. STANDARD FOLDING OF STANDARD
eSee
PAPER” (
☞
p.22)
☞
☞
p.35)
p.39).
40
Length of
single-folded paper
Page 44

14. USING ART PAPER AND COATED PAPER
14-1. Characteristics of Art Paper and Coated Paper
Art paper and coated paper often stick to each other due to the printing ink and become difficult to
separate, resulting in double-feed. When using these types of paper, follow the procedure below.
NoteNote
Some recycled art paper and coated paper may be flimsy and inappropriate for folding.
14-2. Operation Procedure
Fan the paper well.
1
NoteNote
Art paper and coated paper need to be fanned well compared to fine quality paper such as copy paper.
Stack paper on the paper feed tray after neatly aligning the paper, and set the paper
2
feed guides.
For precautions on paper, refer to “7. PRECAUTIONS PRIOR TO USE” (☞p.18).
Do not stack too many sheets of paper on the paper feed tray, the amount of which should be about half the
NoteNote
height of the paper feed guide (approx. 1.0"). If too many sheets are stacked, the paper will stick to each
other from its weight and become difficult to separate, resulting in double-feed.
Set the paper feed pressure adjusting lever to “3”.
3
Set the paper feed pressure within the “3” to “5” range on the scale.
If paper slips and mis-feed occurs, increase the paper feed pressure to “4” or “5”.
Paper feed pressure increases as the scale value increases.
Open the top cover, and set the separating pressure adjusting dial to “2.5”.
4
After setting, close the top cover.
If double-feed occurs, increase the paper separating pressure by 0.5 at a time.
Paper separating pressure increases as the scale value increases.
Do not use fine quality paper such as copy paper with the paper feed pressure and paper separating
NoteNote
pressure settings for art paper and coated paper. Due to the high paper feed pressure, double-feed occurs
more easily. In addition, due to the high paper separating pressure, the paper may be damaged at the lead
edge. When using fine quality paper, always return to paper feed pressure and paper separating pressure
settings to levels suitable for fine quality paper.
Press the test key to perform test folding, and check the finish.
5
If deformed folding occurs, the paper may not have reached the folding plate folding stopper. One solution is to lower the
processing speed.
Other steps are the same as standard folding of standard paper.
“9. STANDARD FOLDING OF STANDARD PAPER” (☞p.22)
eSee
41
Page 45

15. USING SPECIAL PAPER
15-1. Double Folding Thick Paper
When double folding fine quality paper larger than 10" in width and thicker than 28 lb, the stiffness
of the paper makes it difficult for it to enter between the two folding rollers.
For such paper, set the thick paper mode.
This mode is intended only for thick paper. Do not use it for folding other types of paper.
NoteNote
Use of this mode results in unstable paper feed, and quickens wear of parts such as the paper feed ring.
Thick paper mode
In this mode, the folding rollers rotate quickly to help paper enter between the folding rollers.
Setting the thick paper mode
Press the “+” speed key and set the maximum processing
speed, and press it again for another two seconds.
The maximum speed lamp blinks, indicating that the thick
paper mode has been set.
Clearing the thick paper mode
Press the “–” speed key. The maximum speed lamp stops
blinking and lights up, indicating that the thick paper mode has
been cleared.
This setting will also be cleared when the power is turned off.
Blinking (Thick paper mode)
NoteNote
This function may not be that effective, depending on the paper thickness and stiffness.
15-2. Using Recycled Paper
Some recycled paper may be thin, flimsy and easy to curl when copied, and therefore
inappropriate for folding. When folding such paper, pay attention to the following points.
Fan paper well prior to stacking on the paper feed tray.
Set the processing speed as low as possible.
If set to high, wrinkles or deformed folding will result.
Set the paper feed pressure as low as possible.
If set to high, double-feed will result.
Set the paper separating pressure as low as possible.
If set to high, the center of the lead edge of the paper may be scratched or turned over.
42
Page 46

15. USING SPECIAL PAPER
15-3. Folding Small Size Paper
Paper size ranges within 5.1" to 7.1" in length and 3.0" to 5.0" in width (fed by short edge feeding)
can be folded in the following conditions.
Paper size ranges within 5.1" to 5.5" in length and 3.0" to 4.2" in width can only be single folded
or brochure folded.
Paper size ranges within 5.6" to 7.1" in length and 4.3" to 5.0" in width can be single folded, letter
folded, accordion folded, and brochure folded, but not double folded and irregular accordion
folded.
When the folding mode key is pressed, the lamps of unselectable folding modes will be skipped without
NoteNote
lighting.
Paper within the above size ranges are non-standard paper. As the automatic paper size
detection function does not work for these paper sizes, there is a need to register the paper
length.
“11. STANDARD FOLDING OF NON-STANDARD PAPER” (☞p.32)
eSee
The thickness of paper which can be used ranges from 16 to 20 lb.
Stack paper on the paper feed tray after fanning it well. However, stack less than usual, within a
stacking height of 1.4".
Do not set the maximum processing speed. Set as low as possible.
Continuous-feed occurs easily when high processing speeds are set. This is because the paper is small and
NoteNote
light, and is not a malfunction.
Set the paper feed pressure to “0” or “–1”.
Paper feed pressure adjusting lever
Set the paper separating pressure to “0”,
and increase the value by 0.5 at a time
according to the paper feed conditions.
Top cover
-1 1 2 3 4 5 6
0
6
3
4
2
5
1
6
0
Separating pressure adjusting dial
43
Page 47

16. STACKER ROLLER
16-1. Changing the Stacker Roller Position
If paper ejection conditions are poor, there is
a need to change the position of the stacker
roller. Pressing a numerical key between 1
and 6 while pressing the stop key moves the
stacker roller.
Step 6 in “12-2. Operation Procedure”
eSee
(
☞
p.36)
Refer to the following table for the position
for setting the stacker roller according to the
folded paper length.
Approximate stacker roller set position
Numerical
key setting
1
2
Folded paper
length
To 3.35"
3.36" to 4.13"
Applicable standard paper size and folding mode
LTR ........... Double fold
LGL ........... Double fold
STMT ........ Double fold, letter fold, accordion fold
INV ............ Double fold, letter fold, accordion fold
LGR........... Double fold
LTR ........... Letter fold, accordion fold
STMT ........ Irregular accordion fold, brochure fold
INV ............ Irregular accordion fold, brochure fold
Stacker roller
3
4
5
6
4.14" to 4.72"
4.73" to 5.31"
5.32" to 5.91"
From 5.92"
STMT ........ Single fold
INV ............ Single fold
LGL ........... Letter fold, accordion fold
LTR ........... Brochure fold
LGR........... Letter fold, accordion fold, brochure fold
LGL ........... Brochure fold
LTR ........... Single fold, irregular accordion fold
LGR........... Single fold, irregular accordion fold
LGL ........... Single fold, irregular accordion fold
16-2. Changing the Stacker Roller Height
Some thick and stiff paper may not be
ejected smoothly because they may open
up after folding. If this happens, change the
height of the stacker roller and widen the
space for the paper to pass in ejection.
Lift the stacker roller and hold it with subsupport.
Sub-support
NoteNote
44
After completing folding operations, be sure to
return the stacker roller to the standard position.
Leaving it in the raised state will result in poor
alignment of ejected paper.
Stacker roller
Page 48

17. ADDITIONAL FUNCTIONS
Enter the number of sheets to sort
17-1. Interval Function
The interval function suspends paper folding
operations for a certain period of time after
every specified number of sheets, and sorts
the folded paper. This allows the ejected paper
to be removed, and preparations made for
distributing folded paper, placing paper in
envelopes during the suspended time.
For example, if there is a need to bind the
folded paper in sets of 50 sheets, the unit can
be set to suspend folding operations for the
certain period of time for every 50 sheets.
The following describes the setting procedure
for this example.
While pressing the stop key, press the
1
custom folding registration key 2.
The top of the LCD shows “SET INTERVAL”.
3
(bind) using the numerical keys.
The number of sheets can be entered within the range
of 1 to 999.
Register the settings made.
4
While pressing the stop key, press the custom folding
registration key 2.
After completing registration, “I” is displayed at the
bottom right of the LCD.
SET INTERVAL
5 SEC/ 5O SHEETS
SET INTERVAL
OFF
Set the suspension time of paper
2
folding operations.
Press the “+” or “–” speed key, and select from “OFF”,
“3 seconds”, “5 seconds”, and “10 seconds”.
At shipment, this is set to “OFF”.
Select “OFF” when not using this function.
The bottom of the LCD shows the selected setting.
SET INTERVAL
5 SEC/ O SHEET
LTR .OOO/ .OOO
STAND BY I
Clearing the interval function
Select “OFF” in step 2 of the above setting procedure, and
register again using the method in step 4.
When cleared, the “I” displayed on the LCD disappears.
LTR .OOO/ .OOO
STAND BY
Relation between interval function and
add-count and subtract-count counter
Use of the counter is the same as normal for both add-count
and subtract-count.
45
Page 49

17. ADDITIONAL FUNCTIONS
17-2. Folding Stopper Operation Mode Setting Function
This function is used for setting the movements of the folding stoppers of folding plates 1 and 2
when the power is turned on. There are two modes; “Refold mode” and “Folding stopper fixed
mode”.
Refold mode
This function starts this unit at the last settings used when the power is turned on. When set to this
mode, the unit will automatically be set to the following settings when the power is turned on.
If the folding stopper position has been corrected, be sure to register the corrected data to save it. Otherwise,
NoteNote
the corrected data will be erased when the power is turned off.
Setting
Paper size
Folding mode
Stacker roller position
Processing speed
Folding stopper position
Before refold mode setting
Standard paper is automatically
detected.
For non-standard paper, nothing is
displayed on LCD. (Paper length
needs to be registered.)
Set to single fold as in shipment.
(Single-folding mode lamp lights up.)
Automatically set.
Set to same processing speed as when
power is turned off.
Moves to home position and stops.
(Resetting of position, registration
required.)
After refold mode setting
Standard paper is automatically
detected.
When non-standard paper length is
registered, registered data is
displayed on LCD.
Set to same folding mode as when
power is turned off.
(The folding mode display lamp lights
up.)
Set to same stacker roller position as
when power is turned off.
Set to same processing speed as when
power is turned off.
After moving to home position, moves to
position set when power is turned off.
Folding stopper fixed mode
This function allows control panel settings to be skipped when folding paper under the same
conditions all the time (paper size, folding mode, stacker roller position, processing speed, folding
stopper position). When set to this mode, the unit will always be automatically set to the same
conditions when the power is turned on, allowing paper folding to be started without the need for
control panel settings.
NoteNote
When set to this mode, normal operations will not be possible. However, the folding stopper position and
interval function can be changed.
If the folding stopper position has been corrected, be sure to register the corrected data to save it. Otherwise,
the corrected data will be erased when the power is turned off.
When set to this mode, the standard folding lamp and custom folding registration lamp will not light up.
46
Page 50

Setting the refold mode/folding
stopper fixed mode
The refold mode and folding stopper fixed
mode can be set using the same method.
While pressing the stop key, press the
1
custom folding registration key 1.
The top of the LCD shows “SET FUNCTION”.
17. ADDITIONAL FUNCTIONS
Register the mode selected.
3
While pressing the stop key, press the custom folding
registration key 1.
When the refold mode is registered, the bottom right of
the LCD shows “REF”.
When the folding stopper fixed mode is registered, the
top left of the LCD shows “FIX”.
<When refold mode> <When folding stopper
fixed mode>
SET FUNCTION
OFF
Select the mode.
2
Press the “+” or “–” speed key, and select from “OFF”,
“LAST TIME FOLD”, and “STOPPER FIXED”.
At shipment, this is set to “OFF”.
Select “OFF” when not using this function.
<When refold mode> <When folding stopper
fixed mode>
SET FUNCTION
LAST TIME FOLD
SET FUNCTION
STOPPER FIXED
LTR .OOO/ .OOO
STAND BY REF
Clearing the refold mode/folding stopper
fixed mode
Select “OFF” in step 2 of the above setting procedure, and
register again using the method in step 3.
When cleared, the “REF” or “FIX” displayed on the LCD
disappears.
LTR .OOO/ .OOO
STAND BY
When the folding stopper fixed mode is cleared,
NoteNote
the folding stoppers start moving to the home
position, and the LCD displays “WAIT”.
Operations are disabled until the message
changes to “STAND BY”.
FIX 5.5O/O.OO
STAND BY
47
Page 51

18. WHEN PAPER JAMMING OCCURS
If the top cover, side cover, or paper ejection section cover has been opened to remove jammed paper as
NoteNote
described below, be sure to close it after removing. This unit will not operate if covers are open and the LCD will
show an error message such as “TOP COVER OPEN”.
18-1. When Paper Jams
at Paper Feed Section
The LCD shows “FEED ERROR”.
FEED ERROR
Open the top cover, and pull out paper
jammed near the paper feed ring. After
removal, close the top cover.
If the paper jams again, increase the paper
feed pressure using the paper feed pressure
adjusting lever.
Top cover
18-2. When Paper Jams
Near Paper Feed Ring
The LCD shows “JAM FEED SECT”.
JAM FEED SECT
Open the top cover, and pull out paper
jammed near the paper feed ring. After
removal, close the top cover.
If the paper cannot be pulled out easily,
lower the paper feed tray by removing all the
paper on the paper feed tray, or by using the
following keys, and then pull out the paper.
Top cover
48
Raising/lowering the paper feed tray using
the control panel
To lower the paper feed tray, press the “–” key of the folding
plate 1 folding stopper adjusting key while pressing the stop
key. To raise, press the “+” key.
Page 52

18-3. When Paper Jams
Inside Folding Plate
The LCD shows “JAM INSIDE”.
JAM INSIDE
While pressing the stop key, press the clear
key. The LCD shows “WAIT”.
The folding stoppers of folding plates 1 and 2
move to the home position, pushing out the
paper inside the folding plates to the paper
receiving tray.
18. WHEN PAPER JAMMING OCCURS
Release the lock lever, and remove
3
folding plate 1.
NoteNote
Be sure to hold folding plate 1 with both
hands.
Do not subject folding plate 1 to shock,
otherwise it may damage, folding
accuracy will drop.
Folding plate 1
Lock lever
18-4. When Paper Winds
Around Folding Roller
The LCD shows “JAM INSIDE”.
JAM INSIDE
Turn off the power.
1
Disconnect control cord 1 of folding
2
plate 1 from the No.1 connector.
Control cord 1
Open the top cover, and while rotating
4
the jam correction knob, remove the
paper around the folding rollers.
Top cover
Jam correction knob
Folding roller
If paper does not come out easily, insert a scale, etc.
into the lead edge of the paper which had wound
around the folding rollers from between the folding
rollers, and remove the paper while rotating the jam
correction knob.
Be careful not to damage the folding rollers
NoteNote
with the scale.
No.1 connector
49
Page 53

18. WHEN PAPER JAMMING OCCURS
After completing the above, set folding
5
plate 1 back to the original position.
Push the lock lever towards “LOCK”,
6
and insert control cord 1 into the No.1
connector.
Rotate the jam correction knob to
7
check that folding plate 1 is secured. If
the knob rotates smoothly, it means
that folding plate 1 is secured.
If not secured properly, the LCD will show “F.PLAT-1
SET ERR” when the power is turned on.
Close the top cover.
8
18-5. When Paper Jams
Near Folding Plate 1
Release the lock lever, and remove
3
folding plate 1.
NoteNote
Open the top cover, and while rotating
4
the jam correction knob, pull out the
jammed paper.
Be sure to hold folding plate 1 with both
hands.
Do not subject folding plate 1 to shock,
otherwise it may damage, folding
accuracy will drop.
Folding plate 1
Lock lever
The LCD shows “JAM INSIDE”.
JAM INSIDE
Turn off the power.
1
Disconnect control cord 1 of folding
2
plate 1 from the No.1 connector.
Control cord 1
No.1 connector
After completing the above, set folding
5
plate 1 back to the original position.
Push the lock lever towards “LOCK”,
6
and insert control cord 1 into the No.1
connector.
Rotate the jam correction knob to
7
check that folding plate 1 is secured. If
the knob rotates smoothly, it means
that folding plate 1 is secured.
50
If not secured properly, the LCD will show “F.PLAT-1
SET ERR” when the power is turned on.
Close the top cover.
8
Page 54

18-6. When Paper Jams
1
2
Near Folding Plate 2
18. WHEN PAPER JAMMING OCCURS
Remove folding plate 2.
4
q While slightly lifting the handle, slide folding
plate 2 downwards to the “2 ( )” mark.
The LCD shows “JAM INSIDE”.
JAM INSIDE
Turn off the power.
1
Open the side cover.
2
Side cover
w While slightly lifting the handle, further slide
folding plate 2 downwards and remove.
Folding plate 2
NoteNote
To ensure safety, be sure to follow the
above procedure. Performing this work
incorrectly may result in folding plate 2
dropping, injuries, or damage of folding
plate 2.
Be sure to hold folding plate 2 holding
the handle with both hands.
Do not subject folding plate 2 to shock,
otherwise it may damage, folding
accuracy will drop.
Disconnect control cord 2 of folding
3
plate 2 from the No.2 connector, and
release the lock lever.
Lock lever
No.2 connector
Control cord 2
Open the top cover, and while rotating
5
the jam correction knob, pull out the
jammed paper.
51
Page 55

18. WHEN PAPER JAMMING OCCURS
After completing the above, set folding
6
plate 2 back to the original position.
Set folding plate 2 in the reverse order of step 4.
Secure at the “1 (
1
2
Push the lock lever towards “LOCK”,
7
and insert control cord 2 into the No.2
connector.
Rotate the jam correction knob to
8
check that folding plate 2 is secured. If
the knob rotates smoothly, it means
that folding plate 2 is secured.
)” mark.
Folding plate 2
If the paper has come to the front of the
2
stacker roller, pull out the paper.
Paper ejection section cover
If the paper has jammed deep inside
3
the stacker roller, run the folding roller
and stacker belt to eject the jammed
paper.
While pressing the stop key, press the test key. The
folding roller and stacker belt start running.
Stacker roller
If not secured properly, the LCD will show “F.PLAT-2
SET ERR” when the power is turned on.
Close the top cover and side cover.
9
18-7. When Paper Jams at
Paper Ejection Section
The LCD shows “JAM EXIT”.
JAM EXIT
Open the paper ejection section cover,
1
and check that paper is jammed at the
paper ejection section.
Stacker roller
Stacker belt
Close the paper ejection section cover,
4
and check the paper ejection state in
test folding.
If the paper is not ejected smoothly, adjust the position
or height of the stacker roller.
52
“16. STACKER ROLLER” (
eSee
☞
p.44)
Page 56

19. ERROR MESSAGES
When paper jamming, errors, malfunctions occur, details are displayed on the second line of the
LCD. The following describes the error messages and solutions.
If the unit still does not operate normally even after implementing the following solutions, contact
your nearest dealer.
NoteNote
Be sure to disconnect the power cord from the outlet before implementing a solution.
2nd line display Details of display Solution
Paper jamming
JAM FEED SECT
JAM INSIDE
JAM EXIT
Errors
TOP COVER OPEN
SIDE COVER OPEN
DELIVERY COVER
F.PLAT-1 SET ERR
F.PLAT-2 SET ERR
FEED ERROR
PAPER SIZE ERROR
Paper jamming at paper feed section
Paper jamming inside this unit
Paper jamming at paper ejection section
The top cover is open.
The side cover is open.
The paper ejection section cover is open.
Folding plate 1 is not set correctly.
Folding plate 2 is not set correctly.
Paper is not fed normally due to mis-
feeding (slips), etc.
The stacking direction of the paper on the
paper feed tray is incorrect (example:
stacking LTR in long edge feeding
direction detects LGR).
Remove the jammed paper.
Remove the jammed paper.
Remove the jammed paper.
Close the cover.
Close the cover.
Close the cover.
Set back correctly.
Set back correctly.
Adjust the paper feed pressure and paper
separating pressure.
Stack paper in the correct direction.
NO PAPER
Malfunctions
MOTOR ERROR 1
MOTOR ERROR 4
MOTOR ERROR 5
MOTOR ERROR 3
MOTOR ERROR 2
No paper on the paper feed tray
Abnormal load on the motor due to paper
jamming, etc.
Control cord 1 of folding plate 1 is not
connected properly.
Control cord 2 of folding plate 2 is not
connected properly.
Abnormal load on the motor of the stacker
roller due to paper jamming, etc.
Abnormal load on the motor for automatic
rise/descent of paper feed tray when the
paper gets caught, etc.
Stack paper on the paper feed tray.
Remove the jammed paper.
Check the connection of control cord 1.
Check the connection of control cord 2.
Remove the jammed paper.
Remove the jammed paper.
53
Page 57

20. TROUBLESHOOTING
Before calling your dealer, check the following.
Problem Check Correct
The unit does not start
even when the start key is
pressed.
The main motor does not
rotate.
Is there paper stacked on the paper
feed tray?
Is paper placed properly over the paper
switch of the paper feed tray?
Has paper jammed?
Is a cover open? (top cover, side cover,
paper ejection section cover)
Is non-standard paper used in standard
paper settings?
Is the paper size displayed on the LCD?
Is there a gap between the paper feed
guide and paper?
Is the control cord of folding plate 1 or 2
disconnected?
Is the power cord inserted into the
outlet?
Is a cover open?
Has paper jammed?
NoteNote
If the motor is subject to abnormal load due to paper jamming, etc., power to the
motor will be cut off. Investigate the cause of the paper jam carefully. After
correcting the cause, turn on the power again and resume operations.
Stack paper.
Place paper over the paper switch so
that it is properly pressed.
Remove jammed paper.
Close open covers.
Change to non-standard paper
operations.
“11. STANDARD FOLDING OF NON-
eSee
STANDARD PAPER” (
Adjust the paper feed guides accurately
to the paper size on the paper feed tray
scale.
Adjust the paper feed guides to the
paper firmly, ensuring no gaps.
Turn off the power, and insert that
control cord into the connector.
Insert the power cord into the outlet.
Close open covers.
Remove jammed paper.
☞
p.32)
The folding stopper of
folding plate 1 or 2 does
not operate.
Paper is not folded at the
normal folding position.
Paper jam occurs.
Paper is double-fed.
Is the control cord of folding plate 1 or 2
disconnected?
Are folding plates 1, 2 set properly?
Has static electricity occurred in the
paper?
Has the paper been fanned well?
Is the paper curled?
Is the paper conveyance route jammed
with paper chips, etc.?
Is the folding roller dirty?
Is the position of the stacker roller of the
paper ejection section incorrect?
Has static electricity occurred in the
paper?
Is the paper feed pressure value set too
high?
Is the paper separating pressure value
set too low?
Is the paper separator dirty?
Is the paper sticking to each other and
difficult to separate?
Is paper outside the specifications
used?
Turn off the power, and insert that
control cord into the connector.
Set folding plates 1, 2 again.
Lower the processing speed.
Fan the paper well.
Humidify with a humidifier as required.
Fan the paper well.
Correct the paper curl before use.
Inspect the inside of the unit, and
remove paper chips.
Clean with a cloth moistened with
alcohol.
Set the stacker roller position correctly
again.
Use a commercially available static
electricity removal spray.
Humidify with a humidifier as required.
Decrease the paper feed pressure.
Increase the paper separating
pressure.
Clean with a cloth moistened with
alcohol.
Check that the printing ink of the paper
has dried and there is no static
electricity, and then fan the paper well.
Do not use paper outside the
specifications.
54
Page 58

20. TROUBLESHOOTING
Problem Check Correct
Paper slips at the paper
feed section.
Folding misalignment
along the vertical length
of the paper occurs.
Folding misalignment
along the sides of the
paper occurs.
Is the paper feed pressure value set too
low?
Is the paper separating pressure value
set too high?
Is the paper feed ring dirty?
Is the paper sticking to each other and
difficult to separate?
Is paper outside the specifications
used?
Was the processing speed changed
from halfway?
Was the paper type (paper quality,
thickness) changed from halfway?
Is more paper than the standard
amount stacked on the paper feed tray?
Are the paper feed guides set properly?
Are the fixing screws of the paper feed
guides loose?
Is paper cut properly?
Increase the paper feed pressure.
Decrease the paper separating
pressure.
Clean with a cloth moistened with
alcohol.
Check that the printing ink of the paper
has dried and there is no static
electricity, and then fan the paper well.
Do not use paper outside the
specifications.
Return to the speed before change.
When changing the speed, the folding
stopper positions of folding plates 1 and
2 must be adjusted.
Use paper before change.
When changing paper, the folding
stopper positions of folding plates 1 and
2 must be adjusted.
Reduce the paper amount.
Set the paper feed guides correctly
again.
Tighten the fixing screws properly.
Correct the folding misalignment along
the sides of the paper using the skew
correction knob.
Continuous-feeding
occurs with small paper.
Single-folded thick paper
jams at the folding rollers.
When large paper is
stacked on the paper feed
tray, the tray does not rise
even when the start (test)
key is pressed.
Is small paper outside the specifications
used?
Is the paper feed pressure value set too
high?
Is there a gap between the paper feed
guide and paper?
Is paper aligned?
Is thin, flimsy paper used?
Is paper outside the specifications
used?
Is the paper feed pressure value set too
high?
Has the paper been fanned well?
Is more paper than the standard
amount stacked on the paper feed tray?
Is the paper heavy?
Is the paper stacked on the paper feed
tray properly?
Do not use paper outside the
specifications.
Decrease the paper feed pressure.
Adjust the paper feed guides to the
paper firmly, ensuring no gaps.
Align the paper well before stacking on
the paper feed tray.
Lower the processing speed.
Do not use paper outside the
specifications.
Decrease the paper feed pressure.
Fan the paper well.
Reduce the paper amount.
Increase the paper feed pressure.
Adjust the paper feed guides accurately
to the paper size on the paper feed tray
scale.
55
Page 59

21. CLEANING THE UNIT
The adherence of paper dust, printing ink, etc. on the folding rollers, paper feed rings causes
problems such as paper feed errors, folding misalignment, etc. Clean as follows.
NoteNote
Prior to cleaning, be sure to disconnect the power cord from the outlet.
After cleaning, make sure that the areas that were cleaned are completely dry before resuming paper folding
operations.
After cleaning, be sure to close the top cover properly. If not closed properly, the unit will not operate.
!
WARNING
Do not use flammable sprays or solvent inside or near the unit (e.g. when cleaning the
unit). Such flammable gas may ignite and cause a fire or combustion. Take precautions
against fire and ensure ventilation when using alcohol, and store the alcohol in a safe
place after use. Also note that use of other solvents can damage the rubber rollers and
resin inside the unit, resulting in malfunctions.
21-1. Cleaning
the Folding Rollers
Remove folding plate 1 to clean the folding
rollers.
Disconnect control cord 1 of folding
1
plate 1 from the No.1 connector.
While rotating the folding rollers with
4
the jam correction knob, clean them
with a cloth moistened with alcohol.
Jam correction knob
Folding roller
Top cover
Control cord 1
No.1 connector
Release the lock lever, and remove
2
folding plate 1.
NoteNote
Be sure to hold folding plate 1 with both
hands.
Do not subject folding plate 1 to shock,
otherwise it may damage, folding
accuracy will drop.
Folding plate 1
Lock lever
Set folding plate 1 back to the original
5
position.
Push the lock lever towards “LOCK”,
6
and insert control cord 1 into the No.1
connector.
Rotate the jam correction knob to
7
check that folding plate 1 is secured. If
the knob rotates smoothly, it means
that folding plate 1 is secured.
If not secured properly, the LCD will show “F.PLAT-1
SET ERR” when the power is turned on.
Open the top cover.
3
56
Close the top cover.
8
Page 60

21. CLEANING THE UNIT
21-2. Cleaning
the Paper Feed Rings
Open the top cover.
1
While rotating the paper feed rings by
2
hand, clean them with a cloth
moistened with alcohol.
Immediately after cleaning, the dirt on the
NoteNote
paper feed ring may stick to the paper.
Therefore perform test folding until all dirt
has been removed.
Top cover
Paper feed ring
Close the top cover.
3
21-4. Cleaning the Paper
Feed Inlet Sensor
The paper feed inlet of this unit has a sensor
for checking the paper feed state. This sensor
may fail with the error message “JAM FEED
SECT” when printing powder and paper dust
accumulate on it.
When this message appears, clean the sensor
with an Air Duster (a commercially available air
spray for eliminating dust for office
equipment).
Open the top cover.
1
Insert the nozzle of the Air Duster into
2
the hole of the sensor cover and paper
feed inlet, and spray briefly.
NoteNote
Use a non-flammable type. Read the
instructions on use carefully, and be sure
to observe them.
The Air Duster gas will cool the sensor
and metallic parts, causing temporary
condensation. After cleaning, leave for
about five minutes before use.
21-3. Cleaning
the Paper Separator
Open the top cover.
1
Loosen the fixing screw of the middle
2
paper feed ring, and move it aside.
Clean the paper separator with a cloth
3
moistened with alcohol.
Top cover
Middle paper feed ring
Paper separator
Hole of sensor cover
Paper feed inlet
Move the paper feed ring to its original
4
position, and tighten the screw.
Close the top cover.
5
Close the top cover.
3
57
Page 61

Film
Paper ejection
outlet sensor
(lower side)
Hole of power
supply cover
Guide
Paintbrush
4.17"
21. CLEANING THE UNIT
21-5. Cleaning the Paper
Ejection Outlet Sensor
The paper ejection outlet of this unit has a
sensor for checking the paper ejection state.
This sensor may fail with the error message
“JAM EXIT” when printing powder and paper
dust accumulate on it.
When this message appears, clean the sensor
with an Air Duster (a commercially available air
spray for eliminating dust for office equipment)
as well as a paintbrush, etc.
This sensor consists of two sensors located at
the top and bottom of the paper ejection outlet.
First clean the upper sensor and then the
lower sensor.
Cleaning the upper sensor
Disconnect control cord 1 of folding
1
plate 1 from the No.1 connector,
release the lock lever, and then remove
folding plate 1.
Lock lever
Folding plate 1
Cleaning the lower sensor
Open the side cover.
1
Disconnect control cord 2 of folding
2
plate 2 from the No.2 connector,
release the lock lever, and then remove
folding plate 2.
Folding plate 2
Insert the paintbrush straight in from
3
the hole of the power supply cover
along the guide, and gently clean the
top of the sensor with the brush.
Do not rub the top of the sensor with the
NoteNote
metal portion of the paintbrush, as this may
damage the film protecting the sensor,
causing sensor problems.
Hole of power supply cover
Lock lever
No.2 connector
Control cord 2
2
3
4
58
Insert the nozzle of the Air Duster into
the hole of the top cover R shown in the
figure, and spray briefly.
Hole of top cover R
Set folding plate 1 back to the original
position.
Push the lock lever towards “LOCK”,
and insert control cord 1 into the No.1
connector.
Set folding plate 2 back to the original
4
position.
Push the lock lever towards “LOCK”,
5
and insert control cord 2 into the No.2
connector.
Close the side cover.
6
Page 62

22. SPECIFICATIONS
Model DF-920
Max.
Paper size
Min.
Paper quality
Folding mode
Paper weight
Paper feed tray capacity
Maximum processing
speed
Paper feed method
Paper feed tray control
function
11.7" (W) × 17.0" (L) (Along paper feed direction)
5.1" (W) × 7.2" (L) (Along paper feed direction)
However paper size ranges within 5.1" to 7.1" in length and 3.0" to 5.0" in width can be
folded under certain conditions.
Fine quality paper, recycled paper, drawing paper, specific art paper,
specific coated paper
Single fold, double fold, irregular accordion fold, letter fold, accordion fold,
brochure fold, specific cross fold (14 to 28 lb paper), other non-standard fold
14 to 40 lb
∗ However LGR paper can be up to 40 lb thick for single folding only. For other folding
modes, thickness can be up to 32 lb. 40 lb thick paper below INV size cannot be
double folded or irregular accordion folded.
500 sheets (fine quality paper 16 lb)
250 sheets/minute
Condition: When 16 lb LTR size fine quality paper is single folded
3-ring friction feed with skew correction function
Paper presence detection, automatic rise/descent (manual raising/lowering also
possible)
Paper size detection
function
Paper feed error
detection function
Counter
Other detection
functions
Additional functions
Energy saving functions
Power supply
Current consumption
In use
Dimensions
In storage
Automatic detection of following standard paper sizes: LGR, LGL, LTR, STMT, and
INV (fed by short edge feeding)
Mis-feed, continuous-feed, paper jam
4-digit, selection of add or subtract count method
Opening/closing of top cover, side cover, and paper ejection section cover
With/without folding plates 1, 2
Folding stopper position adjustment registration (30 ways), custom folding
registration (2 ways)
Interval, Refold, Folding stopper fixed
LCD backlight automatic OFF, Power still ON alert
100 to 240 V AC 50/60 Hz
1.4 to 0.7 A (95 W)
42.76" (W) × 20.63" (D) × 19.57" (H)
25.91" (W) × 20.63" (D) × 19.57" (H)
Mass (Weight)
Specifications and dimensions are subject to change without prior notice for improvements.
96 lb
59
Page 63

QUICK START
Operation Procedure
Prepare the unit.
1
q Open the auxiliary paper feed tray.
w Open the paper receiving tray.
e Extend the paper receiving stopper.
Turn on the power switch.
2
Insert the plug of the power cord into the outlet, and
turn on the power switch.
Stack paper.
3
q Stack paper on the paper feed tray.
w Move the paper feed guides according to the
paper width, and tighten the fixing screws.
Auxiliary paper feed tray
Power cord
Power switch
Adjust the paper feed guides to the
corresponding paper size on the paper feed tray
scale. If not adjusted to the appropriate scale, the
paper size will not be detected accurately and
this unit will not operate.
Perform test folding.
4
q Select the folding mode with the folding mode
key.
w Press the test key to perform test folding, and
check the finish.
When the test key is pressed, the paper feed tray
rises automatically and paper feed starts.
Start paper folding operations.
5
Press the start key. Paper folding continues until the
paper feed tray becomes empty.
If the number of sheets to be processed was entered
using the numerical keys prior to starting, the unit
stops upon completing folding of this number of
sheets.
Fixing screw
Paper feed
guides
Paper receiving tray
Paper receiving stopper
Example of
LTR paper
To stop halfway, press the stop key.
End paper folding operations.
6
q Turn off the power switch.
w Store the auxiliary paper feed tray, paper
receiving stopper, and paper receiving tray.
If not using the unit for a long time, disconnect
the power cord from the outlet.
This QUICK START is intended for outlining the main steps of the paper folding procedure to those who have read the
NoteNote
instruction manual once. Those who have not read the instruction manual should perform paper folding operations while
referring to the instruction manual.
1/2
Page 64

Duplo Paper Folder DF-920
Control Panel
Standard folding lamp
The lamp of the selected
folding mode lights up.
Speed key
Keys for changing the processing speed.
Pressing the “+” key on the right increases the processing
speed, and pressing the “–” key on the left decreases.
Refer to the instruction
manual for custom
folding registration and
correction of standard
folding. (
☞
p.27, 35)
Folding mode key
Key for selecting the
standard folding mode
Numerical keys
Keys for entering the number of sheets to be processed.
When the number of sheets to be processed is
•
entered with these keys first before starting paper
folding operations, the counter will display the number
of sheets processed by subtract-count.
When the clear key is pressed before starting paper
•
folding operations, the counter will display the number
of sheets processed by add-count.
Liquid crystal display (LCD)
Displays the size of the stacked
paper and error messages.
Clear key
Key for erasing the
count displayed by
the counter
Numerical display (Counter)
Displays the number of
sheets processed.
Start key
Stop key
Refer to the instruction
manual for paper length
registration.(
Test key
Key for test folding
☞
p.32)
Front/Back, Top/End of Paper in Stacking and Ejection
The front, back, top, and end of the paper folded by a folding mode differ according to how the
paper is placed on the paper feed tray.
Lead edge of paper: A
Paper feed direction
Trail edge of paper: B
Single folding Double folding
A
B
Paper ejection direction
A
Paper ejection direction
Paper stacked on
paper feed tray
Letter folding
B
B
Paper ejection direction
A
2/2
Page 65

DUPLO CORPORATION
Duplo building, 1-6, Oyama 4 chome, Sagamihara, Kanagawa 229-1180, Japan
TEL : +81-42-775-3602
FAX : +81-42-775-3606
E-mail : info@duplo.com
This manual is printed on recycled paper to help protect the environment.
12H-90262-04050000M-0
 Loading...