

Page 1

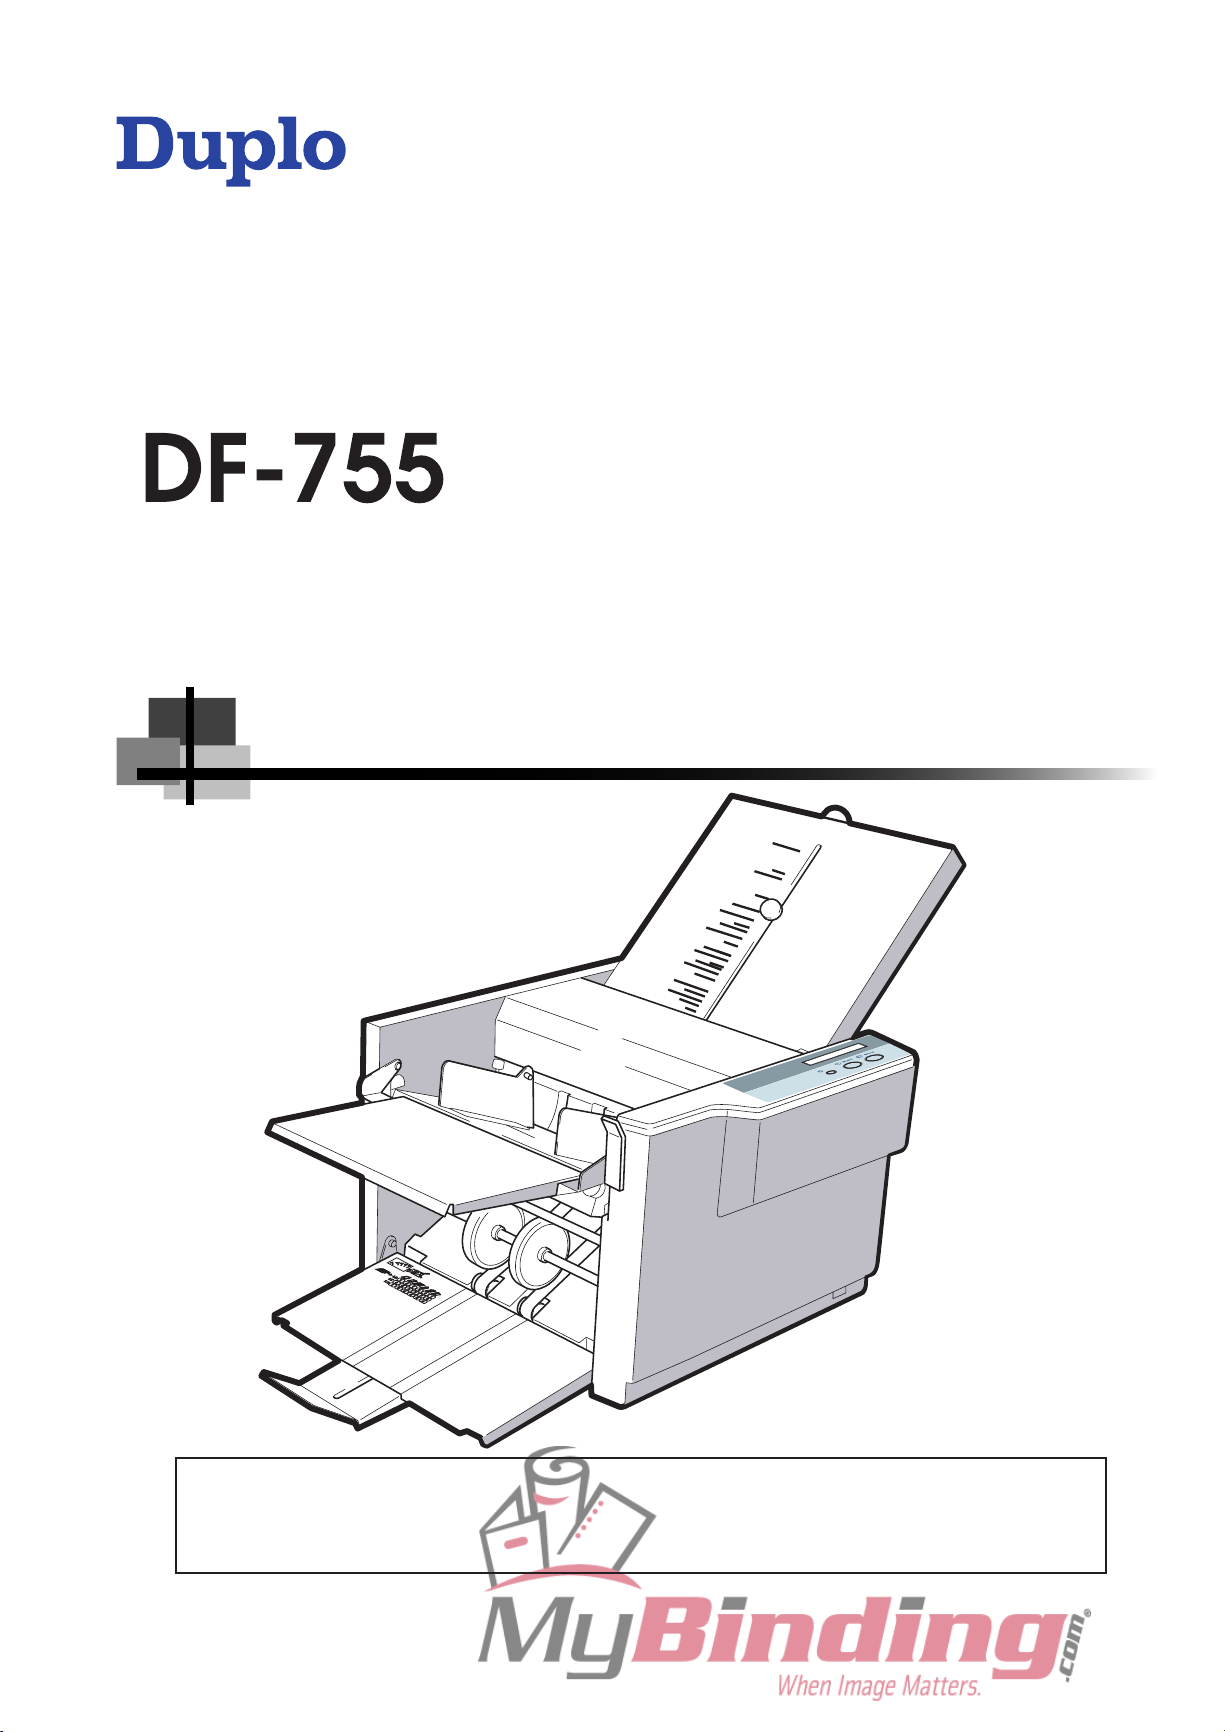
Duplo DF-755
Manual Setting Desktop
Paper Folder
Instruction Manual
Page 2
INSTRUCTION MANUAL
Be sure to read this manual prior to use.
Please leave this manual at the site of use for easy reference.
Duplo Folder
[120 V]
Page 3

“This equipment has been tested and found to comply with the limits for a Class B digital device,
pursuant to Part 15 of the FCC Rules. These limits are designed to provide reasonable protection
against harmful interference in a residential installation. This equipment generates, uses and can
radiate radio frequency energy and, if not installed and used in accordance with the instructions, may
cause harmful interference to radio communications. However, there is no guarantee that interference
will not occur in a particular installation. If this equipment does cause harmful interference to radio
or television reception, which can be determined by turning the equipment off and on, the user is
encouraged to try to correct the interference by one or more of the following measures:
–Reorient or relocate the receiving antenna.
– Increase the separation between the equipment and receiver.
– Connect the equipment into an outlet on a circuit different from that to which the receiver is
connected.
–Consult the dealer or an experienced radio/TV technician for help.“
Page 4

3
Introduction
Thank you for purchasing a Duplo product.
Be sure to read this manual prior to using the product.
Af
ter reading, leave the manual at the site of use for easy reference whenever questions related to the
product arise in the future.
Symbols
In this manual, several symbols are used to indicate important warnings. Please make sure to read
instructions accompanied by these symbols. These symbols have the following
meanings.
Describes instructions which must be followed in use.
Be sure to read the instructions to avoid problems due to incorrect operations.
Indicates supplementary or useful information.
Describes names of related items and supplementary instructions.
Trademark
The product name and company name used in this manual are trademarks or registered trademarks
of the respective companies.
Page 5
i
Safety Precautions
In this manual, operations and handling of the unit which are hazardous are described using the
following marks to prevent personal injury or property damage to the user and others.
Ignoring this mark could result in the possibility of
serious injury or even death.
Ignoring this mark could result in the possibility of injury
or physical damage.
This mark indicates a “Warning” or “Caution”.
A graphic may be shown inside the mark to describe the warning or caution more specifically.
This mark indicates a forbidden action.
A graphic may be shown inside the mark to describe the forbidden action more specifically.
This mark indicates actions that must be performed.
A graphic may be shown inside the mark to describe the action to be performed more specifically.
Power Supply
● This unit shall be installed near the socket-outlet where the plug on the power supply cord is easily
accessible.
● Make sure the power supply used is always within the following range.
Power supply : 120 V AC, 60 Hz
● When you power other appliances from the same AC outlet, make sure that the combined power
consumption does not exceed the power supply capacity.
Rated current (Rated power) : 0.85 A
● The equipment must be reliably connected to an earthed main socket-outlet.
Use only the power supply voltage specified on the main nameplate.
Using other voltages could result in a fire or an electrical shock.
Make sure that the combined power consumption of the appliances to be
connected does not exceed the capacity rating of the power outlets or plug
receptacles.
Exceeding the capacity rating could cause the power outlets, plug receptacles, or power extension
cords to overheat and catch a fire.
Page 6
ii
Safety Precautions
Operating Environment
Operate this unit in the following environment.
● where the temperature range is between 41 and 95°F (14 to 122°F in storage)
● where the humidity range is between 20 and 85% RH (10 to 90% RH in storage, however no
condensation)
●
which is not subject to direct sunlight
● which is reasonably free from dust
● which is subject to little or no vibration
● which is free from air-borne salt
● where there are no harmful chemicals
● where the unit is not exposed to water
Keep this unit and the power cord away from heaters and heater vents.
Excessive heat could melt the cover or power cord covering, and result in a fire or an electrical shock.
Do not place metal objects or vessels containing liquids on top of the unit.
The entry of any metal object or liquid could result in a fire or an electrical shock.
Do not insert any metal or easily-combustible object inside this unit.
This could result in a fire or an electrical shock.
Do not use flammable sprays inside or near the unit (e.g. when cleaning the
unit).
Such flammable gas may ignite and cause a fire or combustion.
Do not install this unit in a location where there is excessive humidity or where
contact with water is possible.
Poor choice of location could result in deterioration of the insulation, a fire or an electrical shock.
Install this unit on a level, stable stand or floor, with sufficient space around it.
Failure to do so could result in the unit overturning and causing injury.
Disconnect the power plug from the power outlet before attempting to move
this unit.
Failure to do so could result in power cord damage, a fire or an electrical shock.
Always disconnect the power plug from the power outlet when the unit is not
to be used for an extended period.
Failure to do so could result in a fire due to leakage current if the insulation should deteriorate.
Page 7
iii
Safety Precautions
Maintenance / Other
Do not damage the power cord or power plug.
Do not scratch, alter, bend, twist, pull or place heavy objects on the power cord or power plug.
This could result in damage, a fire or an electrical shock.
Do not touch the power switch with wet hands.
Otherwise electric hazards may occur.
Do not remove the cover or back panel.
This unit contains high-voltage components that could cause an electrical shock.
Do not disassemble, modify or repair this unit.
There is a danger of fire, electrical shock or injury.
Contact your dealer when repairs are necessary.
If any foreign object such as metal or liquid should enter this unit, immediately
turn the unit off at the power switch and disconnect the power plug from the
power outlet.
Failure to do so could result in a fire or an electrical shock.
Contact your dealer immediately.
Before cleaning this unit, turn the unit off at the power switch and disconnect
the power plug from the power outlet.
Accidental operation of the unit during cleaning could result in injury.
Remove any dust that accumulates on the power plug prongs and the surface
of the plug from which the prongs extend.
Accumulated dust could result in a fire.
Always grip the plug when disconnecting the power plug from the power
outlet.
Forcibly pulling on the power cord could cause damage, resulting in a fire or an electrical shock.
Do not touch or insert foreign objects into any rotating part during operation.
This could result in injury.
Page 8
iv
Safety Precautions
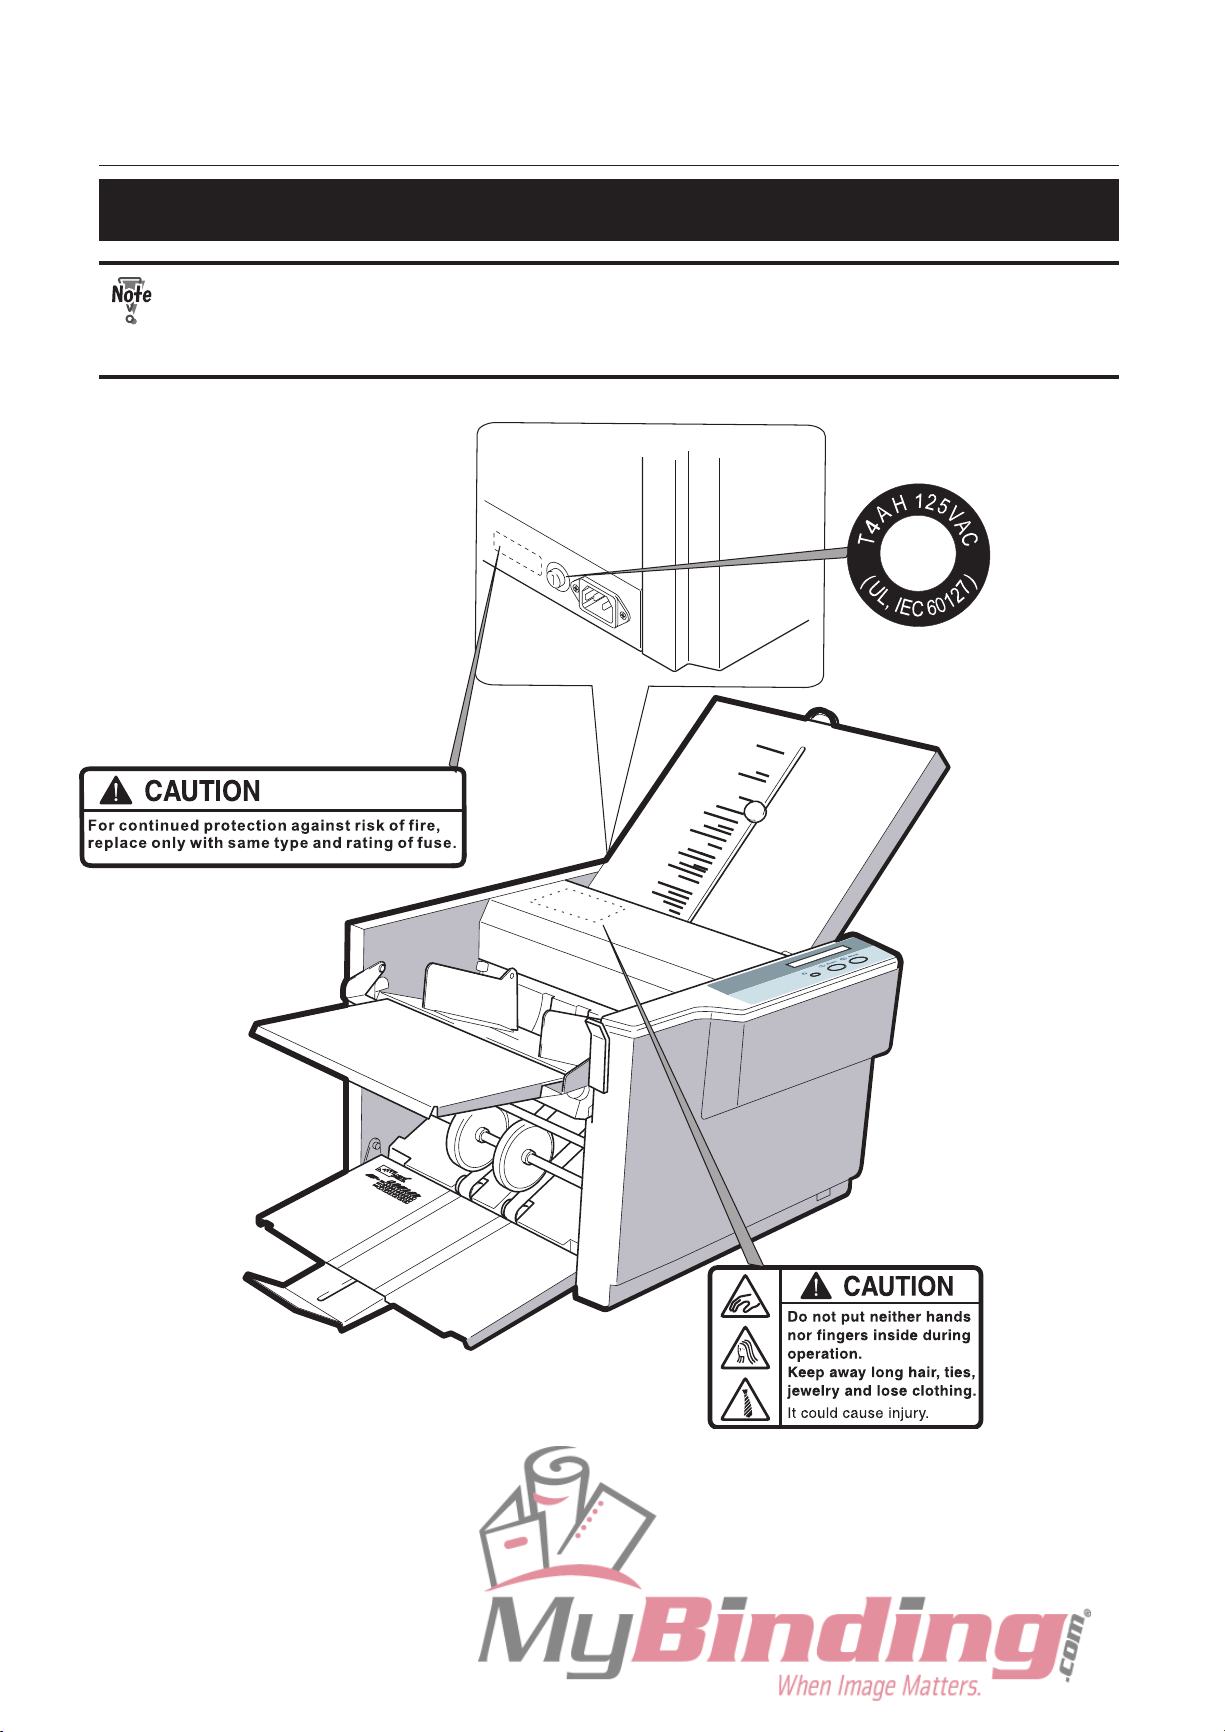
WARNING / CAUTION Labels
"WARNING" and "CAUTION" labels are pasted on the machine to ensure user safety.
Do not remove or change them.
When the labels become dirty or are lost, be sure to contact your dealer for a new one.
When changing a huse, make
sure that the fuse rating is same
as that indicated on this label.
Page 9

v
Contents
Introduction ................................................3
Safety Precautions .....................................i
Power Supply ...................................................... i
Operating Environment .......................................
ii
Maintenance / Other ...........................................iii
WARNING / CAUTION Labels
...........................iv
Chapter 1
BEFORE OPERATION
1. Features .............................................1-2
2. Setting Up the Machine ....................
1-3
2-1. Components .......................................... 1-3
2-2. Removing the Press Release Lever ......
1-3
2-3. Locking the Bearing Support Levers .....
1-4
2-4. Attaching the Parts ................................ 1-5
3. Names and Functions ......................1-7
4. Describing Control Panel .................
1-9
5. Handling Paper ...............................
1-10
5-1. Paper Used ......................................... 1-10
5-2. Precautions on Stacking Paper ........... 1-10
6. Emergency Stop .............................1-12
Chapter 2
BASIC OPERATION
1. Standard Folding of Standard
Paper ..................................................2-2
1-1. Standard Paper ..................................... 2-2
1-2. Standard Folding ................................... 2-2
1-3.
Operation Procedures ........................... 2-3
Chapter 3
ADVANCED OPERATION
1. Single Folding of Standard Paper ...3-2
1-1. Single Folding Thick Paper ................... 3-2
1-2. Double Folding Thick Paper .................. 3-4
1-3. Double Folding Small
Thin Paper .........3-7
2. Custom Folding of Standard
Paper ................................................3-10
3. Standard Folding of
Non-Standard Size Paper ...............3-14
4. Cross Folding ..................................
3-18
4-1. Cross Folding Standard Size Paper .... 3-18
4-2. Cross Folding Non-Standard Size
Paper ................................................... 3-23
Chapter 4
TROUBLESHOOTING
GUIDE
1. Correcting Folding Misalignment ....4-2
1-1. Correcting Folding Misalignment along
Vertical Length of Paper ........................ 4-2
1-2. Correcting Folding Misalignment along
Sides of Paper .......................................
4-4
1.3 Correcting Deformed Folding ................ 4-5
2. Removing Jammed Paper ................4-6
2-1. When Paper Has Jammed Near
the Paper Feed Ring ............................. 4-6
2-2. When Paper Has Slipped at the Paper
Feed Section .........................................
4-6
2-3. When Paper Has Coiled Around the
Rubber Roll ...........................................
4-7
2-4. When Paper Has Jammed at the First
Folding Plate .........................................
4-8
2-5. When Paper Has Jammed at the
Second Folding Plate ............................
4-9
2-6. When Paper Has Jammed Near the
Stacker ................................................ 4-10
3. Error Messages ...............................4-11
4. Troubleshooting ..............................4-12
Chapter 5
CLEANING THE UNIT
1. Cleaning Each Section .....................5-2
1-1. Cleaning the Rubber Roll ...................... 5-2
1-2. Cleaning the Paper Feed Rings ............
5-3
1-3. Cleaning the Paper Separator ............... 5-4
1-4. Cleaning the Paper Sensor ................... 5-4
1-5. Cleaning the Ejection Gate Sensor ....... 5-5
1-6. Cleaning the Paper Ejection Belts
.........
5-5
Chapter 6 APPENDIX
1.
Specification .....................................6-2
Page 10

Chapter 1
BEFORE OPERATION
Page 11
1-2
1. Features
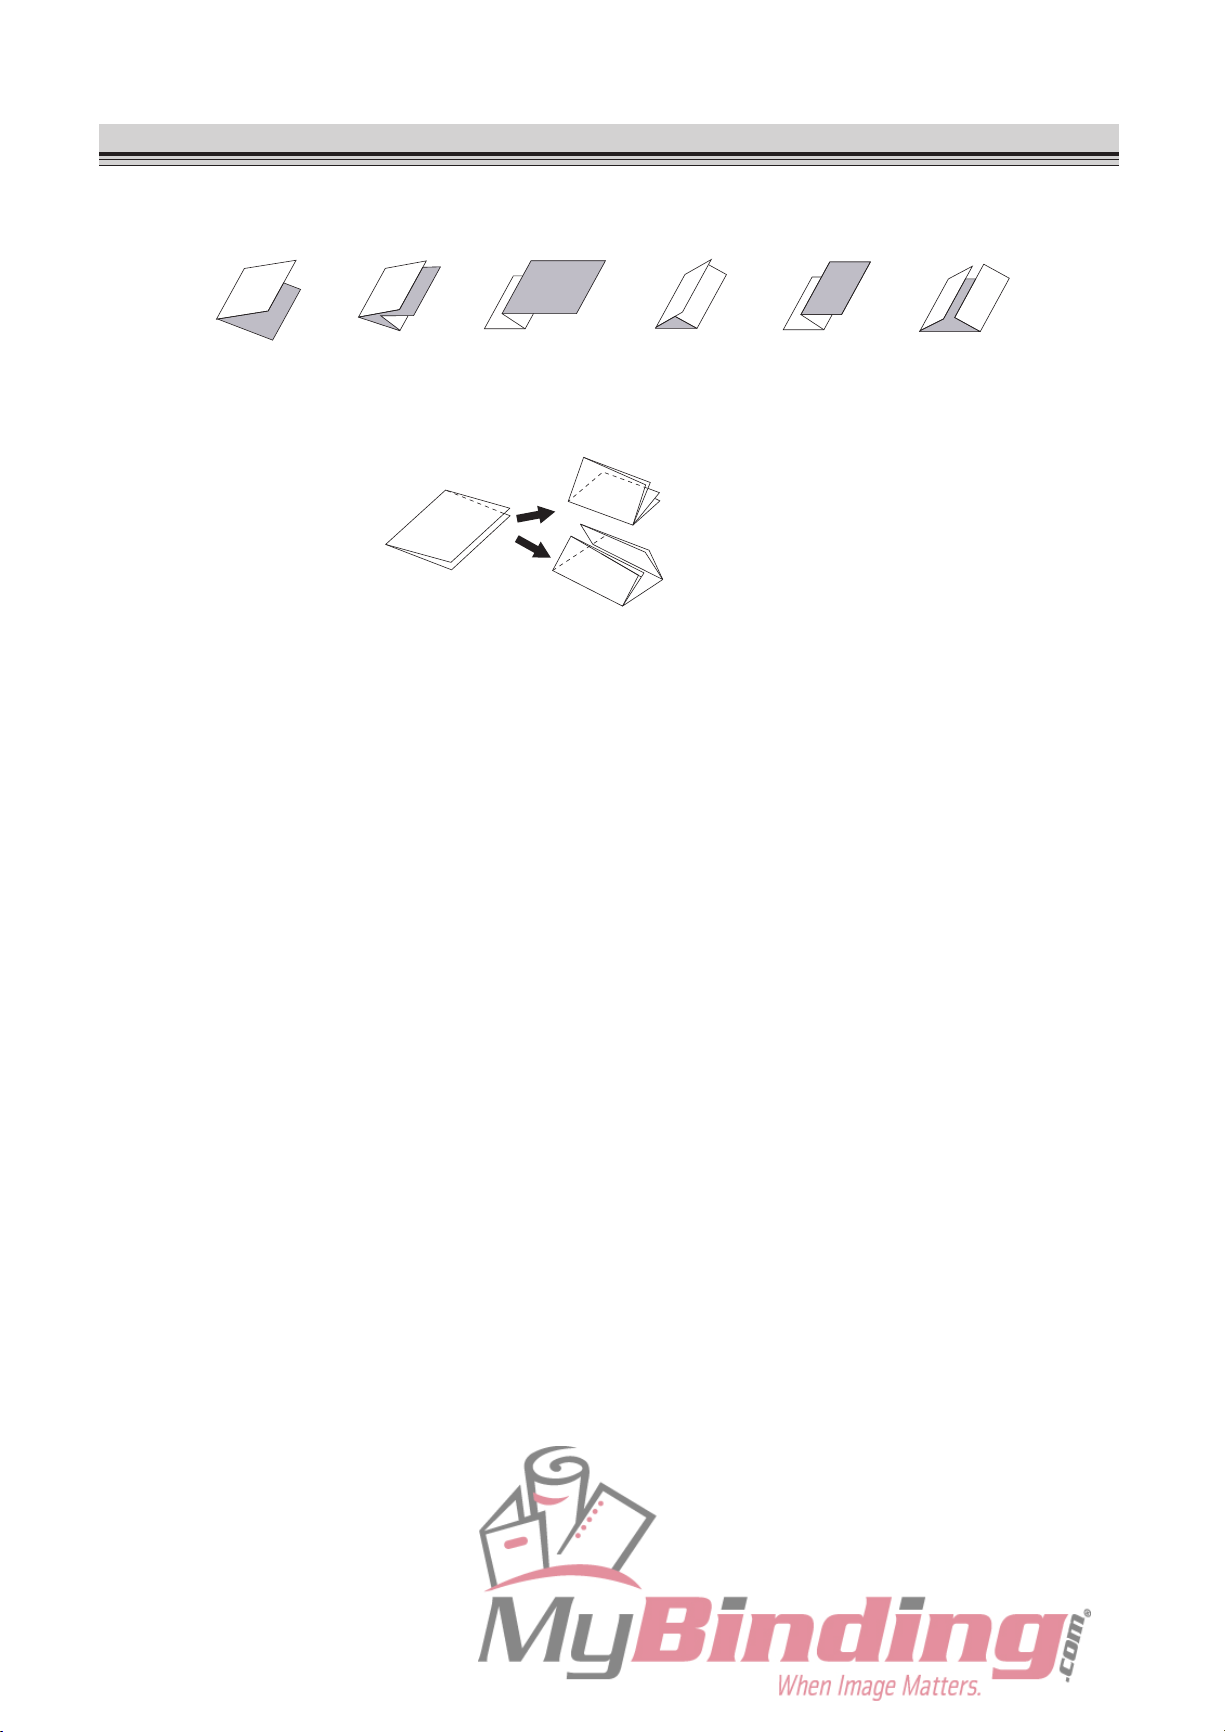
The DF-755 is designed to fold paper into six popular folding patterns and is capable of folding up to
135 sheets of paper per minute when
single folding 11 lb of fine quality LT paper
.
Single fold Double fold Irregular accordion fold Letter fold Accordion fold Gate fold
The DF-755 is also able to create cross single fold and cross letter fold as shown in the figure.
Cross fold
Cross single fold
Cross letter fold
Page 12
1-3
2. Setting Up the Machine
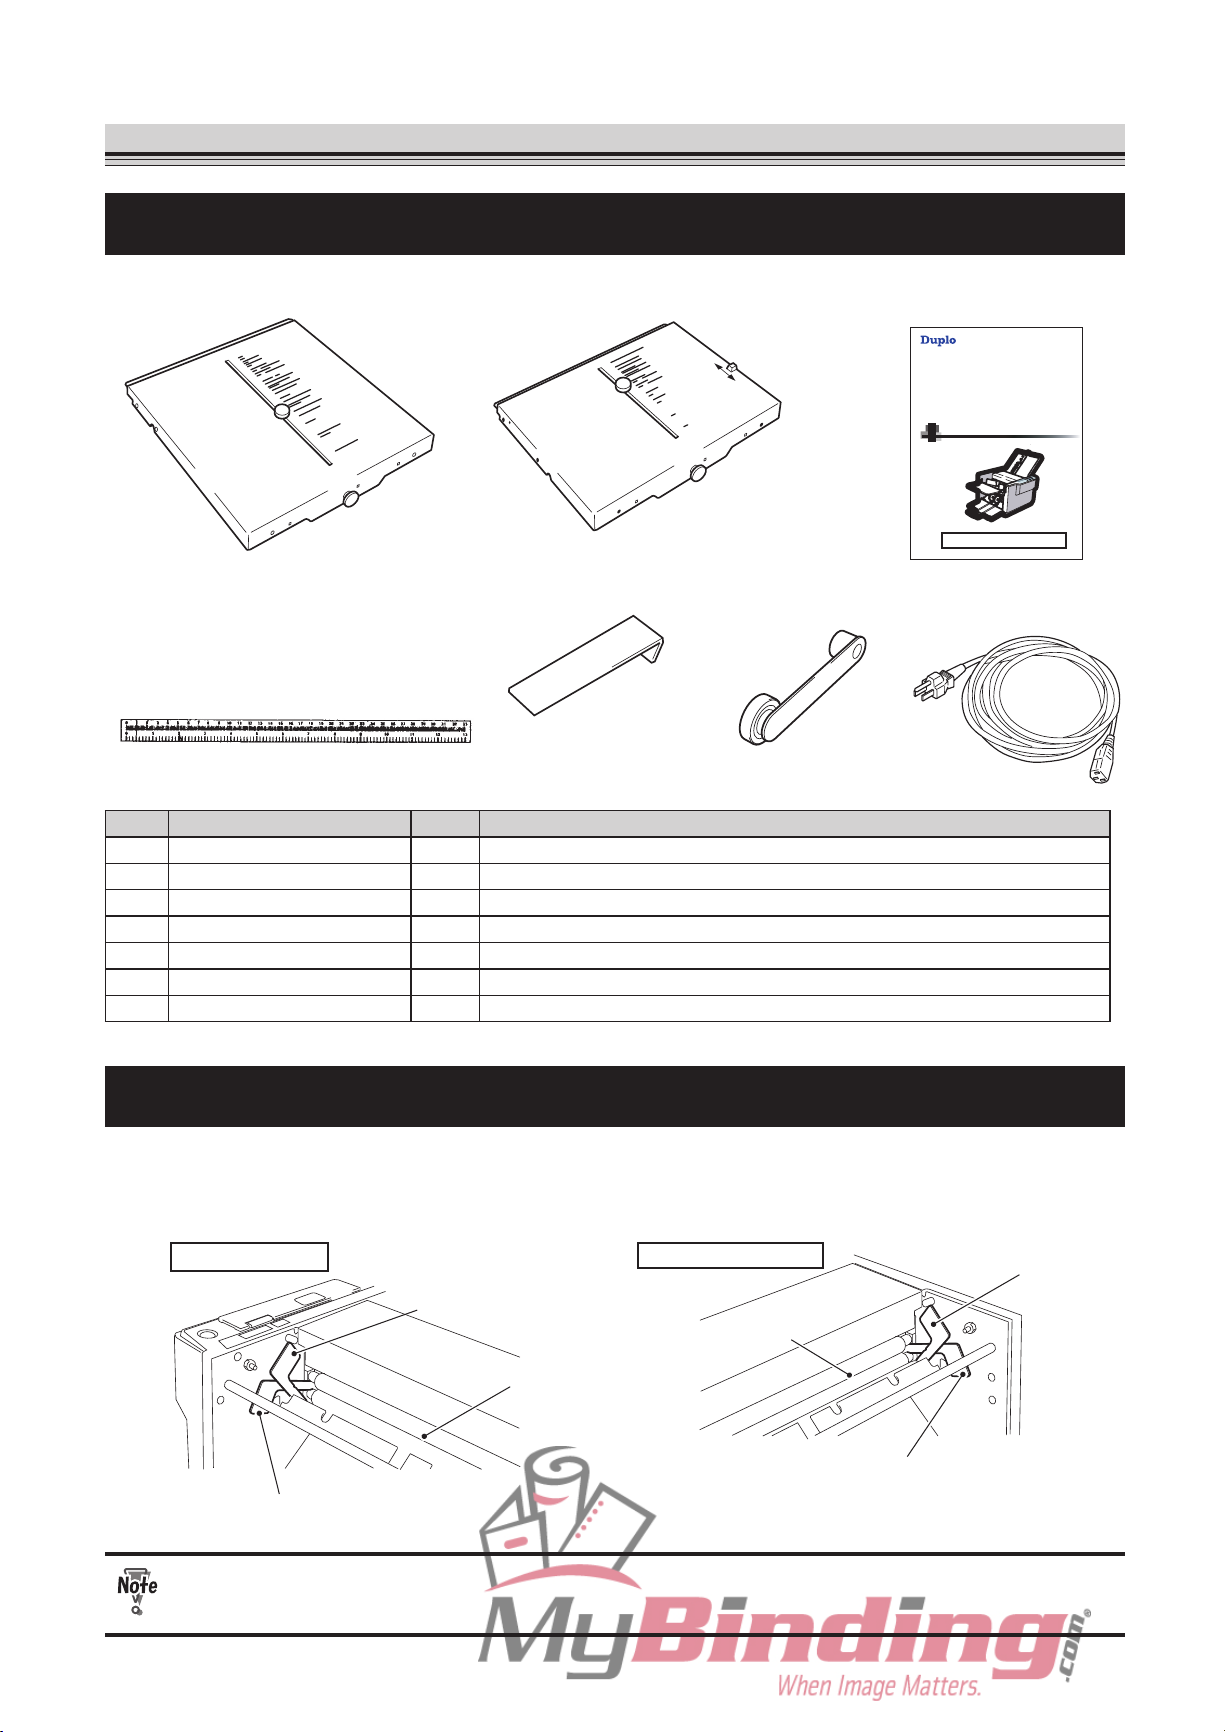
2-1. Components
[1] [2] [3]
[4] [5]
DF-755
[220 to 2 0 V]
INSTRUCTION MANUAL
Be su e to ead th s manua p o o use
ease eave th s manua at he s e o use o easy e e ence
Duplo Folder
[6]
[7]
No. Name Qty. Remark
[1] First folding plate 1 Attached to the right upper section on the operator's side.
[2] Second folding plate 1 Attached to the right lower section on the operator's side.
[3] Instruction manual 1 This manual
[4] Scale label 1 Used to measure non-standard size paper
.
Attach the scale.
[5] Guide plate unit 1 Used when folding small sized medium thickness paper into four.
[6]
Cross folding lever 1 Used when cross folding paper.
[7]
Power cord 1
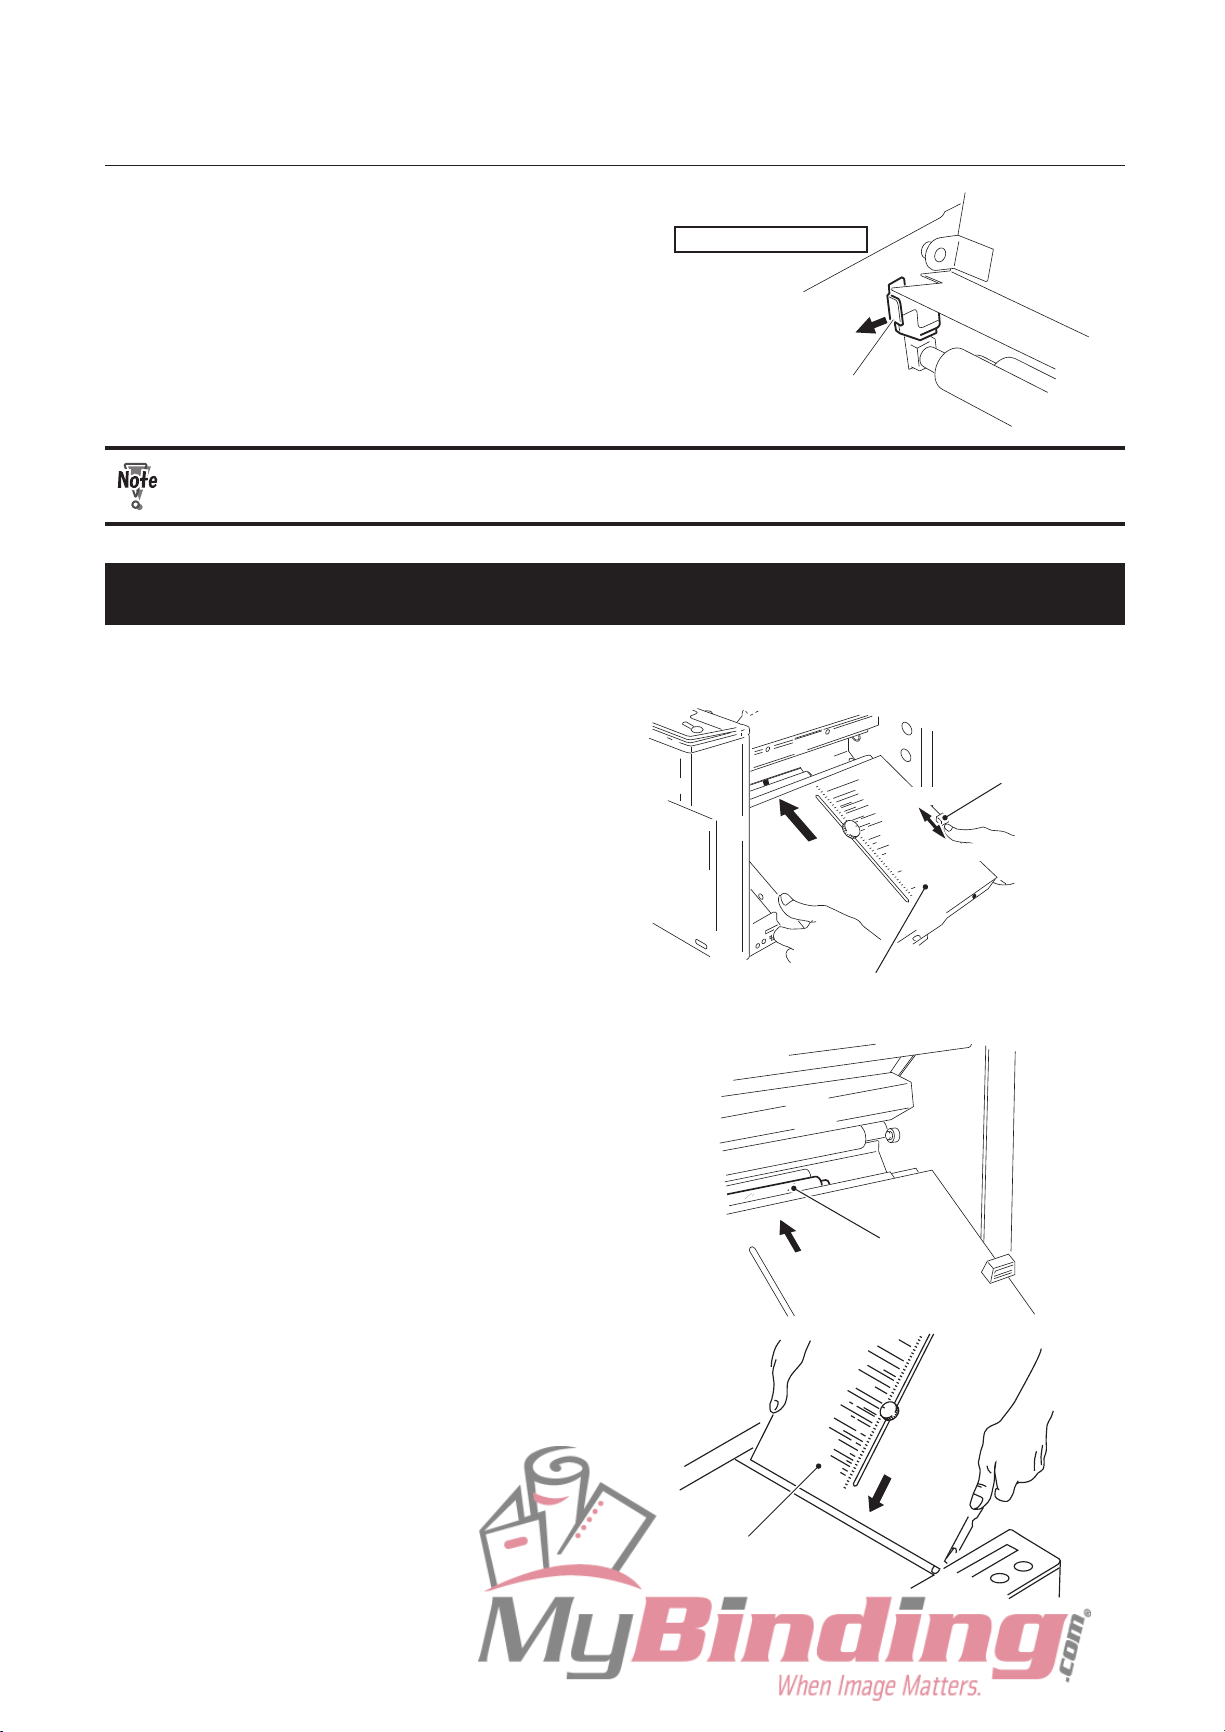
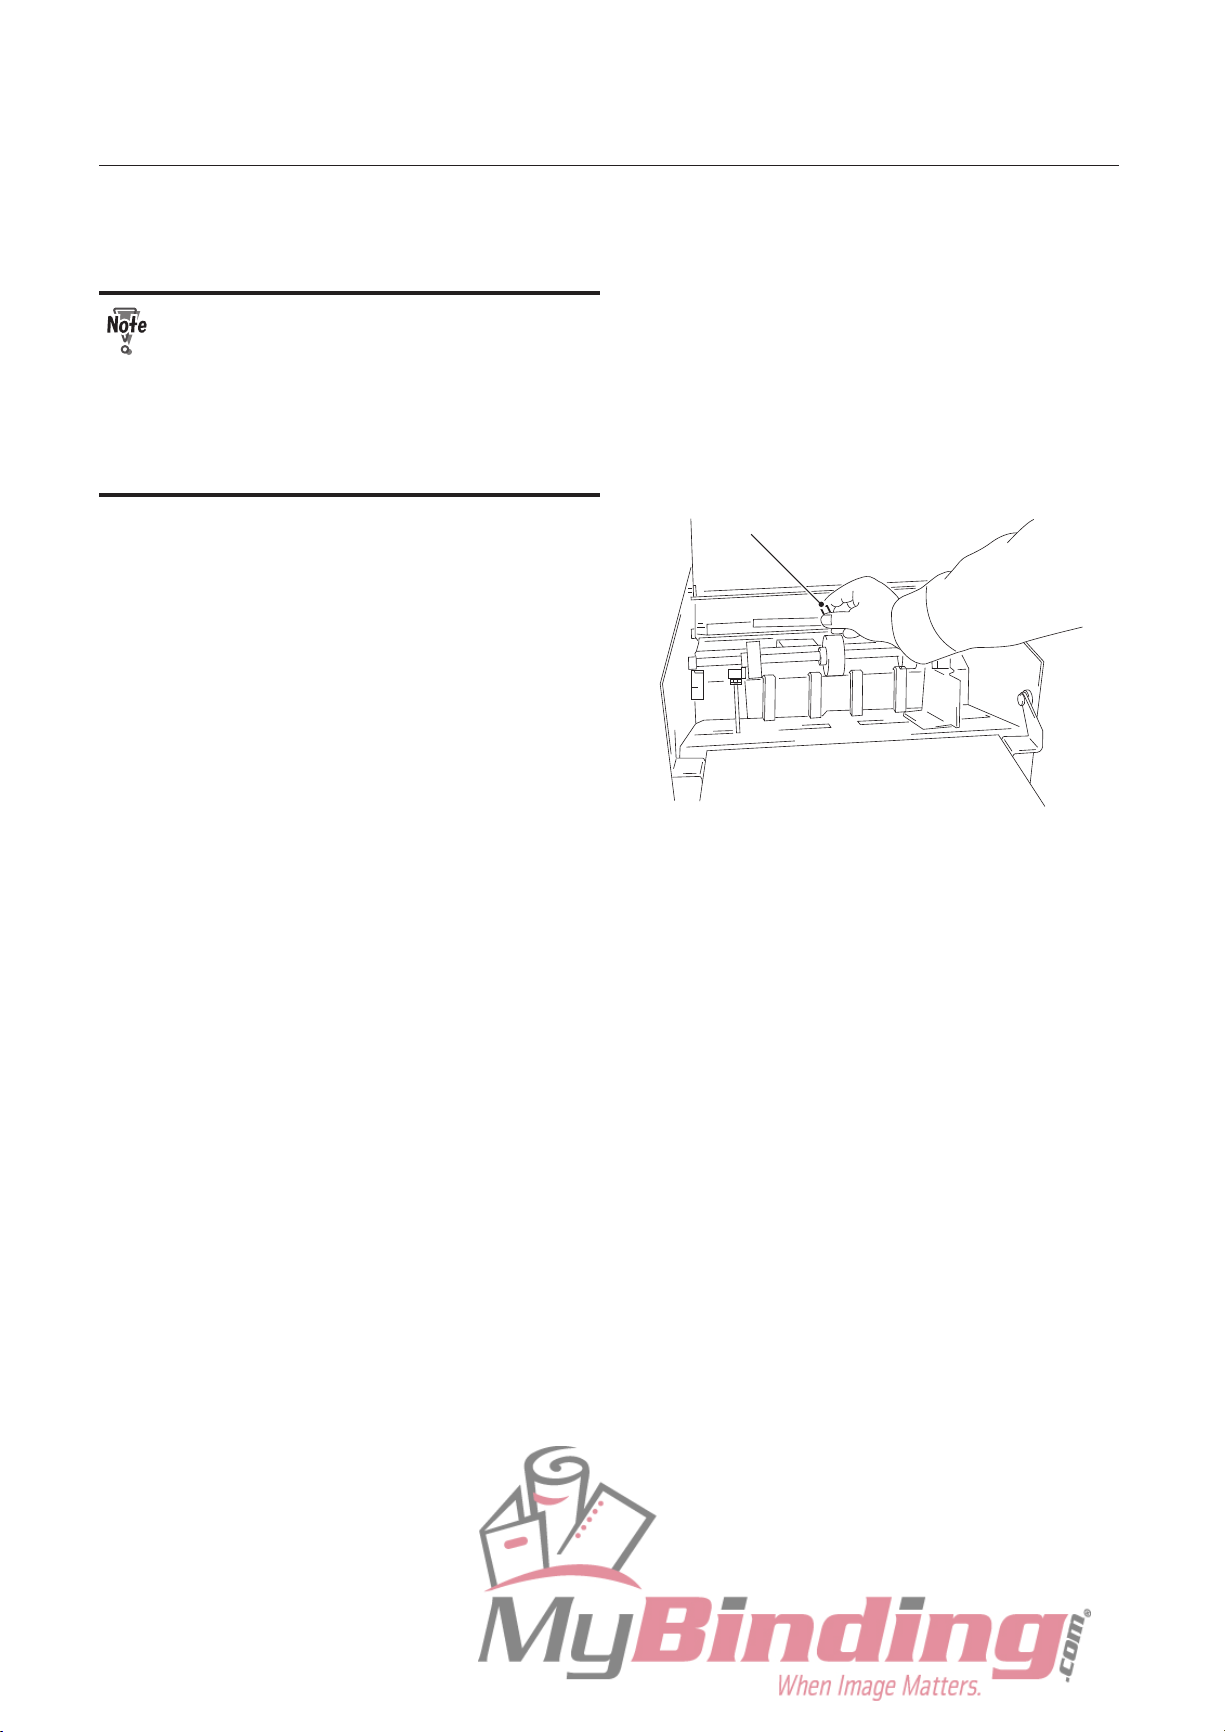
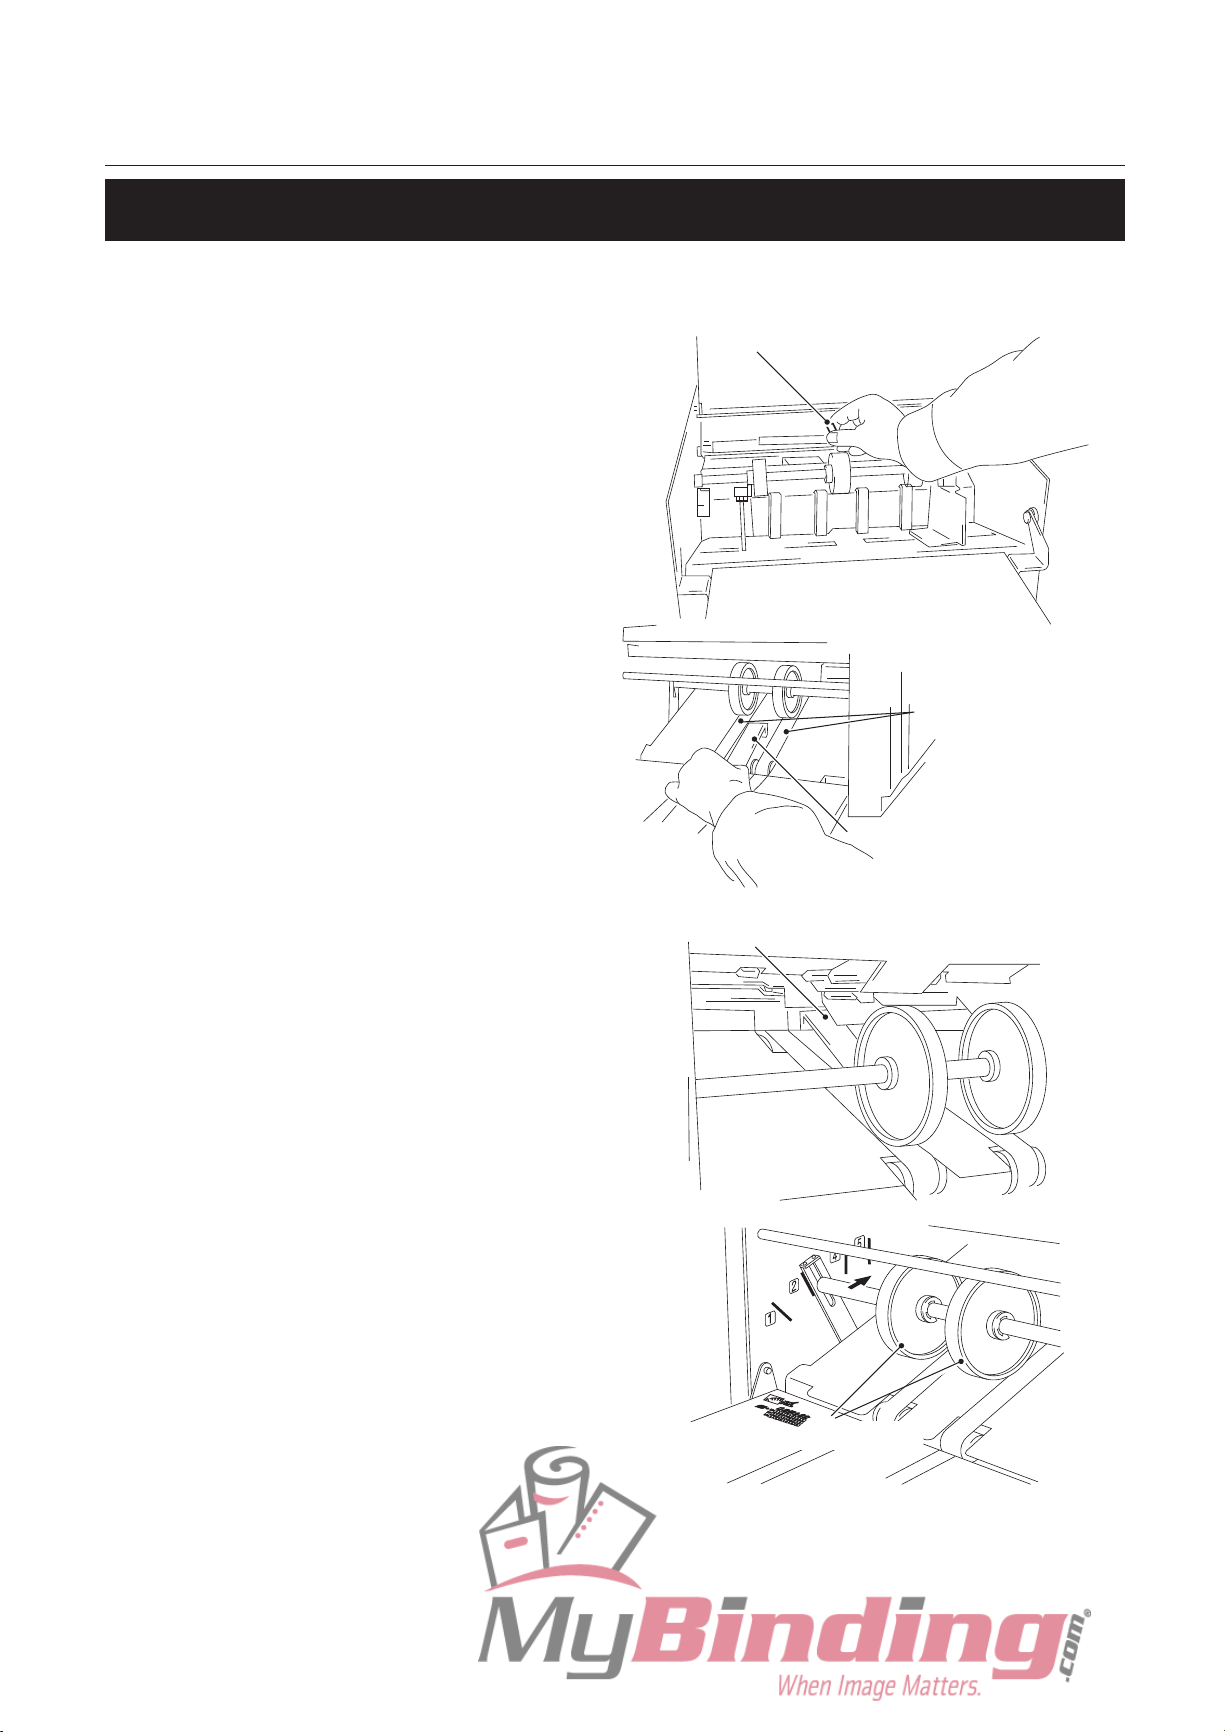
2-2. Removing the Press Release Lever
The press release levers are attached to the unit at shipment to prevent the rubber roll from becoming
distorted. Be sure to remove them when setting up the machine.
The two types of press levers are attached to either side of the rubber roll.
Press release lever (A)
Operator’s side
Rubber roll
Press release lever (B)
Press release lever (A)
Press release lever (B)
Rubber roll
Non-operator’s side
The machine will be damaged if it is used without removing the lever.
Page 13

1-4
Chapter 1 BEFORE OPERATION
1
To remove the press release lever (A) on the non-operator's side, push it inwards
and pull it out.
Press release lever (A)
Press release lever (A)
2
To remove the press release lever (A) on the operator's side, push it inwards and
pull it out.
3
To remove the press release lever (B) on the non-operator's side, push it inwards
and pull it out.
Press release lever (B)
Press release lever (B)
4
To remove the press release lever (B) on the operator's side, push it inwards and
pull it out.
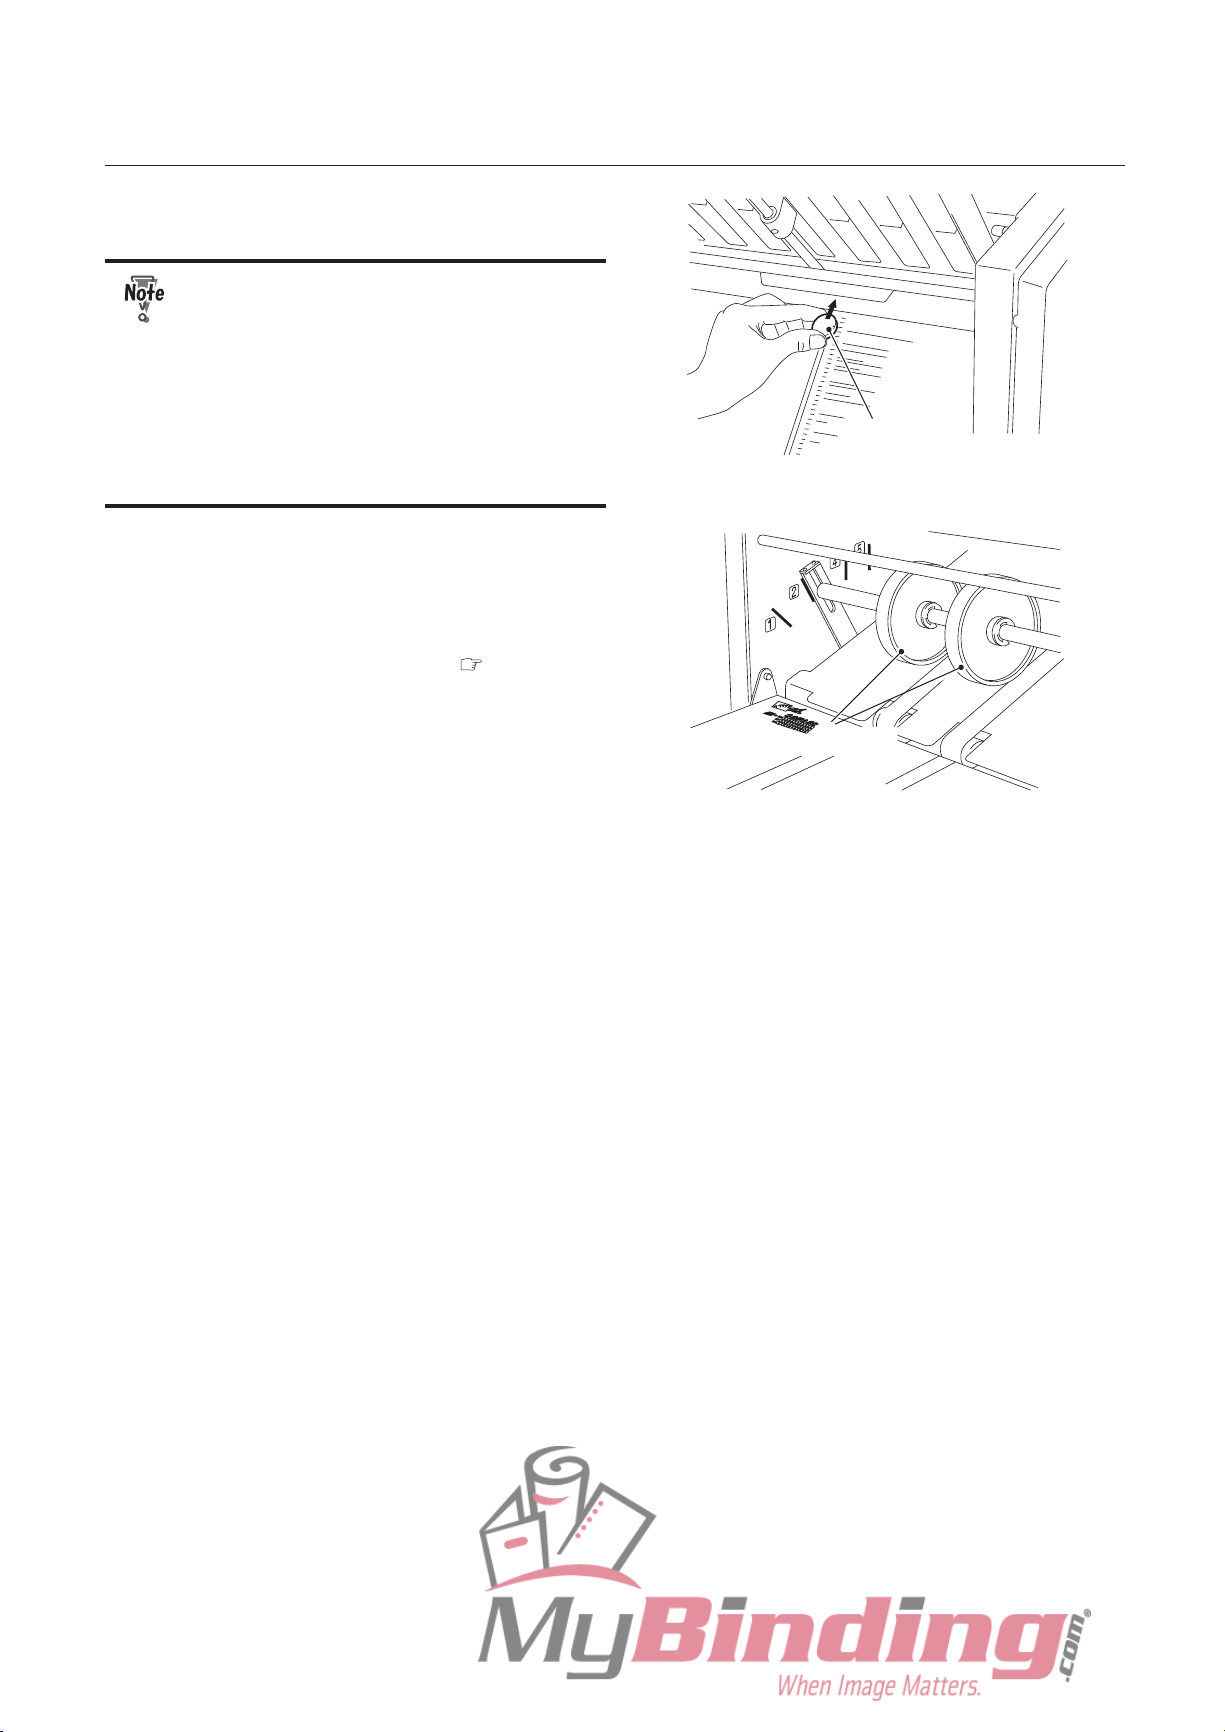
2-3. Locking the Bearing Support Levers
The bearing support levers are released at shipment to prevent the rubber roll from becoming
distorted. After removing the press release levers, be sure to lock the bearing.
Bearing support lever
Operator’s side
1
Turn the bearing support lever on the
operator's side in the direction of the
arrow
.
The bearing will be locked.
Page 14
1-5
Chapter 1 BEFORE OPERATION
Bearing support lever
Non-operator’s side
2
Turn the bearing support lever on the
non-operator's side in the direction
of the arrow
.
The bearing will be locked.
Because the bearing support lever presses down the rubber roll, if it is not locked, thick
paper may not be folded properly.
2-4. Attaching the Parts
1
Attach the second folding plate.
Second folding plate
Lock lever
UNLOCK
LOCK
1) Move the lock lever of the second folding
plate to the position of "UNLOCK."
Slider
2) Insert the folding plate to the machine
along the slider.
3) Move the lock lever to the position of
"LOCK."
First folding plate
2
Attach the first folding plate.
It only needs to be inserted because the
first folding plate is not provided with a lock
lever.
Page 15
1-6
Chapter 1 BEFORE OPERATION
3
Make a ground connection using
the earth wire attached to the power
plug.
● Make sure that you make a ground
connection before connecting the
power plug to the wall socket.
● If earth leakage occurs without a
ground connection, a short circuit
may cause fire and electric shock.
Guide plate unit
4
Place the cross folding lever on the
magnet under the top cover.
Page 16
1-7
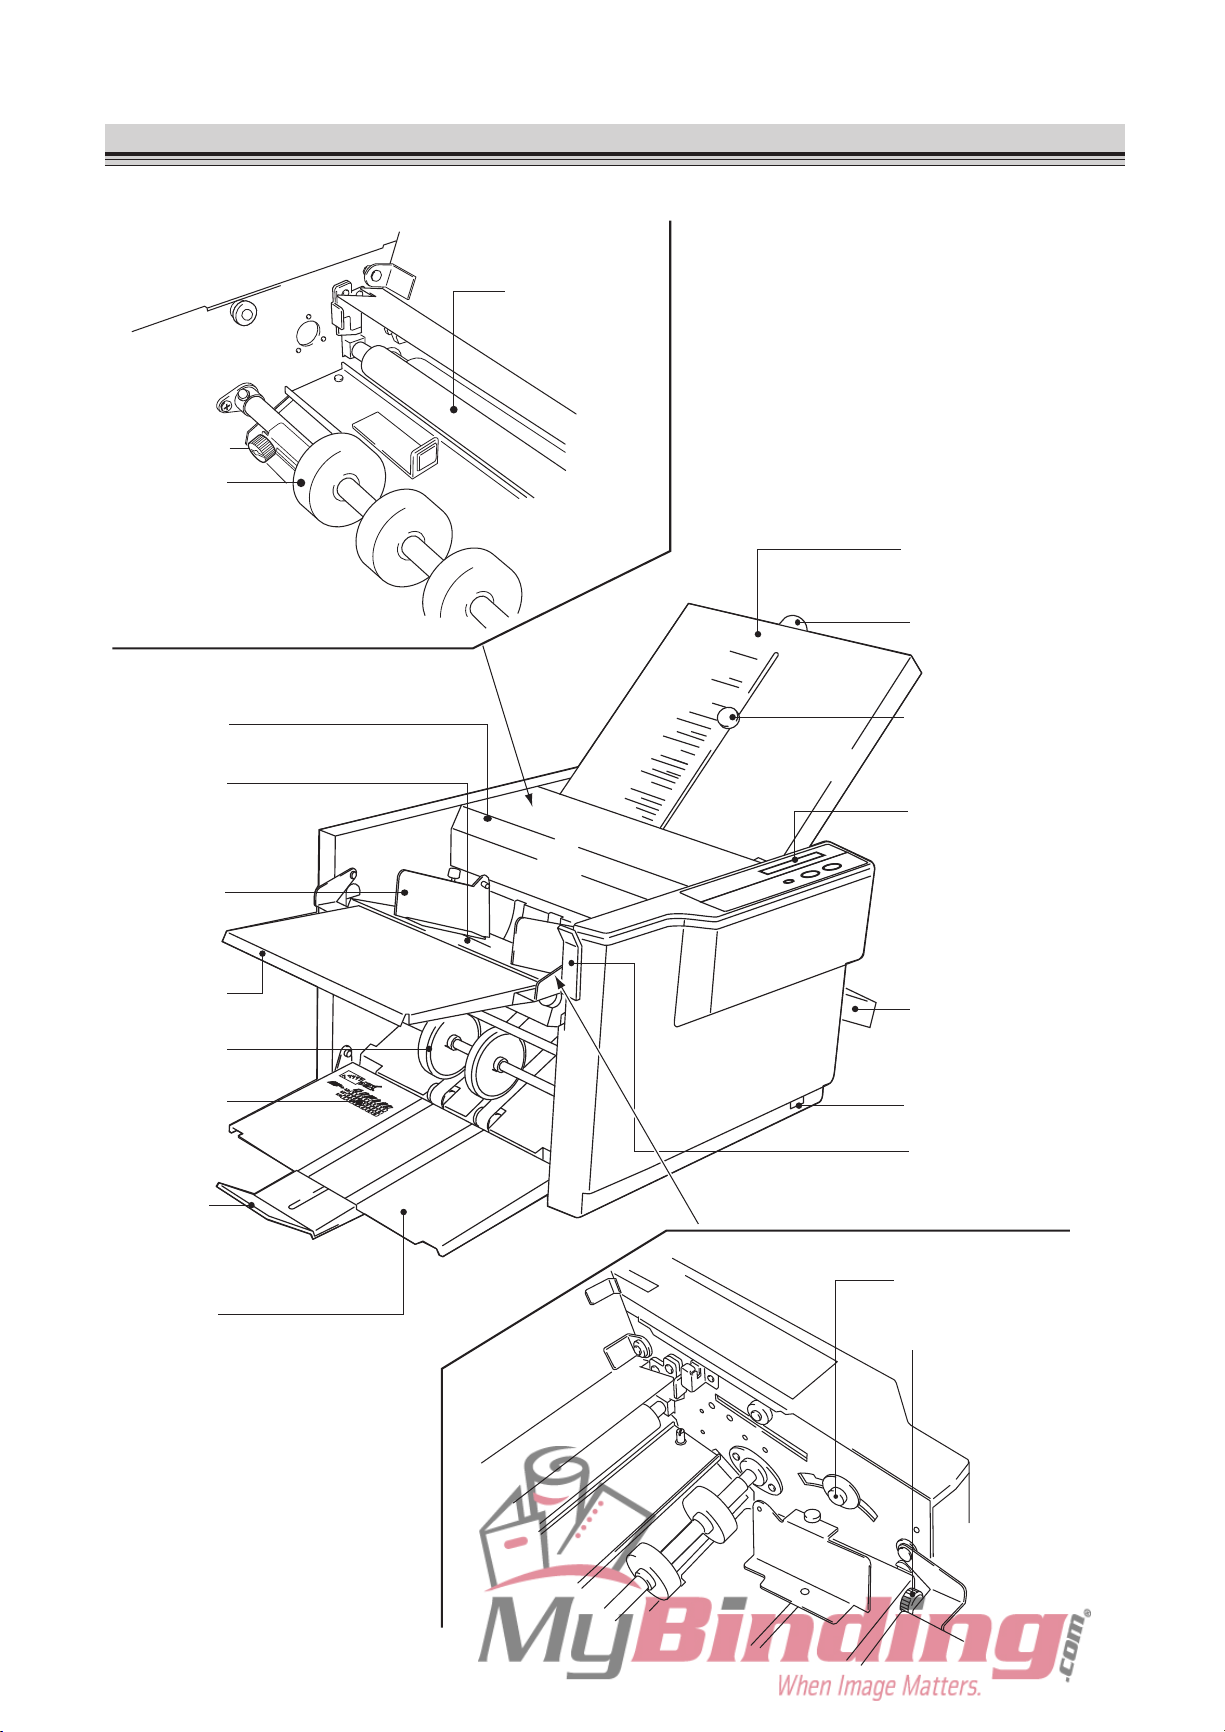
3. Names and Functions
[1]
[4]
[5]
[6]
[7]
[8]
[9]
[11]
[12]
[13]
[14]
[15]
[16]
[17]
[18]
[2]
[3]
[19]
Under the main cover
Paper feed table (operator’s side)
[10]
Page 17
1-8
Chapter 1 BEFORE OPERATION
No. Name Function
[1] First folding plate Guide plate for deciding a paper folding position. First folding
is made using this plate.
[2] Fine adjustment knob Used when adjusting a paper folding position.
[3] Rough adjustment knob Used when deciding a paper folding position.
[4] Control panel Used when operating the machine. Error messages are also
displayed on the LCD display
.
[5] Second folding plate Guide plate for deciding a paper folding position. Second
folding is made using this plate.
This plate is not used when
folding paper into two.
[6] Power switch T
urns on and off the power.
[7] Paper set lever When lowered, the paper feed table is raised.
[8] Paper receiving tray Receives folded paper ejected out.
[9] Paper receiving stopper Stops paper ejected out from the machine.
[10] T
able of stacker rollers position Used to check an appropriate position of the stacker rollers
depending on a paper size and folding pattern.
[11] Stacker rollers Ejects folded paper from the machine.
[12] Support paper feed plate Supports paper stacked on the paper feed table.
[13] Side guide Holds paper stacked on the paper feed table.
[14] Paper feed table Used to stack paper to be folded.
[15] T
op cover Prevents the user from touching the moving parts.
[16] Paper feed ring Feeds paper into the machine.
[17] Rubber roll Sends paper to the first folding plate.
[18] Paper feed pressure adjustment
knob
Adjusts paper feed pressure.
[19] Slant correction paper feed knob Corrects misalignment along sides of paper
.
Page 18

1-9
4. Describing Control Panel
[4]
[1]
[3] [2]
No. Name Function
[1] Counter/LCD display Counts up the number of folded paper or displays the status of
the machine. Up to four digit number is displayed.
[2] Stop button When pressed, the machine stops.
[3] Start button When pressed, the machine starts folding operations.
[4] C (clear) button When pressed for two seconds or longer, the number counted
up returns to "0."
When a paper jam has occurred, pressing this button clears
the message.
Page 19

1-10
5. Handling Paper
5-1. Paper Used
●
Make sure that the printing ink on the paper has dried completely prior to use.
If used without the ink completely dried, the folding roller or paper may become dirty.
●
If curled paper is used, depending on the environmental condition (temperature,
humidity), paper quantity, paper type, and paper fiber, it may not flow smoothly
into the folding plate or may not be folded properly. Flatten the paper prior to use.
●
Fan paper well prior to use.
5-2. Precautions on Stacking Paper
●
Do not stack paper on the paper feed
table with the left and right sides of
the paper unaligned or some sheets
protruding out.
●
Do not stack paper on the paper feed
table with the lead and tail edges
unaligned or some sheets protruding
out.
If the paper is protruding at the lead
or tail edge, paper will not be fed
stably, resulting in problems such
as paper feed error and folding
misalignment.
Page 20

1-11
Chapter 1 BEFORE OPERATION
Paper
Guide plate
Paper set lever
●
When stacking just a few sheets of
paper on the paper feed table, lower
the paper set lever while pressing
the lead edge of the paper against
the guide plate.
Page 21
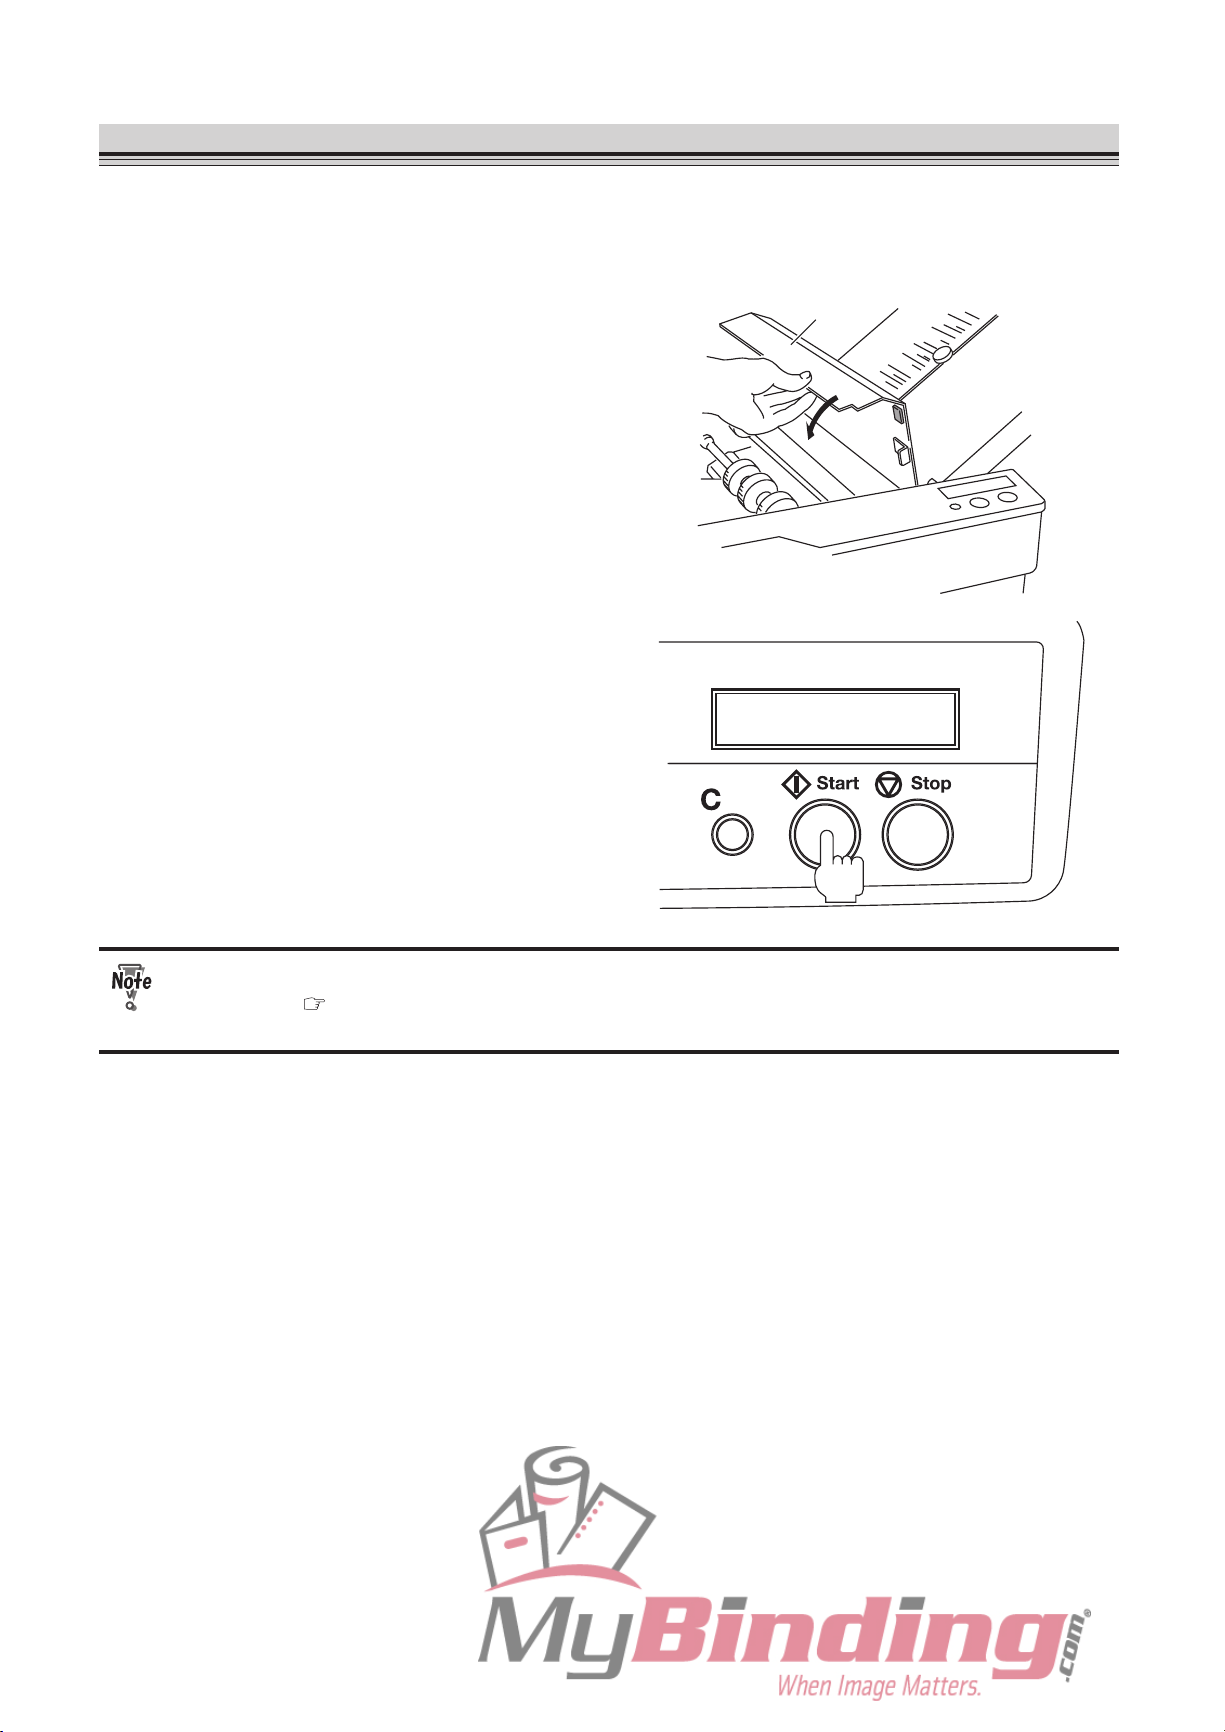
1-12
6. Emergency Stop
An emergency stop device to ensure safety has been installed to the top cover. Opening the cover
during operations will stop the machine.
To resume operations, follow the procedures below.
Top cover
1
Close the top cover.
2
Press the Start button.
Operations will start.
If an error occurs when opening the top cover, an error message will be displayed on the
LCD display ( p.4-11) after closing the cover. Fix the error and press the start button to
resume operations.
Page 22

Chapter 2
BASIC OPERATION
Page 23

2-2
1. Standard Folding of Standard Paper
1-1. Standard Paper
There are six types of standard paper sizes; LD, LG and LT.
Paper Size Long×WIde (inch)
LD 11x17
LG 8.5x14
LT 8.5x1
1
LD and LG are detected as standard paper only when stacked with short edge feed.
Stacking
Direction
Paper Size
LD LG L
T
Short edge feed
O O O
Long edge feed
X X O
Can be used as standard paper : O
Cannot be used as standard paper : X
1-2. Standard Folding
There are six types of standard folding modes: single fold, double fold, irregular accordion fold, letter
fold, accordion fold and gate fold. Paper is folded as shown below when the paper is placed on the
paper feed table with its print side facing upward.
Single fold Double fold Irregular
accordion fold
Letter fold Accordion fold Gate fold
Paper feed direction
Paper ejection direction
Page 24

2-3
Chapter 2 BASIC OPERATION
1-3. Operation Procedures
Power switch
1
Insert the power cord in the wall
socket and turn on the power.
Press “ I ” to turn on the power.
Press “O" to turn off the power.
Side guide
Fixing screw
Side guide
Fixing screw
2
Loosen the fixing screws of the side
guides, and move the side guides to
fit the paper width.
Paper
Paper set lever
Guide plate
3
Raise the paper set lever and place
some paper on the paper feed table.
Push in the paper until its lead edge
touches the guide plate.
The message "NO PAPER" displayed on
the LCD disappears and "COUNT 0" is
displayed instead.
Fan the paper well and stack them
neatly at the center of the paper feed
table.
Side guide
Side guide
Fixing screw
Fixing screw
4
After pressing the side guide to each
side of the paper lightly, tighten the
screws to secure the side guides.
Paper can be stacked to a height of
approximately 2.0 inches at one time.
Do not stack too many sheets of
paper.
Page 25

2-4
Chapter 2 BASIC OPERATION
Paper set lever
5
Lower the paper set lever.
The paper feed table will be raised.
Make sure that you lower the paper
set lever. If you start operations
without the paper set lever lowered,
the paper feed rings will run idle,
causing the machine to stop.
Rough adjustment knob
First folding plateSecond folding plate
Rough adjustment knob
6
Move the rough adjustment knob of
the first and second folding plates
to the mark of a folding pattern you
desire.
Because the second folding plate is not
used for a single fold, move the rough
adjustment knob of the second folding plate
to the upper end to prevent the paper from
being sent to the second folding plate.
"Folding paper into two" ( p.2-7)
Rough adjustment knob
Rough adjustment knob
1) Slide the rough adjustment knob while
pulling it up.
The rough adjustment knob cannot
be turned either clockwise or
counterclockwise. Make sure that you
pull up the knob when you want to
move it.
Fine adjustment knob
Fine adjustment knob
First folding plateSecond folding plate
2) Turn the fine adjustment knob to the
right and left a few times and check that
it moves slightly.
Page 26

2-5
Chapter 2 BASIC OPERATION
Paper feed pressure
adjustment knob
7
Set the paper feed pressure
adjustment knob to “Thin paper.”
If the paper slips and no paper is conveyed,
change the paper feed pressure from “Thin
paper” to “Thick paper”.
Stacker roller
8
Move the stacker rollers to the
appropriate position referring to
the table of stacker rollers position
attached to the paper receiving tray
.
9
Press the Start button for test
folding.
10
Press the Stop button after a couple
of folded sheets are ejected.
Test folded sample
11
Check the finish of test folding.
Check for folding misalignment using the
second test folded sample.
If folding misalignments occur, refer
to Chapter 4 "TROUBLESHOOTING"
“1.Correcting Folding Misalignment”
(
p.4-2).
Page 27

2-6
Chapter 2 BASIC OPERATION
Clear button
12
After completing adjustments, press
the C (clear) button for two seconds
to clear the counter to "0."
13
Press the Start button to start folding
operations.
Press the Stop button to interrupt or stop
the operations. Pressing the Start button
again will resume operations.
When there is no paper on the paper feed
table, the machine will stop automatically
.
Page 28

2-7
Chapter 2 BASIC OPERATION
Folding paper into two
Because the second folding plate is not used for a single fold, move the rough adjustment knob of
the second folding plate to the upper end in the following methos.
Rough
adjustment knob
1) Slide the rough adjustment knob of the
second folding plate up to the upper end
while lifting it up.
Fine adjustment knob
2) Turn the fine adjustment knob to the left
until the rough adjustment knob reaches
the upper end.
0.59 inch
● When the rough adjustment knob has
not reached the upper end, thin paper
may get a crease at around 0.59 inch
from the folded line.
● Rotating the fine adjustment knob
excessively will result in paper
jamming, improper folding, and other
mechanical malfunctions.
Page 29

2-8
Memo
Page 30

Chapter 3
ADVANCED OPERATION
Page 31

3-2
1. Single Folding of Standard Paper
1-1. Single Folding Thick Paper
When folding drawing paper or fine quality thick paper 34 lb into two, the edge of the folding line of the
paper or a part near the center may bend due to environmental conditions (temperature, humidity),
paper size, paper fiber direction, etc. When this occurrs, follow the procedures below.
Bent corner
Bend near the center
Fine adjustment knob
1
Turn the fine adjustment knob of the
second folding plate to the right by
1/4 turn.
The rough adjustment knob will be slightly
apart from the upper end.
2
Press the Start button for test
folding.
3
Press the Stop button after a couple
of folded sheets are ejected.
Test folded sample
4
Check the finish of test folding.
Check for folding misalignment using the
second test folded sample.
If folding misalignments occur, refer to
"TROUBLESHOOTING" “1. Correcting
Folding Misalignment” (
p.4-2).
Page 32

3-3
Chapter 3 ADVANCED OPERATION
Clear button
5
After completing adjustments, press
the C (clear) button for two seconds
to clear the counter to "0."
6
Press the Start button to start folding
operations.
Press the Stop button to interrupt or stop
the operations. Pressing the Start button
again will resume operations.
When there is no paper on the paper feed
table, the machine will stop automatically
.
Fine adjustment knob
7
After completing the operations,
turn the fine adjustment knob to the
left until the rough adjustment knob
reaches the upper end.
After completing single-folding
operations for thick paper, make sure
that you move the fine adjustment
knob back to its normal position. If
thin paper is single-folded with the
stopper of the second folding plate
moved to the position for thick paper,
the thin paper will not be folded
neatly.
Page 33

3-4
Chapter 3 ADVANCED OPERATION
1-2. Double Folding Thick Paper
When folding fine quality thick paper 28 lb into four, its folding section may open when ejected to the
stacker because of the paper thickness and consequently the folded paper may not be able to pass
through the stacker rollers, resulting in paper jam. To prevent this, follow the procedures below.
Do not fold fine quality thick paper 34 lb into four because paper ejection problem may
occur.
Side guide
Fixing screw
Side guide
Fixing screw
1
Loosen the fixing screws of the side
guides, and move the side guides to
fit the paper width.
Paper
Paper set lever
Guide plate
2
Raise the paper set lever and place
some paper on the paper feed table.
Push in the paper until its lead edge
touches the guide plate.
Side guide
Side guide
Fixing screw
Fixing screw
3
After pressing the side guide to each
side of the paper lightly, tighten the
screws to secure the side guides.
Paper set lever
4
Lower the paper set lever.
The paper feed table will be raised.
Make sure that you lower the paper
set lever. If you start operations
without the paper set lever lowered,
the paper feed rings will run idle,
causing the machine to stop.
Page 34

3-5
Chapter 3 ADVANCED OPERATION
Stacker roller
5
Move the stacker rollers to "5."
Stacker roller
Lever
Belt
Stacker lever
6
While lifting up the stacker rollers
with your hand, pull the levers (left
and right) attached to the stacker
lever in the direction of the arrow so
that the stacker rollers are lifted up.
7
Press the Start button for test folding
and check if the paper is ejected
smoothly
.
8
Press the Stop button after a couple
of folded sheets are ejected.
Stacker roller
9
If the paper is not ejected smoothly,
change the position of the stacker
rollers to "3" or "4."
If folding misalignments occur, refer to
Chapter 4 "TROUBLESHOOTING" “1.
Correcting Folding Misalignment”
(
p.4-2).
Page 35

3-6
Chapter 3 ADVANCED OPERATION
Test folded sample
10
Check the finish of test folding.
Check for folding misalignment using the
second test folded sample.
If folding misalignments occur, refer to
Chapter 4 "TROUBLESHOOTING" “1.
Correcting Folding Misalignment”
(
p.4-2).
Clear button
11
After completing adjustments, press
the C (clear) button for two seconds
to clear the counter to "0."
12
Press the Start button to start folding
operations.
Press the Stop button to interrupt or stop
the operations. Pressing the Start button
again will resume operations.
When there is no paper on the paper feed
table, the machine will stop automatically
.
Stacker roller
Lever
Belt
Stacker lever
13
After the operations have completed,
move the left and right levers
attached to the stacker lever in the
direction of the arrow
.
If the stacker rollers are left lifted up,
problems will occur when the normal
paper size is used.
Page 36
3-7
Chapter 3 ADVANCED OPERATION
1-3. Double Folding Small Thin Paper
Paper jam may occur when folding 5.00 (W) x 7.00 (L) inch size fine quality paper of 22 lb or thinner
into four. Using the supplied guide plate unit will prevent paper jam.
Guide plate unit
1
Remove the guide plate unit stored
inside the top cover.
Paper ejection belt
Guide plate unit
2
Attach the guide plate unit to the
innermost center between the two
paper ejection belts.
Guide plate unit
Stacker roller
3
Move the stacker rollers to "4."
Page 37

3-8
Chapter 3 ADVANCED OPERATION
4
Press the Start button for test folding
and check if the paper is ejected
smoothly
.
5
Press the Stop button after a couple
of folded sheets are ejected.
Stacker roller
6
If the paper is not ejected smoothly,
change the position of the stacker
rollers.
Test folded sample
7
Check the finish of test folding.
Check for folding misalignment using the
second test folded sample.
If folding misalignments occur, refer to
Chapter 4 "TROUBLESHOOTING" “1.
Correcting Folding Misalignment”
(
p.4-2).
Clear button
8
After completing adjustments, press
the C (clear) button for two seconds
to clear the counter to "0."
Page 38

3-9
Chapter 3 ADVANCED OPERATION
9
Press the Start button to start folding
operations.
Press the Stop button to interrupt or stop
the operations. Pressing the Start button
again will resume operations.
When there is no paper on the paper feed
table, the machine will stop automatically
.
10
After completing the work, remove
the guide plate unit.
● Leaving the guide plate unit attached
may result in problems when other
types of paper are used.
● When folding fine quality paper 14 lb
into four, do not use the guide plate
unit.
11
Store the removed guide plate unit
inside the top cover.
Page 39

3-10
2. Custom Folding of Standard Paper
Custom folding is the method of folding paper where you specify the folding stoppers of the first and
second folding plates. The following describes the custom folding procedures taking accordion fold as
an example.
Side guide
Fixing screw
Side guide
Fixing screw
1
Loosen the fixing screws of the side
guides, and move the side guides to
fit the paper width.
Paper
Paper set lever
Guide plate
2
Raise the paper set lever and place
some paper on the paper feed table.
Push in the paper until its lead edge
touches the guide plate.
Side guide
Side guide
Fixing screw
Fixing screw
3
After pressing the side guide to each
side of the paper lightly, tighten the
screws to secure the side guides.
Paper set lever
4
Lower the paper set lever.
The paper feed table will be raised.
Make sure that you lower the paper
set lever. If you start operations
without the paper set lever lowered,
the paper feed rings will run idle,
causing the machine to stop.
Page 40

3-11
Chapter 3 ADVANCED OPERATION
Accordion fold
5
Fold a piece of paper as desired and
measure the dimensions of the A, B
and C.
The folding sizes should be within the
following ranges.
A: 1.60 to 12.80 inches
B: 1.60 to 8.50 inches
C: 8.50 inches or shorter
Rough adjustment knob
6
Adjust the rough adjustment knob
of the first folding plate to the mark
corresponding to measurement A.
7
Adjust the rough adjustment knob
of the first folding plate to the mark
corresponding to measurement B.
● The rough adjustment knob cannot
be turned either clockwise or
counterclockwise. Make sure that you
pull up the knob when you want to
move it.
● After moving the rough adjustment
knob, turn the fi
ne adjustment knob
to the right and left a few times to
check that it moves slightly.
Stacker roller
8
Move the stacker rollers to the
appropriate position referring to
T
able of Stacker Rollers Position on
the next page.
Page 41

3-12
Chapter 3 ADVANCED OPERATION
Table of Stacker Rollers Position
Stacker
Rollers
Position
Length of Folded Paper Folding Pattern
1 7.0 to 8.5 inches LD: single fold, irregular accordion fold, gate fold
Single folded paper larger than LD
2 6.0 to 7.0 inches LG: Irregular accordion, gate fold
3 5.0 to 6.0 inches L
T: single fold, irregular accordion fold, gate fold
LD: letter fold, accordion fold
4 4.0 to 5.0 inches LG: letter fold, accordion fold
LD: double fold
5 1.6 to 4.0 inches L
T: double fold, letter fold, accordion fold
LG: double fold
9
Press the Start button for test
folding.
10
Press the Stop button after a couple
of folded sheets are ejected.
Test folded sample
11
Check the finish of test folding.
Check for folding misalignment using the
second test folded sample.
If folding misalignments occur, refer to
Chapter 4 "TROUBLESHOOTING" “1.
Correcting Folding Misalignment”
(
p.4-2).
Clear button
12
After completing adjustments, press
the C (clear) button for two seconds
to clear the counter to "0."
Page 42

3-13
Chapter 3 ADVANCED OPERATION
13
Press the Start button to start folding
operations.
Press the Stop button to interrupt or stop
the operations. Pressing the Start button
again will resume operations.
When there is no paper on the paper feed
table, the machine will stop automatically
.
Page 43

3-14
3.
Standard Folding of Non-Standard Size Paper
Paper other than the six standard size paper are called non-standard size paper. The paper size that
can be used as non-standard size paper is as follows.
Length(L):
7.00 to 17.00 inches
Paper feed
direction
Width:5.00 to 11.00 inch
Maximum: 11.00 (W) x 17.00 (L) inches
Minimum: 5.00 (W) x 7.00 (L) inches
The following describes the single folding procedures
of 12.00 inch long paper as an example.
1
Measure the length (L).
2
Refer to Table of Rough Adjustment
Knob Positions to check the the
appropriate positions of first and
second folding plates.
Table of Rough Adjustment Knob Positions
L=Paper length
Folding
Pattern
Single Fold Double Fold Irregular
Accordion
Fold
Letter Fold Accordion
Fold
Gate Fold
First Folding
Plate
L/2 L/2 3L//4 L/3 2L/3 L/4
Second
Folding Plate
Upper End L/4 L/4 L/3 L/3 L/2
Rough adjustment knob
1) According to the table above, move the
rough adjustment knob to 6.00 inches
(12.00÷2).
● The rough adjustment knob cannot
be turned either clockwise or
counterclockwise. Make sure that you
pull up the knob when you want to
move it. ( p.2-4)
● After moving the rough adjustment
knob, turn the fine adjustment knob
to the right and left a few times to
check that it moves slightly. (
p.2-4)
Rough
adjustment knob
2) Move the rough adjustment knob of the
second folding plate to the upper end.
( p.2-7)
Page 44

3-15
Chapter 3 ADVANCED OPERATION
Stacker roller
3
Move the stacker rollers to the
appropriate position.
Refer to Table of Stacker Rollers Position
for their appropriate position ( p.3-12).
For this example, move the stacker rollers
to "2" for the finished size 6.00 inches.
Side guide
Fixing screw
Side guide
Fixing screw
4
Loosen the fixing screws of the side
guides, and move the side guides to
fit the paper width.
Paper
Paper set lever
Guide plate
5
Raise the paper set lever and place
some paper on the paper feed table.
Push in the paper until its lead edge
touches the guide plate.
Side guide
Side guide
Fixing screw
Fixing screw
6
After pressing the side guide to each
side of the paper lightly, tighten the
screws to secure the side guides.
Page 45

3-16
Chapter 3 ADVANCED OPERATION
Paper set lever
7
Lower the paper set lever.
The paper feed table will be raised.
Make sure that you lower the paper
set lever. If you start operations
without the paper set lever lowered,
the paper feed rings will run idle,
causing the machine to stop.
8
Press the Start button for test
folding.
9
Press the Stop button after a couple
of folded sheets are ejected.
Test folded sample
10
Check the finish of test folding.
Check for folding misalignment using the
second test folded sample.
If folding misalignments occur, refer to
Chapter 4 "TROUBLESHOOTING" “1.
Correcting Folding Misalignment”
(
p.4-2).
Clear button
11
After completing adjustments, press
the C (clear) button for two seconds
to clear the counter to "0."
Page 46

3-17
Chapter 3 ADVANCED OPERATION
12
Press the Start button to start folding
operations.
Press the Stop button to interrupt or stop
the operations. Pressing the Start button
again will resume operations.
When there is no paper on the paper feed
table, the machine will stop automatically
.
For custom folding of non-standard size paper, refer to "2.Custom Folding of Standard
Paper" (
p.3-10).
Page 47

3-18
4. Cross Folding
Cross folding is to fold single-folded paper another time into two or three.
Cross fold
Cross single fold
Cross letter fold
● The maximum paper thickness is 28 lb. However, this thickness may differ slightly
according to various conditions such as environmental conditions (temperature,
humidity), paper size, and paper fiber direction.
● When the paper is cross folded, Σ folding (folding slippage in the horizontal) and
folding misalignment along sides of paper may occur due to conditions such as
en
vironmental conditions (temperature, humidity), paper size and paper fiber direction.
This is not a malfunction of the machine.
folding
4-1. Cross Folding Standard Size Paper
The paper size that can be cross folded is LD, LG and LT.
The following describes the cross single folding procedures of LD size paper.
s
Only short edge feed is available for
cross folding.
1
Fold LD size paper into two
according to Chapter 2 "BASIC
OPERATION" "1.Standard Folding of
Standard Paper" (
p.2-2).
2
Press along the folded line of the
single-folded paper firmly with
your fingers to prevent the paper
from slipping and buckling in the
horizontal direction when folded.
Page 48

3-19
Chapter 3 ADVANCED OPERATION
Paper
36 mm
Side guide
Paper set lever
3
Raise the paper set lever and stack
the single-folded paper on the paper
feed table with the folded line facing
the non-operator's side.
The amount of paper stacked on
the paper feed table should be
approximately 2/3 (approx.1-1/2
inches) of the height of the side
guide.
4
Loosen the fixing screws of the side
guides.
Side guide
Side guide
Fixing screw
Fixing screw
5
After pressing the side guide to each
side of the paper lightly, tighten the
screws to secure the side guides.
Paper set lever
6
Lower the paper set lever.
The paper feed table will be raised.
Make sure that you lower the paper
set lever. If you start operations
without the paper set lever lowered,
the paper feed rings will run idle,
causing the machine to stop.
Rough adjustment knob
7
Move the rough adjustment knob of
the first folding plate to the position
for single-fold LT paper.
Page 49

3-20
Chapter 3 ADVANCED OPERATION
Rough
adjustment knob
8
Move the rough adjustment knob of
the second folding plate to the upper
end.
● The rough adjustment knob cannot
be turned either clockwise or
counterclockwise. Make sure that you
pull up the knob when you want to
move it.
● After moving the rough adjustment
knob, turn the fi
ne adjustment knob
to the right and left a few times to
check that it moves slightly.
Stacker roller
9
Move the stacker rollers to the
appropriate position.
Refer to the table of stacker rollers position
attached to the paper receiving tray for their
appropriate position ( p.3-12).
For this example (LT size, single fold),
move the stacker rollers to "3."
Top cover
10
Open the top cover.
Set screw
Paper feed ring
11
Loosen the set screw of the paper
feed ring.
12
Move the paper feed ring at the far
end to the folded line of the paper.
13
Tighten the set screw of the paper
feed ring.
Page 50

3-21
Chapter 3 ADVANCED OPERATION
Cross folding lever
14
Take out the cross folding lever
stored inside the top cover.
15
Close the top cover.
Cross folding lever
Weight roller
Side guide
16
Attach the cross folding lever to the
side guide of the non-operator' side.
Place the weight roller on the folding line.
Cross folding lever
To replenish paper, lift the cross folding
guide.
Paper feed pressure
adjustment knob
17
Set the paper feed pressure
adjustment knob to “Thin paper.”
If the paper slips and no paper is conveyed,
change the paper feed pressure from “Thin
paper” to “Thick paper
.”
Page 51

3-22
Chapter 3 ADVANCED OPERATION
18
Press the Start button for test
folding.
19
Press the Stop button after a couple
of folded sheets are ejected.
20
Check the finish of test folding.
Check for folding misalignment using the
second test folded sample.
If folding misalignments occur, refer to
Chapter 4 "TROUBLESHOOTING" “1.
Correcting Folding Misalignment”
(
p.4-2).
Clear button
21
After completing adjustments, press
the C (clear) button for two seconds
to clear the counter to "0."
22
Press the Start button to start folding
operations.
Press the Stop button to interrupt or stop
the operations. Pressing the Start button
again will resume operations.
When there is no paper on the paper feed
table, the machine will stop automatically
.
23
Store the cross folding lever.
Page 52

3-23
Chapter 3 ADVANCED OPERATION
4-2. Cross Folding Non-Standard Size Paper
Paper other than the six standard size paper are called non-standard size paper. The paper size that
can be cross folded is as follows.
Length: 7.00 to 17.00 inches
Width: 5.00 to 11.00 inches
Paper feeding direction
Maximum: 11.00 (W) x 17.00 (L) inches
Minimum: 5.00 (W) x 7.00 (L) inches
The following describes the cross single folding
procedures of 12.00 inch long paper as an example.
1
Fold the paper into two according to
Chapter 3 "ADVANCED OPERATION"
"3.Standard Folding of Non-Standard
Size Paper" (
p.3-14).
L
Paper feeding direction
2
Measure the length (L) of the singlefolded paper.
3
Press along the folded line of the
single-folded paper firmly with
your fingers to prevent the paper
from slipping and buckling in the
horizontal direction when folded.
Paper
36 mm
Side guide
Paper set lever
4
Raise the paper set lever and stack
the single-folded paper on the paper
feed table with the folded line facing
the non-operator's side.
The amount of paper stacked on
the paper feed table should be
approximately 2/3 (approx. 1-1/2
inches) of the height of the side
guide.
5
Loosen the fixing screws of the side
guides.
Page 53

3-24
Chapter 3 ADVANCED OPERATION
Side guide
Side guide
Fixing screw
Fixing screw
6
After pressing the side guide to each
side of the paper lightly, tighten the
screws to secure the side guides.
Paper set lever
7
Lower the paper set lever.
The paper feed table will be raised.
Make sure that you lower the paper
set lever. If you start operations
without the paper set lever lowered,
the paper feed rings will run idle,
causing the machine to stop.
8
Refer to Table of Rough Adjustment
Knob Positions to check the
appropriate positions of fi
rst and
second folding plates.
Table of Rough Adjustment Knob Positions
L=Paper length
Folding
Pattern
Single Fold Double Fold Irregular
Accordion
Fold
Letter Fold Accordion
Fold
Gate Fold
First Folding
Plate
L/2 L/2 3L//4 L/3 2L/3 L/4
Second
Folding Plate
Upper End L/4 L/4 L/3 L/3 L/2
Rough adjustment knob
1) According to the table of rough
adjustment knob positions, move the
knob of the first folding plate to 6.00
inches (12.00÷2).
Page 54
3-25
Chapter 3 ADVANCED OPERATION
Rough
adjustment knob
2) Move the rough adjustment knob of the
second folding plate to the upper end.
● The be turned either clockwise or
counterclockwise. Make sure that you
pull up the knob when you want to
move it.
● After moving the rough adjustment
knob, turn the fi
ne adjustment knob
to the right and left a few times to
check that it moves slightly.
Stacker roller
9
Move the stacker rollers to the
appropriate position.
Refer to Table of Stacker Rollers Position
for their appropriate position ( p.3-12).
For this example, move the stacker rollers
to "2."
Refer to procedures between step 10
of p.3-20 and step 23 of p.3-22 for rest
procedures.
Page 55

3-26
Memo
Page 56

Chapter 4
TROUBLESHOOTING
GUIDE
Page 57

4-2
1.
Correcting Folding Misalignment
Folding misalignment consists of two types; “folding misalignment along the vertical length of the
paper” and “folding misalignment along the sides of the paper.”
Other than this, “deformed folding” may also occur due to paper characteristics.
1-1. Correcting Folding Misalignment along Vertical Length of Paper
Paper feeding direction
Misalignment to
be corrected
When folded paper is misaligned along the vertical
length as shown in the figure, turn the fine adjustment
knob to correct the misalignment.
Adjusting Fine Adjustment Knob of the First Folding Plate
Folding Style Fold Surface A Adjustment
First folding plate
Fine adjustment knob
Single fold
Feeding direction
When A is longer
Turn the fine adjustment knob
counterclockwise.
When A is
shorter
Turn the fine adjustment knob
clockwise.
Double fold
Feeding direction
When A is longer
Turn the fine adjustment knob
counterclockwise.
When A is
shorter
Turn the fine adjustment knob
clockwise.
Irregular
accordion
fold
Feeding direction
When A is longer
Turn the fine adjustment knob
counterclockwise.
When A is
shorter
Turn the fine adjustment knob
clockwise.
Letter fold
Feeding direction
When A is longer
Turn the fine adjustment knob
counterclockwise.
When A is
shorter
Turn the fine adjustment knob
clockwise.
Accordion
fold
Feeding direction
When A is longer
Turn the fine adjustment knob
counterclockwise.
When A is
shorter
Turn the fine adjustment knob
clockwise.
Page 58

4-3
Chapter 4 TROUBLESHOOTING GUIDE
Folding Style Fold Surface A Adjustment
First folding plate
Fine adjustment knob
Gate fold
Feeding direction
When A is longer
Turn the fine adjustment knob
counterclockwise.
When A is
shorter
Turn the fine adjustment knob
clockwise.
Adjusting Fine Adjustment Knob of the Second Folding Plate
Folding Style Fold Surface A Adjustment
First folding plate
Fine adjustment knob
Single fold The second folding plate is not used in single folding.
Double fold
Feeding direction
When B is
longer.
Turn the fine adjustment knob
counterclockwise.
When B is
shorter.
Turn the fine adjustment knob
clockwise.
Irregular
accordion
fold
Feeding direction
When B is
longer.
Turn the fine adjustment knob
counterclockwise.
When B is
shorter.
Turn the fine adjustment knob
clockwise.
Letter fold
Feeding direction
When B is
longer.
Turn the fine adjustment knob
counterclockwise.
When B is
shorter.
Turn the fine adjustment knob
clockwise.
Accordion
fold
Feeding direction
When B is
longer.
Turn the fine adjustment knob
counterclockwise.
When B is
shorter.
Turn the fine adjustment knob
clockwise.
Gate fold
Feeding direction
When B is
longer.
Turn the fine adjustment knob
counterclockwise.
When B is
shorter.
Turn the fine adjustment knob
clockwise.
Page 59

4-4
Chapter 4 TROUBLESHOOTING GUIDE
1-2.
Correcting Folding Misalignment along Sides of Paper
Paper feeding
direction
When folded paper is misaligned along the sides
of paper as shown in the figure, turn the slant correction
knob to correct the misalignment.
Slant correction knob
1
Turn the slant correction knob to
adjust the folding slippage.
Slant correction knob
If folding slippage is as shown in Figure A,
turn the knob in the direction of the arrow.
Slant correction knob
If folding slippage is as shown in Figure B,
turn the knob in the direction of the arrow.
Pin
Round hole
Slant correction knob
2
After finishing operations, be sure
to turn the slant correction knob to
align the round holes of the paper
feed table with the pin.
The position at which the round hole meets
the pin is the standard position.
Page 60

4-5
Chapter 4 TROUBLESHOOTING GUIDE
1.3 Correcting Deformed Folding
Check the following when deformed folding occurs.
Deformed folding
●
Fan the paper well before stacking.
●
Check if the folding plates have been
installed properly. (
p.1-5)
●
Spray a commercially-available air
duster on the rubber roll because the
stati
c electricity may have resulted in
deformed folding.
Do not use paper other than those specified. This will cause not only deformed
folding but also malfunction of the machine.
Page 61

4-6
2. Removing Jammed Paper
When paper jam has occurred, "PAPER ERR" will be displayed on the LCD display. Check the
machine to find out where the jam has occurred and remove the jammed paper following the
procedures below.
2-1. When Paper Has Jammed Near the Paper Feed Ring
Paper feed tray
Paper
Paper set lever
1
Raise the paper set lever to lower the
paper feed table downwards.
2
Pull the jammed paper towards you.
2-2. When Paper Has Slipped at the Paper Feed Section
Paper feed pressure adjustment knob
●
If mis-feed frequently occurs using
thick paper (34 lb), set the paper feed
pressure adjustment knob to “Thick
paper
.”
●
Fan the paper well before stacking.
●
Decrease the stacking amount of
paper.
Page 62

4-7
Chapter 4 TROUBLESHOOTING GUIDE
2-3. When Paper Has Coiled Around the Rubber Roll
Turn off the machine before following the procedures below.
Top cover
1
Open the top cover.
Bearing support lever
Rubber roll
Paper
Bearing support lever
Non-operator’s side
Operator’s side
2
Turn the two bearing support levers
in the direction of the arrow to relase
them.
3
Pull the coiled paper towards you to
remove it.
If you cannot remove the paper easily, turn
the roll towards you with both hands and
pull the paper.
4
Return the bearing supprt levers.
Page 63

4-8
Chapter 4 TROUBLESHOOTING GUIDE
2-4. When Paper Has Jammed at the First Folding Plate
First folding plate
1
Remove the first folding plate from
the machine.
Top cover
2
Open the top cover.
3
Pull the jammed paper towards you.
4
Close the top cover.
5
Return the first folding plate.
● Check that the first folding plate has
been installed properly.
● When you remove and return the
folding plate, make sure that you use
both hands.
Page 64

4-9
Chapter 4 TROUBLESHOOTING GUIDE
2-5. When Paper Has Jammed at the Second Folding Plate
Turn off the machine before following the procedures below.
Second folding plate
Lock lever
UNLOCK
LOCK
1
Move the lock lever to the position of
"UNLOCK."
Second folding plate
2
Remove the second folding plate
from the machine.
3
Pull the jammed paper towards you.
Slider
4
Insert the second folding plate to the
machine along the slider.
5
Move the lock lever to the position of
"LOCK."
● Check that the first folding plate has
been installed properly.
● When you remove and return the
folding plate, make sure that you use
both hands.
Page 65

4-10
Chapter 4 TROUBLESHOOTING GUIDE
2-6. When Paper Has Jammed Near the Stacker
Paper
Remove the paper stuck in the
stacker section towards you.
Page 66
4-11
3. Error Messages
When a paper jam has occurred or the top cover is open, an error message is displayed on the LCD
display.
Follow the procedures below to fix the error.
Message Cause Solution
NO PAPER When the power is turned on, there
is no paper on the paper feed
table.
Stack paper on the paper feed
table.
NO PAPER/****(the number of
folded paper)
After paper is fed and folded, there
is no paper left on the paper feed
table.
Stack paper on the paper feed
table. The number of folded paper
will be displayed again.
COVER OPEN The top cover is open. Close the top cover.
P
APER ERR A paper jam has occurred. Remove the jammed paper and
pr
ess the C (clear) button. ( p.4-6)
A mis-feed has occurred. Stack paper properly on the paper
feed table and press the C (clear)
button. (
p.1-10, 4-6)
PRAT-1 SET ERR The first folding plate has not been
installed properly.
Install the first folding plate
properly. (
p.1-5)
PRAT-2 SET ERR The second folding plate has not
been installed properly.
Install the second folding plate
properly. (
p.1-5)
OVER LOAD The motor is overloaded. Turn of
f and on the power.
Page 67

4-12
4. Troubleshooting
When trouble has occurred, find the symptom from the table below and solve the trouble according to
the solution. If you cannot solve the trouble, contact your dealer.
Symptom Cause Solution
The machine does not start
even when the Start button is
pressed.
The power cord is not inserted to
the wall socket.
Insert the power cord to the wall
socket.
The power is not on. T
urn on the power switch.
( p.2-3)
There is no paper on the paper
feed table.
Stack paper on the paper feed
table. (
p.2-3)
Paper has not reached the guide
plate of the paper feed table.
Push in the paper until its lead
edge touches the guide plate.
(
p.2-3)
A paper jam has occurred. Remove the jammed paper.
(
p.4-6)
The top cover is open. Close the top cover.
A
trouble has occurred inside the
machine.
Call your dealer.
When the Start button is pressed,
the paper feed rings rotate but no
paper is fed.
The paper feed table has been
lowered.
Lower the paper set lever to raise
the paper feed table.
(
p.2-3)
The paper has not been fanned
well.
Fan the paper well. (
p.1-10)
The paper is curled. Straighten the paper curl.
The paper is thick. Set the paper feed pressure
adjustment knob to “Thick paper
.”
(
p.1-7)
The paper is outside the
specifications.
Use paper that meets
specifications. (
p.6-2)
The paper is not folded at the
proper folding position.
The paper folding plate is not
installed properly.
Install the paper folding plate
properly. (
p.1-5)
Static electricity has occurred in the
paper.
Fan the paper well. (
p.1-10)
Spray a commercially-available air
duster on the rubber roll.
Use thicker paper.
Paper is double-fed frequently
. The paper feed pressure
adjustment knob is set to “Thick
paper
.”
Set the paper feed pressure
adjustment knob to “Thin paper.”
(
p.1-7)
The paper separator is dirty. Clean it with alcohol. (
p.5-4)
The sheets of paper are sticking
to each other and cannot be
separated.
Fan the paper well. (
p.1-10)
The paper is outside the
specifications.
Use paper that meets
specifications. (
p.6-2)
A trouble has occurred inside the
machine.
Call your dealer.
Page 68

4-13
Chapter 4 TROUBLESHOOTING GUIDE
Symptom Cause Solution
Paper slips at the paper feed
section frequently
.
The paper feed pressure
adjustment knob is set to “Thin
paper.”
Set the paper feed pressure
adjustment knob to “Thick paper.”
( p.1-7)
The paper feed ring is dirty. Clean it with alcohol. (
p.5-3)
The sheets of paper are sticking
to each other and cannot be
separated.
Fan the paper well. (
p.1-10)
The paper is outside the
specifications.
Use paper that meets
specifications. (
p.6-2)
The side guides press
against the paper too tightly
.
Set the side guides so that they
push against the paper lightly.
( p.2-3)
A trouble has occurred inside the
machine.
Call your dealer
.
Paper jams frequently. The rubber roll is dirty. Clean it with alcohol. (
p.5-2)
Paper shreds are stuck inside the
paper conveyance passage.
Check inside the machine and
remove any paper shreds.
The stacker rollers position is not
correct.
Adjust the position of the stacker
rollers.(
p.2-5)
The paper is curled. Straighten the paper curl.
The guide plate unit is left attached
to the paper ejection plate.
Remove the guide plate unit.
(
p.3-7)
Static electricity has occurred in the
paper.
Spray a commercially-available air
duster on the rubber roll.
Paper slips in the vertical direction. After a paper type was changed,
a folding position has not been
adjusted.
Check that the rough adjustment
knob position is correct.
(
p2-4)
Paper slips in the horizontal
direction.
The paper is stacked unevenly
. Stack the paper neatly on the
paper feed table.
(
p.1-10)
There is space between the paper
and side guide.
Set the side guides so that they
push against the paper lightly
.
( p.2-3)
Paper jam at the rubber roll when
thick paper or cross folded thick
paper is folded into two.
The paper is outside the
specifications.
Use paper that meets
specifications. (
p.6-2)
The space inside the internal paper
conveyance passage is narrow
.
Widen the space using the fine
adjustment knob of the second
folding plate. ( p.3-2)
Small paper is fed continuously
(stream-fed).
The paper is outside the
specifications.
Use paper that meets
specifications. (
p.6-2)
The paper feed pressure
adjustment knob is set to “Thick
paper
.”
Set the paper feed pressure
adjustment knob to “Thin paper.”
( p.1-7)
Page 69

4-14
Memo
Page 70

Chapter 5
CLEANING THE UNIT
Page 71

5-2
1. Cleaning Each Section
The adherence of paper dust and printing ink on the rubber rolls and paper feed rings may cause
problems such as paper feed errors and folding misalignment. Adherence of paper dust near sensors
will also cause misdetection. Clean the machine once a week. We recommend that you use a
commercially-available air duster for office equipment to clean sensors.
● Prior to cleaning, be sure to disconnect the power cord from the outlet.
● After cleaning, make sure that the areas that were cleaned are completely dry before
resuming paper folding operations.
Do not use flammable sprays or solvent inside or near the unit (e.g.
when cleaning the unit).
Such flammable gas may ignite and cause a fire or combustion.
Take precautions against fire and ensure ventilation when using alcohol, and store the
alcohol in a safe place after use. Also note that use of other solvents can damage the
rubber rollers and resin inside the unit, resulting in malfunctions.
1-1. Cleaning the Rubber Roll
Top cover
1
Open the top cover.
Second folding plate
First folding plate
2
Remove the first folding plate
and second folding plate from the
machine.
Page 72

5-3
Chapter 5 CLEANING THE UNIT
Rubber roll
3
While rotating the rubber roll, clean
off the dirt with a cloth moistened
with alcohol.
1-2. Cleaning the Paper Feed Rings
Top cover
1
Open the top cover.
Paper feed ring
2
Rotate the rubber roll, and clean off
the dirt with a cloth moistened with
alcohol.
Page 73

5-4
Chapter 5 CLEANING THE UNIT
1-3. Cleaning the Paper Separator
Top cover
1
Open the top cover.
Paper separator
Cloth
Paper feed ring
(middle)
2
Insert a cloth moistened with alcohol
between the paper feed ring (middle)
and the paper separator
.
3
Turn the paper feed rings in the
direction of the arrow.
1-4. Cleaning the Paper Sensor
Paper sensor
Clean the paper sensor using an air
duster or a cotton bud.
Page 74

5-5
Chapter 5 CLEANING THE UNIT
1-5. Cleaning the Ejection Gate Sensor
Ejection gate
sensor
Stacker rollers
Clean the ejection gate sensor,
located on the back of the stacker
rollers using an air duster.
1-6. Cleaning the Paper Ejection Belts
Stacker roller
Paper ejection belt
1
Move the stacker rollers to “5.”
Stacker roller
Lever
Belt
Stacker lever
2
While lifting up the stacker rollers
with your hand, pull the levers (left
and right) attached to the stacker
lever in the direction of the arrow so
that the stacker rollers are lifted up.
3
Rotate the stacker roller, and clean
off the dirt with a cloth moistened
with alcohol.
Page 75

5-6
Memo
Page 76

Chapter 6
APPENDIX
Page 77

6-2
1. Specification
Model DF-755
Type Office use, desktop
Paper size
that can
be folded
Min. 5.00 (W) x 7.00 (L) inches
Max. 1
1.00 (W) x 17.00 (L) inches
Paper quality Rough paper, fine quality paper
, stencil paper, recycled paper
Folding mode Single fold, double fold, ireegular accordion fold, letter fold, accordion fold, gate
fold, custom fold, special cross fold (paper thickness 14 lb to 28 lb)
Paper thickness 14 lb to 34 lb.
34 lb paper cannot be folded into four
.
Loading capacity of paper
feed table
500 sheets (fine quality paper 17 lb.)
Procesing speed 135 sheets/min. (For single folding 1
1 lb of fine quality L
T paper)
Paper feed method 3 rings automatic paper separation method, slant correction device
Counter 4-digit digital display
Folding stopper Manual setting
Stacker roller Manual setting 5 steps
Detection function Opening/closing of top cover
, no paper
, mis-feed, paper jam, first and second
folding plates improper setting, motor overload
Power supply 120 V 60 Hz
Power consumption 0.85
A
Dimensions In use 36.61 (W) x 18.90 (D) x 21.06 (H) inches
In storage 24.41 (W) x 18.90 (D) x 21.06 (H) inches
W
eight 70.4 lb.
Design and specifications are subject to change without notice.
Page 78

6-3
Memo
Page 79

Duplo building, 1-6, Oyama 4 chome, Sagamihara,
Kanagawa 229-1180, Japan
TEL: +81-42-775-3602
F
AX: +81-42-775-3606
E-mail: info@duplo.com
http://www.duplo.com
86V-74020-0
 Loading...