

Page 1

1
DC-10 mini
Instruction Manual
Please let our service people install the machine.
DUPLO CORPORATION
Page 2

2
Page 3

3
Safety Symbols
Various safety symbols are shown in this instruction manual and labeled on the unit to guide you in using
your unit correctly, and to prevent injuries to you and those around you, and other damages.
These symbols have the following meanings.
Indicates death or serious injuries will result if this precaution is not followed
and consequently, the unit is incorrectly handled.
Indicates injuries and damages to objects will result if this precautions is not
followed and consequently, the unit is incorrectly handled.
The % symbols warn of possible danger.
The specific danger is shown inside the %.
(In this example, the symbol warns of possible electric hazard.)
The symbols show prohibited acts.
The specific prohibited act is shown inside the .
(In this example, the symbol indicates disassembly is prohibited.)
The ¶ symbols show instructions.
The specific instruction is shown in the ¶.
(In this example, the symbol instructs that the plug be disconnected.)
Beware of Electric Hazard
Safety Symbols
SAFETY PRECAUTIONS
Thank you for purchasing a DC-10 mini Duplo Collator.
This instruction manual describes the functions of the DC-10Bmini,
how to operate it, and safety precautions in use.
Before using your unit, read this instruction manual carefully in order
to use your unit correctly and get the best out of it.
After reading the manual, keep it safely for future reference when you
have questions regarding your unit or when your unit malfunctions.
Disconnect Plug
Disassembly Prohibited
W ARNING
CA UTION
Page 4

4
Table of Contents
1. WARNINGS ....................................5
2. PRECAUTIONS.............................. 8
2-1. Precautions in Installation........................8
2-2. Component Parts.....................................9
2-3. Attaching the Parts ................................10
3. NAMES OF EACH PART .................. 12
4 NAMES AND FUNCTIONS OF
CONTROL PANEL PARTS ............... 13
5. PRECAUTIONS BEFORE USE.........16
5-1. Stacking the Paper ................................16
5-2. Stacking According to Paper Size .........17
5-3. Stacking Paper for the SINGLE Mode ... 17
5-4. Stacking Paper for
the CONTINUOUS Mode....................... 18
5-5. Stacking Paper for
the INTERLEAVING Mode ....................18
6. OPERATING PROCEDURES ........... 19
6-1. Procedures for Using the Unit................ 19
6-2. PRESET Key ......................................... 26
6-3. SORT Mode and NORMAL Mode .........27
6-4. SINGLE, CONTINUOUS,
and INTERLEAVING Modes.................. 28
6-5. Dip Switches ..........................................30
7. WHAT TO DO WHEN ........................ 31
7-1. When the PAPER FEED TABLE ERROR
Lamp Lights Up in Green.......................31
7-2. When the PAPER FEED TABLE ERROR
Lamp Blinks in Green ............................31
7-3. When the PAPER FEED TABLE ERROR
Lamp Lights Up in Red .......................... 31
7-4. When the PAPER FEED TABLE ERROR
Lamp Blinks in Red................................32
7-5. When the PAPER FEED TABLE ERROR
Lamp Blinks Quickly in Red ...................32
7-6. When the CARRIER COVER OPEN
Lamp Lights Up...................................... 33
7-7. When the PAPER FULL
Lamp Lights Up...................................... 33
7-8. When the PERIPHERALS
Lamp Lights Up...................................... 33
7-9. When the PERIPHERALS
Lamp Blinks ........................................... 33
7-10. When the Paper Jams ...........................34
8. TROUBLESHOOTING GUIDE .......... 35
8-1. When the Unit does not Start Even When
the START/STOP Key is Pressed ......... 35
8-2. When the PAPER JAM ERROR Lamp
Lights Up Although the Paper is Being
Fed Properly .......................................... 35
8-3. When No-Feeding Occurs Frequently ... 35
8-4. When Multi-Feeding Occurs
Frequently..............................................35
8-5. When “E-1” is Displayed on
the NO. OF SETS Window .................... 36
8-6. When “E-2” is Displayed on the
NO. OF SETS Window .......................... 36
8-7. When “E-5” is Displayed on the
NO. OF SETS Window .......................... 36
9. DAILY CLEANING AND REPLACING
EXPENDABLE PARTS ..................... 37
10.SPECIFICATIONS ............................. 38
Page 5

5
• Do not use the unit in voltages other than those specified as this may cause fire and
electric hazards.
• Variable power range : AC-230V
• Variable frequency : 50 Hz
• Do not drop metallic objects, inflammable objects, and liquids such as water inside
the unit. Should such objects and liquids accidentally drop inside the unit, turn off
the power switch, disconnect the power plug, and remove the object or liquid. If the
object or liquid cannot be removed, contact your dealer promptly. Using your unit in
this state may cause malfunction, fire hazards, injuries, and electric hazards.
• Do not remodel the unit as it may cause fire and electric hazards, and injuries.
If the unit grows hot, emits smoke, abnormal smell, or abnormal sounds, etc., turn
off the power switch immediately, disconnect the power plug, and contact your
dealer promptly. Using the unit in this state may cause fire and electric hazards.
• Do not remove the covers and rear panels of this unit using tools as high voltage
parts inside may cause electric hazards.
• Do not insert your fingers or hands between the paper receiving plate and left and
right joggers while the unit is operating, or they may get caught and injured.
Disconnect Plug
1. WARNINGS
• While the unit is operating, do not touch rotating parts of the unit, nor put objects
inside as it may cause injuries.
Do Not Touch
Do Not Touch
Disassembly Prohibited
Disconnect Plug
Voltage Other
• If the power supply plug or power cord becomes abnormally hot, turn off the power
switch immediately, and disconnect the power supply plug from the outlet.
Using the unit in this state may cause fire and electric hazards.
Contact your dealer promptly.
Disconnect Plug
+ 6%
–10%
Page 6

6
• Do not scratch, damage, nor remodel the power cord.
Do not place heavy objects on it, pull it, nor bend it strongly, as the power cord may
become damaged, and fire and electric hazards may result.
If the power cord is frayed, scratched, or damaged, turn off the power switch
immediately, disconnect the power supply plug from the outlet, and contact your
dealer promptly.
Prohibited
• Do not place the unit and power cord near heaters and vents of air-conditioners, as
the cover of the unit and power cord may melt, and cause fire and electric hazards.
• Do not touch the power plug with wet hands as this may cause electric hazards.
• Do not place the power cord where it may be walked over, as this may damage the
power cord, and cause fire and electric hazards.
Prohibited
• Insert the power supply plug in the outlet properly, or fire and electric hazards may
result.
• Do not pull the power cord when disconnecting the power supply plug from the
outlet, or the power cord may be scratched, and fire and electric hazards may result.
Prohibited
Prohibited
Prohibited
1. WARNINGS
Page 7

7
• Do not bind the power cord even if it is too long, as heat discharge may become
poor and cause fire hazards.
• Wipe away dusts collected on the power supply plug blades and the face of these
blades with a dry cloth.
If the dusts are not removed, they may cause fire hazards.
Prohibited
Wipe Plug
• Disconnect the power supply plug from the outlet if not using the unit for some
time, as unexpected malfunctions may cause power leakage and fire hazards.
Disconnect Plug
Disconnect Plug
• When cleaning the unit, turn off the power switch and disconnect the power supply
plug from the outlet to prevent the unit from operating accidentally and causing
injuries.
1. WARNINGS
Page 8

8
2-1. Precautions in Installation
Disconnect Plug
Prohibited
Prohibited
• Avoid installing the unit in dusty places as this may cause malfunction.
Avoid humid and dusty places as this may cause the unit to rust, to malfunction,
and cause electric and fire hazards.
• Install the unit on a strong ground which can bear the weight of the unit, or the unit
may fall and cause injuries.
The weight of the unit is 66 Kg (Including accessory parts).
• Avoid installing the unit in places where it may be exposed to water, and where
power leakage occurs easily.
Use the unit only in the specified environment.
Prohibited
• Do not use the product in environments other than those specified.
The unit may rust and malfunction, and power leakage, fire and electric hazards
may occur.
• Temperature : 10° to 35°C,
temperature change rate : Below 10°C/h
• Humidity : 20 to 85%RH,
temperature change rate : Below 20%RH/h
• Install the unit on a horizontal, wide, and stable ground, or the unit may turn over
and cause injuries.
The size of the unit in use is
790 (Width) x 500 (Depth) x 970 (Height) mm.
• Do not place the unit in direct sunlight, or it may not operate properly.
2. PRECAUTIONS
• Do not oil nor grease parts of the unit when large amounts of paper bits are
produced, to maintain the performance of the unit.
If the unit is oiled or greased, its performance will drop.
If the unit shows abnormal symptoms, contact your dealer.
• When cleaning the unit, turn off the power switch and disconnect the power supply
plug from the outlet to prevent the unit from operating accidentally and causing
injuries.
Prohibited
Page 9

9
2-2. COMPONENT PARTS
2. INSTALLING THE UNIT
Fig. No.
ó
ò
ô
ö
Quantity
1
1
10
1
Name
Power cord
Stabilizer
Instruction manual
*
Support
*
Screw (MSKW6x10)
ó
Check that you have the following partsand attach them to the unit.
Fig. No.
õ
ú
ù
û
ü
ô
ö
ò
õ
ú
ù
û
ü
Name
Jogger unit
Paper receiving table
Auxiliary paper feed table
Guide for feeding A5 paper
horizontally
NOTE
The added parts (marked with *) are necessary for the installation of DC-10 mini on the exclusive cabinet.
Quantity
1
1
1
1
1
Page 10

10
2. INSTALLING THE UNIT
1 Attach the jogger unit
ó
.
Remove the two ornamental screws attached to the
unit and attach the jogger unit ó.
<Parts Used>
Jogger unit ó................................. 1
• Screw on the stopper screws lightly and push
down the left and right edges of the jogger unit
equally so that it does not tilt as shown in the
figure. Then tighten the stopper screws firmly.
2 Attach the paper receiving table
ò
.
ó
Adjust the left jogger to the B4 mark and move the
right jogger to the right completely.
ò
Remove the two stopper screws attached to the
unit.
ô
Push the back jogger of the paper receiving table
in the direction of the arrow so that the paper
receiving table runs onto the jogger unit.
Note
If the back jogger moves to and fro when you move the
paper receiving table to the left and right with your
hand, it indicates that the table has been attached
properly.
<Parts Used>
Paper receiving plate ò................. 1
ö
Screw on the stopper screws lightly and push
down the left and right edges of the paper
receiving plate equally so that it does not tilt as
shown in the figure. Then tighten the stopper
screws firmly.
2-3. ATT ACHING THE P ARTS
Paper receiving table
Back jogger
Set screw
Jogger (right)
Paper receving table
Jogger (left)
Jogger unit
Reinforcement Plate (lower)
Jogger unit
Ornamental
screws
Page 11

11
3 Attach the auxiliary paper feed table
ô
.
Insert the hook of the auxiliary paper receiving table
ô
into the pillar of the unit.
<Parts Used>
Auxiliary paper feed table ô......... 10
4 Connect the power supply cord to the
connector of the unit.
<Parts Used>
Power cord õ................................ 2
5 For details of using the guide
ö
for
feeding A5 paper horizontally, refer to
step 9 on page 18.
6 In case the processor is not
connected independently, use this
stabilizer by all means to prevent the
machine from falling down.
• Screw up the reinforcement plate and the
stabilizer together as shown in the figure.
2. INSTALLING THE UNIT
Stabilizer
Tower A
Reinforcement
plate
Screw
Guide for
feeding horizontally
Power cord
Auxiliary paper feed table
Page 12

12
3. NAMES OF EACH PART
Control panel
Movable guide
Paper feed table
Fixed guide
Auxiliary paper
feed table
Jogger (right)
Paper receiving stopper
Paper receiving table
Power switch
Jogger (left)
Paper feed pressure adjusting knob
(One for each plate)
Carrier cover
Paper separator pressure adjusting
knob
Downstream processing
device (DC24V) connector
Connector for connecting the paper
ejection unit and downstream
processing device
Fuse
Power cord
Connector for connecting the carrier
bridge
Page 13

13
4. NAMES AND FUNCTIONS OF CONTROL
PANEL PARTS
Page 14

14
No.
ó
ò
ô
ö
õ
ú
ù
û
ü
†
°
¢
£
§
Name
NO. OF SETS
window
“+” Key
“–” Key
PAPER
FEED
TABLE
ERROR
lamp
CARRIER COVER
OPEN lamp
TOWER B ERROR lamp
(For linked towers)
Dip Switches
PERIPHERALS
lamp
PERIPHERALS IN
USE lamp
PERIPHERALS key
FAST lamp
SLOW lamp
SPEED key
PRESET key
4. NAMES AND FUNCTIONS OF CONTROL PANEL PARTS
Lights up
in green
Blinks in
green
Lights up
in red
Blinks in
red
Blinks quickly
in red
Function
• Displays the number of sets to be collated into or the number of sets yet to be
collated into.
• When the INTERLEAVING mode is set, it will display where the interleaf is to be
inserted (after how many sets).
• When the alert for the paper feed table is displayed, it will display the number of
sets that need to be checked.
Increases the displayed number by 1 each time it is pressed.
Decreases the displayed number by 1 each time it is pressed.
Indicates the paper feed table has run out of paper.
Indicates that no paper has been fed.
Indicates that the paper has jammed.
Indicates that several sheets of paper have been fed together (multi-feeding).
Indicates that multi-feeding cannot be detected for the paper used.(excessivly thick
paper or paper with large black area.)
Lights up when the door is open, the bridge cover is open when towers are connected,
or when these covers are not closed properly.
Lights up when an error has occurred in Tower B.
Use to stop the functions of the paper jam sensor, multi-feed sensor, etc., when they
are defective.
Lights up when an error has occurred in the downstream processing device, carrier
bridge (for linked towers) or paper ejection unit (for linked towers).
Blinks when the paper has jammed at the gate of each unit.
Lights up when a downstream processing devices is connected and used.
Use to select ''Use" or ''Don't Use" when downstream processing devices is connected.
Lights up when the collating speed is fast.
Lights up when the collating speed is slow.
Use to select ''FAST" or ''SLOW" collating speed.
• Be sure to press this key before starting operations.
• Paper will be fed from the paper feed table for only one set, and the tables used and
thickness and length of the paper will be recorded.
Page 15

15
No.
•
¶
ß
®
©
™
´
¨
≠
Æ
Ø
∞
±
≤
Function
Use to set the number of digits to be input for the number of sets required.
Each time this key is pressed, the number of digits will change.
• Press this key to return the counter to 0.
• Press this key to set the number displayed to 0.
* Press this key continuously until the counter becomes 0.
Press this key when the paper has jammed. The paper will be ejected.
* The unit will stop automatically after four seconds, even if this key is pressed
continuously.
Lights up when an error has occurred in Tower A.
Lights up when the paper receiving table is full (with the collated paper).
Lights up when the SORT mode is set (mode that sorts the collated sets).
Lights up when the NORMAL mode is set (mode that does not sort the collated sets).
Use to select the SORT or NORMAL mode. Each time it is pressed, either one will be
set.
In this mode, all paper on the paper feed table will be fed. Normally, this mode will be
set when the power switch is turned on in the INTERLEAVING mode.
This mode will be set when the power is turned on in the normal COLLATING mode.
Use this mode when dividing paper of the same page into two consecutive (upper and
lower) tables (tables 1 and 2, tables 3 and 4, tables 5 and 6, tables 7 and 8, or tables 9
and 10) and collating them. The paper of either one table of the pair will be fed.
Normally, the paper on the upper table will be fed, and when all paper have been fed,
it will be switched automatically to the lower table.
Lights up when the INTERLEAVING mode is set.
In this mode, the interleaf will be repeatedly inserted after the number of sets
specified. These interleaves are to be placed on the table below the last table stacked
with paper.
When this key is pressed, the mode will change in the order of
SINGLE n CONTINUOUS n SINGLE.
When pressed for more than 0.5 seconds, the INTERLEAVING mode will be set.
When pressed for a further 0.5 seconds, the NORMAL mode will be set again.
Lights up when the unit is operating.
Use to start or stop the unit.
Name
123 key
CLEAR key
PAPER
EJECTION key
TOWER A
ERROR lamp
(For linked towers)
PAPER FULL lamp
SORT MODE
lamp
NORMAL MODE
lamp
PAPER
RECEIVING key
SINGLE MODE
lamp
CONTINUOUS
MODE lamp
INTERLEAVING
MODE lamp
COLLATION
MODE key
START lamp
START/STOP key
4. NAMES AND FUNCTIONS OF CONTROL PANEL PARTS
Page 16

16
5. PRECAUTIONS BEFORE USE
5-1. ST ACKING THE P APER
Loosen the paper sufficiently and
stack it on the paper feed table.
• Insert the paper along the fixed guides until it
touches the guide of the paper feed gate lightly.
• Flatten folded or curled paper before using them.
Stack the paper neatly on the paper
feed table.
• Insert the paper along the fixed guides until it
touches the guide at the paper feed gate lightly.
• If the paper is not stacked neatly and used, the
paper will not be fed or paper will be multi-fed.
Check that the ink on the paper has
completely dried.
• Use the paper after its ink has dried completely.
• If not, not only will the unit become dirty, but
other problems (such as no-feeding) will occur.
5-2. STACKING ACCORDING TO
Page 17
17
5-2. STACKING ACCORDING TO PAPER SIZE
5. PRECAUTIONS BEFORE USE
5-3. STACKING PAPER FOR THE NORMAL MODE
Take note that the way to stack the paper differs according to the size of the paper.
For A3SR, A3, LD, A4, LT, and B5 paper:
• Place the paper vertically as shown in the figure.
For A5 paper:
• Place the paper horizontally as shown in the
figure.
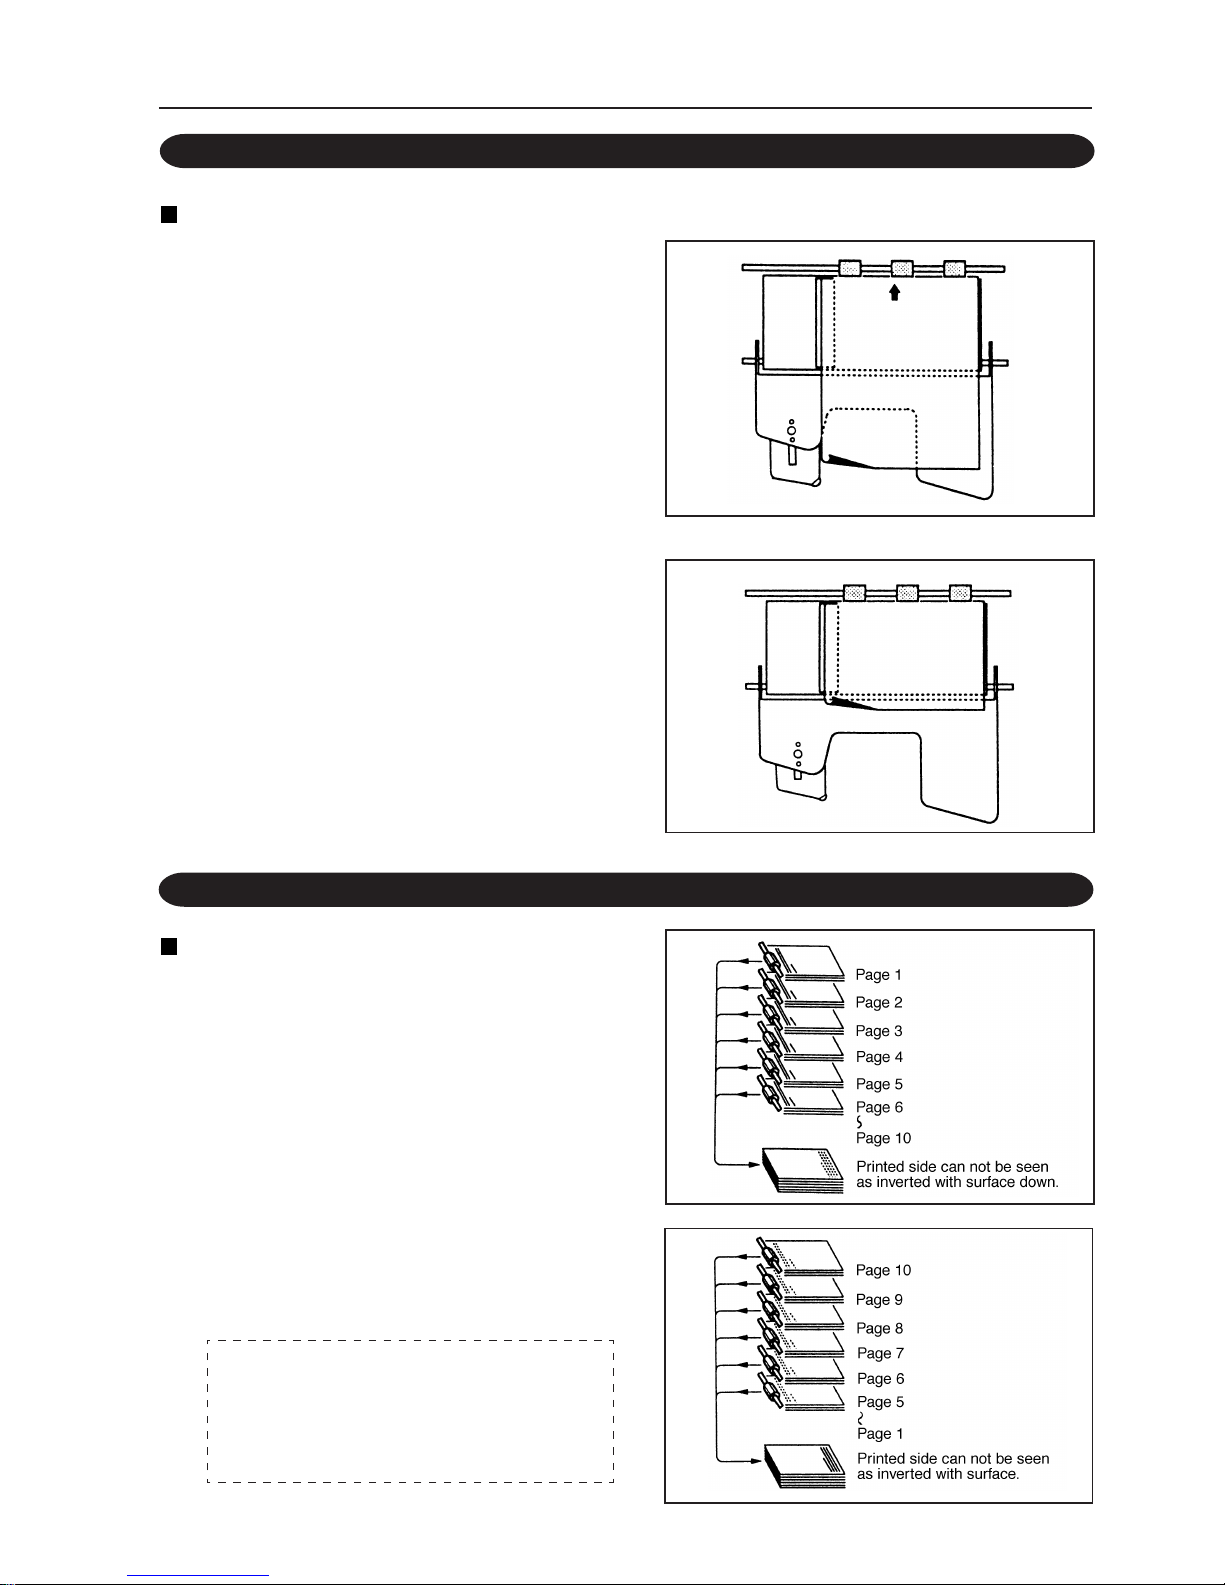
There are two ways of stacking paper
on the paper feed table in this mode.
When the paper is placed with its printed face up:
• Place the paper on the tables, starting from the top
table, in the order of its pages.
• The paper will be ejected onto the paper receiving
table with its printed face down.
When the paper is placed with its printed face
down:
• Place the paper on the tables, starting from the
bottom table, in the order of its pages.
Use the method that makes it easier for you to
carry out operations.
When using downstream processing devices,
refer to the instruction manual provided for
them.
Page 18

18
5. PRECAUTIONS BEFORE USE
5-4. STACKING PAPER FOR THE ALTERNATIVE MODE
• Divide paper of the same page into two piles and
stack them on odd and even paper feed tables
(tables 1 and 2, table 3 and 4, tables 5 and 6, tables
7 and 8, tables 9 and 10).
• The paper will be fed from either table of each pair
(from the odd or even table).
Normally, the paper will be fed from the odd
table, and when it runs out of paper, paper will be
fed from the even table.
• The process hereafter is the same as in ''5-3.
Stacking Paper for the NORMAL Mode" on page
17.
When the paper is placed with its printed face up.
When the paper is placed with its printed face down.
Note
When using peripherals, decide whether to place the
paper with its printed face up or down according to the
specifications of these devices.
• Stack the interleaves on the last table used.
For example, if the first seven tables from the top
are to be used, stack these interleaves on the
seventh table. (See figure on the right.)
• The process hereafter is the same as in ''5-3.
Stacking Paper for the NORMAL Mode" on page
17.
5-5. STACKING PAPER FOR THE INTERLEAVING MODE
Printed face up.
Printed face down.
Page 19

19
6. OPERATING PROCEDURES
<Tower A Initial Setting Operations>
Preset
<Operations when initial
settings have been changed>
Select the collating speed
Preset
Set the mode (NORMAL,
ALTERNATIVE, or
INTERLEAVING)
Start
Select the add or subtract
function
Start
ON
Select the OFFSET/
STRAIGHT mode
Adjust the paper
receiving stopper
Adjust the jogger
Turn on the power Turn on the power
Adjust the paper feed pressure
Adjust the paper separator
pressure
Adjust the paper feed pressure
Adjust the paper separator
pressure
Stack the paper
Stack the paper
• Adjust the paper
receiving stopper
• Adjust the jogger
6-1. PROCEDURES FOR USING THE UNIT
Turn off/on the
peripherals
Order
2 ----------------------------------------
3 ---------------------------------------4 ----------------------------------------
5 ----------------------------------------
6 ------------------------ Initial
Settings
7 -- Peripherals “OFF”
8 -- OFFSET/
STRAIGHT
Mode ------------ “OFFSET”
9 ----------------------------------------
10 --------------------------------------
11 Collating
Speed ---------- “Slow”
12 --------------------------------------
13 NORMAL, ALTERNATIVE,
INTERLEAVING Modes
--------------------- “NORMAL
Mode”
14 Add/ Subtract
Function ------- “Add”
15 --------------------------------------
Page 20

20
6. OPERATING PROCEDURES
1 Insert the power cord into the
electrical outlet.
2 Turn on the power switch.
• When pushed to “I”, the power will be supplied.
• When pushed to “O”, the power will be cut off.
3 Set the paper feed pressure adjusting
knob as follows.
• When using paper smaller than A3, turn the knob
to the left (normal).
• When using paper bigger than A3, turn the knob to
the right (strong).
4 Set the separator pressure adjusting
lever to the center (normal).
• When the lever is moved to the right, the pressure
will be ''strong". When moved to the left, the
pressure will be ''weak".
5 Stack paper on the paper feed table.
• Insert the paper along the fixed guides until it
touches the guide of the paper feed gate lightly.
Paper can be stacked up to 28 mm at one time.
Be careful not to stack more than this.
Paper is stacked differently for each modeSINGLE, CONTINUOUS, or INTERLEAVING.
Power switch
Paper feed pressure knob
Paper feed pressure knob
Paper separator pressure adjusting
lever
Movable guides
Fixed guides
Paper
Page 21

21
6. OPERATING PROCEDURES
6 Push the movable guides lightly
against the sides of the paper.
7 Press the PERIPHERALS key.
• When using the downstream processing devices
(optional), press the key and turn it on.
......................................................The lamp lights up
• When not using them, press the key and turn it off.
It will remain off as long as no downstream
processing devices are connected.
.......................................................The lamp goes off
8 Press the PAPER RECEIVING key.
• To sort the paper, set the OFFSET mode.
......................................The OFFSET lamp lights up
This key cannot be set if the PERIPHERALS
key is set to on.
• When not sorting the paper, set the NORMAL
mode.
................................... The NORMAL lamp lights up
Note
• If the paper receiving table is not at the designated
position, it will automatically move to this
position. While it is moving, the mode cannot be
changed.
• When using A3SR paper, use the NORMAL
mode.
9 Set the paper receiving stopper.
(This step is not required if using the
downstream processing device.)
• When using A3, LD, B4, A4 (LT), B5, etc. paper,
set the paper size displayed at the paper receiving
stopper to the one displayed on the window of the
paper receiving table.
LD:Short for double letter size
LT:Short for letter size
Paper receiving
stopper
Window
PERIPHERALS key
PAPER RECEIVING key
Page 22

22
• When using A5 paper, push in the paper receiving
stopper completely and then attach the guide
ö
for feeding horizontally provided with your unit
as shown in the figure.
10 Set the jogger (left).
(This step is not required if using the
downstream processing device.)
For the SORT Mode
• Adjust the jogger to the paper scale in front and set
it.
• When using A5 paper, adjust the jogger (left) to
the A4 mark. (As paper is fed horizontally)
NORMAL Mode
ó
Move the right guide of the jogger unit inside
completely.
ò
Take out one sheet of paper on the paper feed table
and place it on the paper receiving table along the
normal guide.
ô
Set the jogger (left) so that it is about 5 mm away
from the paper.
6. OPERATING PROCEDURES
Guide for
feeding
horizontally
Paper receiving
stopper
Paper scale
Jogger (left)
Jogger (right)
Jogger (left)
Paper
5mm
Page 23

23
6. OPERATING PROCEDURES
11 Decide the speed.
When using the jogger unit and paper
receiving table
• When the power is turned on, the speed will be set to
“Slow” (35 sets/minute). ....SLOW lamp lights up
• To set to “Fast” (55 sets/minute), press the
SPEED key. ............................ Fast lamp light up
When pressed again, the speed will be set to “Slow”
again.
Note
If an error occurs with the speed set to “Fast”, there
will be more sets of damaged paper.
When using peripherals
• The speed of these devices differs according to the
model used.
The FAST or SLOW lamp shows the speed
according to the peripherals. Refer to the
downstream processing device.
12 Press the PRESET key.
• The paper on the paper feed table will be fed for
only one set.
The NO. OF SETS window will display 1.
Refer to “6-2. Preset Key” on page 26.
Check one set of paper ejected to the paper receiving
table or downstream processing device.
• If paper feed errors occur, check the cause and
correct it.
Refer to “7. WHAT TO DO WHEN...” on page 31.
• After correcting the error, press the CLEAR key
and return the counter to 0, and then press the
PRESET key again.
Page 24

24
13 Decide which mode-NORMAL,
ALTERNATIVE, or INTERLEAVING-to
set.
• When the power is supplied, the NORMAL mode
will be set.
• The mode will change to NORMAL or
ALTERNATIVE each time the COLLATION
MODE key is pressed.
• The INTERLEAVING mode will be set when the
key is pressed for more than 0.5 seconds. When
pressed for a further 0.5 seconds, the NORMAL
mode will be set.
• In the INTERLEAVING mode, the
INTERLEAVING MODE lamp and NORMAL
MODE lamp will light up.
• For the INTERLEAVING mode, it is necessary
to input where the interleaf is to be inserted (after
how many sets).
Refer to “6-4. SINGLE CONTINUOUS, and
INTERLEAVING Modes” on page 28.
14 Decide the method of displaying the
number of sets required.
Add display method
Before starting, check that the NO. OF SETS window
displays 0. To set to 0, press the CLEAR key.
Subtract display method
Input the number of sets required as follows.
Up to 9999 can be input.
ó
Press the 123 key.
“0.0.0.0.” will be displayed on the NO. OF SETS
window. The fourth “0.” from the right will be
blinking. This blinking digit will increase by one from
1 each time the + key is pressed and decrease by one
from 9 each time the – key is pressed. Set this fourth
digit using these keys.
ò
Press the 123 key again.
The third “0.” on the NO. OF SETS window will
blink. Like step ó, use the + or – key to set this third
digit.
ô
Press the 123 key again.
The second “0.” on the NO. OF SETS window will
blink. Like step ó, use the + or – key to set this
second digit.
ö
Press the 123 key again.
The first “0.” on the NO. OF SETS window will blink.
Like step ó, use the + or – key to set this first digit.
6. OPERATING PROCEDURES
COLLATION MODE key
Page 25

25
6. OPERATING PROCEDURES
õ
Press the 123 key again.
The NO. OF SETS window will display the number
input continuously. The first digit will be blinking.
15 Press the START/STOP key and start
operations.
• The following operations will be carried out
according to the method set for displaying the
number of sets to be collated into.
Add display method
• The NO. OF SETS window will start counting
and display the number of sets collated into during
the operations.
• When the unit has collated the number of sets
required, press the START/STOP key and stop
operations.
The unit will stop when all the paper has been
ejected.
• The unit will stop automatically when the window
shows 9999.
• To resume operations, press the START/STOP
key again. The display will turn to 0 and start
increasing again.
Subtract display method
• The number on the NO. OF SETS window will be
subtracted as each set is collated and show the
number of sets still not collated (remainder of
number input). The dot at the first digit will be
blinking.
• When the window shows 0, the unit will stop
automatically.
• To continue with the operations, be sure to input
the number of sets required and then press the
START/STOP key. Refer to step 14 on page 24
for details.
• If the START/STOP key is pressed during
operations, the unit will stop and the NO. OF
SETS window will show the number of sets still
not collated and the dot at the first digit will be
blinking. Operations will start again when the
START/STOP key is pressed.
Note
If the last sheet of paper on the paper feed table
remains, place a white sheet of paper under it and use
it again.
This is caused by static electricity produced by
changes in the environmental temperature and
humidity, and not because of faults.
Page 26

26
6. OPERATING PROCEDURES
6-2. PRESET KEY
Use the PRESET key to check which table has paper and which does not, and at the
same time, to record the thickness of the paper. After checking, the paper will be fed
only from the table which has paper.
ó
When the PRESET key is pressed, paper will be
fed from the paper feed table for one set.
ò
Hold the set of paper ejected and check that the
paper has been fed properly. If it has, press the
START/STOP key and start operations.
• If there is no paper on all the paper feed tables, the
error lamps of all tables will light up in green.
• In the first operation, the NO. OF SETS window
will display 1.
After the operation, the window will display the
number it had displayed previously+1.
If the subtract display method is used and the
number of sets required is input first and then
the preset key is pressed, the window will
display the “number input”–1.
ô
When problems occur such as no-feeding, paper
jams, etc. check the cause.
ö
When multi-feeding occurs, check the cause.
After correcting it, press the CLEAR key and
return the NO. OF SETS window to 0.
Note
Multi-feeding detection cannot be carried out for some
types of paper. In such cases, the PAPER FEED
TABLE ERROR lamp will blink quickly in red.
Cancel the detection function using the dip switch.
Refer to ''6-5. Dip Switches" on page 30.
õ
Press the PRESET key again.
• Check that the paper is fed properly.
Note
If the table used has been changed or the paper used
has been replaced, be sure to press the PRESET key.
Paper
Page 27

27
6. OPERATING PROCEDURES
OFFSET Mode
• In this mode, the paper ejected onto the paper
receiving table will be stacked into one set as
shown in the figure.
STRAIGHT Mode
• The paper ejected on the paper receiving table will
not be sorted but stacked into one pile.
Note 1
In the SORT and NORMAL modes, “Err1” or “Err2”
will be displayed on the NO. OF SETS window if the
unit stops because there is no more paper or because of
problems such as no-feeding, multi-feeding, jams, etc.
For Err1, remove the last set. For Err2, remove the last
two sets. These removed sets will not be included in
the number displayed on the NO. OF SETS window.
• For the OFFSET mode, the first paper ejected
after operations are resumed will be sorted into
the proper pile according to the number of sets
removed.
6-3. OFFSET MODE AND STRAIGHT MODE
Page 28

28
6. OPERATING PROCEDURES
NORMAL Mode
• In this mode, paper can be stacked on all the paper
feed tables. The paper will be fed from the tables,
starting from the top one, and ejected as one set.
• For details of stacking paper, refer to “5-3.
Stacking Paper for the SINGLE Mode” on page
17.
ALTERNATIVE Mode
• Stack paper of the same page on consecutive odd
and even paper feed tables (tables 1 and 2, tables
3 and 4, tables 5 and 6, tables 7 and 8, tables 9 and
10). The paper will be fed from either table.
Normally, paper will be fed from the upper table.
The table will be switched to the lower one
automatically when the upper table runs out of
paper.
• When both tables have run out of paper, the NO
PAPER alert will be displayed and the unit will
stop.
• For details of stacking paper, refer to ''5-4.
Stacking Paper for the ALTERNATIVE Mode"
on page 18.
INTERLEAVING Mode
• An interleaf will be repeatedly inserted after the
specified number of sets. This enables you to sort
the sets. Up to 999 (sets) can be input.
1 Inputting between how many sets the
interleaf is to be inserted
ó
Press the COLLATION MODE key for more than
0.5 seconds.
• The COLLATION mode will be set.
• “-000” will be displayed on the NO. OF SETS
window when the INTERLEAVING mode is set.
The third 0 from the right will blink.
This number will start increasing every time the +
key is pressed and start decreasing every time the
– key is pressed.
ò
Using the + or – key, input for this third digit.
ô
Press the 123 key. The second 0 on the NO. OF
SETS window will blink. Using the + or – key,
input for this second digit.
ö
Press the 123 key again. The first 0 on the NO. OF
SETS window will blink. Using the + or – key,
input for this first digit.
õ
Press the 123 key again. The NO. OF SETS
window will display the number of sets required
and operations will start.
6-4. SINGLE, ALTERNATIVE, AND INTERLEAVING MODES
+ key
- key
123 key
Page 29

29
6. OPERATING PROCEDURES
2 Checking the number of sets
specified and re-inputting the number
• To check the number of sets input and specified,
press the COLLATION MODE key. It will be
displayed on the NO. OF SETS window. When
the key is pressed again, the window will show
how many sets the paper are to be collated into,
and operations can be carried out.
• To re-input the number, press the CLEAR key.
The NO. OF SETS window will display -000.
Carry out steps ó to ö again.
• For details of stacking paper, refer to “5-5.
Stacking Paper for the INTERLEAVING Mode”
on page 17.
3 Pressing the COLLATION MODE Key
COLLATION
MODE key
Lon
Shor
<NORMAL, ALTERNATIVE Modes> <INTERLEAVING Mode>
MODE Key
MODE Key
M
O
D
E
K
e
y
SINGLE
AL TERNA TIVE
Stand-by
starting
MODE KeK
MODE Key
123 Key or
MODE Kee
Input the
number of sett
Mode for
inputting the
number of setss
C
L
E
A
R
K
e
y
Check the number
of sets specifiee
MODE Key : COLLATION MODE key
: Press the key for less than 0.5 seconds.
: Press the key for more than 0.5 seconds.
Shor
Lon
Shor
Shor
Lon
Page 30

30
6. OPERATING PROCEDURES
6-5. DIP SWITCHES
• The dip switches are located inside the cover.
• The functions of the dip switches and settings at factory are as shown in the figure below.
Dip Switch A
• When a paper jam sensor of a paper feed table breaks down, as a temporary measure, this dip switch can be turned
on to stop the sensor.
Dip Switch B
• When the multi-feed sensor breaks down, or cannot be used because special paper is used, this dip switch can be
used to stop the function of the multi-feed sensor.
Dip Switch C
• When the paper full sensor, paper ejection unit (UNIT) jam sensor, or bridge paper jam sensor breaks down, this
dip switch can be used to stop the function.
Dip switches are used mainly as temporary measures. To use them, consult your service engineer.
® mark : means the setting position
1
2
3
4
5
6
7
8
9
0
A
1
2
3
4
5
6
7
8
9
0
B
1
2
3
4
5
6
7
8
C
Dip Switches
OFF ON
Yes No
Effective
Not
effective
Overlap small
Overlap big
Paper full detection
UNIT- bridge detection
Don’t use
Don’t use
Don’t use
Don’t use
Detects multi-feeding at 1st table
Detects multi-feeding at 2nd table
Detects multi-feeding at 3rd table
Detects multi-feeding at 4th table
Setting
OFF ON
Detects paper jamming at 1st table
Detects paper jamming at 2nd table
Detects paper jamming at 3rd table
Detects paper jamming at 4th table
Detects paper jamming at 5th table
Detects paper jamming at 6th table
Detects paper jamming at 7th table
Detects paper jamming at 8th table
Detects paper jamming at 9th table
Detects paper jamming at 10th table
Detects multi-feeding at 5th table
Detects multi-feeding at 6th table
Detects multi-feeding at 7th table
Detects multi-feeding at 8th table
Detects multi-feeding at 9th table
Detects multi-feeding at 10th table
Effective
Not
effective
Yes No
Yes No
Yes No
Yes No
Yes No
Yes No
Yes No
Yes No
Yes No
Yes No
Yes No
Yes No
Yes No
Yes No
Yes No
Yes No
Yes No
Yes No
Yes No
Yes No
Yes No
Dip Switches
Cover
A
B
C
Page 31

31
7. WHA T TO DO WHEN...
7-1. WHEN THE PAPER FEED TABLE ERROR LAMP LIGHTS UP IN GREEN
Cause
• There is no more paper on the paper feed table.
Correction
• When there is not enough paper in the set ejected
onto the paper receiving table or downstream
processing device, Err1 will be displayed on the
NO. OF SETS window. Remove one set. It will
not be included in the number displayed on the
window.
• Stack some paper and then press the START/
STOP key. The error lamp will go off and
operations will start again.
7-2. WHEN THE PAPER FEED TABLE
ERROR LAMP BLINKS IN GREEN
Cause
• Paper has not been fed from the paper feed table.
Correction
• There is not enough paper in the set ejected onto
the paper receiving table or downstream
processing device. Remove sets for the number (1
or 2) next to Err displayed on the NO. OF SETS
window. It will not be included in the number
displayed on the window.
• Loosen the paper and then stack some paper.
Press the START/STOP key. The error lamp will
go off and operations will start again.
If the error occurs again, turn the paper feed
pressure knob to the right (strong) or move the
separator pressure adjusting lever to the left
(lower the pressure).
7-3. WHEN THE PAPER FEED TABLE
ERROR LAMP LIGHTS UP IN RED
Cause
• The paper has jammed on the paper feed table.
Correction
• There is not enough paper in the set ejected onto the
paper receiving table or downstream processing
device. Remove sets for the number (1 or 2) next to
Err displayed on the NO. OF SETS window.
• Remove the jammed paper and then press the
START/STOP key. The error lamp will go off and
operations will start again.
This number of paper removed will not be
included in the number displayed in the NO. OF
SETS window.
Page 32

32
Cause
• Paper have been multi-fed from the paper feed table.
Correction
• There is excessive paper in the set ejected onto the
paper receiving table or downstream processing
device. Remove sets for the number (1 or 2) next
to Err displayed on the NO. OF SETS window. It
will not be included in the number displayed on
the window.
• Loosen the paper. Stack the paper neatly with
their heads aligned. Press the START/STOP key.
The error lamp will go off and operations will start
again.
• If the error occurs again, turn the paper feed
pressure knob to the left (weak) or move the
separator pressure adjusting lever to the right
(raise the pressure).
7-5. WHEN THE PAPER FEED TABLE ERROR
LAMP BLINKS QUICKLY IN RED
Cause
• Normally when the PRESET key has been
pressed, and when the multi-feeding detection
function cannot work for the paper on the paper
feed table.
Correction
• Stop the multi-feeding detection function of the
table with such paper with dip switch B on the
control panel.
• Press the PRESET key and check the state.
• If it is normal, press the START/STOP key.
Operations will start.
7-4. WHEN THE PAPER FEED TABLE ERROR LAMP BLINKS IN RED
7. WHAT TO DO WHEN...
Cover
Dip Switches B
Page 33

33
7. WHAT TO DO WHEN...
7-6. WHEN THE CARRIER COVER OPEN LAMP LIGHTS UP
Cause
• When the carrier cover is not closed properly.
Correction
• Close the door properly. The lamp will go off.
• If the unit stops during operations, press the
EJECT key and eject the paper inside.
Press the START/STOP key to start operations.
7-7. WHEN THE PAPER FULL LAMP
LIGHTS UP
Cause
• When the paper receiving table is full.
Correction
• Remove the paper on the paper receiving table.
• Press the START/STOP key. The error lamp will
go off and operations will start again.
7-8. WHEN THE PERIPHERALS LAMP
LIGHTS UP
Cause
• When an error occurs in the downstream
processing device.
Correction
• Check the cause and correct it.
• Press the START/STOP key. The error lamp will
go off and operations will start again.
For details of errors which occur in these devices,
refer to their instruction manuals.
7-9. WHEN THE PERIPHERALS LAMP
BLINKS
Cause
• When paper has jammed at the gate of the
peripherals.
Correction
• Remove the paper at the gate.
• Press the START/STOP key. The error lamp will
go off and operations will start again.
Page 34

34
7. WHAT TO DO WHEN...
Door
Paper
7-10. WHEN THE PAPER JAMS
When paper jams at the paper feed
ring
Pull out the jammed paper towards you and remove it.
When the paper jams at the ejection
gate
1 Press the EJECT key.
The unit will start and eject the
jammed paper.
2 If the paper does not come out even
when the EJECT key is pressed, open
the carrier cover and remove the
jammed paper.
3 If the paper is not ejected completely
as shown in the figure, remove the
jammed paper with your hand.
Page 35

35
8-1. WHEN THE UNIT DOES NO T ST AR T EVEN WHEN THE ST ART/ST OP KEY IS PRESSED
8. TROUBLESHOOTING GUIDE
ó
Is the door open?
ò
Is the paper receiving table full with paper?
ô
Has a problem occurred inside the peripherals?
ö
If the subtract display method is used, is the NO.
OF SETS window showing 0?
n Close the door. The unit can be operated.
n Remove the paper. Operations will start.
n Check the cause and correct it. Operations will start.
n Input the number of sets or press the CLEAR key to
set the add display method.
8-3. WHEN NO-FEEDING OCCURS FREQUENTLY
Was a different type of paper used halfway through
the operation?
n If the paper used is changed to a different type, be sure
to press the PRESET key.
ó
Is the paper feed pressure too weak?
ò
Is the paper feed pressure too strong?
ô
Is the paper feed ring or paper separator dirty?
ö
Has the paper feed ring or paper separator worn
out?
n Raise the paper feed pressure.
(Turn the adjusting knob to the right.)
n Lower the separator pressure.
(Move the adjusting lever to the left.)
n Clean.
Refer to “9. DAILY CLEANING AND
REPLACING EXPENDABLE PARTS” on page 37.
n Replace the parts.
* Contact your nearest dealer.
ó
Is the paper feed pressure too strong?
ò
Is the separator pressure too weak?
ô
Is the paper feed ring or paper separator dirty?
ö
Has the paper feed ring or paper separator worn
out?
n Lower the paper feed pressure.
(Turn the adjusting knob to the left.)
n Raise the separator pressure.
(Move the adjusting lever to the right.)
n Clean.
Refer to “9. DAILY CLEANING AND
REPLACING EXPENDABLE PARTS” on page 37.
n Replace the parts.
* Contact your nearest dealer.
8-4. WHEN MULTI-FEEDING OCCURS FREQUENTLY
8-2. WHEN THE PAPER JAM ERROR LAMP LIGHTS UP AL THOUGH THE P APER is BEING FED PROPERL Y
Page 36

36
8-6. WHEN “E-2” IS DISPLAYED ON THE NO. OF SETS WINDOW
8. TROUBLESHOOTING GUIDE
n Turn off the power switch, wait 30 seconds, and turn
on the power again. If “E-1” is displayed again,
contact your nearest dealer.
The paper receiver horizontal movement
mechanism is faulty.
n Turn off the power switch, wait 30 seconds, and turn
on the power again. If “E-2” is displayed again,
contact your nearest dealer.
The paper feed table up/down mechanism is faulty.
The maintenance counter is faulty.
n Turn off the power switch and turn it on again. If “E-
5” is displayed again, contact your nearest dealer.
8-7. WHEN “E-5” IS DISPLAYED ON THE NO. OF SETS WINDOW
8-5. WHEN “E-1” IS DISPLAYED ON THE NO. OF SETS WINDOW
Page 37

37
9. DAILY CLEANING AND REPLACING
EXPENDABLE PARTS
1 While pressing the paper feeding
shaft in the direction of the arrow, pull
out the shaft edge at the right of the
shaft.
Pull out the paper feed shaft.
2 Wipe parts dirty with ink or paper
powder with a cloth moistened with
neutral detergent or alcohol, etc.
3 Clean also the paper separator of the
table whose paper feed shaft has
been removed.
Remove the shaft first before cleaning.
Cleaning the Unit
Using paper feed rings, paper separators, etc. (parts carrying the paper) which are dirty with ink or paper
powder will cause paper-feeding problems. Therefore, clean these parts occasionally according to the
following procedure.
Replacing Expendable Parts
If the paper feed ring or paper separator has worn out, ask your nearest dealer to replace them for you.
Paper separator
Paper feed shaft
Paper feed ring
Joint section
Paper feed shaft
Joint section
Page 38

38
10. SPECIFICATIONS
Name
Model
No. of tables
Paper feeding method
Paper carrying method
Paper feed table capacity
Paper sizes
Paper quality
Paper type
Collating speed
Paper receiving table capacity
Paper feed table detection
Paper feed error detection
Other detections
Error display
Counter
Additional functions
Power supply
Power consumption
Size
Mass (Weight)
Specifications and external dimensions may be changed, without prior notice, to
upgrade the unit.
DC-10 mini
Desktop
10
3-rings paper separator
Roller belt
28 mm (Fine quality paper:64g/m2, equivalent to 280 sheets)
Smallest:A5 (148x210)
Largest:A3SR (320x450)
But the smallest paper (A5) can only be fed horizontally and the largest paper
(A3SR) be collated in the NORMAL mode. The SORT mode can be carried
out only for size A3 (297x420) and smaller.
Medium quality paper, fine stencil paper, fine quality paper (52.3 to 128 g/m2)
Sheet
35 sets/min. or 55 sets/min.
But it depends on the specifications of the downstream processing device if it
is used.
55 mm (Fine quality paper:64 g/m2, equivalent to 550 sheets)
The PRESET key is used to distinguish the paper feed tables used
No-feeding, multi-feeding, paper jamming
No-paper detection, door open detection, paper receiving table full detection,
downstream processing device error detection
Displayed on the control panel
Carrier cover open/close, Tower B error (when towers are linked), Tower A error
(when towers are linked), downstream processing device error, paper receiving
table full, No paper on tables, no-feeding, multi-feeding, paper jamming
4-digit adding counter, 4-digit subtracting counter
• Forcible ejection function
•Selection of NORMAL mode/SORT mode (Paper sorted by left/right
swing)
• Selection of SINGLE, CONTINUOUS, INTERLEAVING modes
• Collating speed can be changed in two levels
AC230V/50Hz
1.5A
When used:790 (W) x 500 (D) x 970 (H) mm (including the stabilizer)
66 kg
Page 39

40
97J-91185-9611XXXXS-0
 Loading...