

Page 1
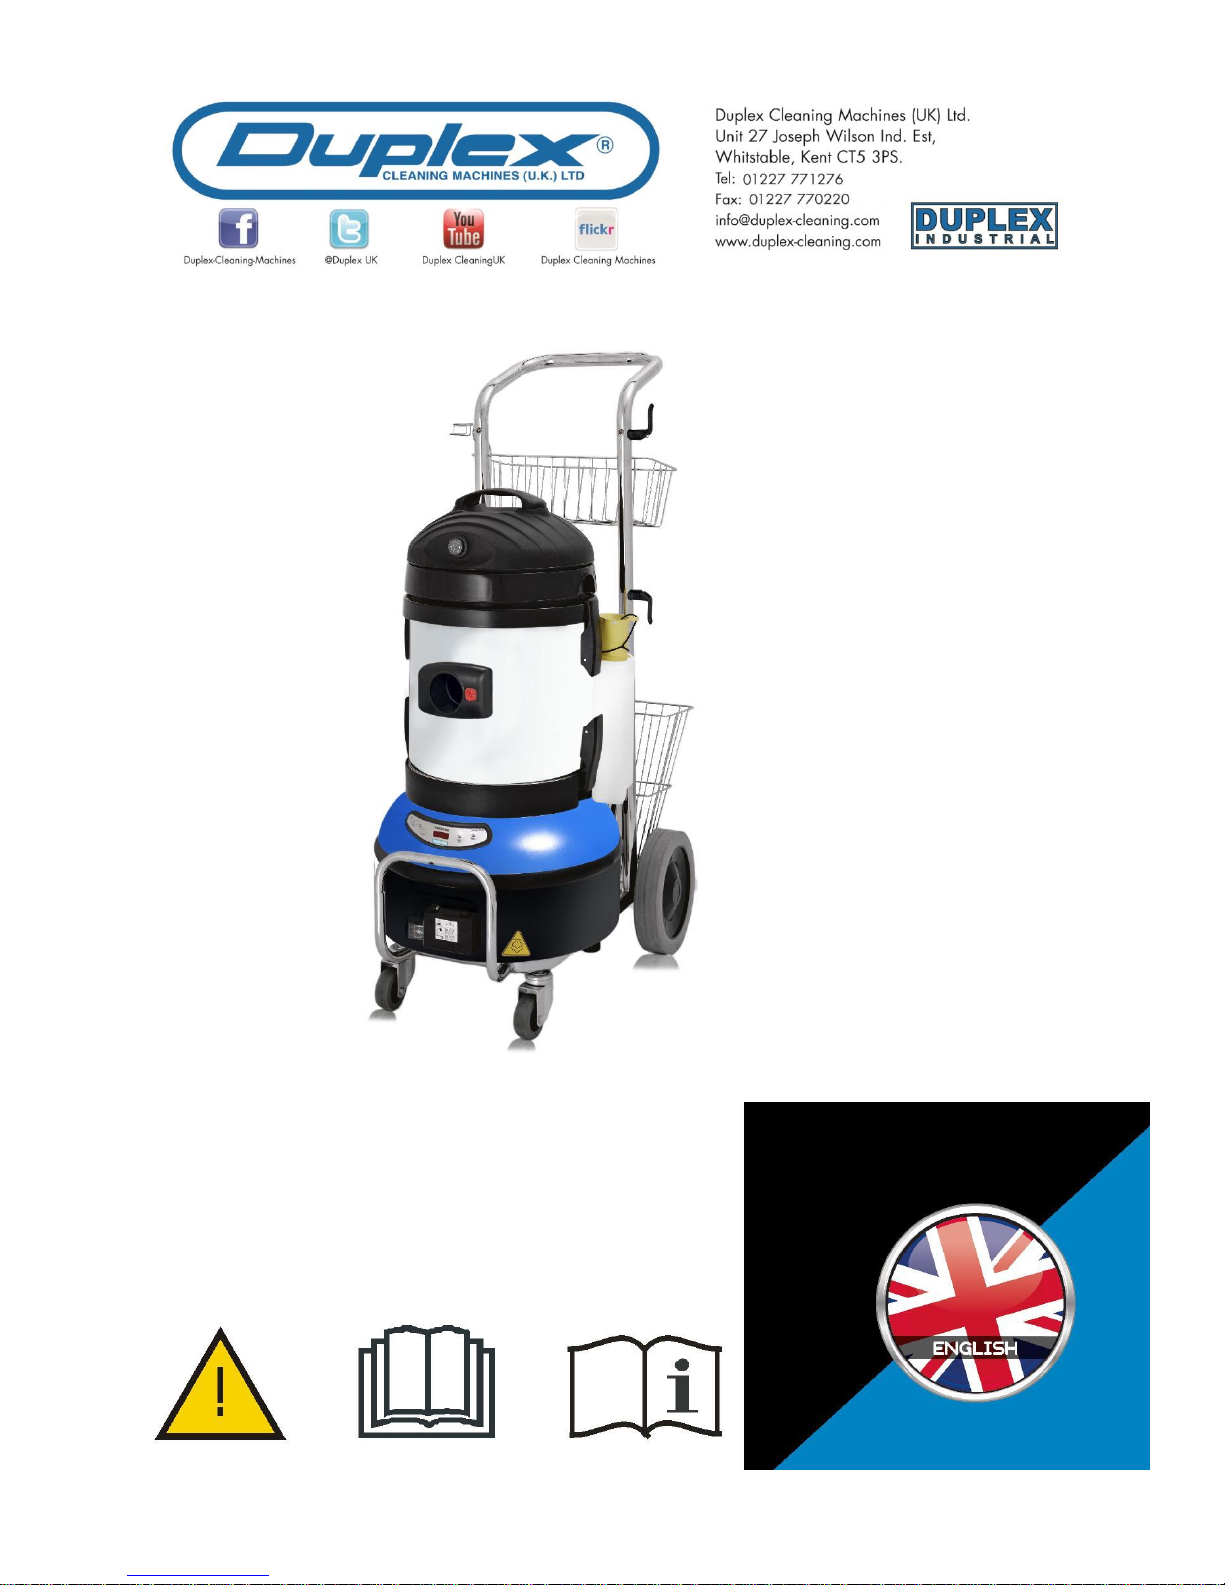
JET VAC COMPACT
1
Jet Vac Compact
Page 2

JET VAC
COMPACT
2 JVC 44/15
Page 3
JET VAC COMPACT
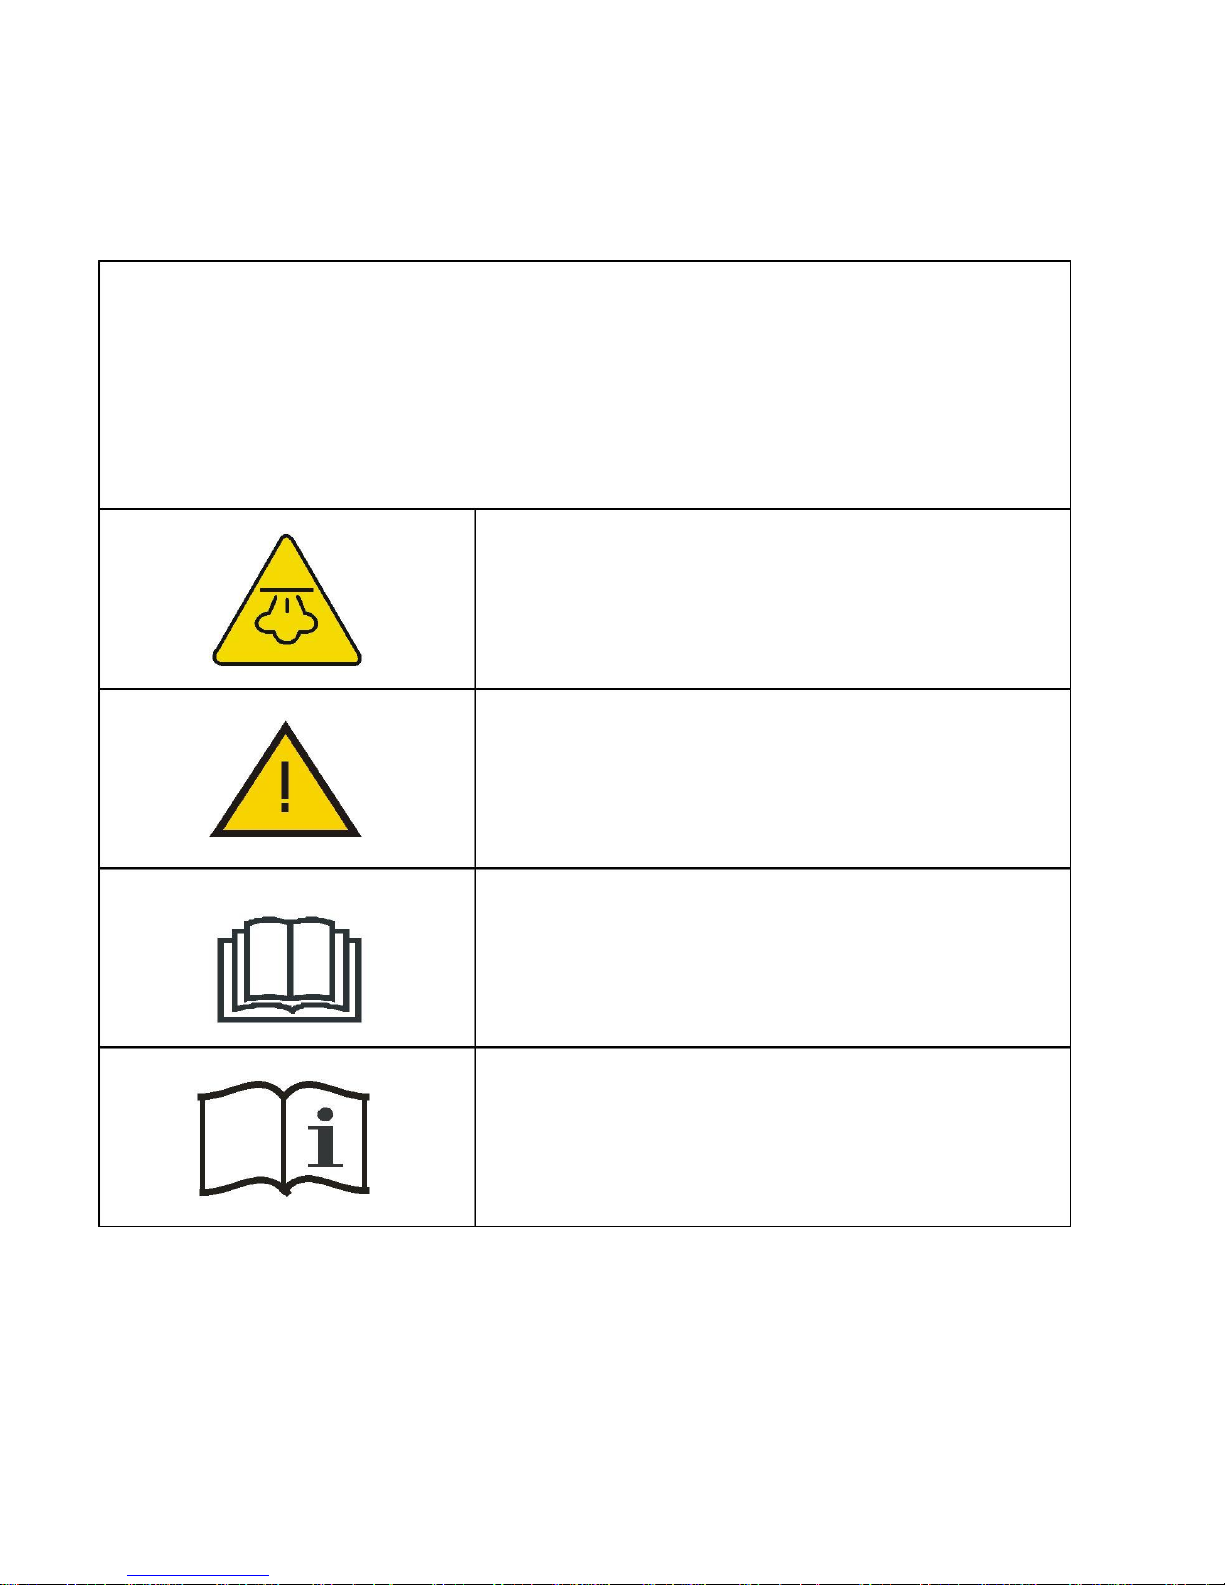
Interpretation of the symbols placed on the unit
BEFORE USING THE STEAM GENERATOR, READ AND FOLLOW THIS INSTRUCTION MANUAL.
IT IS RECOMMENDED TO KEEP THIS INSTRUCTION MANUAL TO CONSULT IT LATER OR TO GIVE IT TO THE
FOLLOWING OWNERS.
PLEASE READ THE SAFETY INSTRUCTIONS ON THIS HANDBOOK BEFORE PROCEEDING WITH THE FIRST USE.
EVENTUAL DAMAGES DUED TO THE CARRIAGE MUST BE COMUNICATED AS SOON AS POSSIBLE TO YOUR
OWN RETAILER.
ATTENTION!!
STEAM….HOT SURFACES – HOT STEAM
ATTENTION!!
READ THE OPERATING MANUAL
OPERATING MANUAL;
OPERATING INSTRUCTIONS
3 JVC 44/15
Page 4
JET VAC COMPACT
ENVIRONMENT PROTECTION
ALL THE PACKINGS ARE RECYCLABLE, PACKINGS DO NOT HAVE
TO BE THROWN IN THE DOMESTIC WASTE BUT THEY HAVE TO BE
DELIVERED TO THE CENTERS SPECIALIZED FOR THE DISPOSING
OF THE WASTE.
ALL DEVICES NOT USED ANYMORE CONTAIN PRECIOUS
RECYCLABLE MATERIALS THAT SHOULD BE DELIVERED TO THE
CENTERS SUITABLE FOR THE DISPOSING OF THE WASTE. ELECTRIC
AND ELECTRONIC EQUIPMENT, BATTERIES, OIL AND SIMILAR
SUBSTANCES MUST BE RECYCLED IN THE PROPER RECYCLING
CENTERS AND MUST NOT BE LEFT IN THE ENVIRONMENT.
SUBSTANCES SUCH AS OIL FOR MOTORS, DIESEL OIL, PETROL
MUST NOT BE LEFT IN THE ENVIRONMENT AND MUST BE RECYCLED
IN THE PROPER RECYCLING CENTERS ACCORDING TO THE
ENVIRONMENTAL REGULATIONS.
The user might return the unit for disposal also to the retailer when purchasing a new equivalent device on
a one to one ratio.
4 JVC 44/15
Page 5

JET VAC
COMPACT
1. SUMMARY
1.
SUMMARY
5
2.
SAFETY REGULATIONS
5
3.
PREFACE
7
4.
TECHNICAL CHARACTERISTICS
8
5.
PARTS LIST
9
6.
TECHNICAL DRAWINGS
10
7.
OPERATING INSTRUCTIONS
15
8.
MAINTENANCE
20
9.
BEFORE REFERRING TO THE TECHNICAL SERVICE
22
10.
DECLARATION OF CONFORMITY
23
2. SAFETY REGULATIONS
It is recommended not to open or remove any machine part for any reason; in case the unit should
present an abnormal functioning or a failure, disconnect the power plug and contact an authorized
service center or the dealer where the product has been purchased.
The electric supply connection shall be made by a qualified electrician and comply with IEC 60364-1.
If the power cable is damaged, it has to be replaced by the manufacturer or by an authorized
technical service or by a qualified person in order to prevent any risk.
It is recommended that the electric supply to this machine should include either a residual current
device that will interrupt the supply if the leakage current to earth exceeds 30ma for 30ms or a device
which will prove the earth circuit.
SAFETY VALVE This machine is equipped with two safety valves, able to ensure the safety of the
machine itself in case other primary control devices are inefficient (due to a failure). Due to the extreme
importance of these components and as not to compromise the safety of the machine, it is
recommended to provide to check them and to substitute them through an authorized service center
every 2 years starting from the purchasing date.
PRESSURE SWITCH This machine is equipped with a pressure switch able to check and to maintain
the pressure under certain preset limits (ref. “rated pressure” on the technical label underneath the
machine). In case there would be a steam leakage on the lower side of the machine, it means that the
functioning of this device has been compromised and the safety valve has been involved as to limit the
boiler’s internal pressure. It is recommended not to use the machine, immediately unplug the
machine from the power feeding and call the service center.
DRAINING CALCIUM FROM THE BOILER The unit automatically indicates the necessity to proceed
with the CALCIUM drain; it will display the notice C A L C on the panel. (refer to the chapter 8
Maintenance).
The boiler’s drain cap must be opened with the machine OFF (power supply plug removed)
since at least 5 hours.
Page 6

5 JVC 44/15
Page 7

JET VAC
COMPACT
ATTENTION. Do not use the appliance within the range of persons.
ATTENTION. The high pressure jets can be dangerous if not used properly. The jet does not have to
be directed against persons, electrical devices under tension or the unit itself.
ATTENTION. Do not direct the jet against yourself or others in order to clean clothes or footwear.
Disconnect the power supply before proceeding with the maintenance by the user.
ATTENTION. This unit is not intended to be used by children or by unqualified persons.
Monitor the children so they cannot play with the machine.
ATTENTION. To ensure the machine’s safety, use only original spare parts from the manufacturer or
spare parts approved by the manufacturer.
ATTENTION. Pressure hoses, fitting and couplings are important for the safety of the machine. Use
only hoses, fitting and couplings recommended by the manufacturer.
ATTENTION. Do not use the machine if the power cord or other important parts of the machine are
damaged, i.e. safety devices, pressure hoses and trigger gun.
ATTENTION. If an extension cord is used, the plug and socket must be of a watertight construction.
ATTENTION. Inadequate extension cords can be dangerous.
The hand-arm vibration data referred to this device are not mentioned as they are below 2,5 m/s² .
ATTENTION. This appliance has been designed for a use with cleaning agents supplied or
recommended by the manufacturer. The use of other cleaning agents or chemicals may adversely
affect the safety of the user and of the appliance itself.
ATTENTION. The detergent injection of this appliance can’t be used continuously but intermittently
(20 seconds ON - 20 seconds OFF). The detergent can be continuously used for no longer than two
minutes.
When using detergent (make sure it’s non-foaming) please follow the specific instructions: 1 litre of
detergent for every 10 litres of water (detergent percentage about 10%), making sure to fill in first the
detergent to obtain a better mixing. Please be careful with the detergent to be used as some
available in commerce will emanate highly toxic gases when heated above 100°C. Always
consult the MSDS datasheet from the manufacturer.
ATTENTION. In case of accidental contact with the detergent, strictly follow the instructions indicated
on its packaging or in its MSDS.
6 JVC 44/15
Page 8

JET VAC
COMPACT
3. PREFACE
Dear Client,
We would like to congratulate you on your choice.
With the goal of improving and continually updating production by always offering innovative products,
JVC has studied, designed and created the JET VAC COMPACT, a combined model for cleaning which
brings together the power of steam and the force of vacuuming.
This product, with its steel body, is equipped with a dependable stainless steel boiler with automatic
refilling system which allows it to produce a powerful and continuous supply of steam (24/24 hours).
JET VAC COMPACT is also equipped with a separate detergent tank which allows the injection of
detergent at 90-125°C.
With the power of steam, meaning ecological cleaning power, JVC has combined a powerful vacuum able
to pick up solids and liquids.
JET VAC COMPACT is the ideal solution when it comes to cleaning and disinfecting.
Pay careful attention to the following instructions which will be helpful in operating your JET VAC
COMPACT.
Page 9

7 JVC 44/15
Page 10
JET VAC COMPACT
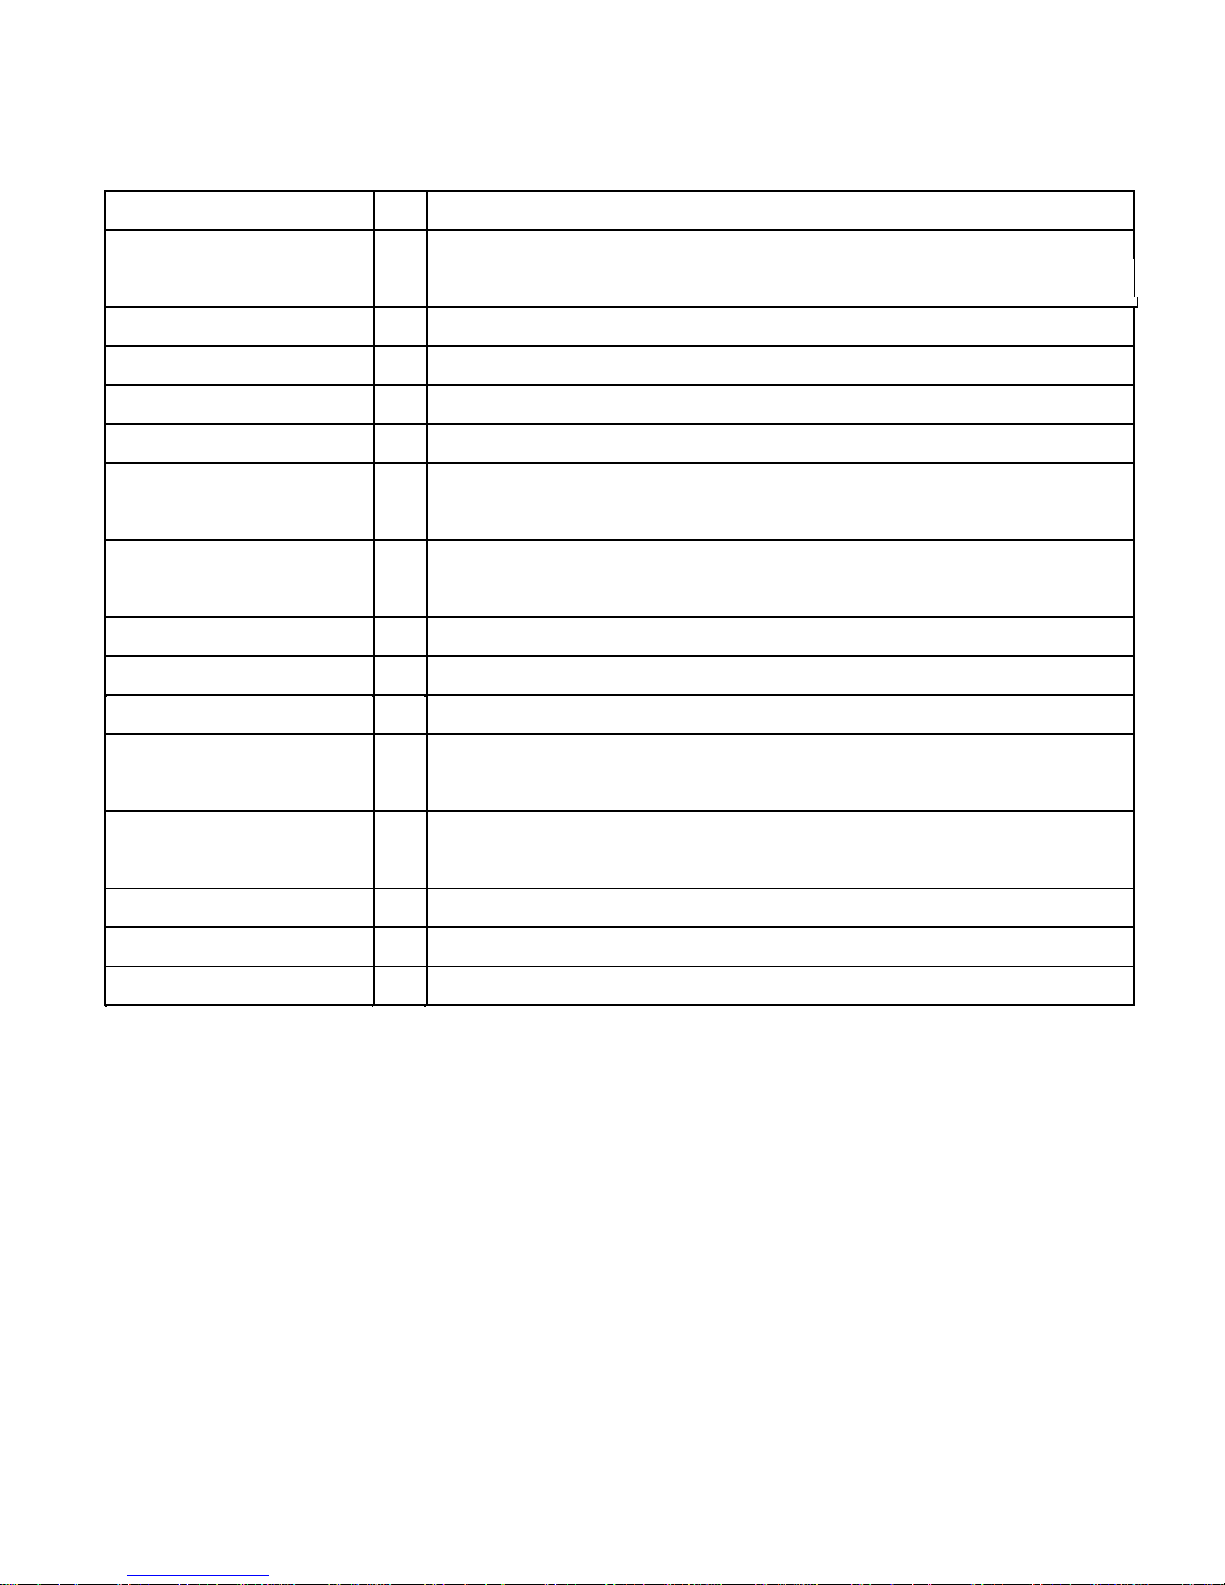
4. TECHNICAL CHARACTERISTICS
FACTORY: JVC SRL
VIA DEI SASSI 1A 37026 PESCANTINA VERONA ITALY
Model
Jet Vac Compact
Rated Voltage
V
230
Current type
Hz
50/60
Rated Power Boiler
kW
3
Max Rated Power
kW
3
Rated Steam Pressure
kPa
600
bar
6
Permissible Steam Pressure
kPa
1200
bar
12
Max. Steam Rated Flow
g/min
97
Max. Steam Rated Flow
Kg/h
5.9
Max temperature
°C
165
Max. inlet water pressure
KPa 600
bar
6
Min. inlet water pressure
KPa 50
bar
0,5
Kickback forces
N
< 20
Vibration hand-arm
m/s² < 2,5
Weight
kg
33
8 JVC 44/15
Page 11

JET VAC COMPACT
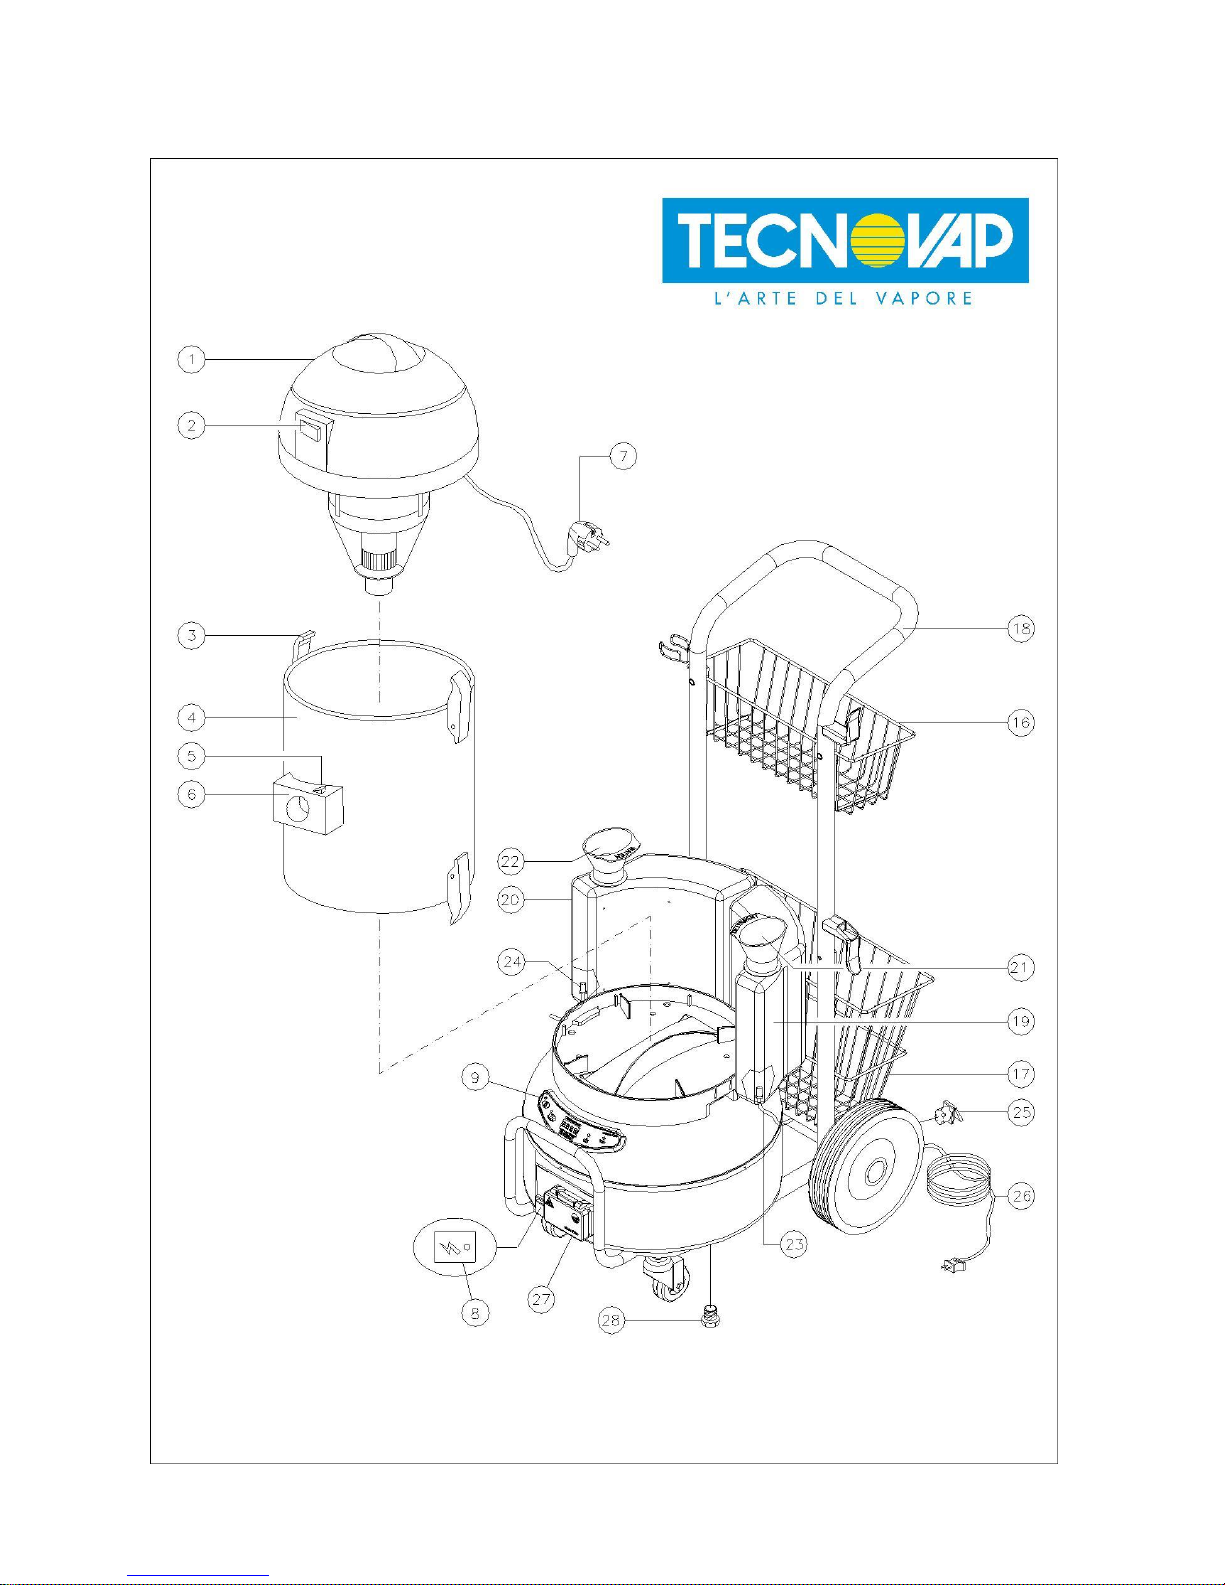
5. NOMENCLATURE
1) Vacuum cleaner motor head
2) Vacuum cleaner power switch
03) Clamping hooks for vacuum drum
04) Vacuum drum (5,5 – 7,5 liters)
05) Locking latch vacuum outlet
06) Vacuum hose outlet
07) Vacuum cleaner power cord
08) General power switch
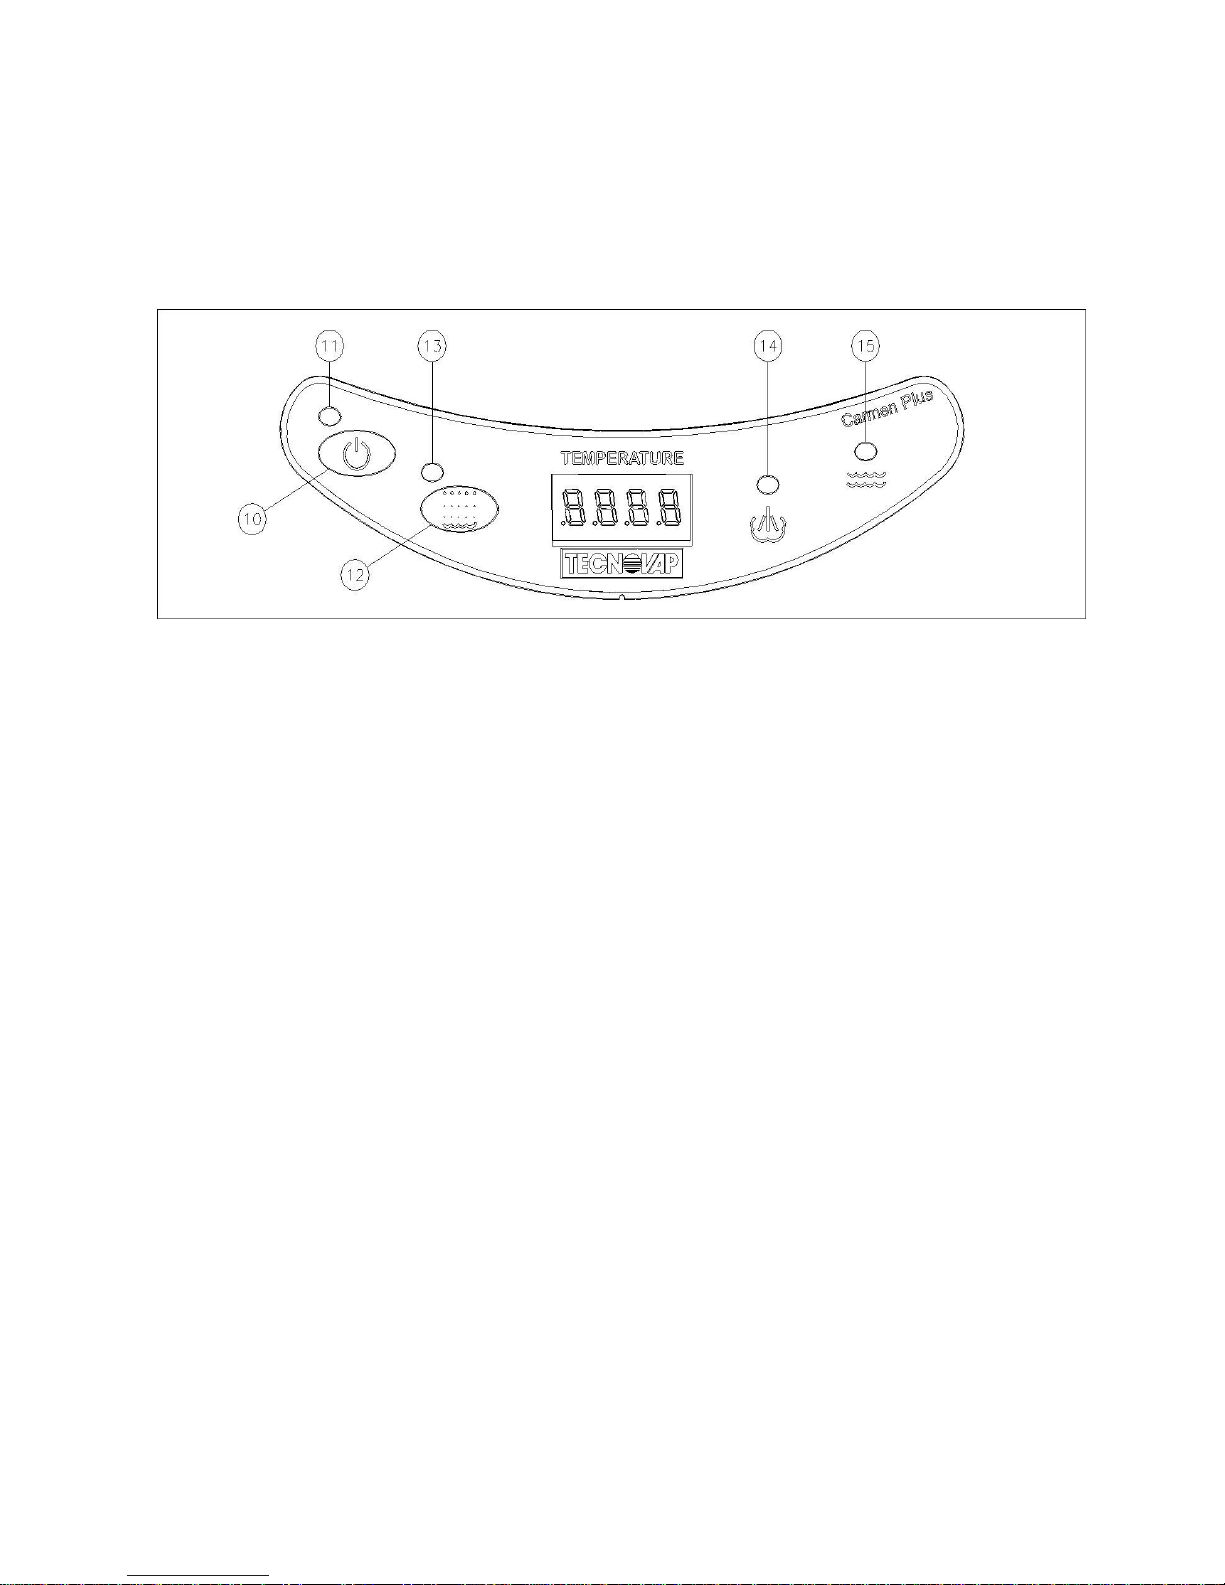
9) Control panel
10) “Power / Stand-by” button
11) “Power / Stand-by” indicator
12) “Boiler” button
13) “Boiler on” indicator
14) “Steam Ready” indicator
15) “Low Water” indicator
16) Small basket for trolley
17) Large basket for trolley
18) Trolley handlebar
19) Detergent tank
20) Water tank
21) Detergent tank cap (yellow)
22) Water tank cap (blue)
23) Drain tube: detergent tank
24) Drain tube: water tank
25) Electric socket for vacuum cleaner
26) Power cord
27) Steam outlet
28) Boiler drain cap
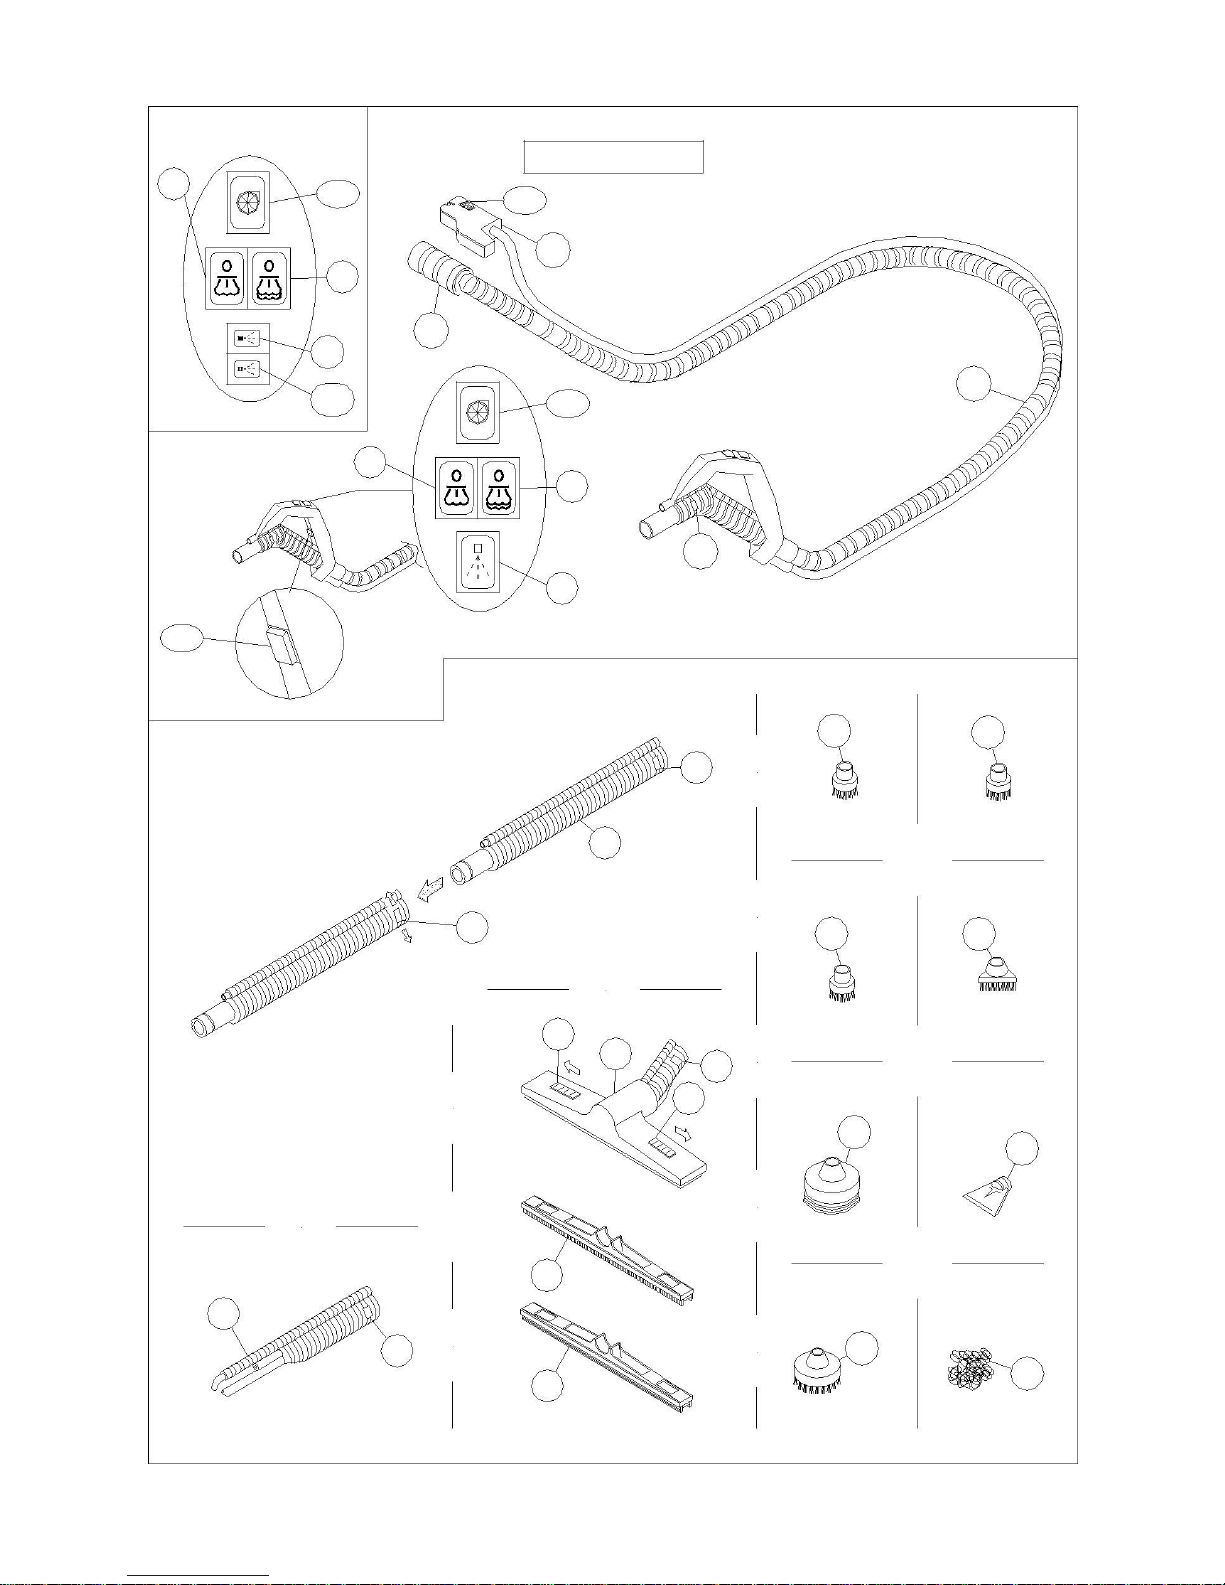
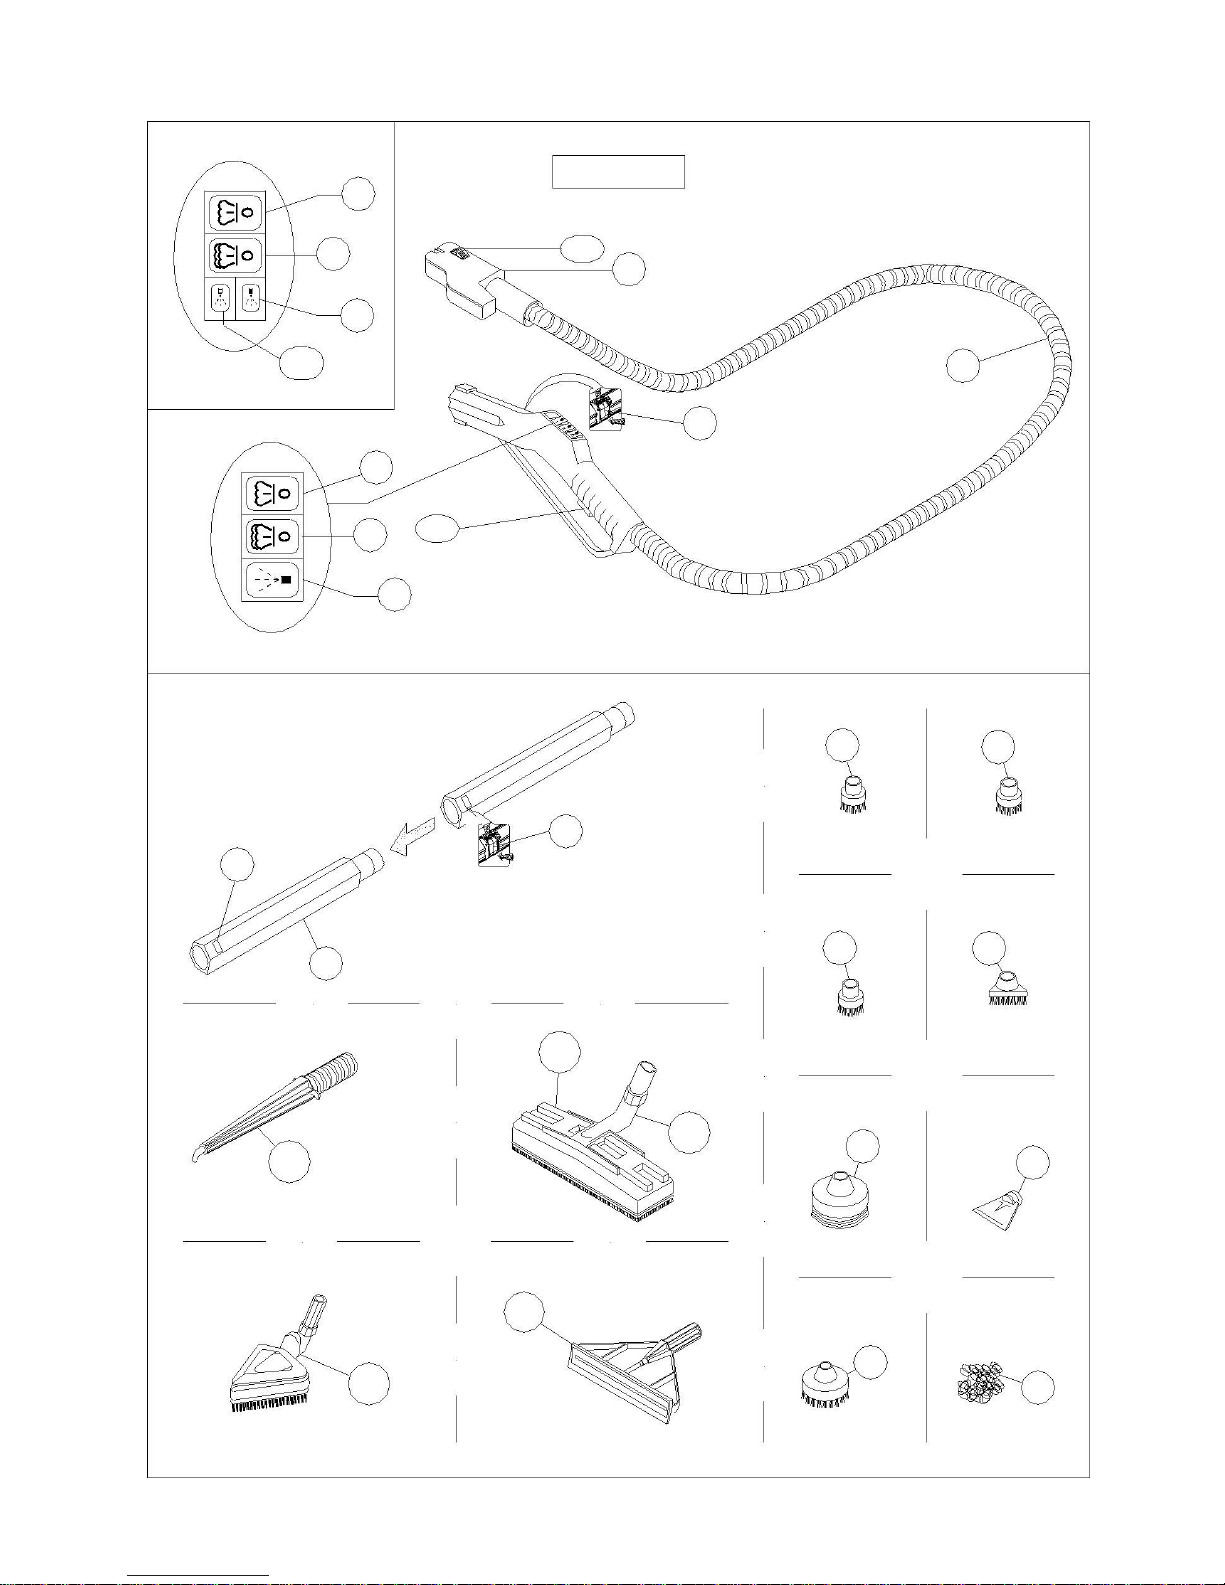
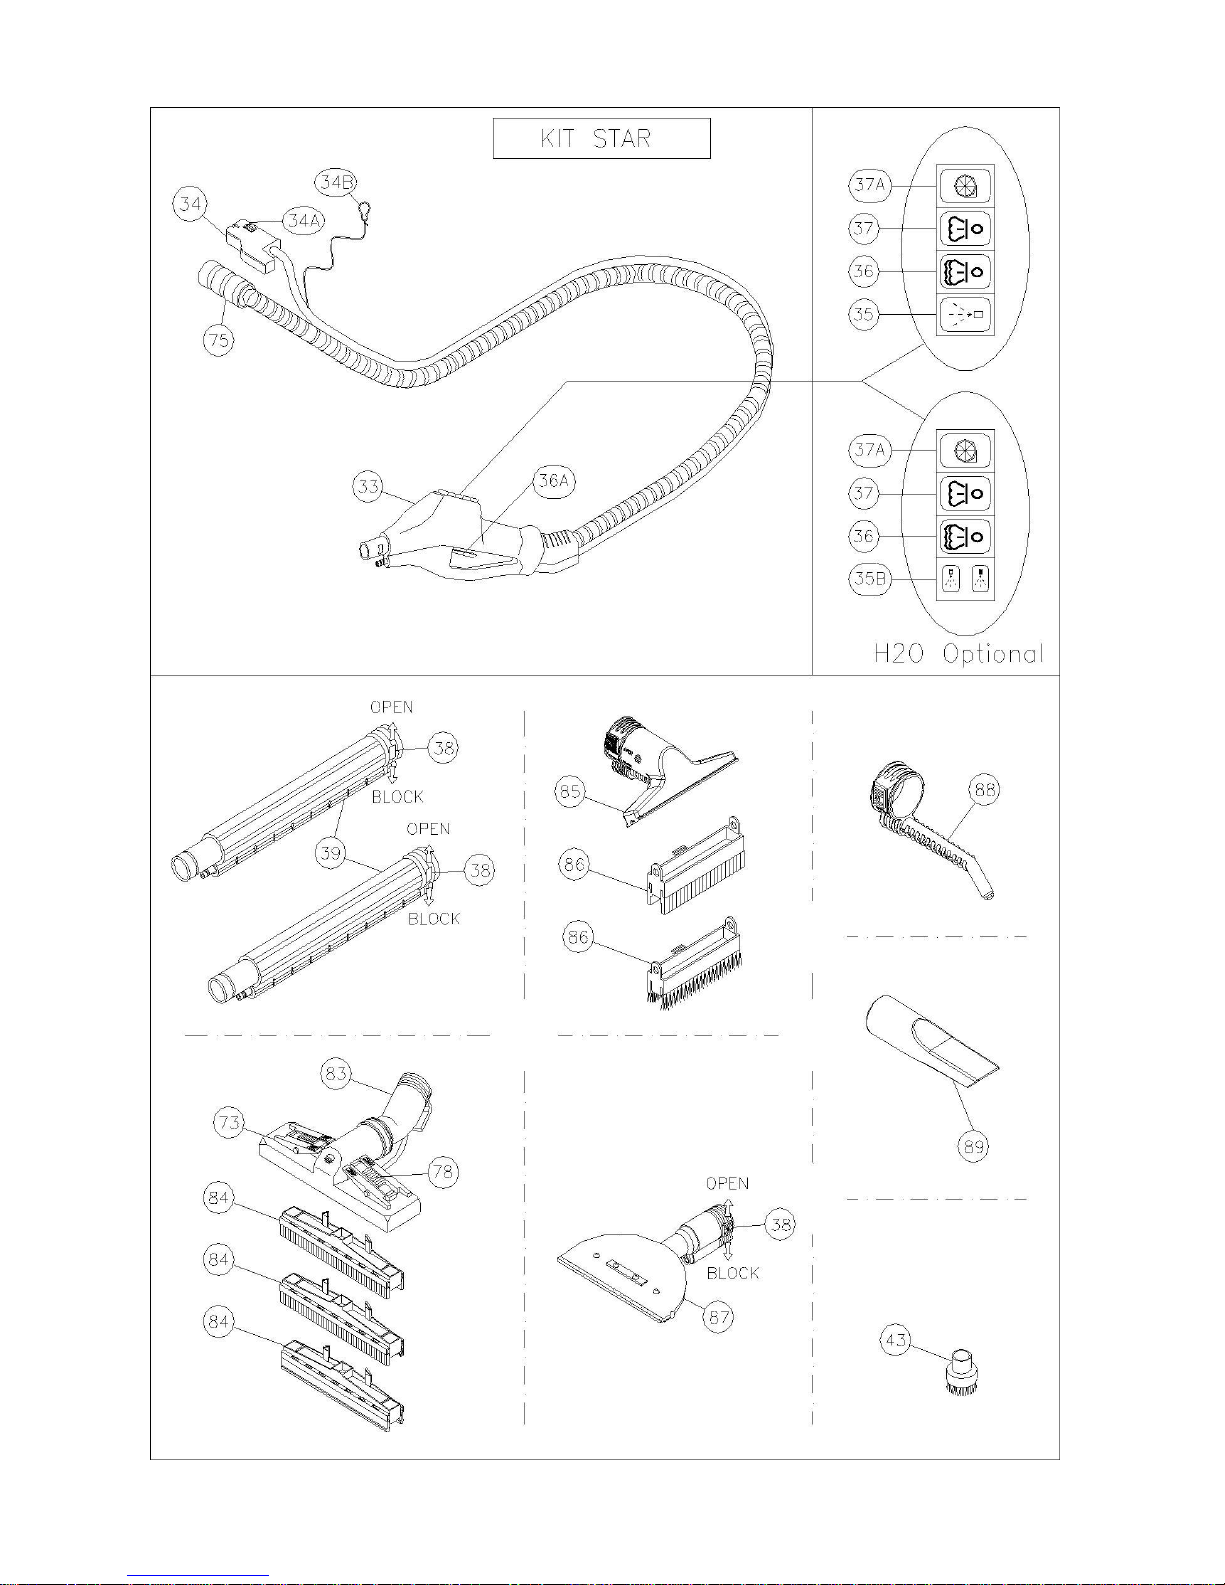
Kit July/Radames/Star
33) Steam / steam & vacuum hose w/handgrip
34) Steam plug
34A) Locking latch steam plug
34B) Steel rope
35) Detergent switch
35A) Hot water switch (optional)
35B) Detergent/hot water switch (optional)
36) Steam adjustment switch - minimum
36A) Steam command switch / lever
37) Steam adjustment switch - medium
37A) Vacuum switch
38) Locking latches for accessories
39) Extension tube
43) Nylon brush (Ø 28mm)
44) Brass brush (Ø 28mm)
45) Stainless steel brush (Ø 28mm)
46) Triangular brush
47) Steam plunger
48) Steam scraper
49) Nylon brush (Ø 60mm)
50) Stainless steel wool pad
71) Steam lance
72) Rectangular brush
73) Cloth holder
74) Triangular brush
75) Vacuum hose
76) Steam/vacuum lance
77) Floor tool for inserts
78) Locking latches for inserts
79) Insert squeegee/brush
80) Insert squeegee/squeegee
83) Floor tool for inserts
84) Inserts 300 mm brush / squeegee / for carpet
85) Steam/vacuum nozzle
86) Inserts 145 mm brush / squeegee
87) Steam / vacuum window cleaner 250 mm
88) Steam lance
89) Vacuum nozzle
9 JVC 44/15
Page 12
JET VAC COMPACT
6. TECHNICAL DRAWINGS
10
JVC 44/15
Page 13
JET VAC COMPACT
H2O Optional
KIT RADAMES
36 37A
34A
34
37
35
75
35A 37A
33
36
37
38
35
36A
43
44
38
39
OPEN
38
45
46
BLOK
78
77
38
78
47
48
79
76
38
49
80
50
11
JVC 44/15
Page 14
JET VAC
COMPACT
H2O Optional
36
KIT JULY
37 34A
34
35
35A
33
BLOCK
38
36
37
36A
35
43
44
OPEN
38
38
BLOCK
39
45
46
73
72
47
71
48
77
74
49
50
12
JVC 44/15
Page 15
JET VAC COMPACT
13
JVC 44/15
Page 16
JET VAC COMPACT
CONTROL PANEL
9 – Control panel
10 : “Power / Stand-by” button
11 : “Power / Stand-by” indicator
12 : “Boiler” button
13 : “Boiler on” indicator
14 : “Steam Ready” indicator
15 : “Low Water” indicator
14 JVC 44/15
Page 17

JET VAC
COMPACT
7. OPERATING INSTRUCTIONS
(a) After opening the packaging box, insert the main handlebar (18) onto the trolley base and block into
place by inserting the large basket (17) into the bottom holes of the handlebar. Then insert the small
basket (16) into the top holes of the handlebar.
(b) Insert the plug (7) into the outlet (25) located behind the machine, and verify that the vacuum power
switch (2) on the vacuum head is in ON position.
(c) Remove the tanks caps (21 and 22), fill in water (max 3 litres) in the water tank (blue funnel) and fill
in the appropriately diluted detergent (max 3 litres) in the detergent tank (yellow funnel). It is
recommended to be very careful during this process because an inverted filling up (detergent
into the water tank or water into detergent tank) causes a steam generator fault.
(d) When using detergent (not foamy for extractions machines), please follow the specific instructions
reported on original packaging: normally 1 litre
(e) 1 litre detergent for every 10 litres water (percentage detergent about 10%), making sure to fill in first
the detergent to obtain a better mixing. Please be aware to the used detergent, as some in
commerce, if you get them above 100°C, taken to the gaseous state, could emanate highly
toxic steams. Be aware to check the technical data sheet and to consult the supplier.
The detergent tank has to be filled only with detergent diluted with water, not with water only,
unless you are not using demineralized water.
The usage of water only (not demineralized) instead of detergent causes faults to the mixing circuit.
(f) Insert the plug (26) into an electrical socket, making sure that the voltage and the amperage
correspond with the data printed on the plate located near the handlebar on the machine.
(g) Switch the unit on by using the main switch (8) and activate the “Power / Stand-by” (10) and the
“Boiler” (12) switches.
ATTENTION
Once the water tank is empty the red “Low water” indicator light (15) will switch on followed by an
intermittent acoustic signal, at the same time the system will disable the power of the heating
element until the water tank (22) is filled again.
To reactivate the device, switch off the unit by the button (10), refill the water tank (22) and
afterwards switch on the unit again by the button (10).
If the water tank is filled without a prior switching off the machine, the low water indicator light and
acoustic signal will remain on; switch the unit off and on again as described above in order to
continue the work.
The intervention of the system can occur also after the refilling of the boiler once performed the mud drain
during the maintenance process; in this case it will last for 30 seconds and it does not have to be
considered as a faulty signal.
Note: Water refilling can be executed without switching the device off.
Page 18

15 JVC 44/15
Page 19

JET VAC
COMPACT
Hour counters
The device is equipped with two hour counters, one resettable by the user and one non resettable. To
visualize the hours, switch the device off by using the button (10), subsequently press the button (12),
every time you press this button you can read the respective partial hour counter and total hour counter.
Reset of the partial hour counter
Switch the device off by using the main switch (8) located in the front of machine, press both “Power /
Stand-by” (10) and “Boiler” (12) switches and hold them, switch the device on by using the main switch
(8), once finished the LED lights sequence, release the switches and the hour counter C2 will be brought
to 0000.
Indication of boiler cleaning operation (C A L C )
The controller has been programmed to warn the user about the ordinary maintenance period; the system
has been programmed in order to warn each 30 effective working hours (steam solenoid valve on).
Proceed as described in the section 8 “Maintenance of the boiler” in order to perform the liquids drainage.
Warning indication (C A L C ) restoration
After having performed the maintenance, switch the device off by using the “Power / Stand-by” switch (10),
press and hold for 10 seconds the “Boiler” switch (12). The warning C A L C will be restored.
Pressure visualization
With the unit being turned on press and keep pressed the “Boiler” button (12), after some seconds the
display will show the value of the pressure in bar inside the boiler, this data will remain visible on the
display for 10 seconds, afterwards the value of the temperature in °C will appear again.
Power save mode
The power save mode permits to reduce the unit’s consumption after 1 hour of inactivity. For activating or
deactivating such mode it is enough to switch the generator off by pressing and holding for 10 seconds the
“Power / Stand-by” button (10), the display will show alternately T-ON or T-OFF depending on the
previously selected setting.
Refilling of detergent :
Once the detergent tank is empty, proceed as follows:
1. Add diluted detergent into the tank (19).
2. Switch the device on, by pressing the “Power / Stand-by” switch (10) and the “Boiler” switch (12).
3. Activate the detergent switch (35), press and hold the steam command switch (36A) until detergent
starts coming out from the tool.
4. Detergent has been trigged and the machine is now ready for use.
16 JVC 44/15
Page 20

JET VAC
COMPACT
7.1. OPERATING OF JET VAC COMPACT WITH KIT RADAMES
Attention!!
It is recommended to switch the steam generator off before connecting the steam hose to the
steam outlet.
Insert the vacuum hose (75) into the vacuum hose outlet (6) and the steam plug (34) into the steam
outlet (27) on the machine. Push until the latches (5 and 34A) lock into place.
Activate the general power switch (8), the “Power / Stand-by” switch (10) and the “Boiler” switch (12) for
the production of steam and wait approx. 4 minutes until the indicator (14) lights up indicating the
presence of steam inside the boiler.
The switches (36, 37 and 37A) on the handle have to be switched off (in OFF position).
Activate the switches (36 and 37) on the handgrip to regulate the steam flow as follows: switch (36):
minimum steam, switch (37): medium switch, switches (36 and 37): maximum steam. Use the steam
command switch (36A) to activate steam flow.
The vacuum switch (37A) activates the vacuum cleaner and can be used simultaneously with steam.
The switch (35) enables you to inject detergent with the steam by activating it for a few seconds at a time
to avoid excess liquid with the steam; to spray hot water (for models with the function of hot water
injection) please refer to what above indicated activating the switch (35A).
Both detergent and hot water injection functions have to be activated at intermittence (for ex. 20 seconds
ON - 20 seconds OFF); both functions have not to be used in continuous duty.
Detergent injection or hot water injection (optional) is possible only if at least one steam command switch
is activated and if “Steam Ready” indicator (14) is on.
Attention!!
Using the switch (35A) you will get hot water under pressure which, according to the model of the
machine, can reach a temperature of 180°C; please pay attention that the switch has not to be
pressed accidentally and that the jet has not to be directed toward people or animals.
To clean with the combination of steam, injection of detergent or of hot water and vacuum suction, choose
the accessory best suited for the job:
The multi-purpose floor tool (77): with appropriate inserts (79 and 80). Inserts are locked into place by
sliding the latches (78) toward the internal side (OPEN position), pressing them upwards, then sliding the
latches toward the external side (BLOCK position). Remember that the command switches on the handle
(36-37-37A) must be in OFF position until the end of this procedure.
Steam/vac lance (76): to be used by itself, or with the small round brushes (43-46, 49), or with steam
plunger (47), or with steam scraper (48) according to the cleaning job to be executed.
If necessary, attach the extension tubes (39) and lock them into place using the clamping units (38) in
BLOCK position. Only one tube may be used if desired.
17 JVC 44/15
Page 21

JET VAC
COMPACT
Once the cleaning is finished it is recommended to vacuum approx. 3-5 litres of clean water to rinse the
inside of the hose (33) and the suction conduits. Wash and dry all accessories used. Remove the vacuum
drum (4) and, after emptying and rinsing it, let it dry before storing it away.
7.2. OPERATING OF JET VAC COMPACT WITH KIT JULY
Attention!!
It is recommended to switch the steam generator off before connecting the steam hose to the
steam outlet.
Insert the steam plug (34) into the steam outlet (27) on the machine. Push until the latches (34A) lock into
place.
Activate the general power switch (8), the “Power / Stand-by” switch (10) and the “Boiler” switch (12) for
the production of steam and wait approx. 4 minutes until the indicator (14) lights up indicating the
presence of steam inside the boiler.
The switches (36, 37) on the handle have to be switched off (in OFF position).
Activate the switches (36 and 37) on the handgrip to regulate the steam flow as follows: switch (36):
minimum steam, switch (37): medium switch, switches (36 and 37): maximum steam. Use the steam
command switch (36A) to activate steam flow.
The switch (35) enables you to inject detergent with the steam by activating it for a few seconds at a time
to avoid excess liquid with the steam; to spray hot water (for models with the function of hot water
injection) please refer to what above indicated activating the switch (35A).
Both detergent and hot water injection functions have to be activated at intermittence (for ex. 20 seconds
ON - 20 seconds OFF); both functions have not to be used in continuous duty.
Detergent injection or hot water injection (optional) is possible only if at least one steam command switch
is activated and if “Steam Ready” indicator (14) is on.
Attention!!
Using the switch (35A) you will get hot water under pressure which, according to the model of the
machine, can reach a temperature of 180°C; please pay attention that the switch has not to be
pressed accidentally and that the jet has not to be directed toward people or animals.
Insert the steam lance (71) directly onto the hose (33) or on extension tubes (39) by sliding the latch (38)
to the OPEN position, lock into place and then slide the latch into the BLOCK position.
Follow the same procedure in attaching the rectangular brush (72) or the triangular brush (74) which
can be covered with an absorbing cloth by using the gripper to hold the cloth in place. This is a
recommended use to clean delicate surfaces (such us precious wood f. e.) or vertical surfaces (tiles
f.e.). In this case the cloth is acting as dirt “extractor”.
18 JVC 44/15
Page 22

JET VAC
COMPACT
7.3. OPERATING OF JET VAC COMPACT WITH KIT STAR
Attention!!
It is recommended to switch the steam generator off before connecting the steam hose to the
steam outlet.
Insert the vacuum hose (75) into the vacuum hose outlet (6) and the steam plug (34) into the steam
outlet (27) on the machine. Push until the latches lock into place. Activate the general power switch (8),
the “Power / Stand-by” switch (10) and the “Boiler” switch (12) for the production of steam and wait
approx. 4 minutes until the indicator (14) lights up indicating the presence of steam inside the boiler.
The switches (36, 37 and 37A) on the handle have to be switched off (in OFF position).
Activate the switches (36 and 37) on the handgrip to regulate the steam flow as follows: switch (36):
minimum steam, switch (37): medium switch, switches (36 and 37): maximum steam. Use the steam
command switch (36A) to activate steam flow.
The vacuum switch (37A) activates the vacuum cleaner and can be used simultaneously with steam.
The switch (35) enables you to inject detergent with the steam by activating it for a few seconds at a time
to avoid excess liquid with the steam; to spray hot water (for models with the function of hot water
injection) please refer to what above indicated activating the switch (35B).
Both detergent and hot water injection functions have to be activated at intermittence (for ex. 20 seconds
ON - 20 seconds OFF); both functions have not to be used in continuous duty.
Detergent injection or hot water injection (optional) is possible only if at least one steam command switch
is activated and if “Steam Ready” indicator (14) is on.
Attention!!
Using the switch (35B) you will get hot water under pressure which, according to the model of the
machine, can reach a temperature of 180°C; please pay attention that the switch has not to be
pressed accidentally and that the jet has not to be directed toward people or animals.
To clean with the combination of steam, injection of detergent or of hot water and vacuum suction, choose
the accessory best suited for the job:
The multi-purpose floor tool (83): with appropriate inserts (84). Inserts are locked into place by sliding the
latches (78) toward the internal side (OPEN position), pressing them upwards, then sliding the latches
toward the external side (BLOCK position). By consequence apply the tool on the hose or on the
extension tubes and lock them with the latches (38). Remember that the command switches on the handle
(36-37-37A) must be in OFF position until the end of this procedure.
Steam/vac lance (88 and 89): to be used by itself or with the small round brush (43). To fix this tool
please refer to the fixing instruction indicated above.
Once the cleaning is finished it is recommended to vacuum approx. 3-5 litres of clean water to rinse the
inside of the hose (33) and the suction conduits. Wash and dry all accessories used. Remove the vacuum
drum and, after emptying and rinsing it, let it dry before storing it away.
19 JVC 44/15
Page 23

JET VAC
COMPACT
8. MAINTENANCE
8.1. Maintenance of the boiler
ATTENTION
DESCONNECT THE UNIT FROM THE ELECTRICAL POWER SUPPLY BEFORE CARRYING OUT USER
MAINTENANCE.
ATTENTION. BURNING DANGER
The boiler cleaning must be carried out when the equipment has cooled down (i.e. switched off for
at least 5 hours) - for this reason we suggest to maintain the boiler in occasion of the following
use, as long as at least 5 hours have passed. Please proceed as follows:
The device is equipped with a maintenance warning system, which every 30 effective working hours
displays the advice “C A L C” to warn the user to proceed with the boiler cleaning.
When this warning appears on the display it is still possible to use the unit until the end of the cleaning
process; then, it will be necessary to switch the unit off by using the main switch (8) and unplugging the
power cable (26). The boiler cleaning must be carried out when the equipment has cooled down (i.e.
switched off for at least 5 hours) - for this reason we suggest to maintain the boiler in occasion of
the following use, as long as at least 5 hours have passed. Please proceed as follows:
Place a recipient under the machine, remove the boiler drain cap (28) and wait until the boiler is
completely emptied.
Clean eventual residuals from the cap with running water, check the efficiency of the gasket located on the
bottom of the cap and, if necessary, substitute it (please contact your supplier for the spare parts); close
the drain cap again.
Using water with hardness higher than 10 French degrees, (according to the usage of the unit, > 2 hours
/ day) it is necessary to use water treated with a proper water softener system, which can reduce the
calcium carbonate up to less than 4 French degrees, increasing by consequence the liability of the
steam generator. (for any further details or to buy a water softener system, contact your supplier).
The cleaning of the boiler is completed, insert the power cable (26) into a suitable plug and activate the
main switch (8), the “Power / Stand-by” switch (10) and the “Boiler” switch (12). It is recommended to
activate also the minimum steam switch (36) on the handgrip, pressing also the safety switch (36A) to
allow the outlet of the air remained in the empty boiler. Wait until the refilling system has finished
(approx. 2 minutes).
The maintenance of the boiler is completed; proceed with the using instructions as described in the
paragraph (f) of the chapter 7.
We suggest to empty the water tank (20) completely if the machine will not be used for a long period of
time.
Page 24

20 JVC 44/15
Page 25
JET VAC COMPACT
8.2. Maintenance of the vacuum cleaner
The vacuum cleaner of JET VAC COMPACT models does not require any specific maintenance. Always
clean the drum and filter after use.
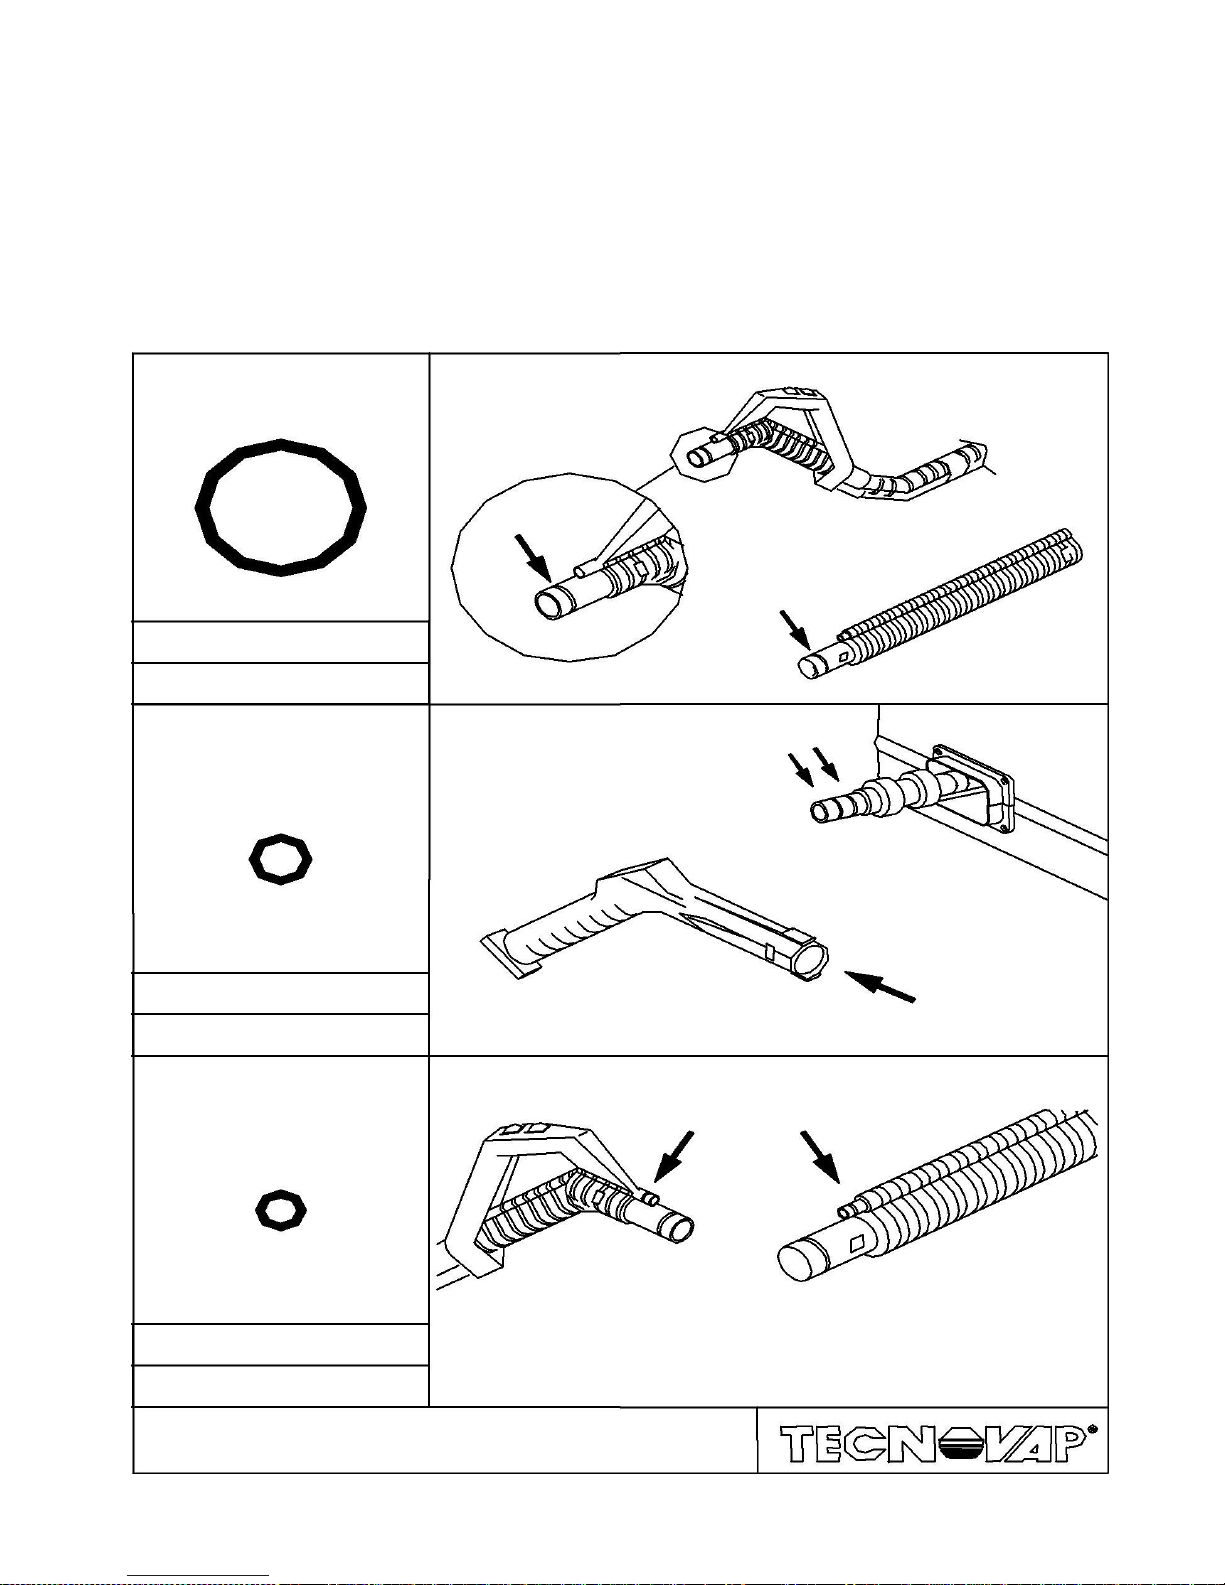
8.3. Maintenance of the tools
Grease occasionally joints on the extension tubes and on the accessories.
PG5123
OR 29.82x2.62
PG5106
OR 9.25x1.78
PG5116
OR 6.75x1.78
21 JVC 44/15
Page 26
JET VAC COMPACT
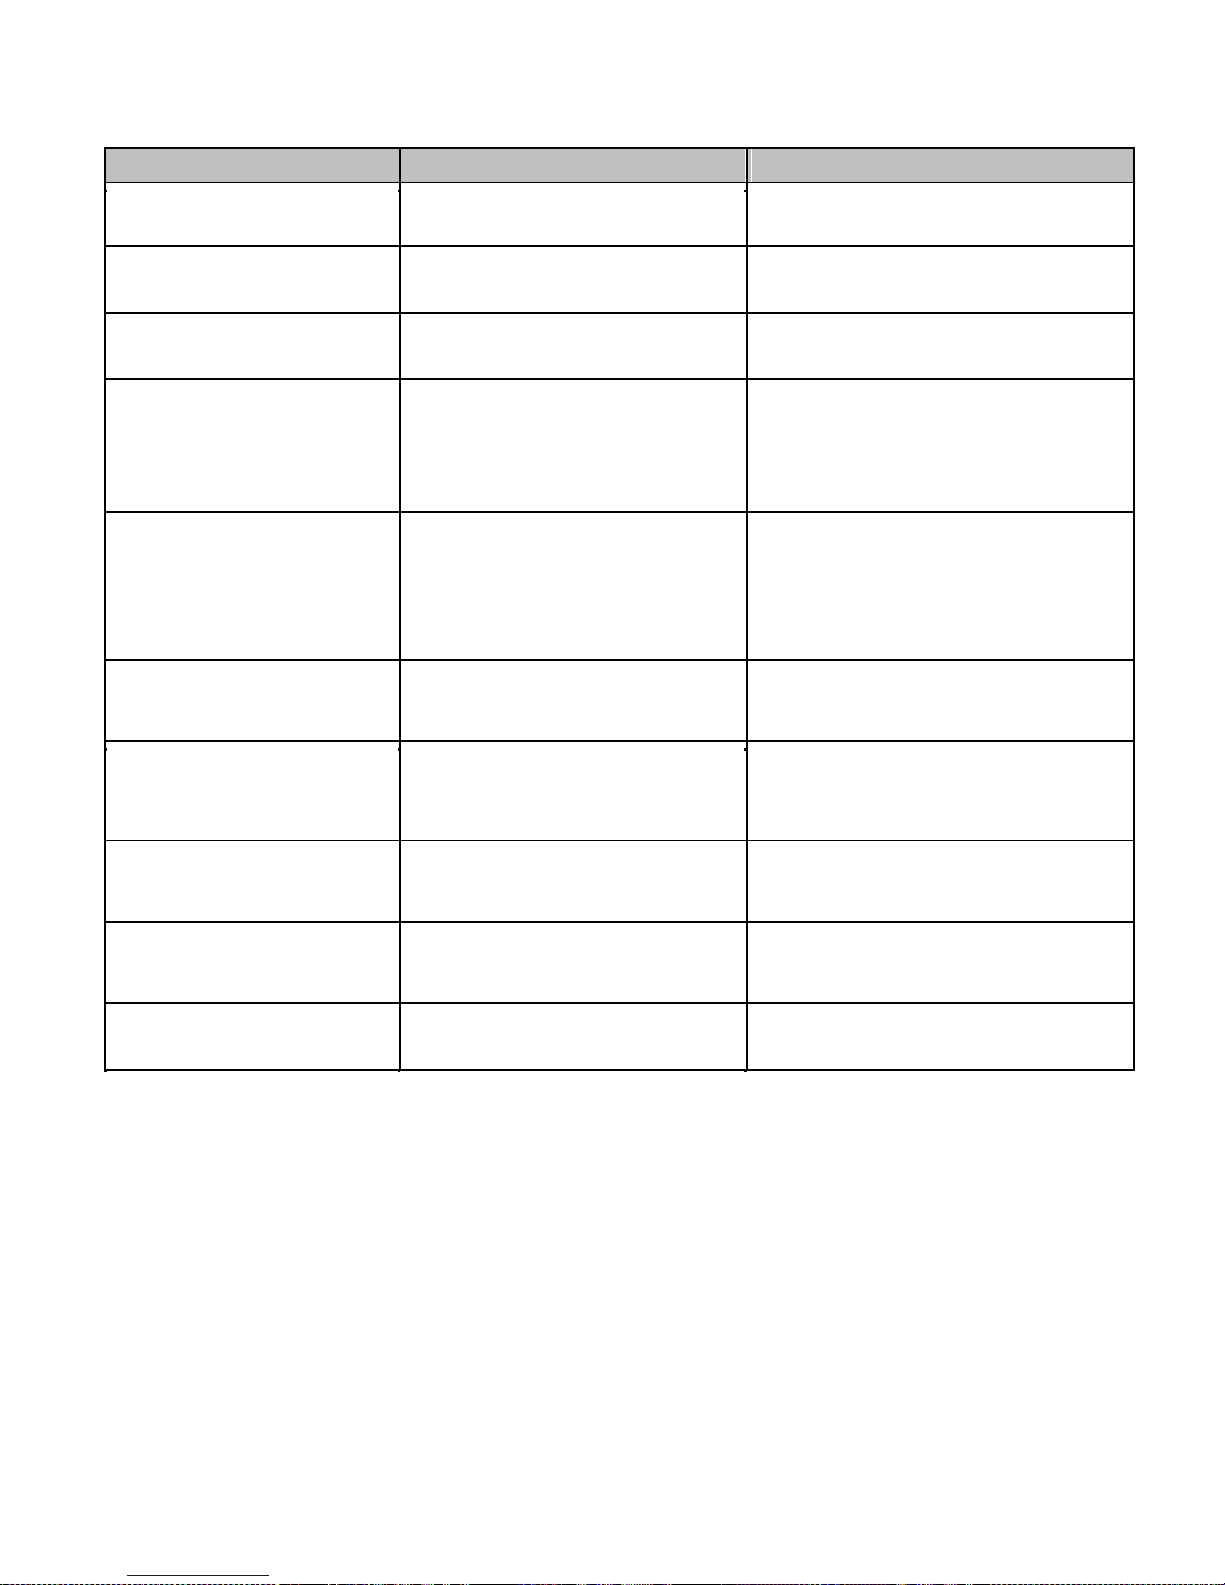
9. BEFORE REFERRING TO THE TECHNICAL SERVICE
PROBLEM
POSSIBLE CAUSE
REMEDY
Machine does not produce steam and
Lack of power.
Make sure that the plug (26) is well inserted and that
vacuum does not work.
the main switch of the building is activated.
The red “Low Water” indicator (15)
All the water from the water tank (20) has been
Refill the water tank (20) with clean water.
lights up.
consumed.
There is no injection of detergent.
All the detergent from the detergent tank (19) has
Check the level in the detergent tank (19).
been consumed.
If necessary, refill the detergent tank (19).
Suction power is missing.
A) Lack of power to the vacuum cleaner.
A) Make sure that the switch (2) is in ON position and
that the plug (7) is well inserted into the socket (25).
B) The vacuum tube is obstructed.
B) Clean the vacuum tube and the accessory in use.
C) The vacuum drum (4) is full of water.
C) Empty the vacuum drum (4).
Steam does not come out.
A) Boiler has not reached yet the operational
A) Wait a few minutes.
pressure (light (10) is off).
B) Steam command switches (36-37) are off.
B) Switch on the steam command switches (36-37).
C) Steam command switch (36A) has not been
C) Use the steam command switch (36A) to activate
activated.
the steam flow.
Steam leaks through the connections of
Check the wear of the o-rings.
Clean and lubricate the o-rings.
the accessories.
If necessary, substitute them with the spares supplied.
Visualization of “ALL2” on the display.
Temperature exceeded the threshold, drain cap
Insert the drain cap, discharge the air inside the boiler
not inserted, boiler under pressure after the
calcium
by activating the steam switch on the handgrip.
draining.
Drops of water come out of the
At beginning of work water condenses in the
After a few minutes of use this problem will cease.
accessories.
tubes and tools due to the difference in
If it continues, proceed to the cleaning of the boiler.
temperature between steam and accessories.
Noise inside the generator.
The boiler getting cold, after about 6-7 hours
Wait the pressure stabilization (about 2-3 minutes), the
creates an internal depression which, at each
noise will disappear.
ignition, provokes some vibrations.
Accessories do not fit perfectly.
There is dirt build up in the joints and locking
Clean and lubricate the joints.
latches (38).
22 JVC 44/15
Page 27

JET VAC COMPACT
10. DECLARATION OF CONFORMITY
DICHIARAZIONE DI CONFORMITA’ CE
(EC DECLARATION OF CONFORMITY)
JVC S.R.L. con la presente dichiara che: la
macchina per pulizia a vapore modello: (Certifies
that the steam cleaning machine model:)
Chattanooga Jet Vac Compact
Risulta conforme alle specifiche delle direttive
(conforms to the specifications of directives)
2006/95/CE 2004/108/CE 2006/42/CE 2002/95/CE
Per il controllo della conformità alle sopraindicate direttive, sono stati seguiti i seguenti standard :
(For the checking of conformity to the above directives, the following standards have been used):
Riferimento alle norme armonizzate:
(Reference to harmonized standards):
EN 60335-1
EN60335-2-79
EN 60335-2-2
EN 55014-1
EN55014-2
EN 61000-3-2
EN 61000-3-3
PESCANTINA – VERONA (ITALY) 21-03-2016
23 JVC 44/15
Page 28
JET VAC
COMPACT
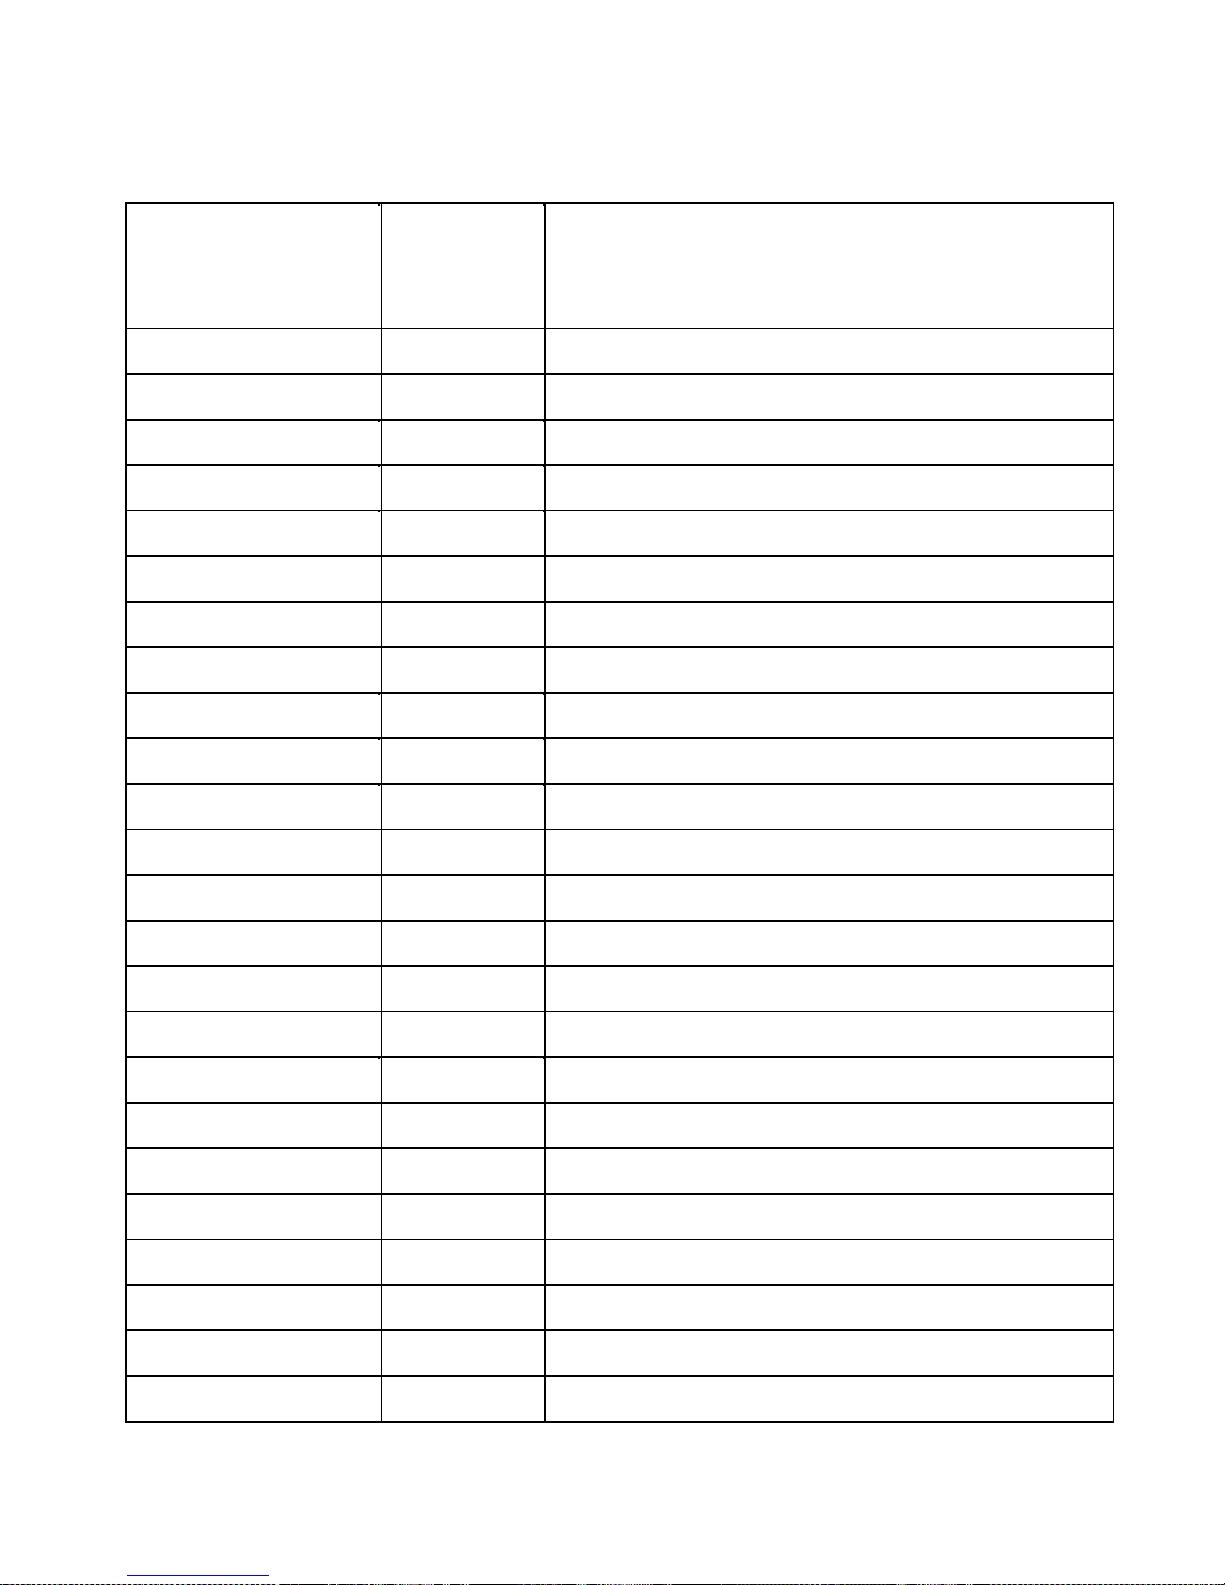
Ordinary maintenance procedures
Generator working
Frequency
Notes
hours
of
intervention
24 JVC 44/15
Page 29
JET VAC
COMPACT
Extraordinary maintenance procedures
Generator
Date of
working
intervention
Intervention description, replaced components etc.
hours
25 JVC 44/15
Page 30

JET VAC COMPACT
NOTES
26 JVC 44/15
Page 31

JET VAC
COMPACT
27 JVC 44/15
Page 32

JET VAC
COMPACT
THE MANUFACTURER RESERVES THE RIGHT TO BRING TECHNICAL AND STRUCTURAL IMPROVEMENTS
WITHOUT PRIOR NOTICE.
Via dei Sassi 1/A, Pescantina (VR) Italy - Tel. +39 045 6767252
Fax. +39 045 6703631 – E-mail: [email protected] – www.JVC.it
28 JVC 44/15
 Loading...