

Page 1
Dohse Aquaristik GmbH & Co. KG
www.dupla.com
Using instruction
pH-Control Pro
Item no. 80286 · Status: 03/2013 ·Version: 1.1
Dohse Aquaristik GmbH & Co. KG · www.dohse-aquaristik.com
Page 2

Table of contents
1. Introduction . . . . . . . . . . . . . . . . . . . . . . . . . . . . . . . . . . . . . . . . . . . . 3
1.1
2. Description of the basic functions. . . . . . . . . . . . . . . . . . . . . . . . . . . . . . . . . 5
3. Description of the programmable functions . . . . . . . . . . . . . . . . . . . . . . . . . . . 6
3.1.1 Time setting . . . . . . . . . . . . . . . . . . . . . . . . . . . . . . . . . . . . . . . . . . . . . . . . . . 6
3.2.1 pH set point . . . . . . . . . . . . . . . . . . . . . . . . . . . . . . . . . . . . . . . . . . . . . . . . . . 6
3.2.2 CO
3.2.3 pH alarm. . . . . . . . . . . . . . . . . . . . . . . . . . . . . . . . . . . . . . . . . . . . . . . . . . . . 6
3.2.4 Deactivation/activation of the audible pH alarm . . . . . . . . . . . . . . . . . . . . . . . . . . . . . . . . 6
3.2.5 Calibration pH electrode . . . . . . . . . . . . . . . . . . . . . . . . . . . . . . . . . . . . . . . . . . . . 6
3.2.6 Calibration reminder function . . . . . . . . . . . . . . . . . . . . . . . . . . . . . . . . . . . . . . . . . 7
3.3.1 Setting the timer control mode . . . . . . . . . . . . . . . . . . . . . . . . . . . . . . . . . . . . . . . . . 7
3.3.2 Programming turn-on and turn-off times . . . . . . . . . . . . . . . . . . . . . . . . . . . . . . . . . . . . 7
3.3.3 Programming interval control. . . . . . . . . . . . . . . . . . . . . . . . . . . . . . . . . . . . . . . . . . 7
4. Quick Start Guide to Programming . . . . . . . . . . . . . . . . . . . . . . . . . . . . . . . . 8
5. Programming Instructions . . . . . . . . . . . . . . . . . . . . . . . . . . . . . . . . . . . . . 9
5.1.1 Time setting . . . . . . . . . . . . . . . . . . . . . . . . . . . . . . . . . . . . . . . . . . . . . . . . . . 9
5.2.1 pH set pointprogramming . . . . . . . . . . . . . . . . . . . . . . . . . . . . . . . . . . . . . . . . . . 10
5.2.2 CO
5.2.3 pH alarm. . . . . . . . . . . . . . . . . . . . . . . . . . . . . . . . . . . . . . . . . . . . . . . . . . . 12
5.2.4 Deactivation/activation of the audible pH alarm . . . . . . . . . . . . . . . . . . . . . . . . . . . . . . . 12
5.2.5 pH electrode calibration . . . . . . . . . . . . . . . . . . . . . . . . . . . . . . . . . . . . . . . . . . . 13
5.2.6 Calibration reminder function . . . . . . . . . . . . . . . . . . . . . . . . . . . . . . . . . . . . . . . . 14
5.3.1 Setting the timer control mode . . . . . . . . . . . . . . . . . . . . . . . . . . . . . . . . . . . . . . . . 14
5.3.2 Programming turn-on and turn-off times . . . . . . . . . . . . . . . . . . . . . . . . . . . . . . . . . . . 15
5.3.3 Programming interval control. . . . . . . . . . . . . . . . . . . . . . . . . . . . . . . . . . . . . . . . . 16
6. Reset to factory presetting . . . . . . . . . . . . . . . . . . . . . . . . . . . . . . . . . . . .18
7. Factory presetting . . . . . . . . . . . . . . . . . . . . . . . . . . . . . . . . . . . . . . . . .18
8. Sources of faults . . . . . . . . . . . . . . . . . . . . . . . . . . . . . . . . . . . . . . . . . . 18
9. Technical specifications . . . . . . . . . . . . . . . . . . . . . . . . . . . . . . . . . . . . . .19
10. EC declaration of conformity . . . . . . . . . . . . . . . . . . . . . . . . . . . . . . . . . . . 19
2
Control units and connection strips. . . . . . . . . . . . . . . . . . . . . . . . . . . . . . . . . . . . . . .
1.2
Display. . . . . . . . . . . . . . . . . . . . . . . . . . . . . . . . . . . . . . . . . . . . . . . . . . . . .
1.3
Safety instructions . . . . . . . . . . . . . . . . . . . . . . . . . . . . . . . . . . . . . . . . . . . . . . .
1.4
Assembly advice . . . . . . . . . . . . . . . . . . . . . . . . . . . . . . . . . . . . . . . . . . . . . . . .
2.1
Function monitoring of external devices . . . . . . . . . . . . . . . . . . . . . . . . . . . . . . . . . . . . 5
2.2
Safety shutdown during programming . . . . . . . . . . . . . . . . . . . . . . . . . . . . . . . . . . . . . 5
2.3
Safeguard function. . . . . . . . . . . . . . . . . . . . . . . . . . . . . . . . . . . . . . . . . . . . . . . 5
2.4
Interval reset. . . . . . . . . . . . . . . . . . . . . . . . . . . . . . . . . . . . . . . . . . . . . . . . . . 5
2.5
Return function . . . . . . . . . . . . . . . . . . . . . . . . . . . . . . . . . . . . . . . . . . . . . . . . 5
2.6
Memory function. . . . . . . . . . . . . . . . . . . . . . . . . . . . . . . . . . . . . . . . . . . . . . . . 5
2.7
Malfunction displaying . . . . . . . . . . . . . . . . . . . . . . . . . . . . . . . . . . . . . . . . . . . . . 5
3.1
Clock programming . . . . . . . . . . . . . . . . . . . . . . . . . . . . . . . . . . . . . . . . . . . . . . 6
3.2
pH programming. . . . . . . . . . . . . . . . . . . . . . . . . . . . . . . . . . . . . . . . . . . . . . . . 6
night function . . . . . . . . . . . . . . . . . . . . . . . . . . . . . . . . . . . . . . . . . . . . . . . 6
2
3.3
Timer programming . . . . . . . . . . . . . . . . . . . . . . . . . . . . . . . . . . . . . . . . . . . . . . 7
3.4
Manual activation/deactivation. . . . . . . . . . . . . . . . . . . . . . . . . . . . . . . . . . . . . . . . .
3.5
Display light . . . . . . . . . . . . . . . . . . . . . . . . . . . . . . . . . . . . . . . . . . . . . . . . . .
5.1
Clock programming . . . . . . . . . . . . . . . . . . . . . . . . . . . . . . . . . . . . . . . . . . . . . .
5.2
pH programming. . . . . . . . . . . . . . . . . . . . . . . . . . . . . . . . . . . . . . . . . . . . . . .
night function . . . . . . . . . . . . . . . . . . . . . . . . . . . . . . . . . . . . . . . . . . . . . . 11
2
5.3
Timer programming . . . . . . . . . . . . . . . . . . . . . . . . . . . . . . . . . . . . . . . . . . . . .
5.4
Manual activation/deactivation. . . . . . . . . . . . . . . . . . . . . . . . . . . . . . . . . . . . . . . .
5.5
Display light . . . . . . . . . . . . . . . . . . . . . . . . . . . . . . . . . . . . . . . . . . . . . . . . .
3
4
5
5
7
7
9
10
14
17
17
Page 3
1. Introduction
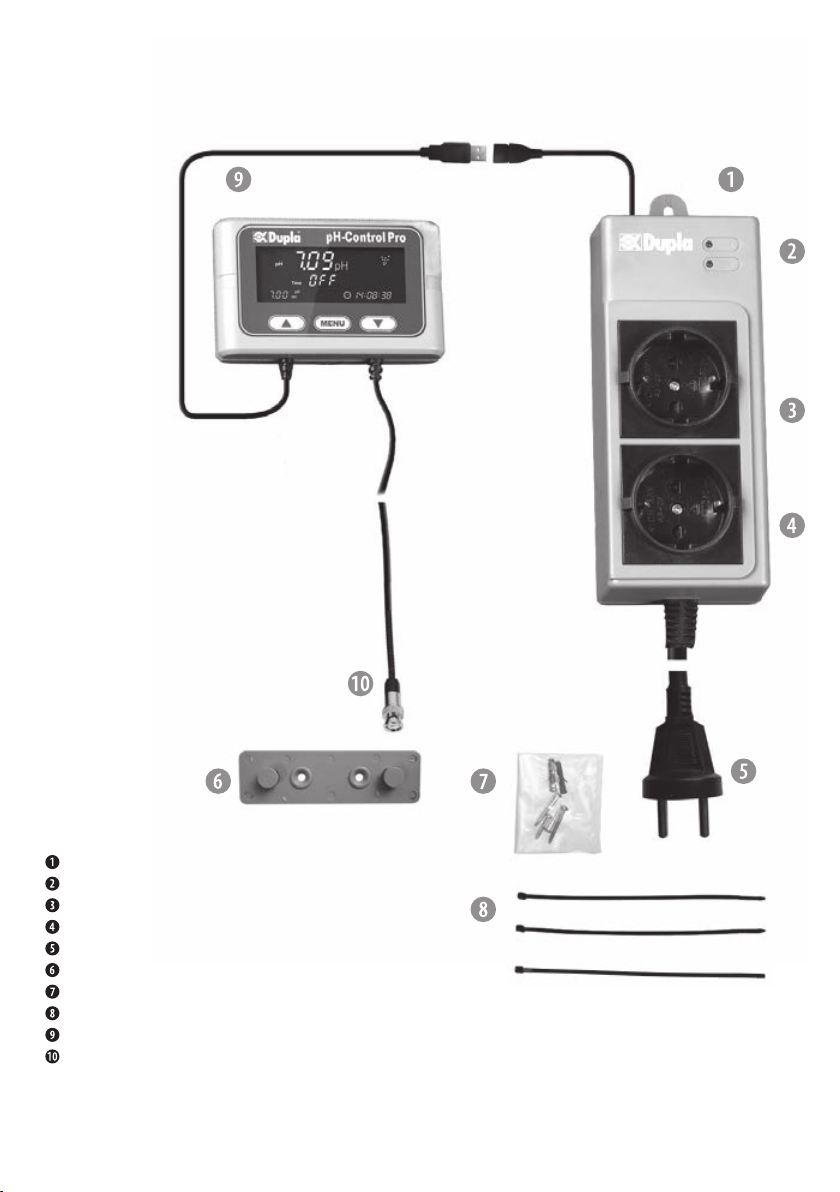
1.1 Control unit and connection strip
Connection strip
LED
Slot 1 for pH value programming
Slot 2 for programming the timer function
Connecting cable
Fastening rail
Set of screws for fastening rail
Cable tie
Control unit
BNC connector
3
Page 4
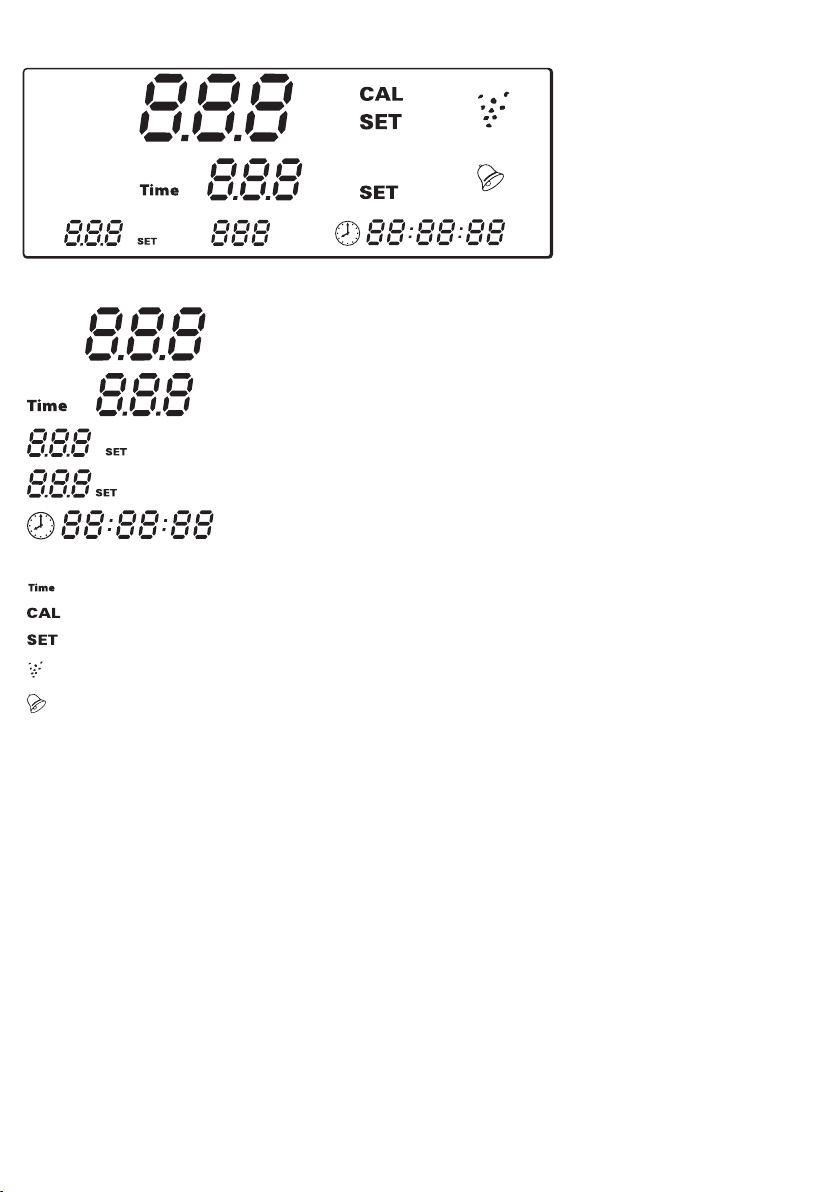
1.2 Display
pH
pH
pH
= Displaying measured pH
pH
= Displaying measured Temp2 or Time
= Displaying set pH
= Displaying set Temp or Time
= Displaying current time
= Symbol for pH (slot 1)
pH
= Symbol for Timer (slot 2)
= Symbol for calibration
= Symbol for Set values
= Symbol for CO
= Symbol for alert (flashes simultaneously with
1.3 Safety instructions
The Dupla pH-Control Pro is designed exclusively for use in enclosed rooms. All electronic components of the device
must only be operated whilst they are free from defects. Should the mains supply be damaged, please please return it
to your dealer for repair. Continued operation of the device may cause fatal injury from electric shock. Ensure that the
control unit and connection strip do not come into contact with water.
pH
supply
2
or flashes simultaneously with
pH
symbol in case for alert
CAL
to remember pH electrode calibration)
Technical products must only be operated as supplied. Electronic components must not be modified in any way, and
the leads must not be shortened. Covers or housings must not be opened. If the product is damaged cease useage or
shut down immediatly by pulling the mains plug.
4
Page 5

1.4 Assembly advice
Control units
The reverse side of the control unit has recesses that are used to lock the fastening rail which is fixed to the wall or
the aquarium cabinet with the screw set. The cable to the control unit has a USB connector so that holes of control
unit dimensions do not need to be sawn out of the terrarium cabinet. The USB connector is not designed for a computer connection. The control unit has a 2 metre cable which permits installation outside the aquarium cabinet as well
as an unobstructed view of all values and status modes.
Connection strips
The connection strip should be screwed to the back or side panel inside the aquarium cabinet to ensure that there is
no contact with the unit in the event of water leakage.
pH-Eletrode
The Dupla pH-Control Pro system is equipped with a BNC connector for pH electrodes.
2. Description of the basic functions
2.1 Function monitoring of external devices
The housing is fitted with LEDs. In operating mode this indicates the active control of the external device.
2.2 Safety shutdown during programming
When entering into the programming mode, both slots are deactivated for safety reasons.
2.3 Safeguard function
To protect electronic components, a delay of 60 seconds is set between 2 switching states before the respective slot
becomes active again.
2.4 Interval reset
Irrespective of the time of day, all programmed intervals start when the device is switched on or the menu is quit.
2.5 Return function
The Dupla pH-Control Pro automatically returns to the operating mode when no button has been pressed for a period
of 90 seconds while in the programming mode.
2.6 Memory function
To safeguard against loss of data in the event of a power failure, the Dupla pH-Control Pro stores all set values. The
unit will continue to calculate the time for up to five hours after such an event, so the clock does not need to be reset
after brief power failures.
2.7 Malfunction displaying
In the event of a pH-Electrode defect
2 is indicated by E05.
will be displayed. A programming error in the timer programming for slot
5
Page 6
3. Description of the programmable functions
Slot 1 can only be programmed for pH control. Slot 2 can only be programmed for timer switch. In programming
mode, the functions can be configured in the following sequence.
3.1 Clock programming
3.1.1 Time setting
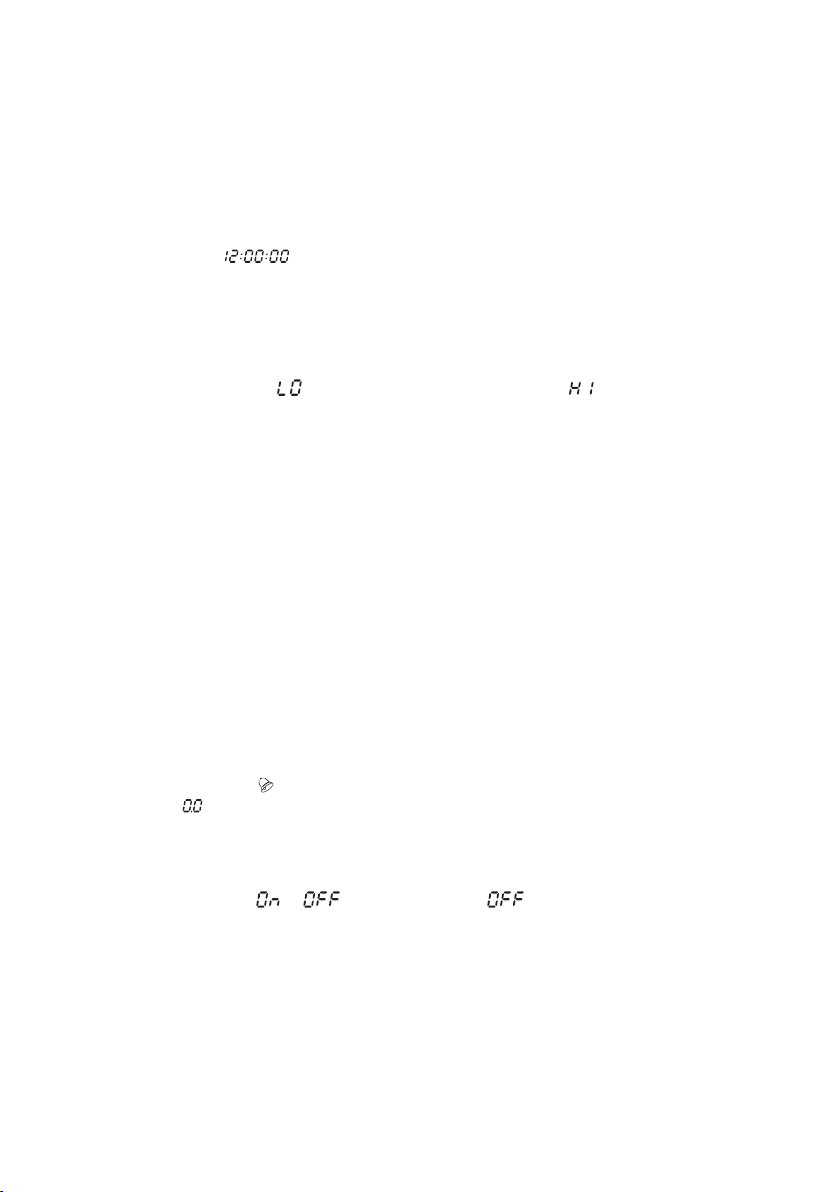
The factory presets the time at
. The time setting however is not cleared during a resetting procedure.
3.2 pH programming
3.2.1 pH set point
The pH set point can be adjusted within the limits of 4.0 - 9.9. If the measured pH value is outside the display range,
values lower than 4.0 are displayed as
the pH channel is switched off. The pH-controlled CO2 fertilisation is carried out through permanent measuring by a
connected Dupla pH electrode and switching of a connected Dupla CO2 magnetic valve with a switch hysteresis (the
difference between the switching point and the triggering point) of 0.1 pH and a control accuracy is +/- 0.1. Switch
hystereris (the difference between the switching point and the triggering point) is pH 0.1, and the control accuracy is
+/- 0.1 (reference value). In order to ensure the accuracy of measurement and therefore the control circuit, the Dupla
pH-Control Pro provides an optional six-week calibration memory function.
Caution: If no pH electrode is connected to the Dupla pH-Control Pro, so that the BNC socket is open, fictitious
pH values will be displayed.
, values higher than 9.9 are displayed as . Outside of these limits,
3.2.2 CO
night function
2
This enables interruption of the supply of CO2, controlled by a magnetic valve, into your aquarium during the night if
desired. The beginning and end times of the interruption during the night can be choosen after programming the pH
Set point.
3.2.3 pH alarm
A visual alarm indicated by flashing
if the temperature exceeds or drops below the programmed desired pH values.
The factory presetting is , which means no alarm. The alarm window can be set between a pH 0.1 and 4.0 deviation from the set point.
3.2.4 Deactivation/activation of the audible pH alarm
The audible alarm can be switched
or . The factory setting is , as otherwise an alarm could be triggered immediately when the system is first put into service when the electrode is still located outside the aquarium or
not yet calibrated.
3.2.5 Calibrate pH electrode
The factory setting of the calibration points are pH 7, pH 4 and pH 9, the calibration sequence is first pH 7, then pH 4
or alternatively pH 9. The calibration process can be cancelled by pressing the ▲ and ▼ buttons simultaneously.
6
Page 7

3.2.6 Calibration reminder function
With this feature enabled, every six-weeks CAL and flash on the display as a reminder to check the pH electrode
calibration. For a period of 10 seconds you will hear a beep every 2 seconds. This will be repeated every hour.
If you prefer not to carry out a calibration, the memory display clears after activating any button and reappears in
another 6 weeks.
In order to calibrate the pH electrode, enter programming mode by pressing the button and follow item 5.2.4 of
the instructions.
To disable of the calibration memory function, continue to scroll through the menu items and set the function to
.
3.3 Timer programming
3.3.1 Setting the timer control mode
As an alternative to temperature regulation, the second slot can be used to control external devices via a timer switch
with a one-second control interval. Selection is between (external device at slot 2 is permanently activated),
(automatic modus) and (interval mode).
3.3.2 Programme turn-on and turn-off times
If Automatic Mode is selected up to 8 turn-on/turn-off times can be programmed. (The Dupla pH-Control Pro has
an automatic sorting function which will re-arrange the time periods into the correct sequential order when exiting
programming mode.)
3.3.3 Programme interval control
If the Interval mode is selected external devices are switched on for a minimum of 1 second (maximum 23 hrs., 59
min. and 59 sec.) and switched off for a minimum of 30 minutes (maximum 96 hrs. and 59 min.).
3.4 Manual activation/deactivation
Both slots can be turned on and off manually by combination of buttons to be pressed.
3.5 Display light
Factory presetting is an automatic adaptation of the display light. After pressing any button the display light is
switched on. When no button has been pressed for 120 seconds, the display light is automatically dimmed down. It is
possible to change from automatic light dimming to full illumination of the display.
7
Page 8
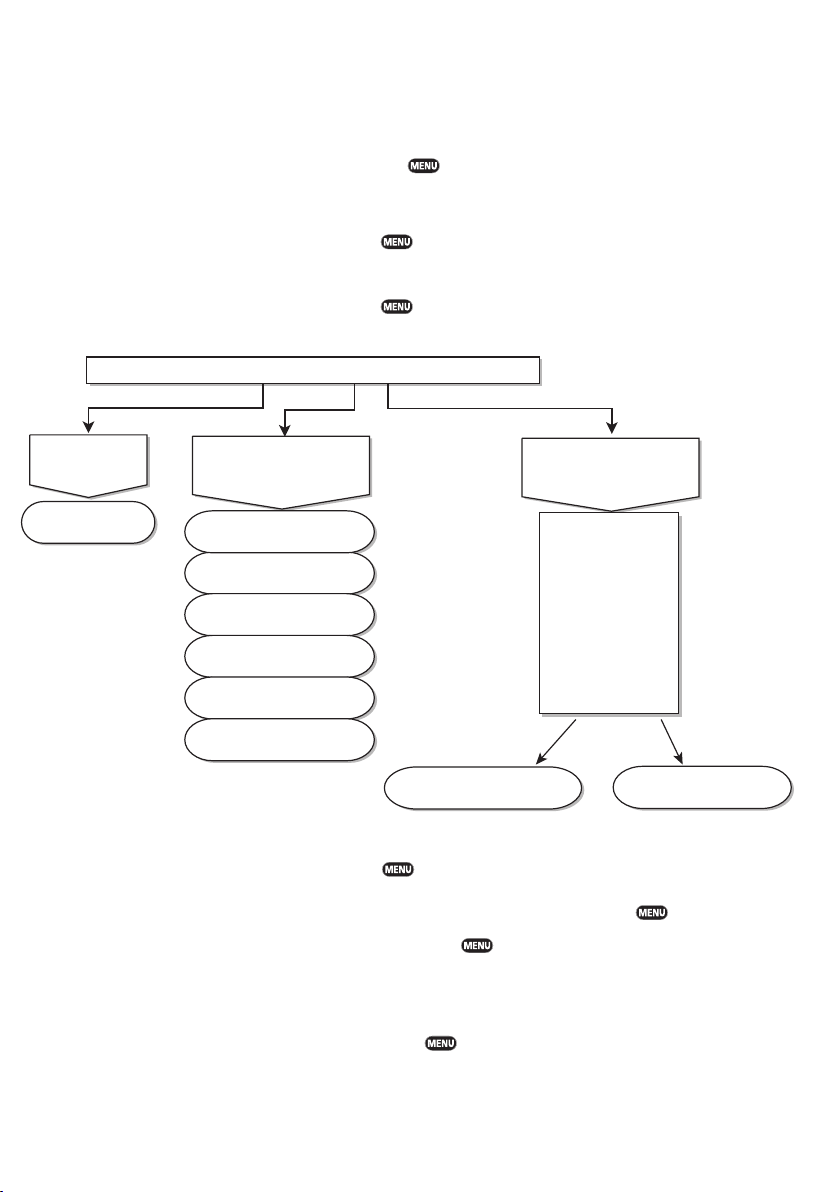
4. Quick start guide to programming
Audible acknowledgment: Press a button briefly, i.e. a ‘tap’ = short sound. Hold a button down, i.e.
for 3 seconds = long sound.
Switching to programming mode: A) Pressing the
Moving within the main [sub] menu structure:
B) With the ▲ or ▼ buttons you can scroll through the menu items. Short
pressing of
access. As well in the sub menu structure you can scroll through the menu
items with the ▲ or ▼ buttons and you acknowledge a selection by short
pressing of .
pH-Control Pro Main Menu
button enters the main programming menu.
acknowledges the selection which sub menu item to
Clock
programming (5.1)
Time
setting (5.1.1)
Slot 1
programming:
pH (5.2)
pH
Set point (5.2.1)
Night Function (5.2.2)
CO
2
pH Alarm
programming (5.2.3)
(De-)activation of the
audible pH alarm (5.2.4)
pH Electrode
Calibration (5.2.5)
Calibration Reminder
(de-)activation (5.2.6)
Modifying programming: C) Pressing
Programming interval
control (5.3.3)
enables the modification of programmed values, the
Slot 2
programming:
Timer (5.3)
Setting the
timer control mode
(5.3.1)
Either
up to 8 ON / OFF
times
or
interval
or
permanent ON
Programming turn-on
and turn-o times (5.3.2)
changeable value flashes. D) Increase or decrease required values with the
▲ or ▼ button. E) Acknowledge by activating the button.
Quitting the submenu structure: F) By holding down the
button for 3 seconds you switch from a
lower to a higher menu level.
Quitting the programming mode: G) After 90 seconds of inactivity you automatically access the operational
mode. From the main level you can access the operational mode as well by
holding down the
button for 3 seconds. All changed values will be
saved.
Cancelation of programming: By pressing the ▲ and ▼ button simultaneously it is possible to quit the
programming mode at any time without saving.
8
Page 9
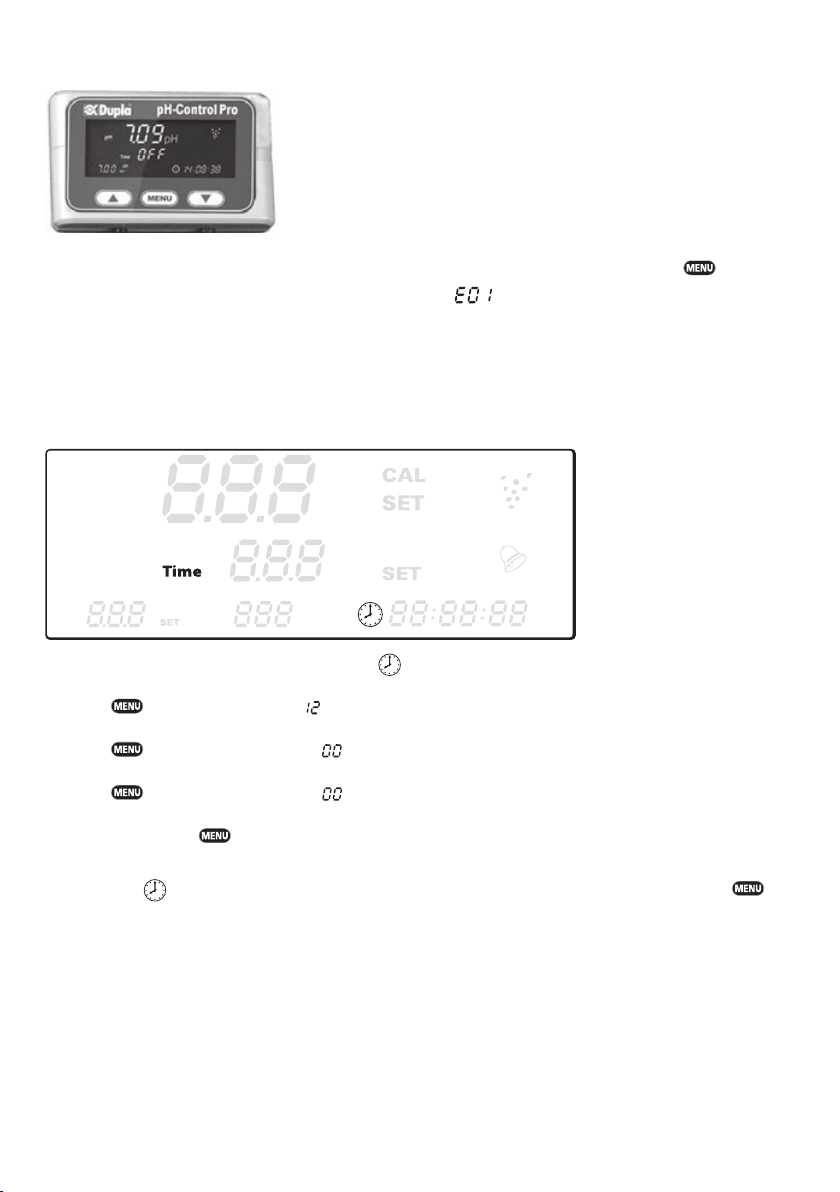
5. Programming instructions
Connect the pH electrode to the Dupla pH-Control Pro. To start the programming mode press the button
Please note: Without connected pH-elctrode the error
will be displayed.
5.1 Clock programming
5.1.1 Time setting
pH
pH
pH
Entering the programming mode, the clock symbol
Press the
Use the ▲ or ▼ button to set the hours between 0 and 23.
Press the
Use the ▲ or ▼ button to set the minutes between 0 and 59.
Press the button, the seconds digits fl ash.
Use the ▲ or ▼ button to set the seconds between 0 and 59.
Acknowledge with the button.
When fi nished
button.
Please note: Once the clock has been set at least once, you can use ▲ or ▼ to directly access the settings
pH or
Please note: The Dupla pH-Control Pro does not automatically switch between summer time and winter time.
This change must be entered manually.
button, the hours digits fl ash.
button, the minutes digits fl ash.
will fl ash again. Scroll to the next main menu item with the ▼ button, then press the
Time
.
fl ash.
9
Page 10
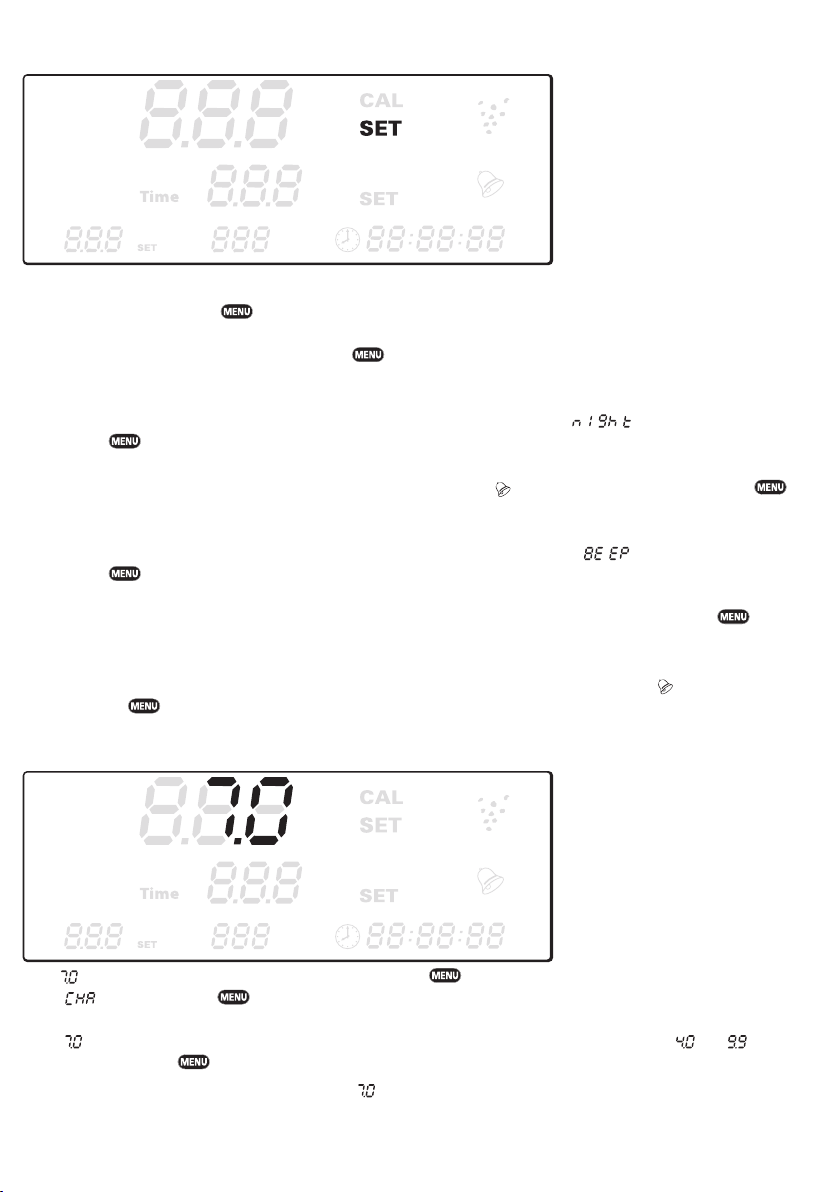
5.2 pH programming
pH
pH
pH
Note: The pH control is an alternative programming for temperature 1 in slot 1.
After acknowledging flashing
If you want to programme the pH Set point, press . Proceed making your settings as in item 5.2.1 of the instructions.
If you want to activate the night off function press another time the ▼, button until flashes and confirm by
pressing the button. Continue making your settings with item 5.3.2 of this instructions.
, pH is displayed and
SET
flashes.
If you want to programme the pH alarm, press the ▼ button again until
button. Proceed making your settings with item 5.2.3 of the instructions.
If you want to (de)activate the audible alarm function, press the ▼ button again until flashes and confirm by
pressing the button. Proceed making your settings with item 5.2.4 of the instructions.
If you want to calibrate your pH-Electrode, press the ▼ button to select CAL and confirm by pressing the
button. Proceed making your settings with item 5.2.5 of the instructions.
If you want to (de)activate the pH Calibration reminder, press the ▼ button again until CAL and
by pressing the button. Proceed making your settings with item 5.2.6 of the instructions.
5.2.1 pH set point programming
flashes and confirm by pressing the
flash and confirm
pH
pH
pH
When or your last set value and pH are flashing, press the button to set the pH point.
When flashes, press the button to confirm.
When or your last set value flashes, use the ▲ or ▼ button to set the desired pH value between and ,
and acknowledge with .
Please note: The pH Set Point presetting is
or lower values could be required.
. Depending on water values where your fish come from, higher
10
Page 11
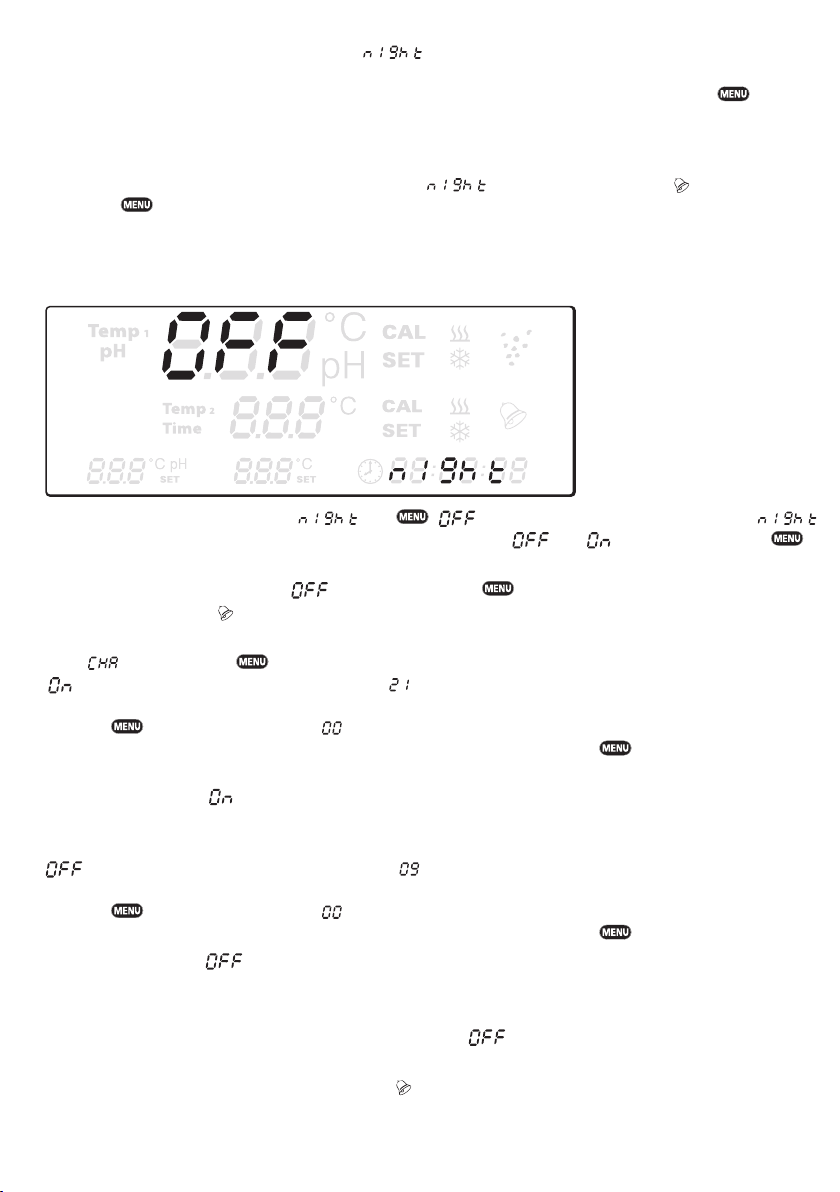
When the pH Set Point Programming is finished,
is flashing.
If you want to activate the CO2-night off function and don´t wish to supply CO2 during the night, press . Continue making your settings with item 5.2.2 of this instructions.
If you want to keep the manufacturers presetting of the CO2-night off function and wish to supply CO2 during the
night, skip the menu item 5.2.2. To do that press – during
is flashing - the ▼ key until flashes, acknow-
ledge with Taste and continue with programming the pH Alarm with item 5.2.3 of this instructions.
5.2.2 CO2-night function
After you have acknowledged flashing with , is flashing and pH is displayed in first line,
is displayed in the third line. Now use the ▲ and ▼ buttons to change into and acknowledge with .
Please note: In case flashing
indicated by flashing
When
is flashing, press to confirm.
.
is acknowledged with , you directly access pH Alarm programming,
in the third line is displayed and the hour digits (or your last programmed value) will flash.
Use the ▲ and ▼ buttons to set the start hours for not supplying CO2 in the night between 0 and 23.
Press the
Use the ▲ and ▼ buttons to set minutes between 0 and 59 and acknowledge with
Attention: Here
button, the minutes digits will flash.
.
is the time when the stop of CO2 supply should beginn, for example at 21.00 when your
lighting is switched off.
in the third line is displayed and the hour digits (or your last programmed value) will flash.
Use the ▲ and ▼ buttons to set the off time hours for CO2 supply stop in the night.
Press the button, the minutes digits will flash.
Use the ▲ and ▼ buttons to set minutes between 0 and 59 and acknowledge with .
Attention: Here
is the time when the stop of CO2 supply should end, for example at 9.00 when your
lighting is switched on.
Please note: When the night off beginning time is reached the display shows a measured but not regulated
pH value in the first line. In the third line for the set value a
When the night off function programming is finished,
is flashing and you can go on with pH Alarm programming.
is displayed.
11
Page 12
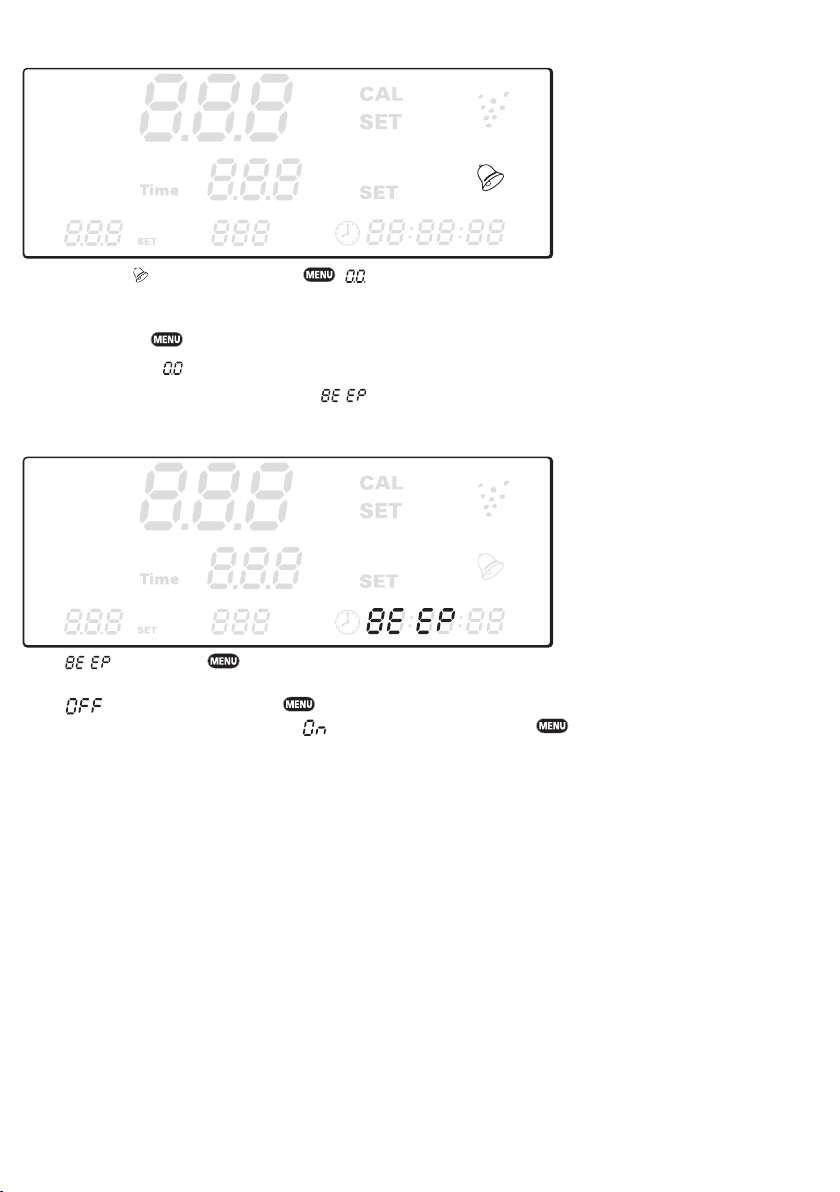
5.2.3 pH alarm programming
pH
pH
pH
When a flashing is acknowledged with , or your last programmed value flashes.
Use the ▲ or ▼ button to set the +/- alarm between pH 0.1 and 4.0.
Acknowledge with
Please note: means that no alarm is set.
When the pH Alarm programming is finished,
5.2.4 Deactivation/activation of the audible pH alarm
pH
flashes.
pH
pH
When flashes, press to (de)activate the audible alarm.
When
Alternatively use the ▲ or ▼ button until
12
flashes acknowledge with to deactivate the pH alarm.
flashes and acknowledge with to activate the pH alarm.
Hint: The audible alarm for pH and calibration reminder can not be separated. If you deactivate the audible pH
alarm the audible calibration reminder alarm is deactivated as well.
Page 13
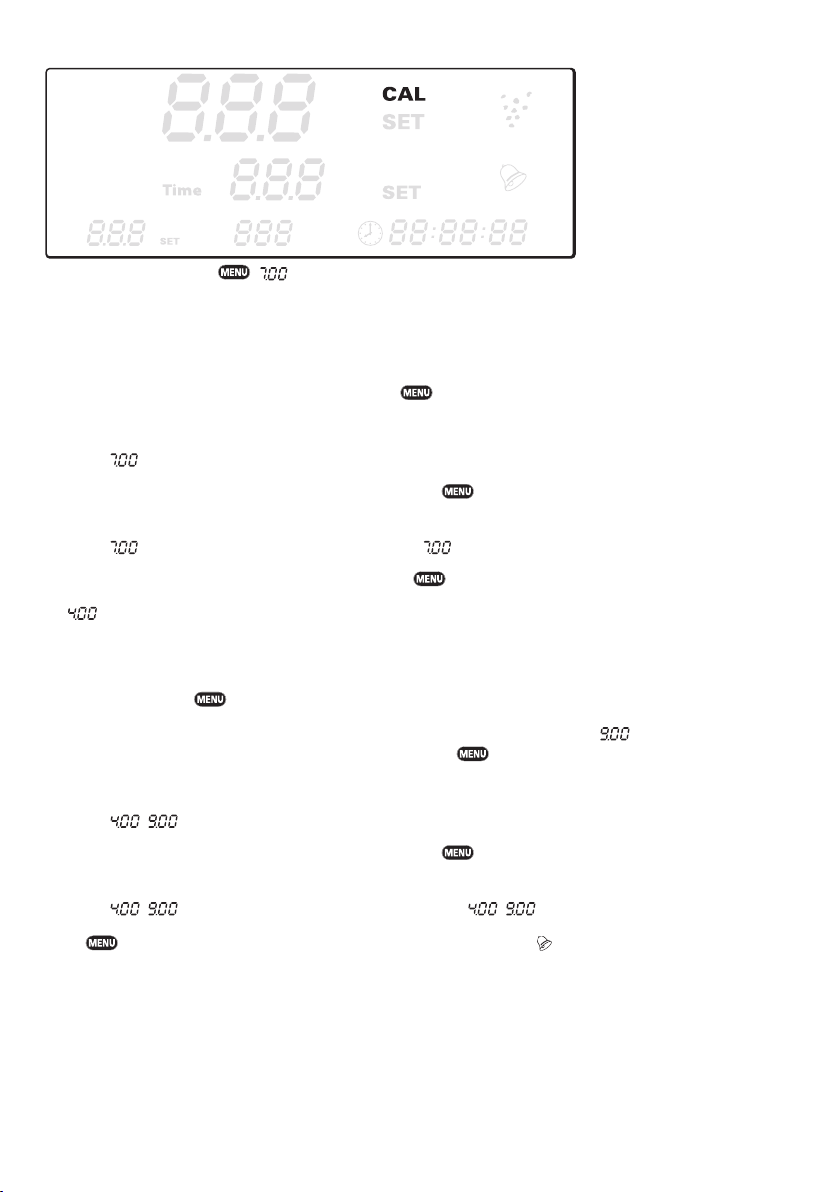
5.2.5 pH electrode calibration
pH
pH
pH
When CAL flashes, press . flashes on the second line.
1. Remove the protective cap from the electrode tip.
2. Rinse electrode tip briefly with DuplaDest.
3. Dip the electrode into the pH 7 solution and press
A measured running value is displayed together with CAL on the first line,
and
SET
When
When the measured running value has settled, press the
beep as confirmation as value acceptance.
When
4. Take the elctrode out of the pH 7 solution and press
flashes on the second line.
5. Rinse the electrode tip briefly with DuplaDest.
6. To calibrate the pH Electrode for freshwater aquaria, dip the electrode into the pH 4 solution for freshwater and
acknowledge with
(To calibrate the pH Electrode for saltwater aquaria, use the ▲ or ▼ button until
into the pH 9 solution for saltwater and acknowledge with .)
7. A measured running value is displayed together with pH and CAL on the first line.
When
When the measured running value has settled, press the
beep as confirmation as value acceptance.
When
are displayed on the second line.
is displayed with CAL on the first line and with
.
( ) with
( ) is displayed with CAL on the first line and ( ) with
SET
is displayed on the second line.
.
button for three seconds – until you hear a long
SET
on the second line.
to proceed calibration.
flashes, dip the electrode
button for three seconds – until you hear a long
SET
on the second line.
Press
8. Rinse the electrode tip briefly with DuplaDest.
9. Fix the electrode in the aquarium with suction cups.
to finish calibration. When the calibration is finished, CAL and
Please note: The calibration can be interrupted at any time by pressing the ▲ or ▼ button at the same time.
Caution: Used electrodes which top has been dried completly in the protection cover need to be put in water
over night before the calibration is done. New electrodes need a 14 days run-in period. After that a second
calibration is necessary for precise mesurement.
flashes.
13
Page 14
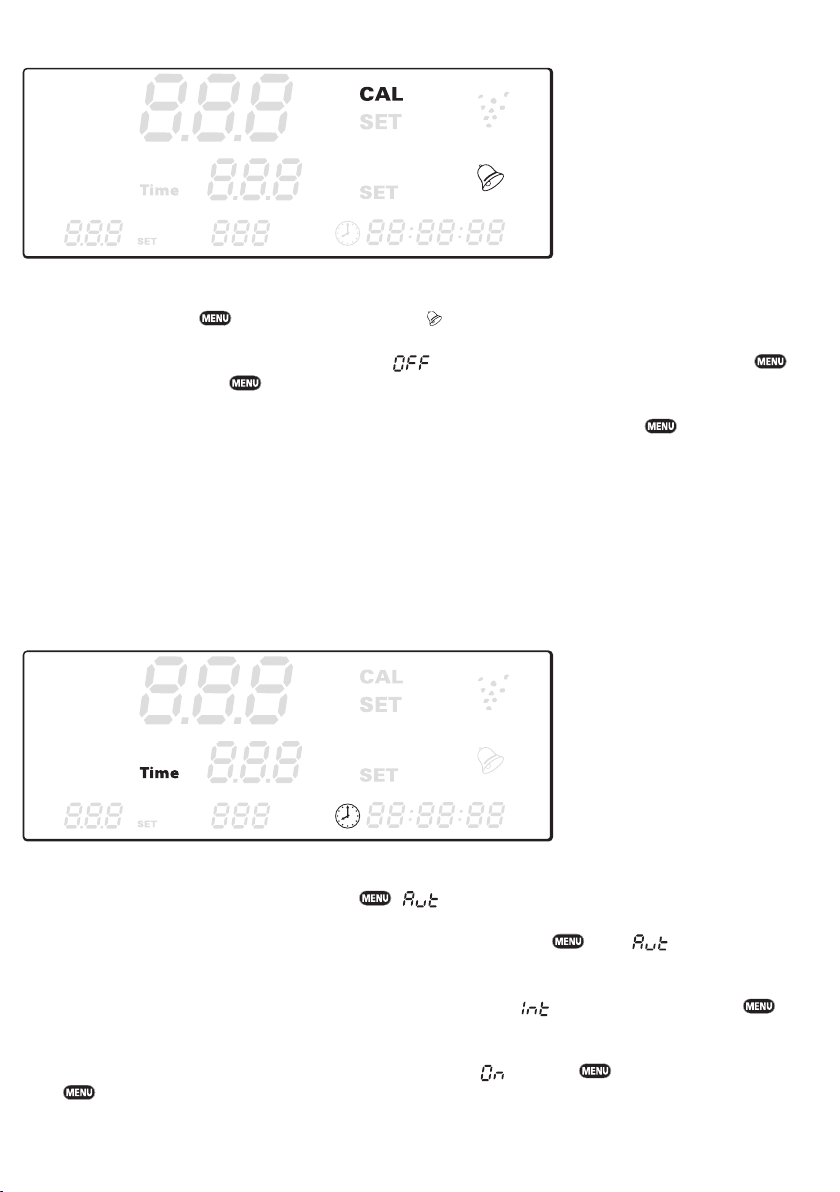
5.2.6 Calibration reminder function
pH
pH
pH
The factory presetting is an activated visual calibration reminder alarm.
If you want to keep it, press
If you want to deactivate the calibration reminder, select
When
SET
flashes again, press three seconds to leave the sub sub level.
pH
When
seconds to return to operating mode.
flashes again scroll with the ▼ buttons to
Please note: The audible alarm for pH and calibration reminder can not be separated. If the audible pH alarm
is deactivated, the audible calibration reminder alarm is deactivated as well. The optical alarm is not affected
from that.
for 3 seconds when CAL and flashes to leave the programming sublevel.
with the ▲ or ▼ button and acknowledge with .
Time
to proceed programmation or press for three
5.3 Timer programming
5.3.1 Setting the timer control mode
pH
pH
pH
Time
flashes.
To choose between the three control options press , (Automatic) will flashin the display
If you want to operate slot 2 with programmed turn-on and turn-off times, press when flash. Proceed
entering your settings as in item 5.3.2 of the instructions.
If you want to operate slot 2 via interval control, use the ▲ button to select
button. Proceed making your settings with item 5.3.3 of the instructions.
If you want to have slot 2 permanently activated, use the ▲ to select and press . When
press
14
for three seconds to finish programming and return to the operating mode.
and confirm by pressing the
Time
flashes again,
Page 15
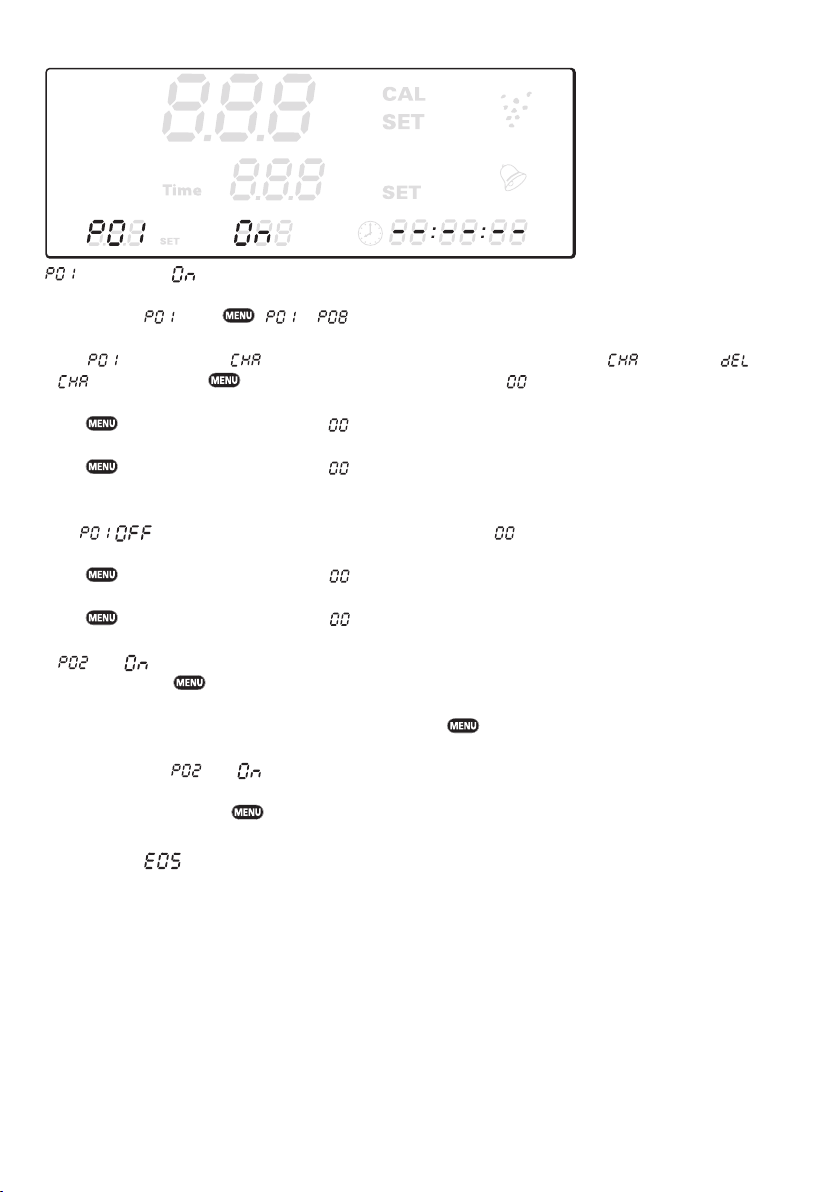
5.3.2 Programming turn-on and turn-off times
pH
pH
pH
(timer 1) and flashes.
To programme , press ( to can be selected using ▲ and ▼)
When is displayed and flashes, the ▲ and ▼ buttons can be used to select (change) or (delete).
If is selected, press to confirm, the turn-on time hour digits will flash.
Use the ▲ or ▼ button to set the hours between 0 and 23.
Press , the turn-on time minute digits will flash.
Use the ▲ or ▼ button to set the minutes between 0 and 59.
Press , the turn-on time second digits will flash.
Use the ▲ or ▼ button to set the seconds between 0 and 59.
Next is displayed and the hour digits of the turn-off time flash.
Use the ▲ or ▼ button to set the hours between 0 and 23.
Press , the turn-off time minute digits will flash.
Use the ▲ or ▼ button to set the minutes between 0 and 59.
Press , the turn-off time second digits will flash.
Use the ▲ or ▼ button to set the seconds between 0 and 59.
If and flash, you can programme further time periods in the same manner.
Acknowledge with .
If you do not wish to set further time periods, press and hold for 3 seconds to leave the programming sublevel.
Alternatively when and are flashing, you can programme further time periods in the same manner.
If
Time
flashes again, press for three seconds to finish programming and return to operating mode.
Caution: A programming error in the timer settings (identical or overlaping starting times) is indicated by an
output of
.
15
Page 16
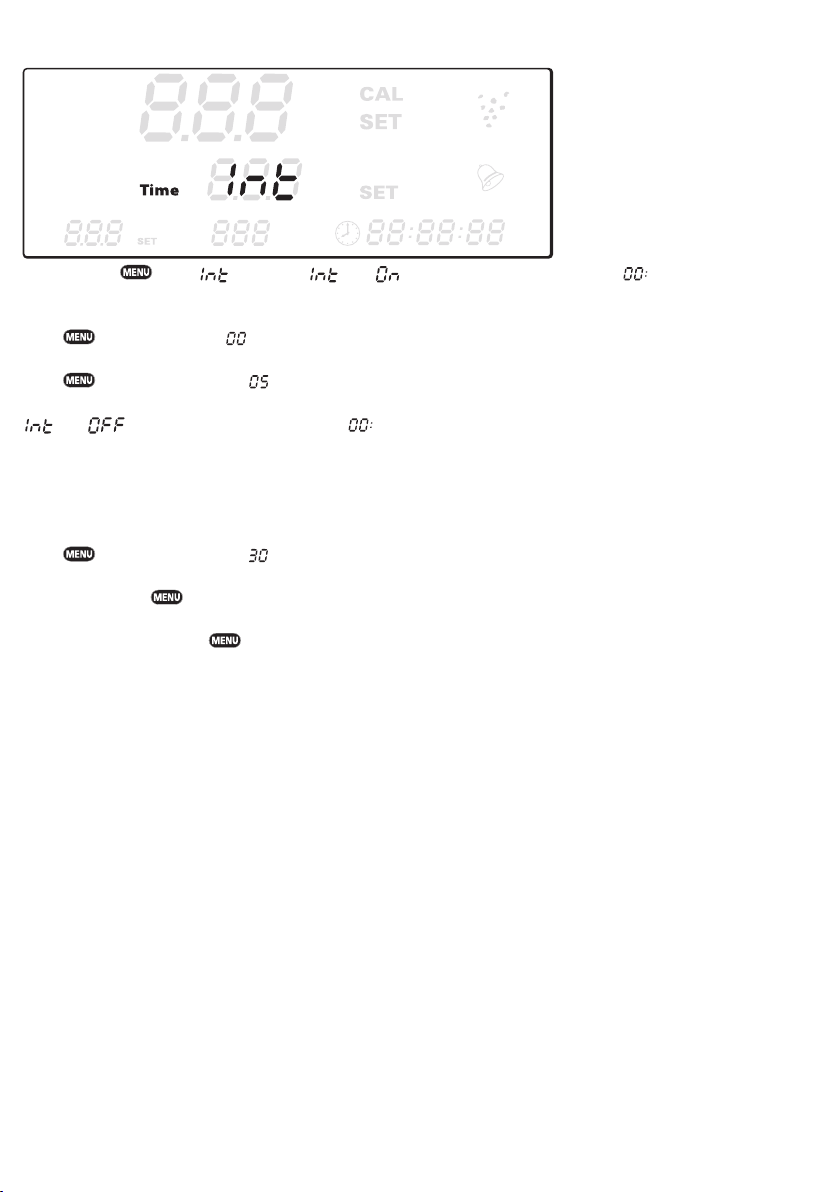
5.3.3 Programming interval control
pH
pH
pH
After pressing while is flashing, and are displayed and the hour digits are flashing.
To adjust the interval On time,
use the ▲ or ▼ button to set the hours between 0 and 23.
Press , the minutes digits will flash.
Use the ▲ or ▼ button to set the minutes between 0 and 59.
Press , the seconds will flash .
Use the ▲ or ▼ button to set the seconds between 0 and 59.
and are displayed and the hour digits flash.
To adjust the interval OFF time, use the ▲ or ▼ button to set the hours between 0 and 96
Please note: 24 means every day, 48 every two days, 72 every three days, 96 every four days.
Press
Use the ▲ or ▼ button to set the minutes between 30 and 59*.
Acknowledge with .
If
Time
, the minutes will flash .
flashes again, press for three seconds to finish programming and return to the operating mode.
* Settings between 0 and 59 are only possible with intervals of 1 hour or longer. For shorter intervals, a minimum of 30 minutes is preset by the manufacturer to protect electronic components.
Please note: The first interval control is triggered immediately after the system returns to the operating mode.
16
Page 17
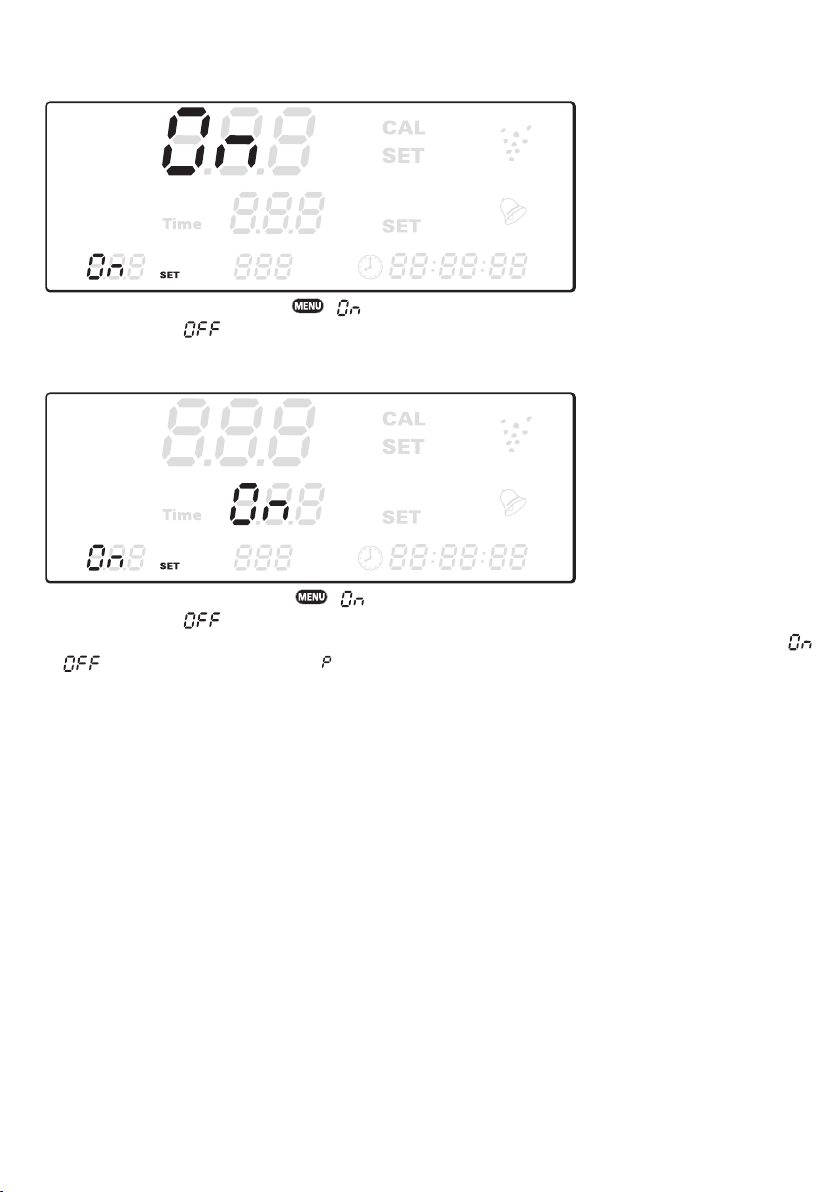
5.4 Manual activation/deactivation
pH
pH
pH
To activate slot 1, hold ▲ then press . is displayed on the first line. Press these buttons a second time,
slot 1 is deactivated. is displayed in the first line. If you press it a third time, the programme mode for slot 1 is
reactivated. The display shows your set values again.
pH
pH
pH
To activate slot 2, hold ▼, then press . is displayed on the second line. Press these buttons a second time,
slot 2 is deactivated. is displayed on the second line. If you press it a third time, the programme mode for slot 2
is reactivated. The display shows your set values again. If slot 2 is time-controlled and not temperature controlled
or on the second line together with on the third line is displayed, indicating permanent on- or off- switch.
5.5 Display light
To change the automatic adaptation of the display light to full illumination, press and hold the ▲ button in operating
mode and then press the ▼ button. When you hear a single beep, the display will remain permanently fulley illuminated. To set the display illumination in automatic mode (down dimming automatically after 120 seconds of inactivity)
again, press the ▲ button again. Immediatly the illumination is dimmend down and the device beeps twice.
17
Page 18
6. Reset to factory presetting
Should your Dupla pH-Control Pro not function correctly, please perform a reset:
1. Unplug from the mains
2. Plug the mains plug back in while keeping the button pressed down
3. Release the button
Please note: All programmed settings, except those for the clock, will be lost. The Dupla pH-Control Pro will
regulate with the manufacturer’s presettings.
7. Factory presetting
Clock setting: 12:00:00 (at delivery)
pH point: 7.0
Audible pH alarm: Deactivated ( )
Visual pH alarm: Deactivated ( means ‘no alarm‘)
pH calibration memory function: On
Night function / CO2 supply during the night: On (not permanent on but regulated corresponding
to day programmation)
Timer mode: (means ‘automatic’)
8. Sources of faults
In the case of a problem, first reset to the manufacturer’s presettings. If the does not solve the problem, please search
for the fault in the following table:
Error Possible causes Solution
Fluctuating pH
value
is displayed
is displayed
pH electrode cable too close to a mains cable
reactor
or a CO
2
pH electrode defect replace pH electrode
programming error in the time settings on slot 2Ensure that the programmed times do not
Re-locate pH electrode cable
overlap
In the event of a warranty or repair issue, please return to the place of purchase.
18
Page 19

9. Technical specifications
Operating voltage: 230 V, 50 Hz
Connected load for each slot: Max. 2,000 W (ohmic load)
Total connected load of the connection strip: Max. 3,000 W (ohmic load)
Connecting cable length: 1.5 m
Cable control unit - control strip length: 2 m
pH control range: 4.0 – 9.9
pH display range: 4.0 – 9.9
pH control accuracy: +/- 0.1 (reference value)
pH switch hystereris
(the difference between the on and off switching point): 0.1
pH alarm window: 0.1 – 4.0
pH calibration memory: Six-week
BNC Adaptor cable length: 20 cm
Timer
Timer
Timer
mode (automatic) switching: Max. 8 On-/Off
mode (interval) switching on time: Minimum 1 sec. / maximum 23 hrs., 59 min. and 59 sec.
mode (interval) switching off time: Minimum 30 min. / maximum 96 hrs. and 59 Min.
10. EC declaration of conformity
The manufacturer declares that the devices comply with the requirements of the relevant EMC and LVD standards and
therefore conform with EC directives 2004/108/EC and 2006/95/EC.
19
Page 20
Dohse Aquaristik GmbH & Co. KG
Otto-Hahn-Str. 9
D-53501 Gelsdorf
Telefon: +49 (0)22 25 - 94 15 0
E-Mail: [email protected]
Internet: www.dupla.com
HOBBY Aquaristik · HOBBY Terraristik · Dupla · DuplaMarin
 Loading...