

Duolabs Spa QBox HD User Manual
Online version
rev.02
QBox High Defi nition User Guide Page 1 of 99

Table of Contents
1 BEFORE INITIA L OPERATION ON THE RECEIVER ....................................................................... 5
1.1
SAFETY INSTRUCTIONS .......................................................................................................................... 5
PACKAGING CONTENTS .......................................................................................................................... 8
1.2
VIEWS .................................................................................................................................................... 9
1.3
EXPLANATION FRONT PANEL ............................................................................................................... 10
1.4
EXPLANATION REAR PANEL ................................................................................................................ 11
1.5
REMOTE CONTROL ............................................................................................................................... 14
1.6
2
INSTALLATION ...................................................................................................................................... 17
2.1
CHECK FOR UPDATES. .......................................................................................................................... 17
BEFORE TURNING THE QBOX HD ON. .................................................................................................. 18
2.2
TURNING THE DEVICE ON ..................................................................................................................... 19
2.3
3
START WIZARD ...................................................................................................................................... 20
3.1
VIDEO OUTPUT SELECTION ................................................................................................................... 20
LANGUAGE SELECTION ........................................................................................................................ 21
3.2
TUNER SETUP ....................................................................................................................................... 22
3.3
SERVICE SCAN ...................................................................................................................................... 22
3.4
PARENTAL CONTROL ........................................................................................................................... 23
3.5
4
BASIC OPERATION ................................................................................................................................ 24
4.1
TURNING YOUR QBOX ON AND OFF ..................................................................................................... 24
SERVICE SELECTION ............................................................................................................................. 25
4.2
CHANGING CHANNEL USING THE SERVICE LIST .................................................................................... 25
4.3
CONTROLLING THE VOLUME ................................................................................................................ 25
4.4
CHANGING THE AUDIO TRACK .............................................................................................................. 26
4.5
SUB SERVICES ...................................................................................................................................... 26
4.6
TV/RADIO SWITCHING ......................................................................................................................... 26
4.7
TELETEXT ............................................................................................................................................ 26
4.8
SUBTITLES ........................................................................................................................................... 27
4.9
INFOBAR .............................................................................................................................................. 28
4.10
5
ELECTRONIC PROGRAM GUIDE EPG ............................................................................................. 29
5.1
SINGLE-EPG ........................................................................................................................................ 30
QBox High Defi nition User Guide Page 2 of 99

5.2 MULTI-EPG ......................................................................................................................................... 31
6
EDIT THE CHANNEL LIST ................................................................................................................... 33
6.1
ADDING A BOUQUET ............................................................................................................................ 34
ADD A SERVICE TO FAVORITES ............................................................................................................. 35
6.2
ADDING MULTIPLE SERVICES TO A BOUQUET ....................................................................................... 36
6.3
REMOVE A SERVICE FROM FAVORITES ................................................................................................. 37
6.4
MOVING A SERV ICE TO FAVORITES ...................................................................................................... 38
6.5
ADDING A MARKER TO FAVORITES ....................................................................................................... 39
6.6
PARENTAL CONTROL ............................................................................................................................ 40
6.7
PROTECTING THE PARENTAL LOCK SETUP ............................................................................................ 42
6.8
7
HARD DISK OPERATION ..................................................................................................................... 43
7.1
HOW TO MOUNT THE EXTERNAL E-SATA HARD DISK ........................................................................ 43
MANAGEMENT ..................................................................................................................................... 44
7.2
RECORDING .......................................................................................................................................... 46
7.3
WATCH A RECORDING ......................................................................................................................... 50
7.4
SETTING A MAR KER (BOOKMARKS) ..................................................................................................... 52
7.5
DELETE A RECORDING ......................................................................................................................... 53
7.6
MOVIELIST OPTIONS ............................................................................................................................. 54
7.7
8
TELETEXT ................................................................................................................................................ 56
SLEEP TIMER .......................................................................................................................................... 59
9
PREFERENCES .................................................................................................................................... 60
10
10.1
LANGUAGE .......................................................................................................................................... 60
CUSTOMIZE .......................................................................................................................................... 61
10.2
SETTING THE TIME ZONE ...................................................................................................................... 63
10.3
A/V SETTINGS ...................................................................................................................................... 63
10.4
LC-DISPLAY ........................................................................................................................................ 66
10.5
FRONT PANEL LED C O LOR AND INTENSITY ......................................................................................... 67
10.6
NETWORK ............................................................................................................................................ 68
10.7
WI-FI CONFIGURATION ........................................................................................................................ 70
10.8
SKIN ..................................................................................................................................................... 72
10.9
FACTORY RESET ............................................................................................................................... 73
10.10
11
SERVICE SEARCHING ...................................................................................................................... 74
11.1
DVB-S TUNER CONFIGURATION .......................................................................................................... 74
QBox High Defi nition User Guide Page 3 of 99

11.2 DVB-T TUNER CONFIGURATION .......................................................................................................... 81
AUTOMATIC SCAN ................................................................................................................................ 82
11.3
MANUAL SCAN ..................................................................................................................................... 83
11.4
12
FIRMWARE UPDATE. ....................................................................................................................... 84
12.1
WHAT IS NEEDED TO UPDATE Y O UR QBOX .......................................................................................... 84
WHAT TO UPDATE ................................................................................................................................ 85
12.2
UPDATING QBOX V IA LAN (ETHERNET) ............................................................................................. 86
12.3
UPDATING QBOX V IA USB PEN ........................................................................................................... 89
12.4
USB PEN FEATURES. ............................................................................................................................ 89
12.5
13
SYSTEM INFO R MATION .................................................................................................................. 90
13.1
SERVICE ............................................................................................................................................... 90
ABOUT (HARD- AND FIRMWARE) ......................................................................................................... 91
13.2
14
APPENDIX A WI-FI MODULE MOUNTING. ................................................................................. 92
14.1
WI-FI MODULE INSTALLATION ............................................................................................................ 92
15
TECHNICAL SPECIFICATIONS ...................................................................................................... 97
CONTACTS ........................................................................................................................................... 98
16
COPYRIGHT NOTES .......................................................................................................................... 99
17
QBox High Defi nition User Guide Page 4 of 99

1 Before initial operation on the
receiver
1.1 Safety instructions
1.1.1 General instructions
Please read the safety instructions completely and carefully, before using the QBox.
The Manufacturer takes no responsibility for damages as a result of incorrect handling
of the QBox.
- The safety marking is located on the exterior of the bottom of the apparatus.
- The mains plug shall be installed near the equipment and shall remain readily operable.
- Allow enough space around the QBox for sufficient ventilation.
- Do not cover the top of the QBox and allow enough space to other devices. The louvers of
the devices must be free at all times to allow sufficient heat transfer from inside the device.
- Never put vases or any other liquid filled containers on top of the device. Do not expose the
device to dripping or splashing liquids.
- Do not place open flame sources, such as lit candles, on top of the device.
- The device may only be operated in moderate climate.
- Do not remove the cover. Risk of electric shock. If it is necessary to open the device please
contact a trained professional.
- Do not put any metal things into the slots or ventilation openings.
- The installation of a hard disk is only allowed by skilled personal or your local dealer.
ATTENTION! Modifications and changes to the QBox lead to loss of warranty if not
performed and documented by skilled operator.
ATTENTION! We recommend the installation of a hard disk by your local dealer.
Unskilled installation of a hard d isk leads to loss of warranty.
QBox High Defi nition User Guide Page 5 of 99

1.1.2 Shut down
- In case your QBox is not in use for a long period of time disconnect the power plug from the
power outlet.
- During thunder storm the unit should also be physically disconnected from the power outlet.
1.1.3
- (Dis-)Connecting to a LNB: Turn the QBox off before you connect or disconnect a cable
- Connecting to a TV: Before connecting or disconnecting your QBox to/from a TV please turn
- In case you notice any damage to the power cord or power plug immediately disconnect the
- In case the device was exposed to humidity immediately disconnect the device from the
- In case you notice any serious damage to the outer shell of the device immediately
- Do not expose the QBox to direct sunlight, lightning or rain.
- Grounding: The LNB cable must be grounded. The grounding system must meet SABS 061
- Cleaning: Disconnect the mains power cord before cleaning the cover. Use a slightly damp
- Connect the QBox only to suitable sockets. Do not allow overloads to occur.
Additional safet y instruc t ions:
coming from or going to a LNB
it off.
device from the power outlet.
power outlet.
disconnect the device from the power outlet.
requirements.
cloth without cleaning agents.
- Please be careful that the batteries of your remote control are not exposed to heat, since they
might explode.
QBox High Defi nition User Guide Page 6 of 99

1.1.4 Disposal instructions
The packaging of the QBox only consists of reusable materials. Please recycle if possible.
This symbol on the product or on its packaging indicates that this product must not be disposed of
with your other household waste. Instead, it is your responsibility to dispose of your waste equipment
by handing it over to a designated collection point for the recycl ing of waste el ec tr ical and el ectr onic
equipment. The separate collection and recycling of your waste equipment at the time of disposal will
help to conserve natural resources and ensure that it is recycled in a manner that protects human
health and the environment.
For more information about where you can drop off your waste equipment for recycling, please
contact your local city office, your household waste disposal service or the shop where you
purchased the product.
Please note that empty batteries and electric waste is not to be put into the regular garbage.
1.1.5 CE Certificat ion
Duolabs S.p.A. declares that this equipment complies to essential requisites and other relevant
provisions of Directives 2006/95/CE (“low voltage”) e 89/336/CE (“electromagnetic compatibility”).
For Wi-Fi sold models.
Duolabs S.p.A. Declares that this equipment complies to essential requisites and other relevant
provisions of Directive 1999/5/CE (“ Radio and Telecommunications Terminal Equipments”). The
declaration of conformity may be required to Duolabs S.p.A., via Baggi 28, 36061 Bassano del
Grappa (VI).
The use of the rad io inter f ac e may be subjected to loc al res tr ict io n of us e. C ustomers are responsibl e
for verifying approval for use in their individual countries. Please consult your local spectrum
authority.
http://ec.europa.eu/enterprise/rtte/spectr.htm
QBox High Defi nition User Guide Page 7 of 99

1.2 Packaging contents
Please check the completeness of the box’s contents.
What’s included on the package:
1 x QBox High Definition
Please check the Tuner configuration from the carton box
1 x Remote Controller
1 x Battery Pack (2x AAA)
Optional
not included
on the standard configuration:
Wi-Fi 802.1n module for WLAN connection
Inc. Wi-Fi antennas
Please check the configuration from the carton box if included
for mounting instructions please follow APPENDIX A
1 x User Manual
QBox High Defi nition User Guide Page 8 of 99
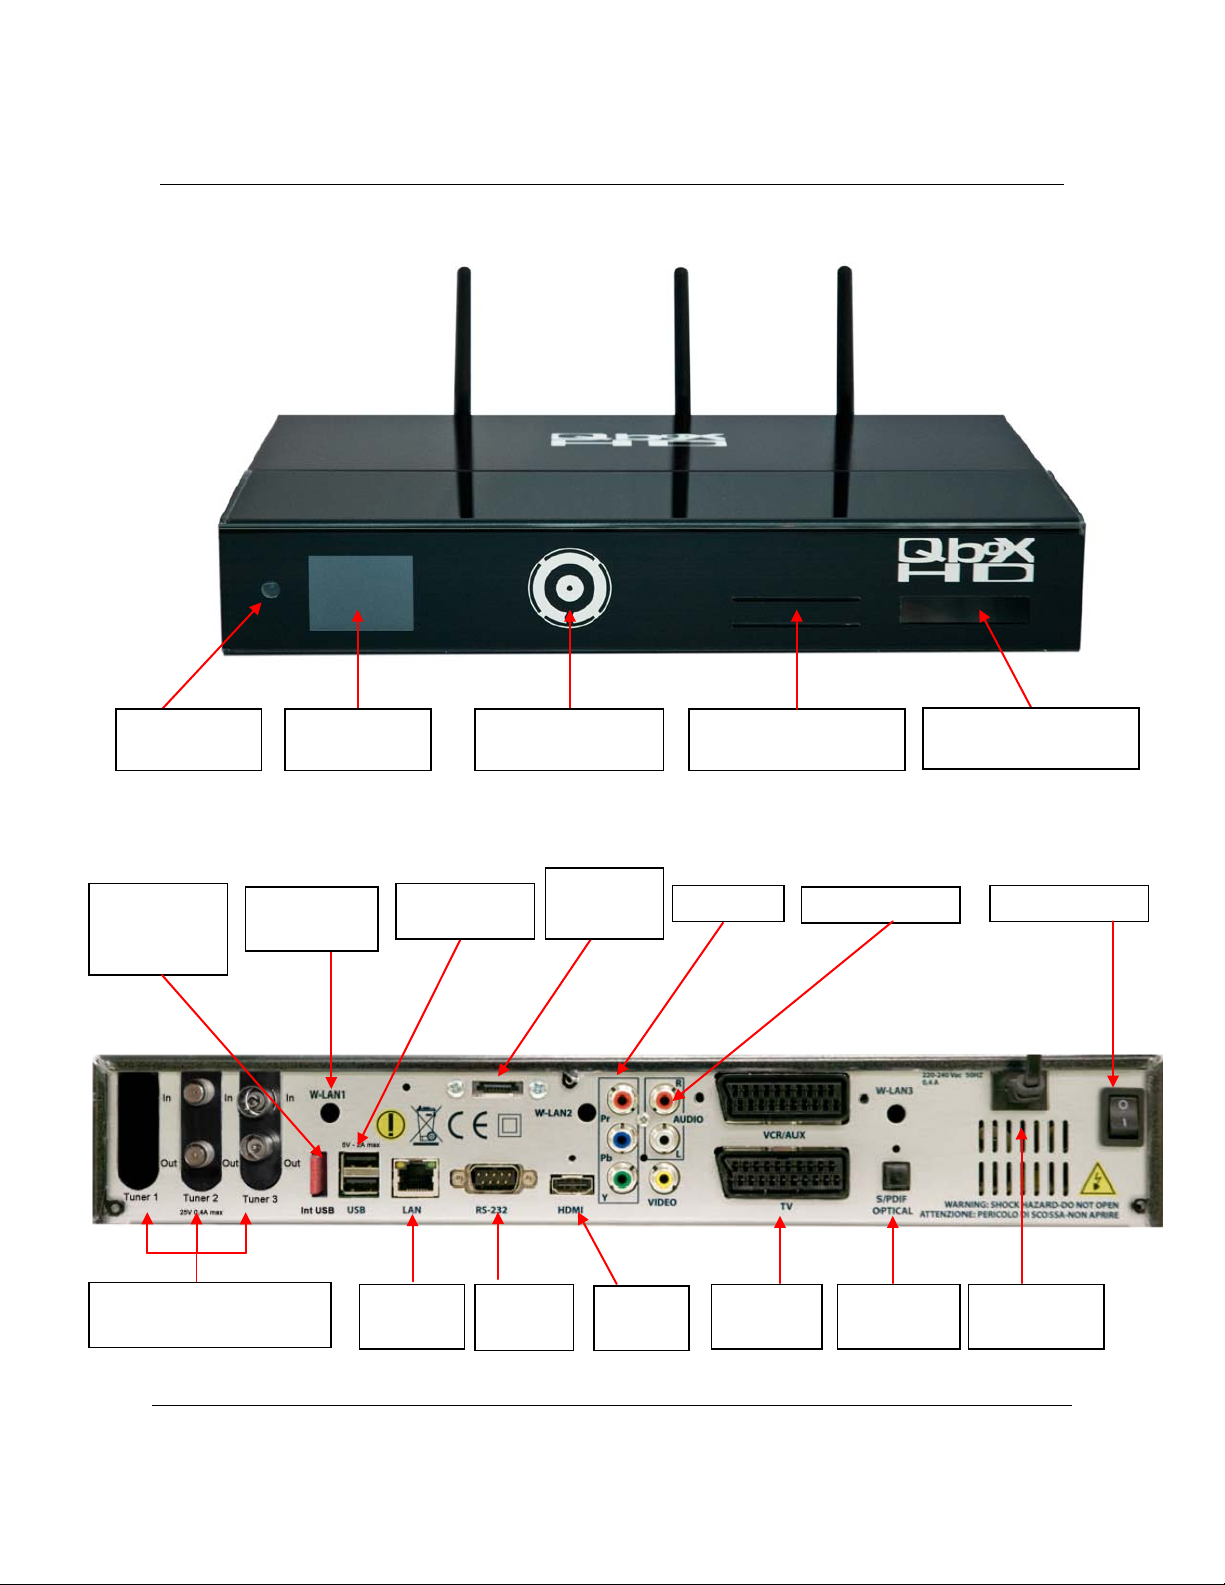
1.3 Views
1.3.1 Font View
Remote Control
Sensor
TFT Display 2,2”
65536 Colors
Touch Pad
Cap Sense Technology
Smarcard Readers
Top (Slot 1) Bottom (Slot2)
Common Interface Slot
Top (Slot 1) Bottom (Slot2)
1.3.2 Rear View
Removable
FileSystem USB
Stick
Tuners Slots
Please check your con figuration
Wi-Fi Antenna
connector
LAN
Connection
USB Input
HUB
RS232
E-SATA
External HDD
HDMI
Output
RGB Output
SCART
Output
Composit Output
Digital Audio
Output
Power Switch
Power Cord
220 Volts Input
QBox High Defi nition User Guide Page 9 of 99
1.4 Explanation Front Panel
Common Interface Slot
Plug in here any Common Interface Module of your choice.
Smartcard Readers
Insert your Conax, Dreamcrypt or DGCrypt Smartcard with the golden chip facing down and forward
into one of the two Smartcard reader slots.
Remote control sensor
The remote control sensor receives the infrared signals of the Remote Control.
Channel up/down
Using the channel-up and –down buttons you can switch the channels directly on your QBox.
LC-Display
The graphical LC-Dis p lay with 65536 Colors shows all major information for the selected service.
Note!
If LCD display when turning on the QBox is flashing two times in RED color it means that
there is a problem with the USB Pen which is not inserted correctly or the content in it is not
correct. For this reason you need to open the receiver and check USB Pen connection.
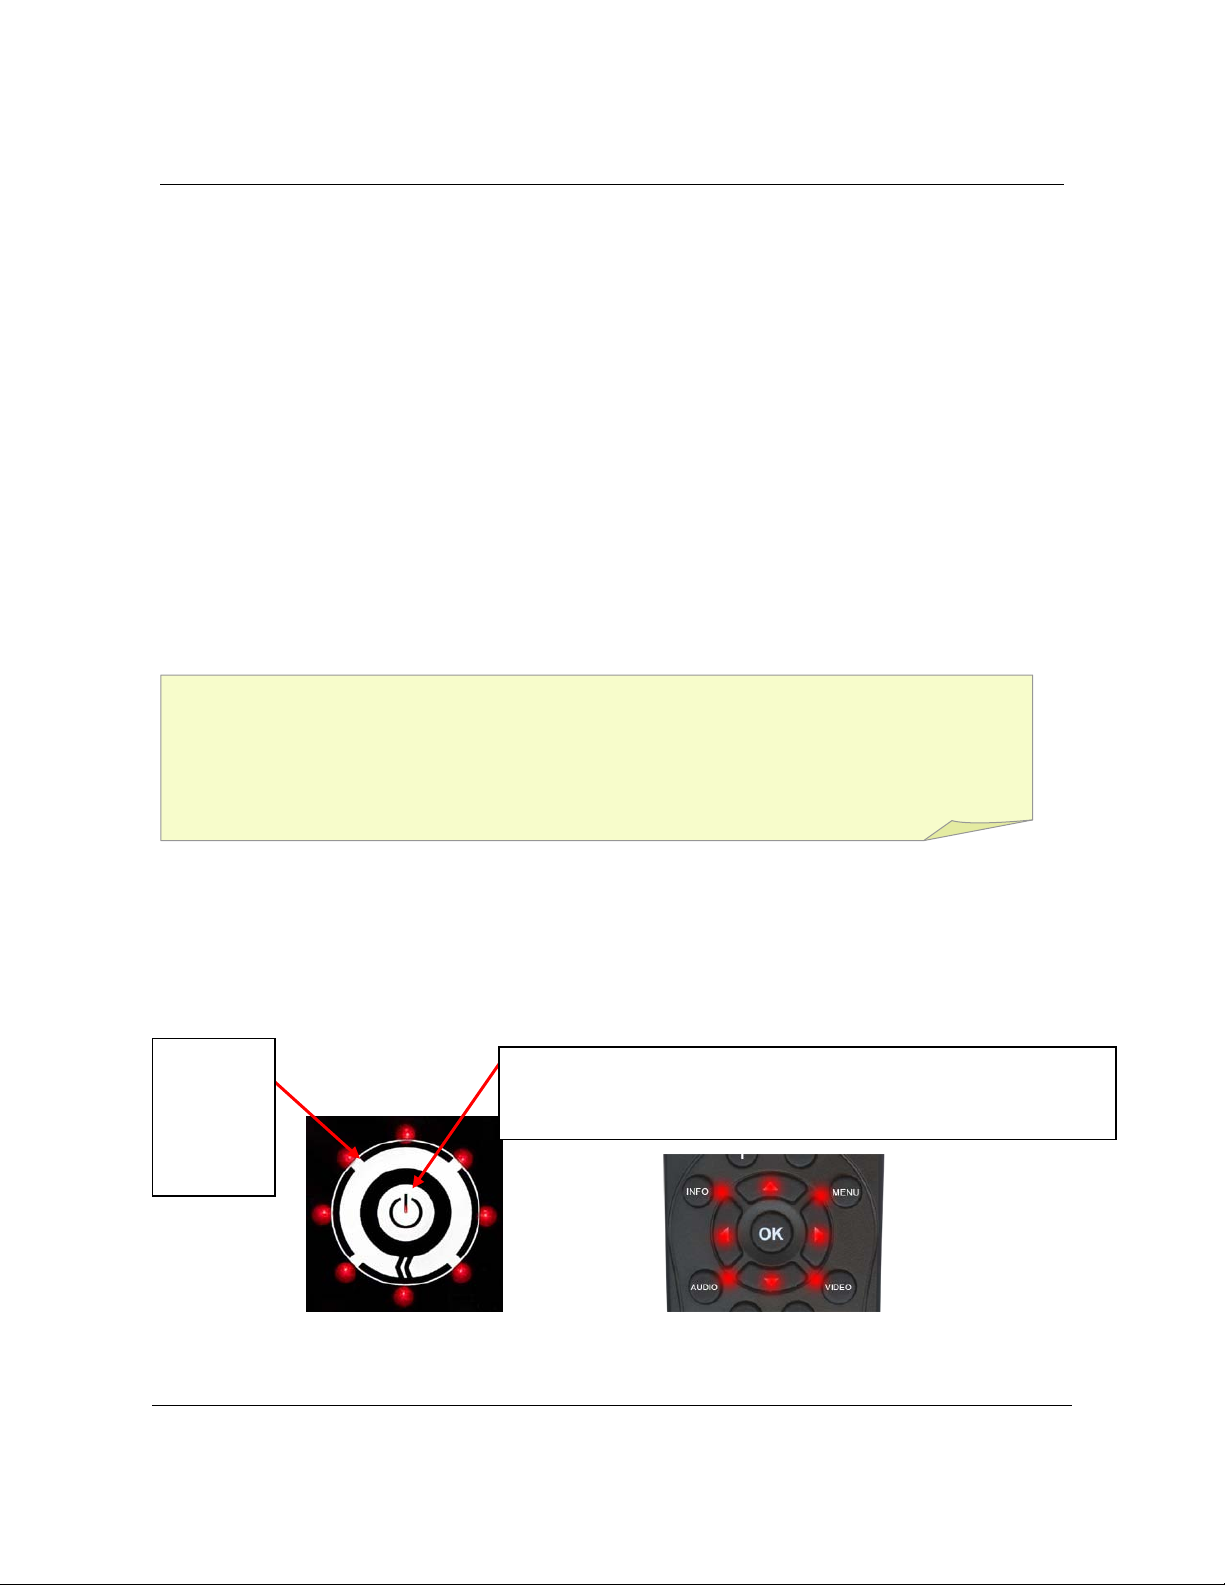
Touch PAD – SenseWheel (Please see 10.6)
Touch PAD is using the cap-sense technology thus is activating its functions by simply getting closer
to it. Functions are the same as the Remote Controller central PAD but may be changed without prior
communication. The illuminated backlights colors can be changed from the OSD.
Position(s) are
illuminated by
the colored
dots
By holding this position for 5 seconds the recei ver will automatically go in Stand-By Mode. For
complete Shut Down ple a se Press the ON/OFF Switch on th e Rear side.
ON/OFF Button – Stand By Mode
QBox High Defi nition User Guide Page 10 of 99

1.5 Explanation Rear Panel
Power Switch
The main power switch completely cuts power from your QBox.
Power Cord
Plug the power cable into the main power socket. You must not connect the power plug to anything
other than a socket that supplies 110V/60Hz or 230V/50Hz.
E-SATA Connector
This is the connector to connect an external Hard Disk E-SATA. E-SATA HardDisk needs to be
externally powered.
Digital Audio Output (SPDIF)
You can connect your QBox with an optical (Toslink) cable to your HiFi-Amplifier or DSP. The AC3
signal is also available at this port in case the selected channel transmits Dolby Digital signals.
Scart Output (TV and VCR)
Connect your TV, projector or beamer to your QBox using a Scart cable (TV).
Connect your VCR or DVD player to your QBox using a Scart cable (on VCR). Remember, the VCR
Scart is not designed to record a video signal from the VCR or DVD player.
Please read carefully point 3.1 when you first startup your QBox.
Composite Output
Connect your QBox with a RCA/Cinch cable (red and white) to your HiFi-Amplifier (e.g. AUX In or
Tape In ports). You can optionally connect your QBox to a TV using a RCA/Chinch cable.
RBG Output
Connect your QBox with a RCA/Cinch cable (red, blue and green) to your TV, projector or beamer on
RGB (component) input. This is just a video Output.
HDMI
QBox High Defi nition User Guide Page 11 of 99

Connect your QBox with a HDMI cable (non included) to your TV HDMI input. HDMI is the highest
performance signal (video and audio) transmission output for your QBox High Definition.
Please read carefully point 3.1 when you first startup your QBox.
RS232
You can connect your QBox The Serial Port is used to update the operating system. Please connect
a serial null modem cable here.
LAN Connection (Ethernet 10/100Mbit, RJ45)
The Communication Port is an Ethernet port. It is used to communicate with your QBox via HTTP,
FTP, NFS, Telnet and Samba to access your recorded movies, to upload channel lists, etc. This port
is also used to update the operating system of your QBox. Please use a regular patch cable or cross
cable to connect your QBox to your LAN. It is recommended to use a LAN switch, Router or Access
point to maintain a stable connection especially for LAN update procedure.
USB Input HUB (USB 2.0)
The USB Port is designed for devices that support the USB 2.0. The amount of supported USB
devices depends on the installed image (Software) and is still under development.
USB Port can be used for P.V.R. (Personal Video Recording) functions by connecting a USB Pens or
USB Drives. USB Port can be used for receiver update (see chapter 12)
Removable Filesystem USB Pen
The FileSsstem is hosted in an external USB Pen of 1GB slim format which can be easily removed
from the back side of the receiver and used in a PC to download the new firmware inside the
receiver. The USB Pen is used instead of internal memory so that the QBox can have larger room to
host more files, videos etc with NO space limitation.
It is possible also to use a different USB Pen simply removing the internal USB and installing the
entire filesystem into another USB Pen. QBox will boot from the USB where the filesystem is present.
LNB 1, 2, 3 – Tuner Slots
QBox is a multi-tuner Set Top Box. You can Plug and Play DVB-T, DVB-S2, DVB-C tuners. Tuners
must be compatible with QBox tuners. Please do not mount any tuner if you are not sure if the tuner
you are using is compatible with QBox Tuners.
QBox tuners are available by QBox resellers or directly by Duolabs Spa.
QBox High Defi nition User Guide Page 12 of 99

Wi-Fi Antenna (optional)
QBox is capable to support WLAN connection with using the WLAN module optionally available
(please check your sales configuration on the carton box if available). Three Wi-Fi antennas are
needed to get the maximum performance for the WLAN module which operates following the 802.11 n
Standard. The WLAN operates in a totally transparent way like LAN connection (see above) including
all its functionalities (see chapter 10.8)
QBox High Defi nition User Guide Page 13 of 99
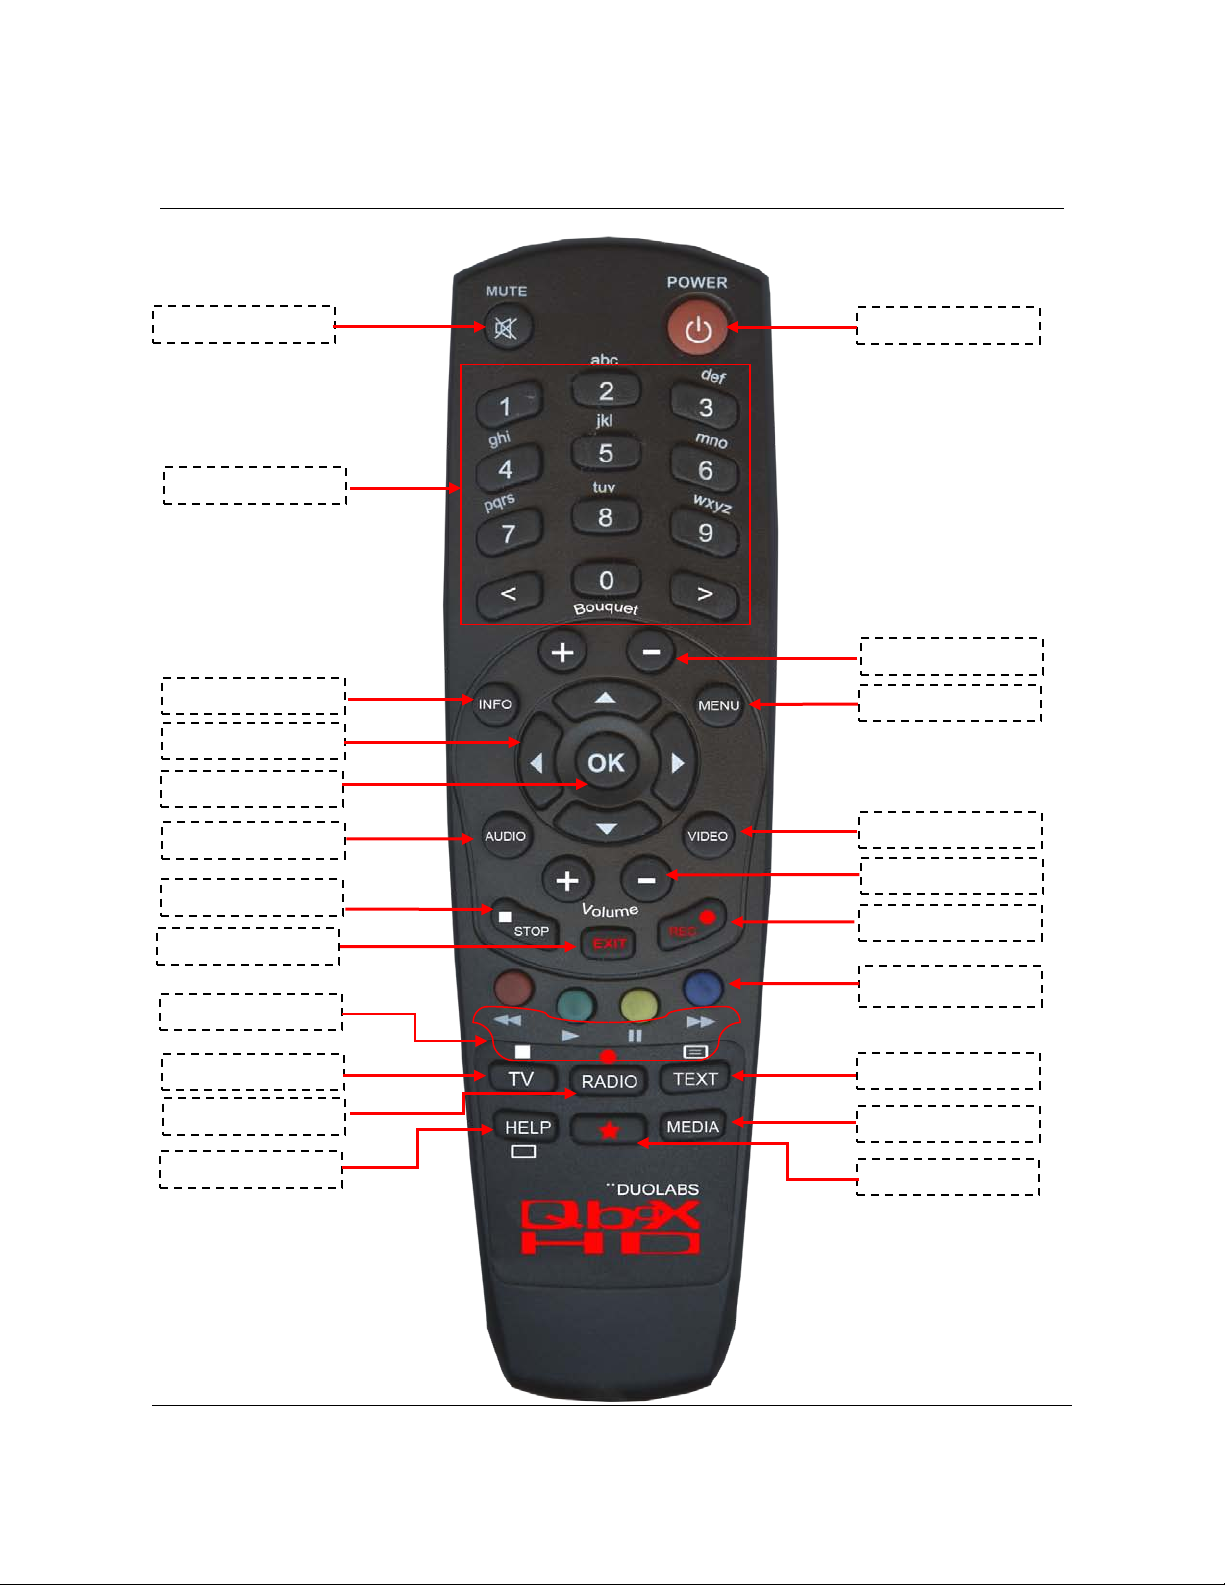
1.6 Remote Control
Mute Button
Numeric KeyBoard
INFO Button
NAVIGATION Buttons
OK Button
AUDIO Button
PVR STOP Button
EXIT Button
POWER Button
BOUQUET Button
MENU Buttons
VIDEO Button
VOLUME Button
PVR REC Button
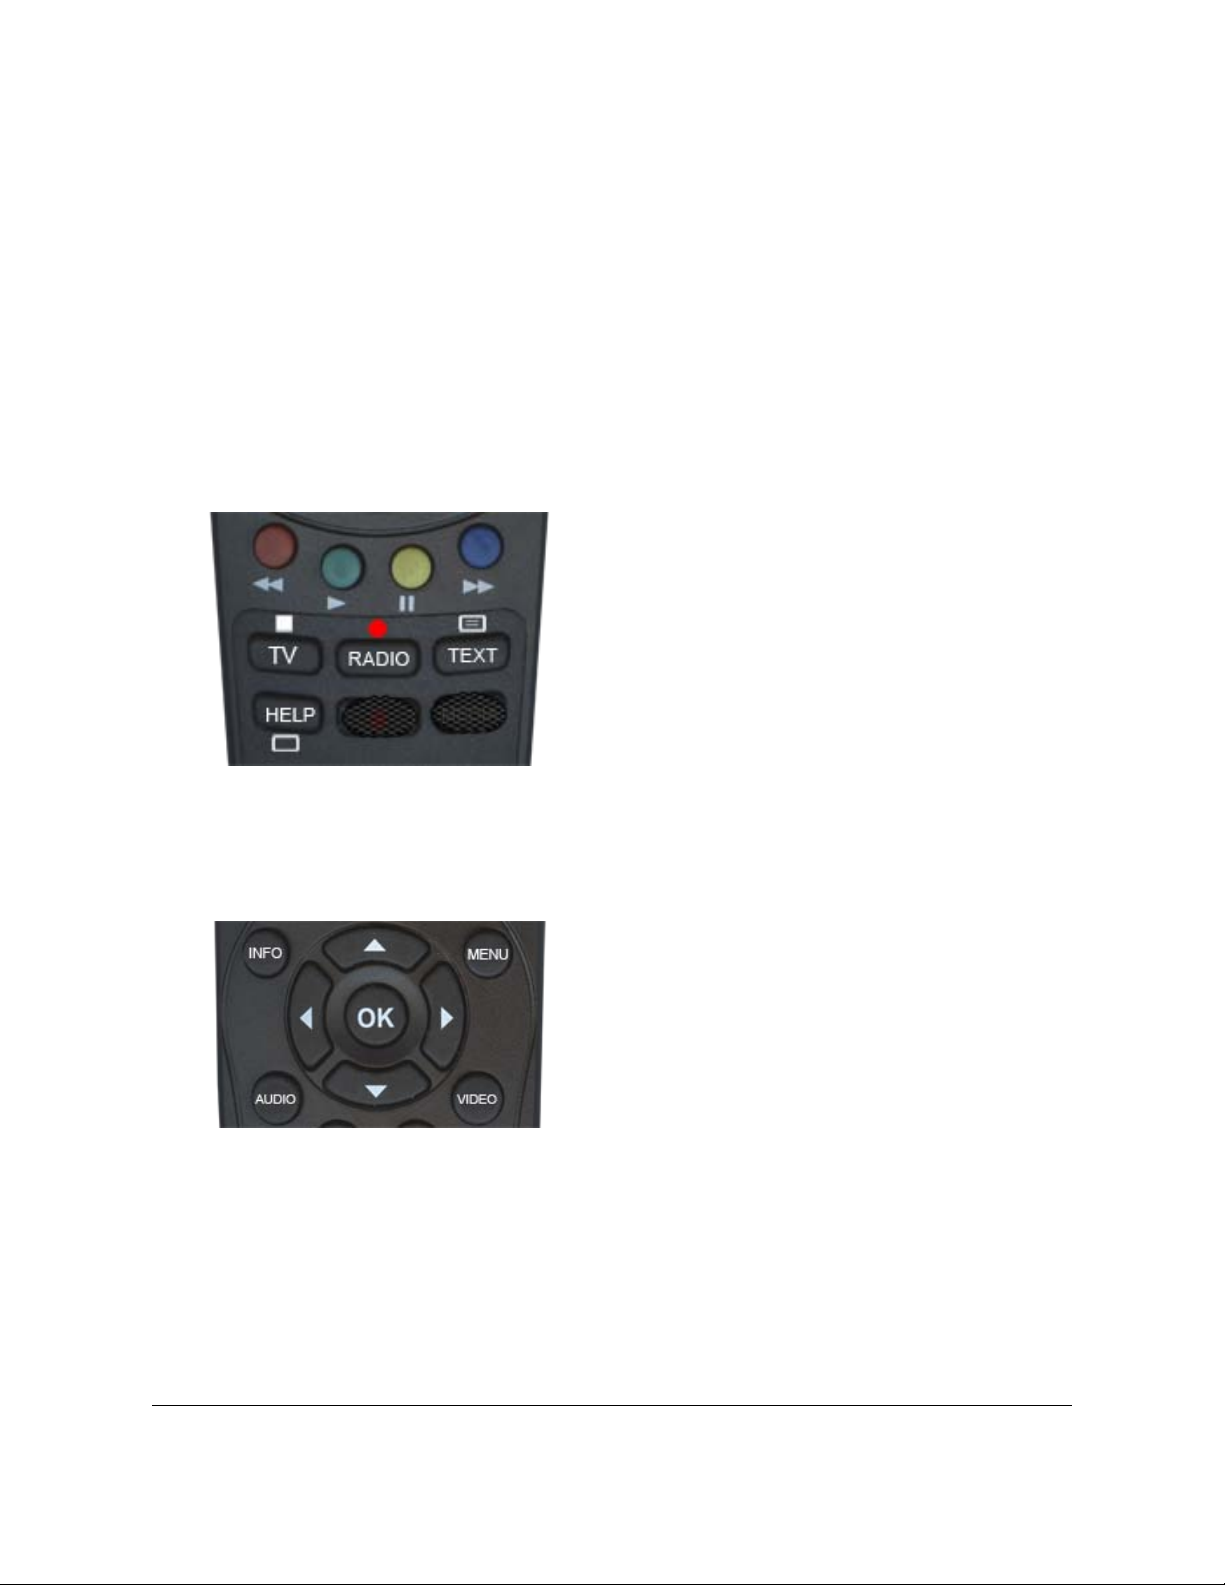
Option Buttons
PVR Mode Buttons
TV Button
RADIO Button
HELP Button
TEXT Button
MEDIA Button
MULTIFUNCTION B u tton
QBox High Defi nition User Guide Page 14 of 99
Important notes about operation
The Options Buttons of your remote control
All functions of the QBox can be controlled via OSD-Menu (On-Screen-Display). This makes the
handling of the QBox very easy for you. All options are indicated by four colored dots or beams (red,
green, yellow, blue) in the OSD-Menu and can be started with the Option Buttons on the Remote
Control.
Depending on the chosen Menu, these options do vary.
have multiple functions. You will notice control
symbols below the four colored Options
Buttons, the TV- and the RADIO Button.
In PVR Mode these buttons are used to control
the digital recording according to their symbols.
Pressing the VIDEO-Button on your remote
control will activate the PVR-Mode.
The Info bar will also indicate this. It changes
from showing the channel information to showing
the control symbols for the PVR-Mode.
In general the menus are controlled using the
Navigation-Buttons on your remote control.
QBox High Defi nition User Guide Page 15 of 99

Pressing the HELP-Button activates the He lp menu.
POWER Button
MUTE Button
Numeric KeyBoard
EXIT Button
VOLUME Buttons
INFO Button
NAVIGATION Buttons
AUDIO Button
PVR Mode Buttons
TV Button
PVR STOP Button
PVR REC Button
BOUQUET Button s
The Power-Button switches your QBox on and off.
Pressi ng the MUTE-Bu tton mutes the Volume. A crossed speaker symbol will appear on the TV screen.
Pressing it again or pressing one of the Volume +/- Buttons brings back the audio. The Mute-Button deletes
a character during text input.
Enter a service number to directly access the option by using the Numeric Keypad. The service numbers
are on the left side of the service list. The Numeric Keypad can also be used to enter the Teletext page
number.
All Menus and Service lists are closed with the EXIT-Button.
The Volume +/- Buttons control the volume of the audio. Pressing + will make turn it up and pressing - will
turn it down.
If no OSD menu is visible on the screen and you are in TV or RADIO-Mode, pressing the INFO-Button will
reveal the EPG informatio n of the chos e c ha nnel if it is available.
In general the menus are controlled using the Navigation-Buttons on your remote con trol. To get into a
submenu you have to press the OK-Button.
By pressing the AUDIO-Button you can choose the dif fe rent audio tracks offere d by th e sta tion.
All possible opti ons are shown by the four colored dots/blocks (red, green, yellow, blue) and can be
activated by the Options-Buttons. These buttons have multiple functions and are also used to control the
PVR-Mode. Depending on the menu you currently are in the options will change and will be named
differently.
Pressing the TV-Button activates the TV-Mode. In PVR-Mode this button is mapped with the stop function
as indicated by the small square underneath it.
Pressing the PVR STOP Button the PVR wil l stop i mm ediately from recording .
Check chapter 7.3.2
Pressing the PVR START Button the PVR will start immediately recording in “Add recording (indefinitely)”
mode.
Check chapter 7.3.1
Pressing the Bouquet +/- Buttons will jump back and forth between the bouquets.
MENU Button
OK Button
RADIO Button
VIDEO Button
Option Buttons
HELP Button
TEXT Button
MULTIFUNCTION B u tton
MEDIA Button
If you are in TV- or RADIO-Mode, pressing this button will bring up the OSD main menu.
You can switch to the needed option by pressing the Navigation-Buttons up or down.
If you are in the service list, pressing the MENU-Button brings up the service menu.
By pressing the OK-Button you confirm a selection in the menu or service list navigation. If no OSD menu
is present on your screen, the Infobar is show n once you press the OK Button.
Pressing the RADIO-Button activates the RADIO-Mode.
Pressing the VIDEO-Button activates the PVR-Mode. The Infobar will show the control symbols. You can
instantly start recording by pressing the red Opti ons-Button on your remote control.
All possible opti ons are shown by the four colored dots/blocks (red, green, yellow, blue) and can be
activated by the Options-Buttons. These buttons have multiple functions and are also used to control the
PVR-Mode. Depending on the menu you currently are in the options will change and will be named
differently.
The TEXT-Button activates the Teletext.
The MULTIFUNCTION button in a user customizable button which gives direct access to a user pre-defined
function. Function can be defined via plug-in by the user.
The MEDIA Button gives the user the direct access to the media functions control panel.
QBox High Defi nition User Guide Page 16 of 99
2 Installation
2.1 Check for updates.
When the Set Top Box is received it is possible that many new features are already been
implemented in the meanwhile. A firmware update is important to be made.
Before starting the receiver please check on the official web site www.qboxhd.com or
www.duolabs.com if there is any firmware update that may have fixed some previous problems.
Check on the update section 12 of this manual how to perform the update on your receiver.
QBox High Defi nition User Guide Page 17 of 99

2.2 Before turning the QBox HD on.
Please remove the protection plastic from all the box and clean the front and rear panel carefully
before turning the receiver on.
IMPORTANT NOTE!
To clean the front panel plastic after removing the protection film please use small quantity of
water mixed with glass cleaning products.
DO NOT USE:
• Acetone
• Any Chemical solvent.
• Alcohol based products.
• Trichloroethylene is a chlorinated hydrocarbon known as TCE, Trike, Tricky and Tri...
The usage of the above products may cause opacity effects on the front panel plastic.
NO WARRANTY WILL COVER SUCH KIND OF DAMAGE!!
QBox High Defi nition User Guide Page 18 of 99

2.3 Turning the device on
- Place the batteries inside the battery compartment of the remote control keeping in mind the
right polarity.
- Before using the QBox, please read the safety instructions (See chapter 1.1 Safety
instructions)
- Connect the LNB or antenna with a coaxial cable to LNB in or Antenna in at your QBox. See
chapter 1.3.2 Explanation rear panel.
- Connect the QBox to your TV using a HDMI or Scart-cable.
Please mind carefully chapter 3.1 before connecting HDMI or SCART at the first use of
QBox
- Plug in t he power cable into the QBox and then into a 110V/60Hz or 230V/50Hz p o wer
socket.
- If you are using a switchable power socket please shutdown your QBox into deep standby
before switching off the power socket. See chapter 4.1 Turning your QBox on and off
- If you switch on your QBox for the first time, you will see the setup wizard. The setup wizard
will guide you through the first time installation. Follow the instructions on the screen. See
chapter 3. Start wizard.
QBox High Defi nition User Guide Page 19 of 99

3 Start wizard
The start wizard helps you with the basic setup of your QBox.
3.1 Video output selection
READ CAREFULLY!
At the first usage of your QBox you have to set up the video/audio output for your receiver.
There are two possible options:
1. Connection using the HDMI.
a. First of all turn on your TV Set and go to HDMI input. Some TV Set will allow the user
to select the HDMI input right after the detection of the receiver’s HDMI signal.
b. During the startup the receiver will negotiate with the TV Set the video output
preferences and will set itself at the maximum possible resolution.
2. Connection using other outputs differ ent than HDMI.
If there is not HDMI connected the receiver will automatically set as output the SCART or
RGB. In this case nothing must be done.
QBox High Defi nition User Guide Page 20 of 99
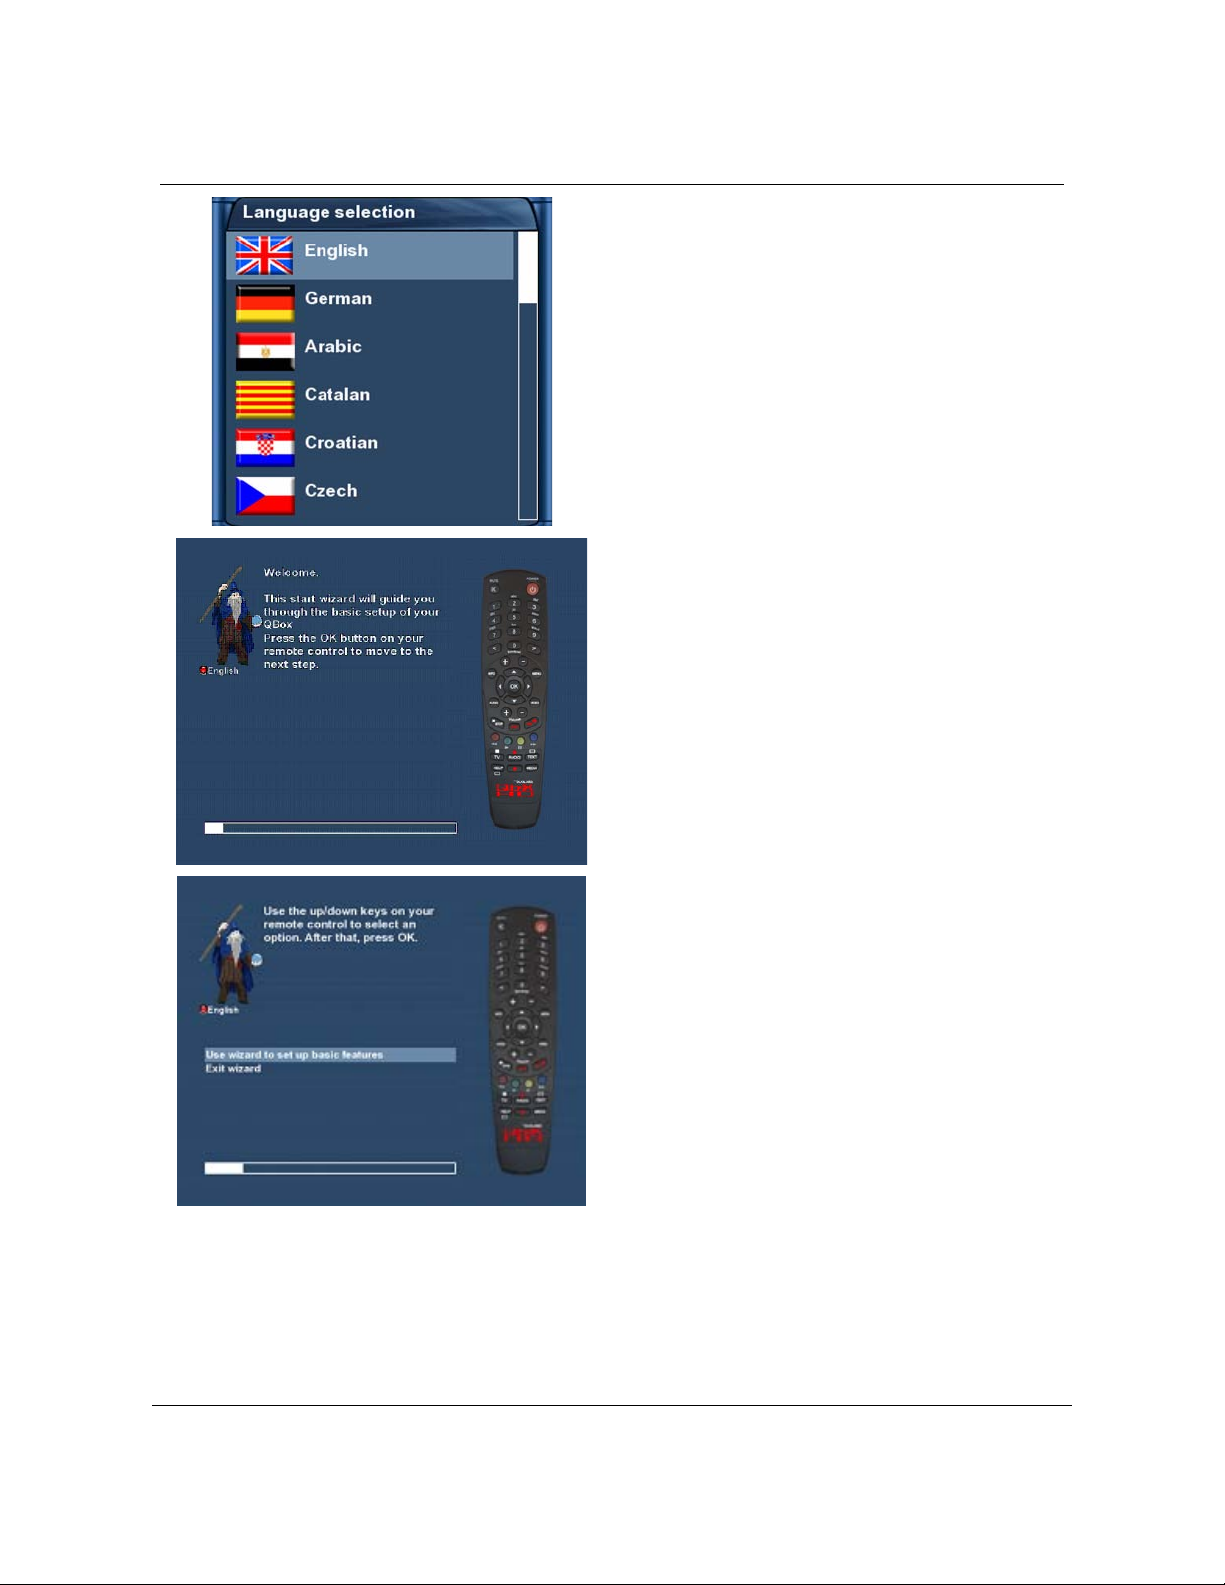
3.2 Language selection
Select your desired and language with the
Navigation-Buttons up and down. Press the
OK-Button to activate.
The start wizard takes you through the basic setup of your QBox.
Press the OK-Button on your remote control to
get to the next step.
You will be asked if you want to set the basic set-
tings for your QBox no w or if you want to quit the
start wizard.
Using the Navigation-Buttons up and down
select your desired option and press the OK-
Button to activate your selection.
If you choose “User wizard to setup basic fea-
tures” you will be taken to the menu for the
tuner configuration.
QBox High Defi nition User Guide Page 21 of 99
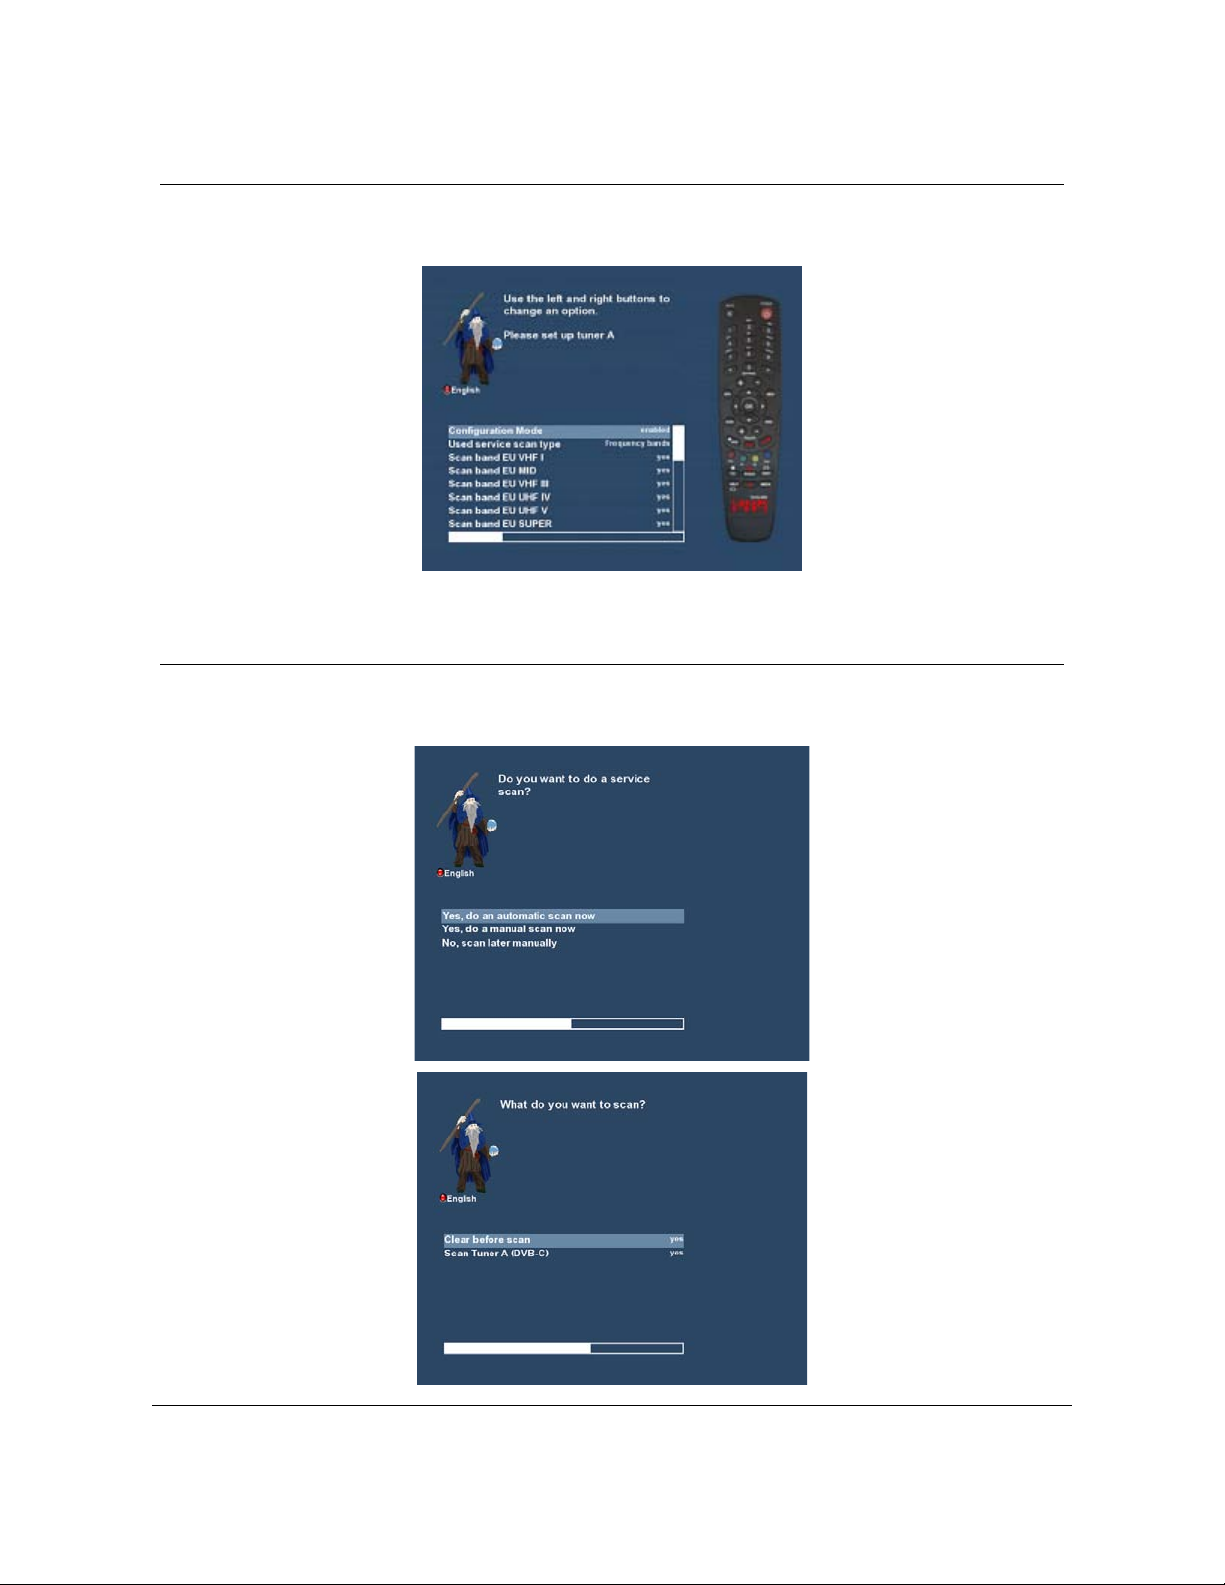
3.3 Tuner setup
Detailed information about the tuner setup can be found in chapter 11.1 DVB-S Tuner configuration
3.4 Service scan
Detailed information about the service scan can be found in chapter 11.3 Automatic scan
QBox High Defi nition User Guide Page 22 of 99
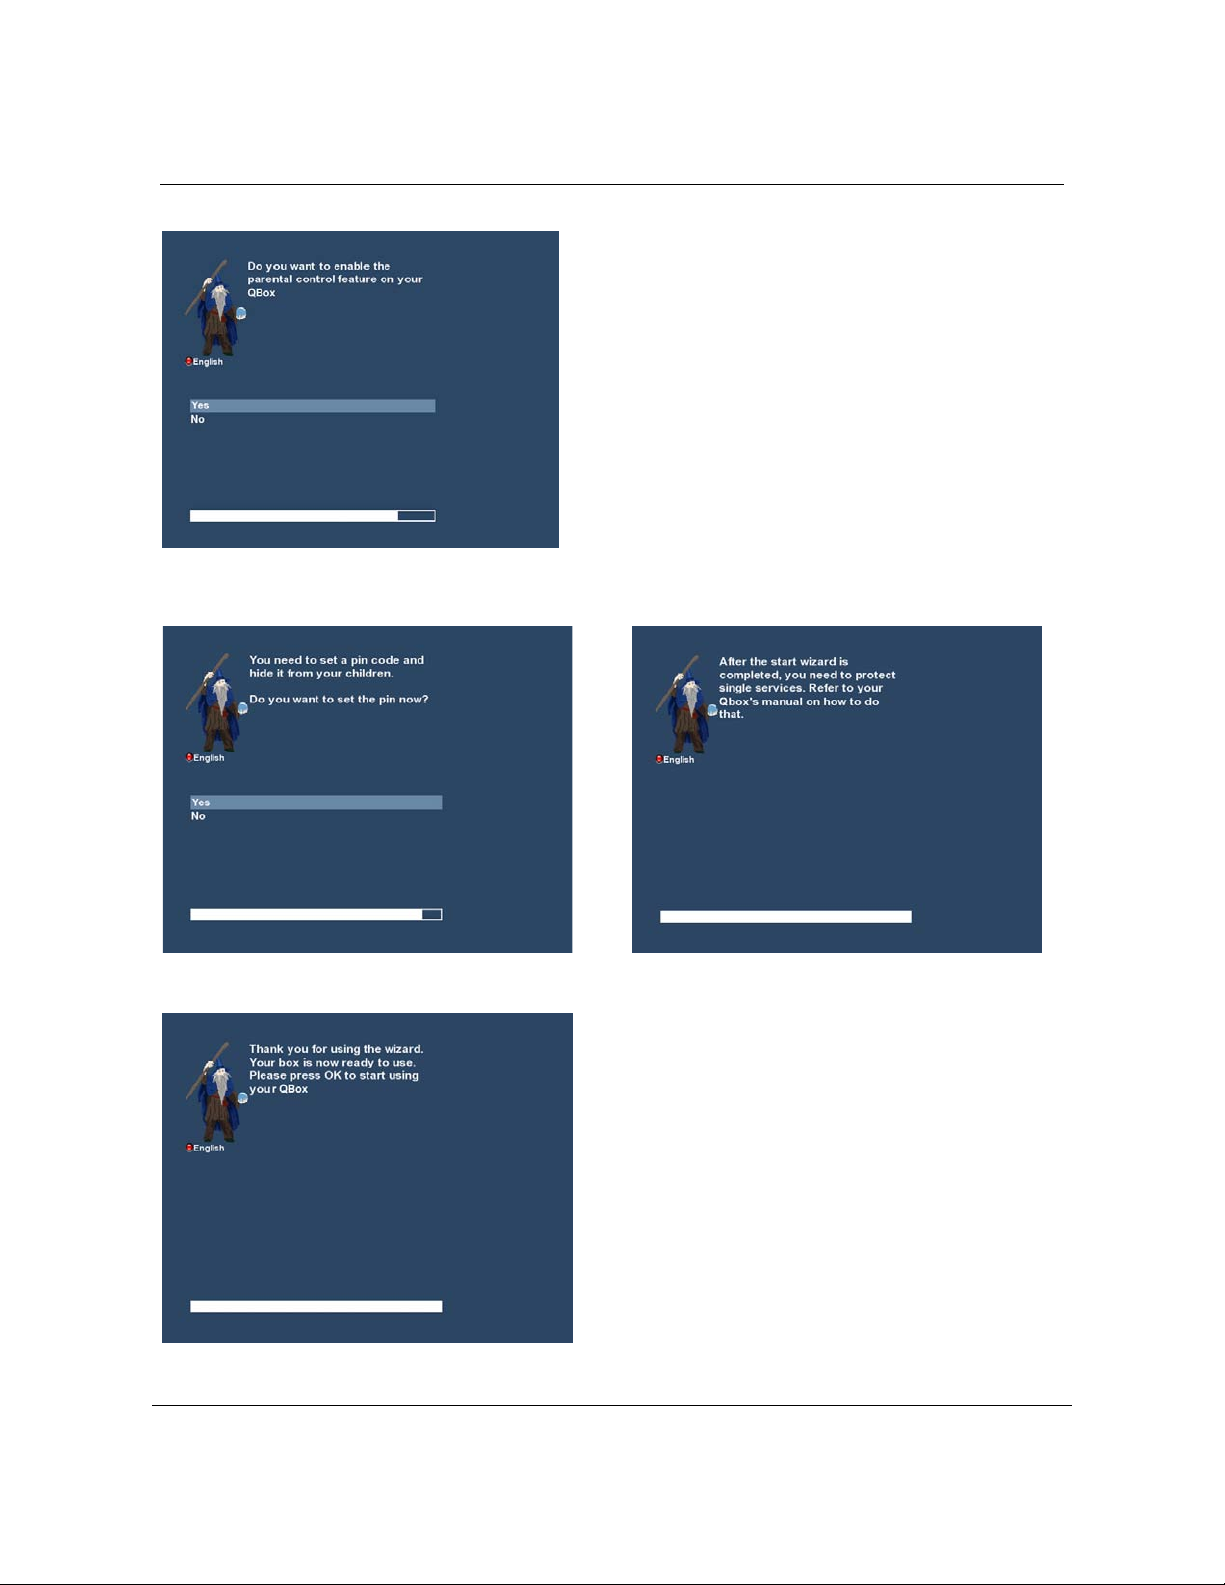
3.5 Parental Control
Refer to section 6.7 Parental Control for further information about this feature
Entering the pin code
Finalizing the basic setup
QBox High Defi nition User Guide Page 23 of 99
4 Basic operation
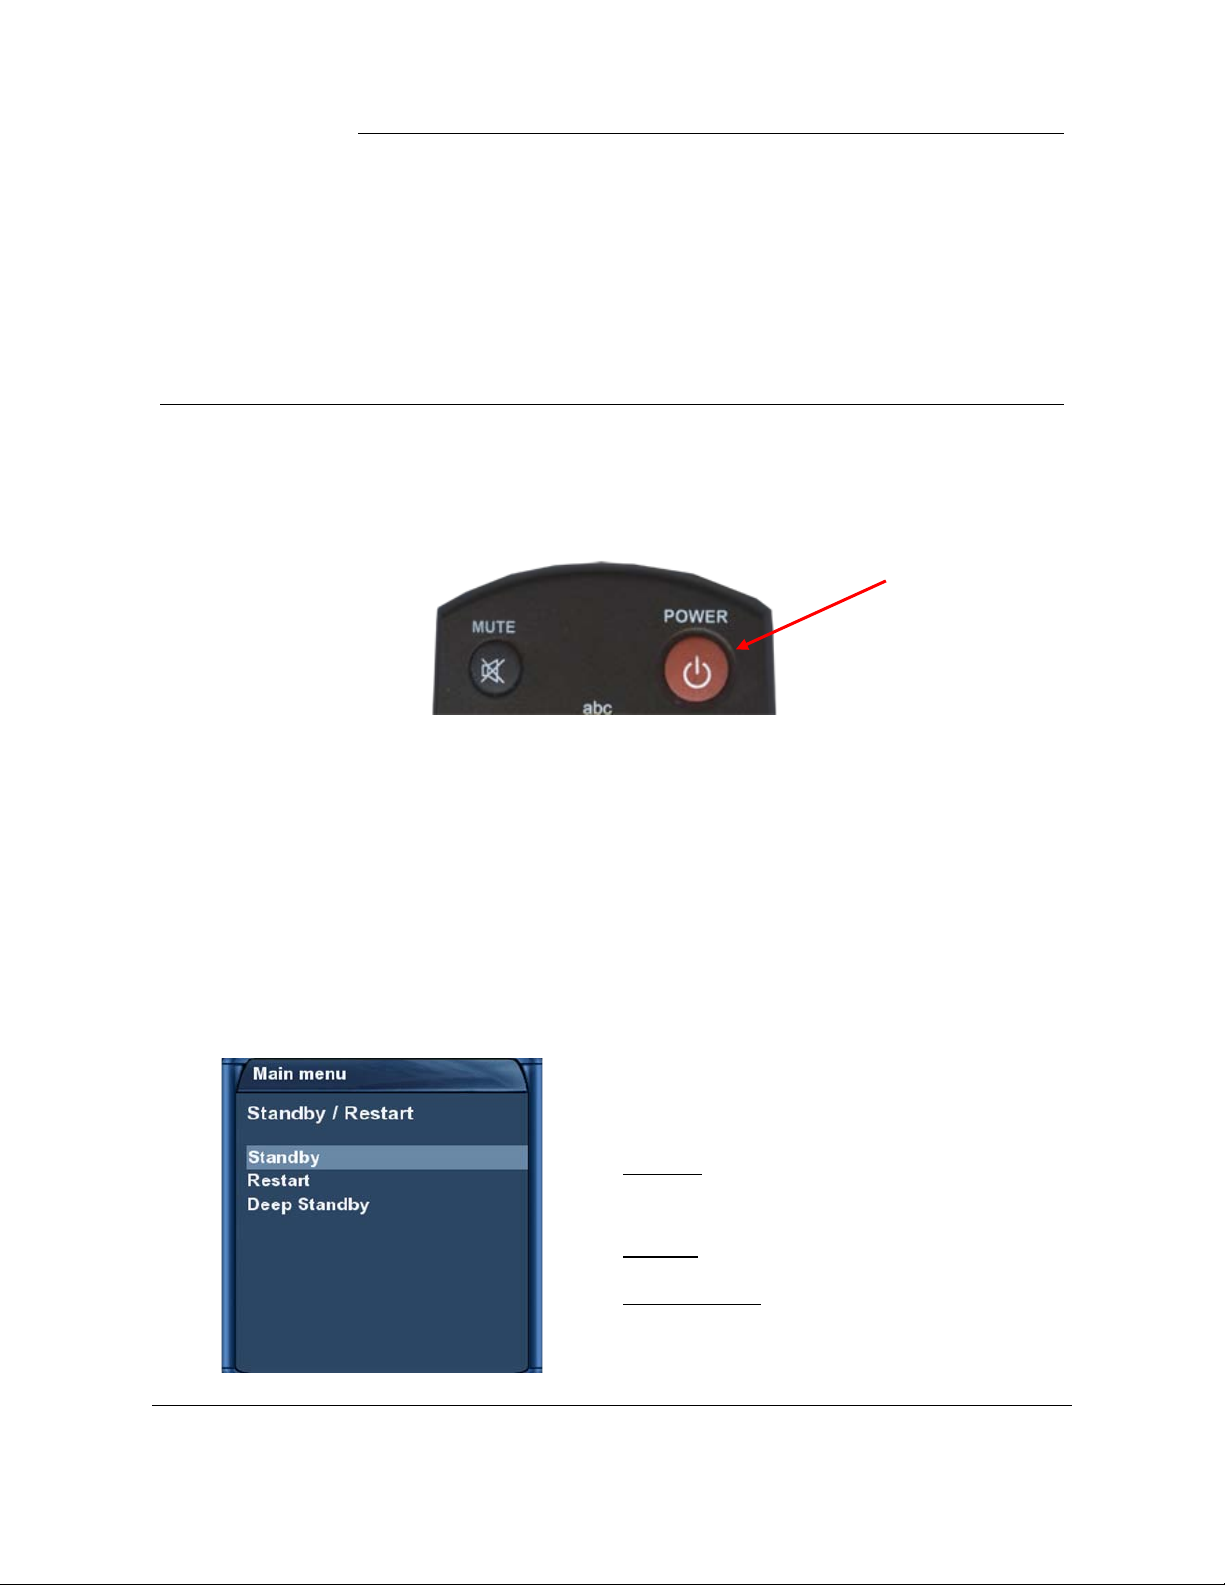
This is the Standby / Restart menu.
4.1 Turning your QBox on and off
Use the Power-Button to tu r n your QBox on and off.
To put your QBox into Standby-Mode either press the Power-Button on your remote control or directly
on your QBox. The current time will be shown in the QBox’s LCD-Display.
Pressing the Power-Button for three seconds saves all settings and prepares your QBox for
disconnection from power.
Please wait for a note on the screen telling you that you can now disconnect your QBox from power.
Another way to achieve the same thing is to access the main OSD menu and selecting the
“Standby/Restart” option. After that select the “Deep Standby” option and press the OK-Button.
Alternatively you can press the Power-Button on your QBox front panel for 5 seconds. You have to
make sure that no OSD menu is visible on the screen before you do so.
Navigate to the desired option and
confirm by pressing the OK-Button.
Standby:
Puts your QBox into Standby mode
Restart: Your QBox will be rebooted.
Deep Standby: Saves all settings and enables
you to disconnect your QBox from power.
QBox High Defi nition User Guide Page 24 of 99
4.2 Service selection
The Volume +/- Buttons control the volume of
Pressing the Left/Right-Buttons on your QBox remote control will take you to the previous or next
service.
Pressing the 0 on the Numeric-Keypad will enable you to skip back and forth between the two most
recently watched services. This feature is quite useful during commercial breaks since it enables
you to watch another channel and quic kly check if your movies is back on.
Using the Navigation-Buttons left/right you can switch to the 20 last viewed services.
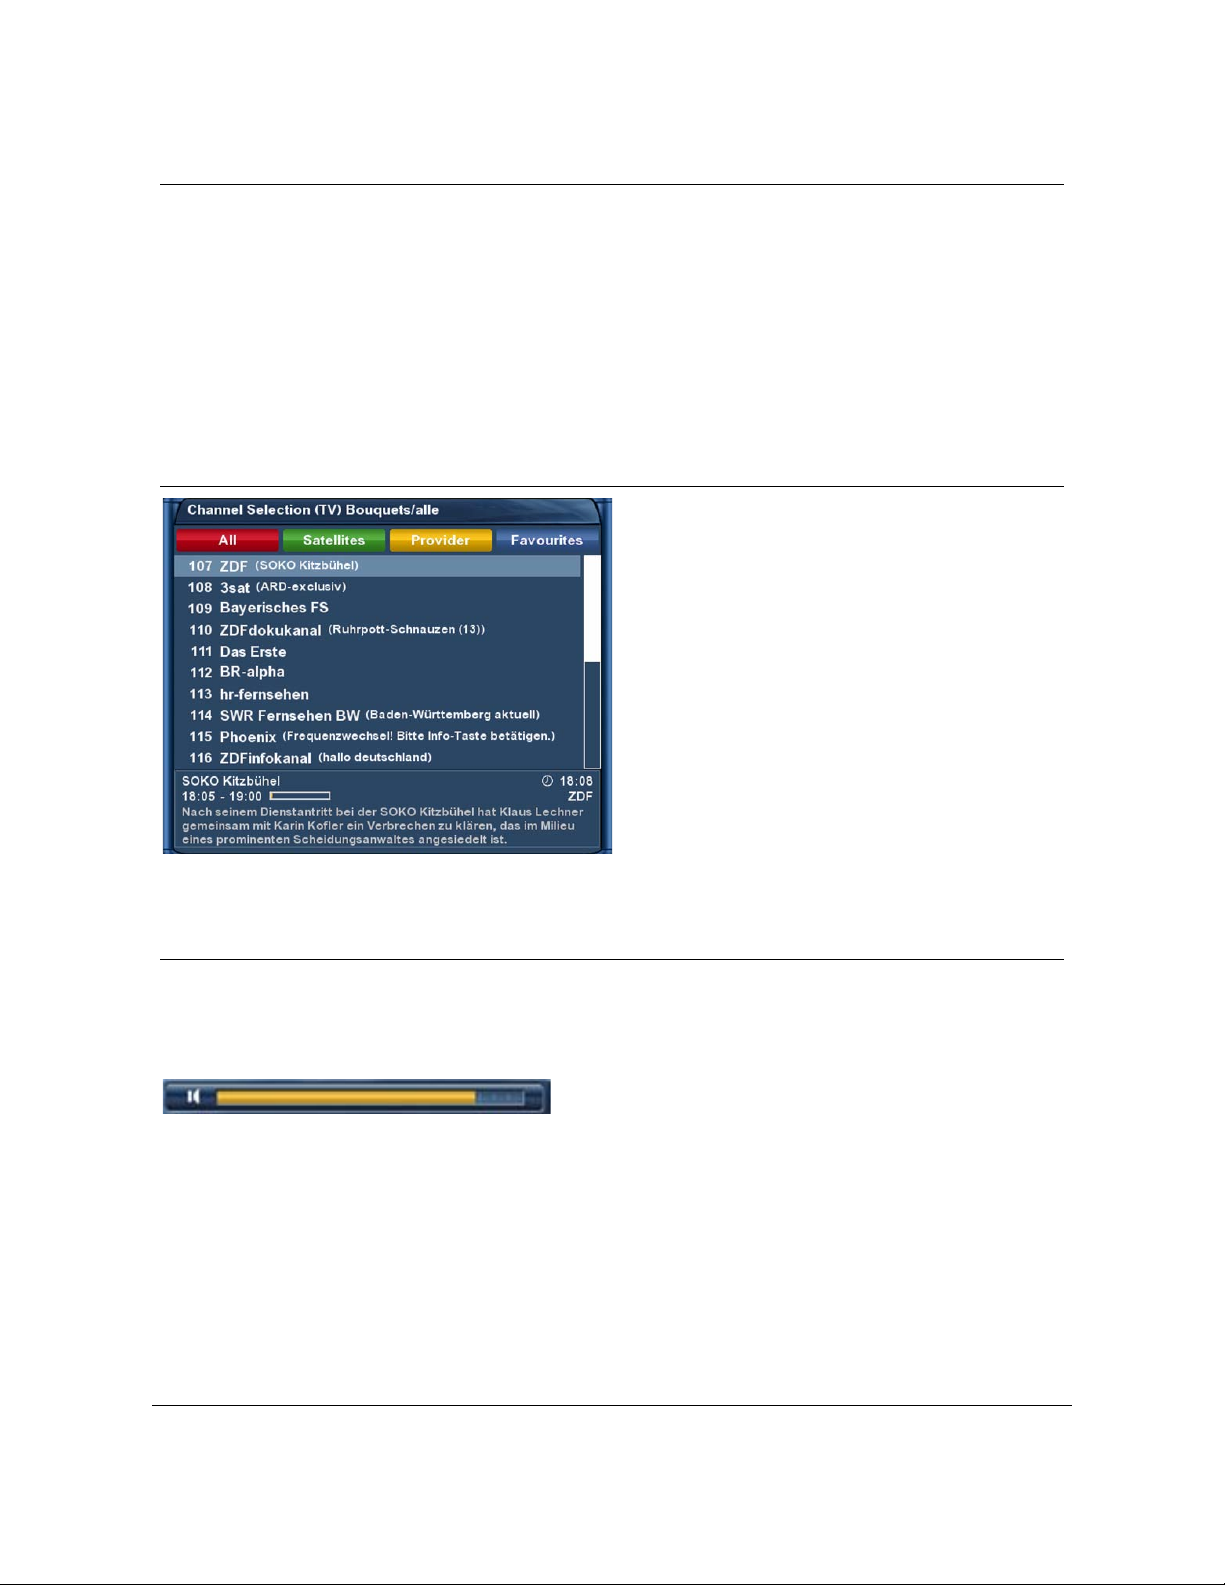
4.3 Changing channel using the service list
Pressing the Up/Down-Buttons on your
remote control activates the service lis t.
Use the Navigation-Buttons up/down to select
the desired service and pre ss the OK-Button to
change to the selected service.
4.4 Controlling the volume
the audio. Pressing + will make turn it up and
pressing will turn it down.
Pressing the MUTE-Button mutes the volume. A
crossed speaker symbol will appear on the
screen.
QBox High Defi nition User Guide Page 25 of 99
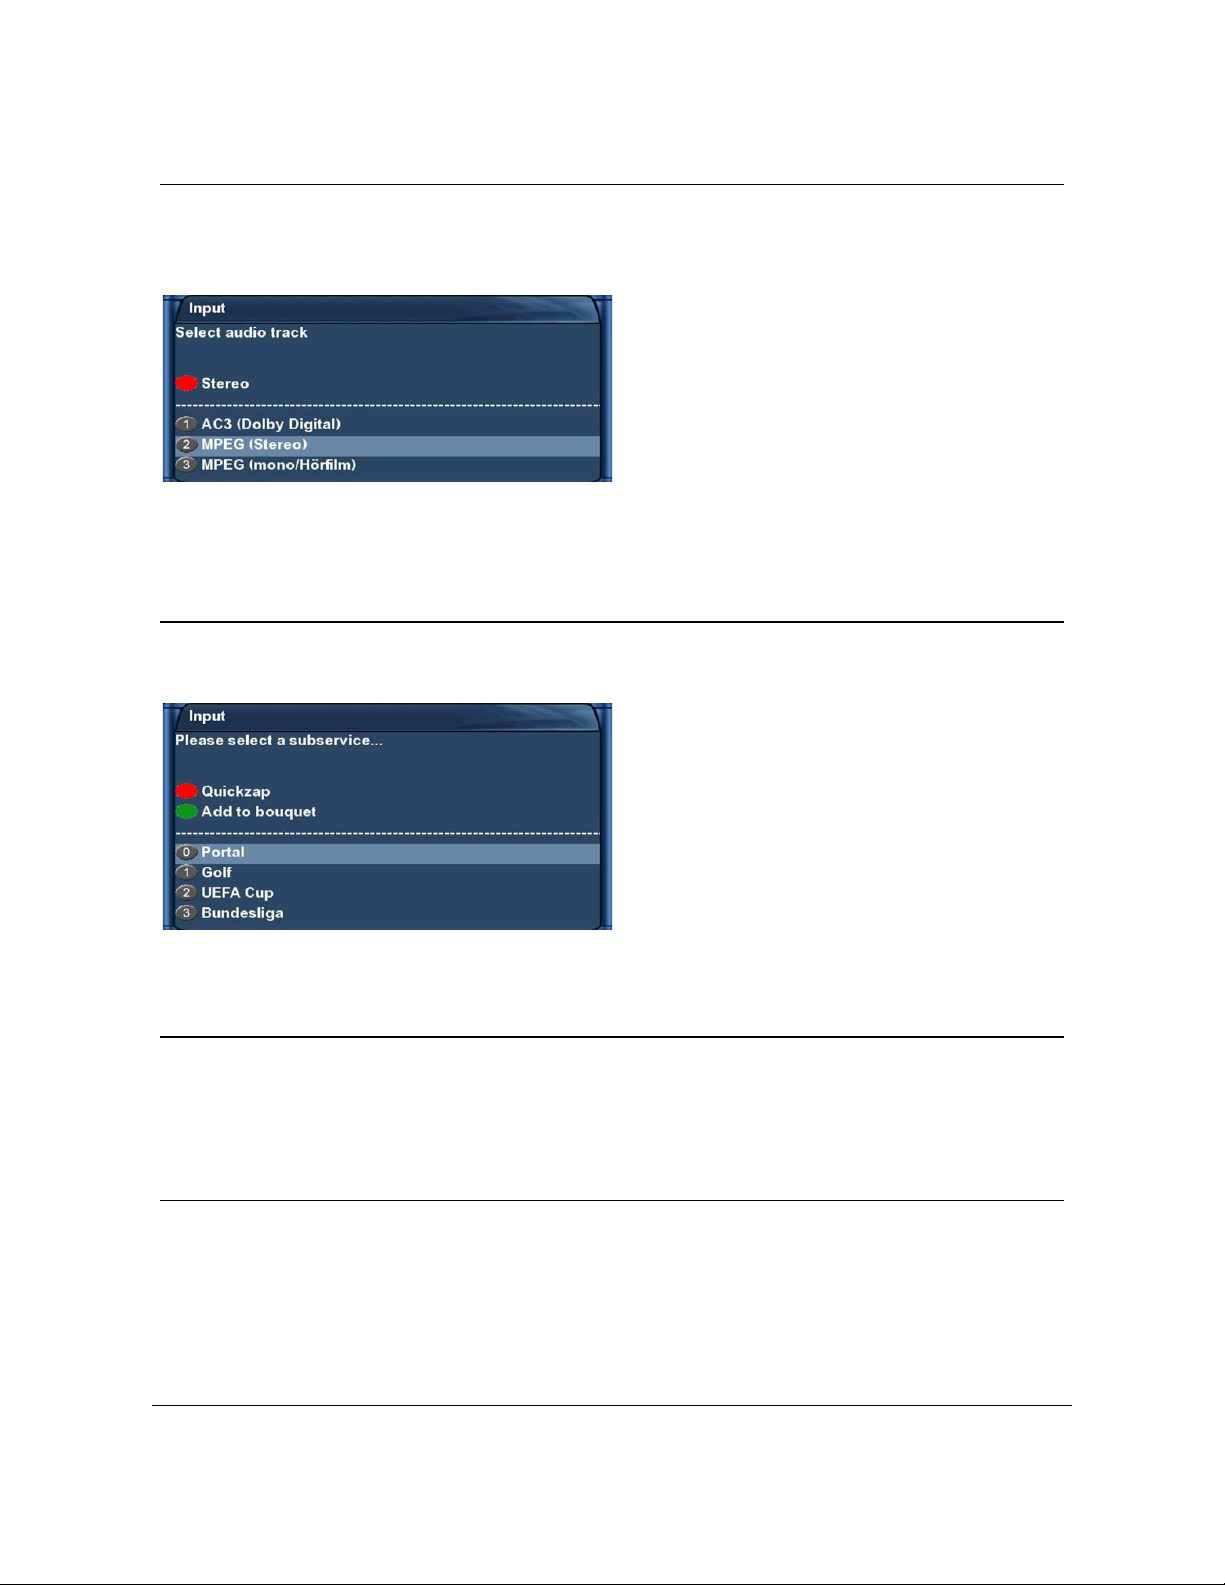
4.5 Changing the audio track
Pressing the green Options-Button in TV or
Pressing the AUDIO-Button in TV or Radio Mode will reveal the “Audio” menu of the
selected service.
Use the Navigation-Buttons up and down to
move to desired audio track. Press the
OK-Button to select.
The contents of this menu will vary from service
to service.
4.6 Sub Services
The green dot in the Infobar appears if the selected station transmits sub services.
Radio mode will reveal the sub services menu.
Use the Navigation-Buttons up and down to
move to one of the sub services. Press the OKButton to select.
You can now use the Arrow-Left/Arrow-Right-
Buttons to toggle the subservices.
4.7 TV/Radio switching
Pressing the RADIO-Button activates the RADIO-Mode. By pressing the TV-or EXIT-Button you can
quit the RADIO-Mode.
4.8 Teletext
Use the Text-Button to enter the Teletext and the Exit-Button to leave.
QBox High Defi nition User Guide Page 26 of 99

4.9 Subtitles
Press the Menu-Button to enter the main menu. Select “Subtitles” and press the OK-Button. A list
with the available subtitles will show up. Use the Navigation-Buttons up and down to select a
desired subtitle and press the OK-Button to activate.
The screenshot on the left shows you an example of how a subtitle looks.
To deactivate subtitles process as described previously, just select deactivate subtitles instead of
a subtitle page.
Note: Keep in mind that not every station offers
subtitles. If no subtitles are available, the subtitle
list will stay empty.
QBox High Defi nition User Guide Page 27 of 99
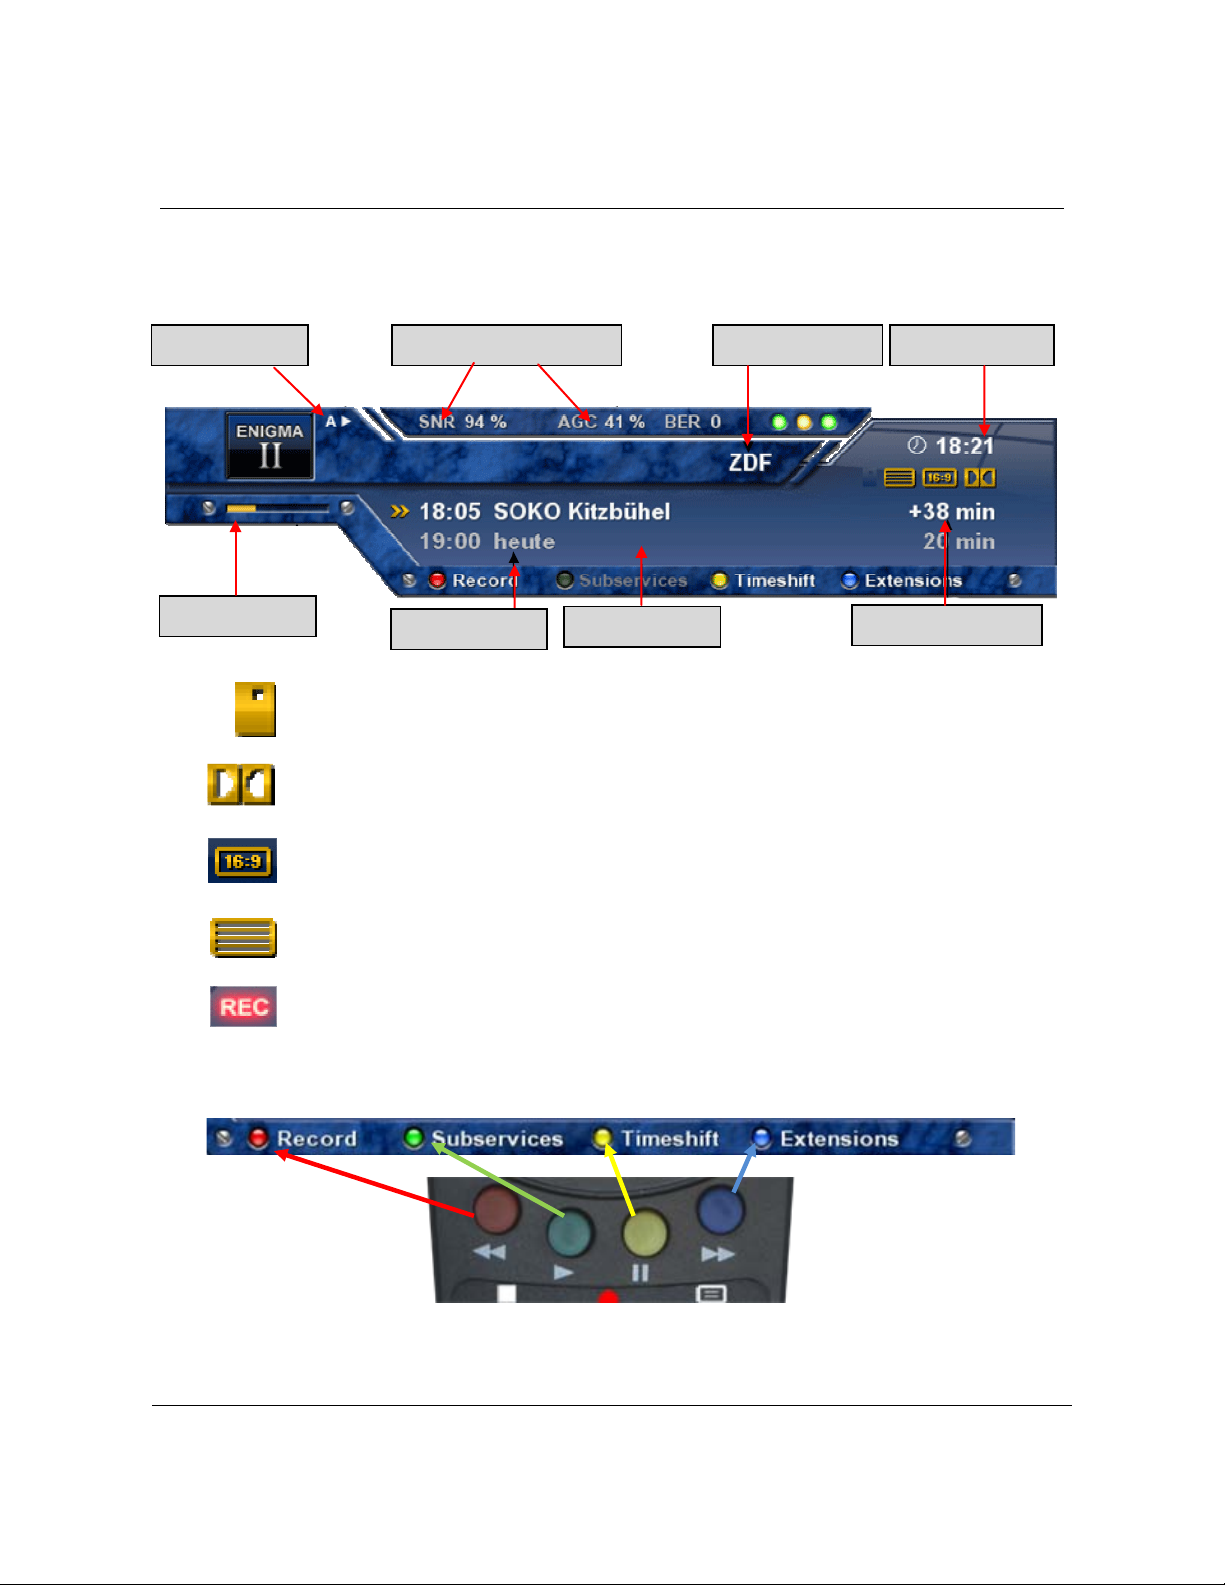
4.10 Infobar
Active Tuner
Signal Level/-Strength
Channel Name
Current Time
Progress Bar
Next Show
Current Show
Remaining Time
The Infobar appears and disappears by pressing the OK-Button once, if no OSD menu is shown on
your screen or when you change channels. The Infobar shows all necessary Information about the
selected service.
Is highlighted yellow as soon as a show is broadcasted Encrypted.
Is highlighted yellow as soon as a show is broadcasted in Dolby Digital.
Is highlighted yellow as soon as a show is broadcasted in 16:9 aspect ratio.
Is highlighted yellow as soon as a station transmits Teletext information.
Lights up during the recording process.
QBox High Defi nition User Guide Page 28 of 99
5 Electronic Program Guide EPG
By pressing the INFO-Button in TV-Mode you
are supplied with detailed information about
the current show and by pressing the Right-
Button afterwards about the next show.
Pressing the yellow Options-Button activates
the “Channel-EPG” (See chapter
pressing the blue Options-Button activates
the “Multi-EPG“ (See chapter 5.2).
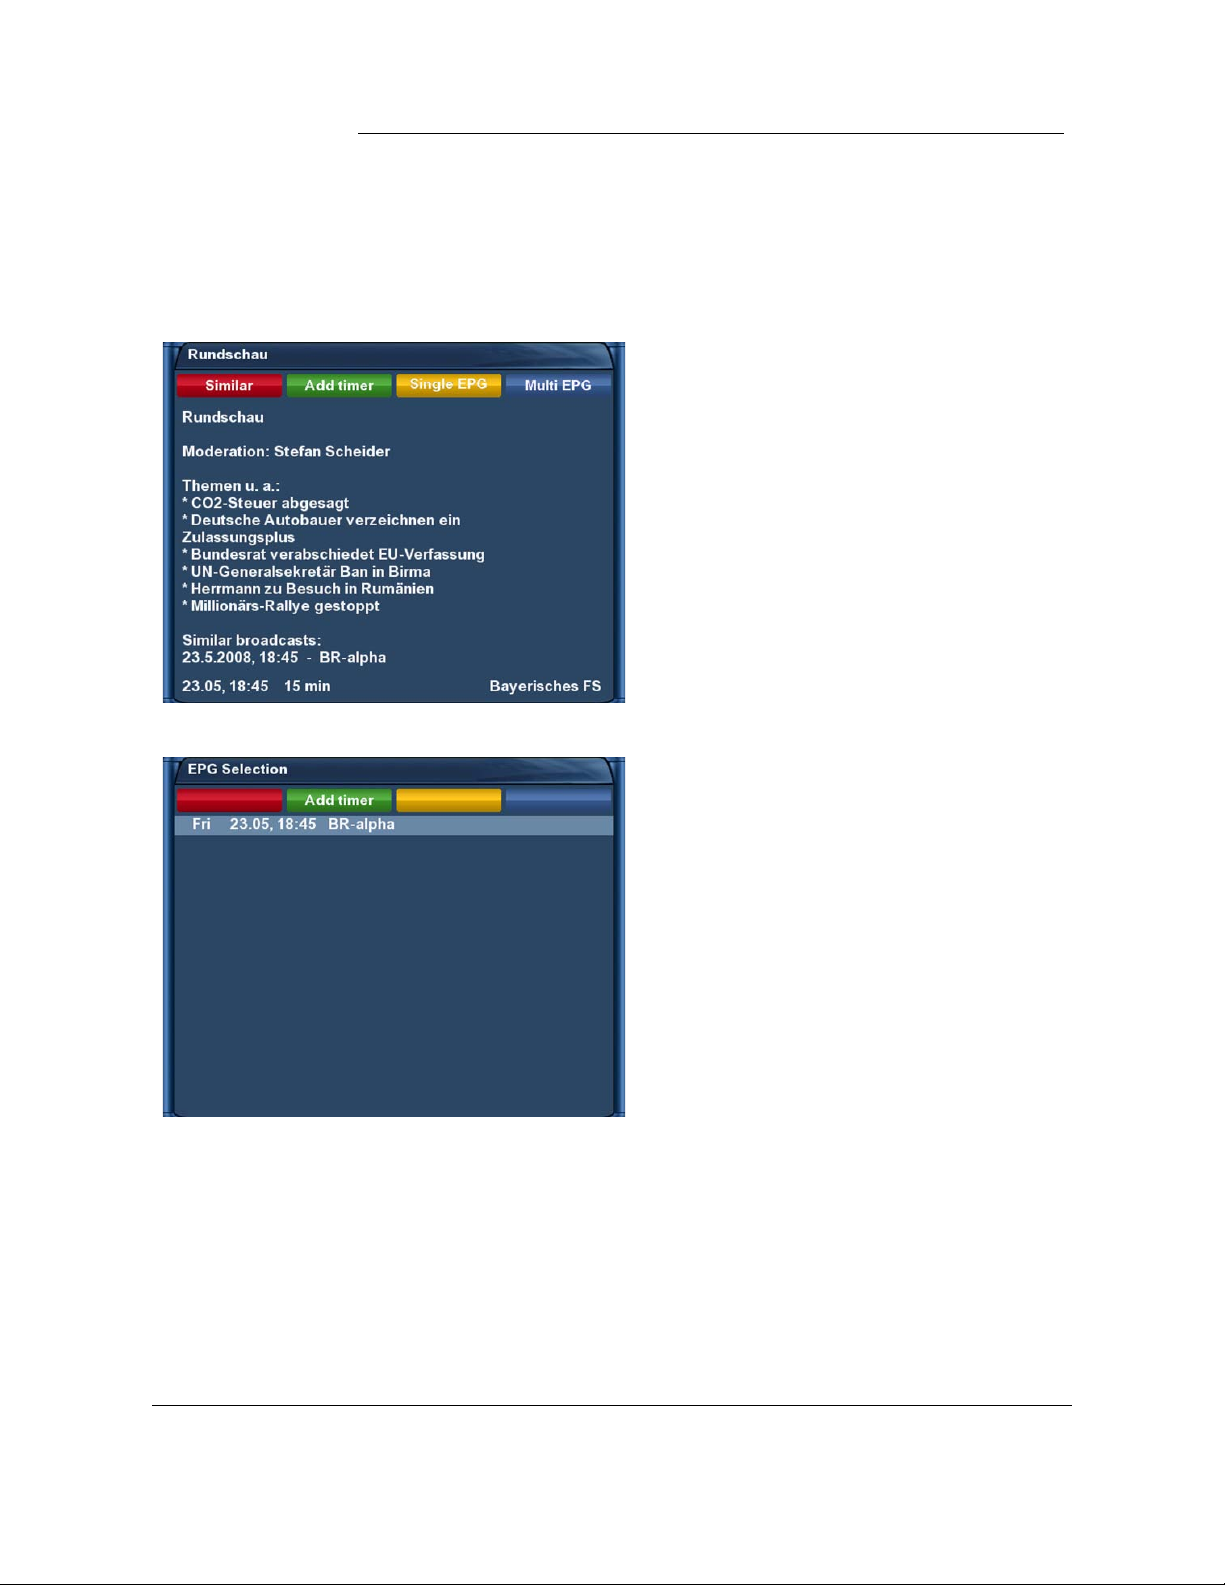
The QBox automatically searches for similar
broadcasts in the background. If one or more
similar broadcasts are found the label “Similar”
will appear in the red window.
5.1) and
Pressing the red Options-Button opens a
listing of similar broadcasts.
By pressing the green Options-Button you
can set a timer for this rerun.
For additional information about recording by
timer please see chapter 7.3.3 Recording by
timer.
QBox High Defi nition User Guide Page 29 of 99

5.1 Single-EPG
In this view you are supplied with detailed
information about the currently selected
channel’s programm ing.
By pressing the yellow Options-Button your
can ether sort the “Single-EPG” alphabetically
or by time.
You can also access this view by pressing
1. the Info-Button for about 2 seconds
2. the Navigation-Buttons up/down to open
the services list and then pressing the Info-
Button.
This way you can very quickly and easily
access the
Single-EPG of every service.
QBox High Defi nition User Guide Page 30 of 99
 Loading...