

DUNIWAY Stockroom DRPG-531 Instruction Manual
Instruction Manual
DRPG-531
Portable Battery Operated Gauge Control/Display
For Use With DST-531 Thermocouple Sensor
Copyright © 2014 DSC
Rev061714mrr

Table of Contents
I. Overview p. 4
II. Quick Start for DRPG-531 p. 5
III. Modes of Display p. 7
A. Display Numeric
B. Display Bar Graph
C. Display Pumpdown Graph
D. Display Line Graph
IV. Menu of Configuration Settings p. 10
A. Display
B. Numeric Format
1. Precision
2. Standard
3. Scientific
C. Setpoint Value
D. Setpoint Action
E. Pumpdown Time
F. Auto-off Time
G. Sound
H. Self Test
I. Units
J. Units - Pumpdown Rate
K. Calibration
L. Version
V. Auto-Off Operation p. 14
VI. Set Point Operation p.14
VII. Vacuum System Analysis p.17
A. Data Set Size
B. Differential Analysis
C. Reset
VIII. Self-Test Operation p.16
IX. Field Calibration p.16
A. Calibration Parameters
B. Calibration Functions
C. Calibrating the Instrument
Page 2 of 22

X. Understanding TORR p.19
XI. Servicing and Maintenance p.20
A. Gauge Tube Servicing
B. Maintenance
C. Factory Repair and Calibration
D. Notes on Calibration
XII. Instrument Accuracy p. 21
XIII. Specifications p. 21
XIV. Terms of Use and Limited Warranty p. 22
Duniway Stockroom Corporation
48501 Milmont Drive
Fremont, CA 94538-7336
Toll Free: 800-446-8811
Phone: 650-969-8811
Fax: 650-965-0764
Email: info@duniway.com
www.duniway.com
Page 3 of 22

I. Overview
The DRPG-531 precision vacuum gauge was built to be a rugged, portable vacuum measurement
instrument designed specifically for the demands of field use. First and foremost, it is a highly
accurate vacuum gauge using field proven thermocouple sensor technology. The DRPG-531
precision gauge offers several viewing options including numeric, bar graph and pumpdown display.
Portable
Rugged design offers a super-strong magnet for hands-free operation.
Field-proven thermocouple vacuum sensing technology
Precise
Accuracy available in 12 different measurement units
Field calibratable
Reliable
70 hour battery life
Protective rubber boot
Simple, easy to use design
Features
Auto OFF
On/Off Soft Switch
Battery level indication
Good/Bad tube indication
Self test mode
3 different graphical displays of vacuum pressure
Vacuum Analytics for leak, outgassing and pump down
Page 4 of 22
II. Quick Start for DRPG-531
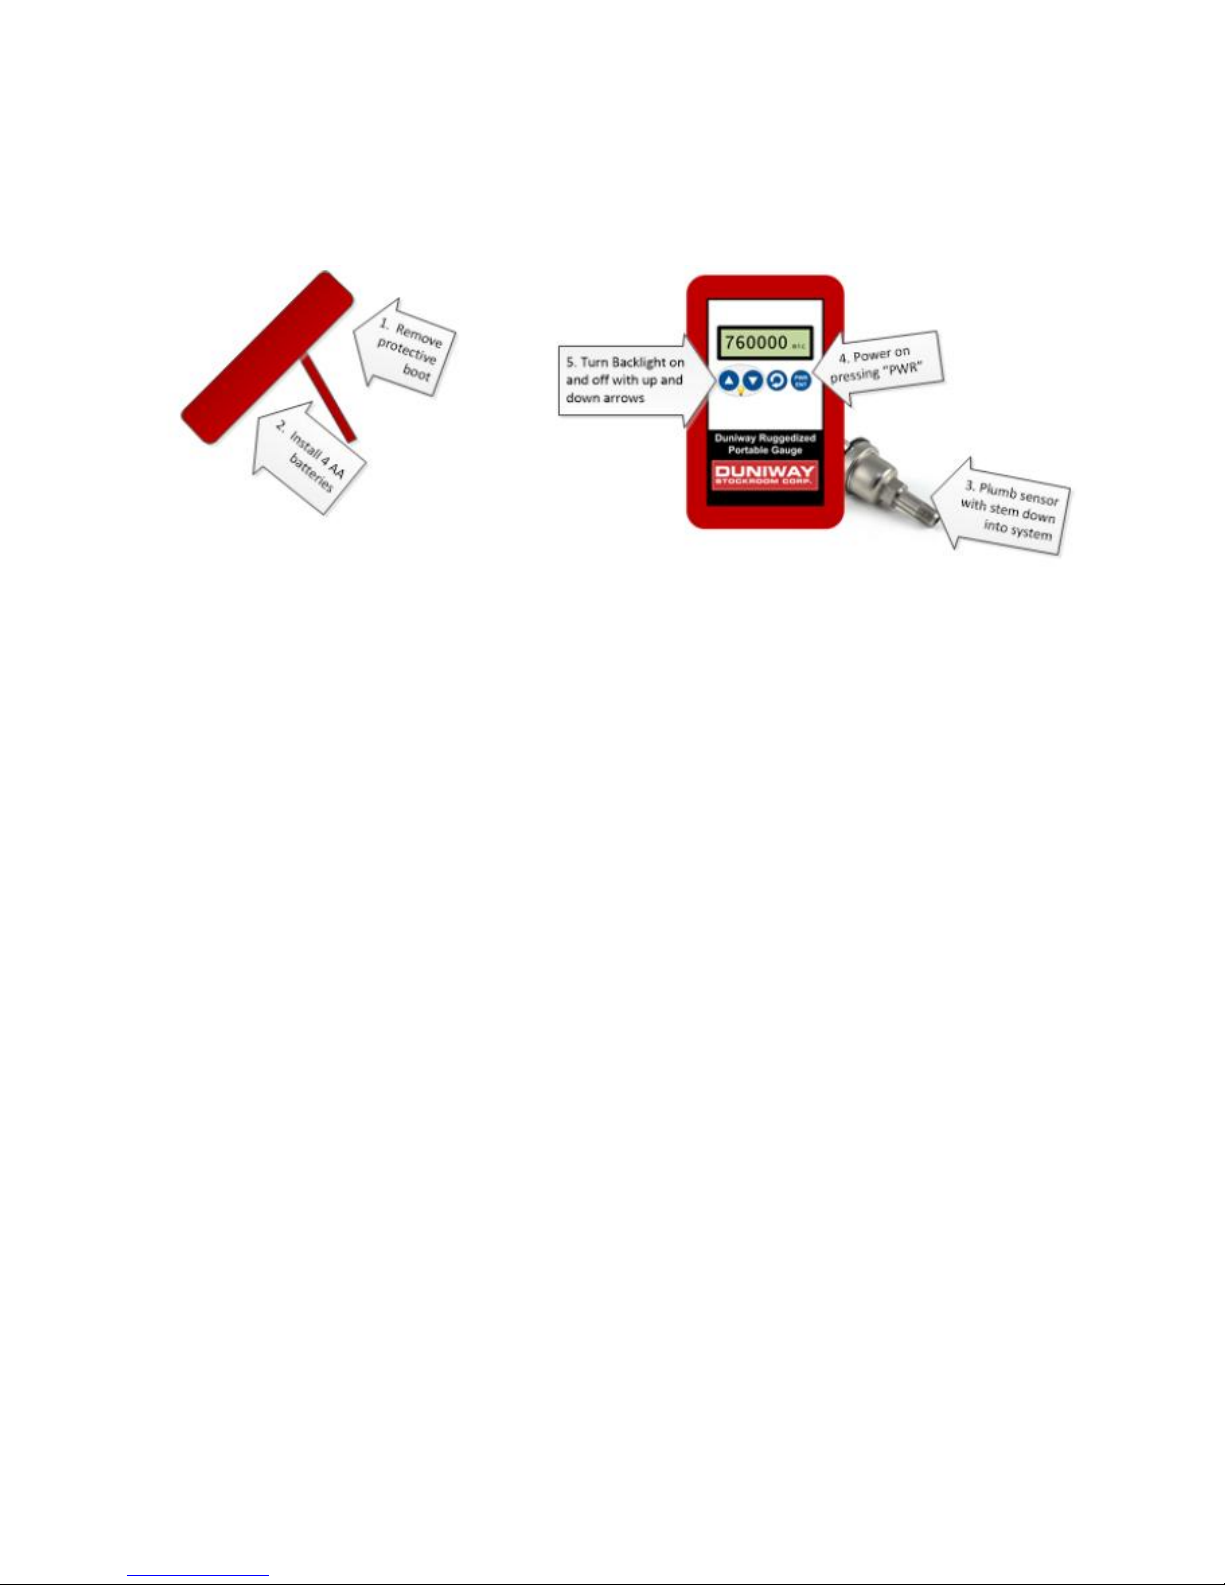
While this vacuum instrument has many features, it is very simple to use. First, unpack the gauge to
be sure that you have received everything that you ordered.
Next:
1. Remove protective hood
2. Remove the battery cover and install 4 AA batteries.
3. Plumb the thermocouple sensor into the system to be measured, taking care to keep the
stem down.
4. Power on the device by pressing the ‘PWR’ button. It will take about 5 seconds to turn
on.
5. If need be, turn on the backlight. The backlight does not affect gauge reading or
accuracy.
6. Read vacuum!
Page 5 of 22
(SEL)
Page 6 of 22
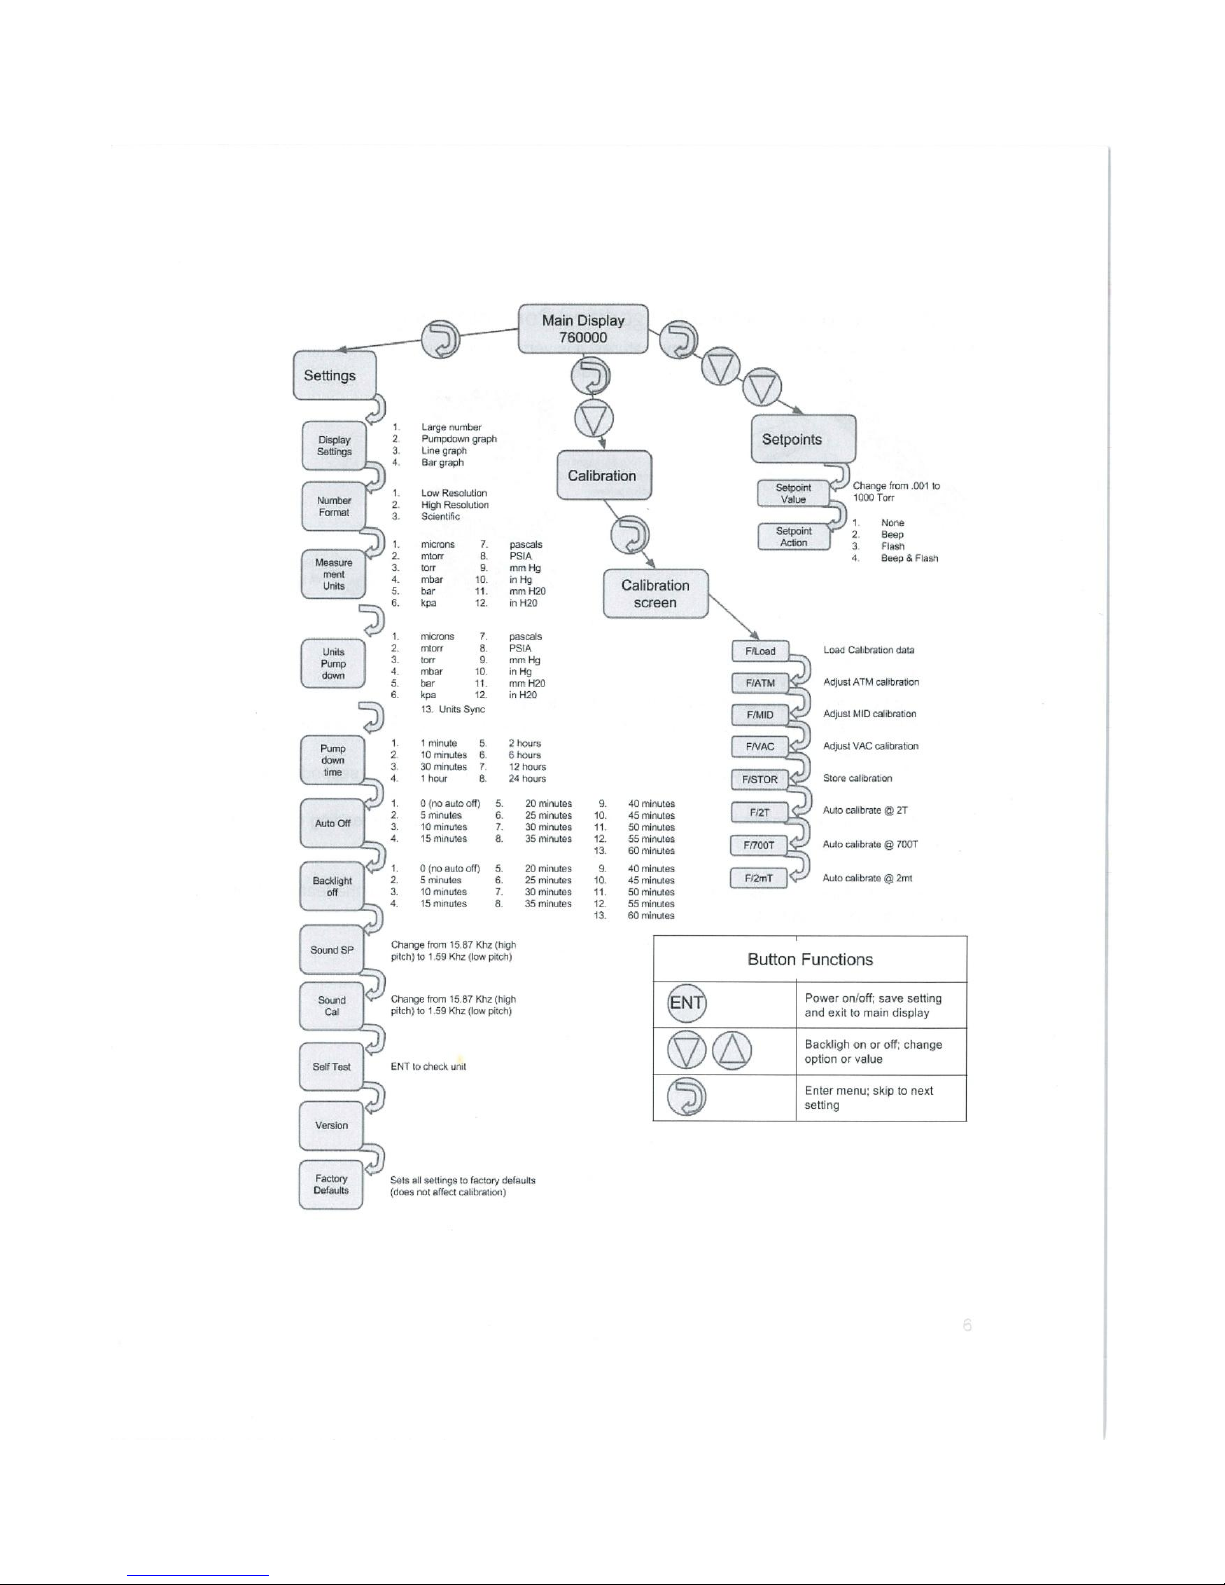
III. Modes of Display
The DRPG-531 has four modes of display: one numeric and three graphs. The numeric display has
three numeric formats: Standard, Precision and Scientific. Display modes are selected from the
Configuration option ‘Display’ and Numeric formats are selected from the Configuration option
‘Numeric’. The SEL button enters and traverses the Configuration menu.
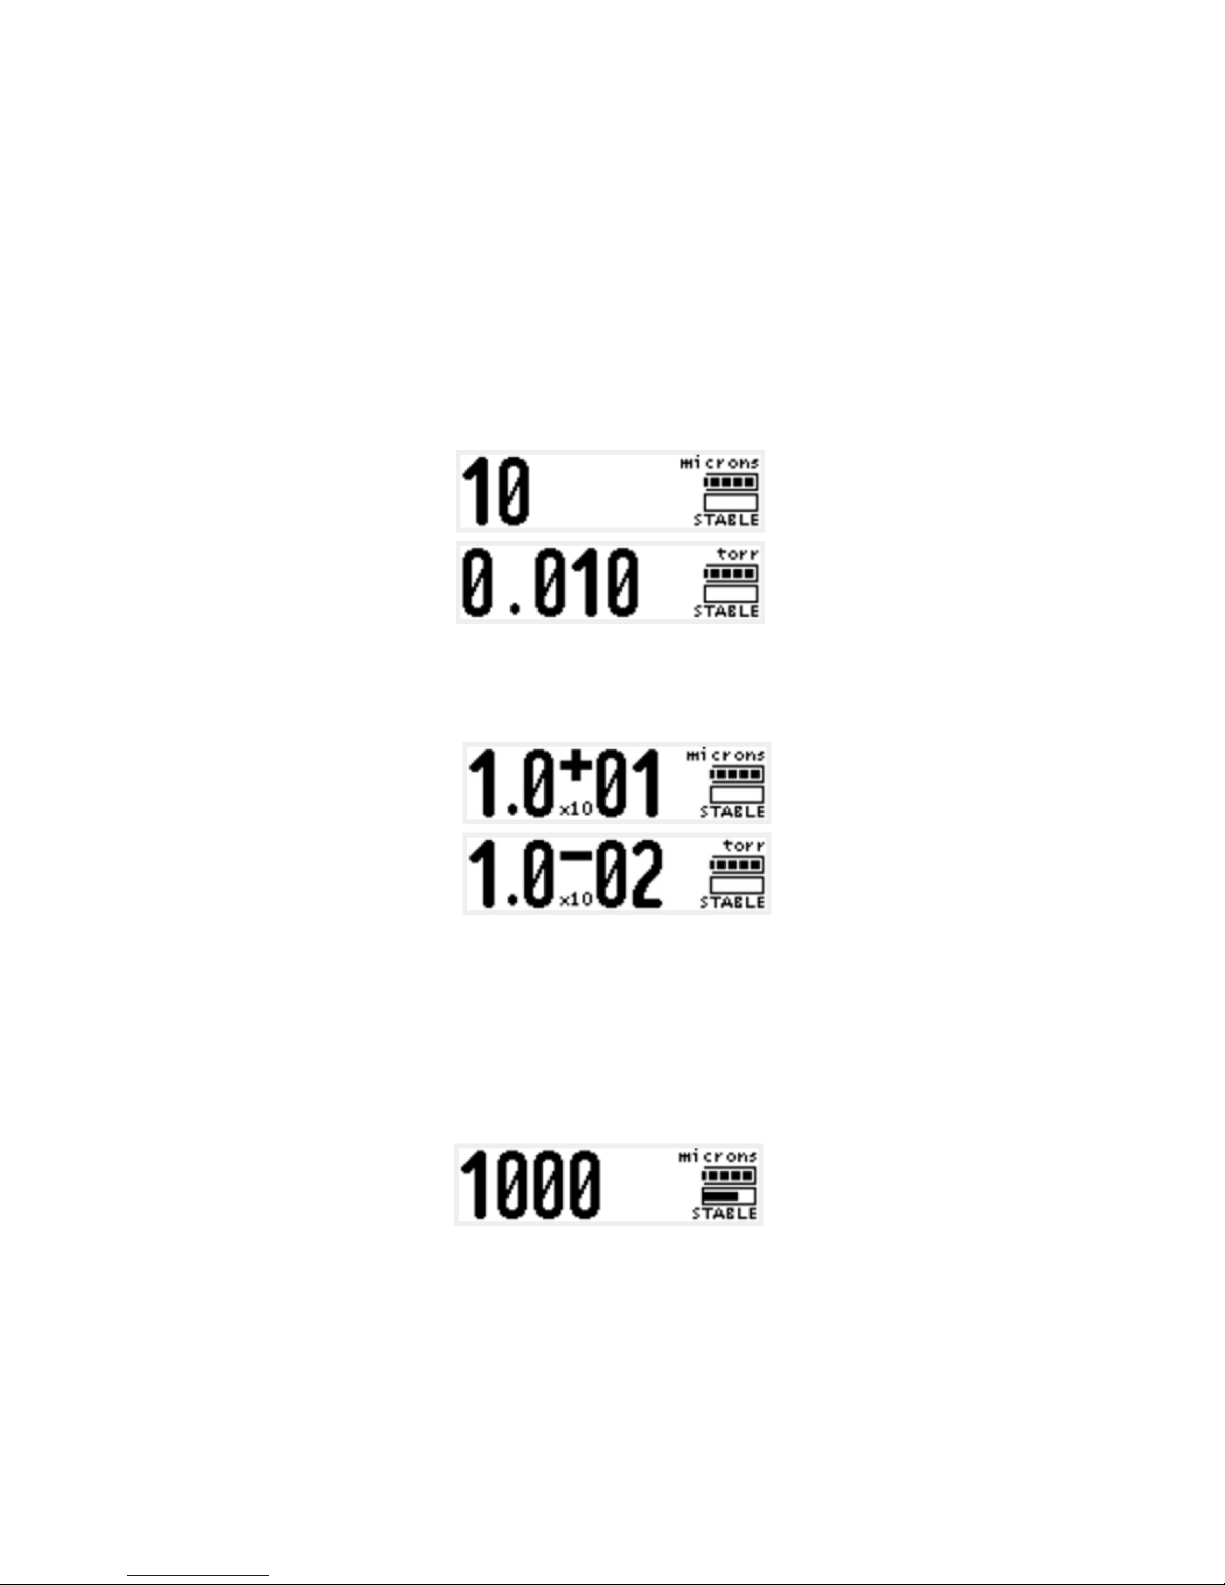
A. Display Numeric
The following example shows the numeric display with the ‘Precision’ format:
The following image shows the numeric display with the ‘Scientific’ format
The Numeric display shows the currently configured units, in these examples, the vacuum pressure
units are ‘microns’ or ‘Torr’. Below the units indicator are the battery, vacuum pressure, and vacuum
system analysis indicators.
In any display mode, the UP and DOWN buttons turn the backlight on and off (respectively). The
SEL button enters the configuration MENU, and the ENT button turns the gauge on or off.
Page 7 of 22
 Loading...