


TOP TIP
TOP TIP
The full list of furniture parts, xtures and ttings, as well as the tools you will need for assembly, can be
found on page 2 of this manual.
Thank you for purchasing your new piece of furniture from Dunelm.
We put a lot of eort in the design and construction of our products to ensure they set the
standard for quality, durability and ease of assembly.
If for any reason you feel we haven’t lived up to the high standards we set ourselves, please
don’t hesitate in contacting us on 08451 656565 where our team will be very keen to
understand what has gone wrong and, more importantly, put it right.
There is no need to feel daunted by the number of parts and ttings in front of you, we have compiled
this straight forward, step-by-step guide to make sure that assembling your furniture is as easy as 1, 2,
3.
Before you begin, we advise that you check that you have everything you need to get started.
DEAR CUSTOMER
The next step…
Safety and Care Advice
Find a space to spread these out across the oor before you begin assembling them. Lay each panel down in position, ready to build.
It is recommended that two people assemble this product together.
Identify all of the ttings, make sure that you have them all prepared and
familiarise yourself with each component, to make things easier when you
are putting it all together.
IMPORTANT - The rst step you need to take is to ensure your safety!
Please take the time to read and understand these instructions before assembling your furniture.
Keep children and animals away from the assembly area.
This furniture contains small parts that could cause choking if swallowed.
Keep all plastic wrapping materials away from children to avoid danger of suocation.
Ensure that all packaging is disposed of carefully and responsibly.
Make sure that you allow enough space to move around when assembling your furniture.
The use of power tools to assemble the product is not recommended due to the risk of over
tightening xings.
2
FL
FR
Follow this step-by-step guide...
Ready?
1
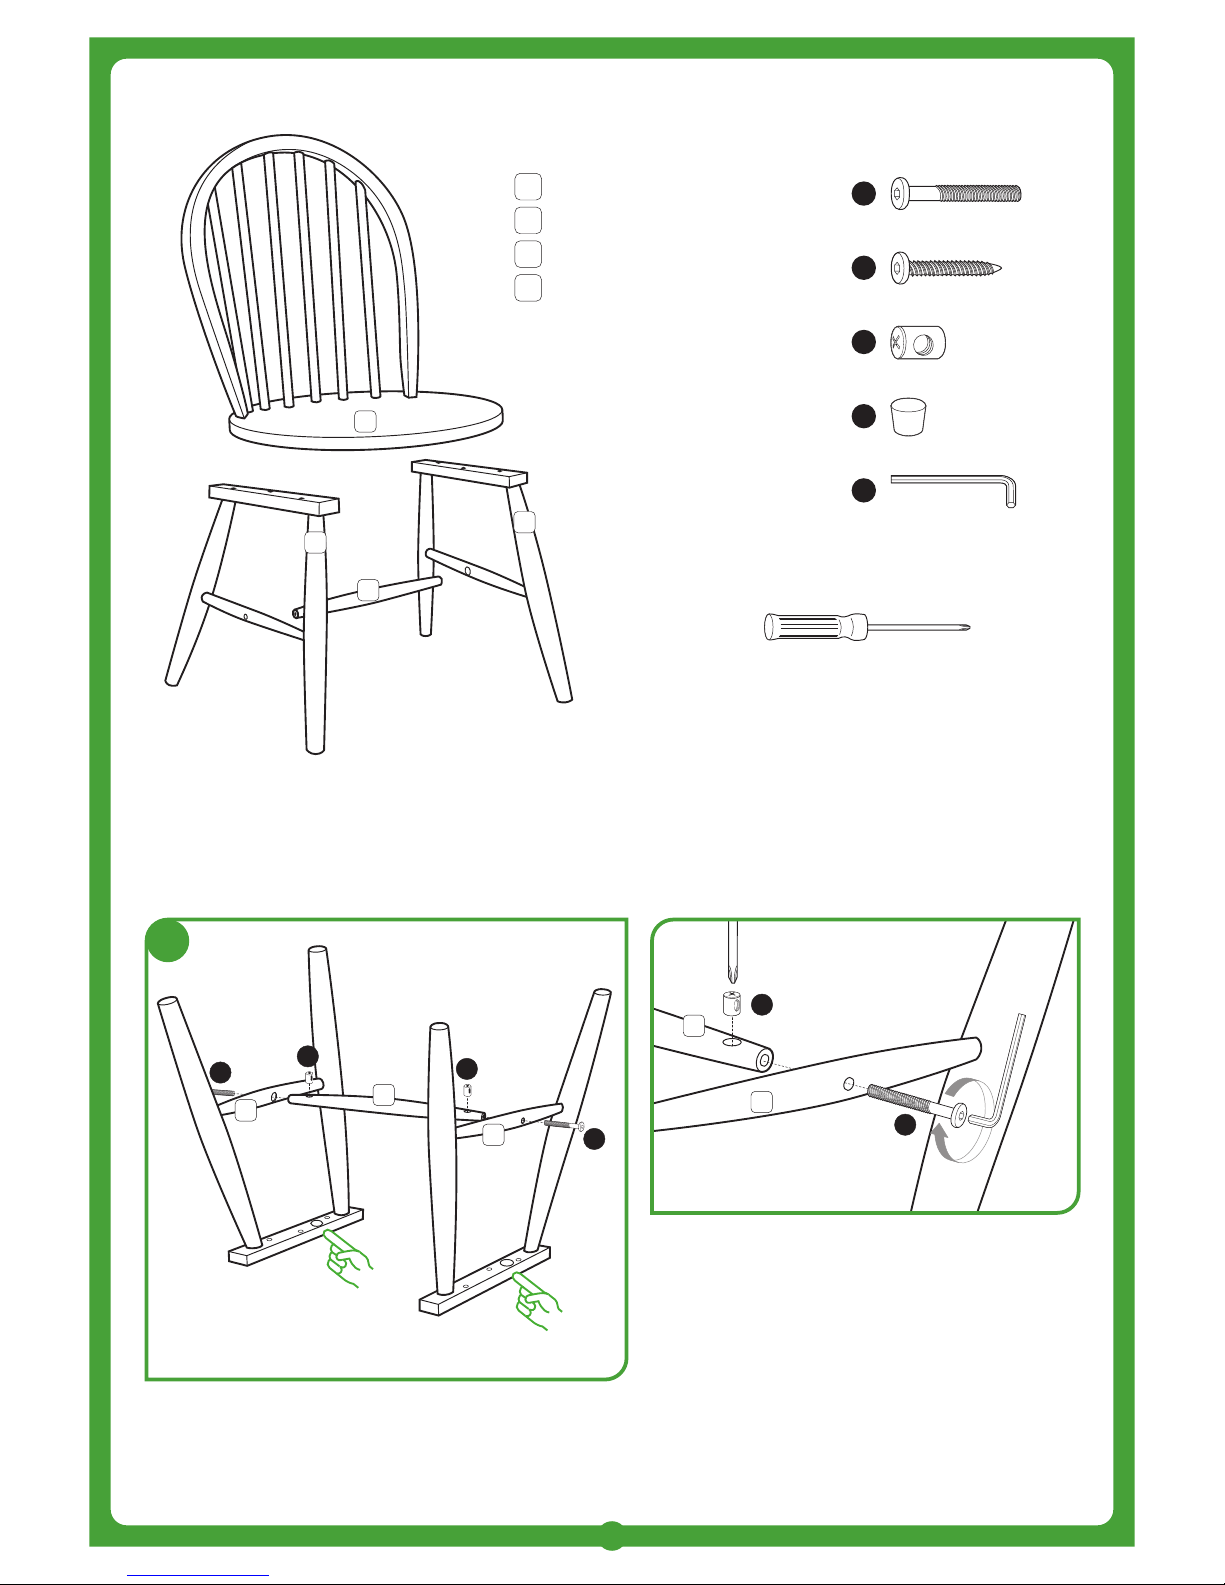
Parts List:
SEAT FRAME - 1pc
LEFT LEG FRAME (FL) - 1pc
RIGHT LEG FRAME (FR) - 1pc
CENTRE STRETCHER - 1pc
1
2
3
4
Parts & Fittings for Alabama Chair (30151290) (30151381)
4
3
2
1
Fittings List:
A
B
C
D
E
M6 x 50mm BOLT - 2pcs
M7 x 35mm BOLT - 6pcs
INSERT NUT - 2pcs
WOOD CAP - 2pcs
ALLEN KEY - 1pc
Additional Tool Required:
CROSSHEAD SCREWDRIVER
4
2
3
Front Right
Front Left
C
C
A
A
x2
3
C
A
4
Attach and insert ends of centre stretcher (4) into
holes on left leg frame (2) and right leg frame (3) as
shown.
Place the insert nuts (C) into holes on the centre
stretcher (4).
Then align xing holes on the insert nut by turning it
using a crosshead screwdriver to be able to x bolts
(A) through holes on the legs as shown.
IMPORTANT NOTE: Fasten bolts using allen key (E) but
do not fully tighten at this stage.
IMPORTANT NOTE: Make sure to correctly identify leg
frame positions. The front side of the left leg frame (2) is
marked with “FL” and right leg frame (3) is marked with
“FR”.

3
dunelm.com
Care and Maintenance
• Only clean using a damp cloth and mild detergent, do not use bleach or abrasive cleaner.
• From time to time check that there are no loose screws on this unit.
• This product should not be discarded with household waste. Talk to your local authority waste
disposal centre.
Finally, we hope you enjoy your furniture for many years to
come and thanks again for your purchase.
FR
2
3
x6
x2
3
1
FR
FL
2
1
3
2
3
Front
Left
Front
Right
Place seat frame (1) upside down on a raised
protected surface. Make sure to position part of the
legs with labels “FL” and “FR” on the front of seat
frame (1) as shown. Then x through holes using
bolts (B).
IMPORTANT NOTE: Fasten bolts using allen key (E)
but before fully tightening bolts (B), fully tighten
bolts (A) assembled in step 1 rst.
Carefully turn the chair upright and place wood
caps (D) into holes on the leg frames (2) & (3) as
shown.
B
B
B
B
B
B
B
D
D
D
2
 Loading...