

Page 1
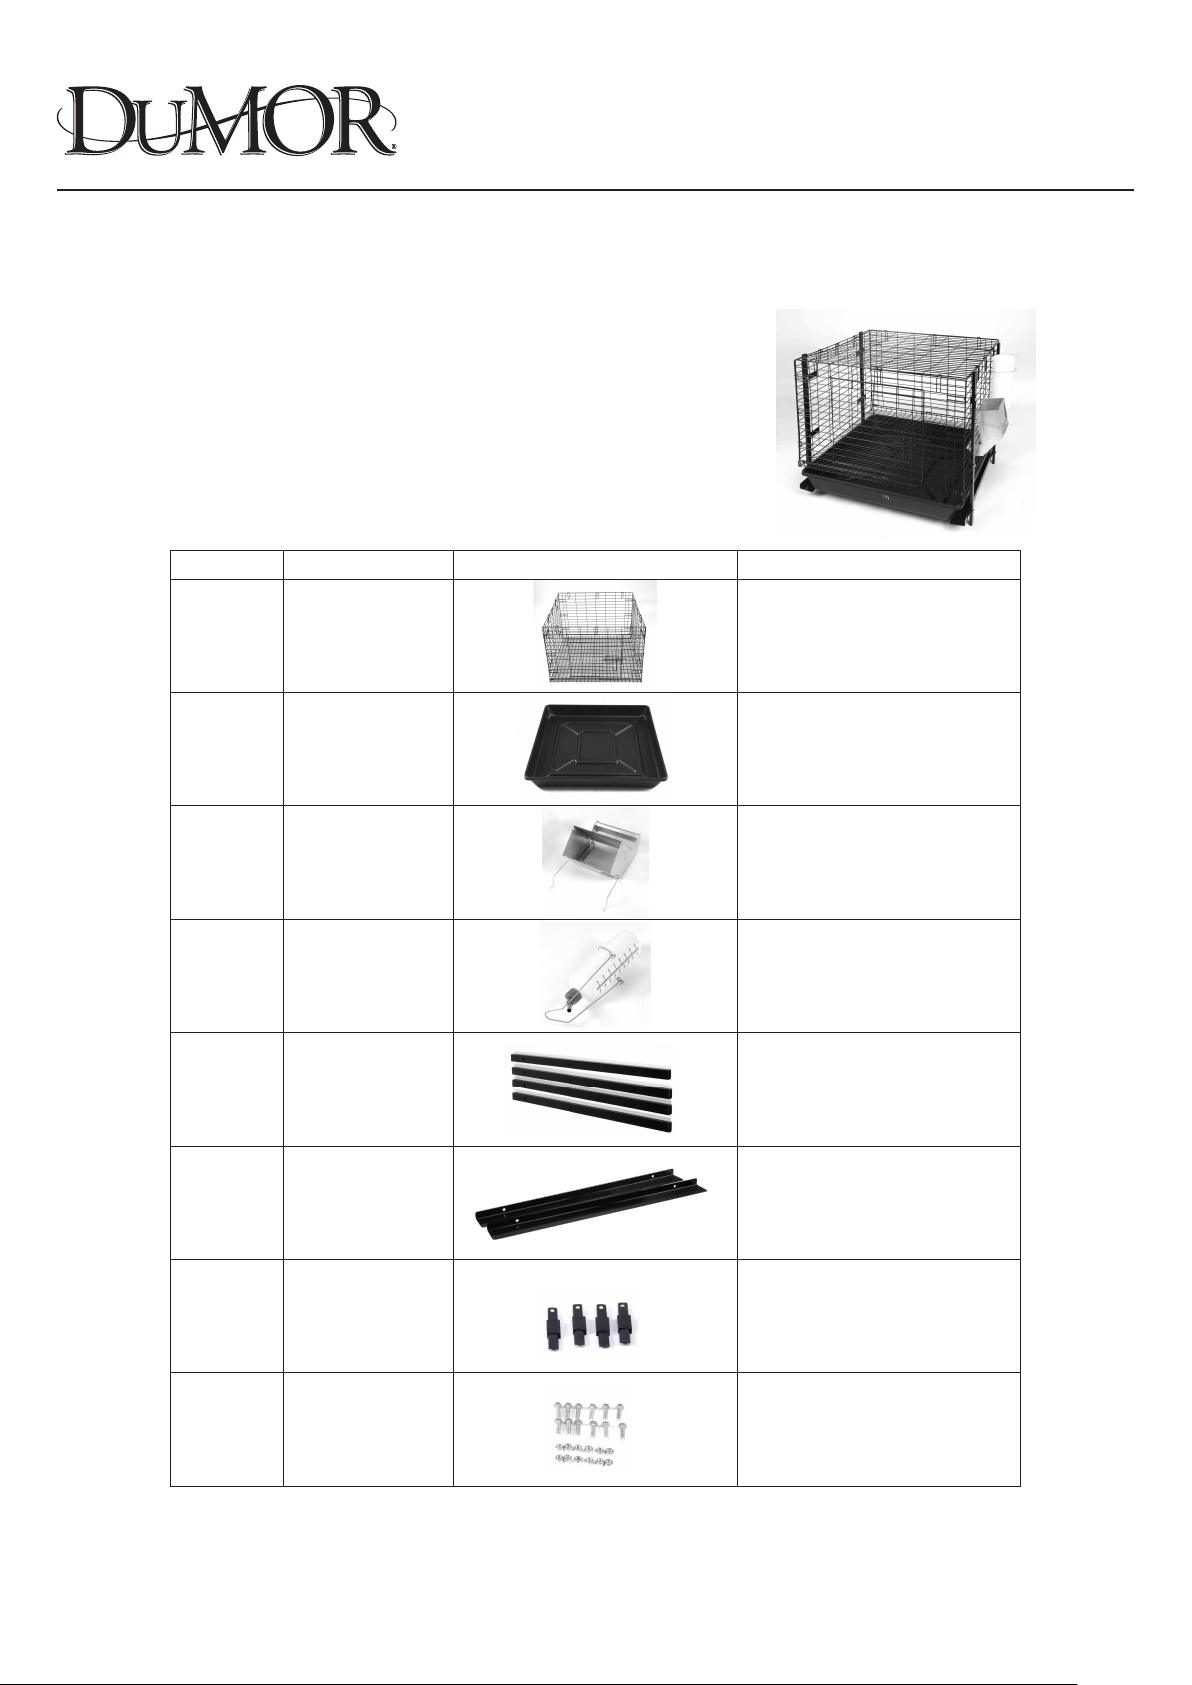
24" Dumor Rabbit Cage Starter Kit Assembly Manual
(Pictures may vary slightly from actual product)
PARTS LIST
SKU#:1457225
Part#
1
2
3
4
5
Description Image Quantity
24" Cage
24" Dropping Pan
Metal Feeder
Water Bottle
24" Vertical
frame legs
1 pc
1 pc
1 pc
1 pc
4 pcs
Horizontal
6
7
8
dropping
pan supports
Stacking Lugs
Nuts & Bolts
(only used if stacking
12 NUTS and 12 BOLTS
Page 1
2 pcs
4 pcs
for more cages)
Page 2
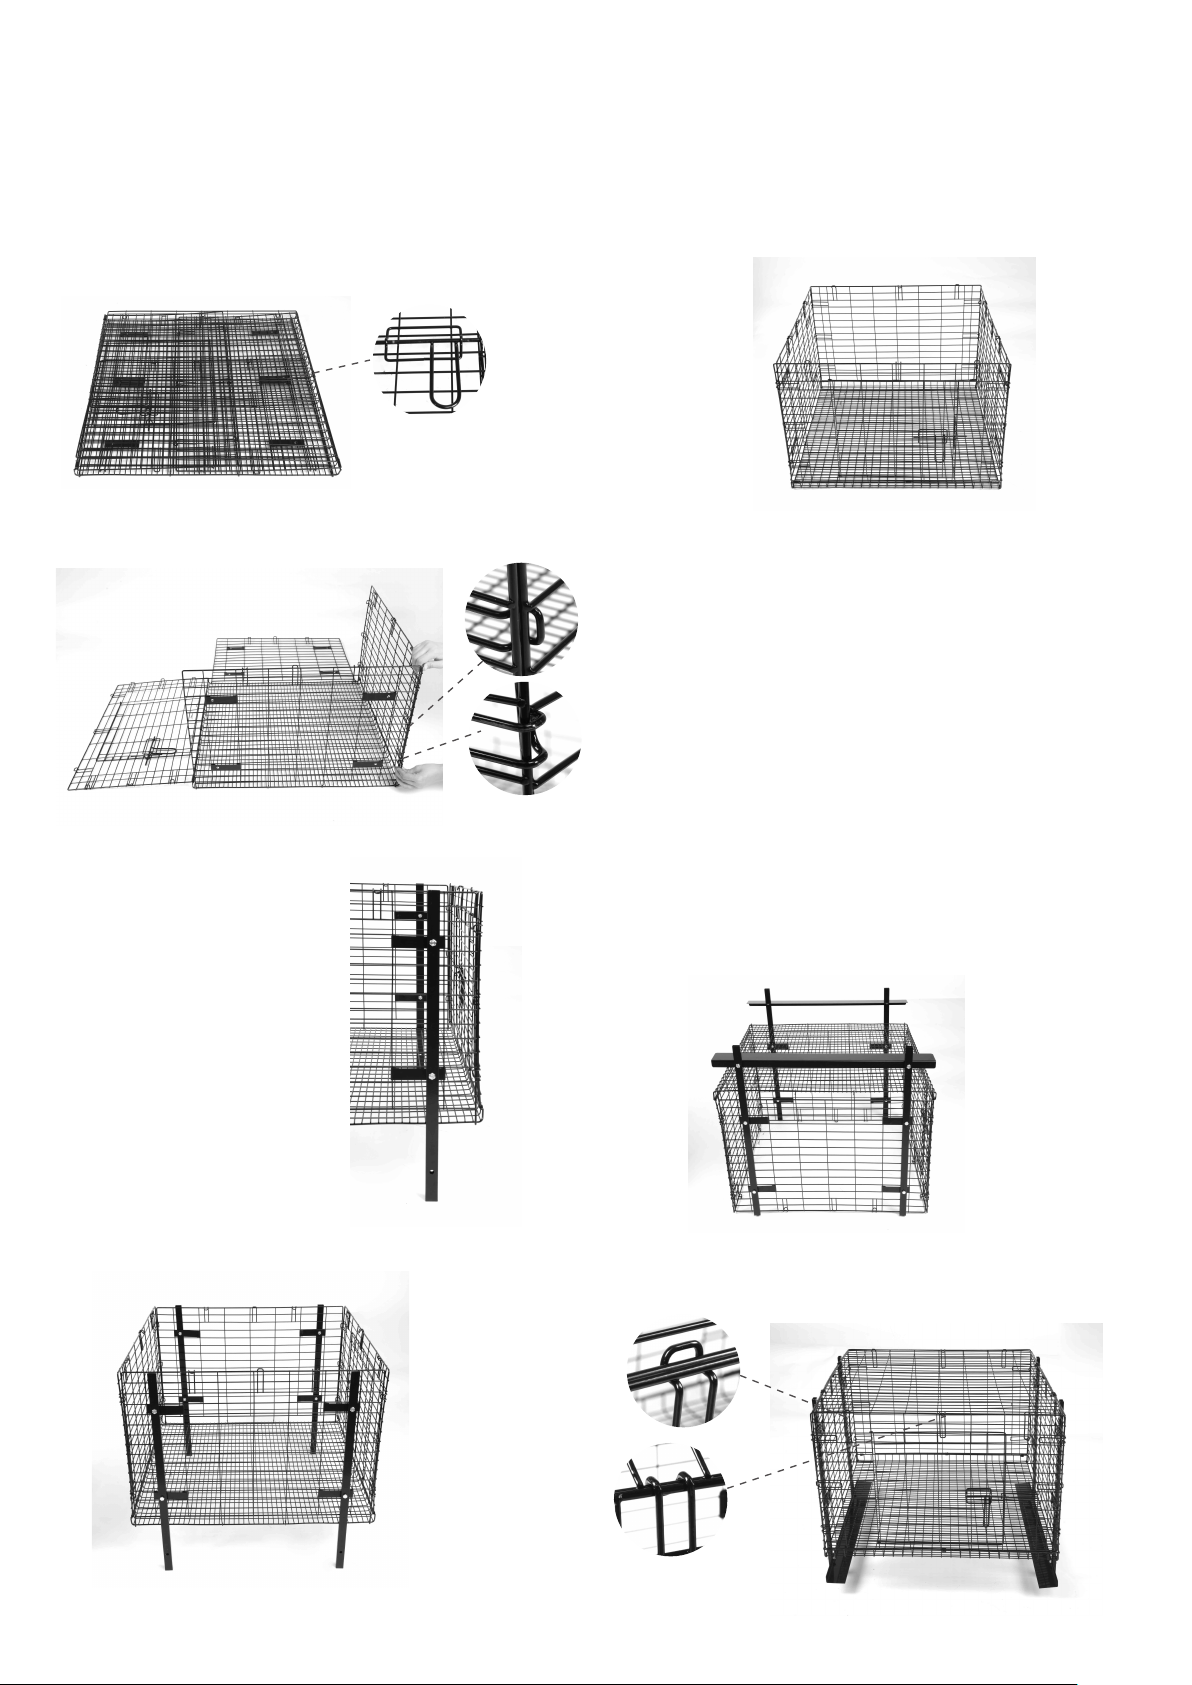
ASSEMBLY INSTRUCTIONS
Step 1. Rabbit Cage Set Up
1. Take the folded cage out of the carton and put it
on a flat surface. Remove the top panel and
make sure the door on the front panel is closed
to keep the cage secure during assembly.
2. Grab any two adjacent side panels and slide the
vertical panel into the side hooks until secure.
3. Repeat Step 2 for the remaining side panels.
You should now have all sides of the cage
assembled.
Step 2. Frame Legs Set Up
1. Lay the cage on its side and
attach the vertical frame legs
to the two horizontal plates on
each side of the cage. There
should be an extra hole at
the bottom of the vertical
frame leg that will be used
to attach the horizontal
dropping pan supports.
Secure with two nuts and
bolts per side. The head of
the bolt will be on the
outside of the cage.
2. Repeat Step 1 for the remaining vertical frame legs.
3. Gently, flip the cage upside down and attach the horizontal
dropping pan supports on the inside of the vertical frame
legs. Bolt the supports through the vertical frame legs
from the same direction as the vertical frame legs.
4. Turn the cage upright and place the top panel on the cage
and secure the top panel with the hooks on all for sides.
Page 2
Page 3
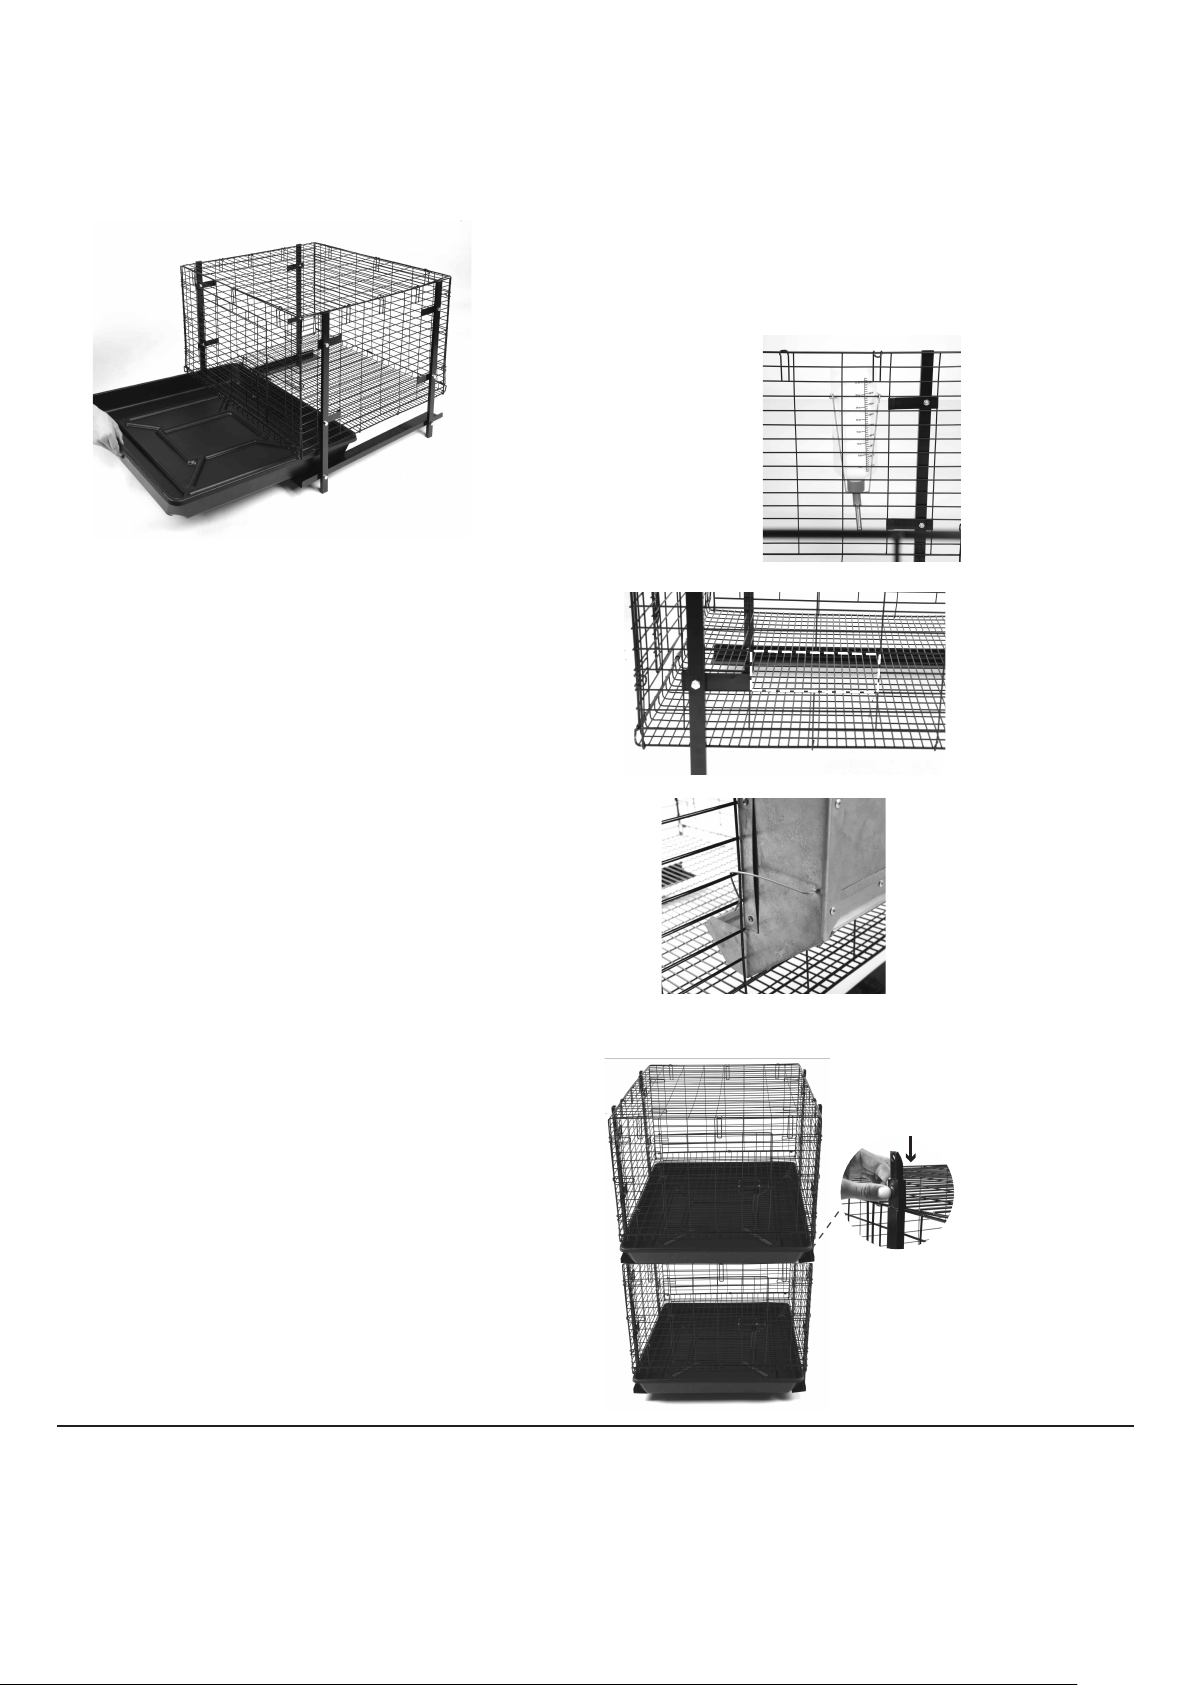
Step 3. Dropping Pan, Metal Feeder and Water Bottle Set Up
Dropping Pan:
Slide the dropping pan into the horizontal dropping pan
supports until centered underneath the cage.
Water Bottle:
1. Determine the proper height for the drinking nozzle for your pet.
2. Hang the metal water bottle support on the appropriate
horizontal wire to maintain the desired height for drinking.
3. Fill the bottle with water to desired amount, secure lid and
attach nozzle.
4. Place water bottle nozzle down into the water bottle
support. The bottle must be set completely vertical to allow
proper nozzle ball seating in order to prevent leaks.
Metal Feeder:
1.To install the rabbit feeder a small opening must be cut
on one side of the cage.The bottom chute of the
feeder requires a 6.25”(L) X 2”(W) opening. Determine
a desired placement of the feeder. It should be low
enough so rabbit can reach it comfortably.
2. With small wire cutters (not supplied) cut one
adjacent horizontal wire and one adjacent vertical
wire close to the outer wires to the 6.25" (L) X 2"(W)
opening. Remove all sharp edges after cutting to
prevent injury to the rabbit.Slide the bottom spout
of feeder through the opening and push the wire
frame through the mesh. The hook of the wire
should go through two horizontal wires of the mesh.
Step 4. You can stack 2 cages on top of each other
using the four stacking lugs. Insert 1 stacking
lug in each frame leg-gently place additional
cage on top and secure.
Assembly time: 15 minutes
Required for Assembly: 1 person
Tools required: 2 small adjustable wrenches or 2 - 10 mm wrenches and 1 small wire cutter
Page 3
TRACTOR SUPPLY COMPANY
Distributed by:
5401 VIRGINIA WAY
BRENTWOOD, TN 37027
For customer support,
call: 1-888-376-9601
www.TractorSupply.com
MADE IN VIETNAM
 Loading...