

Page 1
Value !
Quality !
Innovation !
MULTILAM 360
MULTILAM 460
MULTILAM 660 Dual
USER MANUAL
Geelseweg, 80 | 2250 | Olen | BELGIUM | Tel. +32 (0) 14 25 92 83 | [email protected] | www.dumor.be
Page 2

The MULTILAM laminators are available on several sizes
36 cm / 46 cm / 65cm / 110cm and optional stands can be used in several configurations
NOTE: Keep about 1M of free space behind the machine for the product to run out.
To let the product bunch up will destroy the laminate !
Applications
From the roll of pet or bopp film
Cold / warm pressure sealing using pressure sensitive film (requires rewinder accessory)
Hot double sided lamination
Hot single sided lamination (not 110)
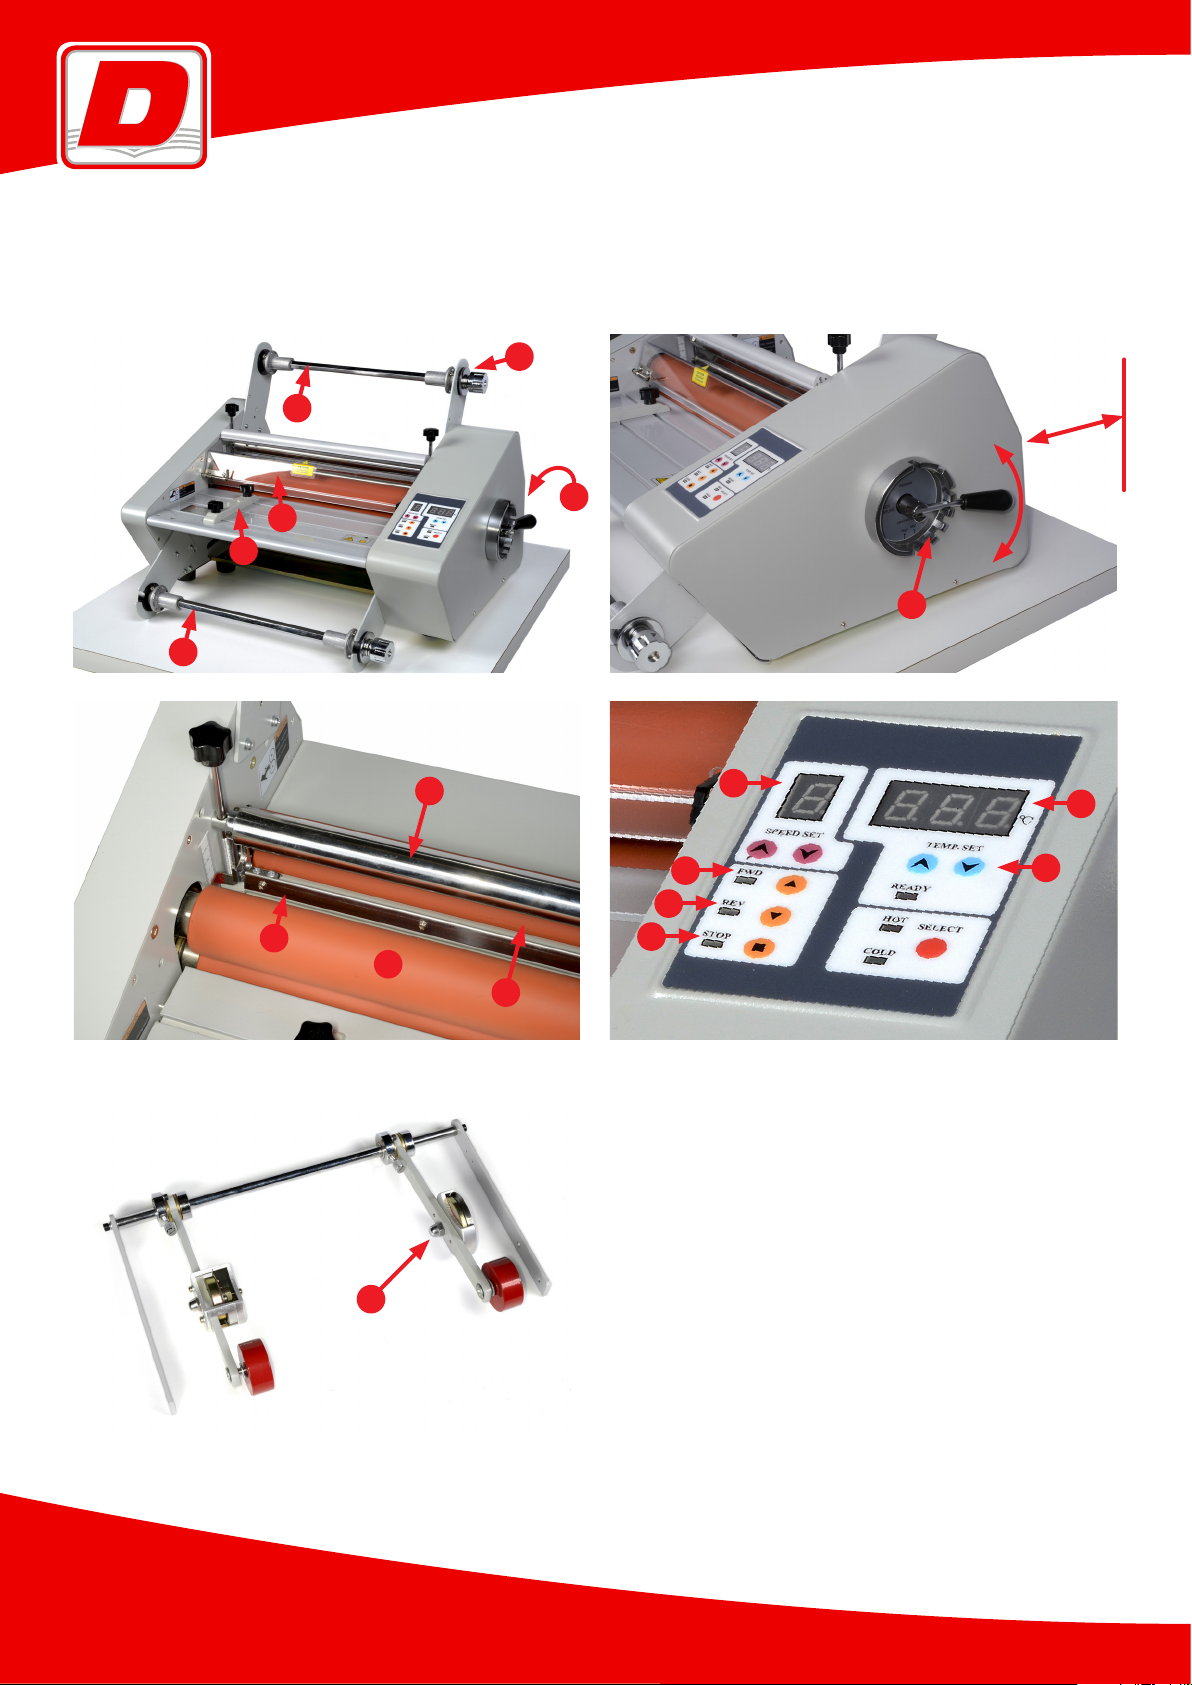
The machine consists of
-
2 roll unwinders, upper and lower
sizes (usually 1 and 3inch, 2inch optional
- Brakes for each unwinder to keep the web tension and to eliminate web wrinkles.
(1) (1a) see pictures at end of the manual
)
, each with the possibility of several mandrel
(2)
- Paper rewinder for taking up the paper used as a backing for sticky film (on the model 110 only)
- 2 floating tension rollers to tension the film web.
- 2 pressure rollers that can be warm or cold.
- 2 traction rollers
- A pressure lever
- A control panel
- A single side switch
(5)
(6)
(7)
(8)
(3)
(4)
- A pressure lever
- An adjustable side guide (9)
Decurling system with 2 adjustment knobs (10a) to raise and lower the de curlers (not on the model 110)
- De curler with roller
- De curler with bar
-
Plexiglas guard : note if the guard
(10)
(11)
is not engaged and the locking pins are not fully home the unit will not heat up or
run !
Optionally
- A pair of film stripper slitters (12) to cut film to a reduced width (on the upper carrier)
- A film cross slitter at the exit: if using this the film transport must be stopped !!!
-Extra high upper roll holder arms (pair)
Note: The 660 and 110 models come with a stand , the smaller models are table mounted
The stand is in the crate hidden under the main carton!!! Don’t make the mistake of throwing it away !
On the control panel
- Forward button
- Reverse button
- Stop button
(a)
(b)
(c)
2
Geelseweg, 80 | 2250 | Olen | BELGIUM | Tel. +32 (0) 14 25 92 83 | [email protected] | www.dumor.be
Page 3

Temp setting button Up/ Down
(d)
Hot / Cold selector
LED temp display
(e) with last setting memory note that the sensor is very sensitive and will display any small change
in the roll temp.
The roll temp will tend to reduce when laminating due to the heat being transferred to the substrate.
In this case its important to have the film and substrate at least 24°C or too much heat will be sucked away from the
roll and the adhesion and lamination performance will diminish.
Speed selector from 1 to 9 (9 = approx 3m/min)
(f)
Note lamination is a very precise job
- It is easy to get a poor result due to :
- Wrong film used
- Wrong temp=> no adherence or if too high burning the print
- Wrong speed => poor adherence
- Wrong substrate (too much silicone or coating)
- Wrong pressure (larger bubbles)
- Dusty substrate (film will have micro bubbles)
- Powder on substrate (film will not adhere)
- Dust in the air (will make bubbles under the film)
- The room should be almost a “clean room environment“ for a good result
- Don’t blame the machine for the above mistakes !!!
Cold lamination all models
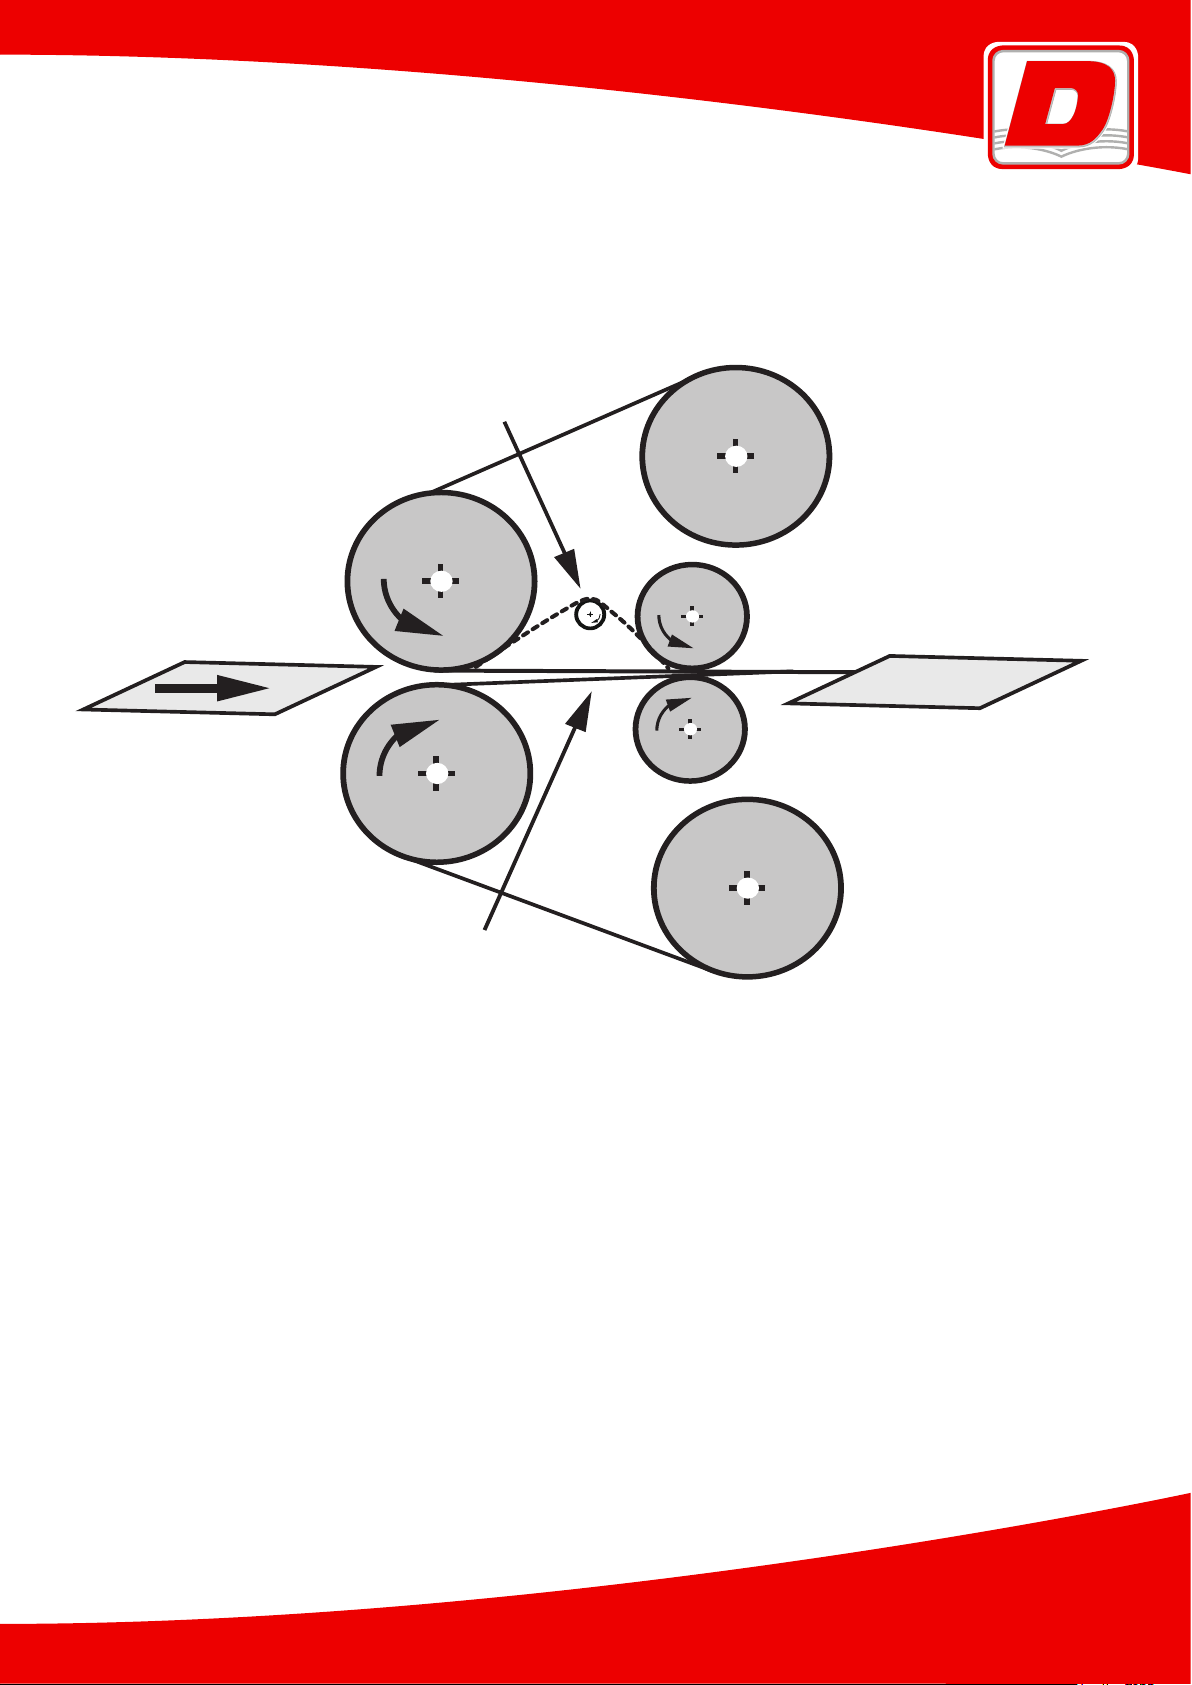
The film is threaded through the rollers avoiding the de curlers (straight through) ( see the machine diagram) making
sure that the sticky side of the film is always kept away from the roll surface!
The two films must be in line with each other (not offset)
Keep at least 1 meter of free space at the exit of the machine to allow the film to run out !
The film is already tacky at room temp
Lower the upper roll to meet the lower roll and start the machine up (forward button).
For cold lamination a higher pressure setting on the lever will be needed to chase out bubbles.
- Run some film through the machine until the tension is steady (seen by having a wrinkle free web).
In the case of using a paper backing use the rewinder on the 110 model to take up the paper.
If the wrinkles do not disappear fast you have not well aligned the track of the film or there is not enough brake
tension.
Once the film is running well and wrinkle free, align and slide in the substrate to be covered.
For encapsulation leave about 1 cm between the sheets.
Once finished raise the rolls.
Never store the unit under roller pressure or you will get flat spots on the rolls !
Geelseweg, 80 | 2250 | Olen | BELGIUM | Tel. +32 (0) 14 25 92 83 | [email protected] | www.dumor.be
3
Page 4

Hot lamination double sided 70 micron pet film on up all models
Heating on both rolls => ON
The film is threaded in the machine following the diagram not using the anticurling system.
Lower the pressure rollers and start the machine, pressure setting medium.
Once the film is wrinkle free insert the substrate carefully.
Select the appropriate temp for the film you use
Note that generally :
Thinner film = less temp / slightly higher speed eg 120/ 130°C, speed 4 or 5
Thicker film = more temp / lower speed eg 140°C, speed 1 or 2
There is no hard and fast rule, find the best setting by trial.
Attention, a too high temp will tend to burn off the ink on digital print and cause speckling!
NOTE:
• Freshly printed Xerox®/Konica® production should be left to air for several hours before trying to laminate to let
the silicone oil evaporate.
• The different kinds of print will require different kinds of adhesive on the film eg super sticky for Xerox/Konica paper.
• On wax based printers the darker colours are thicker than the lighter colours due to more wax being applied to
darken the colour. This means that you can see a difference in the film height around the contour of profile of the
colour being covered by the film.
• The edge seal of the film on thicker substrates may not wrap fully due to the thickness of the substrate.
• If you trim the film close to the substrate the adhesion and sealing will be diminished.
• As soon as you stop the production raise the rolls or flat spots will occur !
Single side lamination using bopp film of ca 25 - 30micron models 360 / 460 / 660
In this case only the upper roll holder is used and the only single side switch is enabled on the back of the machine
Feed the film through the de curler you need to use.
Thicker paper => roller de curler
Thinner paper => bar de curler
By trial you will find the right height of the de curler to get the flat output
Output curling upwards => increase the de curler height
Output curling downwards => decrease the de curling height
Speed 1 to 3 depending on the film
Pressure setting higher
Heat ca 110°C to 120°C
A too high temp will blister the digital print !
Optional film strippers in position and engaged to cut the film to width
4
Geelseweg, 80 | 2250 | Olen | BELGIUM | Tel. +32 (0) 14 25 92 83 | [email protected] | www.dumor.be
Page 5

Insert scrap paper before lowering or you will foul the opposite roller !
The scrap paper is to get the film web and machine stabilised before committing to produce.
Film must be narrower than the paper or you will foul the opposite roller !
Have the next sheets ready to insert !
Infeed overlap the sheets by ca 5 mm to avoid fouling the opposite roller !
• Lower the rolls
• Start the machine
• Let the wrinkles disappear
• Keep feeding continuously !
• Once stabilized use the real paper
• Be careful always to keep an overlap !
• Last sheet is scrap paper !
Once finished raise the rolls and turn OFF
If you use the film stripper wheels you will need from time to time to remove the waste film or the cutters will jam on
the roll.
The wheels are a wear part.
MAINTENANCE
Unplug the machine, let the machine cooling !
- Clean the rolls with rubbing alcohol to remove glue deposits
- Make sure brake is working
- Make sure tensioner rolls are free moving
- Make sure the rolls are not worn and are with no flat spots
The silicone rolls are wear parts and may need to be changed after some years of use.
There is a drive chain in the side frame and it should be greased each year by a trained technical person.
Copyright Dumor International 2106
SPECIFICATIONS
Width 360mm / 460mm / 660mm with anti-curling, single or double sided
Control panel Digital
Optional film thickness From 20 mic bopp for single-sided use to 200 mic pet for double-sided use
Types of anti-curler fitted Roller and blade
Substrate To 2mm
Warm up time 10 minutes
Temperature adjustment Cold up to 150°C
Speed adjustment From 0.3 to 2 m/min in 9 steps
Option Film trimmer rotary knives with guards
Film perforator for easy tear
Weight 30kg / 44kg / 55kg
Size 62 / 76 / 91cm(H)×52×40cm
Power Supply 220V/50HZ
Geelseweg, 80 | 2250 | Olen | BELGIUM | Tel. +32 (0) 14 25 92 83 | [email protected] | www.dumor.be
5
Page 6
PICTURES
1a
2
1M
distance
PRESSUREPRESSURE
8
-
11
9
6
1
f
a
10
3
b
c
4
5
+
e
d
12
6
Geelseweg, 80 | 2250 | Olen | BELGIUM | Tel. +32 (0) 14 25 92 83 | [email protected] | www.dumor.be
Page 7
HOT
HOT
DOUBLE SIDED
ANTICURLING
300M
DIAGRAM
Geelseweg, 80 | 2250 | Olen | BELGIUM | Tel. +32 (0) 14 25 92 83 | [email protected] | www.dumor.be
7
Page 8

Value !
Quality !
Innovation !
Geelseweg, 80 | 2250 | Olen | BELGIUM | Tel. +32 (0) 14 25 92 83 | [email protected] | www.dumor.be
 Loading...