

USER GUIDE
Please read this user guide
for important health & safety
instructions and to get the best
results every time. Retain it for
future reference.
IMPORTANT INFORMATION –
please read before you start
• Carefully read the complete user guide before use and
always follow instructions including those on the paint
pack packaging.
• Keep user guide in a safe place for future reference.
• Dispose of all waste packaging properly.
• The PaintPod is for indoor use only.
• Only use PaintPod paint packs, parts, products
and accessories.
• Always wear protective clothing and as with all
decorating, cover furnishings, ooring etc.
• Keep area around your work place clean and tidy to
help avoid accidents.
• Ensure children and animals are kept away at all times
whilst operating the PaintPod.
• Always place and use the PaintPod on a at, stable
and horizontal surface.
• Always unplug the PaintPod after use.
• Keep power lead away from water, heat, oil, sharp
edges and moving parts.
• Keep the PaintPod away from sources of heat, naked
ames or ignition.
• Only use clean warm water to clean the PaintPod.
• Clean the PaintPod thoroughly after each use to
ensure it works effectively next time.
• Only store the PaintPod when clean and dry.
• Dispose of waste water by pouring down the sink.
• DO take care not to trip over the power lead or
delivery tube.
• ONLY USE a CR2032 3v battery in the roller handle.
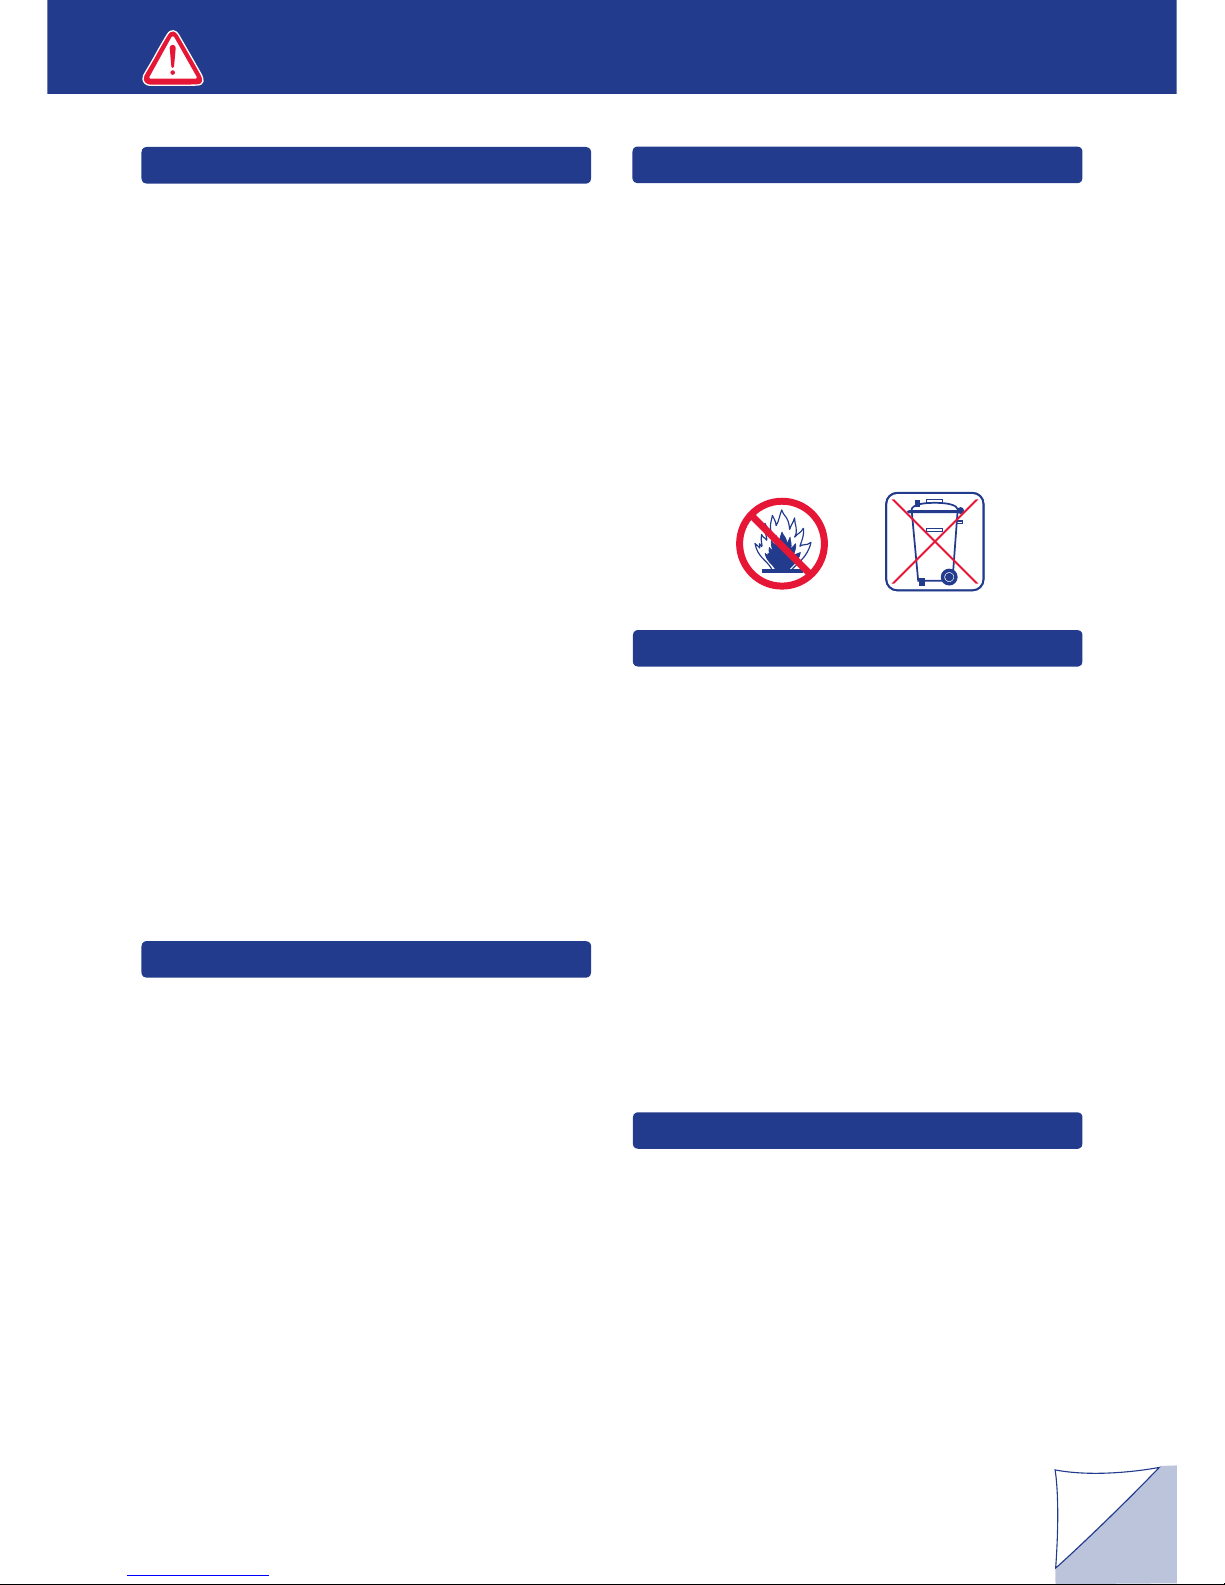
• WARNING Fire Hazard! DO NOT incinerate waste
batteries.
• DO NOT dispose of batteries as household waste.
Dispose of or recycle according to local authority
guidelines.
• DO NOT store batteries in any location where
temperatures may exceed 40°C.
• DO NOT tamper with the battery.
• When replacing battery, follow manufacturer
instructions.
DO
DO NOT
BATTERIES
MAINS CONNECTION
DISPOSAL
• DO NOT use any other paint with the PaintPod.
Dulux PaintPod paint is specially formulated.
• DO NOT modify the PaintPod.
• DO NOT place PaintPod on ladders or on stair treads.
• DO NOT use hot or boiling water to clean the
PaintPod.
• DO NOT use solvents, detergents chemical or abrasive
cleaners to clean the inside or outside of the PaintPod.
• DO NOT pour paint directly into the PaintPod.
• DO NOT use the PaintPod if any parts of it are
damaged, excessively worn, faulty or missing.
• DO NOT put any object or part of your body near any
moving parts of the PaintPod.
• DO NOT use the PaintPod with wet hands.
• DO NOT use the PaintPod in explosive atmospheres.
• DO NOT pour waste water into rain water drains, natural
water courses or on to land.
• DO NOT pull the unit by either the power lead or
delivery tube.
The PaintPod is supplied with a power lead and a tted
3 amp fused plug. It operates at low voltage
and is connected to a separate power supply unit.
IMPORTANT: Please read the following safety
instructions carefully before use.
• DO only use the PaintPod power supply provided.
• If a replacement plug is tted, dispose of the old
plug safely.
• DO NOT use the PaintPod if the power lead
is damaged.
• DO NOT use the PaintPod or power lead without the
plug’s top cover tted.
• ONLY USE 3 amp replacement fuses. Replacement
fuses must conform to BS1362.
• WARNING: IF IN ANY DOUBT PLEASE CONSULT
A QUALIFIED ELECTRICIAN.
Once the product has reached the end of its useful life
or if it has become damaged outside of the one year
guarantee, please dispose of the PaintPod roller system
correctly. Do not dispose of the PaintPod roller system
as household waste. Take to your local authority waste
electrical equipment disposal centre.
1
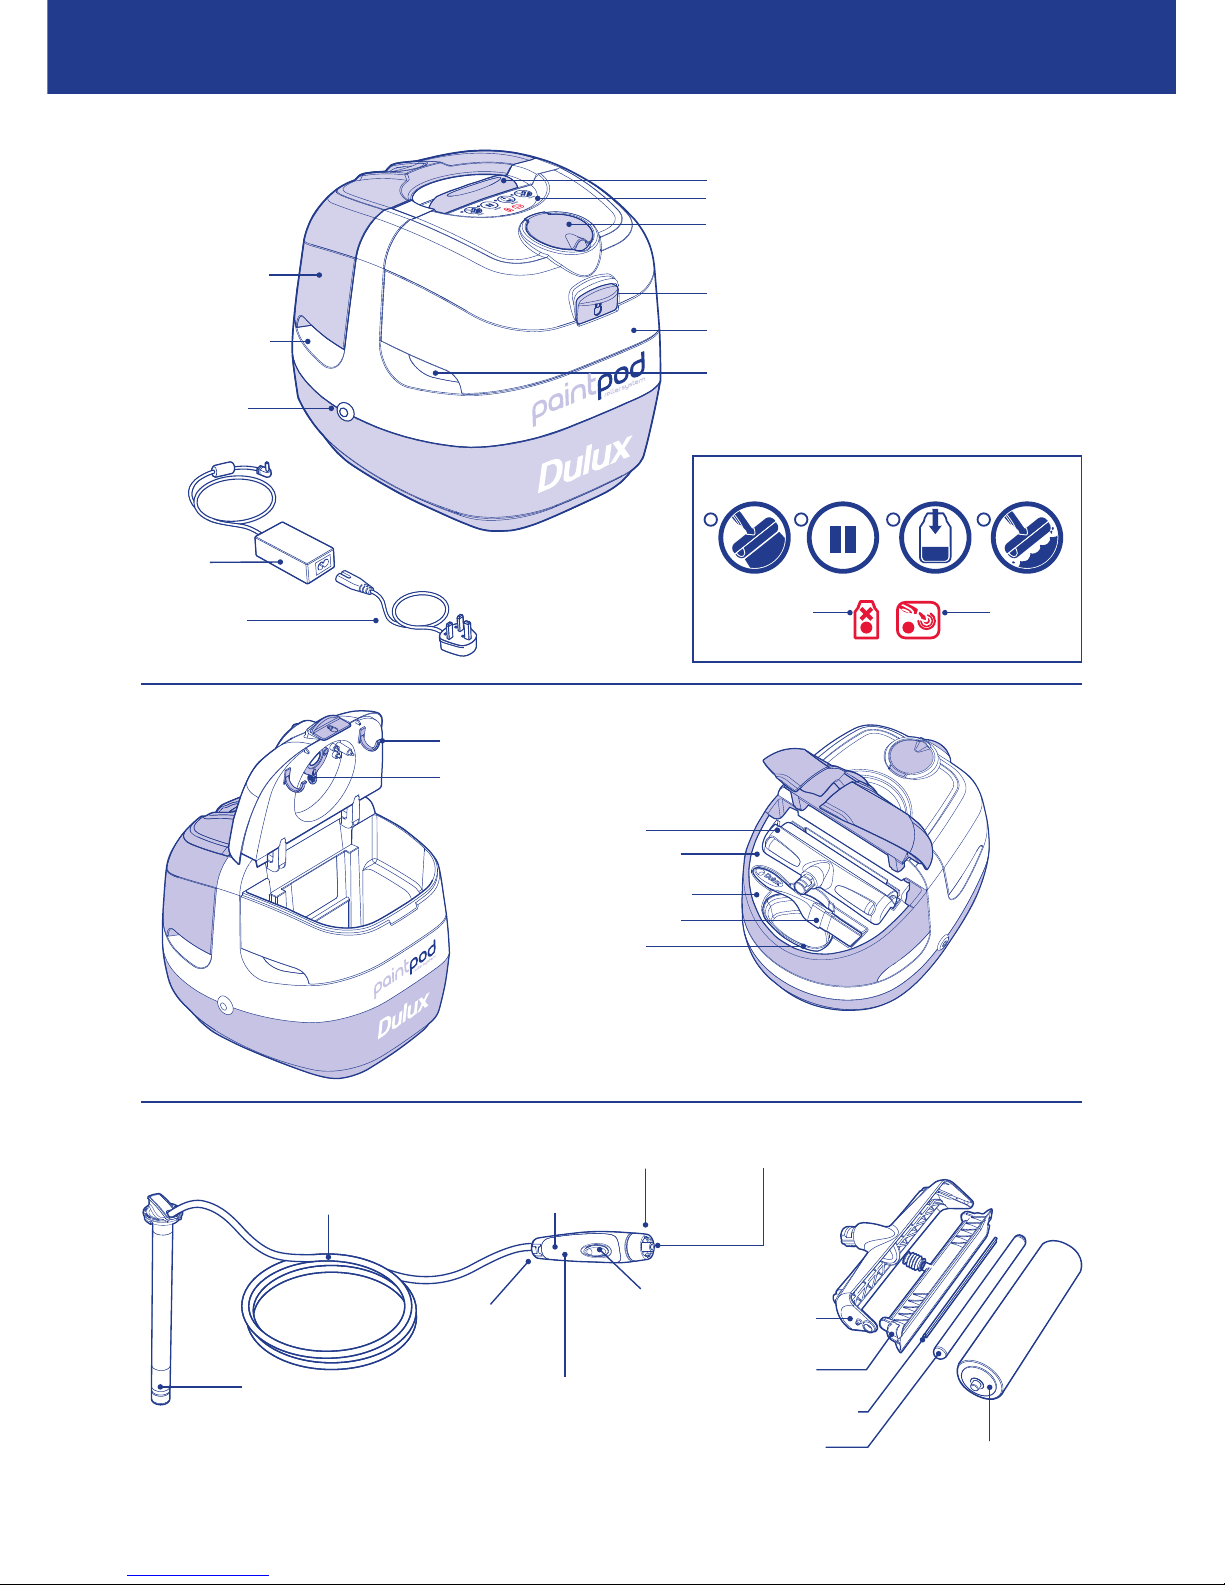
GETTING TO KNOW YOUR PAINTPOD
Dip tube rest
Dip tube wipe
2
Battery
compartment
Paint loading
trigger
Roller handle
Roller head
release button
Roller head
connector
Dip tube
Delivery tube
Battery
compartment
release button
Feeder tray
Roller head
Distribution plate
Feeder roller
Roller sleeve
Control panel
Clean
warning
Paint pack
warning
CLEANDRAINPAUSEPAINT
Blue chamber
Blue chamber
handle
Power lead
input
Carry handle
Dip tube cover
Lid release
White chamber (front)
White chamber handle
Control panel
Power lead
Power
supply unit
IMPORTANT: The dip tube and delivery tube
are a single unit. DO NOT pull apart.
Roller head
Docking station
Spout
(hidden by brush)
Triangular brush
Edging cup

The PaintPod is a power assisted roller system that enables you to control the
flow of paint onto the roller at all times. It has a unique triangular edging brush
which makes light work of edges and corners before walls are painted with the
roller. Finally, when you have finished, it cleans itself whilst you stand back and
admire your work!!
Visit either www.dulux.co.uk/paintpod or www.dulux.ie/paintpod for a step
by step product demonstration.
If you are experiencing technical difculties or need
product advice, visit our web site or Customer Advice
Centre.
UK
ICI Paints, Wexham Road, Slough, SL2 5DS
Tel: 0870 444 1111
www.dulux.co.uk/paintpod
ROI
ICI Dulux Paints Ireland, Commons Road, Cork
Tel: 021 422 0222
Fax: 021 422 0205
www.dulux.ie/paintpod
The guarantee is valid for one year from date of
purchase and covers the complete PaintPod roller
system, with the exception of the dip tube and
delivery tube.
This guarantee does not cover rectication or any
other costs.
We will repair the PaintPod roller system or replace
free of charge the complete unit or parts of, if it is
faulty due to a manufacturing or material fault.
The guarantee does not cover the application of the
PaintPod emulsion.
Nothing in this clause is deemed to exclude or restrict
liability for death or personal injury resulting from the
negligence of the manufacturer.
The following are specifically excluded from the terms
and conditions of this guarantee:
• Damage caused by misuse or improper handling
of the PaintPod roller system or damage due to
incorrect use in accordance with the instructions.
• Normal ‘wear and tear’.
• Damage suffered through negligence, wilful damage,
improper use or accidental damage.
• Any modications made by the purchaser to the
PaintPod roller system or repairs carried out by an
unauthorised service agent.
• Damage caused by immersion in water, damp, re,
natural light and atmospheric conditions.
This guarantee does not affect your statutory rights.
For advice on returns, contact the ICI Customer
Advice Centre in your country.
TECHNICAL PRODUCT ADVICE
EU STATEMENT OF COMPLIANCE
PRODUCT SPECIFICATION
GUARANTEE
3
The PaintPod unit conforms to:
This product complies with WEEE Directive 2002/96/
EC and ROSH Directive 2002/95/EC
EMC EN 301 489-3 v1.4.1 (2002-08)
Radio frequencey EN 300 220-2 v2.1.1 (2004-06)
Power supply unit EN 60950
Model No: A466000150N
Voltage: 240v – 12v – 3 amps
Length: 450mm
Width: 340mm
Depth: 350mm
Unit weight: up to 12.5kgs
including paint
THE FAST, EASY AND CLEAN WAY TO DECORATE

CONTENTS
4
SECTIONS PAGES
IMPORTANT INFORMATION
GETTING TO KNOW YOUR PAINTPOD
USING YOUR PAINTPOD
Setting up
Painting edges and corners
Painting walls and ceilings with the roller
Taking a break
Moving to a new location
Inserting a new paint pack
CARING FOR YOUR PAINTPOD
Draining and cleaning
Storage
Replacing the dip tube and delivery tube
Removing and replacing the roller sleeve
Replacing the battery
TROUBLE SHOOTING
Accessories
Spare parts
Dip tube replacement chart
1
2 – 3
5
6
7
8
8
9
10 – 12
12
13
13
14
15 – 16
16
16
Back cover
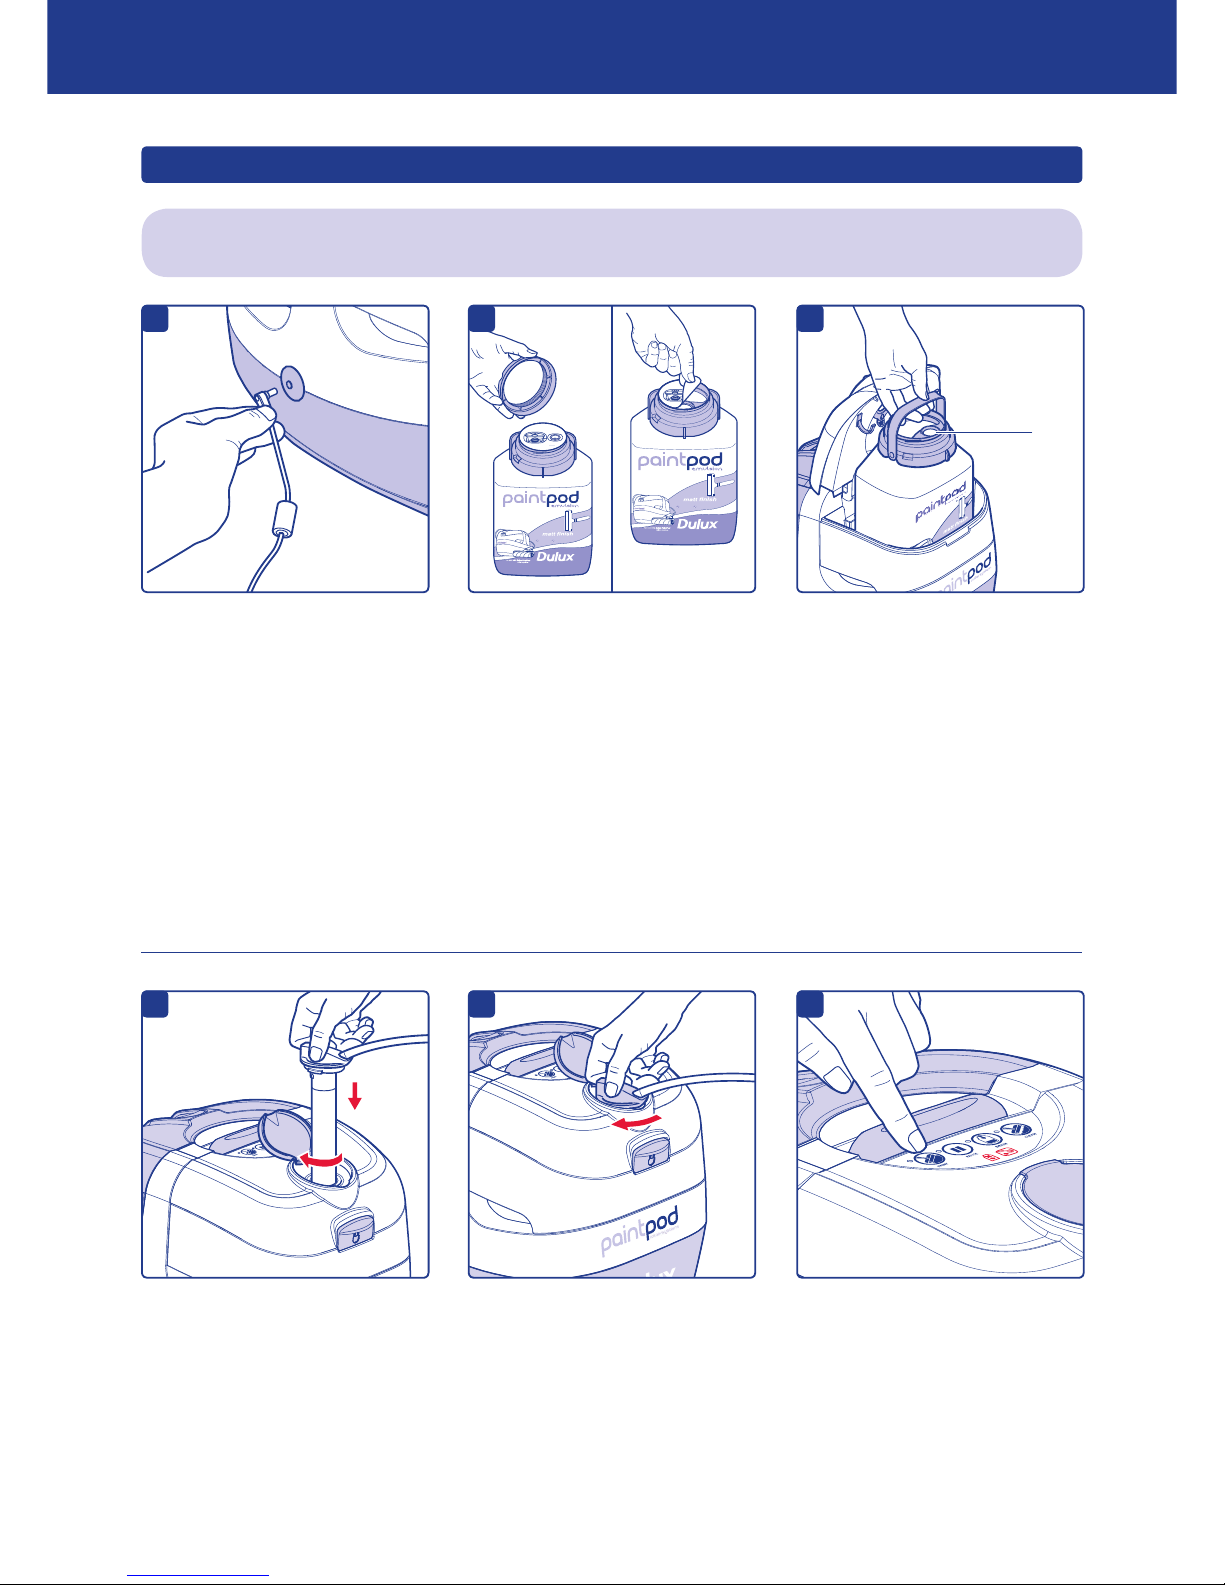
USING YOUR PAINTPOD
SETTING UP
a
Plug mains power lead into power
supply unit. Connect one end
of the power lead to power lead
input on the PaintPod and the
other to a mains socket. The lights
on the PaintPod will ‘ash’ twice
and make a noise to show it is
connected to the mains
power supply.
Always set up the PaintPod in the room to be painted.
Lift the lid release of the white chamber and remove the contents.
Gently shake the paint pack
(not supplied) for approximately
10 seconds before unscrewing
the lid.
Peel off the foil seal.
Lift lid release of white chamber
and place paint pack inside.
Ensure paint pack is facing the
right direction – the dip tube hole
on the paint pack must face the
front of the white chamber.
IMPORTANT: If dip tube hole on the paint pack is NOT facing the front of the white chamber the paint pack
warning light will illuminate when the ‘paint’ button is pressed and the PaintPod will not operate. If this
happens, lift lid and re-insert paint pack in the correct position.
d
e
f
Fold down paint pack handle and
close the white chamber lid.
IMPORTANT: Check paint pack
warning light is NOT illuminated
then lift dip tube cover and fully
insert dip tube into PaintPod.
Twist dip tube clockwise to lock
and ‘click’ into position. Ensure
dip tube is locked correctly
otherwise pump will not work
Close dip tube cover.
for wall and ceilings
I
M
P
O
R
T
A
N
T
I
N
F
O
R
M
A
T
I
O
N
PLEASE READ
THEN REMOVE BEFORE
INSERTING PACK
PAINTPOD emulsion pask MUST be
placed into the PaintPod rooler system
with the drip tube hole facing
the front of the unit
b
c
for wall and ceilings
emulsion
White
Chamber
Dip
tube
hole
When ready to paint
Press ‘paint’ button. The blue light
will illuminate.
for wall and ceilings
splatter free ultra smooth finish
5

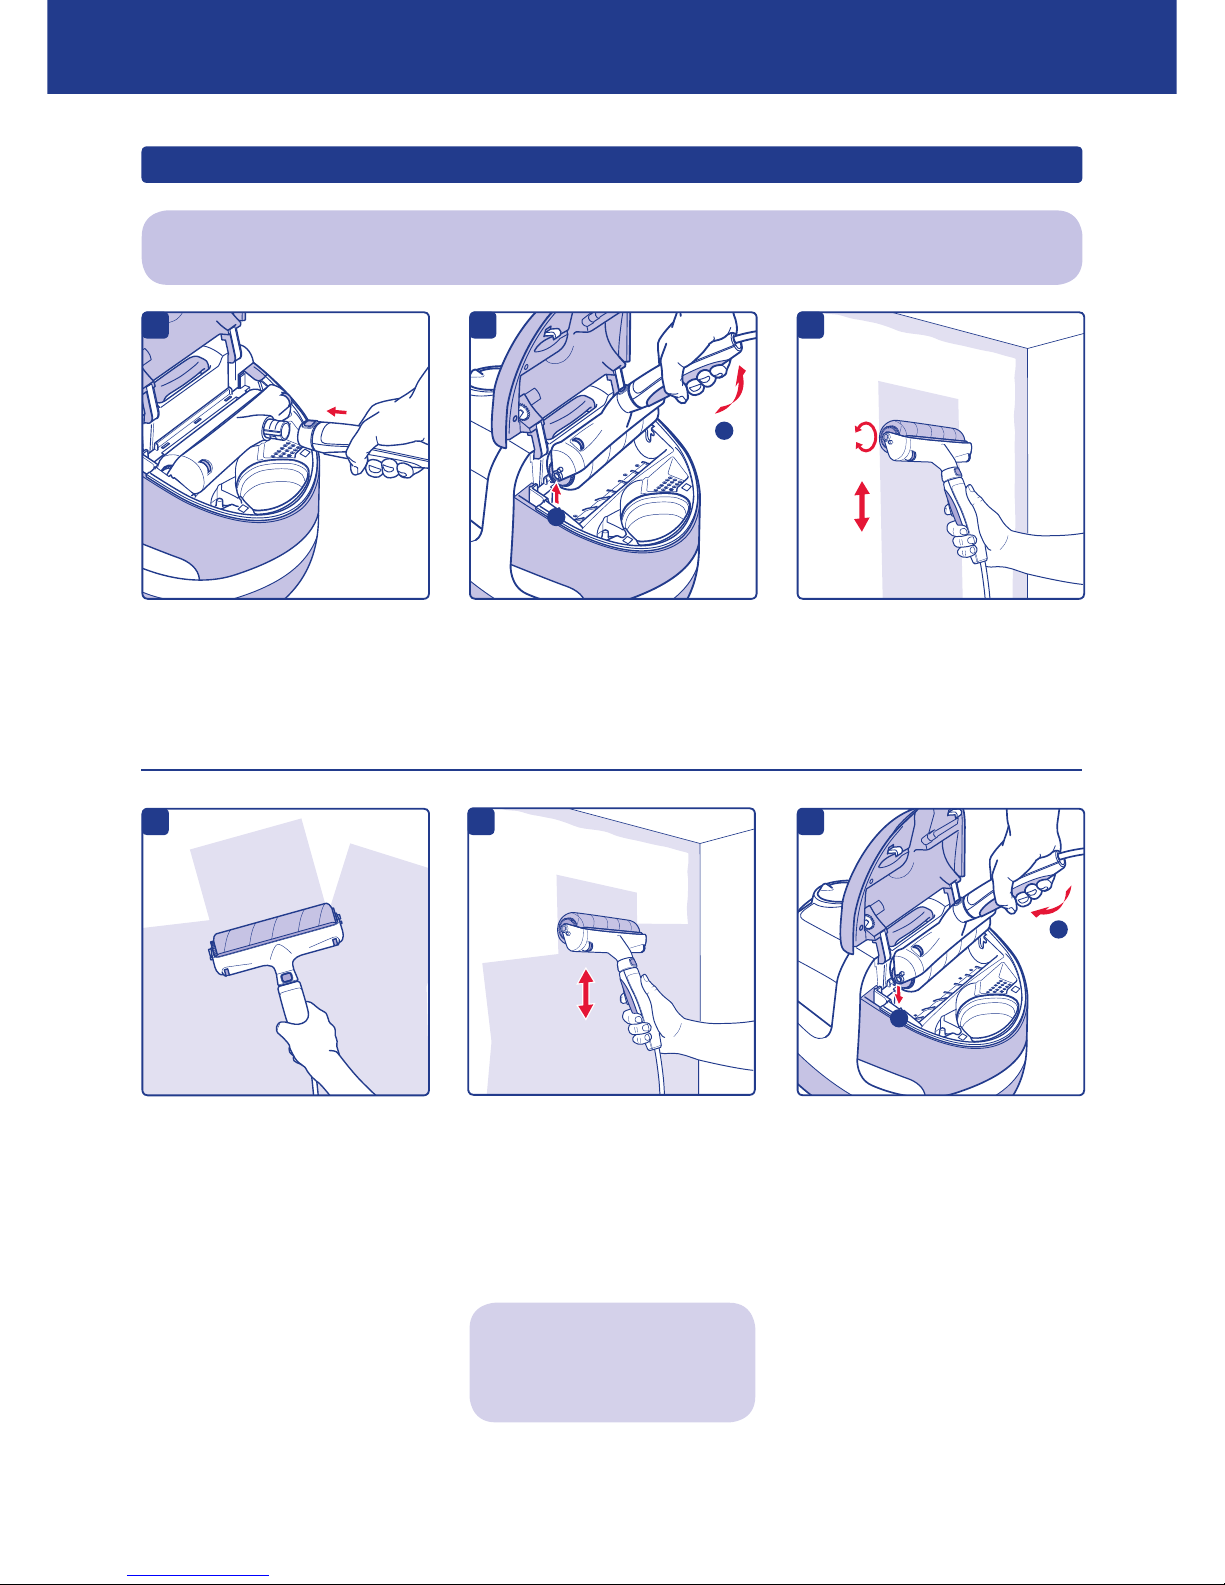
PAINTING EDGES AND CORNERS
d
Remove spout, triangular brush
and edging cup from docking
station.
Using both hands lift blue lid as
shown.
For best results use the triangular brush to paint the edges and corners before using the roller.
Insert the spout onto roller handle.
It will ‘click’ when tted.
Ensure ‘paint’ button is
illuminated. Squeeze paint loading
trigger to pump paint into edging
cup. Release trigger to stop
paint ow.
IMPORTANT: When paint loading
trigger is released the sound will
change. This is normal.
f
Using the triangular brush paint
the edges and corners.
Rell edging cup if necessary.
b
Triangular
brush
Spout
(hidden
by brush)
Edging
cup
a
USING YOUR PAINTPOD
Press ‘pause’ button.
e
When nished remove the spout
by pressing the handle release
button on the handle. Wipe roller
head connector thoroughly, rinse
the edging cup, triangular brush
and spout thoroughly with warm
water and allow to dry.
c
Spout ridge
6
USING YOUR PAINTPOD
7
PAINTING WALLS AND CEILINGS
d
Ensuring roller head connector is
free from paint, push t the handle
securely onto the roller head.
Lift the handle upwards and
remove the roller head from the
docking station.
Remove the paper label.
The PaintPod makes painting easy, fast and clean. However it may take a little time to perfect your
painting technique. Practice using the roller before starting.
Ensure ‘paint’ button is illuminated.
Start rolling the dry roller on the
wall and whilst in motion squeeze
paint loading trigger to load paint
onto roller.
Keep squeezing paint loading
trigger AND keep roller in motion
until it begins to load with paint.
When sufciently loaded, release
trigger and roll out paint to an
even nish.
IMPORTANT: Do not continually
squeeze the trigger, this will
overload the roller with paint
and may cause dripping. To
avoid, squeeze the trigger
INTERMITTENTLY and ONLY
when roller is in motion.
e
As paint is rolled onto the wall, the
roller will need to be reloaded with
more paint. WHILST CONTINUING
TO ROLL, squeeze paint loading
trigger to load paint onto roller.
When sufciently loaded, release
trigger and continue painting.
To keep your work area clean
and safe, place roller head in
the docking station in the blue
chamber when pausing.
IMPORTANT: The roller head
MUST be lowered down into the
cleaning station as shown so
it sits correctly when the lid is
closed.
c
a
Hold the delivery tube away
from the wall with your free
hand so it does not ‘brush’
against the wet paint.
b
1
2
f
1
2
7

TAKING A BREAK
To take a break during painting,
press ‘pause’ button.
Place roller head correctly in
docking station, close lid and
‘click’ shut.
IMPORTANT: If leaving for more
than 4 hours clean system
completely.
Follow instructions in
‘DRAINING AND CLEANING’.
a
b
Press ‘pause’ button and unplug
power lead from mains socket.
IMPORTANT: The PaintPod
and paint pack can weigh up to
12.5kgs. LIFT WITH CARE.
Press centre of carry handle to
release it and pull up.
Carry PaintPod to new location
and push handle down.
IMPORTANT: Lids cannot be
opened whilst carry handle is
raised.
Plug power lead into the mains
socket in the new location and
press ‘paint’ button to continue.
a
MOVING TO A NEW LOCATION
c
USING YOUR PAINTPOD
b
1
2
IMPORTANT:
The PaintPod and paint pack can weigh up to 12.5kgs. LIFT WITH CARE.
8

INSERTING A NEW PAINT PACK
d
Press ‘pause’ button on control
panel.
Place roller head correctly in the
docking station, close lid and
‘click’ shut.
9
Lift dip tube cover and twist dip
tube cap anti-clockwise to unlock.
Carefully remove dip tube from
PaintPod.
Any excess paint on dip tube will
be removed by dip tube wipe.
Whilst holding dip tube in one
hand, open lid of white chamber
and place dip tube onto dip tube
rests.
for wall and ceilings
emulsion
e
Remove empty paint pack and
replace with a new one. Follow
instructions in ‘SETTING UP’
(page 5).
IMPORTANT: Ensure paint pack
is facing the right direction.
Remove dip tube from resting
position, close lid and insert dip
tube back into PaintPod, locking
it into position. Follow instructions
in ‘SETTING UP’.
Press ‘paint’ button to resume
painting.
If a different paint colour is to be used, the PaintPod should be drained and cleaned. Follow instructions on
pages 10, 11 and 12.
USING YOUR PAINTPOD
c
Paint on the end of dip tube will
need to be removed with a rag.
a
1
2
b
1
2
f
1
2

CARING FOR YOUR PAINTPOD
DRAINING AND CLEANING
Draining
Leaving paint pack in PaintPod,
place roller head and roller handle
correctly in docking station, close
lid and ‘click’ shut.
As with a normal roller, clean as much excess paint as possible before cleaning by rolling on the wall or on
waste paper. Remove the triangular brush, edging cup and spout and rinse separately.
IMPORTANT: Ensure drain cycle is completed before paint pack is removed or before starting cleaning process.
Press ‘drain’ button to drain paint
back into paint pack – this takes
about 30 seconds and stops
automatically.
IMPORTANT: Paint residue will
still be visible on inside surface
of delivery tube.
Cleaning
Lift dip tube cover and twist dip
tube anti-clockwise to unlock.
Carfully remove dip tube from
PaintPod.
d
f
e
Any excess paint on dip tube will
be removed by dip tube wipe.
Paint on the end of dip tube will
need to be removed with a rag.
Using the handles, remove white
chamber and carry it to sink.
Whilst holding dip tube, open lid
of white chamber and place dip
tube onto dip tube rests.
Remove paint pack and replace
screw cap.
b
a
1
2
c
1
2
10

CARING FOR YOUR PAINTPOD
DRAINING AND CLEANING
Fill white chamber to level
indicated with 5 litres of warm
water and return it to the
PaintPod.
Remove dip tube from dip tube
rests and close lid.
Lift dip tube cover and insert dip
tube into PaintPod.
Twist dip tube clockwise to lock
and ‘click’ into position.
Close the dip tube cover.
Press ‘clean’ button to activate
cleaning cycle – this takes
about 10 minutes and stops
automatically when completed.
IMPORTANT: If ‘clean’ warning
light illuminates, check roller
head and handle are correctly
placed in the docking station.
j
Lift blue chamber lid and remove
roller handle from roller head
by pressing roller head release
button.
Hold delivery tube above
PaintPod and press ‘drain’ button
again to remove any excess water.
IMPORTANT: If roller contains
excessive paint, it may be
necessary to repeat the cleaning
cycle, using clean warm water.
To prevent spilling dirty water on
oor – DO NOT lift roller head from
docking station.
Remove roller head from docking
station. Remove roller sleeve from
roller head. Squeeze out excess
water and leave out to dry.
IMPORTANT: The roller fibres will
permanently adsorb some dye
from the colour of the paint being
used. This is more noticeable
with stronger colours.
IMPORTANT: In some instances
(e.g. if roller has been overloaded)
it may be necessary to give the
roller head components a more
thorough clean as described on
page 12. This will ensure that you
get maximum performance from
your PaintPod.
h
g
Using handles, lift blue chamber
out of the PaintPod and take to
the sink to empty the waste water.
DO NOT pour into rain water
drains, natural water courses or
onto land.
Any paint left on the roller head
connector should be removed
with a rag.
If necessary remove and clean
the roller head connector as
described on page 13.
k
Roller
head
connector
i
1
2
11

12
CARING FOR YOUR PAINTPOD
DRAINING AND CLEANING
STORAGE
Remove white chamber and
dispose of any water.
Dry and replace white chamber.
Ensure PaintPod and all parts
are completely clean and dry
before storage.
Do not store in moist or damp
environments.
The delivery tube should be stored
in the white chamber, taking care
that it is not kinked.
After storing PaintPod in
extremely cold temperatures,
allow it to reach room temperature
before use.
Remove dip tube wipe (by pushing
up) and rinse separately.
Ret the dip tube wipe by placing
over the lugs and pulling down.
n
Dip tube
wipe
Lug
m
Remove feeder roller from the
feeder tray and clean.
Ret feeder roller and roller sleeve
into roller head, (note: the roller
sleeve will only t one way into the
roller head).
If roller head needs extra cleaning
remove the roller head from the
handle. Wipe and dry the roller
head inlet.
Carefully pull out at one end of the
‘roller head’ and remove the roller
sleeve and clean.
l
Roller sleeve
Roller head inlet
a
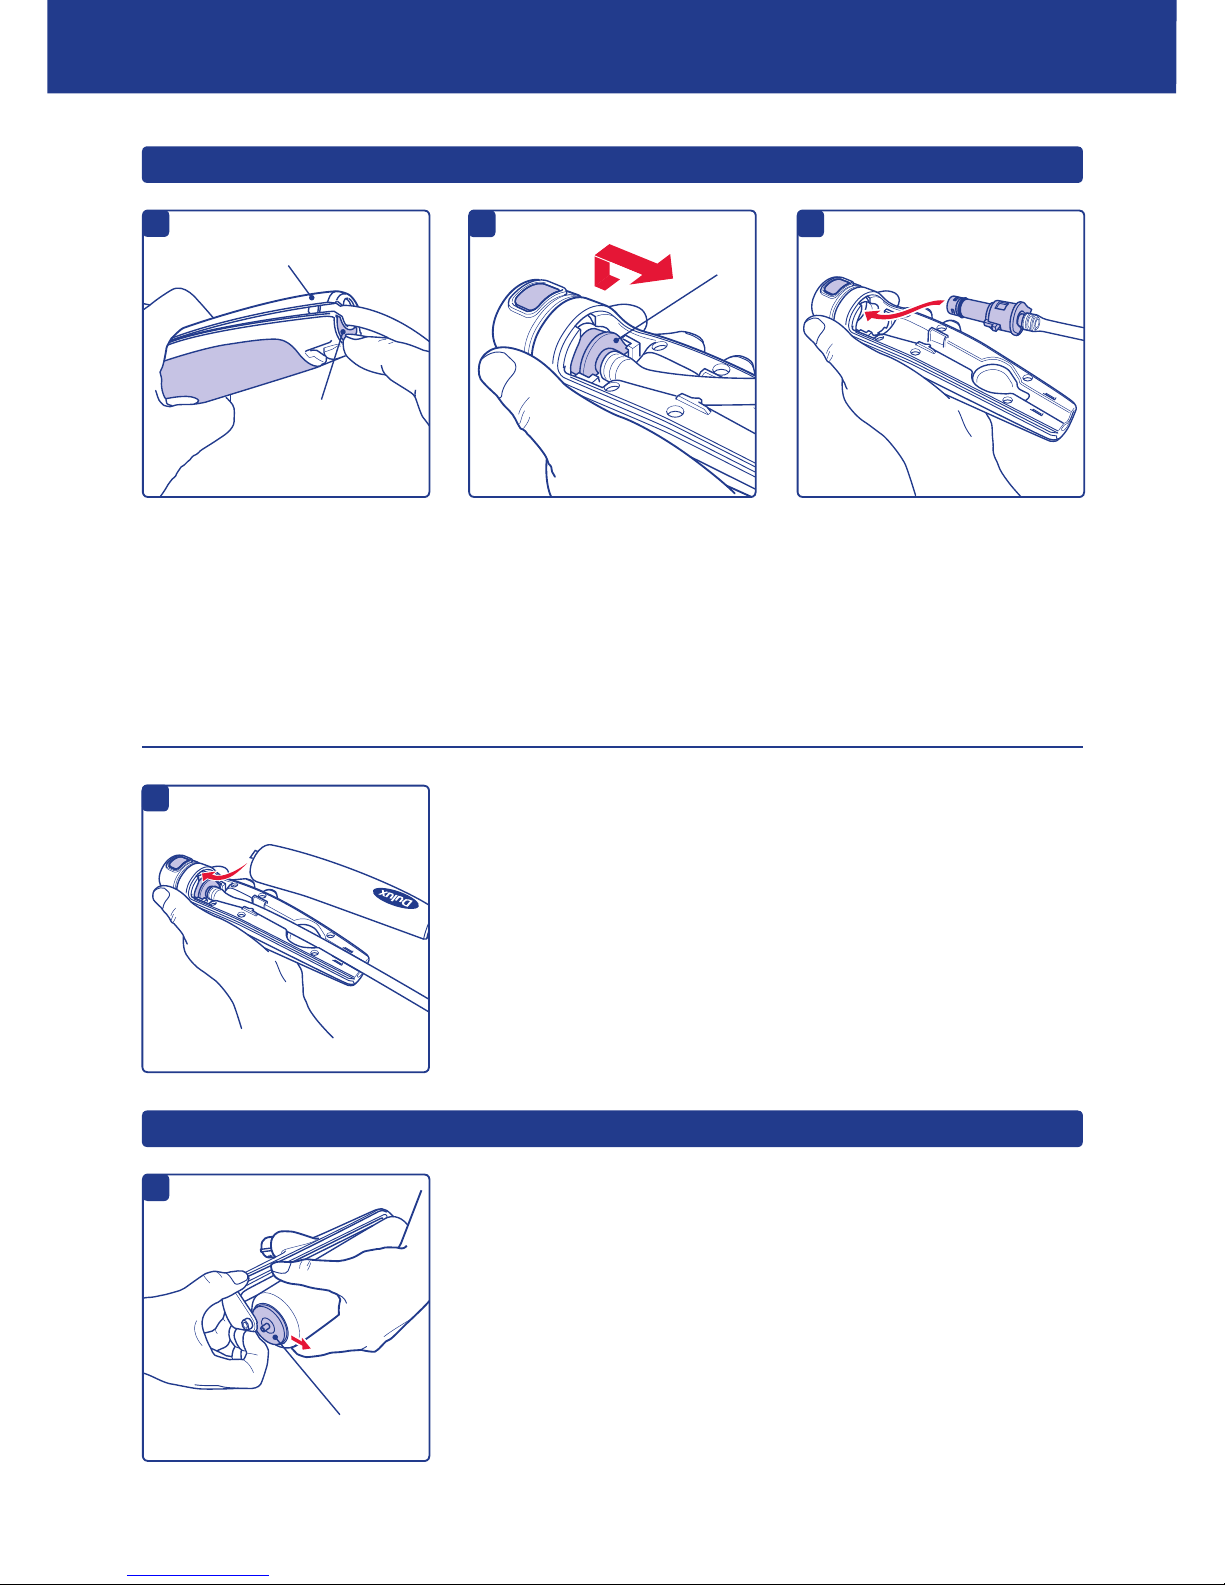
CARING FOR YOUR PAINTPOD
REPLACING THE DIP TUBE AND DELIVERY TUBE
REMOVING AND REPLACING THE ROLLER SLEEVE
c
Remove the battery compartment
cover by pressing the battery
compartment release button on
the end of the handle assembly.
Remove the roller head from the
handle.
Carefully pull out at one end of the
‘roller head’ and remove the roller
sleeve.
Clean or replace the roller sleeve
and ret into the roller head. The
roller sleeve will only t one way
into the roller head. Make sure the
distribution plate and feeder roller
are in position.
Whilst holding the delivery tube,
gently push forward and lift the
roller head connector upwards to
remove from handle.
Insert the new roller head
connector (attached to delivery
tube) back into handle and gently
push forwards and down. It will
‘click’ when inserted correctly.
IMPORTANT: DO NOT force the
roller head connector, it will only
go in one way.
d
Place the delivery tube into its
holding position (in handle) and
replace the white handle cover. It
will ‘click’ when replaced correctly.
The replacement dip tube and
delivery tube are now ready for use.
Please dispose of the used dip
tube and delivery tube with normal
household waste.
a
Battery compartment cover
Battery compartment
release button
a
Roller sleeve
b
Roller
head
connector
13
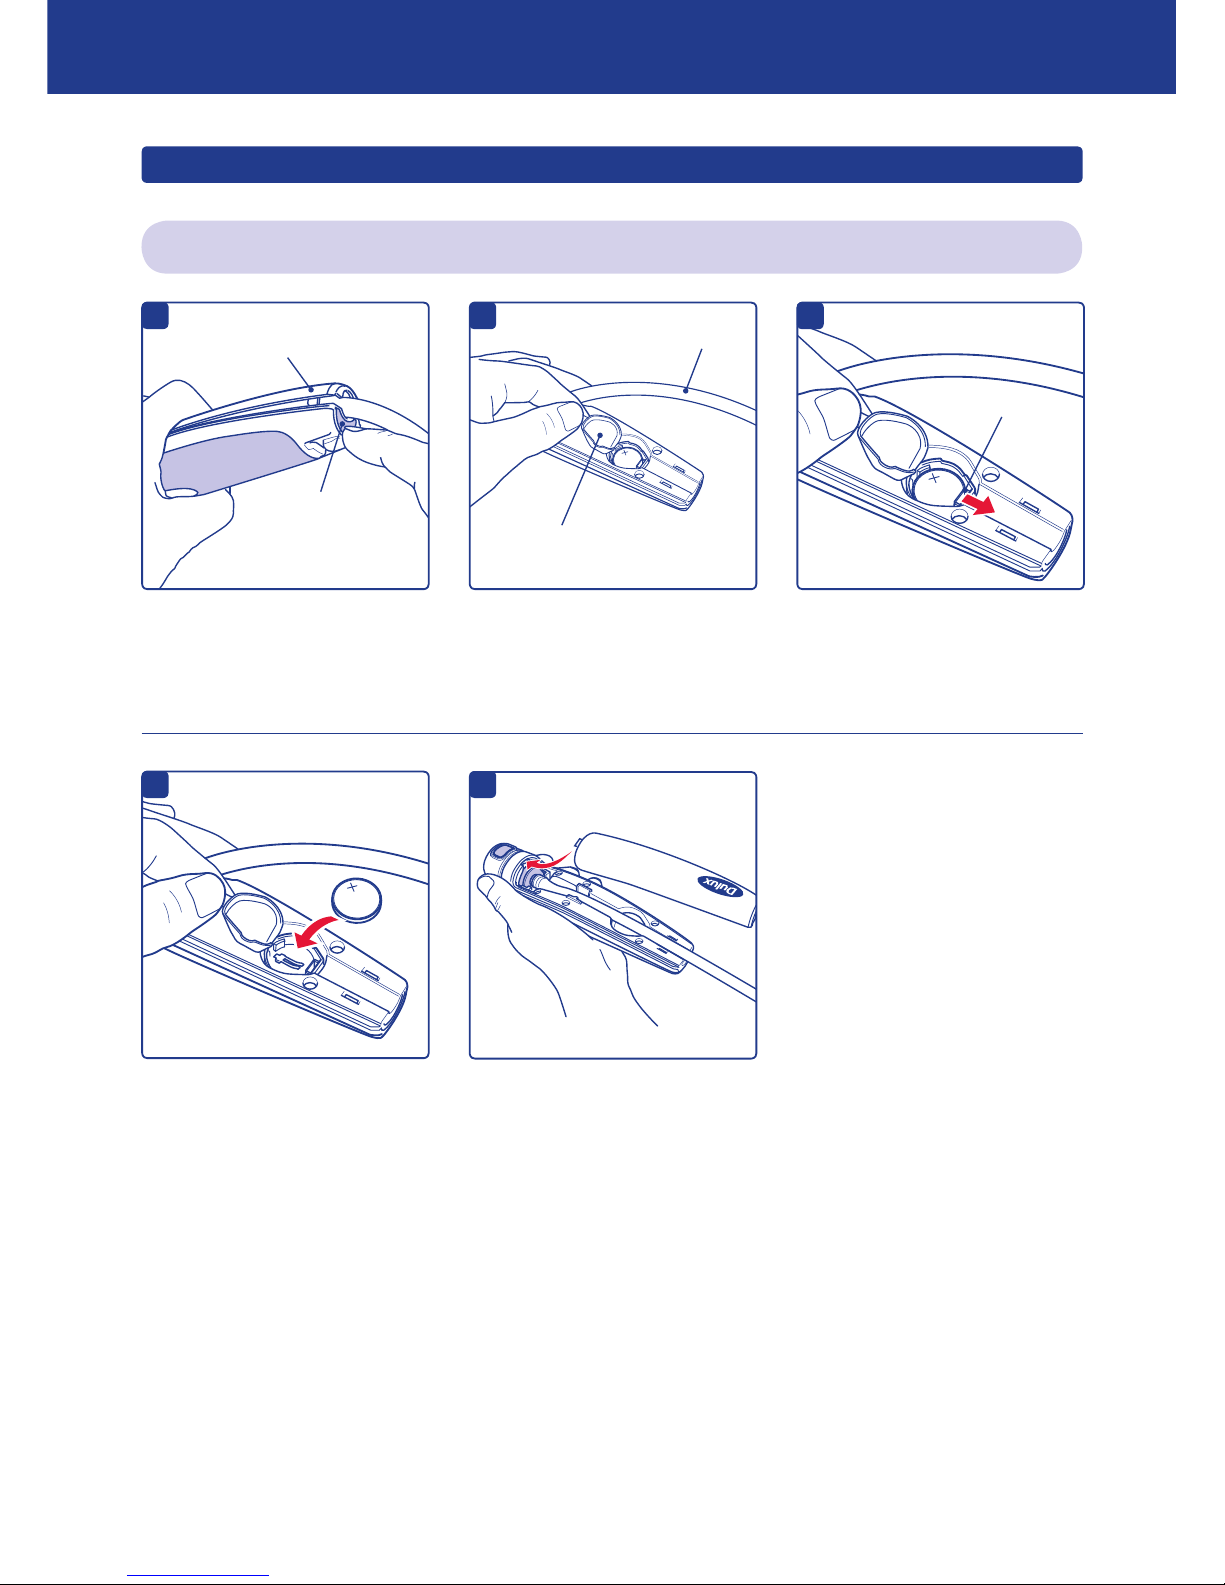
CARING FOR YOUR PAINTPOD
REPLACING THE BATTERY
Remove the battery compartment
cover by pressing the battery
compartment release button on
the end of the handle assembly.
Move the delivery tube aside.
Pull the tab of the rubber cover up
to expose the CR2032 3v battery.
Release the battery by pushing
the metal holding clip down.
CR2032
3V
d
Replace the battery the correct
way up and ensure the metal
holding clip keeps the battery in
place. Reposition the rubber cover
and delivery tube.
Replace the battery compartment
cover. It will ‘click’ when replaced
correctly.
Please dispose of the used battery
as stated in the BATTERIES
section on page 1.
CR2032
3V
b
Delivery tube
Rubber cover
CR2032
3V
c
Metal holding clip
e
a
Battery compartment cover
Battery compartment
release button
Replacement CR2032 3v batteries can be purchased from leading retailers.
14

TROUBLE SHOOTING
15
SYMPTOM POSSIBLE CAUSES ACTION
Unit does not power up and/
or cuts out during use.
Paint pack warning light
illuminated.
Unit does not start pumping
paint or occasionally cuts out
during painting.
Insufcient/no paint owing
onto roller sleeve.
Paint dripping/splatter during
painting.
Roller handle is difcult to
insert into roller head.
Roller will not rotate during
painting.
Power lead not inserted correctly. Insert power lead correctly (page 5).
Power lead has been pulled out of
PaintPod unit.
Reinsert power lead (page 5).
Power lead is not plugged into
mains socket.
Plug 3 pin plug into mains socket (page 5).
Mains power is not turned on. Turn on mains socket (page 5).
Power lead is damaged. Replace power lead.
No paint pack in the PaintPod. Place paint pack into the white chamber and follow user
guide (page 5).
Paint pack is inserted into white chamber
the wrong way around.
Remove paint pack and replace ensuring dip tube hole inside
the pack is facing the correct way (see foil lid or user guide
– page 5).
The white chamber lid is not closed
properly.
Open and reclose the lid ensuring that it clicks closed.
Paint pack still present in white chamber
whilst trying to clean.
‘Drain’ the paint back into the pack. Remove pack from white
chamber before starting the cleaning program (page 10).
Battery in handset is at. Replace battery in roller handle (page 14).
Battery missing from handset. Replace battery in roller handle (page 14).
Two or more PaintPods in the same room. The rst time the trigger on the roller handle is pressed its
identity (ID) is transmitted from the handle and stored in the
unit. This occurs each time the unit is powered up. Pairing of
the handle and the unit occurs after pressing the paint button
once on the control panel. Ensure you only ‘pair’ ONE unit at
a time.
Dip tube pump wear. Replace dip tube.
Tube twisted, kinked or pinched off. Straighten, or replace dip tube.
Inadequate cleaning on previous use
(instructions not followed) leading to
blocked dip tube.
Replace dip tube.
Dip tube not engaged correctly. Check orientation of dip tube (page 5).
Battery in handset at. Replace battery in roller handle (page 14).
Paint pack empty. Replace paint pack (page 9).
Not using paint loading trigger sufciently to
load paint.
Use paint loading trigger whilst rolling roller to load paint
onto roller.
Constant pressure on paint loading trigger
leading to overloading of paint into feeder
tray during painting and not rolling/rolling
fast enough to distribute paint.
Immediately release paint loading trigger and roll out excess
paint onto wall/ceiling. Then use paint loading trigger as
directed in user guide (page 7).
Roller sleeve old and worn. Replace roller sleeve (page 13).
Roller sleeve is wet from previous use. Remove sleeve from roller head, squeeze out excess water
and allow to dry.
Water in tube from previous cleaning cycle. Roll roller onto dry cloth to remove excess water before
painting. If you notice water in the tube before painting then
excess water can be drained by using the drain cycle.
Feeder roller not in place. Correctly place feeder roller into feeder tray.
Feeder tray has become detatched from
roller head.
Reassemble feeder tray.
Paint contamination of either handle
coupling or roller head connector.
Remove any paint contamination or replace dip tube if
contamination is excessive (page 12).
Constant pressure on paint loading trigger
leading to overloading of paint into feeder
tray during painting and not rolling/rolling
fast enough to distribute paint.
Immediately release paint loading trigger and roll out excess
paint onto wall/ceiling. Then use paint loading trigger as per
instruction.

16
A range of spare parts are available for you to order
either on line or by telephone.
If the item required is claimable under the guarantee
(within 12 months of purchase) then please phone:
UK: 0870 444 1111
ROI: 021 422 0222
If the item required is not under guarantee then
please order on:
UK: 0844 844 2625 or www.dulux.co.uk/paintpod
ROI: 01 459 6021 or www.dulux.ie/paintpod
White chamber (A466900050P)
Blue chamber (A466900150P)
Docking station (A466900250P)
Edging cup (A466900350P)
Edging spout (A466900450P)
Roller cage (A466900550P)
(Including: Roller head, Feeder tray,
Distribution plate and Feeder roller)
Dip tube wipe (5 per pack) (A466900650P)
Roller handle (A466900750P)
Dip tube rest (2 per pack) (A466900850P)
Power supply unit (A466900950P)
SPARE PARTS
Visit either www.dulux.co.uk/paintpod or www.dulux.ie/paintpod for more technical advice.
Cleaning button does not
activate cleaning cycle.
Cleaning cycle does not
clean/effectively clean tube.
Cleaning cycle does not
clean/effectively clean roller.
Drain cycle has not been carried out. Carry out drain cycle (page 10).
Paint pack still in place. Carry out draining and cleaning cycle (page 10).
Roller not docked in docking station
correctly (clean warning light will be
illuminated).
Place in docking station according to user guide
(page 10).
Dip tube pump wear resulting in slow/no
pumping of water.
Replace dip tube.
Inadequate cleaning on previous use
leading to blocked dip tube.
Replace dip tube.
Delivery tube twisted, kinked or otherwise
damaged.
Straighten, or replace delivery tube.
Cold water used. Repeat cleaning cycle using warm water (page 11).
Roller handle not attached to roller head. Ensure handle is completely engaged.
Dip tube not engaged properly. Check orientation of dip tube (page 5).
Roller sleeve old and worn. Replace roller sleeve (page 13).
Blue chamber lid not closed. Check and close completely until ‘clicked’ into position.
Docking station not correctly located. Check location and ensure that lid closes completely.
Roller not engaged in correct position. Ensure roller is placed in position as per user guide.
Dip tube pump wear resulting in slow/no
pumping of water.
Replace dip tube.
Cold water used. Repeat cleaning cycle using warm water (page 11).
SYMPTOM POSSIBLE CAUSES ACTION
For convenience when painting ceilings and other high
areas, an Extra reach handle and 2 Metre extension
tube are available. These items plus the accessories
listed below are available from your local DIY retailer.
ACCESSORIES
Roller sleeve
(A466000250N)
Dip tube and delivery
tube (4 metre)
(A466000350N)
2 Metre
extension tube
(A466000450N)
Extra reach handle
(A466000550N)
Edging brush
(A466000650N)
TROUBLE SHOOTING

Dulux, PaintPod and the distinctive
livery are trademarks of ICI.
A466000150N. DATE: FEBRUARY 2008
IMPORTANT: The dip tube contains a pump which
has an optimum performance life of 10 packs
(approximately 50 litres of paint). After this time,
the pump performance will begin to deteriorate and
should be replaced.
Use the chart below to record the number of paint
packs you have used so you know when to replace
dip tube.
To replace see: ‘REPLACING THE DIP TUBE AND
DELIVERY TUBE’ on page 13.
DIP TUBE REPLACEMENT
PaintPod roller system record 1
Time to replace
Dip tube
PaintPod roller system record 1
Time to replace
Dip tube
PaintPod roller system record 2
Time to replace
Dip tube
PaintPod roller system record 3
Time to replace
Dip tube
 Loading...