

DE
FR
SPAZZATRICE / SWEEPER /
KEHRMASCHINE / BARREDORA /
BALAYEUSE
1000 BH - 1000 EH - 1000 YH
USO E MANUTENZIONE
Istruzioni originali /
Instrucciones originales / Instructions originales
USE AND MAINTENANCE
Translation of the original instructions
BEDIENUNGS - UND WARTUNGSANLEITUNG
Übersetzung der Originalanweisungen
USO Y MANTENIMIENTO
Traducción de las instrucciones originales
MODE D’EMPLOI ET D’ENTRETIEN
Traduction des instructions originales
Cod. F03Z600000 - Ed. 2014 - 07
Original instructions / Originalanweisungen /

DULEVO INTERNATIONAL S.p.A.
Copyright by
Via Giovannino Guareschi, 1
43012 FONTANELLATO (Parma) ITALY
Printed in Italy
2
2010-01

Grazie per aver scelto una spazzatrice
Abbiamo studiato questo manuale espressamente per permetterle di apprezzare completamente le doti tecniche e la ricerca di stile della sua
Nelle pagine seguenti sono contenute le indicazioni rivolte all’uso corretto ed alla manutenzione nonché i consigli e le avvertenze per un uso
Cordialmente
DULEVO INTERNATIONAL S.p.A.
nuova macchina.
pratico e sicuro della macchina.
Thank you for having choosing our sweeper
This manual was expressly conceived to allow you to fully appreciate the technical advantages and the stylistic research of your new
The following pages contain indications concerning its correct use and maintenance, as well as suggestions and warnings for its practical and
Sincerely
DULEVO INTERNATIONAL S.p.A.
machine.
safe use.
Vielen Dank für die Wahl einer Kehraschine von
Diese Anleitung wurde ausdrücklich so konzipiert, dass Sie die technischen Vorteile und die Gestaltung Ihrer neuen Maschine gänzlich
Die folgenden Seiten liefern Ihnen Anweisungen für einen ordnungsgemäßen Gebrauch und die korrekte Instandhaltung sowie Ratschläge
DULEVO INTERNATIONAL S.p.A.
und Warnhinweise für eine praktische und sichere Anwendung der Maschine.
schätzen können.
Mit freundlichen Grüßen
Gracias por elegir nuestra barredora
El presente manual ha sido concebido expresamente para permitir que se aprecien los dotes técnicos y el estilo refi nado de la nueva mãquìna.
En las páginas a continuación proporcionamos orientación al empleo y al mantenimiento correctos además de consejos y advertencias para
DULEVO INTERNATIONAL S.p.A.
el manejo práctico y seguro de la mãquìna.
Cordialmente
Merci d’avoir choisi une balayeuse
Le présent manuel a été spécialement conçu et réalisé pour vous permettre d’apprécier toutes les qualités techniques et l’esthétique de votre
Les indications contenues dans les pages qui suivent ont trait à une utilisation et à un entretien corrects de la machine et proposent des
DULEVO INTERNATIONAL S.p.A.
conseils et des instructions pour l’utiliser de manière pratique et sûre.
nouvelle machine.
Bien cordialement
2010-01
3
Uso e Manutenzione ............................................................................................................ IT-1
DE
FR
Use and Maintenance ........................................................................................................ EN-1
Bedienungs - und wartungsanleitung ............................................................................. DE-1
Uso y Mantenimiento .........................................................................................................ES-1
Mode d’emploi et d’entretien .............................................................................................FR-1
IT - Dichiarazione CE di conformitá in lingua originale .......alla fi ne del presente manuale
EN - EC conformity certifi cate...........................................................at the end of this manual
DE - CE - Konformitatser kKlarung fur Maschinen ...................am Ende dieses Handbuchs
ES - Declaracion CE de conformidad .................................................. al fi nal de este manual
FR - Declaration de conformité CE ..........................................................à la fi n de ce manuel
4
2010-01

1000 BH - 1000 EH - 1000 YH
Italiano
INDICE
CARATTERISTICHE TECNICHE ...............................................................................................IT-3
DIMENSIONE MACCHINA .........................................................................................................IT-7
SEGNALETICA DI SICUREZZA .................................................................................................IT-9
INFORMAZIONI GENERALI .....................................................................................................IT-11
Scopo del manuale ....................................................................................................................IT-11
Identicazione della macchina...................................................................................................IT-12
Posizione dell’operatore ............................................................................................................IT-12
Responsabilita’ del costruttore ..................................................................................................IT-12
Sostituzione ricambi ..................................................................................................................IT-12
Assistenza tecnica .....................................................................................................................IT-12
Richieste d’intervento ................................................................................................................IT-12
Campo di utilizzo .......................................................................................................................IT-13
Rottamazione macchina ............................................................................................................IT-13
NORME GENERALI ..................................................................................................................IT-13
Convenzioni e legenda ..............................................................................................................IT-13
EMISSIONE SONORA DELLA MACCHINA .............................................................................IT-14
INFORMAZIONI SULLE VIBRAZIONI ......................................................................................IT-14
INFORMAZIONI TECNICHE .....................................................................................................IT-15
Descrizione generale .................................................................................................................IT-15
Legenda ...................................................................................................................................IT-15
Zone a rischio residuo ...............................................................................................................IT-16
Sicurezze ...................................................................................................................................IT-16
INFORMAZIONI SULLA SICUREZZA ......................................................................................IT-17
Norme di sicurezza ....................................................................................................................IT-17
MOVIMENTAZIONE ED INSTALLAZIONE ..............................................................................IT-21
Sollevamento e trasporto della macchina imballata ..................................................................IT-21
Controlli alla consegna ..............................................................................................................IT-21
Sballaggio ..................................................................................................................................IT-21
Batterie di alimentazione (versione EH) ....................................................................................IT-21
Batteria: preparazione ...............................................................................................................IT-22
Batterie: installazione e collegamento .......................................................................................IT-22
Batteria: rimozione.....................................................................................................................IT-23
Scelta del caricabatterie ............................................................................................................IT-23
Preparazione del carica batterie ...............................................................................................IT-23
Preparazione motore endotermico (versione BH e YH) ............................................................IT-23
Preparazione circuito idraulico (versione BH) ...........................................................................IT-23
Montaggio spazzole laterali .......................................................................................................IT-23
Sollevamento e trasporto della macchina..................................................................................IT-24
GUIDA PRATICA PER L’OPERATORE ....................................................................................IT-25
Approntamento della macchina per il lavoro .............................................................................IT-25
Comandi versione EH e YH .......................................................................................................IT-26
Lavoro versione EH e YH .........................................................................................................IT-28
Comandi versione BH................................................................................................................IT-28
Lavoro versione BH ...................................................................................................................IT-30
Svuotamento cassetto riuti con scarico a terra ........................................................................IT-30
Svuotamento cassetto riuti con scarico alto ............................................................................IT-31
2014-07
IT-1

Italiano
1000 BH - 1000 EH - 1000 YH
Fine lavoro .................................................................................................................................IT-31
Spostamento della macchina non in lavoro ...............................................................................IT-31
PERIODI DI INATTIVITÀ ...........................................................................................................IT-33
ISTRUZIONI PER LA MANUTENZIONE ..................................................................................IT-35
Manutenzione - Regole generali................................................................................................IT-35
Sostituzione - installazione spazzola centrale ...........................................................................IT-35
Regolazione spazzola centrale..................................................................................................IT-36
Sostituzione - installazione spazzole laterali .............................................................................IT-36
Regolazione spazzole laterali ....................................................................................................IT-37
Sostituzione - installazione - pulizia ltro aspirazione ...............................................................IT-37
Fusibili: sostituzione ..................................................................................................................IT-39
Manutenzione e ricarica delle batterie .......................................................................................IT-39
Cambio olio motore ...................................................................................................................IT-40
Controllo periodici ......................................................................................................................IT-41
INCONVENIENTI , CAUSE E RIMEDI ......................................................................................IT-43
ALLARMI SUL DISPLAY ..........................................................................................................IT-45
MENU TECNICO .......................................................................................................................IT-47
IT-2
2014-07

1000 BH - 1000 EH - 1000 YH
CARATTERISTICHE TECNICHE
Italiano
EH YH BH
Larghezza pista pulita con spazzole DX
e SX
Rendimento orario m2/h 7800
Potenza motore spazzola centrale W 600 -
Potenza motore spazzola laterale W 90 -
Potenza motore trazione 450 W 98 Cm3/rpm
Avviamento motore endotermico W -
Potenza motore endotermico W - 4125 4125
Capacità serbatoio carburante Lt - 3,1 3,1
Potenza motore aspirazione W 260 -
mm 1200
Potenza motore scuotiltro, ltro a pannello
Potenza motore scuotiltro, ltro a tasche
Alternatore A - 80 -
Velocità massima in avanti Km/h 6 6 6
W 90
W 90
2014-07
IT-3

Italiano
Velocità massima in retromarcia Km/h 6 6 4,6
Pendenza massima superabile % 16
Capacità cassetto riuti (scarico basso) Lt 70
Capacità cassetto riuti (scarico alto) Lt 75
Diametro ruote posteriori mm 250
Diametro ruota anteriore mm 250
Diametro spazzola centrale mm 300
Diametro spazzola laterale mm 460
1000 BH - 1000 EH - 1000 YH
Filtro a pannello, supercie ltrante mq 4
Filtro a tasche, supercie ltrante mq 4
Altezza massima ribaltamento cassetto
(scarico alto)
Peso netto senza batterie Kg
Numero batterie n° 4 2 1
Tensione batteria V 6 12
Capacità singola batteria Ah (5h) 190 75 45
IT-4
mm 1450
258
320 (scarico alto)
2014-07
346 (scarico alto)
284
1000 BH - 1000 EH - 1000 YH
Tensione alimentazione V 24 24 12
Italiano
Dimensione macchina (scarico basso) mm
Dimensione macchina (scarico alto) mm
Dimensione vano batterie (lunghezza,
larghezza, altezza)
Dimensione imballo (lunghezza, larghezza, altezza)
Pressione sonora
Potenza sonora misurata
Potenza sonora garantita
Vibrazioni Mano
Incertezza della misura, k m/sec2
mm 500 x 450 x 350 / /
mm
LpA
(dB)
Lwa
(dB)
Lwa,g
(dB)
HAV
m/sec2
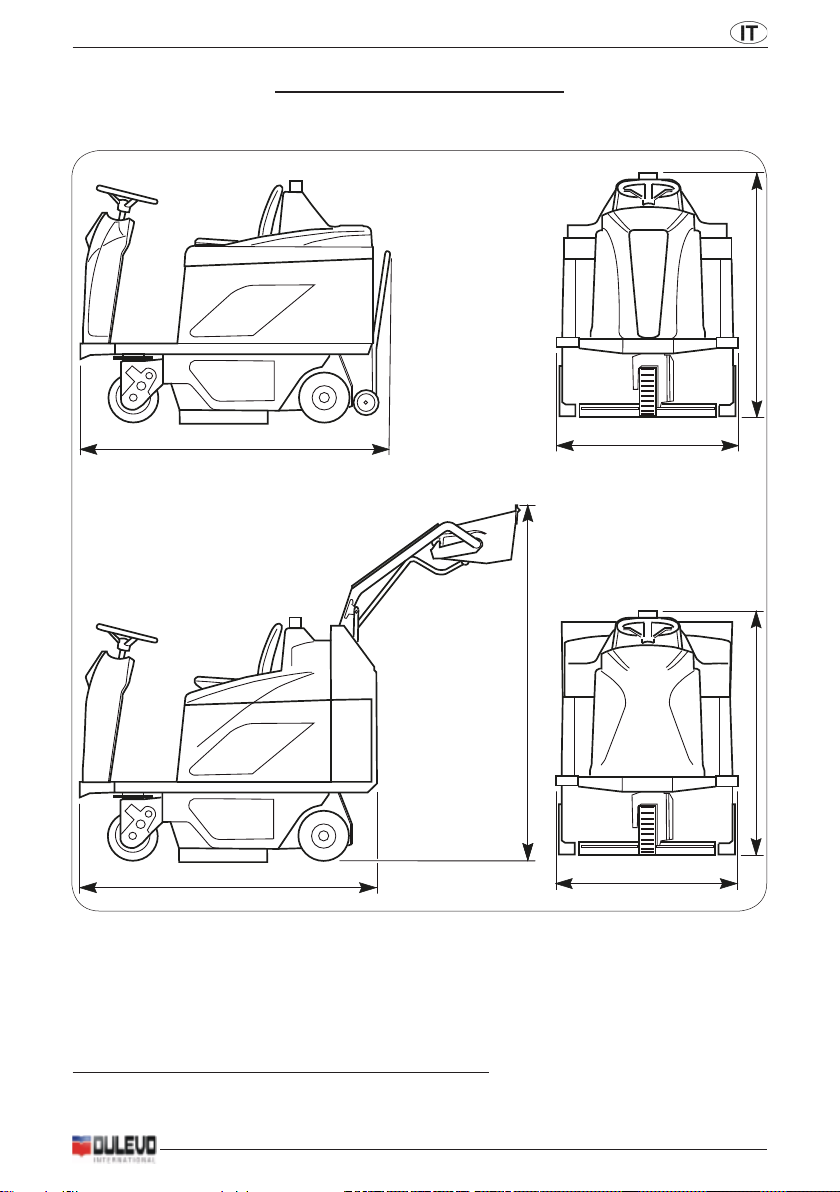
X=1615
Z=905
Y=1210
X=1615
Z=905
Y1=1868
Y2=1210
70 82
83 95
2,6 2,5
Vibrazioni corpo
Incertezza della misura, k m/sec2
HBV
m/sec2
Dati soggetti a variazioni senza preavviso
0,5 0,5
2014-07
IT-5

PAGINA INTENZIONALMENTE BIANCA
1000 BH - 1000 EH - 1000 YH
Italiano
DIMENSIONE MACCHINA
Y
X
Z
Y1
Y2
X
Z
X-Y-Z: Vedi tabella “CARATTERISTICHE TECNICHE”
2014-07
IT-7

PAGINA INTENZIONALMENTE BIANCA
1000 BH - 1000 EH - 1000 YH
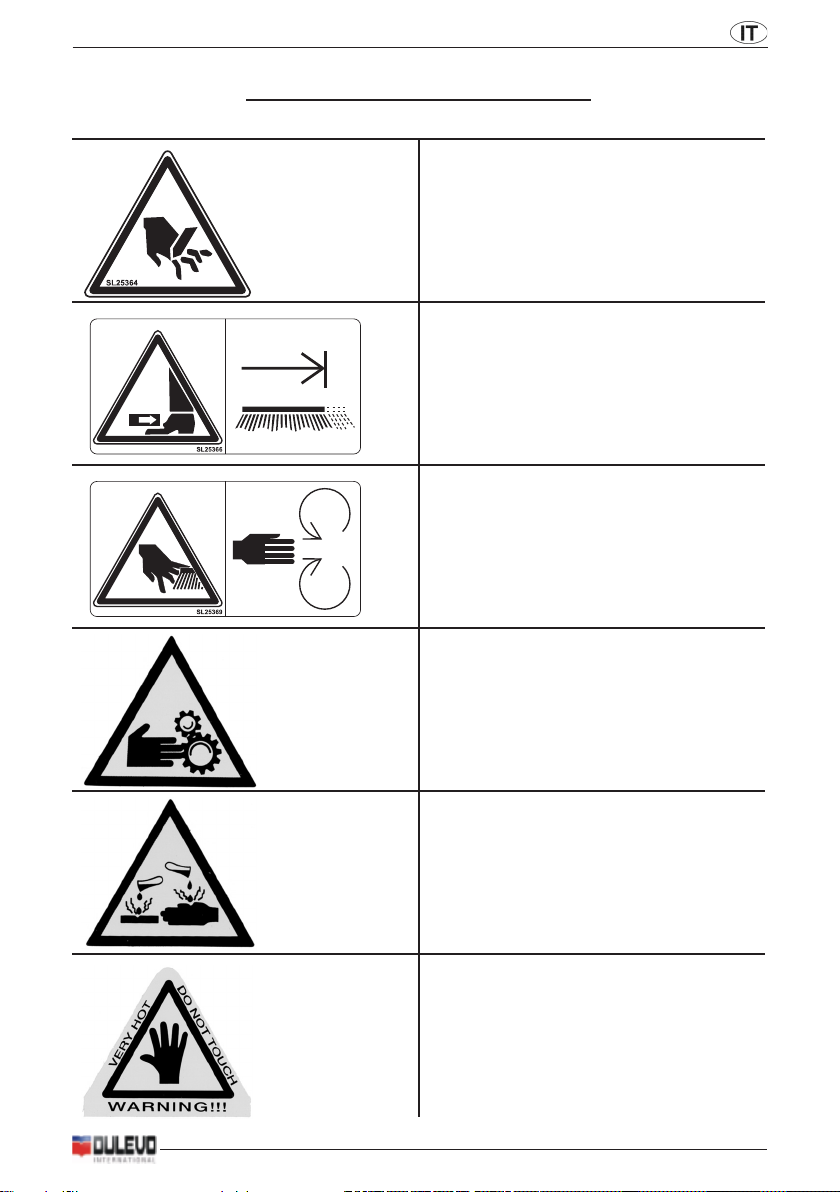
SEGNALETICA DI SICUREZZA
Italiano
ATTENZIONE, PERICOLO TRANCIAMENTO
ATTENZIONE, PERICOLO SCHIACCIAMENTO ARTI
ATTENZIONE, PERICOLO DI ABRASIONE
ATTENZIONE, PERICOLO ORGANI IN MOVIMENTO
ATTENZIONE, PERICOLO PRESENZA ACIDI
ATTENZIONE, SUPERFICIE CALDA
2014-07
IT-9

PAGINA INTENZIONALMENTE BIANCA

1000 BH - 1000 EH - 1000 YH
Italiano
INFORMAZIONI GENERALI
Scopo del manuale
Questo manuale è stato redatto dal Costruttore e costituisce parte integrante del corredo della
macchina1.
Esso denisce lo scopo per cui la macchina è stata costruita e contiene tutte le informazioni necessarie per gli operatori2.
Oltre a questo manuale, contenente le informazioni necessarie per gli utilizzatori, sono state redatte
altre pubblicazioni che riportano le informazioni speciche per tecnici addetti alla manutenzione3.
Eventuali indicazioni destra o sinistra, orario o antiorario presenti in questo libretto si intendono
sempre riferite al senso di avanzamento della macchina.
La costante osservanza delle indicazioni garantisce la sicurezza dell’uomo e della macchina, l’economia di esercizio, la qualità dei risultati ed una più lunga durata di funzionamento della macchina
stessa. La mancata osservanza delle prescrizioni può comportare danni all’uomo, alla macchina, al
pavimento lavato ed all’ambiente.
Per una ricerca più rapida degli argomenti consultare l’indice descrittivo, posto all’inizio del ma-
nuale.
Le indicazioni e le istruzioni fornite nel manuale non intendono comunque sostituire, integrare o modicare qualsiasi NORMA, PRESCRIZIONE, DECRETO o LEGGE di carattere generale o specico
in vigore nel luogo in cui opera la macchina e riguardanti la sicurezza, l’uso e la manutenzione di
apparecchiature o dispositivi meccanici, elettrici, chimici, oleodinamici, pneumatici o altro.
I brani di testo da non trascurare sono evidenziati in grassetto e preceduti da simboli qui di seguito
illustrati e deniti.
Indica che è necessario prestare attenzione al ne di non incorrere in serie conseguenze che
potrebbero provocare la morte del personale oppure possibili danni alla salute.
! PERICOLO
Indica che è necessario prestare attenzione al ne di non incorrere in serie conseguenze
! ATTENZIONE
che potrebbero comportare danni alla macchina, all’ambiente in cui si opera od a perdite
economiche.
! INFORMAZIONE
Indicazioni di particolare importanza
Il Costruttore, nel perseguire una politica di costante sviluppo ed aggiornamento del prodot-
to, può apportare modiche senza alcun preavviso.
Anche se la macchina in Vs. possesso si differenzia sensibilmente dalle illustrazioni conte-
nute in questo documento, la sicurezza e le informazioni sulla stessa sono garantite.
1 La denizione “macchina” sostituisce la denominazione commerciale a cui fa riferimento il manuale in oggetto.
2 Sono le persone che hanno ilcompito di usare la macchina senza eseguire interventi che richiedono una precisa
competenza tecnica.
3 Sono le persone in possesso di esperienza, preparazione tecnica, conoscenza normativa e legislativa in grado di
svolgere le attività necessarie ed in grado di riconoscere ed evitare possibili pericoli nell’eseguire la movimentazione,
l’installazione, l’uso e la manutenzione della macchina.
2014-07
IT-11
Italiano
H
A
B
E
F
C
D
G
1000 BH - 1000 EH - 1000 YH
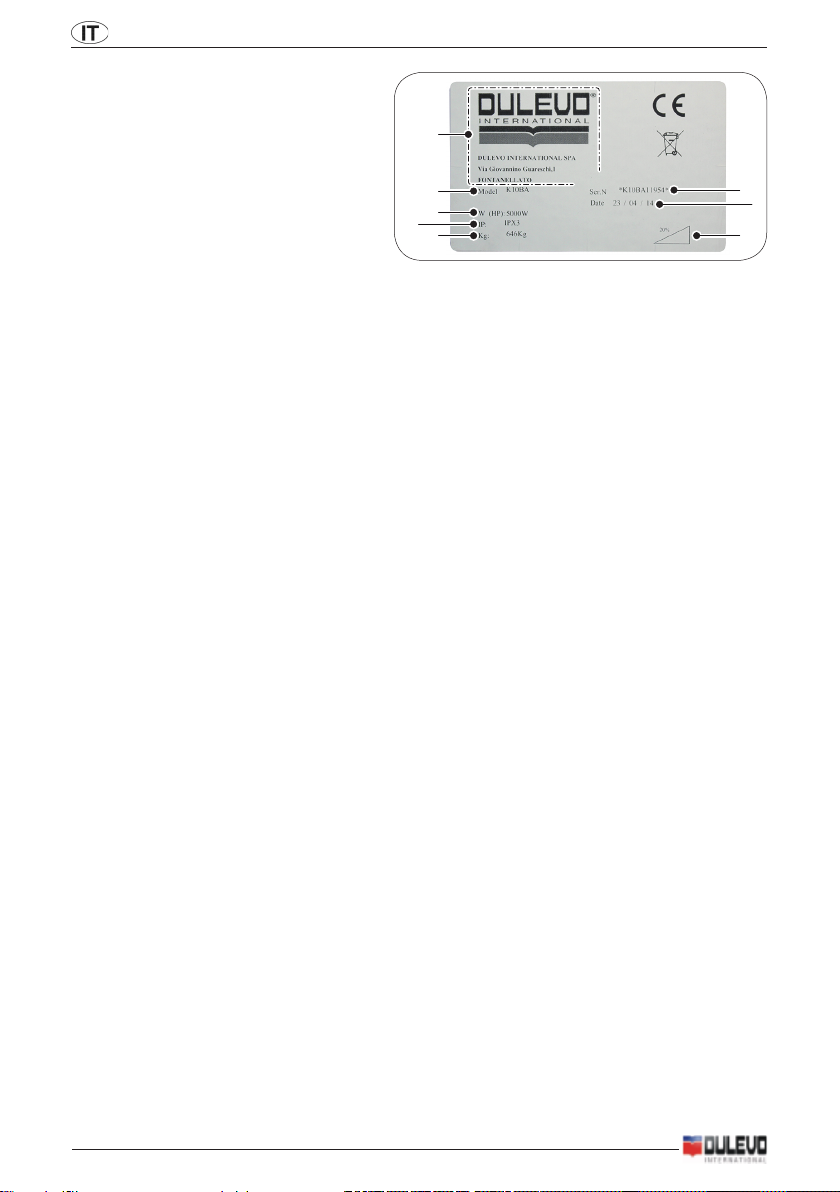
Identicazione della macchina
La targa matricola, riporta le seguenti informazioni:
A Modello.
B Tensione di alimentazione / Potenza.
C Numero di serie (numero di matricola).
D Anno di fabbricazione.
E Grado di protezione IP
F Peso a secco.
G Pendenza massima.
H Identicazione del Costruttore.
Posizione dell’operatore
L’operatore durante il lavoro è seduto al posto di guida.
Responsabilita’ del costruttore
Il costruttore, Dulevo International S.p.A., non si riterrà responsabile di inconvenienti, rotture, incidenti ecc. dovuti alla non conoscenza (o comunque alla non applicazione) delle prescrizioni contenute nel presente manuale. Lo stesso dicasi per l’esecu zione di modiche, varianti, e/o l’installazione di accessori non autorizzati preventivamente.
In particolare la Dulevo International S.p.A. declina ogni respon sabili tà per danni derivanti
da:
- Calamità naturali
- Manovre errate
- Mancanza di manutenzione
La Ditta Costruttrice non risponde dei danni (di qualsiasi tipo) causati da interventi sulla macchina
(per manutenzione, riparazioni, ecc.) se detti interventi non sono stati eseguiti da PERSONALE
AUTORIZZATO Dulevo International S.p.A. (salvo accordi diversi autorizzati da Dulevo International S.p.A.).
Sostituzione ricambi
Nella sostituzione di ricambi usare esclusivamente RICAMBI ORIGINALI collaudati e autorizzati
dal COSTRUTTORE.
Non attendere che i componenti siano logorati dall’uso; sostituire un componente al momento opportuno signica un migliore funzionamento della macchina e contemporaneamente un risparmio
dovuto al fatto che si evitano danni maggiori.
Assistenza tecnica
Il COSTRUTTORE mette al servizio della Clientela il pro prio Servizio Assistenza Tecnica per risolvere qua lunque problema riguardante l’impiego e la manu tenzione della macchina.
Richieste d’intervento
Le eventuali richieste devono essere fatte dopo un’attenta analisi degli inconvenienti e delle loro
cause.
Nei caso di richieste scritte si prega di specicare nel messaggio quanto segue:
· Modello macchina
· Numero matricola
· Il dettaglio dei difetti riscontrati
· I controlli eseguiti
· Le regolazioni effettuate e i loro effetti
· Ogni altra informazione ritenuta utile
IT-12
2014-07

1000 BH - 1000 EH - 1000 YH
Indirizzare le richieste a :
DULEVO INTERNATIONAL S.p.A.
Via Giovannino Guareschi, 1
43012 FONTANELLATO
(Parma) ITALY
Tel. +39 0521 - 82 77 11
Fax. +39 0521 - 82 77 95
oppure alla “RETE DI ASSISTENZA AUTORIZZATA”
Il COSTRUTTORE si riserva il diritto di modicare la macchina, per qualunque esigenza di carattere
costruttivo o commerciale, senza I’obbligo di ag giornare tempestivamente il manuale d’istruzioni e
il catalogo ricambi.
Italiano
Campo di utilizzo
La macchina è destinata ESCLUSIVAMENTE alla pulizia di pavimenti tramite spazzolatura ed aspirazione, di superci asciutte. Ogni suo altro utilizzo può arrecare danni a cose o a persone e quindi
è da ritenersi ASSOLUTAMENTE VIETATO.
Rottamazione macchina
In caso in cui si decida di rottamare la macchina, si ricorda che le batterie NON possono essere
considerate come riuti comuni ma devono essere smaltite secondo le leggi vigenti.
Essendo la macchina un insieme di più parti, si consiglia di disassemblarla e di raccogliere le parti
in modo omogeneo secondo le leggi vigenti.
La progettazione e realizzazione della presente macchina è conforme ai fondamentali requisiti per
NORME GENERALI
la sicurezza e la salute dell’utilizzatore previsti dalle direttive europee elencate nel certicato di
conformità CE allegato al presente manuale.
La marcatura CE di conformità alle direttive dell’Unione Europea è posta sulla targhetta di identicazione della macchina.
Convenzioni e legenda
Eventuali indicazioni DESTRA (DS), SINISTRA (SN), ANTERIORE (ANT), POSTERIORE (POST),
ORARIO, ANTIORARIO presenti in questo manuale si intendono sempre riferite all’operatore quando utilizza la macchina.
2014-07
IT-13
Italiano
1000 BH - 1000 EH - 1000 YH
Le condizioni di prova in cui sono stati eseguiti i rilievi fonometrici ed il calcolo della potenza sonora
sono conformi a quanto previsto dalle norme e dalle direttive europee vigenti e sono dettagliatamente descritte nelle relative relazioni tecniche detenute dalla Dulevo International S.p.A.
LpA: Livello di pressione sonora di emissione ponderato A - al posto di guida
E’ questo un indice di ciò che viene percepito all’orecchio umano. E’ quindi il valore che interessa
per valutare l’esposizione al rumore degli operatori.
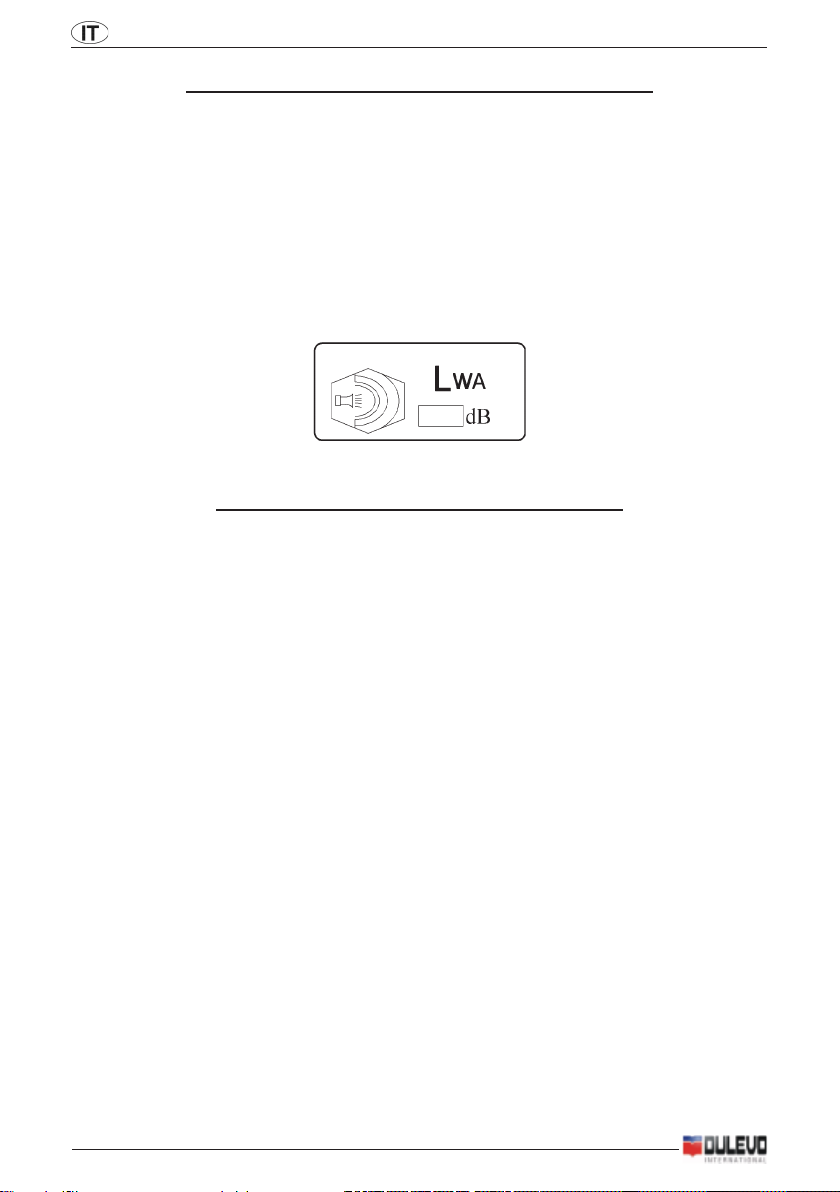
LwA: LIVELLO DI POTENZA SONORA PONDERATO A EMESSO DALLA MACCHINA
NELL’AMBIENTE
LwA = (Vedere targhetta applicata sulla macchina)
INFORMAZIONI SULLE VIBRAZIONI
Le condizioni di prova in cui sono stati eseguiti i rilievi di vibrazione sono conformi a quanto previsto
dalle norme e dalle direttive europee vigenti e sono dettagliatamente descritte nella relativa relazione tecnica detenuta dalla Dulevo International S.p.A.
Questo valore può essere usato solamente come valore di comparazione e non è adatto per la
determinazione dei livelli reali che dipendono dalle condizioni e dall’ambiente di utilizzo.
EMISSIONE SONORA DELLA MACCHINA
IT-14
2014-07
1
2
3
4
5
6
7
1000 BH - 1000 EH - 1000 YH
Italiano
INFORMAZIONI TECNICHE
Descrizione generale
La macchina in esame è una motospazzatrice, utilizzabile in ambienti sia civili che industriali per
effettuare lo spazzaggio di pavimenti.
La motospazzatrice può essere utilizzata per pulire residui di lavorazione, polvere e sporcizia in
genere, tutte le superci in piano, dure, non eccessivamente sconnesse come: cemento, asfalto,
gres, ceramica, lamiera, marmo, tappeti in gomma o in materiali plastici in genere, bugnati o lisci in
ambienti chiusi o all’aperto.
Legenda
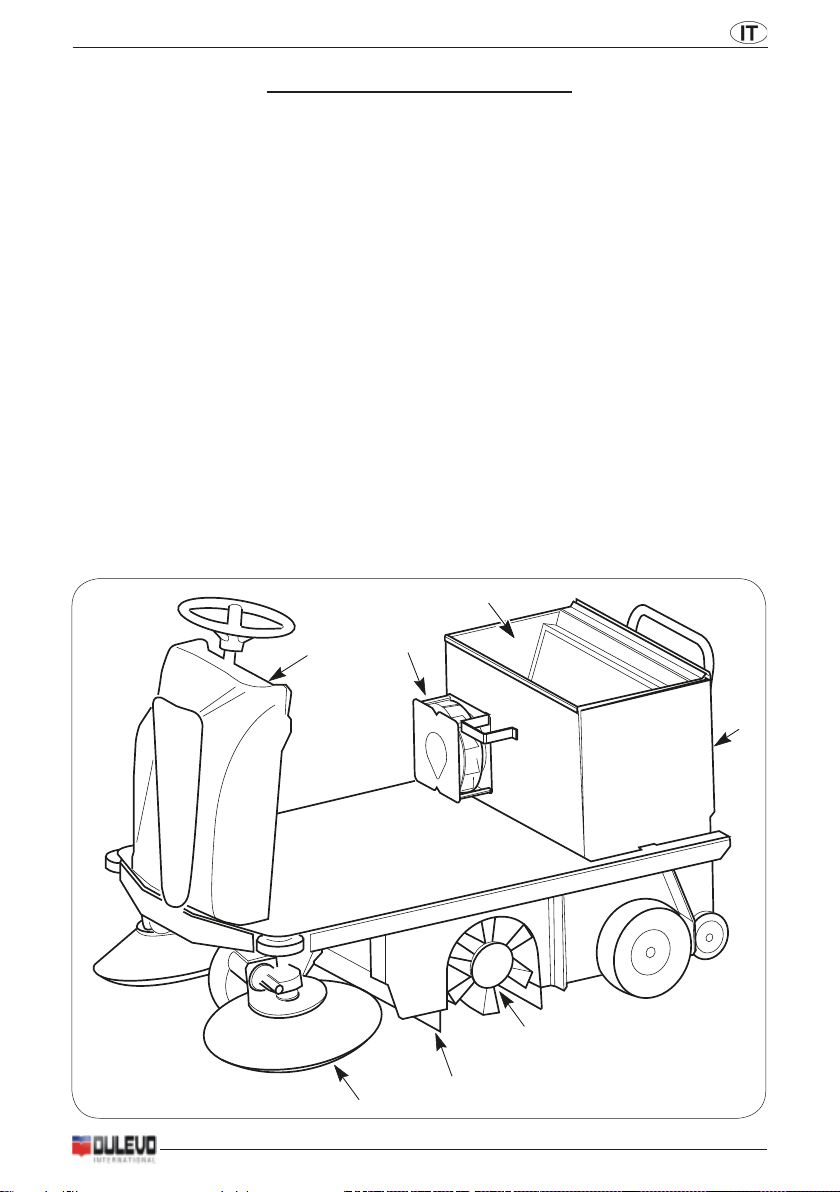
Le parti principali della macchina sono le seguenti (Fig.1):
► Contenitore riuti, serve a contenere tutto il materiale raccolto dalla spazzola centrale e la
polvere del ltro (Fig.1-Rif.1).
► Pannello comandi (Fig.1-Rif.2).
► Spazzola centrale, è l’organo principale della macchina, il quale permette il caricamento
della polvere e dei detriti nel contenitore di raccolta, essa può essere richiesta in diverse
durezze e natura delle setole, a seconda del materiale da raccogliere (Fig.1-Rif.3).
► Spazzole laterali, fungono da convogliatore della polvere e dei detriti, servono esclusiva-
mente per la pulizia di bordi, angoli, proli (Fig.1-Rif.4).
► Filtro aspirazione, esso permette alla macchina di ltrare l’aria aspirata dalla ventola aspi-
razione (Fig.1-Rif.5).
► Ventola aspirazione, con la sua azione permette alla macchina di spazzare senza solleva-
re polvere (Fig.1-Rif.6).
► Flap, circondano la spazzola centrale e permettono l’effetto aspirante (Fig.1-Rif.7).
1
2014-07
IT-15

Italiano
1000 BH - 1000 EH - 1000 YH
Zone a rischio residuo
► Spazzole laterali: pericolo per la rotazione delle spazzole.
► Ruote posteriori / anteriore: pericolo di schiacciamento tra ruota e telaio.
► Vano motore/batterie: pericolo di cortocircuitazione tra i poli delle batterie e presenza di
idrogeno durante la fase di carica, rischio di gravi ustioni, eseguendo qualsiasi manutenzione a motore spento non completamente freddo (versione BH e YH).
► Vano motore / batterie: pericolo di cesoiamento / schiacciamento durante la movimetazio-
ne del carter.
► Contenitore riuti: durante il sollevamento-abbassamento e rotazione del cassetto, peri-
colo di schiacciamento.
Sicurezze
Le sicurezze presenti sulla macchina sono le seguenti:
► Pulsante emergenza, posizionato sul pannello sotto il sedile.
► Sensore presenza operatore, posizionato sotto il sedile guida.
► Microinterruttore cofano batterie / motore, posizionato all’interno del vano batterie / motore
e blocca il funzionamento della macchina a cofano aperto.
► Cicalino retromarcia: si inserisce quando si seleziona la retromarcia.
► Carter con viti.
IT-16
2014-07

1000 BH - 1000 EH - 1000 YH
Italiano
INFORMAZIONI SULLA SICUREZZA
Norme di sicurezza
Leggere attentamente il “Manuale Istruzioni per l’uso” prima di procedere alle operazioni di
avviamento, impiego, manutenzione, manutenzione ordinaria, o qualsiasi altro intervento
! PERICOLO
sulla macchina.
Rispettare rigorosamente tutte le prescrizioni, contenute nel Manuale (ed in particolare
! ATTENZIONE
modo quelle di pericolo e di attenzione) e le targhette, vedere capitolo “Segnaletica di Sicu-
rezza” applicate direttamente sulla macchina.
Il Costruttore declina ogni responsabilità per danni a persone o cose conseguenti l’inosser-
vanza delle prescrizioni.
La macchina deve essere utilizzata solo da personale che sia addestrato all’impiego, che abbia
dimostrato la propria capacità e che sia stato espressamente incaricato all’uso.
L’impiego della macchina è vietato ai minori.
Non destinare questa macchina ad usi diversi da quelli espressamente previsti. Valutare il tipo di
edicio nel quale si opera (es.: industrie farmaceutiche, ospedali, chimiche, ecc.) e rispettare scrupolosamente le norme e condizioni di sicurezza ivi vigenti.
Non utilizzare la macchina in luoghi non adeguatamente illuminati, in ambienti esplosivi, su strade
pubbliche, in presenza di sporco nocivo alla salute (polveri, gas, ecc.) ed in ambienti non consoni.
Il campo di temperatura previsto per l’utilizzo della macchina è tra +4°C e +40°C; in condizioni di
non utilizzo della macchina il campo di temperatura è invece tra +0°C e +50°C.
Il campo di umidità previsto per la macchina in qualsiasi condizione si trovi è tra 30% e 95%.
Non raccogliere mai liquidi inammabili od esplosivi (es. benzina, olio combustibile, ecc.), acidi
e solventi (es. diluenti per vernici, acetone, ecc.) anche se diluiti. Non raccogliere mai oggetti in
amme od incandescenti.
Non impiegare la macchina su pendenze o rampe superiori al 16%; in caso di piccole pendenze
non utilizzare la macchina in modo trasversale, manovrandola sempre con cautela e non facendo
inversioni. Nel trasporto su rampe o pendenze più elevate usare la massima attenzione per evitare
ribaltamenti e/o accelerazioni incontrollate.
Non parcheggiare mai la macchina in pendenza.
La macchina non deve essere mai lasciata incustodita con motori in moto; abbandonarla solo dopo
aver spento i motori, averla assicurata contro movimenti accidentali e scollegata dall’alimentazione
elettrica.
Nell’uso fare attenzione a terze persone, in particolare ai bambini presenti nell’ambiente in cui si
opera.
I bambini devono essere sorvegliati per sincerarsi che non giochino con l’apparecchio.
La macchina non è destinata a essere usata da persone (bambini compresi) le cui capacità siche,
sensoriali o mentali siano ridotte, oppure con mancanza di esperienza o di conoscenza, a meno che
esse abbiano potuto beneciare, attraverso l’intermediazione di una persona responsabile della
loro sicurezza, di una sorveglianza o di istruzioni riguardanti l’uso della macchina.
Non utilizzare la macchina per il trasporto di persone/cose o il traino di cose.
Non trainare la macchina.
Non utilizzare la macchina come banco di appoggio per nessun peso e per nessun motivo.
Non ostruire le aperture di ventilazione e di smaltimento calore.
Non rimuovere, non modicare e non eludere i dispositivi di sicurezza.
Spiacevoli e numerose esperienze hanno evidenziato che sulla persona vi possono essere svariati
oggetti in grado di provocare gravi infortuni, prima di iniziare a lavorare, togliersi monili, orologi,
cravatte od altro.
Utilizzare sempre le protezioni individuali per la sicurezza dell’operatore: grembiule o tuta protettiva,
scarpe antiscivolo ed impermeabili, guanti di gomma, occhiali e cufe di protezione, mascherina per
la protezione delle via respiratorie.
2014-07
IT-17
Italiano
1000 BH - 1000 EH - 1000 YH
Non mettere le mani tra le parti in movimento.
Accertarsi che le prese di corrente per l’alimentazione dei caricabatteria siano collegate ad idonea
rete di terra e che siano protette da interruttori magnetotermici e differenziali.
Assicurarsi che le caratteristiche elettriche della macchina (tensione, frequenza, potenza assorbita), riportate sulla targhetta matricola, siano conformi a quelle dell’impianto distribuzione energia
elettrica.
È indispensabile osservare le istruzioni della Casa produttrice delle batterie ed osservare le di-
sposizioni del Legislatore. Mantenere le batterie sempre pulite ed asciutte al ne di evitare correnti di dispersione superciale. Proteggere le batterie da impurità, per esempio da polvere metalli-
ca.
Non appoggiare utensili sulle batterie: pericolo di cortocircuito e di esplosione.
Nell’uso dell’acido per batterie, osservare scrupolosamente le istruzioni presenti nel paragrafo
“Batteria: preparazione”.
Caricabatteria (OPTIONAL): controllare periodicamente il cavo di alimentazione vericando che
non sia danneggiato; nel caso in cui fosse danneggiato, l’apparecchiatura non può essere usata.
In presenza di campi magnetici particolarmente elevati, valutare l’eventuale effetto sull’elettronica
di controllo.
Non lavare mai la macchina con getti d’acqua.
In caso di guasto e/o cattivo funzionamento della macchina, spegnerla immediatamente (scollegandola dalle batterie/rete elettrica) e non manometterla. Rivolgersi ad un centro di assistenza tecnica
del Costruttore.
Tutte le operazioni di manutenzione devono essere eseguite in ambienti adeguatamente illuminati
e solamente dopo aver scollegato la macchina dall’alimentazione elettrica.
Far effettuare qualsiasi genere di intervento sull’impianto elettrico e tutte le operazioni di manutenzione e riparazione (particolarmente quelle non esplicitamente descritte in questo manuale) solo a
personale tecnico specializzato ed esperto nel settore.
E’ consentito solo l’uso di accessori e ricambi originali forniti unicamente dal Costruttore in quanto
solo questi offrono la certezza che l’apparecchio possa funzionare in modo sicuro e senza inconve-
nienti. Non usare parti smontate da altre macchine o altri kit come ricambi.
- La macchina deve essere usata solamente dal personale autorizzato.
! INFORMAZIONE
! ATTENZIONE
- Durante le operazioni di pulizia della macchina o di manutenzione la spazzatrice deve ESSERE spenta.
- Non avviare la macchina con il pedale di selezione della direzione premuto; la sua partenza
improvvisa potrebbe causare danni a cose e/o a persone.
- Utilizzare la macchina con motore a scoppio esclusivamente in luoghi aperti ed aerati.
Questa macchina è stata progettata e costruita per una durata in servizio di dieci anni a partire
dalla data di fabbricazione visibile sulla targa matricola. Trascorso tale termine, sia che la macchina
sia stata utilizzata o meno, va previsto lo smaltimento secondo la legislazione vigente nel luogo di
utilizzo:
la macchina va scollegata dall’alimentazione elettrica, svuotata da riuti e pulita;
questo prodotto è un riuto speciale di tipo RAEE, e risponde ai requisiti richiesti dalle nuove direttive a tutela dell’ ambiente (2002/96/CE RAEE).
IT-18
2014-07

1000 BH - 1000 EH - 1000 YH
Italiano
Deve essere smaltito separatamente ai riuti comuni, in ottemperanza alle leggi e norme vigenti.
Qualora si decida di non utilizzare più la macchina, si raccomanda di asportare le batterie e di depositarle in un centro di raccolta autorizzato.
Si raccomanda inoltre di rendere innocue quelle parti della macchina suscettibili di costituire un
pericolo, specialmente per i bambini.
In alternativa, la macchina va consegnata al Costruttore per una completa revisione.
2014-07
IT-19

PAGINA INTENZIONALMENTE BIANCA

1000 BH - 1000 EH - 1000 YH
Italiano
MOVIMENTAZIONE ED INSTALLAZIONE
Sollevamento e trasporto della macchina imballata
In tutte le operazioni di sollevamento assicurarsi di aver saldamente ancorato la macchina
imballata, al ne di evitare ribaltamenti o cadute accidentali.
La fase di carico/scarico dagli automezzi deve essere effettuata con illuminazione adeguata.
La macchina, imballata su pallet in legno dal Costruttore, deve essere caricata, con mezzi di movimentazione adeguati (fare riferimento alla Direttiva 2006/42/CEE e successive modiche e/o integrazioni), sul veicolo trasportatore ed una volta giunta a destinazione, scaricata con mezzi analoghi.
Il sollevamento del corpo macchina imballato può essere eseguito solamente con l’utilizzo di un
carrello elevatore a forche. Maneggiare facendo attenzione ad evitare urti e senza capovolgere.
Controlli alla consegna
Al momento della consegna da parte del trasportatore, vericare con attenzione l’integrità dell’imballo e della macchina in esso contenuta. Nel caso che quest’ultima abbia subito danni, farne
constatare l’entità anche al trasportatore; prima di accettare la merce, riservarsi, per iscritto, di
presentare domanda per il risarcimento dei danni stessi.
! ATTENZIONE
Sballaggio
Durante il disimballaggio della macchina l’operatore deve essere munito degli accessori
necessari (guanti, occhiali, ecc.) per limitare i rischi di infortuni.
Togliere la macchina dal suo imballaggio eseguendo le seguenti operazioni:
► Tagliare ed eliminare le reggette plastiche con forbici o tronchese;
► Togliere il cartone;
► Togliere le buste poste all’interno del vano batterie e vericarne il contenuto:
manuale d’uso e manutenzione, dichiarazione di conformità, certicato di garanzia;
ponti batterie con morsetti;
N°1 connettore per il caricabatterie;
A seconda del modello, togliere le staffe metalliche oppure tagliare le reggette plastiche, che ssa-
no il telaio della macchina al pallet.
Utilizzando un piano inclinato, far scendere la macchina dal pallet, spingendola in retromarcia.
Liberare le spazzole dai relativi imballi.
Pulire esternamente la macchina rispettando le norme di sicurezza.
Allontanata la macchina dall’imballaggio, si può procedere all’installazione delle batterie ,vedere il
paragrafo “Batteria: installazione e collegamento”.
Se necessario, conservare gli elementi dell’imballaggio, poiché possono essere riutilizzati per pro-
teggere la macchina in caso di cambio sito o per essere inviata alle ofcine di riparazione.
In caso contrario devono essere smaltiti secondo quanto previsto dalle leggi vigenti in materia.
! ATTENZIONE
Batterie di alimentazione (versione EH)
Su queste macchine possono essere installati due tipi diversi di batterie:
► Batterie corazzate tubolari: richiedono il controllo periodico del livello dell’elettrolito. Quan-
do è necessario, rabboccare solo con acqua distillata sino a coprire le piastre; non eccedere nel rabbocco (max 5 mm. sopra le piastre).
► Batterie al gel: questo tipo di batterie non necessita di manutenzione.
Le caratteristiche tecniche devono corrispondere con quelle indicate nel capitolo relativo alle Carat-
teristiche Tecniche della macchina: infatti, l’uso di accumulatori più pesanti può compromettere,
anche seriamente la manovrabilità e surriscaldare il motore trazione; quelli di inferiore capacità e
peso, invece, rendono necessarie ricariche più frequenti.
Esse devono essere mantenute cariche, asciutte, pulite e con i collegamenti ben serrati.
2014-07
IT-21
Italiano
+
+
+
+
+
-
-
-
-
-
Battery
Battery
-
-
+
+
+
-
-
+
-
+
+
-
-
-
+
+
Dual Power
1000 BH - 1000 EH - 1000 YH
Seguire le seguenti istruzioni per impostare sul Software della macchina il tipo di batteria
vedere capitolo “Menù Tecnico”
! INFORMAZIONE
installata:
Batteria: preparazione
Durante l’installazione o qualsiasi tipo di manutenzione delle batteria, l’operatore deve esse-
re munito degli accessori (guanti, occhiali, tuta protettiva, ecc.) necessari a limitare i rischi
di infortuni, allontanarsi da eventuali amme libere, non cortocircuitare i poli delle batterie,
non causare scintille e non fumare.
Le batterie vengono normalmente fornite cariche con acido e pronte per l’impiego.
Nel caso in cui si vada ad utilizzare batterie a carica secca, prima di montarle a bordo è necessario
attivarle con la seguente procedura:
Dopo aver tolto i tappi delle batterie, riempire tutti gli elementi con soluzione di acido solforico spe-
cico, no a quando le piastre sono interamente ricoperte (effettuare almeno un paio di passaggi
su ciascun elemento).
Lasciare riposare per 4-5 ore, per dare tempo alle bolle d’aria di risalire alla supercie ed alle piastre
di assorbire l’elettrolito.
Vericare che il livello dell’elettrolito sia ancora superiore alle piastre e, in caso contrario, ripristinare
il livello rabboccando con la soluzione di acido solforico;
Richiudere i tappi.
Montare gli accumulatori sulla macchina (secondo la procedura indicata nel seguito).
È opportuno ora effettuare una prima ricarica prima di mettere in esercizio la macchina: per questa
operazione attenersi a quando scritto nel paragrafo “Manutenzione e ricarica delle batterie”.
! PERICOLO
Batterie: installazione e collegamento
Vericare che tutti gli interruttori sul pannello comandi siano in posizione “0” (spento).
Fare attenzione a montare sui poli positivi solo morsetti contrassegnati con il simbolo “+”.
Non controllate la carica delle batterie mediante scintillamenti.
Attenersi scrupolosamente alle indicazioni descritte nel seguito in quanto una eventuale
cortocircuitazione delle batterie può provocare l’esplosione delle stesse.
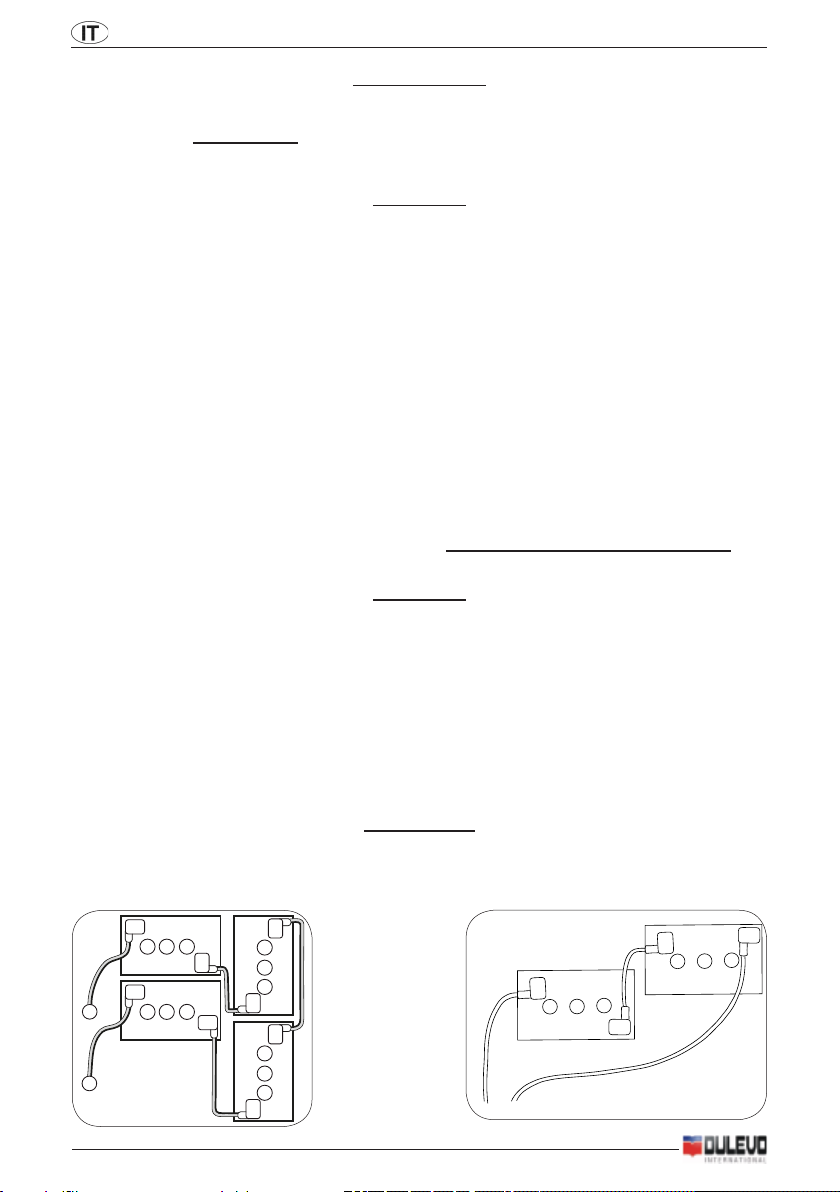
Inserire nel vano la batteria, orientandola come indicato sul disegno (Fig.2-Fig.3).
Facendo riferimento alla disposizione dei cavi visibile sui disegni, collegare i morsetti del cablaggio
ai poli degli accumulatori. Orientati i cavi come indicato sui disegni, serrare i morsetti ai poli e ricoprirli con vaselina.
Abbassare il cofano nella posizione di lavoro.
Utilizzare la macchina conformemente alle istruzioni riportate nel seguito.
Non lasciare mai scaricare in modo eccessivo la batteria, in quanto potrebbe danneggiarsi
! PERICOLO
! ATTENZIONE
irreparabilmente.
3
IT-22
2
EH
YH
2014-07

1000 BH - 1000 EH - 1000 YH
Italiano
Batteria: rimozione
Durante la rimozione della batteria, l’operatore deve essere munito degli accessori (guanti,
occhiali, tuta protettiva, scarpe antinfortunistiche, ecc.) necessari a limitare i rischi di infortuni; vericare che tutti gli interruttori sul pannello comandi siano in posizione “0” (spento)
e che la macchina sia spenta, allontanarsi da eventuali amme libere, non cortocircuitare
i poli delle batterie, non causare scintille e non fumare, procedere quindi in questo modo:
► Scollegare i morsetti del cablaggio batteria dai poli delle batteria.
► Togliere se previsti, i dispositivi di ancoraggio della batteria al basamento della macchina.
► Sollevare la batteria dal vano con mezzi di movimentazione adeguati.
! PERICOLO
Scelta del caricabatterie
Vericare che il caricabatterie sia compatibile con le batterie da caricare.
Batterie tubolari al piombo: è consigliato un caricabatterie automatico, consultare comunque il fabbricante ed il manuale del caricabatterie per confermare la scelta.
Batterie al gel: utilizzare un caricabatterie specico per questo tipo di accumulatori.
Preparazione del carica batterie
Se si desidera utilizzare un caricabatterie non fornito con la macchina, è necessario montare su di
esso il connettore spedito con la macchina.
Per l’installazione del connettore procedere nel seguente modo:
togliere circa 13 mm. di guaina protettiva dai cavi rosso e nero del caricabatteria;
inserire i cavi nei puntali del connettore e schiacciare con forza con pinze adatte;
inserire i cavi nel connettore rispettando le polarità (cavo rosso +, cavo nero –).
Preparazione motore endotermico (versione BH e YH)
► Riempire il serbatoio carburante.
► Controllare il livello dell’olio motore.
Preparazione circuito idraulico (versione BH)
► Controllare il livello dell’olio impianto idraulico.
Montaggio spazzole laterali
Vedere il paragrafo “Sostituzione - installazione spazzole laterali”
Seguire le seguenti istruzioni per impostare sul Software della macchina la lingua da utiliz-
zare per la messaggistica visualizzata sul display :
vedere il capitolo “Menù Tecnico”
! INFORMAZIONE
2014-07
IT-23

Italiano
1000 BH - 1000 EH - 1000 YH
Sollevamento e trasporto della macchina
Tutte le fasi devono essere eseguite in ambiente adeguatamente illuminato ed adottando le
misure di sicurezza più appropriate alla situazione.
Utilizzare sempre protezioni individuali per la sicurezza dell’operatore.
Il caricamento della macchina su un mezzo di trasporto deve essere eseguito nel modo seguente:
► Vuotare il contenitore riuti.
► Togliere le batterie.
► Sistemare la macchina sul pallet, ssandola con reggette plastiche o con le apposite staffe
metalliche.
► Sollevare il pallet mediante un carrello elevatore a forca e caricarlo sul mezzo di trasporto.
► Ancorare la macchina al mezzo di trasporto con funi collegate al pallet e alla macchina
stessa.
! ATTENZIONE
IT-24
2014-07

1000 BH - 1000 EH - 1000 YH
Italiano
GUIDA PRATICA PER L’OPERATORE
Prima di iniziare a lavorare, indossare camice, cufe, scarpe antiscivolo ed impermeabili,
mascherina di protezione delle vie respiratorie, guanti ed ogni altro dispositivo di protezione
richiesto dall’ambiente in cui si opera.
Non lasciare mai incustodita o parcheggiata la macchina con la chiave di accensione inseri-
ta nell’interruttore generale e con freno di stazionamento disinserito.
Nel caso si utilizzi la macchina per la prima volta, si consiglia un breve periodo di prova su
una supercie ampia e senza ostacoli, per acquisire la necessaria dimestichezza.
Non raccogliere li, corde, reggette, acqua o altri liquidi.
In presenza di oggetti voluminosi e particolarmente leggeri (carta, foglie, ecc.) azionare
Per evitare di danneggiare la supercie del pavimento da trattare, evitare di mantenere in
rotazione le spazzole con la macchina ferma.
Ogni 30 minuti di lavoro è necessario azionare il pulsante scuotiltro per 30 secondi, in
modo da pulire il ltro aspirazione, durante questa operazione la ventola aspirazione viene
spenta automaticamente, versione Batteria e Dual Power.
Evitare di passare sopra a pozzanghere d’acqua, qualora la supercie di lavoro fosse umida,
è possibile procedere all’utilizzo della macchina escludendo però la ventola di aspirazione in
quanto lo sporco umido/bagnato compromette la funzionalità del ltro aspirazione.
Per ottenere un buon risultato durante il lavoro, vuotare spesso il contenitore riuti e tenere
pulito il ltro vibrandolo con gli appositi strumenti.
La macchina è dotata di un dispositivo di presenza, il quale consente l’accensione della
stessa, solo se l’operatore si trova nella corretta posizione di lavoro; il dispositivo arresta la
macchina nel caso in cui l’operatore si alzi dal sedile
! ATTENZIONE
! ATTENZIONE
! INFORMAZIONE
! ATTENZIONE
! INFORMAZIONE
l’alza-ap.
! ATTENZIONE
! ATTENZIONE
! ATTENZIONE
! ATTENZIONE
! INFORMAZIONE
Approntamento della macchina per il lavoro
Eseguire le seguenti operazioni prima di cominciare il lavoro:
► Controllare il livello di carica delle batterie (ricaricare se necessario) oppure per le versione
BH o YH controllare e se è necessario rabboccare il serbatoio carburante.
► Accertarsi che il cassetto riuti sia vuoto, se così non fosse, svuotarlo.
2014-07
IT-25
Italiano
1
2
3
4
5
1
1
1
2
1000 BH - 1000 EH - 1000 YH
Comandi versione EH e YH
► Pedale blocco freno (Fig.4-Rif.2):
premuto assieme al pedale freno di
servizio, blocca quest’ultimo inserendo così il freno di stazionamento. Per
sbloccare il freno di stazionamento premere il pedale del freno di servizio che
farà scattare il pedale di blocco freno in
posizione di non lavoro.
► Pedale freno di servizio (Fig.4-Rif.3):
azionando questo pedale si ferma la
macchina durante la fase di lavoro.
► Pedale alza-ap (Fig.4-Rif.4): usare
questo pedale qualora si debbano rac-
cogliere particolari voluminosi ma leg-
geri, si consiglia di non tenere premuto
questo pedale se non necessario.
► Pedale acceleratore (Fig.4-Rif.5): agendo su que-
sto pedale si regola la velocità della macchina. A
macchina accesa, se il pedale acceleratore viene
rilasciato per più di tre secondi, questa entra in modalità “AUTO POWER-OFF”, vengono spente tutte
le funzioni della macchina, per poi riaccendersi alla
successiva pressione dell’acceleratore. E’ possibile
attivare/disattivare e variare il tempo di attivazione
della modalità “AUTO POWER-OFF” attraverso il
“Menù Tecnico”.
► Leva comando spazzola laterale destra e sinistra
(Fig.4-Rif.1): abbassando la leva spazzola laterale ,
la spazzola si porta in posizione di lavo-
ro iniziando a girare, sollevando la leva
spazzola laterale la spazzola si ferma.
► Leva comando spazzola centrale
(Fig.5-Rif.1): portando la leva in avanti,
la spazzola centrale si porta in posizione
di lavoro iniziando a girare, per fermare
la spazzola a ne lavoro, riportare la leva
nella posizione iniziale; attivando la spazzola centrale viene attivato anche l’aspiratore.
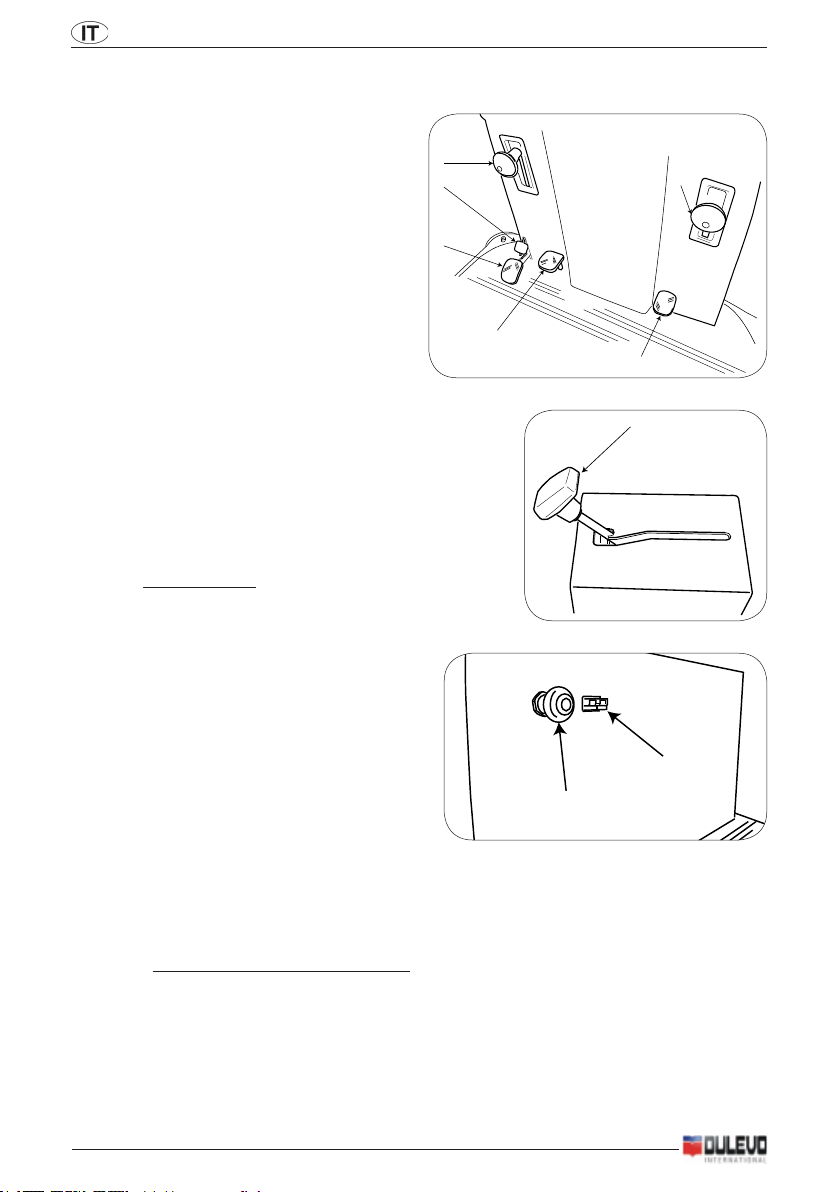
► Pulsante a fungo (Fig.6-Rif.1): questo
pulsante di sicurezza, disattiva in caso di necessità o imminente pericolo, tutte le funzioni
della macchina interrompendo direttamente la sorgente di alimentazione della macchina.
Prima di ripristinare il pulsante, ricordarsi di spegnere tutte le funzioni accese (spazzole
laterali, spazzola centrale) .
► Presa per caricabatterie (Fig.6-Rif.2): collegare ad un carica batterie, vedere il paragra-
fo ”Preparazione del carica batteria”.
4
5
6
IT-26
2014-07

1
2
0
1
START
1 2 3 4 5
6 7 8 9 10 11
00:00
100%
1000 BH - 1000 EH - 1000 YH
Italiano
► Leva ribaltamento cassetto (scarico alto) (Fig.7):
7
tirando la leva il cassetto ruota, svuotando il suo
contenuto.
► Display (Fig.8-Rif.1): visualizza lo stato di carica
rimanente delle batterie espresso in percentuale,
il logo delle funzioni attive, “Conta-ore” visualizza
l’utilizzo in ore della macchina e gli allarmi, vedere
il capitolo “Allarmi sul display”.
► Pulsante menu (Fig.8-Rif.2): nella versione EH ha
funzionalità solamente nel “Menù Tecnico” , nella
versione YH mostra le ore di funzionamento motore
endotermico.
► Commutatore salita e discesa cassetto (Fig.8-Rif.3): permette di sollevare o abbassare
il cassetto riuti.
► Potenziometro velocità (Fig.8-Rif.4): permette di regolare la velocità massima della
macchina.
► Commutatore direzione avanzamento (Fig.8-Rif.5): agendo su questo commutatore, si
seleziona la direzione di movimento della macchina.
► Interruttore generale (Fig.8-Rif.6): attiva/disattiva tutte le funzioni della macchina.
► Pulsante segnalatore acustico (Fig.8-Rif.7): attiva il segnalatore acustico.
► Commutatore luci (Fig.8-Rif.8): permette di accendere e spegnere le luci (OPTIONAL)
► Commutatore accensione motore endotermico (Fig.8-Rif.9): permette di accendere o
spegnere il motore endotermico.
► Pulsante aspiratore (Fig.8-Rif.10): attiva e disattiva l’aspiratore.
29
► Pulsante scuotiltro (Fig.8-Rif.11): permette con un semplice ge-
sto di tenere sempre il ltro in perfette condizioni, tenerlo premuto
per 30 secondi, all’accensione del motore scuotiltro viene spento
automaticamente il motore aspirazione ed inibito il motore trazio-
ne. E’ possibile attivare attraverso il “Menù Tecnico” la funzione
“scuotltro automatico”, allo scadere del tempo impostato sempre
nel menù tecnico, la sequenza di pulizia verrà eseguita automatica-
mente dalla macchina.
► Pulsante consenso salita e discesa cassetto (Fig.29-Rif.1): uti-
lizzato insieme al commutatore salita e discesa cassetto, permette
il movimento di questo.
8
2014-07
IT-27

Italiano
1
2
3
4
5
1
1
2
3
1000 BH - 1000 EH - 1000 YH
Lavoro versione EH e YH
► Sedersi sul sedile.
► Portare in posizione “1” l’interruttore generale.
► Controllare attraverso il display, che le batterie siano completamente cariche, in caso con-
trario procedere con la carica, vedere il paragrafo “Manutenzione e ricarica delle bat-
terie”.
► Selezionare attraverso il commutatore la direzione di marcia.
► Sbloccare il freno di stazionamento.
► Abbassare la spazzola laterale.
► Abbassare la spazzola centrale.
► Premere il pedale acceleratore, iniziare il lavoro.
► Qualora ci sia necessità, agire sul pedale alza-ap per la raccolta di oggetto voluminosi.
► La qualità del lavoro, dipende dalla pulizia del ltro, si consiglia di azionare lo scuotiltro in
base all’ambiente in cui si sta utilizzando la macchina.
9
Comandi versione BH
► Pedale blocco freno (Fig.9-
Rif.2): premuto assieme al pedale
freno di servizio, blocca quest’ulti-
mo inserendo così il freno di sta-
zionamento. Per sbloccare il freno
di stazionamento premere il pe-
dale del freno di servizio che farà
scattare il pedale di blocco freno in
posizione di non lavoro.
► Pedale freno di servizio (Fig.9-
Rif.3): azionando questo pedale si
ferma la macchina durante la fase
di lavoro.
► Pedale alza-ap (Fig.9-Rif.4):
usare questo pedale qualora si
debbano raccogliere particolari volu-
minosi ma leggeri, si consiglia di non
tenere premuto questo pedale se non
necessario.
► Pedale di selezione direzione
(Fig.9-Rif.5): agendo su questo peda-
le si seleziona il senso di marcia e la
relativa velocità.
► Leva comando spazzola laterale
destra e sinistra (Fig.9-Rif.1): ab-
bassando la leva spazzola laterale
, la spazzola si porta in posizione di
lavoro iniziando a girare, sollevando
la leva spazzola laterale la spazzola si ferma.
► Leva comando spazzola centrale (Fig.10-Rif.2): portando la leva in avanti, la spazzola
centrale si porta in posizione di lavoro iniziando a girare, per fermare la spazzola a ne
lavoro, riportare la leva nella posizione iniziale.
► Leva apertura presa d’aria (Fig.10-Rif.1): apre o chiude il usso d’aria per l’aspirazione
polveri.
► Leva disgiunzione motore (Fig.10-Rif.3): Disabilita tutte le funzioni collegate al motore
in fase di accensione.
10
IT-28
2014-07

1
1
1
START
O
F
F
O
N
S
T
A
R
T
1
2
3 4
5
6 7 8
1000 BH - 1000 EH - 1000 YH
Italiano
► By-pass per spostamento di emergenza (Fig.11-
11
Rif.1): consente lo spostamento in caso di necessità,
della macchina a motore endotermico spento. Spo-
stare la leva nella direzione indicata per sbloccare la
pompa.
► Leva ribaltamento cassetto (scarico alto) (Fig.7):
tirando la leva il cassetto ruota, svuotando il suo con-
tenuto.
► Pulsante a fungo (Fig.12-Rif.1): questo pulsante di
sicurezza, disattiva in caso di necessità o imminente
pericolo, tutte le funzioni della macchina interrompendo
7
direttamente la sorgente di alimentazione della macchi-
na.
► Starter (Fig.13-Rif.1): leva di attivazione aria per ac-
censione a motore freddo.
► Pulsante scuotiltro (Fig.13-Rif.2): permette con un
semplice gesto di tenere sempre il ltro in perfette con-
dizioni, tenerlo premuto per 30 secondi, avendo prima
interrotto il usso d’aria per l’aspirazione polveri, attra-
verso la “Leva apertura presa d’aria”.
12
► Commutatore salita a discesa cassetto (Fig.13-
Rif.3): permette di sollevare o abbassare il cassetto
riuti.
► Pulsante segnalatore acustico (Fig.13-Rif.4): attiva il
segnalatore acustico.
► Interruttore generale (Fig.13-Rif.5): attiva/disattiva
tutte le funzioni della macchina.
► Spia presenza tensione (Fig.13-Rif.6): visualizza la
corretta tensione nel circuito elettrico.
► Conta ore (Fig.13-Rif.7): visualizza le ore di funzionamento della
macchina
► Leva regolazione giri motore (Fig.13-Rif.8): permette di regolare i
giri dle motore endotermico.
► Pulsante consenso salita e discesa cassetto (Fig.29-Rif.1): uti-
lizzato insieme al commutatore salita e discesa cassetto, permette il
movimento di questo.
29
13
2014-07
IT-29

Italiano
1000 BH - 1000 EH - 1000 YH
Lavoro versione BH
► Sedersi sul sedile.
► Sbloccare il freno di stazionamento.
► Portare la leva di regolazione giri motore nella posizione START
► Tirare la leva STARTER.
► Portare la leva disgiuntore motore, in posizione 1-START-POSITION e tenerla in questa
posizione mentre si azione la chiave di accensione nella posizione START.
Non usare il motorino di avviamento per più di cinque secondi alla volta. Se il motore non
dovesse partire, lasciare andare la chiave ed attendere circa dieci secondi prima di azionare
► Alla partenza del motore rilasciare la chiave nella posizione ON e rilasciare la leva disgiun-
tore motore.
► Azionare il pedale di selezione direzione, premendo verso destra, la macchina si muoverà
in avanti, premendo verso sinistra, la macchina si muoverà all’indietro.
► Abbassare la spazzola laterale.
► Abbassare la spazzola centrale.
► Azionare la ventola aspirazione attraverso la leva, regolando il usso d’aria per l’aspira-
zione polveri.
► Qualora ci sia necessità, agire sul pedale alza-ap per la raccolta di oggetto voluminosi.
► La qualità del lavoro, dipende dalla pulizia del ltro, si consiglia di azionare lo scuotiltro in
base all’ambiente in cui si sta utilizzando la macchina.
! ATTENZIONE
di nuovo il motorino.
Svuotamento cassetto riuti con scarico a terra
L’operazione di svuotamento del contenitore riuti deve sempre essere eseguita munendosi di mascherina per proteggere le vie respiratorie dalla polvere, sempre presente durante
Prima di procedere con lo svuotamento del contenitore riuti azionare, lo scuotiltro per 30
secondi , in modo da pulire il ltro
► Sganciare la chiusura di bloccaggio del cassetto (Fig.14).
► Tirare il cassetto posteriore afferrandolo dall’apposita maniglia.
► Con l’aiuto delle ruote montate sul cassetto, trascinare lo stesso, no alla zona di raccolta
riuti e svuotarne il contenuto.
! ATTENZIONE
questa operazione
! ATTENZIONE
14
IT-30
2014-07

1
2
1000 BH - 1000 EH - 1000 YH
Italiano
Svuotamento cassetto riuti con scarico alto
L’operazione di svuotamento del contenitore riuti deve sempre essere eseguita munendosi di mascherina per proteggere le vie respiratorie dalla polvere, sempre presente durante
Prima di procedere con lo svuotamento del contenitore riuti azionare, lo scuotiltro per 30
secondi , in modo da pulire il ltro.
Con l’apertura del contenitore riuti vengono spente tutte le funzioni della macchina, versio-
ne EH e versione YH, nella versione YH viene spento anche il motore endotermico.
► Sollevare il cassetto no all’altezza desiderata, tenendo premuto il pulsante consenso
(Fig.29-Rif.1) e agendo sul commutatore (Fig.29-Rif.2).
► Tirare la leva per ruotare il cassetto e svuotarne il contenuto (Fig.7).
► Ruotare il cassetto riportandolo in posizione orrizzontale.
► Abbassare il cassetto tenendo premuto il pulsante consenso (Fig.29-Rif.1) e agendo sul
commutatore (Fig.29-Rif.2)
7
! ATTENZIONE
questa operazione
! ATTENZIONE
! INFORMAZIONE
29
Fine lavoro
! INFORMAZIONE
Vibrare il ltro alla ne del lavoro
A ne lavoro, spegnere la machina attraverso l’interruttore generale, sollevare le spazzole laterali e
la spazzola centrale ed azionare il freno di stazionamento.
Spostamento della macchina non in lavoro
Per muovere la macchina effettuare le seguenti azioni:
► Sollevare le spazzole laterali.
► Sollevare la spazzola centrale.
► Selezionare la direzione di marcia.
► Premere il pedale acceleratore.
2014-07
IT-31

PAGINA INTENZIONALMENTE BIANCA

1000 BH - 1000 EH - 1000 YH
Italiano
Quando la macchina deve rimanere a lungo inattiva, seguire i punti elencati sotto:
PERIODI DI INATTIVITÀ
► Vuotare il contenitore riuti.
► Pulire il ltro aspirazione.
► Scollegare la macchina dall’alimentazione elettrica.
► Ricaricare completamente le batterie prima di riporle a magazzino. Durante periodi lunghi
di inattività, provvedere anche a periodiche ricariche tampone (almeno una volta ogni due
mesi) per conservare gli accumulatori costantemente al massimo della carica.
Se non si provvede a ricariche periodiche degli accumulatori si rischia che si danneggino
! ATTENZIONE
irrimediabilmente.
2014-07
IT-33

PAGINA INTENZIONALMENTE BIANCA

1000 BH - 1000 EH - 1000 YH
Italiano
ISTRUZIONI PER LA MANUTENZIONE
Non bisogna effettuare alcuna operazione di manutenzione senza prima aver scollegato le
Le operazioni di manutenzione riguardanti l’impianto elettrico e, comunque, tutte quelle non
esplicitamente descritte in questo manuale d’uso, devono essere eseguite da personale tecnico specializzato, in conformità alle norme di sicurezza vigenti ed a quanto previsto dal
manuale per la manutenzione.
Manutenzione - Regole generali
Eseguire una regolare manutenzione, seguendo le indicazioni fornite dal Costruttore, garantisce un
migliore rendimento ed una maggiore durata della macchina.
Nel pulire la macchina adottare sempre i seguenti accorgimenti:
► Evitare l’uso di idropulitrici: potrebbero far arrivare acqua all’interno del vano elettrico o dei
motori, con conseguente danneggiamento o rischio di corto circuito;
► Non utilizzare vapore per non deformare termicamente le parti in plastica;
► Non impiegare idrocarburi o solventi: si potrebbero danneggiare le cofanature e le parti in
gomma.
Sostituzione - installazione spazzola centrale
Operazione da effettuare a macchina spenta e chiave disinserita
Per la sostituzione della spazzola centrale procedere in questo modo:
► Aprire il portello sul lato sinistro della macchina svitando il pomello.
► Svitare i tre pomelli che ssano il coperchio vano spazzola (Fig.15).
► Togliere il coperchio vano spazzola (Fig.16).
► Estrarre la spazzola (Fig.17).
► Togliere l’adattatore dal fusto della spazzola e ricollocarlo sulla nuova spazzola mantenen-
do lo stesso senso di inclinazione delle setola (Fig.18).
► Ricollocare l’adattatore e introdurre la nuova spazzola ed assicurarsi che l’adattatore sia
inserito nel mozzo trascinatore.Rimontare il coperchio del vano spazzola con i pomelli
seguendo le operazioni di disassemblaggio in senso contrario.
! PERICOLO
batterie.
! PERICOLO
15
17
2014-07
16
18
IT-35

Italiano
1000 BH - 1000 EH - 1000 YH
Regolazione spazzola centrale
La spazzola centrale è un componente di importanza fondamentale per il buon rendimento della
macchina. Una sua corretta regolazione permetterà di ottenere ottimi risultati in tempi minimi.
Premesso che la macchina viene fornita con tutte le regolazioni, eseguire la regolazione quando la
spazzola è consumata. Operare come segue:
► Svitare il pomello (Fig.19).
► Ruotare il selettore in senso antiorario, andando ad intercettare il foro di ssaggio del
pomello (Fig.19).
► Riavvitare il pomello (Fig.19).
19
Sostituzione - installazione spazzole laterali
Per facilitare il trasporto, le spazzola laterali non sono installate sulla macchina.
Operazione da effettuare a macchina spenta e chiave disinserita
Per installare le spazzole laterali procedere in questo modo:
► Sollevare le spazzole laterali (Fig.30).
► Svitare la vite dell’albero motore spazzola laterale (Fig.20).
► Togliere la protezione della chiavetta.
► Posizionare la spazzola completa di angia sull’albero motore (Fig.20).
► Riavvitare la vite di bloccaggio (Fig.20).
Per sostituire le spazzole laterali usurate, ripetere le operazioni elencate sopra.
! PERICOLO
30 20
IT-36
2014-07

1000 BH - 1000 EH - 1000 YH
Italiano
Regolazione spazzole laterali
La funzione della spazzola laterale è quella di convogliare il materiale da raccogliere verso il centro
Non lavorare senza spazzole installate.
della macchina. La posizione ottimale per ottenere questa operazione è quella di sorare il pavimento. Nel caso si decidesse di aumentare o diminuire la pressione della spazzola operare come
segue:
► Portare le spazzole laterali in posizione di lavoro (Fig.21).
► Allentare le due viti di regolazione poste sotto il pomolo alazaspazzola (Fig.22).
► Regolare manualmente la spazzola nella posizione desiderata.
► Stringere le viti di regolazione (Fig.22).
► Riportare le spazzole laterali in posizione di non lavoro.
! ATTENZIONE
21 22
Sostituzione - installazione - pulizia ltro aspirazione
Il ltro è un componente di primaria importanza per il corretto funzionamento della macchina.
Operazione da effettuare a macchina spenta e chiave disinserita
Una sua corretta manutenzione garantisce che il rendimento della macchina sia sempre ai massimi
livelli. Se durante il lavoro la spazzatrice solleva polvere, vericare l’integrità del ltro.
Il ltro può essere pulito in due modi:
Pulizia semiautomatica ltro:
► Permette con un semplice gesto di tenere sempre il ltro in perfette condizioni di lavoro,
premere il pulsante scuotiltro e tenerlo premuto per alcuni secondi, ripetere questa ope-
razione quattro o cinque volte. Per la versione BH, interrompere il usso d’aria per l’aspira-
zione polveri, attraverso la “Leva apertura presa d’aria”.
! PERICOLO
2014-07
IT-37

Italiano
FLOW
1000 BH - 1000 EH - 1000 YH
Pulizia manuale del ltro a pannello:
! PERICOLO
Operazione da effettuare a macchina spenta e chiave disinserita
Se il risultato della pulizia del ltro attraverso lo scuotiltro, non risultasse efcace, procedere alla
pulizia manuale:
► Togliere il coperchio vano ltro.
► Estrarre la staffa con il motore scuotiltro sollevando le due maniglie, facendo attenzione a
scollegare il connettore di alimentazione dello scuotiltro (Fig.23).
► Estrarre il ltro (Fig.23).
► Sofare con aria compressa il ltro (massima pressione 6 bar)
! INFORMAZIONE
Inserire il ltro nella direzione indicata sullo stesso
23
Pulizia manuale del ltro a sacche:
Operazione da effettuare a macchina spenta e chiave disinserita
se il risultato della pulizia del ltro attraverso lo scuotiltro, non risultasse efcace, procedere alla
pulizia manuale:
► Togliere il coperchio vano ltro.
► Svitare le quattro viti che ssano le due staffe blocca ltro (Fig.24).
► Togliere le due staffe (Fig.24).
► Estrarre il ltro, facendo attenzione a scollegare il connettore di alimentazione dello scuo-
tiltro (Fig.24).
► Sofare con aria compressa il ltro (massima pressione 6 bar)
! PERICOLO
IT-38
24
2014-07

Petrol - Diesel
1 2 3
Battery - Dual Power
Battery - Dual Power
Battery - Dual Power
1
2
1000 BH - 1000 EH - 1000 YH
Italiano
Fusibili: sostituzione
Operazione da effettuare a macchina spenta e chiave disinserita
Non installare mai un fusibile di amperaggio superiore a quello previsto.
Nel caso in cui un fusibile continui a bruciarsi, è necessario individuare e riparare il guasto presen-
te nel cablaggio, nelle schede (se presenti) o nei motori: far vericare la macchina da personale
tecnico qualicato.
(Fig.25-Rif.1) fusibile regolatore, (Fig.25-Rif.2) fusibile scuotiltro e intermittenza lampeggiante,
(Fig.25-Rif.3) fusibile conta ore e clacson, versione BH.
(Fig.26), fusibile generale, versione EH e YH.
(Fig.27), fusibile ripristinabile motore spazzola laterale, versione EH e YH.
(Fig.28-Rif.1), fusibile scuotiltro e aspiratore, (Fig.28-Rif.2) fusibile spazzola centrale, versione
EH e YH.
25
BH
! PERICOLO
! ATTENZIONE
26
EH - YH
28
27
EH - YH
EH - YH
Manutenzione e ricarica delle batterie
Le batterie sprigionano vapori inammabili: estinguete ogni fuoco o brace prima di verica-
Non controllate le batterie mediante scintillamenti.
! PERICOLO
re o rabboccare le batterie.
2014-07
IT-39

Italiano
1000 BH - 1000 EH - 1000 YH
Al ne di evitare danni permanenti alle batterie, non scaricarle mai completamente.
Eseguire le operazioni descritte di seguito in ambienti aerati.
Procedura per la ricarica:
collegare il connettore del caricabatterie a quello del cablaggio batterie.
! ATTENZIONE
Nel caso di batterie al gel, usare solamente un caricabatterie specico per accumulatori al
gel.
! ATTENZIONE
Effettuare la ricarica secondo quanto specicato nel manuale del caricabatterie,
al termine del periodo di ricarica scollegare i connettori.
Cambio olio motore
Per la periodicità del cambio olio motore, fare riferimento alla segnalazione “CAMBIO OLIO
MOTORE” che compare sul display della macchina (solo per la versione YH), per le versioni
BH fare riferimento al manuale uso e manutenzione del costruttore del motore endotermico
ed al conta ore installato sulla plancia della macchina, questa operazione deve essere ese-
guita a macchina spenta e a motore freddo.
Dopo aver sollevato il cofano superiore della macchina ed aver vericato che tutte le funzioni della
macchina siano spente e che il motore non è ad una temperatura tale da provocare pericoli per il
manutentore procedere come segue:
► Individuato il tubo di scarico olio collegato al motore endotermico, farlo passare attraverso
il foro situato sulla lamiera di chiusura vano motore.
► Slare l’asta livello olio dal motore, per favorire una più facile fuoriuscita dell’olio.
► Posizionare una vaschetta per la raccolta dell’olio esausto in prossimità del tubo di scarico
e svitare il tappo di chiusura.
► Ultimata l’operazione di scarico dell’olio esausto, richiudere il tubo di scarico e riporlo all’in-
terno del vano motore, posizionandolo in modo che non comprometta nessun movimento
agli organi della macchina.
► Inserire attraverso il tubo porta asta livello, l’olio all’interno del motore per la quantità fare
riferimento al manuale del motore.
► Terminata l’operazione di riempimento inserire l’asta livello olio e controllare tramite la
stessa la corretta quantità di olio
► Chiudere il cofano superiore della macchina.
! ATTENZIONE
IT-40
2014-07

1000 BH - 1000 EH - 1000 YH
Italiano
Controllo periodici
CONTROLLO
ALLA CONSEGNA
OGNI 10 ORE
OGNI 50 ORE
CONTROLLARE LIQUIDO BATTERIA X X
CONTROLLARE L’OLIO IMPIANTO IDRAULICO X X
CONTROLLARE L’USURA DELLE CINGHIE X
REGISTRARE IL FRENO X
CONTROLLARE IL SERRAGGIO DI DADI E VITI X
CONTROLLARE LO STATO DELLE SPAZZOLE X
CONTROLLARE LA TENUTA DELLE GUARNIZIONI X
CONTROLLARE IL FUNZIONAMENTO DI TUTTE LE FUNZIONI X X
INGRASSARE LA CATENA DELLO STERZO X
OGNI 100 ORE
2014-07
IT-41

PAGINA INTENZIONALMENTE BIANCA

1000 BH - 1000 EH - 1000 YH
Italiano
INCONVENIENTI , CAUSE E RIMEDI
INCONVENIENTI CAUSE RIMEDI
La macchina fa polvere Filtro intasato. (EH,YH,BH) Scuotere il ltro con lo scuotiltro ed
Filtro danneggiato. (EH,YH,BH) Sostituire il ltro
Filtro montato male. (EH,YH,BH) Alloggiare il ltro correttamente nella
La macchina tralascia sporco a terra La spazzola centrale non è regolata, op-
La spazzola centrale non gira Cinghia rotta. (EH,YH,BH) Sostituire
La spazzola laterale non gira Cinghia rotta. (BH) Sostituire
Motore aspirazione non funziona Fusibile bruciato (EH,YH) Sostituire
Motore scuotiltro non funziona Fusibile bruciato (EH,YH,BH) Sostituire
La macchina non si accende Morsetti batteria staccati (EH,YH,BH) Controllare
La batteria non mantiene la carica Liquido mancante (EH,YH,BH) Rabboccare
pure si è consumata. (EH,YH,BH)
La spazzola centrale ha raccolto li e
corde. (EH,YH,BH)
I ap sono danneggiati. (EH,YH,BH) Sostituire i ap
Contenitore riuti pieno. (EH,YH,BH) Vuotare il contenitore riuti
Fusbile bruciato. (EH,YH) Sostituire
Microinterruttore danneggiato. (EH,YH) Sostituire
Filo staccato. (EH,YH) Controllare
Motoriduttore danneggiato (EH,YH) Sostituire
Intervento fusibile. (EH,YH) Ripristinare
Microinterruttore danneggiato. (EH,YH) Sostituire
Filo staccato. (EH,YH) Controllare
Interruttore guasto (EH,YH) Sostituire
Filo staccato (EH,YH) Controllare
Motore danneggiato (EH,YH) Sostituire
Interruttore guasto (EH,YH,BH) Sostituire
Filo staccato (EH,YH,BH) Controllare
Motore danneggiato (EH,YH,BH) Sostituire
Batterie scariche (EH,YH,BH) Ricaricare
Pulsante fungo premuto (EH,YH,BH) Sbloccare
Manca carburante (YH,BH) Riempire
Manca olio motore (YH,BH) Riempire
Dispositivo di presenza difettoso
(EH,YH,BH)
Operatore non al posto di guida Sedersi sul sedile
Frizione non inserita (BH) Inserire
Fusibile principale bruciato (EH,YH) Sostituire
Fusibile su scheda potenza bruciato
(EH,YH)
Morsetto allentato (EH,YH,BH) Stringere
2014-07
all’occorrenza estrarlo e pulirlo a fondo
propria sede
Regolare la spazzola centrale oppure
sostituirla
Togliere i li e le corde raccolte.
Sostituire
Sostituire
IT-43

Italiano
1000 BH - 1000 EH - 1000 YH
IT-44
PAGINA INTENZIONALMENTE BIANCA
2014-07

1000 BH - 1000 EH - 1000 YH
Italiano
ALLARMI SUL DISPLAY
PROTEZIONE TERMICA
Surriscaldamento motore spazzola.
MOTORE SPAZZOLA
FRENO Freno di stazionamento inserito oppure surriscaldamento mo-
tore trazione.
STAND-BY Micro di sicurezza sedile non rileva la presenza dell’operatore.
RILASCIARE
ACCELERATORE
Sequenza accensione errata, rilasciare il pedale acceleratore
durante l’accensione.
ERROR EEPROM 1 Sostituire la scheda display
PROTEZIONE TERMICA
Surriscaldamento scheda trazione.
SCHEDA TRAZIONE
GUASTO ACCELERATORE Guasto al cablaggio acceleratore
GUASTO POTENZIOMETRO
VELOCITA’ MAX
Guasto cablaggio del potenziometro limitatore velocità massima.
GUASTO SOTTO - TENSIONE Controllare le batterie.
GUASTO SOVRA - TENSIONE Controllare le batterie.
GUASTO RELE’ PRINCIPALE Sostituire la scheda trazione.
HPD Controllare il pedale acceleratore, spegnere e riaccendere la
macchina con il pedale rilasciato.
PROBLEMA MOSFET Sostituire la scheda trazione.
ERROR EEPROM 2 Sostituire la scheda trazione.
2014-07
IT-45

Italiano
1000 BH - 1000 EH - 1000 YH
SERVICE Chiamare il centro assistenza per la manutenzione program-
mata.
BATTERIA SCARICA Batteria scarica
ACCENDERE MOTORE Solo per versione YH, procedere con il lavoro utilizzando il mo-
tore endotermico.
BATTERIA CARICA Solo per versione YH, batterie cariche.
PROTEZIONE TERMICA
Solo per versione YH, surriscaldamento alternatore.
ALTERNATORE
CAMBIO OLIO MOTORE Solo per versione YH, procedere con il cambio olio motore en-
dotermico.
COFANO APERTO
SPEGNERE MOTORE
IT-46
2014-07

1000 BH - 1000 EH - 1000 YH
Italiano
Si entra nel menu premendo contemporaneamente il pulsante “menu” ed il pulsante “aspiratore” per
MENU TECNICO
tre secondi all’attivazione “dell’interruttore generale”.
Pulsante “ASPIRATORE”, incrementa la selezione delle voci o il valore della variabile selezionata.
Pulsate “SCUOTIFILTRO”, decrementa la selezione delle voci o il valore della variabile selezionata.
Pulsante “MENU’”, seleziona la variabile da modicare, la variabile selezionata viene visualizzata
in “negativo”.
LINGUA IT, GB, ES....
TIPO BATTERIA
AUTO POWER-OFF
SCUOTIFILTRO
TIPO MACCHINA
ACIDO
GEL
OFF
TIME-OUT 0-10
SECONDI
MANUALE
AUTOMATICO 5-30
MINUTI
BATTERY DUAL POWER
TEMPO
ALTERNATORE
MENU SERVICEMENU SERVICE
ESCI
SALVATAGGIO
2014-07
20-120 SECONDI,
DALL’AVVIAMENTO
DEL MOTORE
ENDOTERMICO
IT-47

PAGINA INTENZIONALMENTE BIANCA

1000 BH - 1000 EH - 1000 YH
English
INDEX
TECHNICAL CHARACTERISTICS ..........................................................................................EN-3
MACHINE DIMENSIONS ..........................................................................................................EN-7
SAFETY SYMBOLS ..................................................................................................................EN-9
GENERAL INFORMATION .....................................................................................................EN-11
Purpose of this manual ............................................................................................................EN-11
Identifying the machine............................................................................................................EN-12
Position of the operator ...........................................................................................................EN-12
Responsibility of the manufacturer ..........................................................................................EN-12
Replacement of parts ..............................................................................................................EN-12
Technical assistance................................................................................................................EN-12
Requests for assistance ..........................................................................................................EN-12
Utilization eld .........................................................................................................................EN-13
Scrapping the machine ............................................................................................................EN-13
GENERAL NORMS .................................................................................................................EN-13
General information - key ........................................................................................................EN-13
NOISE EMISSION OF THE VEHICLE ...................................................................................EN-13
INFORMATION ABOUT VIBRATION .....................................................................................EN-14
TECHNICAL INFORMATION ..................................................................................................EN-15
General description .................................................................................................................EN-15
Parts of the machine................................................................................................................EN-15
Residual risk areas ..................................................................................................................EN-16
Safeties .................................................................................................................................EN-16
SAFETY INFORMATION ........................................................................................................EN-17
Safety precautions ...................................................................................................................EN-17
MOVEMENT INSTALLATION ................................................................................................EN-21
Lifting and transporting the packaged machine .......................................................................EN-21
Delivery checks .......................................................................................................................EN-21
Unpacking................................................................................................................................EN-21
Batteries (EH version) .............................................................................................................EN-21
Batteries: preparation ..............................................................................................................EN-22
Batteries: installation and connection ......................................................................................EN-22
Batteries: removal....................................................................................................................EN-23
Choosing a battery charger .....................................................................................................EN-23
Preparing the battery charger .................................................................................................EN-23
Preparing the engine (BH and YH versions) ..........................................................................EN-23
Preparing the hydraulic circuit (BH version) ............................................................................EN-23
Fitting the side brushes ...........................................................................................................EN-23
Lifting and transporting the machine .......................................................................................EN-24
PRACTICAL GUIDE FOR THE OPERATOR ..........................................................................EN-25
Preparing the machine for work...............................................................................................EN-25
Controls of the EH and YH versions ........................................................................................EN-26
Operating the EH and YH versions .........................................................................................EN-28
Controls of the BH versions .....................................................................................................EN-28
Operating the BH versions ......................................................................................................EN-30
Emptying the bottom unloading debris bin ..............................................................................EN-30
2014-07
EN-1

English
1000 BH - 1000 EH - 1000 YH
Emptying the top unloading debris bin ....................................................................................EN-31
Finishing work..........................................................................................................................EN-31
Moving the machine when not in operation .............................................................................EN-31
PERIODS OF INACTIVITY .....................................................................................................EN-33
MAINTENANCE INSTRUCTIONS ..........................................................................................EN-35
Maintenance - General rules ...................................................................................................EN-35
Replacing/installing the main brush ........................................................................................EN-35
Adjusting the main brush .........................................................................................................EN-36
Replacing/installing the side brushes ......................................................................................EN-36
Adjusting the side brushes ......................................................................................................EN-37
Replacing/installing the suction lter .......................................................................................EN-37
Fuses: replacing ......................................................................................................................EN-39
Battery maintenance and charging ..........................................................................................EN-39
Changing the engine oil ...........................................................................................................EN-40
Periodic checks .......................................................................................................................EN-41
TROUBLESHOOTING ............................................................................................................EN-43
DISPLAY ALARMS .................................................................................................................EN-45
TECHNICAL MENU ................................................................................................................EN-47
EN-2
2014-07

1000 BH - 1000 EH - 1000 YH
English
TECHNICAL CHARACTERISTICS
EH YH BH
Sweeping path with RH and LH brushes mm 1200
Cleaning capacity per hour m2/h 7800
Main brush motor power W 600 -
Side brush motor power W 90 -
Drive motor power 450 W 98 Cm3/rpm
Internal combustion engine starting W -
Internal combustion engine power W - 4125 4125
Fuel tank capacity l - 3,1 3,1
Suction motor power W 260 -
Panel lter shaker motor power W 90
Pocket lter shaker motor power W 90
Alternator A - 80 -
Maximum forward speed Km/h 6 6 6
2014-07
EN-3

English
Maximum reverse speed Km/h 6 6 4,6
Maximum negotiable gradient % 16
Debris bin capacity (bottom unloading) l 70
Debris bin capacity (top unloading) l 75
Rear wheel diameter mm 250
Front wheel diameter mm 250
Main brush diameter mm 300
Side brush diameter mm 460
1000 BH - 1000 EH - 1000 YH
Panel lter surface area sq.m. 4
Pocket lter surface area sq.m. 4
Maximum bin tipping height (top unloading)
Net weight without batteries Kg
Number of batteries n° 4 2 1
Battery voltage V 6 12
Individual battery capacity Ah (5h) 190 75 45
EN-4
mm 1450
258
320 (High dumping)
2014-07
346 (High dumping)
284

1000 BH - 1000 EH - 1000 YH
Power system voltage V 24 24 12
English
Machine dimensions (bottom unloading) mm
Machine dimensions (top unloading) mm
Battery compartment dimensions
(length, width, height)
Packed size (length, width, height) mm
Sound pressure
Measured sound power
Guaranteed sound power
Vibration level (hand)
Measurement uncertainty, k m/sec2
mm 500 x 450 x 350 / /
LpA
(dB)
Lwa
(dB)
Lwa,g
(dB)
HAV
m/sec2
X=1615
Z=905
Y=1210
X=1615
Z=905
Y1=1868
Y2=1210
70 82
83 95
2,6 2,5
Vibration level (body)
Measurement uncertainty, k m/sec2
HBV
m/sec2
Data subject to variation without warning.
0,5 0,5
2014-07
EN-5

INTENTIONALLY WHITE PAGE

1000 BH - 1000 EH - 1000 YH
English
MACHINE DIMENSIONS
Y
X
Z
Y1
Y2
X
Z
X-Y-Z: See “TECHNICAL CHARACTERISTICS” table
2014-07
EN-7

INTENTIONALLY WHITE PAGE

1000 BH - 1000 EH - 1000 YH
English
SAFETY SYMBOLS
WARNING! RISK OF CUTTING
WARNING! RISK OF CRUSHING LIMBS
WARNING! RISK OF ABRASION
WARNING! RISK OF ENTANGLEMENT
WARNING! RISK OF ACID BURNS
WARNING! RISK OF BURNS
2014-07
EN-9

INTENTIONALLY WHITE PAGE

1000 BH - 1000 EH - 1000 YH
English
GENERAL INFORMATION
Purpose of this manual
This manual has been written by the Manufacturer and is an integral part of the machine1.
It denes the purpose for which the machine has been designed and constructed and contains all
the information required by operators2.
In addition to this manual, which contains information for operators, other publications are available
providing specic information for maintenance personnel3.
The terms “right” and “left”, “clockwise” and “anti-clockwise” refer to the forward movement of the
machine.
Constant compliance with the instructions provided in this manual guarantees the safety of the operator and the machine, ensures low running costs and high quality results and extends the working
life of the machine. Failure to follow these instructions may lead to injury to the operator or damage
to the machine, oor and environment.
Consult the table of contents at the beginning of the manual to nd the section you need rapidly.
The indications and instructions of this manual are not meant to substitute, integrate or modify any
REGULATION, DIRECTIVE, DECREE or LAW of a general or a specic nature in force in the country where the machine is to operate regarding safety, use and maintenance of mechanical, electric,
chemical, oil-pressure, pneumatic or other types of devices.
Parts of the text requiring special attention are printed in bold and preceded by the symbols illustrated and described here.
Indicates the need for attention in order to avoid a series of consequences which could cau-
se death or serious injury to personnel.
! DANGER!
Indicates the need for attention in order to avoid a series of consequences which could
! WARNING!
cause injury to personnel or damage to the machine or work environment or nancial loss.
! IMPORTANT!
Important information.
In line with the company’s policy of constant product development and updating, the Manu-
facturer reserves the right to make modications without prior notice.
Although your machine may differ appreciably from the illustrations in this document, the
correctness and validity of the instructions contained in this manual are guaranteed.
1 The term "machine" replaces the trade name of the machine described in this manual.
2 Persons responsible for operating the machine but not for performing maintenance operations requiring special
technical skills.
3 Persons with technical experience, training and a knowledge of applicable legislation and standards, able to perform
all necessary operations and to recognise and avoid possible risks in handling, installing, operating and maintaining the
machine.
2014-07
EN-11

English
H
A
B
E
F
C
D
G
1000 BH - 1000 EH - 1000 YH
Identifying the machine
The nameplate provides the following information:
A Model.
B Battery voltage / Power.
C Serial number
D Year of manufacture
E IP Index of Protection.
F Dry weight.
G Maximum negotiable gradient.
H Name of manufacturer.
Position of the operator
The operator has to sit on the driver’s seat during the work.
Responsibility of the manufacturer
The manufacturer, Dulevo International S.p.A., declines any responsibility arising from breaks, accidents, etc. due to the lack of knowledge (or to the lack of application) of the prescriptions contained
in this manual. The same holds true for any change, variation and/or installation of accessories that
has not been previously authorized.
In particular Dulevo International S.p.A. declines any responsibility for any damage caused
by:
- Acts of God
- Wrong maneuvers
- Lack of maintenance
The Manufacturer cannot be held responsible for damages (of any type) caused by the operations
performed on the machine (servicing, repair, etc.) if these were not carried out by Dulevo International S.p.A. AUTHORIZED PERSONNEL (except for different agreements authorized by Dulevo
International S.p.A.).
Replacement of parts
In the replacement of parts use only GENUINE PARTS, tested and authorized by the MANUFACTURER.
Do not wait until the components are worn out through use. Replacing a component at an op portune
moment means a better functioning machine and also a saving due to the fact that major damage
has been avoided.
Technical assistance
The manufacturer puts Its Technical Assistance Service at the disposition of the customer to resolve
any problem related to the use or maintenance of the machine.
Requests for assistance
Any such requests should be made after a close analysis of the problems and their causes.
When making written requests please specify the following information:
- Machine model
- Registration number
- Details of problems encountered
- Checks made
- Adjustments made and their effect
- Any other information that might be useful
EN-12
2014-07

1000 BH - 1000 EH - 1000 YH
Send your requests to:
DULEVO INTERNATIONAL S.p.A.
Via Giovannino Guareschi, 1
43012 FONTANELLATO
(PARMA) ITALY
Tel. +39 0521 - 82 77 11
Fax. +39 0521 - 82 77 95
or to the “AUTHORIZED ASSISTANCE NETWORK”
The MANUFACTURER reserves the right to carry out modications to the machine for technical or
commercial reasons, without obligation to update the instruction manual and spare parts catalogue
at that time.
English
Utilization eld
The machine, composed of a brush and a suction sistem, is to be used EXCLUSIVELY to clean
dry surfaces. Anyother use could be cause of damage to people or things and is therefore PROHIBITED.
Scrapping the machine
In the event the machine must be scrapped, please remember that batteries are NOT common
waste materials. They must be disposed of in accordance with the relevant laws.
The machine is composed of differents parts. Dismantle it and prepare the wastes for disposal in
accordance to their type.
Design and development of this machine complies with the fundamental safety and health requi-
GENERAL NORMS
rements set forth by the European directives listed in the EC conformity certicate enclosed with
this manual.
The EC marking of conformity to European Union directives is located on the machine’s ID tag.
General information - key
Any terms RIGHT (R.H.), LEFT (L.H.), FRONT, REAR, CLOCKWISE, COUNTER CLOCKWISE
indications included in this handbook are always to be intended with respect to the operator when
he uses the machine.
Noise emission of the vehicle
The test conditions under which the phonometric survey and the calculation of the sonic power
were carried out comply with European regulations and directives and are described in detail in the
various technical reports kept by Dulevo International S.p.A.
LpA: A-weighed average emission sound pressure level - at driver’s seat
This is an indicator of what is perceived by the human ear and consequently constitutes the value
used to assess the operators’ exposure to noise.
2014-07
EN-13

English
1000 BH - 1000 EH - 1000 YH
LwA: WEIGHED SOUND POWER LEVEL A ISSUED BY THE MACHINE IN THE ENVI-
RONMENT
LwA = (See the name tag applied on the machine)
The test conditions under which the vibration survey was carried out comply with European regu-
INFORMATION ABOUT VIBRATION
lations and directives and are described in detail in the various technical reports kept by Dulevo
International S.p.A.
This value can be used only as a comparison value and it is not suitable to determine real levels that
depend on the conditions and on the environment where the machine is used.
EN-14
2014-07

1
2
3
4
5
6
7
1000 BH - 1000 EH - 1000 YH
English
TECHNICAL INFORMATION
General description
The machine described in this manual is a motorised sweeper designed to sweep oors in civil and
industrial premises.
It may be used to clean the residues of industrial processes, dust and dirt in general on all relatively
even, at and hard surfaces such as concrete, asphalt, porcelain stoneware, ceramic tiles, sheet
metal, marble, embossed or smooth rubber or plastic mats indoors or outdoors.
Parts of the machine
The machine comprises the main parts described below (g. 1).
► Debris bin (1, g. 1). This collects the debris picked up by the main brush and dust from
the lter.
► Control panel (2, g. 1).
► Main brush (3, g. 1). This is the most important part of the machine, and transfers dust
and debris to the bin. Brushes are available in different hardnesses and with different bristles to suit the type of material to be picked up.
► Side brushes (4, g. 1). These convey dust and debris towards the main brush. They only
clean edges, corners and proles.
► Suction lter (5, g. 1). This lters the air drawn in by the suction fan.
► Suction fan (6, g. 1). This enables the machine to sweep without raising dust.
► Flaps (7, g. 1). These surround the main brush and maintain the suction created by the
fan.
1
2014-07
EN-15

English
1000 BH - 1000 EH - 1000 YH
Residual risk areas
► Side brush: danger for the rotation of the brushes.
► Rear/ Front wheels: Danger of crushing between the wheel and the frame.
► Engine / Battery compartment: danger of short-circuiting between the poles of the batteries
and the presence of hydrogen during the charging phase, the risk of severe burns, performing any maintenance with the engine off but not completely cold (BH version and YH).
► Engine / Battery compartment: danger of shearing / crushing when handling the crankcase.
► Waste materials container: during lifting-lowering and rotation of the drawer, danger of
crushing.
Safeties
The safety devices on the machine are as follows:
► Emergency button, located on the panel under the seat.
► Operator presence sensor located under the driver’s seat.
► Micro-switch for battery / motor hood , located inside the battery / engine compartment and
stops the machine when the hood is open.
► Reverse gear buzzer: enters when you select reverse gear.
► Carter with screws.
EN-16
2014-07

1000 BH - 1000 EH - 1000 YH
English
SAFETY INFORMATION
Safety precautions
Read this Operator’s Manual carefully before start-up and use and before performing any
maintenance or other work on the machine.
! DANGER!
Rigorously follow all the instructions in this Operator’s Manual (in particular those marked
! WARNING!
“Danger!” and “Warning!”. Also respect the safety labels applied to the machine (see the
“Safety symbols” section.
The Manufacturer declines all liability for injury to persons or damage to property resulting
from failure to follow instructions.
The machine must be used exclusively by persons trained in its use and/or who have demonstrated
their ability and have been expressly authorised to use it.
The machine must not be used by minors.
The machine must not be used for purposes other than those for which it was expressly designed.
Scrupulously respect all safety standards and conditions applicable to the type of building in which
the machine is to be operated (e.g.: pharmaceutical companies, hospitals, chemicals, etc.).
Do not use the machine in inadequate lighting, explosive atmospheres, on public roads, to clean dirt
that is hazardous to health (dust, gas, etc.) or in unsuitable environments.
The machine is designed to operate in temperatures between +4°C and +40°C. It can be stored in
temperatures between +0°C and +50°C when not in use.
The machine is designed to operate at relative humidity levels between 30% and 95%.
Never use the machine to clean up ammable or explosive liquids (e.g. petrol, fuel oil, etc.), acids or
solvents (e.g. paint solvents, acetone etc.) even if diluted. Never clean up burning or incandescent
objects.
Never use the machine on slopes or ramps of more than 16%. Never drive across even gentle
slopes. Always manoeuvre with care and avoid reversing. When transiting steeper ramps or slopes,
take the utmost care to prevent tipping and/or uncontrolled acceleration.
Never park the machine on a slope.
Never leave the machine unattended with the motor or engine on. Before leaving it, turn the motor
or engine off and make sure it cannot move accidentally.
Always pay attention to other people, especially children, in the place where you are working.
Children must be supervised to make sure they do not play with the machine.
The machine is not intended for use by persons (including children) with reduced physical, sensory
or mental capabilities, or lack of experience and knowledge, unless they are supervised by a person
responsible for their safety and have received instruction in the use of the machine.
Never use the machine to transport people or goods or to tow things.
Do not tow the machine.
Never rest objects of any weight on the machine for any reason.
Never obstruct the ventilation and heat dispersion openings.
Never remove, modify or circumvent safety devices.
Numerous unpleasant experiences have shown that a wide range of personal objects may cause
serious accidents. Before beginning work, remove jewellery, watches, ties, etc..
The operator must always use personal protection devices: protective apron or overalls, non-slip
waterproof shoes, rubber gloves, protective goggles and ear protectors and mask to protect the
respiratory tract.
Keep hands away from moving parts.
Make sure the power sockets used for the battery charger are connected to a suitable earth system
and protected by thermal magnetic and earth leakage breakers.
Make sure the electrical characteristics of the machine (voltage, frequency, power) given on the
nameplate correspond to those of the mains electricity supply.
It is indispensable to respect the battery manufacturer’s instructions and applicable legislation. The
2014-07
EN-17

English
1000 BH - 1000 EH - 1000 YH
batteries should always be kept clean and dry to avoid surface leakage current. Protect the batteries from impurities such as metal dust.
Never rest tools on the batteries as they could cause short circuits leading to explosions.
When using battery acid, always follow scrupulously the safety instructions given in the “Batteries:
preparation” section.
Battery charger ( OPTIONAL ): check the power cable regularly for damage. If the power cable is
damaged, do not use the charger.
If particularly strong magnetic elds are present, assess their possible effect on the control electronics.
Never wash the machine with water jets.
In the case of malfunction and/or faulty operation, turn the machine off immediately (disconnecting
it from the mains power supply or batteries) and do not tamper with it. Contact a service centre
authorised by the Manufacturer.
All maintenance operations must be performed in an adequately illuminated area and only after
disconnecting the machine from the power supply.
All work on the electrical system and all maintenance and repair operations other than those
explicitly described in this manual must be performed by specialist and experienced personnel
only.
Only use original accessories and spare parts supplied by the Manufacturer to guarantee safe and
problem-free operation of the machine. Never use parts removed from other machines or from
other kits.
- The machine must be used by authorised personnel only.
! IMPORTANT!
! WARNING!
- Before cleaning or servicing the machine, always turn it off.
- Do not start the machine with the direction pedal pressed downt could jolt forward and
cause damange to people and/or things.
- The petrol-powered machine must be used in open and aired places only.
EN-18
2014-07

1000 BH - 1000 EH - 1000 YH
English
The machine is designed and constructed to provide ten years’ service from the date of manufacture shown on the nameplate. After this period, whether the machine has been used or not, it
should be disposed of according to current legislation in the country in which it is used.
It should be disconnected from the power supply, emptied of all liquids and cleaned prior to disposal.
The machine is classied as WEEE type special waste and is covered by the requirements of applicable environmental protection regulations (2002/96/EC WEEE).
The machine must be disposed of separately from ordinary waste in compliance with current legislation and standards.
If you decide to stop using the machine, remove the batteries and dispose of them through an authorised recycling centre.
You should also make sure that all parts of the machine that could represent a hazard, particularly
to children, are made safe.
Alternatively, return the machine to the Manufacturer for a complete overhaul.
2014-07
EN-19

INTENTIONALLY WHITE PAGE

1000 BH - 1000 EH - 1000 YH
English
MOVEMENT INSTALLATION
Lifting and transporting the packaged machine
During all lifting operations, make sure the packaged machine is rmly secured to avoid it
tipping up or being accidentally dropped.
Always load/unload lorries in adequately illuminated areas.
The machine is packaged on a wooden pallet by the Manufacturer. It must be loaded on to the transporting vehicle using suitable equipment (see EC Directive 89/392 and subsequent amendments
and/or additions). At destination, it must be unloaded using similar means.
A fork lift truck must always be used to lift the packaged body of the machine. Handle with care to
avoid knocking or overturning the machine.
Delivery checks
When the carrier delivers the machine, make sure the packaging and machine are both whole and
undamaged. If the machine is damaged, make sure the carrier is aware of the damage and before
accepting the goods, reserve the right (in writing) to request compensation for the damage.
! WARNING!
Unpacking
When unpacking the machine, the operator must be provided with the necessary personal
protection devices (gloves, goggles, etc.) to limit the risk of injury.
Proceed as follows to unpack the machine.
► Cut and remove the plastic straps using scissors or nippers.
► Remove the cardboard packaging.
► Remove the bags from the battery compartment and check their contents:
this Operator’s Manual, the maintenance manual, declaration of conformity, certicate of
warranty; battery bridges with terminals; connector for battery charger.
Depending on the model, remove the metal brackets or cut the plastic straps xing the machine
chassis to the pallet.
Using a sloping ramp, push the machine backwards off the pallet.
Unpack the brushes from their packaging.
Clean the outside of the machine, taking care to respect safety regulations.
Once the machine is clear of the packaging, proceed to install the batteries (see the “Batteries:
installation and connection” section).
The packaging may be kept and reused to protect the machine if it is moved to another site or to a
repair workshop.
Otherwise it must be disposed off in compliance with current legislation.
! WARNING!
Batteries (EH version)
Two different types of battery may be installed on these machines:
► Leak-proof tubular batteries: these require regular checks on electrolyte level. When nec-
essary, top up with distilled water until the plates are covered. Do not over-ll (5 mm max.
above the plates).
► Gel batteries: this type of battery requires no maintenance.
Battery technical characteristics must correspond to those listed in the Technical characteristics
section. The use of higher capacity batteries could seriously jeopardise manoeuvrability and lead to
the drive motor overheating. Batteries with a lower capacity and weight will require charging more
frequently.
Batteries must be kept charged, dry and clean and the connections must be kept tight.
2014-07
EN-21

English
+
+
+
+
+
-
-
-
-
-
Battery
Battery
-
-
+
+
+
-
-
+
-
+
+
-
-
-
+
+
Dual Power
1000 BH - 1000 EH - 1000 YH
Follow the instructions below to congure the machine’s software for the type of batteries
see the “Technical menu section”.
! IMPORTANT!
installed:
Batteries: preparation
During battery installation and any type of battery maintenance, the operator must be provided with the necessary personal protection devices (gloves, goggles overalls, etc.) to limit
the risk of injury. Keep clear of naked ames, avoid short circuiting the battery poles, avoid
Batteries are normally supplied lled with acid and ready for use.
If the batteries are dry, proceed as follows before installing them in the machine.
Remove the caps and ll all elements with sulphuric acid solution specic for batteries until the
plates are entirely covered (this requires at least a couple of passes for each element).
Leave the batteries stand for 4-5 hours to allow air bubbles to come to the surface and the plates
to absorb the electrolyte.
Make sure the level of electrolyte is still above the plates and if necessary top up with sulphuric
acid solution.
Close the caps.
Install the batteries in the machine (following the procedure described below).
Charge the batteries before starting up the machine for the rst time. Follow the instructions in the
“Battery maintenance and charging” section.
! DANGER!
sparks and do not smoke.
Batteries: installation and connection
Make sure you connect the terminals marked with a “+” to the positive poles of the battery.
Check that all switches on the control panel are in the “0” (off) position.
Do not check the battery charge by sparking.
Meticulously follow the instructions given below as short circuiting the batteries could
Place the batteries in the battery compartment, orienting them as shown in the drawings (gs. 2
and 3).
Referring to the cable layout shown in the above diagram, connect the battery cables and bridge
terminals to the battery poles. Arrange the cables as shown in the diagram, tighten the terminals on
the poles and coat with Vaseline.
Lower the cowling into the working position
When using the machine, follow the instructions below.
Never allow the batteries to become excessively at as this could damage them irreparably.
! DANGER!
cause them to explode.
! WARNING!
3
EN-22
2
EH
YH
2014-07

1000 BH - 1000 EH - 1000 YH
English
Batteries: removal
When removing the batteries, the operator must be equipped with suitable personal protection devices (gloves, goggles, overalls, safety shoes, etc.) to reduce the risk of injury. Make
sure the switches on the control panel are in the “0” position (off) and the machine is turned
off. Keep away from naked ames, do not short circuit the battery poles, do not cause sparks
and do not smoke. Proceed as follows.
► Disconnect the battery cables and bridge terminals from the battery poles.
► If necessary, remove the devices xing the battery to the base of the machine.
► Lift the batteries from the compartment using suitable lifting equipment.
! DANGER!
Choosing a battery charger
Make sure the battery charger is compatible with the batteries to be charged.
Tubular lead batteries: an automatic charger is recommended. Consult the battery charger manu-
facturer and manual to conrm the choice.
Gel batteries: use a charger specic for this type of battery.
Preparing the battery charger
If you wish to use a battery charger not provided with the machine, you must t it with the connector
supplied with the machine.
Proceed as follows to t the connector.
Remove about 13 mm of protective sheath from the red and black cables of the battery charger.
Insert the wires into the connector contacts and squeeze them forcefully with suitable pliers.
Respect the polarity (red wire + black wire –) when inserting the wires into the connector.
Preparing the engine (BH and YH versions)
► Fill the fuel tank.
► Check the engine oil level.
Preparing the hydraulic circuit (BH version)
► Check the hydraulic oil level.
Fitting the side brushes
See the “Replacing/installing the side brushes” section.
Follow the instructions given below to congure the machine’s control software to use the
See the “Technical menu” section.
! IMPORTANT!
display language you require.
2014-07
EN-23

English
1000 BH - 1000 EH - 1000 YH
Lifting and transporting the machine
All phases of lifting and moving must be performed in an adequately illuminated environ-
ment with the adoption of the safety measures most appropriate to the situation.
The operator must always use personal protection devices.
Proceed as follows to load the machine onto a means of transport.
► Empty the debris bin.
► Remove the batteries.
► Position the machine on a pallet and x it in place with plastic straps or metal brackets.
► Lift the pallet (with the machine) using a fork lift truck and load it onto the means of trans-
port.
► Anchor the machine to the means of transport with cables connected to the pallet and to
the machine itself.
! WARNING!
EN-24
2014-07

1000 BH - 1000 EH - 1000 YH
English
PRACTICAL GUIDE FOR THE OPERATOR
Before starting work, wear overalls, ear protectors, non-slip and waterproof shoes, mask to
protect the respiratory tract, gloves and all other personal protection devices necessitated
Do not leave the machine unattended or parked with the key in the switch and the parking
If you are using the machine for the rst time, we recommend trying it out on a large obsta-
cle-free surface rst to acquire the necessary familiarity.
Do not use the machine to clean up wire, string, plastic straps, water or other liquids.
When picking up large but light objects (e.g. paper, leaves, etc.) raise the aps.
To avoid damaging the surface of the oor you are cleaning, avoid rotating the brushes with
Each 30 minutes of work, press the lter shaker button for 30 seconds to clean the suction
lter. During this operation, the suction fan shuts off automatically (Battery and Dual Power
Avoid passing over puddles of water. If the oor is wet, you can still use the machine, but
you must turn off the suction fan since damp/wet dirt reduces the performance of the suc-
For best results, empty the debris bin often and use the lter shaker frequently to keep the
The machine is tted with a driver detection device. It is only possible to start the machine
while seated correctly in the driving seat. The device halts the machine if you get up from
! WARNING!
by the work environment.
! WARNING!
brake off.
! IMPORTANT!
! WARNING!
! IMPORTANT!
! WARNING!
the machine stationary.
! WARNING!
versions).
! WARNING!
tion lter.
! WARNING!
lter clean.
! IMPORTANT!
the seat.
Preparing the machine for work
Proceed as follows before starting work.
► Check the battery charge level (and recharge if necessary). On BH and YH versions, check
whether the fuel tank needs topping up.
► Make sure the debris bin is empty. If necessary, empty it.
2014-07
EN-25

English
1
2
3
4
5
1
1
1
2
1000 BH - 1000 EH - 1000 YH
Controls of the EH and YH versions
► Brake lock pedal (2, g. 4): Press
this pedal along with the service brake
pedal to engage the parking brake. To
disengage the brake lock and release
the parking brake, simply press the service brake pedal.
► Service brake pedal (3, g. 4): Press
this pedal to stop the machine during
operation.
► Flap lift pedal (4, g. 4): Press this
pedal to lift the aps in order to pick
up large but light objects. Release the
pedal when not needed.
► Accelerator pedal (5, g. 4): Press
this pedal to control the speed of the
machine. If the accelerator pedal is released for more than three seconds while the machine is switched on, the “ AUTO POWER-OFF” function switches off all machine functions. To start again,
simply press the accelerator pedal. You can enable/
disable and change the delay for “ AUTO POWEROFF” mode from the “Technical menu”.
► Left and right side brush control lever (1, g. 4):
Push this lever down to lower the side brushes to
working position and start rotation. Raise the lever to
lift the brushes and stop rotation.
► Main brush control lever (1, g. 5): Push this lever
forwards to lower the main brush to working position
and start rotation. Raise the lever again
to lift the brushes and stop rotation on
completion of work. The suction fan starts
automatically when the main brush starts
rotating.
► Emergency stop button (1, g. 6):
Press this mushroom head button in the
event of imminent danger or need to deactivate all machine functions and disconnect power to the machine. Switch off
all the previously active functions (side
brushes, main brush) before resetting the
emergency stop button.
► Battery charger socket (2, g. 6): Plug the battery charger into this socket. See the
”Preparing the battery charger” section.
4
5
6
EN-26
2014-07

1
2
0
1
START
1 2 3 4 5
6 7 8 9 10 11
00:00
100%
1000 BH - 1000 EH - 1000 YH
English
► Bin tipping lever (top unloading) (g. 7): Pull this
7
lever to rotate the bin and empty its contents.
► Display (1, g. 8): This displays the current battery
charge level expressed as a percentage, logos for
active functions, an hour counter showing the total
hours of use of the machine and any active alarms,
see the “Display alarms” section.
► Menu button (2, g. 8): On the EH version, this
button is only active in the “Technical menu”. On
the YH version, it serves to display the hours of
functioning of the engine.
► Bin up/down switch (3, g. 8): Lifts or lowers the debris bin.
► Speed control (4, g. 8): Regulates the forward and reverse speed of the machine.
► Direction selector (5, g. 8): Turn this selector to engage forward or reverse travel.
► Main switch (6, g. 8): Switches power to all machine functions on/off.
► Horn button (7, g. 8): Press to sound the horn.
► Light switch (8, g. 8): Turns the lights (OPTIONAL) on and off.
► Engine start switch (9, g. 8): Starts and shuts down the engine.
► Suction switch (10, g. 8): Switches suction on and off.
► Filter shaker button (11, g. 8): Press and hold this button for 30 seconds to shake and
clean the suction lter. As soon as the shaker motor starts, the suction and drive motors
are switched off. You can select the “automatic lter shaker” function from the “Technical
menu”. When this function is active, the lter shaker is automati-
cally switched on at the end of the set interval.
29
► Bin up/down movement enabling button (1, g. 29): Press this
button to enable bin movement by the bin up/down switch.
8
2014-07
EN-27

English
1
2
3
4
5
1
1
2
3
1000 BH - 1000 EH - 1000 YH
Operating the EH and YH versions
► Sit correctly in the seat.
► Turn the main switch to position “1”.
► Check that the display shows the batteries to be fully charged. Recharge if necessary. See
the “Battery maintenance and charging” section.
► Select the direction of travel with the direction selector.
► Release the parking brake.
► Lower the side brushes.
► Lower the main brush.
► Press the accelerator pedal to move off and start work.
► Press the ap lift pedal only when you need to pick up large but light objects.
► Cleaning quality depends largely on the cleanliness of the suction lter. Operate the lter
shaker at intervals suitable to the environment in which you are using the machine.
Controls of the BH versions
► Brake lock pedal (2, g. 9): Press
this pedal along with the service
brake pedal to engage the parking
brake. To disengage the brake lock
and release the parking brake,
simply press the service brake
pedal.
► Service brake pedal (3, g. 9):
Press this pedal to stop the machine during operation.
► Flap lift pedal (4, g. 9): Press
this pedal to lift the aps in order to
pick up large but light objects. Release the pedal when not needed.
► Direction selector pedal (5, g.
9): Press this pedal to select the
direction and the speed of travel.
► Left and right side brush control le-
ver (1, g. 9): Push this lever down
to lower the side brushes to working
position and start rotation. Raise the
lever to lift the brushes and stop rotation.
► Main brush control lever (2, g. 10):
Push this lever forwards to lower the
main brush to working position and
start rotation. Raise the lever again
to lift the brushes and stop rotation on
completion of work.
► Suction control level (1, g. 10): Adjust this lever to increase or reduce suction.
► Engine drive lever (3, g. 10): Enables/disables all functions powered by the engine.
9
10
EN-28
2014-07

1
1
1
START
O
F
F
O
N
S
T
A
R
T
1
2
3 4
5
6 7 8
1000 BH - 1000 EH - 1000 YH
English
► Emergency bypass (1, g. 11): Use this lever to
move the machine with the engine off. Press in the
direction shown to disengage the hydraulic pump.
► Bin tipping lever (top unloading) (g. 7): Pull this
lever to rotate the bin and empty its contents.
► Emergency stop button (1, g. 12): Press this
mushroom head button in the event of imminent danger or need to deactivate all machine functions and
disconnect power to the machine.
► Choke (1, g. 13): Pull to engage the choke for cold
starting.
► Filter shaker button (2, g. 13): Shut off suction with
the suction control lever and then press and hold this
button for 30 seconds to shake and clean the suction
lter.
► Bin up/down switch (3, g. 13): Lifts or lowers the
debris bin.
► Horn button (4, g. 13): Press to sound the horn.
► Main switch (5, g. 13): Switches power to all machine
functions on/off.
► Voltage indicator (6, g. 13): Shows correct electric
circuit voltage.
► Hour counter (7, g. 13): Shows machine operating
hours.
► Engine speed control lever (8, g. 13): Move this le-
ver to adjust engine speed.
► Bin up/down movement enabling button (1, g. 29):
Press this button to enable bin movement by the bin
up/down switch.
11
7
12
29
13
2014-07
EN-29

English
1000 BH - 1000 EH - 1000 YH
Operating the BH versions
► Sit correctly in the seat.
► Release the parking brake.
► Move the engine speed control lever to START position.
► Pull out the choke.
► Move the engine drive lever to position 1-START and hold it there while turning the ignition
key to START position.
Do not engage the starter motor for more than ve seconds at a time. If the engine fails to
start, release the ignition key and wait ten seconds before trying again.
► Allow the ignition key to return to ON position as soon as the engine starts and release the
engine drive lever.
► Press on the direction selector pedal to move off. Press the right side to move forwards.
Press the left side to move backwards.
► Lower the side brushes.
► Lower the main brush.
► Adjust the suction control lever to obtain the required strength of suction.
► Press the ap lift pedal only when you need to pick up large but light objects.
► Cleaning quality depends largely on the cleanliness of the suction lter. Operate the lter
shaker at intervals suitable to the environment in which you are using the machine.
! WARNING!
Emptying the bottom unloading debris bin
When emptying the bin, always wear a mask to protect the respiratory tract from the dust
which is always present during this operation.
Before emptying the debris bin, operate the lter shaker for 30 seconds to clean the lter
► Release the bin lock (g. 14).
► Pull out the rear bin by means of its handle.
► Take the bin (which is tted with wheels) to the rubbish collection point and empty it.
! WARNING!
! WARNING!
14
EN-30
2014-07

1
2
1000 BH - 1000 EH - 1000 YH
English
Emptying the top unloading debris bin
When emptying the bin, always wear a mask to protect the respiratory tract from the dust
which is always present during this operation.
Before emptying the debris bin, operate the lter shaker for 30 seconds to clean the lter
When you open the bin, all functions are disabled on EH and YH versions, and the engine is
also switched off on the YH version.
► Press and hold the bin movement enabling button (1, g. 29) then operate the bin up/down
switch (2, g. 29) to raise the bin to the required height.
► Pull the lever (g. 7) to rotate the bin and empty its contents.
► Turn the bin back to its horizontal position.
► Press and hold the bin movement enabling button (1, g. 29) then operate the bin up/down
switch (2, g. 29) to lower the bin again.
7
! WARNING!
! WARNING!
! IMPORTANT!
29
Finishing work
Shake the lter at the end of every work session.
When you nish work, switch the machine off at the main switch, lift the side brushes and main
brush and engage the parking brake.
! IMPORTANT!
Moving the machine when not in operation
Proceed as follows to move the machine.
► Raise the side brushes.
► Raise the main brush.
► Select the direction of travel.
► Press the accelerator pedal.
2014-07
EN-31

INTENTIONALLY WHITE PAGE

1000 BH - 1000 EH - 1000 YH
English
Proceed as follows to prepare the machine for extended periods of inactivity.
PERIODS OF INACTIVITY
► Empty the debris bin.
► Clean the suction lter.
► Disconnect the machine from the power supply.
► Completely recharge the batteries and deposit them in the battery store. During long peri-
ods of inactivity, you should charge the batteries regularly (at least once every two months)
to keep them constantly at maximum charge.
If you do not charge the batteries regularly, they may be irreparably damaged.
! WARNING!
2014-07
EN-33

INTENTIONALLY WHITE PAGE

1000 BH - 1000 EH - 1000 YH
English
MAINTENANCE INSTRUCTIONS
Never perform any maintenance operations without rst disconnecting the batteries.
Maintenance of the electrical circuit and all other operations not expressly required by this
manual must be performed by specialised personnel only, in compliance with current safety
legislation and as described in the maintenance manual.
Maintenance - General rules
Performing regular maintenance according to the Manufacturer’s instructions improves performance and extends the working life of the machine.
When cleaning the machine, observe the following precautions.
► Avoid using pressure washers. Water could penetrate the electrical compartment or mo-
tors leading to damage or short circuits.
► Do not use steam to avoid the heat warping plastic parts.
► Do not use solvents or hydrocarbon based products. These can damage the cowling and
rubber components.
Replacing/installing the main brush
This operation must be performed with the machine switched off and the key removed.
Proceed as follows to replace the main brush.
► Unscrew the knob and open the door on the left of the machine.
► Unscrew the three knobs securing the brush compartment cover (g. 15).
► Remove the brush compartment cover (g. 16).
► Pull out the brush (g. 17).
► Remove the adapter from the core of the old brush and t it to the new brush, taking care
to keep the bristles aligned in the same direction (g. 18).
► Fit the adapter with the new brush in the machine, taking care to ensure that the adapter
engages the drive hub securely. Fit the cover over the brush compartment and x it in place
with the three knobs removed previously.
! DANGER!
! DANGER!
15
17
2014-07
16
18
EN-35

English
1000 BH - 1000 EH - 1000 YH
Adjusting the main brush
The main brush makes a major contribution to the efciency of the whole machine. Correct adjustment ensures better quality cleaning in shorter times.
The machine is delivered correctly adjusted. The main brush therefore only needs further adjustment when it becomes worn. Proceed as follows to adjust the main brush.
► Unscrew the knob (g. 19).
► Turn the adjuster anti-clockwise until the knob xing hole can be engaged (g. 19).
► Screw the knob back in (g. 19).
19
Replacing/installing the side brushes
This operation must be performed with the machine switched off and the key removed.
For ease of transport, the side brushes are not installed on the machine when it is delivered.
Proceed as follows to install the side brushes.
► Raise the side brush holders (g. 30).
► Unscrew the screw on the side brush motor shaft (g. 20).
► Remove the keyway protector.
► Position the brush complete with ange over the motor shaft (g. 20).
► Fit and tighten the brush locking screw again (g. 20).
Repeat the above procedure to replace worn side brushes.
! DANGER!
30 20
EN-36
2014-07

1000 BH - 1000 EH - 1000 YH
English
Adjusting the side brushes
The side brushes direct dirt and debris towards the centre of the machine. The most efcient height
Never operate the machine without the side brushes installed.
for this purpose is when the side brushes gently touch the oor. Proceed as follows to increase or
reduce the pressure of the side brushes on the oor, if necessary.
► Lower the side brushes into work position (g. 21).
► Loosen the two locking screws under the brush lifting knob (g. 22).
► Manually move the brush to the required position.
► Tighten the locking screws again (g. 22).
► Return the brushes to idle position.
! WARNING!
21 22
Replacing/installing the suction lter
This operation must be performed with the machine switched off and the key removed.
The suction lter makes a major contribution to the efciency of the whole machine.
Its correct maintenance keeps the machine at maximum efciency at all times. If the sweeper begins
to raise dust as it sweeps, check the condition of the suction lter.
The suction lter can be cleaned in two ways.
Semiautomatic lter cleaning:
► This method provides a quick and easy way to keep the suction lter clean and ready for
work. Press and hold the lter shaker button for a number of seconds, then repeat four or
ve times. On BH versions, shut off suction with the suction control lever before pressing
the lter shaker button.
! DANGER!
2014-07
EN-37

English
FLOW
1000 BH - 1000 EH - 1000 YH
Manual cleaning of the panel lter:
! DANGER!
This operation must be performed with the machine switched off and the key removed.
If the action of the lter shaker proves insufcient, proceed as follows to clean the lter manually.
► Remove the lter compartment cover.
► Lift the two levers and remove the lter shaker bracket complete with the lter shaker mo-
tor, carefully disconnecting the power cable from the lter shaker (g. 23).
► Remove the suction lter (g. 23).
► Blow the lter clean with compressed air (maximum pressure 6 bar).
! IMPORTANT!
The lter is marked to show the correct direction for tting.
23
Manual cleaning of the pocket lter:
This operation must be performed with the machine switched off and the key removed.
If the action of the lter shaker proves insufcient, proceed as follows to clean the lter manually.
► Remove the lter compartment cover.
► Unscrew the four screws securing the two lter holder brackets (g. 24).
► Remove the two brackets (g. 24).
► Remove the lter, carefully disconnecting the power cable from the lter shaker (g. 24).
► Blow the lter clean with compressed air (maximum pressure 6 bar).
! DANGER!
EN-38
24
2014-07

Petrol - Diesel
1 2 3
Battery - Dual Power
Battery - Dual Power
Battery - Dual Power
1
2
1000 BH - 1000 EH - 1000 YH
English
Fuses: replacing
This operation must be performed with the machine switched off and the key removed.
Never use a fuse with a higher amperage than specied.
If a fuse continues to blow, the fault in the wiring, boards (if present) or motors must be identied
and repaired. Have the machine checked by qualied personnel.
Regulator fuse (1, g. 25), lter shaker and ashing beacon fuse (2, g. 25), hour counter and horn
fuse (3, g. 25), BH versions.
Main fuse (g. 26) EH and YH versions.
Manual reset cutouts for side brush motors (g. 27), EH and YH versions.
Filter shaker and suction fan fuse (1, g. 28), central brush motor fuse (2, g. 28), EH and YH ver-
sions.
25
BH
! DANGER!
! WARNING!
26
EH - YH
28
27
EH - YH
EH - YH
Battery maintenance and charging
The batteries give off ammable fumes. Put out all res and hot embers before checking or
To avoid permanent damage to the batteries, do not run them down completely.
Do not check the batteries by sparking.
Perform the operations described below in a ventilated area.
! DANGER!
topping up the batteries.
2014-07
EN-39

English
Charging procedure
Connect the battery charger connector to the battery wiring connector.
! WARNING!
In the case of gel batteries, use a charger specic for gel batteries only.
! WARNING!
Charge the batteries as instructed in the battery charger manual.
Disconnect the connectors at the end of charging.
1000 BH - 1000 EH - 1000 YH
Changing the engine oil
On YH machines, change the engine oil when the “CHANGE ENGINE OIL” warning appears
on the display. On BH machines, change the engine oil at the intervals specied in the operation and maintenance manual provided by the engine manufacturer on the basis of the hour
counter on the machine’s dashboard. Always change engine oil with the machine switched
Check that all machine functions are disabled, then lift the top cowling. Check that the engine is not
hot enough to cause burns then proceed as follows.
► Find the engine oil drain pipe and pass it through the hole in the engine compartment bot-
tom plate.
► Remove the oil level dipstick to facilitate drainage of the old oil.
► Position a suitable container under the drain pipe and unscrew the plug to let the old oil out.
► When the old oil has all drained out, t the plug back in the drain pipe and arrange the
pipe back inside the engine compartment, making sure that it does not interfere with any
moving parts.
► Add new oil through the dipstick hole in the quantity specied in the engine’s own manual.
► Once the right quantity of new oil has been added, t the oil level dipstick and check that
the level is correct.
► Close the top cowling.
! WARNING!
off and the engine cold.
EN-40
2014-07

1000 BH - 1000 EH - 1000 YH
English
Periodic checks
CHECK
ON DELIVERY
EVERY 10 HOURS
EVERY 50 HOURS
CHECK THE BATTERY ELECTROLYTE X X
CHECK THE HYDRAULIC OIL X X
CHECK THE CONDITION OF THE BELTS X
ADJUST THE BRAKE X
CHECK THE TIGHTNESS OF NUTS BOLTS X
CHECK THE CONDITION OF THE BRUSHES X
CHECK THE TIGHTNESS OF THE SEALS X
CHECK THE FUNCTIONING OF DEVICES X X
GREASE THE STEERING CHAIN X
EVERY 100 HOURS
2014-07
EN-41

INTENTIONALLY WHITE PAGE

1000 BH - 1000 EH - 1000 YH
TROUBLESHOOTING
PROBLEM CAUSE REMEDY
The machine raises dust. Filter clogged. (EH,YH,BH)
Filter damaged. (EH,YH,BH) Replace the lter.
Filter incorrectly tted. (EH,YH,BH) Fit the lter correctly in its housing.
The machine leaves dirt on the ground. The main brush is not adjusted correctly
The main brush does not rotate. Belt broken. (EH,YH,BH) Replace.
The side brushes do not rotate. Belt broken. (BH) Replace.
The suction motor does not work. Fuse burned out. (EH,YH) Replace.
The lter shaker motor does not work. Fuse burned out. (EH,YH,BH) Replace.
The machine won’t start. Battery terminals disconnected.
The batteries do not hold their charge. Electrolyte low. (EH,YH,BH) Top up.
or is worn. (EH,YH,BH)
The main brush has collected string or
wire. (EH,YH,BH)
The aps are damaged. (EH,YH,BH) Replace the aps.
Debris bin full. (EH,YH,BH) Empty the debris bin.
Fuse burned out. (EH,YH) Replace.
Microswitch faulty. (EH,YH) Replace.
Cable disconnected. (EH,YH) Check.
Gearmotor faulty. (EH,YH) Replace.
Cutout tripped. (EH,YH) Reset.
Microswitch faulty. (EH,YH) Replace.
Cable disconnected. (EH,YH) Check.
Switch faulty. (EH,YH) Replace.
Cable disconnected. (EH,YH) Check.
Motor faulty. (EH,YH) Replace.
Switch faulty. (EH,YH,BH) Replace.
Cable disconnected. (EH,YH,BH) Check.
Motor faulty. (EH,YH,BH) Replace.
(EH,YH,BH)
Batteries discharged. (EH,YH,BH) Recharge.
Emergency stop button pressed.
(EH,YH,BH)
No fuel. (YH,BH) Top up.
No engine oil. (YH,BH) Top up.
Driver detection device faulty.
(EH,YH,BH)
Operator not correctly seated. Sit correctly in the seat.
Clutch not engaged. (BH) Engage.
Main fuse burned out. (EH,YH) Replace.
Power control board fuse burned out.
(EH,YH)
Battery terminal loose. (EH,YH,BH) Tighten.
2014-07
Shake the lter with the lter shaker and, if
necessary, remove and clean it thoroughly.
Adjust or replace the main brush as necessary.
Remove the string and wire picked up.
Check.
Reset.
Replace.
Replace.
English
EN-43

English
1000 BH - 1000 EH - 1000 YH
EN-44
INTENTIONALLY WHITE PAGE
2014-07

1000 BH - 1000 EH - 1000 YH
English
DISPLAY ALARMS
BRUSH MOTOR CUTOUT
The brush motor has overheated.
TRIPPED
BRAKE The parking brake is engaged or the drive motor has over-
heated.
STAND-BY The driver detection microswitch is not detecting an operator.
RELEASE ACCELERATOR Incorrect starting sequence. Release the accelerator pedal
when starting.
EEPROM 1 FAULT Replace the display board.
DRIVE CONTROL BOARD
The drive control board has overheated.
CUTOUT TRIPPED
ACCELERATOR FAULT There is a problem with the accelerator cable.
MAX. SPEED POTENTIOM-
There is a fault in the maximum speed potentiometer cabling.
ETER FAULT
UNDERVOLTAGE FAULT Check the batteries.
OVERVOLTAGE FAULT Check the batteries.
RELAY FAULT Replace the drive control board.
HPD Check the accelerator pedal. Switch the machine off and back
on with the accelerator released.
MOSFET FAULT Replace the drive control board.
EEPROM 2 FAULT Replace the drive control board.
2014-07
EN-45

English
1000 BH - 1000 EH - 1000 YH
SERVICE Call a service centre to arrange servicing.
BATTERY DISCHARGED Battery discharged.
START ENGINE YH version only: start the engine to continue work.
BATTERY CHARGED YH version only: batteries charged.
ALTERNATOR CUTOUT
YH version only: the alternator has overheated.
TRIPPED
CHANGE ENGINE OIL YH version only: change the engine oil.
COWLING OPEN
SWITCH OFF MOTOR/
ENGINE
EN-46
2014-07

1000 BH - 1000 EH - 1000 YH
English
To access the technical menu, turn the main switch on then press and hold the menu and suction
TECHNICAL MENU
buttons for three seconds.
Press the “SUCTION” button to scroll up through items or increment the selected parameter value.
Press the “FILTER SHAKER” button to scroll down through items or decrement the selected parameter value.
Press the “MENU” button to select the parameter to change. The selected parameter appears in
negative.
LANGUAGE IT, GB, ES....
BATTERY TYPE
AUTO POWER-OFF
FILTER SHAKER
MACHINE TYPE
ACID
GEL
OFF
TIME-OUT 0-10
SECONDS
MANUAL
AUTOMATIC 5-30
MINUTES
BATTERY DUAL POWER
ALTERNATOR
TIME
SERVICE MENUSERVICE MENU
EXIT
SAVE
2014-07
20-120 SECONDS
FROM ENGINE
STARTUP
EN-47

INTENTIONALLY WHITE PAGE
 Loading...