

Duke Energy H?M Energy Manager, HoM Energy Manager Homeowner's Manual
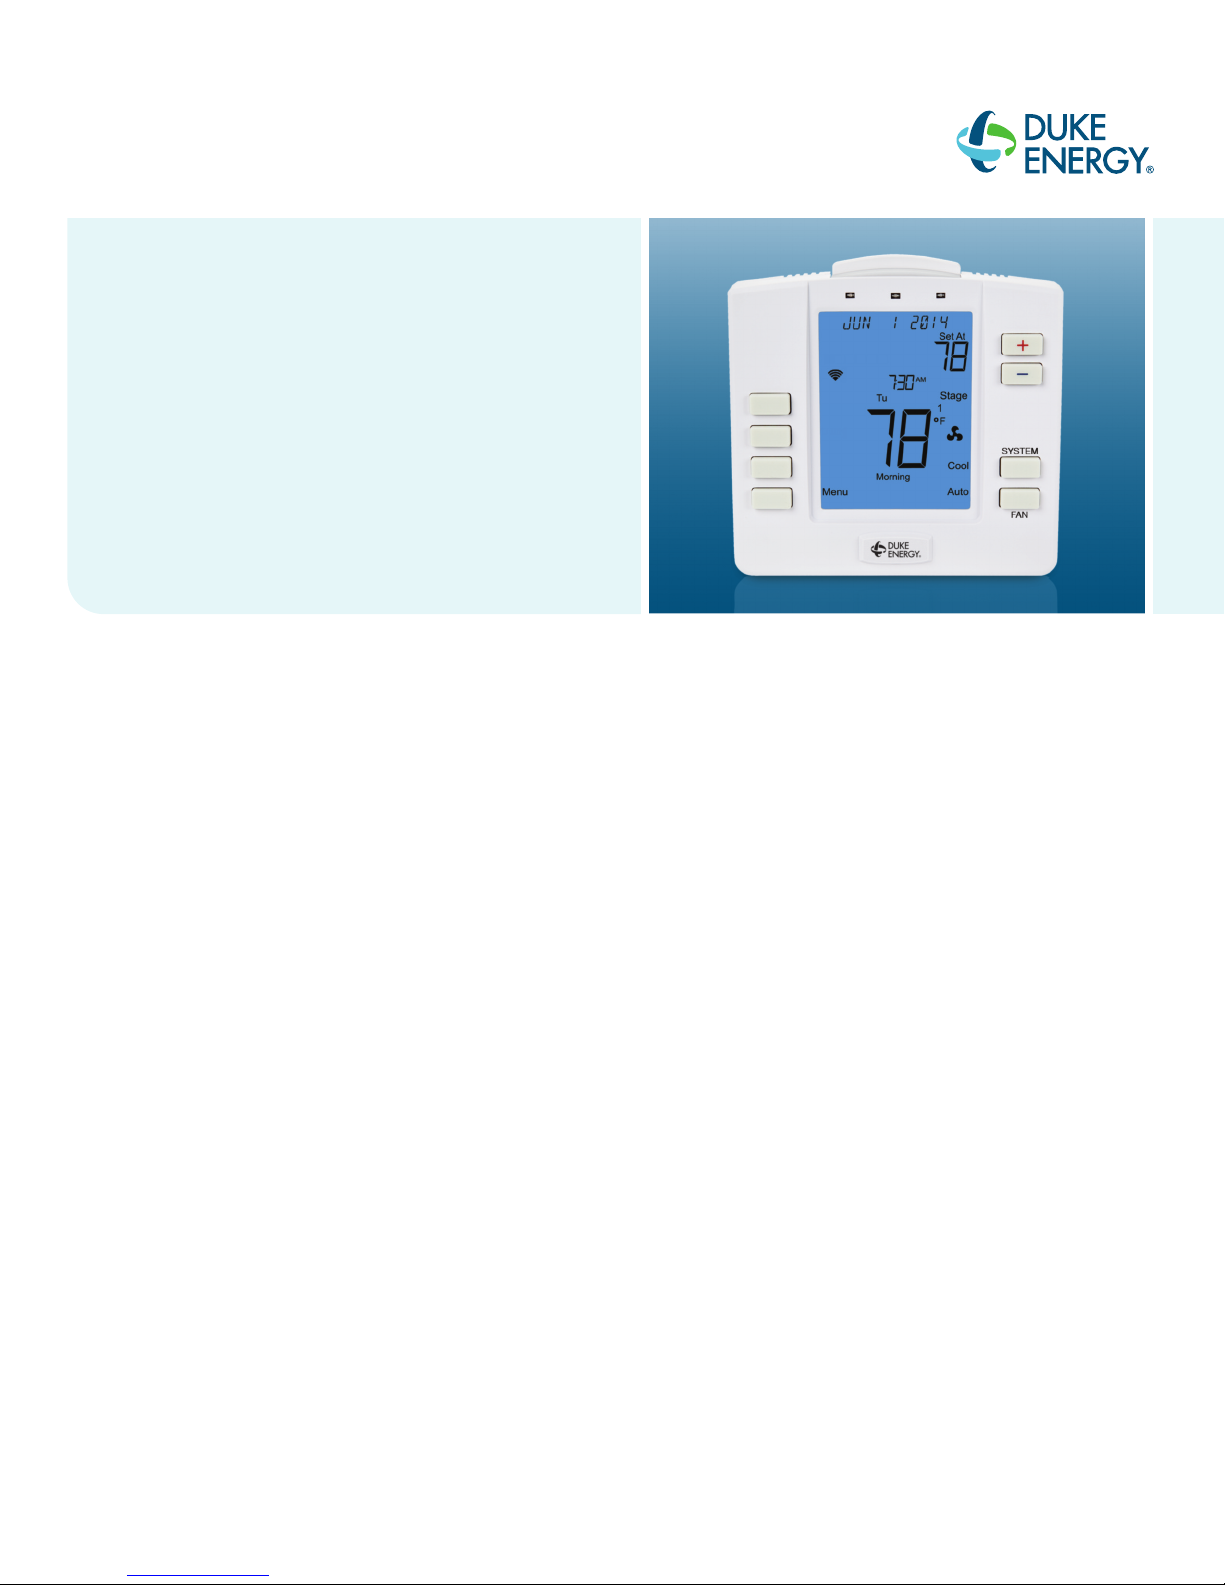
HōM™ Energy Manager
Web-Programmable Thermostat
Homeowner’s Manual
Look inside for a complete guide to the setup
and operation of your new thermostat.
Installed by: ____________________________________________
Date: __________________________________________________
Number of Thermostats: ________________________________
Notes: ________________________________________________
800.956.8825 • duke-energy.com/homenergymgr

HōM Energy Manager Portal
homenergymgr.com/portal/engagement
Table of Contents
Step 1: Getting Started..........................................................................................................................................4-6
A. Thermostat Buttons and Indicators ............................................................................................................4
B. Thermostat Display................................................................................................................................5-6
Step 2: Main Menu and Thermostat Settings..........................................................................................................7-15
A. Wi-Fi
B. Filter Timer Settings Menu..................................................................................................................11-12
C
D. LCD Backlight Settings Menu ..................................................................................................................13
E
F. Keypress Beep Confirmation Menu ............................................................................................................14
G. Time-of-Day (TOD) Recovery ..................................................................................................................15
Step 3: How to Set a Temperature “Hold” ............................................................................................................16-17
A. Temporary Hold......................................................................................................................................16
B. Timed Temporary Hold ......................................................................................................................16-17
C. Permanent Hold ....................................................................................................................................17
®
Settings Menu ..........................................................................................................................7-10
. Reset Filter Timer ..................................................................................................................................12
. Nightlight Settings Menu ....................................................................................................................13-14
D. Ending a Hold........................................................................................................................................17
Step 4: Using the Keypad Lock ..........................................................................................................................18-20
A. Partial (PART) Lockout ............................................................................................................................18
B. Full (FULL) Lockout................................................................................................................................19
C. Unlocking the Keypad ............................................................................................................................20
Step 5: Conservation Events ..............................................................................................................................21-22
Troubleshooting ................................................................................................................................................23-25
©2014 Comverge, Inc. All rights reserved. Wi-Fi®is a registered trademark of Wi-Fi Alliance®.
HōM™ Energy Manager Web-Programmable Thermostat Homeowner’s Manual
2

HōM Energy Manager Portal
homenergymgr.com/portal/engagement
our Duke Energy HōM™ Energy Manager thermostat controls your central air conditioning and heating system. The types of
Y
compatible systems include:
Central Air Conditioners:
• Single-Stage
• Multi-Stage
MPORTANT
I
All programming functions are available through the Duke Energy HōM Energy Manager Portal. The “7-Day/4-Interval”
rogramming function cannot be done manually at the thermostat. It can only be done through the HōM Energy Manager
p
Portal.
You may enter the HōM Energy Manager Portal from anywhere you have Web access, using your smartphone, tablet,
or computer. You may manually use the thermostat to raise or lower the temperature in your home, and set all other HVAC
eatures. For details on programming through the HōM Energy Manager Portal, please see your Welcome to Duke Energy
f
HōM Energy Manager brochure or visit duke-energy.com/homenergymgr.
All compatible components are connected and configured by the HōM Energy Manager technician during installation.
Heat Pump*:
• Single-Stage
• Multi-Stage
Furnaces:
• Single-Stage Gas or Oil
• Multi-Stage Gas or Oil
ingle-Stage Electric
• S
• Multi-Stage Electric
• Two-Wire Hydronic
• Millivolt Heat System
Aux Heat:
• Single-Stage Electric
• Multi-Stage Electric
*If you have a heat pump, make sure your settings are no more than 2 degrees between the warmest temperature (the
one you set when you are home) and coolest temperature (the one you set when you are away). Large temperature
differences may enable the auxiliary heating mode and potentially cause your electric bill to increase significantly in the
fall and winter months.
HōM™ Energy Manager Web-Programmable Thermostat Homeowner’s Manual
3

Step 1: Getting Started
A. Thermostat Buttons and Indicators
HōM Energy Manager Portal
homenergymgr.com/portal/engagement
1
Nightlight
7
1
6
5
4
3
2
Enables or disables illumination. Provides night light function. Can be used to
activate the LCD back light.
FAN Button Changes fan setting (Auto/On)
2
3
SYSTEM Button Changes operating mode (Off, Cool, Off, Heat, Aux Heat [displayed on heat pump
units only] and Off)
User Program Buttons
4
5
Temperature Setpoint Buttons Changes temperature up or down
6
LEDs Indicates status of conservation periods
Module Slot Houses the communications radio module
7
Facilitate various operations in different menus
HōM™ Energy Manager Web-Programmable Thermostat Homeowner’s Manual
4
Step 1: Getting Started
Aux
Auto
On
Energy
Perm
Menu
Done
Timed
Prev
Other
Select
Utility
Sched
Run
Next
Clock
Set At
H
OLD
O
1
C
F
Stage
24
3
Mo
T
u
WeThFr
Sa
Su
AM
P
M
Evening
Morning
N
ight
Day
Un
Occupied
Off
Cool
Heat
¿¿¿¿¿¿¿¿¿¿¿¿¿¿¿¿
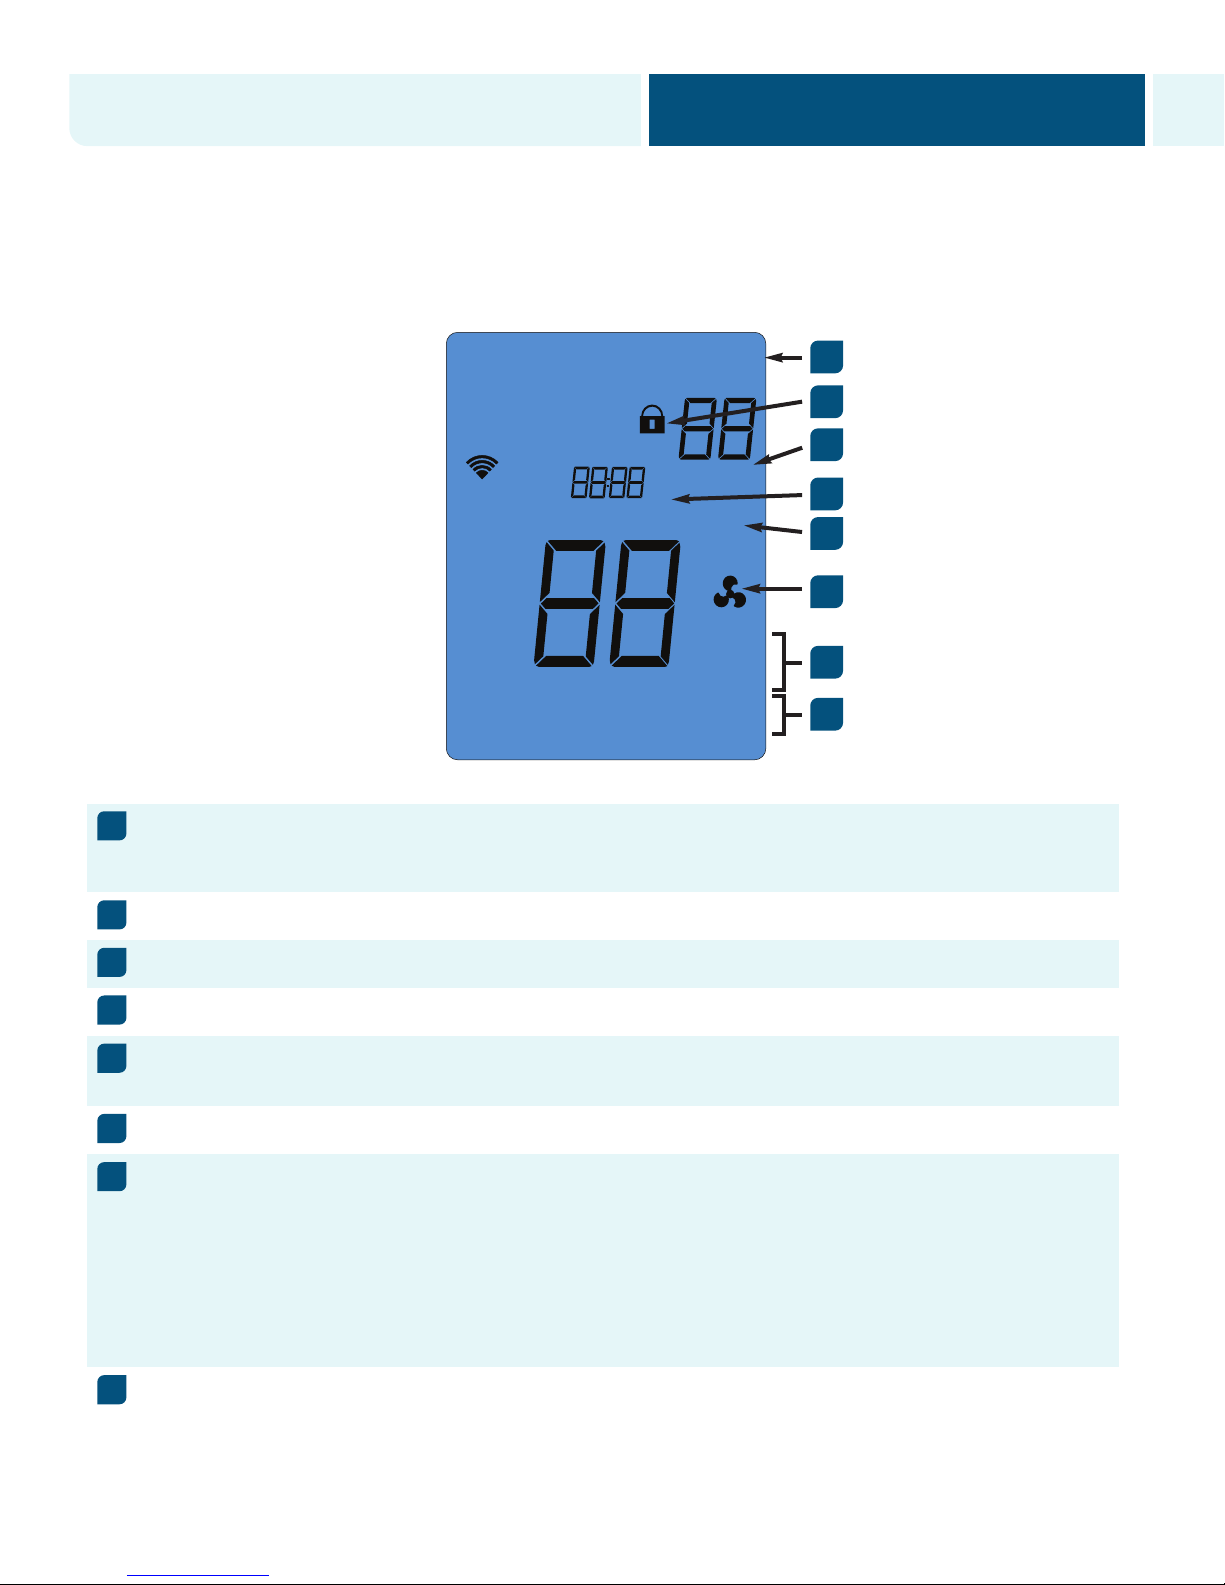
B. Thermostat Display
HōM Energy Manager Portal
homenergymgr.com/portal/engagement
1
2
3
4
5
6
7
1
Messaging Display
Lock Icon Confirms keypad lockout, preventing unwanted changes to thermostat settings
2
3
HOLD Indicator Appears only when thermostat program is overridden
4
Time and Day Display Indicates current time and day of the week
5
HEAT/COOL Stage Display When ON, the indicated stage is active; when OFF, the state is inactive; when
Fan Status Appears only when fan is on
6
7
System Status Displays current operation mode according to system configuration as set
8
Fan Mode • Auto
Displays current date, HVAC system status, conservation period status, and Duke
Energy-related messages. In the event of a power outage, the clock will maintain
the correct time for 24 hours
flashing, compressor delay is active
by installer
• Off – system is OFF
• Cool
• Off
• Heat
• Aux Heat
• Off
• On
HōM™ Energy Manager Web-Programmable Thermostat Homeowner’s Manual
8
5
Step 1: Getting Started
Aux
Auto
On
Energy
Perm
Menu
Done
Timed
Prev
Other
Select
Utility
Sched
Run
Next
Clock
Set At
H
OLD
O
1
C
F
Stage
24
3
Mo
T
u
WeThFr
Sa
Su
AM
P
M
Evening
Morning
N
ight
Day
Un
Occupied
Off
Cool
Heat
¿¿¿¿¿¿¿¿¿¿¿¿¿¿¿¿
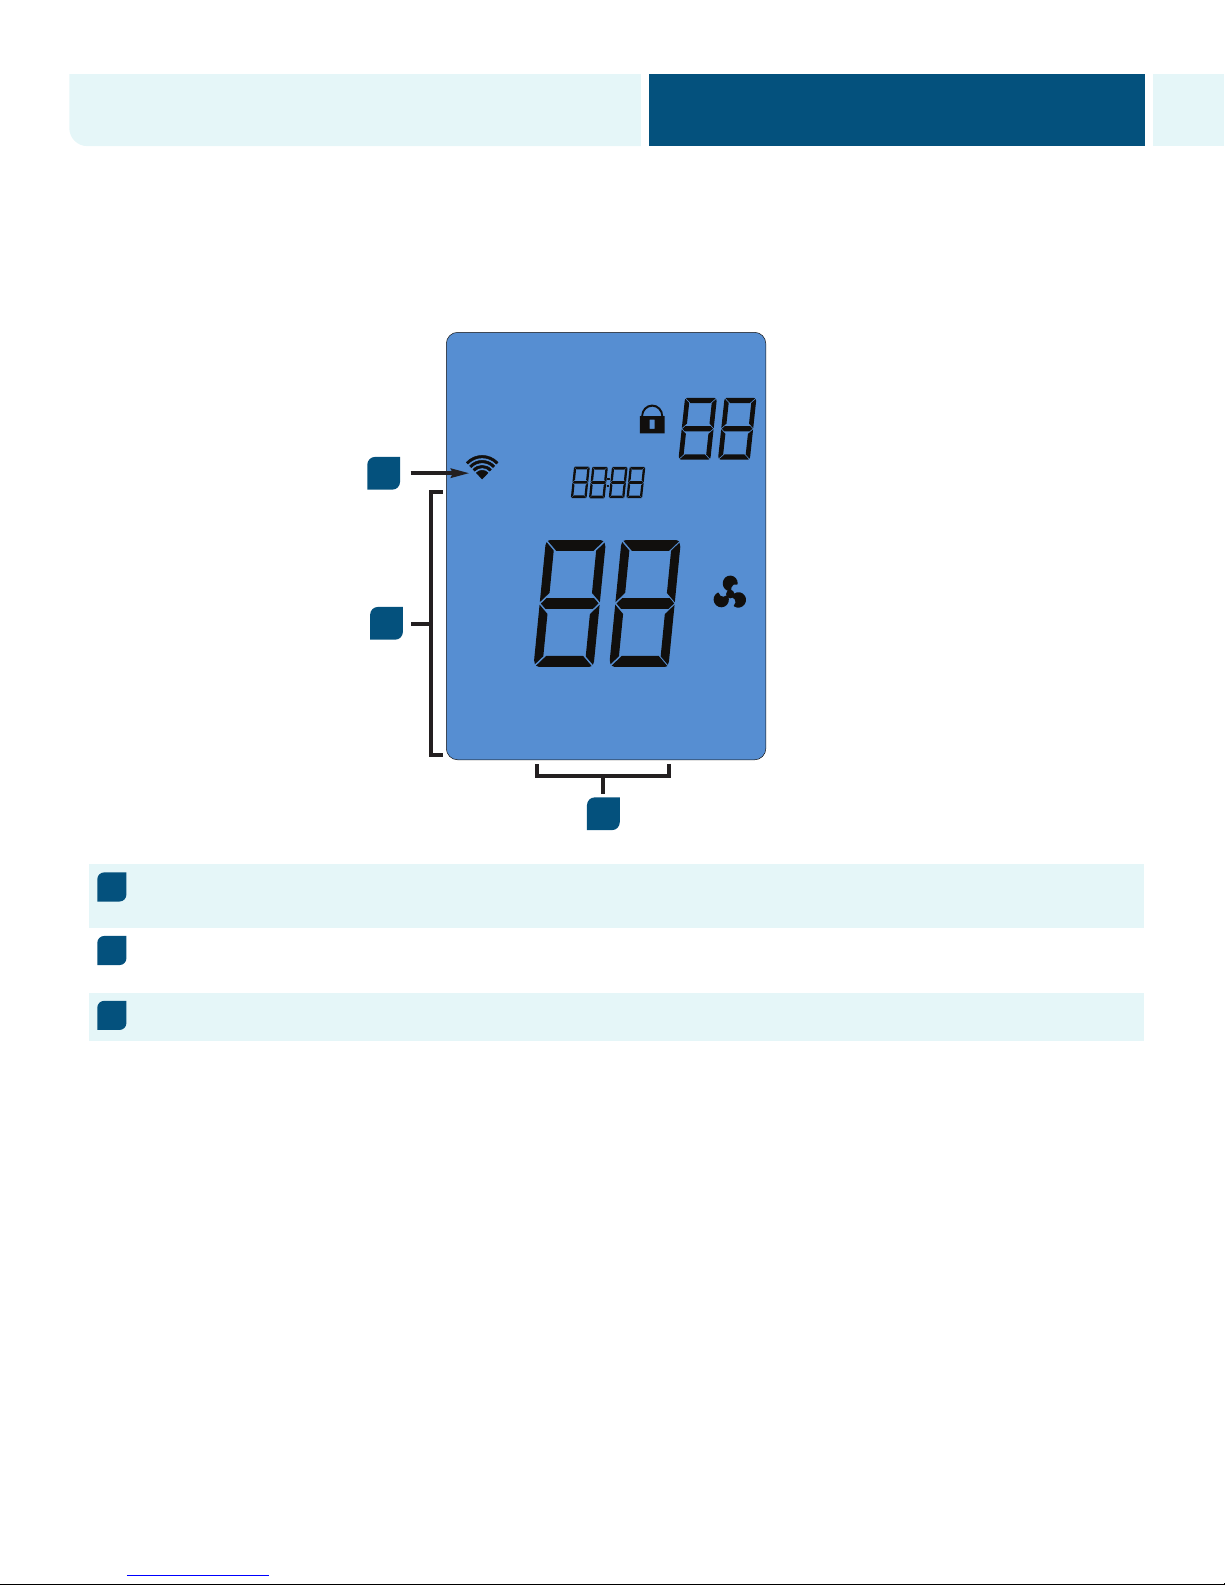
B. Thermostat Display (continued)
11
0
1
HōM Energy Manager Portal
homenergymgr.com/portal/engagement
9
Time Of Day Program
Interval
10
User Buttons Display
(Programming Buttons)
Link Status Indicates status of Wi-Fi®link
11
NOTE: Should a communications error (COMM ERROR) display in the thermostat messaging area, please call Duke
Energy at 800.956.8825 immediately. The message indicates a communication problem between your thermostat
and Duke Energy. In some instances, the utility will program the thermostat to also display whom to contact during a
communications error.
Displays current programming interval setting
Actions to be performed when corresponding user button is pressed
HōM™ Energy Manager Web-Programmable Thermostat Homeowner’s Manual
9
6
HōM Energy Manager Portal
homenergymgr.com/portal/engagement
Step 2: Main Menu and Thermostat Settings
The Homeowner Programming Menu table (next page) summarizes the configuration items that the
homeowner can adjust, and provides a convenient space to keep track of your settings.
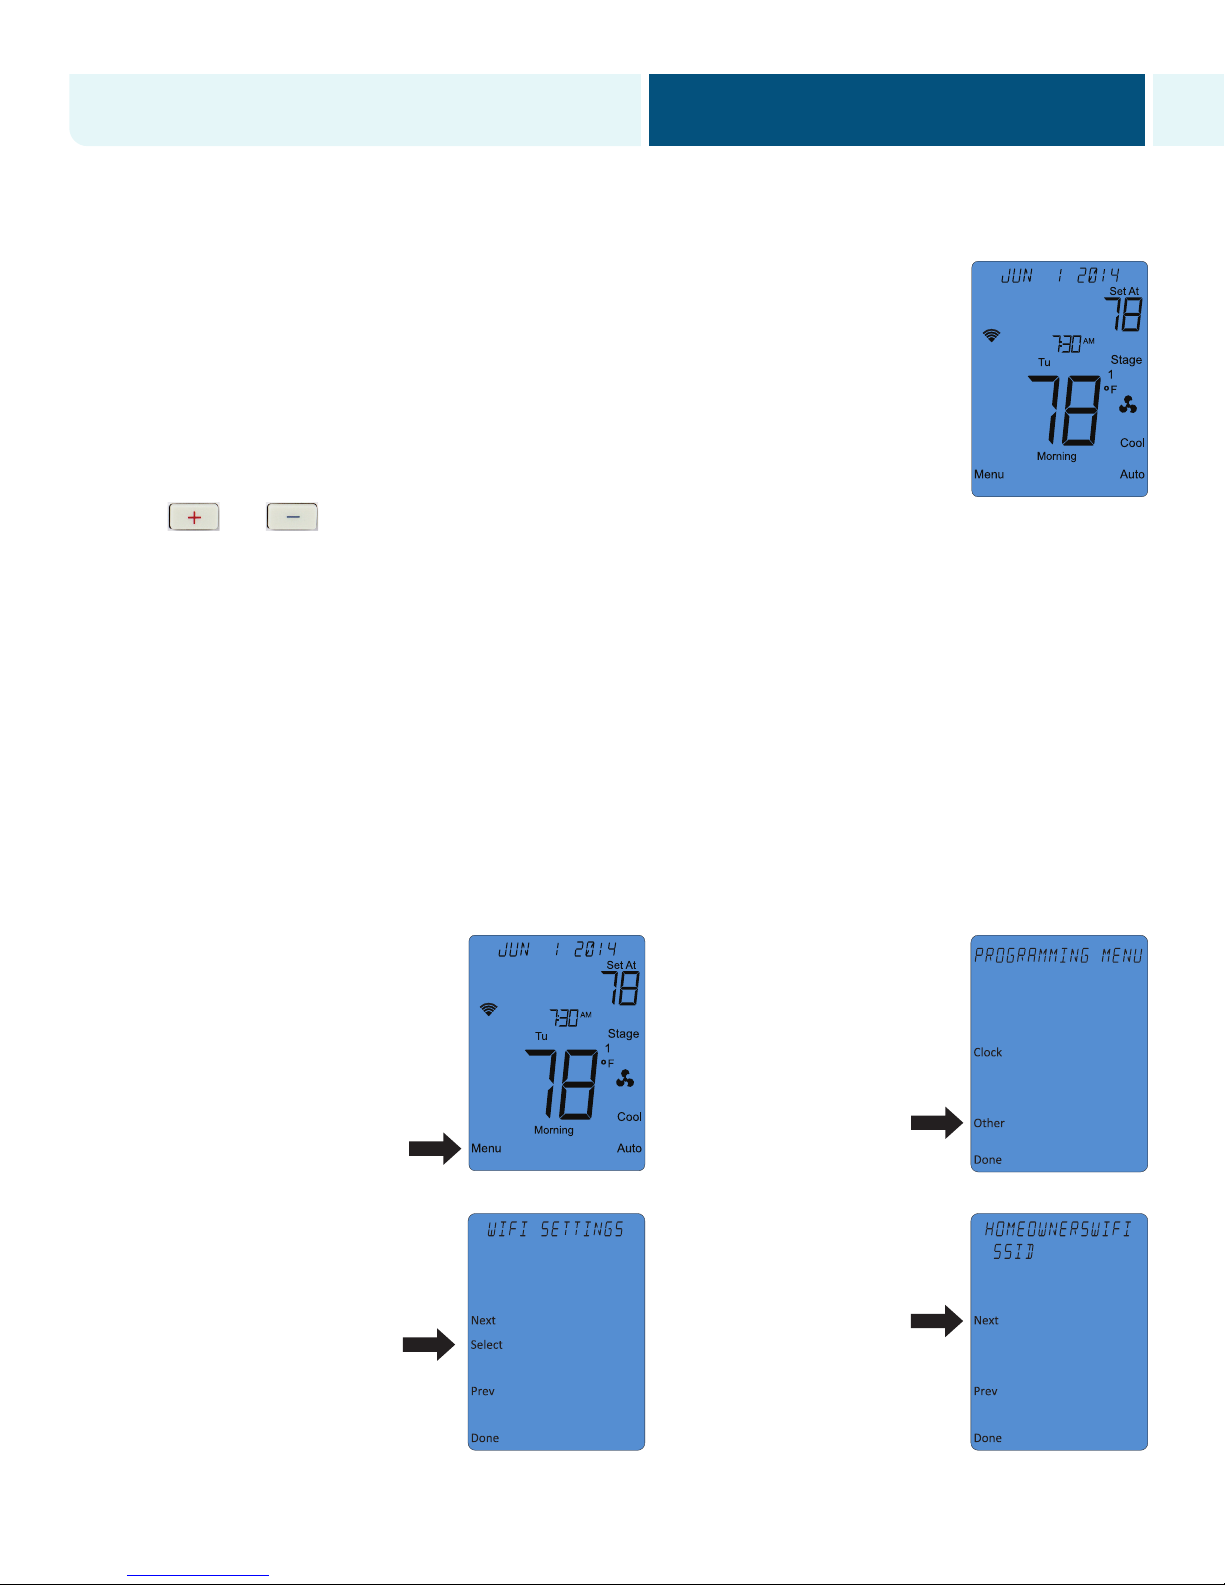
o enter the Homeowner Programming Menu:
T
1. Ensure the thermostat is at the home screen (see example at right).
2. Press the Menu button. The display will show the first level of the Homeowner Programming Menu.
3. While in the Homeowner Programming Menu:
• The and buttons change settings
• The Next and Previous buttons move from one item screen to another
• The Done button exits the Homeowner Programming Menu
A. Wi-Fi®Settings Menu
This menu displays the name of the wireless Internet access network to which the thermostat is connected. In this
menu, you may reset your wireless Internet connection [RESET WI-FI®] or remain connected to the existing network
CLIENT]. The default setting is CLIENT.
[
STEP 1: Return Thermostat to Wi-Fi®Configuration Mode
Sometimes it might be necessary to move the wireless Internet accessible thermostat to a different wireless Internet
access network, change your network name or change your network password. To do this, you will need to
disconnect your HōM™ Energy Manager thermostat for your wireless Internet network as follows:
1. On the Main Menu screen,
press the Menu button.
3. Press the Select button. The
message area of the thermostat
will display the wireless
Internet access network name
(SSID) to which you are
currently connected.
2. Press the Other button. The
thermostat will display the
WI-FI®SETTINGS menu.
4. Press the Next button. The top
line of the message area will
flash CLIENT.
HōM™ Energy Manager Web-Programmable Thermostat Homeowner’s Manual
7

HōM Energy Manager Portal
homenergymgr.com/portal/engagement
Step 2: Main Menu and Thermostat Settings (continued)
5. Press the button to
advance the display to
ESET WI-FI
R
STEP 2: Connect to a Wireless Internet Network
n the configuration mode, the HōM™ Energy Manager thermostat acts like a wireless Internet access point. This
I
allows the homeowner to use any wireless Internet-enabled device to connect to the thermostat and configure it to
use their Wi-Fi®settings with a standard Web browser.
NOTE: If any settings on your wireless Internet router are changed at any time during this step, you must cycle the
ower to your thermostat and restart this procedure.
p
1. On the thermostat Main Menu
screen, press the Menu button.
®
.
6. As RESET WI-FI®is flashing,
press the Select button.
2. Press the Other button. The
thermostat will display the
WI-FI®SETTINGS menu.
3. Press the Select button. 4. The message area of the
If you continue to have connectivity problems, please call the HōM Energy Manager customer service center
at 800.956.8825.
HōM™ Energy Manager Web-Programmable Thermostat Homeowner’s Manual
thermostat will display
THERMOSTAT followed by
the last four digits of the
thermostat’s Wi-Fi®module
serial number. This is the
network name (SSID) you
will use to connect to the
thermostat.
8
HōM Energy Manager Portal
homenergymgr.com/portal/engagement
Step 2: Main Menu and Thermostat Settings (continued)
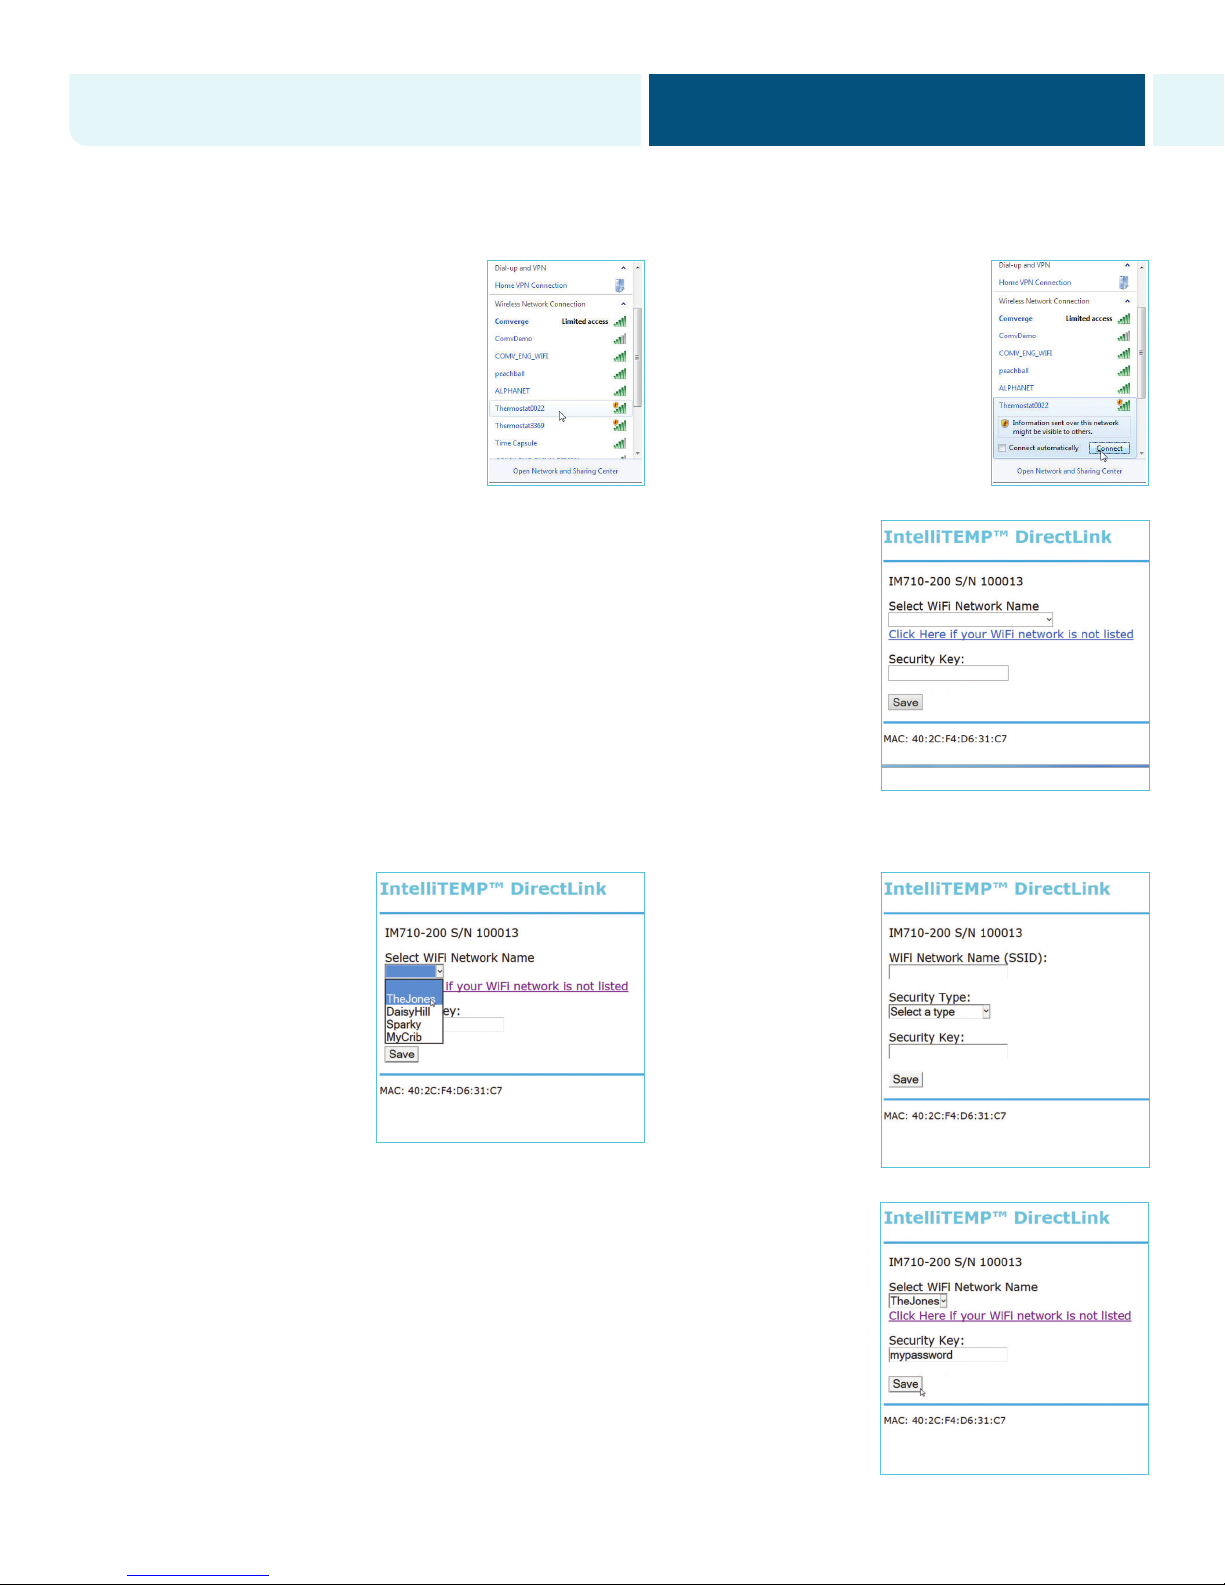
5. Use a Wi-Fi®-enabled
smartphone, tablet, or computer
o connect to the thermostat.
t
Open the Wi-Fi®settings menu
on your device and select the
THERMOSTAT name displayed
in step 4.
7. Open the web browser on your device. If your browser is set to automatically open
Web page, the IntelliTEMP configuration page should automatically appear.
a
8.
If the settings page does not appear after a few seconds, type “directlink/settings”
in the address bar, then press ENTER. If the settings page still does not appear,
on the thermostat Main Menu screen, press the button next to Menu. Then
ress the button next to Other. The thermostat will display the WI-FI
p
SETTINGS menu. Press the button next to Select. The message area of the
thermostat will display the Wi-Fi®network name (SSID) to which you are
currently connected. Press the button next to Next. The IP Address of your
device will be displayed in the thermostat’s message area. In the browser bar of
your device, type “http://” followed by the IP address displayed on the
thermostat. Press ENTER.
6. You may receive a notification
that you are connected to a
on-secure network. Select OK
n
or CONTINUE.
®
9. Use the pull-down on
the settings page to
select your home
network name.
11. Enter the network password for your network.
12. Once all fields are filled in correctly, click on the Save button.
10. If your wireless
Internet router is
to hide the network
name or your network
is not listed in the
pull-down, click on the
link below the pulldown to display the
manual settings page.
set
HōM™ Energy Manager Web-Programmable Thermostat Homeowner’s Manual
9
 Loading...