

Page 1
1
DUKANE Projector
Contents of package........................... 1
Preparations ....................................... 2
Using the CD manual .........................2
Arrangement ....................................... 3
Connecting your devices .................... 4
Connecting power supply ................... 5
Loading batteries
into the remote control ...................... 5
Turning on the power ..........................6
Adjusting the projector’s elevator .......6
Displaying the picture ......................... 7
Turning off the power ..........................7
Lamp................................................... 8
Air lter .............................................10
Regulatory notice.............................. 11
Warranty and after-service ............... 12
Specication ..................................... 12
Content
NOTE • Keep the original packing materials for future reshipment. Be sure
to use the original packing materials when moving the projector. Use special
caution for the lens.
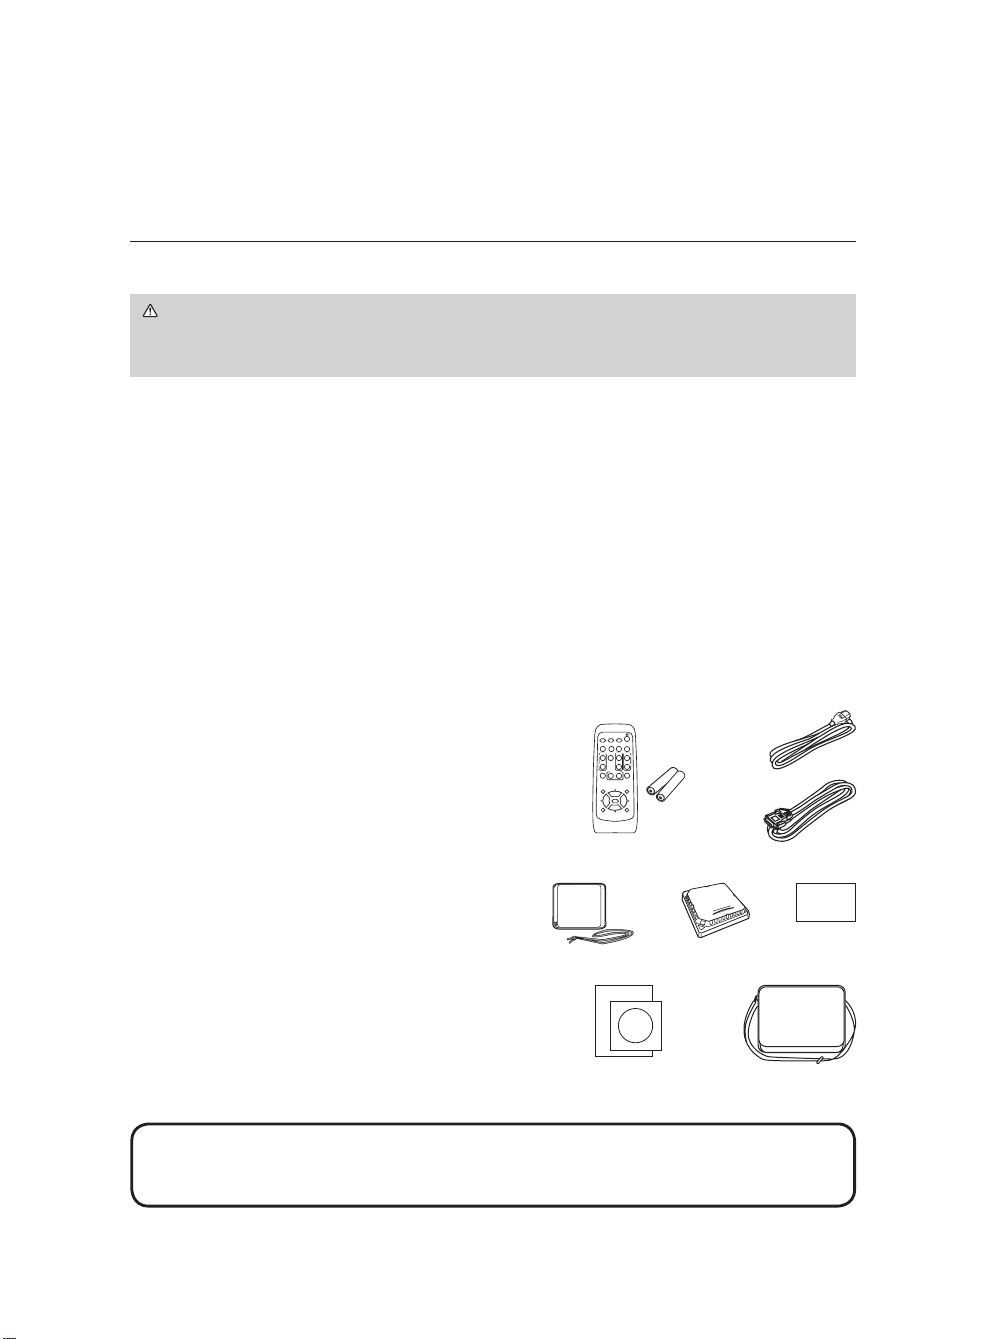
Contents of package
Your projector should come with the items
shown below. Check to make sure that all the
items are included. Contact to your dealer
immediately if any items are missing.
(1) Remote control with two AA batteries
(2) Power cord
(3) RGB cable
(4) Lens cover and Strap
(5) Filter cover for bottom-up use
(6) Security Label
(7) User’s manuals (Book x1, CD x1)
(8) Soft case
(1)
(2)
(3)
(6)
(7) (8)
(5)(4)
VIDEO
DOC.CAMERA
KEYSTONE
ASPECT SEARCH
BLANK
MUTE
MY BUTTON
POSITION
1 2
ESC
ENTER
MENU
RESET
COMPUTER
MY SOURCE/
AUTO
MAGNIFY
PAGE
UP
VOLUME
DOWN
ONOFF
㧗
FREEZE
8783
User's Manual (concise)
Thank you for purchasing this projector.
WARNING ►Before using this product, be sure to read all manuals for this
product. See “Using the CD manual” (2) to read the manuals in the CD. After
reading them, store them in a safe place for future reference.
ENGLISH
Page 2
2
Using the CD manual
The other manuals for this product are written into the included CD-ROM titled
“User’s Manual (detailed)”. Before using the CD-ROM, please read the following
to ensure the proper use.
System requirements
The system for using the CD-ROM requires the following.
Windows®: OS:Microsoft® Windows® 98, 98SE, NT4.0, Me, 2000/XP, or later
CPU:Pentium® processor 133MHz / Memory:32MB or more
Macintosh®:
OS:Mac OS 10.2 or later
CPU:Power PC® / Memory:32MB or more
CD-ROM drive:
4x CD-ROM drive
Display:
256 color / 640x480 dots resolution
Applications: Microsoft Internet Explorer4.0 and
Adobe Acrobat Reader 4.0 or later
How to use the CD
1. Insert CD into PC’s CD-ROM drive.
Windows®:
In a while, Web browser automatically starts. Start up window
comes up.
Macintosh®:
(1) Double-click on the ”Hitachi Projectors” icon appeared on the
desktop screen.
(2) When “main.html” file is clicked, Web browser will start and Initial
window will appear.
2. Click the model name of your projector first, and then click language you want from the
displayed list. The user’s manual (detailed) will open.
CAUTION ►Only use the CD-ROM in a computer CD drive. The CD-ROM is
designed for PC use only. NEVER INSERT THE CD-ROM INTO A NON-COMPUTER
CD PLAYER! Inserting the CD-ROM into an incompatible CD drive may produce a loud
noise, which in turn MAY RESULT IN EAR AND SPEAKER DAMAGE!
• After using CD-ROM, please put it into CD case and keep it. Please keep the CD
neither in direct sunlight nor in a high temperature and high humidity environment.
NOTE • The information in the CD-ROM is subject to change without notice.
• No responsibility is taken for any obstacle and defect to hardware and software of your
PC as a result of the use of the CD-ROM.
• All or Any part of the information in the CD-ROM must not be copied, reproduced or
republished without notice to our company.
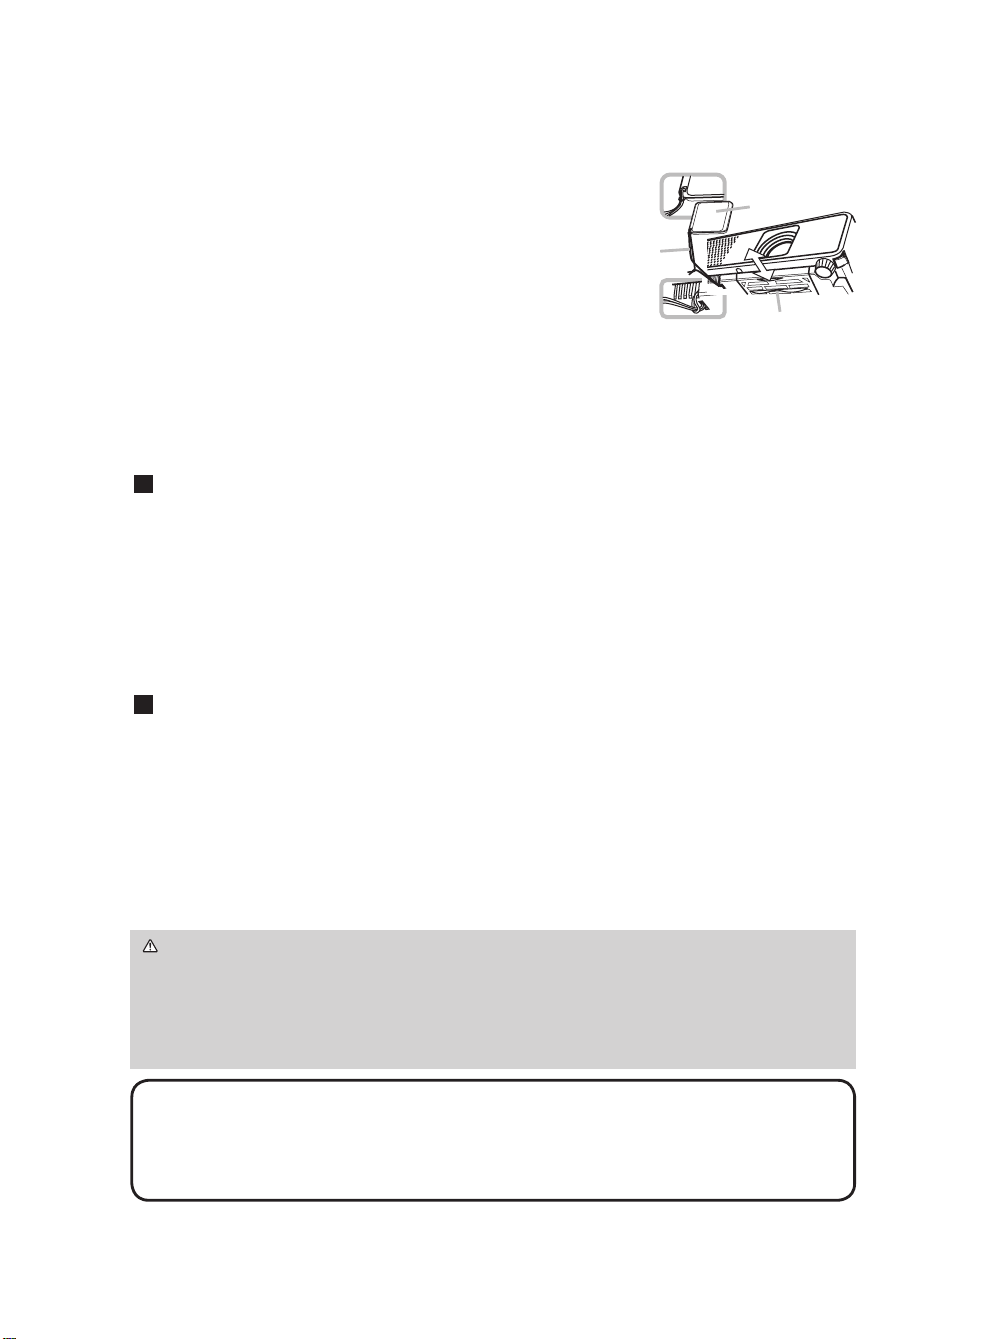
Fastening the lens cover
To avoid losing the lens cover, please fasten the lens
cover to the projector using the enclosed strap.
Replacing the lter cover for bottom-up use
When the projector is installed bottom up, please use
the enclosed lter cover for bottom-up use. Please refer
to the “Air lter” (10).
Preparations
Lens cover
Strap
Filter cover
Page 3
3
ENGLISH
C
B
A
16:10
B
C
A
4:3
Arrangement
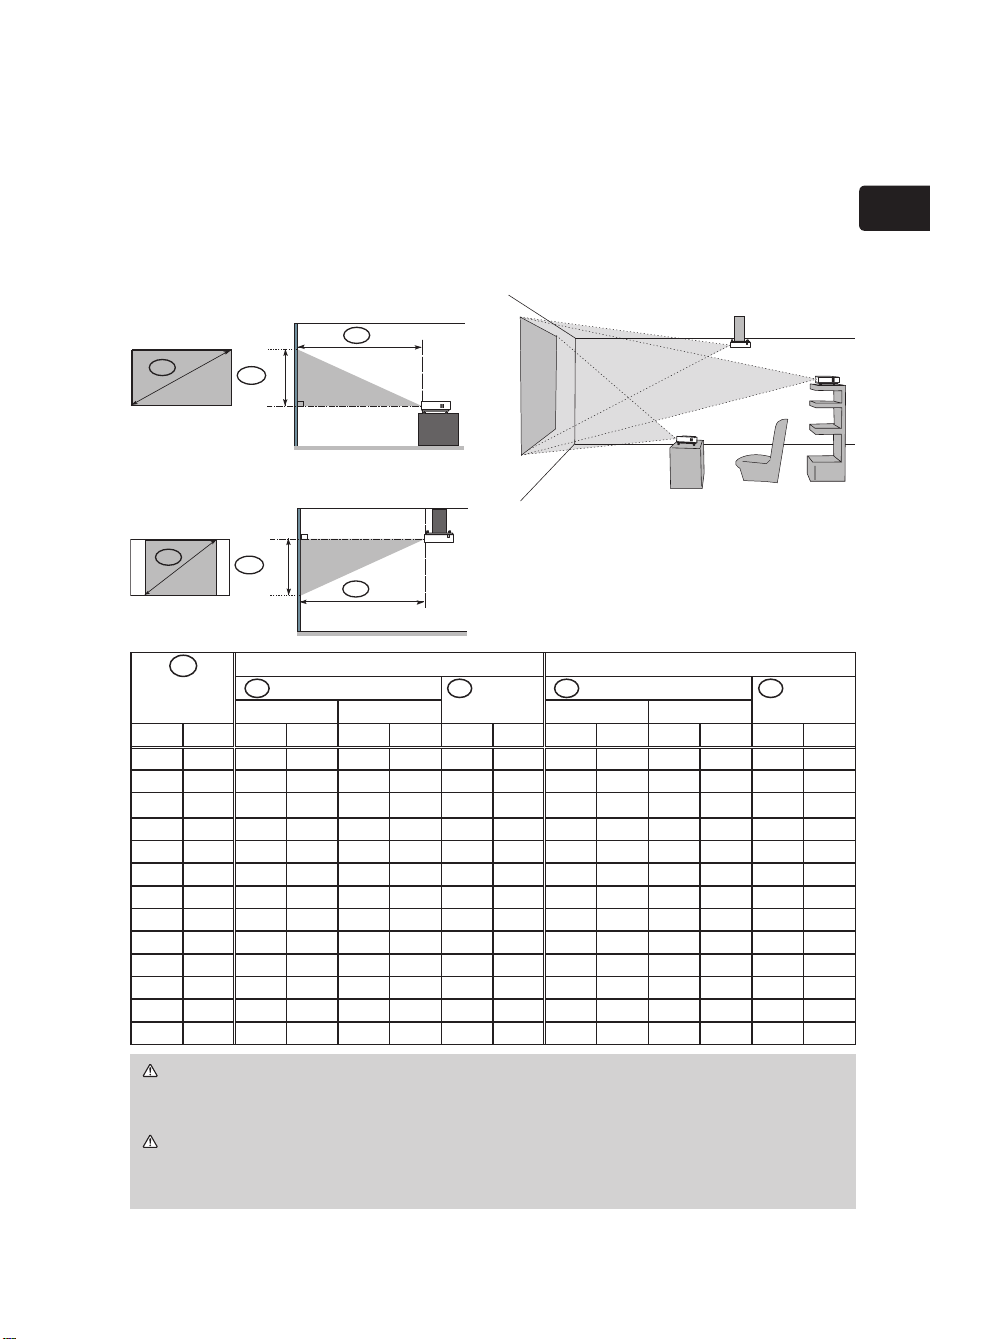
Refer to the illustrations and tables below to determine screen size and projection distance.
The values shown in the table are calculated for a full size screen: 1280x800
(a) Screen size (diagonal)
(b) Projection distance (±10%)
(c) Screen height (±10%)
On a horizontal surface
Suspended from the ceiling
• Keep a space of 30 cm or more
between the sides of the projector
and other objects such as walls.
• Consult with your dealer before
a special installation such as
suspending from a ceiling.
WARNING ► Install the projector in a stable horizontal position.
►
Place the projector in a cool place, and ensure that there is sufcient ventilation.
►Do not place the projector anyplace where it may get wet.
CAUTION ►Avoid placing the projector in smoky, humid or dusty place.
►Position the projector to prevent light from directly hitting the projector’s
remote sensor.
A
Screen size
(diagonal)
16:10 screen 4:3 screen
B Projection distance C Screen
height
B Projection distance C Screen
height
min. max. min. max.
inch m m inch m inch cm inch m inch m inch cm inch
30 0.8 0.9 37 1.1 45 40 16 1.1 42 1.3 51 46 18
40 1.0 1.3 50 1.5 60 54 21 1.4 57 1.7 68 61 24
50 1.3 1.6 62 1.9 75 67 26 1.8 71 2.2 85 76 30
60 1.5 1.9 75 2.3 90 81 32 2.2 85 2.6 102 91 36
70 1.8 2.2 88 2.7 106 94 37 2.5 100 3.0 120 107 42
80 2.0 2.6 101 3.1 121 108 42 2.9 114 3.5 137 122 48
90 2.3 2.9 113 3.5 136 121 48 3.3 128 3.9 154 137 54
100
2.5 3.2 126 3.8 151 135 53 3.6 143 4.4 171 152 60
120
3.0 3.8 151 4.6 182 162 64 4.4 171 5.2 206 183 72
150
3.8 4.8 189 5.8 228 202 79 5.4 215 6.5 258 229 90
200 5.1 6.4 253 7.7 304 269 106 7.3 286 8.7 344 305 120
250 6.4 8.0 316 9.6 380 337 132 9.1 358 10.9 430 381 150
300 7.6 9.6 380 11.6 456 404 159 10.9 430 13.1 516 457 180
Page 4
4
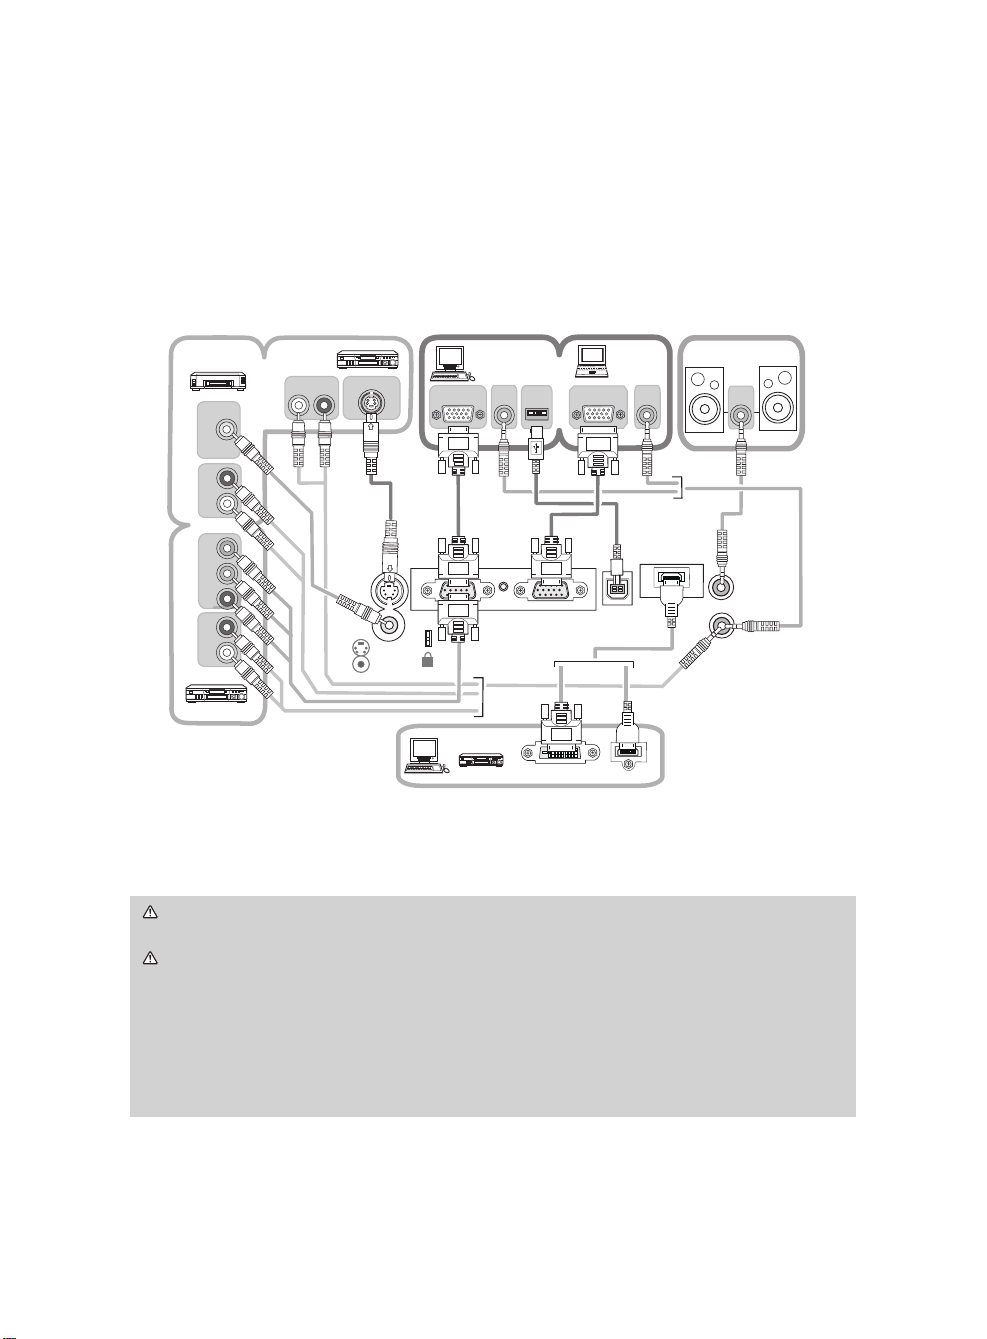
Connecting your devices
Be sure to read the manuals for devices before connecting them to the projector.
Make sure that all the devices are suitable to be connected with this product, and
prepare the cables required to connect. Please refer to the following illustrations
to connect them.
WARNING ►Do not disassemble or modify the projector and accessories.
►Be careful not to damage the cables, and do not use damaged cables.
CAUTION ►Turn off all devices and unplug their power cords prior to
connecting them to projector.
►Use appropriate accessory or otherwise designed cables. Ask your dealer
about non-accessory cables which may have to be of a specic length or
equipped with a core. For cables with a core only at one end, connect the end
with the core to the projector.
►Make sure that devices are connected to the correct ports.
• The COMPUTER IN1 port can support a component signal also.
PCVCR/DVD player
Monitor
or
Speakers
(with an amplier)
K
COMPUTER IN1
COMPUTER IN2
USB
AUDIO OUT
AUDIO IN
S-VIDEO
VIDEO
AUDIO
OUT
AUDIO
IN
USB-A
AUDIO
OUT
RGB OUT
VIDEO OUT
AUDIO OUT
L R
S-VIDEO OUT
AUDIO OUT
L R
AUDIO OUT
L R
COMPONENT
C
R
/P
R
C
B
/P
B
Y
HDMI
HDMI OUT
DVI OUT
RGB OUT
Page 5

5
ENGLISH
Loading batteries into the remote control
Please set the batteries to the remote control before using it. If the remote control starts
to malfunction, try to replace the batteries. If you will not use the remote control for long
period, remove the batteries from the remote control and store them in a safe place.
1.
Holding the hook part of the battery
cover, remove it.
2.
Align and insert the two AA batteries
(HITACHI MAXELL, Part No.LR6 or R6P)
according to their plus and minus terminals
as indicated in the remote control.
3.
Replace the battery cover in the direction
of the arrow and snap it back into place.
Connecting power supply
1.
Put the connector of the power cord into the
AC inlet of the projector.
2.
Firmly plug the power cord’s plug into
the outlet. In a couple of seconds after
the power supply connection, the POWER
indicator will light up in steady orange.
Please remember that when the AUTO ON function activated (“Operating
Guide” in the CD), the connection of the power supply make the projector turn on.
WARNING ►Please use extra caution when connecting the power cord, as
incorrect or faulty connections may result in re and/or electrical shock.
• Only use the power cord that came with the projector. If it is damaged, contact
your dealer to newly get correct one.
• Only plug the power cord into an outlet rated for use with the power cord's
specied voltage range. The power outlet should be close to the projector and
easily accessible. Remove the power cord for complete separation.
• Never modify the power cord.
A
C
IN
AC inlet
to the outlet
Connector of the
power cord
POWER
indicator
WARNING ►Always handle the batteries with care and use them only as
directed. Improper use may result in battery explosion, cracking or leakage,
which could result in re, injury and/or pollution of the surrounding environment.
• Be sure to use only the batteries specied. Do not use batteries of different
types at the same time. Do not mix a new battery with used one.
•
Make sure the plus and minus terminals are correctly aligned when loading a battery.
• Keep a battery away from children and pets.
• Do not recharge, short circuit, solder or disassemble a battery.
•
Do not allow a battery in a re or water. Keep batteries in a dark, cool and dry place.
•
If you observe a leakage of a battery, wipe out the ower and then replace a battery.
If the ower adheres your body or clothes, rinse well with water immediately.
•
Obey the local laws on disposing the battery.
POWER
Page 6

6
VIDEO
DOC.CAMERA
KEYSTONE
ASPECT SEARCH
BLANK
MUTE
MY BUTTON
POSITION
1 2
ESC
ENTER
MENU
RESET
COMPUTER
MY SOURCE/
AUTO
MAGNIFY
PAGE
UP
VOLUME
DOWN
ONOFF
㧗
FREEZE
Turning on the power
1.
Make sure that the POWER indicator turns in
steady orange and the lens cover is removed.
2.
Press the STANDBY/ON button on the
projector or the remote control.
The projection lamp will light up and the POWER
indicator will begin blinking in green. When the
power is completely on, the indicator will stop
blinking and light in steady green.
WARNING ►A strong light is emitted when the projector’s power is on. Do
not look into the lens of the projector or look inside of the projector through any
of the projector’s openings.
NOTE •
Please power on the projector prior to the connected devices.
•
The projector has the AUTO ON function, which can make the projector
automatically turn on. For more information, please see the “Operating Guide” in the CD.
MENU
LAMP
TEMP
POWER
STANDBY/ON
INPUT/
ENTER
STANDBY/ON button
POWER indicator
Adjusting the projector's elevator
When the place to put the projector is slightly uneven to the left or right, use the
elevator feet to place the projector horizontally.
Using the feet can also tilt the projector in order to project at a suitable angle to
the screen, elevating the front side of the projector within 11 degrees.
This projector has 2 elevator feet and 2 elevator knobs. An elevator foot is
adjustable while pulling up the elevator knob on the same side as it.
1.
Holding the projector, pull the elevator knobs up to loose the elevator feet.
2.
Position the front side of the projector to the desired height.
3.
Release the elevator knobs in order to lock the elevator feet.
4.
After making sure that the elevator feet are locked, put the projector gently.
5.
If necessary, the elevator feet can be manually twisted to make more precise
adjustments. Hold the projector when twisting the feet.
To loose an elevator foot, pull up the
elevator knob on the same side as it.
CAUTION ►Do not handle the elevator knobs without holding the projector,
since the projector may drop down.
►Do not tilt the projector other than it elevating its front within 11 degrees using
the adjuster feet. A tilt of the projector exceeding the restriction could cause
malfunction or shortening the lifetime of consumables, or the projector itself.
To nely adjust, twist the foot.
11°
Lens cover
Page 7

7
ENGLISH
VIDEO
DOC.CAMERA
KEYSTONE
ASPECT SEARCH
BLANK
MUTE
MY BUTTON
POSITION
1 2
ESC
ENTER
MENU
RESET
COMPUTER
MY SOURCE/
AUTO
MAGNIFY
PAGE
UP
VOLUME
DOWN
ON
OFF
㧗
FREEZE
VIDEO
DOC.CAMERA
KEYSTONE
ASPECT SEARCH
BLANK
MUTE
MY BUTTON
POSITION
1 2
ESC
ENTER
MENU
RESET
COMPUTER
MY SOURCE/
AUTO
MAGNIFY
PAGE
UP
VOLUME
DOWN
ONOFF
㧗
FREEZE
Displaying the picture
1.
Make sure that the signal source is sending
the signal to the projector.
2.
Use the VOLUME +/- buttons to adjust the
volume. To have the projector silent, press
the MUTE button on the remote control.
3.
Press the INPUT/ENTER button on the
projector.
Each time you press the button, the projector
switches its input port in turn.
You can also use the remote control to select
an input signal. Press the VIDEO button for
selecting an input signal from the VIDEO or
S-VIDEO port, or the COMPUTER button for
selecting an input signal from the COMPUTER
IN1 or COMPUTER IN2 port.
4.
Press the ASPECT button on the remote control.
Each time you press the button, the projector
switches the mode for aspect ratio in turn.
5.
Use the zoom ring to adjust the screen size.
6.
Use the focus ring to focus the picture.
VIDEO button
COMPUTER button
STANDBY /ON button
AUTO button
VOLUME+/- buttons
MUTE button
ASPECT button
▲ cursor button
▼ cursor button
MENU
LAMP
TEMP
POWER
STANDBY/ON
INPUT/
ENTER
STANDBY/ON button
INPUT/ENTER button
POWER indicator
Lens cover
Zoom ring
Focus ring
Turning off the power
1.
Press the STANDBY/ON button on the projector or the remote control.
The message "Power off?" will appear on the screen for about 5 seconds.
2.
Press the STANDBY/ON button again while the message appears.
The projector lamp will go off, and the POWER indicator will begin blinking in orange. Then the
POWER indicator will stop blinking and light in steady orange when the lamp cooling is complete.
3.
Attach the lens cover, after the POWER indicator turns in steady orange.
Do not turn the projector on for about 10 minutes after turning it off. Turning the projector
on again too soon could shorten the lifetime of some consumable parts of the projector
.
WARNING ►
Do not touch around the lamp cover and the exhaust vents
during use or just after use, since it is too hot.
►
Remove the power cord for complete separation. The power outlet should be
close to the projector and easily accessible.
NOTE •
Please power off the projector, after any connected devices are powered off.
•
This projector has the AUTO OFF function that can make the projector turn off
automatically. For more information, please see the “Operating Guide” in the CD.
NOTE •
The ASPECT button does not work when no proper signal is inputted.
Page 8

8
Lamp
A lamp has nite product life. Using the lamp for long periods of time could cause
the pictures darker or the color tone poor. Note that each lamp has a different
lifetime, and some may burst or burn out soon after you start using them.
Preparation of a new lamp and early replacement are recommended. To prepare
a new lamp, contact your dealer and tell the lamp type number.
Type number : 456-8783
Replacing the lamp
Turn the projector off, and unplug the power cord.
1.
Allow the projector to cool for at least 45 minutes.
Prepare a new lamp.
2.
If the projector is mounted on a ceiling, or if the lamp
has broken, also ask the dealer to replace the lamp.
In case of replacement by yourself,
Loosen the screw (marked by arrow) of the lamp cover
3.
and then slide the lamp cover to the side to remove it.
Loosen the 2 screws (marked by arrow) of the
4.
lamp, and slowly pick up the lamp by the handle. It
may make it easy to take the lamp out slightly toward
the control panel of the projector.
Insert the new lamp, and retighten rmly the
5.
2 screws of the lamp that are loosened in the
previous process to lock it in place. Tighten the
screw rst, then screw .
Slide the lamp cover back in place and rmly
6.
fasten the screw of the lamp cover.
Turn the projector on and reset the lamp time
7.
using the LAMP TIME item in the OPTION menu.
(1) Press the MENU button to display a menu.
(2) Point at the “Go to Advanced Menu …” in the menu
using the ▼/▲ button, then press the ► button.
(3) Point at the “OPTION” in the left column of the menu
using the ▼/▲button, then press the ► button.
(4) Point at the “LAMP TIME” using the ▼/▲ button, then press the ► button. A
dialog will appear.
(5) Press the ▲ button to select “RESET” on the dialog. It performs resetting the
lamp time.
The lamp cover
The handle
2
1
CAUTION ►Do not touch any inner space of the projector, while the lamp
is taken out.
NOTE • Please reset the lamp time only when you have replaced the lamp,
for a suitable indication about the lamp.
Page 9

9
ENGLISH
Lamp warning
HIGH VOLTAGE
HIGH TEMPERATURE HIGH PRESSURE
WARNING
►The projector uses a high-pressure mercury glass lamp. The
lamp can break with a loud bang, or burn out, if jolted or scratched, handled
while hot, or worn over time. Note that each lamp has a different lifetime, and
some may burst or burn out soon after you start using them. In addition, when
the bulb bursts, it is possible for shards of glass to y into the lamp housing, and
for gas containing mercury to escape from the projector’s vent holes.
►About disposal of a lamp: This product contains a mercury lamp; do not put
it in a trash. Dispose of it in accordance with environmental laws.
• For lamp recycling, go to
www.lamprecycle.org. (in the US)
• For product disposal, contact your local government agency
or www.eiae.org (in the US) or www.epsc.ca (in Canada).
For more information, call your dealer.
• If the lamp should break (it will make a loud bang when it does),
unplug the power cord from the outlet, and make sure to request a
replacement lamp from your local dealer. Note that shards of glass
could damage the projector’s internals, or cause injury during handling,
so please do not try to clean the projector or replace the lamp yourself.
• If the lamp should break (it will make a loud bang when it does),
ventilate the room well, and make sure not to breathe the gas that
comes out of the projector vents, or get it in your eyes or mouth.
• Before replacing the lamp, turn the projector off and unplug the power
cord, then wait at least 45 minutes for the lamp to cool sufficiently.
Handling the lamp while hot can cause burns, as well as damaging the
lamp.
• Never unscrew except the appointed (marked by an arrow) screws.
• Do not open the lamp cover while the projector is suspended from
above. This is dangerous, since if the lamp’s bulb has broken, the
shards will fall out when the cover is opened. In addition, working in
high places is dangerous, so ask your local dealer to have the lamp
replaced even if the bulb is not broken.
• Do not use the projector with the lamp cover removed. At the lamp
replacing, make sure that the screws are screwed in firmly. Loose
screws could result in damage or injury.
• Use only the lamp of the specied type.
• If the lamp breaks soon after the first time it is used, it is possible
that there are electrical problems elsewhere besides the lamp. If this
happens, contact your local dealer or a service representative.
•
Handle with care: jolting or scratching could cause the lamp bulb to burst during use.
• Using the lamp for long periods of time, could cause it dark, not to light
up or to burst. When the pictures appear dark, or when the color tone
is poor, please replace the lamp as soon as possible. Do not use old
(used) lamps; this is a cause of breakage.
Disconnect
the plug
from the
power
outlet
Page 10

10
Please check and clean the air lter periodically. When the indicators or a
message prompts you to clean the air lter, comply with it as soon as possible.
Replace the air lter when it is damaged or too soiled. To prepare a new air lter,
contact with your dealer and tell the air lter type number.
Type number : MU03602
When you replace the projection lamp, please replace the air lter. An air lter of
specied type will come together with a replacement lamp for this projector.
Cleaning the air lter
1.
Turn the projector off, and unplug the power cord.
Allow the projector to sufciently cool down.
2.
Use a vacuum cleaner on and around the lter
cover.
3.
While supporting the projector with one hand, use
your other hand to pull the lter cover forward in
the direction of the arrow.
4.
Use a vacuum cleaner for the lter ventilation of
the projector. And clean the air lter that is set
at one side of the lter cover by using a vacuum
cleaner over the other side of the lter cover.
Please replace the air lter when it is damaged or
too soiled. When the air lter is set, take its half
moon shape cut part to the swelled part of the lter
cover.
5.
Put the lter unit back into the projector.
6.
Turn the projector on and reset the lter time
using the FILTER TIME item in the EASY MENU.
(1) Press the MENU button to display a menu.
(2) Point at the “FILTER TIME” using the ▼/▲ button, then press the ► button. A dialog
will appear.
(3) Press the ▲ button to select “RESET” on the dialog. It performs resetting the lter time.
Air lter
Swelled part
Air lter
Filter cover
WARNING ►Before taking care of the air lter, make sure the power cable
is not plugged in, then allow the projector to cool sufciently.
►
Use only the air lter of the specied type. Do not use the projector without the
air lter or the lter cover. It could result in a re or malfunction to the projector
.
►Clean the air lter periodically. If the air lter becomes clogged by dust or the
like, internal temperatures rise and could cause a re, a burn or malfunction to
the projector.
NOTE • Please reset the lter time only when you have cleaned or replaced
the air lter, for a suitable indication about the air lter.
• The projector may display the message such as “CHECK THE AIR FLOW” or
turn off the projector, to prevent the internal heat level rising.
The lter cover
The air lter is set in the reverse
side
Page 11

11
Information for users applicable in European Union countries
This symbol on the product or on its packaging means that your electrical and
electronic equipment should be disposed at the end of life separately from your
household wastes. There are separate collection systems for recycling in EU.
For more information, please contact the local authority or the dealer where you
purchased the product.
WARNING:
These limits are designed to provide reasonable protection against harmful interference
in a residential installation. This equipment generates, uses, and can radiate radio
frequency energy and, if not installed and used in accordance with the instructions, may
cause harmful interference to radio communications. However, there is no guarantee that
interference will not occur in a particular installation. If this equipment does cause harmful
interference to radio or television reception, which can be determined by turning the
equipment off and on, the user is encouraged to try to correct the interference by one or
more of the following measures:
- Reorient or relocate the receiving antenna.
- Increase the separation between the equipment and receiver
- Connect the equipment into an outlet on a circuit different from that to which the receiver
is connected.
- Consult the dealer or an experienced radio/TV technician for help.
This device complies with part 15 of the FCC Rules. Operation is subject to the
following two conditions: (1) This device may not cause harmful interference, and (2)
this device must accept any interference received, including interference that may
cause undesired operation.
This equipment has been tested and found to comply with the limits for a Class B
digital device, pursuant to Part 15 of the FCC Rules.
In Canada NOTICE: This Class B digital apparatus complies with Canadian
ICES-003.
Trade name: HITACHI
Model Number: CPX3
Responsible Party: Hitachi America, Ltd.
Address: 900 Hitachi way, Chula Vista, CA 91914-3556 U.S.A.
Telephone Number: +1 -800-225-1741
INSTRUCTIONS TO USERS:
In the US
This equipment complies with the requirements of FCC (Federal
Communication Commission) equipment provided that the following conditions are met.
Some cables have to be used with the core set. Use the accessory cable or a designatedtype cable for the connection. For cables that have a core only at one end, connect the
core to the projector.
CAUTION: Changes or modifications not expressly approved by the party responsible for
compliance could void the user’s authority to operate the equipment.
In the US Declaration of Conformity
Regulatory notices
Page 12
Warranty and after-service
If an abnormal operation (such as smoke, strange odor or excessive sound) should occur, stop
using the projector immediately. Otherwise if a problem occurs with the projector, rst refer to
the “Troubleshooting” of the “Operating Guide” in the CD and run through the suggested checks.
If this does not resolve the problem, please contact your dealer or service company. They will
tell you what warranty condition is applied.
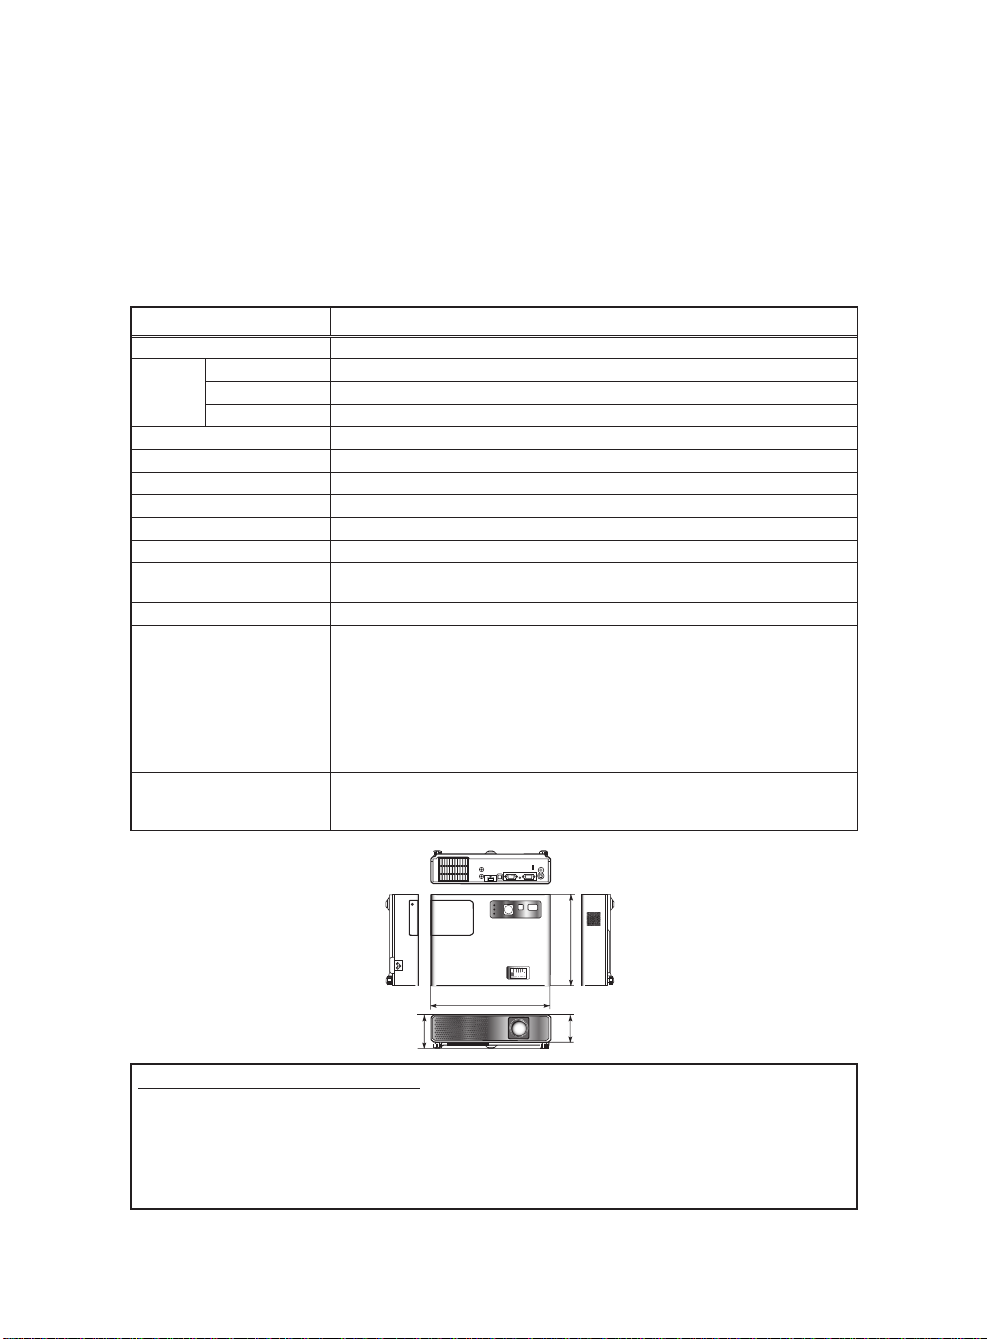
Specication
Item Specication
Product name
Liquid
Crystal
Panel
Lens Zoom lens F=1.7~1.9 f=19~23 mm
Lamp 190W UHP
Audio output 1 W x1
Power supply AC100-120V/3.4A, AC220-240V/1.7A
Power consumption 310 W
Temperature range 5 ~ 35°C (Operating)
Size
Weight (mass) approx. 1.7 kg
Ports
Optional parts
Panel size 1.5cm (0.54 type)
Drive system TFT active matrix
Pixels 1,024,000 pixels (1280 horizontal x 800 vertical)
Liquid crystal projector
274 (W) x 59 (H) x 205 (D) mm
* Not including protruding parts. Please refer to the following gure.
COMPUTER IN1 ......................................................D-sub 15 pin mini x1
COMPUTER IN2 ......................................................D-sub 15 pin mini x1
HDMI ..........................................................................HDMI connector x1
S-VIDEO ........................................................................ mini DIN 4 pin x1
VIDEO ..........................................................................................RCA x1
AUDIO IN ........................................................................... Stereo mini x1
AUDIO OUT ....................................................................... Stereo mini x1
USB ...........................................................................................USB-B x1
Lamp: 456-8783
Air lter: MU03602
Others: Please consult your dealer.
205
274
73
59
[unit : mm]
Trademark acknowledgment
•
Mac, Macintosh, Power PC and Mac OS are registered trademarks of Apple Computer, Inc.
• Pentium is a registered trademark of Intel Corporation.
• Adobe and Acrobat are registered trademarks of Adobe Systems Incorporated.
• Windows is a registered trademark of Microsoft Corporation.
• VESA and SVGA are trademarks of the Video Electronics Standard Association.
All other trademarks are the properties of their respective owners.
12
 Loading...