

Page 1

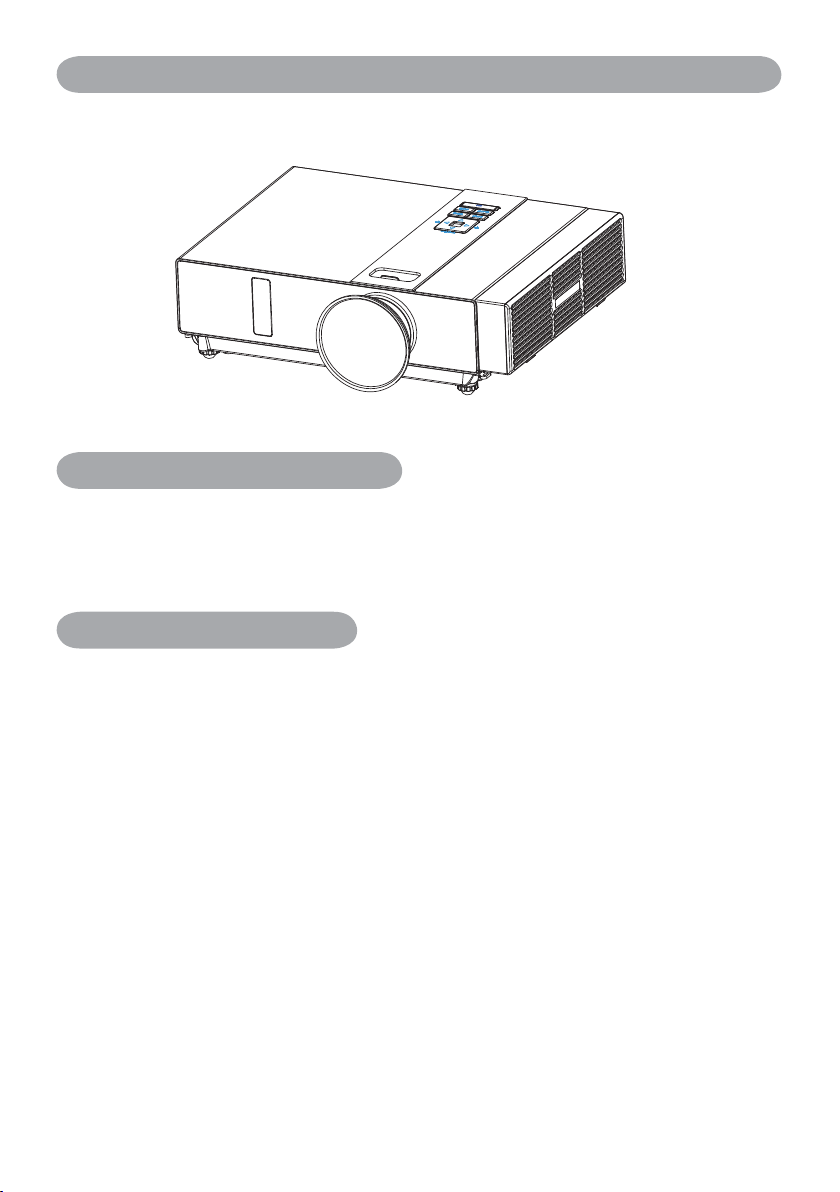
Projector
About the Owner’s Manual
Please read the owner’s manual thoroughly to ensure correct usage of the projector and its
features.
After reading, store the owner’s manual in a safe place for future reference.
Features
1. Dress up Design
2. Designed for tough environment
3. Side change lamp
4. Side change filter
5. Quick off
6. Advanced Anti-theft features
7. Five auto features (Auto Search, Auto Sync, Auto Ceiling, Auto Keystone and Auto
Filter Alert)
8. Seven display modes (Natural, Cinema, Daylight, Green board, White Board, Black
Board and User)
9. Built-in 8W speaker
10. Logo capture
11. Image freeze function
12. Digital zoom adjustment
13. Extreme Short Throw Distance.
The content of this manual is subject to change without previous notice.
All rights reserved.
Issue of edition 1002.05_01
Page 2

Contents
About Owner’s Manual
Contents .....................................................................................................................1
Contents of Your Box ............................................................................................ 3-A
Safety Instructions ....................................................................................................4
Safety Labels..............................................................................................................5
Part Names ................................................................................................................6
Projector .................................................................................................................. 6
Control Panel .......................................................................................................... 7
Rear ......................................................................................................................... 8
Setting Up ..................................................................................................................9
Arrangement ............................................................................................................ 9
Power ON / OFF ....................................................................................................10
Setting Up The Projector ....................................................................................... 11
Ceiling Mounted Installation Guide ...................................................................... 12
Adjusting The Projector’s Elevation .....................................................................13
How To Connect ....................................................................................................14
Remote Control .......................................................................................................16
Remote Control (Optional) ....................................................................................19
Menu Operation ......................................................................................................23
How To Operate On-Screen Display ......................................................................23
MENU (PC Mode) ...................................................................................................24
Picture Menu (PC Mode) ........................................................................................ 24
Audio Menu (PC Mode) ......................................................................................... 25
Setting Menu (PC Mode) ........................................................................................ 26
MENU (Video Mode) ..............................................................................................27
Picture Menu (Video Mode) ....................................................................................27
Audio Menu (Video Mode) ..................................................................................... 28
Setting Menu (Video Mode) ....................................................................................29
1
Page 3

Contents
MENU ......................................................................................................................30
Advanced Menu ..................................................................................................... 30
Presentation Menu .................................................................................................33
Security Menu ........................................................................................................35
PIN Key In Operation ............................................................................................38
Network Control Software Application ................................................................39
Before Use ................................................................................................................40
Before To Use Network Control Software ............................................................40
Projector Auto Search. ...........................................................................................41
Modify the Projector Setting .................................................................................44
Registering And Configuring the Projector ..........................................................45
Delete ..................................................................................................................... 45
Projector Setting .................................................................................................... 46
System Setting / Monitor / Default Setting / Auto Detect Optimal Setting ........... 48
Link ........................................................................................................................ 49
Control Panel Window Introduction .....................................................................50
Power Control / Input Source / Function Key ........................................................50
Function Key / Projector Status ..............................................................................51
Network Control Window Introduction ..................................................................52
Maintenance Of Projector ......................................................................................53
Air Filter / Replacing the Air Filter ........................................................................ 53
Lamp / Replacing New Lamp ................................................................................. 54
Other Care / Cleaning the Lens .............................................................................. 56
Troubleshooting ....................................................................................................... 57
Indicator .................................................................................................................. 57
Error For Machine Defects ..................................................................................... 58
List of Supported Monitor Displays ....................................................................... 60
Appendix
Interactive Function Operation(Optional)
2
Page 4

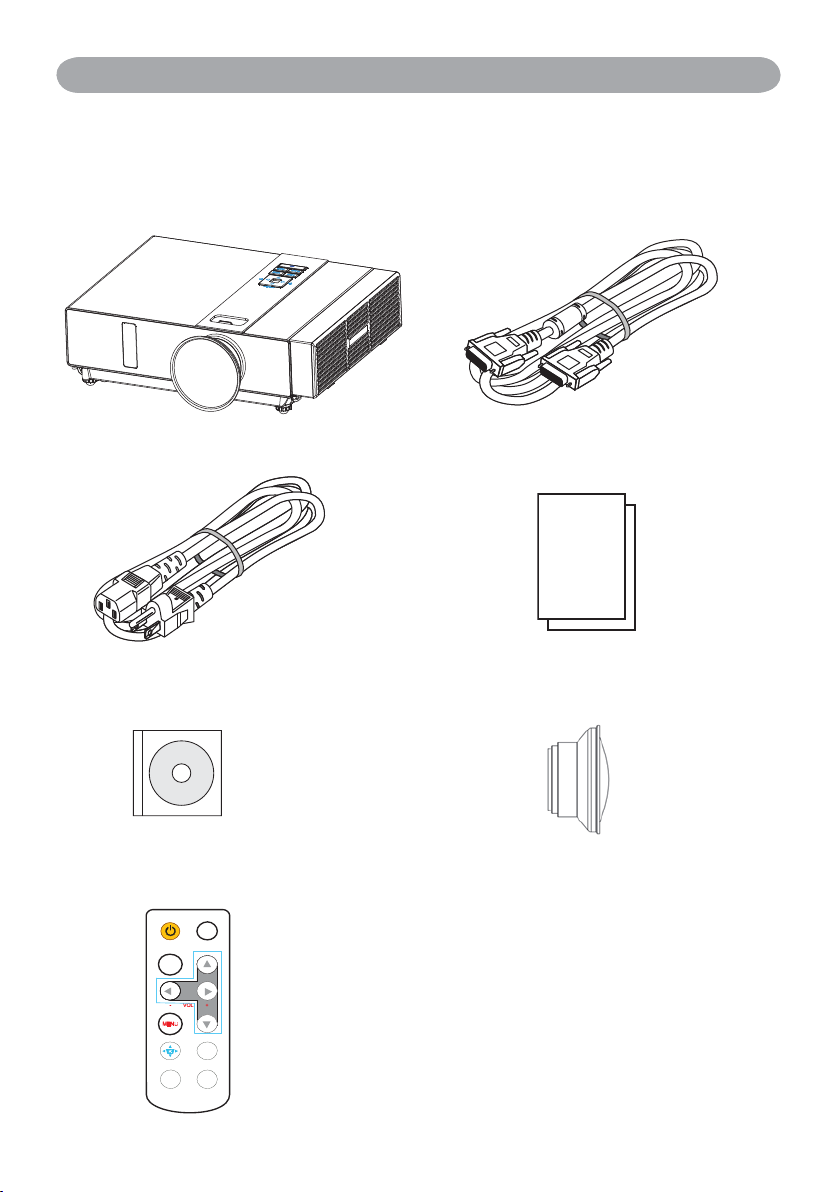
Safety InstructionsContents of Your Box
Check-list of your accessories
Please make sure that following items are included in the box,
along with the main.
If any items missing, contact your dealer.
1. Projector
2. Computer cable
3. Power cord
5. Owner’s Manual CD
7. Remote control
INPUT
ESC
- VOL +
MENU
Auto
K
Blank
Still
4. Quick Start Guide
6. Convergence Lens
3-A
Page 5
Safety InstructionsContents of Your Box
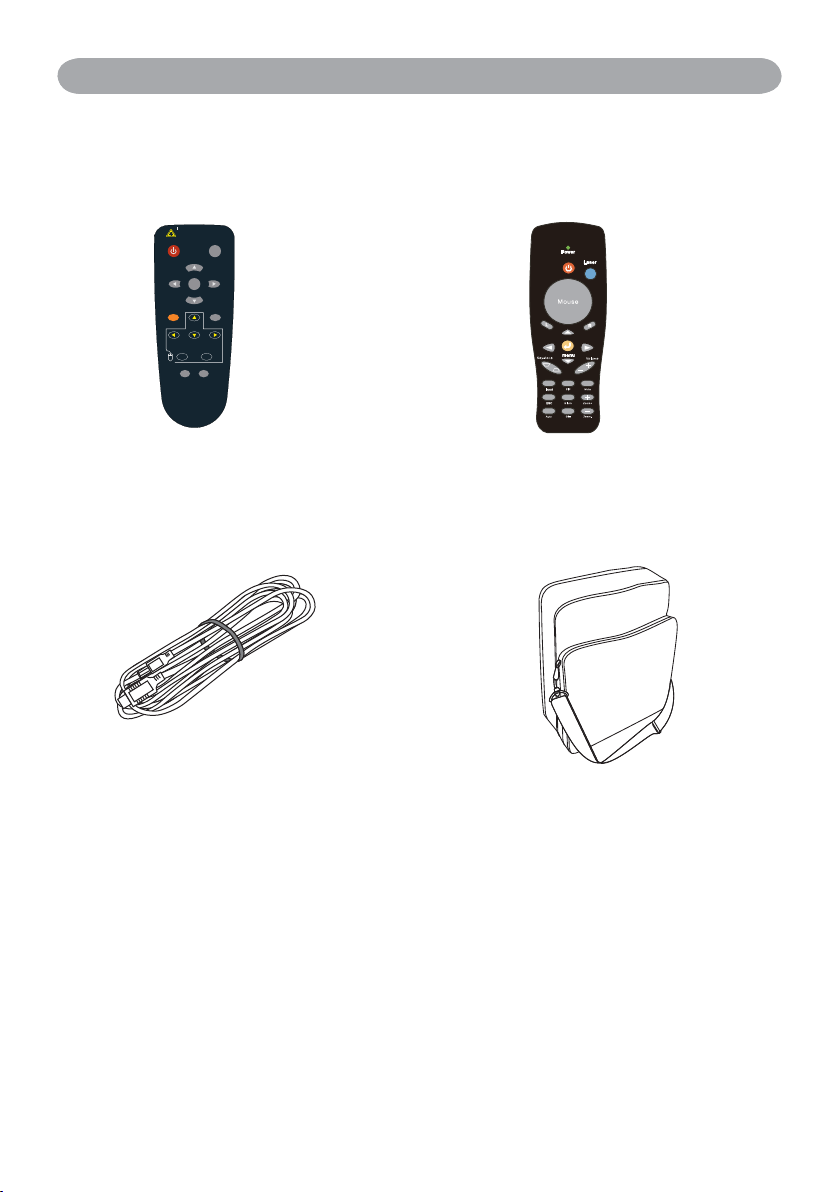
Optional
Remote control
POWER
USB Cable (1.5M)
LASER
LASER
INDICATOR
MOUSE-L
AUTO BLANK
Remote control
INPUT
MENU
MUTE
MOUSE-R
Soft Bag
3-B
Page 6

Safety Instructions
The projector is designed and tested to meet the latest standards for safety of information technology
equipment. However, to ensure safe use of this product, it is important that you follow the
instructions mentioned in this manual and marked on the product.
WARNING / CAUTION
1. If a problem occurs
- If smoke or trange odors arise, continued use
could result in fire or electrical shock.
- If there is no image or sound, or the sound
is distorted in the projector. In some cases,
immediately remove the power cable from the
power outlet. After making sure that the unit has
stopped, contact your dealer for repairs.
Never attempt to repair by yourself because this
is dangerous.
2. Do....
- Place the projector in a stable horizontal
position.
- Put the projector in a cool place, and ensure that
there is sufficient ventilation.
- To consult with your dealer before a special
installation such as suspending from a ceiling.
3. Do not....
- Do not place the projector on an unstable,
slanted or vibrating surface such as a wobbly or
inclined stand.
- Do not cover the projector's vents. Keep a space
of 20 cm or more between the projector and
other objects such as walls.
-Do not place the projector on metallic goods.
- Do not place the projector on carpet, cushions
or bedding. Do not place the projector in direct
sunlight or near hot objects such as heaters.
- Do not place anything near the projector lens or
vents, or on top of the projector.
- Do not place anything that may be sucked into
or stick to the vents beside of the projector.
- Do not use this projector if there is no image or
sound, or if the sound is distorted.
- Do not place this projector in a container
containing liquid.
4. While connecting, make sure that the shape
of the cable’s connector fits the port to
connect with. Be sure to tighten the screws
on connectors with screws.
5. Do not disassemble or modify the projector
and accessories.
6. Be careful not to damage the cables, and do
not use damaged cables.
7. Use appropriate accessories or otherwise
designed cables. Ask your dealer about nonaccessory cables that may have other lengths.
8. Make sure that devices are connected to the
correct ports. An incorrect connection may
result in malfunction or damage to the device
and the projector.
9. Do not look through the lens when the lamp
is on.
Do not look through the lens when the lamp is
on. The powerful light could adversely affect
vision. Use special caution in households where
children are present.
10. A strong light is emitted when the projector’
s power on. Do not look into the lens of the
projector or look inside of the projector.
Do not place the projector upon either
side to project an image.
NO SIDEWARD
Do not point the projector down to
project an image.
NO DOWNWARD
4
Page 7
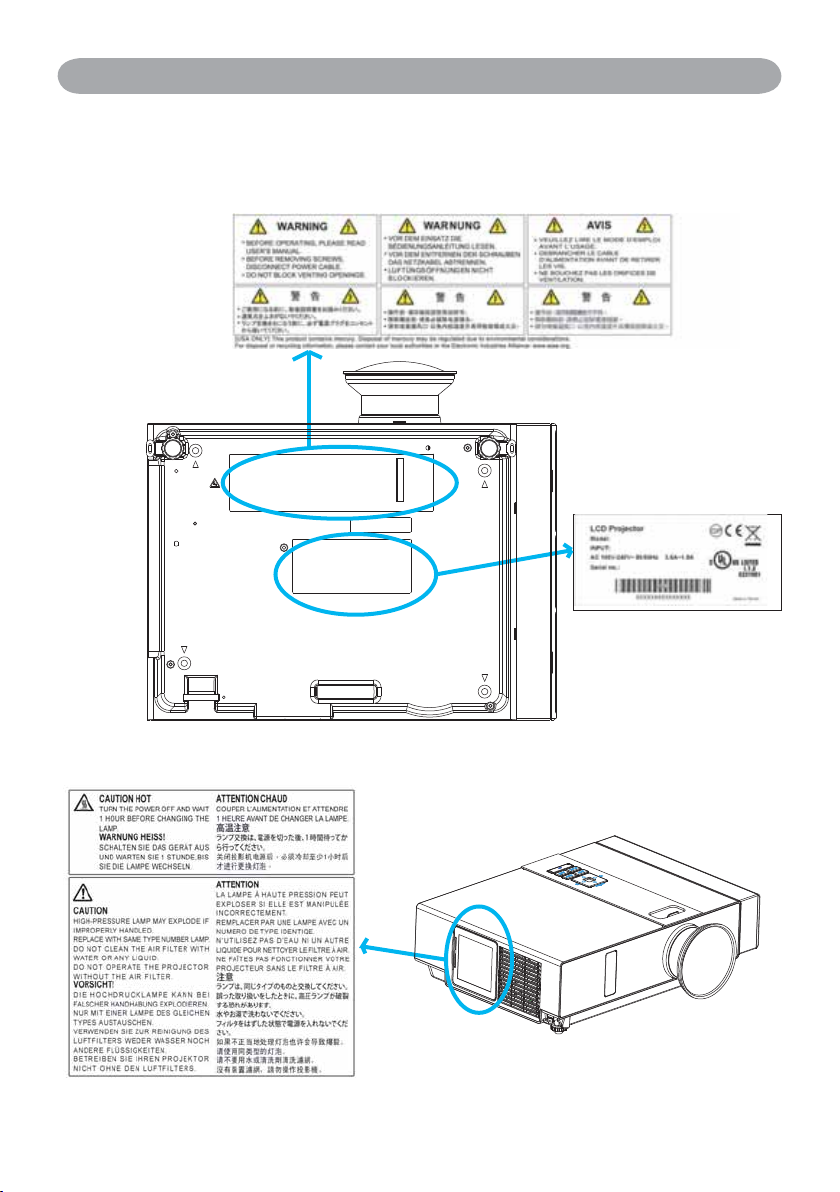
Safety Labels
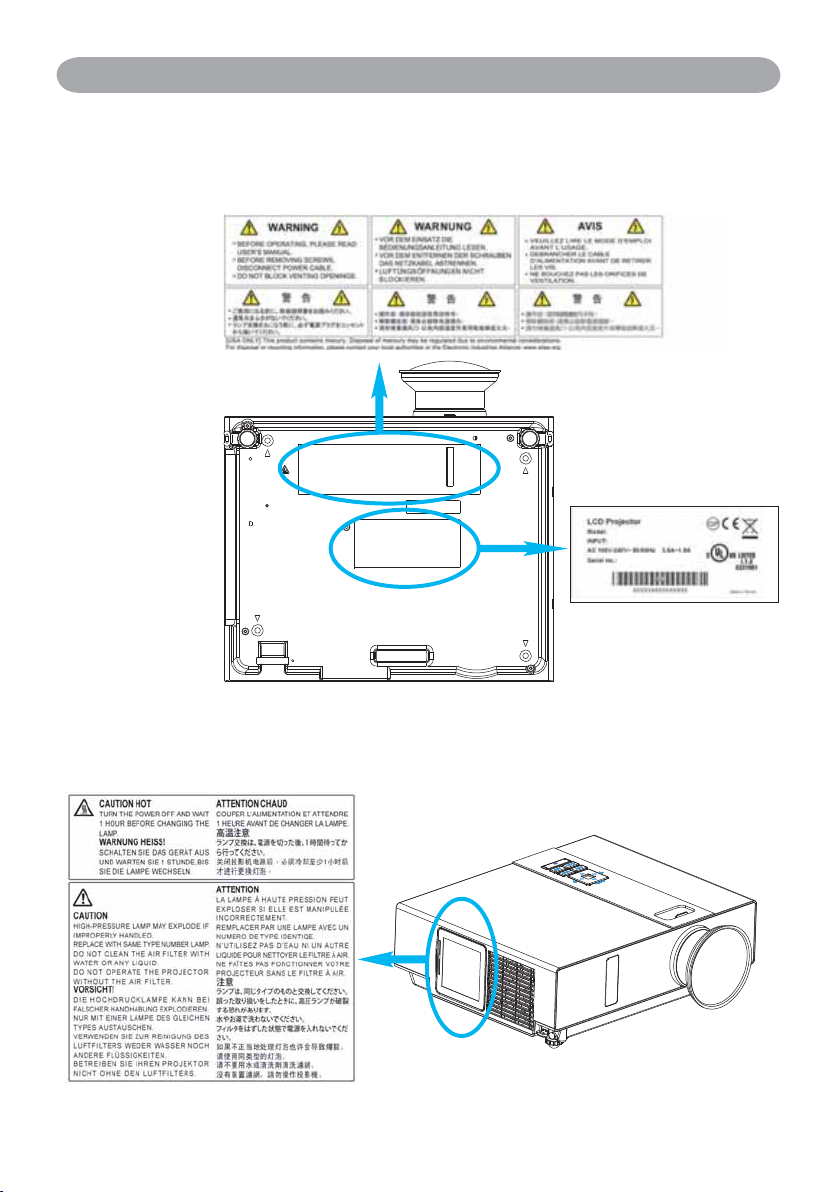
Safety labels are used on or within the projector to
alert you to items or areas requiring your attention.
WARNING LABEL
EMI LABEL
LAMP DOOR WARNING LABEL
5
Page 8
Part Names
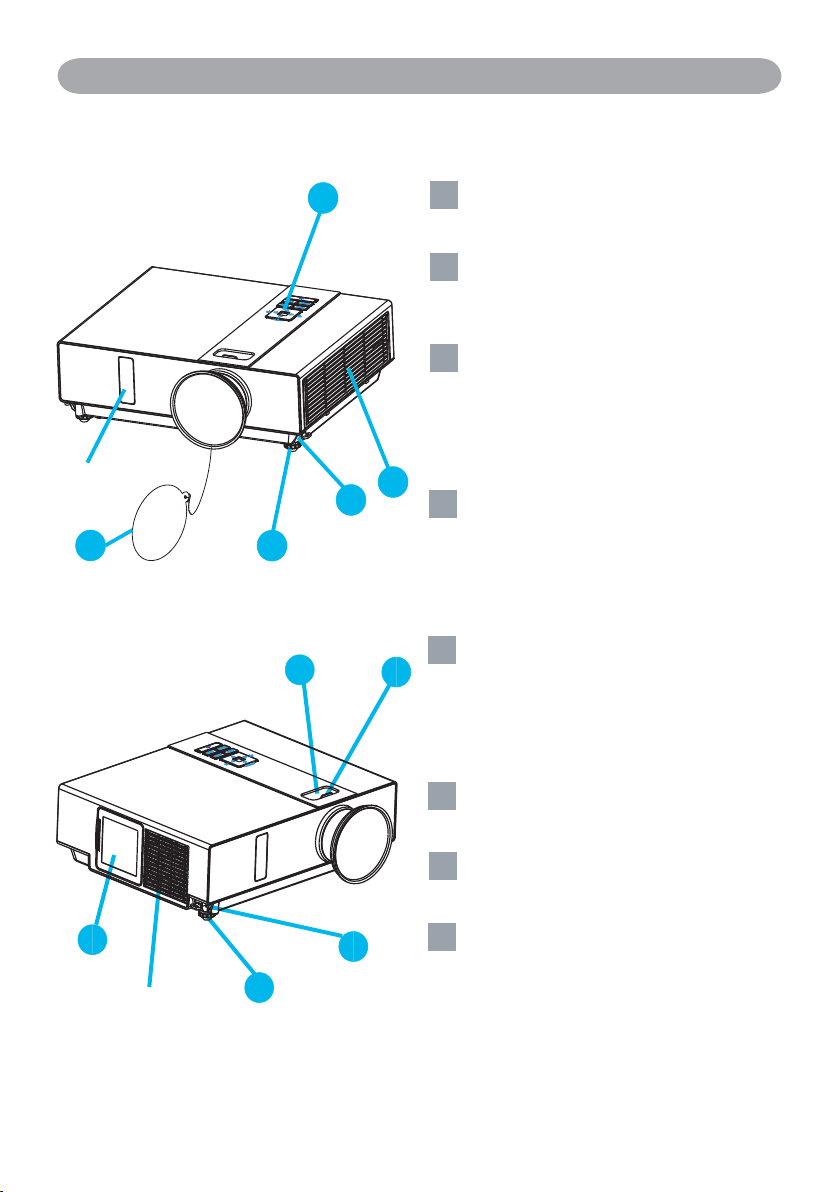
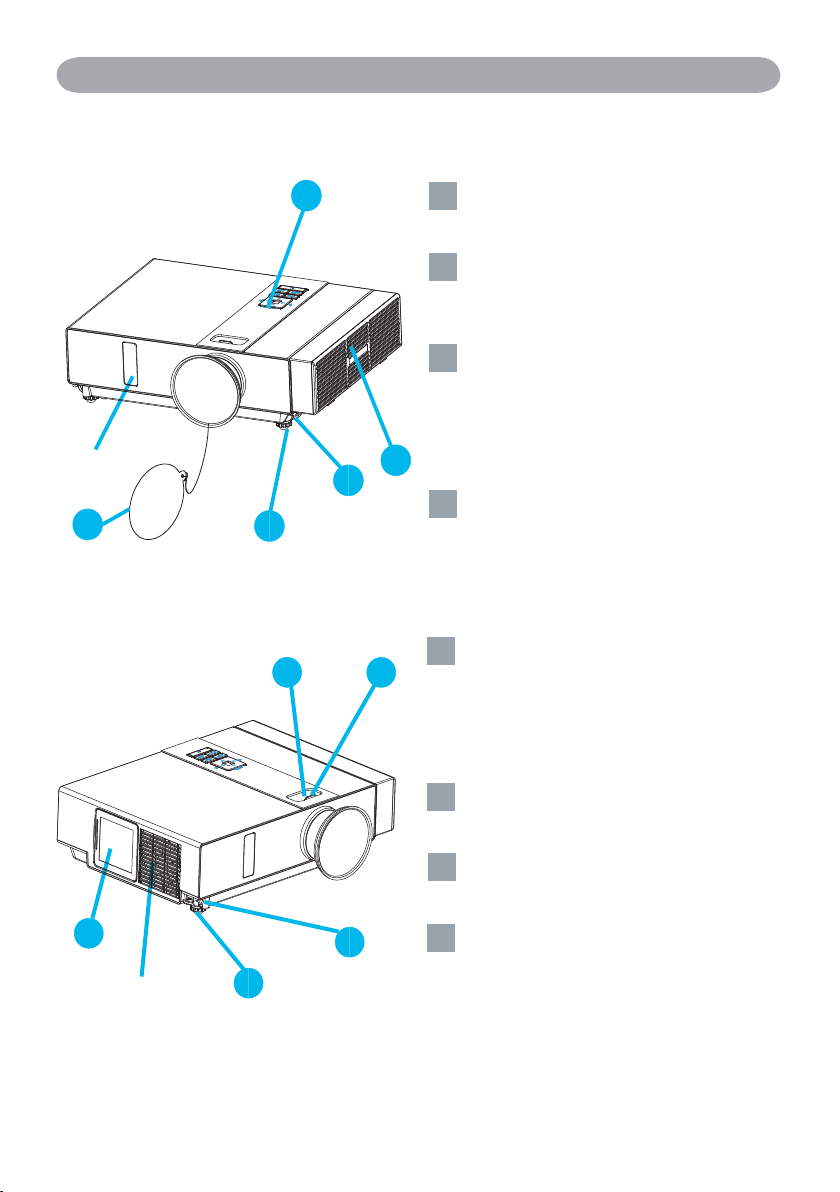
Projector
Front IR
receiver
2
Control panel
1
1
Operating system.
Lens cover
12
Attach when not using to protect the lens
from becoming dirty or damaged.
Filter cover
3
Prevents dust and other foreign particles
from being drawn into projector.
Remove the filter cover to clean the air
filter.
3
7
8
5
4
Focus ring
14
Use the focus ring to focus the projector
image.
Rotate the focus ring until the image is
clear.
Zoom ring
15
Use the zoom ring to adjust the size of the
projected image.
Rotate the zoom ring until the image is the
desired size.
6
Outlet ventilation
Lamp door
16
The lamp unit is inside.
Foot adjust button
17
Lock / unlock the adjustable foot.
Front adjustable foot
7
8
18
Extend and retract to adjust the projection
angle.
6
Page 9
Part Names
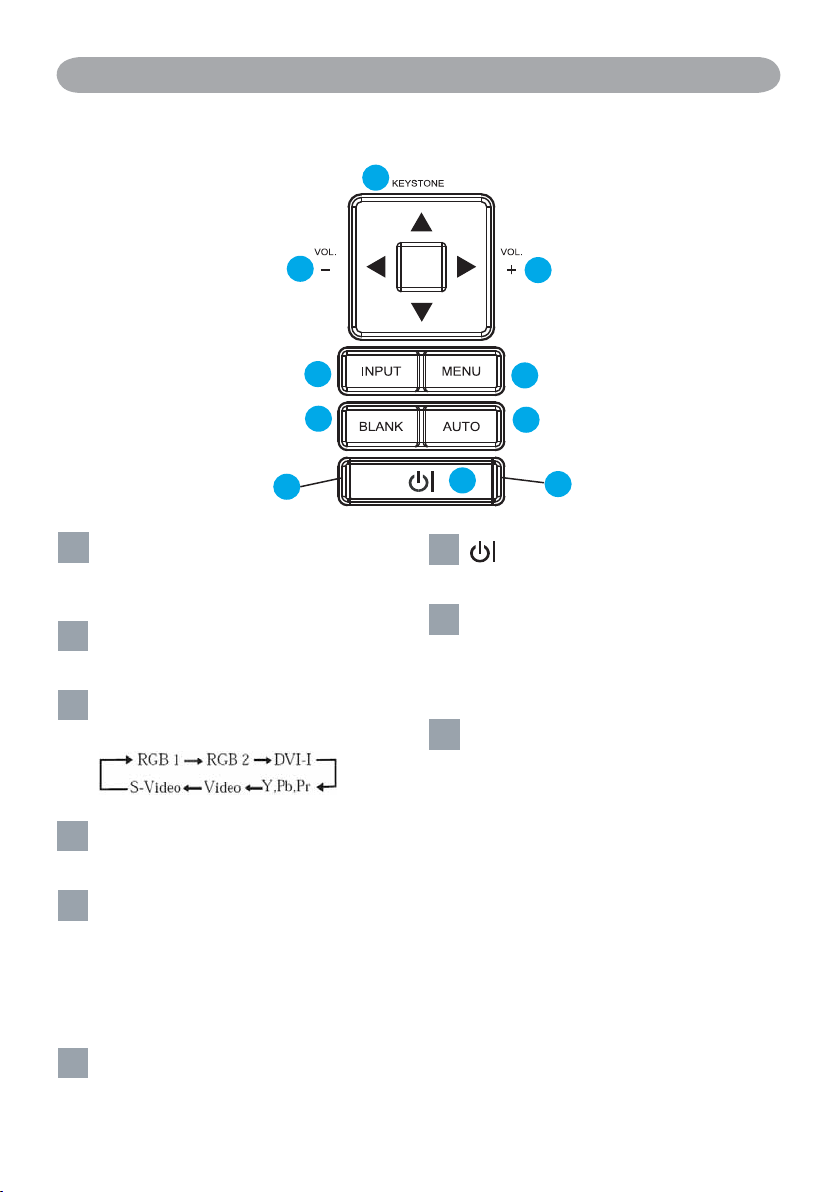
Control Panel
9
10
11
13
16
LAMP INDICATOR
KEYSTONE
9
Adjust the vertical keystone with menu-up,
menu-down.
VOLUME + / -
110
Sound louder or lower.
INPUT
11
Select input source:
MENU
112
Display or hide the OSD main menu page.
10
12
14
15
(POWER)
115
Power On / Off.
LAMP INDICATOR
116
Indicates a status in the internal projector
temperature, lamp door properly closed or
cooling down.
17
POWER INDICATOR
1
Light on or flash to indicate the operating
status of the projector.
17
POWER INDICATOR
BLANK
113
Blank the projected image. The time of
Blank mode can be set in 15 minutes, 30
minutes or 60 minutes. The projector will
shut down automatically after passing each
set time.
AUTO
14
1
Automatically adjust the setting to match
the current input.
7
Page 10

Part Names
Rear
N
A
B
C
I
H
F
K
M
P
D
MOUSE
A
Connect a USB mouse cable to a computer
to control computer mouse functions.
RS232
B
Serial data port for controlling the projector
with a computer or other RS-232 control
device.
C
AUDIO IN 1 & D AUDIO IN 2
Mini jack port corresponds to computer
input.(RGB IN→AUDIO IN 1, DVI-1 IN
→AUDIO IN 2)
E
AUDIO OUT
This jack outputs the audio signal
from computer signal to external audio
equipment.
RGB IN
F
Input analog RGB video signal from a
computer.
RGB OUT
G
Connect an external monitor to this
connection to view the "RGB IN" input.
DVI-I IN
H
Input digital DVI-I signal from a computer.
S-VIDEO
I
S-Video signal from a video source.
E
G
L
J
VIDEO
J
Composite video signal from a video
source.
AUDIO IN 3, R / L
K
RCA type corresponds to video input.
COMPONENT /Y, Pb, Pr
L
Input Y,Pb,Pr signal from a DVD player.
LAN (Optional)
M
This function is optional.
Please see page 34 Network Control
Application for details.
REAR IR RECEIVER
N
SPEAKER
O
Slot for Kensington Micro Saver
P
O
Security System
Built-in Security Slot
This security slot supports the MicroSaver®
Security System. MicroSaver® is a registered
trademark of Kensington Microware Inc.
The logo is trademarked and owned by
Kensington Microware Inc.
8
Page 11

Setting Up
Arrangement
1. Before installation, make sure that the projector is turned off and the power cord is disconnected.
2. Do not set up and move the projector, while it is hot.
3. The distance between the projector and screen determines the actual image size. Refer to the table
below to determine the screen size at a given distance.
Note: The dimensions in the table below are approximate.
Screen size (diagonal) Distance (m) Distance (feet)
inch m Tele Wide Tele Wide
40 1.0 0.95 0.77 3.13 2.53
60 1.5 1.45 1.18 4.74 3.88
70 1.8 1.69 1.39 5.55 4.56
80 2.0 1.94 1.59 6.36 5.23
100 2.5 2.43 2.01 7.98 6.58
150 3.8 3.67 3.03 12.03 9.95
200 5.1 4.90 4.06 16.07 13.32
250 6.4 6.13 5.09 20.12 16.69
300 7.6 7.37 6.12 24.16 20.06
Distance(M)
2.01~2.43
1.59~1.94
1.18~1.45
0.77~0.95
When in against at wall, leave about 20cm (7.9in.) Between thw projector and the wall.
3.03~3.67
6.12~7.37
4.06~4.9
Image size(inch)
Image size(inch)
0.77~0.95
1.18~1.45
1.59~1.94
2.01~2.43
3.03~3.67
4.06~4.90
Distance(M)
9
6.12~7.37
Page 12
Setting Up
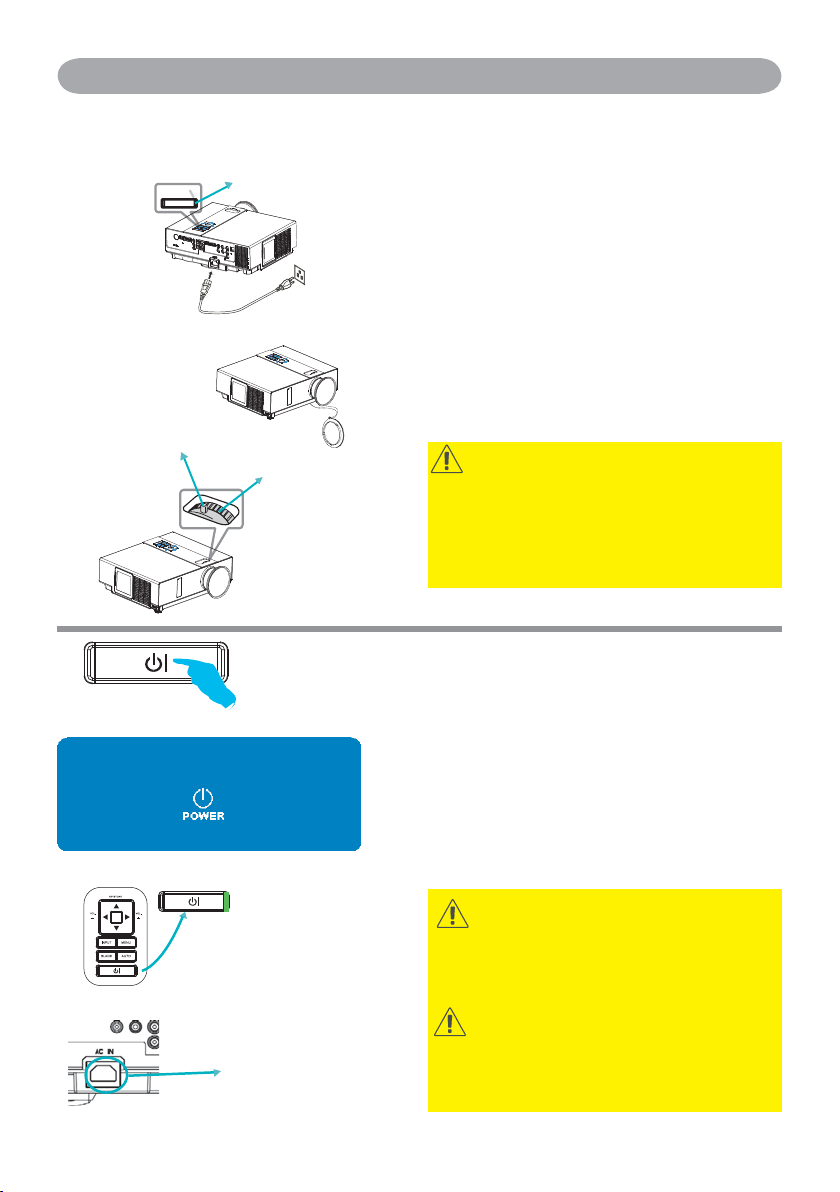
Power ON / OFF
Power off?
AC inlet
Zoom ring
Focus ring
Please press
key again to power off.
POWER indicator
Outlet
Turning on the power
1. Make sure that power cord is firmly and
correctly connected to the projector.
2. Remove the lens cover, and the POWER
indicator will light up in green.
3. Press POWER button on the control panel or
the remote control to turn on the projector.
4. Rotate the zoom ring to adjust the screen size.
5. Rotate the focus ring to adjust the focus.
WARNING
A strong light is emitted when the projector’s
power is on. Do not look into the lens of the
projector or look inside of the projector through
any of the projector’s openings.
Turning off the power
1. Press the POWER button on the control
panel or the remote control. The “power off”
confirmation message appears.
2. Press the POWER button again while the
message appears.
3. When the projector enters “Standby” mode,
the POWER indicator will light up in green.
4. If you don’t use the projector, remove power
cord.
WARNING
Do not touch around the lamp cover and the
exhaust vents during use or just after use, since it
is too hot.
CAUTION
Do not turn off the AC power for 60 seconds
after the lamp is turned on. Doing so could cause
premature lamp failure.
10
Page 13
Setting Up
Setting Up The Projector
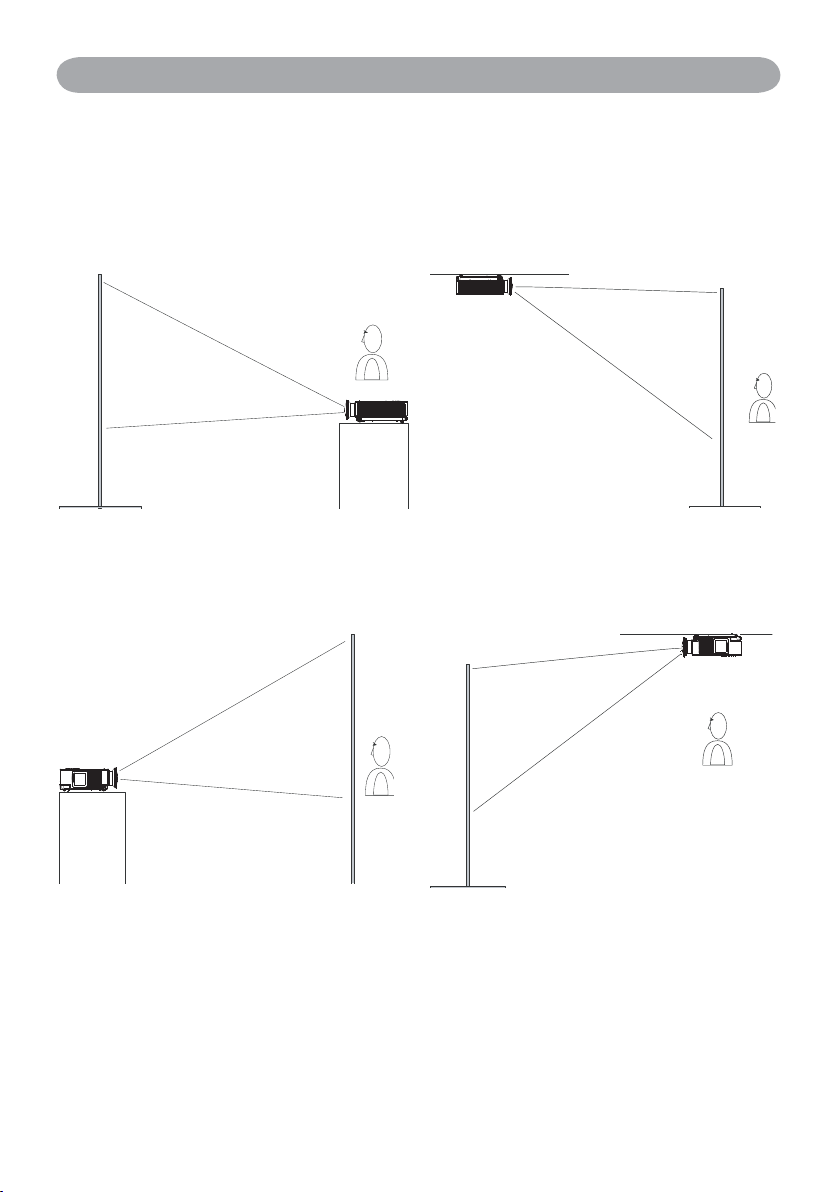
The projector supports the following four different projection methods.
1. Front projection
2. Rear projection
3. Rear ceiling projection
4. Front ceiling projection
Special installation is required in order to suspend the projector from the ceiling. Please ask your
dealer for details.
11
Page 14
Setting Up
Ceiling Mounted Installation Guide
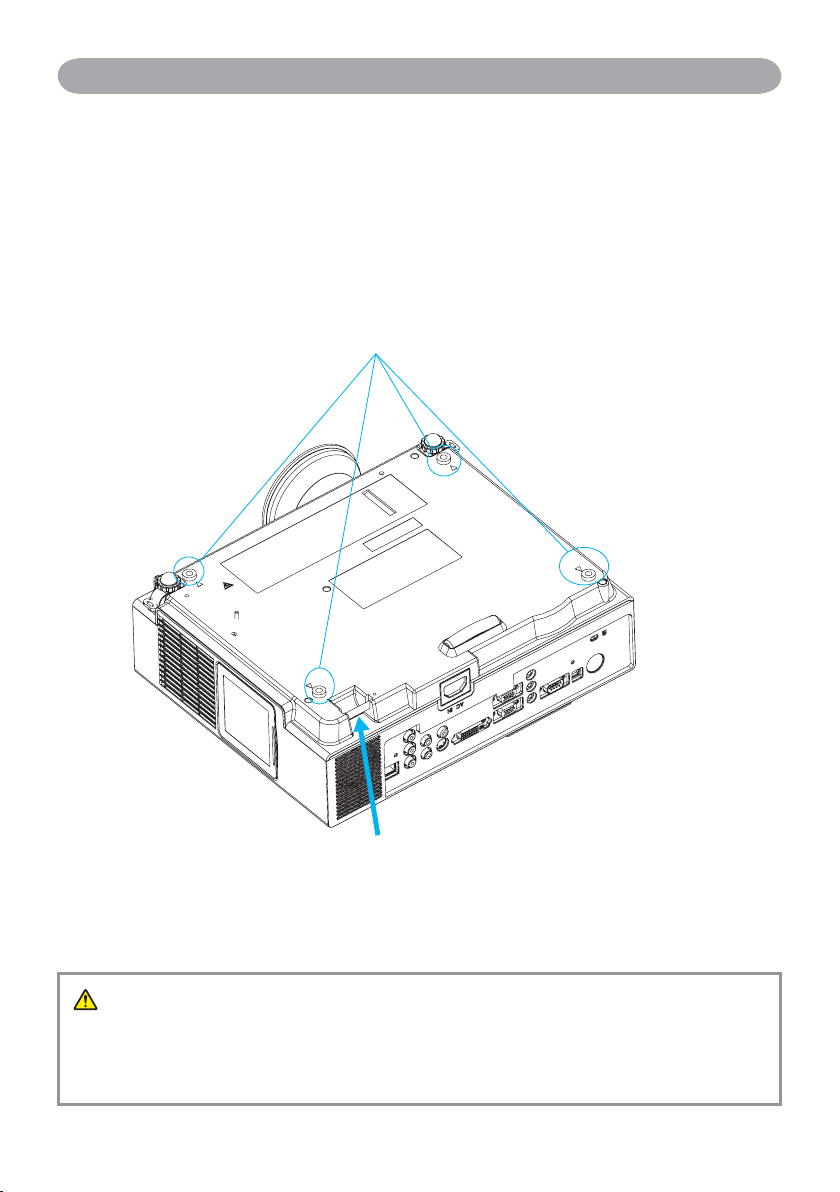
Attach ceiling mount at four-suspension bracket fixing points when suspending from a ceiling.
Special installation is required in order to suspend the projector from the ceiling. Please ask your
dealer for detals.
MAX M4x8 mm For Mounting.
Security Anchor
The product is equipped with security anchor and
PIN LOCK functions to help prevent unauthorized
removal projector.
WARNING
►Do not grasp the security anchor to carry projector, since it is not designed for it.
► The security anchor is not for comprehensive theft prevention measures. It is intended to be
used as supplemental theft prevention measure.
12
Page 15
Setting Up
Adjusting The Projector’s Elevation
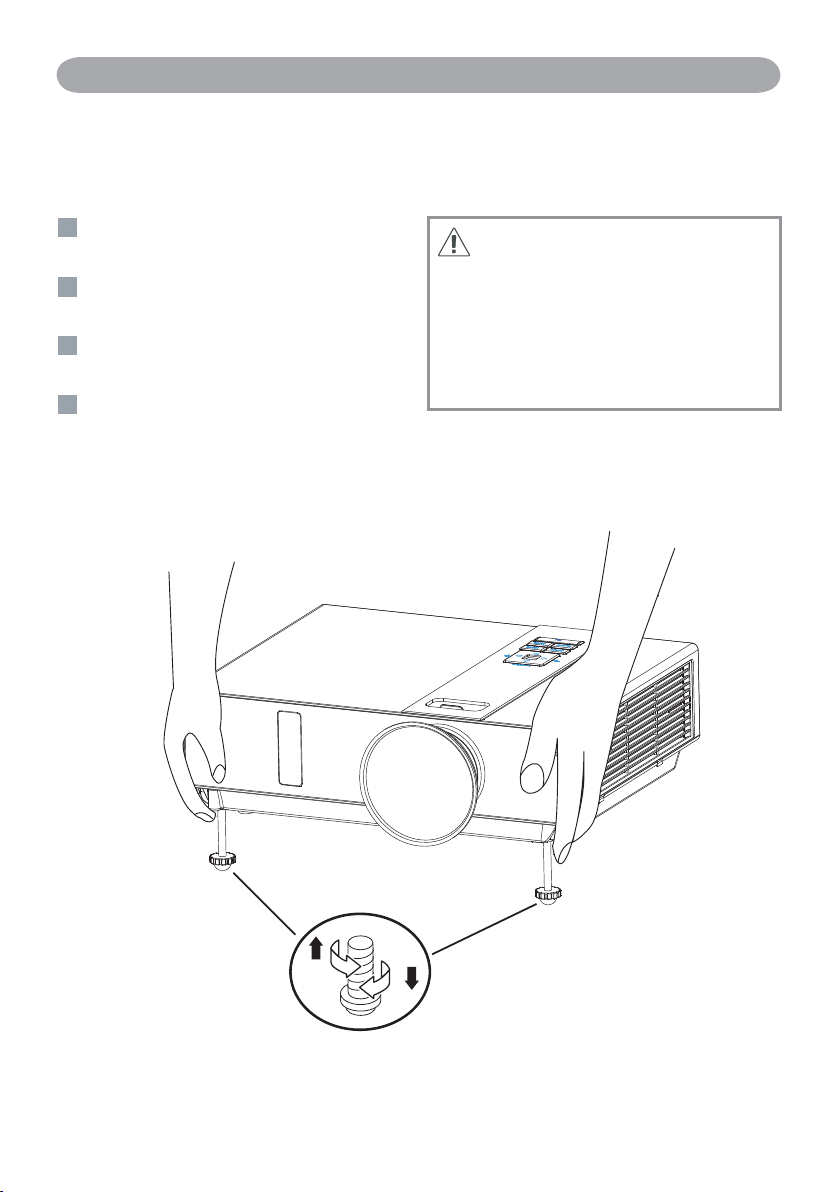
Use the adjustable foot at the front of the projector to set the image height.
1
Holding the projector, push the foot adjust
buttons to loosen the front adjustable foot.
Position the front side of the projector to the
12
desired height.
3
Release the foot adjust buttons in order to
lock the front adjustable feet.
14
After making sure that the front adjustable
feet are locked, put the projector gently
atop.
CAUTION
* The adjustment range of front adjustable
foot is 0 to 8.5 degrees.
* When the foot is adjusted, it may cause the
shape of the projected image to become
distorted. Use the keystone correction
function to correct this distortion.
13
Page 16
Setting Up
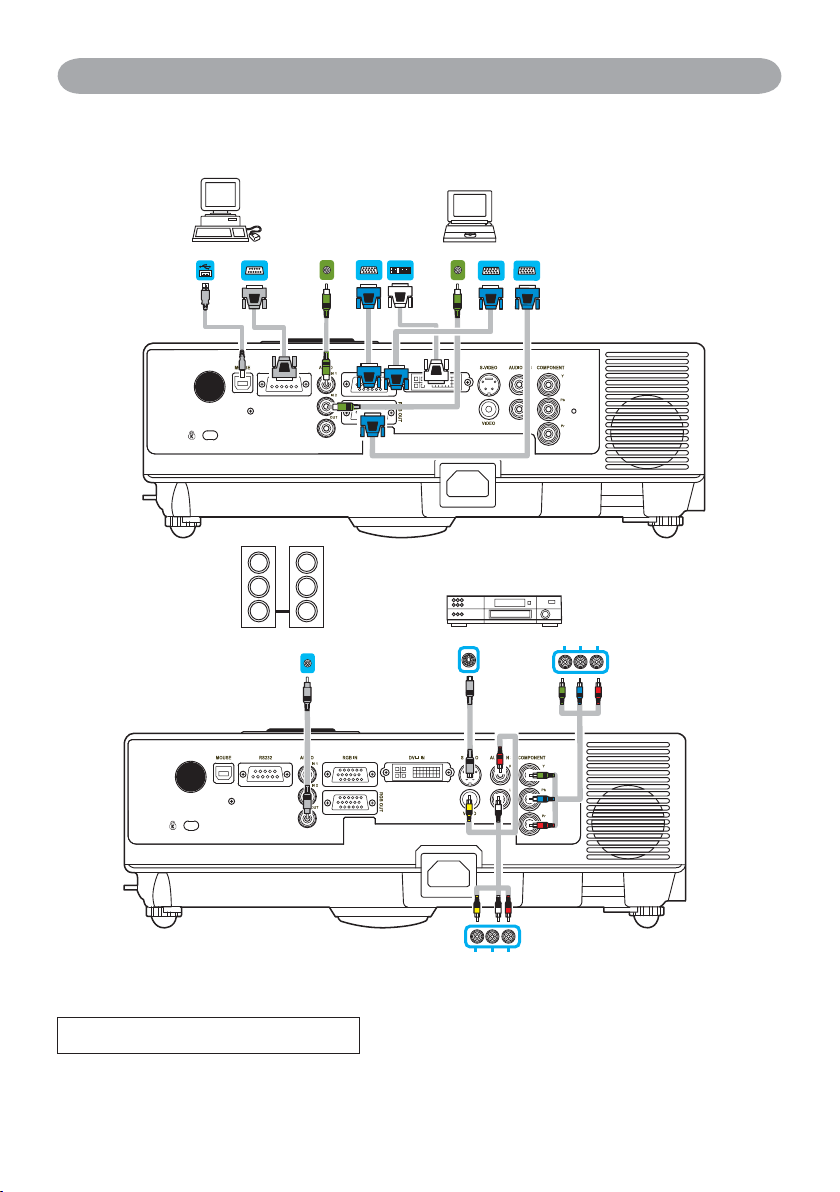
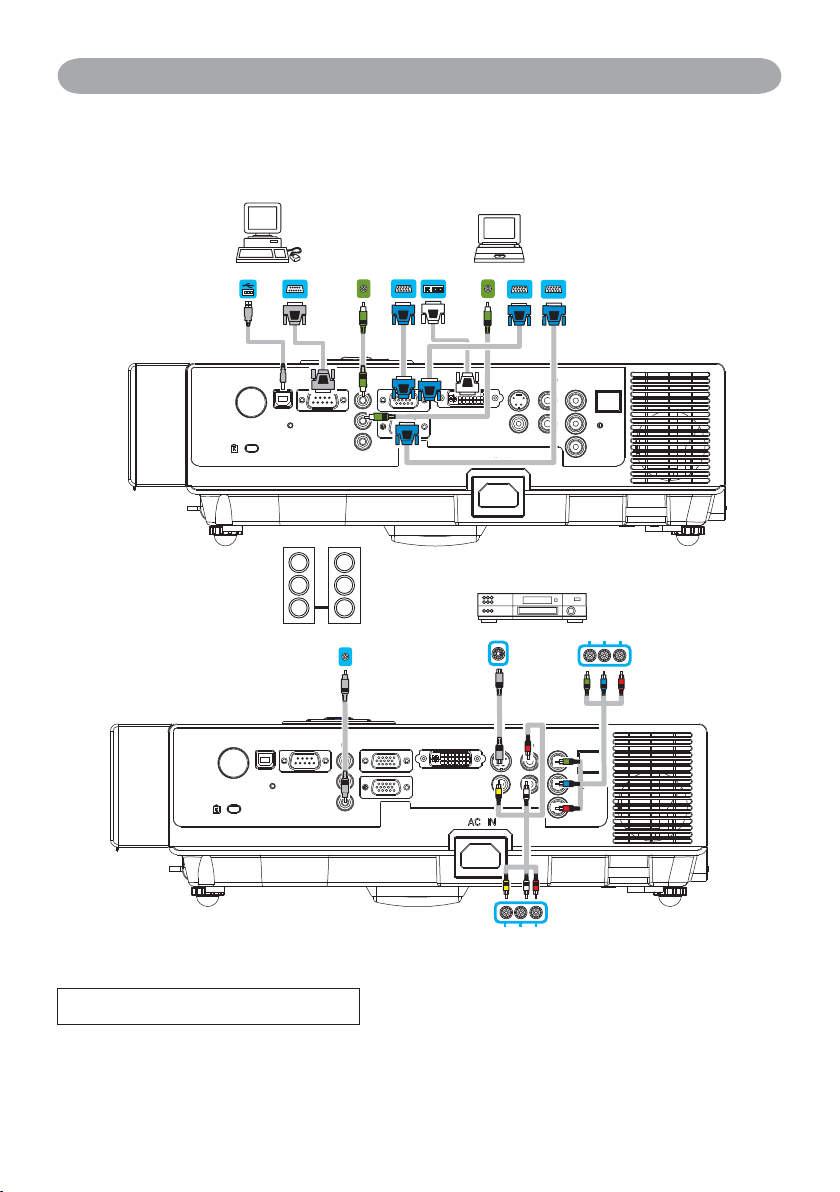
How To Connect
Laptop or desktop computer
MOUSE
RS-232
AUDIO IN
AUDIO OUT
VGA OUT
DVI OUT
AUDIO OUT
S-VIDEO OUT
VGA OUT
RGB IN
Y Pb/Cb Pr/Cr
VIDEO OUT AUDIO OUT (L)&(R)
Before starting, make sure that the projector and computer are both turned off.
Connect the computer cable
Connect the computer cable from the computer to the projector's RGB IN or DVI-I IN.
If needed, connect the MONITOR OUT to a monitor to view input from RGB IN or DVI-I
IN. Tighten the screw on all connectors.
14
Page 17

Setting Up
How To Connect
Laptop or desktop computer
Connect the audio cable if necessary
1. Please connect the audio cable to the AUDIO IN 1 if the computer cable connected to
the projector's RGB IN.
2. Please connect the audio cable to the AUDIO IN 2 if the computer cable connected to
the projector's DVI-I IN.
3. Please connect the audio cable to the AUDIO IN 3 if the video cables are connected to
the VEDIO / S-VIDEO / Y,Pb,Pr port of the projector.
Connect USB Mouse
USB mouse compatible MS-Window98/ 2000/ NT/ XP/ Me, Macintosh :OS8.6~10.1, and
a Microsoft Mouse driver installed.
1. Insert the end of the USB Cable (B-Type) to the projector’s USB port.
2. Connect the end of the USB Cable (A-type) to the computer’s USB port.
3. When the projector and computer are turned on, the appropriate drivers should load
automatically.
If the selected video image is not displayed after the projector is turned on and the
correct video source has been selected, please check that the video source device
is turned on and operating correctly. Also check that the signal cables have been
connected correctly.
Many laptops do not turn on their external video ports when connected to a projector.
Usually a key combination like Fn + F3 or CRT/LCD key turns the external display
on / off. Locate a function key labeled CRT/LCD or a function key with a monitor
symbol on the laptop. Press Fn and the labeledfunction key simultaneously. Refer to
your laptop’s documentation to discover your laptop’s key combination.
15
Page 18

Remote Control
Remote Control Battery Installation
1. Remove the battery cover.
2. Load the batteries. Make sure the plus
pole is correctly oriented.
3. Close the battery cover.
Caution
► Avoid excessive heat and humidity.
►Do not drop the remote control.
► Do not expose the remote control to water or moisture, this could result in malfunction.
► If the remote control will not be used for an extended period, remove the battery.
► Replace the battery when remote control operation becomes sluggish or unresponsive.
► Do not place the remote control close to the cooling fan of the projector.
► Do not use batteries of different types at the same time.
► Do not mix a new battery with used one. Make sure the plus and terminals are correctly
aligned when loading a battery.
► Dispose of batteries in accordance with environmental laws.
► Do not disassemble the remote control. If the remote control needs service, please contact
your dealer.
16
Page 19

Remote Control
Power
Power on operation mode, standby mode, cool
down mode.
ESC
Press “ ESC ” button to close “Menu” picture.
Volume +/-
Adjust Volume higher or lower.
Menu
Display or hide the On-Screen Display main
menu page.
Keystone
Adjust the vertical keystone function.
Still
Keep the current image on the screen.
ESC
- VOL +
MENU
K
Still
INPUT
Auto
Blank
17
Page 20
Remote Control
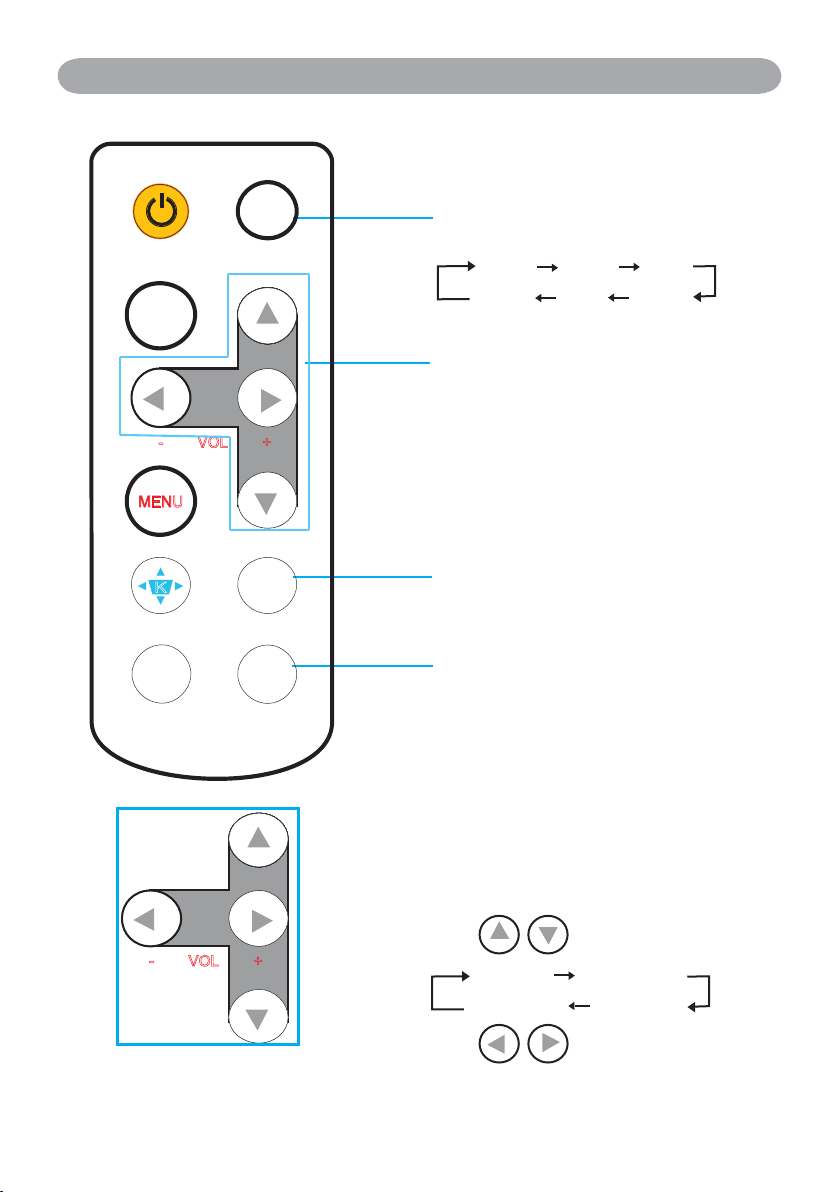
ESC
- VOL +
MENU
K
Still
INPUT
Auto
Blank
INPUT
Select input source:
RGB 1 RGB 2
S-Video
Video
DVI-I
Y,Pb,Pr
Menu up / down
Menu left / right
Select and adjust the function of On-Screen
Display.
Auto
Refresh the current image.
Blank
Hide the current image, become black color on
the screen.
- VOL +
Quick Key:
If it is not in the OSD menu of screen,
you could press the buttons as seen on
the left.
Press
button to select item.
Keystone Brightness
Volume
Contrast
Press button to select item.
18
Page 21
Remote Control (Optional)
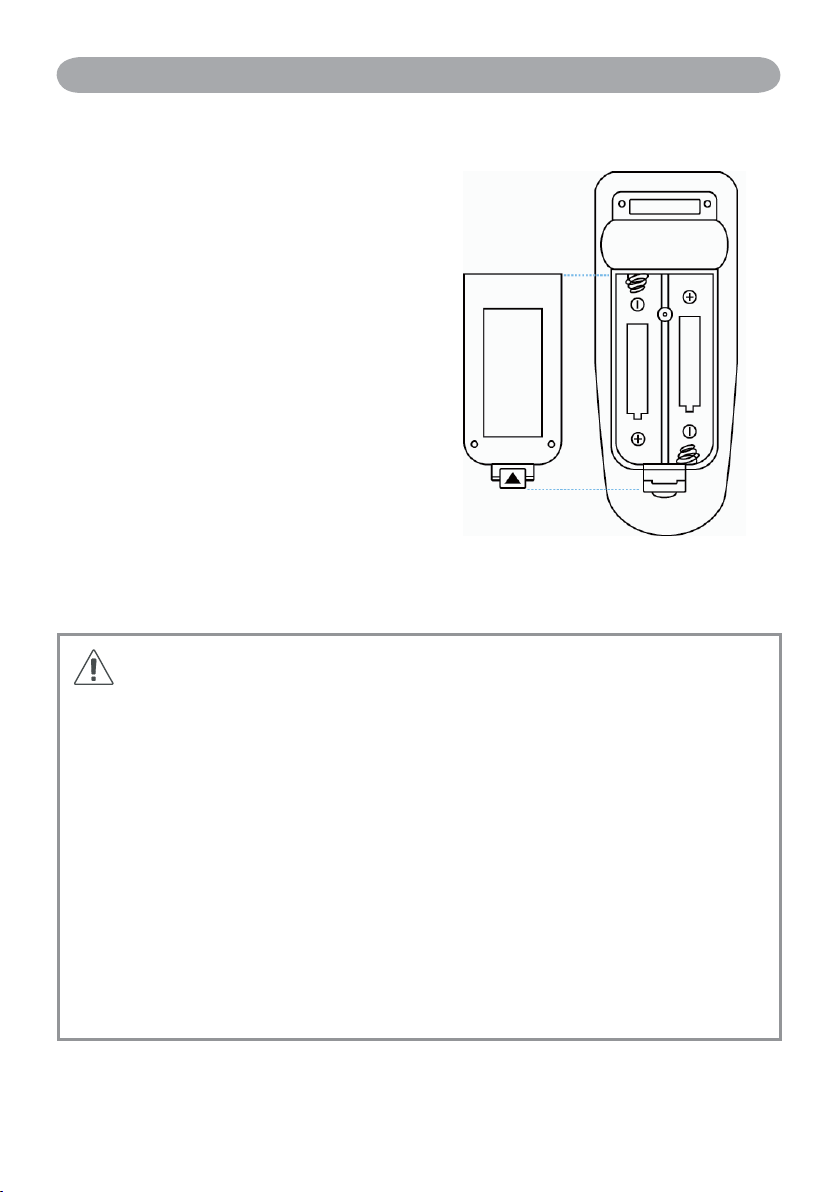
Remote Control Batteries Installation
1. Remove the battery cover.
2. Load the batteries.
Make sure the poles are correctly oriented.
3. Close the battery cover.
Caution
►Avoid excessive heat and humidity.
►Do not drop the remote control.
► If the remote control will not be used for an extended period, remove the batteries.
► Do not expose the remote control to water or moisture. This could result in malfunction.
► Replace the battery when remote control operation becomes sluggish or unresponsive.
► Do not place the remote control close to the cooling fan of the projector.
► Do not use batteries of different types at the same time.
► Do not mix a new battery with used one. Make sure the plus and terminals are correctly
aligned when loading batteries.
► Dispose of batteries in accordance with environmental laws.
► Do not disassemble the remote control. If the remote control needs service, please contact
your dealer.
19
Page 22

Remote Control (Optional)
POWER
Power on / operation mode, Standby mode,
Cool down mode.
INPUT
Select input source :
RGB 1 RGB 2
S-Video
Video
MENU
Display or hide the On-Screen Display main menu
page.
Press or to select On-Screen
Display menu item.
Press or to select and adjust the
function of On-Screen Display menu item or value.
LASER
Aim the remote control at the screen, press and
hold button to activate the laser pointer.
DVI-I
Y,Pb,Pr
POWER
LASER
LASER
INDICAT
OR
INPUT
MENU
MUTE
MUTE
Mute audio.
AUTO
Refresh the current image.
BLANK
Hide the current image, become black color on the
screen.
Press / / / button to move
arrow direction of window.
MOUSE-L / MOUSE-R
The function is like mouse of desktop/ notebook.
Remote control’s mouse functions only will work
if the USB cable is connected (see page 15 for
instructions)
20
MOUSE-L
AUTO BLANK
MOUSE-R
Page 23

Remote Control (Optional)
Remote Control Batteries Installation
1. Remove the battery cover.
2. Loading the batteries.
Make sure the plus and minus poles are
correctly oriented.
3. Close the battery cover.
Caution
1. Avoid excessive heat and humidity.
2. Do not drop the remote control.
3. Do not expose the remote control to water or moisture, this could result in malfunction.
4. When the remote control will not be used for an extended period, remove the batteries.
5. Replace the batteries when remote control operation becomes sluggish or unresponsive.
6. Do not place the remote control close to the cooling fan of the projector.
7. Do not disassemble the remote control. If the remote control needs service. Please bring it
to the service station.
21
Page 24

Remote Control (Optional)
Power
Power on / operation mode, Standby mode,
Cooling-down mode.
ESC
Press ”ESC” button, it will close ”Menu”
picture.
Vol +/-
Sound louder or lower.
Menu
Display or hide the OSD main menu page.
Keystone +/-
Adjusts the vertical keystone function.
Still
Keep the current image on the Screen.
Blank
Hide the current image,become black color on
the screen.
Auto
Refresh the current image.
Menu up/down, Menu left/right
Selecting and adjusting the function of OSD.
INPUT source
Select input source:
Mouse
Select an item or adjust value in the OnScreen Menu.
Zoom in / Zoom out
Zoom in or zoom out.
Mute
Mute audio.
Laser pointer
Use laser pointer from remote control.
22
Page 25
Menu Operation
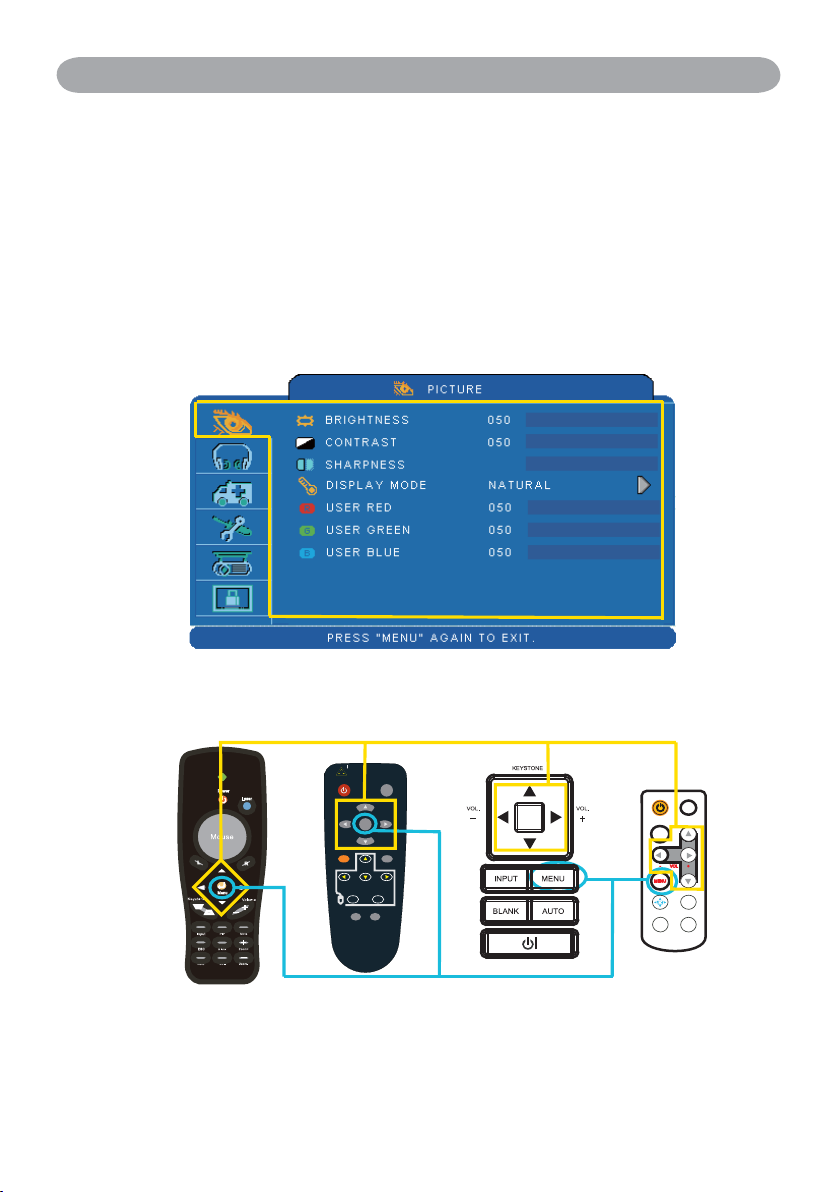
How To Operate On-Screen Display
1. You could press "Menu" button. It will be shown blue main menu. The
first main menu is " PICTURE" menu.
2. Choose which item you want to enter, you could press up / down /left/
right button of control panel or remote control to adjust item or value.
007
Up / Down / Right / Left button
LASER
INDICATOR
POWER
LASER
MOUSE-L
AUTO BLANK
INPUT
MENU
MUTE
MOUSE-R
ESC
-VOL+
MENU
K
Still
INPUT
Auto
Blank
Power
Laser
Menu
Menu button
23
Page 26
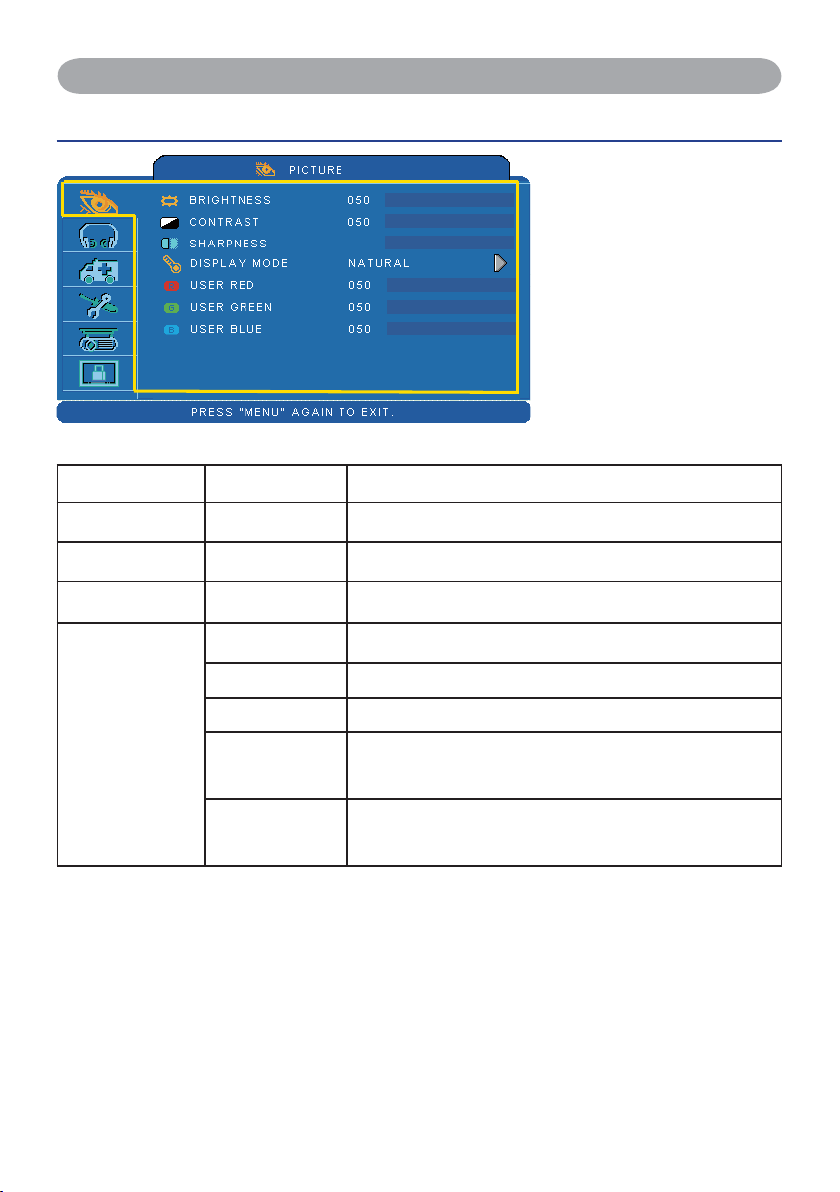
MENU (PC Mode)
Picture Menu
007
Item Selection Description
BRIGHTNESS 000/100 Adjust the image brightness level.
CONTRAST 000/100 Adjust the image contrast level.
SHARPNESS 000/015 Adjusts the image sharpness.
NATURAL Natural color.
Step:
1. Use the ▲ /▼ buttons to
select an item.
2. Use the ◄ / ► cursor
buttons to select an item
or adjust the value.
DISPLAY MODE
CINEMA Enhance contrast ratio when displaying DVD contents.
DAYLIGHT Suitable when ambient light is strong.
GREEN BOARD
WHITE BOARD
BLACK BOARD
USER
Adjust the color settings to make the projected image on
a (green, white, black) board more visible.
User Red 000/100
User Green 000/100
User Blue 000/100
24
Page 27
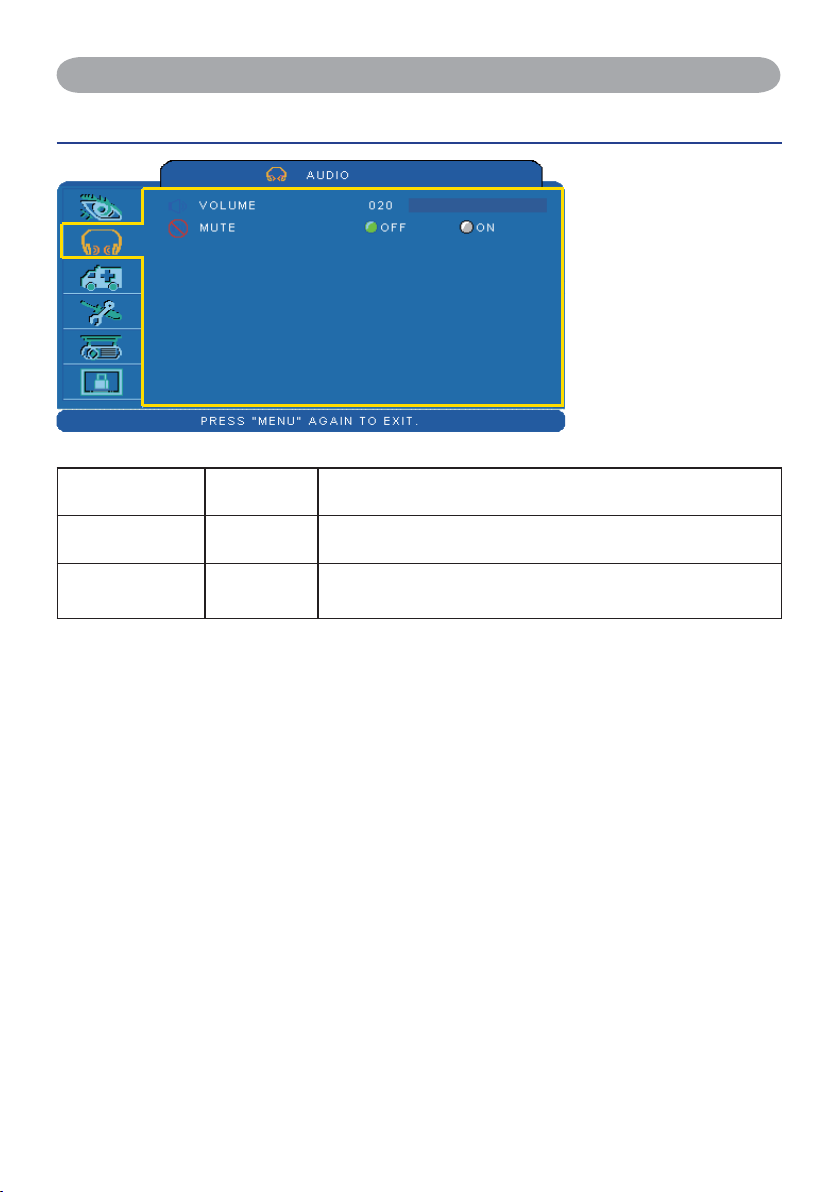
MENU (PC Mode)
Audio Menu
Item Selection Description
VOLUME 00/40 Adjust the volume.
MUTE OFF/ON Mute the volume OFF / ON.
Step:
1. Use the ▲ /▼ buttons
to select an item.
2. Use the ◄ / ►
buttons to select an
item or adjust the
value.
25
Page 28
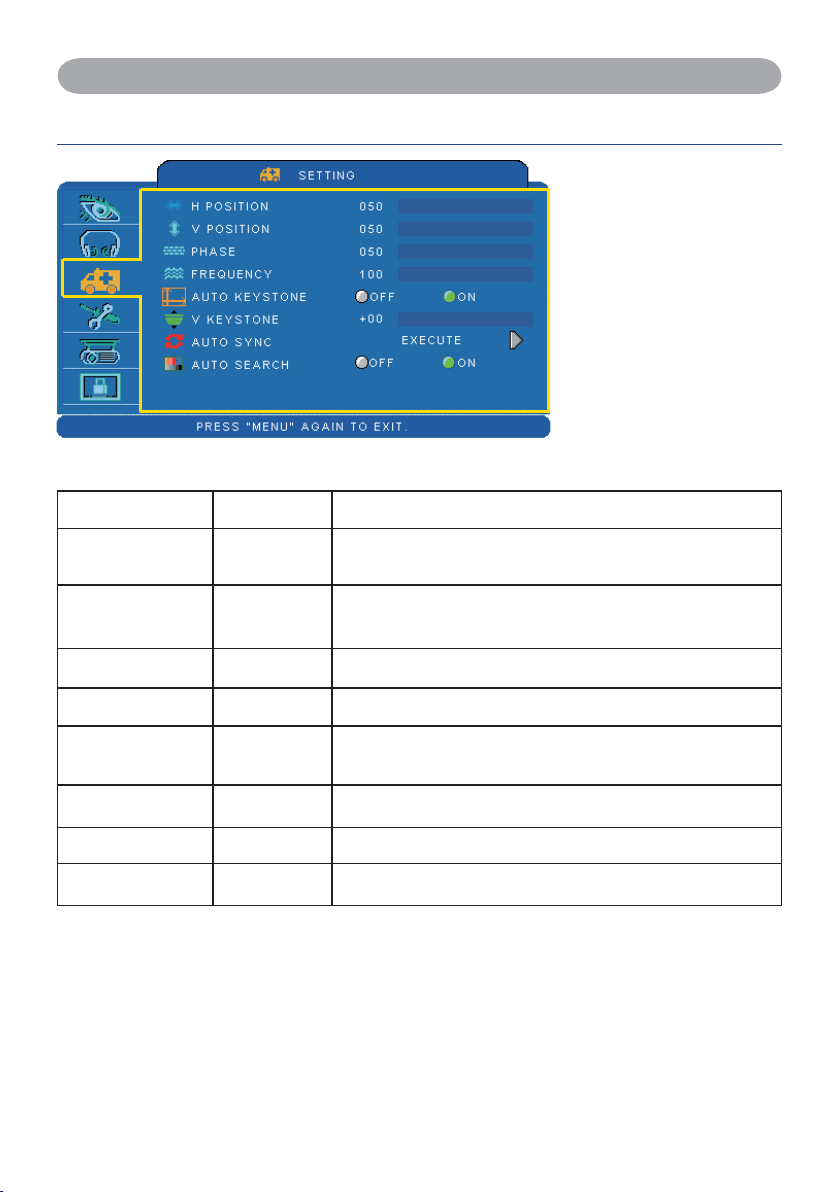
MENU (PC Mode)
Setting Menu
Item Selection Description
Step:
1. Use the ▲ /▼buttons
to select an item.
2. Use the ◄ / ► buttons
to select an item or
adjust the value.
H POSITION 000/100
V POSITION 000/100
PHASE 000/100 Adjust the image sharpness.
FREQUENCY 000/200 Set the horizontal scanning frequency.
AUTO
KEYSTONE
KEYSTONE V -70/+70 Correct vertical keystone distortion in image manually.
AUTO SYNC EXECUTE Set all of the above setting automatically.
AUTO SEARCH OFF/ON Search signal source manually or automatically.
*DVI doesn't support H POSITION, V POSITION, PHASE, FREQUENCY and AUTO SYNC.
OFF/ON Correct keystone distortion in image automatically.
Move the image position horizontally.
This function is only selected for computer signal.
Move the image position vertically.
This function is only selected for computer signal.
26
Page 29
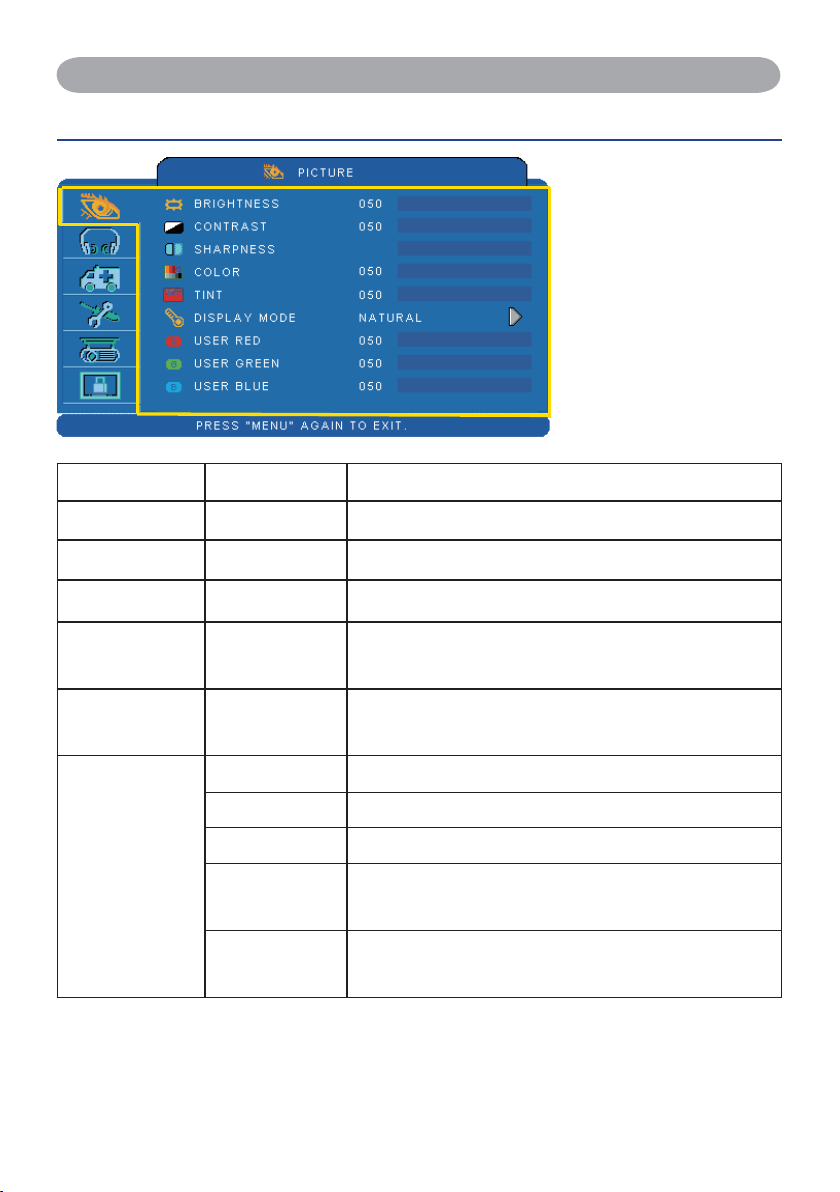
MENU (Video Mode)
Picture Menu
007
Item Selection Description
BRIGHTNESS 000/100 Adjust the image brightness level.
CONTRAST 000/100 Adjust the image contrast level.
SHARPNESS 000/015 Adjusts the image sharpness.
Adjust the strength of whole color.
COLOR 000/100
TINT 000/100
NATURAL Natural color.
This function can be used under video signal, S-Video
signal, or component video signal input only.
Adjust the image tint.
This function can be used under video signal, S-Video
signal, or component video signal.
Step:
1. Use the ▲ /▼ buttons
to select an item.
2. Use the ◄ / ► cursor
buttons to select an
item or adjust the value.
DISPLAY MODE
CINEMA Enhance contrast ratio when displaying DVD contents.
DAYLIGHT Suitable when ambient light is strong.
GREEN BOARD
WHITE BOARD
BLACK BOARD
USER
Adjust the color settings to make the projected image on
a (green, white, black) board more visible.
User Red 000/100
User Green 000/100
User Blue 000/100
27
Page 30
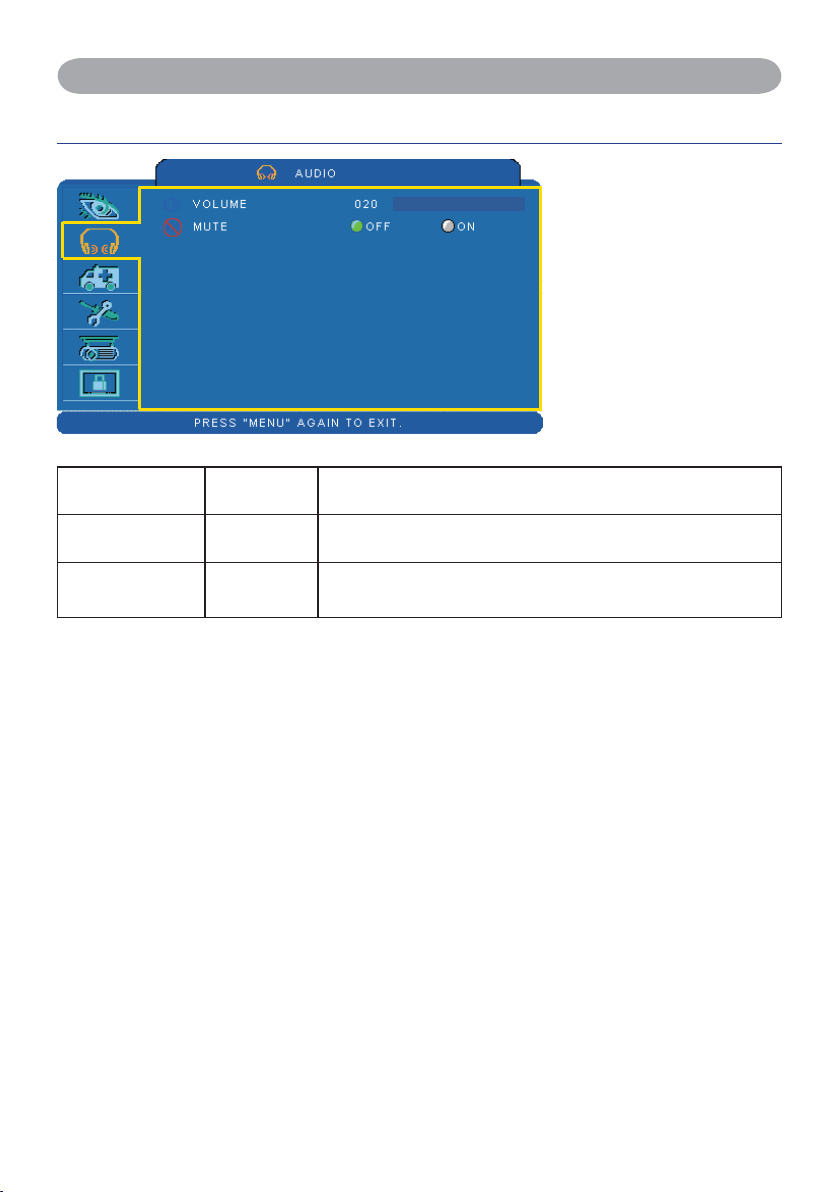
MENU (Video Mode)
Audio Menu
Item Selection Description
VOLUME 00/40 Adjust the volume.
MUTE OFF/ON Mute the volume OFF / ON.
Step:
1. Use the ▲ /▼ buttons to
select an item.
2. Use the ◄ / ► buttons
to select an item or
adjust the value.
28
Page 31
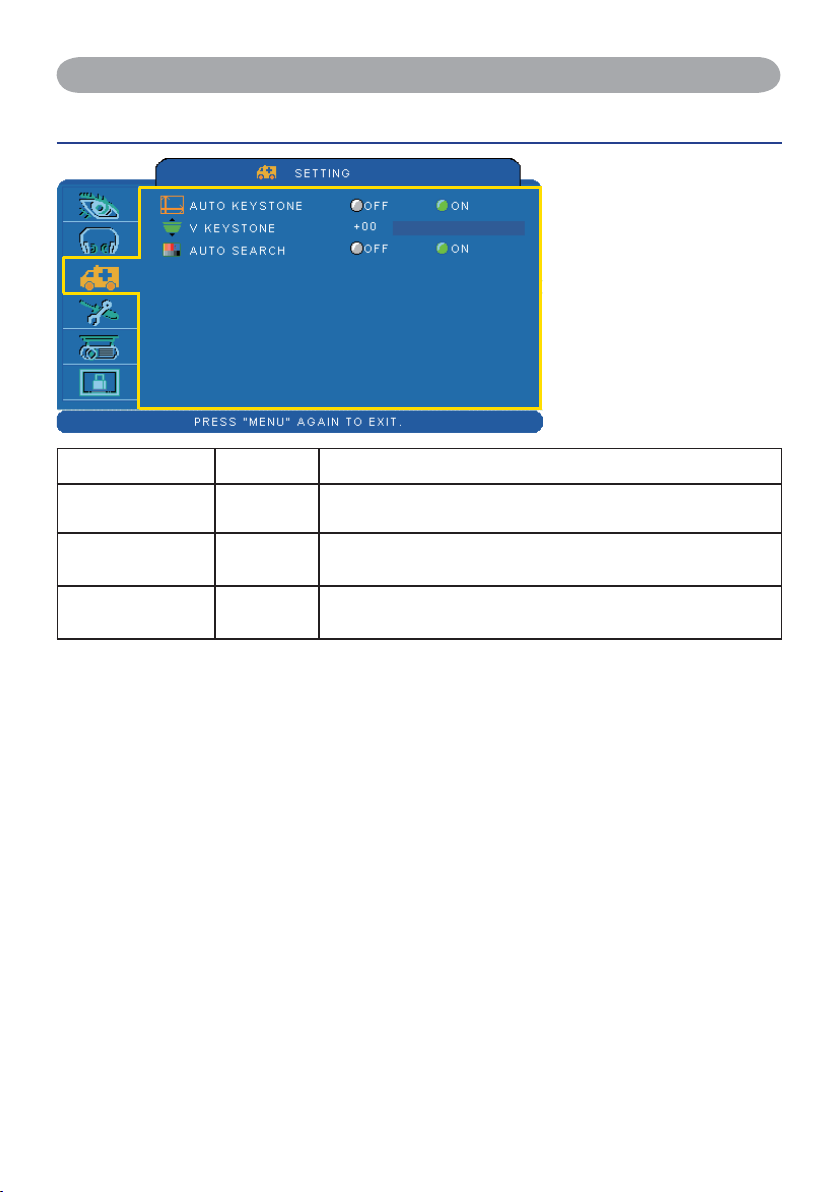
MENU (Video Mode)
Setting Menu
Step:
1. Use the ▲ /▼buttons to
select an item.
2. Use the ◄ / ► buttons
to select an item or
adjust the value.
Item Selection Description
AUTO KEYSTONE OFF/ON Automatically Correct keystone distortion in image.
KEYSTONE V -70/+70 Correct vertical keystone distortion in image manually.
AUTO SEARCH OFF/ON Search signal source manually or automatically.
29
Page 32
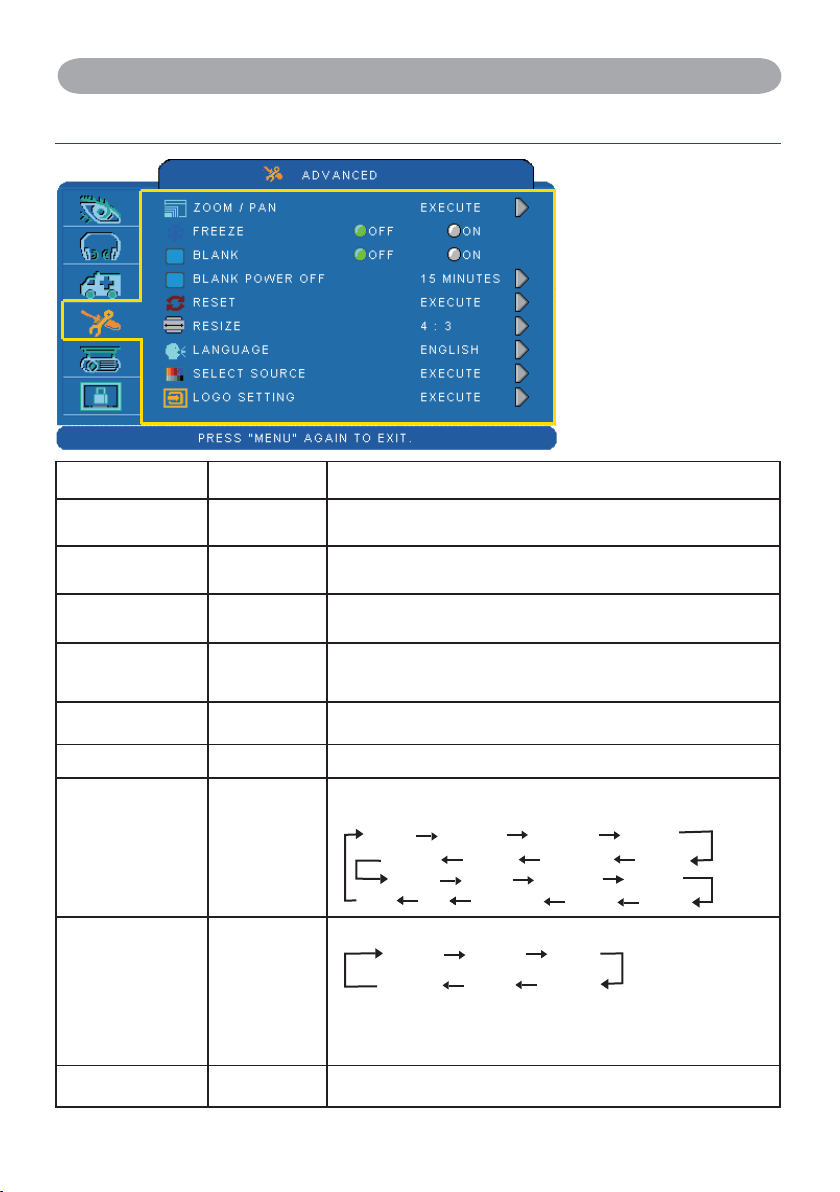
MENU
Advanced Menu
Item Selection Description
ZOOM / PAN EXECUTE Execute digital zoom and pan function.
FREEZE OFF/ON Freeze the current image on the screen.
BLANK OFF/ON Hide the image, display a black screen.
Step:
1. Use the ▲ /▼buttons
to select an item.
2. Use the ◄ / ► buttons
to select an item or
adjust the value.
BLANK POWER
OFF
15/30/60
Minute
Set power off time after blank.
RESET EXECUTE Reset all menu function to their factory default values.
RESIZE 4:3,16:9, 1:1
Select the language that the menu and on screen massage is
display in
LANGUAGE ENGLISH
English
Suomi
Italiano
ไทย
ᓄវ
FrançaisDeutsch
Polski
Українська
ㅔԧЁ᭛
Nederlands
Português
Svenska
ᣣᧄ⺆
Select the input source from:
SELECT SOURCE EXECUTE
RGB 1 RGB 2
S-Video
Video
DVI-I
Y,Pb,Pr
The search is started from the current port. Then when an
input is found, the projector will stop searching and display
the image.
LOGO SETTING EXECUTE Customize the start-up logo.
30
䚐ạ㛨
Русский
Español
Page 33
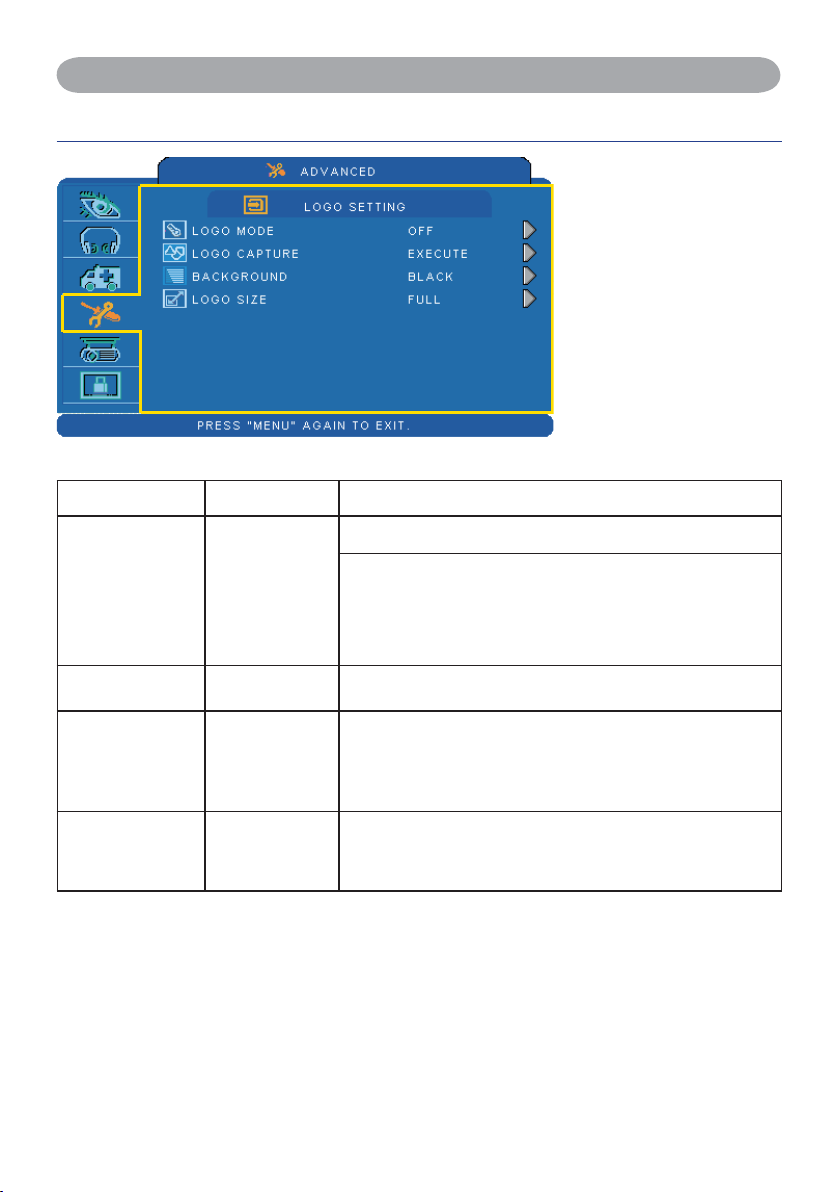
MENU
Advanced Menu
Item Selection Description
Select Mode( ► cursor button)
LOGO SETTING
This function allows you
to customize the start-up
logo.
IMPORTANT:
To implement Logo
setting function, please
enter PIN code first.
Without inputting the PIN
code, you cannot modify
Logo setting function.
LOGO MODE
LOGO
CAPTURE
BACKGROUND
LOGO SIZE
DEFAULT
USER
OFF
EXECUTE Start to capture the image.(PC mode only)
BLACK
BLUE
WHITE
ORIGINAL
FULL
The factory logo.
The image you captured.
The blank image. You can select color with background
function.
Set background color.
Display the captured image in original size and put in the
center of the screen.
Expend the image to full screen.
31
Page 34
MENU
Advanced Menu
Logo Capture
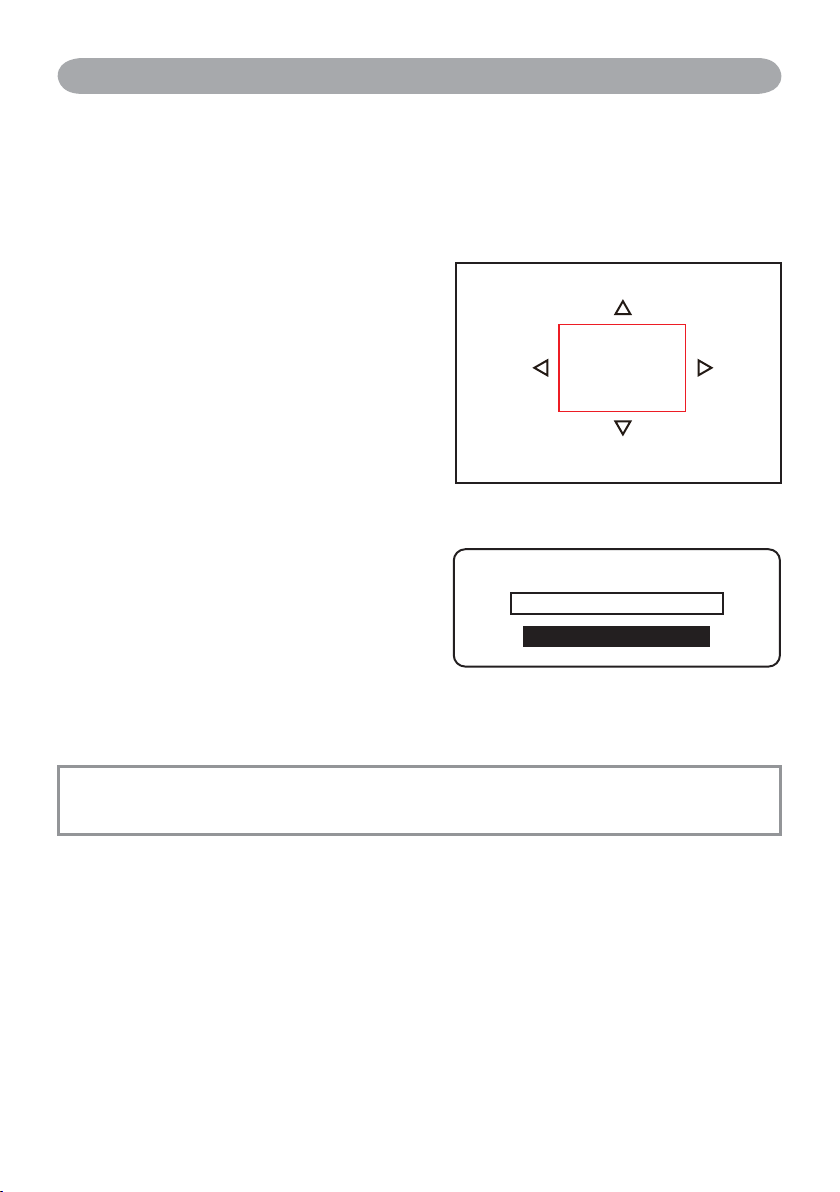
How to use this function?
Select Logo Capture item in the logo
setting menu, and press ► button.
You can see the red frame to select
captured area.
Use 4 direction buttons to adjust the
position of the frame.
Press “MENU” to start capturing and
display a dialog.
►To capture an image is available only in computer mode.
NOTE
►The area that can be captured is 512 x 384 dots.
Image
Logo Capture In Progress.
32
Page 35
MENU
Presentation Menu
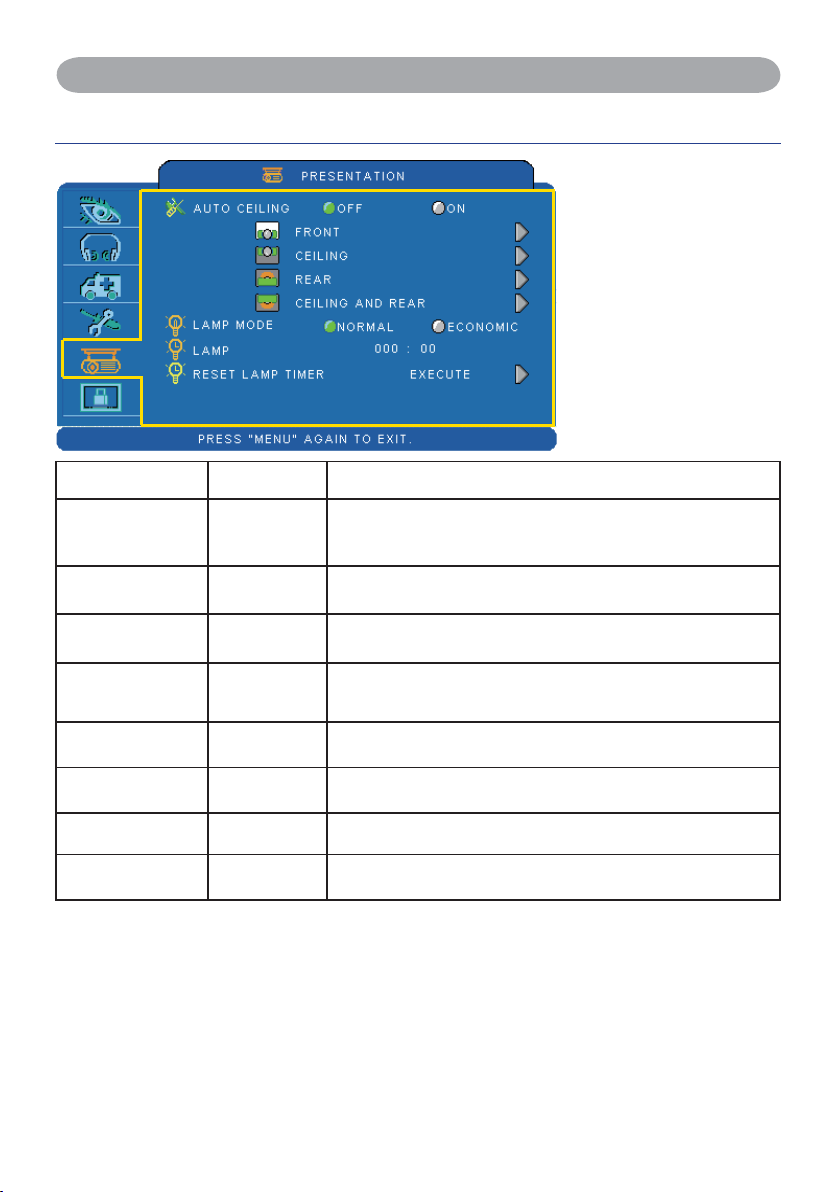
Item Selection Description
Automatically invert the image when the projector is turned
AUTO CEILING OFF / ON
FRONT EXECUTE Normal projection mode.
upside down, i.e. when the projector is mounted on the
ceiling.
Step:
1. Use the ▲ /▼buttons
to select an item.
2. Use the ◄ / ► buttons
to select an item or
adjust the value.
CEILING EXECUTE
REAR EXECUTE
CEILING AND
REAR
LAMP MODE
LAMP Show lamp use time.
RESET LAMP
TIMER
EXECUTE
NORMAL /
ECONOMIC
EXECUTE
Mirror the image vertically, only for the projector mounted
upside down.
Mirror the image horizontally, only for projecting onto rear
projection screen.
Mirror the image horizontally and vertically. Projecting onto
a rear projection screen while projector is upside down.
Switch lamp mode between normal or ECO mode.
After changing a new lamp, execute this function to reset
the lamp timer.
33
Page 36
MENU
Presentation Menu
Reset Lamp Timer
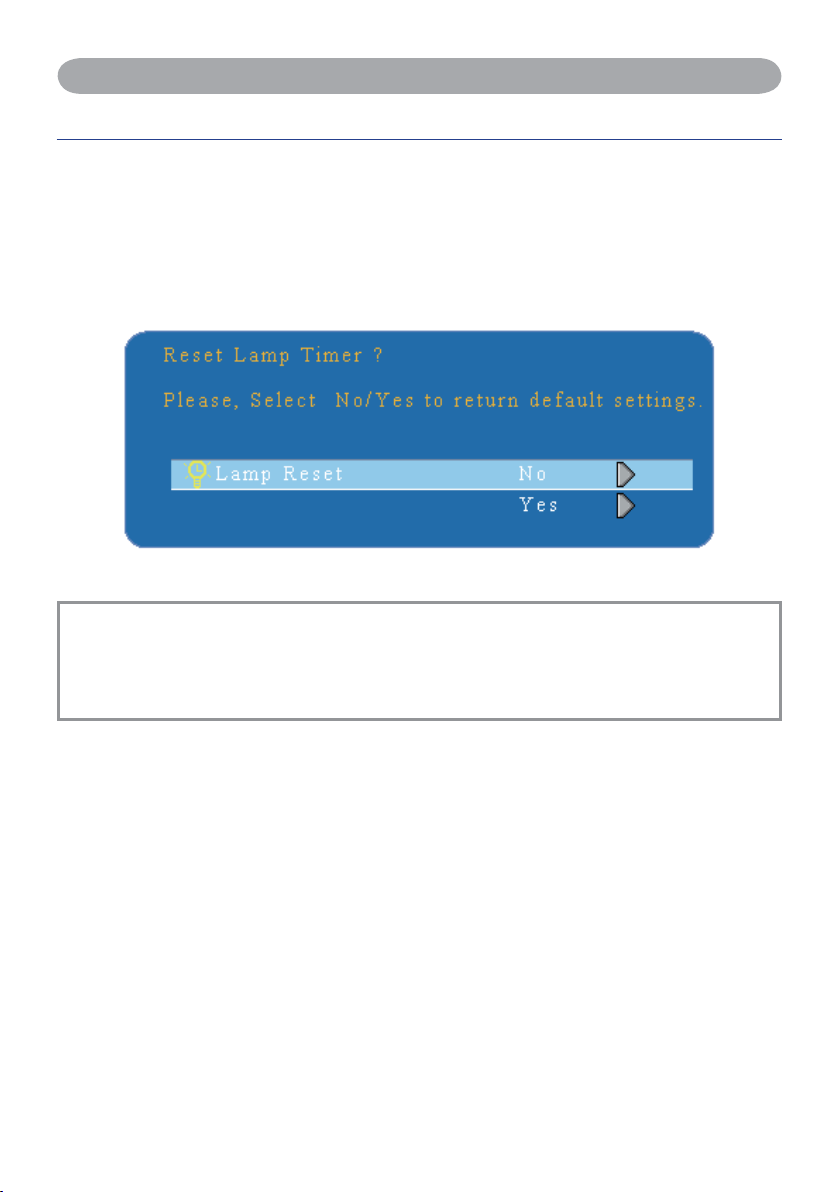
The lamp timer is the time counted after the last resetting. The usage time of the lamp
is shown in the PRESENTATION Menu. Pressing the RESET button or the ► button
displays a dialog.
To reset the lamp time, select the RESET using the ► button.
NOTE
► The replacement warning message is set to appear after about 2000 hours of lamp use in order
to maintain the initial brightness. When replacement message appears, replace the lamp with a
new one as soon as possible, even if the lamp is still workable.
34
Page 37
MENU
Security Menu
Item Selection Description
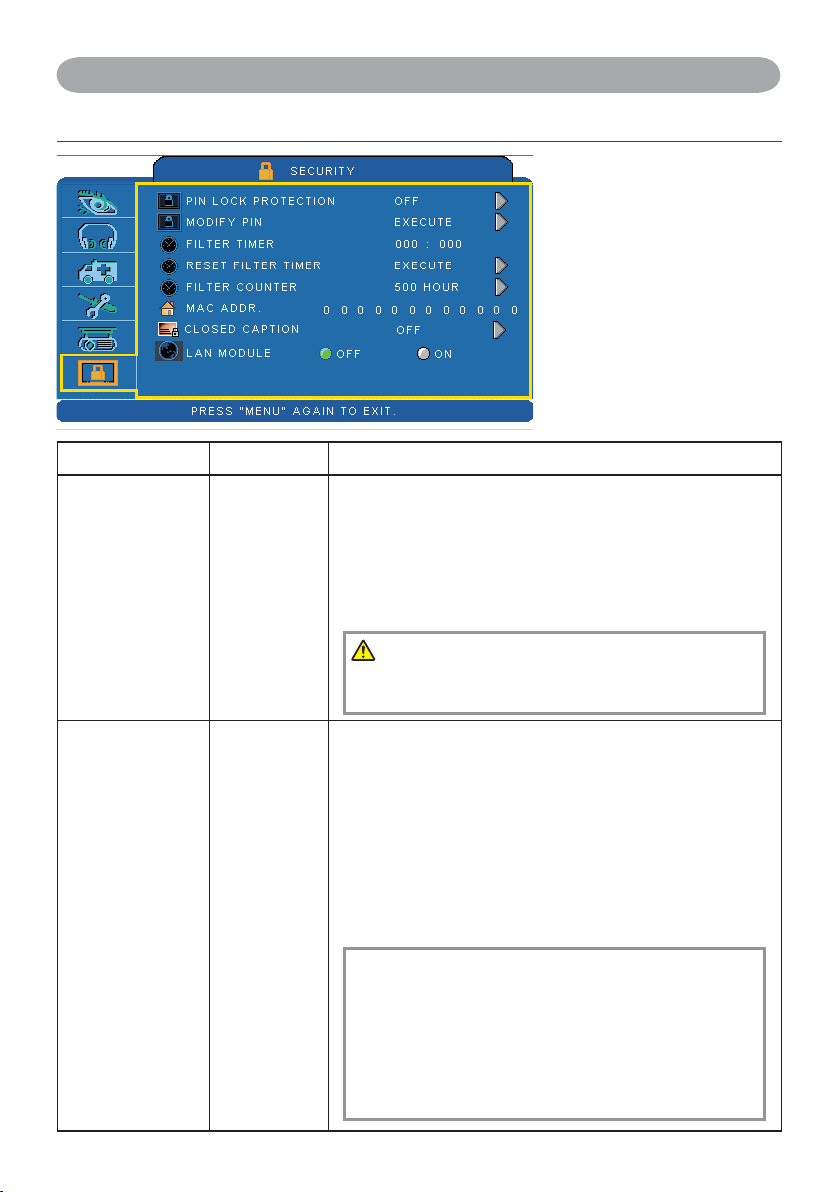
OFF: Turn off PIN lock protection.
ON 1: After plugging in AC power, you need to key in PIN
code at the first time of use. If the AC power stays
unplugged, you do not need to key in PIN code next
PIN LOCK
PROTECTION
OFF
ON 1
ON 2
time when you use the projector.
ON 2: You need to key in PIN code every time when you
turn on the projector.
CAUTION:
Once the PIN code had been set, the projector cannot be
used unless you enter the correct PIN code.
Step:
1. Use the ▲ /▼buttons to
select an item.
2. Use the ◄ / ► buttons to
select an item or adjust the
value.
MODIFY PIN EXECUTE
1. Press " MENU " on the projector or remote control.
2. Use the ► button to select the MODIFY PIN item of the
SECURITY category.
3. Press the ► button to change PIN LOCK PROTECTION
mode.
4. Please enter the original PIN code.
(a) If the PIN is correct, system will allow you to change
a new PIN code.
(b) If the PIN is incorrect, a " Code Error " message will appear.
5. Please enter a new PIN code. And then enter again to confirm.
NOTE:
(1) To change the PIN lock protection state, you must
enter the PIN code first.
(2) Please enter: 0000 for first-time use.
(3) To avoid unnecessary trouble, if you activate the [PIN
Lock Protection], it is highly recommended that you
write down the PIN code and store it in a safe place.
35
Page 38
MENU
Security Menu
Item Selection Description
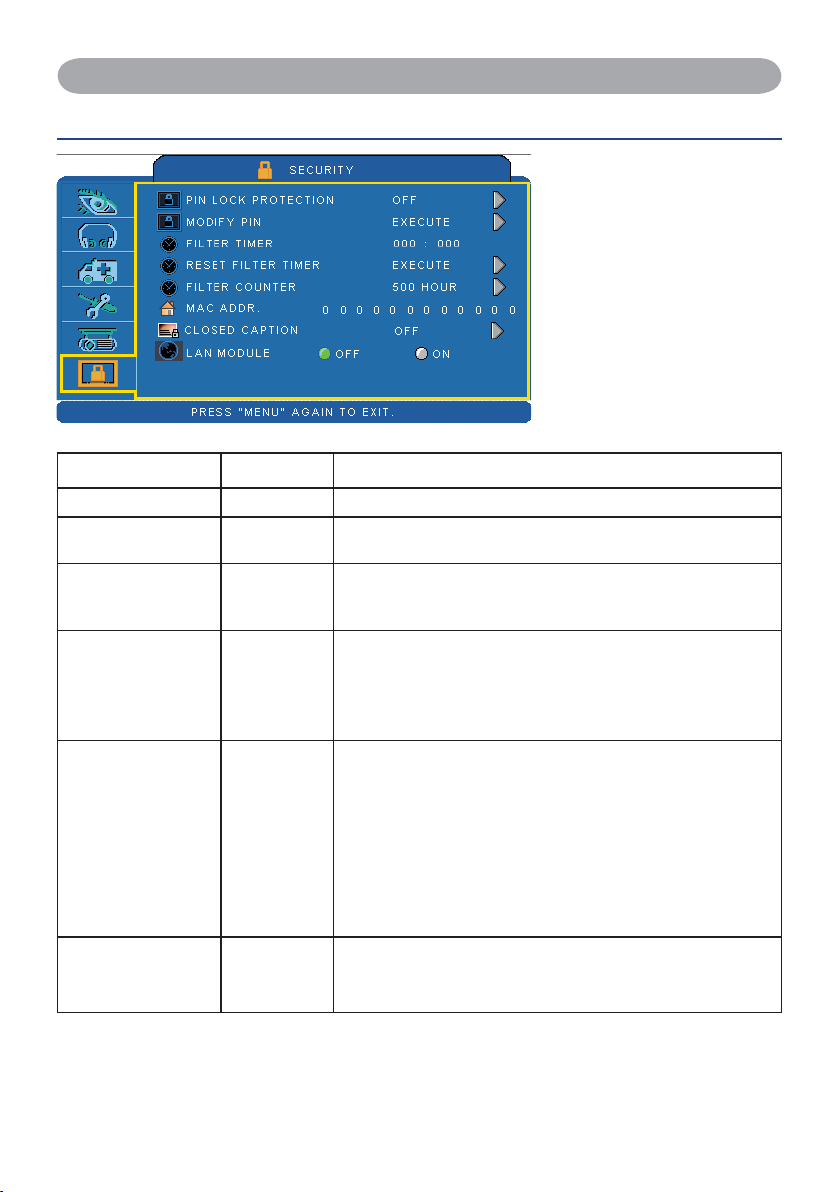
FILTER TIMER Show the filter use hour.
RESET FILTER
TIMER
FILTER COUNTER
MAC ADDR.
CLOSED CAPTION
LAN MODULE
EXECUTE Reset the filter timer after cleaning / changing filter.
500 hours
800 hours
1000 hours
OFF(Default)
C.C1
C.C2
C.C3
C.C4
T1
T2
T3
T4
OFF
ON
Select (500 / 800 / 1000 hours) depending on the
environment.(default : 500 hours). Please see as below.
If purchasing LAN control module, "MAC ADDR." will be
shown in "Security" Menu.
MAC address stands for unique Media Access Control
address of LAN control module and displays with six
groups of two hexadecimal digits.
The Closed Caption function intimates the sound effects,
dialogue, and narration in the content of the television
program or video source.
Caption (C.C1~C.C4) : Display closed caption Text
(T1~T4) : Display text data, which is for additional
information such as news reports or a TV program guide.
NOTE : This function is available only in video / S-Video
source.
If purchasing LAN control module, "LAN MODULE" will
be shown in "Security" Menu.
Select ON/OFF to turn on/off LAN control feature.
Step:
1. Use the ▲ /▼buttons to
select an item.
2. Use the ◄ / ► buttons to
select an item or adjust the
value.
36
Page 39

MENU
Auto Filter Alert
Auto Filter Alert is in SECURITY category to show the air filter use time and alert user
to change filter. Pressing ► cursor button will display a dialog. When the operating time
reaches the set time, a warning message will appear on the screen to remind user of filter
cleaning / replacing.
Filter Replace...
Filter has been used for more than 500 hours.
NOTE
► Please reset the Filter time only when you replace the filter.
37
Page 40
MENU
PIN Key In Operation
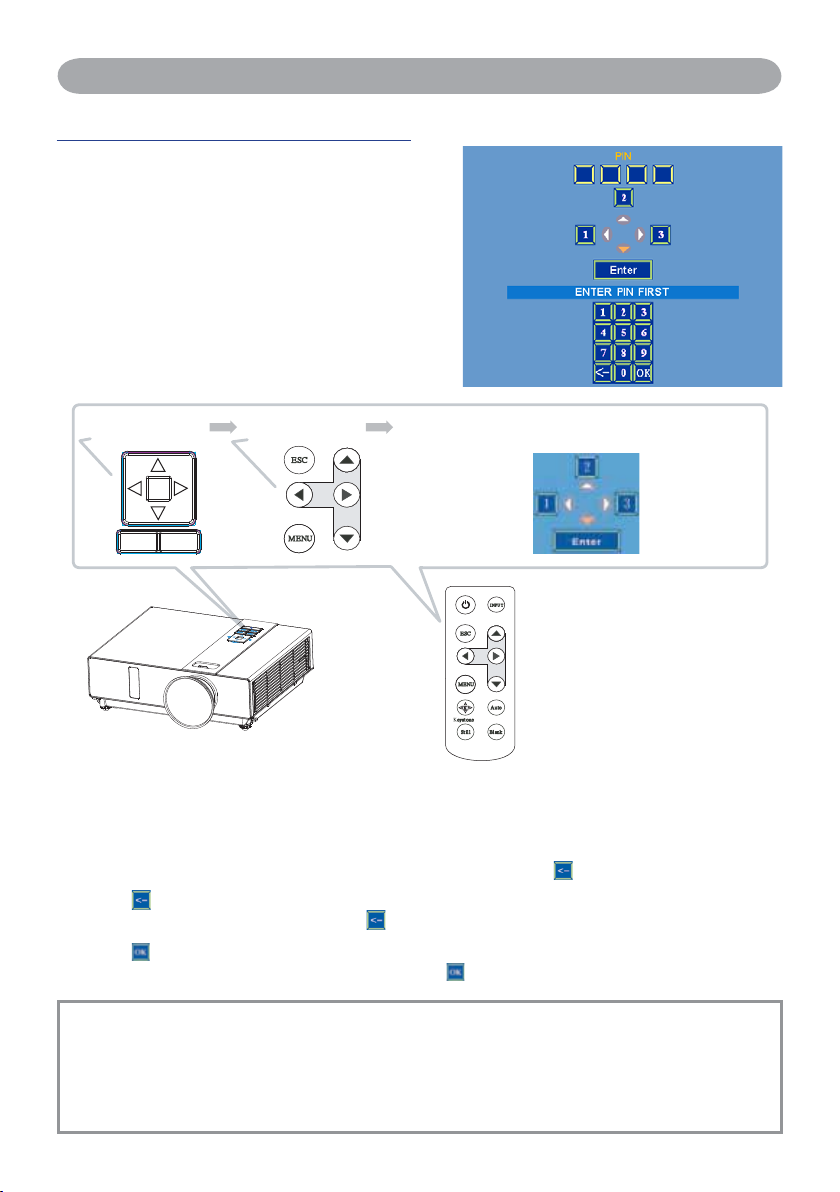
When the projector is turned on and the
PIN LOCK PROTECTION is set to [ON],
the image will show as on the right side.
1. Press the MENU button on the projector
or remote control. Enter PIN code by
keypad or remote control.
2. How to enter a PIN code?
You can use control panel or remote
control.
CONTROL PANEL
KEYSTONE
VOL - VOL+
MENUINPUT
REMOTE CONTROL
The control panel and remote control buttons to enter a sequence
of PIN code is like the photo below.
(1) Press ◄ button: Select the [ 1 ]
(2) Press ▲ button: Select the [ 2 ]
(3) Press ► button: Select the [ 3 ]
(4) Press ▼ button: Select the [ Enter ] move to next row.(4~6,7~9,
(5) Press
In case you enter a wrong digit, select
(backspace) item:
to delete the wrong digit you entered.
(6) Press item:
Once all four digits of the PIN are entered, select
to confirm.
~OK)
NOTE
If the PIN is incorrect, a ‘ Enter new code ” message will be shown. Please try again. If the PIN
code input is incorrect for three times, a warning message will show up and the projector will shut
itself down in 30 seconds.
If you have no idea about the PIN, please contact your dealer for help.
38
Page 41
Network Control Software Application
LAN
NOTE: This Network Control Software Application is an optional function and support
model with RJ45 LAN port only.
Register the projector(s) which needs to be controlled.
" Auto search " can help you to seek the projector(s) source easily.
After registering in the work group, you can start to control the projector.
Group the projector(s) into different sections.
You can monitor the status easily by the sort of group name function in the network.
Monitor the status for each projector.
a.You can manage and change the monitoring content by System Parameter Setting.
b. The Lamp timer, filter working time or system warning feedback etc. can be known
by checking the status for projector(s).
Control the booked projector(s).
The status can be refreshed and acquired by monitoring functions; you can also
operate the function easily by Network Control.
NOTE
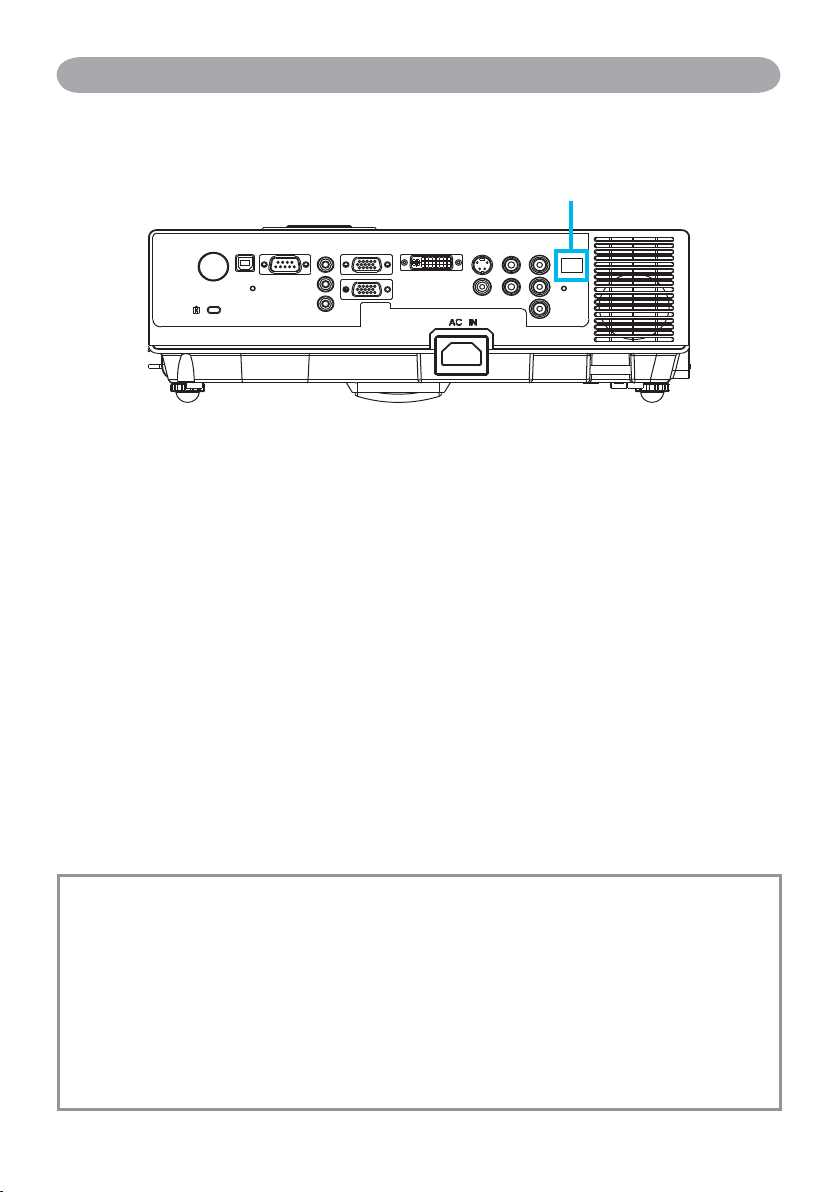
To monitor and control the projector(including stand-by mode), the following
conditions need to be ready:
(1) Projector should already be powered on.
(2) Projector is connected to network.
(3) LED light of the projector network port shows normal. (Green light on, Orange
twinkle)
*
Stand-by mode indictor: Green LED (Power) on the projector’s control panel flashes.
39
Page 42
Before Use
Before To Use Network Control Software
If the system is Windows 2000, NT 4.0 or XP, the PC should be started by the
Administrator.
Before starting the Network Control software, please check the following.
(1) The computer must have Network Control software installed.
(2) The projector should be powered on and the LAN wire is well connected to
projector.
(3) The LAN module ON/OFF item in SECURITY menu of OSD should be setting ON.
(4) Make sure the computer and projector can connect to network. Network Control
software needs to arrange in TCP/IP network communication and the network cable.
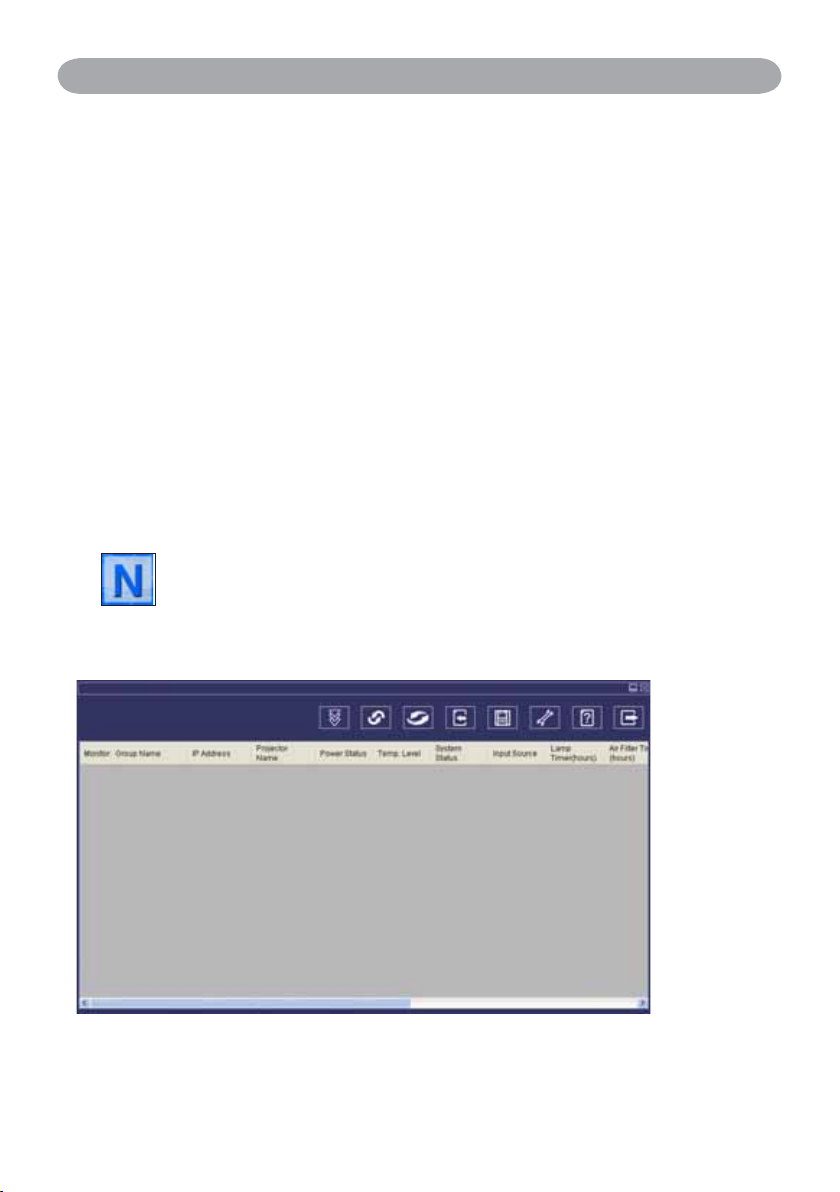
Open Network Control Software
Click Network control software icon.
Monitor window will show as Graph 1.
<Graph 1>
40
Page 43
Before Use
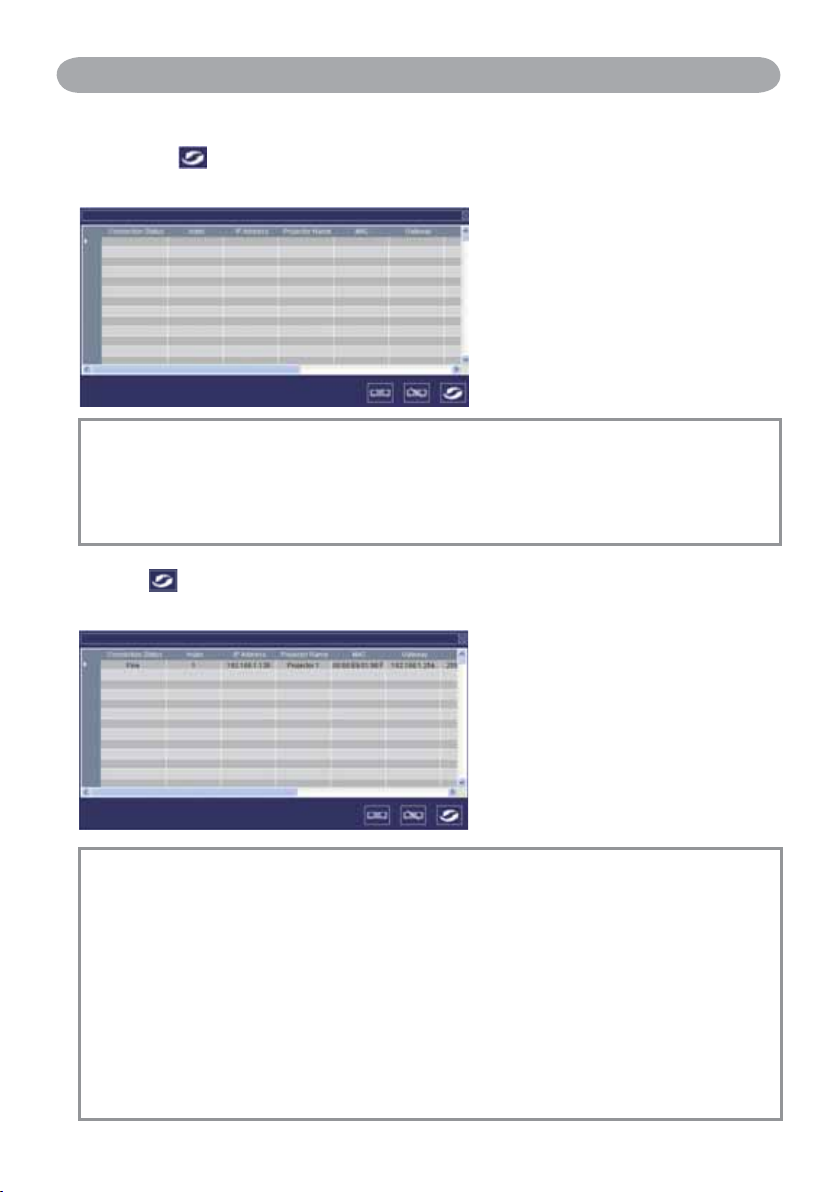
Projector Auto Search.
Click the
correctly.
(Projector search), located projector will show on the network
(Graph2)
<Graph 2>
NOTE
When the security warning window appears while Network Control is executing,
please select "Unblock" to decontrol area network linking against from System
Administer.
Click
shown.
(search again), the projector which is well connected with a PC will be
(Graph3)
<Graph 3>
NOTE
If there is no projector found on the display window, the following maybe the causes:
1. There is no DHCP server available on the LAN. The LAN module is shipping
with DHCP-configured client enabled in default.
2. If there is no DHCP server available on the LAN. The LAN module default IP
address should be 169.254.1.1. Please modify the PC/Laptop IP address setting to
make the PC/Laptop IP address located on the same segment as 169.254.xxx.xxx
and try again.
41
Page 44
Before Use
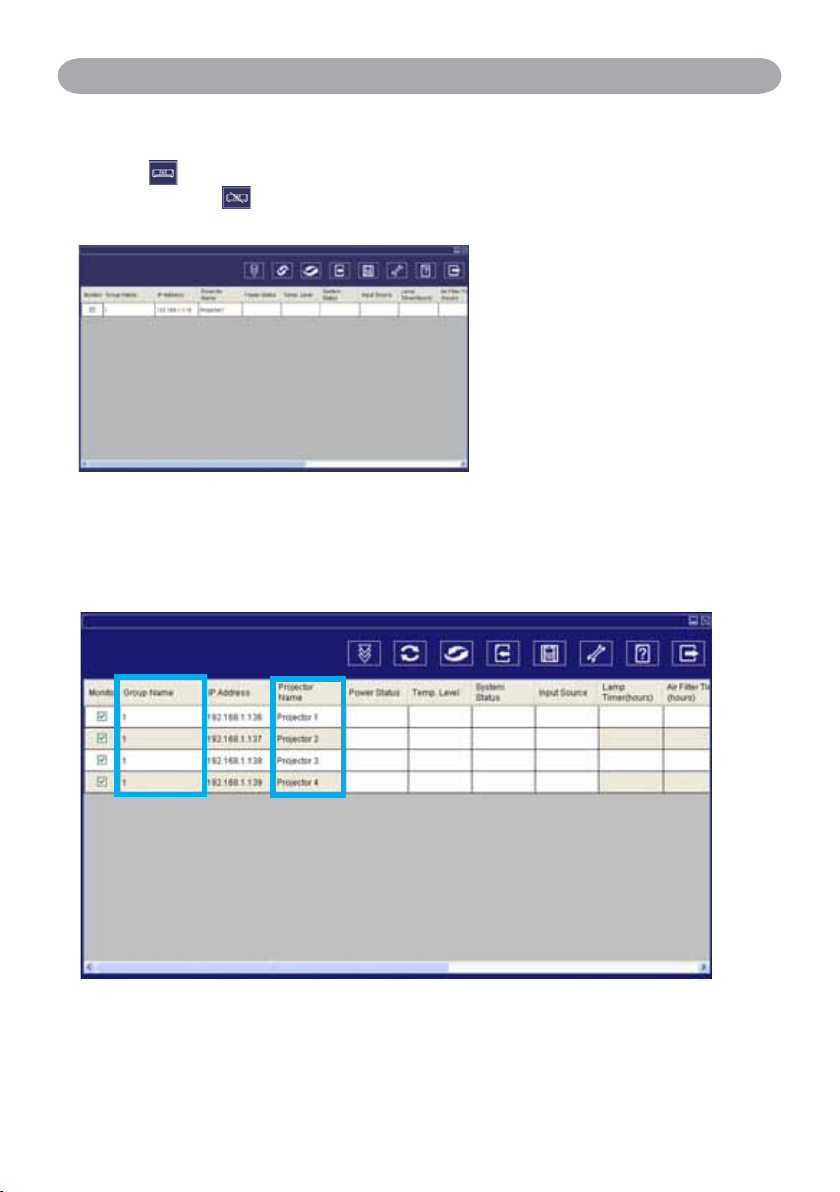
Projector Auto Search.
Click
window. Click
register table.
Projector Auto Search can rank group names or display names by clicking the
monitor window title (Group Name) or (Projector Name). This will help you easily
to understand projectors status.
(register projector), the projector information will show on the monitor
button (exit), it will cancel the registered item then return to
<Graph 4-1> Monitor window
<Graph 4-2>
42
Page 45
Before Use
Projector Auto Search.
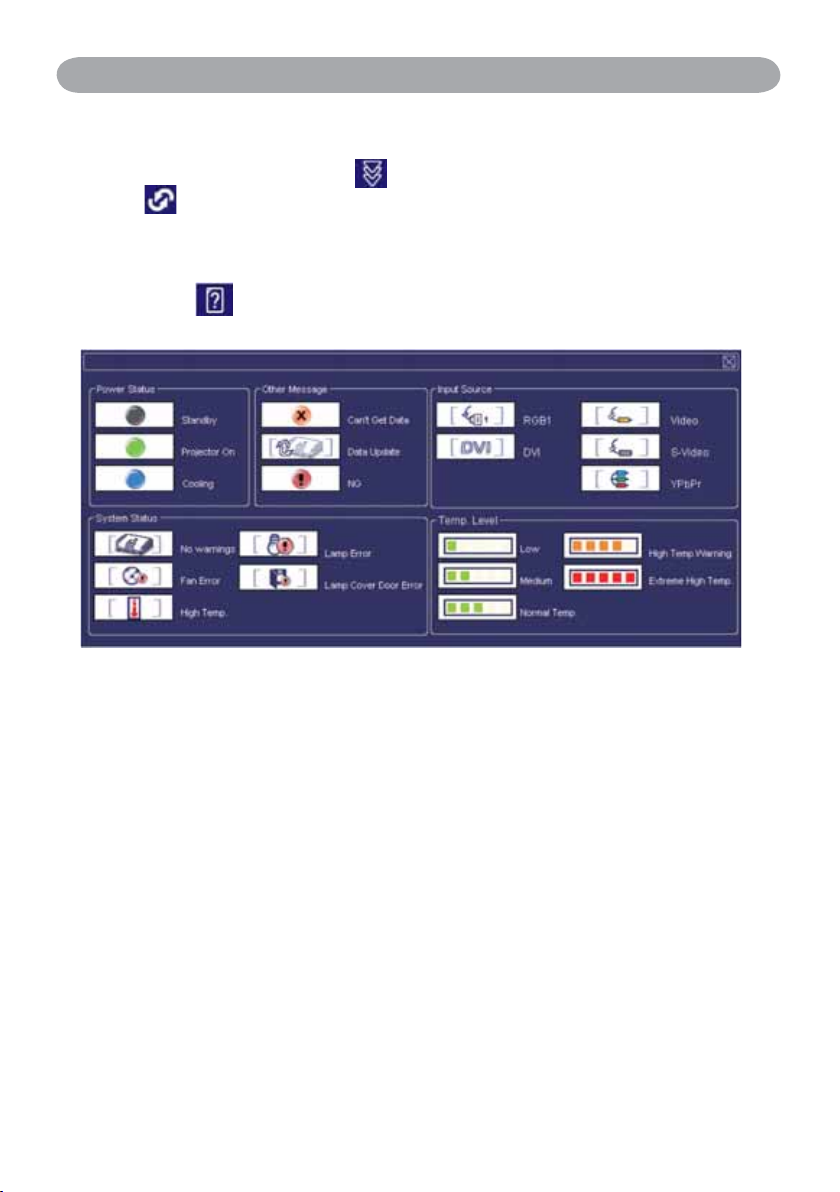
After registering, you can click
click
button (Start Auto Scan) running in this program to monitor the projector.
button (Data single capture) in the tool bar or
NOTE
When pressing "About"” button for help, you will see icons explained as in the chart.
43
Page 46
Before Use
Modify The Projector Setting
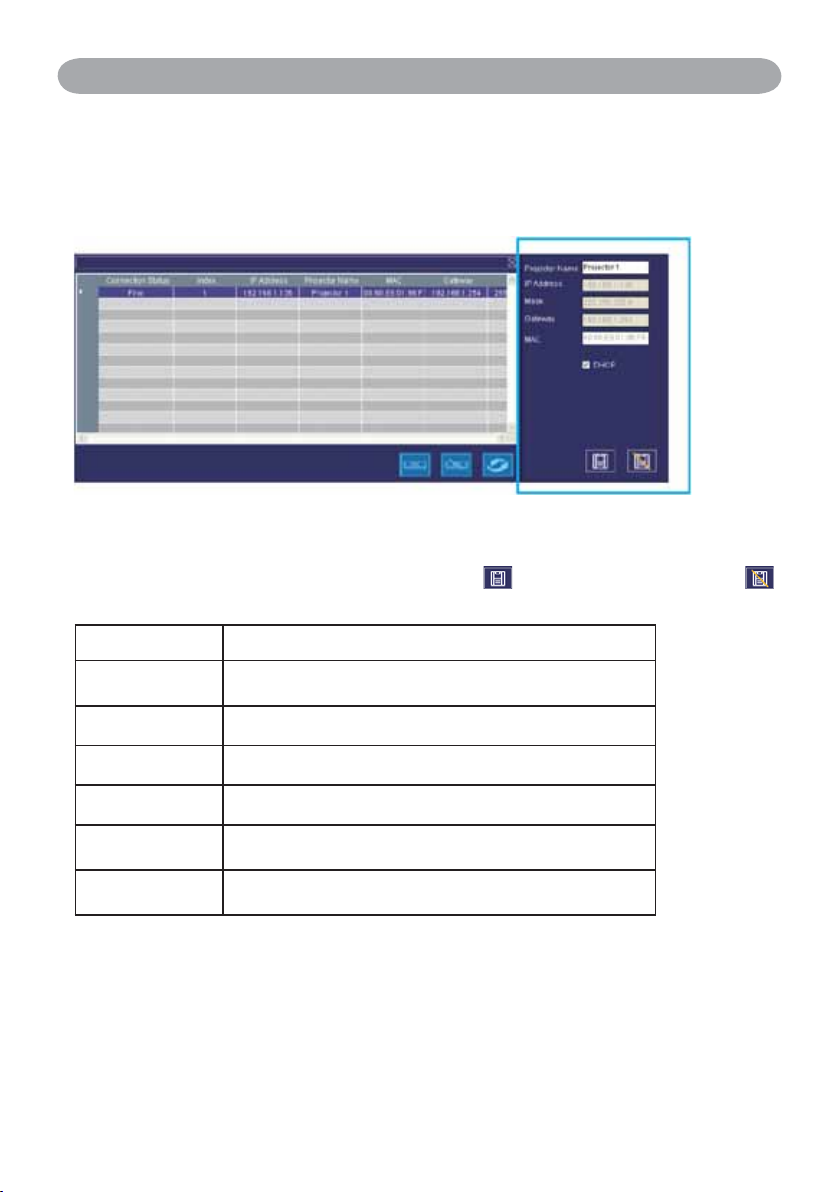
If modifying the registered projector setting is needed, please move your cursor to
the data table and click the item that you would like to modify, the detail will be
shown on the right side table.
< Graph 5 > : Register Table.
After setting, you can save the data by clicking
button.
Item Description
Display name
IP Address Show the IP Address
Mask Show the Mask
Gateway Show the Gateway
MAC
DHCP
Show the Host name
(16 characters at most in ASCII)
Show up the MAC code
(The default value can not be modified)
Capture IP address from network sensor
automatically.
< Table 1 > : Setting Windows
44
button or cancel by clicking
Page 47
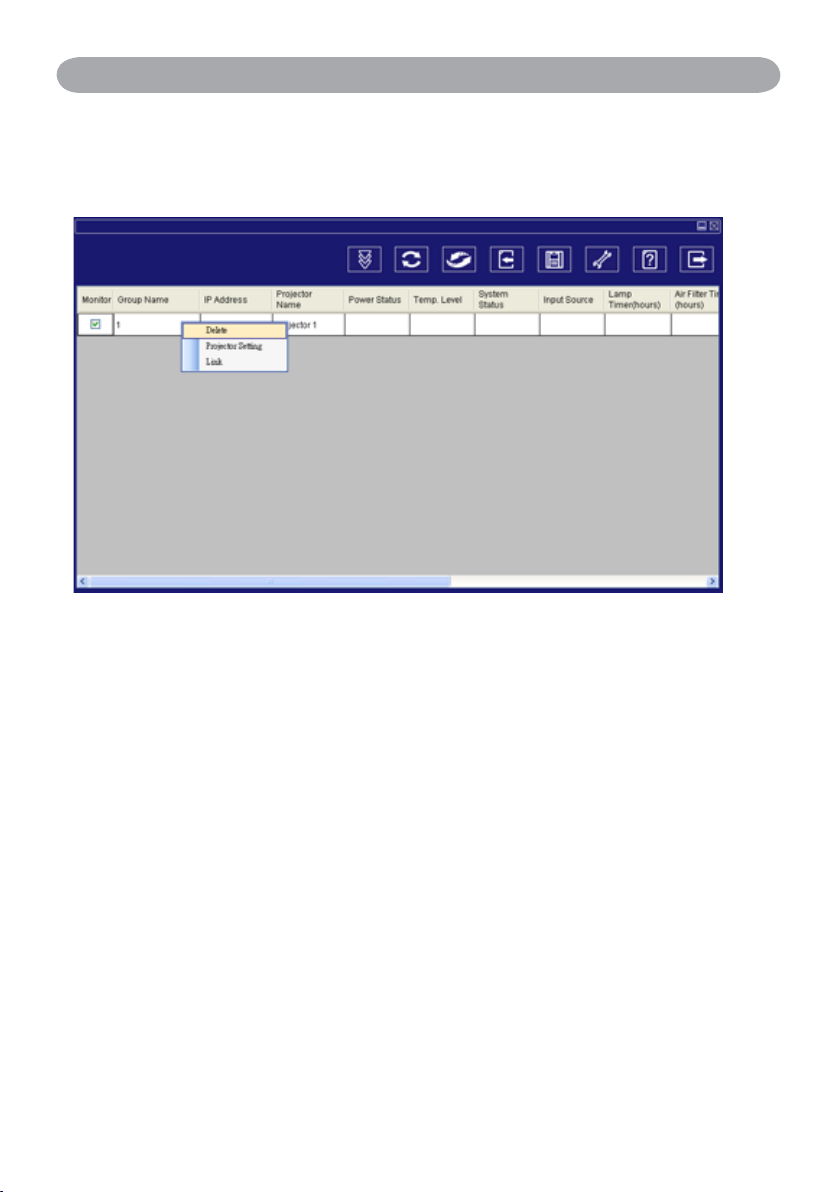
Registering And Configuring The Projector
Delete
Select the registered projector in monitor window. Click mouse right key and select
" Delete " to erase the registered projector data.
< Graph 6 > : Register Table.
45
Page 48
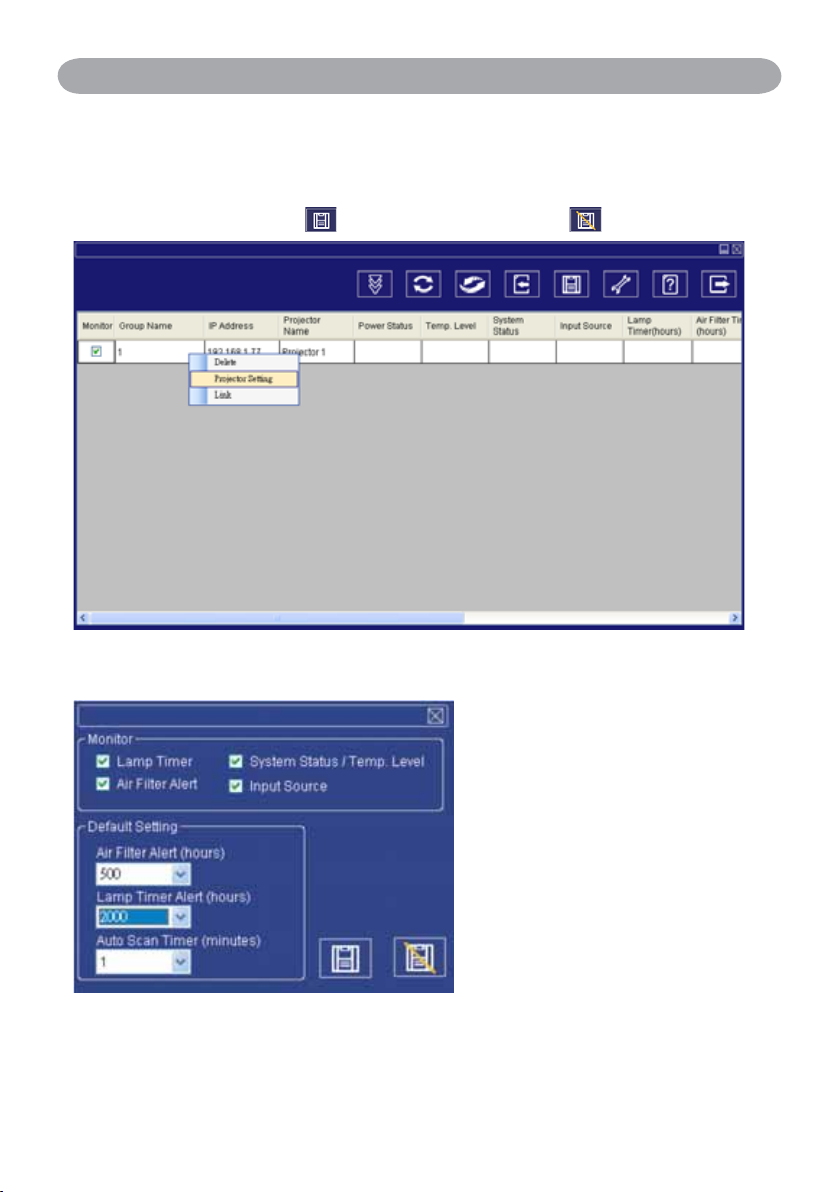
Registering And Configuring The Projector
Projector Setting
Select the registered projector in monitor window. Click mouse right key and select “
projector setting ” to modify the registered projector data. After finishing the setting,
you can save by clicking
< Graph 7 > : Register table.
button or cancel by clicking button.
< Graph 8 > :Setting table.
46
Page 49
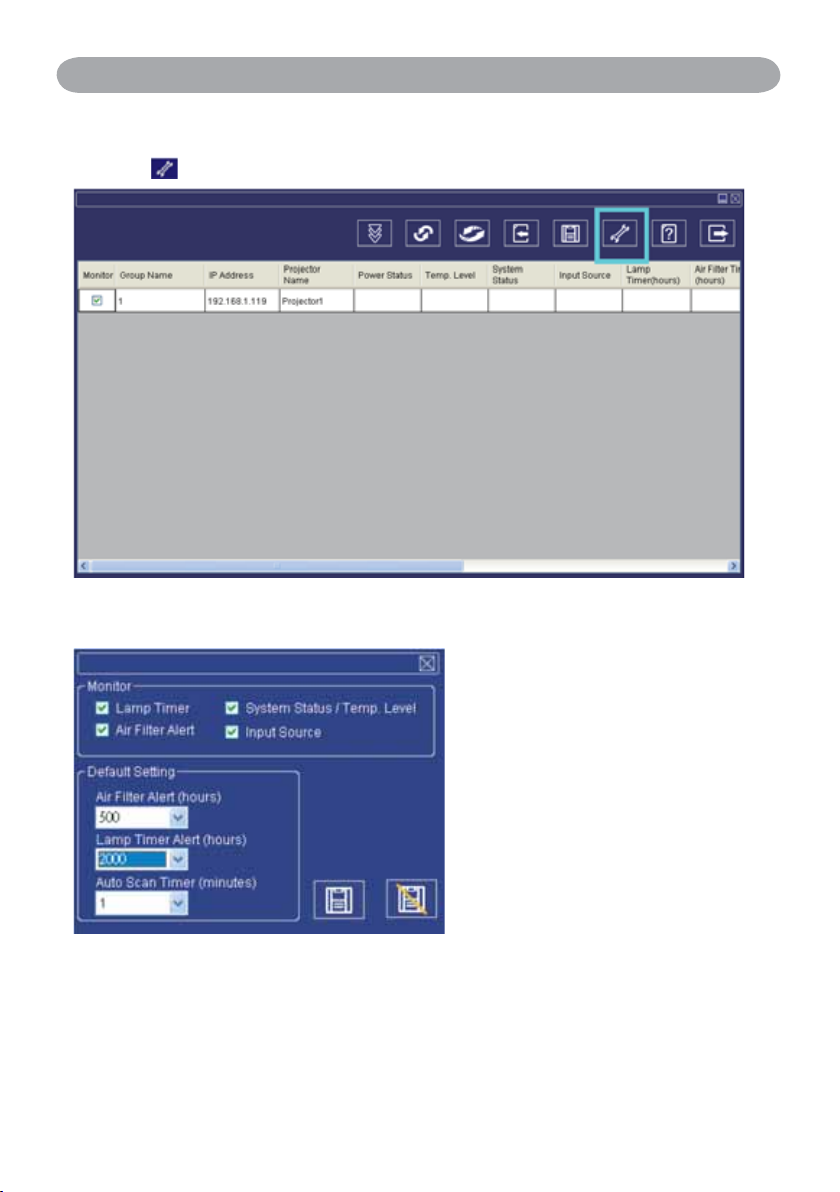
Registering And Configuring The Projector
Projector Setting
Click
< Graph 9 >
button (system setting) to modify system alert setting.
<Graph 10>
47
Page 50
Registering And Configuring The Projector
System Setting
Monitor
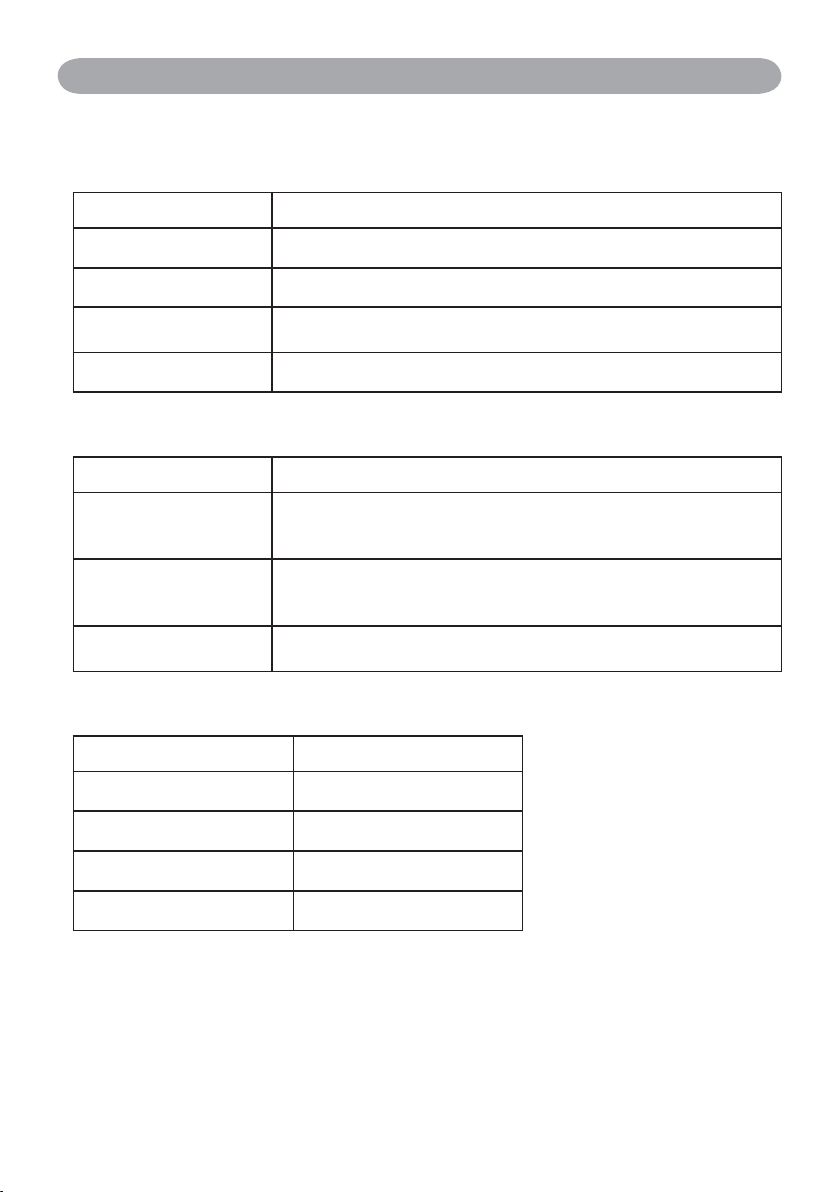
Item Description
Lamp Timer Lamp timer from projector.
Air Filter Alert Air Filter Timer from projector.
System Status/
Tempeture Level
Input Source Input Source from projector in Power On status.
Default Setting
Item Description
Lamp Timer Alert (Hr.)
Filter Timer Alert (Hr.)
Auto Detect Timer
(minutes)
Auto Detect Optimal Setting
System Status and Tempeture. Level from projector in Power On
status.
Default Setting Includes 1000/1500/2000 Hours.
When Lamp Timer reach alert target, window will show lamp timer
in red color to remind user to replace the lamp.
Default setting includes 300/500/800/1000/1500 Hours. When Filter
Timer reach alert target, window will show filter timer in red color
to remind user to replace the filter.
Auto Detect setting. Default setting includes 1/3/5/10 minutes; user
can set the optimal default listed in Table 4.
< Table 2 >
< Table 3 >
Projector Number (Sets) Timer Interval (Minutes)
1~25 1/3/5/10
26~50 3/5/10
51~100 5/10
101~255 10>
48
* The maximum quantity of
projector monitored is 255.
< Table 4 >
Page 51
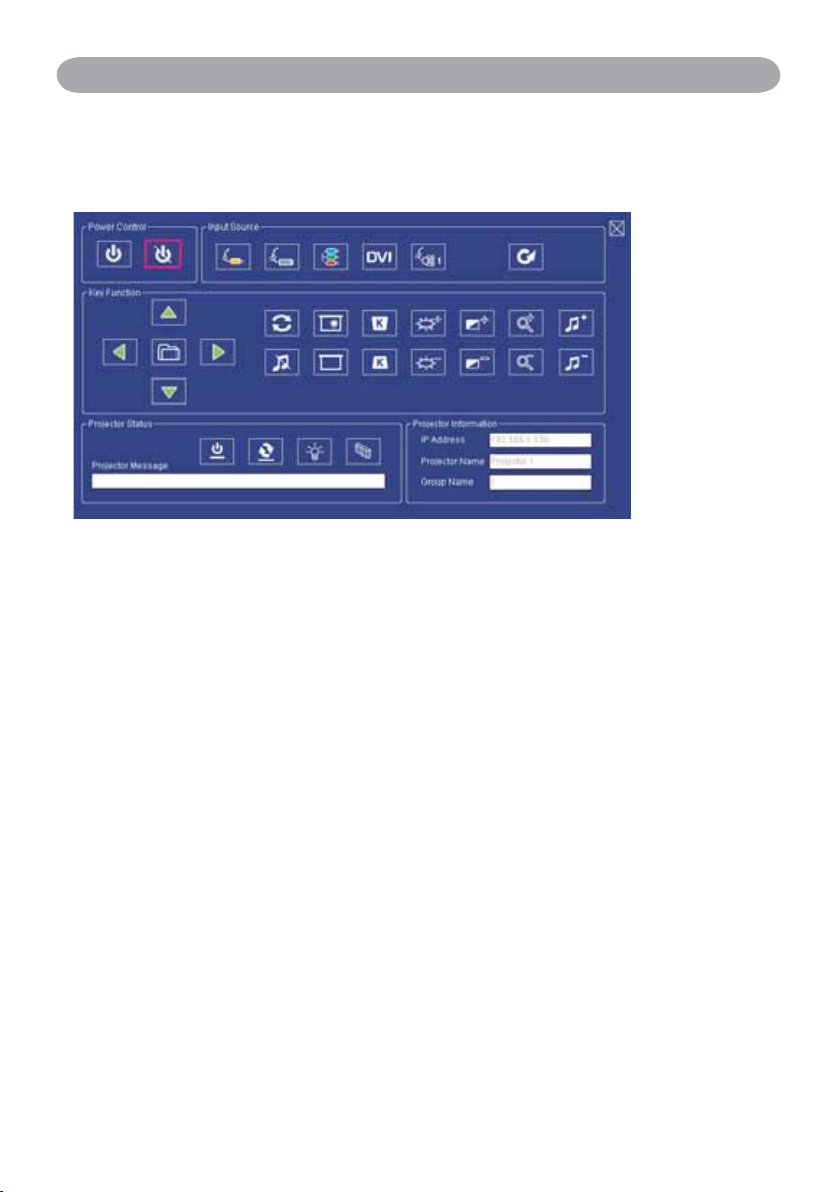
Registering And Configuring The Projector
Link
Select the registered projector in monitor window. Click mouse right key and select “
Link ” to show up the control panel table and the projector connected status.
< Graph 12 > : The control panel table
49
Page 52
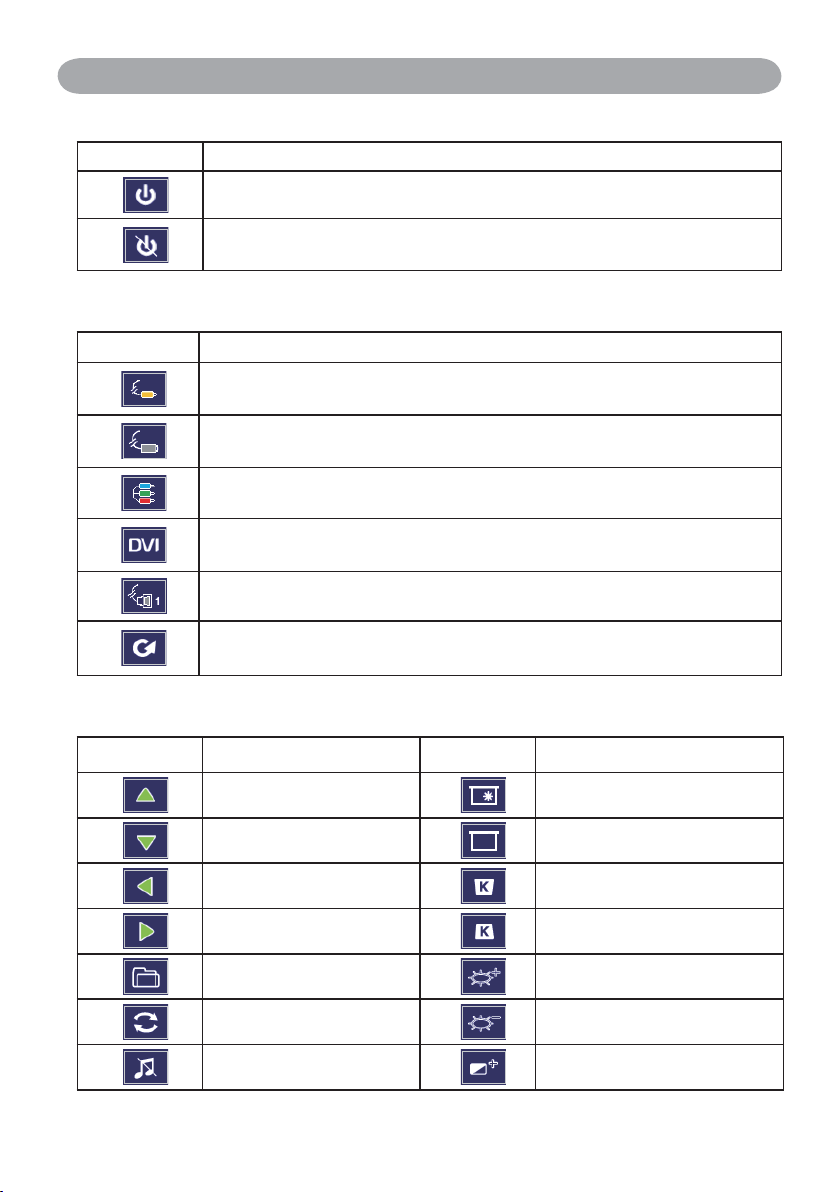
Control Panel Window Introduction
Power Control
Icon Name
Power on
Power off
Input Source
Icon Name
Video
S-Video
Y,Pb,Pr
DVI-I
RGB 1
Change Input Source
Function Key
Icon Name Icon Name
Up Freeze
Down Blank
Left Keystone Correction +
Right Keystone Correction -
Menu Increase Brightness
Auto Sync Decrease Brightness
Mute Higher Contrast
50
Page 53
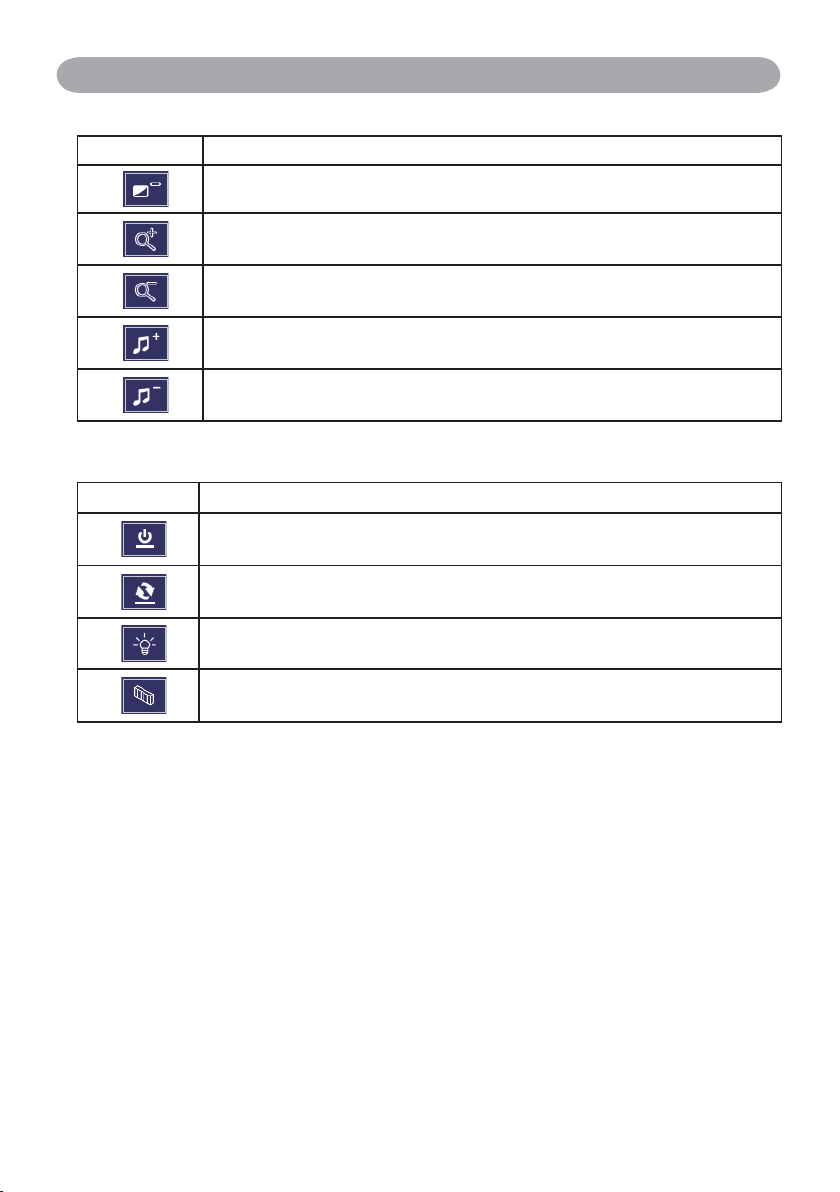
Control Panel Window Introduction
Function Key
Icon Name
Lower Contrast
Zoom In
Zoom Out
Volume Up
Volume Down
Projector Status
Icon Name
System Status
Input Source Status
Lamp Timer
Air Filter Timer
51
Page 54
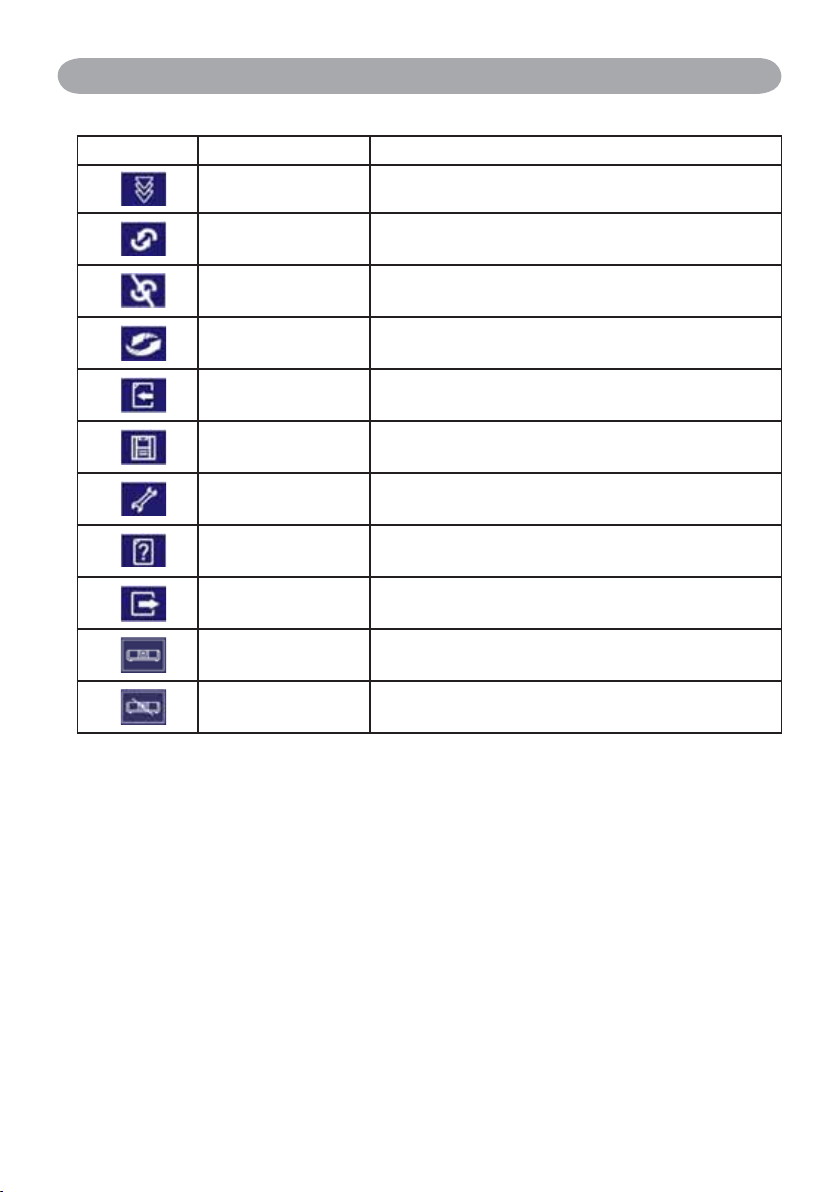
Control Panel Window Introduction
Network Control Window introduction
Icon Name Description
Scan all
Start Auto Scan
Stop Auto Capture Stop scanning the projector information.
Capture the all registered projectors’ information one
time only.
According to the system setting, get the projector
information automatically.
Auto Search
Open Project File Open project file which was saved.
Save Project File Save the registered projector in this project.
System Setting Setting the projector system reminder message.
About Icon content description.
Exit Exit the Network software.
Register projector Register projector’s information.
Exit Cancel registered information.
Search the projector in the same network to register
and modify the setting.
52
Page 55
Maintenance of Projector
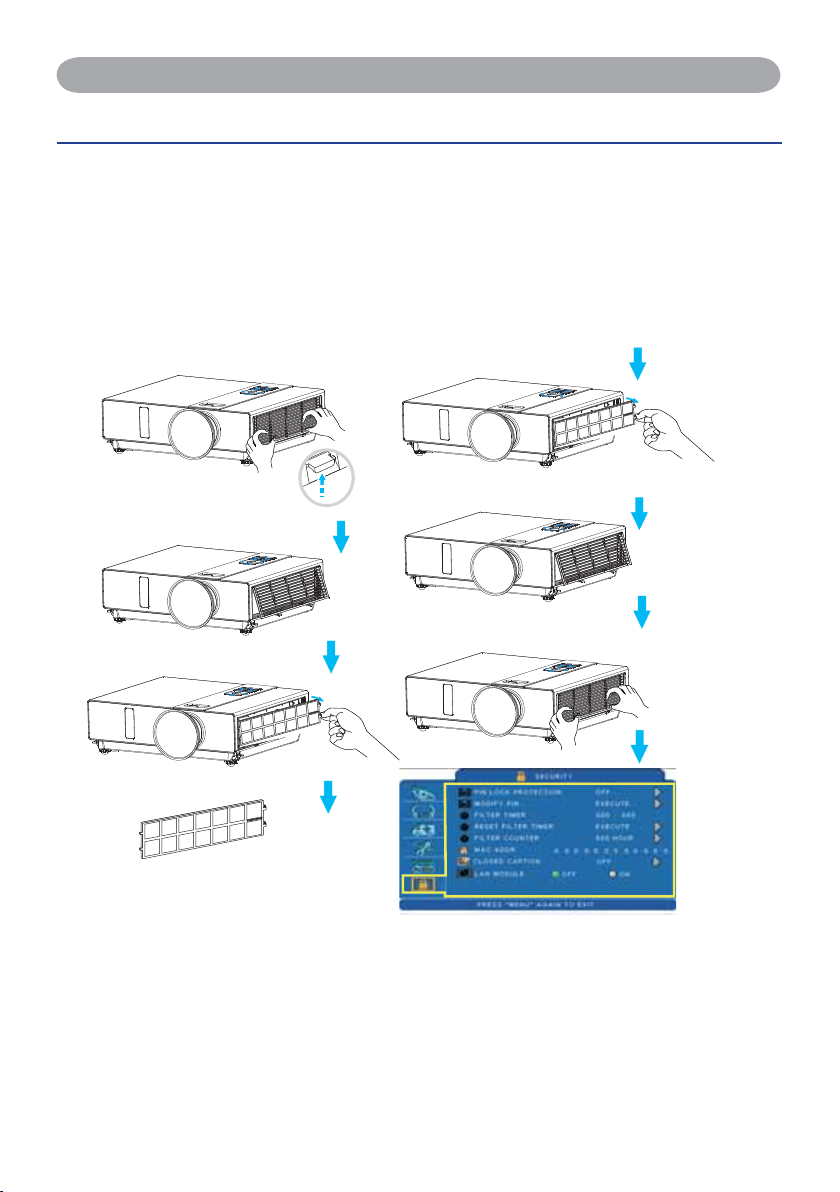
Air Filter
When a warning message appears to remind you to clean the air filter, please replace a
new one as soon as possible. Please check and clean the air filter periodically.
Replacing the Air Filter
When the use time reaches the filter counter time, the projector will display a message
that indicates to replace a new filter. If there is no spare air filter available, please contact
your dealer.
Up
New one
Turn off the projector, and unplug the power cord. Allow the projector to sufficiently
cool down.
Remove the filter cover from the right side of projector.
Pull out the air filter.
Install a new air filter.
Put the filter cover on.
Reset filter timer after cleaning or changing air filter. (P.35)
53
Page 56
Maintenance of Projector
Lamp
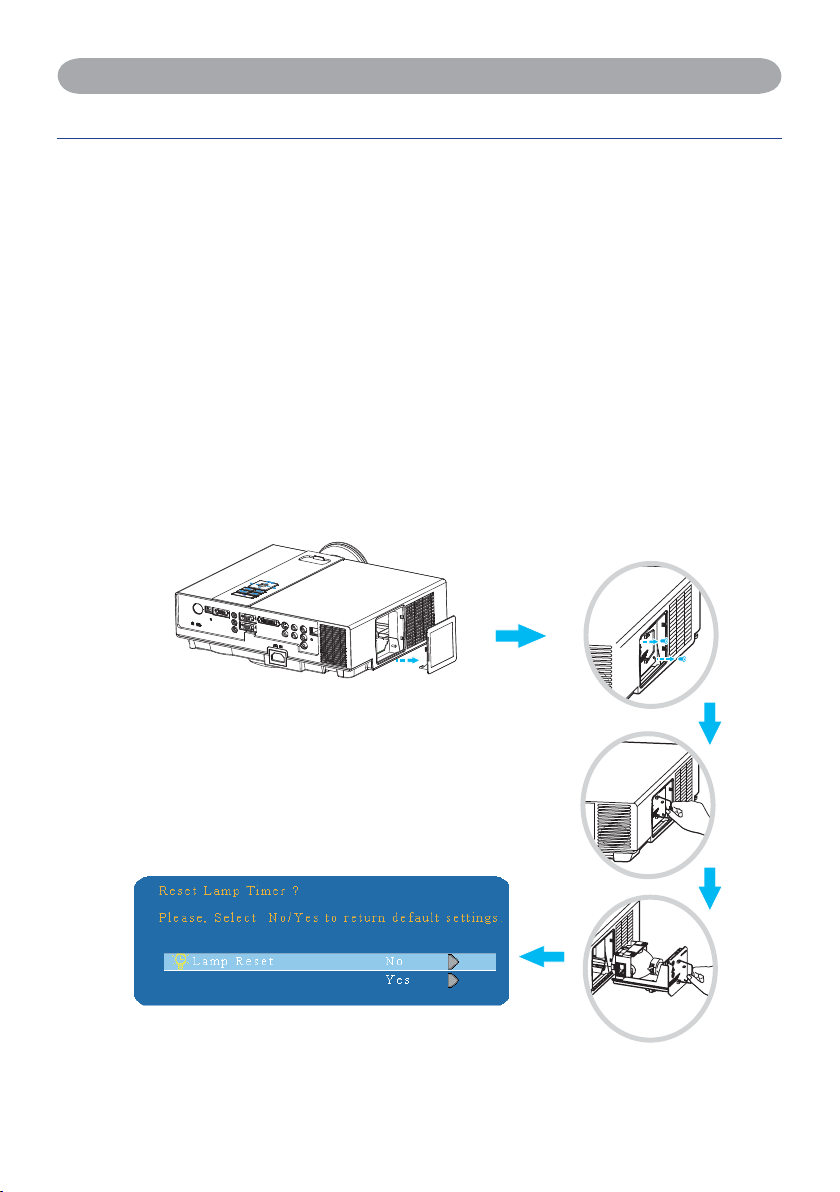
1. If you want to replace new lamp, but the projector was just turned off, please let the
projector cool down and unplug power cord at least 60 minutes.
2. If the projector is mounted in the ceiling, contact your dealer to replace the lamp.
Replacing New Lamp
1. Remove the lamp door.
2. Loosen 2 screws of the lamp holder. Take the handle on the top of the lamp, pull out
the lamp straight off the projector.
3. Insert new lamp, lock the lamp door firmly with 2 screws.
4. Put the lamp door on.
5. Please reset the lamp timer after replacing lamp. (P.34)
54
Page 57

Maintenance of Projector
WARNING
The projector uses a high-pressure mercury lamp.
The explosion of lamp with a loud bang or burn out could possibly cause injury or a fire.
When the bulb burts, it is possible for shards of glass to fly into the lamp housing; and
for gas containing mercury to escapefrom the projector’s vent holes.
If the lamp has broken, do not check the inside of the projector. Please ventilate the room
immediately.
Do not touch or bring your face close to the broken pieces since it might get into your
eyes or mouth. In case of injury, seek medical advice immediately.
Disposal of a Lamp
Dispose of a lamp in accordance with the local recycling laws.
Do not put it to your trash.
Recycling Lamp’s laws of the USA, go to www.lamprecycle.org.
Recycling Product’slaws of USA, go to www.eiae.org.
Recycling Product’slaws of Canada, go to www.epsc.ca.
For more information about recycling laws, please contact local government agency or
dealer.
CAUTION HOT
Before replacing the Lamp part, pay attention to the following items:
1.The Lamp is optional part. Contact the dealer for replacement lamp.
2. The lamp becomes very hot when in use. Turn the power off and disconnect the power
cord.
3.Wait 1 Hour before replacing the lamp.
4.Do not use old lamp part.
55
Page 58

Maintenance of Projector
Other Care
Cleaning The Lens
If the lens is dirty and dusty, display quality maybe decreased. Before cleaning the lens,
please make sure that the projector is cool down adequately.
After the projector has cooled down adequately, lightly wipe the lens with the available
lens-cleaning cloth.
Do not touch the lens directly with your hand.
Additional
- In order to ensure the safe use of your projector, please contact your dealer to inspect
about once a year.
- Before maintenance, make sure the power cable is unplugged, allow the projector to
cool sufficiently. The high temperature state of the projector could cause a burn in and/
or malfunction to the projector.
-Never try to maintain the inside of the projector by yourself.
56
Page 59
Troubleshooting
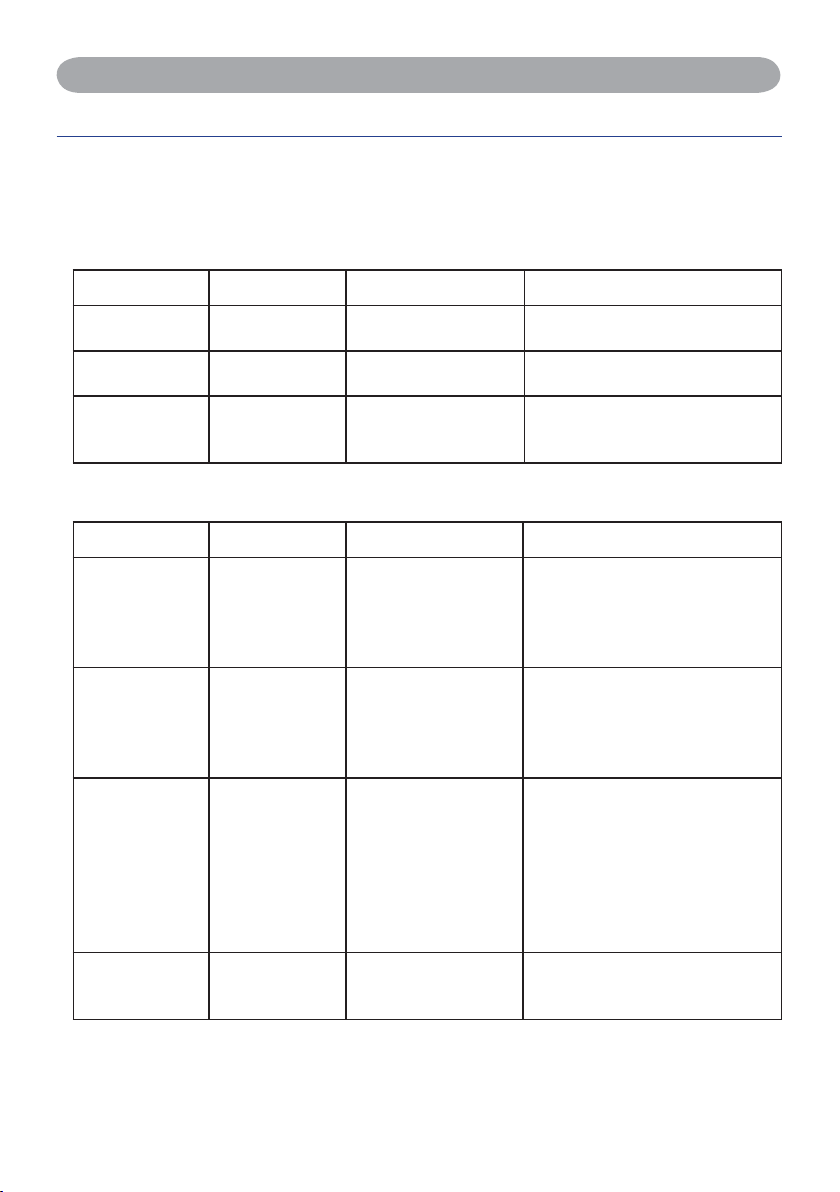
Indicator
The power and lamp indicators show the status of the projector. Before requesting repair,
check the projector status using the chart below. If the problem cannot be resolved,
contact your dealer.
In normal status~~~
POWER LAMP
Blinking In
Green
Lighting In
Green
Lighting In
Green
Off Stand by mode
Off On mode Projector is on and operating.
Blinking In Red
( Slow )
In abnormal status~~~
POWER LAMP
Blinking In
Green
Blinking In
Green
Blinking
In Green (Fast)
Blinking In
Green (Slow)
Blinking In Red
( Fast )
Lighting In Red Lamp cover open
Blinking In Red
( Fast )
Blinking In Red
(Slow)
CONDITIONS DESCRIPTION
Projector is ready to be turned
on.
Projector is in cool down mode
Cool down mode
CONDITIONS DESCRIPTION
Fan fault mode
High temperature
Lamp fail
and will not respond to user
input.
The projector has detected a
problem of a slow internal fan
speed. The lamp will shut off
automatically. Contact your
dealer.
The lamp cover is open or there
is a problem with the lamp. If the
lamp door is closed and replacing
the lamp does not correct the
issue, contact your dealer.
The projector has overheated and
shut itself down.
Correct the over temperature
condition immediately.
1. Check that the ventilation slots
are free from obstructions.
2. Check the cleanliness of the
air filter.
The lamp does not light. Come
back to "stand by mode", and
press the power button.
57
Page 60
Troubleshooting
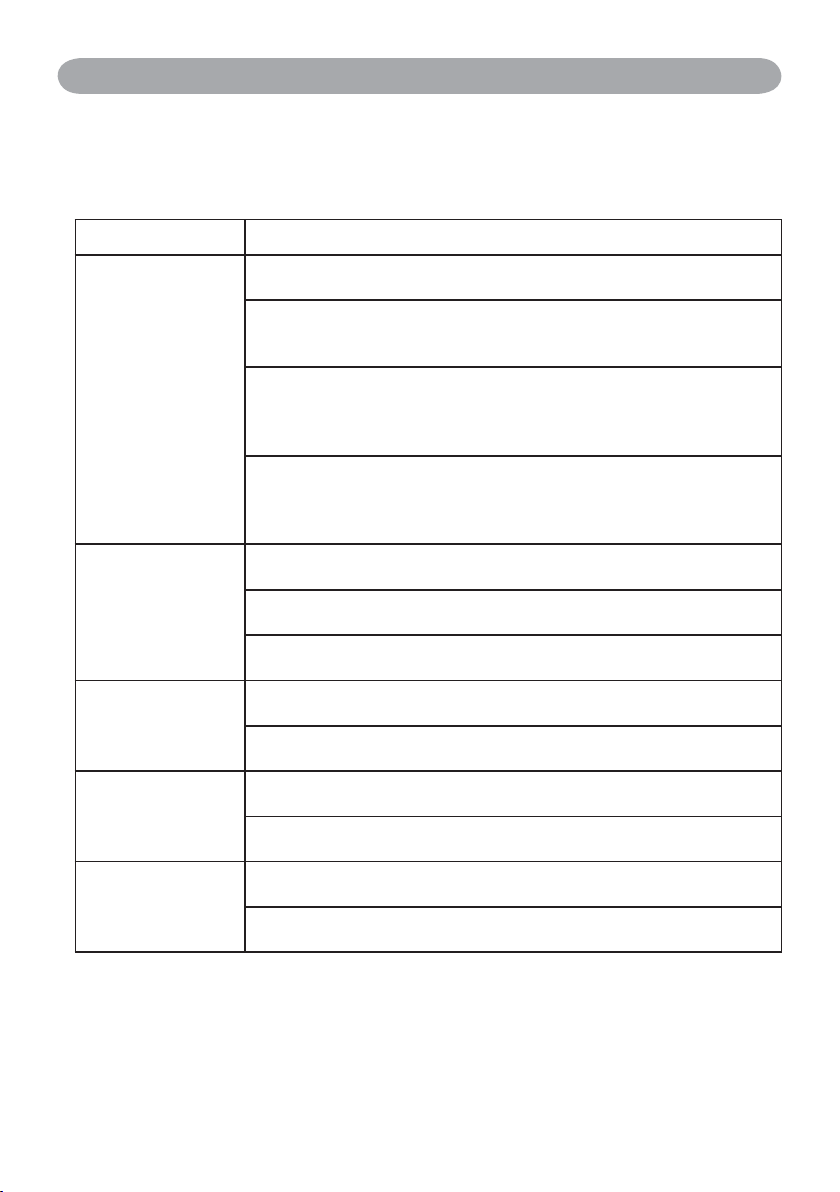
Error For Machine Defects
The following problems may be confused with a machine defect. Check and follow the
table. If it couldn’t be improved, contact your dealer.
Symptom Cause / Remedy
The power cord is disconnected.
Plug the power cord into an AC outlet.
Intending to turn on the projector again during the cool down
mode.
Wait until the cool down mode has completed.
Projector power
does not turn on.
No image
Colors are pale
Abnormal brightness
& contrast
Video is blurred
There is no lamp and/or lamp cover is not firmly closed.
Please turn off the power and disconnect the power plug from the power
outlet. Check if the lamp is installed or the lamp cover is firmly closed
and turn on the power again.
Power cord has impaired.
When you touch the power cord, the indicator goes on then off, please
remove the power cord and connect it again. If the situation is repeated,
remove the power cord and contact your dealer.
The input is not connected correctly.
Select the appropriate input source.
No signal input.
Connect correctly.
The lens cover is attached to the lens.
Remove the lens cover.
Color density and color matching are not adjusted correctly.
Adjust the RGB setting.
Color lose.
Caused by poor VGA cable connection.
Brightness and contrast are not adjusted correctly.
Adjust the brightness and contrast setting.
The lamp is near the end of its service life.
Replace with a new lamp.
The projection lens is not focused.
Adjust the focus using the focus ring.
The lens is dirty or misty.
Clean the lens.
58
Page 61
Troubleshooting
Error For Machine Defects
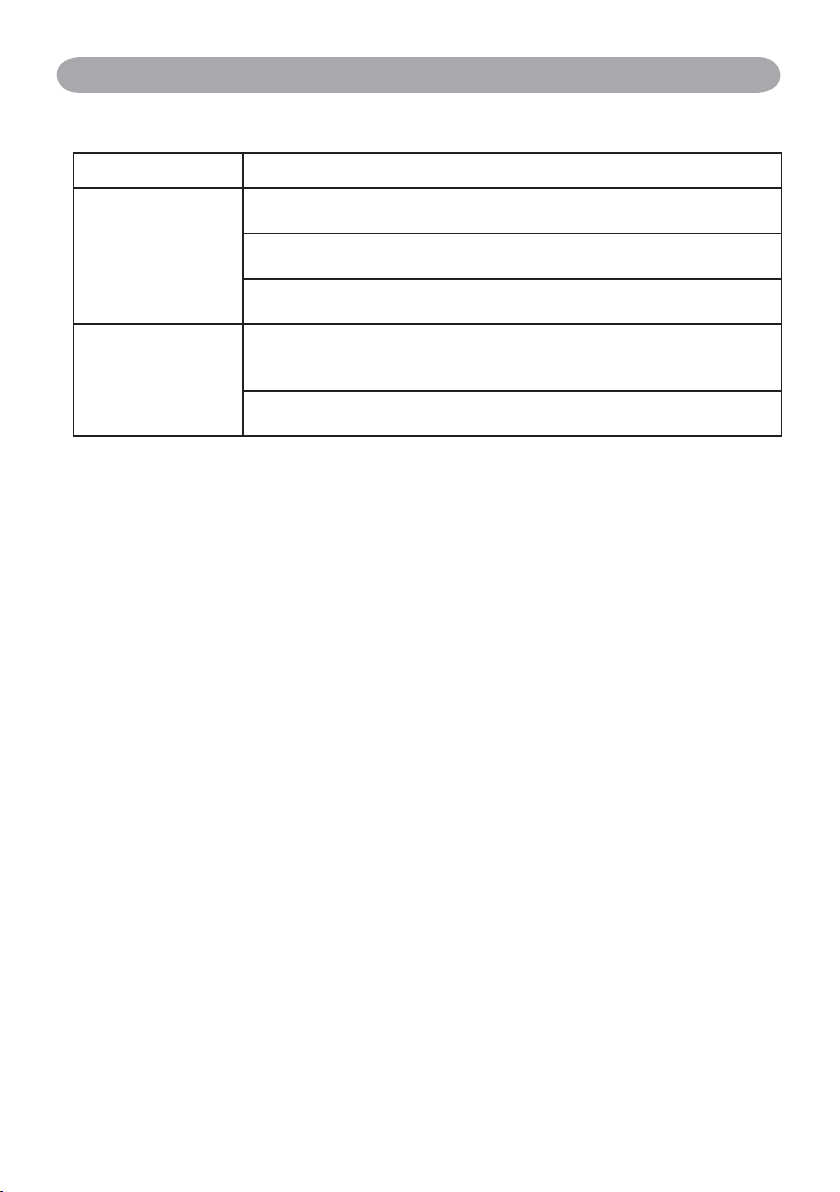
Symptom Cause / Remedy
The projector is not connected correctly.
Check audio cable if connect correctly.
No audio
Remote control is
not working.
The volume is set to minimum.
Adjust the volume.
Mute is turned on.
Press the MUTE button.
No battery.
Before using the remote control, please check the battery of remote
control.
Remote signal is obstructed.
Remove the obstacle between projector and remote control.
59
Page 62
Troubleshooting
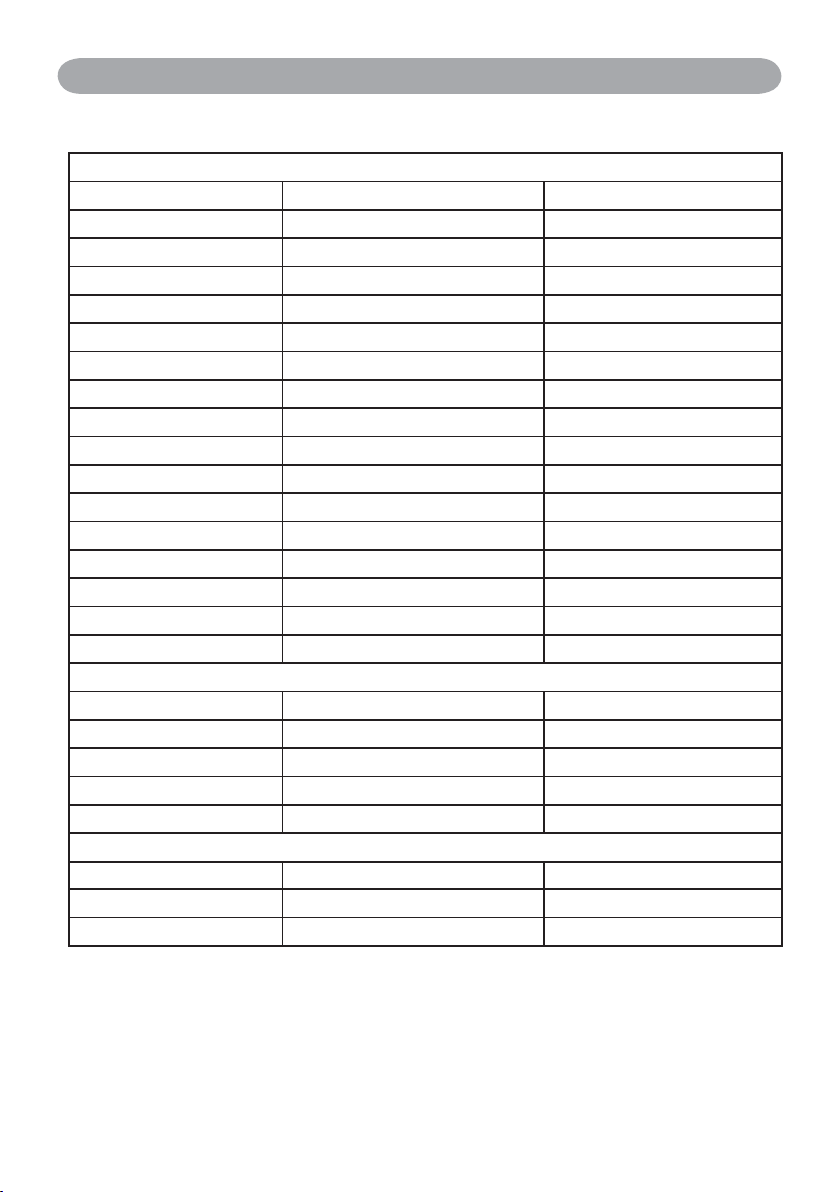
List of Supported Monitor Displays
Computer mode
Signal Refresh Rate (Hz) Resolution (dots)
VGA 60 640x480
VESA 60/72/75/85 640x480
SVGA 56/60/72/75/85 800x600
XGA 60/70/75/85 1024x768
SXGA 70/75 1152x864
SXGA 60/75 1280x960
SXGA 60 1280x1024
WXGA 60/75 1280x800
WXGA+ 60/75/85 1440x900
SXGA + 60/75 1400x1050
UXGA 60 1600x1200
WSXGA+ 60 1680x1050
MAC 67 1280x1024 / 640x480
MAC 75 832x624
MAC 75 1024x768
MAC 75 1152x870
Component (Y,Pb,Pr)
Signal Refresh Rate (Hz) Resolution (dots)
SDTV(480i) 30 720x480
SDTV(480p) 60 720x480
HDTV(720p) 60 1280x720
HDTV(1080i) 30 1920x1080
Composite / S-Video
Signal Refresh Rate (Hz) Resolution (dots)
TV(NTSC) 60 720x480
TV(PAL,SECAM) 50 720x576
60
Page 63

Appendix
r
Menu Tree (PC Mode)
Brightness
PICTURE
AUDIO
SETTING
ADVANCED
Contrast
Sharpness
Display Mode
Volume
Mute
H Position
V Position
Phase
Frequency
Auto Keystone
V Keystone
Auto Sync
Auto Search
Zoom / Pan
Freeze
Blank Power Off
Blank
Reset
Resize
Language
Select Source
Logo Setting
Natural
Cinema
Daylight
Green Board
White Board
Black Board
User
PRESENTATION
SECURITY
4:3
16:9
1:1
English
ᖅᡝϛМ
䳾ᥟύЎ
Вҁ俟
䚐ạ㛨
Dutch
Français
Deutsch
RGB 1
RGB 2
DVI-I
Y,Pb,Pr
Video
S-Video
Logo Mode
Logo Capture
Background
Logo Size
Auto Ceiling
Lamp Mode
Lamp
Reset Lamp Timer
PIN Lock Protection
Modify PIN
Filter Timer
Reset Filter Timer
Filter Counter
MAC ADDR.
Italiano
Polski
Português
Русский
Español
Svenska
Українська
(optional)
Front
Ceiling
Rear
Ceiling And Rea
Off
On 1
On 2
500 hours
800 hours
1000 hours
*DVI doesn’t support H / V POSITION, PHASE, FREQUENCY, AUTO SYNC function.
Page 64
Appendix
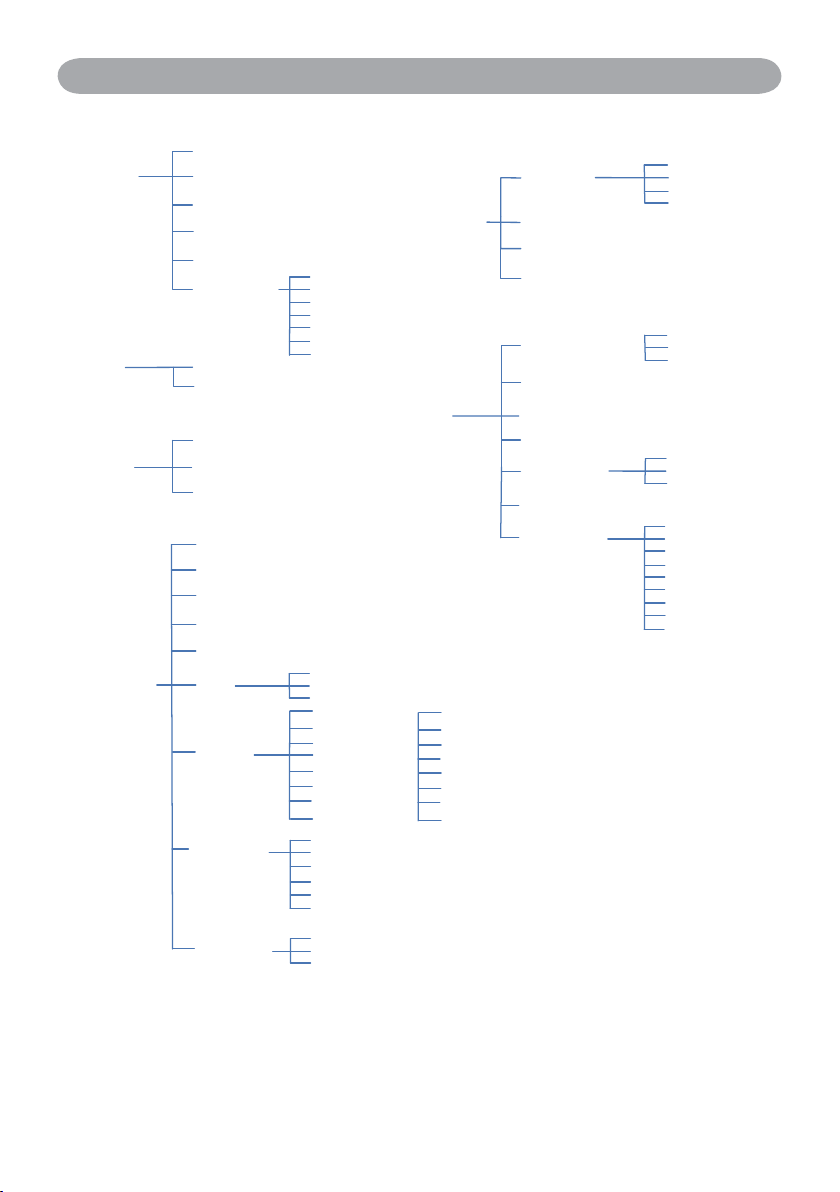
Menu Tree (Video Mode)
Brightness
PICTURE
AUDIO
SETTING
ADVANCED
Contrast
Sharpness
Color
Tint
Display Mode
Volume
Mute
Auto Keystone
Auto Sync
Auto Search
Zoom / Pan
Freeze
Blank Power Off
Blank
Reset
Resize
Language
Select Source
Logo Setting
Natural
Cinema
Daylight
Green Board
White Board
Black Board
User
4:3
16:9
1:1
English
ᖅᡝϛМ
䳾ᥟύЎ
Вҁ俟
䚐ạ㛨
Dutch
Français
Deutsch
RGB 1
RGB 2
DVI-I
Y,Pb,Pr
Video
S-Video
Logo Mode
Background
Logo Size
PRESENTATION
SECURITY
Italiano
Polski
Português
Русский
Español
Svenska
Українська
Auto Ceiling
Lamp Mode
Lamp
Reset Lamp Timer
PIN Lock Protection
Modify PIN
Filter Timer
Reset Filter Timer
Filter Counter
MAC ADDR.(optional)
Close Caption
Front
Ceiling
Rear
Ceiling And Rear
Off
On 1
On 2
500 hours
800 hours
1000 hours
Off
C.C1
C.C2
C.C3
C.C4
T1
T2
T3
T4
Page 65
Appendix
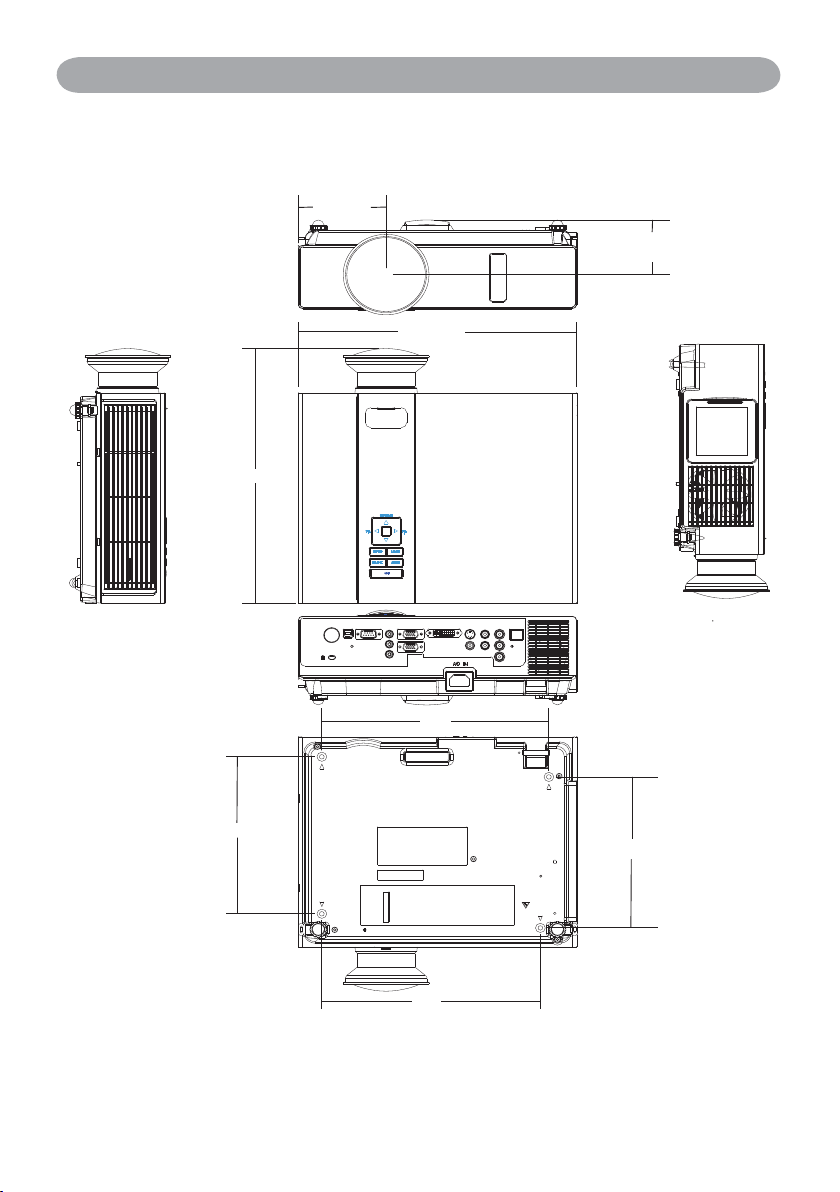
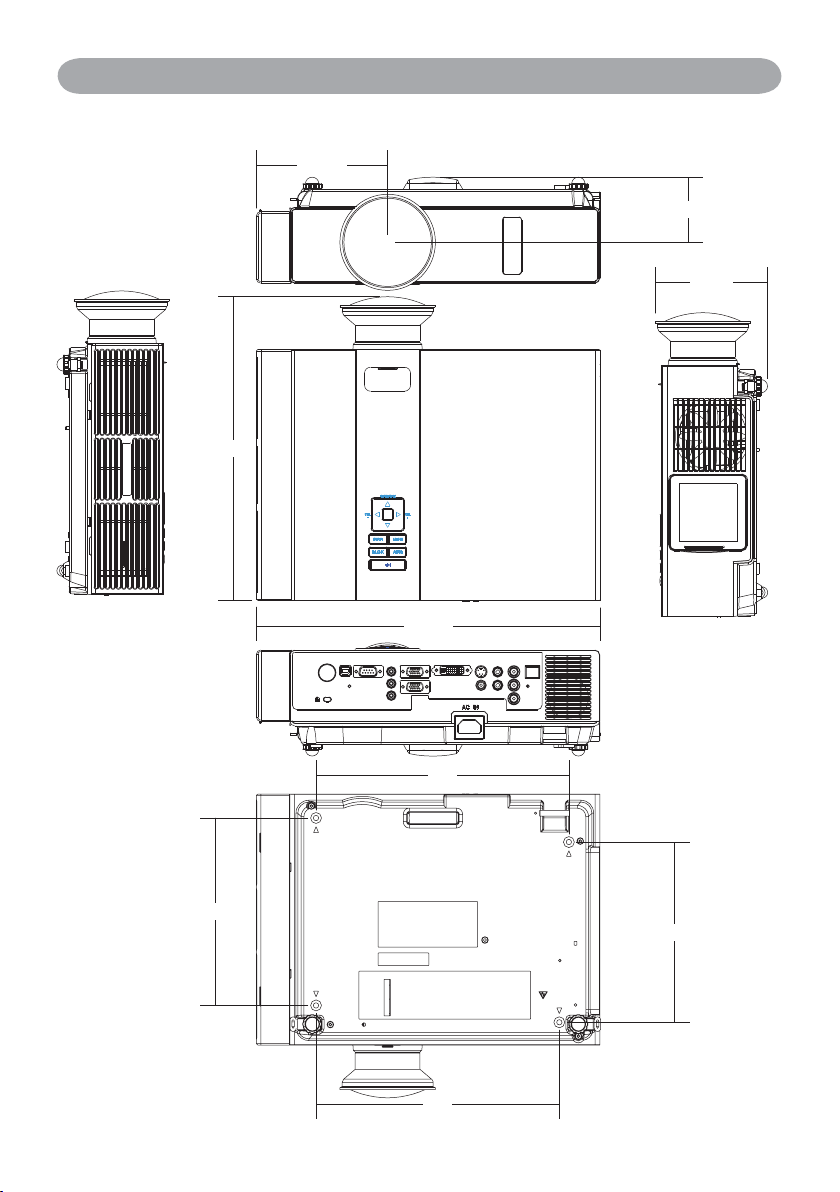
Appearance
102.5
67.8
325
316.2
195
265
187.5
255
Page 66
Projector
About the Owner’s Manual
Please read the owner’s manual thoroughly to ensure correct usage of the projector and its
features.
After reading, store the owner’s manual in a safe place for future reference.
Features
1. Dress up Design
2. Designed for tough environment
3. Side change lamp
4. Side change filter
5. Quick off
6. Advanced Anti-theft features
7. Five auto features (Auto Search, Auto Sync, Auto Ceiling, Auto Keystone and Auto
Filter Alert)
8. Seven display modes (Natural, Cinema, Daylight, Green board, White Board, Black
Board and User)
9. Built-in 8W speaker
10. Logo capture
11. Image freeze function
12. Digital zoom adjustment
13. Extreme Short Throw Distance.
The content of this manual is subject to change without previous notice.
All rights reserved.
Issue of edition 1002.05_01
Page 67
Safety InstructionsContents of Your Box
Check-list of your accessories
Please make sure that following items are included in the box, along with the main.
If any items missing, contact your dealer.
1. Projector
3. Power cord
5. Owner’s Manual CD
2. Computer cable
4. Quick Start Guide
6. Convergence Lens
7. Remote control
ESC
- VOL +
MENU
K
Still
INPUT
Auto
Blank
65
Page 68
Safety Labels
Safety labels are used on or within the projector to alert you to items or areas
requiring your attention.
WARNING LABEL
EMI LABEL
LAMP DOOR WARNING LABEL
66
Page 69
Safety Labels
Projector
Front IR
receiver
2
1
3
Control panel
1
Operating system.
Lens cover
12
Attach when not using to protect the lens
from becoming dirty or damaged.
Filter cover
3
Prevents dust and other foreign particles
from being drawn into projector.
Remove the filter cover to clean the air
filter.
7
Focus ring
14
8
5
4
Use the focus ring to focus the projector
image.
Rotate the focus ring until the image is
clear.
Zoom ring
15
Use the zoom ring to adjust the size of the
projected image.
Rotate the zoom ring until the image is the
desired size.
6
Outlet ventilation
Lamp door
16
The lamp unit is inside.
Foot adjust button
17
Lock / unlock the adjustable foot.
Front adjustable foot
7
8
18
Extend and retract to adjust the projection
angle.
67
Page 70
Part Names
Rear
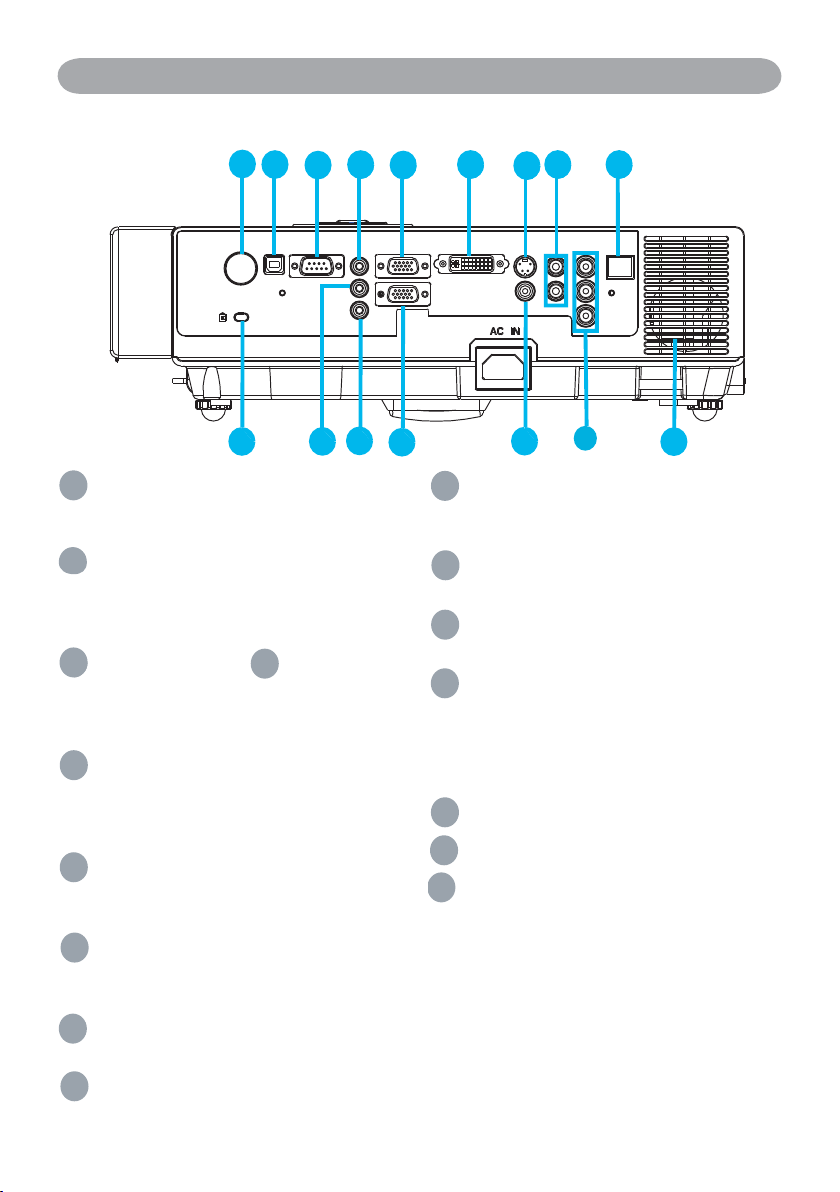
N
A
B
C
F
H
K M
I
P
MOUSE
A
Connect a USB mouse cable to a computer
to control computer mouse functions.
RS232
B
Serial data port for controlling the projector
with a computer or other RS-232 control
device.
C
AUDIO IN 1 & D AUDIO IN 2
Mini jack port corresponds to computer
input.(RGB IN→AUDIO IN 1, DVI-1 IN
→AUDIO IN 2)
E
AUDIO OUT
This jack outputs the audio signal
from computer signal to external audio
equipment.
RGB IN
F
Input analog RGB video signal from a
computer.
RGB OUT
G
Connect an external monitor to this
connection to view the "RGB IN" input.
DVI-I IN
H
Input digital DVI-I signal from a computer.
S-VIDEO
I
S-Video signal from a video source.
D
E
G
J
K
L
M
N
O
P
J
VIDEO
Composite video signal from a video
source.
AUDIO IN 3, R / L
RCA type corresponds to video input.
COMPONENT /Y, Pb, Pr
Input Y,Pb,Pr signal from a DVD player.
LAN (Optional)
This function is optional.
Please see page 34 Network Control
Application for details.
REAR IR RECEIVER
SPEAKER
Slot for Kensington Micro Saver
L
O
Security System
Built-in Security Slot
This security slot supports the MicroSaver®
Security System. MicroSaver
trademark of Kensington Microware Inc.
The logo is trademarked and owned by
Kensington Microware Inc.
®
is a registered
68
Page 71
Part Names
Power ON / OFF
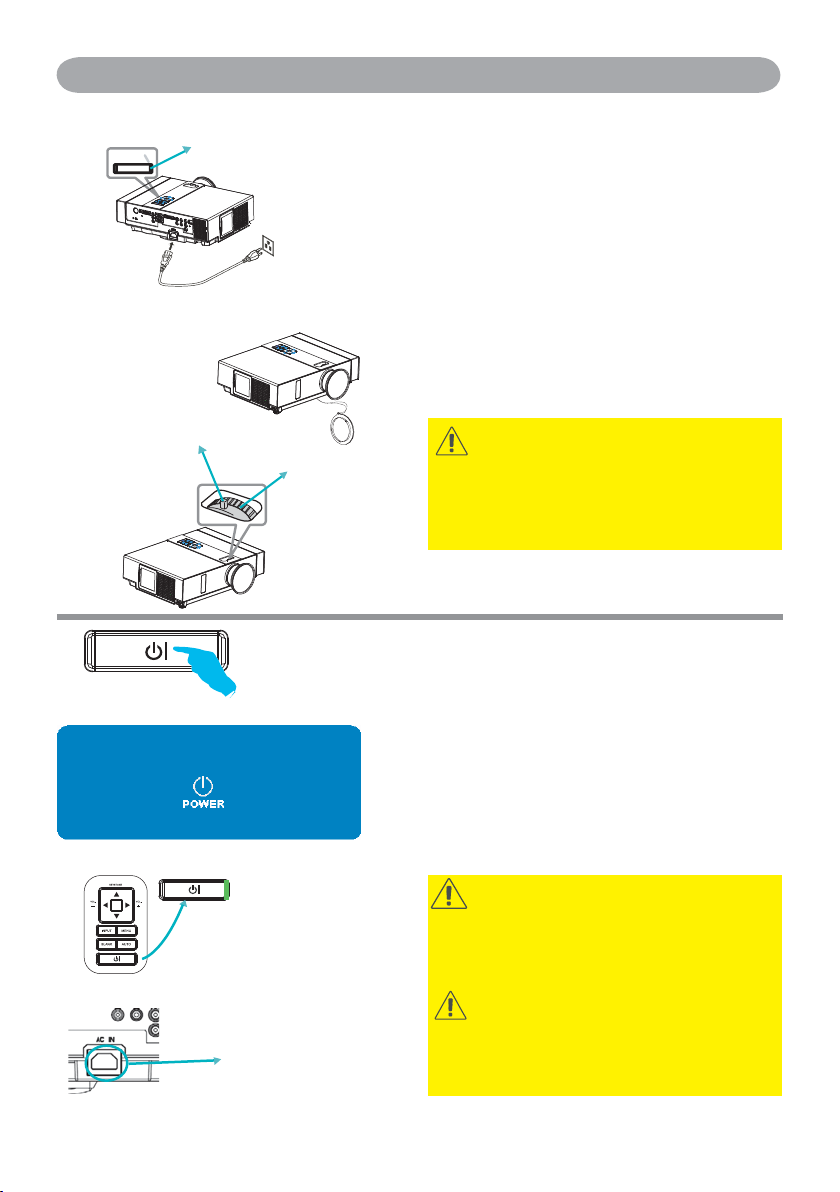
POWER indicator
AC inlet
Outlet
Turning on the power
1. Make sure that power cord is firmly and
correctly connected to the projector.
2. Remove the lens cover, and the POWER
indicator will light up in green.
3. Press POWER button on the control panel or
the remote control to turn on the projector.
4. Rotate the zoom ring to adjust the screen size.
5. Rotate the focus ring to adjust the focus.
Power off?
Zoom ring
Please press
key again to power off.
Focus ring
WARNING
A strong light is emitted when the projector’s
power is on. Do not look into the lens of the
projector or look inside of the projector through
any of the projector’s openings.
Turning off the power
1. Press the POWER button on the control
panel or the remote control. The “power off”
confirmation message appears.
2. Press the POWER button again while the
message appears.
3. When the projector enters "standby" mode, the
POWER indicator will light up in green.
4. If you don’t use the projector, remove power
cord.
WARNING
Do not touch around the lamp cover and the
exhaust vents during use or just after use, since it
is too hot.
CAUTION
Do not turn off the AC power for 60 seconds
after the lamp is turned on. Doing so could cause
premature lamp failure.
69
Page 72
Setting Up
Ceiling Mounted Installation Guide
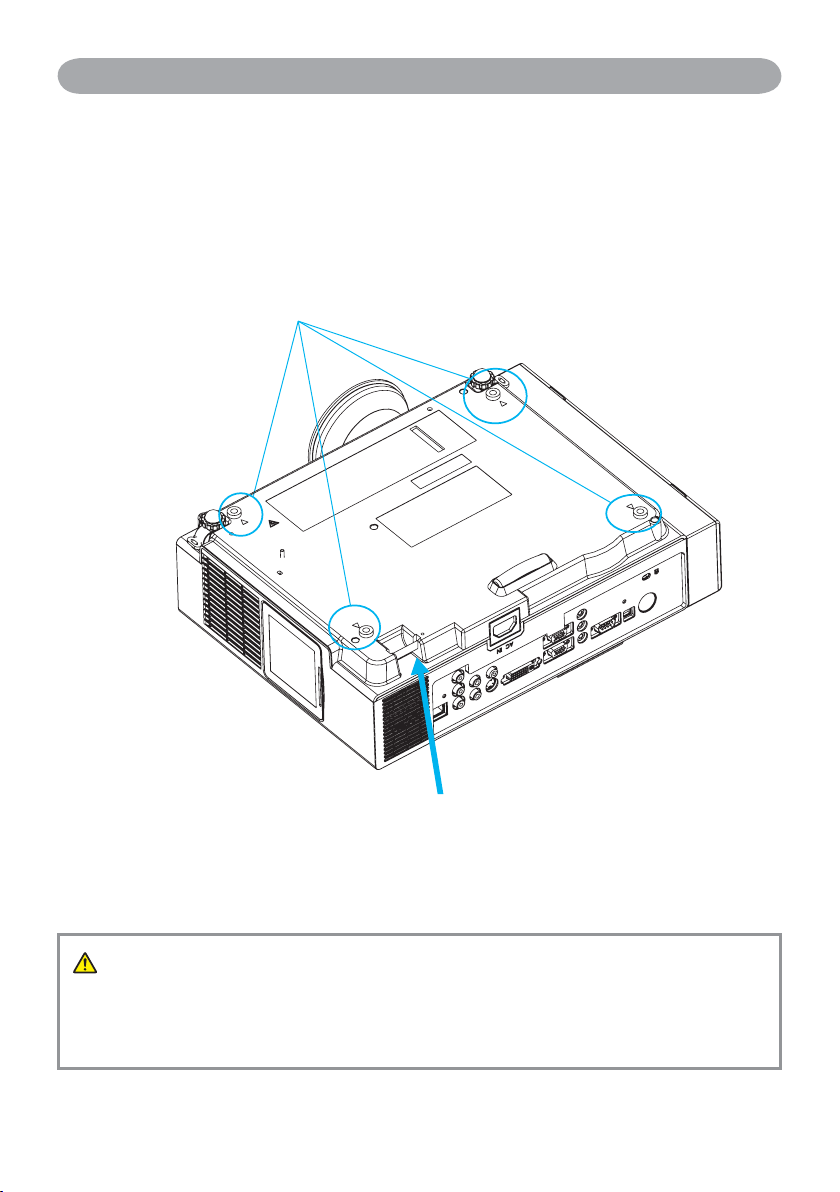
Attach ceiling mount at four-suspension bracket fixing points when suspending from a ceiling.
Special installation is required in order to suspend the projector from the ceiling. Please ask your
dealer for detals.
MAX M4x8 mm For Mounting.
Security Anchor
The product is equipped with security
anchor and PIN LOCK functions to help
prevent unauthorized removal projector.
WARNING
►Do not grasp the security anchor to carry projector, since it is not designed for it.
► The security anchor is not for comprehensive theft prevention measures. It is intended to be
used as supplemental theft prevention measure.
70
Page 73
Setting Up
Adjusting The Projector’s Elevation
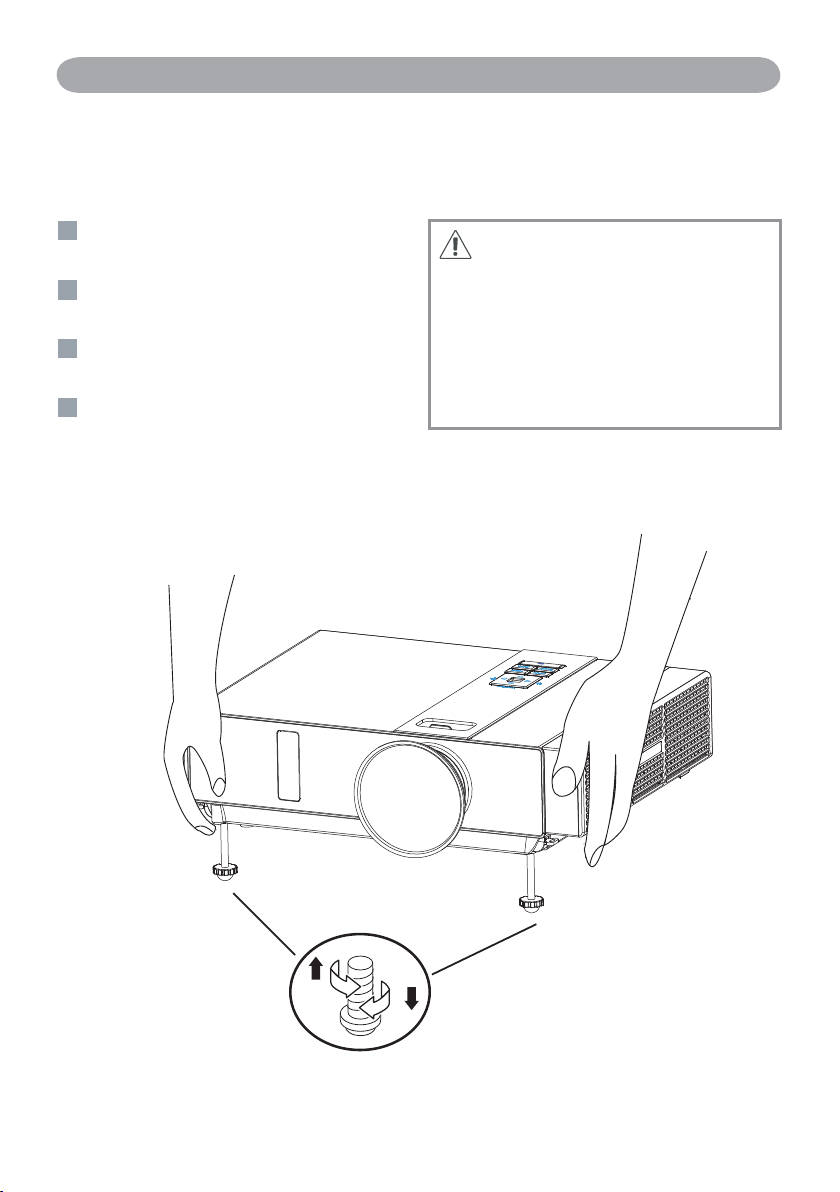
Use the adjustable foot at the front of the projector to set the image height.
1
Holding the projector, push the foot adjust
buttons to loosen the front adjustable foot.
Position the front side of the projector to the
12
desired height.
3
Release the foot adjust buttons in order to
lock the front adjustable feet.
14
After making sure that the front adjustable
feet are locked, put the projector gently
atop.
CAUTION
* The adjustment range of front adjustable
foot is 0 to 8.5 degrees.
* When the foot is adjusted, it may cause the
shape of the projected image to become
distorted. Use the keystone correction
function to correct this distortion.
71
Page 74
Setting Up
How To Connect
Laptop or desktop computer
MOUSE
RS-232
AUDIO IN
AUDIO OUT
VGA OUT
DVI OUT
AUDIO OUT
S-VIDEO OUT
VGA OUT
RGB IN
Y Pb/Cb Pr/Cr
VIDEO OUT AUDIO OUT (L)&(R)
Before starting, make sure that the projector and computer are both turned off.
Connect the computer cable
Connect the computer cable from the computer to the projector's RGB IN or DVI-I IN.
If needed, connect the MONITOR OUT to a monitor to view input from RGB IN or DVI-I
IN. Tighten the screw on all connectors.
72
Page 75
Network Control Software Application
LAN
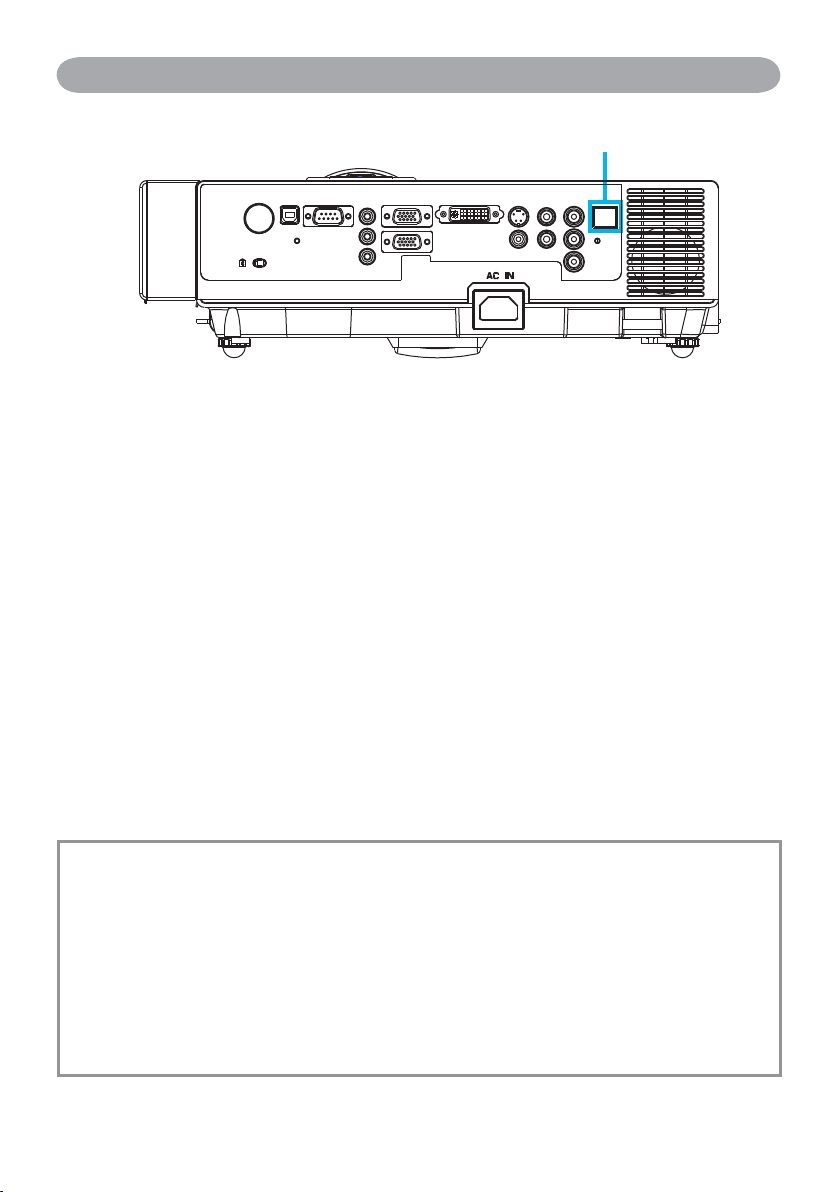
NOTE: This Network Control Software Application is an optional function and support
model with RJ45 LAN port only.
Register the projector(s) which needs to be controlled.
"Auto search" can help you to seek the projector(s) source easily.
After registering in the work group, you can start to control the projector.
Group the projector(s) into different sections.
You can monitor the status easily by the sort of group name function in the network.
Monitor the status for each projector.
a.You can manage and change the monitoring content by System Parameter Setting.
b. The Lamp timer, filter working time or system warning feedback etc. can be known
by checking the status for projector(s).
Control the booked projector(s).
The status can be refreshed and acquired by monitoring functions; you can also
operate the function easily by Network Control.
NOTE
To monitor and control the projector(including stand-by mode), the following
conditions need to be ready:
(1) Projector should already be powered on.
(2) Projector is connected to network.
(3) LED light of the projector network port shows normal. (Green light on, Orange
twinkle)
*
Stand-by mode indictor: Green LED (Power) on the projector’s control panel flashes.
73
Page 76
Maintenance of Projector
Air Filter
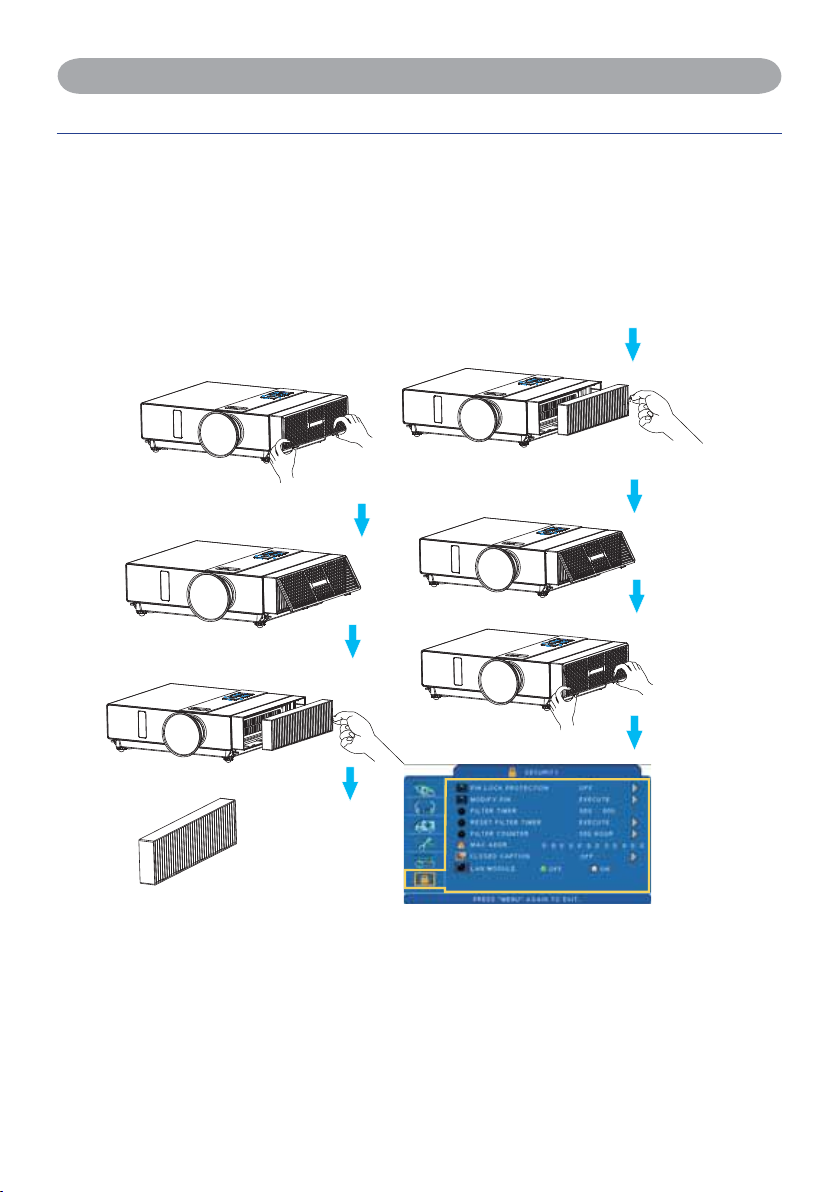
When a warning message appears to remind you to clean the air filter, please replace a
new one as soon as possible. Please check and clean the air filter periodically.
Replacing the Air Filter
When the use time reaches the filter counter time, the projector will display a message
that indicates to replace a new filter. If there is no spare air filter available, please contact
your dealer.
New one
Turn off the projector, and unplug the power cord. Allow the projector to sufficiently
cool down.
Remove the filter cover from the right side of projector.
Pull out the air filter.
Install a new air filter.
Put the filter cover on.
Reset filter timer after cleaning or changing air filter. (P.35)
74
Page 77
Maintenance of Projector
Lamp
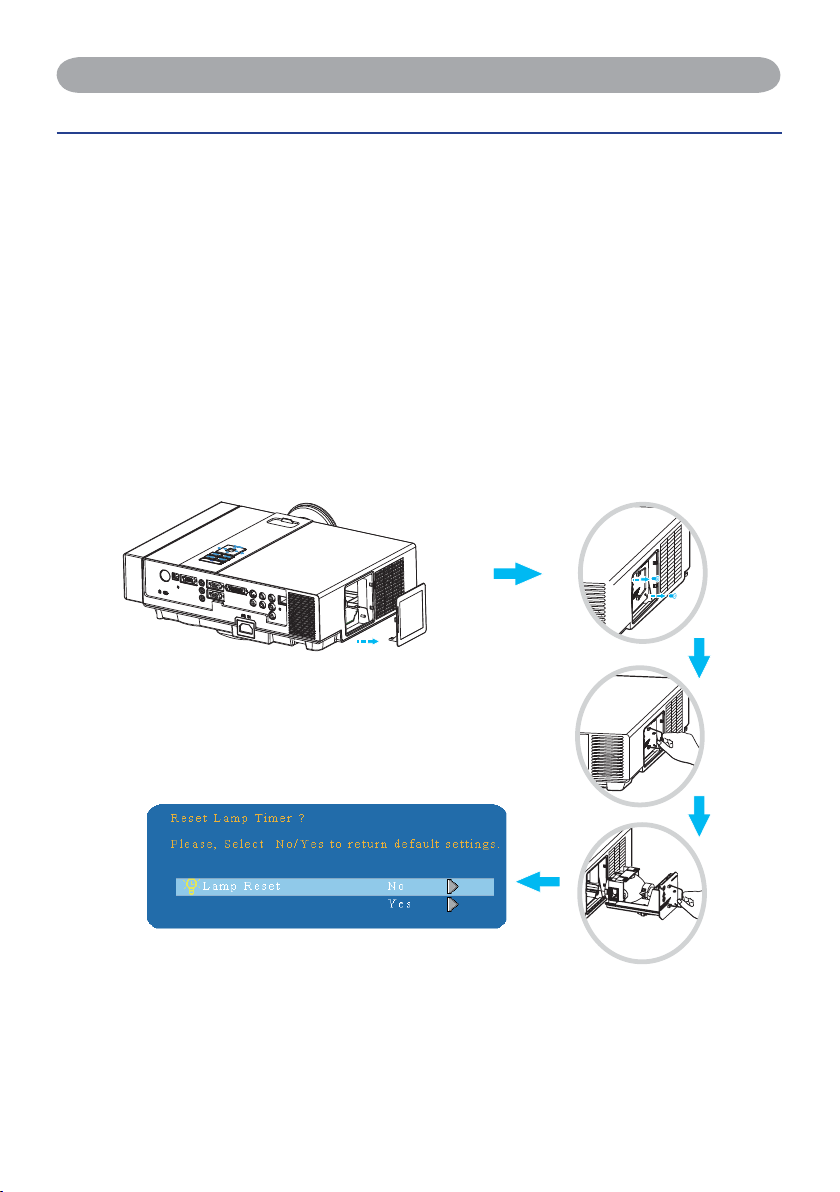
1. If you want to replace new lamp, but the projector was just turned off, please let the
projector cool down and unplug power cord at least 60 minutes.
2. If the projector is mounted in the ceiling, contact your dealer to replace the lamp.
Replacing New Lamp
1. Remove the lamp door.
2. Loosen 2 screws of the lamp holder. Take the handle on the top of the lamp, pull out
the lamp straight off the projector.
3. Insert new lamp, lock the lamp door firmly with 2 screws.
4. Put the lamp door on.
5. Please reset the lamp timer after replacing lamp. (P.34)
75
Page 78
Appendix
Appearance
137.45
67.8
117.8
316.2
359.95
195
265
187.5
255
 Loading...