

Page 1
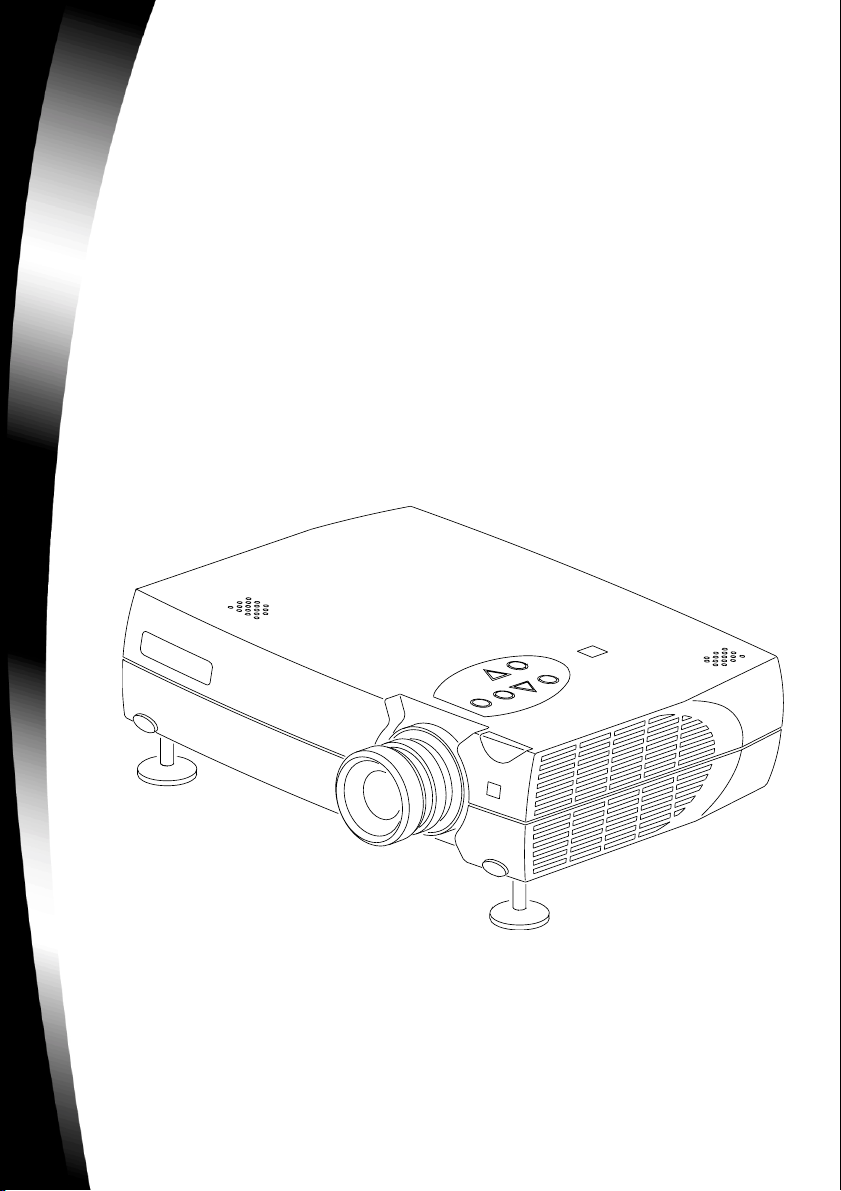
LCD Projector
with Image Manager Feature
75-4/71,-
Page 2

Table of Contents
Introduction ...........................................................................2
How And Where To Get Help ................................................ 3
How To Get Help ............................................................................... 3
Where To Get Help ............................................................................ 4
Projector Features.................................................................5
Connecting the Projector .....................................................6
Starting the Presentation...................................................... 7
Using the Remote Control and Keypad...............................9
Positioning the Projector....................................................10
Using Image Manager ......................................................... 11
Adjusting the Display and Volume..................................................12
Setting Up the Image Source .......................................................... 13
Selecting a Language ...................................................................... 14
Checking the Status.........................................................................15
To reset lamp hours .........................................................................15
Turning Off the Projector.................................................................15
Transporting the Projector .................................................16
Maintenance.........................................................................17
Changing the Lamp Module ............................................................17
Cleaning the Projection Lens..........................................................18
Cleaning the Exterior Case..............................................................19
Cleaning the Air Filter......................................................................19
Troubleshooting ..................................................................20
Power Indicator ................................................................................20
Image Quality ...................................................................................21
Sound ...............................................................................................22
Remote Control ................................................................................23
Lamp .................................................................................................23
Safety ...................................................................................25
Safety Definitions.............................................................................25
Projector Safety ............................................................................... 25
Battery Safety ...................................................................................26
Specifications......................................................................27
1
Page 3

LCD Projector User Guide
Introduction
The easy-to-use LCD Digital Projector offer superb image quality at an
affordable price. Built into the LCD Digital Projector with Image Manager
feature. With this feature, you can select the image display setting best suited
for your specific presentation material and projection environment.
In only minutes you can have your LCD Digital Projector ready to go. Just
connect the projector to an image source such as a computer, DVD, VCR, or
digital camera.
If you are familiar with connecting and using digital projectors, refer to the
Quick Start Guide included with the projector. If not, follow the directions in
this user guide to connect your projector and run your presentation.
What’ s in the Box
Make sure that all of the following components were included with the
projector. Contact your dealer immediately
if anything is missing.
• Soft carry case
• Lens cap
• Analog RGB (15 Pin HD) cable
• S-video cable
• Composite video cable
• Stereo audio cable – 1/8” mini-plug
• Power cord
• User Manual
• Quick Start Guide
• Remote control
• MACINTOSH adapter
2
Page 4

How And Where To Get Help
How And Where To Get Help
This section describes the most efficient and effective way for you to receive
technical support and customer service, should you need it.
How To Get Help
Before you call Service Center, please refer to the Troubleshooting section of
this manual.
Seller provides technical support and customer service through a network of
authorized dealers. Contact seller’ s for the location of the nearest Authorized
dealer.
When you call seller, or an authorized service center, please be prepared to
provide the following information:
1. Product:
2. Serial Number:
3. Place Of Purchase:
Company Name
Contact
Address
Telephone
Fax
4. Date Of Purchase:
Note: Please keep an original copy of the invoice or receipt from the
purchase of your multimedia projector as proof of purchase.
5. What peripheral equipment is connected to your multimedia projector?
Brand Model Number
__________________________________________________________________
___________________________________________________________________
______________________________________________________________________________
______________________________________________________________________________________________________________________________________________________________
6. Description Of Problem:
_______________________________________________________________________________
________________________________________________________________________________
________________________________________________________________________________
Note: If you need help using third-party peripherals or software with your
multimedia projector, please refer to the documentation provided with the third
party peripheral or software or contact the manufacturer for technical support
or customer service.
3
Page 5

LCD Projector User Guide
Where To Get Help
Your authorized dealer
Note: Please record the contact information for the authorized dealer
from which you purchased your multimedia projector.
Company Name
Contact
Address
Telephone
Fax
Home Page
E-Mail
Hours of Operation
4
Page 6
Projector Features
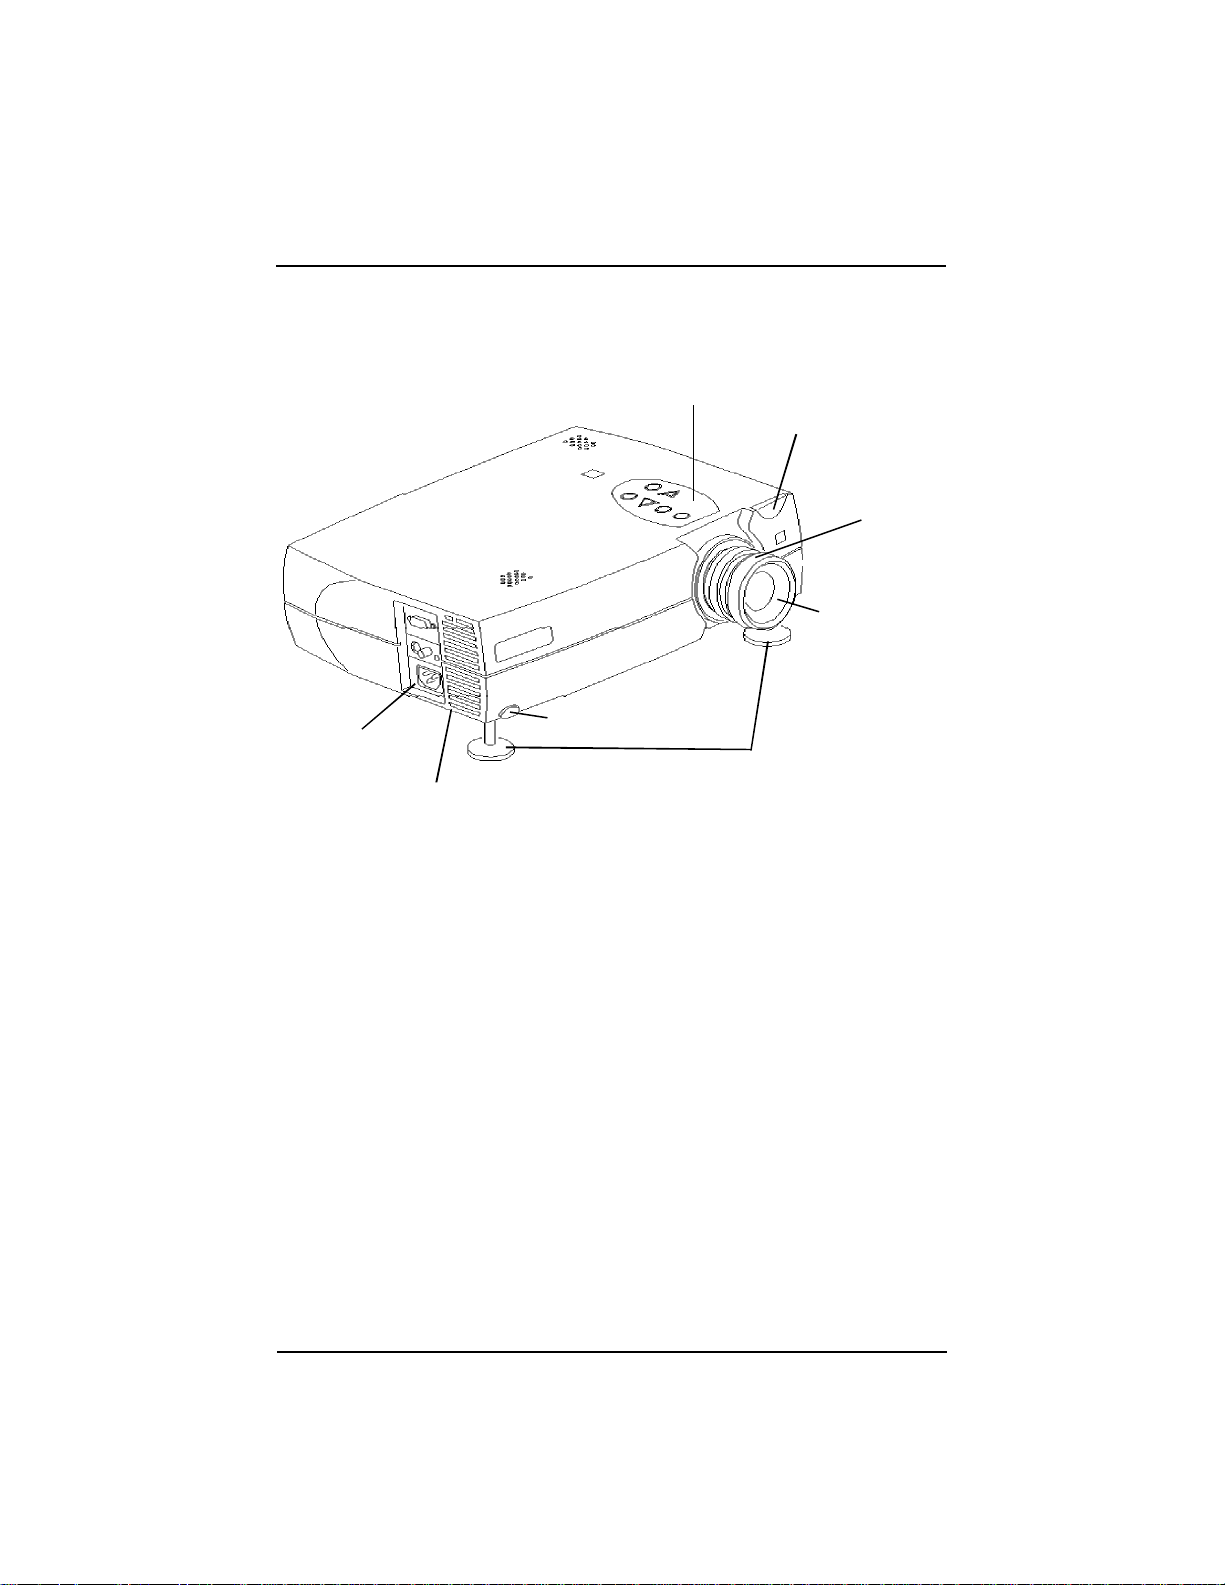
connection panel
connection for optional Kensington Lock
Projector Features
keypad
remote control sensor
focus ring
zoom ring
( Zoom model
only)
foot release button (2)
adjustable feet
5
Page 7
LCD Projector User Guide
Connecting the Projector
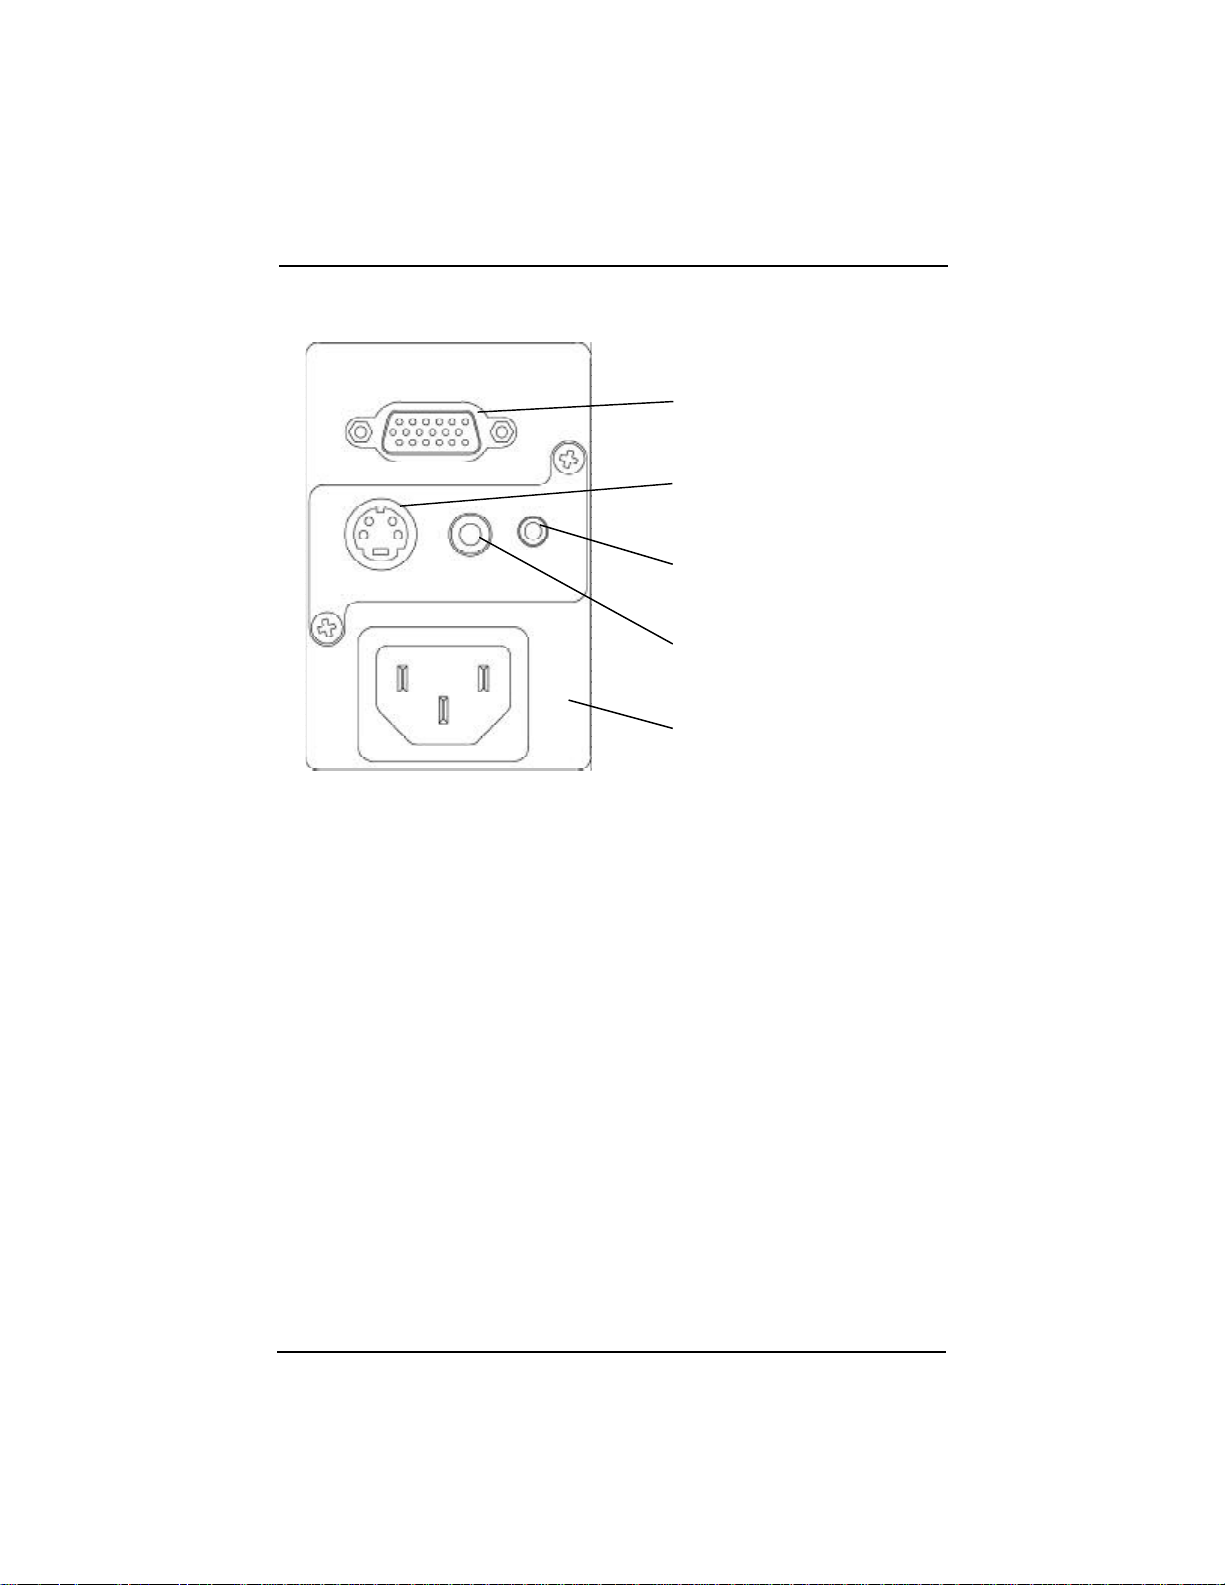
S-VIDEO
PC / MAC
VIDEO AUDIO
AV
100V
PC/MAC connection to the
computer monitor prot
S-Video
to the S-Video out port
Audio
to the source’ s Audio out port
Video
to the Composite video out port
~
240V
The cables are color coded to assist you with making the connections.
When you connect the power cable to the projector, the Power light on the
keypad begins to blink.
You can connect more than one image source at a time. Use the Setup tab on
the menu screen to select which image source you want to view. See “Setting
Up the Image Source” on page 13.
If you are using an older MACINTOSH computer, you might need to use the
MACINTOSH adapter that was included with your projector.
Warning:Always turn off the image source (computer or video source)
and projector before connecting or disconnecting cables.
Power cord connection to an
electrical outlet
6
Page 8
Starting the Presentation
Starting the Presentation
We recommend turning on the projector and image sources in the order listed
here.
Note: You might not be using all of these components for your presentation.
• Video source such as VCR, DVD or digital camera.
• Audio source if different from your video source or computer
• Projector
• Computer
1. Connect the signal cable to the computer or video source.
2. Connect the power cord to the projector and to a power source. The Power
light begins to blink.
3. Turn on the presentation components in the order listed. To turn on the
projector, remove the lens cap and press the Power button on either the
remote control or the keypad.
Power button
The Power light stays a steady green when the lamp comes on. Either the
title screen or the image from the image source appears.
Note: Many laptop computers do not automatically turn on their external
video port when another display device is connected. Refer to
your computer’ s user guide for the function key or command that
activates the port. MAC users may need to turn on SimulSCAN or
monitor mirroring. Refer to the computer manual.
7
Page 9
LCD Projector User Guide
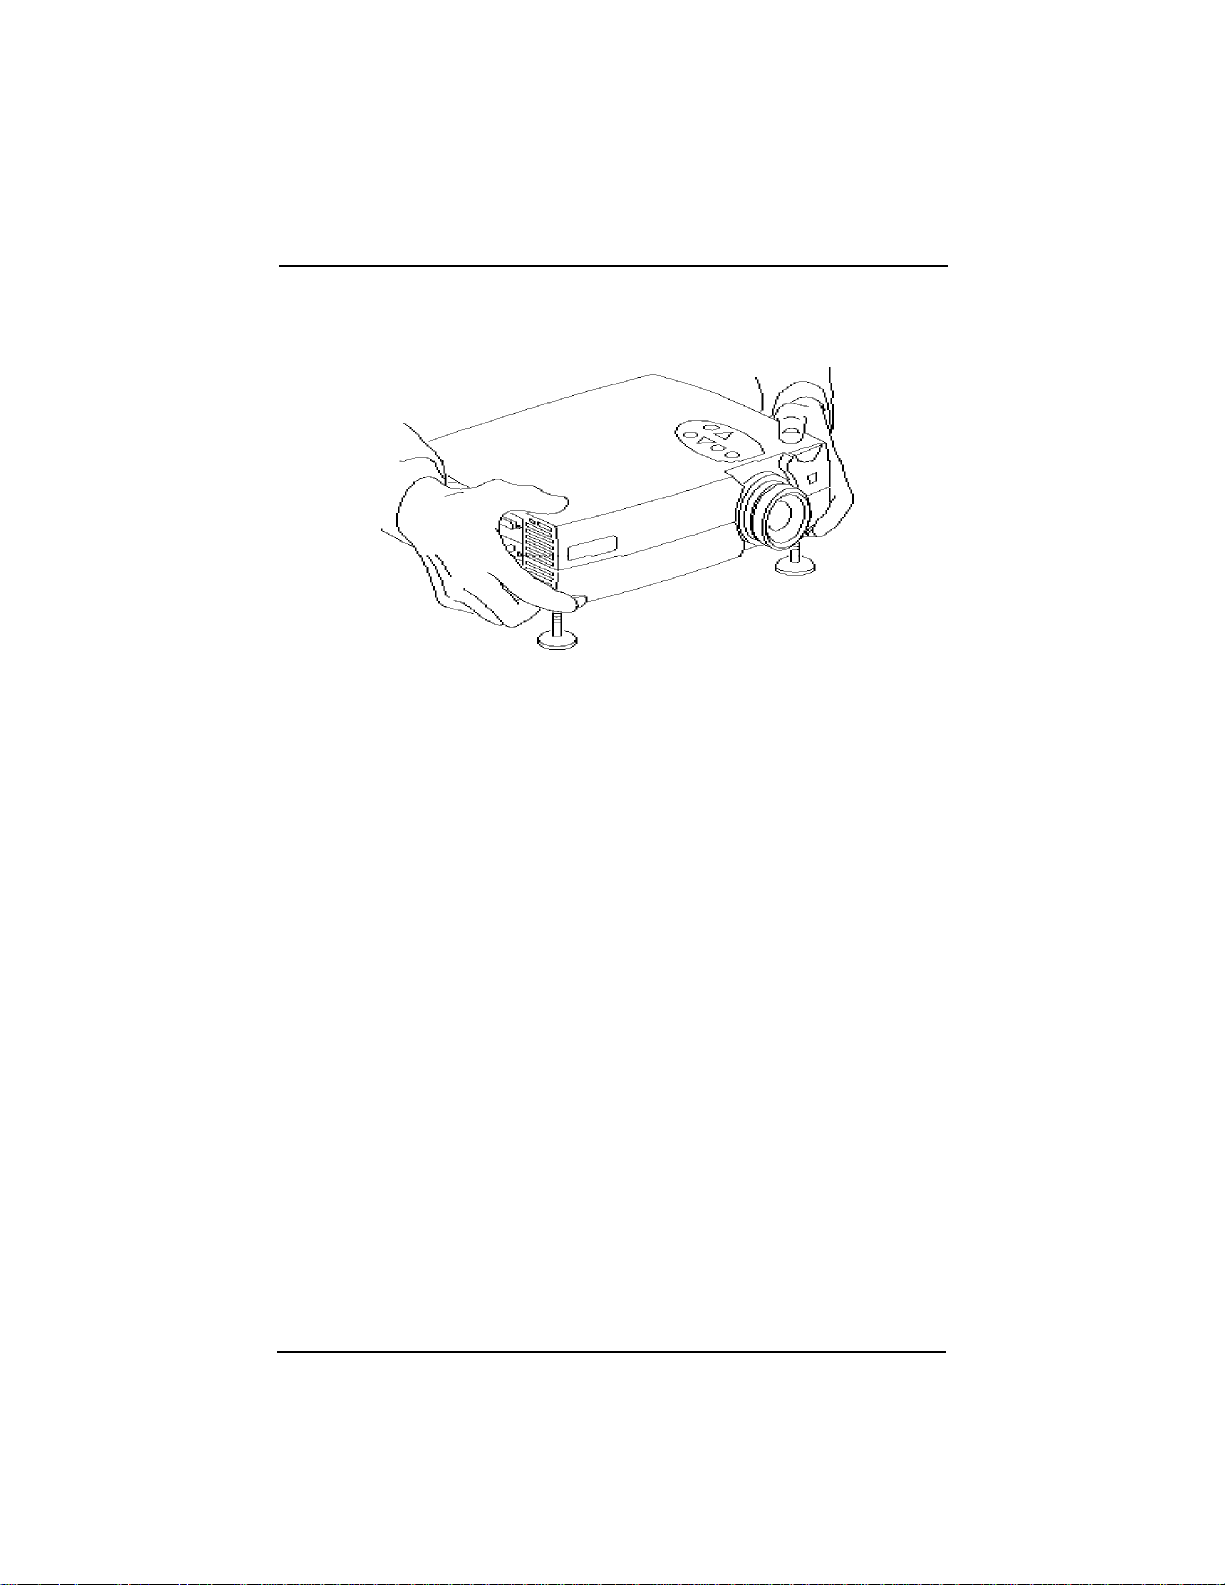
4. Position the projector by using the adjustable feet on the bottom of the
projector. Press the foot release buttons on the front of the projector to raise
or lower the feet.
5. Turn the focus ring to focus the image and turn the zoom ring (zoom model
only) to zoom in or out on the image.
6. Make any necessary image adjustments by using the on-screen menus.
Press the Menu button to view the menu choices. Use the Adjust + - buttons
to go to the desired tab. Press the Menu button again to dismiss the menus.
Go to the header tab to select the type of content in your presentation. See
“Using Image Manager” on page 11.
Go to the Adjust tab to adjust brightness, contrast, color (video only) and
tint (video only). See “Adjusting the Display and Volume” on page 12.
Go to the Setup tab to select the image source, type of projection, video
AGC (Automatic Gain Control), video format and to adjust frequency,
tracking and the image position. See “Setting Up the Image Source” on
page 13.
7. Run your presentation from your computer or video source.
8
Page 10
Using the Remote Control and Keypad
Using the Remote Control and Keypad
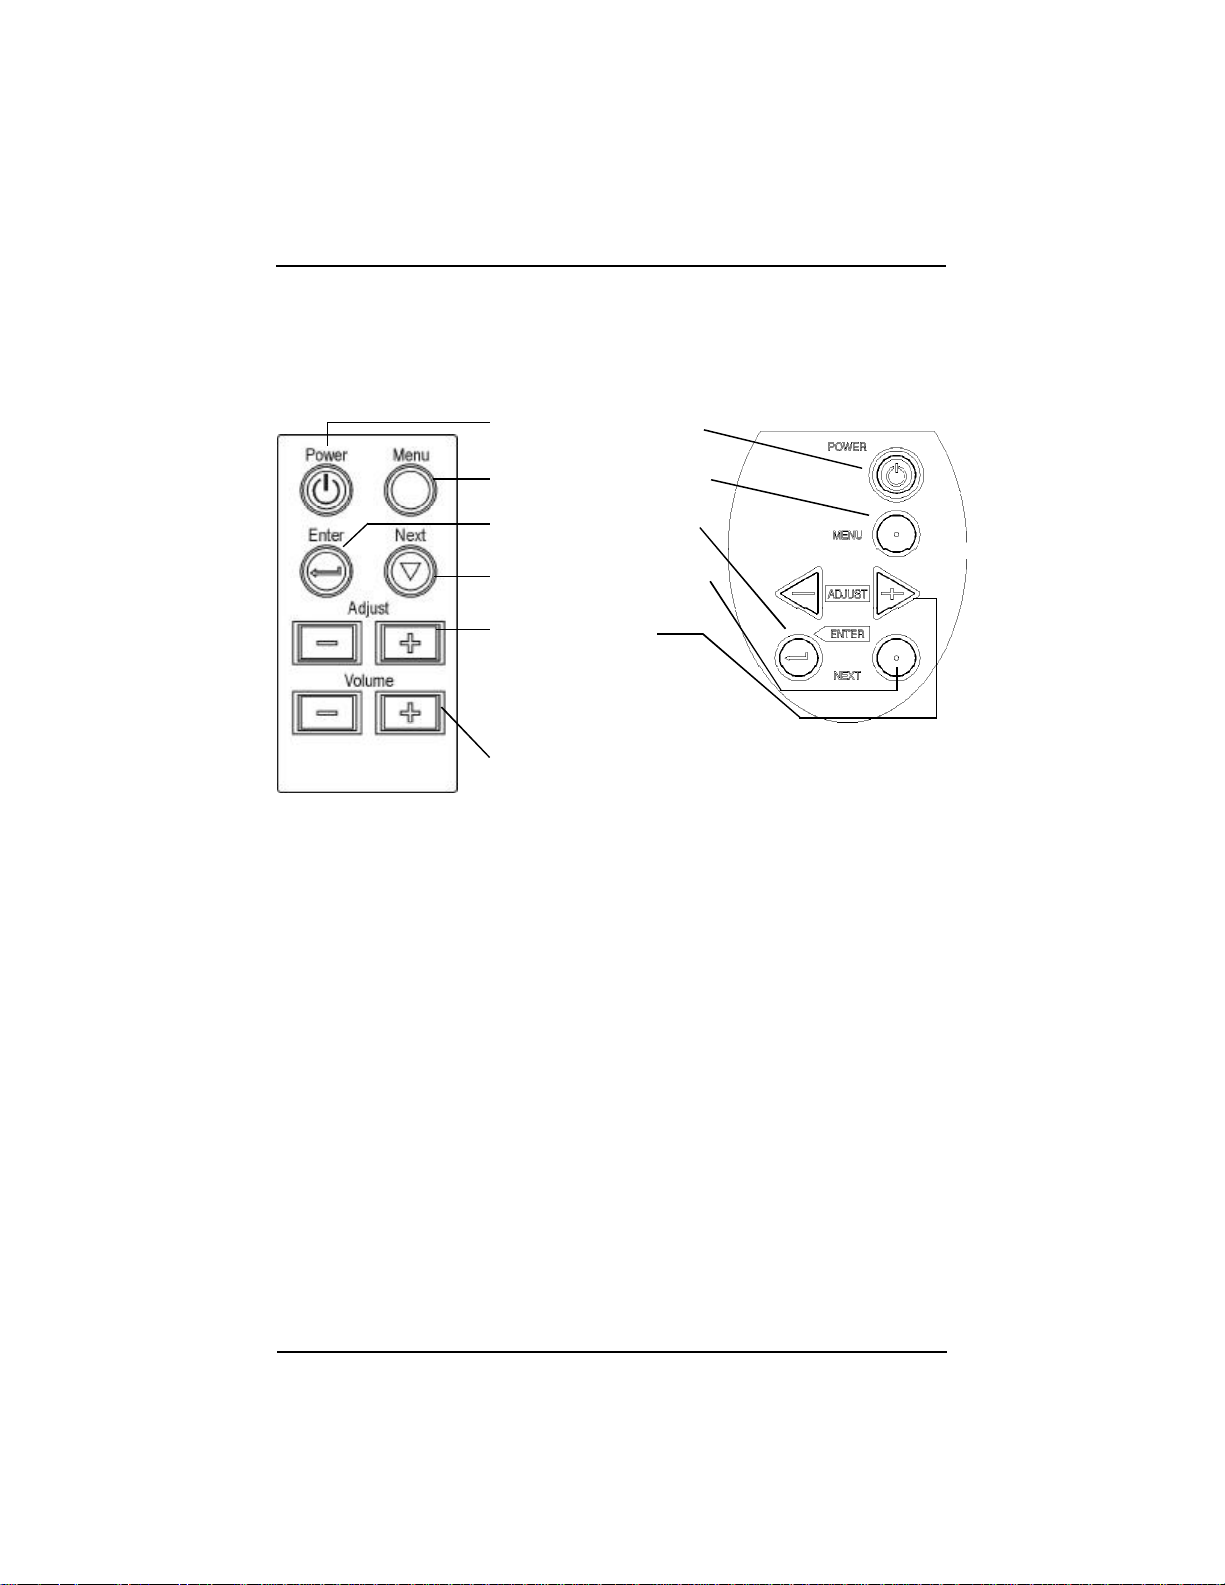
The remote control and projector keypad perform similar operations,
with one exception-the remote control has a volume control.
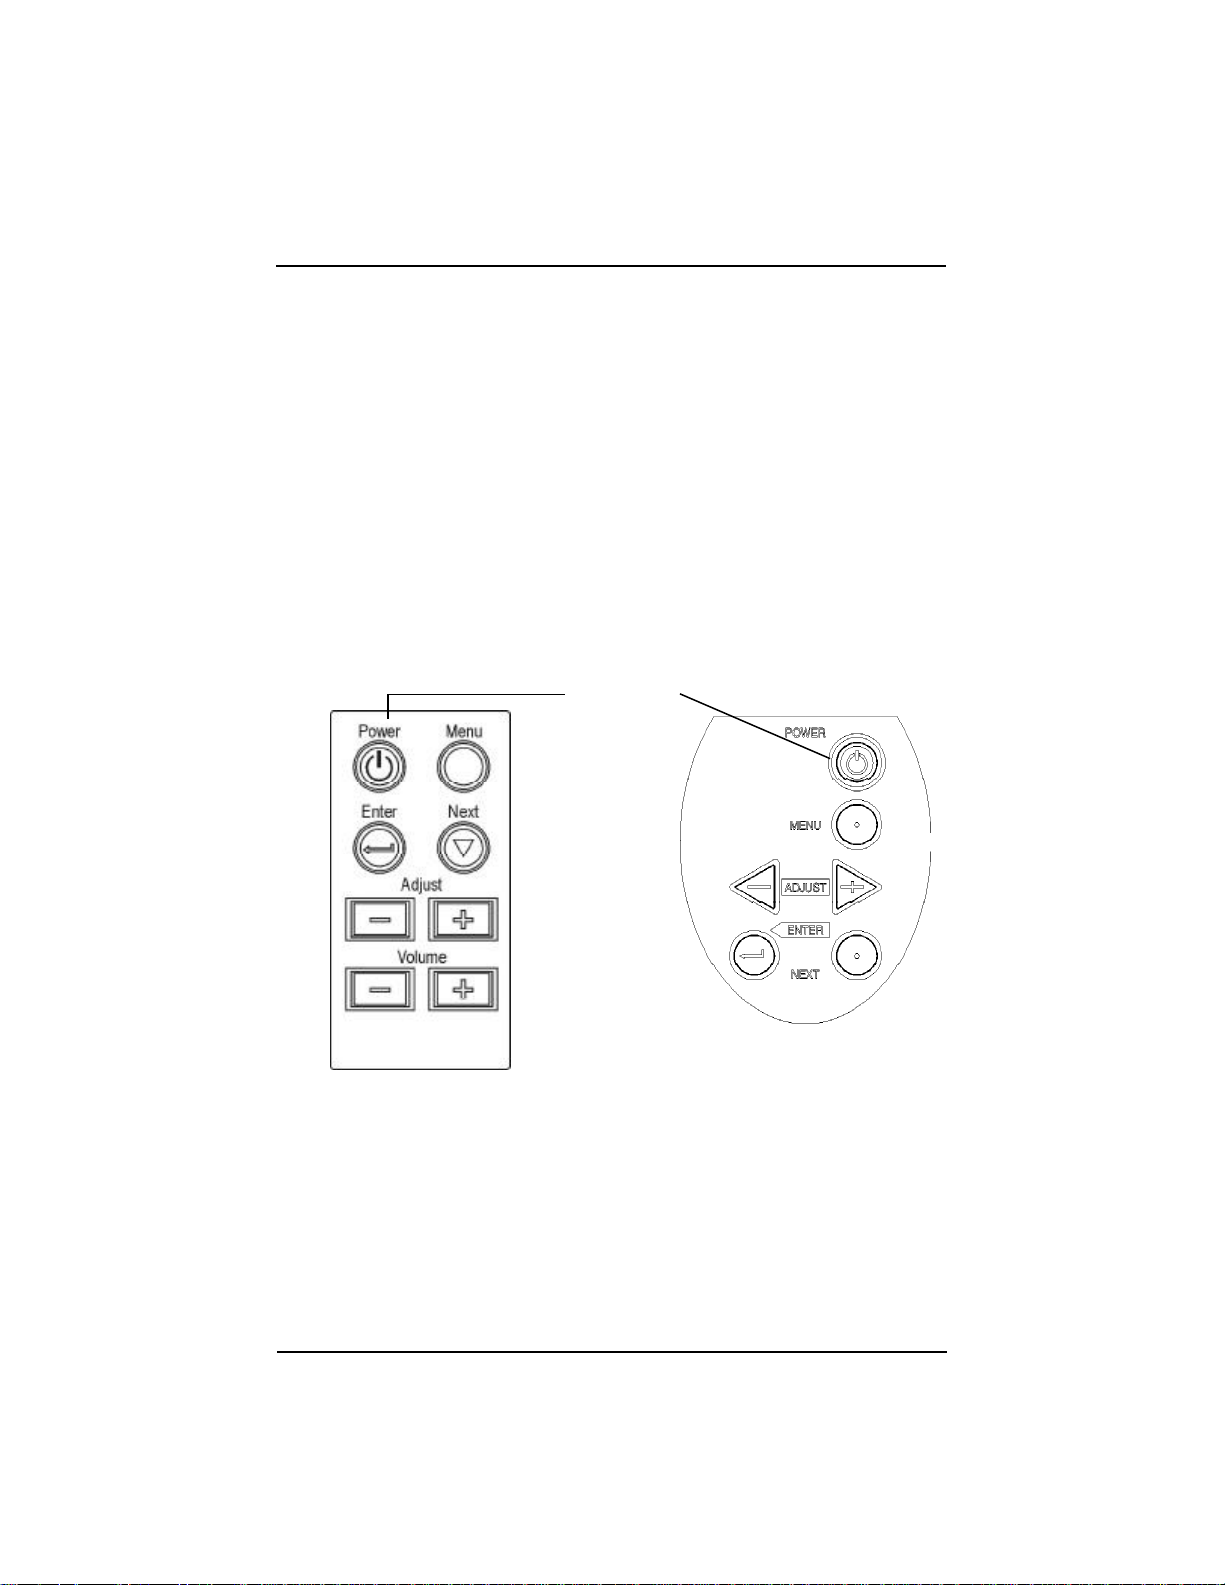
Power - turns the projector on and off
Menu - display the menus
on the projected image
Enter - selects an option
button
Next - hightlights the next
feature in the menu
Adjust - navigates
between tabs; moves a
highlighted slider bar left
or right; and moves
between options for
features like Source and Projection
Volume - increase or decreases volume
Remote Control
Key pad
Press and hold the buttons to make repeated moves and adjustments.
9
Page 11

LCD Projector User Guide
Positioning the Projector
The projector should be at least 2.5 feet (.9 m) from the screen but no more
than 32 feet (10 m) away from the screen.
Fixed lens model - screen sizes are:
Distance Width x Height Diagonal
3' (.9 m) 18 x 13" (.5 x .3 m) 22.5" (.6 m)
5' (1.5 m) 31 x 23" (.8 x .6 m) 38.5" (1.0 m)
6.5' (2.0 m) 40 x 30" (1.0 x .8 m) 50" (1.3 m)
8' (2.4 m) 48 x 36" (1.21 x .9 m) 60" (1.5 m)
9' (2.8 m) 56 x 42" (1.4 x 1.1 m) 70" (1.8 m)
10.5' (3.2 m) 64 x 48" (1.6 x 1.21m) 80" (2.0 m)
12' (3.6 m) 72 x 54" (1.8 x 1.4 m) 90" (2.3 m)
13' (4.0 m) 80 x 60" (2.0 x 1.5m) 100" (2.5 m)
14.5' (4.4 m) 88 x 66" (2.2 x 1.7 m) 110" (2.8 m)
16' (4.8 m) 96 x 72" (2.4 x 1.8m) 120" (3.0 m)
17' (5.2 m) 104 x 78" (2.6 x 2.0 m) 130" (3.3 m)
18' (5.6 m) 112 x 84" (2.8 x 2.1m) 140" (3.6 m)
20' (6.0 m) 120 x 90" (3.0 x 2.3 m) 150" (3.8 m)
33' (10 m) 200 x 150" (5 x 3.8 m) 250" (6.4 m)
Zoom lens model - screen sizes are:
Distance Width x Height Diagonal
3' (.9 m) 13~17" x 10~13" (.33~.43 x .25~.33 m) 16~21" (.4~.5 m)
5' (1.5 m) 22~28"x 16~19" (.55~.71 x .41~.48 m) 27~35" (.7~.9 m)
6.5' (2.0 m) 29~38"x 22~28" (.74~.97 x .56~.71 m) 36~47" (.9~1.2 m)
8' (2.4 m) 34~46"x 26~32" (.86~1.2 x .66~.81 m) 43~57" (1.1~1.5 m)
9' (2.8 m) 41~54"x 31~40" (1.0~1.4 x .79~1.0 m) 51~67" (1.3~1.7 m)
10.5' (3.2 m) 46~61"x 35~46" (1.2~1.5 x .89~1.2 m) 58~76" (1.5~ 1.9m)
12' (3.6 m) 53~69"x 40~52" (1.3~1.8 x 1.0~1.3 m) 66~86" (1.7~2.2 m)
13' (4.0 m) 58~76" x 44~57" (1.5~1.9 x 1.1~ 1.4m) 73~95" (1.9~2.4 m)
14.5' (4.4 m) 64~84" x 48~62" (1.6~2.1 x 1.2~1.6 m) 80~105" (2.0~2.7 m)
16' (4.8 m) 70~91" x 53~69" (1.8~2.3 x 1.4~1.8 m) 88~115" (2.2~3.0 m)
17' (5.2 m) 74~99" x 57~74" (1.8~2.5 x 1.4~1.9m) 95~124" (2.4~3.1 m)
18' (5.6 m) 82~107" x 88~114" (2.0~ 2.7 x 2.2~2.9 m) 103"~134" (2.6~3.4 m)
20' (6.0 m) 88~114" x 66 ~86" (2.2~2.9 x 1.7~2.1m) 110~143" (2.8~3.6 m)
33' (10 m) 147~192" x 110~144" (3.7~4.9 x 2.8~3.7 m) 184~240" (4.7~6.1 m)
10
Page 12
Using Image Manager
Using Image Manager
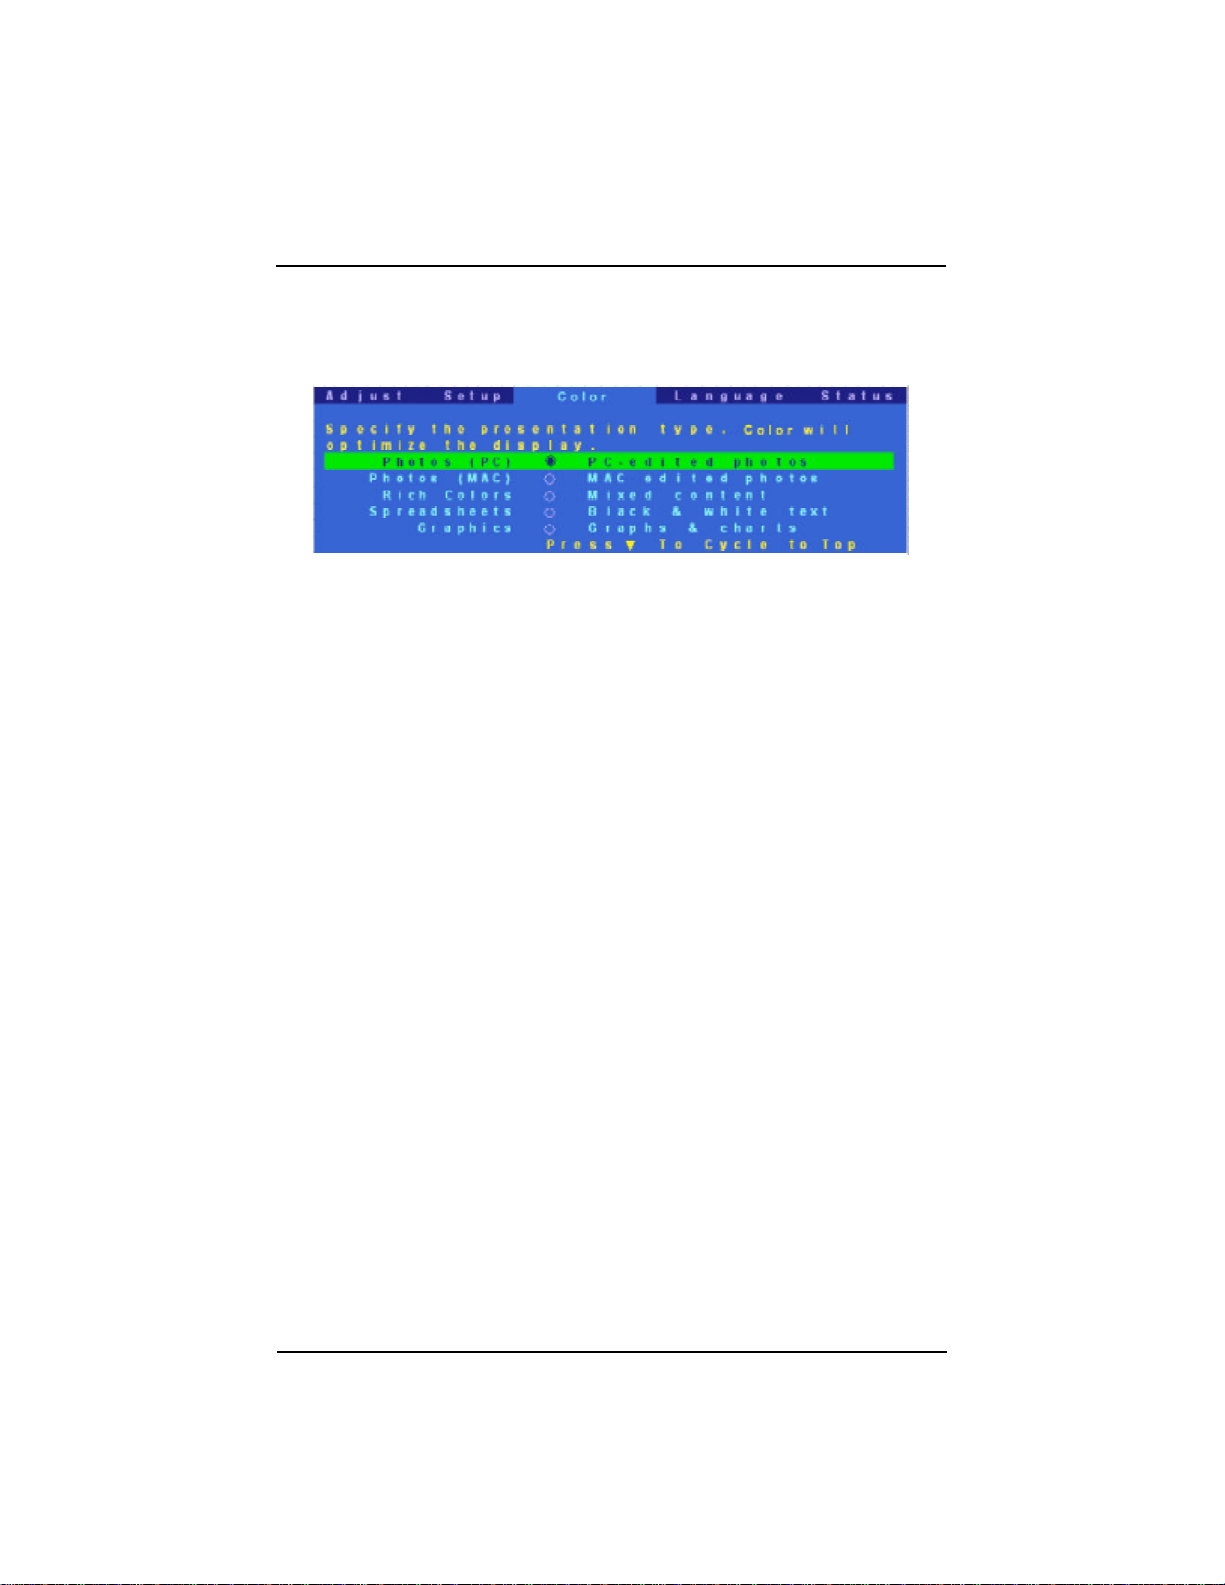
With one click, Image Manager lets you choose the best image settings for
your presentation type.
Important:The Image Manager settings work best if you select Reset from the
Adjust tab each time before selecting an Image Manager setting.
1. Press Menu and use the Adjust + - buttons to move to the tab.
2. Press Next to move to the appropriate Image Manager feature.
3. Press Enter to select that feature.
4. Press Menu to dismiss the menu or wait for the menu to close
(about 15 seconds).
Photos (PC) matches the higher contrast found on a standard PC monitor.
This feature is best for:
• images created on a PC
• images from a digital camera
• a starting point for video input.
Photos (MAC) matches the lower contrast found on a standard MACINTOSH
monitor. It is generally used for images created on or for a MACINTOSH. This
setting also works well with a PC if you are using higher than normal contrast
PC images.
Rich Colors results in an image with deep contrast and saturated vibrant
colors. It is generally used under bright lighting conditions. This setting works
well to enhance colors of certain graphics and it may be useful when images
created for a MACINTOSH are displayed from a PC.
Spreadsheets results in an image with contrast between a PC and
MACINTOSH monitor. It is generally used for text-rich tables, such as financial
displays. This setting factors in ambient light, subject matter, and personal
preferences to deliver the right balance of contrast and brightness.
Graphics delivers the high contrast needed to project graphics and text
against solid colored backgrounds.
11
Page 13
LCD Projector User Guide
Adjusting the Display and Volume
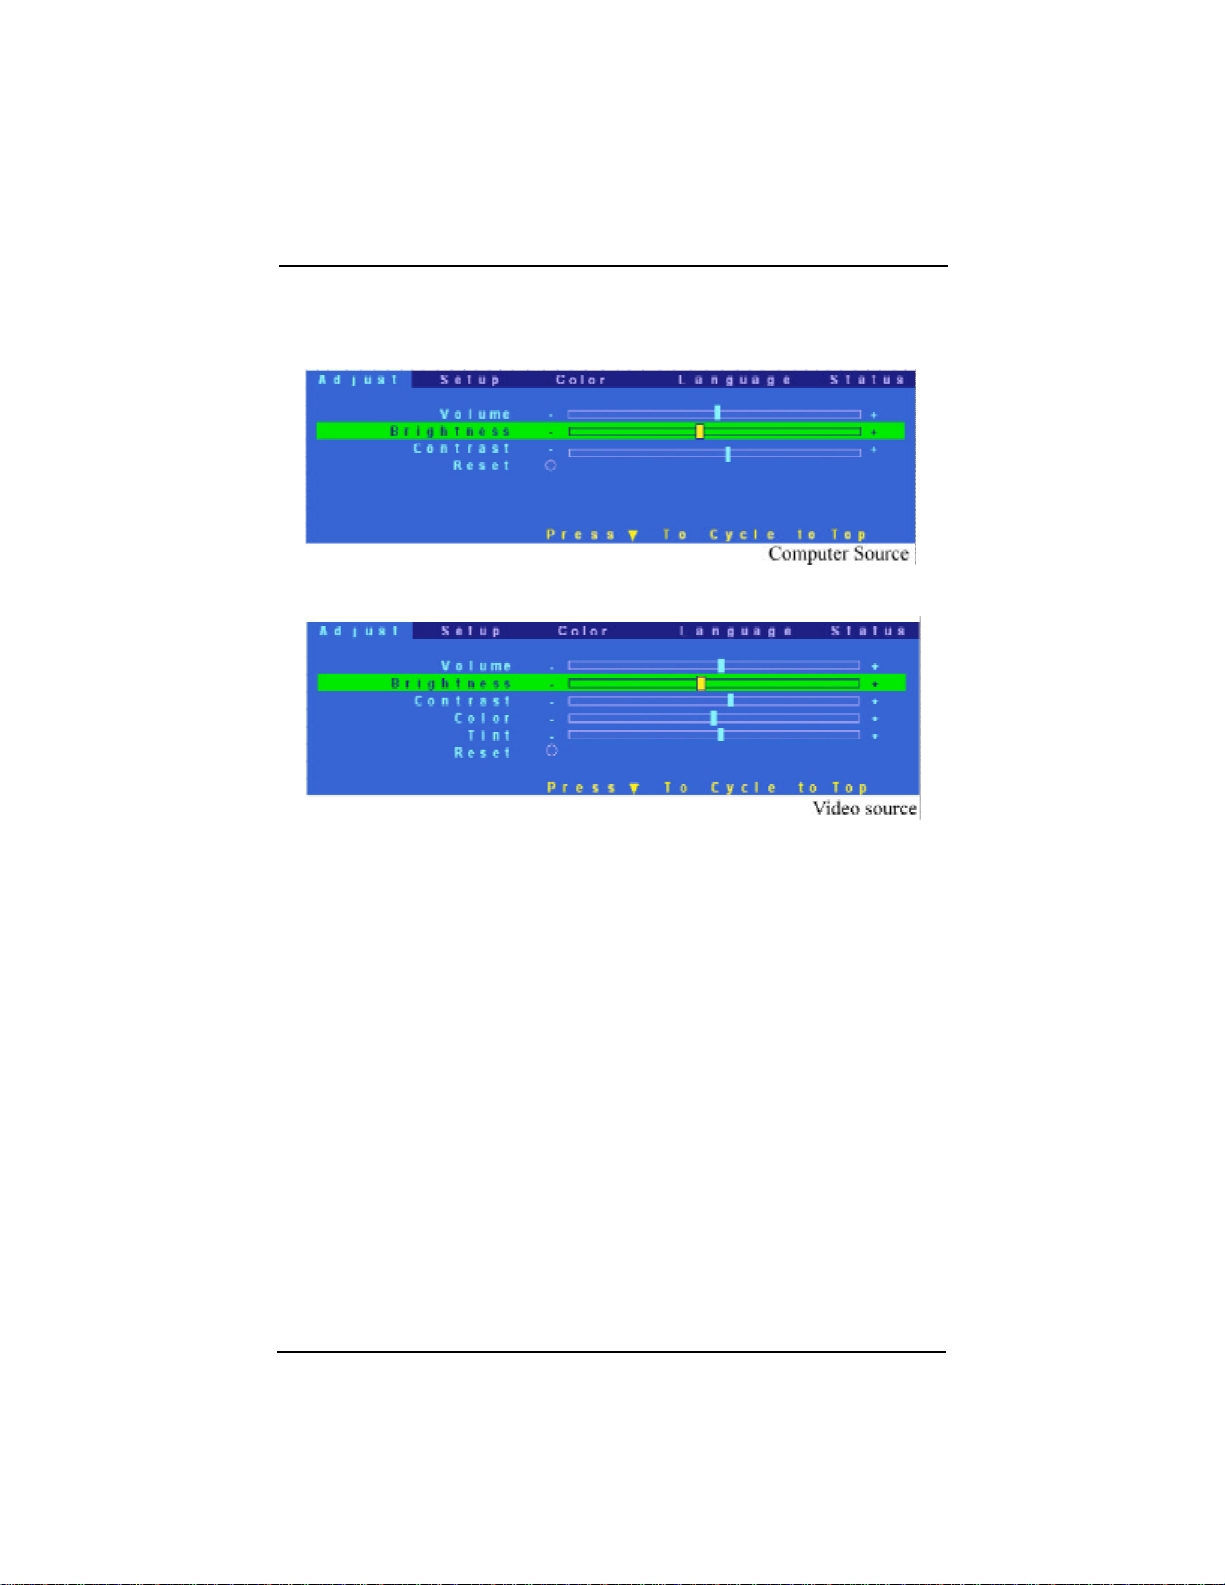
The features available on the Adjust tab depend on your image source.
12
Note: We recommend using the Image Manager to optimize the display.
Then, if further adjustments are needed, use the brightness and contrast
settings on the Adjust tab.
1. Press Menu and use the Adjust + - buttons to move to the Adjust tab.
2. Use the Next button to move to the feature that you want to adjust.
3. Use the Adjust + - buttons to move the slider bars. If you wish to return to
the factory default settings, use Next to highlight Reset and press Enter.
Note: The volume can also be adjusted from the remote control.
Brightness controls the intensity of the image.
Contrast controls the degree of difference between the lightest and darkest
parts of the image.
Color controls the saturation of the colors.
Tint controls the red-green color balance.
Page 14
Setting Up the Image Source
Setting Up the Image Source
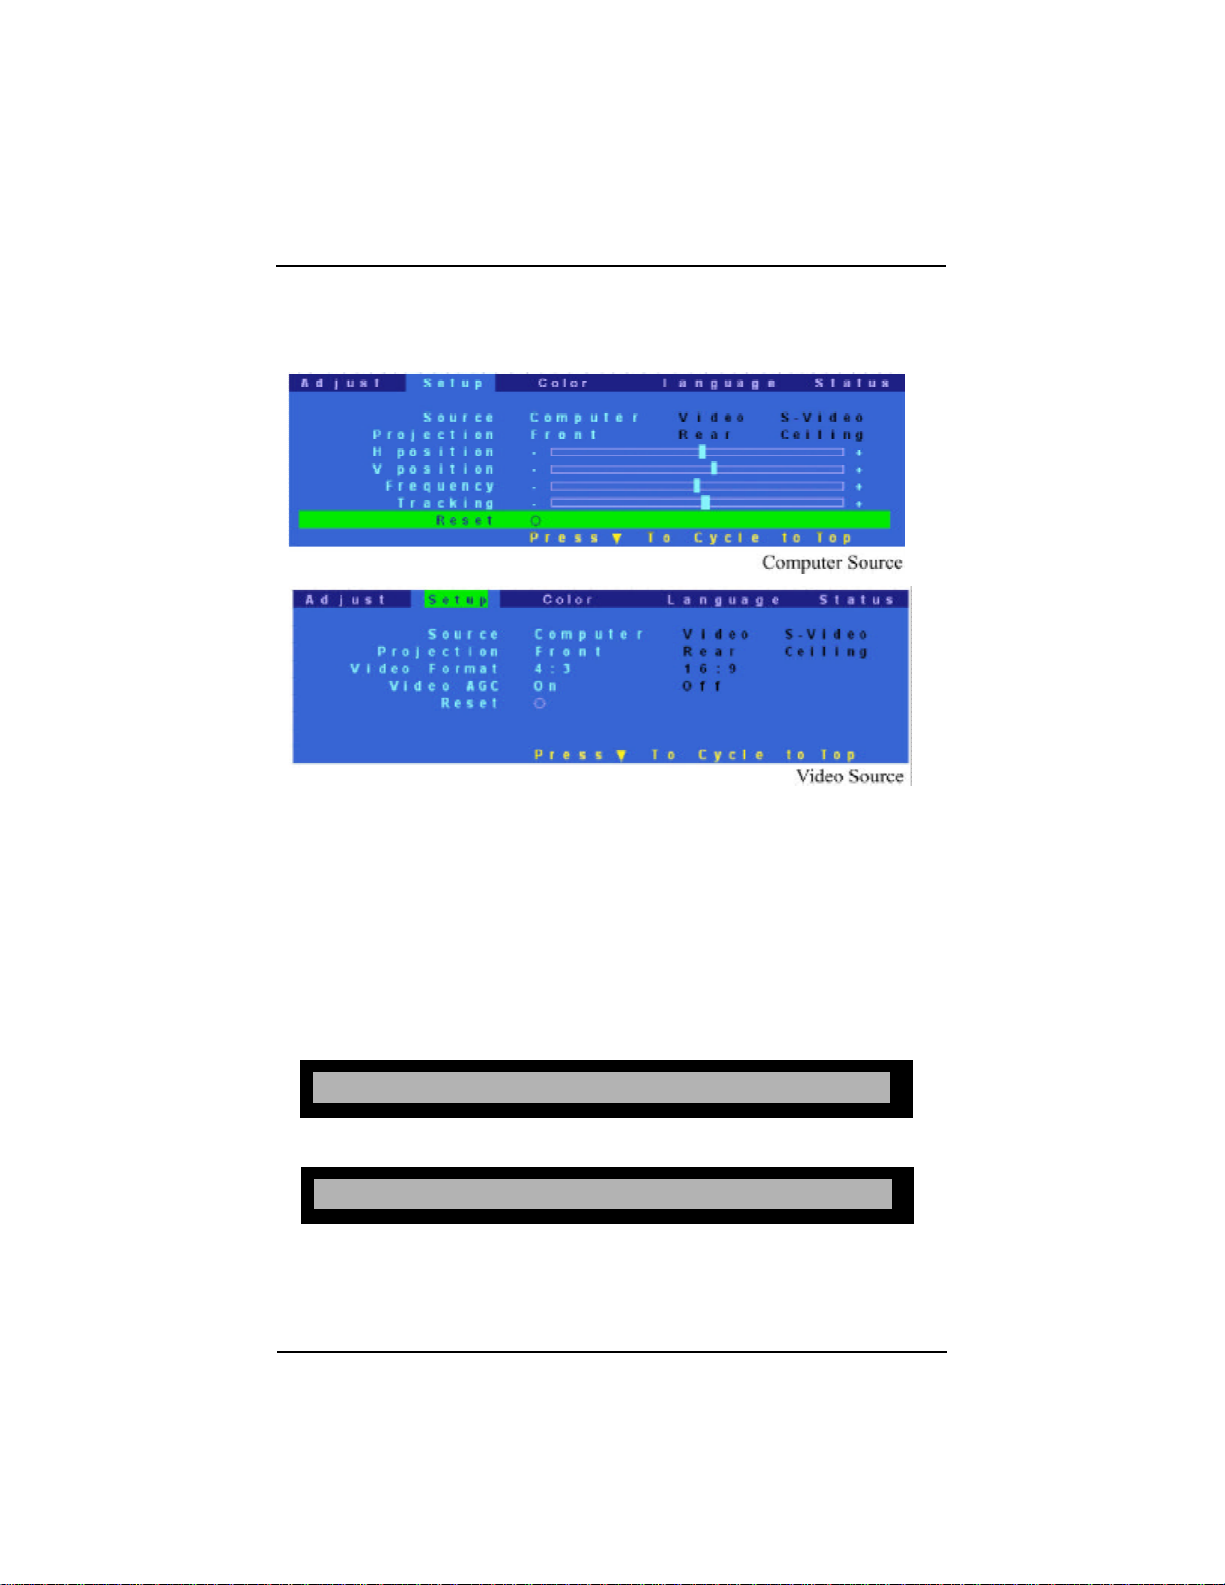
The features that are available on the Setup tab depend on the type of image
source that you are using.
1. Press Menu and use the Adjust + - buttons to go to the Setup tab.
2. Use the Next button to select a feature.
3. Use the Adjust + - buttons to select an option for the selected feature.
If you wish to return to the factory default settings, use Next to highlight
Reset and press Enter.
Source options are computer, video and S-video. When you change sources, a
source status message appears indicating if the projector is receiving a signal
from that source.
Signal is received:
C o m p u t e r
No signal:
C o m p u t e r - N o I n p u t
13
Page 15
LCD Projector User Guide
Projection options are front, rear and ceiling.
• Front projection is used for projecting straight ahead onto a screen.
• Rear projection reverses the image if you wish to project from behind the
screen.
• Use ceiling projection when you attach the projector to a permanent ceiling
bracket.
H Position and V Position adjustments are available only for images from a
computer.
Adjust Frequency and Tracking of images from a computer until the image is
evenly spaced, fuzzy vertical lines disappear, or the projected image is as wide
as the menu.
Video Format refers to the height and width ratio of the projected image. The
4:3 ratio is the standard format. Use the 16:9 ratio when projecting wide screen
(anamorph) movies in 16:9 format.
We recommend leaving AGC (Automatic Gain Control) turned on. When it is
turned on, the image is automatically adjusted if the video signal is too strong
or too weak.
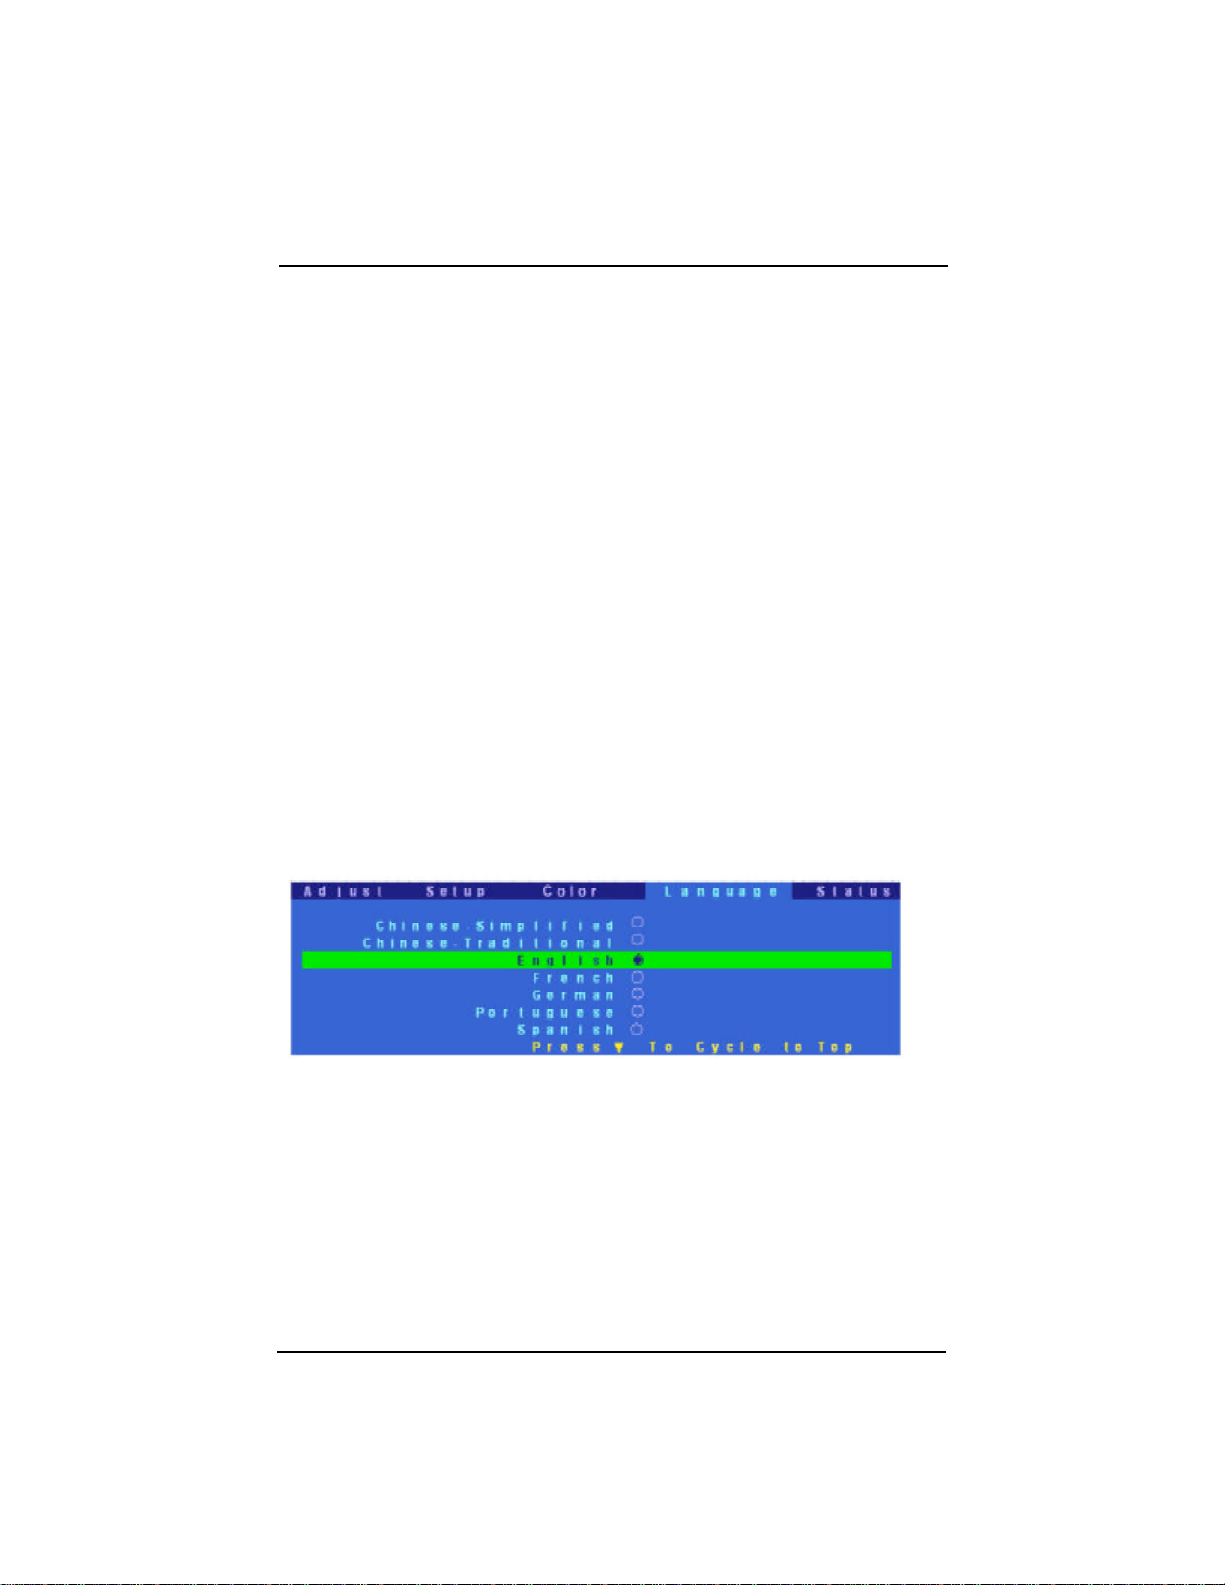
Selecting a Language
The on-screen menus can be displayed in seven languages.
14
1. Press Menu and use the Adjust + - buttons to go to the Language tab.
2. Press Next to highlight the desired language.
3. Press Enter to select the language.
Page 16
Checking the Status
Checking the Status
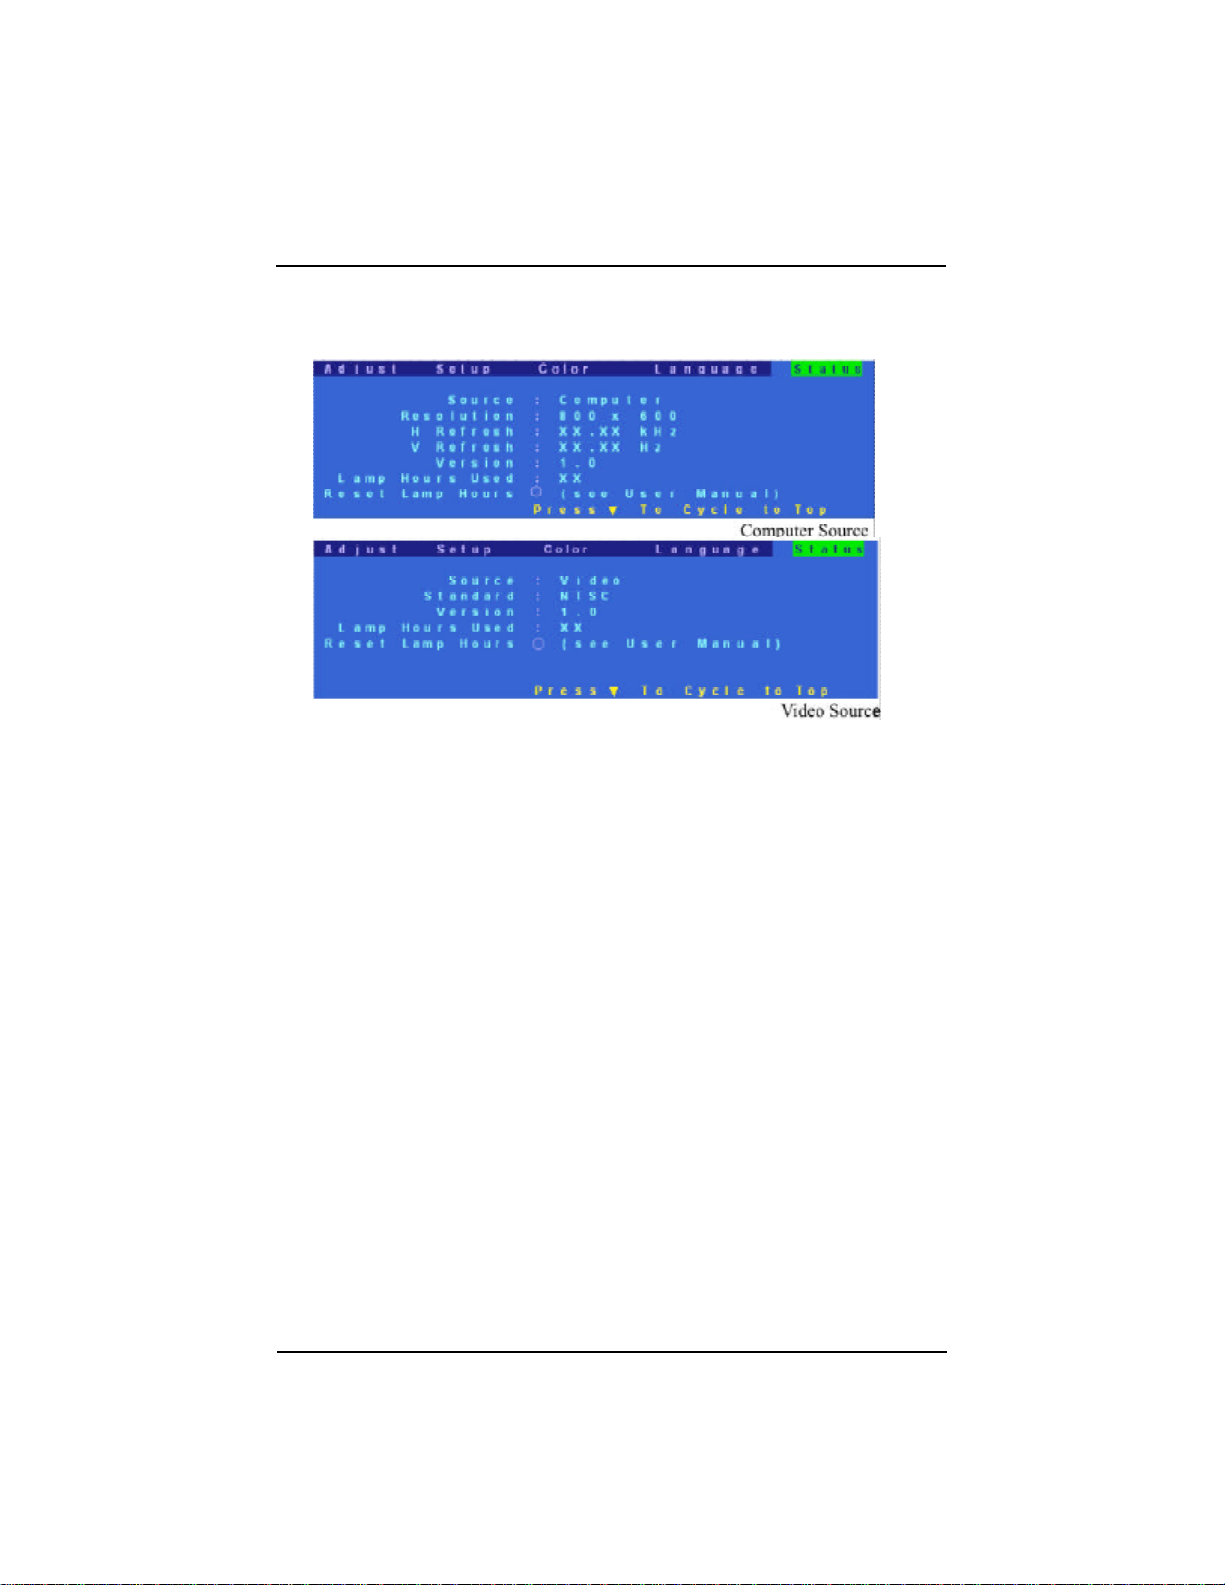
The information displayed on the Status tab depends on the type of image
source you use.
The Reset Lamp Hours feature is the only item that can be adjusted on this
screen. Refer to the Lamp Hours Used when you want to know how much
longer your lamp will last. Estimated lamp life expectancy is 2,000 to 4,000
hours.
Important:Only reset the lamp hours after you have installed a new lamp.
To reset lamp hours
1. Press Menu and use the Adjust + - buttons to go to the Status tab.
2. Press Next to highlight Reset Lamp Hours.
3. Press Enter.
The Lamp Hours Used number resets to zero.
Turning Off the Projector
Turn off the projector and image sources in the order listed here.
Note: You might not be using all of these components for your presentation.
• Computer
• Projector
• Audio source if different from your video source or computer
• Video source such as VCR, DVD or digital camera.
To turn off the projector:
1. Press the Power button on the keypad or remote control.
A confirmation screen appears.
2. Press the Power button again to confirm.
The lamp turns off immediately but the fan continues to run until the
projector cools down. The Power light continues to blink after the projector
has cooled and as long as the live power cord is connected to the projector.
15
Page 17
LCD Projector User Guide
Transporting the Projector
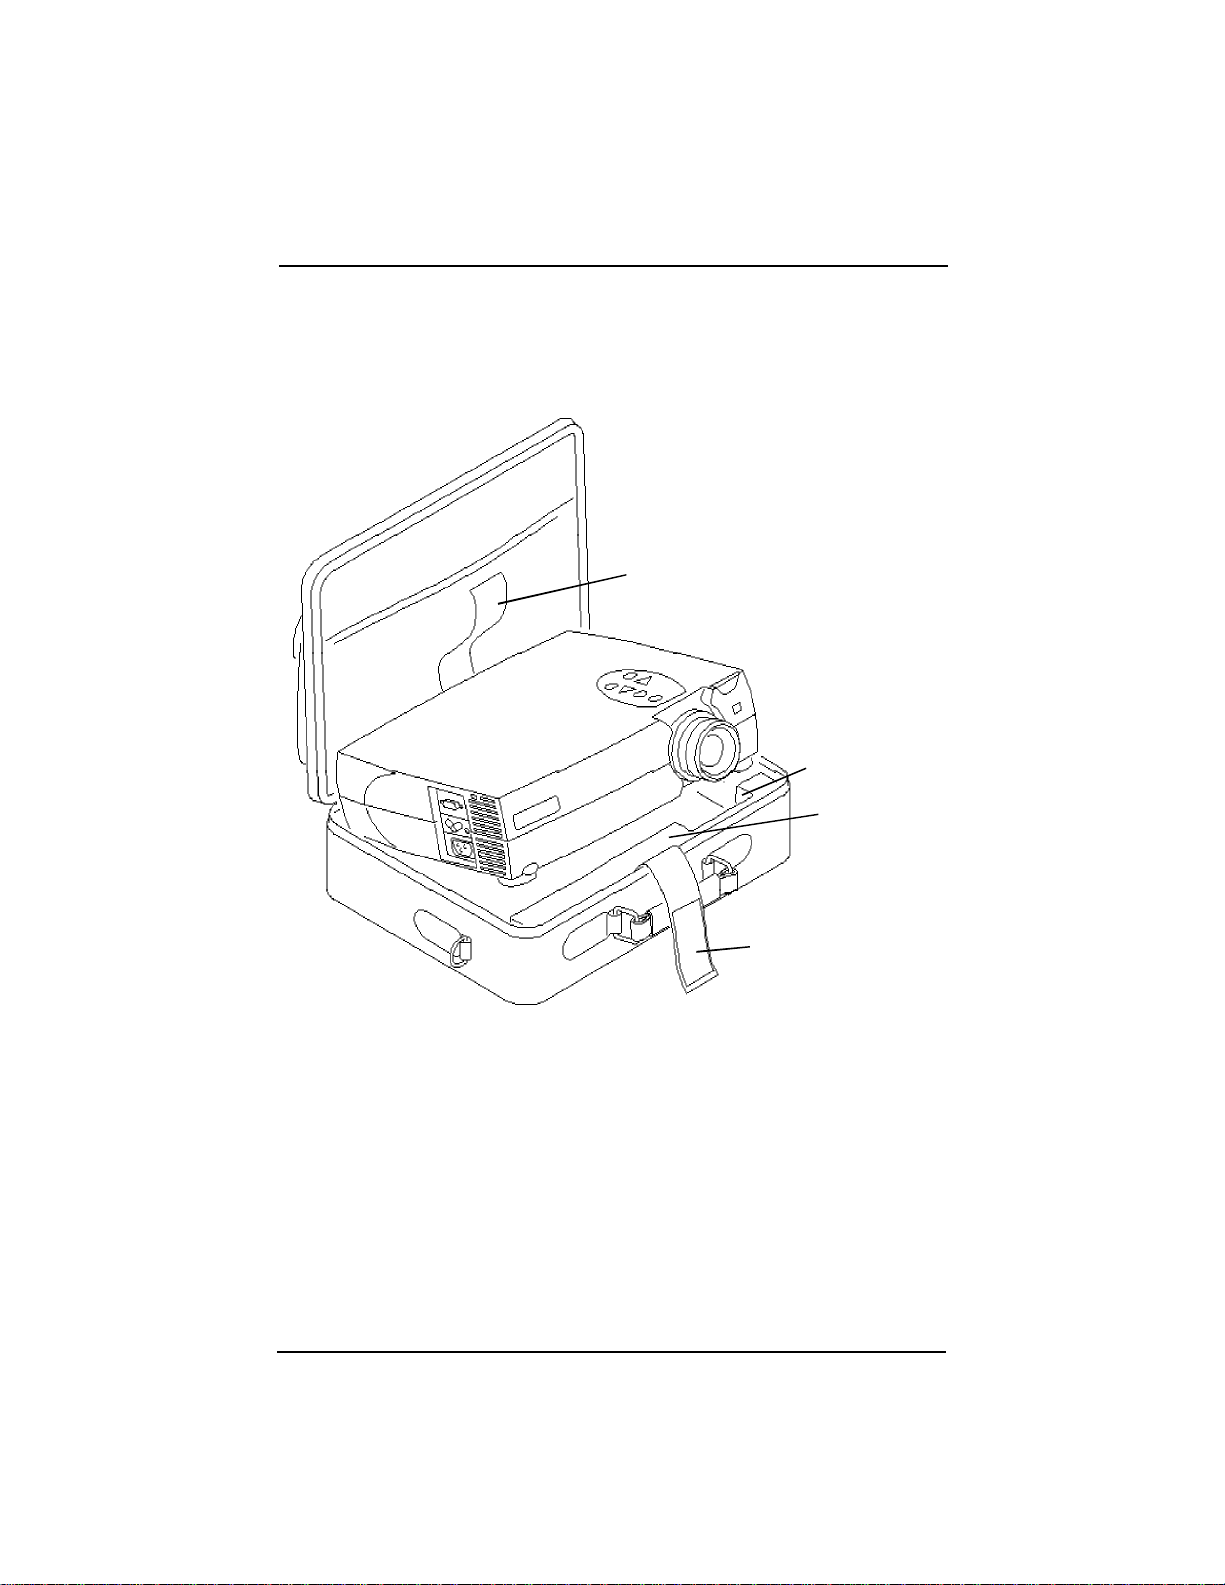
When you place the projector in the carrying case make sure the lens is
positioned inside the lens notch of the foam insert. Secure the projector with
the velcro strap.
Velcro Strap
Lens Notch
Foam Insert
16
Velcro Strap
Important:The carrying case provided with the projector is not designed to be
checked through baggage. If you can not hand carry this projector make sure
it is packed properly to prevent damage. The warranty does not cover damage
from improper handling.
Page 18
Maintenance
Maintenance
Changing the Lamp Module
Important:The lamp in the LCD Digital Projector contains trace amounts of
mercury. Some governments require special disposal of lamps containing
mercury. Dispose of lamps in accordance with the law and any applicable local
regulations.
The lamp module should be replaced with a certified replacement part. To
order a new lamp, contact your local dealer.
After you have changed the lamp module, make sure that you reset the lamp
counter. See “To reset lamp hours” on page 15.
Warning: When replacing the lamp, be sure to turn off the power and unplug
the power cord. To avoid burns, wait 30 minutes before opening the lamp
module door.
Warning: When you open the lamp module door, be careful to not touch the
hot surfaces inside.
Warning: Do not loosen or remove any screws other than those on the lamp
module door and the lamp module. Doing so may result in electric shock.
To replace the lamp module:
1. Turn off the projector and let the projector cool for at least 30 minutes.
The fan continues to run after the projector has been turned off.
2. Unplug the power cord from the projector.
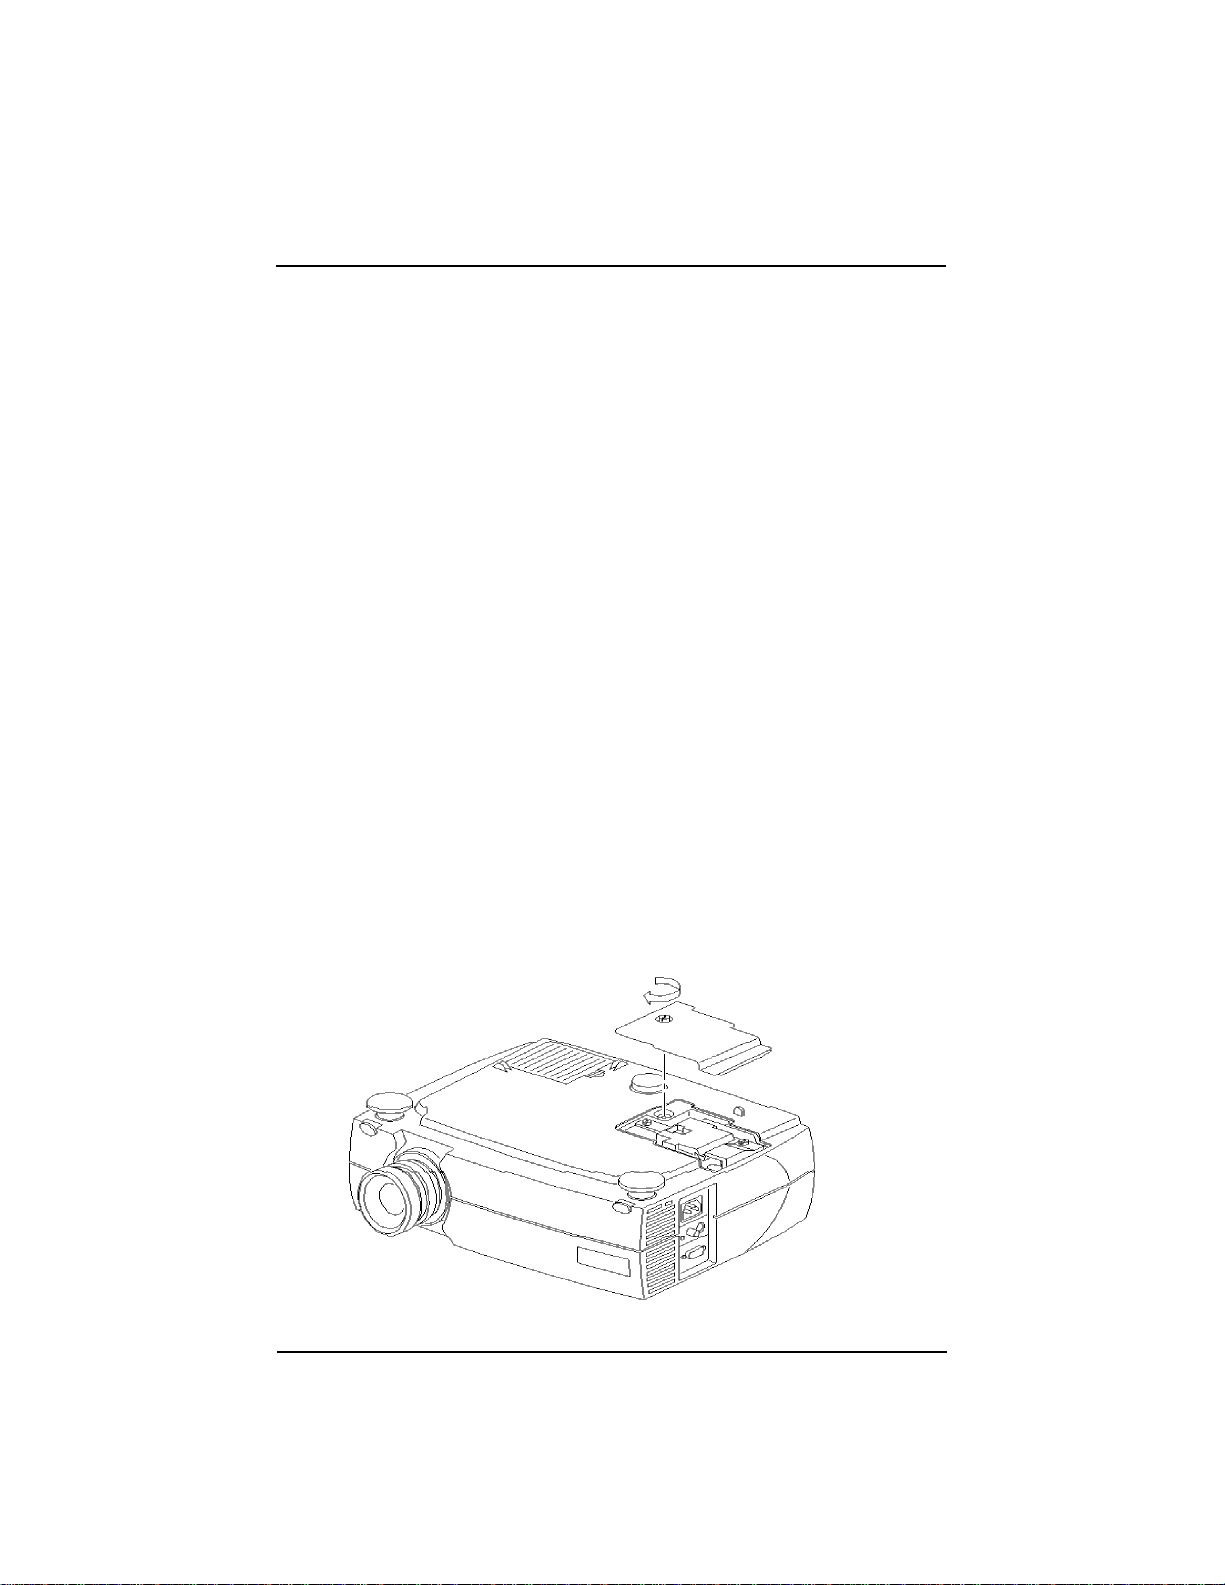
3. Turn the projector upside down. With a flat head screw driver, loosen but do
not remove the slotted screw in the lamp module door.
4. Lift up on the screw side of the lamp module door. Then carefully remove
the lamp module cover.
17
Page 19
LCD Projector User Guide
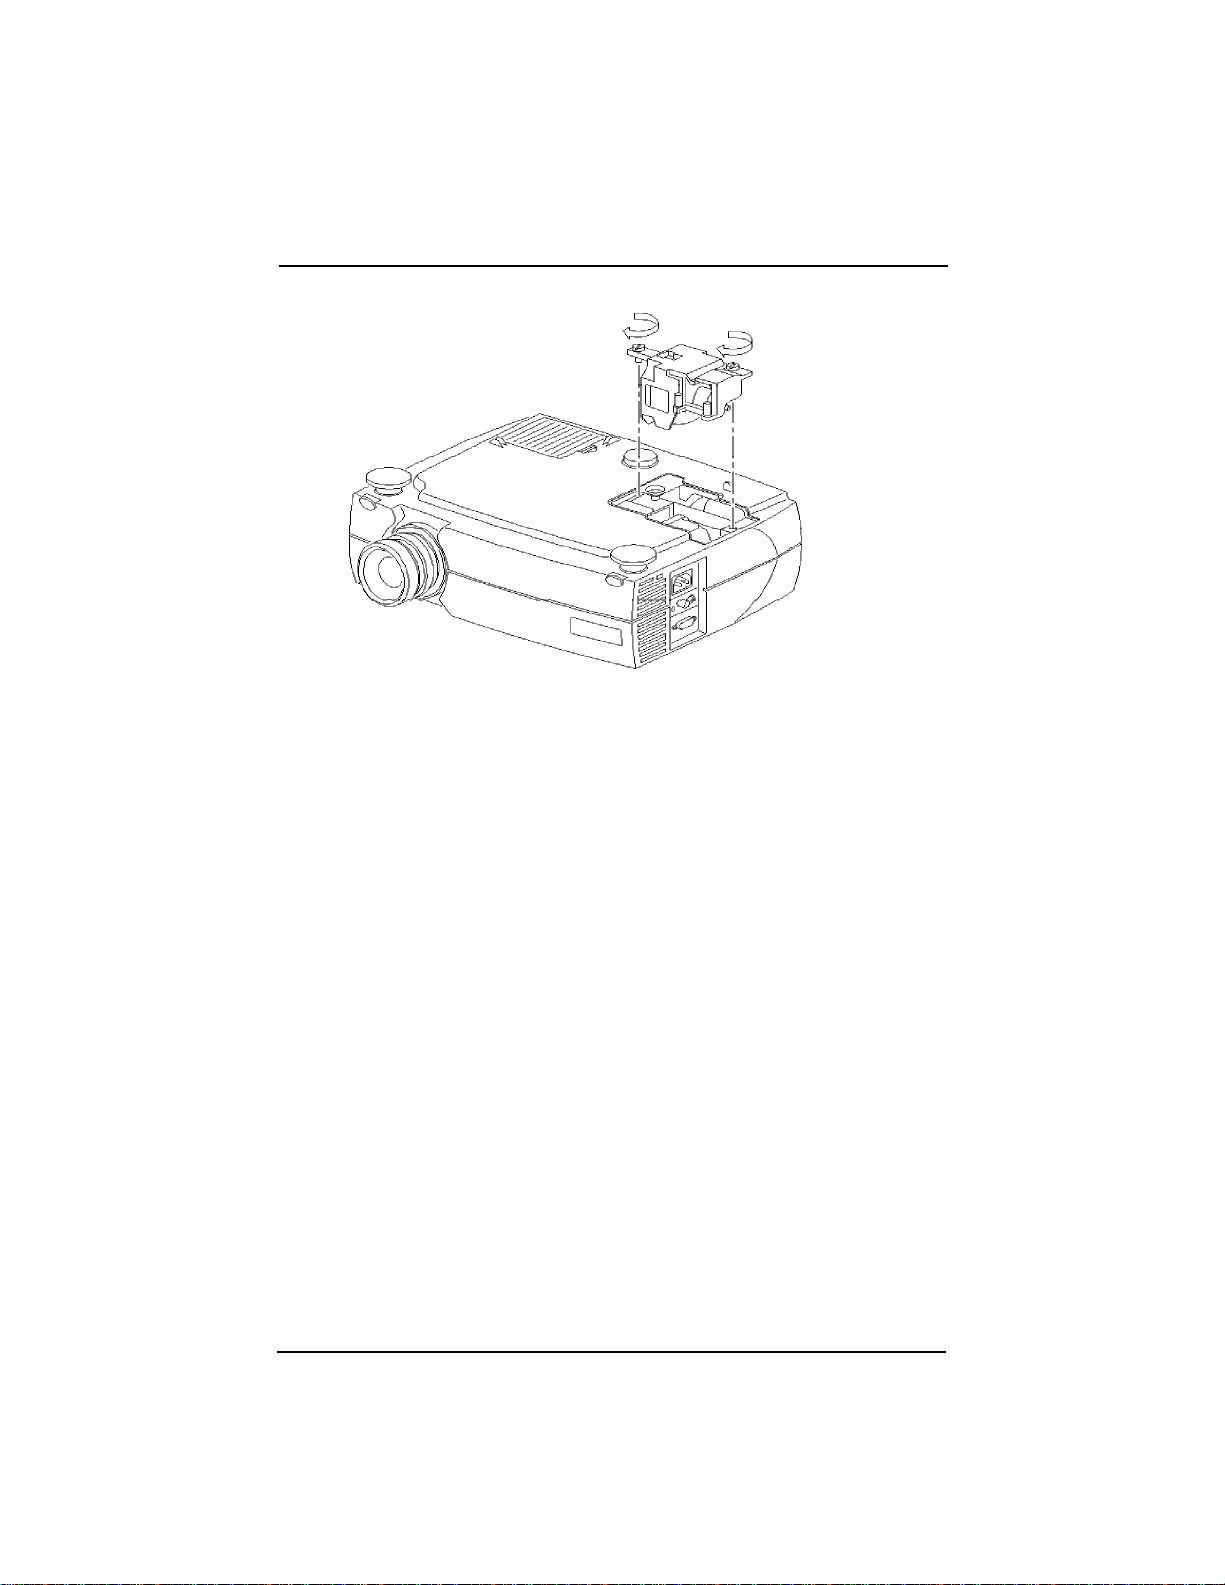
5. Loosen the two slotted screws on the lamp module bracket.
6. Gently lift and pull up on the metal wire to remove the lamp module.
Caution: Do not touch the glass portion of the new lamp module with
your hands or allow it to touch other objects as this may damage it and
shorten its operational life.
Caution: Do not drop the lamp module as the glass may shatter and
cause injury.
7. Carefully place the new lamp module into the projector, with the glass
portion facing left. Make sure that it is inserted securely and that the two
location holes match the two location pins of the inner engine case. Tighten
the slotted screws.
8. Replace the lamp module door and tighten the screw.
9. Reset the lamp usage counter. See “To reset lamp hours” on page 15.
Important:The only time that you should reset the counter is after you have
replaced the lamp module.
18
Cleaning the Projection Lens
1. Turn off the projector and allow it to cool.
2. Remove the lens cap.
3. Apply a non-abrasive camera lens cleaner to a soft, dry cloth.
Caution: Avoid using an excessive amount of camera lens cleaner. Do
not use abrasive cleaners, solvents or other harsh chemicals as they
might scratch the lens. Do not spill any camera lens cleaner on the
exterior case as it may fade, deform or melt the exterior case.
4. Lightly wipe the cleaning cloth over the lens.
5. If you do not intend to use the projector immediately, replace the lens cap.
Page 20

Cleaning the Exterior Case
Cleaning the Exterior Case
1. Turn off the projector and allow it to cool.
2. To remove dirt or dust, gently wipe the exterior case with a soft, dry, lint-free
cloth.
3. To remove stubborn dirt or stains, moisten a soft cloth with water and a
neutral detergent and gently wipe the exterior case.
Caution: Do not use alcohol, benzene, thinner or other chemical cleaners
which may fade, deform or melt the exterior case. Do not apply the
detergent solution to the projector lens as it may scratch the lens.
Cleaning the Air Filter
To ensure proper ventilation inside your multimedia projector, the air filter
should be periodically cleaned. More frequent cleaning may be required if you
use your projector in a dusty or dirty environment.
Caution: If the air filter is not cleaned periodically, it can become
clogged with dust and prevent proper ventilation. This may cause
overheating and damage.
Important:If the filter cannot be cleaned or becomes damaged or torn, it
should be promptly replaced with an certified replacement part. Contact your
dealer of products for additional information.
1. Turn off the projector and wait for the fan to stop running.
2. Unplug the projector.
3. Turn the projector on its side so that the connection panel is facing
upwards.
Note: Standing the projector on its side keeps dust from getting inside.
4. Locate the air filter cover on the bottom of the projector and slide the cover
latch downward to remove the cover.
The air filter is attached to the inside of the air filter cover.
5. Use a softbrush to clean the air filter being careful not to tear the filter or
loosen it.
Caution: Installing a wet or damp air filter may damage your projector.
6. Replace the air filter cover on the projector. Make sure that it clicks into
place.
Caution: Never replace the air filter cover without the air filter attached;
this allows dust to get inside. Never operate your projector without the
air filter cover in place.
Doing so may damage your projector.
19
Page 21

LCD Projector User Guide
Troubleshooting
Power Indicator
The power indicator on the keypad provides you with information about the
condition of the projector.
Light Status Condition
Blinking
Lamp is off but live power cord is connected to
the projector.
Projector is in standby mode.
OR
Lamp is off and fan is running.
Projector is cooling down.
Steady
Two blinks
Three blinks
Four blinks
Five blinks
Six blinks
Lamp is on and fan is running.
Projector is ready.
Scaling chip is malfunctioning.
RAM is malfunctioning.
I2C bus is malfunctioning.
Lamp is malfunctioning.
Fan is malfunctioning.
20
Page 22
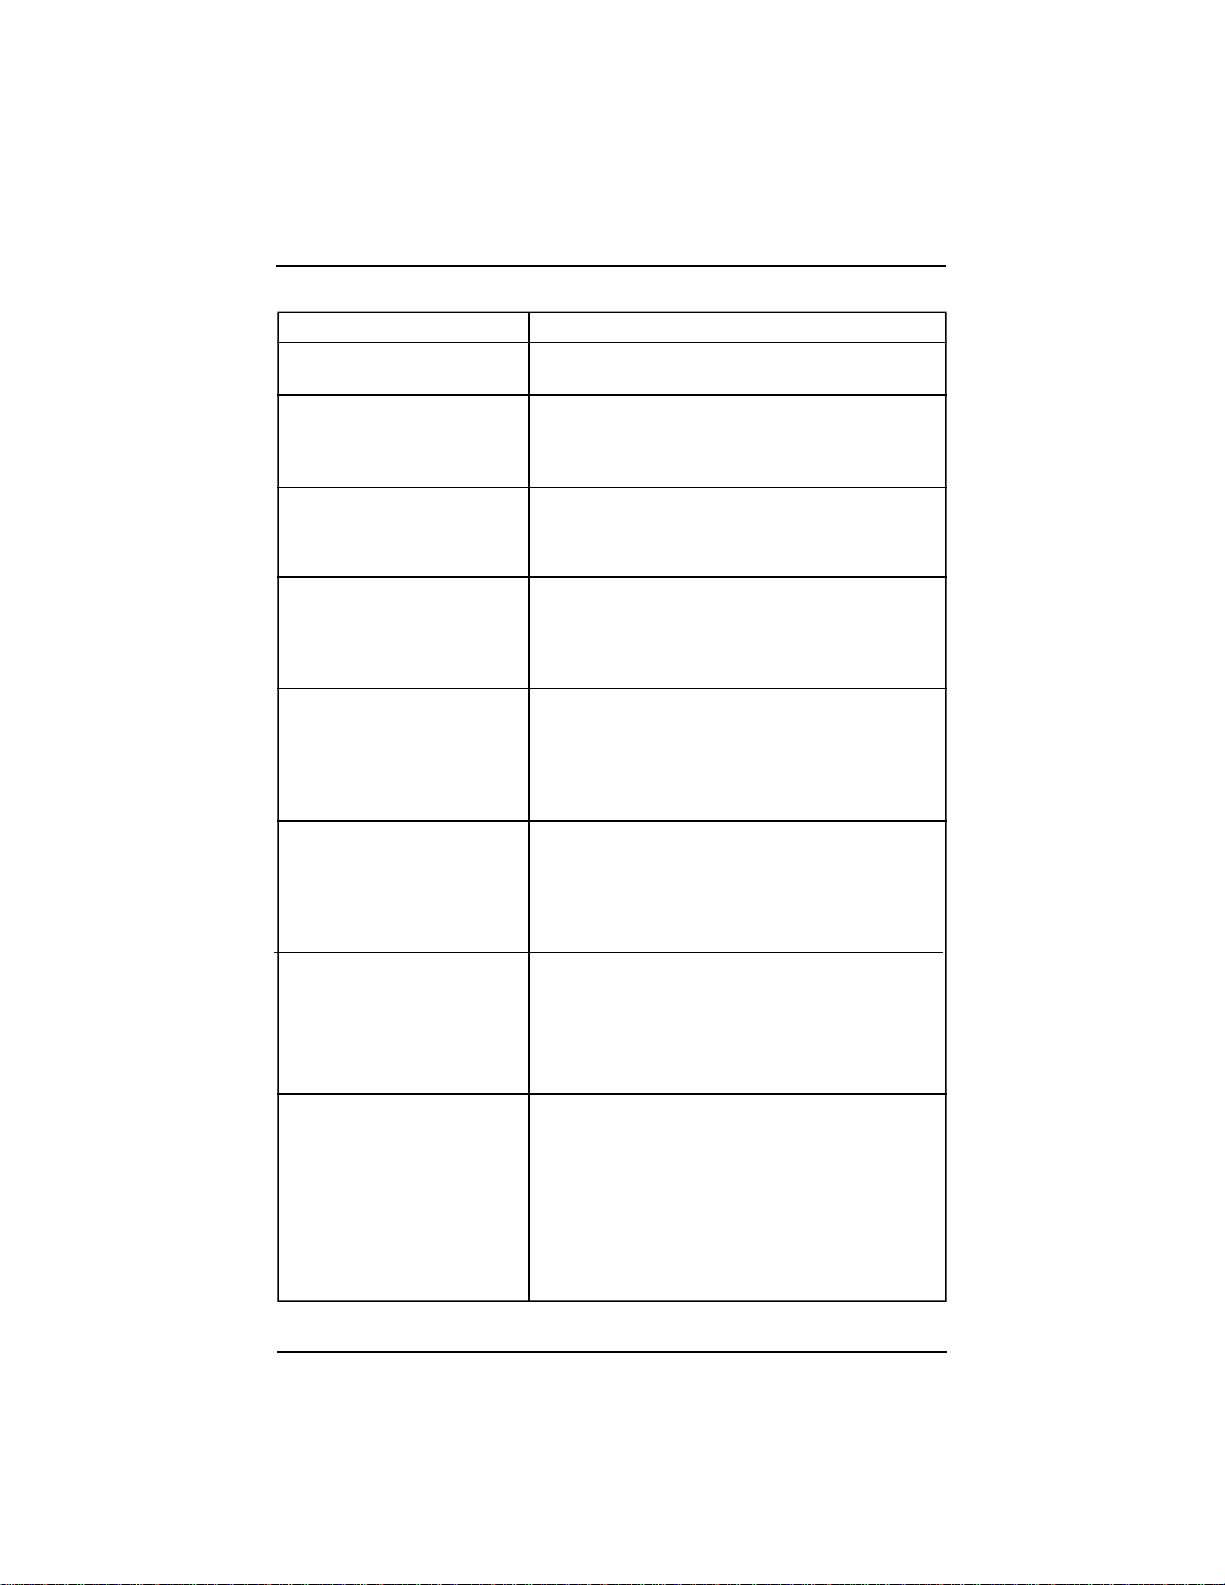
Image Quality
Problem
Color or text is not being
projected.
Some text or fonts are not
sharp with a computer as
an image source.
Image isn’ t centered on the
screen.
Image is out of focus.
Image and menus are
upside down.
Image and menus are
reversed from left to right.
Image appears flat with no
contrast
Image appears washed out
or dark
Troubleshooting
Solution
Adjust the brightness up or down until the text is
visible.
For optimal results, set the computer’ s resolution to 800 x 600. (Refer to your computer user
manual.) But this projector can compress
resolutions up to 1024 x 768.
• Be sure that the projector is at a 90° angle to
the screen.
• Reposition the image. See “Setting Up the
Image Source” on page 13.
• Turn the projection lens to focus the image.
• Make sure that the projection screen is at least
3 ft (.9 m) from the projector.
• Check the projection lens to see if it needs
cleaning.
• If projecting from a ceiling mount, make sure
that Ceiling Projection is selected on the Setup
tab in the Menu.
• If projecting from an upright position, make
sure that Front or Rear projection is selected on
the Setup tab in the Menu.
• If projecting from behind a screen make sure
that Rear Projection is selected on the Setup tab
in the Menu.
• If projecting in front of a screen, make sure that
Front or Ceiling Projection is selected on the
Setup tab in the Menu.
To adjust the contrast:
1.Press Menu and use the Adjust + -buttons to
go to the Adjust tab.
2.Use the Next button to highlight Contrast.
3.Use the Adjust + - buttons to increase or
decrease the contrast.
• Check the projection lens to see if it needs
cleaning.
• To adjust the brightness:
1.Press Menu and use the Adjust + - buttons
to go to the Adjust tab.
2.Use the Next button to highlight Brightness.
3.Use the Adjust + - buttons to increase or
decrease the brightness.
21
Page 23
LCD Projector User Guide
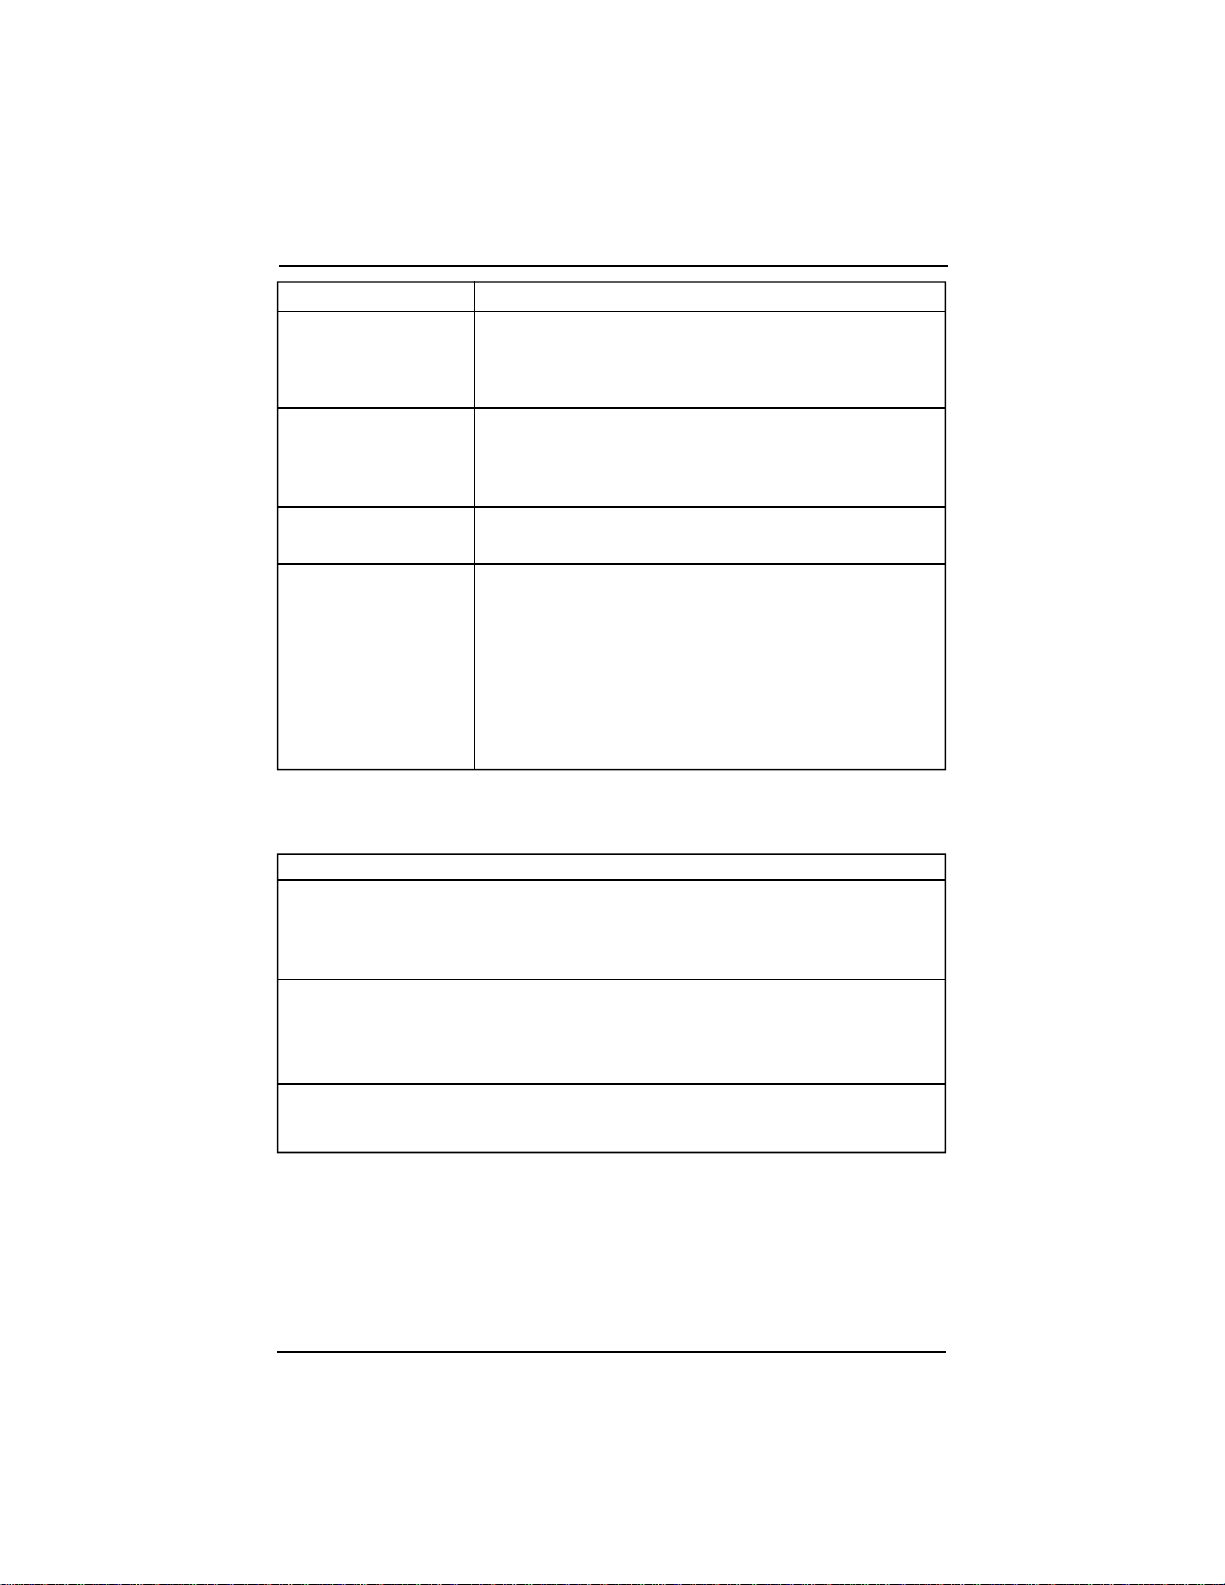
Problem
Image is “noisy” or
streaked.
Image is wider at the
top or bottom of the
screen.
Image is wider at one
side than the other
Projected colors
don’ t match the
computer or video
source colors.
Sound
Problem
No sound.
Solution
• From the Setup tab in the menus, adjust the frequency
and tracking manually to find an optimal setting.
• Try connecting to another computer. The problem
could be with your computer’ s video card.
This keystoning effect is caused by the projection angle
not being perpendicular to the screen. For a more
pleasing image result, raise or lower the front legs or
prop up the back of the projector.
Make sure the projector is at a 90 degree angle to the
screen.
Use the Image Manager to select a setting that is more
acceptable.
Important: The Image Manager settings work best if you
select Reset from the Adjust Tab each time before
selecting an Image Manager setting.
If further adjustment is needed, optimize the brightness,
tint, color and contrast from the Adjust tab in the
Menus.
Cause and Solution
• Adjust volume.
• Verify audio / input connections.
• Adjust audio source.
22
Poor sound quality.
No audio-out port on
the image source.
• Make sure you are connected to the earphone jack on
your laptop or line out jack on your desktop.
• Make sure the volume setting on your computer is
halfway.
You are not able to connect audio to the projector.
Page 24
Remote Control
Problem
Projector responds poorly
or not at all to the remote
control.
Lamp
Problem
No light is coming from the
lamp.
Lamp shuts off.
Troubleshooting
Cause and Solution
• Make sure that the total distance from the
remote to the projector is no more than 32 feet
(10 m).
• Point the remote control at the screen or at the
front of the projector.
• Make sure nothing is blocking the infrared
sensor on the front of the projector.
• Darken the room. The lighting might be
effecting the remote control.
• Replace the remote control batteries.
Cause and Solution
• Make sure that the power cord is properly
connected to a fully functional AC electric outlet.
The Power light blinks when the power is
connected but the projector is not turned on.
The Power light is a steady green when the
lamp is running.
• Make sure that the power cord is properly
connected to the projector.
• Make sure that you have removed the lens cap
on the projector lens at the front of the
projector.
• Make sure you have pressed the Power button
and the Power light is a steady green.
• Check the projector’ s lamp to make sure that it
is securely connected in the lamp module.
• Make sure that the lamp module door is fully
closed.
• Make sure that the cable connectors do not
have any bent pins.
• Replace the lamp.
• A minor power surge may cause the lamp to
shut off. Press the Power button twice to turn off
the projector. (The Power light continues to
blink and the fan continues to run until the
projector cools down.) Wait at least three
minutes, then press the Power button again.
• Replace the lamp module.
23
Page 25
LCD Projector User Guide
Image Source
Problem
The S-Video image source
does not appear.
Cause and Solution
Some inexpensive cables are not compatible with
the projector. Be sure to use the cable that came
with your projector.
Only the start-up screen
appears and not the image
from the image source.
The image source is
connected but a No Signal
message appears.
• Verify that the cables are connected correctly.
See “Connecting the Projector” on page 7.
• Verify that the proper image source is connected and that it is selected on the Setup tab
of the menus.
• Make sure that the image source is turned on.
• Turn off everything and power up again in the
proper order. See “Turning Off the Projector” on
page 15. See “Starting the Presentation” on
page 7.
• Make sure that your laptop’ s external video
port is turned on. See the computer manual for
details.
• Verify that the cables are connected correctly.
See “Connecting the Projector” on page 6.
• Verify that the proper image source is connected and that it is selected on the Setup tab
of the menus.
• Make sure there are no bent pins in the
connectors.
• Make sure the image source is turned on.
• Turn off everything and power up again in the
proper order. See “Turning Off the Projector” on
page 15. See “Starting the Presentation” on
page 7.
• Make sure that your laptop’ s external video
port is turned on. See the computer manual for
details.
24
MFG Mode screen appears
instead of the image.
Turn off the projector and wait until the fan stops.
Turn on the projector.
Note: The MFG mode screen appears if you
press the Power button at the same
time that you plug in the power cord.
This mode should only be used by
service technicians.
Page 26
Safety
These safety precautions include information to prevent personal injury and
damage to the projector.
Safety Definitions
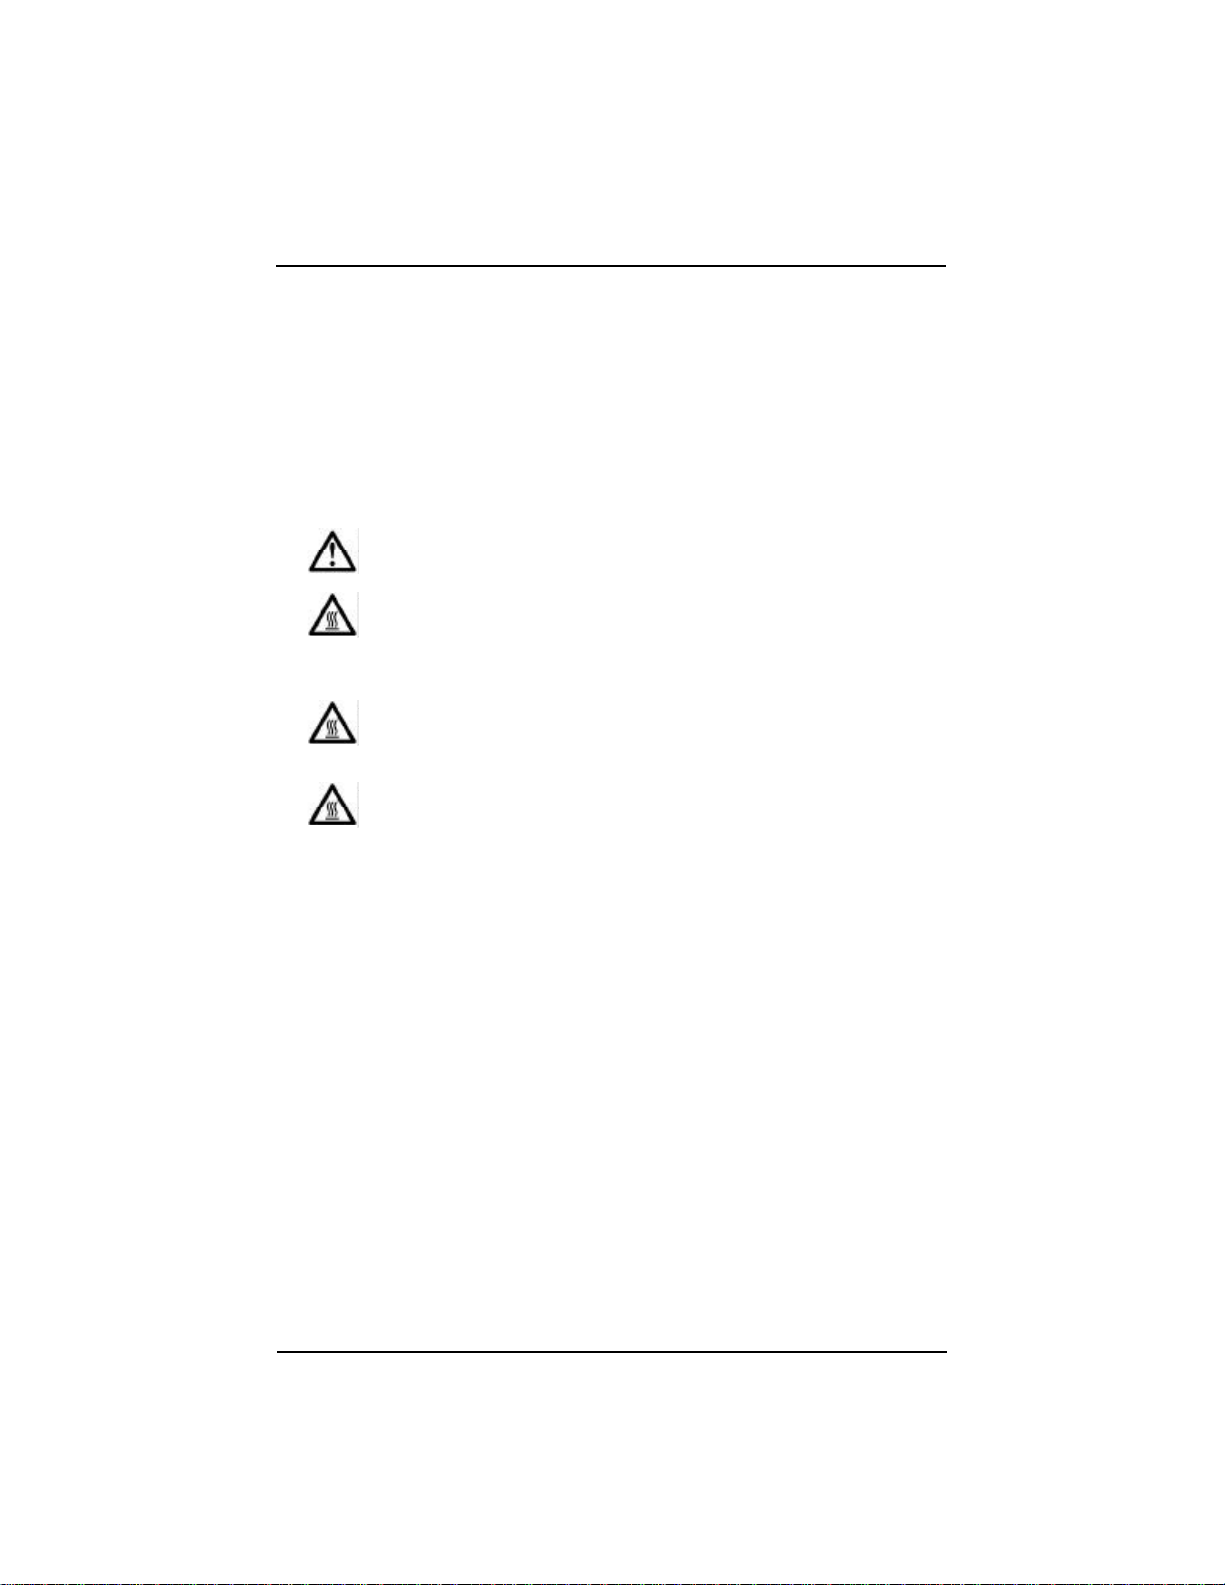
Warning: Statements identify conditions or practices that could result in
personal injury.
Caution: Statements identify conditions or practices that could result in
damage to your equipment.
Warning: For information about use of a feature, please refer to
this User Guide.
Warning: Hot surface. Do not touch.
Projector Safety
Warning: To replace the lamp, turn off the power and unplug the
power cord. To avoid burns, wait 30 minutes before opening the
lamp door. Follow all instructions provided in this User Guide. See
“Changing the Lamp Module” on page 17.
Warning: When you open the lamp module door, be careful not to
touch the hot surfaces inside.
Warning: Please use the power cord provided. Connect the power cord to a
receptacle with a protective safety (earth) ground terminal.
Warning: Don’ t look directly into the lens when the lamp is on. Doing so may
cause eye injury.
Warning: Servicing your own projector may expose you to hazards or create
potential hazards. Also, servicing your own projector will void the warranty.
Refer all service to qualified service personnel. See “How and Where to get
help” on page 3.
Warning: In the unlikely event of the bulb rupturing, thoroughly clean the area
behind the projector and discard any food that might have been contaminated
with broken glass.
Warning: Do not loosen or remove any screws other than those on the lamp
module door and the lamp module. Doing so may result in electric shock.
Caution: Don’ t set liquids on the projector. Spilled liquids may damage your
projector.
Caution: Don’ t put the projector on a hot surface or in direct sunlight.
Caution: Do not drop the projector.
Safety
25
Page 27

LCD Projector User Guide
Caution: Never operate your projector without the lamp module or lamp
module door. Doing so may damage the projector.
Caution: Proper ventilation is important. Don’ t block ventilation openings.
Never operate this projector in an enclosed area. Do not place the projector on
a tablecloth or other soft covering that may block the vents. With ceiling
installations, use approved mounting hardware. Do not put the projector near
heat ducts, air cleaners, transformers or other electrical devices. For permanent installations follow local codes.
Caution: Do not touch the glass portion of the new lamp module with your
hands or allow it to touch other objects as this may damage it and shorten its
operational life.
Caution: Do not drop the lamp module as the glass may shatter.
Battery Safety
• Read and follow all warnings and instructions supplied by the battery
manufacturer.
• Keep batteries away from children.
• Store batteries in their original packaging.
• When inserting batteries, verify that the (+) and (-) terminals are aligned
correctly.
• Replace all batteries of a set at the same time.
• Do not mix new batteries with used ones.
• Do not use batteries of different chemistries, capacities, brands or sizes
together. Leakage could result.
• Do not disassemble, recharge, or short-circuit batteries.
• Do not subject batteries to high temperature or fire.
• Discard used batteries according to all applicable local and national
regulations.
26
Page 28

Specifications
Specifications
Specification
Weight in lbs. (kg)
Dimensions (inches) (WxDxH)
Dimensions (mm) (WxDxH)
Color Palette
Resolution
XGA compression(1024 x 768)
Three 0.9” panel
polysilicone LCD
Projection lamp
Lamp life
User-replaceable lamp
Brightness (ANSI lumens based on industry
specification practices)
Contrast ratio (Full On/Off)
Projection Distances/
Image Sizes
Projection Lens
Zoom Factor
Aspect Ratio
Audio (built in)
Video Compatibility –
NTSC/NTSC 4.43
PAL B/D/G/H/I/K/L/N/M
SECAM B/D/G/H/K/L
Computer compatibility
Vertical frequency (Hz)
Horizontal frequency(KHz)
MACINTOSH Compatibility
Audible noise – typical
Fixed lens model
7.5 (3.4)
12.8 x 9.8 x 3.6 (with lens)
325 x 250 x 92 (with lens)
16.7 million (24 bit)
800 x 600
Yes
Yes
120w UHP, ultra compact
up to 4000 hours
Yes
1000
200:1
0.9 m (2.95 ft)
0.57 m (1.875 ft)
3.66 m (12 ft)
2.29 m (7.5 ft)
10 m (32.8 ft)
6.35 m (20.6 ft)
Fixed/manual focus
N/A
4:3, 16:9
Stereo, 2 x 2 watts
Yes
VGA/SVGA/XGA/SXGA
56 – 85
30 – 90
Yes
42 measured
Zoom lens model
8.0(3.64)
12.8 x 10.8 x 3.6 (with lens)
325 x 275 x 92 (with lens)
16.7 million (24 bit)
800 x 600
Yes
Yes
120w UHP, ultra compact
up to 4000 hours
Yes
1000
200:1
0.9 m (2.95 ft)
0.4 m (1.33 ft) to 0.53 m (1.74 ft)
3.66 m (12 ft)
1.68 m (5.5 ft) to 2.19 m(7.17 ft)
10 m (32.8 ft)
4.67 m (15.3ft) to 6.1 m(20 ft)
Manual zoom/focus
1.3x
4:3, 16:9
Stereo, 2 x 2 watts
Yes
VGA/SVGA/XGA/SXGA
56 – 85
30 – 90
Yes
42 measured
27
Page 29

LCD Projector User Guide
Specification
Connections on projector
Analog RGB (15 Pin HD)
Composite video (RCA)
Stereo Audio (1/8” mini-plug)
S-video
Power Supply
Voltage (AC RMS)
Frequency (Hz)
Auto Sense
Typical Power Consumption (watts)
Operating Temperature Range
Storage Temperature Range
Humidity Range (relative)
Altitude (operating)
Altitude (storage)
Fixed lens model
Yes
Yes
Yes
Yes
100-240
50-60
Yes
195
0-35º C
-20-70º C
10-95%
0 - 10,000 ft
0 - 3,048 m
0 - 40,000 ft
0 - 12,192 m
Zoom lens model
Yes
Yes
Yes
Yes
100-240
50-60
Yes
195
0-35º C
-20-70º C
10-95%
0 - 10,000 ft
0 - 3,048 m
0 - 40,000 ft
0 - 12,192 m
28
Page 30

29
 Loading...