

Page 1

Projector
6542W/6545X/6442W/6445X/6540U
User’s Manual
Page 2

Ver. 1 3/21
• Apple and Mac are trademarks of Apple Inc. registered in the U.S. and other countries.
• Microsoft and Windows are either a registered trademark or trademark of Microsoft Corporation in the United
States and/or other countries.
• MicroSaver is a registered trademark of Kensington Computer Products Group, a division of ACCO Brands in the
U.S. and other countries.
• The terms HDMI and HDMI High-Definition Multimedia Interface, and the HDMI Logo are trademarks or registered
trademarks of HDMI Licensing Administrator, Inc. in the United States and other countries.
• Blu-ray is a trademark of Blu-ray Disc Association.
• CRESTRON and ROOMVIEW are registered trademarks of Crestron Electronics, Inc. in the United States and other
countries.
• Other product names and logos mentioned in this user’s manual may be the trademarks or registered trademarks
of their respective holders.
• GPL/LGPL Software Licenses
The product includes software licensed under GNU General Public License (GPL), GNU Lesser General Public
License (LGPL), and others.
For more information on each software, see “readme.pdf” in the “about GPL&LGPL” folder on the supplied CD-
ROM.
NOTES
(1) The contents of this user’s manual may not be reprinted in part or whole without permission.
(2) The contents of this user’s manual are subject to change without notice.
(3) Great care has been taken in the preparation of this user’s manual; however, should you notice any questionable
points, errors or omissions, please contact us.
Page 3
Important Information
Important Information
Safety Cautions
Precautions
Please read this manual carefully before using your Dukane projector and keep the manual handy for future reference.
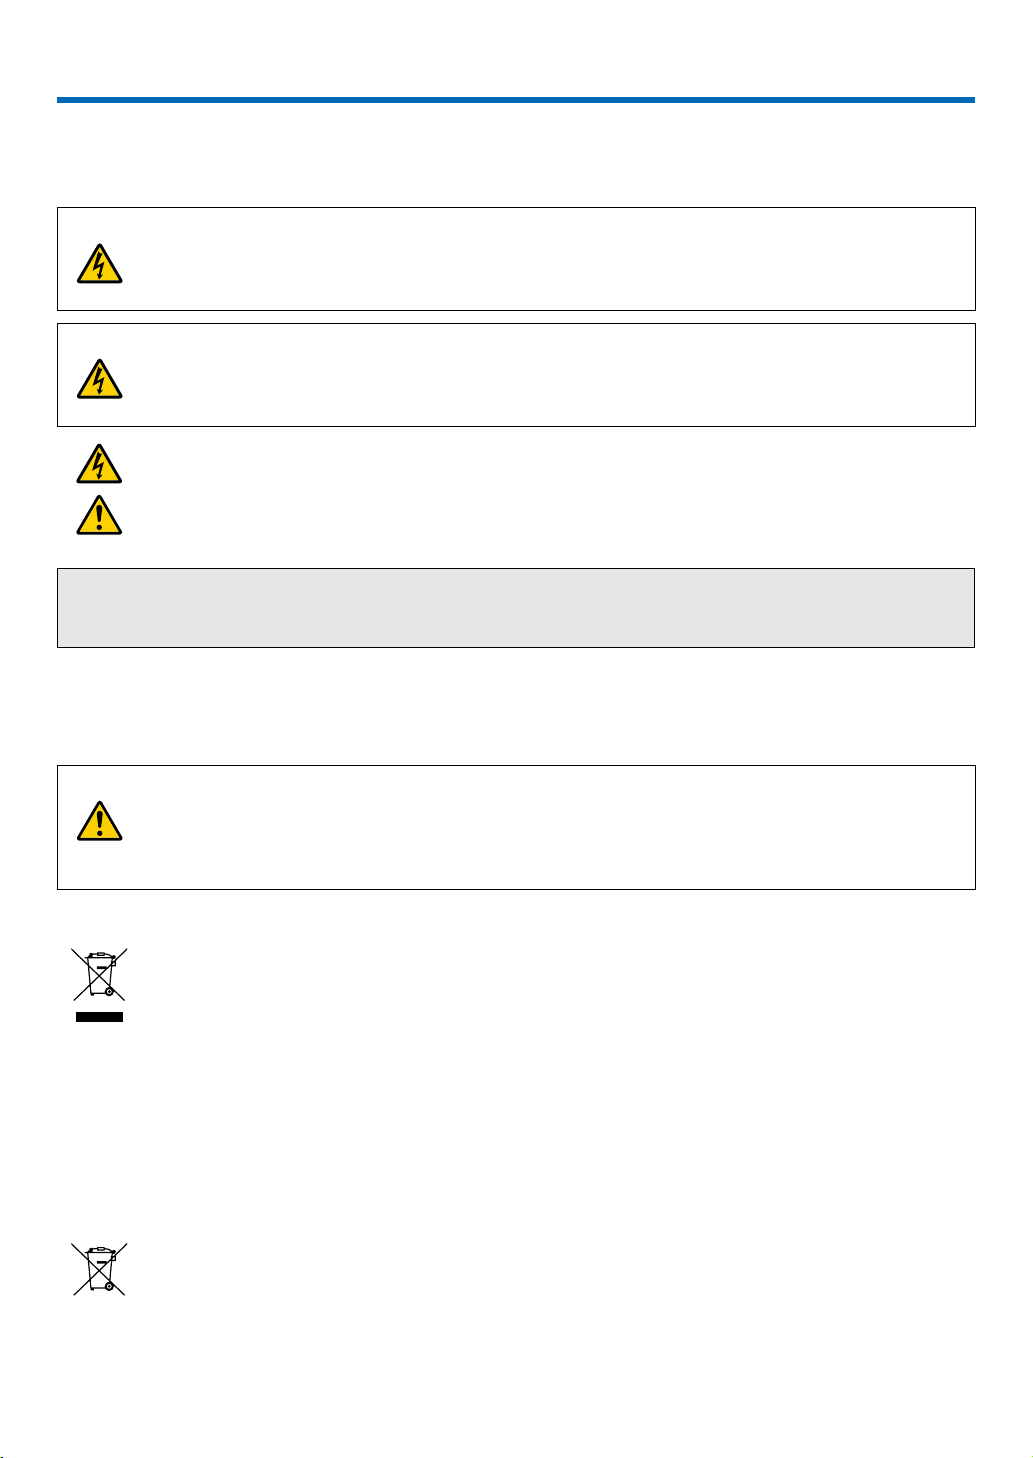
CAUTION
To turn off main power, be sure to remove the plug from power outlet.
The power outlet socket should be installed as near to the equipment as possible, and should be easily
accessible.
CAUTION
TO PREVENT SHOCK, DO NOT OPEN THE CABINET.
THERE ARE HIGH-VOLTAGE COMPONENTS INSIDE.
REFER SERVICING TO QUALIFIED SERVICE PERSONNEL.
This symbol warns the user that uninsulated voltage within the unit may be sufficient to cause electrical
shock. Therefore, it is dangerous to make any kind of contact with any part inside of the unit.
This symbol alerts the user that important information concerning the operation and maintenance of this
unit has been provided.
The information should be read carefully to avoid problems.
WARNING: TO PREVENT FIRE OR SHOCK, DO NOT EXPOSE THIS UNIT TO RAIN OR MOISTURE.
DO NOT USE THIS UNIT’S PLUG WITH AN EXTENSION CORD OR IN AN OUTLET UNLESS ALL THE PRONGS
CAN BE FULLY INSERTED.
Machine Noise Information Regulation - 3. GPSGV,
The highest sound pressure level is less than 70 dB (A) in accordance with EN ISO 7779.
CAUTION
Avoid displaying stationary images for a prolonged period of time.
Doing so can result in these images being temporarily sustained on the surface of the LCD panel.
If this should happen, continue to use your projector. The static background from previous images will
disappear.
Disposing of your used product
In the European Union
EU-wide legislation as implemented in each Member State requires that used electrical and electronic
products carrying the mark (left) must be disposed of separately from normal household waste. This includes projectors and their electrical accessories. When you dispose of such products, please follow the
guidance of your local authority and/or ask the shop where you purchased the product.
After collecting the used products, they are reused and recycled in a proper way. This effort will help us
reduce the wastes as well as the negative impact to the human health and the environment at the minimum level.
The mark on the electrical and electronic products only applies to the current European Union Member
States.
Outside the European Union
If you wish to dispose of used electrical and electronic products outside the European union, please
contact your local authority and ask for the correct method of disposal.
For EU: The crossed-out wheeled bin implies that used batteries should not be put to the general household
waste! There is a separate collection system for used batteries, to allow proper treatment and recycling
in accordance with legislation.
According to EU directive 2006/66/EC, the battery can’t be disposed improperly. The battery shall
be separated to collect by local service.
I
Page 4

Important Information
FCC Information (for USA only)
WARNING
The Federal Communications Commission does not allow any modifications or changes to the unit EXCEPT those
specified by Dukane in this manual. Failure to comply with this government
regulation could void your right to operate this equipment. This equipment has been tested and found to comply
with the limits for a Class B digital device, pursuant to Part 15 of the FCC Rules. These limits are designed to
provide reasonable protection against harmful interference in a residential installation. This equipment generates,
uses, and can radiate radio frequency energy and, if not installed and used in accordance with the instructions,
may cause harmful interference to radio communications. However, there is no guarantee that interference will
not occur in a particular installation.
If this equipment does cause harmful interference to radio or television reception, which can be determined by
turning the equipment off and on, the user is encouraged to try to correct the interference by one or more of the
following measures:
• Reorient or relocate the receiving antenna.
• Increase the separation between the equipment and receiver.
• Connect the equipment into an outlet on a circuit different from that to which the receiver is connected.
• Consult the dealer or an experienced radio / TV technician for help.
Supplier’s declaration of conformity (for USA only)
This device complies with Part 15 of the FCC Rules. Operation is subject to the following two conditions.
(1) This device may not cause harmful interference, and (2) this device must accept any interference received, including interference that may cause undesired operation.
For UK only: In UK, a BS approved power cord with moulded plug has a Black (five Amps) fuse installed for use with
this equipment. If a power cord is not supplied with this equipment please contact your supplier.
Important Safeguards
These safety instructions are to ensure the long life of your projector and to prevent fire and shock. Please read
them carefully and heed all warnings.
Installation
• Do not place the projector in the following conditions:
- on an unstable cart, stand, or table.
- near water, baths, or damp rooms.
- in direct sunlight, near heaters, or heat radiating appliances.
- in a dusty, smoky or steamy environment.
- on a sheet of paper or cloth, rugs or carpets.
• If you wish to have the projector installed on the ceiling:
- Do not attempt to install the projector yourself.
- The projector must be installed by qualified technicians in order to ensure proper operation and reduce the risk
of bodily injury.
- In addition, the ceiling must be strong enough to support the projector and the installation must be in accordance
with any local building codes.
II
Page 5
Important Information
- Please consult your dealer for more information.
• Do not install and store the projector in the below circumstances. Failure to do so may cause of malfunction.
- In powerful magnetic fields
- In corrosive gas environment
- Outdoors
• If intense light like laser beams enters from the lens, it could lead to malfunction.
CAUTION
This equipment is designed to be used in the condition of the power cord connected to earth. If the
power cord is not connected to the earth, it may cause electric shock. Please make sure the power
cord is earthed properly.
Cable information
CAUTION
Use shielded cables or cables attached ferrite cores so as not to interfere with radio and television
reception. For details, please refer to “Making Connections” in this user’s manual.
WARNING
• Do not cover the lens with the lens cap or equivalent while the projector is on. Doing so can lead to melting
of the cap due to the heat emitted from the light output.
• Do not place any objects, which are easily affected by heat, in front of the projection window. Doing so could
lead to the object melting from the heat that is emitted from the light output.
• Do not use a spray containing flammable gas to get rid of accumulated dust and dirt on the filter and the
projection window. It may cause of fire.
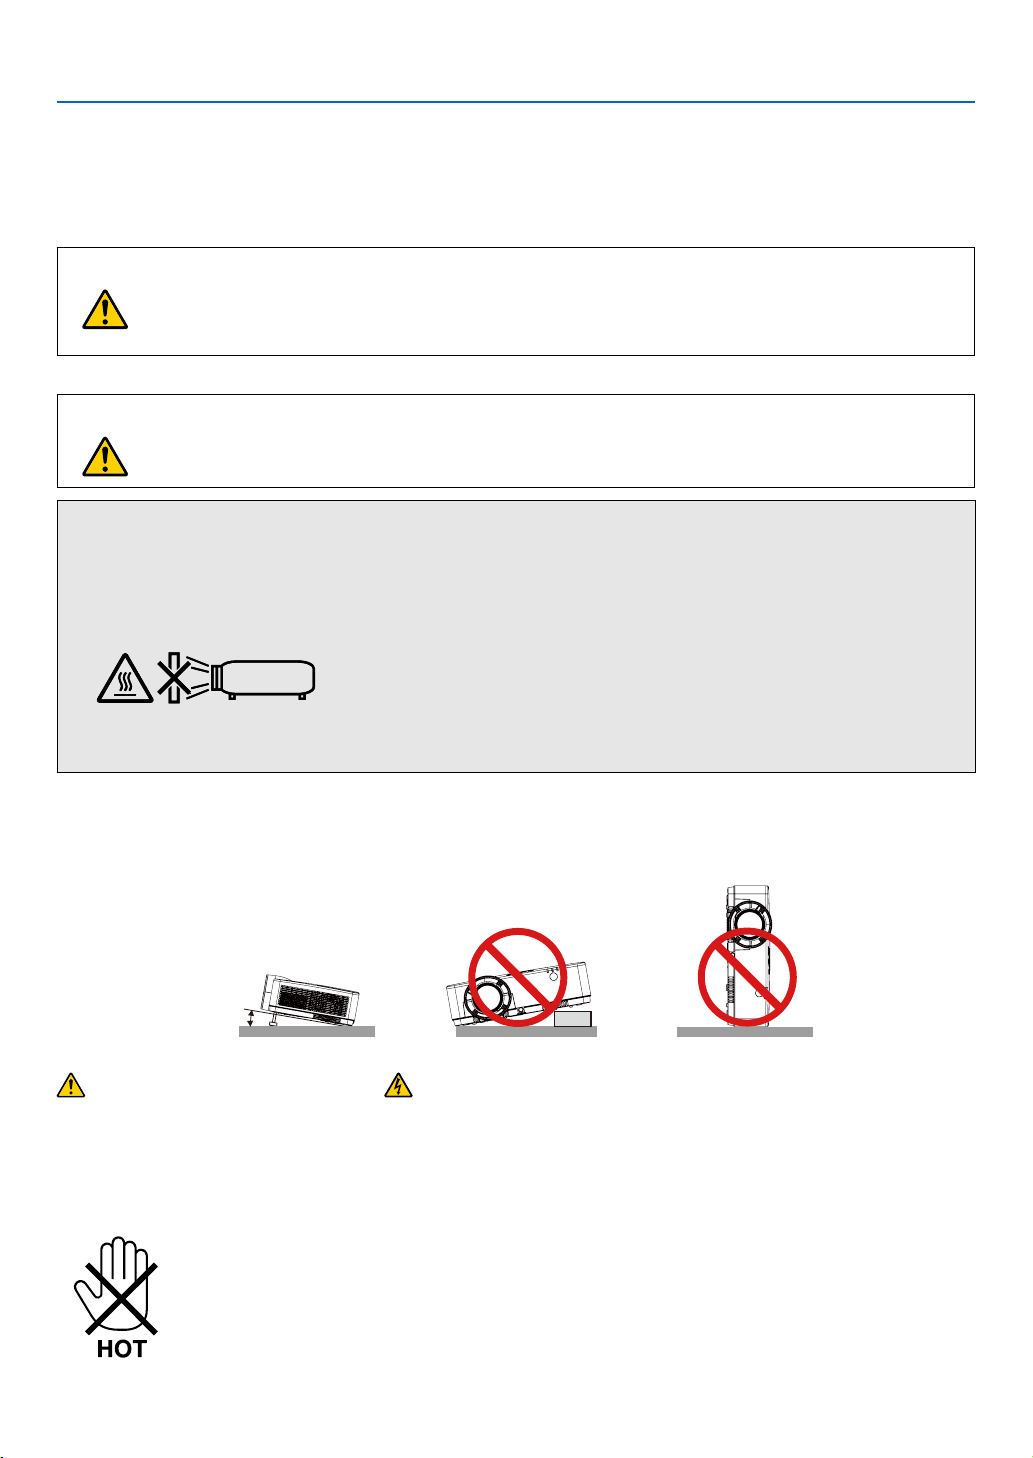
Place the projector in a horizontal position
The tilt angle of the projector should not exceed 10 degrees, nor should the projector be installed in any way other
than the desktop and ceiling mount, otherwise lamp life could decrease dramatically.
10°
Fire and Shock Precautions
• Ensure that there is sufficient ventilation and that vents are unobstructed to prevent the build-up of heat inside
your projector. Allow at least 4 inches (10 cm) of space between your projector and a wall.
• Do not try to touch the exhaust vent as it can become heated while the projector is turned on and immediately
after the projector is turned off. Parts of the projector may become temporarily heated if the projector is turned off
with the POWER button or if the AC power supply is disconnected during normal projector operation.
Use caution when picking up the projector.
III
Page 6
Important Information
• Prevent foreign objects such as paper clips and bits of paper from falling into your projector. Do not attempt to
retrieve any objects that might fall into your projector. Do not insert any metal objects such as a wire or screwdriver
into your projector. If something should fall into your projector, disconnect it immediately and have the object
removed by a qualified service personnel.
• Do not place any objects on top of the projector.
• Do not touch the power plug during a thunderstorm. Doing so can cause electrical shock or fire.
• The projector is designed to operate on a power supply of 100-240V AC 50/60 Hz. Ensure that your power supply
fits this requirement before attempting to use your projector.
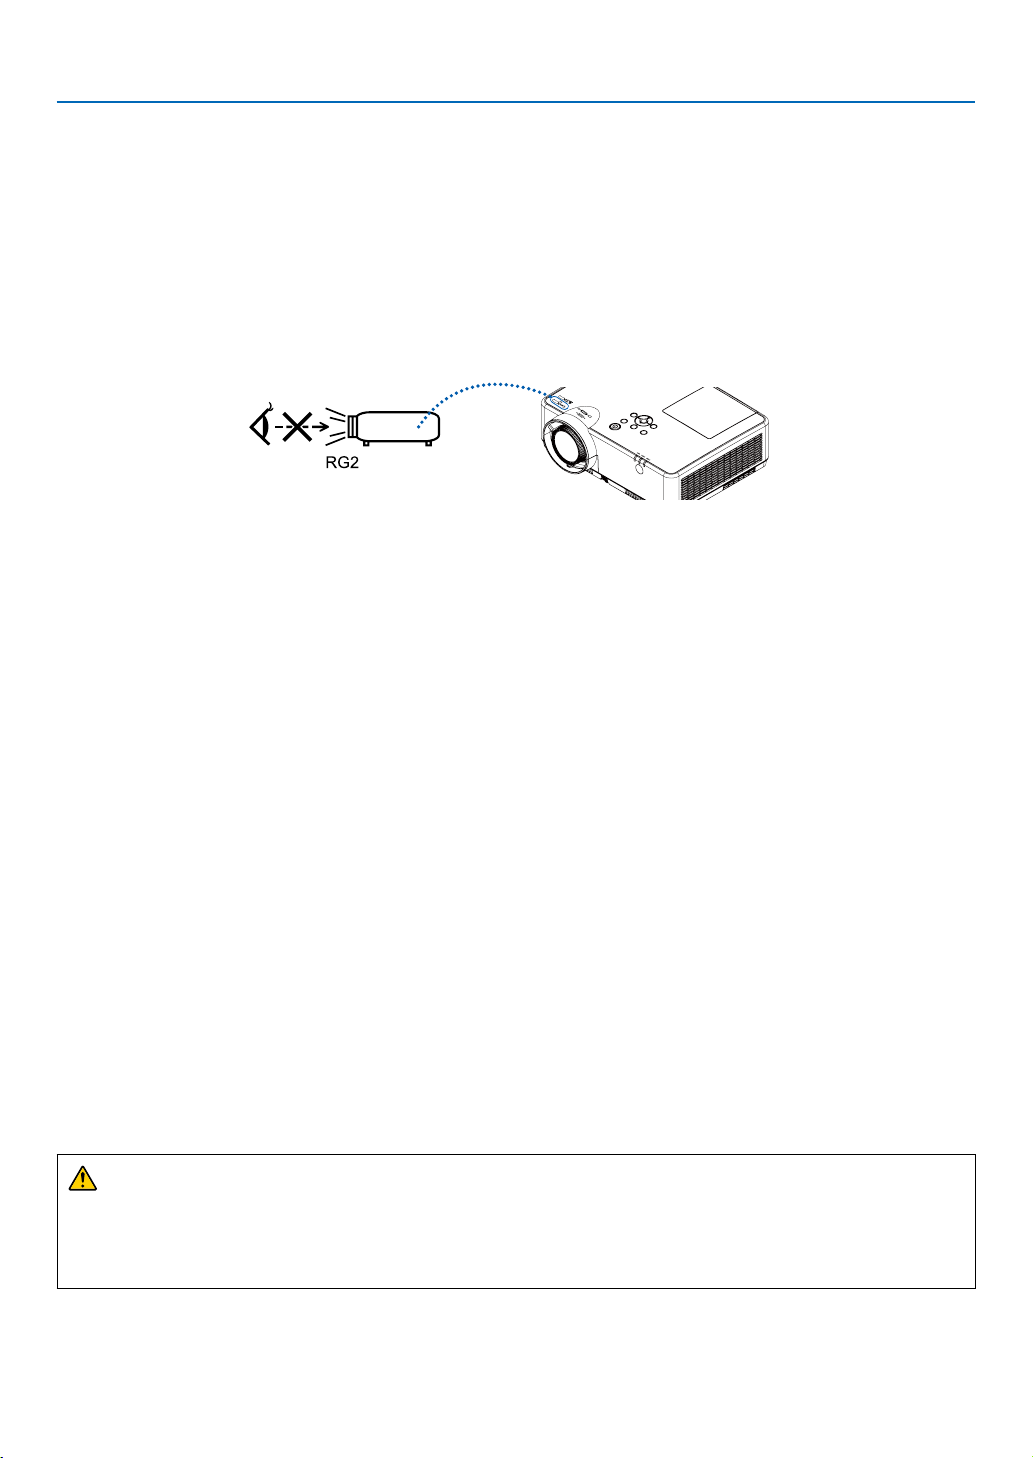
• Do not look the lens while the projector is on. Serious damage to your eyes could result. The following logo, that
is indicated near the lens-mounting-section on the projector cabinet, describes this projector is categorized in the
risk group 2 of IEC 62471-5: 2015. As with any bright source, do not stare into the beam, RG2 IEC 62471-5: 2015.
• Keep any items such as magnifying glass out of the light path of the projector. The light being projected from the
lens is extensive, therefore any kind of abnormal objects that can redirect light coming out of the lens, can cause
unpredictable outcome such as fire or injury to the eyes.
• Do not place any objects, which are easily affected by heat, in front of a projector exhaust vent.
Doing so could lead to the object melting or getting your hands burned from the heat that is emitted from the
exhaust.
• Do not splash water over the projector. Doing so can cause electrical shock or fire. If the projector gets wet, turn
off the projector, unplug the power cord and have the projector serviced by a qualified service personnel.
• Handle the power cord carefully. A damaged or frayed power cord can cause electric shock or fire.
- Do not use any power cord other than the one supplied with the projector.
- Do not bend or tug the power cord excessively.
- Do not place the power cord under the projector, or any heavy object.
- Do not cover the power cord with other soft materials such as rugs.
- Do not heat the power cord.
- Do not handle the power plug with wet hands.
• Turn off the projector, unplug the power cord and have the projector serviced by a qualified service personnel
under the following conditions:
- When the power cord or plug is damaged or frayed.
- If liquid has been spilled into the projector, or if it has been exposed to rain or water.
- If the projector does not operate normally when you follow the instructions described in this user’s manual.
- If the projector has been dropped or the cabinet has been damaged.
- If the projector exhibits a distinct change in performance, indicating a need for service.
• Disconnect the power cord and any other cables before carrying the projector.
• Turn off the projector and unplug the power cord before cleaning the cabinet or replacing the lamp.
• Turn off the projector and unplug the power cord if the projector is not to be used for an extended period of time.
• When using a LAN cable:
For safety, do not connect to the terminal for peripheral device wiring that might have excessive voltage.
CAUTION
• Do not use the adjustable tilt foot for purposes other than originally intended. Misuses such as gripping the
tilt-foot or hanging on the wall can cause damage to the projector.
• Do not turn off the AC power for 60 seconds after the lamp is turned on and while the POWER indicator is
blinking blue. Doing so could cause premature lamp failure.
IV
Page 7
Important Information
Remote Control Precautions
• Handle the remote control carefully.
• If the remote control gets wet, wipe it dry immediately.
• Avoid excessive heat and humidity.
• Do not short, heat, or take apart batteries.
• Do not throw batteries into fire.
• If you will not be using the remote control for a long time, remove the batteries.
• Ensure that you have the batteries’ polarity (+/−) aligned correctly.
• Do not use new and old batteries together, or use different types of batteries together.
• Dispose of used batteries according to your local regulations.
Note for Canadian Environmental Protection Act, 1999
The lamp(s) in this product contains mercury. Please dispose according to your local authority law.
Note for US Residents
The lamp in this product contains mercury. Please dispose according to Local, State or Federal Laws.
Lamp Replacement
• Use the specified lamp for safety and performance.
• To replace the lamp, follow all instructions provided on page 86.
A Lamp Characteristic
The projector has a discharge lamp for special purposes as a light source.
A lamp has a characteristic that its brightness gradually decreases with age. Also repeatedly turning the lamp on
and off will increase the possibility of its lower brightness.
The actual lamp life may vary depending upon the individual lamp, the environmental conditions and usage.
CAUTION:
• DO NOT TOUCH THE LAMP immediately after it has been used. It will be extremely hot. Turn the projector off
and then disconnect the power cord. Allow at least one hour for the lamp to cool before handling.
• When removing the lamp from a ceiling-mounted projector, make sure that no one is under the projector. Glass
fragments could fall if the lamp has been burned out.
About High Altitude mode
• Set [High altitude] to [ON] in the Setting menu when using the projector at altitudes approximately 1700 meters
or higher.
Using the projector at an altitude of about 1700 meters or more without setting [High altitude] to [ON] can cause
the projector to overheat and shut down the protector.
• Using the projector at altitudes less than approximately 1700 meters and setting it to [ON] can cause the light
module to overcool, causing the image to flicker. Switch [High altitude] to [OFF].
• Using the projector at altitudes approximately 1700 meters or higher can shorten the life of optical components
such as the light module.
V
Page 8
Important Information
About Copyright of original projected pictures:
Please note that using this projector for the purpose of commercial gain or the attraction of public attention in a venue
such as a coffee shop or hotel and employing compression or expansion of the screen image with the following
functions may raise concern about the infringement of copyrights which are protected by copyright law.
[ASPECT], [KEYSTONE], Magnifying feature and other similar features.
Turkish WEEE information relevant for Turkish market
AEEE Yonetmeliğine Uygundur.
This device is not intended for use in the direct field of view at visual display workplaces. To avoid incommoding
reflections at visual display workplaces this device must not be placed in the direct field of view.
Power management function
The projector has power management functions. To reduce power consumption, the power management functions
(1 and 2) are factory preset as shown below. To control the projector from an external device via a LAN or serial
cable connection, use the on-screen menu to change the settings for 1 and 2.
1. STANDBY MODE (Factory preset: NORMAL)
To control the projector from an external device, select [NETWORK STANDBY] or [SLEEP] for [STANDBY MODE].
NOTE:
• When [NORMAL] is selected for [STANDBY MODE], the following terminals and functions will not work:
COMPUTER OUT terminal, AUDIO OUT terminal, LAN functions. Please refer to page 37 about details.
2. Power management (Factory preset: Ready)
To control the projector from an external device, select [OFF] for [Power management].
NOTE:
• When [5 Min] is selected for [Timer], you can enable the projector to automatically turn off in 5 Min if there is no signal received by any
input or if no operation is performed.
VI
Page 9

Table of Contents
Important Information ............................................................... I
1. Introduction ......................................................................... 1
❶ What’s in the Box? ........................................................................................................ 1
❷ Introduction to the Projector ......................................................................................... 2
About this user’s manual ......................................................................................... 2
❸ Part Names of the Projector .......................................................................................... 3
Front/Top ................................................................................................................. 3
Rear ......................................................................................................................... 4
Top Features ............................................................................................................ 5
Terminal Panel Features .......................................................................................... 6
❹ Part Names of the Remote Control ............................................................................... 7
Battery Installation ................................................................................................... 8
Remote Control Precautions ................................................................................... 8
Operating Range for Wireless Remote Control ....................................................... 8
2. Projecting an Image (Basic Operation) ................................. 9
❶ Flow of Projecting an Image .......................................................................................... 9
❷ Connecting Your Computer/Connecting the Power Cord .......................................... 10
❸ Turning on the Projector .............................................................................................. 11
❹ Selecting a Source ...................................................................................................... 12
Selecting the computer or video source ................................................................ 12
❺ Adjusting the Picture Size and Position ...................................................................... 13
Adjust the Tilt Foot................................................................................................. 14
Zoom...................................................................................................................... 15
Focus ..................................................................................................................... 15
❻ Correcting Keystone Distortion [KEYSTONE] ............................................................. 16
❼ Optimizing Computer Signal Automatically ................................................................ 17
Adjusting the Image Using Auto Adjust ................................................................. 17
❽ Turning Up or Down Volume ....................................................................................... 17
❾ Turning off the Projector ............................................................................................. 18
❿ When Moving the Projector ......................................................................................... 19
Table of Contents
3. Convenient Features .......................................................... 20
❶ Turning off the Image and Sound ................................................................................ 20
❷ Freezing a Picture........................................................................................................ 20
❸ Magnifying a Picture .................................................................................................... 20
4. Using the VIEWER .............................................................. 22
Memory viewer function................................................................................................... 22
5. Using On-Screen Menu ...................................................... 24
❶ Menu item overview .................................................................................................... 24
❷ List of Menu Items ....................................................................................................... 25
❸ Menu Descriptions & Functions [INPUT] ..................................................................... 28
Computer ............................................................................................................... 28
Page 10

Table of Contents
HDMI1 and HDMI2 ................................................................................................ 28
Video ...................................................................................................................... 28
USB-A .................................................................................................................... 28
LAN ........................................................................................................................ 28
❹ Menu Descriptions & Functions [Display menu] .......................................................... 29
[Auto PC adj.] ......................................................................................................... 29
[Fine sync] .............................................................................................................. 29
[H position] ............................................................................................................. 29
[V position] ............................................................................................................. 30
[H. size] .................................................................................................................. 30
[Aspect] .................................................................................................................. 30
[Orientation] ........................................................................................................... 31
[Menu position] ...................................................................................................... 31
[Background display] ............................................................................................. 32
[Signal format] ........................................................................................................ 32
❺ Menu Descriptions & Functions [Color adjust] ............................................................ 34
[Image mode] ......................................................................................................... 34
[Color adjust].......................................................................................................... 34
6 Menu Descriptions & Functions [Setting] .................................................................... 36
[On start] ................................................................................................................ 36
[Standby mode] ..................................................................................................... 37
[High altitude] ......................................................................................................... 37
[ECO mode] ........................................................................................................... 38
[Cooling fast] .......................................................................................................... 38
[Closed caption] ..................................................................................................... 39
[Key lock] ............................................................................................................... 39
[Iris] ........................................................................................................................ 40
[Baud rate] ............................................................................................................. 40
[Sound]................................................................................................................... 41
[HDMI setup] .......................................................................................................... 41
❼ Menu Descriptions & Functions [Expand] ................................................................... 43
[Language] ............................................................................................................. 43
[Auto setup]............................................................................................................ 44
[Keystone] .............................................................................................................. 44
[Security] ................................................................................................................ 48
[Power management] ............................................................................................. 49
[Filter] ..................................................................................................................... 50
[Network setup]...................................................................................................... 51
[Control ID] ............................................................................................................. 52
[Factory default] ..................................................................................................... 53
[Lamp counter reset] .............................................................................................. 53
❽ Menu Descriptions & Functions [USB-A] .................................................................... 54
[Set slide] ............................................................................................................... 54
[Slide transition effect] ........................................................................................... 54
[Sort order] ............................................................................................................. 55
[Rotate] .................................................................................................................. 55
[Best fit] .................................................................................................................. 55
[Repeat].................................................................................................................. 55
[Apply] .................................................................................................................... 55
❾ Menu Descriptions & Functions [Info.] ........................................................................ 56
Page 11

Table of Contents
6. Network control ................................................................. 57
❶ Network control operation ........................................................................................... 57
❷ Enter through a Web browser ..................................................................................... 58
Connecting Your Computer ................................................................................... 58
❸ [System status] page ................................................................................................... 59
4 [General setup] page ................................................................................................... 59
❺ [Picture setup] page .................................................................................................... 59
❻ [Image setup] page ...................................................................................................... 60
❼ [Network setup] page .................................................................................................. 61
7. Installation and Connections ............................................. 62
❶ Setting Up the Screen and the Projector .................................................................... 62
Throw Distance and Screen Size ........................................................................... 68
❷ Making Connections ................................................................................................... 71
Connecting Your Computer ................................................................................... 71
Connecting an External Monitor ............................................................................ 73
Connecting Your DVD Player or Other AV Equipment .......................................... 74
Connecting Component Input ............................................................................... 75
Connecting HDMI Input ......................................................................................... 76
Connecting to a Wired LAN ................................................................................... 77
Connecting to a Wireless LAN (Optional: NP05LM series) .................................... 77
8. Connecting to a Network ................................................... 80
1 Things you can do by connecting the projector to a network..................................... 80
2 Connecting to MultiPresenter ..................................................................................... 81
9. Maintenance ...................................................................... 82
❶ Cleaning the Filter ....................................................................................................... 82
❷ Cleaning the Lens ........................................................................................................ 84
❸ Cleaning the Cabinet ................................................................................................... 84
❹ Replacing the Lamp and the Filter .............................................................................. 85
10. Appendix .......................................................................... 90
❶ Troubleshooting .......................................................................................................... 90
Feature of each indicator ....................................................................................... 90
Indicator Message (Status message) .................................................................... 90
Indicator Message (Error message) ....................................................................... 91
❷ Specifications .............................................................................................................. 92
❸ Cabinet Dimensions .................................................................................................... 94
❹ Pin Assignments of D-Sub COMPUTER Input Terminal ............................................. 96
❺ Compatible Input Signal List ....................................................................................... 97
❻ PC Control Codes and Cable Connection .................................................................. 99
❼ Troubleshooting Check List ...................................................................................... 101
❽ REGISTER YOUR PROJECTOR! (for residents in the United States, Canada, and
Mexico) ................................................................................................................ 103
Page 12
1. Introduction
❶ What’s in the Box?
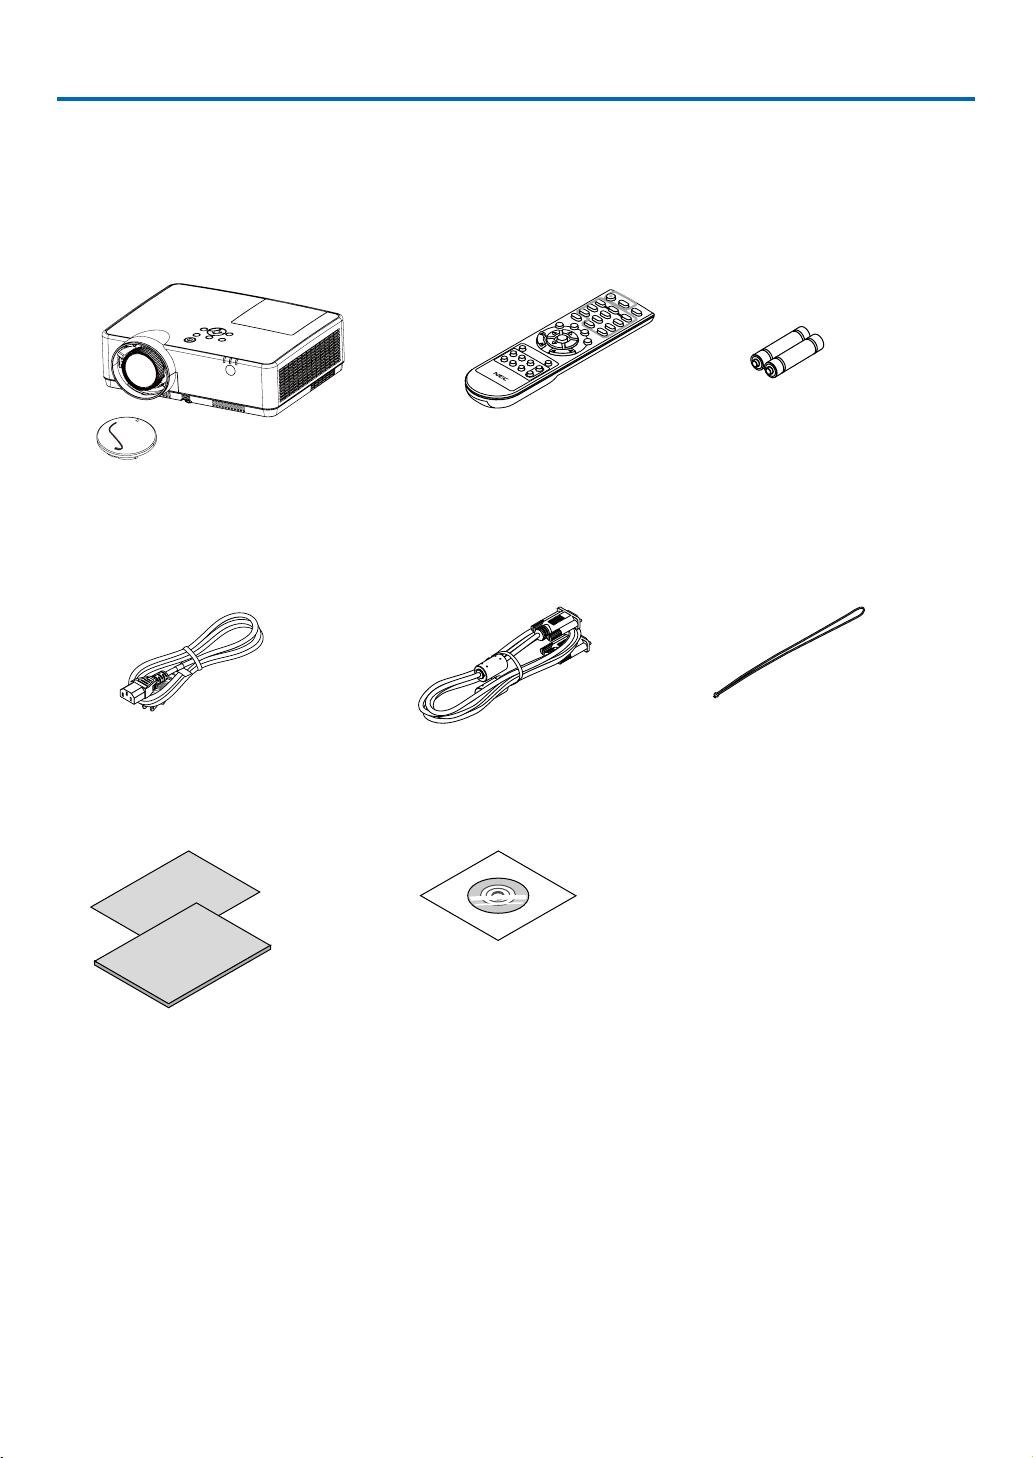
Make sure your box contains everything listed. If any pieces are missing, contact your dealer.
Please save the original box and packing materials if you ever need to ship your projector.
Projector
Lens cap (440092200)
Lens cap strap × 1 (410034900)
Power cord
(US: 310004900)
(EU: 310003100)
• Important Infomation (510048600)
• Quick Setup Guide(UG) (510048900)
Quick Setup Guide(G2) (510048700)
Remote control
(393004710)
Computer cable (VGA)
(310002200)
Dukane Projector CD-ROM
User’s manual (PDF)
(510048500)
Batteries (AAA × 2)
(391003200)
Strap × 1
(410035000)
Unless otherwise described in the user’s manual, the drawings for the projector cabinet show examples of the ME403U.
1
Page 13

1. Introduction
❷ Introduction to the Projector
This section introduces you to your new projector and describes the features and controls.
• Simple Computer System Setting
The projector has the Multi-scan system to conform to many computer output signals quickly. Up to WUXGA
resolution can be accepted.
• Useful Functions for Presentations
The digital zoom function allows you to focus on the crucial information during a presentation.
• Brightness adjustment
Brightness of the projection lamp can be selected.
• Multilanguage Menu Display
The screen menu of the projector is available in 27 languages: English, German, French, Italian, Spanish, Polish,
Swedish, Dutch, Portuguese, Japanese, Simplified Chinese, traditional Chinese, Korean, Russian,Arabic, Turkish,
Finnish, Norwegian, Danish, Indonesian, Hungarian, Czech, Kazakh, Vietnamese, Thai, Farsi, Romania.
• Convenient Maintenance Functions
Lamp and filter maintenance functions provide for better and proper maintenance of the projector.
• Security Function
The Security function helps you to ensure security of the projector. With the Key lock function, you can lock
the operation on the control panel or remote control. Passcode lock function prevents unauthorized use of the
projector.
• Colorboard Function
At the time of simple projection on the colored wall, you can get the close color image to the color image projected
on a white screen by selecting the similar color to the wall color from the preset four colors.
• Power Management
The Power management function reduces power consumption and maintains the lamp life.
• Closed Caption
This is a printed version of the program sound or other information displayed on the screen. You can turn on the
feature and switch the channels.
About this user’s manual
The fastest way to get started is to take your time and do everything right the first time. Take a few minutes now to
review the user’s manual. This may save you time later on. At the beginning of each section of the manual you’ll find
an overview. If the section doesn’t apply, you can skip it.
2
Page 14
❸ Part Names of the Projector
Front/Top
1. Introduction
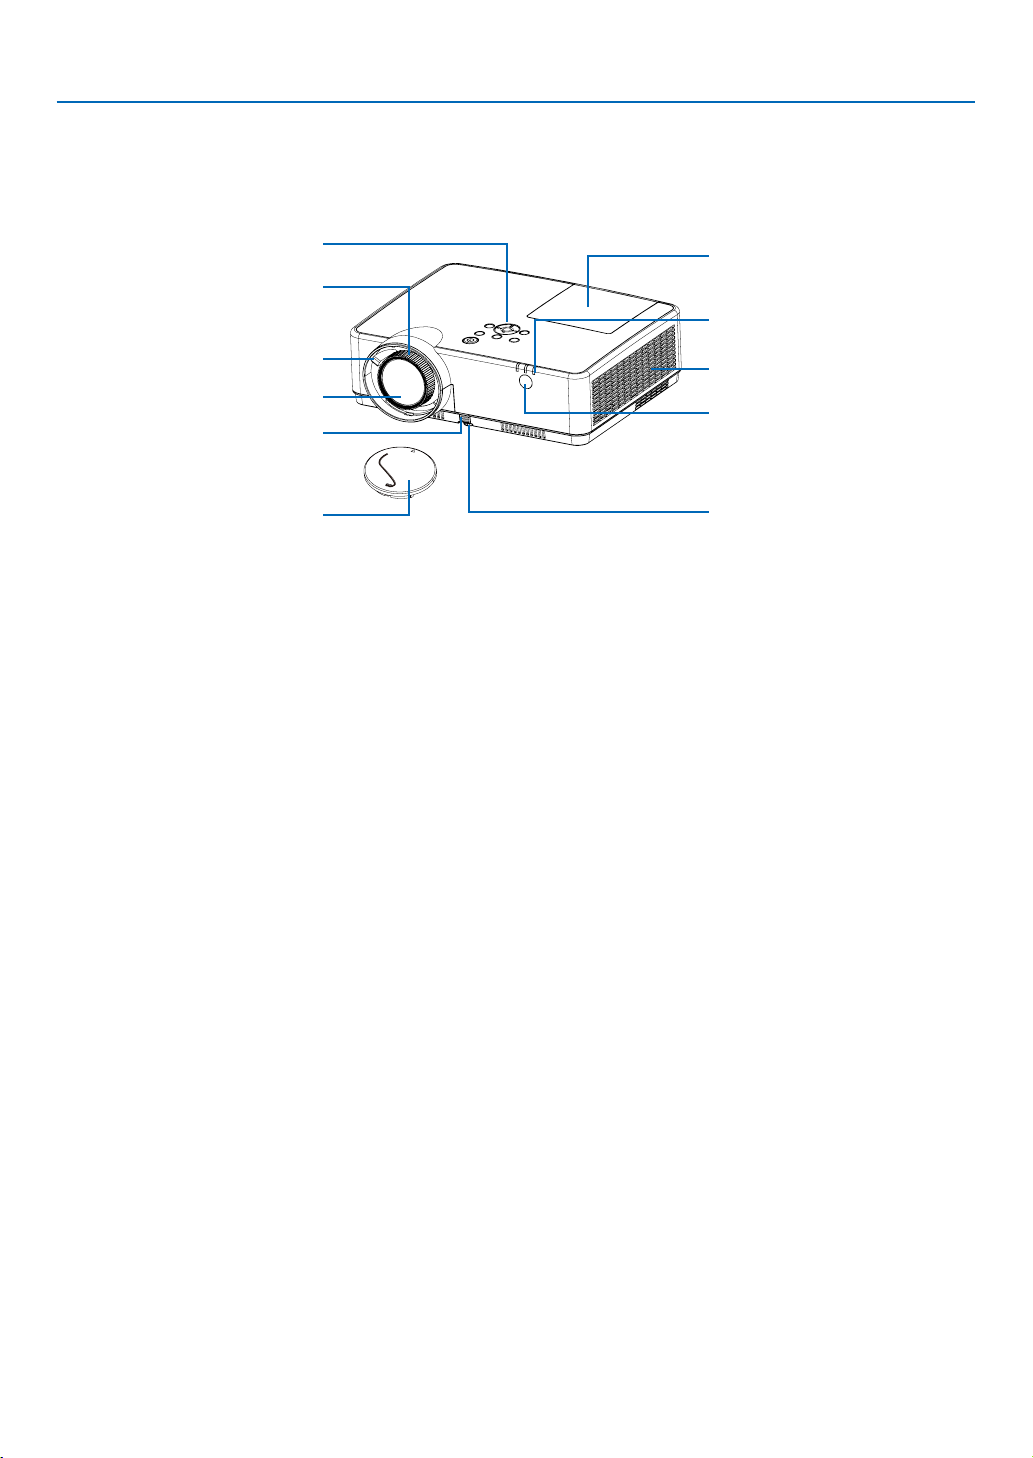
Controls
(→ page 5)
Focus Ring
(→ page 15)
Zoom Lever
(→ page 15)
Lens
Adjustable Tilt Foot Lever
(→ page 14)
Lens Cap
For protecting lens.
Make sure to take it off during
projection.
Lamp Cover
(→ page 86)
Indicators
(→ page 5)
Exhaust Vent
Heated air is exhausted from here.
Front Remote Sensor
(→ page 8)
Adjustable Tilt Foot
(→ page 14)
3
Page 15
Rear
1. Introduction
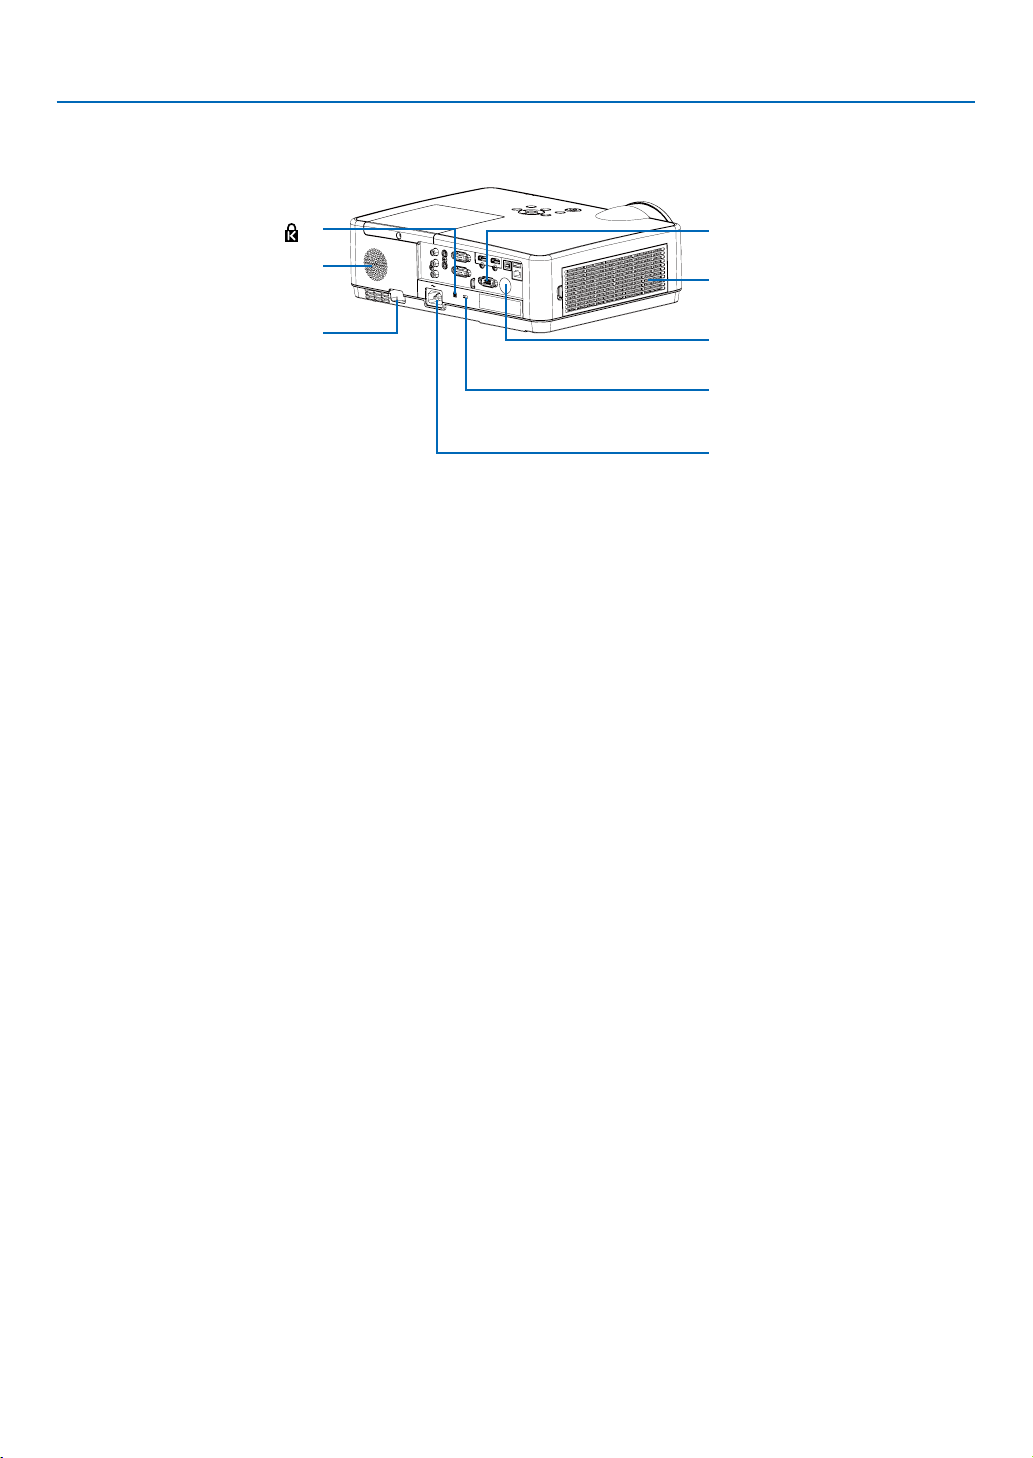
Built-in Security Slot ( )*
Monaural Speaker (16 W)
Security chain opening
Attach an anti-theft device.
The security chain opening accepts
security wires or chains up to
0.18 inch/4.6 mm in diameter.
* This security slot supports the MicroSaver ® Security System.
Terminal Panel
(→ page 6)
Intake Vent / Filter Cover
(→ page 82, 88)
Rear Remote Sensor
(→ page 8)
As the theft and dropping-off
prevention measure, fix on the
supplied strap.
AC Input
Connect the supplied power cord’s
three-pin plug here, and plug the
other end into an active wall outlet.
(→ page 10)
4
Page 16
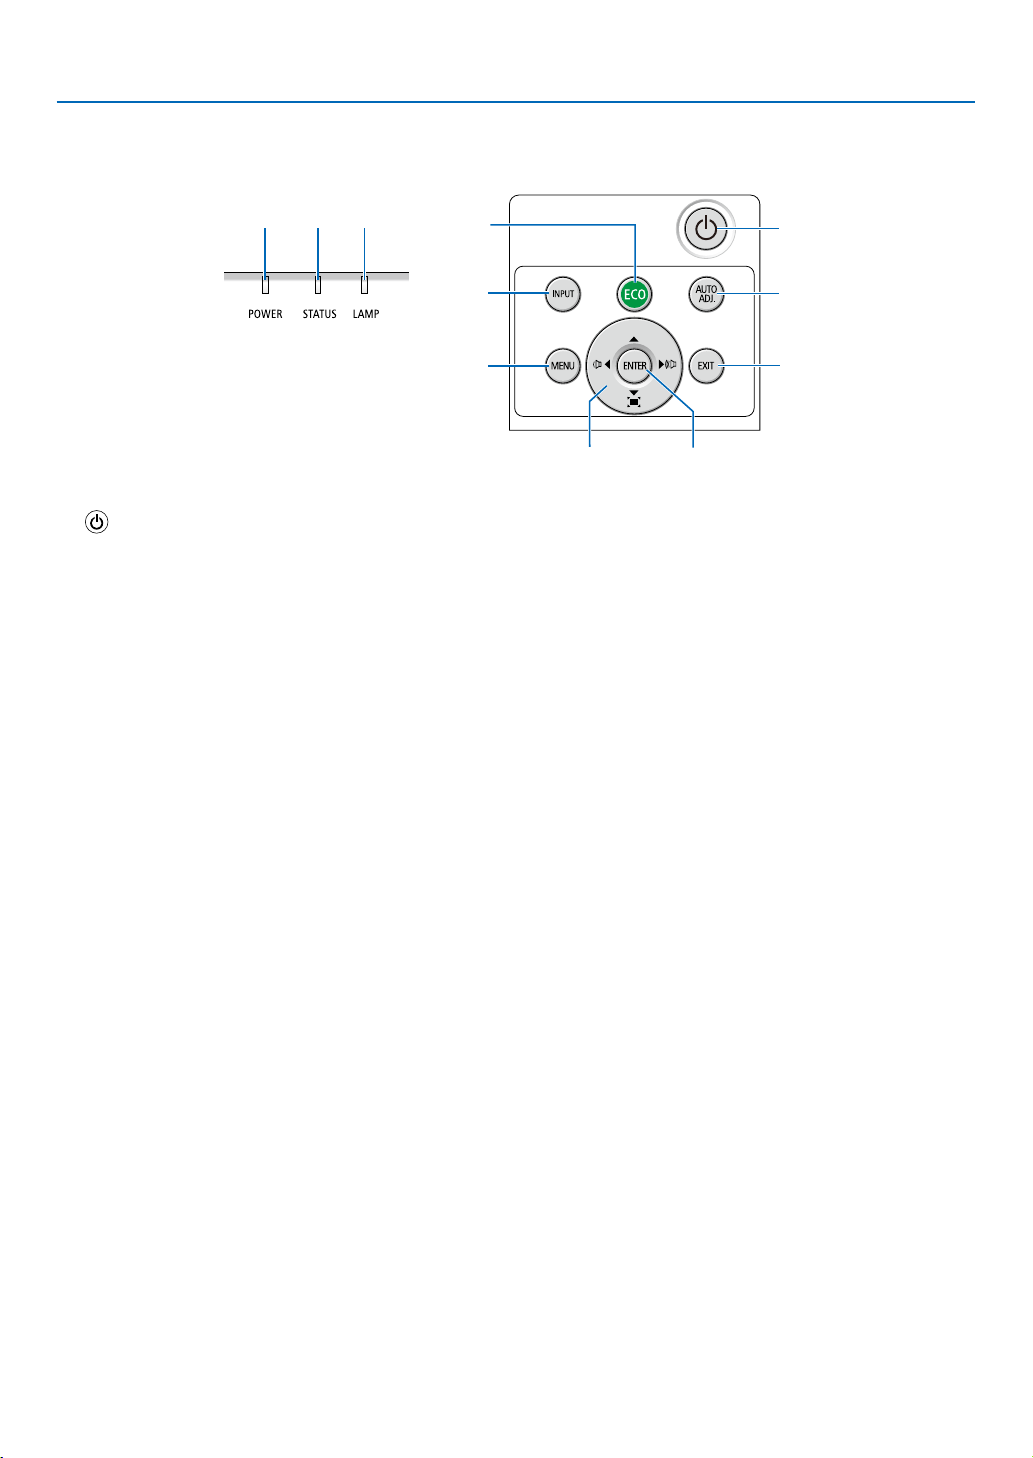
Top Features
1. Introduction
2
3 4
5
1
1. (POWER) Button
(→ page 11, 18)
2. POWER Indicator
(→ page 10, 11, 18, 90)
3. STATUS Indicator
(→ page 90)
4. LAMP Indicator
(→ page 90)
5. ECO Button
(→ page 21)
6. INPUT Button
(→ page 12)
7. AUTO ADJ. Button
(→ page 17)
8. MENU Button
(→ page 24)
9. Volume Buttons ◀▶ / Keystone Buttons
(→ page 16, 17)
10. ENTER Button
11. EXIT Button
6
8
9
10
7
11
5
Page 17
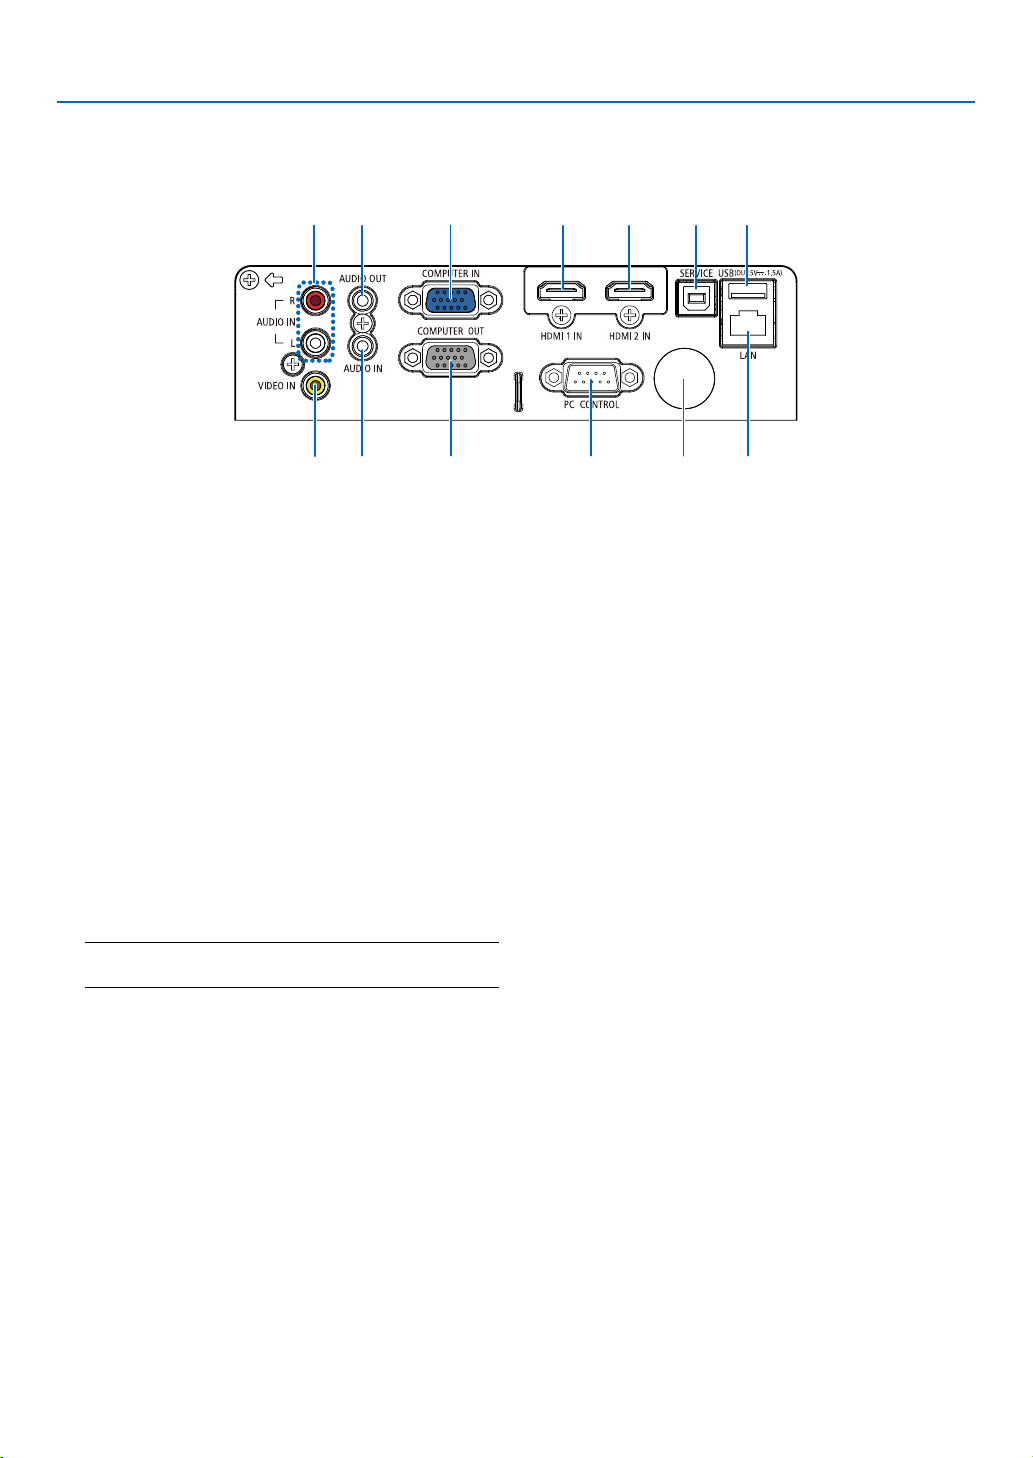
Terminal Panel Features
1. Introduction
7
9
2
8
1. COMPUTER IN/ Component Input Terminal
(Mini D-Sub 15 Pin)
(→ page 10, 71, 75)
2. COMPUTER AUDIO IN Mini Jack (Stereo Mini)
(→ page 71, 75)
3. HDMI 1 IN Terminal (Type A)
(→ page 71, 72, 76)
4. HDMI 2 IN Terminal (Type A)
(→ page 71, 72, 76)
5. SERVICE Port (USB Type B)
(for service purpose only)
6. COMPUTER OUT Terminal (Mini D-Sub 15 Pin)
(→ page 73)
7. AUDIO OUT Mini Jack (Stereo Mini)
(→ page 73)
NOTE: The AUDIO OUT mini jack does not support earphone/
headphone terminal.
8. VIDEO IN Terminal (RCA)
(→ page 74)
9. VIDEO AUDIO IN L/MONO, R (RCA)
(→ page 74)
10. LAN Port (RJ-45)
(→ page 77)
11. USB Port (Type A)
For USB memory
(→ page 22,77)
1
6
3 4 11
12 10
12. PC CONTROL Port (D-Sub 9 Pin)
(→ page 98)
Use this port to connect a PC or control system.
This enables you to control the projector using serial
communication protocol. If you are writing your own
program, typical PC control codes are on page 98.
13. Rear Remote Sensor
(→ page 8)
5
13
6
Page 18
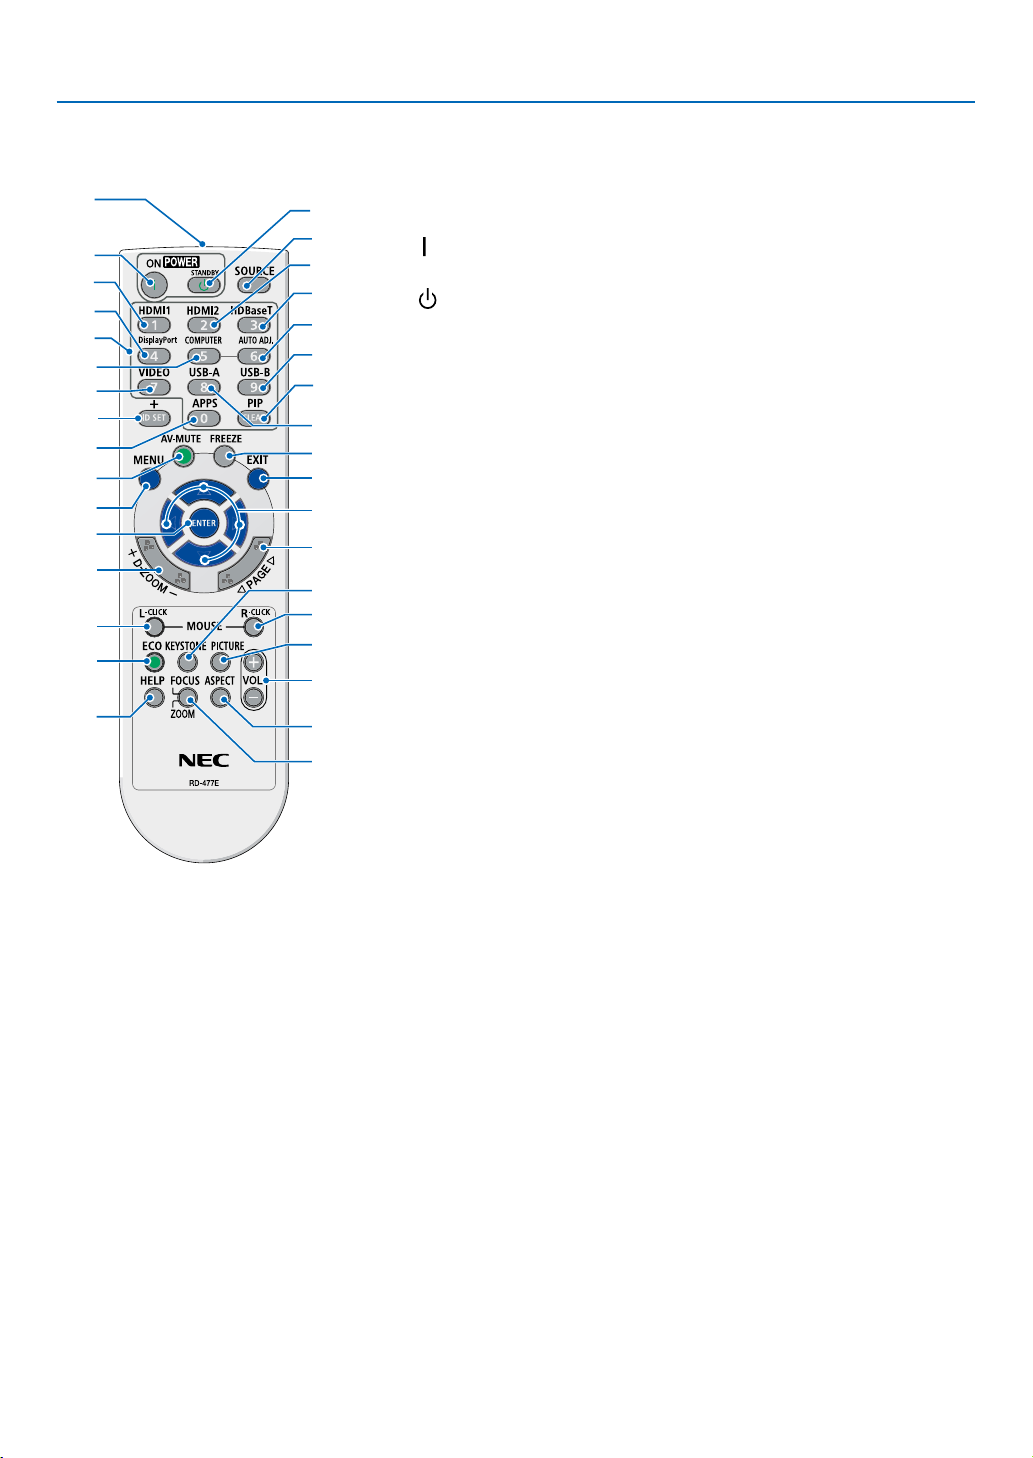
❹ Part Names of the Remote Control
1
17
31
32
33
21
22
27
29
30
26
12
18
10
13
1. Introduction
1. Infrared Transmitter
3
(→ page 8)
4
2
5
8
16
9
11
15
14
19
20
23
24
25
28
34
2. ( ) POWER ON Button
6
(→ page 11)
7
3. ( )POWER STANDBY
Button
(→ page 18)
4. SOURCE Button
(→ page 12)
5. HDMI 1 Button
(→ page 12)
6. HDMI 2 Button
(→ page 12)
7. HDBaseT Button
(This button does not work on this
series of projectors)
8. DisplayPort Button
(This button does not work on this
series of projectors)
9. COMPUTER Button
(→ page 12)
10. AUTO ADJ. Button
(→ page 17)
11. VIDEO Button
(→ page 12)
12. USB-A Button
(→ page 12, 22)
13. USB-B Button
(This button does not work on this
series of projectors)
14. APPS Button
(→ page 14)
15. ID SET Button
(→ page 52)
16. Numeric Keypad Button/
CLEAR Button
(→ page 52)
17. PIP Button
(PIP button does not work on this
series of projectors)
18. FREEZE Button
(→ page 20)
19. AV-MUTE Button
(→ page 20)
20. MENU Button
(→ page 24)
21. EXIT Button
22. ▲▼◀▶ Button
23. ENTER Button
24. D-ZOOM (+)(–) Button
(→ page 20, 21)
25. MOUSE L-CLICK Button*
(This button does not work on this
series of projectors)
26. MOUSE R-CLICK Button*
(This button does not work on this
series of projectors)
27. PAGE ▽/△ Button
(This button does not work on this
series of projectors)
28. ECO Button
(→ page 38)
29. KEYSTONE Button
(→ page 16, 44)
30. PICTURE Button
(→ page 34, 35)
31. VOL. (+)(–) Button
(→ page 17)
32. ASPECT Button
(→ page 30)
33. FOCUS/ZOOM Button
(This button does not work on this
series of projectors)
34. HELP Button
(→ page 56, 87)
7
Page 19
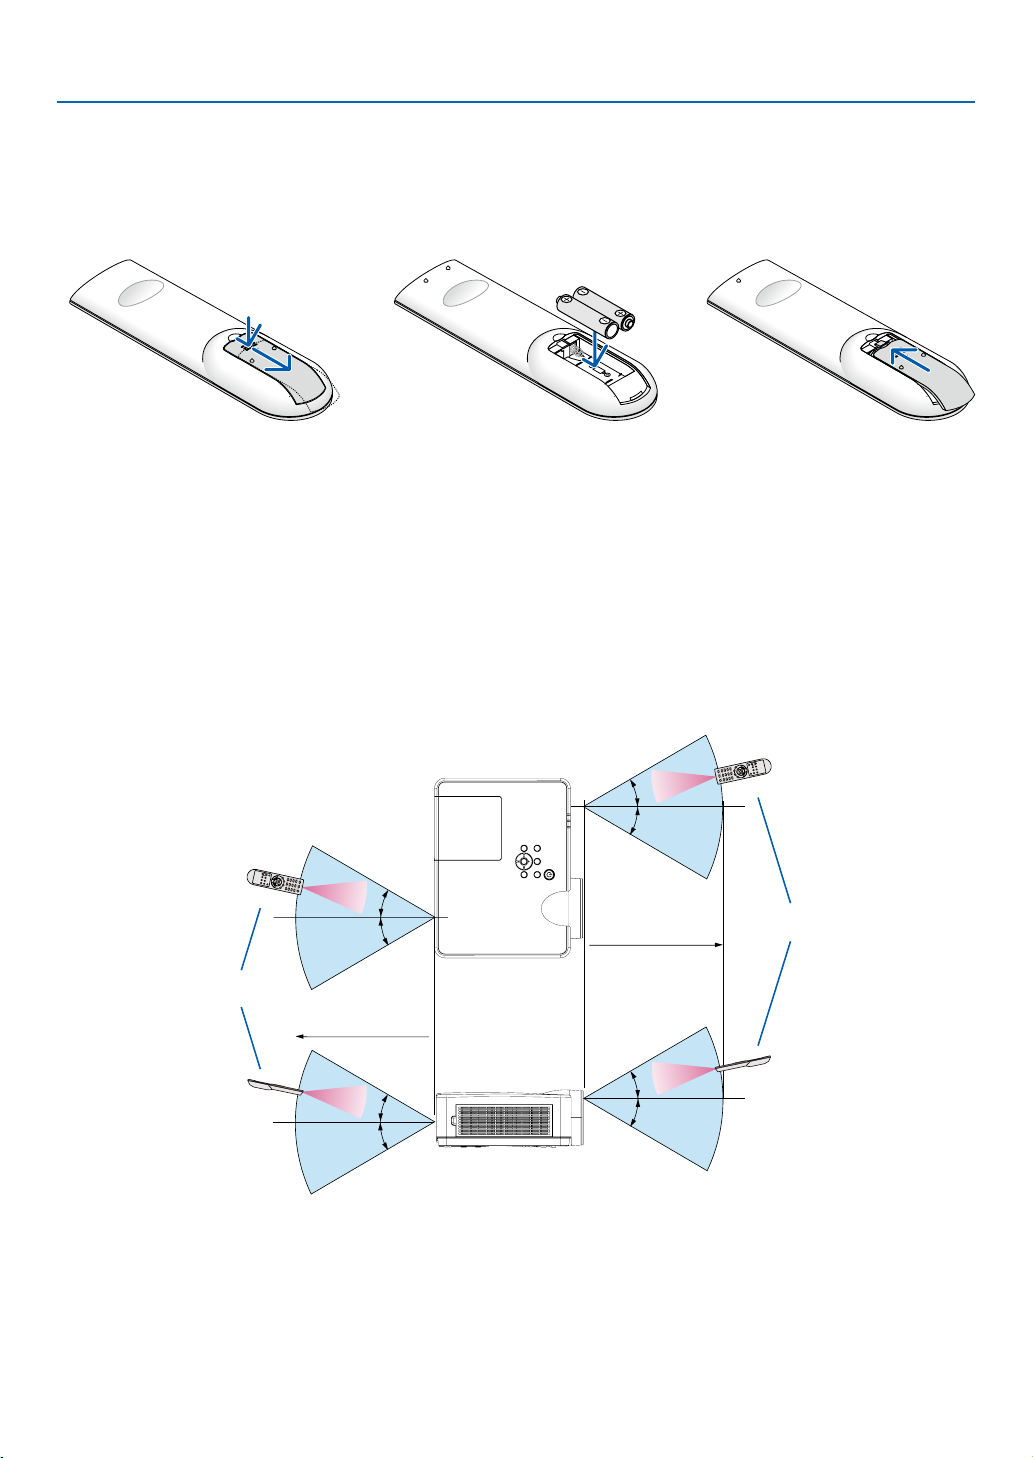
Battery Installation
1. Press firmly and slide the battery cover off.
2. Install new batteries (AAA).
Ensure that you have the batteries’ polarity (+/−) aligned
correctly.
1. Introduction
3. Slip the cover back over the
batteries until it snaps into
place. Do not mix different
types of batteries or new and
old batteries.
OPEN
Remote Control Precautions
• Handle the remote control carefully.
• If the remote control gets wet, wipe it dry immediately.
• Avoid excessive heat and humidity.
• Do not short, heat, or take apart batteries.
• Do not throw batteries into fire.
• If you will not be using the remote control for a long time, remove the batteries.
• Ensure that you have the batteries’ polarity (+/−) aligned correctly.
• Do not use new and old batteries together, or use different types of batteries together.
• Dispose of used batteries according to your local regulations.
Operating Range for Wireless Remote Control
30°
30°
30°
30°
22 feet/7 m
OPEN
Remote control
Remote control
22 feet/7 m
30°
30°
30°
30°
• The infrared signal operates by line-of-sight up to a distance of about 22 feet/7 m and within a 60-degree angle
of the remote sensor on the projector cabinet.
• The projector will not respond if there are objects between the remote control and the sensor, or if strong light
falls on the sensor. Weak batteries will also prevent the remote control from properly operating the projector.
8
Page 20

2. Projecting an Image (Basic Operation)
This section describes how to turn on the projector and to project a picture onto the screen.
❶ Flow of Projecting an Image
Step 1
• Connecting your computer / Connecting the power cord (→ page 10)
Step 2
• Turning on the projector (→ page 11)
Step 3
• Selecting a source (→ page 12)
Step 4
• Adjusting the picture size and position (→ page 13)
• Correcting keystone distortion [KEYSTONE] (→ page 16)
Step 5
• Adjusting a picture and sound
- Optimizing a computer signal automatically (→ page 17)
- Turning up or down volume (→ page 18)
Step 6
• Making a presentation
Step 7
• Turning off the projector (→ page 18)
Step 8
• When Moving the Projector (→ page 19)
9
Page 21
2. Projecting an Image (Basic Operation)
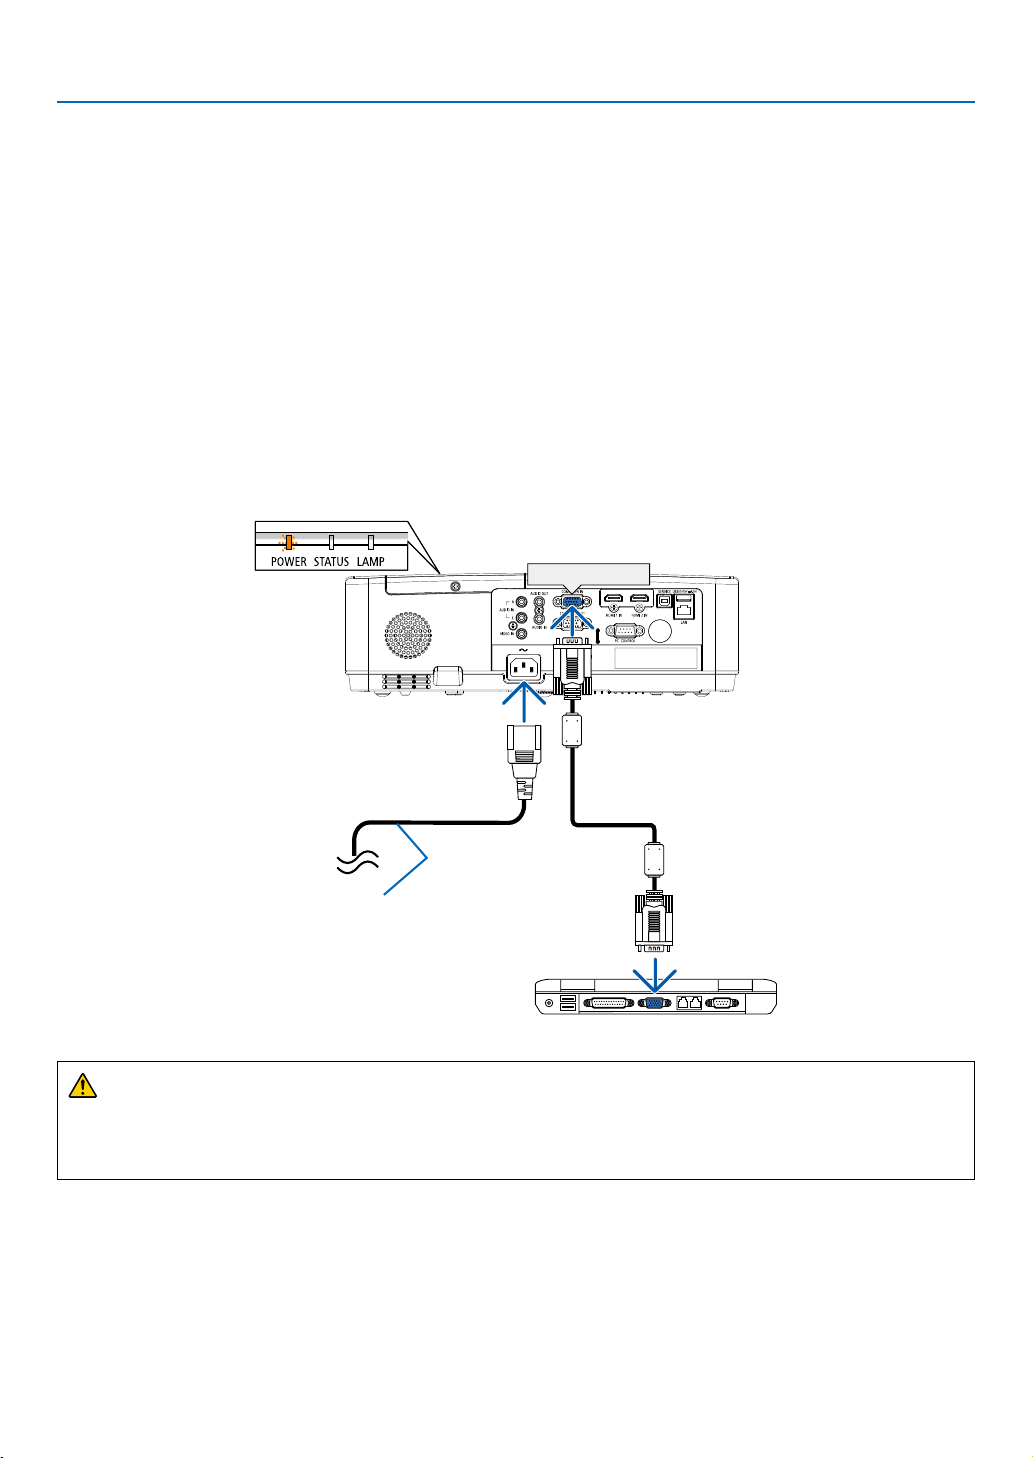
❷ Connecting Your Computer/Connecting the Power Cord
1. Connect your computer to the projector.
This section will show you a basic connection to a computer. For information about other connections, see
“6. Installation and Connections” on page 71.
Connect the computer cable (VGA) between the projector’s COMPUTER IN terminal and the computer’s port (mini
D-Sub 15 Pin). Turn two thumb screws of both terminals to fix the computer cable (VGA).
2. Connect the supplied power cord to the projector.
First connect the supplied power cord’s three-pin plug to the AC IN terminal of the projector, and then connect
another plug of the supplied power cord directly in the wall outlet. Do not use any plug converter.
The projector’s power indicator will start blinking orange.
* This will apply for both indicators when [NORMAL] is selected for [STANDBY MODE]. See the Power Indicator
section. (→ page 90)
COMPUTER IN
Make sure that the
prongs are fully inserted
→ To wall outlet
into both the AC IN and
the wall outlet.
CAUTION:
Parts of the projector may become temporarily heated if the projector is turned off with the POWER button or if
the AC power supply is disconnected during normal projector operation.
Be careful to handle the projector.
10
Page 22
❸ Turning on the Projector
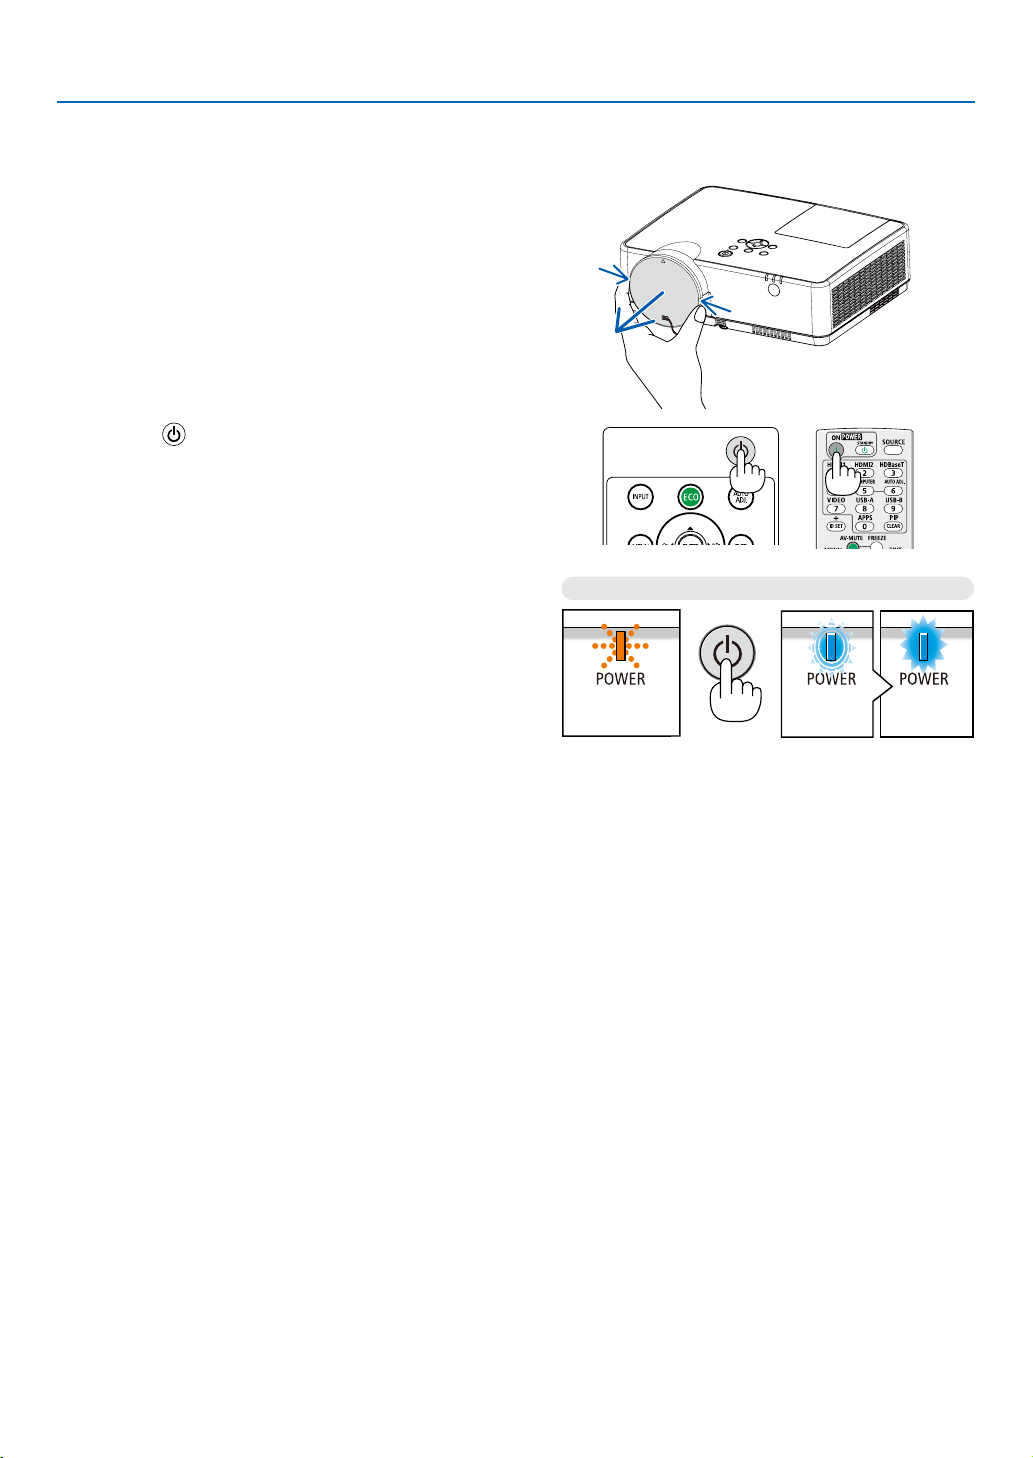
1. Remove the lens cap.
Press and hold both ends of the lens cap and pull it toward
you.
2. Press the (POWER) button on the projector cabinet
or the POWER ON button on the remote control.
The POWER indicator will blink and the projector will
become ready to use.
TIP:
• When the message “PIN code” is displayed, it means that the
[SECURITY] feature is turned on.
(→ page 49)
After you turn on your projector, ensure that the computer
or video source is turned on.
2. Projecting an Image (Basic Operation)
Standby Blinking Power On
Blinking orange light Blinking blue
light
(→ page 90)
Steady blue
light
11
Page 23
2. Projecting an Image (Basic Operation)
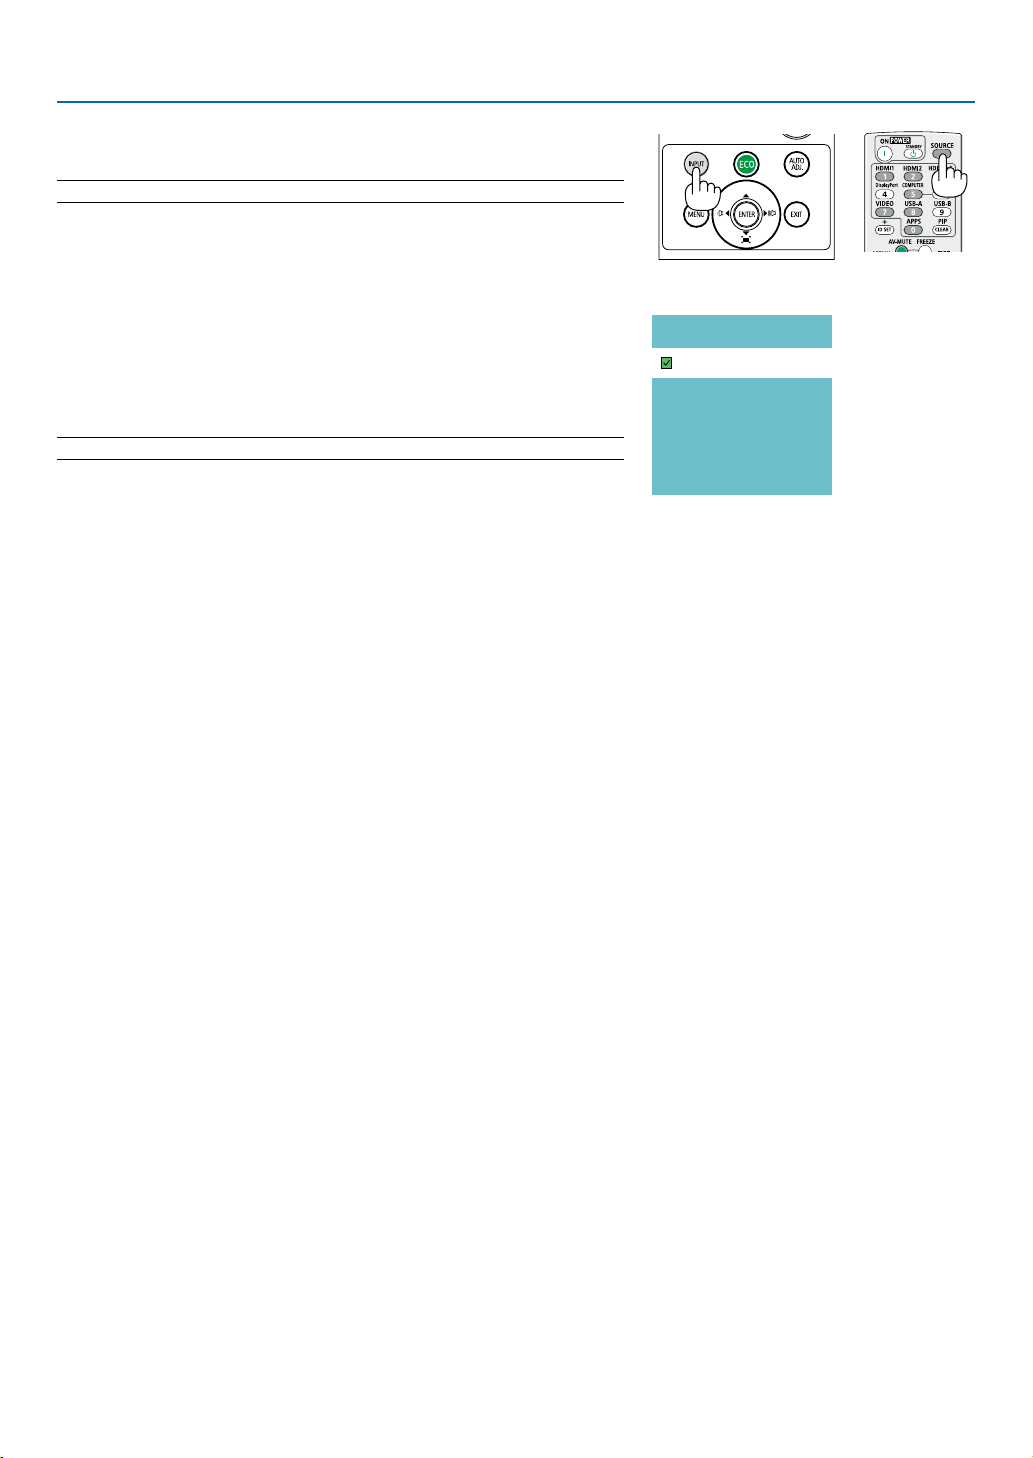
❹ Selecting a Source
Selecting the computer or video source
NOTE: Turn on the computer or video source equipment connected to the projector.
Detecting the Signal Automatically
Press the INPUT button once. The projector will search for the available
input source and display it. The input source will change as follows:
Computer →HDMI1 → HDMI2 → Video → USB-A → LAN
• With the INPUT screen displayed, you can press the ▼▼ button to
select the input source.
TIP: If no input signal is present, the input will be skipped.
Using the Remote Control
Press any one of the Computer, HDMI1, HDMI2, Video, USB-A, or APPS
buttons.
Computer
HDMI 1
HDMI 2
Video
USB-A
LAN
12
Page 24
2. Projecting an Image (Basic Operation)
❺ Adjusting the Picture Size and Position
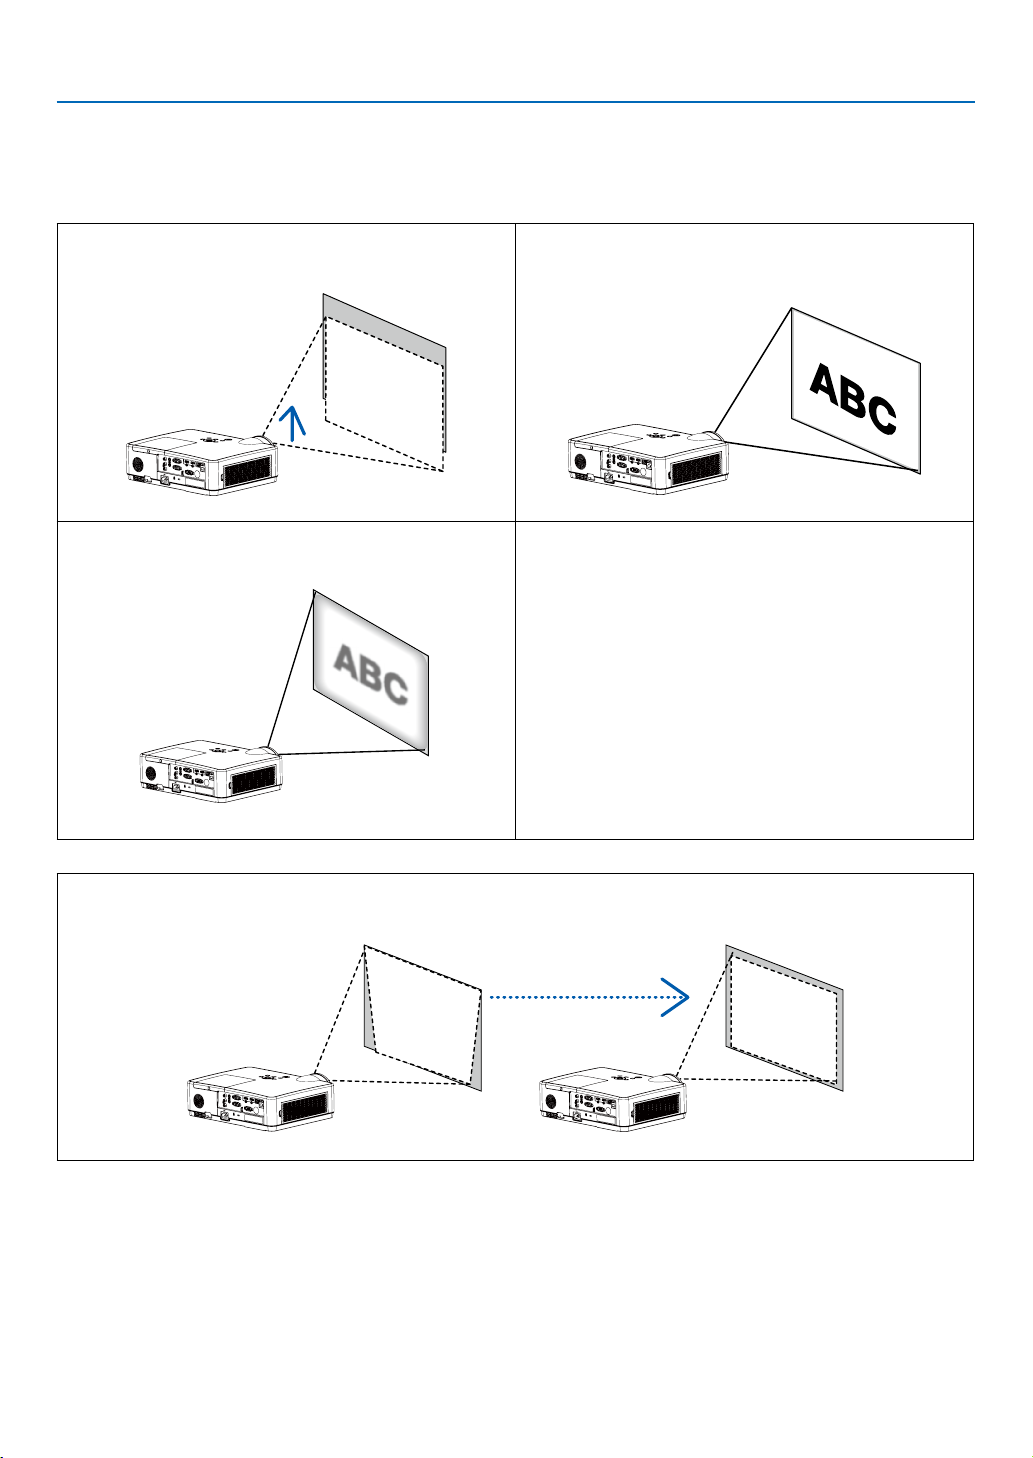
Use the adjustable tilt foot, the zoom function or the focus ring to adjust the picture size and position.
In this chapter drawings and cables are omitted for clarity.
Adjusting the throw angle (the height of an image)
[Tilt foot] (→ page 14)
Adjusting the focus
[Focus ring] (→ page 15)
Finely adjusting the size of an image
[Zoom lever] (→ page 15)
Adjusting the keystone correction [KEYSTONE]* (→ page 16)
Automatic Keystone Correction function is turned on at the time of shipment.
To perform keystone correction manually, see “6. Correcting Keystone Distortion [KEYSTONE]” on page 16.
13
Page 25
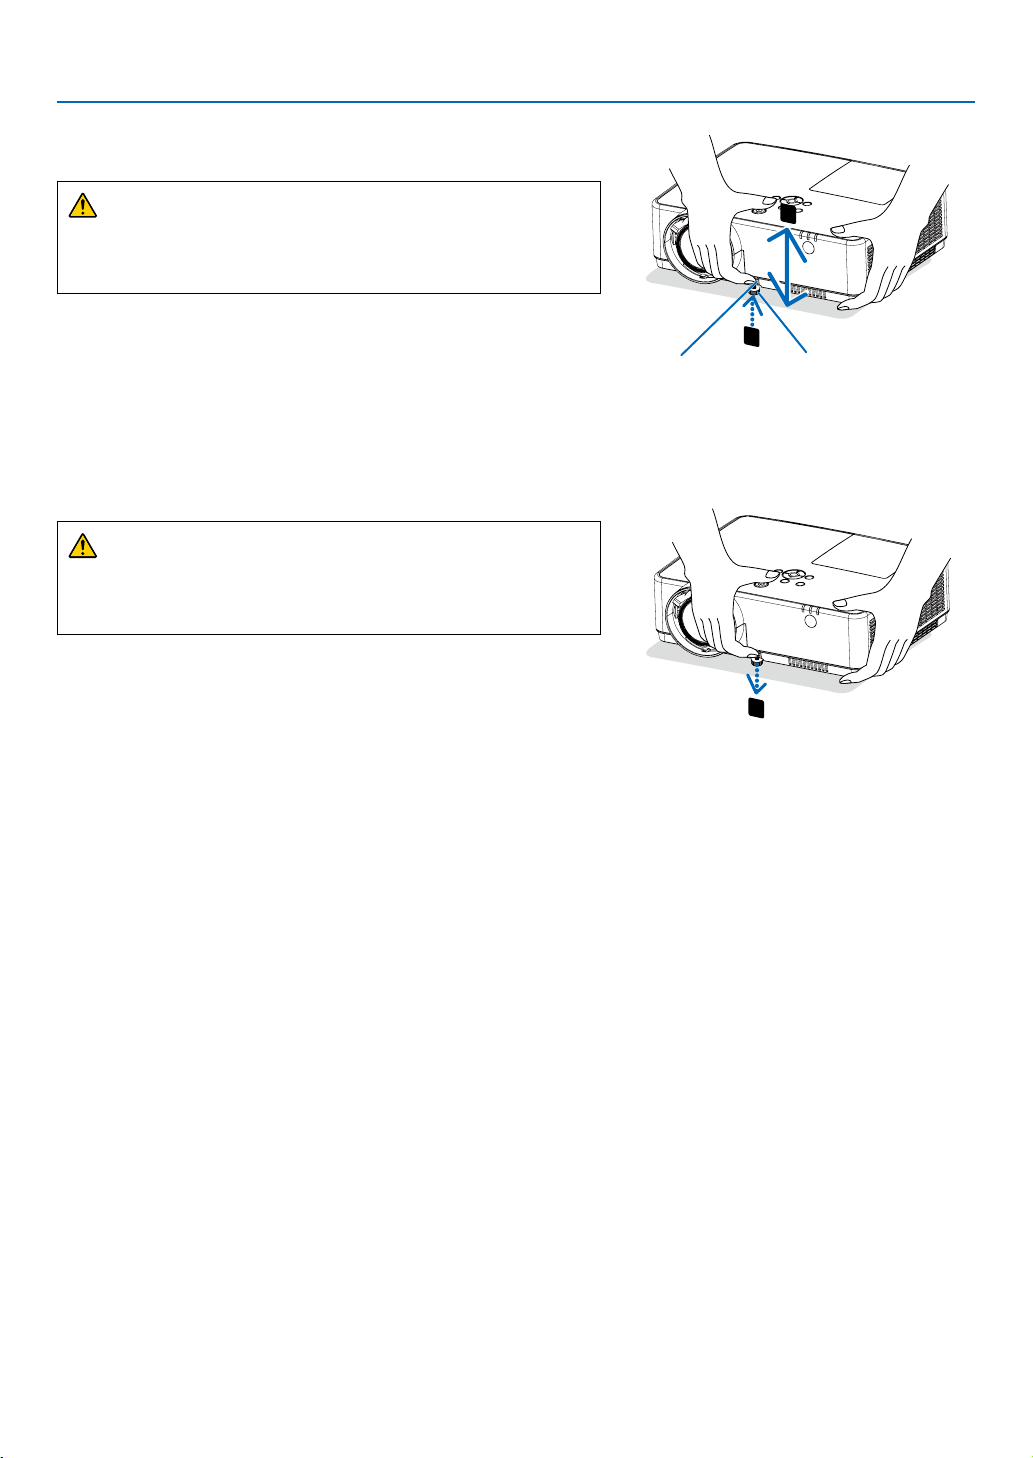
Adjust the Tilt Foot
1. Lift the front edge of the projector.
2. Projecting an Image (Basic Operation)
CAUTION:
Do not try to touch the exhaust vent during Tilt Foot adjustment
as it can become heated while the projector is turned on and after
it is turned off.
2. Push up and hold the Adjustable Tilt Foot Lever on the front
of the projector to extend the adjustable tilt foot.
3. Lower the front of the projector to the desired height.
4. Release the Adjustable Tilt Foot Lever to lock the Adjustable
tilt foot.
The tilt foot can be extended up to 1.6 inch/40 mm.
There is approximately 10 degrees (up) of adjustment for the front
of the projector.
CAUTION:
• Do not use the tilt-foot for purposes other than originally intended.
Misuses such as using the tilt foot to carry or hang (from the wall
or ceiling) the projector can cause damage to the projector.
1
2
Adjustable Tilt FootAdjustable Tilt
Foot Lever
3
14
Page 26
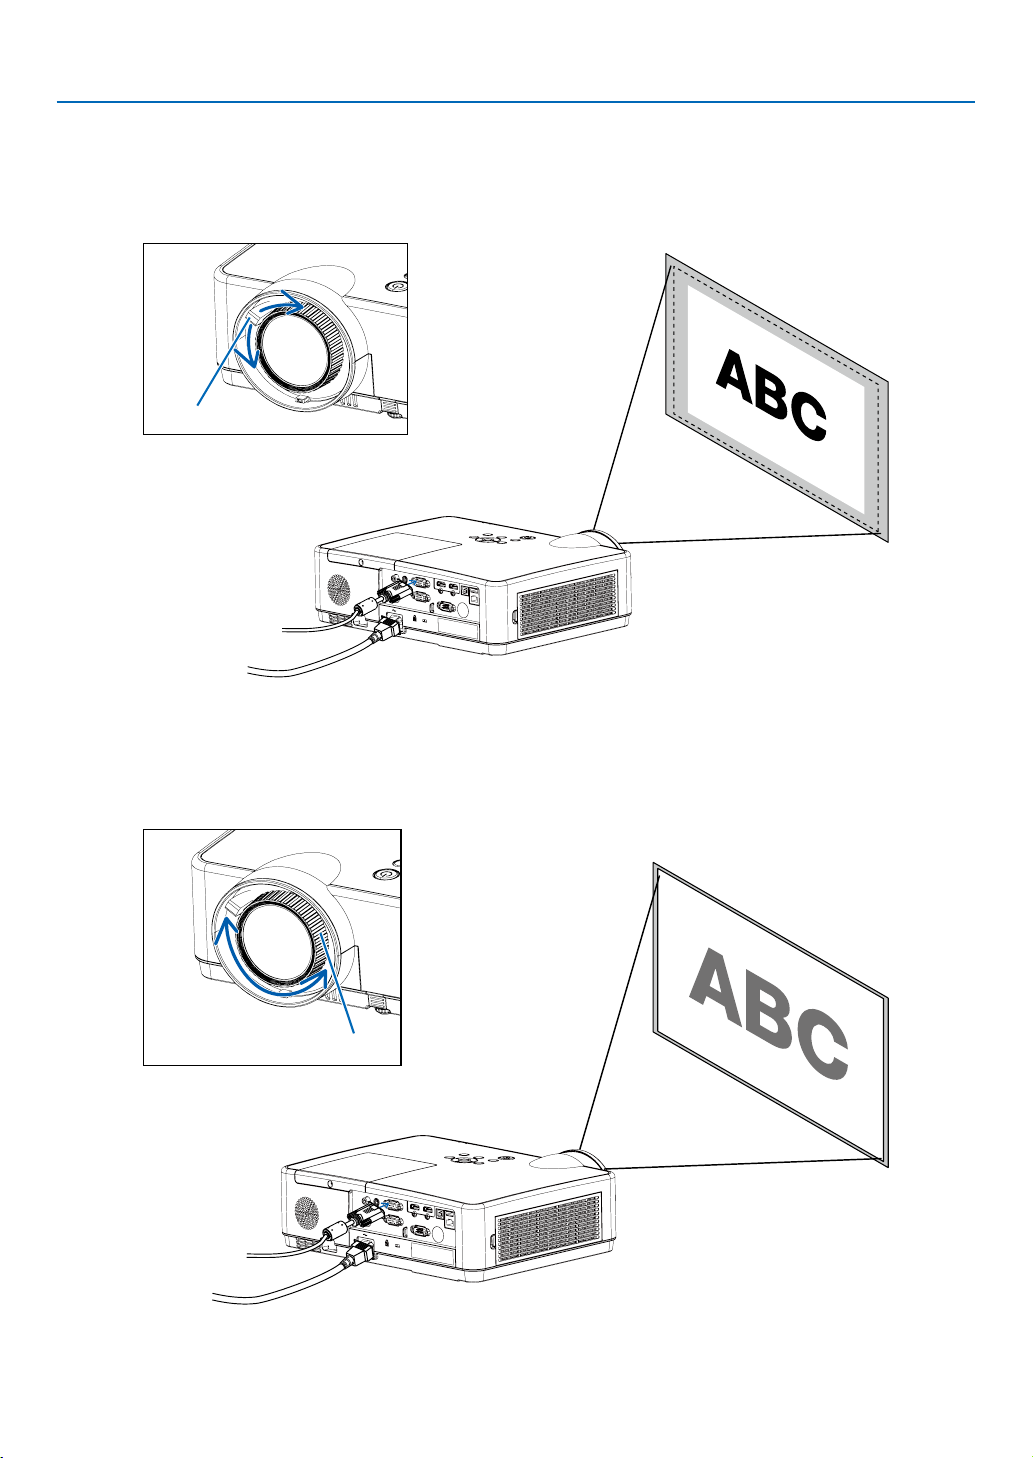
Zoom
Use the ZOOM lever to adjust the image size on the screen.
Zoom Lever
2. Projecting an Image (Basic Operation)
Focus
Use the FOCUS ring to obtain the best focus.
Focus Ring
15
Page 27

2. Projecting an Image (Basic Operation)
❻ Correcting Keystone Distortion [KEYSTONE]
You may adjust keystone distortion of image in your projector with the V keystone adjustment. Follow steps below
to adjust keystone distortion of projected image manually.
Press the KEYSTONE button on your remote controller. The keystone adjustment dialog box displays ( including
H/V keystone, 4-Corner correction, 6-Corner correction, Curved correction, Grid Image Tune, Reset) , press ▲▼◀
▶button to adjust keystone distortion.
You may save your settings for keystone adjustment.
• H/V Keystone......Adjust the projected image when the projector is on the horizontal or vertical keystone distortion.
• 4-Corner correction......Adjust the projected image when the projector is keystone distortion of four corners .
• 6-Corner correction......Adjust the projected image when the projector is keystone distortion of four corners.
• Curved correction......Adjust the projected image when the projector linearity is uneven or the projected images
bent vertically and horizontally.
• Grid Image Tune......Adjust the local points of the projected image.
• Reset......The correction values will be restored to the factory defaults.
NOTE:
• The arrow mark looks white when there is no keystone adjustment in existence.
• The arrow mark indicating the adjustment direction turns red.
• The arrow mark disappears when the maximum adjustment limit reaches.
• The keystone prompt box will disappear if you press the keystone button again when it is displaying. Press the ENTER button again to
switch the four correction items.
• The adjustable range is subject to source of signal input.
• For further details about Keystone function, please turn to page 44-48.
• When using the VIEWER, you cannot use ▼ button on the panel to directly call up the keystone correction menu.
H/V Keystone
4-Corner correction
6-Corner correction
Curved correction
Grid Image Tune
Reset value
• Only for ME403U
H/V Keystone
4-Corner correction
Reset value
• Only for ME423W/ME383W/MC423W/MC393W/ME453X/MC453X.
16
Page 28
2. Projecting an Image (Basic Operation)
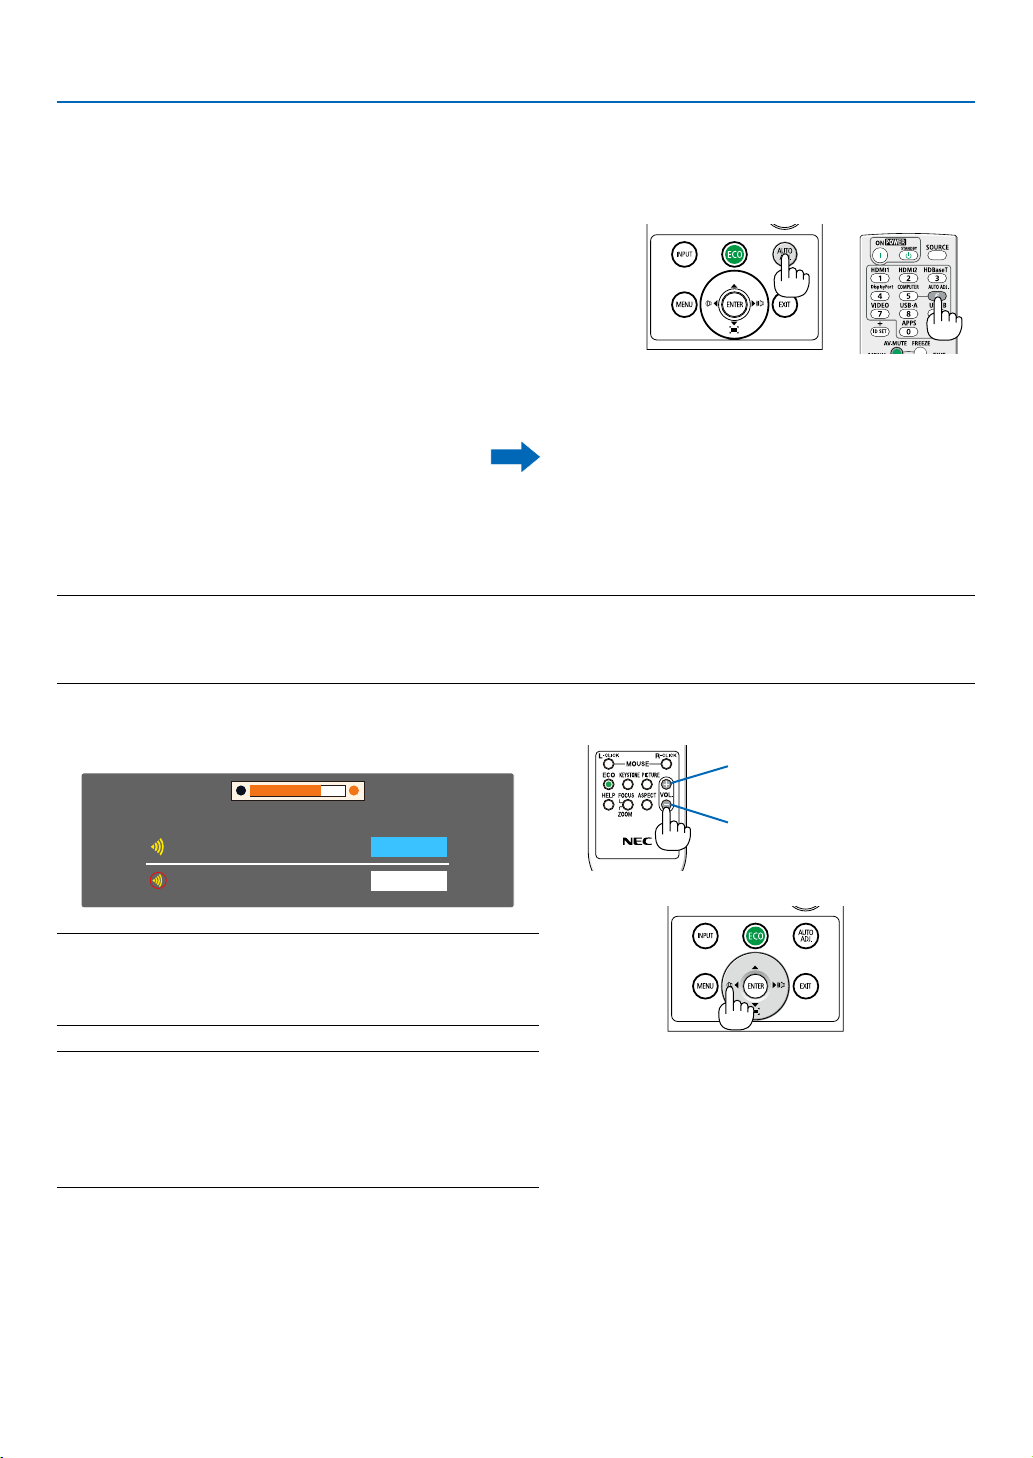
❼ Optimizing Computer Signal Automatically
Adjusting the Image Using Auto Adjust
Optimizing a computer image automatically. (COMPUTER)
Press the AUTO ADJ. button to optimize a computer image automatically.
This adjustment may be necessary when you connect your computer
for the first time.
[Poor picture] [Adjusted picture]
NOTE:
Some signals may take time to display or may not be displayed correctly.
• If the Auto Adjust operation cannot optimize the computer signal, try to adjust [Fine sync], [H position], [V position], and [H. size] manually.
(→ page 30, 31)
❽ Turning Up or Down Volume
Sound level from the speaker or audio output can be adjusted.
Volume
Mute
TIP: When no menus appear, the ◀ and ▶ buttons on the projector cabinet
work as a volume control.
When the above volume adjustment menu appears, press ▲ and ▼ buttons
to control the mute on and off.
NOTE:
• Volume control is not available with the ◀ or ▶ button when an image
is magnified by using the D-ZOOM (+) button or when the menu is
displayed.
• Volume control is not available with the ◀ or ▶ button when VIEWER
is used.
19
Off
Increase volume
Decrease volume
17
Page 29
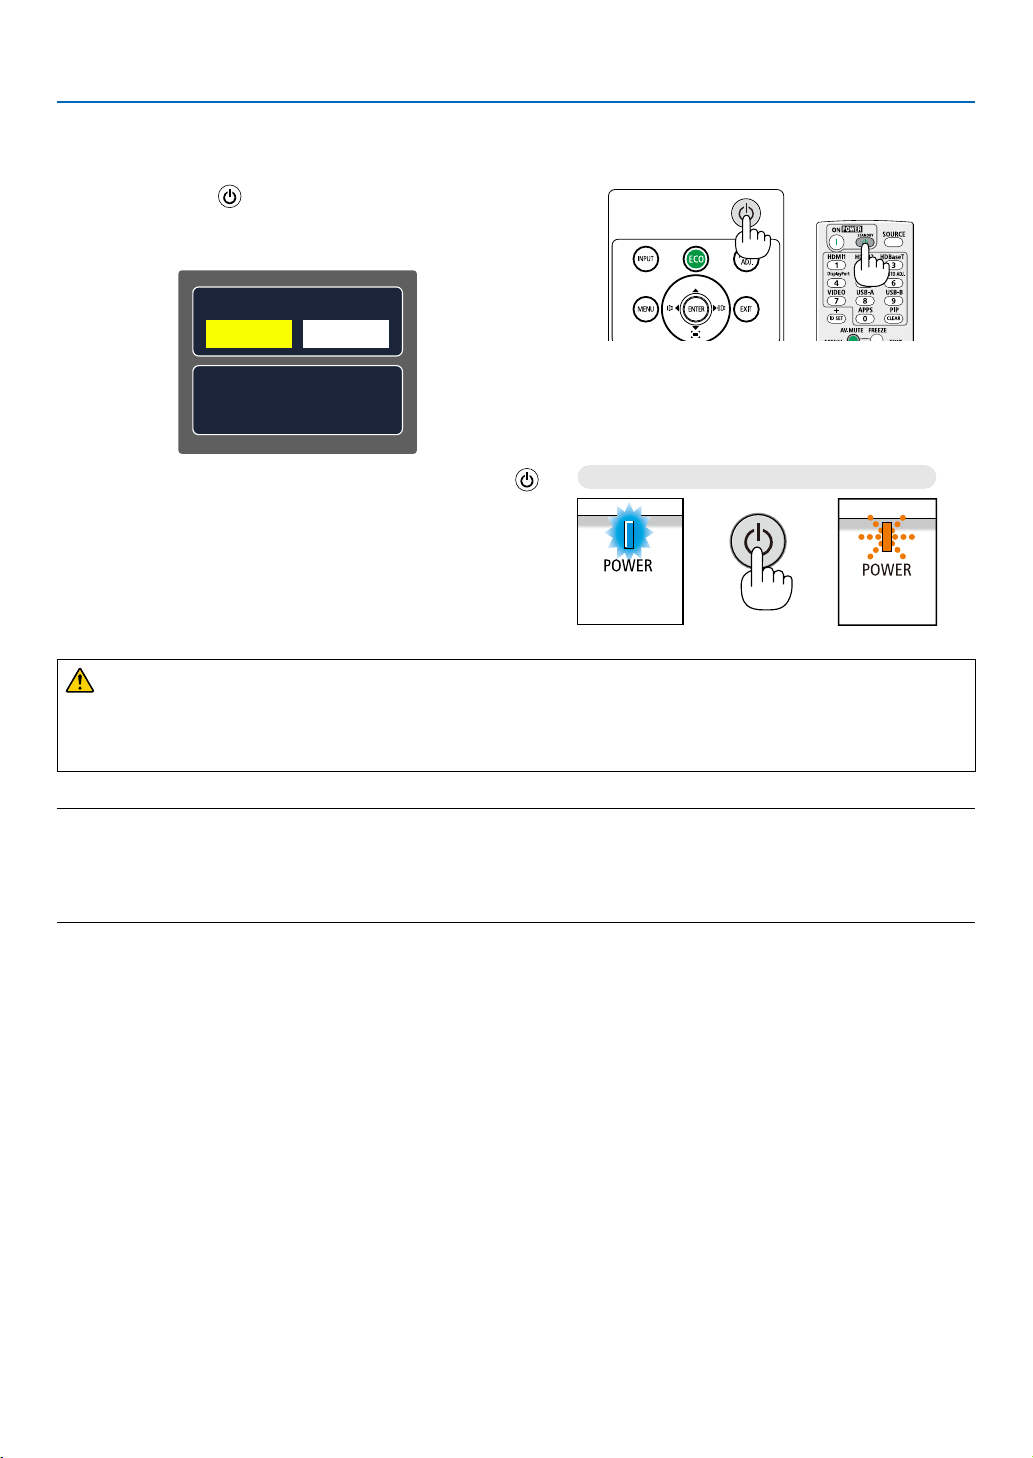
❾ Turning off the Projector
To turn off the projector:
1. First, press the (POWER) button on the projector
cabinet or the STANDBY button on the remote control.
The confirmation message will be displayed.
Power off?
Yes No
Carbon savings-session
[g-CO2]66.5200
2. Projecting an Image (Basic Operation)
2. Secondly, press the ENTER button or press the
Power On
Standby
(POWER) or the STANDBY button again.
The lamp will turn off and the projector will go into standby
mode. When in standby mode, the POWER indicator will
blinking orange and the STATUS indicator will turn off when
[Normal] is selected for [STANDBY MODE].
Steady blue light
Blinking orange
light
CAUTION:
Parts of the projector may become temporarily heated if the projector is turned off with the POWER button or if
the AC power supply is disconnected during normal projector operation.
Use caution when picking up the projector.
NOTE:
• While the power indicator is blinking blue in short cycles, the power cannot be turned off.
• You cannot turn off the power for 60 seconds immediately after turning it on and displaying an image.
• Do not disconnect the AC power supply to the projector within 10 seconds after making adjustment or setting changes and closing the
menu. Doing so can cause loss of adjustments and settings.
18
Page 30

❿ When Moving the Projector
Preparation: Make sure that the projector is turned off.
1. Put on the lens cap.
2. Unplug the power cord.
3. Disconnect any other cables.
• Remove the USB memory if it is inserted into the projector.
(→ page 22,77)
2. Projecting an Image (Basic Operation)
19
Page 31
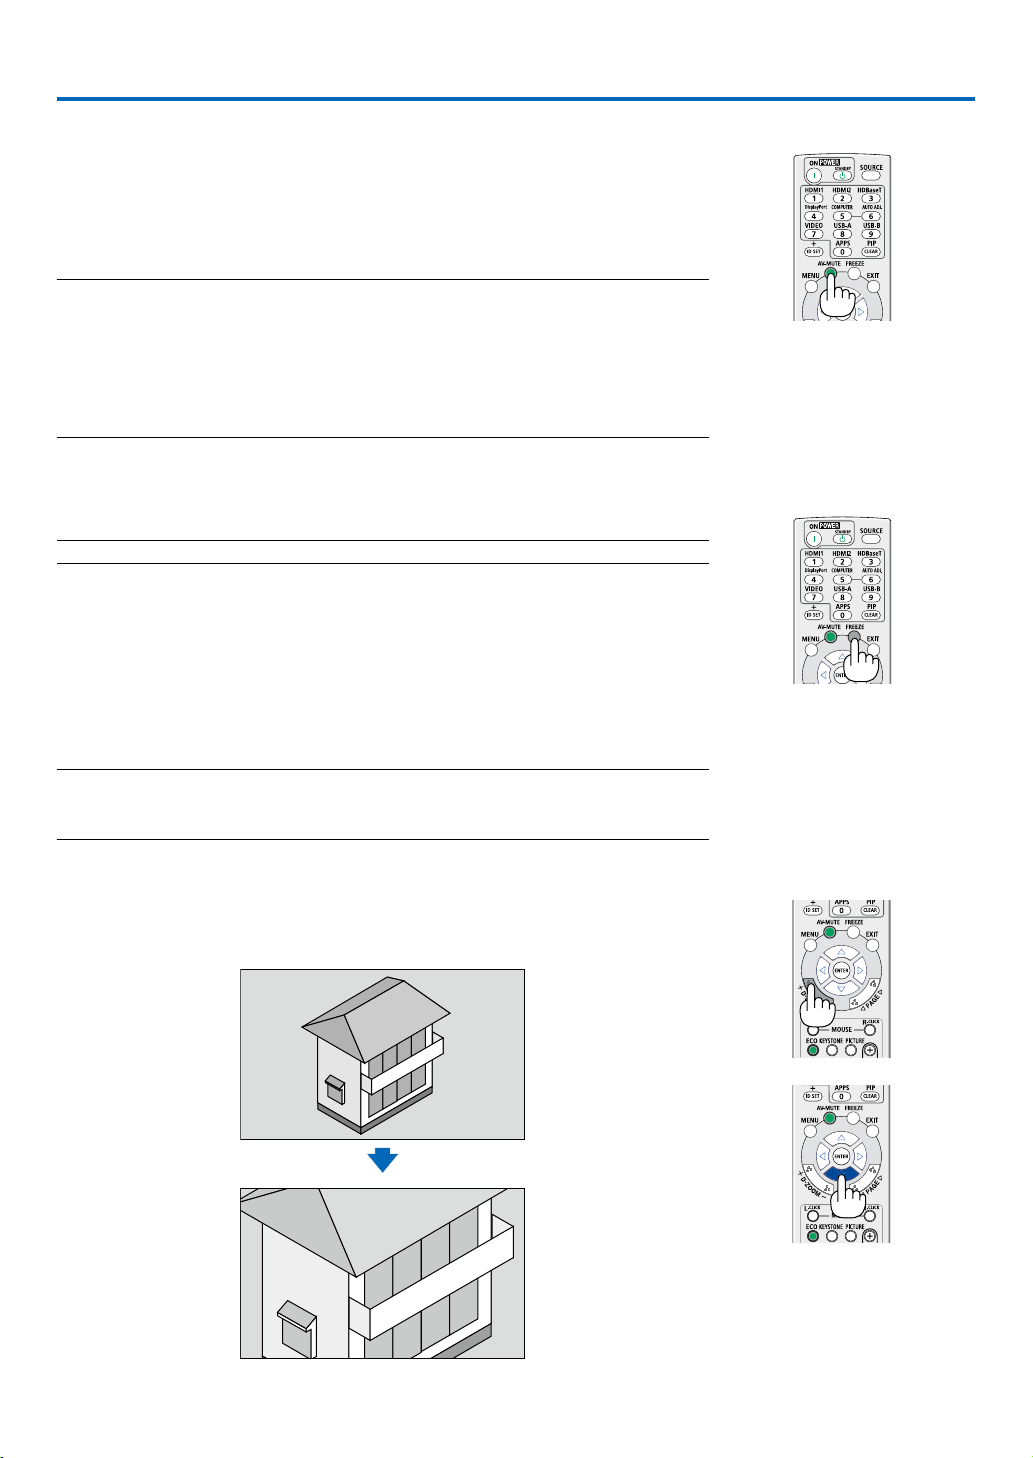
3. Convenient Features
❶ Turning off the Image and Sound
Press the AV-MUTE button to turn off the image and sound for a short period of
time. Press again to restore the image and sound.
The projector’s power-saving function will work 10 seconds after the image is
turned off.
As a result, the lamp power will be reduced.
NOTE:
• Even though the image is turned off, the menu still remains on the screen.
• Sound from the AUDIO OUT jack (Stereo mini) can be turned off.
• Even when the power-saving function works, the lamp power may be restored to its original level
temporarily.
• To restore the image, even if you press the AV-MUTE button immediately after the start of the
power-saving function, the lamp brightness may not be restored to its original level.
❷ Freezing a Picture
Press the FREEZE button to freeze a picture. Press again to resume motion.
NOTE: The image is frozen but the original video is still playing back.
• This feature can not be used when LAN, and USB-A is selected as the input
terminal.
❸ Magnifying a Picture
You can enlarge the picture up to four times.
NOTE:
• The maximum magnification may be less than four times depending on the signal.
• This feature can not be used when LAN, and USB-A is selected as the input terminal.
To do so:
1. Press the D-ZOOM (+) button to magnify the picture.
To move the magnified image, use the ▲,▼,◀ or ▶ button.
20
Page 32
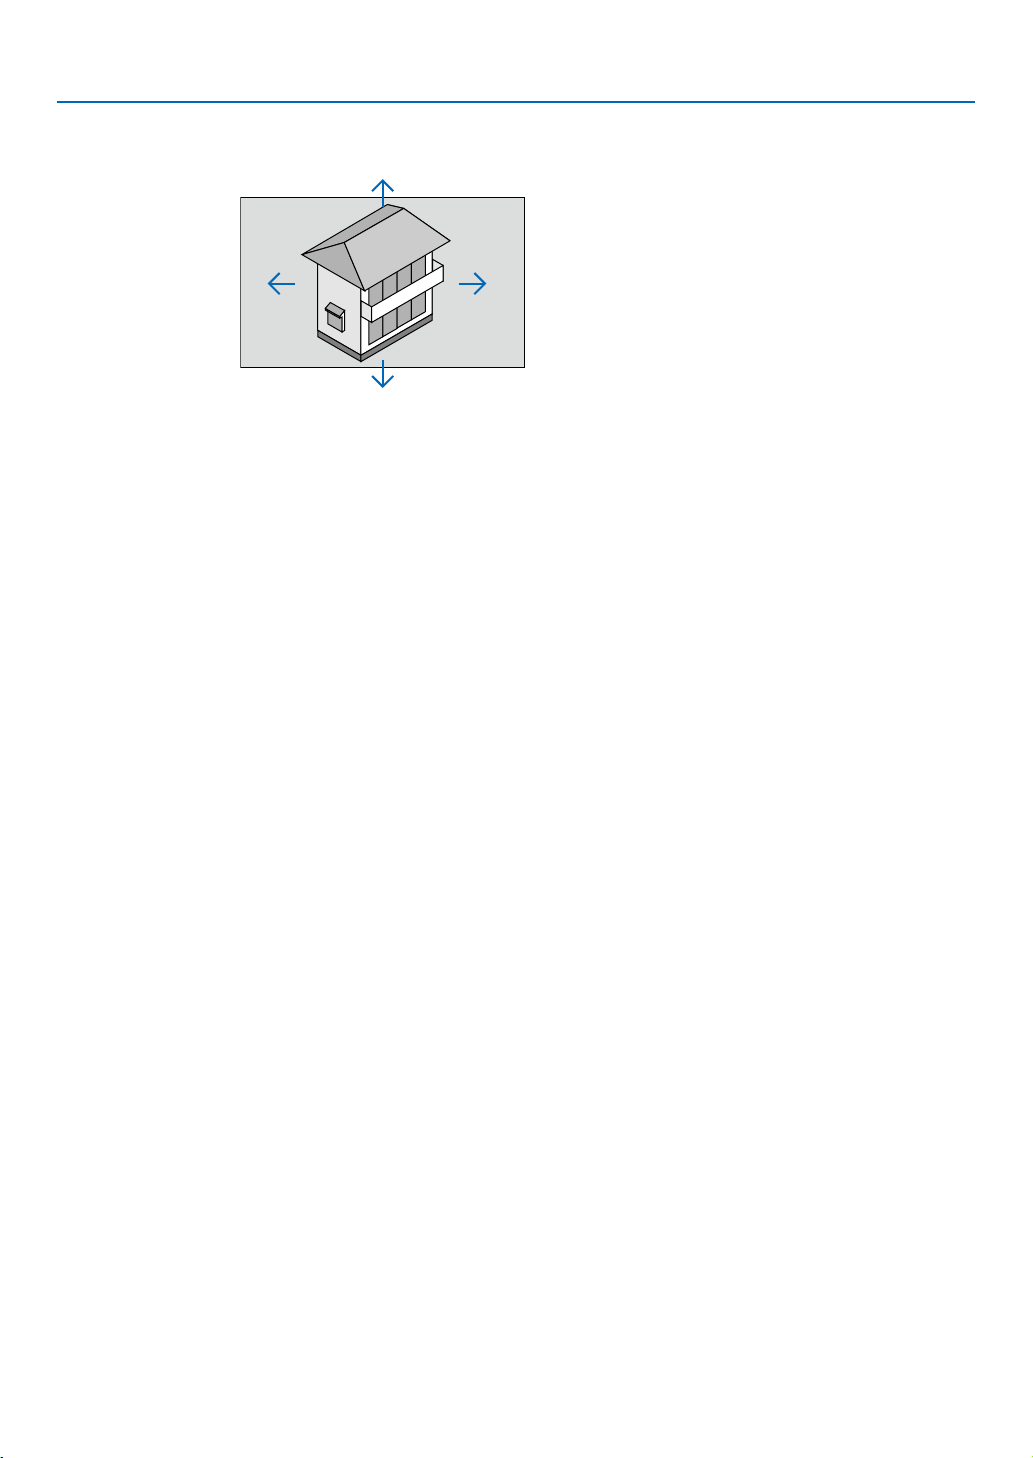
2. Press the ▲▼◀▶ button.
The area of the magnified image will be moved.
3. Convenient Features
21
Page 33
4. Using the VIEWER
Memory viewer function
When the USB memory inset into the projector, the viewer memory function can Project the video and pictures
stored in the USB memory.
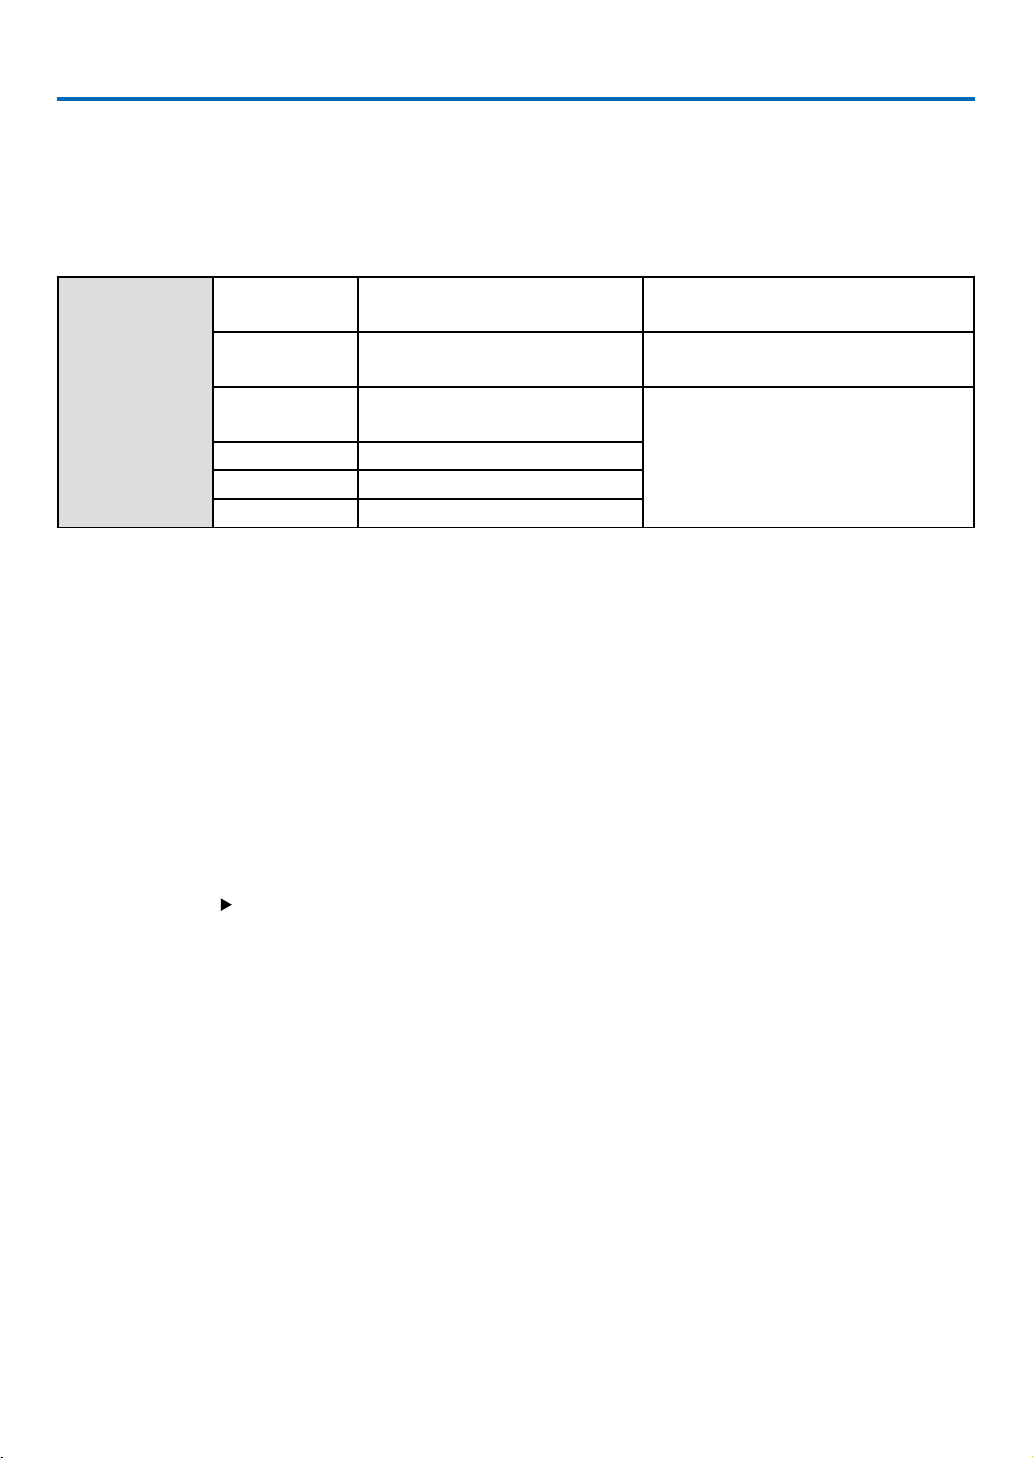
The projected content of memory viewer function
Memory viewer function supports the following picture files.
Maps
Extension
name
jpg/jpeg
bmp
Baseline encoder 24
Progressive RGB24 bit
1.4.8 bit palette-based
RGB24,32 bit
png 24, 48-bit True Color
Format Description
Max resolution: 10000x10000
Max resolution: Panel Resolution
Max resolution: 1280X800
gif 1,4,8-bit palette-based
tiff
Display memory viewer screen
When the USB memory inset into the projector, the viewer memory function can projecte the video and pictures
stored in the USB memory.
1) Press INPUT button on the remote controller and on the top control panel and select the input source of [USB-A].
2) Insert the USB memory into the <USB-A> terminal directly.
• Press RC enter to display standby screen instanly , while the USB memory icon display in the left corner of
the screen.
• When the USB memory is independent of the partition, it will display more than one USB icon.
3) Press ▲ ▼ button to switch required items.
• The root directory of the USB memory is displayed in a thumbnail.
Play image
Only one image show on the screen when you play it.
1) Press button to select a file.
2) Press <ENTER or > button.
• Full screen display
3) Press <ENTER > button.
• Press <ENTER> to return the thumbnail.
Play slide
The slide show mode in the USB-A menu is set to a special setting ,all images in the same folder can play automatically.
1) Press button to select a file.
2) Press ▲ ▼ button to select [USB-A] menu,then select [Set slide] menu.
3) Press <ENTER > button.
• Full screen display
• Press <ENTER> button to return the thumbnail.
22
Page 34

4. Using the VIEWER
The termination of memory viewer
The slide show mode in the USB-A menu is set to a special setting ,all images in the same folder can play automatically.
1) Press button to select , displayed in the left corner of the screen.
2) Press <ENTER > button.
3) Unplug the USB memory directly.
NOTE:
• Only USB memory up to FAT32 (32GB) can be read.
• When you insert a USB memory, please make sure insertion direction to avoid damaging the port.
• Please note the following points when inserting and removing USB memory:
a. The indicator flashes,when the USB memory insert into the projector or the projector is reading data.do not remove the USB memory
When the light is flashing.
b. If you use a USB memory device without indicator, the projector will not recognize when reading data. Please close its browse function
on and turn off the projector , then remove the USB memory.
c. Do not insert and remove USB memory frequently. Then remove it after the installation of at least 5 seconds. After removing at least 5
seconds and then reinsert it.
d.Due to the file format, some pictures cannot display thumbnails.
Precautions on processing and storage of USB memory
• If smoke or produce abnormal smell, close the external device and contact the dealer.
• Do not put foreign matter or metal items in the USB port. Static electricity may cause data loss or data damage.
23
Page 35

5. Using On-Screen Menu
❶ Menu item overview
Main menu Submemu
①
②
③
④
⑤
⑥
Display
Auto PC adj.
Fine sync 0
H position
V position
H.size
Aspect Normal
Orientation
Menu position
Background display
System
Front
Upper left
0
0
0
Blue
...
1. Display menu
• Select Auto PC adj., Fine sync, H position, V position, H. size to adjust the parameters to match the VGA
format.
• Aspect: XGA(Normal/Wide/Full/16:10), WXGA/WUXGA(Normal/Wide/Full/4:3).
---Video signal only supports Normal/Wide.
• Orientation: Choose Front, Auto ceiling/Rear, Auto ceiling/Front, Ceiling / Rear, Ceiling / Front and Rear.
• Menu position: Set screen menu display position on the screen.
• Background display: Sets the background color of the projection screen.
• Signal format: Select the compatible system signal format with input source.
2. Color adjust menu
Available options in the Image mode menu are Dynamic, Standard, Cinema, Blackboard (Green), Color-
board, or User image.
• For video signal input, the available color adjust options: Contrast, Brightness, Color, Tint, Red, Green,
Blue and Sharpness.
• For other signal input, the available color adjust options:Contrast, Brightness, Color temp. , Red, Green,
Blue and Sharpness.
3. Setting menu
Configuration of the basic function operation on the projector: On start, Standby mode, High altitude, ECO
mode, Cooling fast, Closed caption, Key lock, Iris, Baud rate, Sound and HDMI setup.
4. Expand menu
Available adjust options are Language, Auto setup, Keystone, Security, Power management, Filter, Test
pattern, Network setup, Control ID, Factory default and Lamp counter reset.
5. USB-A menu
Select parameter of Set slide, Slide transition effect, Sort order, Rotate, Best fit, Repeat, Apply.
6. Information menu
Display information about the projector.
24
Page 36
5. Using On-Screen Menu
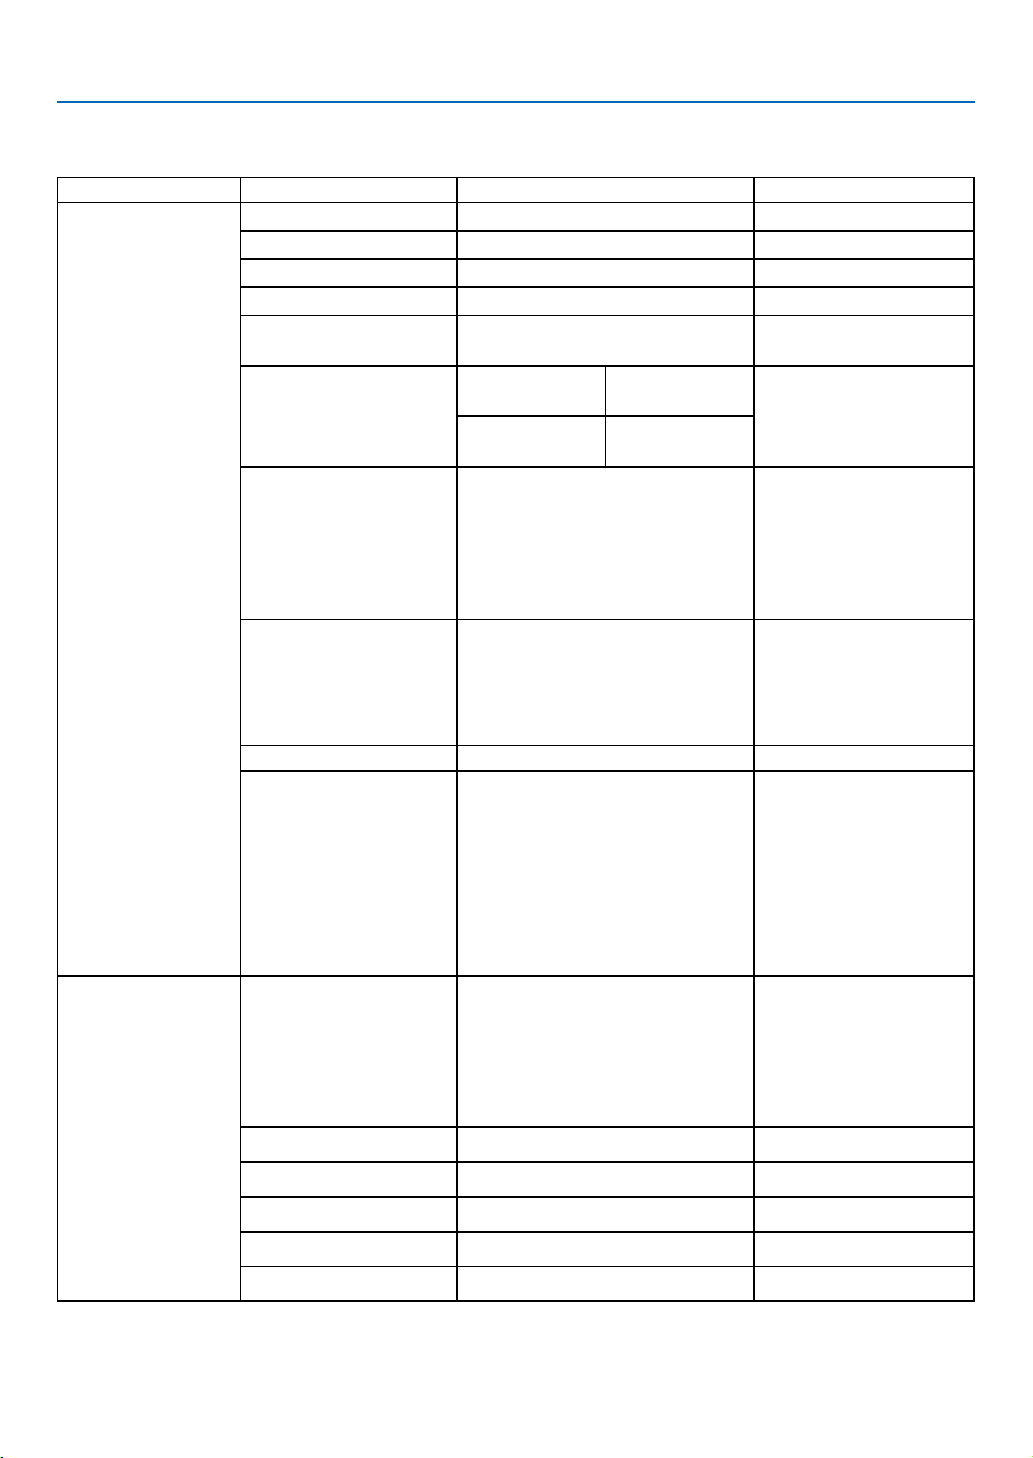
❷ List of Menu Items
Some menu items are not available depending on the input source.
Main menu Sub-menu Setting Remarks
Auto PC adj.
Fine sync 0-31
H position -5 - +5
V position -5 - +5
The range of H. size
differs from signals.
Video signal only supports
Normal/Wide.
Video Input
Display
Color adjust
H. Size -15 - +15
XGA
Aspect
WXGA/WUXGA
Front *
Rear
Orientation
Menu position
Background display Black,Blue*,Logo
Signal format
Image mode
Contrast
Ceiling / Front
Ceiling / Rear
Auto ceiling / Front
Auto ceiling / Rear
Upper left*
Upper right
Center
Lower left
Lower right
AUTO*
PAL
SECAM
NTSC
NTSC4.43
PAL-M
PAL-N
PAL-60
Standard*
Cinema
Blackboard(Green)
Colorboard
User image
Dynamic
0-63
Normal*/Wide/
Full/16:10
Normal*/Wide/
Full/4:3
Brightness
Color temp High/Mid/Low/User
Color
Tint
* The asterisk (*) indicates that the default setting varies depending on the signal.
0-63
0-63
0-63
25
Computer/HDMI
Video Input
Video Input
Input
Page 37
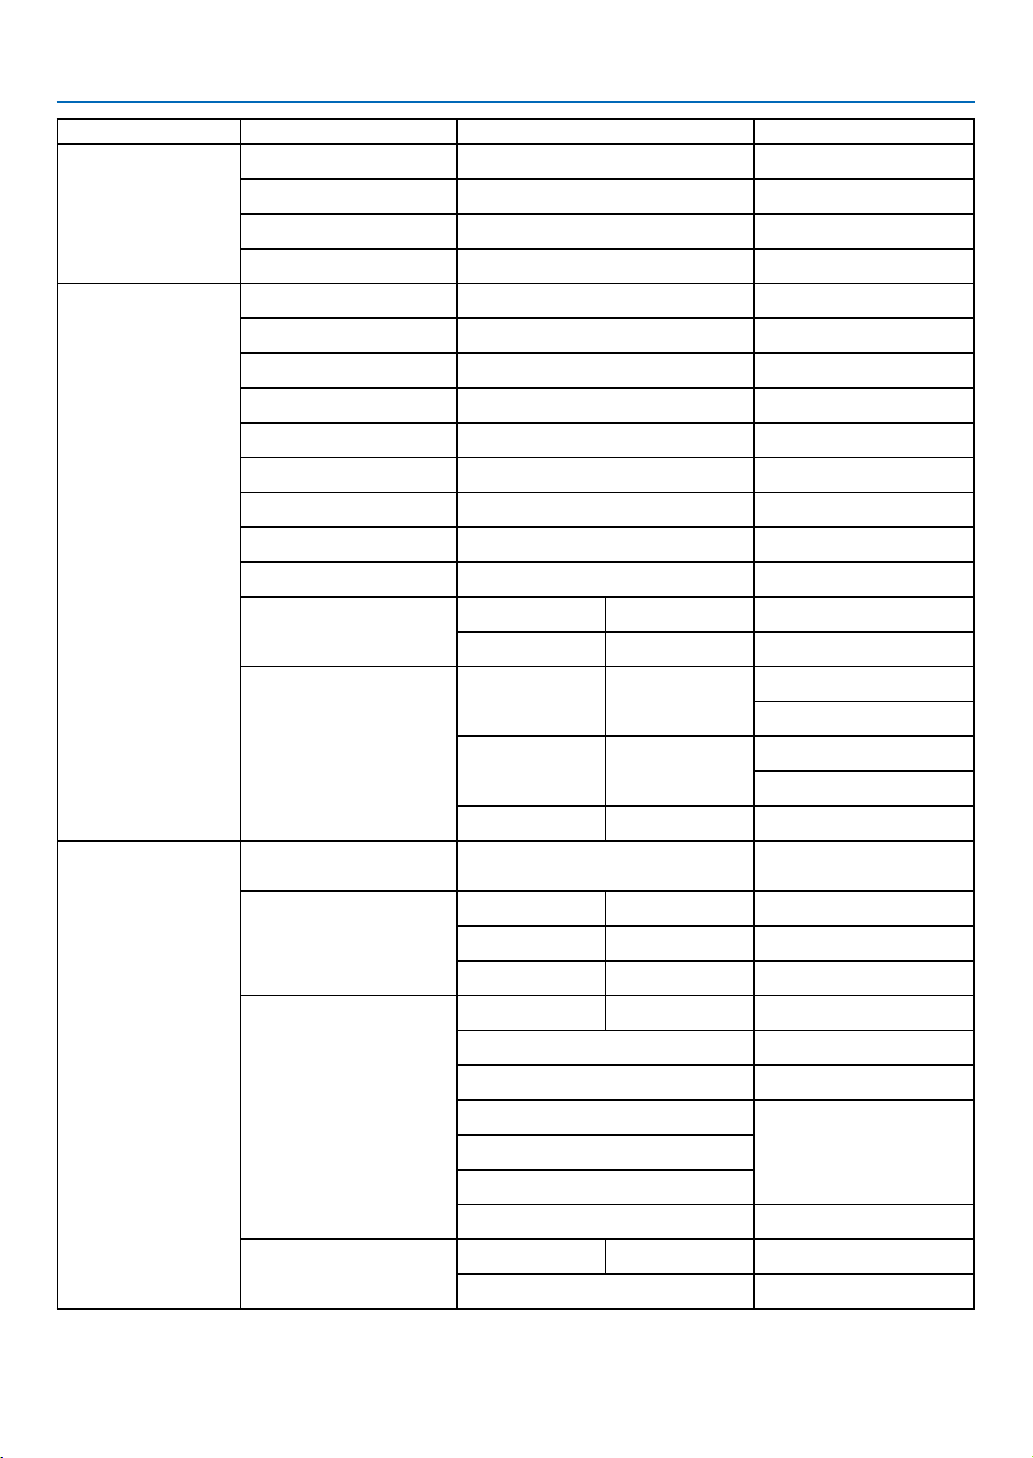
5. Using On-Screen Menu
Main menu Sub-menu Setting Remarks
Red
0-63
Color adjust
Setting
Green
Blue
Sharpness
On start On/Off*
Standby mode Normal*/Sleep/Network standby
High altitude On/Off*
ECO mode
Cooling fast Normal*/0 Sec/30 Sec
Closed caption Off*/CC1/CC2/CC3/CC4
Key lock On/Off*
Iris On/Off*
Baud rate 19200/4800/38400/9600
Sound
HDMI setup
0-63
0-63
0-15
Normal*/ECO1/ECO2/Boost
Volume 0-25
Mute On/Off*
Image
Sound
Auto/64-940/
0-1023
HDMI*/
Computer
HDMI EQ setup 0*/1/2/3
Language
Auto setup
Expand
Keystone
Security
* The asterisk (*) indicates that the default setting varies depending on the signal.
*1 This feature is not supported by ME423W/ME383W/MC423W/MC393W/ME453X/MC453X.
Projector provides multiple
language support
Input search
Auto PC adj. On/Off
Auto keystone On/Off*
Keystone Store* / Reset
H/V keystone
4-Corner correction
6-Corner correction*1
Curved correction*1
Grid image tune*1
Reset
PIN code lock On/Off*
PIN code change
On*/Off
26
Page 38
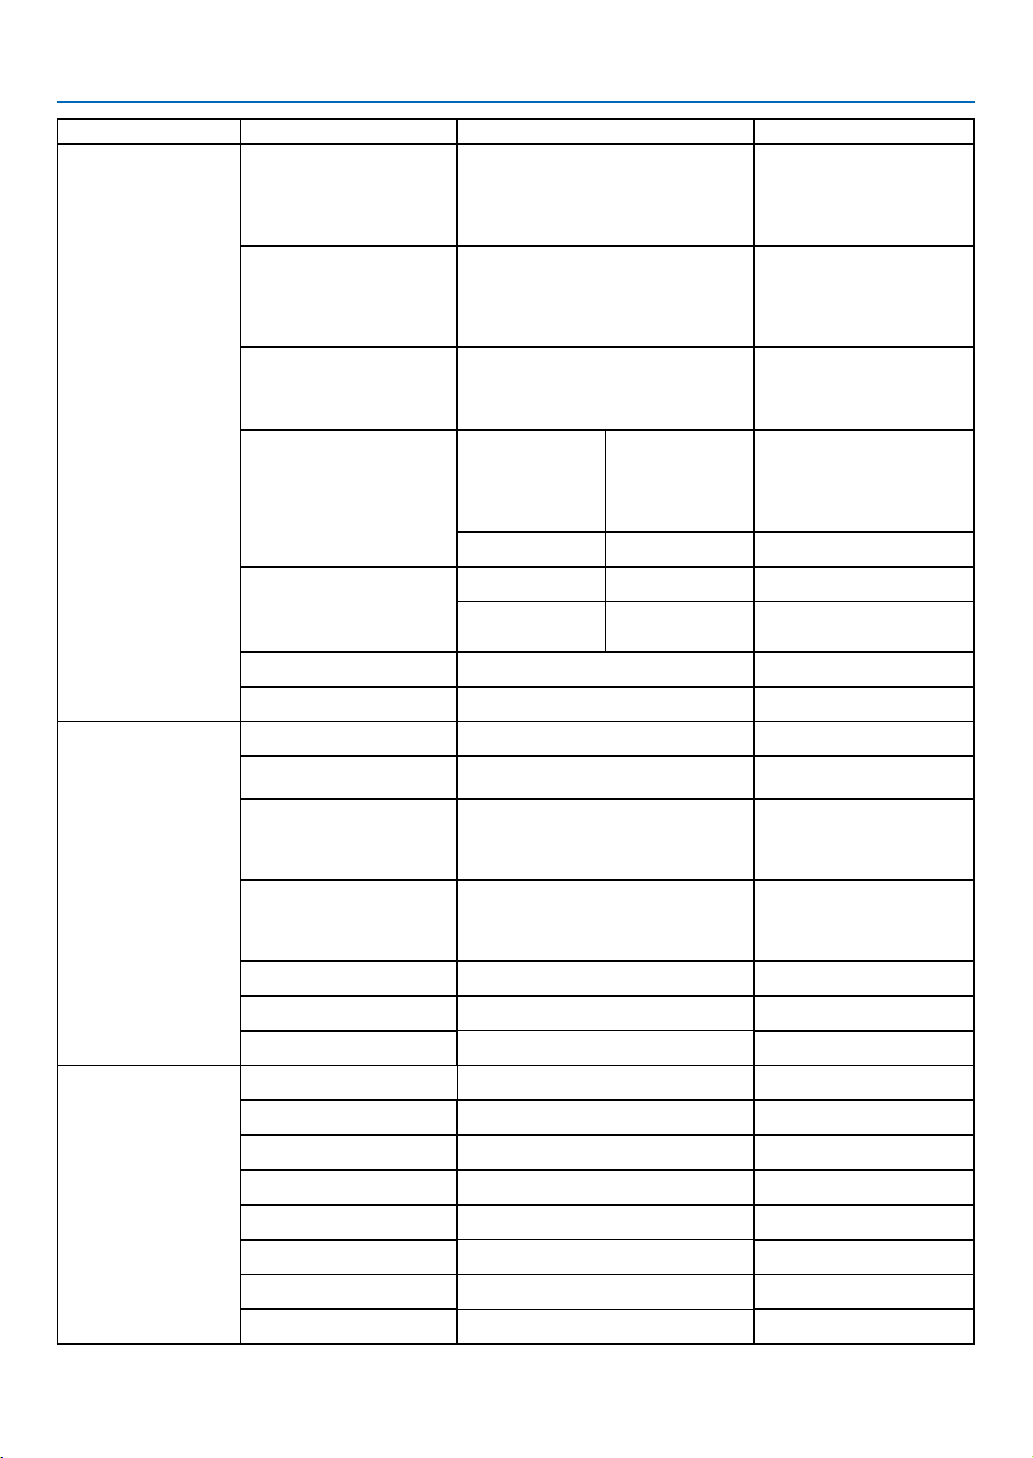
5. Using On-Screen Menu
Main menu Sub-menu Setting Remarks
Ready*
Power management
Filter
Test pattern
Network setup
Shut down
Off
Timer
Ready countdown
Filter counter
Timer
Filter counter reset
Filter clogging check
Off,Gray scale(1-4),Color
bar, Red, Green, Blue,
hatch
,White, Black,
gray
DHCP(On/Off)
Wired LAN
Wireless LAN Setting
IP address
Subnet
Gateway
DNS
Cross
Raster
(On/Off)
Memory Viewer
Control ID
Control ID
Factory default
Lamp counter reset
Set slide
Slide transition effect
Sort order
Rotate
Best fit On/Off*
Repeat On/Off*
Apply
Input
H- sync freq.
V- sync freq.
Control ID
number
Slide down
Slide right*
Extend order
Name order*
Time order
Size order
No rotate*
270° degree
180° degree
90° degree
On/Off
1-254
Info.
* The asterisk (*) indicates that the default setting varies depending on the signal.
Lamp counter
Model name
S/N
Firmware version
SUBCPU
27
Page 39

5. Using On-Screen Menu
❸ Menu Descriptions & Functions [INPUT]
Computer
HDMI 1
HDMI 2
Video
USB-A
LAN
Computer
Selects the computer connected to your Computer input terminal signal.
NOTE: When the component input signal is connected to the COMPUTER IN terminal, select [Computer].
HDMI1 and HDMI2
Selects the HDMI compatible equipment connected to your HDMI1 or 2 IN terminal.
Video
Selects what is connected to your Video input-VCR, DVD player or document camera.
USB-A
This feature enables you to make presentations using a USB memory that contains slides.
(→ page 22 “4. Using the VIEWER”)
LAN
Selects a signal from the LAN port (RJ-45).
28
Page 40

5. Using On-Screen Menu
❹ Menu Descriptions & Functions [Display menu]
[Auto PC adj.]
Display
Auto PC adj.
Fine sync 0
H position
V position
H.size
Aspect Normal
Orientation
Menu position
Background display
System
Select Auto PC Adj. function can adjusts Fine sync, H position, V position , H. size to be compatible with the computer automatically.
Press < MENU > button on the remote controller or on the top control panel to display the OSD menu.
Press ▲ ▼ button to select the Display menu ,then press <ENTER> or ▶ button.
1) Press ▲ ▼ button to select [Auto pc adj.] menu.
2) press <ENTER> button.
0
0
0
Front
Upper left
Blue
...
NOTE:
• The projector will perform Auto PC Adjustment function automatically,when its signal is input for the first time.
• Auto PC Adjustment function may fail to work if computer models is not compatible with the input signal .
• Auto PC Adjustment function may fail to work if you select the following system signal format: 480i, 576i, 480p, 576p, 720p, 1080i,1080p,
or signals from the HDMI terminal.
[Fine sync]
(Only for PC signal input)
Adujust image to the best state When the image jitters, or the image outline dims.
1) Press ▲ ▼ button to select [Fine sync] menu.
2) Press <ENTER> button.
3) Press ▲ ▼ button to adjust Fine sync .
Adjustment range is from 0 to +31. Please adjust to the least interference state.
[H position]
(Only for PC signal input)
On the premise that the relative position of both projector and the screen is set up right,you can move the image
horizontal position,if the position of the projected image on the screen is deviated.
1) Press ▲ ▼ button to select [H position] menu.
2) Press <ENTER> button.
3) Press ▲ ▼ button to adjust image H position.
Adjustment range is from -5 to +5.
29
Page 41

5. Using On-Screen Menu
[V position]
(Only for PC signal input)
On the premise that the relative position of both projector and the screen is set up right, you can move the image
vertical position, if the position of the projected image on the screen is deviated.
1) Press ▲ ▼ button to select [V position] menu.
2) Press <ENTER> button.
3) Press ▲ ▼ button to adjust image V position.
Adjustment range is from -5 to +5.
[H. size]
(Only for PC signal input)
You can adjust and reduce the interference caused by patterns of the projected vertical stripes.The following projected patterns may cause a circular pattern (Noise). Adjust the amount of interference to the minimum. Users can
point the clock to adjust images.
1) Press ▲ ▼ button to select [H. size] menu.
2) press <ENTER> button.
3) Press ▲ ▼ button to adjust H. size level .
Adjustment range is from -15 to +15.
[Aspect]
Adjust the image to fit the screen size, while keeping aspect of input signal's unchanged.
Press < MENU > button on the remote controller or on the top control panel to display the OSD menu. Press ▲ ▼
button to select the Display menu, then Press <ENTER> or ▶ button.
1) Press ▲ ▼ button to select [ Aspect ] menu.
2) Press <ENTER> button.
3) Press ▲ ▼ button to select the required item.
Normal........... Use the maximum size to roject while keeping the aspect of input signal's unchanged.
Wide............... Project images at the aspect of 16: 9.
Full..................Project images to the maximum.
4:3...................Project images at the aspect of 4:3.
16:10...............Project images at the aspect of 16:10.
NOTE:
• Aspect: XGA(Normal/Wide/Full/16:10), WXGA/WUXGA(Normal/Wide/Full/4:3).
• Video signal only supports Normal/Wide.
Display
Auto PC adj.
Fine sync 0
H position
V position
H.size
Aspect Normal
Orientation
Menu position
Background display
System
0
0
0
Front
Upper left
Blue
...
30
Page 42

5. Using On-Screen Menu
[Orientation]
Select this function to set the project way.
Please change the projection way, if the OSD displays inversely or reversedly.
Press < MENU > button on the remote controller or on the top control panel to display the OSD menu. Press ▲ ▼
button to select the Display menu ,then press <ENTER> or ▶ button.
1) Press ▲ ▼ button to select [Orientation] menu.
2) Press <ENTER> button.
3) Press ▲ ▼ button to switch.
Front: when the projector is installed on the table and projected in front of the screen.
Rear: when the projector is installed on the table and projected in rear of the screen (using translucent screen)
Ceiling / Front: when use the bracket to lift the projector (optional) in front of the screen.
Ceiling / Rear: when use the bracket to lift the projector (optional) in rear of the screen(using translucent screen).
Auto ceiling / Front: when the projector is projected in front of the screen.
Auto ceiling / Rear: when the projector is projected in rear of the screen.
Display
Auto PC adj.
Fine sync 0
H position
V position
H.size
Aspect Normal
Orientation
Menu position
Background display
System
0
0
0
Front
Upper left
Blue
...
[Menu position]
Select this function to set the OSD Menu position.
Press < MENU > button on the remote controller or on the top control panel to display the OSD menu. Press ▲ ▼
button to select the Display menu ,then press <ENTER> or ▶ button.
1) Press ▲ ▼ button to select [Menu position] menu.
2) Press <ENTER> button.
3) Press ▲ ▼ button to change menu position.
Upper left ......The menu display on the upper left corner of the screen.
Upper right ....The menu display on the upper right corner of the screen.
Center............The menu display in the center of the screen.
Lower left ......The menu display on the lower left corner of the screen.
Lower right ....The menu display on the lower right corner of the screen.
Display
Auto PC adj.
Fine sync 0
H position
V position
H.size
Aspect Normal
Orientation
Menu position
Background display
System
0
0
0
Front
Upper left
Blue
...
31
Page 43

5. Using On-Screen Menu
[Background display]
Select this function can adjust background color.
Press < MENU > button on the remote controller or on the top control panel to display the OSD menu. Press ▲ ▼
button to select the Display menu ,then press <ENTER> or ▶ button.
1) Press ▲ ▼ button to select [Background display] menu.
2) Press <ENTER> button.
3) Press ▲ ▼ button to select reqiured item .
Blue....... The entire projection area display blue.
Black......The entire projection area display black.
Logo.......The entire projection area display PROJECTOR background.
NOTE:
• This function will be invalid once you select input signal as USB-A and LAN.
Display
Auto PC adj.
Fine sync 0
H position
V position
H.size
Aspect Normal
Orientation
Menu position
Background display
System
0
0
0
Front
Upper left
Blue
...
[Signal format]
If a PC is selected as the input signal source, your projector will detect and adapt to its signal format automatically.
Correct image can be displayed without any setup operation.
Your projector will display one of the following:
Auto: The Auto PC Adjusting function will make necessary adjustment to your projector to project valid images. If
images are displayed incorrectly, adjust it manually.
---- : No PC signals detected. Check the connection between PC and your projector.
NOTE:
• Your projector may save data generated by the Auto PC Adjusting function.
Display
System
1024 x 768 , 60 HZ
1280 x 800 , 60 HZ
1920 x 1080 , 60 HZ
- - - -
- - - -
• The selected Signal format displays in the Signal format menu.
32
Page 44
5. Using On-Screen Menu
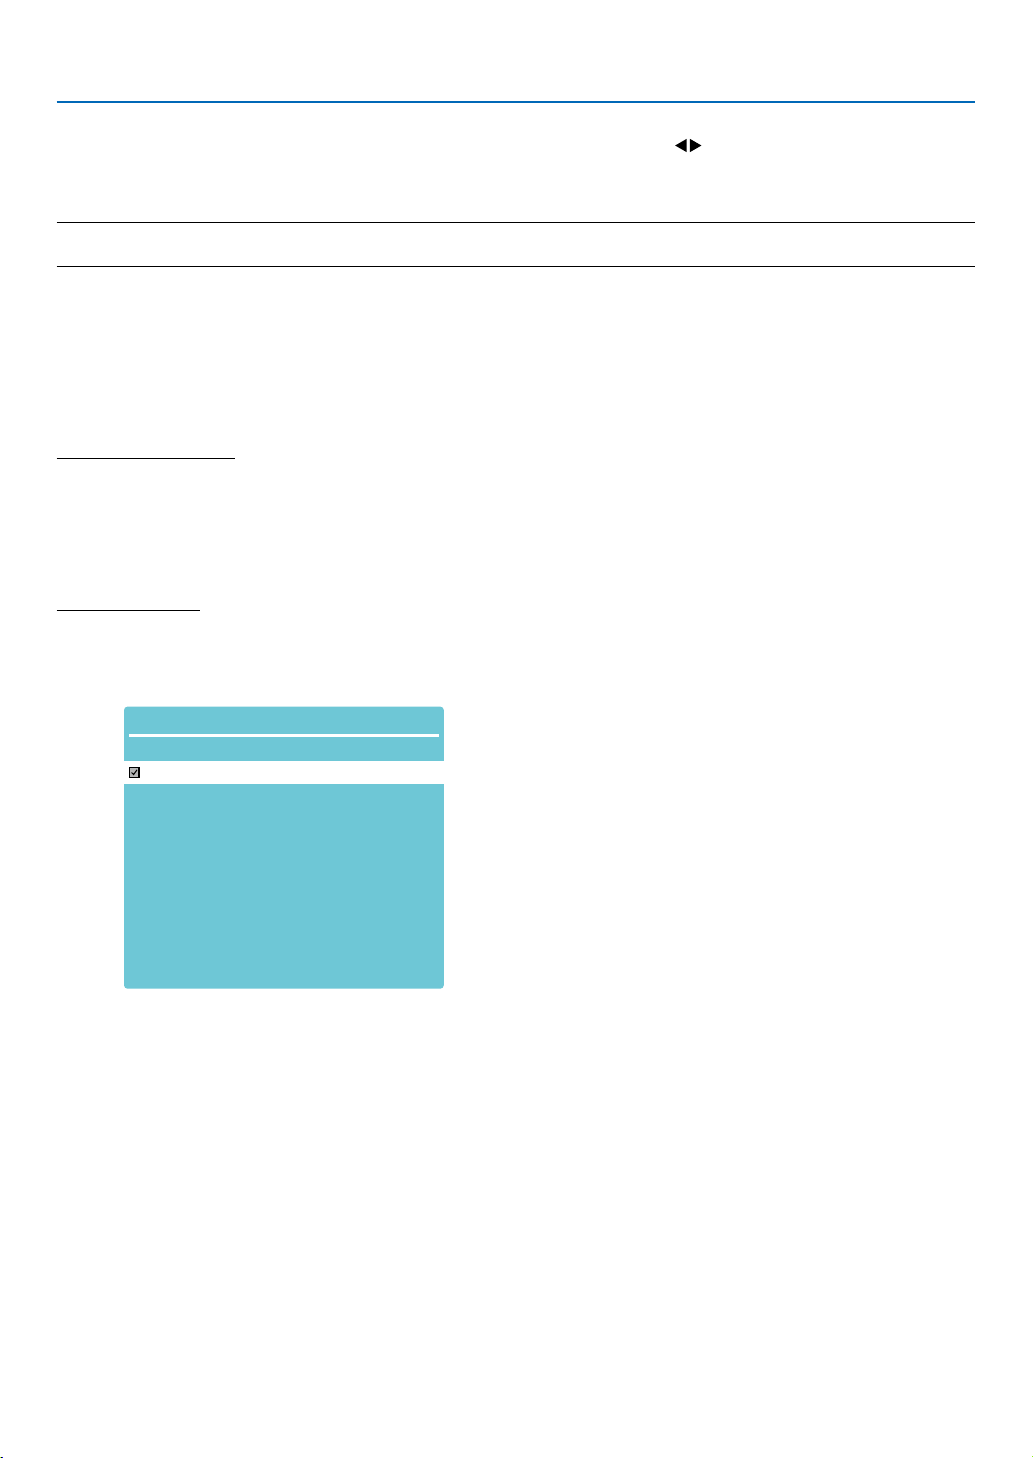
Select the computer Signal format manually.
1. Press the MENU button on remote controller and the OSD displays. Press button to point to the Input icon,
press ▲ ▼ button or ENTER button and the Input menu displays.
2. Press ▲ ▼ button to select Signal format, then press ENTER button.
NOTE:
• The computer Signal format menu will be disabled once HDMI 1,HDMI 2, USB-A, LAN has been selected.
Video
Select this function to set resolution of input signal is compatible with the PC.
Set video input signal color Signal format or component input signal scanning mode.
1) Press ▲ ▼ button to select [Signal format] menu.
2) Press <ENTER> button.
3) Press ▲ ▼ button to select wanted Signal format.
Computer input signal
1024x768 60HZ, etc:display the compatible name input signal name.
Auto: When projector has no compatible input signal with one from connected PC, the PC can adjust automatically
to run and Auto appear on the Signal format. If the image is not projected out correctly, please adjust it to match
your computer manually.
- - - -: No signal input come from PC. Please check the connections.
Video input signal
AUTO: When projector select the input signal color Signal format automatically. set [PAL-M] or [PAL-N] manually .
[PAL]/[SECAM]/[NTSC]/[NTSC4.43]/[PAL-M]/[PAL-N]/[PAL60]:When projector can not display images correctly in
[AUTO], please set input signal color Signal format manually.
Display
System
AUTO
PAL
SECAM
NTSC
NTSC4.43
PAL.M
PAL.N
PAL60
• Signal format menu, when Video input.
33
Page 45
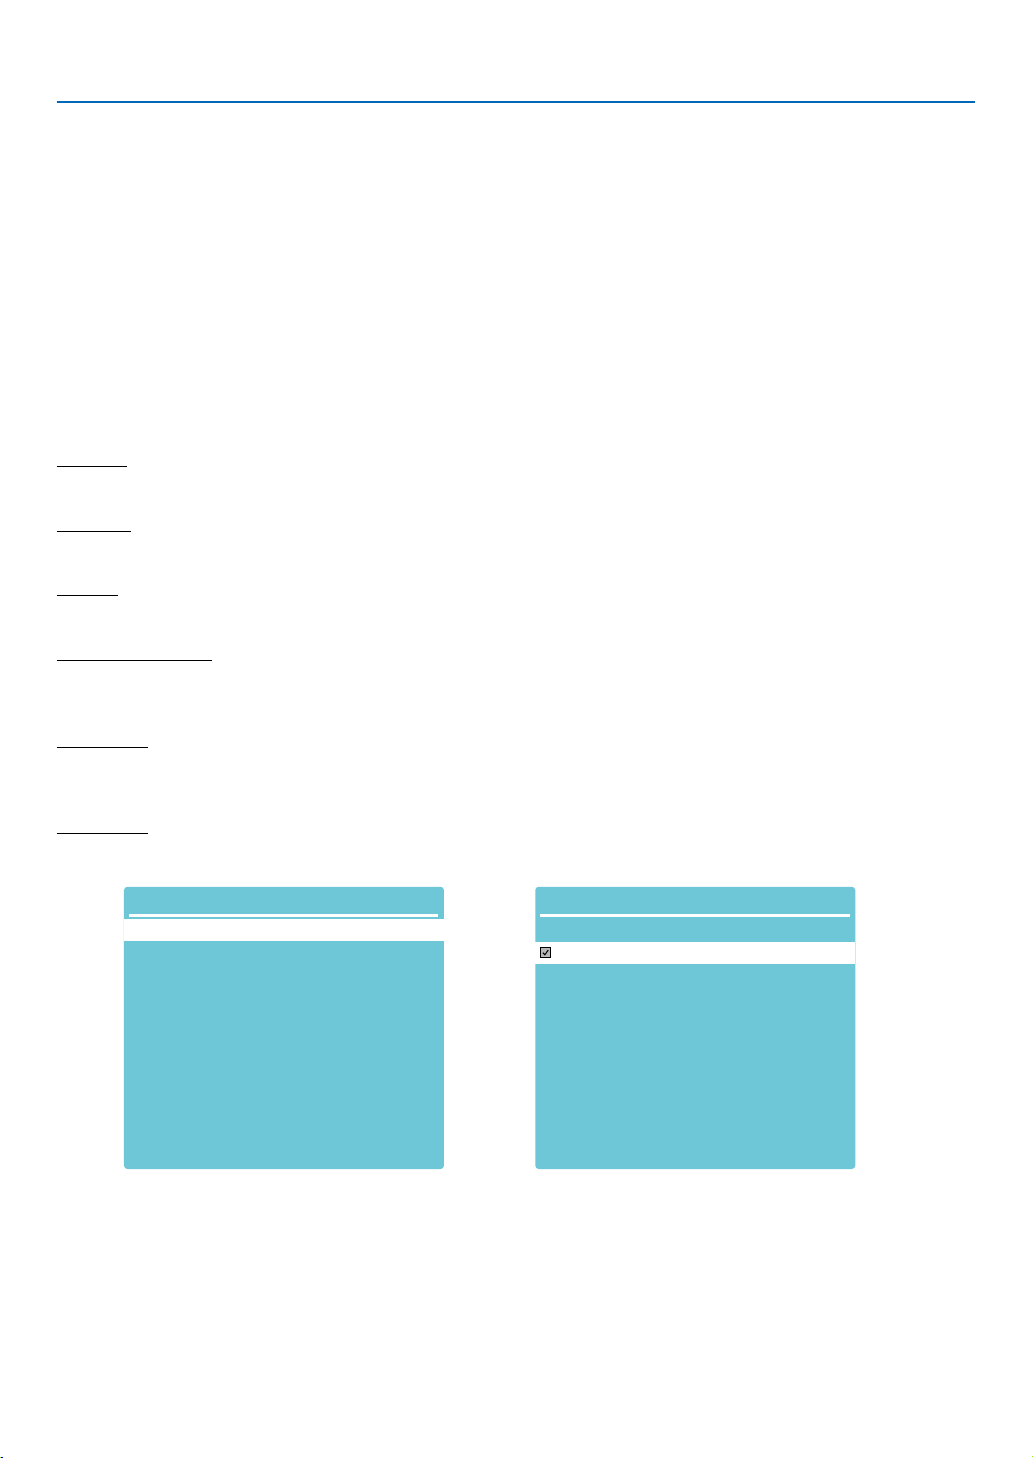
5. Using On-Screen Menu
❺ Menu Descriptions & Functions [Color adjust]
Select color adjustment to set the image mode and adjust the quality of the projected image.
[Image mode]
Direct operation
Press the PICTURE select button on remote controller to select required image mode.
Menu operation
Press < MENU > button on the remote controller or on the top control panel to display the OSD menu.Press ▲ ▼
button to select the color adjust menu ,then press <ENTER> or ▶ button.
1) Press ▲ ▼ button to select [Image mode] menu.
2) Press <ENTER> button.
3) Press ▲ ▼ button to select reqiured item.
Dynamic
An image mode suitable for viewing in bright room.
Standard
The default mode of your projector ,can come to national color.
Cinema
Enriched grayscale for viewing movies.
Blackboard (Green)
An image mode designed for displaying on a blackboard (Green). It boosts quality of image projected on blackboard
(Green). This is designed for a board in green rather than black as indicated by its name.
Colorboard
A image mode suitable for image projecting on surface of wall in red, blue, yellow or green.press <ENTER> button.
to enter colorboard menu, then press ▲ ▼ button to select Red ,Blue ,Yellow or Green,press <ENTER> button.
User image
Users can customize the color adjustment.
Color adjust
Image mode
Contrast
Brightness
Color temp.
Red
Green
Blue
Sharpness
Standard
32
32
Mid
32
32
32
0
Color adjust
Colorboard
Red
Blue
Green
Yellow
[Color adjust]
Press < MENU > button on the remote controller or on the top control panel to display the OSD menu. Press ▲ ▼
button to select the Color adjust menu ,then press <ENTER> or ▶ button.
1) Press ▲ ▼ button to select reqiured item.
2) Press <ENTER> button.
3) Press ▲ ▼ button to select adjust setpoint.
34
Page 46

Contrast
Press ▼ button to decrease contrast, range from 0 - +63.
Press ▼ button to increase contrast,range from 0 - +63.
Brightness
Press ▼ button to decrease brightness, range from 0 - +63.
Press ▲ button to increase brightness, range from 0 - +63.
Color temp. (For PC/HDMI input)
Press ▲ ▼ button to select required color temperature (Low, Mid. and High)
High temp: Become blue gradually.
Mid temp: Suitable natural color.
Low temp: Become red gradually.
User:You can adjust the Red, Green, and Blue values by yourself.
Color (For Video input)
Press ▼ button to decrease saturation, press ▲ button to increase saturation.
Tint. (For Video input)
Press ▲ ▼ button to select required tint.
Red
Press ▼ button to decrease red tint and ▲ button to increase it.
Green
Press ▼ button to decrease green tint and ▲ button to increase it.
5. Using On-Screen Menu
Blue
Press ▼ button to decrease blue tint and ▲ button to increase.
Sharpness
Press ▼ button to soften image and ▲ button to sharpen, range from 0 - +15.
Color adjust
Image mode
Contrast
Brightness
Color temp.
Red
Green
Blue
Sharpness
Standard
32
32
Mid
32
32
32
0
Color adjust
Image mode
Contrast
Brightness
Color
Tint
Red
Green
Blue
Sharpness
Standard
32
32
32
32
32
32
32
0
35
Page 47

5. Using On-Screen Menu
6 Menu Descriptions & Functions [Setting]
The projector has setting fuction, you can select other functions as described below.
Menu operation
Press < MENU > button on the remote controller or on the top control panel to display the OSD menu.Press ▲ ▼
button to select the setting menu ,then press <ENTER> or ▶ button.
1) Press ▲ ▼ button to select reqiured item.
2) Press <ENTER> button.
3) Press ▲ ▼ button to set options.
Setting
On start
Standby mode
High altitude
ECO mode
Cooling fast
Closed caption
Key lock
lris
Baud rate
Sound
HDMI setup
Off
Normal
Off
Normal
Normal
Off
Off
Off
19200
[On start]
Set the power mode on , when the power cord is connected to a power outlet.
1) Press ▲ ▼ button to select [ On start ] menu.
2) Press <ENTER> button.
3) Press ▲ ▼ button to select reqiured item.
Off...... Get into standby mode.
On.......Start up immediately.
Setting
On start
Standby mode
High altitude
ECO mode
Cooling fast
Closed caption
Key lock
lris
Baud rate
Sound
HDMI setup
Off
Normal
Off
Normal
Normal
Off
Off
Off
19200
36
Page 48

5. Using On-Screen Menu
[Standby mode]
Set power consumption in standby mode, no matter whenever your projector is operated through network.
1) Press ▲ ▼ button to select [Standby mode] menu.
2) Press <ENTER> button.
3) Press ▲ ▼ button to adjust levels.
Normal......Some function will be disabled once your projector is in ECO. standby mode to reduce power consumption.
network and RS-232C serial communication will be unavailable except the power on command during that mode.
Network standby......In order to reduce power consumption, some functions in standby mode will be limited. Under
network standby, network function is not available and RS-232C serial communication (except boot command)
function is not available.
• Standby mode network wake-up function can only use the "Wake On LAN" tool.
Sleep ........Even in standby mode,there are no restraint on network function and serial communication function.
Setting
On start
Standby mode
High altitude
ECO mode
Cooling fast
Closed caption
Key lock
lris
Baud rate
Sound
HDMI setup
Off
Normal
Off
Normal
Normal
Off
Off
Off
19200
[High altitude]
You can change the setting about speed of cooling fan according to the altitude your projector is operating at.
1) Press ▲ ▼ button to select [High altitude] menu.
2) Press <ENTER> button.
3) Press ▲ ▼ button to select required menu.
Off: Normal speed. set the option off when operating the operator, if the altitude is not too high.
On: Faster than when in off mode .set the option on when operating the operator in high land.
Note:
• Set high altitude option on when you operate the operator at an altitude of approximately 1700 m/5500 f or higher.
Setting
On start
Standby mode
High altitude
ECO mode
Cooling fast
Closed caption
Key lock
lris
Baud rate
Sound
HDMI setup
Off
Normal
Off
Normal
Normal
Off
Off
Off
19200
37
Page 49

5. Using On-Screen Menu
[ECO mode]
Change lamp brightness according to the environment and aim your projector is operating.
1) Press ▲ ▼ button to select [ECO mode] menu.
2) Press <ENTER> button.
3) Press ▲ ▼ button to switch required menu.
Normal.....Normal brightness.
ECO 1/ECO 2........Lower the brightness and reduce energy consumption, thus prolonging the light source service life.
Boost.......Enhance brightness.
Setting
On start
Standby mode
High altitude
ECO mode
Cooling fast
Closed caption
Key lock
lris
Baud rate
Sound
HDMI setup
Off
Normal
Off
Normal
Normal
Off
Off
Off
19200
[Cooling fast]
Select the cooling time after projector is turned off.
1) Press ▲ ▼ button to select [Cooling fast] menu.
2) Press <ENTER> button.
3) Press ▲ ▼ button to switch required menu.
Normal............Running in normal way.
30 Sec.....Running faster than in normal mode with shorter time but a louder sound.
0 Sec.......Select this function allow you to unplug the AC power directly after the shutdown, without waiting for the
projector cooling off.
NOTE:
• When set the option 0 Sec, user cannot restart the projector immediately after turning off it.
• While sometimes,the lamp may take a longer time to cool off than usual to light again for high temperature.
Setting
On start
Standby mode
High altitude
ECO mode
Cooling fast
Closed caption
Key lock
lris
Baud rate
Sound
HDMI setup
Off
Normal
Off
Normal
Normal
Off
Off
Off
19200
38
Page 50

5. Using On-Screen Menu
[Closed caption]
Closed Caption is used for displaying the program sound or other information on the screen. select this function to
switch channel with input signal of closed caption.
1) Press ▲ ▼ button to select [Closed caption] menu.
2) Press <ENTER> button.
3) Press ▲ ▼ button to switch required menu.
Off :No closed caption.
CC1......Display CC1 data.
CC2......Display CC2 data.
CC3......Display CC3 data.
CC4......Display CC4 data.
NOTE:
• The icon display gray if the Closed caption function is invaild.
• The Closed caption function is invaild when the OSD menu and Timer display on the screen.
Setting
On start
Standby mode
High altitude
ECO mode
Cooling fast
Closed caption
Key lock
lris
Baud rate
Sound
HDMI setup
Off
Normal
Off
Normal
Normal
Off
Off
Off
19200
[Key lock]
Select this function to lock and unlock the control panel or remote controller keypad.
1) Press ▲ ▼ button to select [Key lock] menu.
2) Press <ENTER> button.
3) Press ▲ ▼ button to switch required menu.
Off......The control panel or remote controller keypad are effective.
On......The control panel keypad is invalid.
NOTE:
• If you lock the top of the control panel, but without a remote controller or something wrong with the remote controller, please contact
your dealer or service center.
Setting
On start
Standby mode
High altitude
ECO mode
Cooling fast
Closed caption
Key lock
lris
Baud rate
Sound
HDMI setup
Off
Normal
Off
Normal
Normal
Off
Off
Off
19200
39
Page 51

5. Using On-Screen Menu
[Iris]
Adjust the light output to the image signal and perform projection with emphasis on contrast.
1) Press ▲ ▼ button to select [Iris] menu.
2) Press <ENTER> button.
3) Press ▲ ▼ button to adjust levels.
Off......No correction.
On......Correct iris.
Setting
On start
Standby mode
High altitude
ECO mode
Cooling fast
Closed caption
Key lock
lris
Baud rate
Sound
HDMI setup
Off
Normal
Off
Normal
Normal
Off
Off
Off
19200
[Baud rate]
Select this function to adjust the projector transmission rate.
1) Press ▲ ▼ button to select [Baud rate] menu.
2) Press <ENTER> button.
3) Press ▲ ▼ button to select rate: 19200/4800/38400/9600.
Setting
On start
Standby mode
High altitude
ECO mode
Cooling fast
Closed caption
Key lock
lris
Baud rate
Sound
HDMI setup
Off
Normal
Off
Normal
Normal
Off
Off
Off
19200
40
Page 52
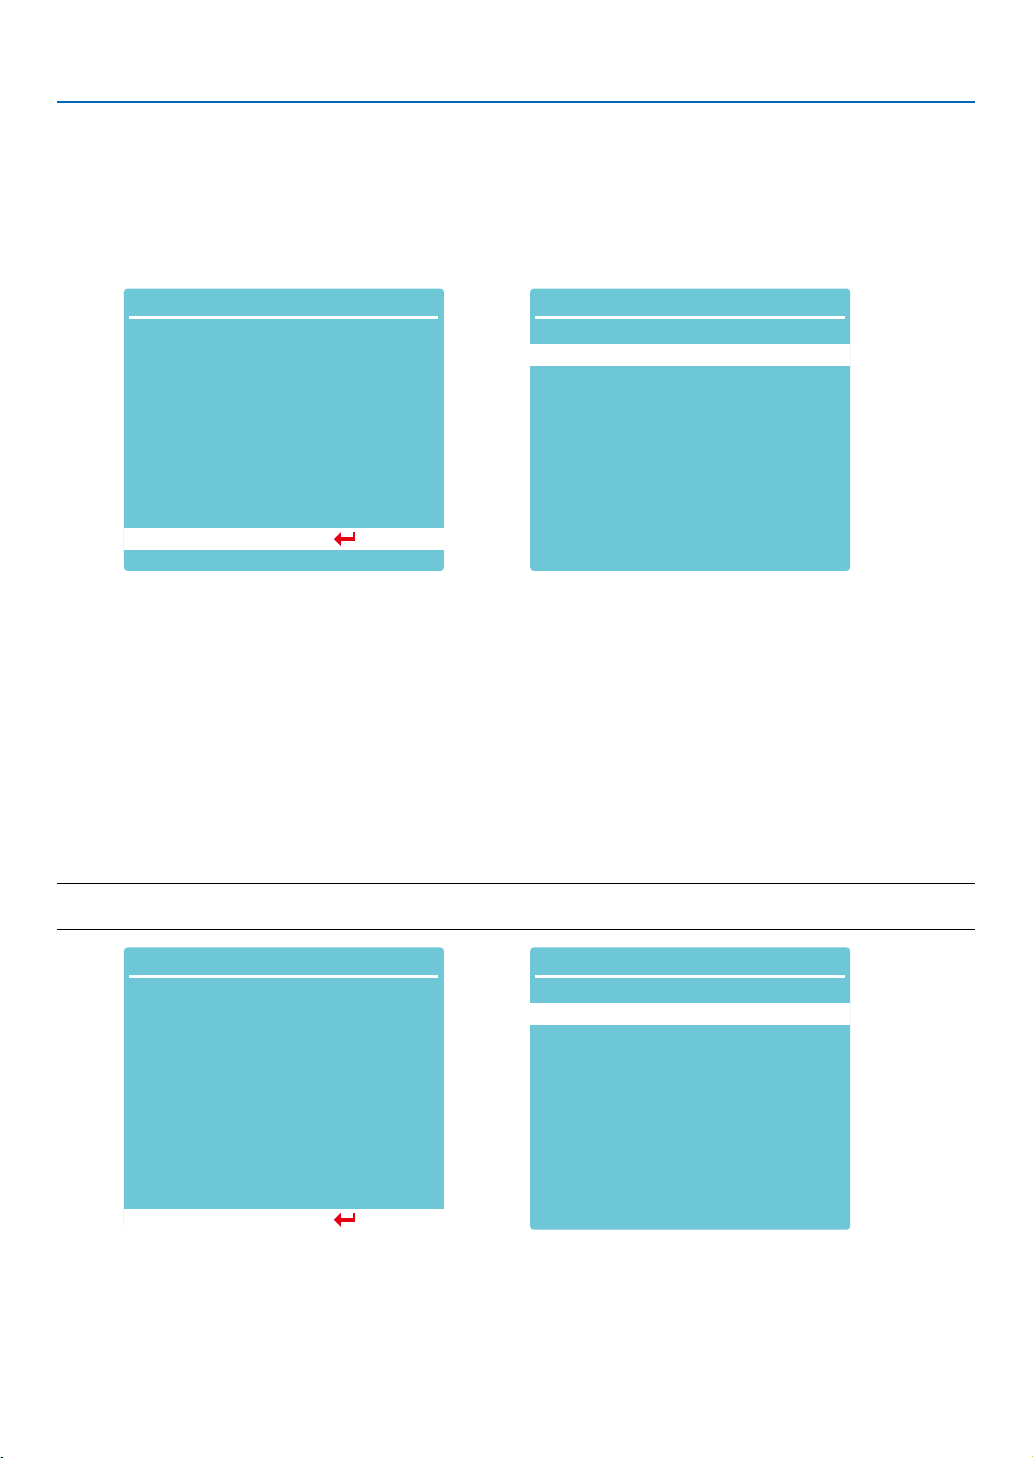
[Sound]
Select this function to adjust the sound.
1) Press ▲ ▼ button to select [Sound] menu.
2) Press <ENTER> button.
3) Press ▲ ▼ button to switch required menu.
5. Using On-Screen Menu
Setting
On start
Standby mode
High altitude
ECO mode
Cooling fast
Closed caption
Key lock
lris
Baud rate
Sound
HDMI setup
Off
Normal
Off
Normal
Normal
Off
Off
Off
19200
...
Setting
Volume
Mute
Sound
12
Off
[HDMI setup]
When the external device is connected to the HDMI terminal of the projector, and the images can not be projected
normally, please switch on the image or sound setting.
Press < MENU > button on the remote controller or on the top control panel to display the OSD menu. Press ▲ ▼
button to select the setting menu ,then press <ENTER> or ▶ button to enter the sub-menu.
1) Press ▲ ▼ button to select [HDMI setup] menu.
2) Press <ENTER> button.
• Display [HDMI setup] instantly.
3) Press ▲ ▼ button to select [Image] / [Sound] / [HDMI EQ setup].
4) Press <ENTER> button.
NOTE:
• HDMI setup option can be chosen only in HDMI 1 and HDMI 2 channel.
Setting
On start
Standby mode
High altitude
ECO mode
Cooling fast
Closed caption
Key lock
lris
Baud rate
Sound
HDMI setup
Off
Normal
Off
Normal
Normal
Off
Off
Off
19200
...
41
Setting
Image
Sound
HDMI EQ setup
HDMI setup
0-1023
HDMI
0
Page 53
Image
Auto Set the signal level automatically.
[
64-940
] When external device (such as:a blu ray disc player) is connected to the HDMI setup terminal .
When the output of an external device (such as a computer), via a conversion cable or a similar cable,
[
0-1023
is connected to the HDMI setup terminal.
]
Select this option
minal also.
when
Sound
the output of
5. Using On-Screen Menu
the PC or any other device is connected to the HDMI setup ter-
[
HDMI
[
Computer
When connect to the HDMI cable to tansmite images and audio while the users donot need connect
]
to audio signal separatly.
When the output of an external device (such as a computer), via a conversion cable or a similar
cable ,
]
The audio signal would be output according the connection of AUDIO IN terminal.
HDMI EQ setup
Mode 0-3
Change the HDMI reception level according to the AV device connected to the HDMI input terminal.
If noise appears in the image or the image does not appear, change the settings.
is connected to the HDMI terminal .
42
Page 54

5. Using On-Screen Menu
❼ Menu Descriptions & Functions [Expand]
The projector has expand fuction, you can select other functions as described below.
Menu operation
Press < MENU > button on the remote controller or on the top control panel to display the OSD menu. Press ▲ ▼
button to select the Expand menu, then press <ENTER> or ▶ button.
1) Press ▲ ▼ button to select reqiured item.
2) Press <ENTER> button.
3) Press ▲ ▼ button to set options.
4) Press <ENTER> button.
Expand
Language
Auto setup
Keystone
Security
Power management
Filter
Test pattern
Network setup
Control ID
Factory default
Lamp counter reset
[Language]
Users can selected the language displayed on the screen.
1) Press ▲ ▼ button to select [language] menu.
2) Press <ENTER> button.
3) Press ▲ ▼ button to select required language.
4) Press <ENTER> button.
The name of menus, setting, the OSD, button etc., can displayed by the selected language.
Your projector comes with multiple language support. You may select required one from them,such as:English,
German, French, Italian, Spanish, Polish, Swedish, Dutch, Portuguese, Japanese, Simplified Chinese, traditional
Chinese, Korean, Russian,Arabic, Turkey, Finland, Norway, Denmark, Indonesia, Hungary, Czech Republic, Kazakhstan, Vietnamese, Thai, Farsi, Romania.
Expand
English
Deutsch
Français
Italiano
Español
Português
Nederlands
Svenska
Suomi
Norsk
Language 1/3
Expand
Dansk
Polski
český
Magyar
Русский
Türkçe
Қазақ
Tiếng Việt
한글
Language 2/3
Expand
Language 3/3
日本語
ภาษาไทย
中文繁体
中文
Bahasa Indonesia
Română
43
Page 55
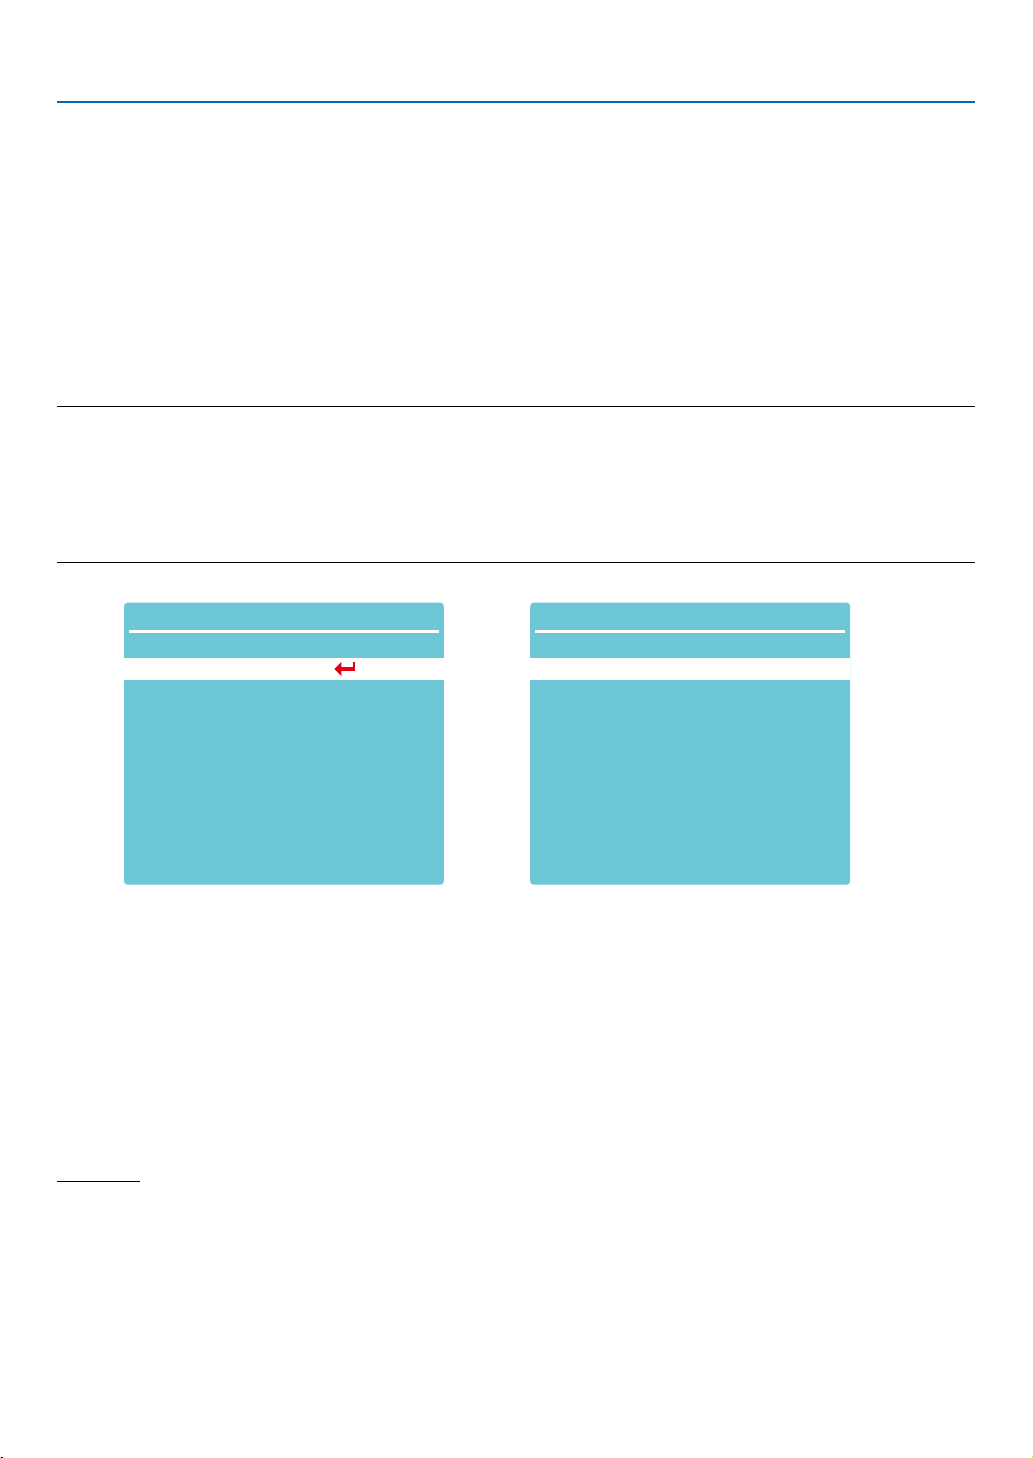
5. Using On-Screen Menu
[Auto setup]
Select this function to store or reset the keystone or some related setting after unpluging the AC power.
Press < MENU > button on the remote controller or on the top control panel to display the OSD menu.Press ▲ ▼
Press the AUTO button on your remote controller to execute the following functions : Input search, Auto PC adj. ,
and Auto keystone.
1) Press ▲ ▼ button to select [Auto setup] menu.
2) Press <ENTER> button.
3) Press ▲ ▼ button to select required items.
Input search: Select this function to detect the signal, then project images automatically.
Auto PC adj.: Select this function to adjust [Fine sync], [H Position], [V Position] and [H. size] automatically, when
projector input analog signals.
Auto keystone: select this function to correct vertical distortion of the projected image automatically.
NOTE:
• One of input search, Auto PC adj. and Auto keystone option should be set to On at least .
• Plesse adjust the projector manually, if the image is displayed abnormal even if you have select Auto keystone function.
• When you set Project way as Ceiling / Front or Ceiling / Rear, Auto keystone function is invaild.
• When you set Project way as Auto ceiling / Front or Auto ceiling / Rear, and users put their projector in ceiling state, the Auto keystone
function will be invaild.
• When select auto search for input source search, USB-A and LAN signals are not in the scope of auto search function.
Expand
Language
Auto setup
Keystone
Security
Power management
Filter
Test pattern
Network setup
Control ID
Factory default
Lamp counter reset
...
Expand
Input search
Auto PC adj.
Auto keystone
Auto setup
On
On
Off
[Keystone]
Select this function to store or reset the keystone or some related setting after unpluging the AC power.
Press < MENU > button on the remote controller or on the top control panel to display the OSD menu.Press ▲ ▼
button to select the expand menu, then press <ENTER> or ▶ button to enter.
1) Press ▲ ▼ button to select [keystone] menu.
2) Press <ENTER> button.
3) Press ▲ ▼ button to select required item.
4) Press <ENTER> button.
Keystone
Select this function to store and reset keystone after closing the projector or unpluging the AC power .
Store......store keystone after closing the projector or unpluging the AC power cord .
Reset......keystone function will be cancelled after closing the projector or unpluging the AC power.
44
Page 56
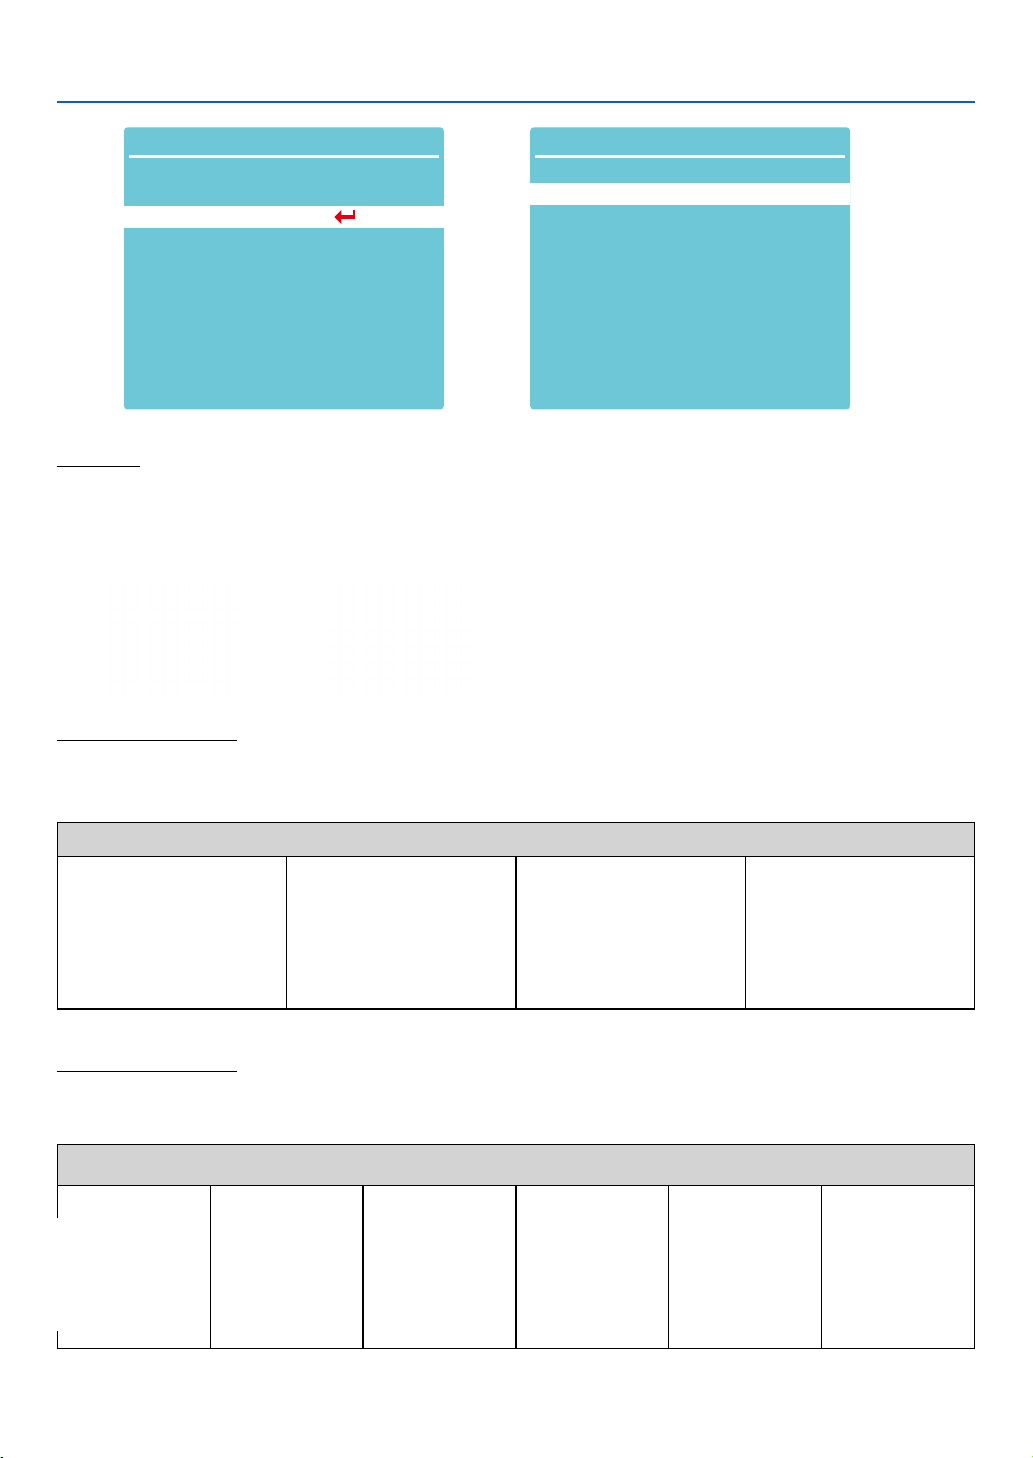
5. Using On-Screen Menu
Expand
Language
Auto setup
Keystone
Security
Power management
Filter
Test pattern
Network setup
Control ID
Factory default
Lamp counter reset
...
Expand
Keystone
H/V Keystone
4-Corner correction
6-Corner correction
Curved correction
Grid image tune
Reset value
Keystone
Select this function to correct the projected images horizontally or vertically.
Press ▲ button to
reduce upper width
Press ▼ button to
reduce bottom width
Press ▶ button to
reduce left width
StoreKeystone
Press ▶ button to
reduce right width
4-Conner correction
Select this function to correct the projected images of four corners distorted.
Press ▲ ▼ ▶ ▶ button to keystone at four corners of the screen. The four corners are looped in sequence shown below:
Conner correction
Upper left Upper right Bottom left Bottom right
6-Conner correction
Select this function to correct the projected images of six corners distorted.
Press ▲ ▼ ▶ ▶ button to keystone at six corners of the screen. The six corners are looped in sequence shown below:
Conner correction
Upper left Upper right Upper middle Bottom middle Bottom left Bottom right
45
Page 57
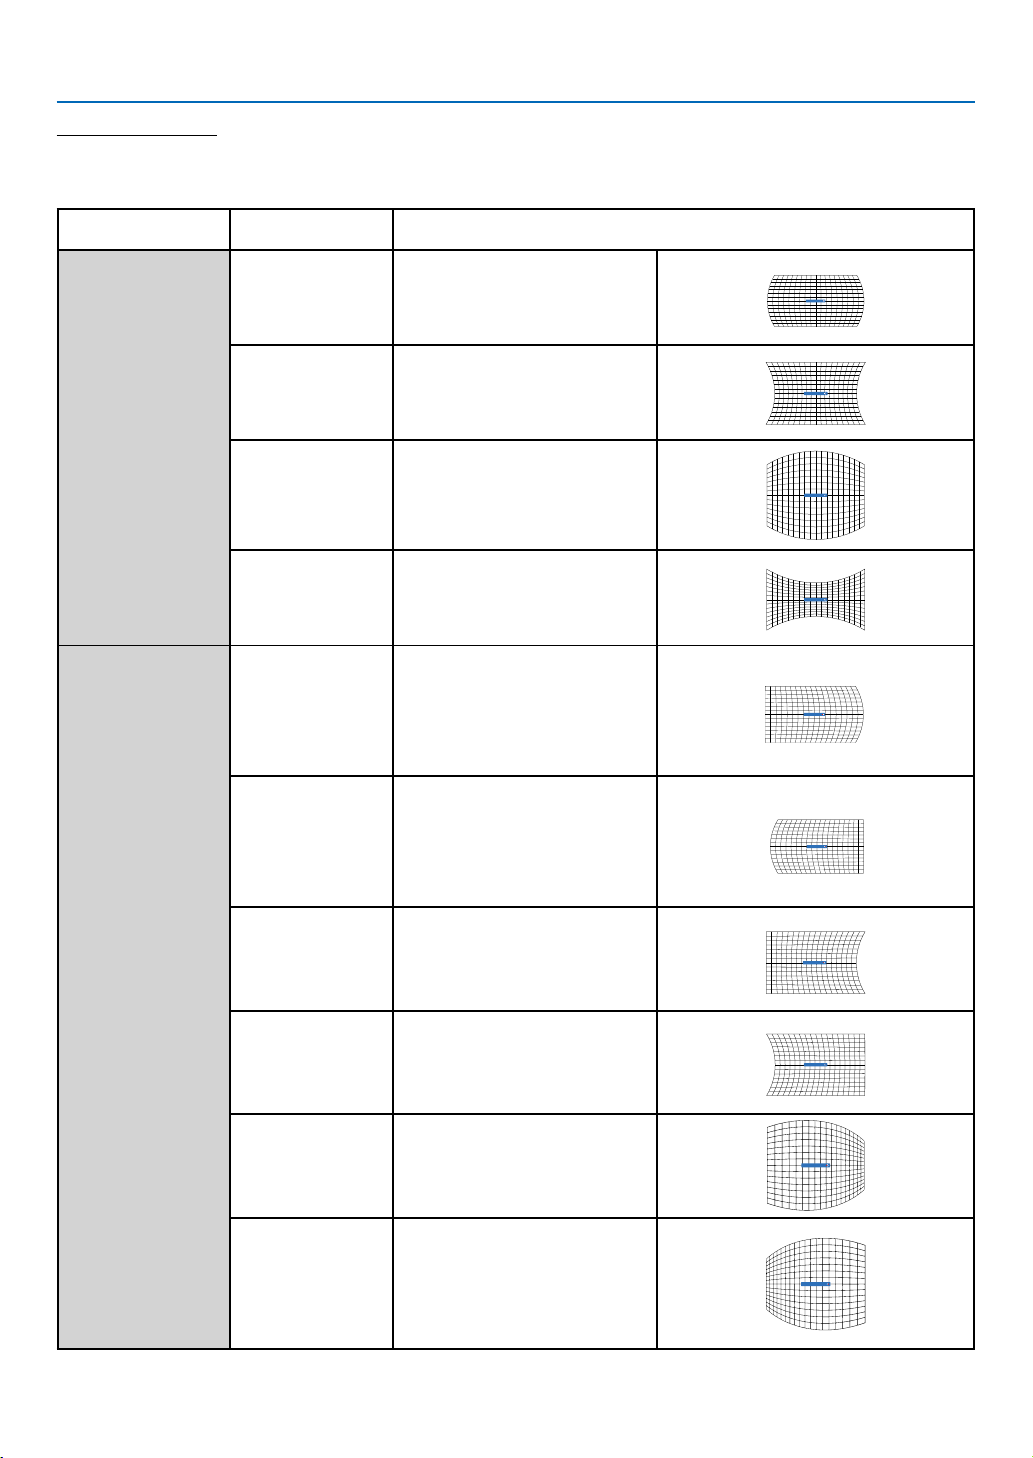
5. Using On-Screen Menu
Curved cerrection X/Y gain
Curved correction
Select this function to correct the projected images with linearity uneven or vertical and horizontal bending deformation.
press ▲ ▼ ▶ ▶ button to adjust options.
Item Operation Adjustment
Curved correction
X/Y gain
Curved correction
X offset
Press
Press
Press
Press
Press
Press
Press
Press
Press
Press
▼
Extend left and right vertically
Sag left and right vertically
Reach up and down horizontally
Sag up and down horizontally
Correct the vertical lins on the
left.
Expand the top an and bottom
while maintaining the central
area
Correct the vertical lins on the
right.
Expand the top an and bottom
while maintaining the central
area
Correct the horizontal line on
the left.
Expand the top and bottom
while maintaining the central
area.
Correct the horizontal line on
the right.
Expand the top and bottom
while maintaining the central
area.
Correct the horizontal line on
the left.
Expand the top and bottom
while maintaining the central
area.
Correct the horizontal line to
the right.
Expand the top and bottom
while maintaining the central
area.
Curved cerrection X/Y gain
Curved cerrection X/Y gain
Curved cerrection X/Y gain
Curved cerrection X Offset
Curved cerrection X Offset
Curved cerrection X Offset
Curved cerrection X Offset
Curved cerrection X Offset
Curved cerrection X Offset
46
Page 58
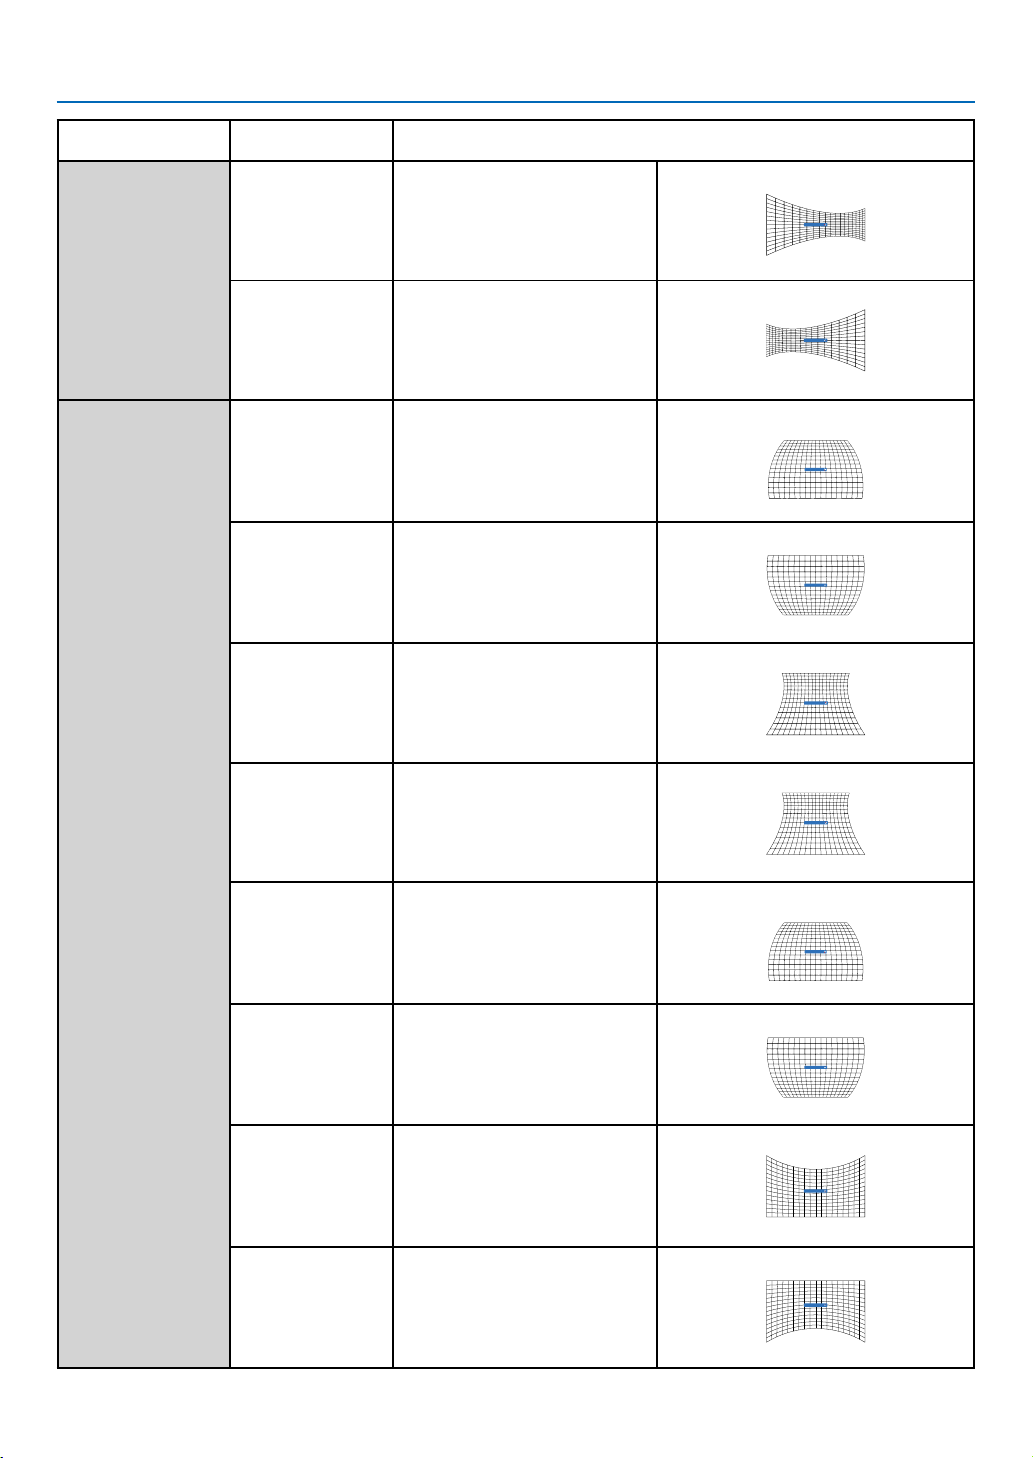
Item Operation Adjustment
Correct the horizontal line on
the left.
Press
Expand the top and bottom
while maintaining the central
Curved correction
X offset
area.
Correct the horizontal line to the
right.
Press
Expand the top and bottom
while maintaining the central
area.
Correct vertical lines on both
sides.
Press
▼
Expand the lower corners while
maintaining the central and
upper regions
Correct vertical lines on both
sides.
Press
Expand the top corners while
maintaining the central and
upper regions
Correct vertical lines on both
sides.
Press
▼
Expand the lower corners while
maintaining the central and
upper regions
Correct vertical lines on both
sides.
Press
▼
Expand the lower corners while
maintaining the central and
Curved correction
Y offset
upper regions
Correct vertical lines on both
sides.
Press
▼
Expand the lower corners while
maintaining the central and
upper regions
Correct vertical lines on both
sides.
Press
Expand the top corners while
maintaining the central and
upper regions
Correct vertical lines on both
sides.
Press
▼
Expand the lower corners while
maintaining the central and
upper regions.
Correct vertical lines on both
sides.
Press
Expand the upper corner while
keeping the central and lower
regions unchanged.
5. Using On-Screen Menu
Curved cerrection X Offset
Curved cerrection X Offset
Curved cerrection Y Offset
Curved cerrection Y Offset
Curved cerrection Y Offset
Curved cerrection Y Offset
Curved cerrection Y Offset
Curved cerrection Y Offset
Curved cerrection Y Offset
Curved cerrection Y Offset
47
Page 59

5. Using On-Screen Menu
NOTE:
• After adjusting values about h/v keystone , if users adjust conner correction, values about h/v keystone will be reset . and after adjusting
values about conner correction, if users adjust about h/v keystone, values about conner correction will be reset also.
• Curved correction X offset and curved correction y offset can not be adjusted individually. Adjust curved correction X offset and curved
correction y offset after adjusting the x/y curved correction.
• Maximum keystone range up to ±30° vertically and ±30° horizontally. However, the image quality will deteriorate, and becoe more difficult
to focus. install the projector with the minimal correction value.
• The screen size will be changed with various h/v keystone adjustments .
• Keystone may influence image aspect .
Grid image tune
select this function to adjust the local points of the projected image.
1) Press ▲ ▼ ▶ ▶ button to select [Grid image tune] option.
2) Press <ENTER> button.
Reset
Select this function to make adjustment value back to the factory default.
1) Press ▲ ▼ ▶ ▶ button to select [Reset] option.
2) Press <ENTER> button.
• Release keystone mode.
[Security]
Set a passcode to lock the usage of the projector to prevent unauthorized personnel from operating your projector.
Once the projector is on, the [passcode] screen will be displayed.
1) Press ▲ ▼ button to select [Security] menu.
2) Press <ENTER> button.
3) Press ▲ ▼ button to switch required item.
PIN code lock
This function helps preventing unauthorized personnel from changing projector setting.
Off......PIN code lock function is not available.
On......The [PIN code] screen will appear when the projector is on. If you want to change the PIN code lock or pass-
word (for three digits), you must enter the password. The factory default password is "111."
PIN code change
• You can change the Passcode. Click the [ENTER] button and select [Change Passcode]. When the [Passcode]
dialog box is displayed, press the button to enter a valid Passcode, and select [Set] to display the [New Passcode] dialog box. Set a new Passcode, confirm the contents in the dialog box, and select Set to set a new Passcode.
• The number you typed is displayed as “ * ”. To edit number you have entered, press menu button to move the
cursor to the number you want to change, press button to select the correct one.
• Repeat this step to type in a 3-digit number.
• Enter a three-digit number, move the cursor to "set" . Press the ENTER button, you can start to operate the projector.
• If the Passcode is invalid, the Passcode displayed as “ *** ” will be in red. Please try again with a valid one.
• Please remember your new password and keep it safe.
To cancel the passcode
(1) While simultaneously pressing the [POWER] button and [ENTER] button on the main unit, plug the power cord
into the main unit. After a while keep pressing the button, the passcode input screen appears. Enter "111".
(2) Select OSD menu Security >> PIN code lock >> "On". As the input screen appears again, enter the default value
(111) and set the passcode to "off" or set a new passcode.
48
Page 60
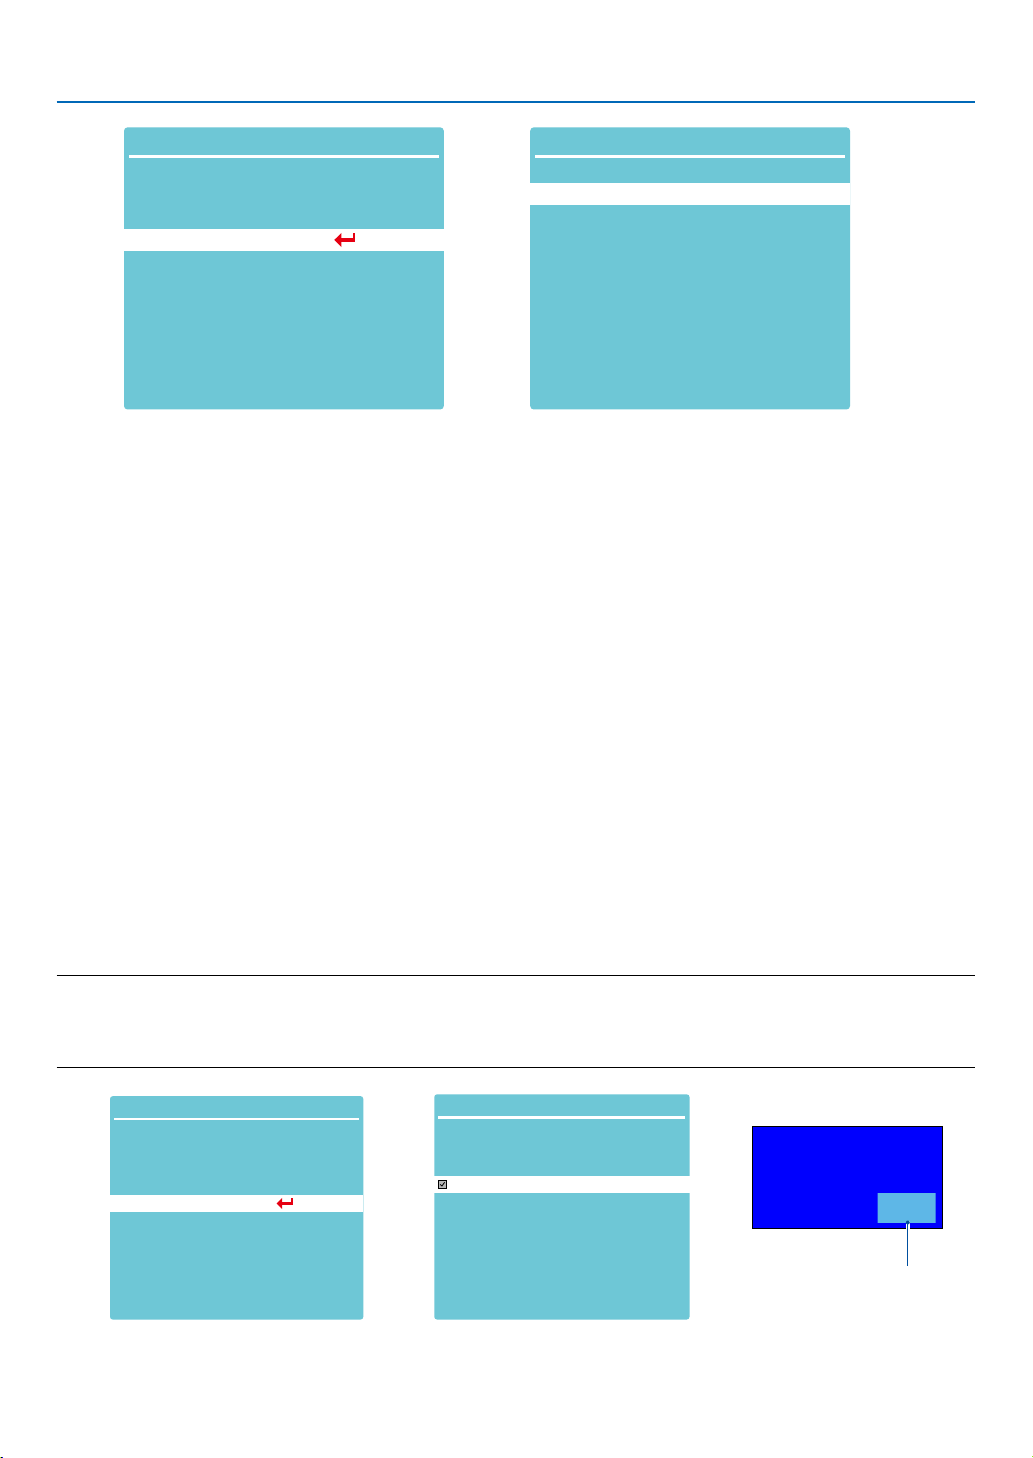
5. Using On-Screen Menu
Expand
Language
Auto setup
Keystone
Security
Power management
Filter
Test pattern
Network setup
Control ID
Factory default
Lamp counter reset
...
Expand
Security
OffPIN code lock
PIN code change
[Power management]
To reduce power consumption and maintain life cycle of light source, the power management function will turn off
the projection light source if your projector has no signals for a period of time.
1) Press ▲ ▼ button to select [Power management] menu.
2) Press <ENTER > button.
3) Press ▲ ▼ button to switch required item.
Ready......the power light indicator flashesgreen when the lamp is fully cooled down. The light source turns on
again if an input signal is connected or any key (except the power button ) on the side panel and remote controller
is pressed during this period of time.
Shut down......The projector shut down after the light source is fully cooled down.
Off......Disable the power management function.
Timer......Once the input signal is interrupted and no keys has been pressed for 30 seconds afterwards, the “No
signal” message displays in the timer. The timer counts down until the light source turns off. Press arrow key to set
up the timer in range of 1~30 minutes.
Ready countdown......Set the interval from ready mode change to standby mode (0 to 30 minutes) automatically.
When it is set it to zero, the projector will never change automatically. Press the Power key to change your projector
into standby mode and any other key to power on.
NOTE:
• Factory default for standby time: 5 minutes. Count down for ready mode: 5 minutes.
• When selecting [Off], the [Timer] and [Ready countdown] is unavailable.
• When selecting [Shut down], the [Timer] is unavailable.
Expand
Language
Auto setup
Keystone
Security
Power management
Filter
Test pattern
Network setup
Control ID
Factory default
Lamp counter reset
...
Expand
Ready
Shut down
Off
Timer
Ready countdown
Power management
5 Min
5 Min
Remaining time before
poweroff the light source.
No signal
01: 20
49
Page 61
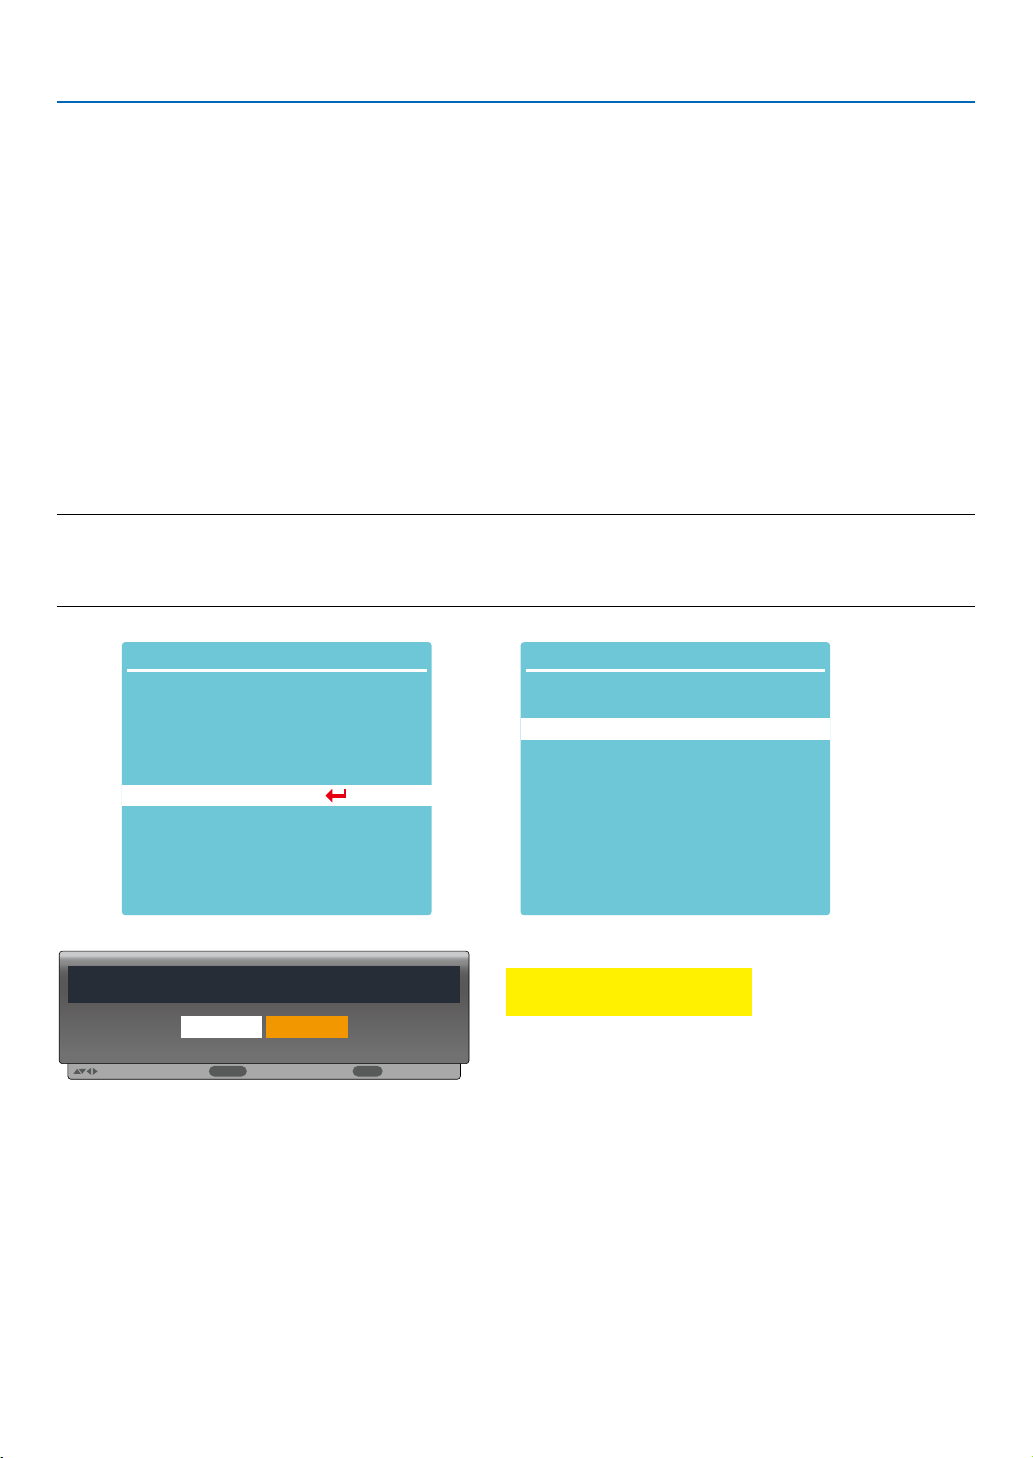
5. Using On-Screen Menu
:
ENTER
:
EXIT
:
[Filter]
Set this function to reset the filter usage time and set up warning display.
1) Press ▲ ▼ button to select [Filter] menu.
2) Press <ENTER> button.
3) Press ▲ ▼ button to switch required item.
When the projector reaches the user-set cleaning time, filter warning icon will appear on the screen to notify the user
needs to clean the projector filter. please make sure to select the initial state and set the timer after cleaning it. once
resetting filter counter, filter warning icon will be closed.
Fliter counter......Displays the filter usage time.
Timer......Set the time to display a warning icon.
Filter counter reset......Reset filter counter.
Filter clogging check......Check the temperature inside the projector and make reactions.
On: Check filter.
• Once the projector has checked any filter problem,the screen will display a warning icon"Filter
warning! please change the filter! " .
Off: DO NOT check filter.
NOTE:
• The screen will display the icon "Filter warning! please change the filter! " when the projector has checks one warning. And the the warn-
ing icon will disappear 30S later atuomatically, while only the power button is effective during that period.the projector will give warning
again if the projector has checked filter block and will record the information.
Expand
Language
Auto setup
Keystone
Security
Power management
Filter
Test pattern
Network setup
Control ID
Factory default
Lamp counter reset
Move
Filter counter reset?
Yes No
Select
...
Back
Expand
Filter counter
Timer
Filter counter reset
Filter clogging check
[Test pattern]
Select this function to display the projector's built-in test pattern.
1) Press ▲ ▼ button to select [Test pattern] menu.
2) Press <ENTER > button.
3) Press ▲ ▼ button to switch required item.
4) Press <ENTER> button.
Filter
5H
1000H
On
Filter warning
Off / Gray scale 1 / Gray scale 2 / Gray scale 3 / Gray scale 4 / Color bar / Red / Green / Blue / Cross hatch /
White / Black / Raster gray: Use The OSD menu to display the test pattern.
50
Page 62
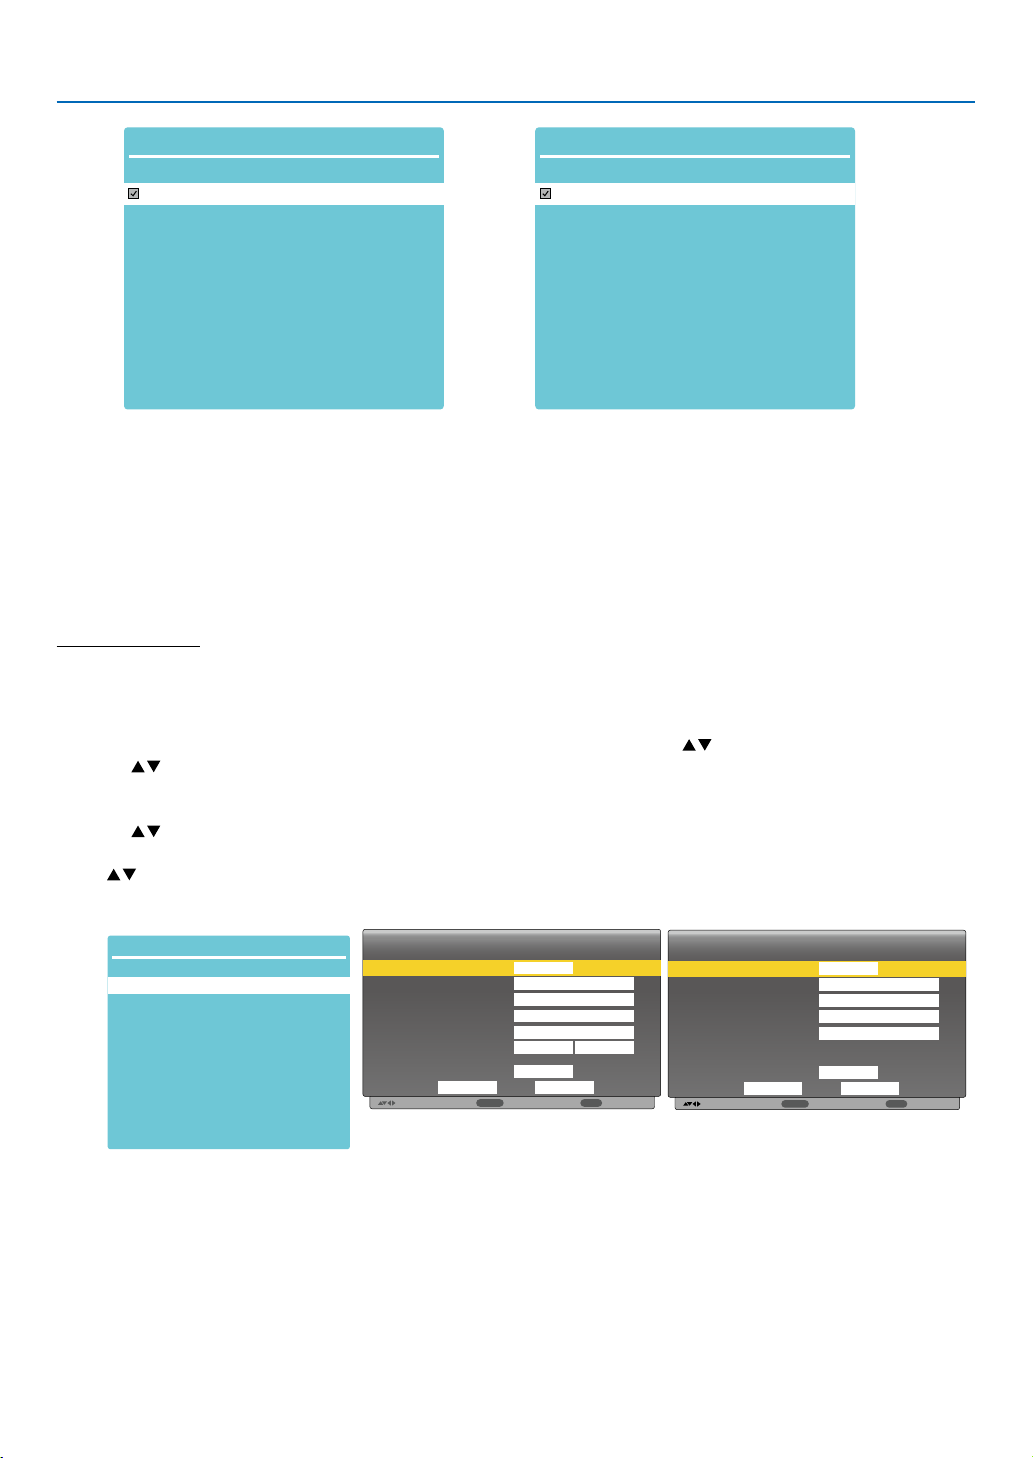
5. Using On-Screen Menu
:
:
ENTER
:
EXIT
:
:
:
ENTER
EXIT
Expand
Test pattern 1/2
Off
Gray scale1
Gray scale2
Expand
White
Black
Raster gray
Test pattern
2/2
Gray scale3
Gray scale4
Color bar
Red
Green
Blue
Cross hatch
[Network setup]
Function: This function is designed to allow the computer control the projector remotely via intranet.
1.Required equipment: Projector, computer, network cable
2.Connection:
Connect your projector to a router or switch in the LAN with normal or jumper network cable. In case a normal network cable failed to connect successfully, use a jumper cable instead.
3.Turn on the computer. The LAN port on computer and projector are flashing after power on the projector.
Operation steps
1. Power on your projector.
2. Acquire the IP address, with DHCP set to on and auto IP allocation set to On. (You may set DHCP to Off and set
up IP address manually if you are somehow familiar with networking.)
3. Enter the network setup menu
(1) Press MENU button on remote controller or top of the control panel, press button to select LAN icon.
(2) Press button select network settings and press ENTER button to enter.
MAC address......Display the MAC address of wired network.
IP address...........Display the ip address of wired network.
(3) Press button to set DHCP On to obtain an IP address, subnet , gateway and DNS automatically , and
press ENTER button to confirm.
Press button to set DHCP off, then press ENTER button to enter an IP address, then press ▼ button to select
subnet , gateway and dns automatically.and press ENTER button to confirm.
Expand
Network setting
Network information
MAC address:
IP address
Network Setup
7C:6F:F8:4E:B9:2F
192.168.1.100
Wired LAN
Wireless LAN
Move
DHCP
IP address
Subnet
Gateway
DNS
Setting
Next
On
. . .
. . .
. . .
. . .
Set
On
CancelSet
Cancel
Back
Wired LAN
Wireless LAN
Move
DHCP
IP address
Subnet
Gateway
DNS
Setting
off
192 . 168 . 1 . 1
255 . 255 . 255 . 0
192 . 168 . 1 . 1
0 . 0 . 0 . 0
On
CancelSet
Next
Back
51
Page 63
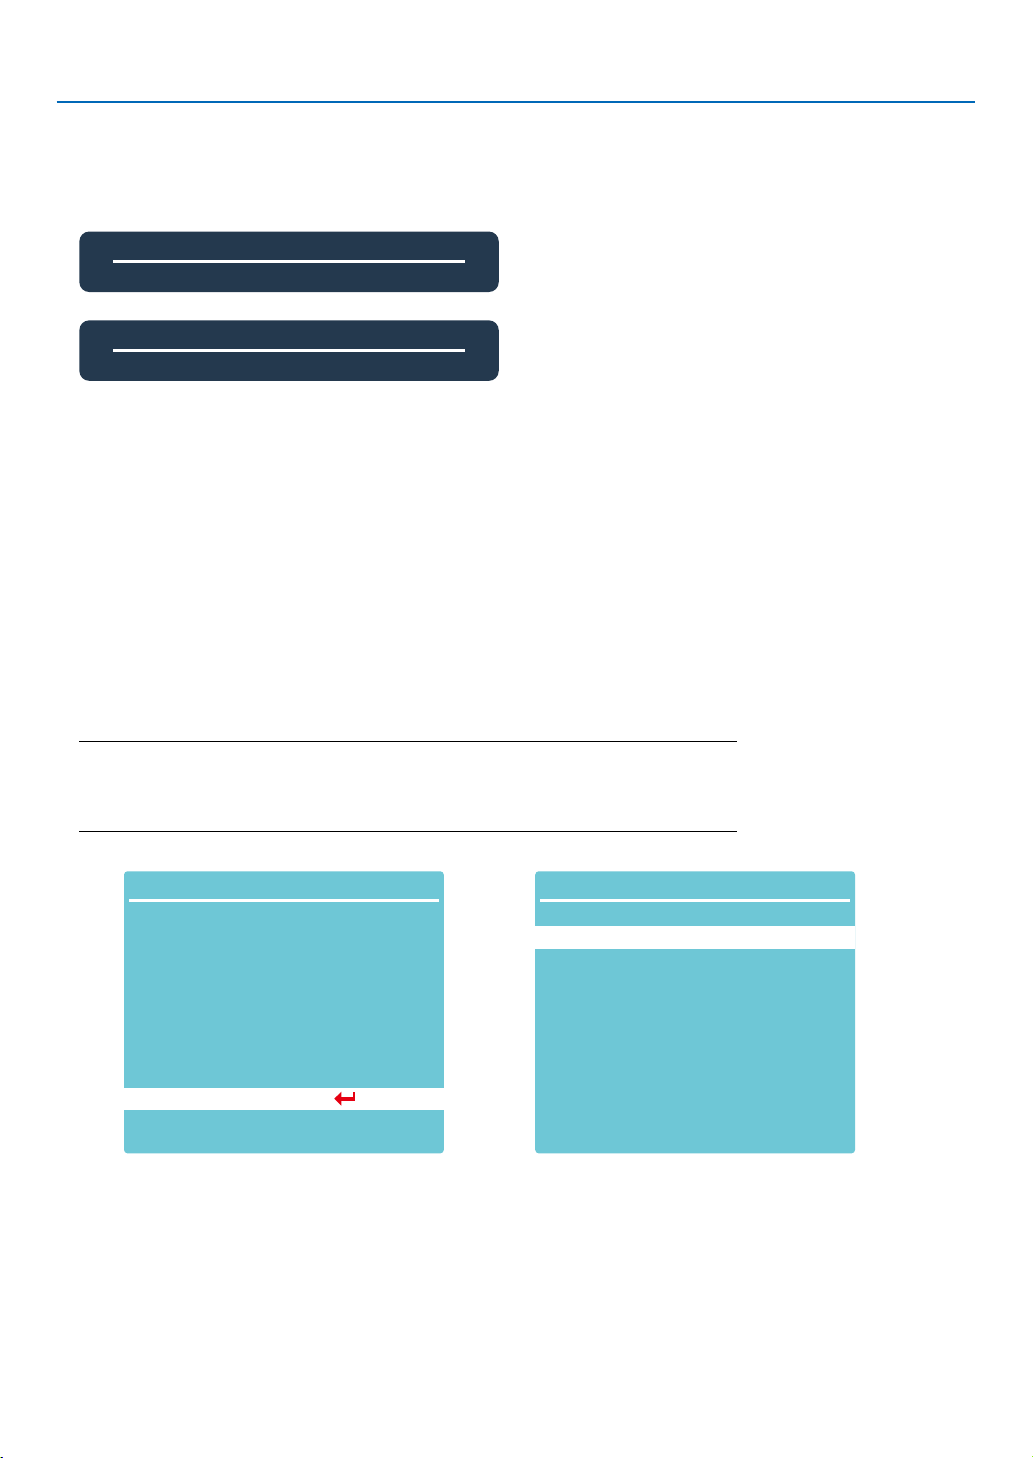
5. Using On-Screen Menu
[Control ID]
1. Turn on the projector.
2. Press the ID SET button on the remote control.
The CONTROL ID screen will be displayed.
Control ID(Inactive)
Control ID Number 5
Control ID(Active)
Control ID Number 5
If the projector can be operated with the current remote control ID, the [ACTIVE] will
be displayed. If the projector cannot be operated with the current remote control
ID, the [INACTIVE] will be displayed. To operate the inactive projector, assign the
control ID used for the projector by using the following procedure (Step 3).
3. Press one of numeric keypad buttons while pressing and holding the ID SET
button on the remote control.
Example:
To assign “3”, press the “3” button on the remote control.
No ID means that all the projectors can be operated together with a single remote
control. To set “No ID”, enter “000” or press the CLEAR button.
TIP: The range of IDs is from 1 to 254.
4. Release the ID SET button.
The updated Control ID screen will be displayed.
NOTE:
• The IDs can be cleared in a few days after the batteries are run down or removed.
• Accidentally pressing any one of the buttons of the remote control will clear currently specified ID
with batteries removed.
Expand
Language
Auto setup
Keystone
Security
Power management
Filter
Test pattern
Network setup
Control ID
Factory default
Lamp counter reset
Expand
Control ID
Control ID
Control ID Number
...
Off
1
52
Page 64
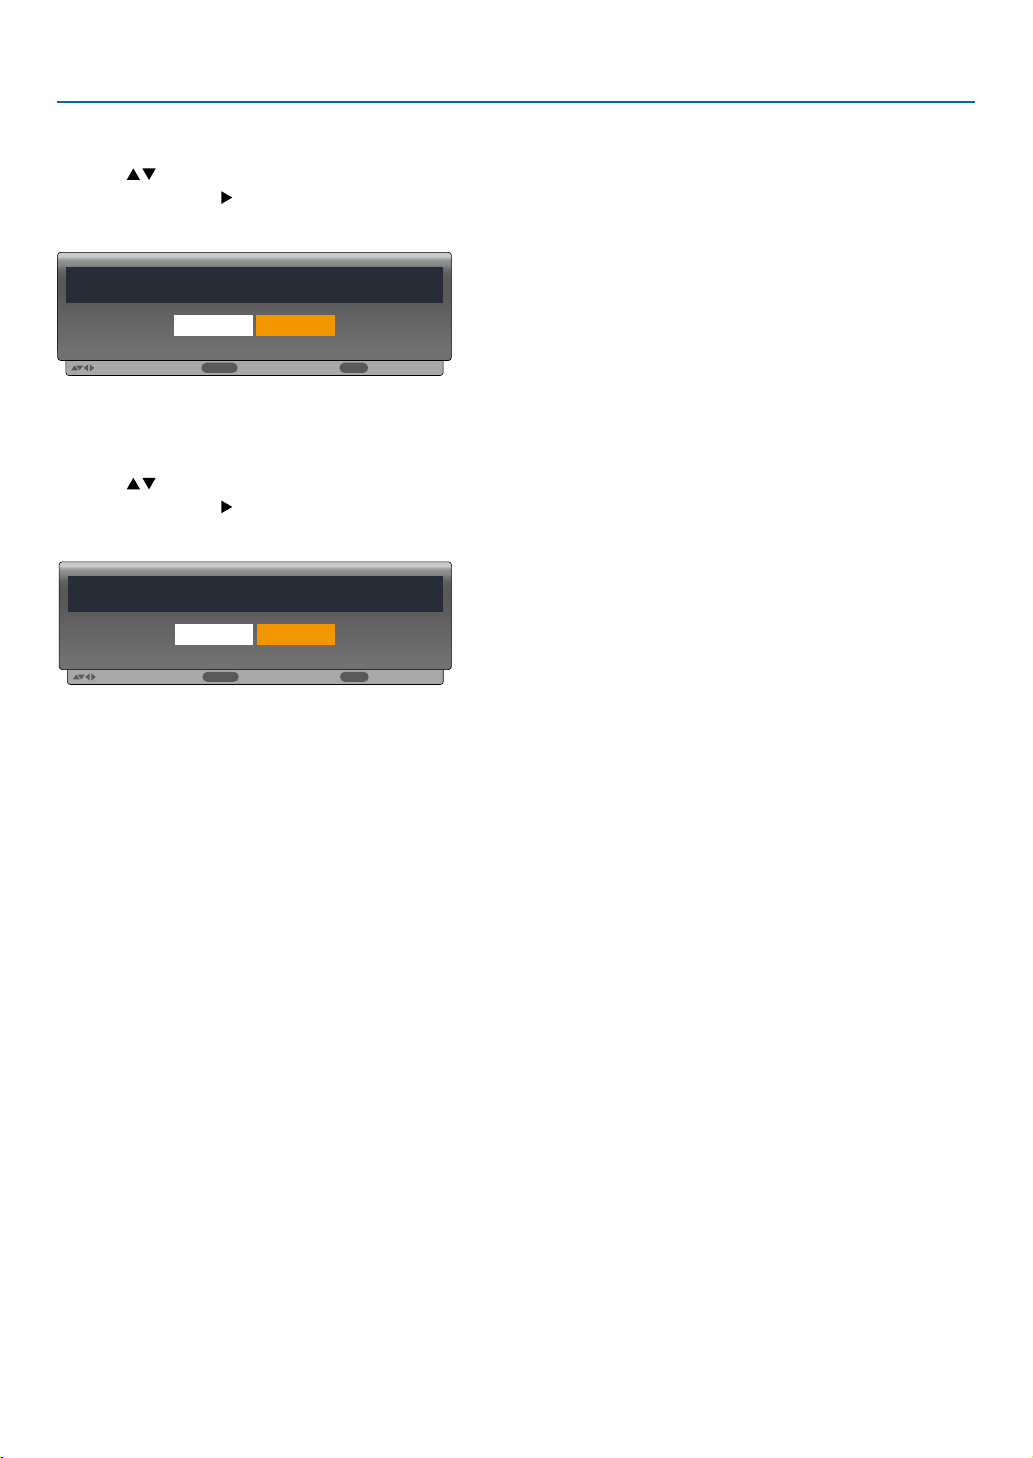
[Factory default]
:
:
ENTER
:
EXIT
:
ENTER
:
EXIT
:
This function resets all your settings to factory default.
1) Press button to select [Factory default] menu.
2) Press <ENTER or > button.
3) Press button to select yes ,then press <ENTER> button.
Return to factory default?
Yes No
5. Using On-Screen Menu
Move
Select
Back
[Lamp counter reset]
Make sure to reset the lamp counter, when replacing the lamp. Then the warning indicator goes out and the lamp
replacement icon will disappears.
1) Press button to select [Lamp counter reset] menu.
2) Press <ENTER or > button.
3) Press button to select yes ,then press <ENTER> button.
Lamp counter reset?
Yes No
Move
Select
Back
53
Page 65

5. Using On-Screen Menu
❽ Menu Descriptions & Functions [USB-A]
The projector has expand fuction, you can select other functions as described below.
When the USB memory inset into the projector, the viewer memory function can project the video and pictures
stored in the USB memory.
Press < MENU > button on the remote controller to display the OSD menu.Press button to select the USB-A
menu ,then press <ENTER> or button.
1) Press button to select reqiured item.
2) Press <ENTER> button.
3) Press button to set options.
4) Press <ENTER> button.
NOTE:
• When selecting [USB-A] as input signal, the "USB-A" menu is available.
• In addition to "Set slide" menu, even change the settings, If you do not implement the [Application], the setting value of the change is invalid.
USB-A
Set slide
Slide transition effect
Sort order
Rotate
Best fit
Repeat
Apply
Slide right
Name order
No rotate
Off
On
[Set slide]
Select this function to play slides.
1) Press button to select a file.
2) Press button to select [Set slide] menu.
3) Press <ENTER or > button.
• Full screen display
• Press <ENTER> to return the thumbnail.
[Slide transition effect]
Select this function to set the slide's playback, when switching slides.
1) Press button to select [Slide transition effect] menu.
2) Press <ENTER or > button.
3) Press button to switch required item.
Slide down.....Switch slides from the upper to the lower .
Slide right...... Switch slides from left to the right.
54
Page 66

[Sort order]
Select this function to set the slide's order.
1) Press button to select [Sort order] menu.
2) Press < ENTER > button.
3) Press button to switch required item.
Extend order...... Sort by extend names of file or folder.
Size order...........Sort by size of file or folder.
Time order..........Sort by the time of file or folder.
Name order........ Sort by names of file or folder.
[Rotate]
Set the rotation direction of images.
1) Press button to select [rotate] menu.
2) Press < ENTER > button.
3) Press button to switch required item.
No rotate ........Rotation is invalid.
270 degree......Rotate counterclockwise by 270 degrees.
180 degree......Rotate clockwise by 180 degrees.
90 degree...... rotate clockwise by 90 degrees.
[Best fit]
Set the image to be compatible with projection screen.
1) Press button to select [Best fit] menu.
2) Press < ENTER > button.
3) Press button to switch required item.
On.....Display images by the aspect ratio of the screen.
Off.....Display image by the normal pixels.
5. Using On-Screen Menu
[Repeat]
Select this function to play slides repeatedly.
1) Press button to select [repeat] menu.
2) press <ENTER or > button.
3) Press button to switch required item.
On.....Replay the first document,after playing the last one.
Off.....return to the thumbnail display screen,after playing the last one.
[Apply]
Only be used in playing slides.
1) Press button to select [Apply] menu.
2) press <ENTER or > button.
55
Page 67

5. Using On-Screen Menu
❾ Menu Descriptions & Functions [Info.]
Select info. function to detect the projected image signal and the projector operating status.
Press <HELP > button on the remote controller or <MENU> button on the control panel to display the OSD menu.
Press button to select the info. menu, then press <ENTER> or button.
Info. display as follows:
Input......Display selected input source.
H- sync freq.......Display H- sync freq. of input signal in unit of KHz. Show “---KHz” when no signals are in existence.
V- sync freq.......Display V- sync freq. of input signal in unit of KHz. Show “---KHz” when no signals are in existence.
Lamp counter......Display the lamp's usage time.
Model name......Display the projector's model name.
S/N......Display the projector's serial number.
Firmware version......Display the projector's firmware version.
SUBCPU......Display the projector's SUBCPU.
Info.
Input
H-sync freq.
V-sync freq.
Lamp counter
Model name
S/N
Firmware version
SUBCPU
Computer
...
31.50 kHZ
59.99 HZ
30 H
99.85%
xxxxx
xxxxx
1.00.010
0.10
56
Page 68
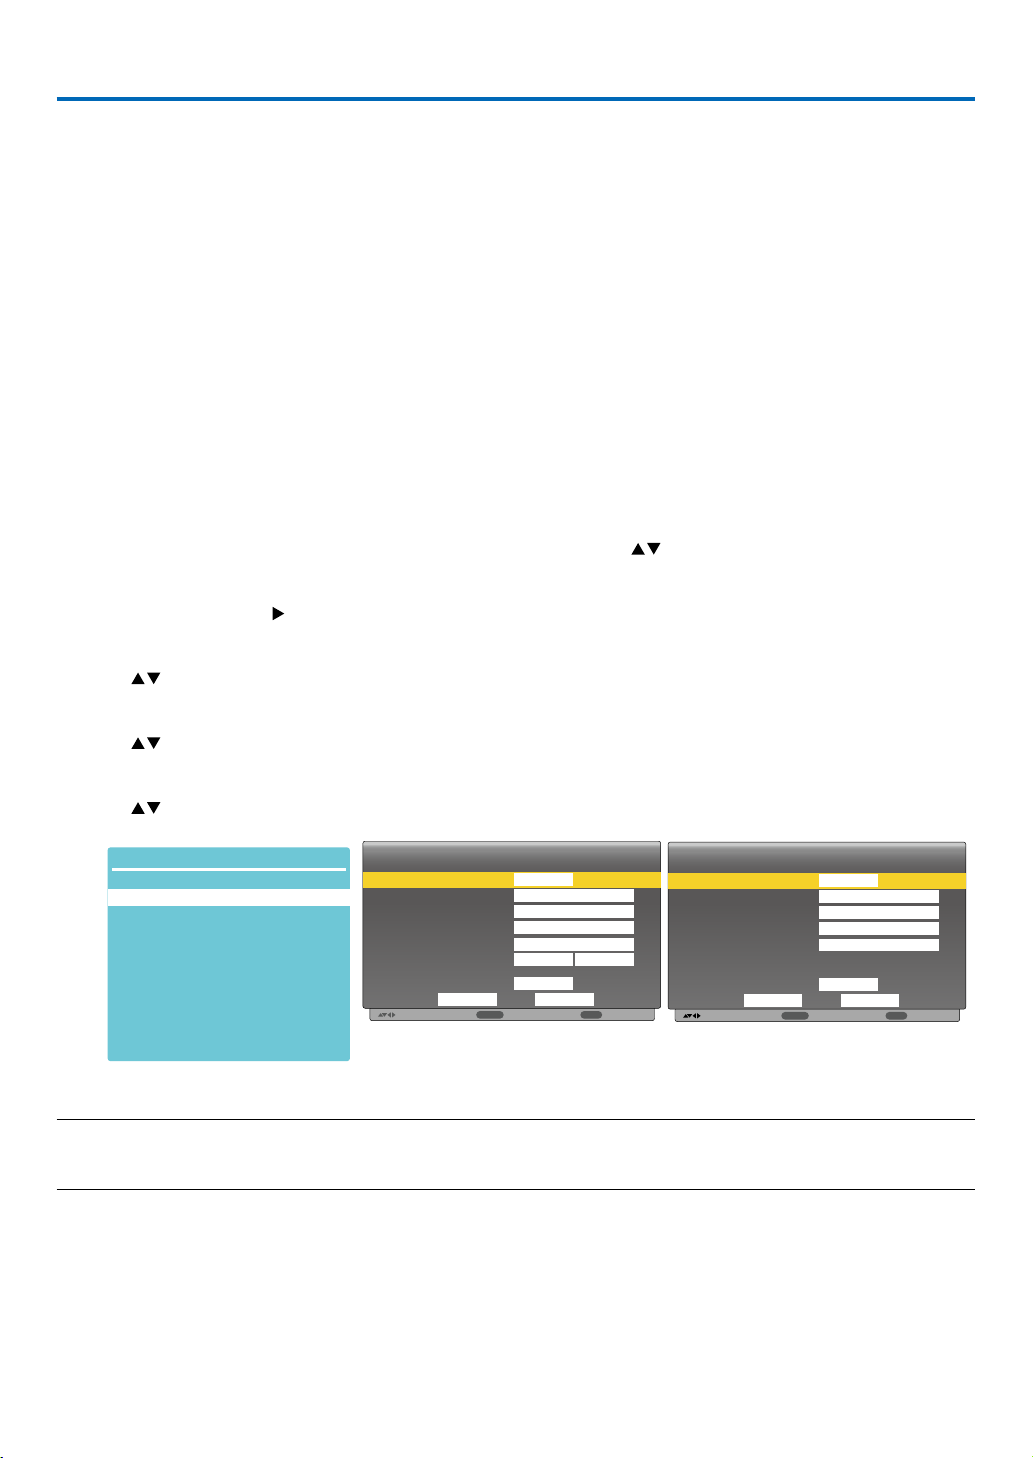
6. Network control
:
:
ENTER
:
EXIT
:
:
:
ENTER
EXIT
❶ Network control operation
Function: This function is designed to remote control computer in the same LAN.
Preparation
1. Required equipment: Projector, Computer, Network cable
2. Connection:
Connect your projector to a router or switch in the LAN with normal or jumper network cable. In case a normal network cable failed to connect successfully, use a jumper cable instead.
3. Turn on the computer. The LAN port on computer and projector are flashing after power on the projector.
Operation steps
1. Power on your projector.
2. Acquire the IP address, with DHCP set to on and auto IP allocation set to On. (You may set DHCP to Off and set
up IP address manually if you are somehow familiar with networking.)
3. Enter the network setup menu
(1) Press MENU button on remote controller or top control panel, press button to select LAN icon.
(2) Press ENTER button or button and the network menu displays.
(3) Press button select network settings and press ENTER to confirm.
(4) Press button to set DHCP On and press ENTER button to confirm.
(5) Press button to select Set, press ENTER button to wait until the “Please wait..” message disappears.
Expand
Network setting
Network information
MAC address:
IP address
Network Setup
7C:6F:F8:4E:B9:2F
192.168.1.100
Wired LAN
Wireless LAN
Move
DHCP
IP address
Subnet
Gateway
DNS
Setting
Next
On
. . .
. . .
. . .
. . .
Set
On
CancelSet
Cancel
Back
Wired LAN
Wireless LAN
Move
DHCP
IP address
Subnet
Gateway
DNS
Setting
off
192 . 168 . 1 . 1
255 . 255 . 255 . 0
192 . 168 . 1 . 1
0 . 0 . 0 . 0
On
CancelSet
Next
Back
NOTE:
• If you are using the wireless LAN connection, please check the SSID / ESSID and wireless IP address in the network setting status , and
write down the information.
57
Page 69

6. Network control
❷ Enter through a Web browser
Connecting Your Computer
1) Start the computer's Web browser.
2) Enter the IP address on the projector set in the URL input field of the Web browser.
3) Enter the password in the [Password], then click [Login].
"* "the factory default setting is the user name: "admin" (administrator privileges), password: "admin".
4) Click the [Login]
NOTE:
• Users can click on the top right corner of the Web browser screen to select the display language.
• Do not start multiple Web browser settings or control. Do not use more than one computer set or control the projector.
• Please change your password.
• If the network does not appear on screen controls, please consult your network administrator.
• Please refresh the web page before operating the main body.
Description of each option
①
②
③
④
⑤
① System status: Click this option to display the [System status] page.
② General setup: Click this option to display the [General setup] page.
③ Picture setup: Click this option to display the [picture setup] page.
58
Page 70
④ Image setup: Click this option to display the [image setup] page.
⑤ Network setup: Click this option to display [Network setup] page.
❸ [System status] page
① Versions: Displays the firmware version of the projector.
② LAN status: Displays the LAN. connection status.
4 [General setup] page
6. Network control
①
②
① Enter old password: Enter the password for the configuration.
② Enter new password: Enter a new password.
③ Confirm new password: Re-enter the new password to confirm.
④ Power & source: Update settings.
⑤ Power: Switch on the power of the projector on / off.
⑥ Source select: Switch the input source of the projector.
❺ [Picture setup] page
①
②
③
④
⑤
⑥
①
②
③
59
④
Page 71
① Brightness:Adjust the brightness of the projected image.
② Contrast:Adjust the contrast of the projected image.
③ Sharpness:Adjust the sharpness of the projected image.
④ Color Temperature:Adjust the color temperature of the projected image.
❻ [Image setup] page
6. Network control
①
②
③
④
⑤
⑥
⑦
⑧
⑨
⑩
① Aspect: Switch the aspect ratio of the projected image.
② Fine sync: Adjust the phase of the projected image.
③ H position: Adjust the horizontal position of the projected image.
④ V position: Adjust the vertical position of the projected image.
⑤ H. size: Adjust the horizontal dimension of the projected image.
⑥ Freeze: Select the function to switch the screen freeze on and off.
⑦ Auto PC adj.: Implement the automatic computer adjustment function.
⑧ V keystone: Correct trapezoidal distortion in vertical direction.
⑨ H keystone: Correc horizontal distortion in horizontal direction.
⑩ Corner correction: Correct four angles of the projected image.
60
Page 72
❼ [Network setup] page
① Network setup
If you want to enable the DHCP client, select the IP address automatically.
IP address:
Please enter the IP address when you do not use the DHCP server.
Subnet :
Please enter a subnet shield,when you do not use the DHCP server .
Gateway:
Please enter the gateway ,when you do not use the DHCP server.
6. Network control
①
②
③
④
②
DNS:
Please enter the DNS address, when you do not use the DHCP server.
Available characters : digital (0 - 9), a period (.)
(For example: 192.168.0.253)
② Apply
Update settings.
③ Crestron control
Connect Crestron tool by setting IP address, IP ID and Port options.
④ Wireless setup
Wireless LAN: Please select wireless LAN on or off.
ESSID: Please enter the ESSID.
AP/AdHoc Encryption: Please select password set on or off.
AP/AdHoc key: Please set password.
61
Page 73
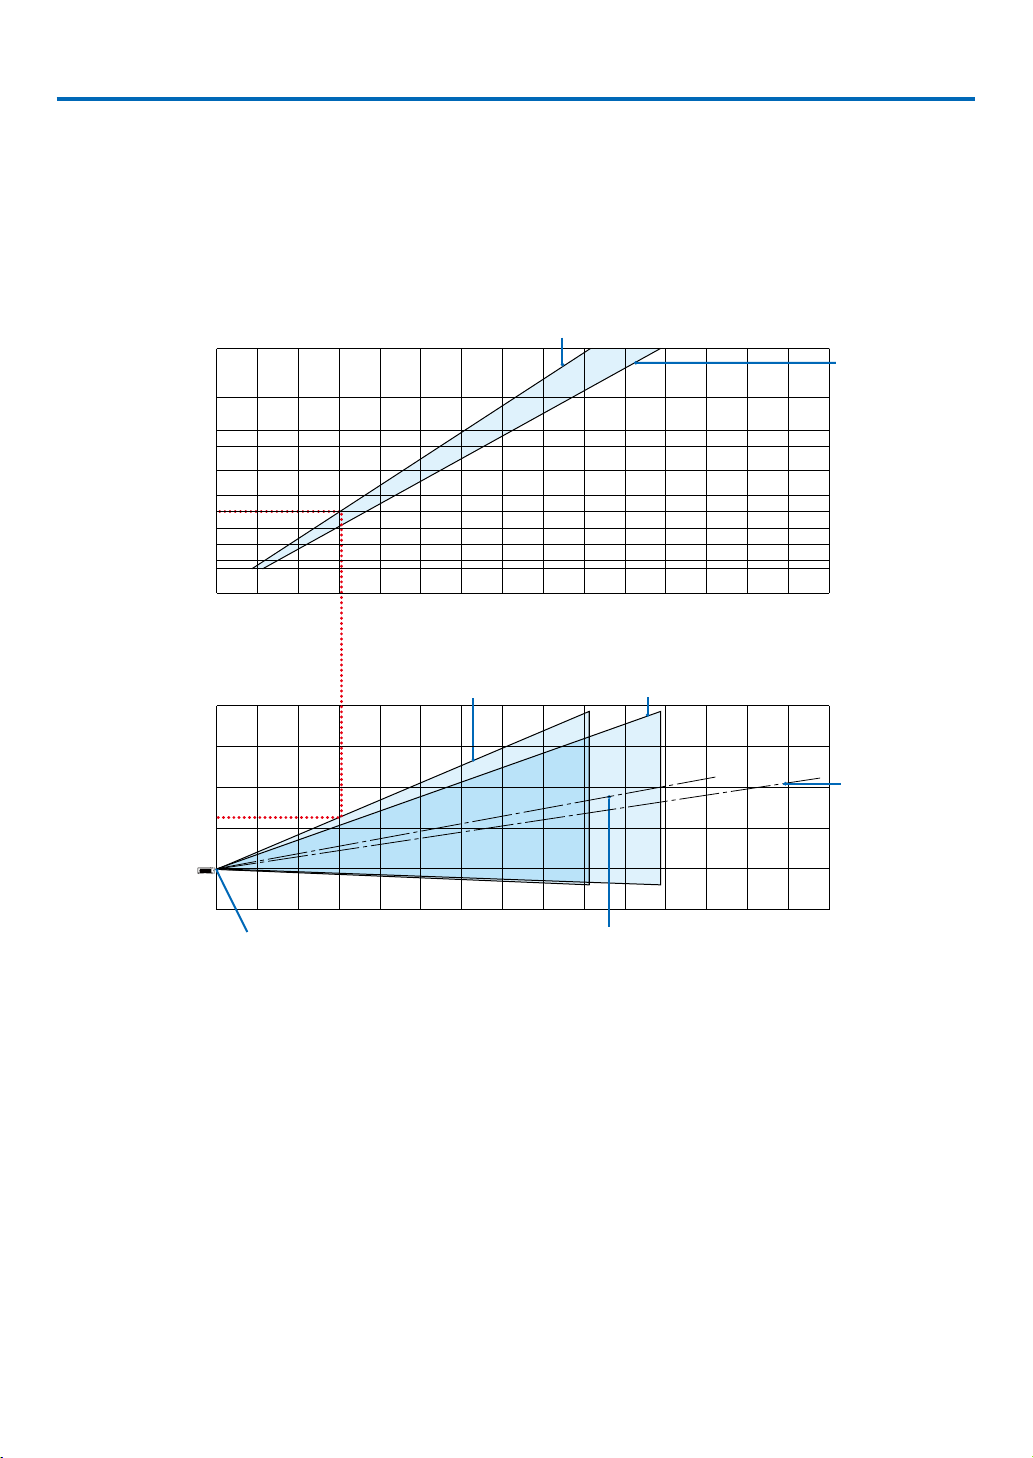
7. Installation and Connections
❶ Setting Up the Screen and the Projector
Use this to get a general idea of what the screen size will be when set in a certain position, what size screen you will
need, and what distance you will need to project images of the desired size.
The projection distance range at which focusing is possible is 0.9 m (for 30 inches) to 10.9 m (for 300 inches). Install
within this range.
[MC453X]
(inch)
300
240
200
180
150
Screen size
120
100
80
60
40
30
0123456789 10 11 12 13 14 15
(m)
4
3
2
1
projector lens
Screen height from the center of the
-1
12345678 91011
0
Projector lens center
When zoom lever turned to wide
When zoom lever turned to wide
[Projection distance]
Screen center line (wide)
When zoom lever turned to telescopic
12 13 14 15
When zoom lever
turned to telescopic
(m)
Screen center line
(telescopic)
(m)
[Reading the Table]
From the upper table on this page, to project wide images on a 100 screen, install at about 3.0 m from the front.
Also, from the lower table we can see that about 1.3 m are required from the projector’s lens center to the upper
edge of the screen. Use this to see whether or not enough height can be provided from the projector to the ceiling
and for installing the screen. The diagram shows the projection distance when the projector is installed horizontally.
62
Page 74
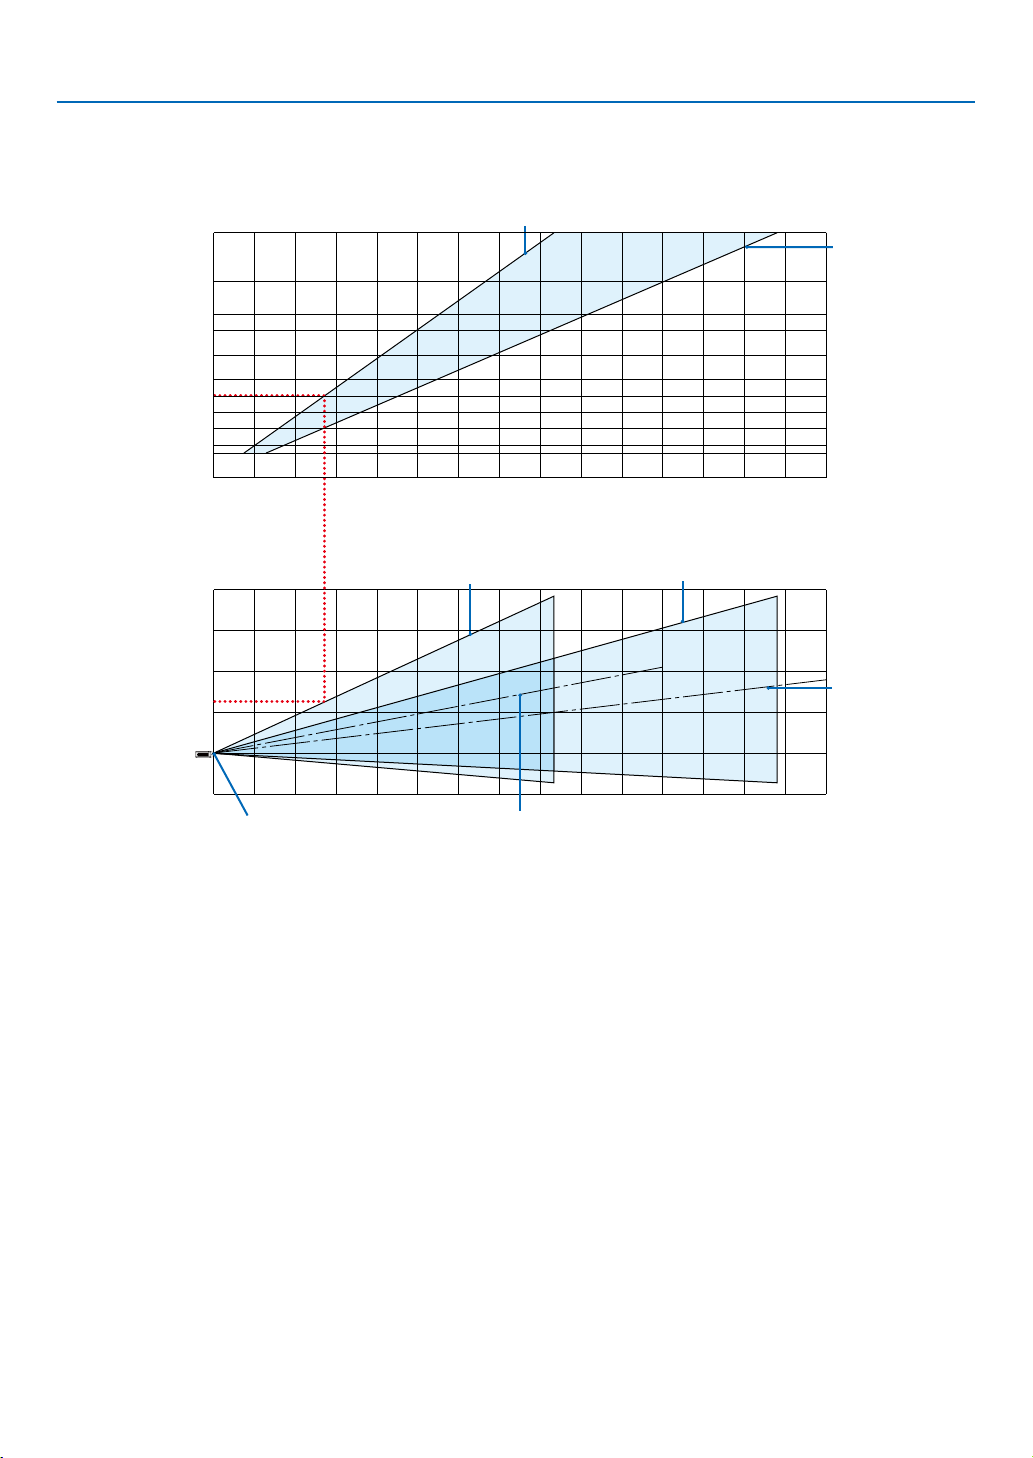
7. Installation and Connections
300
The projection distance range at which focusing is possible is 0.8 m (for 30 inches) to 13.8 m (for 300 inches). Install
within this range.
[ME453X]
(inch)
240
200
180
150
120
Screen size
100
80
60
40
30
0123456789 10 11 12 13 14 15
(m)
4
3
2
1
projector lens
Screen height from the center of the
-1
0
12345678 91011
Projector lens center
When zoom lever turned to wide
When zoom lever turned to wide
[Projection distance]
Screen center line (wide)
When zoom lever turned to telescopic
12 13 14 15
When zoom
lever turned to
telescopic
(m)
Screen center line
(telescopic)
(m)
[Reading the Table]
From the upper table on this page, to project wide images on a 100 screen, install at about 2.7 m from the front.
Also, from the lower table we can see that about 1.3 m are required from the projector’s lens center to the upper
edge of the screen. Use this to see whether or not enough height can be provided from the projector to the ceiling
and for installing the screen.
63
Page 75
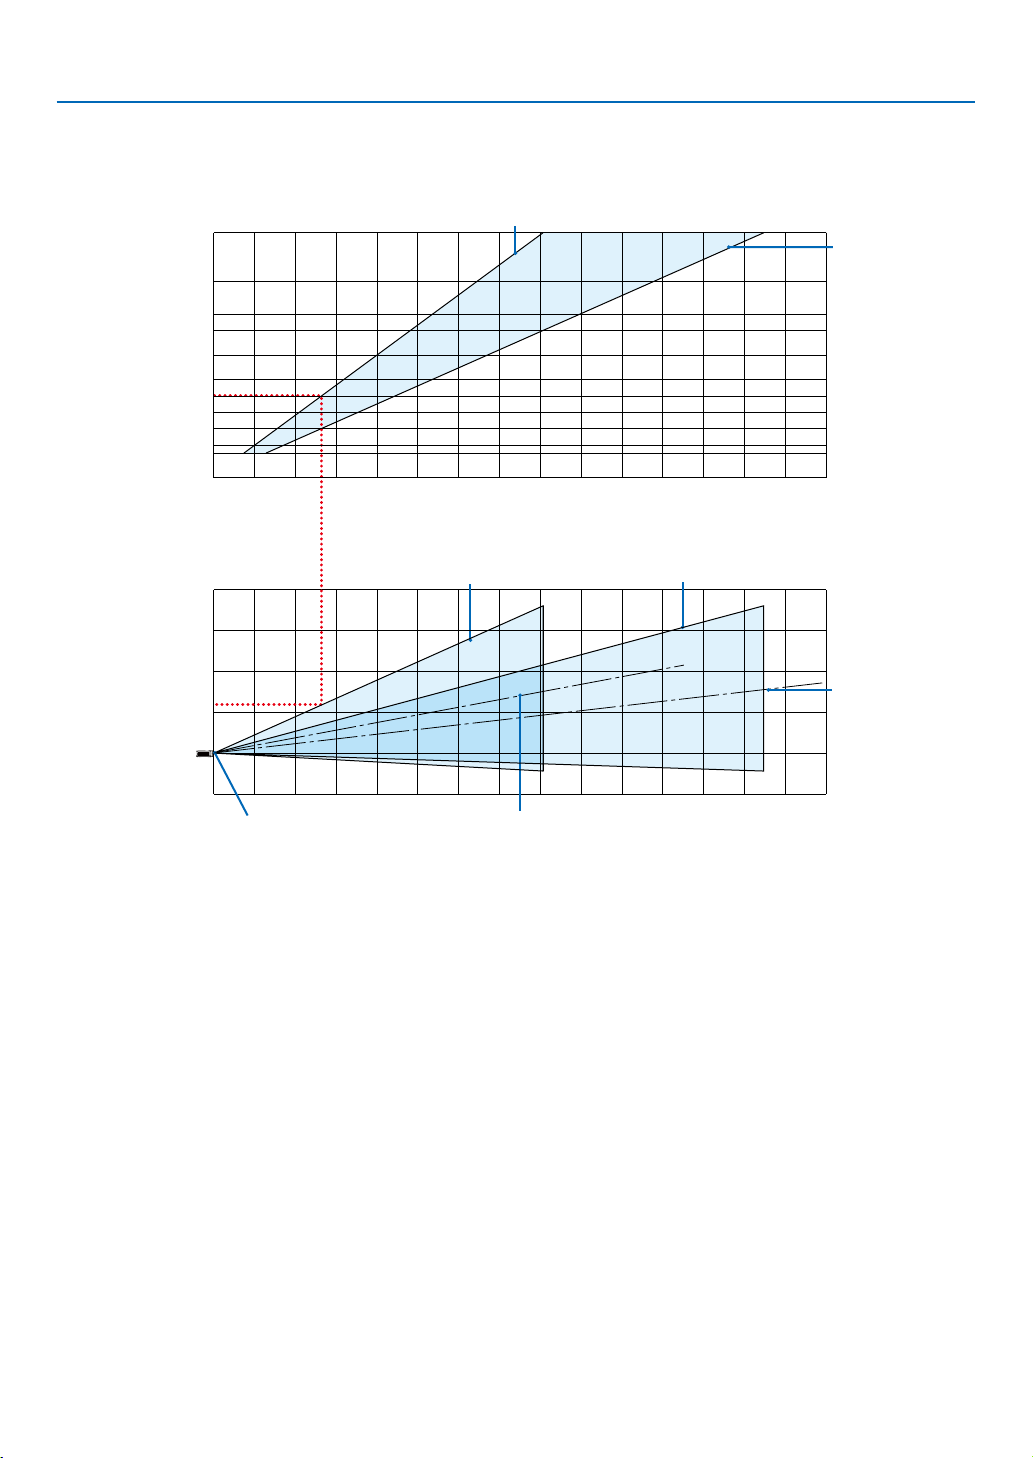
7. Installation and Connections
300
The projection distance range at which focusing is possible is 0.8 m (for 30 inches) to 13.4 m (for 300 inches). Install
within this range.
[ME423W/ME383W]
(inch)
240
200
180
150
120
Screen size
100
80
60
40
30
012345678910 11 12 13 14 15
(m)
4
3
2
1
projector lens
Screen height from the center of the
-1
0
1234567891011
Projector lens center
When zoom lever turned to wide
When zoom lever turned to wide
[Projection distance]
Screen center line (wide)
When zoom lever turned to telescopic
12 13 14 15
When zoom
lever turned to
telescopic
(m)
Screen center line
(telescopic)
(m)
[Reading the Table]
From the upper table on this page, to project wide images on a 100 screen, install at about 2.7 m from the front.
Also, from the lower table we can see that about 1.2 m are required from the projector’s lens center to the upper
edge of the screen. Use this to see whether or not enough height can be provided from the projector to the ceiling
and for installing the screen.
64
Page 76
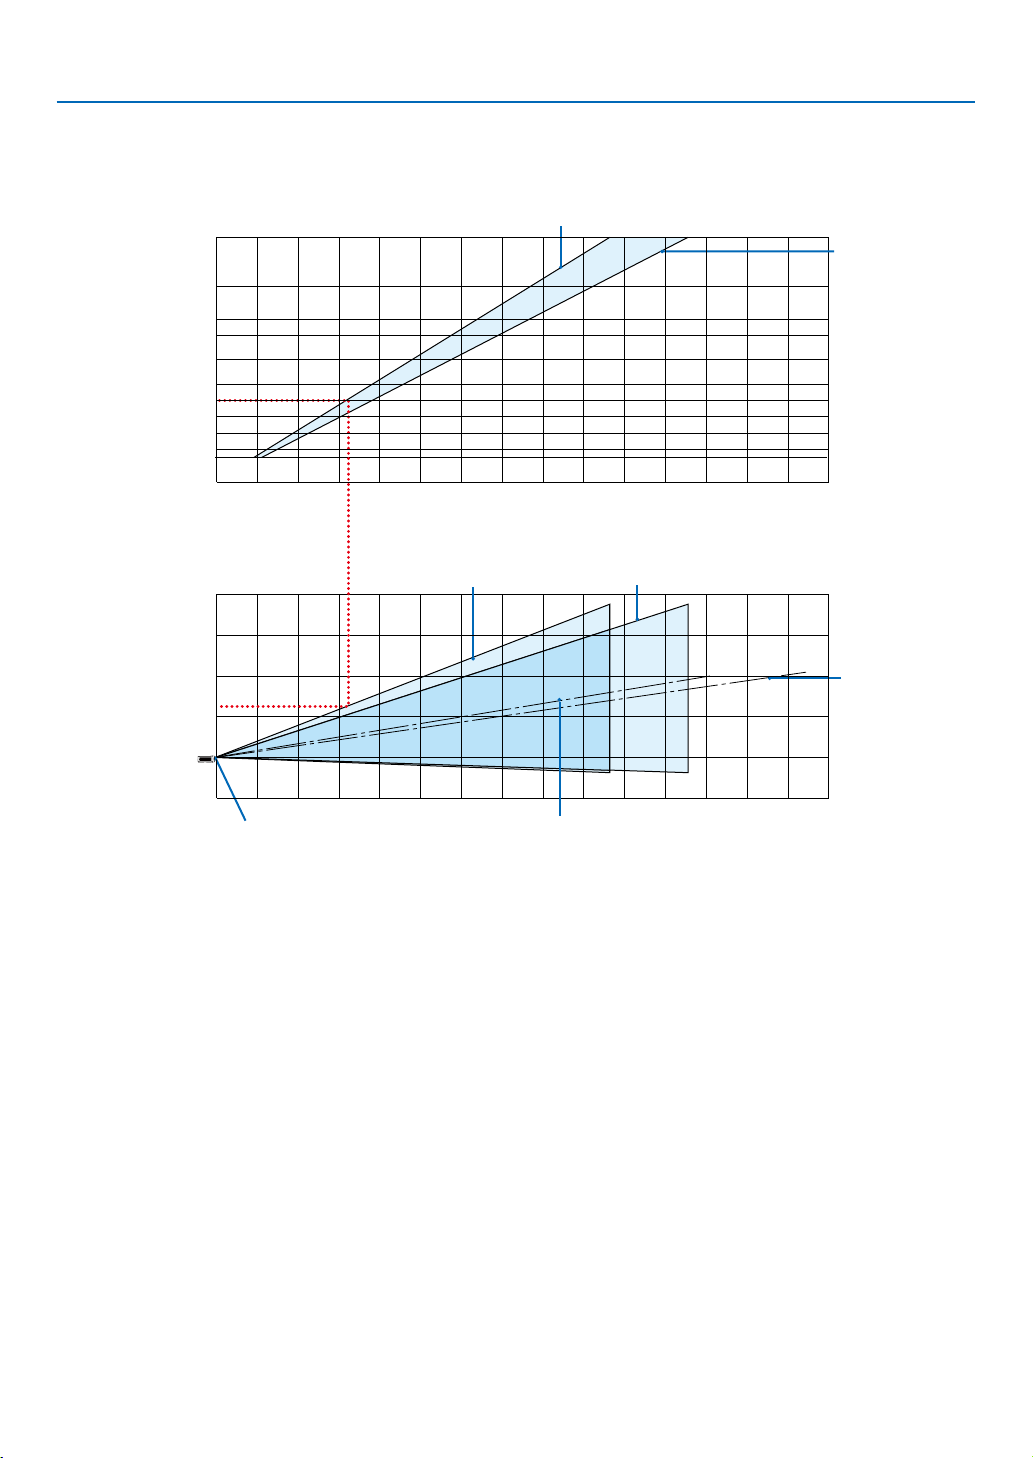
7. Installation and Connections
The projection distance range at which focusing is possible is 1.0 m (for 30 inches) to 11.6 m (for 300 inches). Install
within this range.
[MC393W]
(inch)
300
240
200
180
150
Screen size
120
100
80
60
40
30
012345678910 11 12 13 14 15
(m)
4
3
2
1
projector lens
Screen height from the center of the
-1
1234567891011
0
Projector lens center
When zoom lever turned to wide
When zoom lever turned to wide
[Projection distance]
Screen center line (wide)
When zoom lever turned to telescopic
12 13 14 15
When zoom lever
turned to telescopic
(m)
Screen center line
(telescopic)
(m)
[Reading the Table]
From the upper table on this page, to project wide images on a 100 screen, install at about 3.2 m from the front.
Also, from the lower table we can see that about 1.3 m are required from the projector’s lens center to the upper
edge of the screen. Use this to see whether or not enough height can be provided from the projector to the ceiling
and for installing the screen. The diagram shows the projection distance when the projector is installed horizontally.
65
Page 77
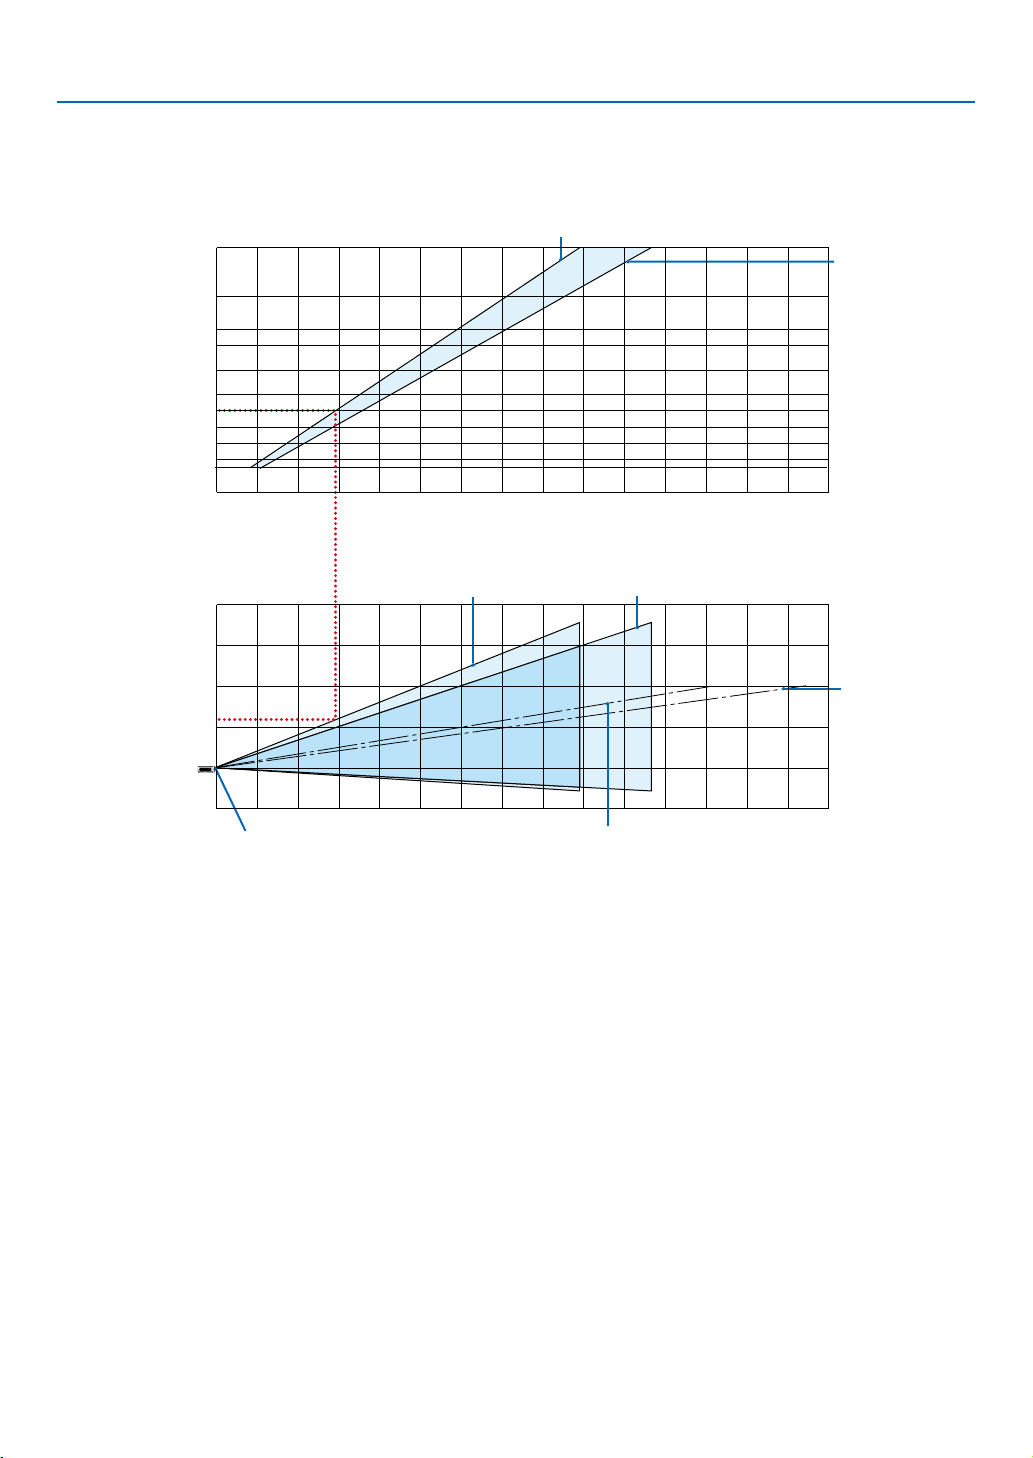
7. Installation and Connections
The projection distance range at which focusing is possible is 0.9 m (for 30 inches) to 10.7 m (for 300 inches). Install
within this range.
[MC423W]
(inch)
300
240
200
180
150
Screen size
120
100
80
60
40
30
0123456789 10 11 12 13 14 15
(m)
4
3
2
1
projector lens
Screen height from the center of the
-1
12345678 91011
0
Projector lens center
When zoom lever turned to wide
When zoom lever turned to wide
[Projection distance]
Screen center line (wide)
When zoom lever turned to telescopic
12 13 14 15
When zoom lever
turned to telescopic
(m)
Screen center line
(telescopic)
(m)
[Reading the Table]
From the upper table on this page, to project wide images on a 100 screen, install at about 3.0 m from the front.
Also, from the lower table we can see that about 1.2 m are required from the projector’s lens center to the upper
edge of the screen. Use this to see whether or not enough height can be provided from the projector to the ceiling
and for installing the screen. The diagram shows the projection distance when the projector is installed horizontally.
66
Page 78
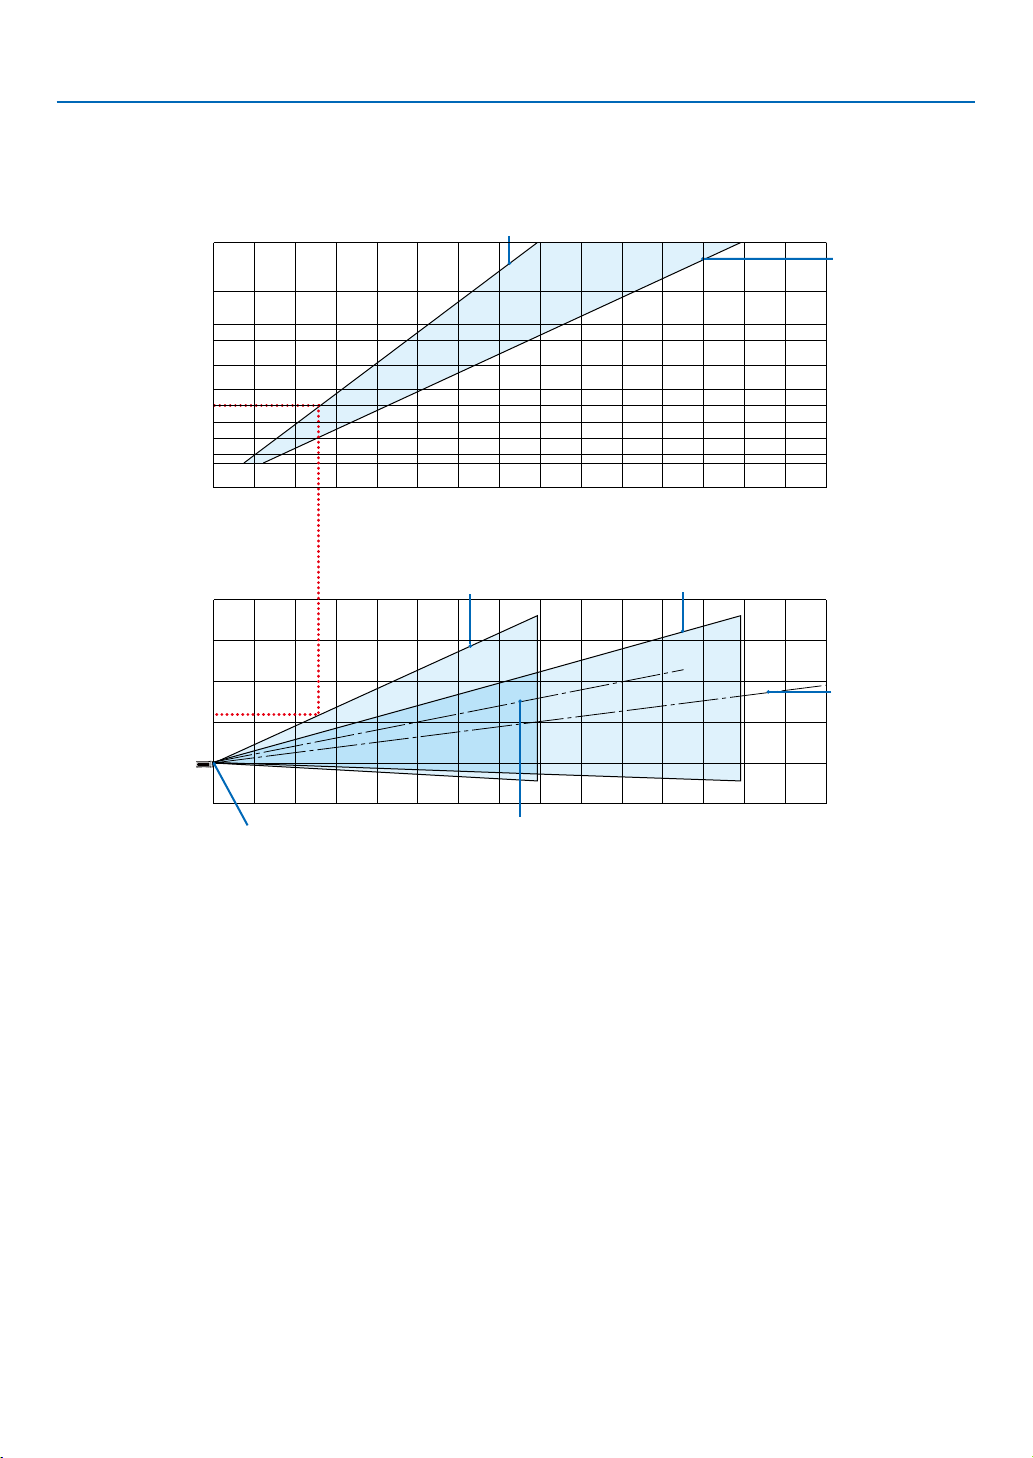
7. Installation and Connections
300
The projection distance range at which focusing is possible is 0.8 m (for 30 inches) to 12.9 m (for 300 inches). Install
within this range.
[ME403U]
(inch)
240
200
180
150
120
Screen size
100
80
60
40
30
012345678910 11 12 13 14 15
(m)
4
3
2
1
projector lens
Screen height from the center of the
-1
0
1234567891011
Projector lens center
When zoom lever turned to wide
When zoom lever turned to wide
[Projection distance]
Screen center line (wide)
When zoom lever turned to telescopic
12 13 14 15
When zoom lever
turned to telescopic
(m)
Screen center line
(telescopic)
(m)
[Reading the Table]
From the upper table on this page, to project wide images on a 100 screen, install at about 2.6 m from the front.
Also, from the lower table we can see that about 1.2 m are required from the projector’s lens center to the upper
edge of the screen. Use this to see whether or not enough height can be provided from the projector to the ceiling
and for installing the screen.
67
Page 79
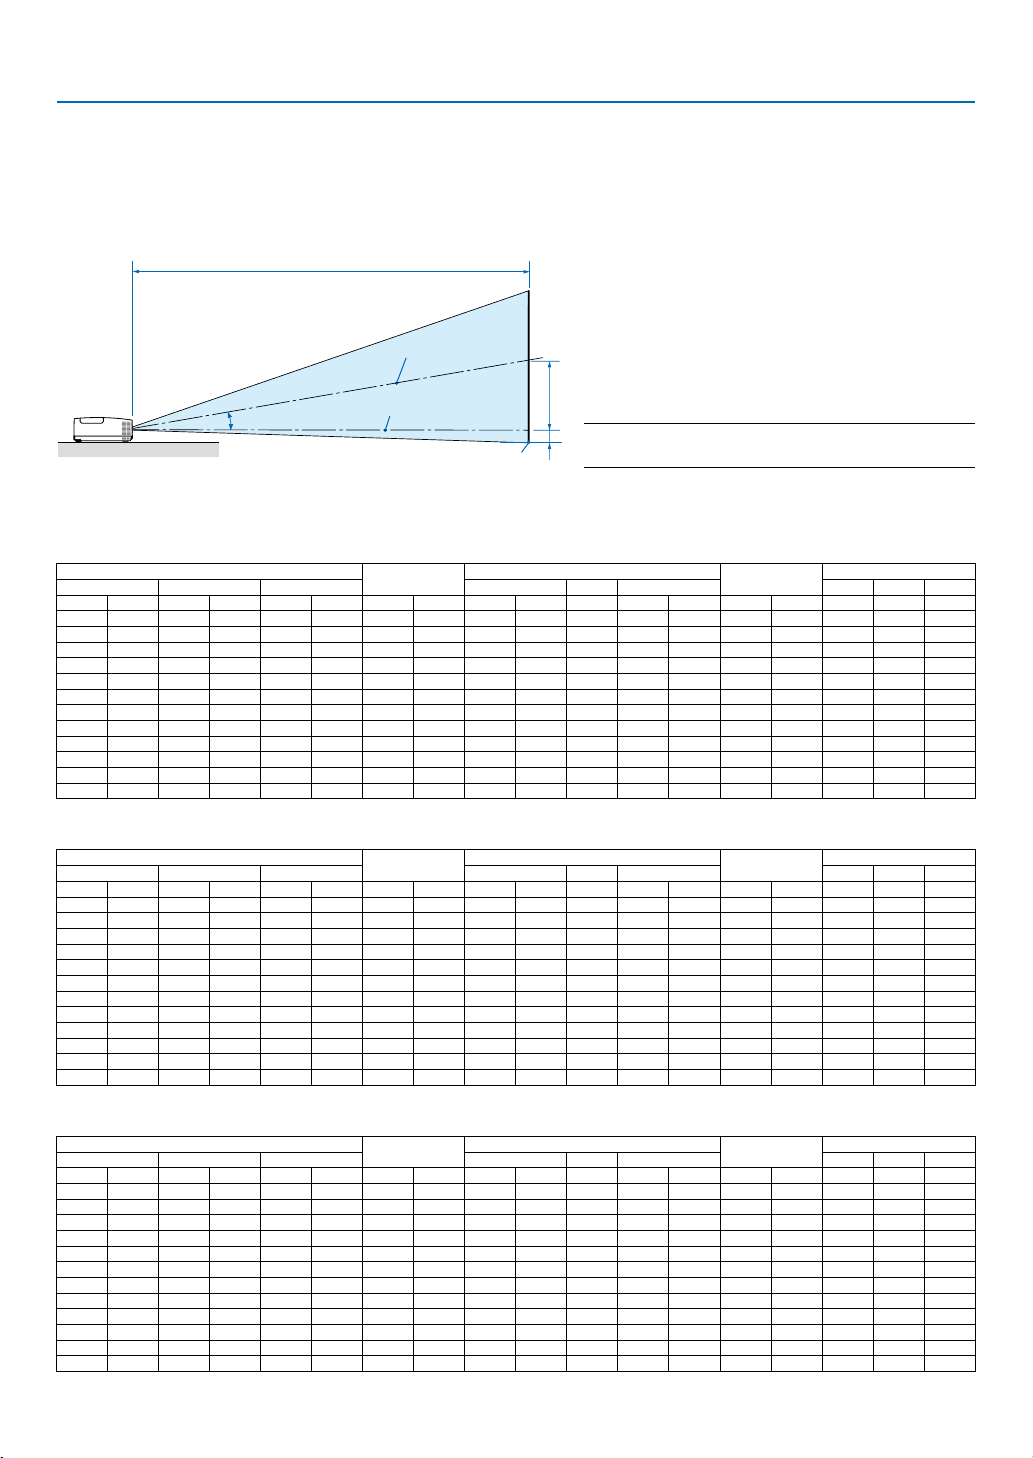
7. Installation and Connections
C
B
D
Throw Distance and Screen Size
The following shows the proper relative positions of the projector and screen. Refer to the table to determine the
position of installation.
Distance Chart
B = Vertical distance between lens center and
screen center
C = Throw distance
D = Vertical distance between lens center and
Screen center
α
Lens center
Screen bottom
[MC453X]
Diagonal Width Height Wide Tele Wide Tele
inch mm inch mm inch mm inch mm inch mm - inch mm inch mm Degree - Degree
30 762 24 610 18 457 6 163 35 900 - 43 1083 -3 -65 10.3 - 8.6
40 1016 32 813 24 610 9 218 47 1204 - 57 1448 -3 -87 10.3 - 8.6
60 1524 48 1219 36 914 13 327 71 1812 - 86 2179 -5 -130 10.2 - 8.5
80 2032 64 1626 48 1219 17 436 95 2421 - 115 2910 -7 -174 10.2 - 8.5
100 2540 80 2032 60 1524 21 545 119 3029 - 143 3641 -9 -217 10.2 - 8.5
120 3048 96 2438 72 1829 26 653 143 3637 - 172 4372 -10 -261 10.2 - 8.5
150 3810 120 3048 90 2286 32 817 179 4550 - 215 5468 -13 -326 10.2 - 8.5
180 4572 144 3658 108 2743 39 980 215 5462 - 258 6564 -15 -391 10.2 - 8.5
200 5080 160 4064 120 3048 43 1089 239 6070 - 287 7295 -17 -435 10.2 - 8.5
240 6096 192 4877 144 3658 51 1307 287 7287 - 345 8756 -21 -522 10.2 - 8.5
270 6858 216 5486 162 4115 58 1470 323 8199 - 388 9853 -23 -587 10.2 - 8.5
300 7620 240 6096 180 4572 64 1634 359 9112 - 431 10949 -26 -652 10.2 - 8.5
Screen Size
B
screen bottom (top of screen for ceiling
application)
α = Throw angle
NOTE: The values in the tables are design values and may
vary.
C
D
α
[ME453X]
Diagonal Width Height Wide Tele Wide Tele
inch mm inch mm inch mm inch mm inch mm - inch mm inch mm Degree - Degree
30 762 24 610 18 457 6 157 31 778 - 52 1327 -3 -71 11.4 - 6.8
40 1016 32 813 24 610 8 210 42 1056 - 70 1788 -4 -95 11.2 - 6.7
60 1524 48 1219 36 914 12 314 63 1612 - 107 2710 -6 -143 11.0 - 6.6
80 2032 64 1626 48 1219 17 419 85 2168 - 143 3632 -8 -191 10.9 - 6.6
100 2540 80 2032 60 1524 21 524 107 2724 - 179 4554 -9 -238 10.9 - 6.6
120 3048 96 2438 72 1829 25 629 129 3280 - 216 5476 -11 -286 10.8 - 6.5
150 3810 120 3048 90 2286 31 786 162 4114 - 270 6859 -14 -357 10.8 - 6.5
180 4572 144 3658 108 2743 37 943 195 4948 - 324 8242 -17 -429 10.8 - 6.5
200 5080 160 4064 120 3048 41 1048 217 5504 - 361 9164 -19 -476 10.8 - 6.5
240 6096 192 4877 144 3658 50 1257 260 6616 - 433 11008 -23 -572 10.8 - 6.5
270 6858 216 5486 162 4115 56 1414 293 7450 - 488 12391 -25 -643 10.8 - 6.5
300 7620 240 6096 180 4572 62 1572 326 8284 - 542 13774 -28 -714 10.7 - 6.5
Screen Size
B
C
D
α
[ME423W/ME383W]
Diagonal Width Height Wide Tele Wide Tele
inch mm inch mm inch mm inch mm inch mm - inch mm inch mm Degree - Degree
30 762 25 646 16 404 6 154 30 755 - 51 1291 -2 -48 11.5 - 6.8
40 1016 34 862 21 538 8 206 40 1025 - 69 1740 -3 -64 11.3 - 6.7
60 1524 51 1292 32 808 12 309 62 1565 - 104 2638 -4 -95 11.2 - 6.7
80 2032 68 1723 42 1077 16 411 83 2105 - 139 3536 -5 -127 11.1 - 6.6
100 2540 85 2154 53 1346 20 514 104 2645 - 175 4434 -6 -159 11.0 - 6.6
120 3048 102 2585 64 1615 24 617 125 3186 - 210 5332 -8 -191 11.0 - 6.6
150 3810 127 3231 79 2019 30 771 157 3996 - 263 6679 -9 -238 10.9 - 6.6
180 4572 153 3877 95 2423 36 926 189 4806 - 316 8025 -11 -286 10.9 - 6.6
200 5080 170 4308 106 2692 40 1028 210 5346 - 351 8923 -13 -318 10.9 - 6.6
240 6096 204 5169 127 3231 49 1234 253 6427 - 422 10719 -15 -381 10.9 - 6.6
270 6858 229 5816 143 3635 55 1388 285 7237 - 475 12066 -17 -429 10.9 - 6.6
300 7620 254 6462 159 4039 61 1543 317 8048 - 528 13413 -19 -477 10.8 - 6.6
Screen Size
B
C
D
α
68
Page 80
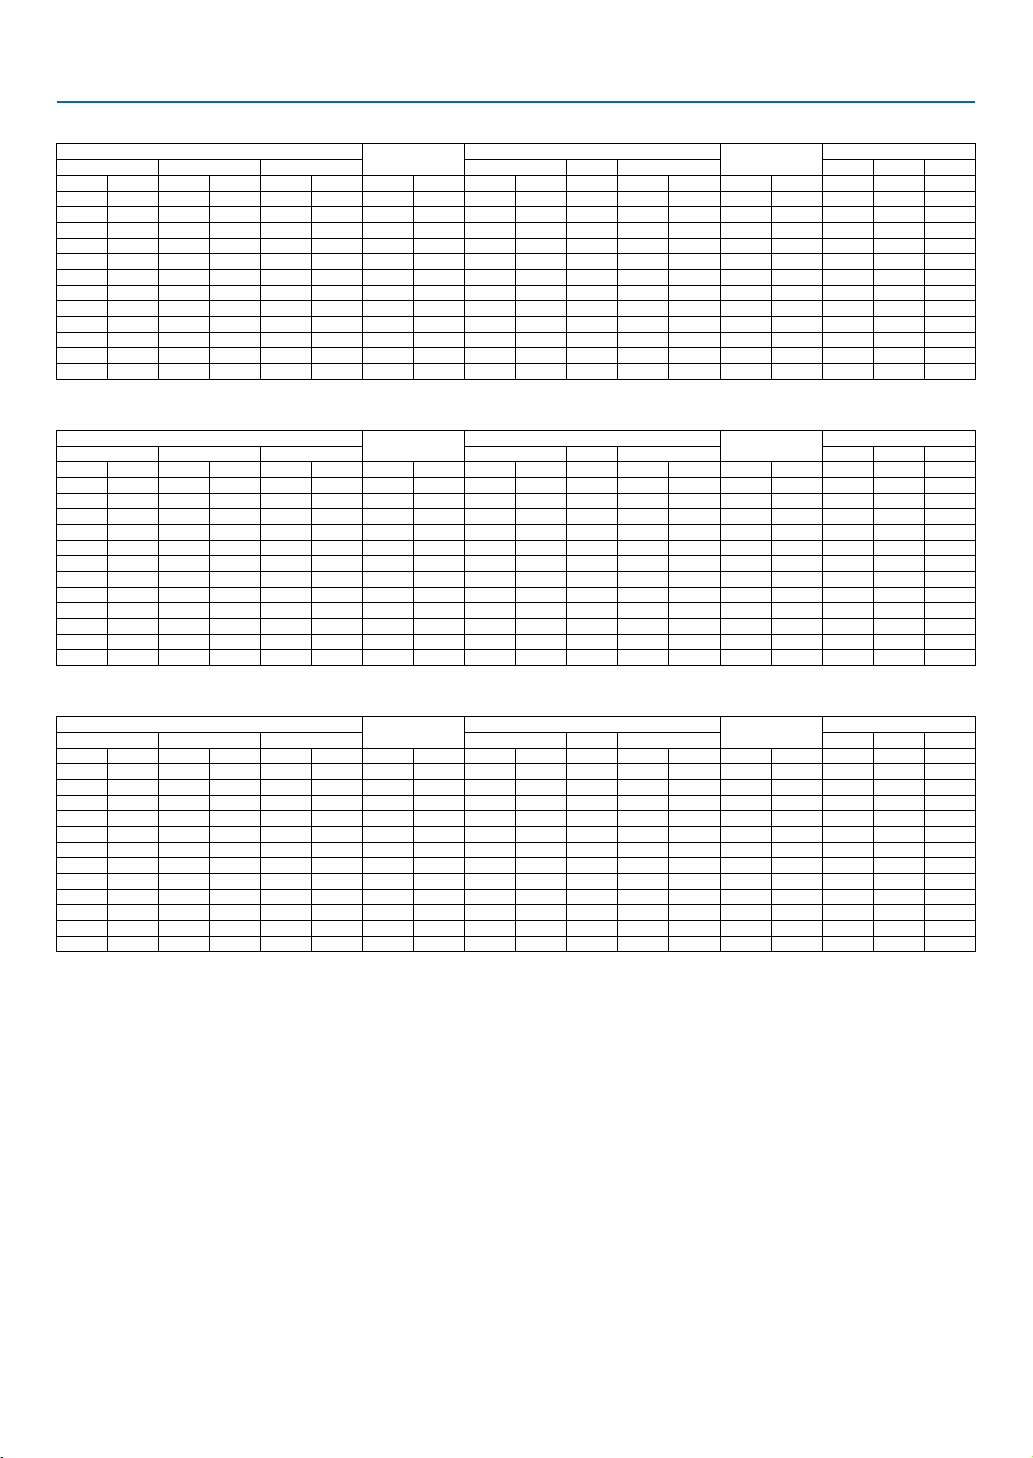
7. Installation and Connections
[MC393W]
Diagonal Width Height Wide Tele Wide Tele
inch mm inch mm inch mm inch mm inch mm - inch mm inch mm Degree - Degree
30 762 25 635 16 406 7 174 38 955 - 45 1149 -1 -29 10.3 - 8.6
40 1016 34 864 21 533 9 229 50 1277 - 60 1536 -2 -38 10.2 - 8.5
60 1524 51 1295 32 813 14 348 76 1922 - 91 2311 -2 -58 10.2 - 8.5
80 2032 68 1727 42 1067 18 457 101 2567 - 121 3086 -3 -77 10.2 - 8.5
100 2540 85 2159 53 1346 23 577 126 3211 - 152 3860 -4 -96 10.2 - 8.5
120 3048 102 2591 64 1626 27 697 152 3856 - 182 4635 -5 -115 10.2 - 8.5
150 3810 127 3226 79 2007 34 860 190 4823 - 228 5797 -6 -144 10.2 - 8.5
180 4572 153 3886 95 2413 41 1035 228 5790 - 274 6959 -7 -173 10.2 - 8.5
200 5080 170 4318 106 2692 45 1154 253 6435 - 304 7733 -8 -192 10.2 - 8.5
240 6096 204 5182 127 3226 54 1383 304 7725 - 365 9283 -9 -230 10.2 - 8.5
270 6858 229 5817 143 3632 61 1557 342 8692 - 411 10445 -10 -259 10.2 - 8.5
300 7620 254 6452 159 4039 68 1732 380 9659 - 457 11607 -11 -288 10.2 - 8.5
Screen Size
B
[MC423W]
Diagonal Width Height Wide Tele Wide Tele
inch mm inch mm inch mm inch mm inch mm - inch mm inch mm Degree - Degree
30 762 25 646 16 404 6 160 34 856 - 41 1046 -2 -42 10.6 - 8.7
40 1016 34 862 21 538 8 214 45 1153 - 55 1403 -2 -55 10.5 - 8.7
60 1524 51 1292 32 808 13 321 69 1748 - 83 2117 -3 -83 10.4 - 8.6
80 2032 68 1723 42 1077 17 428 92 2342 - 111 2831 -4 -111 10.3 - 8.6
100 2540 85 2154 53 1346 21 534 116 2937 - 140 3545 -5 -139 10.3 - 8.6
120 3048 102 2585 64 1615 25 641 139 3531 - 168 4260 -7 -166 10.3 - 8.6
150 3810 127 3231 79 2019 32 802 174 4423 - 210 5331 -8 -208 10.3 - 8.6
180 4572 153 3877 95 2423 38 962 209 5314 - 252 6402 -10 -250 10.3 - 8.5
200 5080 170 4308 106 2692 42 1069 233 5909 - 280 7116 -11 -277 10.3 - 8.5
240 6096 204 5169 127 3231 50 1283 279 7097 - 336 8544 -13 -333 10.2 - 8.5
270 6858 229 5816 143 3635 57 1443 315 7989 - 379 9615 -15 -374 10.2 - 8.5
300 7620 254 6462 159 4039 63 1603 350 8881 - 421 10686 -16 -416 10.2 - 8.5
Screen Size
B
C
C
D
D
α
α
[ME403U]
Diagonal Width Height Wide Tele Wide Tele
inch mm inch mm inch mm inch mm inch mm - inch mm inch mm Degree - Degree
30 762 25 646 16 404 6 154 29 745 - 49 1240 -2 -48 11.7 - 7.1
40 1016 34 862 21 538 8 206 40 1012 - 66 1670 -3 -64 11.5 - 7.0
60 1524 51 1292 32 808 12 309 61 1545 - 100 2532 -4 -95 11.3 - 6.9
80 2032 68 1723 42 1077 16 411 82 2079 - 134 3393 -5 -127 11.2 - 6.9
100 2540 85 2154 53 1346 20 514 103 2612 - 167 4254 -6 -159 11.1 - 6.9
120 3048 102 2585 64 1615 24 617 124 3145 - 201 5115 -8 -191 11.1 - 6.9
150 3810 127 3231 79 2019 30 771 155 3945 - 252 6407 -9 -238 11.1 - 6.9
180 4572 153 3877 95 2423 36 926 187 4745 - 303 7699 -11 -286 11.0 - 6.9
200 5080 170 4308 106 2692 40 1028 208 5278 - 337 8560 -13 -318 11.0 - 6.9
240 6096 204 5169 127 3231 49 1234 250 6345 - 405 10283 -15 -381 11.0 - 6.8
270 6858 229 5816 143 3635 55 1388 281 7145 - 456 11575 -17 -429 11.0 - 6.8
300 7620 254 6462 159 4039 61 1543 313 7945 - 507 12867 -19 -477 11.0 - 6.8
Screen Size
B
C
D
α
69
Page 81

7. Installation and Connections
WARNING
• Installing your projector on the ceiling must be done by a qualified technician. Contact your Dukane dealer for more
information.
• Do not attempt to install the projector yourself.
• Only use your projector on a solid, level surface. If the projector falls to the ground, you can be injured and the
projector severely damaged.
• Do not use the projector where temperatures vary greatly. The projector must be used at temperatures between
41°F (5°C) and 104°F (40°C) (Eco mode selected automatically at 95°F to 104°F/35°C to 40°C).
• Do not expose the projector to moisture, dust, or smoke. This will harm the screen image.
• Ensure that you have adequate ventilation around your projector so heat can dissipate. Do not cover the vents on
the side or the front of the projector.
70
Page 82
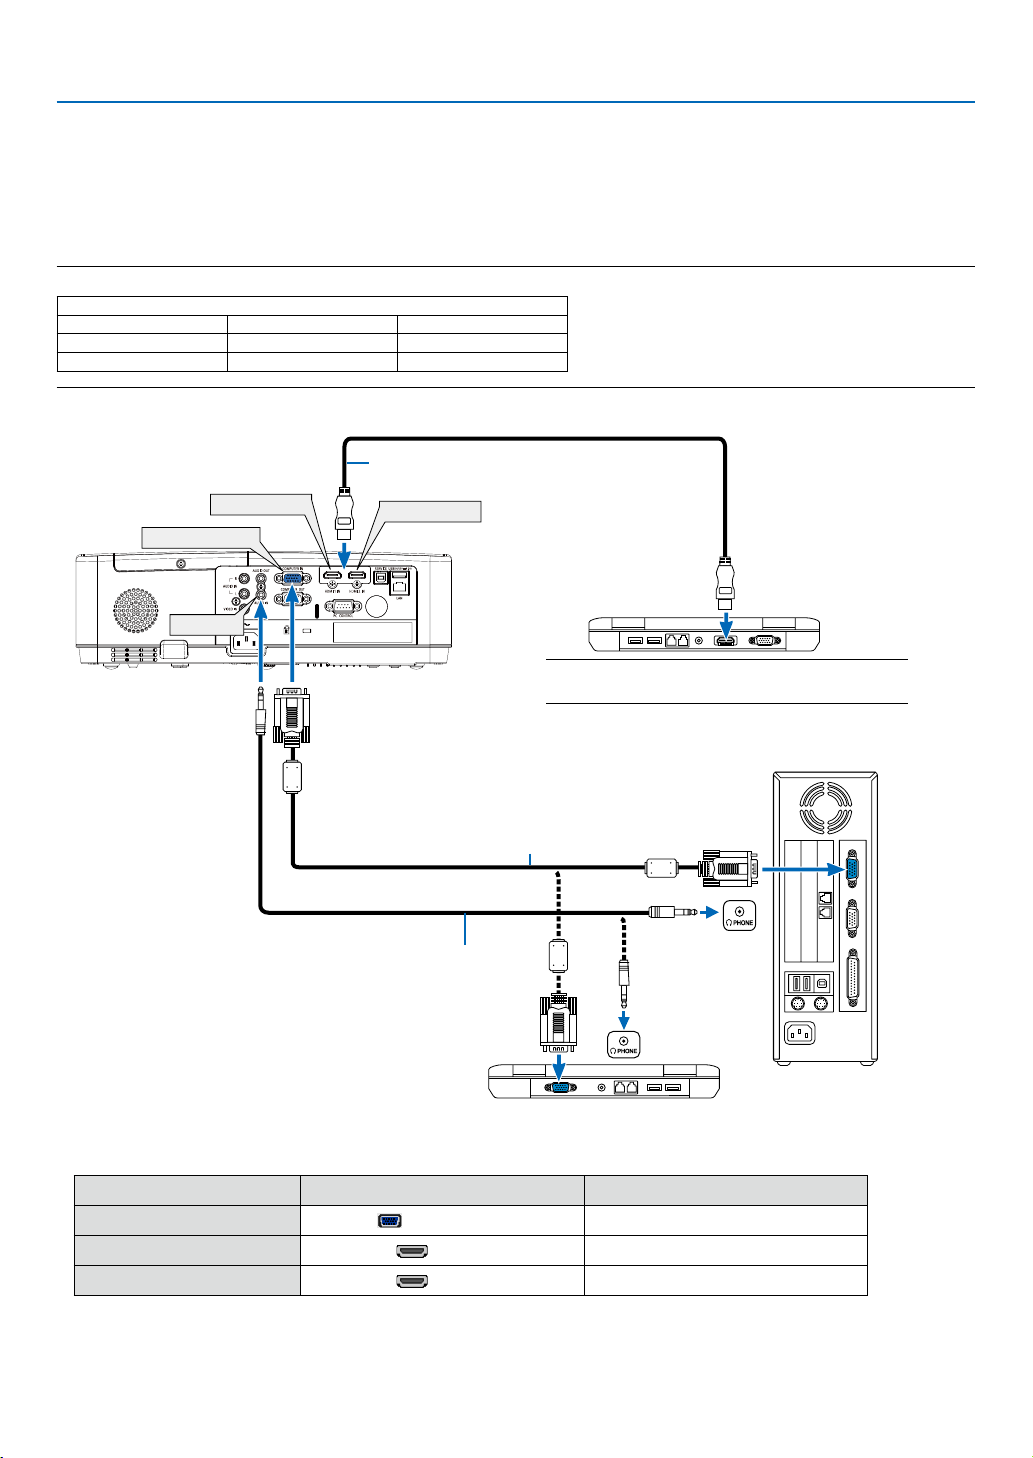
7. Installation and Connections
❷ Making Connections
Connecting Your Computer
Computer cables, HDMI can be used to connect to a computer. The connection cable is not enclosed with the
projector. Please get ready a suitable cable for the connection.
NOTE: Signals supported by Plug & Play (DDC2)
COMPUTER IN HDMI 1 IN HDMI 2 IN
analog digital digital
Yes Yes Yes
HDMI 1 IN
COMPUTER IN
AUDIO IN
INPUT
HDMI cable (not supplied)
Use High Speed HDMI® Cable.
HDMI 2 IN
NOTE: For Mac, use a commercially available pin adapter
(not supplied) to connect to your Mac’s video port.
Computer cable (VGA) (supplied)
To mini D-Sub 15-pin terminal on the
projector. It is recommended that you use a
commercially available distribution amplifier
if connecting a signal cable longer than the
cable supplied.
Stereo mini-plug audio cable (not supplied)
• Select the source name for its appropriate input terminal after turning on the projector.
Input terminal
COMPUTER IN
INPUT button on the projector cabinet
Button on the remote control
COMPUTER
(COMPUTER)
HDMI 1 IN HDMI1 (HDMI 1)
HDMI 2 IN HDMI2 (HDMI 2)
71
Page 83
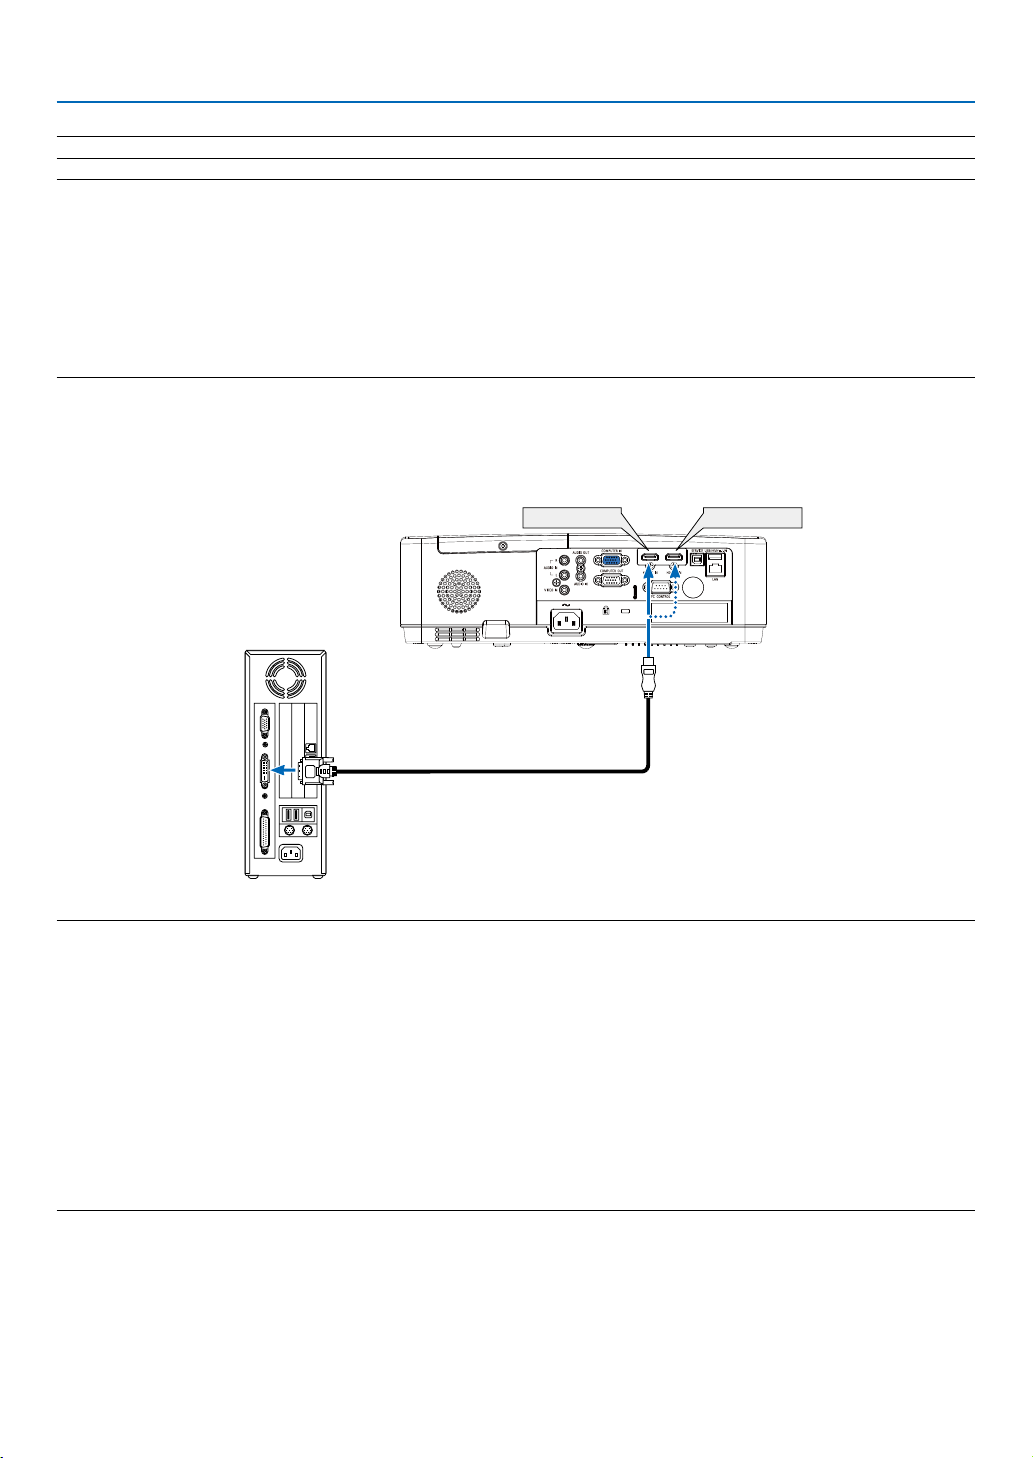
7. Installation and Connections
NOTE: The projector is not compatible with video decoded outputs of the ISS-6020 switcher.
NOTE: An image may not be displayed correctly when a Video source is played back via a commercially available scan converter.
This is because the projector will process a video signal as a computer signal at the default setting. In that case, do the following.
* When an image is displayed with the lower and upper black portion of the screen or a dark image is not displayed correctly:
Project an image to fill the screen and then press the AUTO ADJ. button on the remote control or the projector cabinet.
Enabling the computer’s external display
Displaying an image on the notebook PC’s screen does not necessarily mean it outputs a signal to the projector.
When using a PC compatible laptop, a combination of function keys will enable/disable the external display.
Usually, the combination of the “Fn” key along with one of the 12 function keys gets the external display to come on or off. For example,
laptops use Fn + F3, while Dell laptops use Fn + F8 key combinations to toggle through external display selections.
Cautions when using a DVI signal
• When the computer has a DVI output terminal, use a commercially available converter cable to connect the computer to the projector’s HDMI 1 or HDMI 2 input terminal (only digital video signals can be input).
HDMI 1 IN HDMI 2 IN
NOTE: When Viewing a DVI Digital Signal
• Turn off the power of the computer and projector before connecting.
• When a video deck is connected via a scan converter, etc., the display may not be correct during fast-forwarding and rewinding.
• Use a DVI-to-HDMI cable compliant with DDWG (Digital Display Working Group) DVI (Digital Visual Interface) revision 1.0 standard.
The cable should be within 197"/5 m long.
• Turn off the projector and the PC before connecting the DVI-to-HDMI cable.
• To project a DVI digital signal: Connect the cables, turn the projector on, then select the HDMI input. Finally, turn on your PC.
Failure to do so may not activate the digital output of the graphics card resulting in no picture being displayed. Should this happen, restart
your PC.
• Do not disconnect the DVI-to-HDMI cable while the projector is running. If the signal cable has been disconnected and then reconnected,
an image may not be correctly displayed. Should this happen, restart your PC.
• The COMPUTER video input terminals support Windows Plug and Play.
• A Mac signal adapter (commercially available) may be required to connect a Mac computer.
72
Page 84
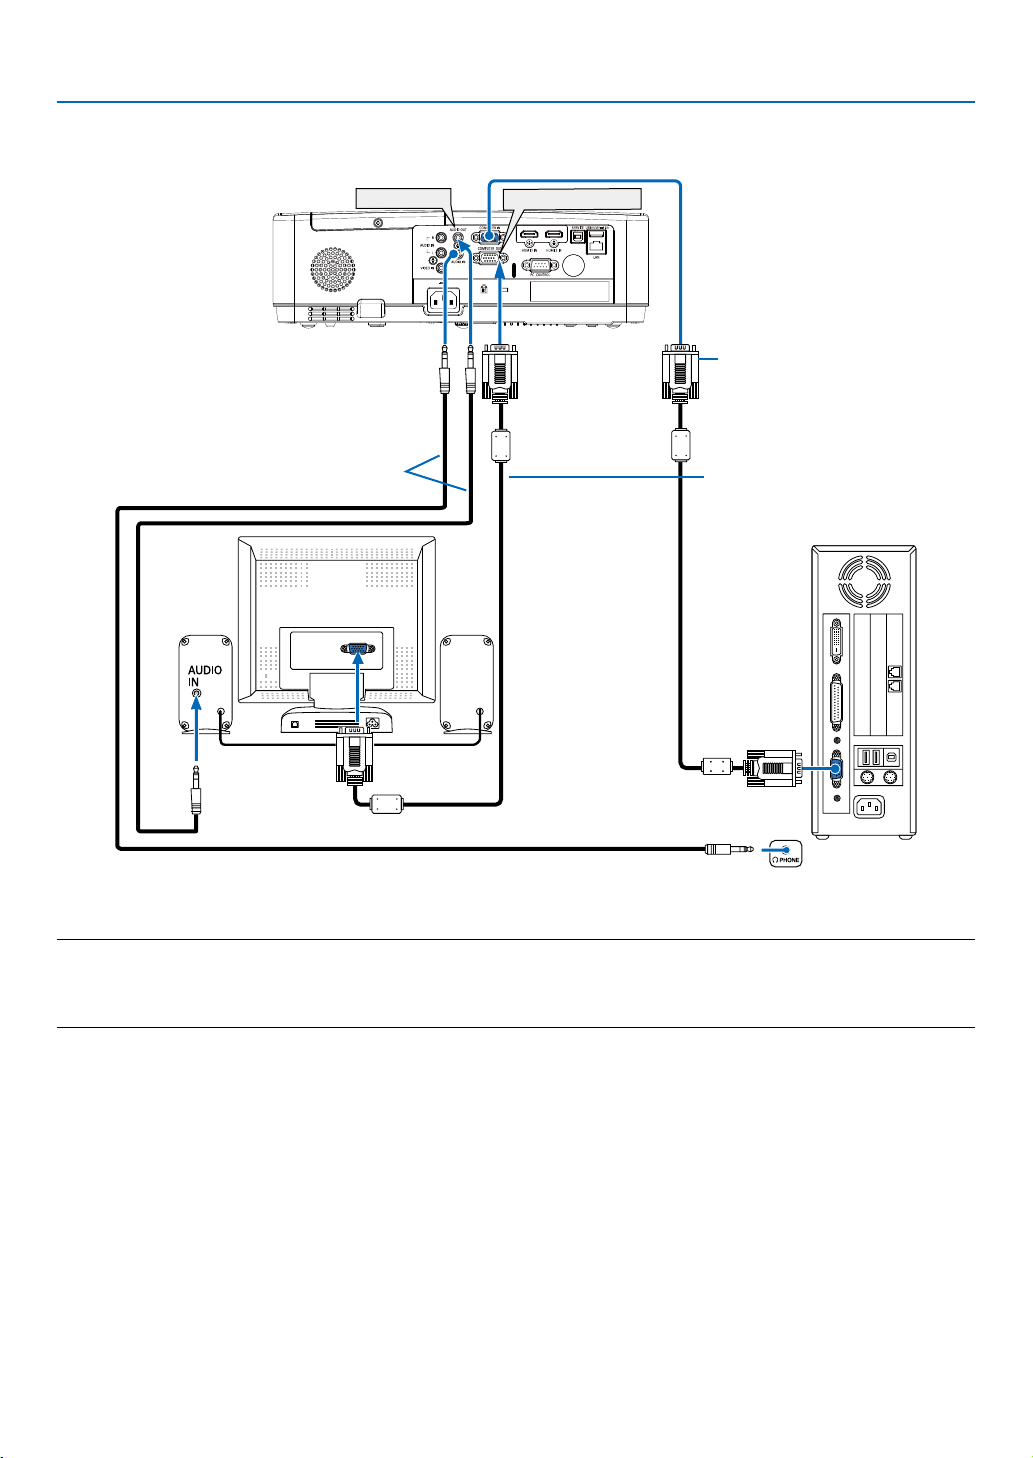
Connecting an External Monitor
7. Installation and Connections
AUDIO OUT
Stereo mini-plug audio cable (not supplied)
COMPUTER OUT
Computer cable (VGA) (supplied)
Computer cable (VGA) (not supplied)
You can connect a separate, external monitor to your projector to simultaneously view on a monitor the computer
analog image you’re projecting.
NOTE:
• The AUDIO OUT mini jack does not support earphone/headphone terminal.
• When audio equipment is connected, the projector speaker is disabled.
• The signal output from the COMPUTER OUT of this projector is for projecting image on exclusive one display.
73
Page 85
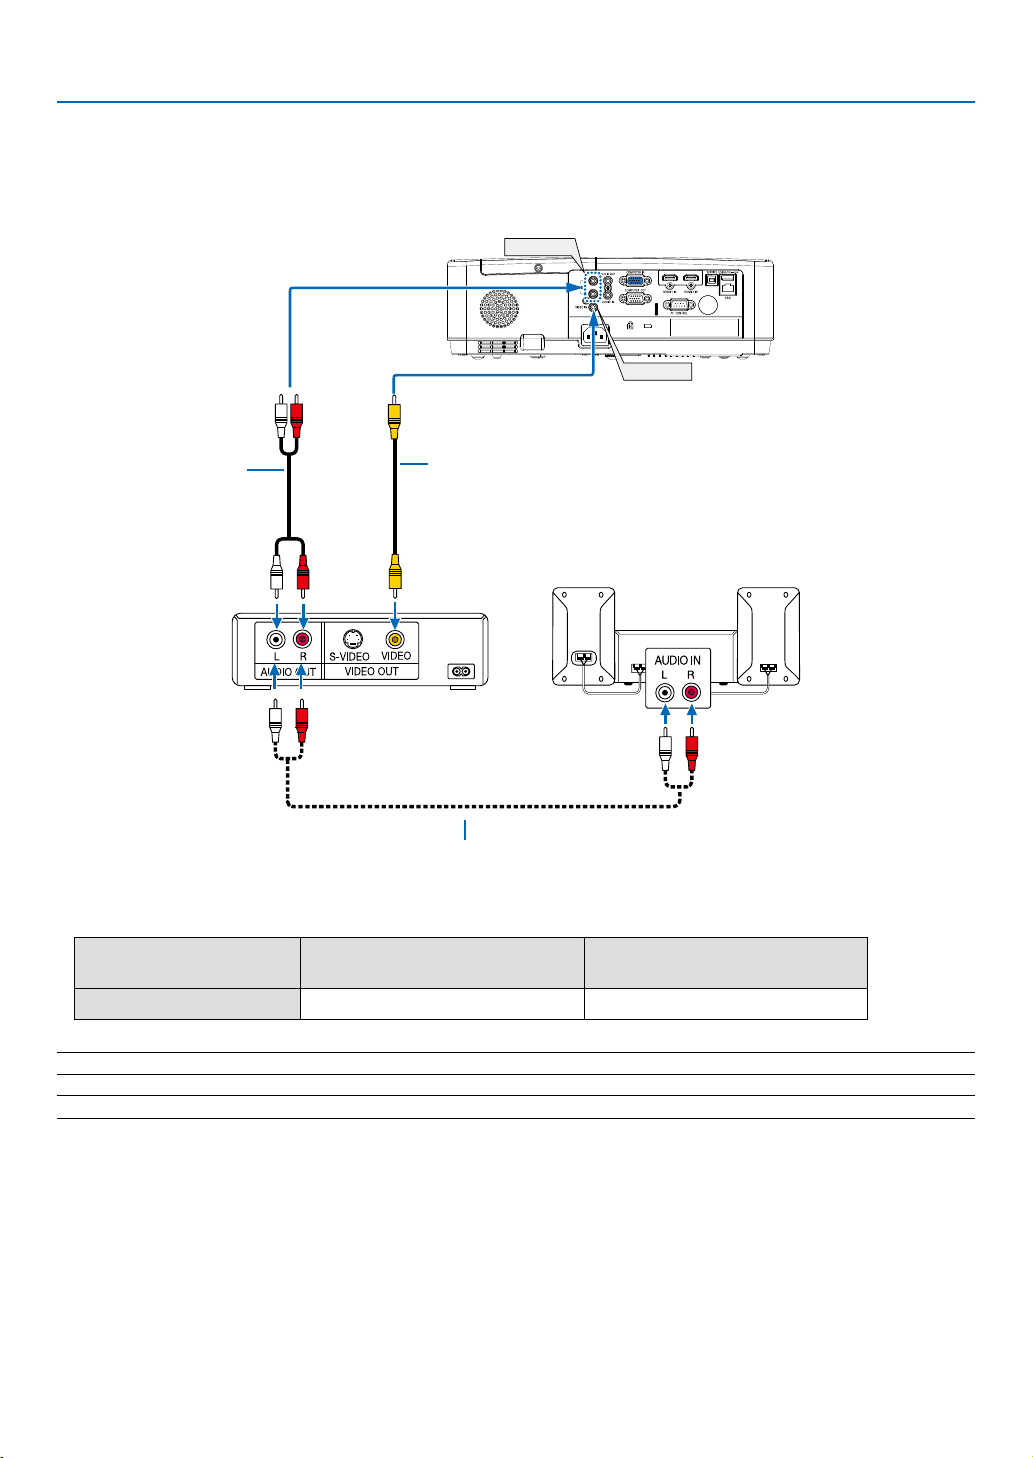
Connecting Your DVD Player or Other AV Equipment
Connecting Video Input
AUDIO IN
7. Installation and Connections
VIDEO IN
Audio cable (not supplied)
Video cable (not supplied)
Audio equipment
Audio cable (not supplied)
• Select the source name for its appropriate input terminal after turning on the projector.
Input terminal
VIDEO IN
INPUT button on the projector
cabinet
VIDEO
Button on the remote control
(VIDEO)
NOTE: Refer to your VCR owner’s manual for more information about your equipment’s video output requirements.
NOTE: An image may not be displayed correctly when a Video source is played back in fast-forward or fast-rewind via a scan converter.
74
Page 86
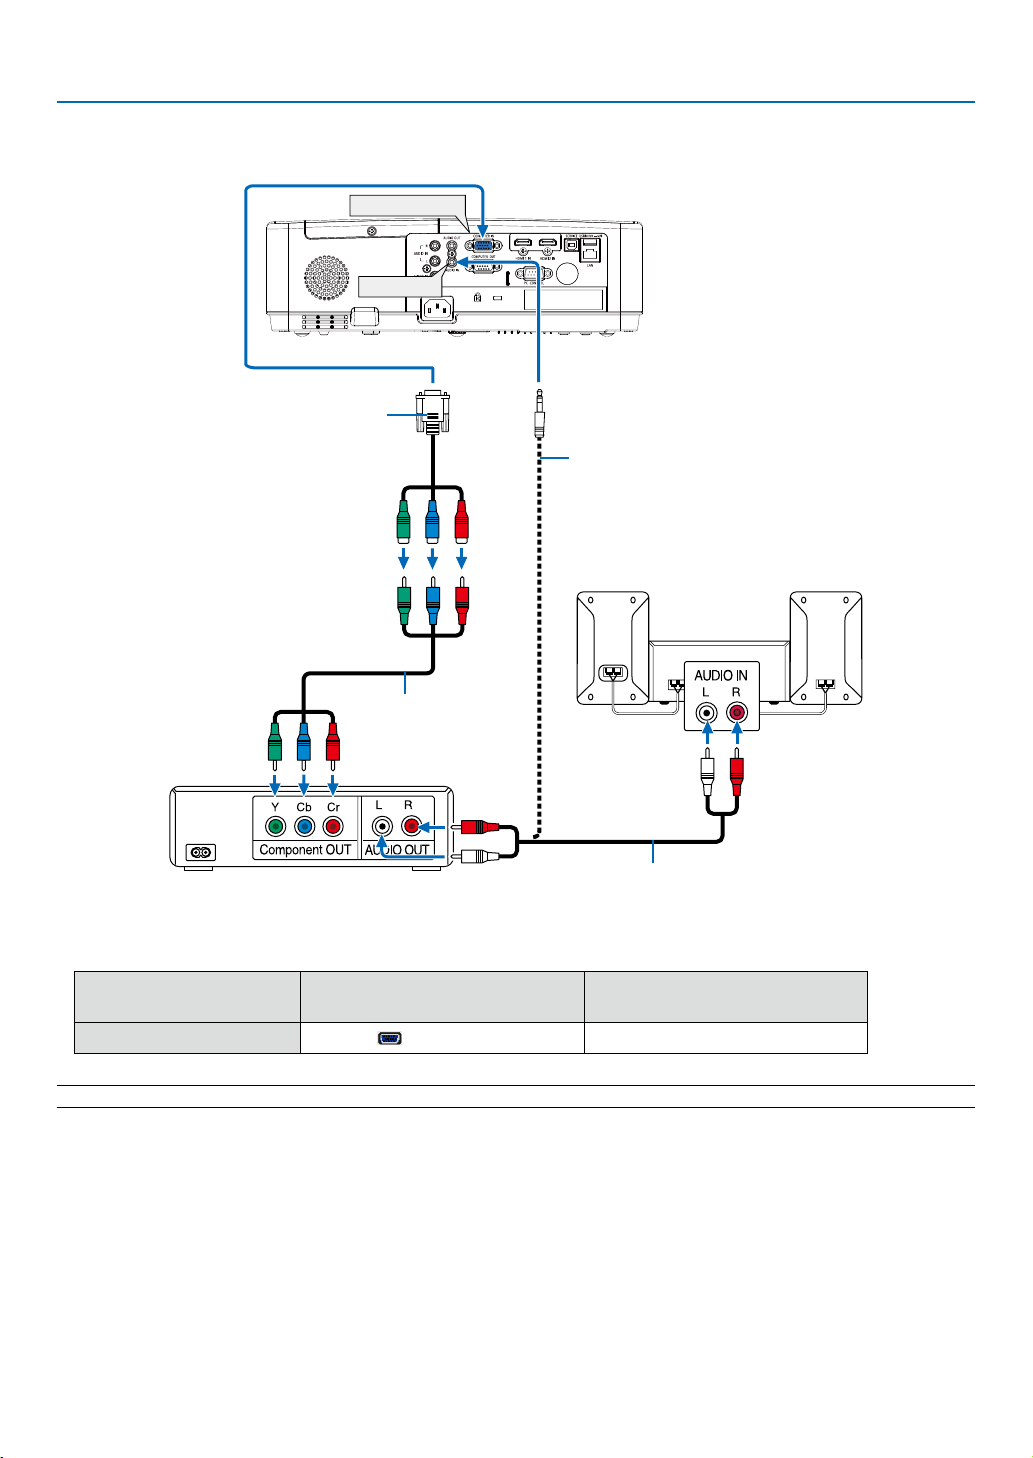
Connecting Component Input
7. Installation and Connections
COMPUTER IN
AUDIO IN
15-pin - to - RCA (female) × 3 cable adapter
DVD player
(ADP-CV1E)
Stereo mini plug - to - RCA audio cable (not supplied)
Audio Equipment
Component video RCA ×
3 cable (not supplied)
Audio cable (not supplied)
• Select the source name for its appropriate input terminal after turning on the projector.
Input terminal
COMPUTER IN
INPUT button on the projector
cabinet
COMPUTER
Button on the remote control
(COMPUTER)
NOTE: Refer to your DVD player’s owner’s manual for more information about your DVD player’s video output requirements.
75
Page 87
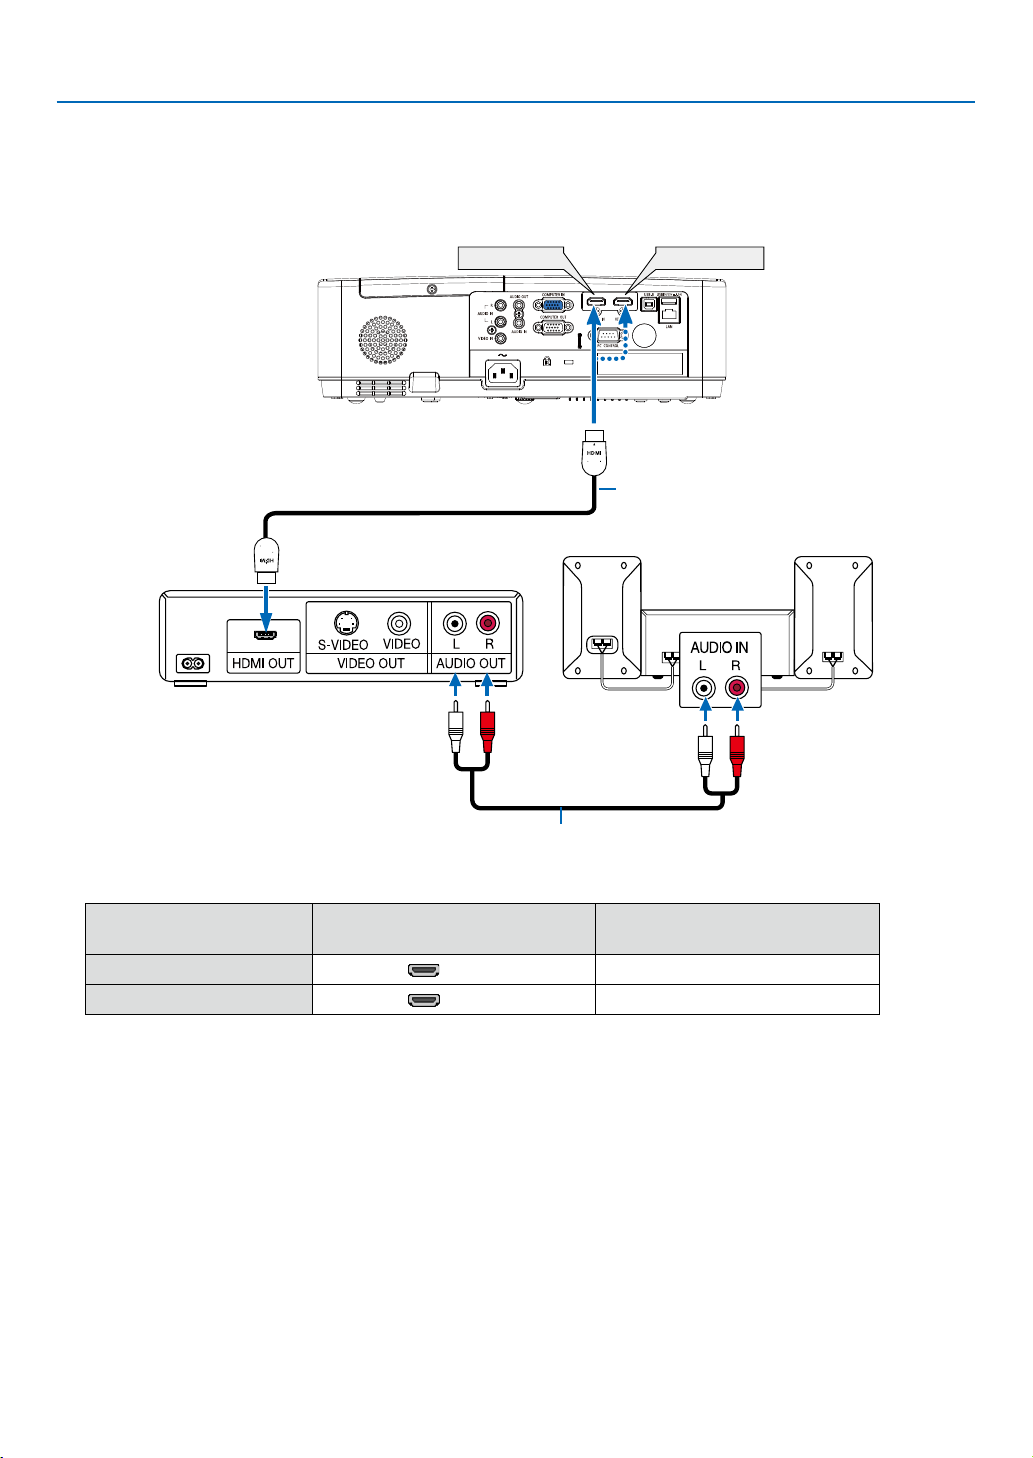
7. Installation and Connections
Connecting HDMI Input
You can connect the HDMI output of your DVD player, hard disk player, Blu-ray player, or notebook type PC to the
HDMI IN terminal of your projector.
HDMI 1 IN
HDMI 2 IN
HDMI cable (not supplied)
Use High Speed HDMI® Cable.
Audio cable (not supplied)
• Select the source name for its appropriate input terminal after turning on the projector.
Input terminal
HDMI 1 IN HDMI1 (HDMI1)
HDMI 2 IN HDMI2 (HDMI2)
INPUT button on the projector
cabinet
Button on the remote control
76
Page 88
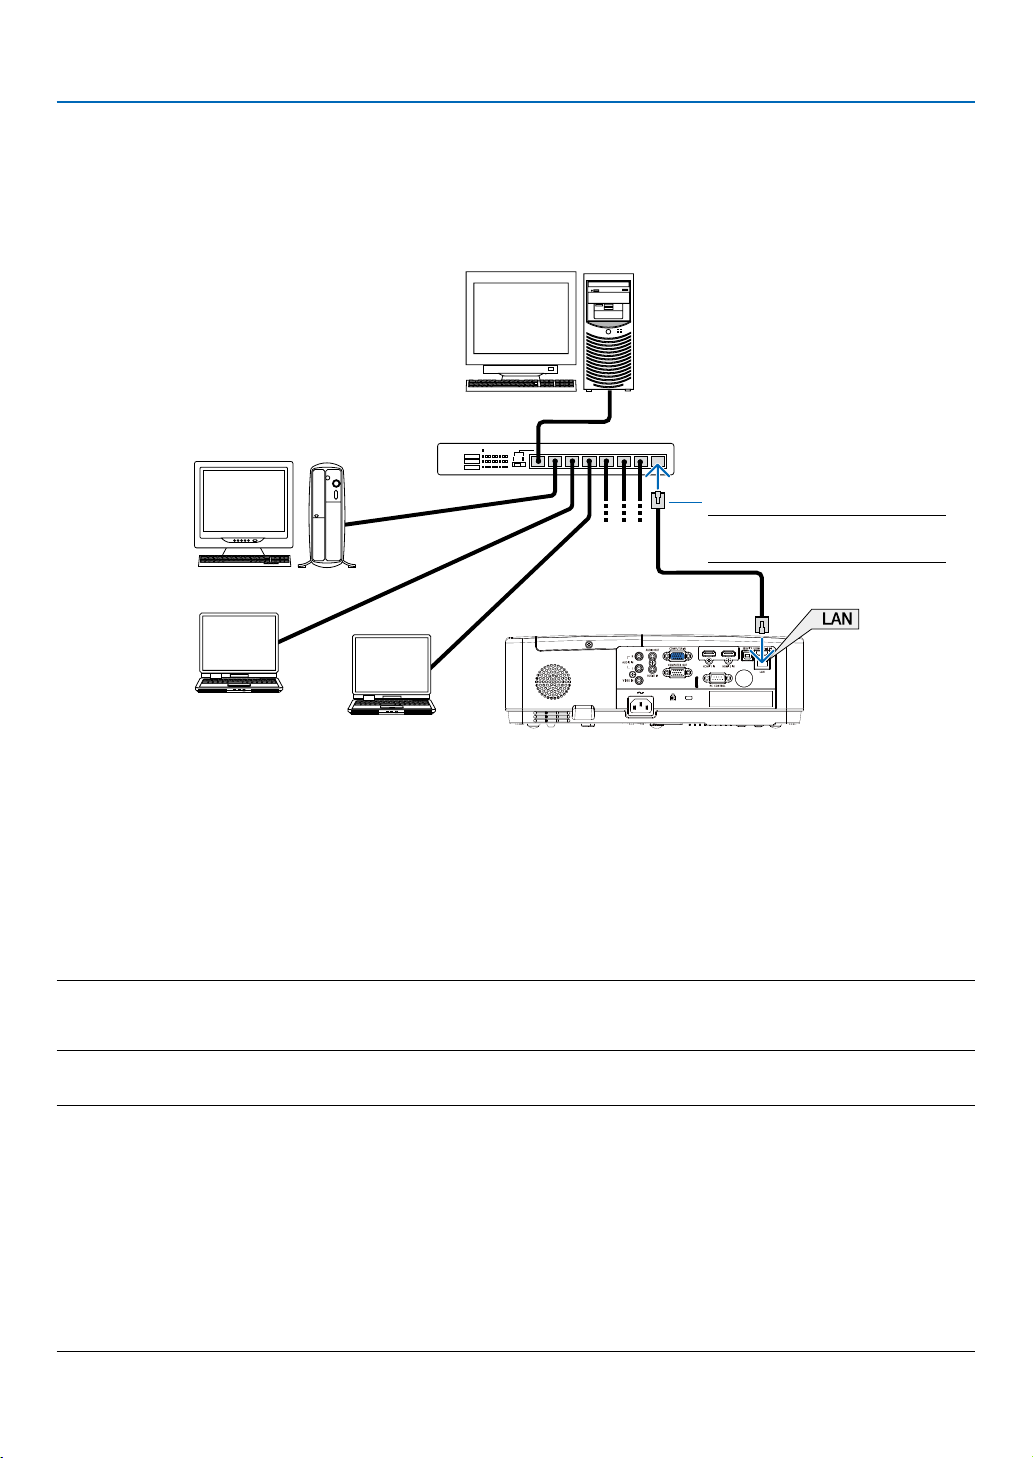
7. Installation and Connections
Connecting to a Wired LAN
The projector comes standard with a LAN port (RJ-45) which provides a LAN connection using a LAN cable.
To use a LAN connection, you are required to set the LAN on the projector menu. (→ page 51)
Example of LAN connection
Server
Hub
LAN cable (not supplied)
NOTE: Use a Category 5 or higher
LAN cable.
Connecting to a Wireless LAN (Optional: NP05LM series)
The USB Wireless LAN Unit also provides a wireless LAN connection.
Important:
• If you use the projector with the USB Wireless LAN Unit in the area where the use of wireless LAN equipment is
prohibited, remove the USB Wireless LAN Unit from the projector.
• Buy the appropriate USB Wireless LAN Unit for your country or area.
NOTE:
• The green LED on the USB Wireless LAN Unit flashes to show that the USB Wireless LAN Unit is working.
• Your computer’s wireless LAN adapter (or unit) must be complied with IEEE802.11b/g/n standard.
Attaching the USB Wireless LAN Unit
NOTE:
• The USB Wireless LAN Unit must be inserted into the USB Wireless LAN Unit port in the correct direction. It cannot be inserted
in the reverse direction. If the USB Wireless LAN Unit is inserted in the reverse direction with excessive force applied, the USB
port may break.
• Before touching the USB Wireless LAN Unit, touch a metallic object (such as a door knob or aluminum window frame) to discharge
the static electricity from your body.
• Always insert or remove the USB Wireless LAN unit when the main power is turned off. Failure to do so may cause projector
malfunction or damage to the USB wireless LAN unit. If the projector will not work correctly, turn off the projector, disconnect
the power cord, and then connect it again.
• The USB port of the projector is common use for the VIERWER. When the USB memory is installed and activate the VIEWER,
you can not utilize wireless LAN.
77
Page 89
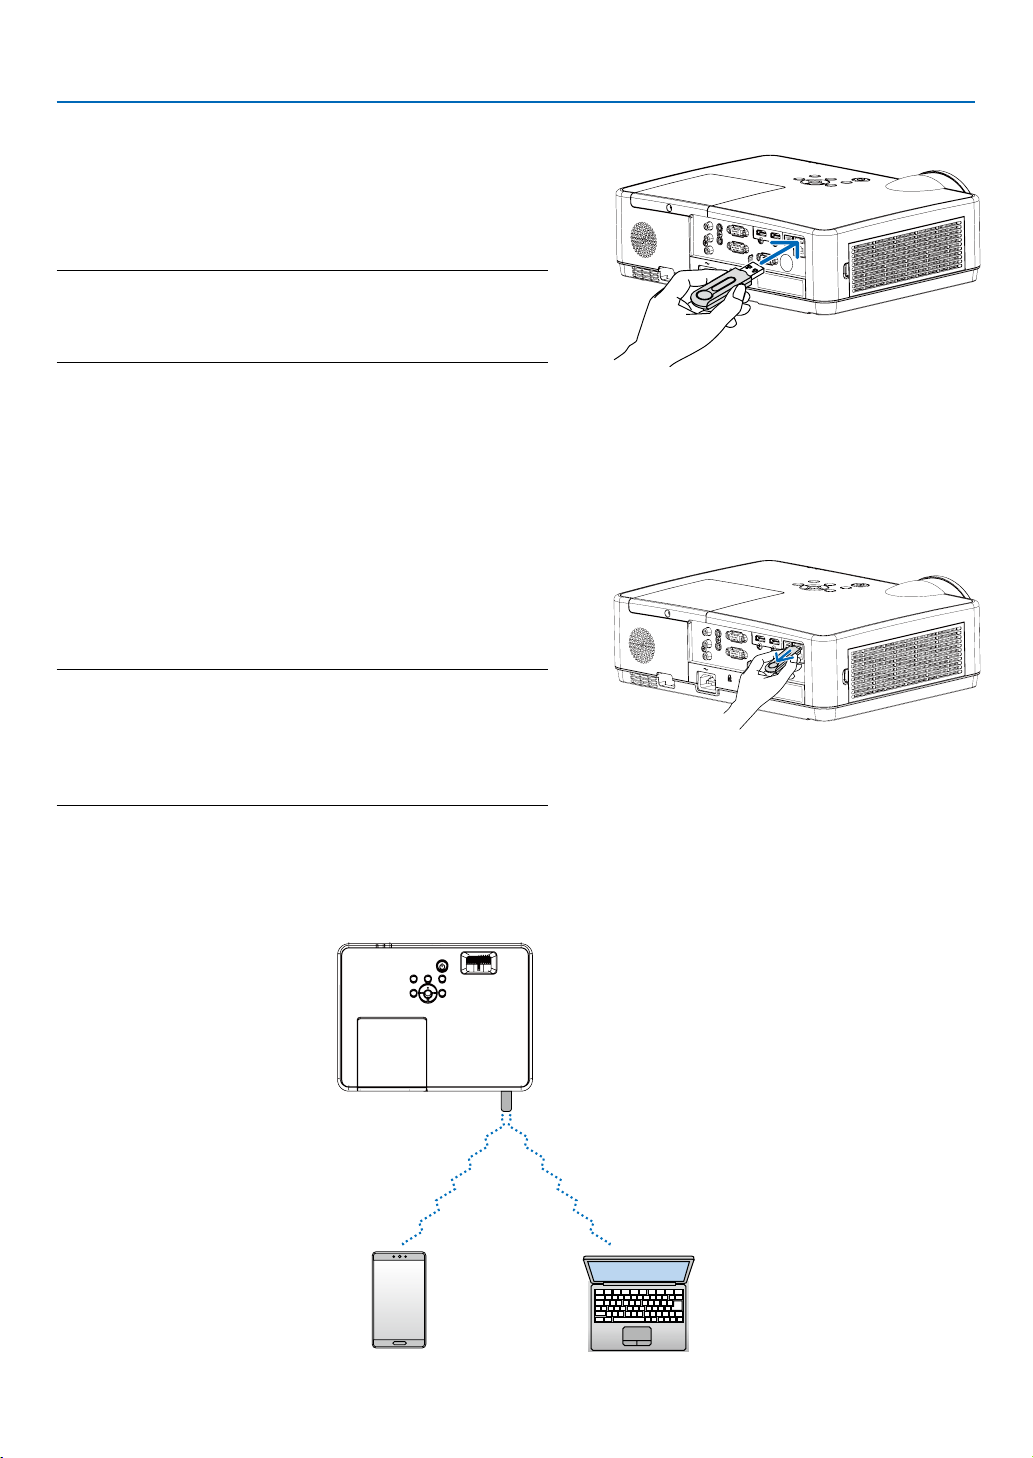
1. Press the POWER button to turn off the projector and set
it into standby condition, and disconnect the power cord.
2. Slowly insert the USB Wireless LAN Unit into the USB port.
Remove the cap from the USB Wireless LAN Unit, and then
insert it with the surface (side of indicator) facing down. Keep
the cap for later use.
NOTE:
• Do not force to insert the USB Wireless LAN Unit.
• Set the supplied strap onto the strap fixing hole for the measure of
anti-theft and dropping-off.
To remove the USB Wireless LAN Unit, disconnect the power cord
and use the above procedure.
7. Installation and Connections
NOTE:
• The green LED on the USB Wireless LAN Unit flashes to show that Wireless
LAN Unit is working. If the USB Wireless LAN Unit is incorrectly
attached, the blue LED will not flash.
• Do not press the button on the USB Wireless LAN Unit. The button will
not work with this model.
Connection Example [SIMPLE ACCESS POINT]
Set the projector as SIMPLE ACCESS POINT for connecting to terminals as computers and smart phones.
78
Page 90

7. Installation and Connections
1. Connect a computer to the projector via wired LAN. (→ page 57)
2. Use the computer’s browser to display the projector’s HTTP server. (→ page 61)
3. Use an HTTP server to set the wireless LAN. (→ page 57)
NOTE:
• To use the HTTP server function, the projector must be connected to a network. First, connect the projector to a network by the
wired LAN and then perform required settings for the wireless LAN on the HTTP server.
• Data transmission between wireless LAN and wired LAN is not possible.
If you want to change the wireless LAN setting on the projector after setting it on the HTTP server, perform setting
change on the on-screen menu.(→ page 57)
79
Page 91

8. Connecting to a Network
1 Things you can do by connecting the projector to a network
• You can send screen images via a wired LAN/wireless LAN from a terminal installed with our MultiPresenter app
to the projector and project them onto a screen.
• Using the web browser of a computer and tablet terminal connected to a wired LAN/wireless LAN, you can con-
nect the projector to a HTTP server to control the projector or configure the NETWORK SETTINGS.
80
Page 92

8. Connecting to a Network
2 Connecting to MultiPresenter
Preparations:
• When connecting the projector to a wired LAN, connect a LAN cable to the projector. (→ page 77)
• When connecting the projector to a wireless LAN, install a separately-sold (or the enclosed) LAN unit (NP05LM)
in the projector. (→ page 77)
• Configure the NETWORK SETTINGS of the projector. (→ page 57)
• Install the MultiPresenter app in the computer or tablet terminal.
① When connecting using a Wired LAN
1. Turn on the power of the projector and press the APPS button on the remote control.
The start-up screen of MultiPresenter is displayed.
2. Start MultiPresenter.
The target device screen is displayed.
3. Enter the 4-digit PIN code displayed in the start-up screen in the target device screen.
When connection with the projector is completed, the screen of the computer or tablet terminal is projected on
the screen.
② When connecting using a Wireless LAN
1. Turn on the power of the projector and press the APPS button on the remote control.
The start-up screen of MultiPresenter is displayed.
2. Connect your computer or tablet terminal to the access point matching the “SSID” displayed in the start-
up screen.
3. Start MultiPresenter.
The target device screen is displayed.
4. Enter the 4-digit PIN code displayed in the start-up screen in the target device screen.
When connection with the projector is completed, the screen of the computer or tablet terminal is projected on
the screen.
81
Page 93
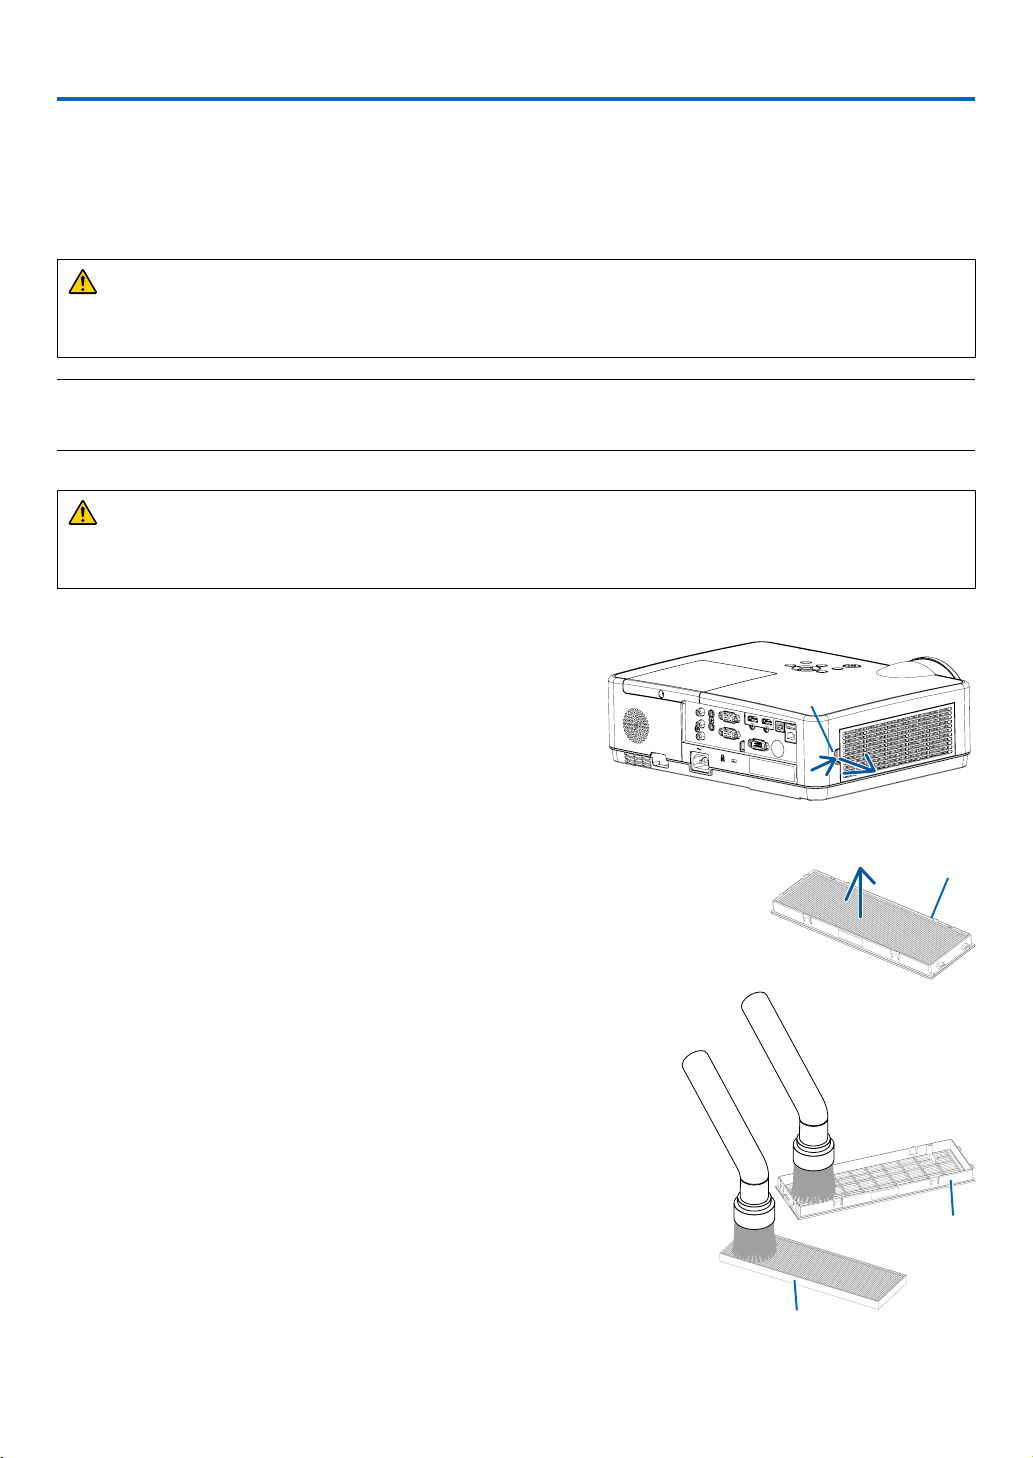
9. Maintenance
This section describes the simple maintenance procedures you should follow to clean the filter, the lens, the cabinet,
and to replace the lamp and the filter.
❶ Cleaning the Filter
The air-filter sponge keeps dust and dirt from getting inside the projector and should be frequently cleaned. If the
filter is dirty or clogged, your projector may overheat.
WARNING
• Please do not use a spray containing flammable gas to remove dust attached to the filter, etc. Doing so may
result in fires.
NOTE: The message for filter cleaning will be displayed for one minute after the projector is turned on or off. When the message is displayed,
clean the filter. The time to clean the filter is set to [10000 H] at time of shipment.
To cancel the message, press any button on the projector cabinet or the remote control.
To clean the filter, detach the filter unit and the filter cover.
CAUTION
• Before cleaning the filter, turn off the projector, disconnect the power cord and then allow the cabinet to cool.
Failure to do so can result in electric shock or burn injuries.
1. Push button to release the filter unit and pull it out.
2. Remove the filter.
• Remove the filter from the filter cover.
3. Remove dust from the filter and the filter cover.
• Clean both outside and inside.
Button
Filter unit
Filter cover
82
Filter
Page 94
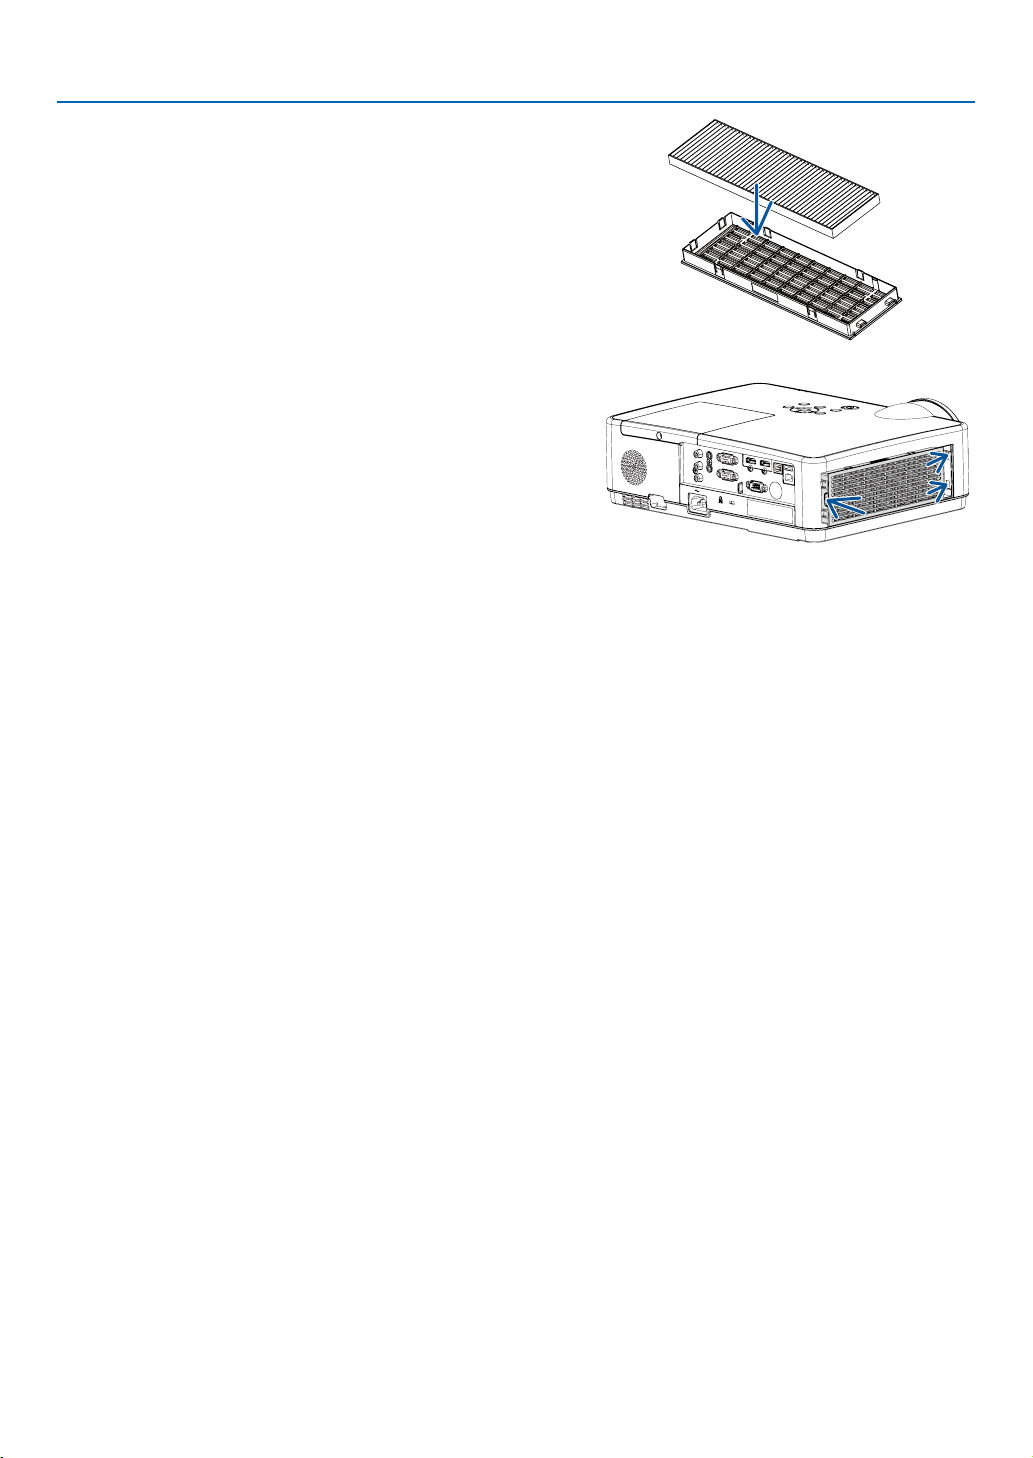
4. Attach the filter to the filter cover.
5. Put the filter unit back to the projector cabinet.
Insert two catches of the tip of the filter unit into the groove
of the cabinet, and push the button to close the filter unit.
• Push the filter unit until it clicks into place.
6. Clear the filter usage hours.
Plug the power cord into the wall outlet, and then turn on the
projector.
From the menu, select [Filter] → [Filter counter reset].
(→ page 53)
The interval time to clean the filter is set to [OFF] at time of ship-
ment. When using the projector as it is, you do not clear the filter
usage.
9. Maintenance
83
Page 95
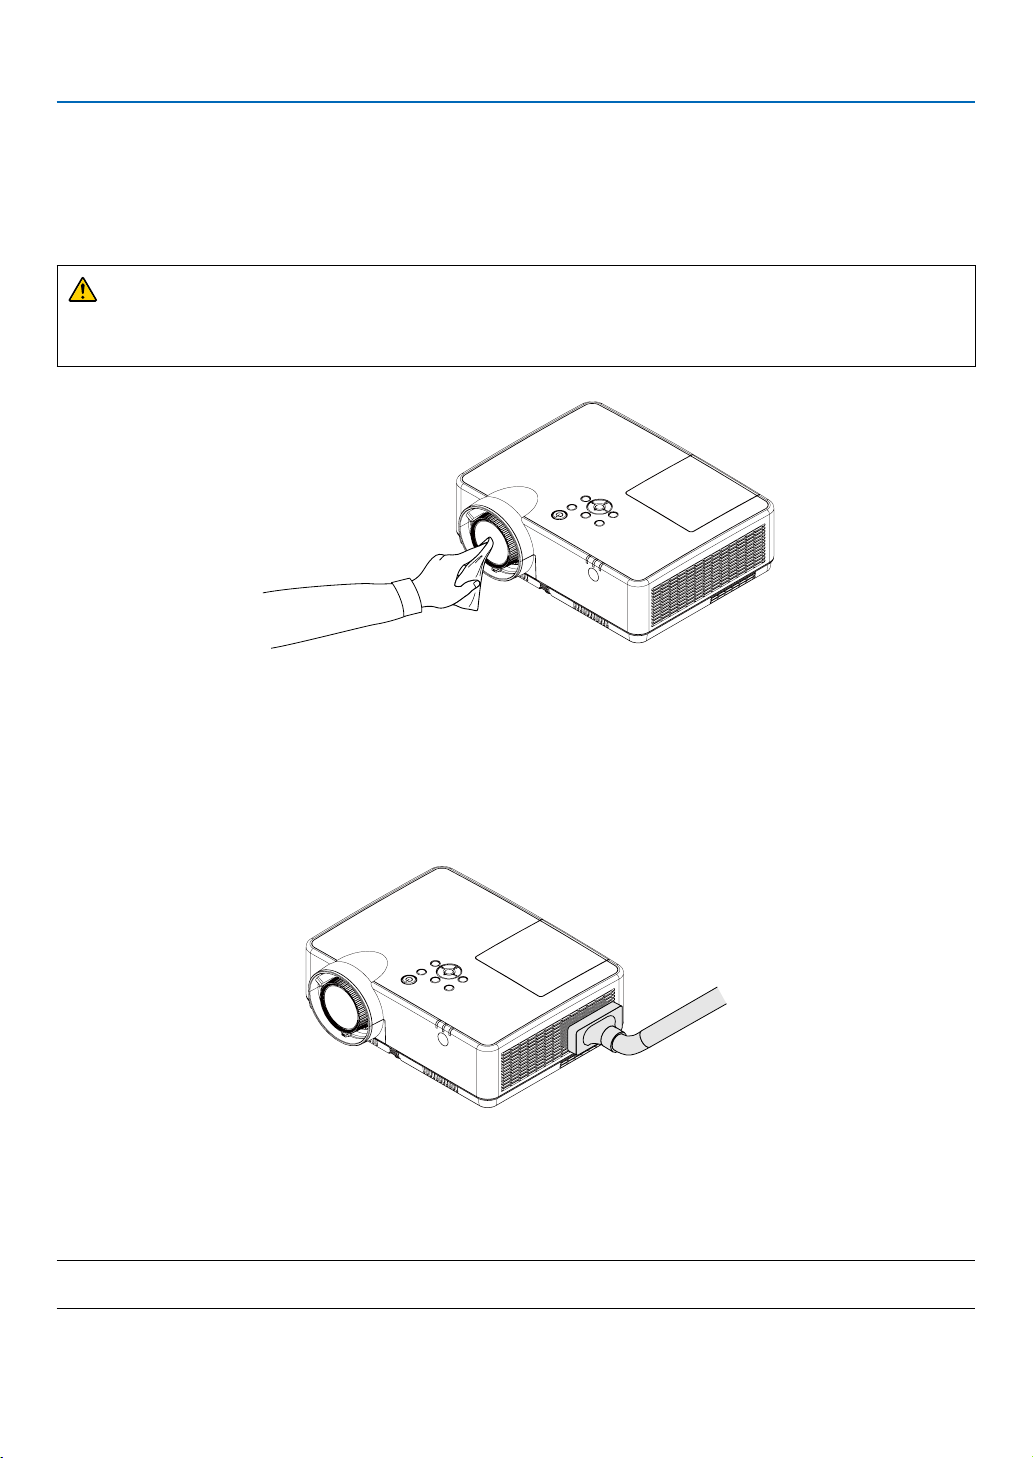
9. Maintenance
❷ Cleaning the Lens
• Turn off the projector before cleaning.
• The projector has a plastic lens. Use a commercially available plastic lens cleaner.
• Do not scratch or mar the lens surface as a plastic lens is easily scratched.
• Never use alcohol or glass lens cleaner as doing so will cause damage to the plastic lens surface.
WARNING
• Please do not use a spray containing flammable gas to remove dust attached to the lens, etc. Doing so may
result in fires.
❸ Cleaning the Cabinet
Turn off the projector, and unplug the projector before cleaning.
• Use a dry soft cloth to wipe dust off the cabinet.
If heavily soiled, use a mild detergent.
• Never use strong detergents or solvents such as alcohol or thinner.
• When cleaning the vents or the speaker using a vacuum cleaner, do not force the brush of the vacuum cleaner
into the slits of the cabinet.
Vacuum the dust off the vents.
• Clogged vents may cause a rise in the internal temperature of the projector, resulting in malfunction.
• Do not scratch or hit the cabinet with your fingers or any hard objects.
• Contact your dealer for cleaning the inside of the projector.
NOTE: Do not apply volatile agent such as insecticide on the cabinet, the lens, or the screen. Do not leave a rubber or vinyl product in prolonged contact with it. Otherwise the surface finish will be deteriorated or the coating may be stripped off.
84
Page 96
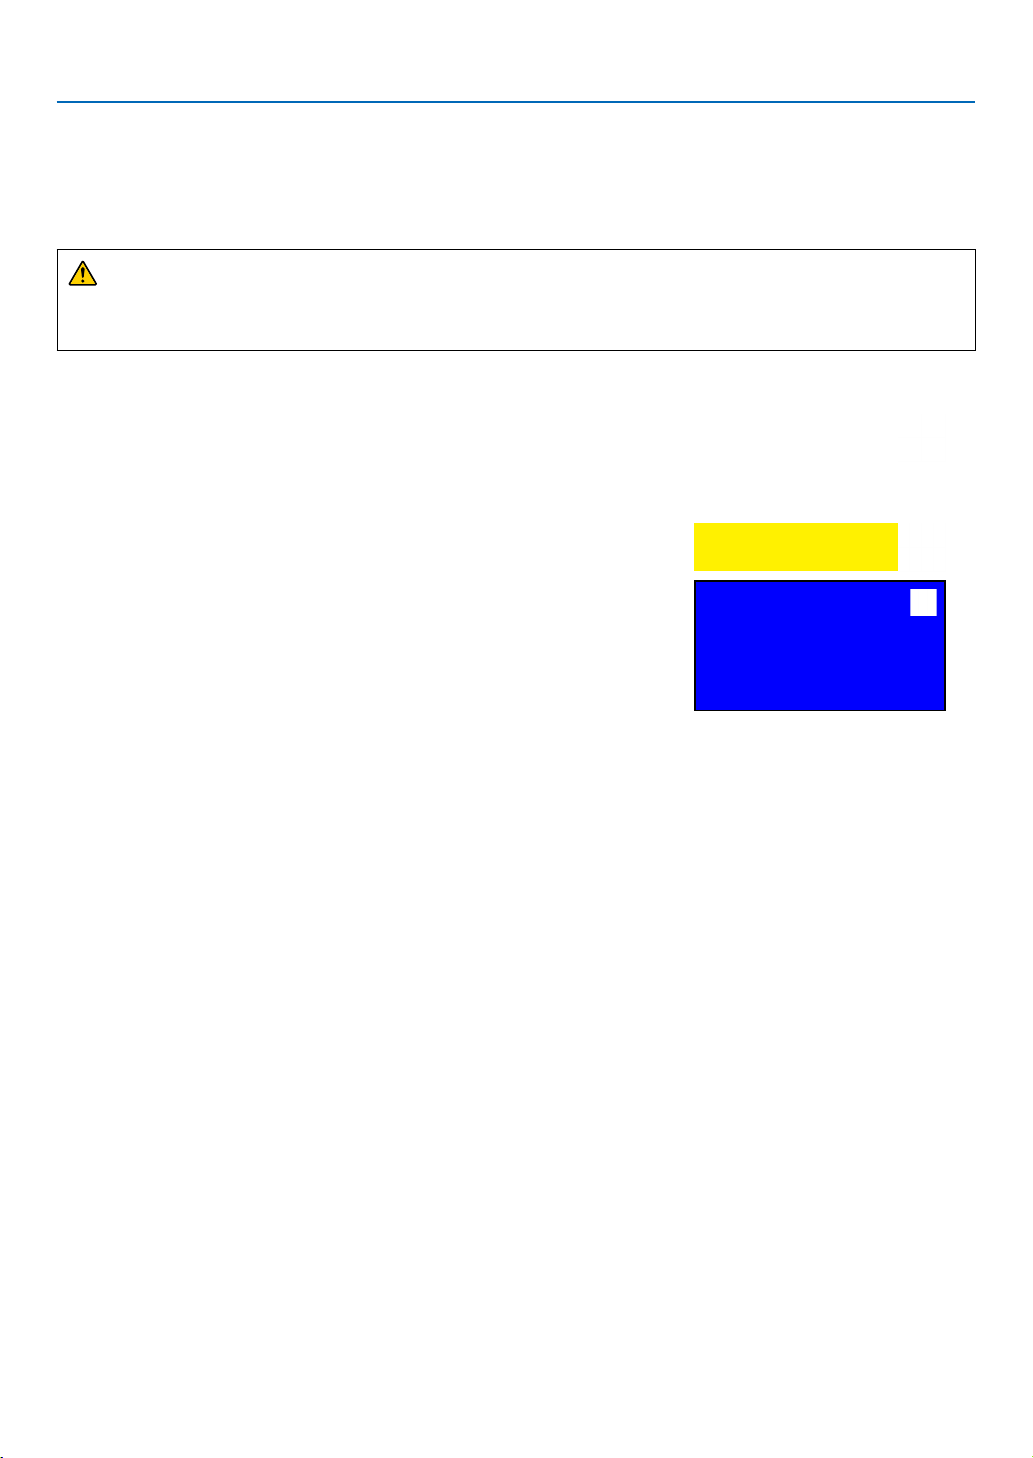
9. Maintenance
❹ Replacing the Lamp and the Filter
Your projector’s lamp is a consumable. you can comfirm your usage time according to "Lamp counter" on the Info.
menu. (→ page 56)
you'd better ask a professional technician to replace the lamp, contact your Dukane dealer for lamp replacement.
CAUTION
• DO NOT TOUCH THE LAMP immediately after it has been used. It will be extremely hot. Turn the projector
off and then disconnect the power cord. Allow at least one hour for the lamp to cool before handling.
• Use the specified lamp for safety and performance.
To order the replacement lamp, specify your lamp type, NP47LP.
The replacement lamp comes with filters.
• DO NOT REMOVE ANY SCREWS except one lamp cover screw and
three lamp housing screws. You could receive an electric shock.
• Do not break the glass on the lamp housing.
Keep finger prints off the glass surface on the lamp housing. Leaving
finger prints on the glass surface might cause an unwanted shadow and
poor picture quality.
• The lamp warning icon displays when its usage time are more than the
replacement period of the lamp minus 300H and less than the life of the
projector.
• The lamp replacement icon displays when its usage time are more than
the replacement period of the lamp. If this happens, be sure to replace the
lamp. If you continue to use the lamp after the lamp reaches the end of
its life, the lamp bulb may shatter, and pieces of glass may be scattered
in the lamp case. Do not touch them as the pieces of glass may cause
injury. If this happens, contact your Dukane dealer for lamp replacement.
Optional lamp and tools needed for replacement:
• Phillips screwdriver (plus-head)
• Replacement lamp
The lamp warning icon
The lamp replacement icon
Lamp replacement
Flow of Replacing the Lamp and the Filter
Step 1. Replace the lamp (→ page 86)
Step 2. Replace the filter (→ page 88)
Step 3. Clear the lamp usage hours and the filter usage hours (→ page 89)
85
Page 97
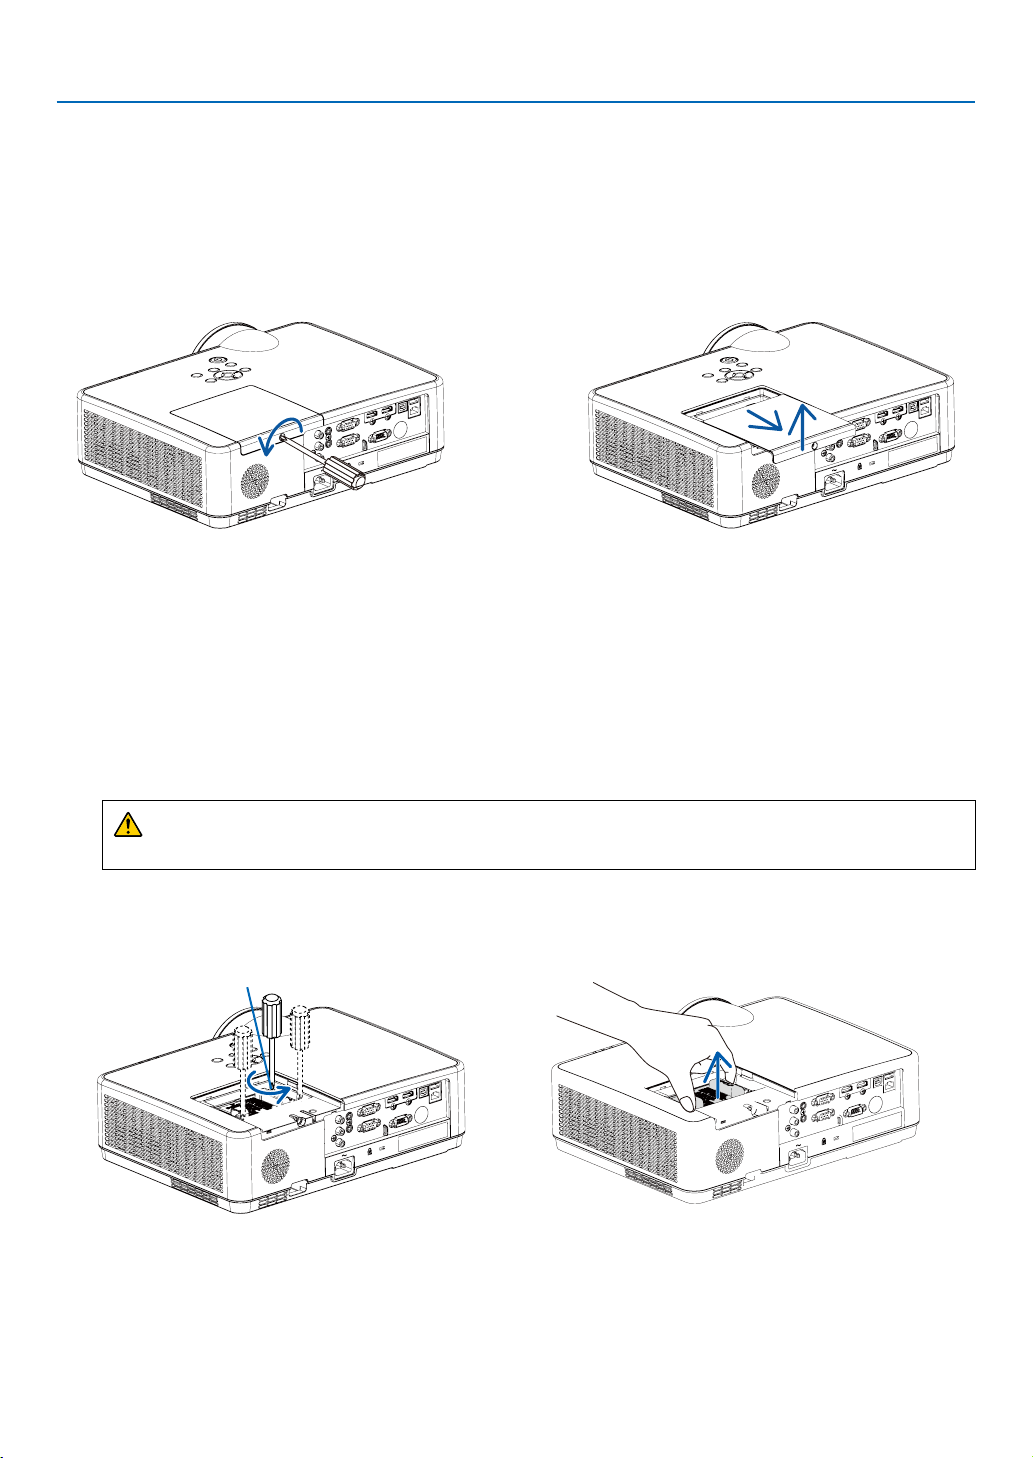
9. Maintenance
To replace the lamp:
1. Remove the lamp cover.
(1) Loosen the lamp cover screw.
• The lamp cover screw is not removable.
(2) Push and slide the lamp cover off.
2. Remove the lamp housing.
(1) Loosen the three screws securing the lamp housing until the phillips screwdriver goes into a freewheeling
condition.
• The three screws are not removable.
• One of the screws is interlocked to prevent electric shock. Do not attempt to circumvent this interlock.
(2) Remove the lamp housing by holding it.
CAUTION:
Make sure that the lamp housing is cool enough before removing it.
Interlock
86
Page 98
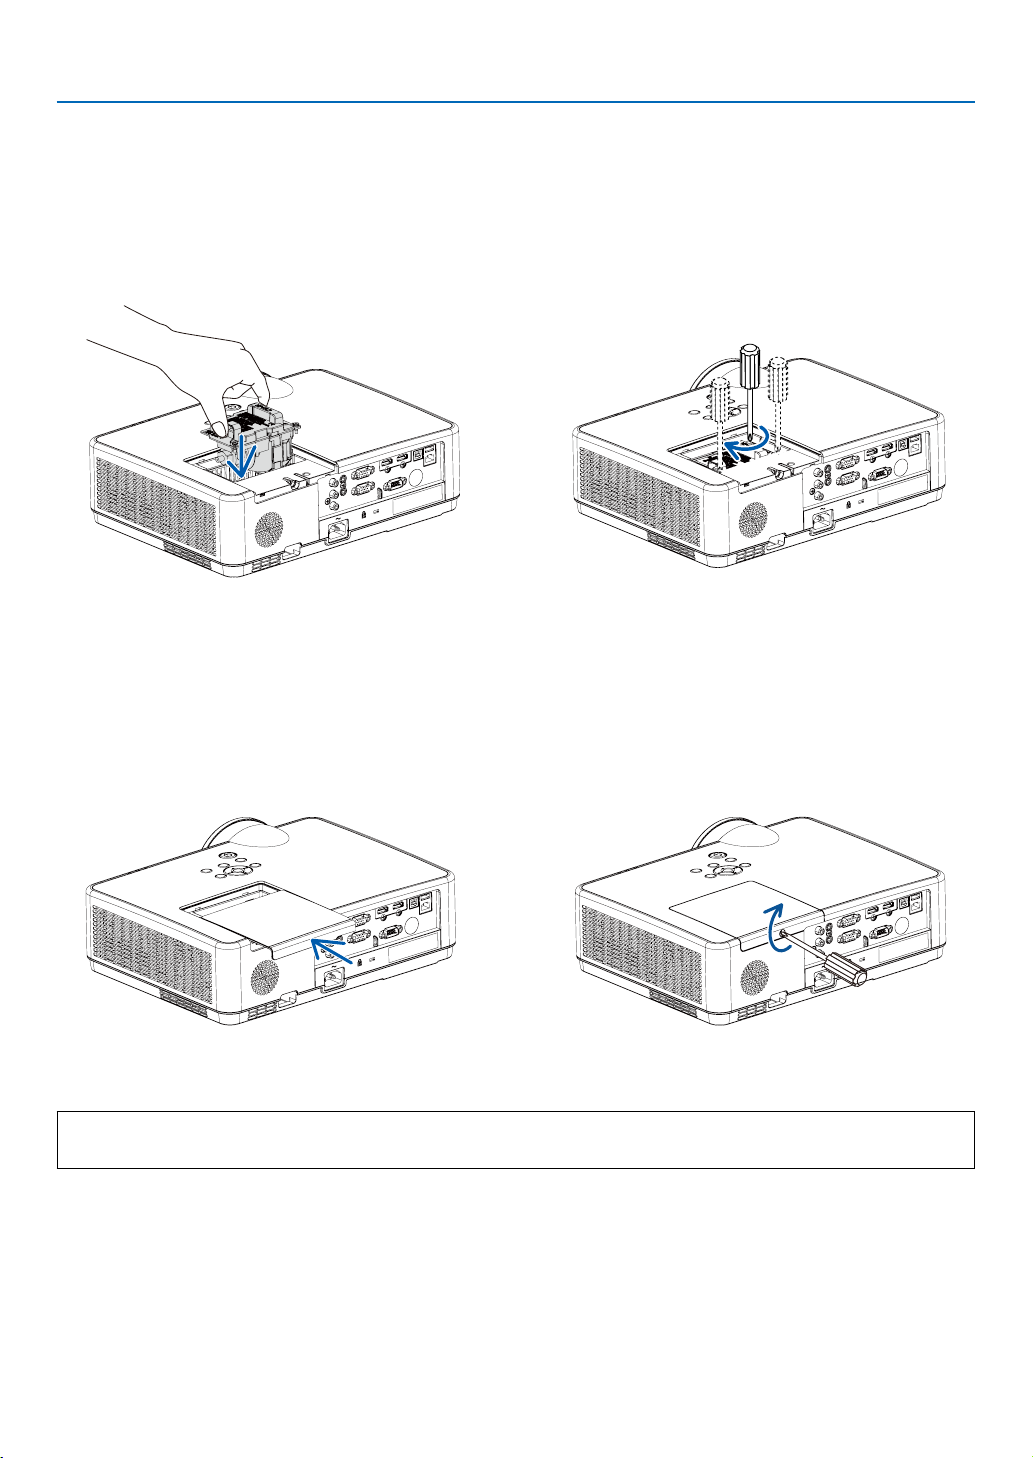
3. Install a new lamp housing.
(1) Insert a new lamp housing until the lamp housing is plugged into the socket.
(2) Push the top center of the lamp housing to secure it.
(3) Secure it in place with the three screws.
• Be sure to tighten the screws.
4. Reattach the lamp cover.
(1) Slide the lamp cover back until it snaps into place.
(2) Tighten the screw to secure the lamp cover.
• Be sure to tighten the screw.
9. Maintenance
This completes the lamp replacement.
Go on to the filter replacement.
87
Page 99
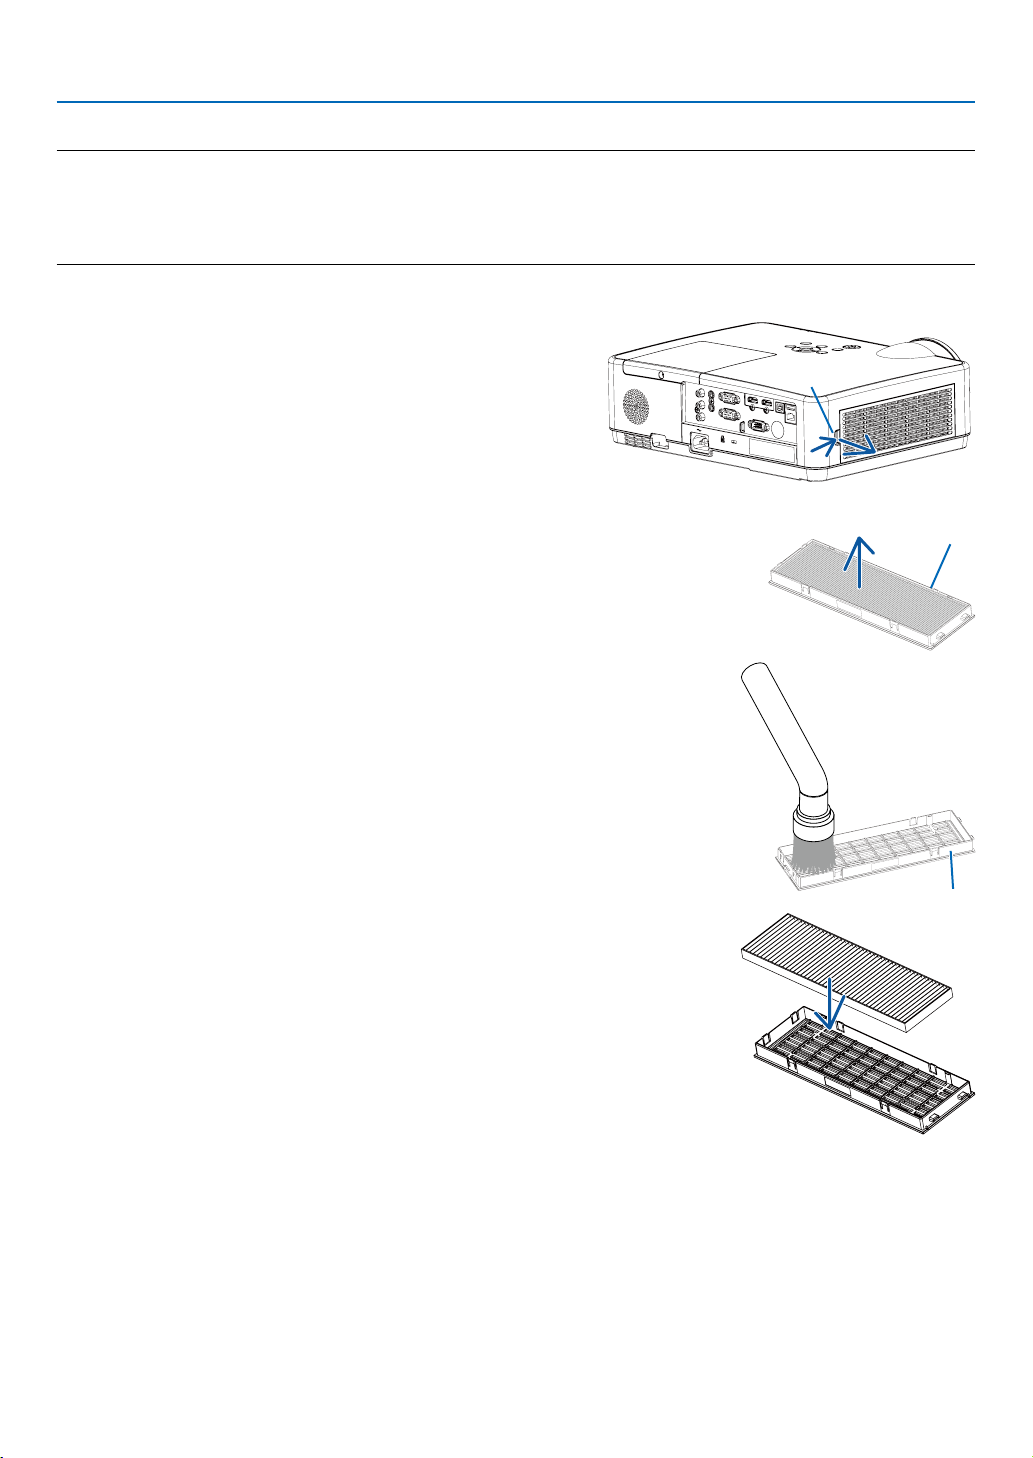
To replace the filter:
NOTE:
• Before replacing the filter, wipe off dust and dirt from the projector cabinet.
• The projector is precision equipment. Keep out dust and dirt during filter replacement.
• Do not wash the filter with soap and water. Soap and water will damage the filter membrane.
• Put filter into place. Incorrect attachment of a filter may cause dust and dirt to get into the inside of the projector.
1. Push button to release the filter unit and pull it out.
Button
9. Maintenance
2. Remove the filter.
• Remove the filter from the filter cover.
3. Remove dust from the filter cover.
• Clean both outside and inside.
4. Attach a new filter to the filter cover.
Filter unit
Filter cover
88
Page 100
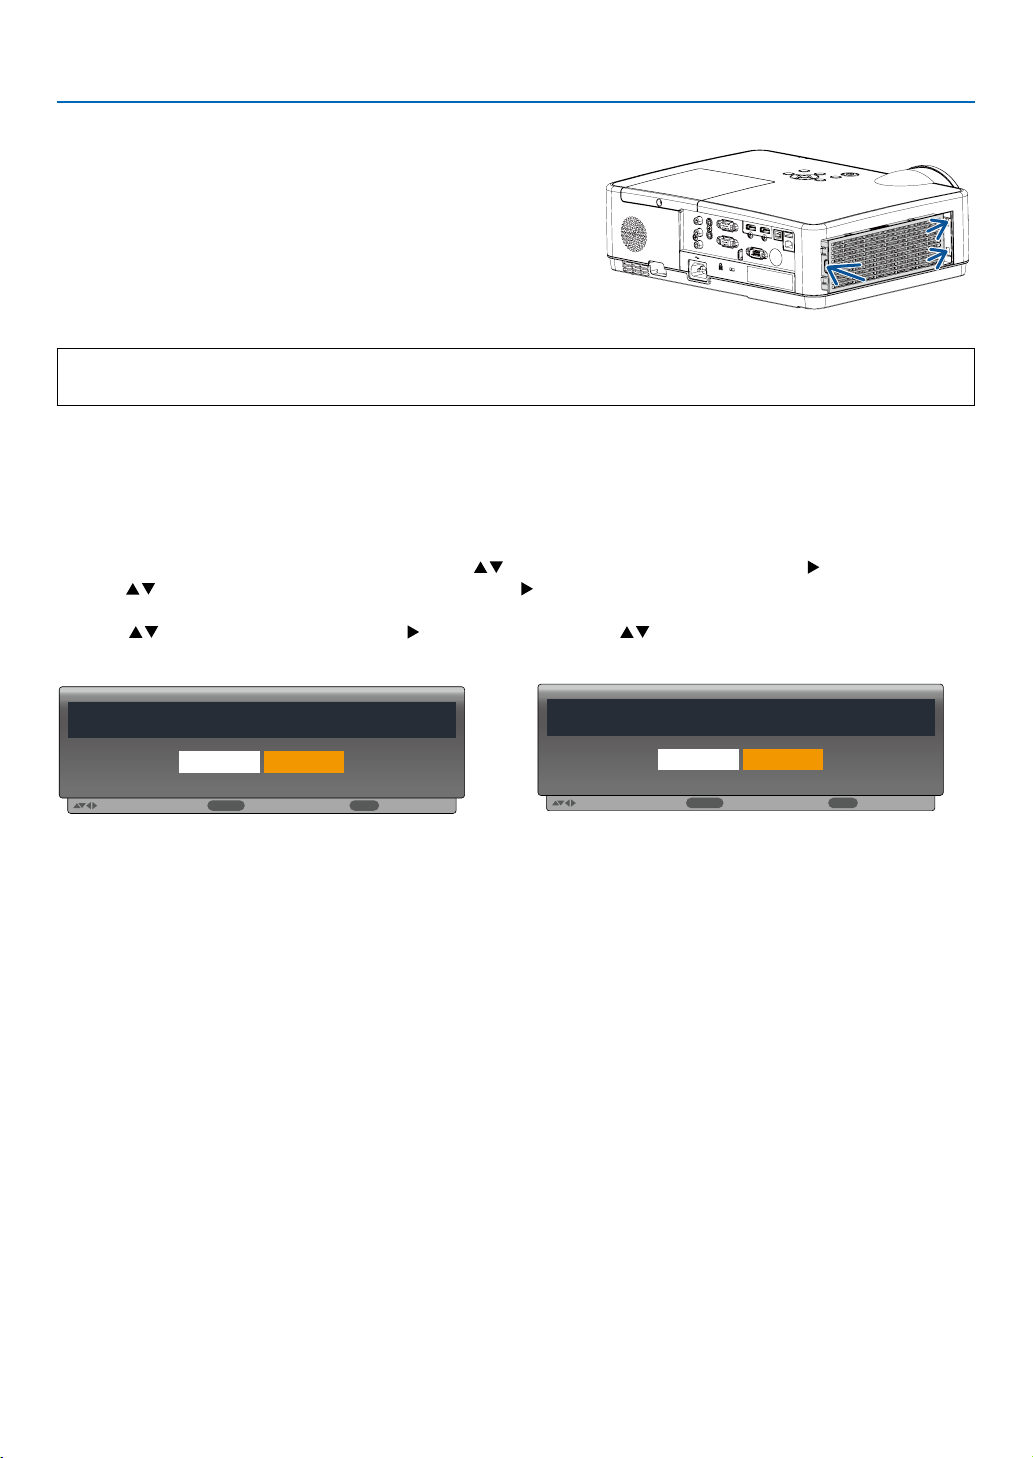
9. Maintenance
:
ENTER
:
EXIT
:
:Select
ENTER
:Back
EXIT
:
5. Put the filter unit back to the projector cabinet.
Insert two catches of the tip of the filter unit into the groove of
the cabinet, and push the button to close the filter unit.
• Push the filter unit until it clicks into place.
This completes the filter replacement.
Go on to the clearing lamp and filter hour meters.
To clear the lamp usage hours and the filter usage hours:
1. Place the projector where you use it.
2. Plug the power cord into the wall outlet, and then turn on the projector.
3. Clear the lamp usage hours and the filter usage hours.
1) Press MENU button and the OSD displays. Press button to select Expand menu, press button or ENTER.
2) Press button to select "Lamp counter reset", press button or ENTER. The “Lamp counter reset?” mes-
sage displays. Select Yes to proceed.
Press button to select "Filter", press button or ENTER. Press button to select “Filter counter reset”
and press ENTER. The “Filter counter reset”?” message displays. Select Yes to proceed.
Move
Filter counter reset?
Yes No
Select
Back
Lamp counter reset?
Yes No
Move
89
 Loading...