

DU-HA DU-HOOKY 70088 Installation And Operational Instructions

PART #70088
DU-HOOKY
Installation and Operational Instructions
ENGLISH
Tools Required:
// 5/16” Socket // Drill or Impact Wrench
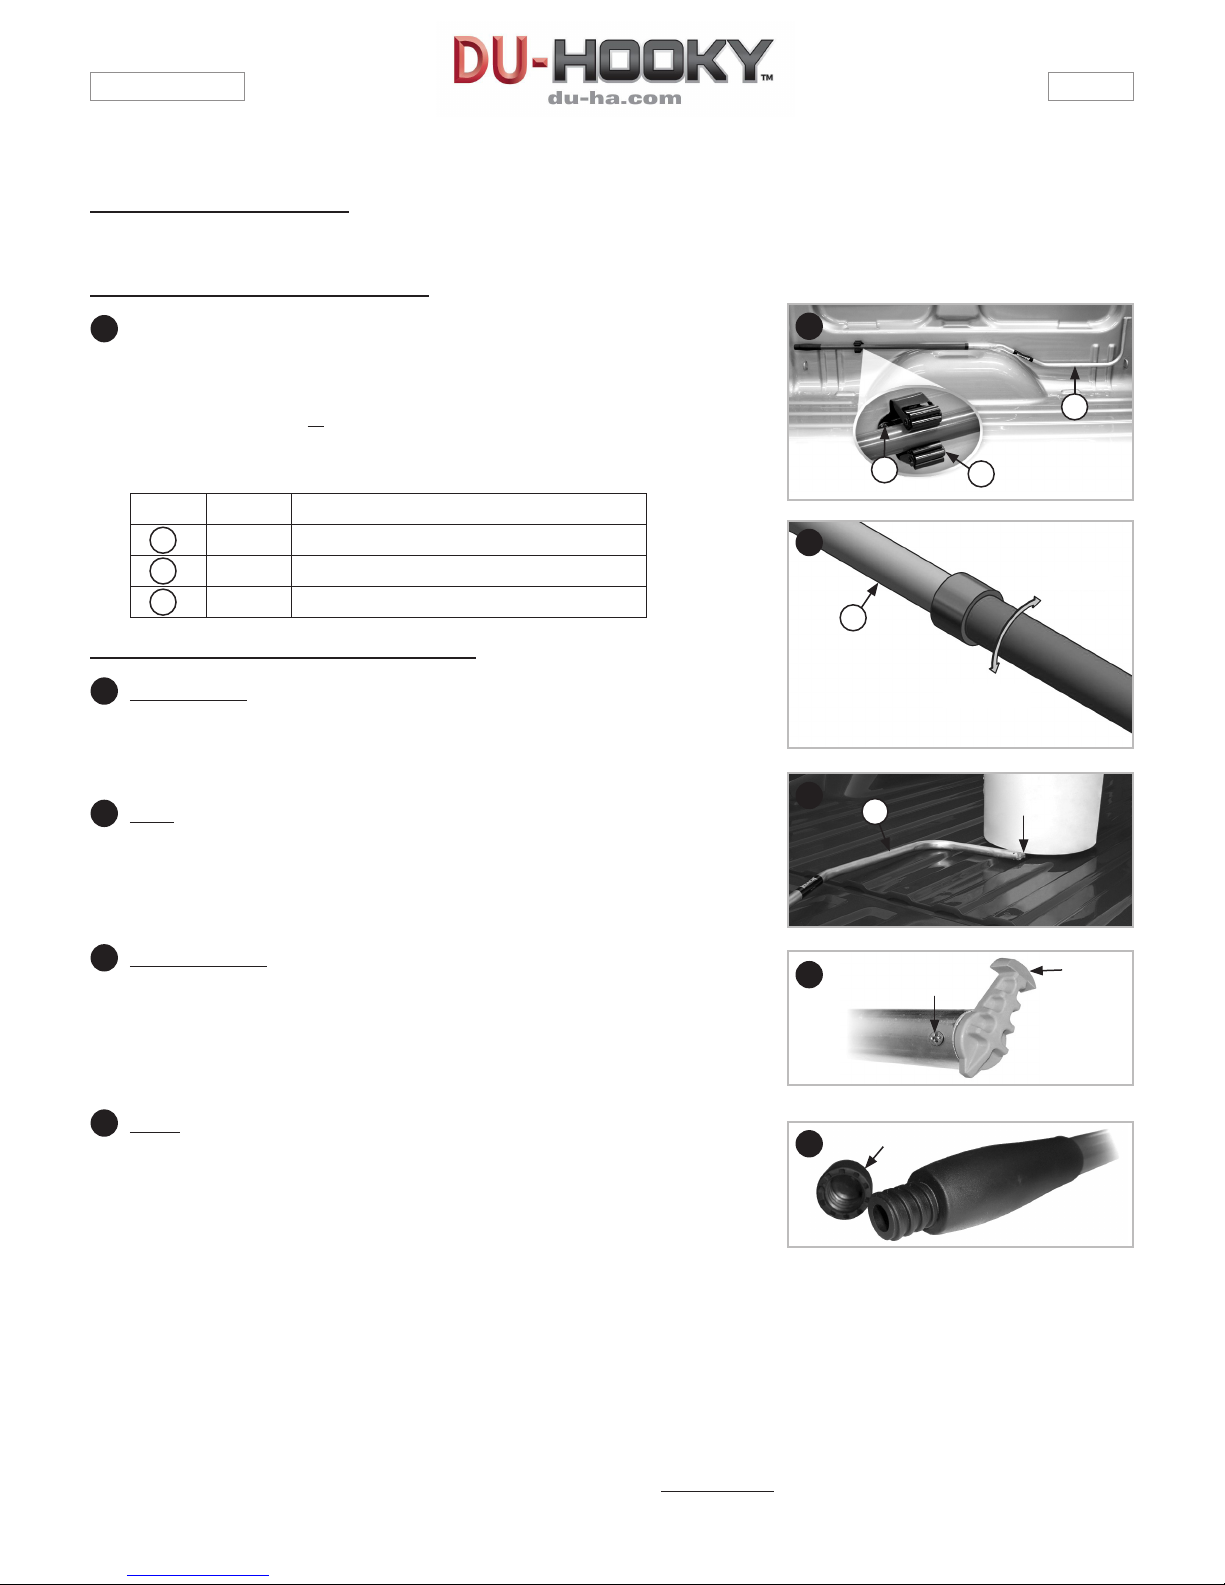
Installation Instructions:
Secure the mounting clip (Item B) to a convenient location in the bed of your pickup
1
truck using a 5/16” socket to secure the hex head self drilling screws (Item C).
We recommend installing over the wheel well as shown. The clip should not be more
than 18 inches from the end of the handle.
Note: You can also attach the mounting clip (Item B) to a wall in your shop or garage
to keep the DU-HOOKY (Item A) within reach at all times.
ITEM QTY DESCRIPTION
A
B
C
1 Reach E-Z
1 Mounting Clip
2 Hex Head Self Drilling Screws
Operational Instructions:
Length Adjustment
2
Twist the Reach E-Z (Item A) shaft 1/4 turn counterclockwise, then pull to extend the
Reach E-Z (Item A). Twist the Reach E-Z (Item A) shaft 1/4 turn clockwise to tighten
at desired length.
1
A
C
2
A
3
A
B
Tip
3
Tip
Slide tip under the item you’re trying to retrieve, then turn the Reach E-Z (Item A) all
the way to the side, (so the front edge of the tip catches the lip of the bucket) then
pull the Reach E-Z (Item A) towards you, to retrieve items. This works great for
getting underneath and hooking into cardboard boxes, the bottom of buckets, and
anything else you can’t get the hook around.
Set Screw
4
To re-position the tip, loosen the set screw using a screwdriver, then turn the tip to
the desired position, and re-tighten the set screw. Do not over-tighten.
Note: Tip turned sideways or in its original position works great for hanging plants
and holiday decorations. Turned 180 degrees, it makes a good hook for retrieving
duck decoys and lines.
Handle
5
Remove the end cap from the handle by twisting the end cap counterclockwise. This
will reveal the threaded connector. The ice scraper accessory can be attached to
the threaded connector. Many other standard items with a female connector, such
as a paint roller, squeegee, or duster, can also be attached to the threaded connector.
4
5
Set Screw
Tip
End Cap
phone: 1.866.306.DUHA (3842) // fax: 1.218.998.4013 // 306 Saint Andrews Street South, Fergus Falls, MN 56537
Manufactured by DU-HA, Inc. // www.du-ha.com
PIEZA NÚM. 70088 ESPAÑOL
DU-HOOKY
Instrucciones para la instalación y funcionamiento
Herramientas necesarias
// Llave de cubo de 5/16” // Taladro o llave de impacto
Instrucciones para la instalación
1
Fije la abrazadera de montaje (el Artículo B) en un lugar cómodo de la plataforma de su camión
utilizando la llave de cubo de 5/16” para apretar los tornillos autorroscables de cabeza
hexagonal (el Artículo C).
Recomendamos que se instale sobre la cavidad para la rueda, según se muestra en la
ilustración. La abrazadera no debe estar más de 18 pulgadas del extremo del mango.
Nota: También puede fijar la abrazadera de montaje (el Artículo B) en una pared de su taller o
garaje para mantener siempre DU-HOOKY (el Artículo A) a su alcance.
Artículo Cantidad Descripción
A
B
C
1 Reach E-Z
1 Abrazadera de montaje
2 Tornillos autorroscables de cabeza hexagonal
Instrucciones para el funcionamiento
Ajuste del largo
2
Dele ¼ de vuelta a la columna de Reach E-Z en el sentido contrario a las agujas del reloj.
Entonces, hale para extender Reach E-Z (el Artículo A). Dele ¼ de vuelta a la columna de Reach
E-Z (el Artículo A) en el sentido de las agujas del reloj para apretarla cuando esté en el largo
deseado.
Punta
3
Haga deslizar la punta por debajo del artículo que trata de recoger. Entonces, voltee Reach
E-Z (el Artículo A) completamente hacia el costado (de manera que el extremo delantero de la
punta atrape el borde del cubo). Después, hale Reach E-Z hacia sí para recoger los artículos.
Esto funciona magníficamente para meterse por debajo y enganchar cajas de cartón, la parte
inferior de cubos y todo lo demás alrededor de lo cual no pueda colocar el gancho.
Tornillo prisionero
4
Para cambiar la posición de la punta, afloje el tornillo prisionero utilizando el destornillador.
Entonces, haga girar la punta hasta la posición deseada y vuelva a apretar el tornillo prisionero.
No lo apriete demasiado.
Nota: Al estar inclinada de lado o en su posición original, la punta funciona estupendamente
para colgar plantas y decoraciones de días festivos. Al girarse 180 grados, se convierte en un
gancho útil para recoger señuelos e hileras de patos.
Mango
5
Quite la cofia del mango haciendo girar la tapa protectora en el sentido contrario a las agujas
del reloj, lo que dejará el conector roscado al descubierto. El raspador de hielo desmontable se
puede enganchar en el conector roscado. Muchos artículos estándares, además del anterior,
que vienen con conector hembra, como el rodillo para pintar, la escobilla de goma o el plumero,
también se pueden enganchar en el conector roscado.
1
A
C
2
A
3
4
5
A
Tornillo
Prisionero
Coa
B
Trabar
Destrabar
Punta
Punta
Teléfono: 1.866.306.DUHA (3842) // Fax: 1.218.998.4013 // 306 Saint Andrews Street South, Fergus Falls, MN 56537
Fabricado por DU-HA, Inc. // www.du-ha.com
 Loading...