

Page 1

Umbauanleitung für Nähgutklammerlüftung, pneum.
Converting Instructions - Pneum. Fabric Clamp Lifting
Bausatz 0510 590124 / Kit 0510 590124
1. Verwendung des Umbausatzes
Der Umbausatz “Pneumatische Nähgutklammerlüftung” ist für
Riegelmaschinen der Klasse 510 vorgesehen.
2. Komponenten des Bausatzes
Der Umbausatz 0510 590124 besteht aus den in der Abbildung
dargestellten Einzelteilen. Siehe auch beiliegende Stückliste.
Teile-Nr./ Part-No.:
0791 510771
1
2
3
4
Ausgabe/Edition:
04.2008
Änderungsindex
Rev. index: 00.0
–
Adapter für Steuerung 1
–
Doppelzylinder 2
–
Betätigungssgestänge 3
–
Schrauben, Scheiben
–
Schlauchteile und Verbindungen
–
Wartungseinheit
Printed in Germany
Blatt: 1 von 16
Sheet: 1 from 16
Page 2

Umbauanleitung für Nähgutklammerlüftung, pneum.
Converting Instructions - Pneum. Fabric Clamp Lifting
Bausatz 0510 590124 / Kit 0510 590124
2. Demontage der elektromagnetischen Nähgutklammerlüftung
2.1 Kopfdeckel und Abdeckhaube abnehmen
Teile-Nr./ Part-No.:
0791 510771
2.2 Magnet entfernen
1 2
– Kopfdeckel 1 und Abdeckhaube 2 abschrauben.
Ausgabe/Edition:
04.2008
3
–
–
–
Änderungsindex
Rev. index: 00.0
4
Magnet 3 demontieren.
Stecker 4 des Magneten abziehen.
Kabel aus dem Kabelbau entfernen und Kabelbaum neu binden.
Blatt: 2 von 16
Printed in Germany
Sheet: 2 from 16
Page 3
Umbauanleitung für Nähgutklammerlüftung, pneum.
Converting Instructions - Pneum. Fabric Clamp Lifting
Bausatz 0510 590124 / Kit 0510 590124
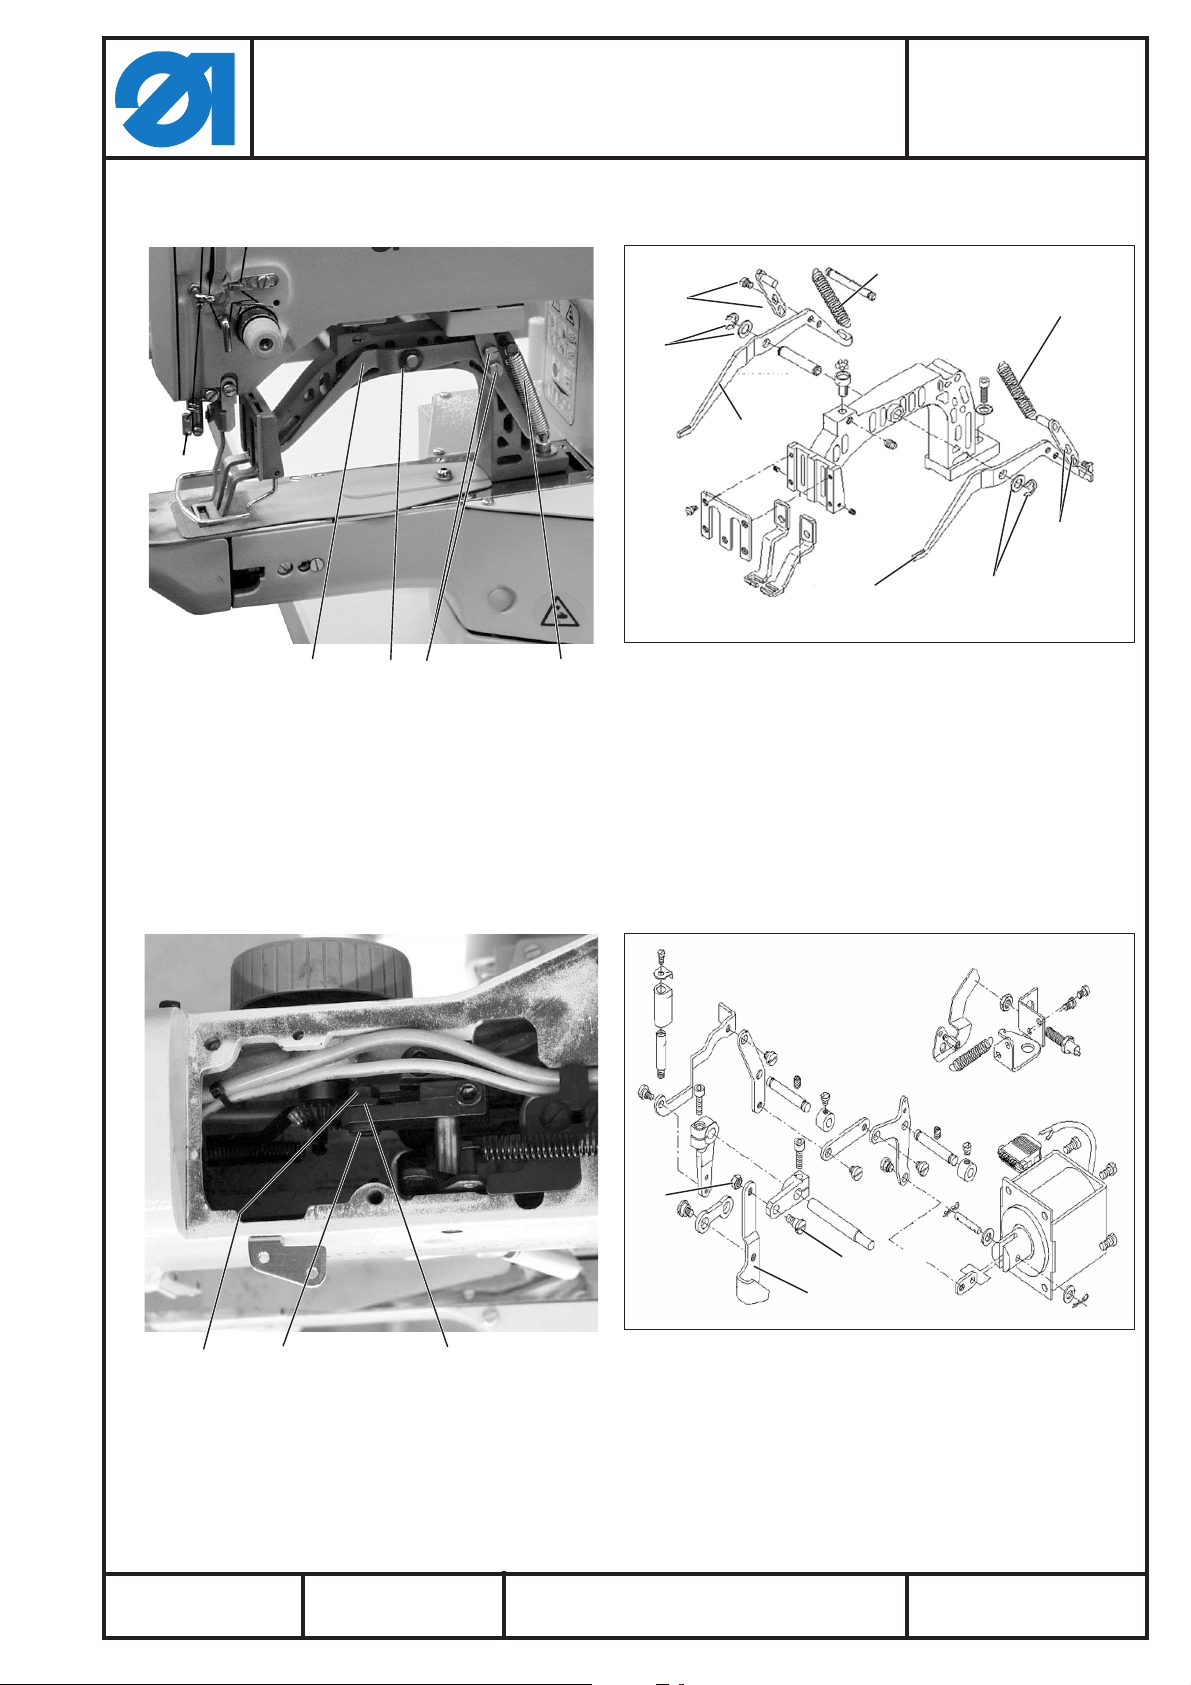
2.3 Mechanik am Klammerarm demontiern
Teile-Nr./ Part-No.:
0791 510771
1
2
1
3
4
2
432 1
– Federn 1 am Klammerarm abnehmen.
– Schrauben 2 herausdrehen.
– Sicherungsring 3 und Unterlegscheibe abnehmen.
– Hebel 4 abnehmen.
2.4 Mechanik im Nähkopf demontieren
4
3
32 1
Ausgabe/Edition:
04.2008
Änderungsindex
Rev. index: 00.0
3
–
Schraube 2 und Mutter 3 entfernen.
–
Hebel 1 entfernen.
Printed in Germany
2
1
Blatt: 3 von 16
Sheet: 3 from 16
Page 4

Umbauanleitung für Nähgutklammerlüftung, pneum.
Converting Instructions - Pneum. Fabric Clamp Lifting
Bausatz 0510 590124 / Kit 0510 590124
8
6
9
Teile-Nr./ Part-No.:
0791 510771
876 5
Feder 5 aushängen.
–
– Schraube 6 am Kloben 7 lösen.
– Schraube 8 am Kloben 9 lösen.
– Welle 10 so weit herausdrücken, bis die Scheiben 11 und 12
von der Welle 10 entfernt werden können.
– Kloben 7 von der Welle entfernen.
– Scheiben 11 und 12 wieder auf die Welle 10 setzen.
– Welle ganz eindrücken und mit Kloben 9 dichtstellen.
10
7
10
5
Ausgabe/Edition:
04.2008
910
Änderungsindex
Rev. index: 00.0
12
Printed in Germany
11
Blatt: 4 von 16
Sheet: 4 from 16
Page 5

Umbauanleitung für Nähgutklammerlüftung, pneum.
Converting Instructions - Pneum. Fabric Clamp Lifting
Bausatz 0510 590124 / Kit 0510 590124
3. Pneumatische Nähgutklammerlüftung montieren
3.1 Teile am Klammerarm montieren
3
Teile-Nr./ Part-No.:
0791 510771
14
11
6
3
17
2
7
5
2
1
4
Ausgabe/Edition:
04.2008
Änderungsindex
Rev. index: 00.0
–
Teile, wie aus der Abbildung ersichtlich, in folgender
Reihenfolge am Klammerarm montieren.
–
Halteplatten 1 und 11 montieren.
–
Hebel 2 und 3 mit den Schrauben 4 und 14 verbinden und auf
der Welle 5 mit Scheibe und Sicherungsring montieren.
–
Anschlagschraube 6 montieren.
–
Zylinder 7 und 17 montieren.
Blatt: 5 von 16
Printed in Germany
Sheet: 5 from 16
Page 6

Umbauanleitung für Nähgutklammerlüftung, pneum.
Converting Instructions - Pneum. Fabric Clamp Lifting
Bausatz 0510 590124 / Kit 0510 590124
3.2 Magnetventilblock und Pneumatiskschläuche montieren
A
B
C
Teile-Nr./ Part-No.:
0791 510771
3D21
– Magnetventilblock 3 mit den Schrauben 2 an den unteren
beiden Halterungen des Magneten festschrauben.
– Pneumatikleitungen an den Zylinder 4 anschließen.
- Anschluss A zu Zylinder links, oberer Anschluss
- Anschluss D zu Zylinder links, unterer Anschluss
- Anschluss B zu Zylinder rechts, oberer Anschluss
- Anschluss C zu Zylinder rechts, unterer Anschluss
4
Ausgabe/Edition:
04.2008
Änderungsindex
Rev. index: 00.0
Printed in Germany
Blatt: 6 von 16
Sheet: 6 from 16
Page 7

Umbauanleitung für Nähgutklammerlüftung, pneum.
Converting Instructions - Pneum. Fabric Clamp Lifting
Bausatz 0510 590124 / Kit 0510 590124
3.3 Wartungseinheit und Pneumatikzuleitung montieren
Teile-Nr./ Part-No.:
0791 510771
5
3
4
21
– Wartungseinheit 2 an die Gestellstrebe 3 schrauben.
– Druckluftzuleitung 4 in Anschluss 1 und Anschluss 5 stecken.
3.4 Elektroadapter anschließen
1
2
3
4
Ausgabe/Edition:
04.2008
Änderungsindex
Rev. index: 00.0
–
Stecker 1 von der Steuerung abnehmen.
–
Stecker des Adapters 3 in die Steuerung stecken.
–
Stecker 4 in die Buchse des Adaptares 3 stecken.
–
Leitungen 2 zu den Magnetventilen verlegen und anschließen.
Blatt: 7 von 16
Printed in Germany
Sheet: 7 from 16
Page 8

Umbauanleitung für Nähgutklammerlüftung, pneum.
Benutzer
Service
Freie Konturen
Memory-Dongle
Maschine
8.5
8.5
Ausstattung
Handtast.: Aus
E1.Fw.: Aus
Laserl.: Aus
F.Brenner: Aus
Opt.Anyeige
Belegung Eing.
_/-Klamm.: EIN
Converting Instructions - Pneum. Fabric Clamp Lifting
Bausatz 0510 590124 / Kit 0510 590124
4. Steuerung einstellen
Teile-Nr./ Part-No.:
0791 510771
Hauptschalter einschalten.
–
Die Steuerung wird initialisiert.
Es erscheint das Haupt-Menü.
Bei angezeigtem Haupt-Menü Funktionstaste “F” drücken.
–
Es erscheint das Menü für die Code-Abfrage.
Codenummer “25483” (Code 1) eingeben.
–
Nach Eingabe der richtigen Codenummer wechselt die Anzeige
zum Menü “Technikermodus”.
Mit den Tasten “ñ “ oder “ò “ Untermenü “Maschine” anwählen.
–
Mit der “OK”-Taste in das angewählte Untermenü schalten.
–
– Mit den Tasten “ñ “ oder “ò “Untermenü “Einrichtung”
anwählen.
– Mit der “OK”-Taste in das angewählte Untermenü schalten.
–
Mit den Tasten “ñ “ oder “ò “ Untermenü “Ausstattung”
anwählen.
–
Mit der “OK”-Taste in das angewählte Untermenü schalten.
–
Mit den Tasten “ñ “ oder “ò “ Untermenü “Klammer” anwählen.
–
Mit der “OK”-Taste in das angewählte Untermenü schalten.
Ausgabe/Edition:
04.2008
–
Änderungsindex
Rev. index: 00.0
Klammer einstellung auf “AUS” setzen.
Printed in Germany
Blatt: 8 von 16
Sheet: 8 from 16
Page 9

Umbauanleitung für Nähgutklammerlüftung, pneum.
Converting Instructions - Pneum. Fabric Clamp Lifting
Bausatz 0510 590124 / Kit 0510 590124
1. Use of the kit
2. Kit components
Teile-Nr./ Part-No.:
0791 510771
The “pneumatic fabric clamp lifting” kit has been designed for the
automatic bartacker machines of the class 510.
The kit for conversion 0510 590124 consists of the parts shown in
the sketch below. See also the enclosed parts list.
1
2
3
4
Ausgabe/Edition:
04.2008
Änderungsindex
Rev. index: 00.0
–
Adapter for control unit 1
–
Double-acting cylinder 2
–
Operating lever 3
–
Screws, washers
–
Hose parts and connections
–
Maintenance unit
Printed in Germany
Blatt: 9 von 16
Sheet: 9 from 16
Page 10

Umbauanleitung für Nähgutklammerlüftung, pneum.
Converting Instructions - Pneum. Fabric Clamp Lifting
Bausatz 0510 590124 / Kit 0510 590124
2. Removing the electromagnetic clamp lifting
2.1 Taking off the head cover and the covering cap
Teile-Nr./ Part-No.:
0791 510771
2.2 Removing the solenoid
1 2
– Unscrew the head cover 1 and the covering cap 2.
Ausgabe/Edition:
04.2008
3
–
–
–
Änderungsindex
Rev. index: 00.0
4
Dismount the solenoid 3.
Pull the plug 4 off the solenoid.
Remove the cable from the cable harness and tie the cable
harness again.
Blatt: 10 von 16
Printed in Germany
Sheet: 10 from 16
Page 11

Umbauanleitung für Nähgutklammerlüftung, pneum.
Converting Instructions - Pneum. Fabric Clamp Lifting
Bausatz 0510 590124 / Kit 0510 590124
2.3 Dismounting the mechanism on the clamp arm
Teile-Nr./ Part-No.:
0791 510771
1
2
1
3
4
2
432 1
– Unhook the springs 1 on the clamp arm.
– Unscrew the screws 2.
– Remove the circlip 3 and the washer.
– Remove the lever 4.
2.4 Dismounting the mechanism in the sewing head
4
3
32 1
Ausgabe/Edition:
04.2008
Änderungsindex
Rev. index: 00.0
3
–
Remove the screw 2 and the nut 3.
–
Remove the lever 1.
Printed in Germany
2
1
Blatt: 11 von 16
Sheet: 11 from 16
Page 12

Umbauanleitung für Nähgutklammerlüftung, pneum.
Converting Instructions - Pneum. Fabric Clamp Lifting
Bausatz 0510 590124 / Kit 0510 590124
8
6
9
Teile-Nr./ Part-No.:
0791 510771
876 5
Unhook the spring 5.
–
– Loosen the screw 6 on the block 7.
– Loosen the screw 8 on the block 9.
– Push out the shaft 10 just enough to remove the washers 11
and 12 from off the shaft 10.
– Removetheblock7fromofftheshaft.
– Put the washers 11 and 12 back onto the shaft 10.
– Push in the shaft completely and fix it with block 9.
10
7
10
5
Ausgabe/Edition:
04.2008
910
Änderungsindex
Rev. index: 00.0
12
Printed in Germany
11
Blatt: 12 von 16
Sheet: 12 from 16
Page 13

Umbauanleitung für Nähgutklammerlüftung, pneum.
Converting Instructions - Pneum. Fabric Clamp Lifting
Bausatz 0510 590124 / Kit 0510 590124
3. Mounting the pneumatic fabric clamp lifting
3.1 Mounting the parts on the clamp arm
3
Teile-Nr./ Part-No.:
0791 510771
14
11
6
3
17
2
7
5
2
1
4
Ausgabe/Edition:
04.2008
Änderungsindex
Rev. index: 00.0
–
Mount the parts on the clamp arm as shown in the diagram in
the following sequence.
–
Mount the holding plates 1 and 11.
–
Connect the levers 2 and 3 with the screws 4 and 14 and mount
them onto the shaft 5 with the washer and the circlip.
–
Mount the stop screw 6.
–
Mount the cylinders 7 and 17.
Blatt: 13 von 16
Printed in Germany
Sheet: 13 from 16
Page 14

Umbauanleitung für Nähgutklammerlüftung, pneum.
Converting Instructions - Pneum. Fabric Clamp Lifting
Bausatz 0510 590124 / Kit 0510 590124
3.2 Mounting the solenoid valve block and the pneumatic hoses
A
B
C
Teile-Nr./ Part-No.:
0791 510771
3D21
– Fix the solenoid valve block 3 with the screws 2 at the two lower
holders of the solenoid.
– Connect the pneumatic hoses to the cylinder 4.
- Connection A to the cylinder's left, upper connection
- Connection D to the cylinder's left, lower connection
- Connection B to the cylinder's right, upper connection
- Connection C to the cylinder's right, lower connection
4
Ausgabe/Edition:
04.2008
Änderungsindex
Rev. index: 00.0
Printed in Germany
Blatt: 14 von 16
Sheet: 14 from 16
Page 15

Umbauanleitung für Nähgutklammerlüftung, pneum.
Teile-Nr./ Part-No.:
Converting Instructions - Pneum. Fabric Clamp Lifting
0791 510771
Bausatz 0510 590124 / Kit 0510 590124
3.3 Mounting the maintenance unit and the pneumatic service connection
3
5
4
21
– Screw the maintenance unit 2 onto the stand's cross bar 3.
– Plug the compressed-air supply 4 into connection 1 and
connection 5.
3.4 Connecting the electric adapter
1
2
3
4
Ausgabe/Edition:
04.2008
Änderungsindex
Rev. index: 00.0
–
Pulltheplug1offthecontrolunit.
–
Plug in the plug of the adapter 3 into the control unit.
–
Plug in the plug 4 into the bush of the adapter 3.
–
Lay the cables 2 to the solenoid valve and connect them.
Blatt: 15 von 16
Printed in Germany
Sheet: 15 from 16
Page 16

Umbauanleitung für Nähgutklammerlüftung, pneum.
Benutzer
Service
Freie Konturen
Memory-Dongle
Maschine
8.5
8.5
Ausstattung
Handtast.: Aus
E1.Fw.: Aus
Laserl.: Aus
F.Brenner: Aus
Opt.Anyeige
Belegung Eing.
_/-Klamm.: EIN
Converting Instructions - Pneum. Fabric Clamp Lifting
Bausatz 0510 590124 / Kit 0510 590124
4. Setting the control unit
–
–
–
–
–
Teile-Nr./ Part-No.:
0791 510771
Switch on the main switch.
The control unit is initialized.
The main menu appears
Press function key "F" while the main menu is displayed.
The menu for the code entry will appear.
Enter code number “25483” (Code 1).
After input of the correct code number, the display changes over
to the menu “Technician mode”.
Select the submenu "machine" by using the keys "ñ" and "ò".
Switch to the selected submenu with the "OK"key.
– Select the submenu "sewing equipment" by using the keys "ñ"
and "ò".
– Switch to the selected submenu with the "OK"key.
–
Select the submenu "equipment" by using the keys "ñ " and "ò".
–
Switch to the selected submenu with the "OK"key.
–
Select the submenu "clamp" by using the keys "ñ " and "ò".
–
Switch to the selected submenu with the "OK"key.
–
Switch the clamp setting to “OFF”.
Ausgabe/Edition:
04.2008
Änderungsindex
Rev. index: 00.0
Printed in Germany
Blatt: 16 von 16
Sheet: 16 from 16
 Loading...