

Page 1
281
Spezialnähmaschine
Serviceanleitung
Service Instructions
Service Instructions
维修指导书
D
GB
CN
Manufacturer: Dürkopp Adler Manufacturing (Shanghai) Co., Ltd.
Conta c t: Dürkopp Adler AG, PO Box 17 03 51, D-33703 Bielefeld, Potsdamerstr. 190, D-33719 Bielefeld,
Manufacturer: Dürkopp Adler Manufacturing (Shanghai) Co., Ltd.
制造商:
Conta c t: Dürkopp Adler AG, PO Box 17 03 51, D-33703 Bielefeld, Potsdamerstr. 190, D-33719 Bielefeld,
联系单位:
Ausgabe / Edition: Änderungsindex Teile-Nr./Part.-No.:
01/2009 Rev. index: 00.0 PrintedinChina 0791 281641
1201 Luoshan Road, Pudong New Area, Shanghai 200135, China
Phone +49 ( 0) 521 9 25 00, Fax +49 (0) 521 9 25 24 35, www.duerkopp-adler.com
ᴰܟ᱂⠅ᎹϮࠊ䗴˄Ϟ⍋˅᳝䰤݀ৌ
ЁϞ⍋⌺ϰᮄ㔫ቅ䏃1201ো 䚂ᬓ㓪ⷕ˖200135
1201 Luoshan Road, Pudong New Area, Shanghai 200135, China
Phone +49 ( 0) 521 9 25 00, Fax +49 (0) 521 9 25 24 35, www.duerkopp-adler.com
中国印制
Page 2

Alle Rechte vorbehalten.
Eigentum der Dürkopp Adler und urheberrechtlich geschützt. Jede, auch auszugsweise Wiederverwendung
dieser Inhalte ist ohne vorheriges schriftliches Einverständnis der Dürkopp Adler verboten.
All rights reserved.
Property of Dürkopp Adler and copyrighted. Reproduction or publication of the content in any manner, even in
extracts, without prior written permission of Dürkopp Adler, is prohibited.
All rights reserved.
⠜ᴗ᠔᳝ˈϡ䆌㗏
Property of Dürkopp Adler and copyrighted. Reproduction or publication of the content in any manner, even in
⠜ᴗѻᴗᔦᴰܟ᱂⠅᳝䰤݀ৌDŽ㒣ᴰܟ᱂⠅᳝䰤݀ৌк䴶䆌ৃˈ⽕ℶҹӏԩᮍᓣ㗏ᴀݙᆍˈࣙᣀᨬ㽕DŽ
extracts, without prior written permission of Dürkopp Adler, is prohibited.
Copyright ©
Dürkopp Adler - 2009
Page 3

ϔ㠀ᅝܼ䇈ᯢ
ϡ䙉ᅜҹϟᅝܼ䇈ᯢӮᇐ㟈Ҏ䑿Ӹᆇᴎ఼ᤳണDŽ
䰆ℶҎ䑿Ӹᆇʽ
ˊᴎ఼া㛑⬅ܙߚњ㾷᪡䇈ᯢкⱘҎ䇗䆩ᑊ⬅ফ䖛ϧϮ䆁Ҏ
᪡DŽ
ˊᡩܹՓ⫼Пࠡ乏䯙䇏ᅝܼ㾘߭ҹঞ偀䖒կᑨଚⱘՓ⫼ݠDŽ
ˊা㛑ᣝ㾘ᅮⱘ⫼䗨Փ⫼ᴎ఼DŽ≵᳝ᅝܼ㺙㕂ⱘᴎ఼ϡᕫՓ⫼DŽ䙉
ᅜ᠔᳝Ⳍ݇ⱘᅝܼ㾘ᅮDŽ
ˊᤶޚ䳊ӊ˄བ䩜ǃ㛮ǃ䩜ᵓǃ䗕᭭⠭ẁ㢃˅ᯊ˗こ㒓ᯊ˗
⾏ᓔᎹഎ᠔ᯊҹঞ㓈ᡸֱݏᯊᖙ乏݇䯁Џᓔ݇ˈᮁᓔ⬉⑤ᢨ
ϟ⬉⑤ᦦ༈DŽ
ˊ᮹ᐌֱݏা㛑⬅㒣䖛Ⳍᑨ䆁ⱘҎ䖯㸠DŽ
ˊׂ⧚ǃ䇗ᤶ䳊ӊ⡍⅞㓈ׂা㛑⬅ᡔᴃҎ㒣䖛ϧϮ䆁ⱘҎ
䖯㸠DŽ
ˊ⇨ࡼ㋏㒳ֱݏׂ⧚ᯊˈᑨᡞᴎ఼ৠ㓽ぎ⇨կᑨ㋏㒳˄᳔催
EDU˅ᮁᓔDŽᮁᓔࠡˈ䰡Ԣ㓈ׂ㺙㕂ⱘϗDŽ㒣䖛ϧϮ
䆁ⱘᡔᴃҎҙᇍᴎ఼䖯㸠䇗ᭈࡳ㛑Ẕᶹⱘᚙމ՟DŽ
ˊᇍ⬉⇨䆒ⱘ᳝݇Ꮉᖙ乏⬅⬉⇨ᡔᴃҎ㒣䖛ϧϮ䆁ⱘҎ
䖯㸠DŽ
ˊϡܕ䆌䗮⬉ᚙމϟᇍ䳊ӊ㋏㒳䖯㸠ᎹDŽ',19'( Ё᳝
ԧ㾘ᅮⱘᚙމ䰸DŽ
ˊ ᴎ఼ⱘ䕀ᤶবᖙ乏㒣䖛៥ӀⱘᥜᴗϨা᳝䙉ᅜ᠔᳝ⱘᅝ
ܼޚ߭ᚙމϟ䖯㸠DŽ
ˊ ׂ⧚ᯊা㛑Փ⫼㒣៥Ӏᡍޚⱘ᳓ᤶ䳊ӊDŽ
ˊ 䆕ᅲᭈϾ㓱㑿ܗヺড় (& ᴵ՟ПࠡˈϹ⽕Փ⫼㓱㑿ᴎDŽ
ˊ ⬉⑤㒓ᖙ乏䜡᳝Ϣԧ᠔㾘ᅮⳌᑨⱘ⬉⑤Џᦦ༈DŽ
䖭乍Ꮉᖙ乏⬅㒣䖛ϧϮ䆁ⱘᡔᴃҎ䖯㸠˄㾕 ↉˅DŽ
㒱ᇍ᳝ᖙ㽕䙉ᅜ᳝䖭ѯᖫⱘᅝܼ䇈ᯢ
䖬䇋⊼ᛣϔ㠀ᅝܼ䇈ᯢ
Page 4

Page 5

Ⳃᔩ
Contents Page:
3䚼ߚ˖281ѻક㓈ׂ䇈ᯢк
Part 3: Service Instructions Class 281
(Edition 01/2009)
˄2009/01⠜˅
1. 概况
1. General
1.1 工具和量规 ···························································································································3
1.1 Tools and Gauges .............................................. 3
1.2 调整帮手 ···························································································································· 4
1.2 Adjustingaids................................................. 4
2. 送料和缝纫附件
2. Feeding and sewing equipment
2.1 送料偏心轮同步性调节········································································································· 5
2.1 Timing of the thrust eccentric ....................................... 5
2.2 抬牙凸轮同步性调节············································································································· 6
2.2 Timing of the lifting cam ........................................... 6
2.3 送料牙高度和倾斜度调整········································································································7
2.3 Feeddogheightandinclination...................................... 7
2.4 送料牙在针板槽内的位置······································································································· 8
2.4 Feeddogpositionwithinthethroatplate................................. 8
2.5 针距限位 ···························································································································· 9
2.5 Stitch length limitation ............................................ 9
2.6 针距对称性·························································································································· 10
2.6 Stitch length symmetry ........................................... 10
3. 压脚高度和抬压脚
3. Sewing foot height and sew ing foot lifting
3.1 压杆高度 ···························································································································· 11
3.1 Pressure-barheight............................................. 11
3.2 机械式抬压脚······················································································································ 12
3.2 Mechanical sewing foot lifting ....................................... 12
3.2.1 抬压脚动作和抬压脚高度·································································································· 12
3.2.1 Liftingmotionandliftedsewingfootheight ............................... 12
3.3 电磁铁抬压脚······················································································································· 13
3.3 Electromagnetic sewing foot lifting .................................... 13
3.3.1 抬压脚电磁铁定位············································································································· 13
3.3.1 Sewing foot lifter solenoid position .................................... 13
3.3.2 安装抬压脚电磁铁 ············································································································ 14
3.3.2 Mounting the sewing foot lifting solenoid ................................. 14
3.3.3 更换抬压脚电磁铁上的缓冲垫圈 ······················································································· 16
3.3.3 Replacing the shock absorbing washer of the sewing foot lifter solenoid ............. 16
3.4 压脚压力 ···························································································································· 18
3.4 Sewingfootpressure ............................................ 18
义ⷕ˖
CN
4. 过线件
4. Thread-guiding parts
4.1 夹线器松线功能···················································································································· 19
4.1 Releasing the needle thread tension ................................... 19
4.2 挑线簧··································································································································20
4.2 Threadtake-upspring............................................ 20
4.3 面线线量调节器··················································································································· 21
4.3 Thread regulator ............................................... 21
5. 针杆高度······························································································································· 22
5. Needle bar height .............................................. 22
6. 装旋梭
6. Hook setting
6.1 形成线环所需的机针行程、旋梭尖与机针间间隙·································································23
6.1 Looping stroke and distance between the hook point and needle .................. 23
6.2 旋梭定位钩···························································································································24
6.2 Bobbin case holder .............................................. 24
7. 剪线机构
7. Thread trimmer
7.1 动刀动作控制凸轮··············································································································· 25
7.1 Controlcamfortheknifemotion...................................... 25
7.1.1 控制凸轮定位····················································································································25
7.1.1 Controlcamposition............................................. 25
7.1.2 滚柱和剪线凸轮间间隙······································································································26
7.1.2 Distance between the r oller and thread trimmer cam ......................... 26
7.2 装动刀·································································································································27
7.2 Hookedknife ................................................. 27
7.3 调整剪线压力
7.3 Settingthecuttingpressure ........................................ 28
······················································································································28
Page 6

Contents Page:
页
目
录
8. Setting the bobbin w inder
8. 绕线器的调整
8.1 Switching off the bobbin winder ...................................... 29
8.1 关绕线器 ···························································································································· 29
8.2 Winding form of the bobbin ......................................... 30
8.2 梭芯绕线形式··························································································································30
8.3 Windingtightness .............................................. 30
8.3 绕线张力·································································································································30
9. Filling up oil (gear box) .......................................... 31
9. ( 齿轮箱)加油························································································································· 31
10. Hook lubrication
10. 旋梭润滑
10.1 Setting the oil quantity for the hook .................................... 33
10.1 旋梭油量调节·························································································································33
11. Maintenance ................................................. 34
11. 维护保养································································································································34
码
Page 7

1. 概况
1. General
本维修指导书描述的是281缝纫机的调整方法。
⊼ᛣʽ
The present service instruction describes the adjustment of the special
sewing machine 281.
ATTENTION!
对㓈ׂᣛᇐкЁ߫ߎⱘ᪡ˈা㛑⬅ড়ḐҎ㒣䖛Ⳍᑨᣛᇐ䆁Ҏ
ᠡ㛑䖯㸠ʽ
The operations described in the service instructions must only be
executed by qualified staff or correspondingly instructed persons
respectively!
ᦤ䝦˖ 有Ҏ䑿Ӹᆇⱘ䰽ʽ
䖯㸠ׂ⧚ǃᤶֱݏᎹᯊˈ݇䯁Џᓔ݇ˈᑊ⹂ֱᴎ఼ϡӮᛣ䗮
⬉DŽ
ᇍ䖤㸠Ёⱘᴎ఼䖯㸠䇗㡖᪡ࡳ㛑⌟䆩ᯊˈᖙ乏ϹḐ䙉ᅜ᠔᳝ⱘᅝܼ
ᮑˈৠᯊᑨ⡍߿ᇣᖗDŽ
本维修指导书按照相应的次序来说明该缝纫机的调整方法。请注意在结合
处各种位置设定都是相互关联的,所以绝对有必要按照描述的顺序来进行
调整。
对与形成线迹有关的零件安装调整时,要装一根无损坏的新机针。
在检查和调整操作中,机器罩壳拆下和重新装上的内容在本文中未提及。
请注意:
Caution: Risk of injury !
In case of repair, alteration or maintenance work turn off the main
switch and make sure to protect the machine from powering up
accidentally.
Carry out adjusting operations and functional tests of the running
machine only under observation of all safety measures and with
utmost caution.
The present service instruction describes the adjustment of the sewing
machine in an appropriate sequence. Please observe in this
connection that various setting positions are interdependent. Therefore
it is absolutely necessary to perform the adjustment following the
described order.
For all setting operations of parts involved in the stitch formation use a
new needle without any damage.
Machine covers having to be screwed off and on again for checking
and adjusting operations are not mentioned in the text.
281缝纫机的上轴上有扁榫, 这使调整相当便利。
万一需要调整,按转动方向上的第一排螺钉支住扁榫。
Please note:
The shaft of the special sewing machine 281 is provided with flat spots.
This facilitates the adjustment considerably.
In case of adjustments on flat spots the first screw in rotation direction
is put on such a flat spot.
CN
3
Page 8
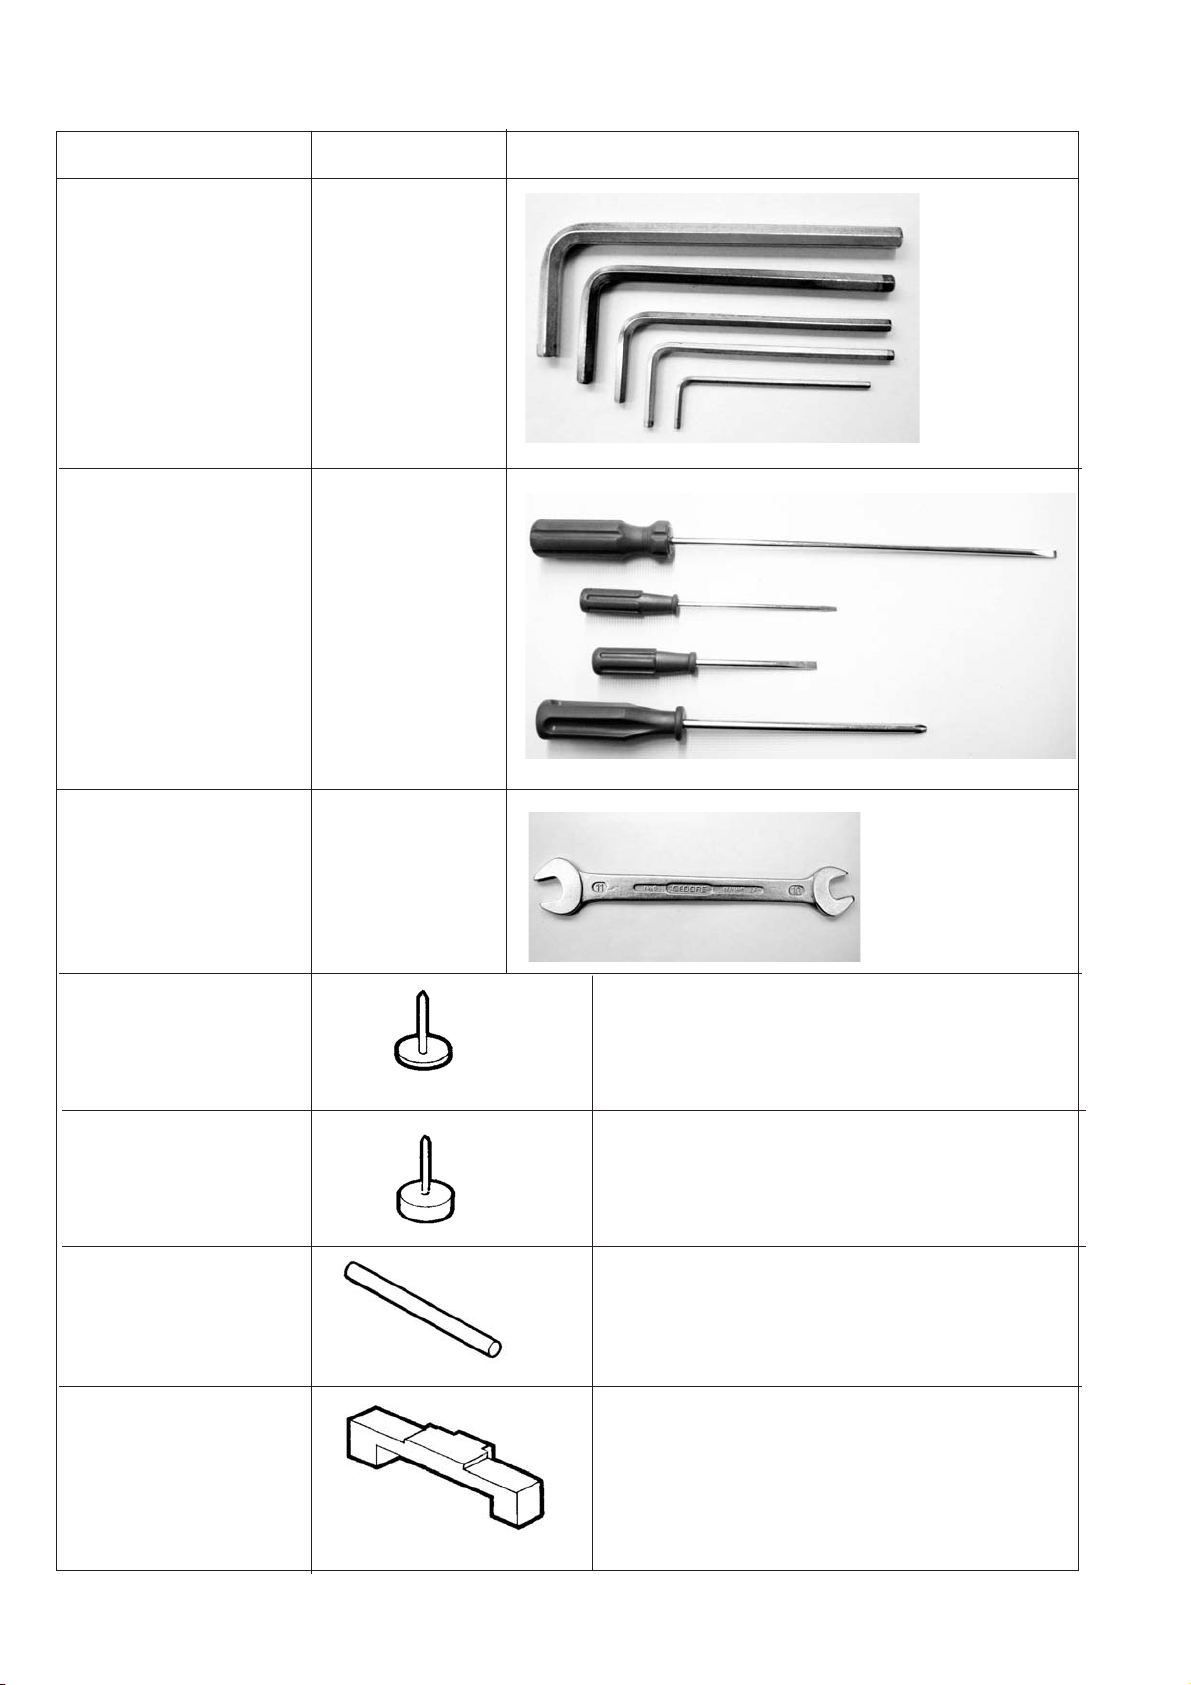
1.1 Tools and Gauges
规
形
格
内
名称
螺
杆
销
杆
工具和量
Art Size Figure
六角扳手
Allen key
丝刀:
Screw driver
Flat tip 0.7 x 4,5
平头一字
Flat tip 0.3 x 3
平头一字
Flat tip 0.7 x 4.5
平头一字
Cross tip B2 -H
十字
规
5
4
3
2.5
2
1.5
图
扳手
Open-end wrench 10
量规
Gauge Needle bar height
0281 801819 for needle diameter 1.62 mm
量规
Gauge Needle bar height
0281 800300 for needle diameter 2.00 mm
安装
Setting pin For locking the machine at position 1 - 6
9301 022608
用于针柄直径为1.62毫米的针
高度调节
用于针柄直径为2.00毫米的针
高度调节
用于机器在1-6号位置的锁定
0281 800290
4
量规
Gauge Feed dog height / Needle bar height
用于送料牙高度 / 针杆高度调整
Page 9
符
1.2 调整帮手
在
第
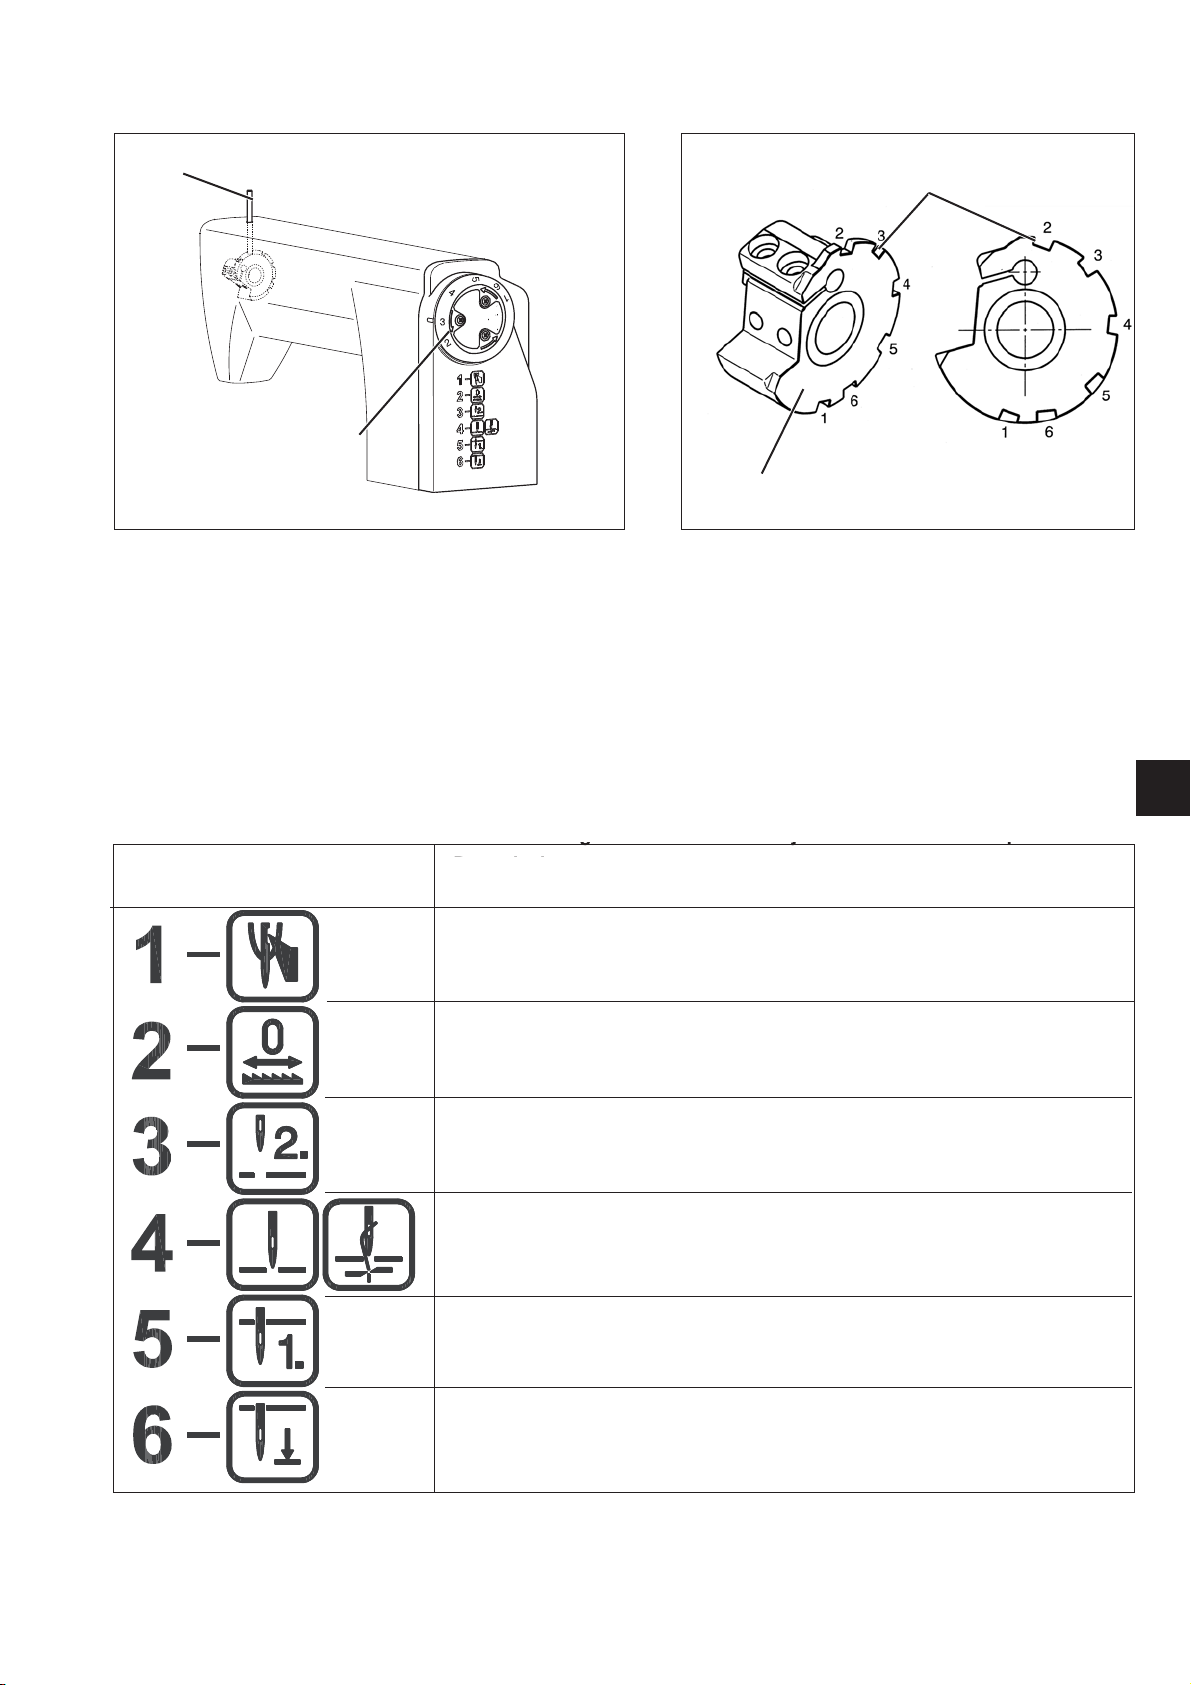
1.2 Adjusting aids
1
4
The sewing machine can be locked in six different setting positions
通过锁定销1和针杆曲柄3上的槽2能将机器锁定在6个不同的位
with the locking pin 1 and the arresting notches 2 on the arm shaft
置。
crank 3.
针杆曲柄上有6个槽口,对应手轮上的数字 1,2,3,4,5和6。当手轮
The crank has six notches which are marked on the handwheel by the
4上的数字与刻线对齐时, 用锁定销1将机器锁定在数字对应的槽
figures 1, 2, 3, 4, 5 and 6. In conjunction with marking 4 the figures
indicate the position of the notches in which the machine can be locked
口位置。
with locking pin 1.
这些数字能简单地找到所要锁定的槽口,只有将机器锁定在所要
The figures simplify the finding of the arresting notches. A precise
的槽口中,才能确保设置精确。
setting can only be ensured by arresting the machine at the provided
notches.
不同位置对以下项目进行调整:
The following items should be adjusted in the various positions:
Pos. Symb. Description
位置
号
说明
2
3
CN
Loop stroke
线环形成所需的机针行程
Distance between the hook point and needle
旋梭尖和机针之间的间隙
只有送料牙高度变化,而不送料。
Feed dog standstill when stitch-length regulator moves
feed dog height
nd
2机针位置(挑线杆上死点)
2
needle position (thread lever upper dead centre)
Reference position machine head / Control cam for thread trimmer
机器参考点位置 / 控制凸轮剪线位置
st
1
Needle position
第1机针位置
Needle in lowest position
机针最低位置
5
Page 10
2. 送料和缝纫附件
2. Feeding and sewing equipment
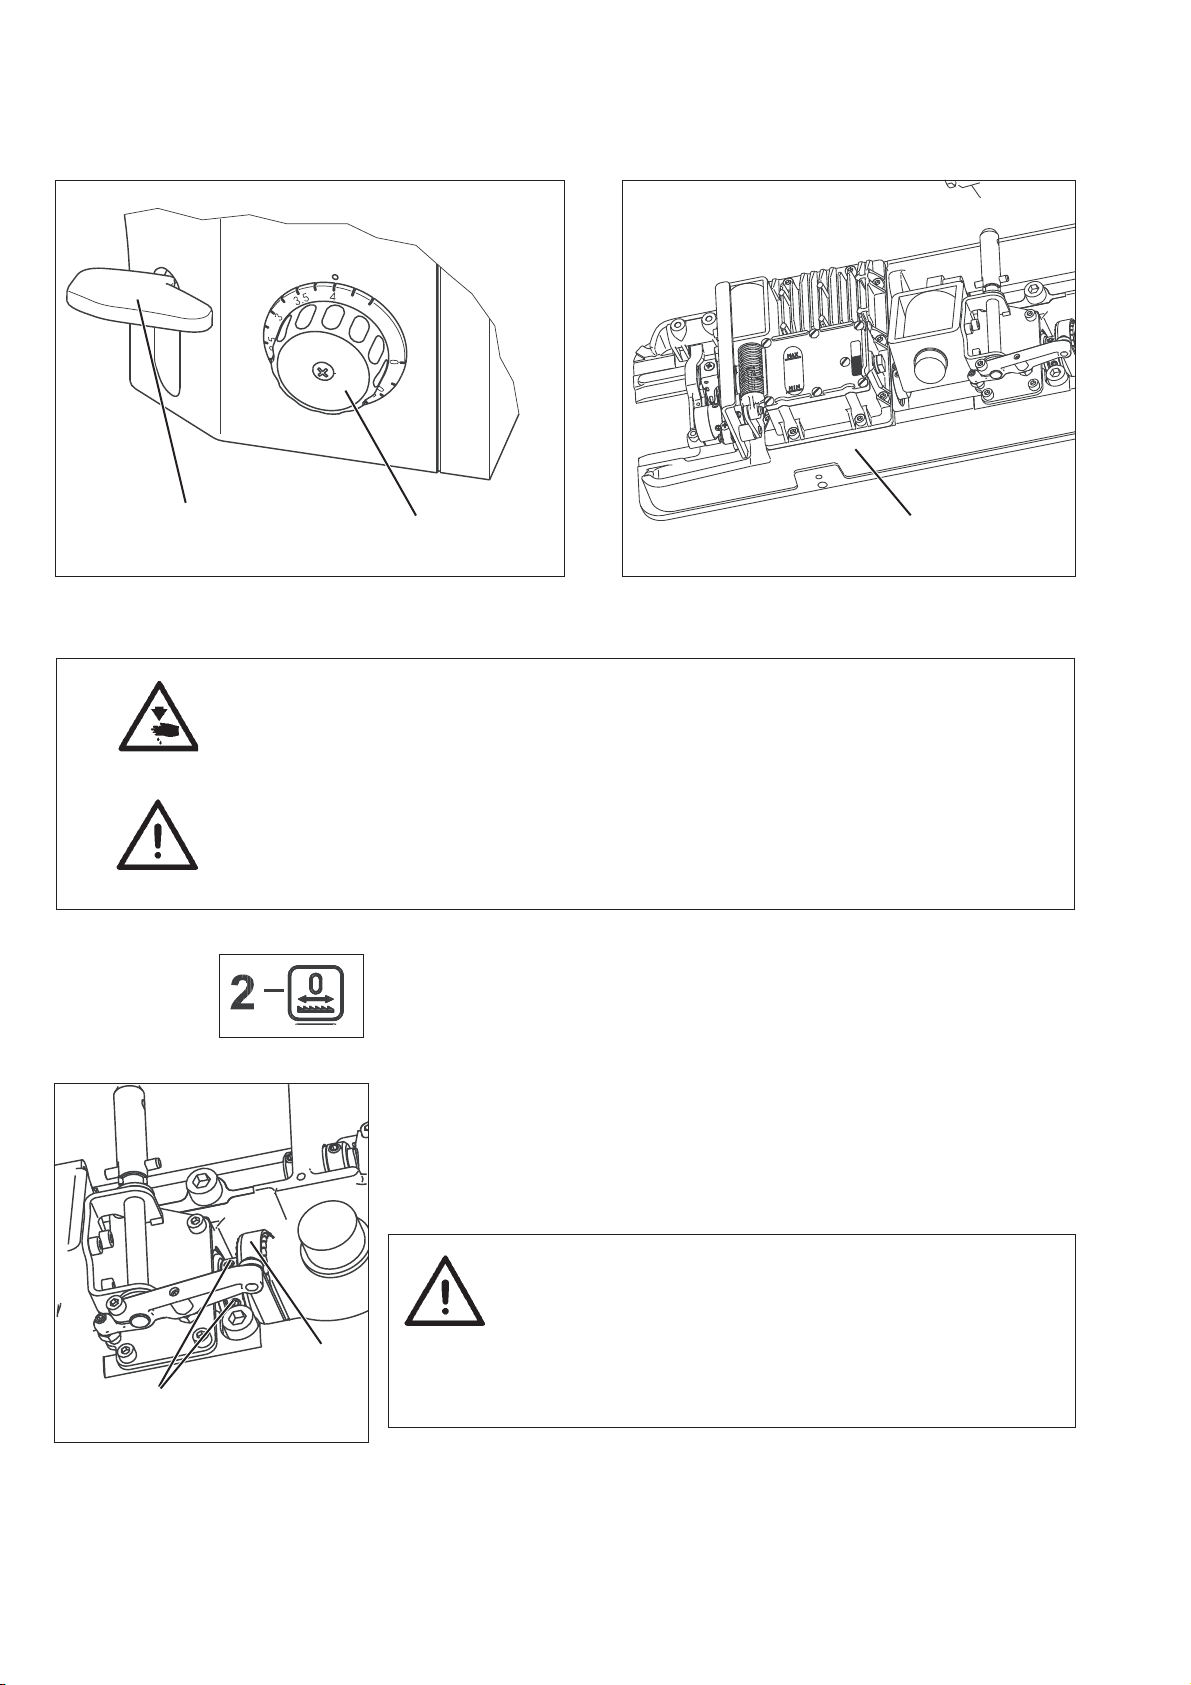
2.1 送料偏心轮同步性调节
2.1 Timing of the thrust eccentric
2
1
Caution: Risk of injury !
提醒:有人身伤害的危险!
Turnthemainswitchoff!
切断主开关!
Check and set the feed standstill only when the machine is switched
只有当机器主电源切断时才能检查和设置送料机构。
off.
注意!
ATTENTION!
齿轮箱3中的送料偏心轮已经在出厂设置时调整到最佳位置。
The thrust eccentric in the gear box 3 is already optimally set
ex factory.
这一设置最好不要改。
The setting should preferably not be modified.
标准检查
Standard checking
当机器锁定在2号位置时, 针距旋钮置在最大针距位置, 按倒送料手
With the sewing machine arrested at locking position “2", there should
be no feeding movement if the reverse feed lever 2 is actuated and the
柄应无送料移动量。
greatest stitch length is selected.
Correction
校正
–
Set the greatest stitch length at the setting wheel 1.
- 将针距旋钮1设置在最大针距处。
–
Loosen the screws 5 at the lower toothed belt wheel 4.
- 松开下轴同步带齿轮4上的螺钉5。
–
Turn the lower shaft accordingly.
- 相应转动下轴。
–
Fasten the screws 5 at the lower toothed belt wheel 4.
- 拧紧下轴同步带齿轮4上的螺钉5。
3
ATTENTION!
注意!
Should the lower shaft be misaligned, the following
如果下轴位置不正确, 以下位置须重新调整:
positions must also be re-adjusted again:
● 旋梭(见章 6.1)
l Hook (see chapter 6.1)
4
5
6
● 剪线凸轮(见章 7.11)
l Thread trimmer cam (see chapter 7.11)
● 抬牙凸轮(见章 2.2)
l Lifting cam (see chapter 2.2)
Page 11

标
查
2.2 抬牙凸轮同步性调节
2.2 Timing of the lifting cam
5
1
2
3
3
4
1
4
CN
提醒:有人身伤害的危险!
Caution: Risk of injury !
切断主开关!
Turnthemainswitchoff!
只有在机器主电源切断时才能检查和设置抬牙凸轮。
Check and set the lifting cam only when the machine is switched off.
Standard checking
准检
With the sewing machine arrested at locking position “2", align the
当机器锁定在2号位置时, 使抬牙凸轮 2 上槽1与抬牙连杆5上缺
notches 1 (of the lifting cam 2) and 4 (of the traction rod 5).
口4成一直线。
Correction timing of the lifting cam
抬牙凸轮的同步性校正:
–
Arrest the sewing machine at locking position “2".
- 将机器锁定在2号锁定位置。
–
Loosen both screws 3 of the lifting cam 2.
- 松开抬牙凸轮 2上的两个螺钉3。
–
Turn the lifting cam 2.
- 转动抬牙凸轮2。
The notches 1 and 4 muss be aligned.
槽1和缺口4必须成一直线。
–
Tighten both screws 3 of the lifting cam 2 again.
- 重新拧紧抬牙凸轮2上的螺钉3。
7
Page 12
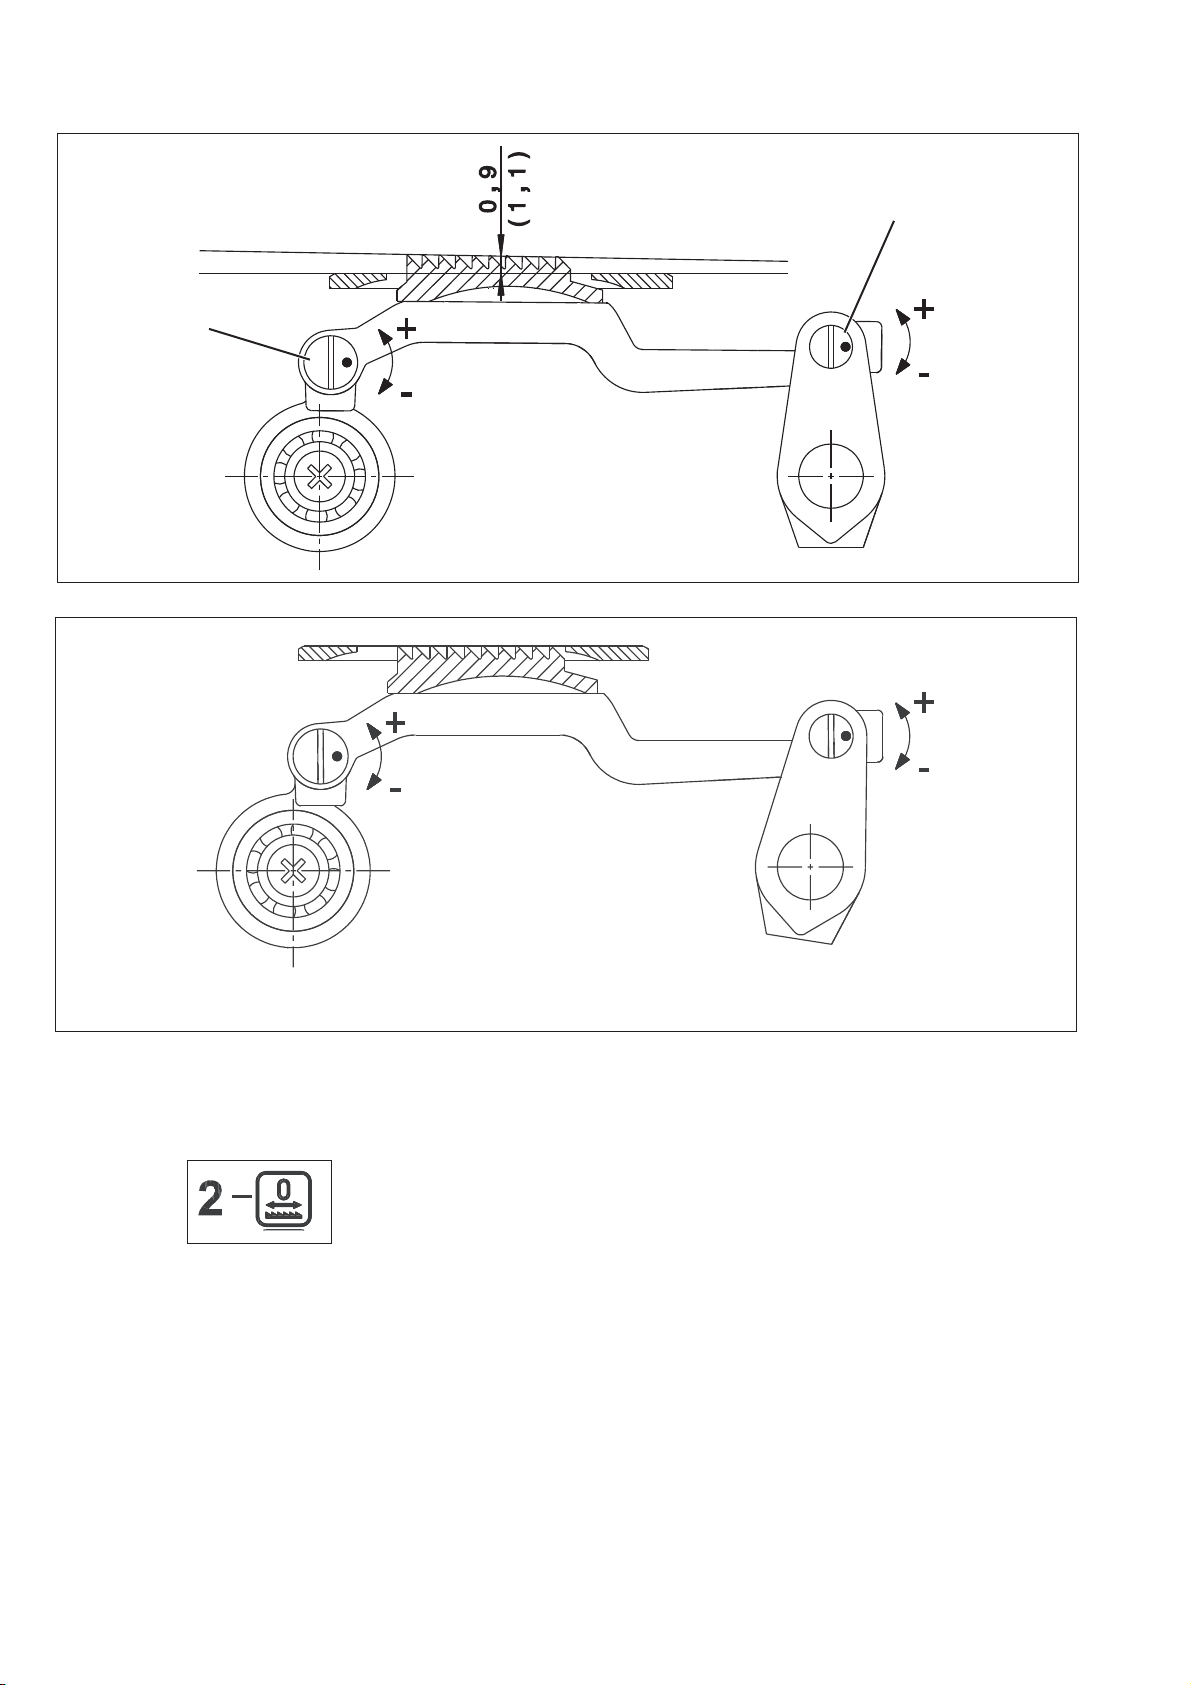
2.3 Feed dog height and inclination
图
图
标
查
出
2.3 送料牙高度和倾斜度调整
Fig. A
A
7
8
B
Fig. B
准检
Standard checking
图 A
Fig. A
送料牙高出针板形成的高度,以及相对于针板的爬行斜度或平行度
The emerging height of the feed dog over the throat plate, its angle of
climb or the parallelism to the throat plate can be set via eccentrics 7
可通过偏心销7和8来调节。
and 8.
机器锁定在2号锁定位置时,送料牙在针板中心( 针孔处)高度在
With the sewing machine arrested at locking position “2", the height of
厂时已设置好:
the centre of the throat plate (at the needle hole) is set ex factory:
● 细牙送料牙时为0.9毫米
0.9 mm with fine toothed feed dog
·
● 粗牙送料牙时为1.1毫米
送料牙调整到从前端到后端一点一点升高。
1.1 mm with coarse toothed feed dog
·
Thereby the feed dog is slightly rising from front to rear.
图 B
此设置要求:送料牙刚露出针板上平面时与针板平行。
Fig. B
With this setting, the feed dog is parallel to the throat plate when
emerging.
8
Page 13
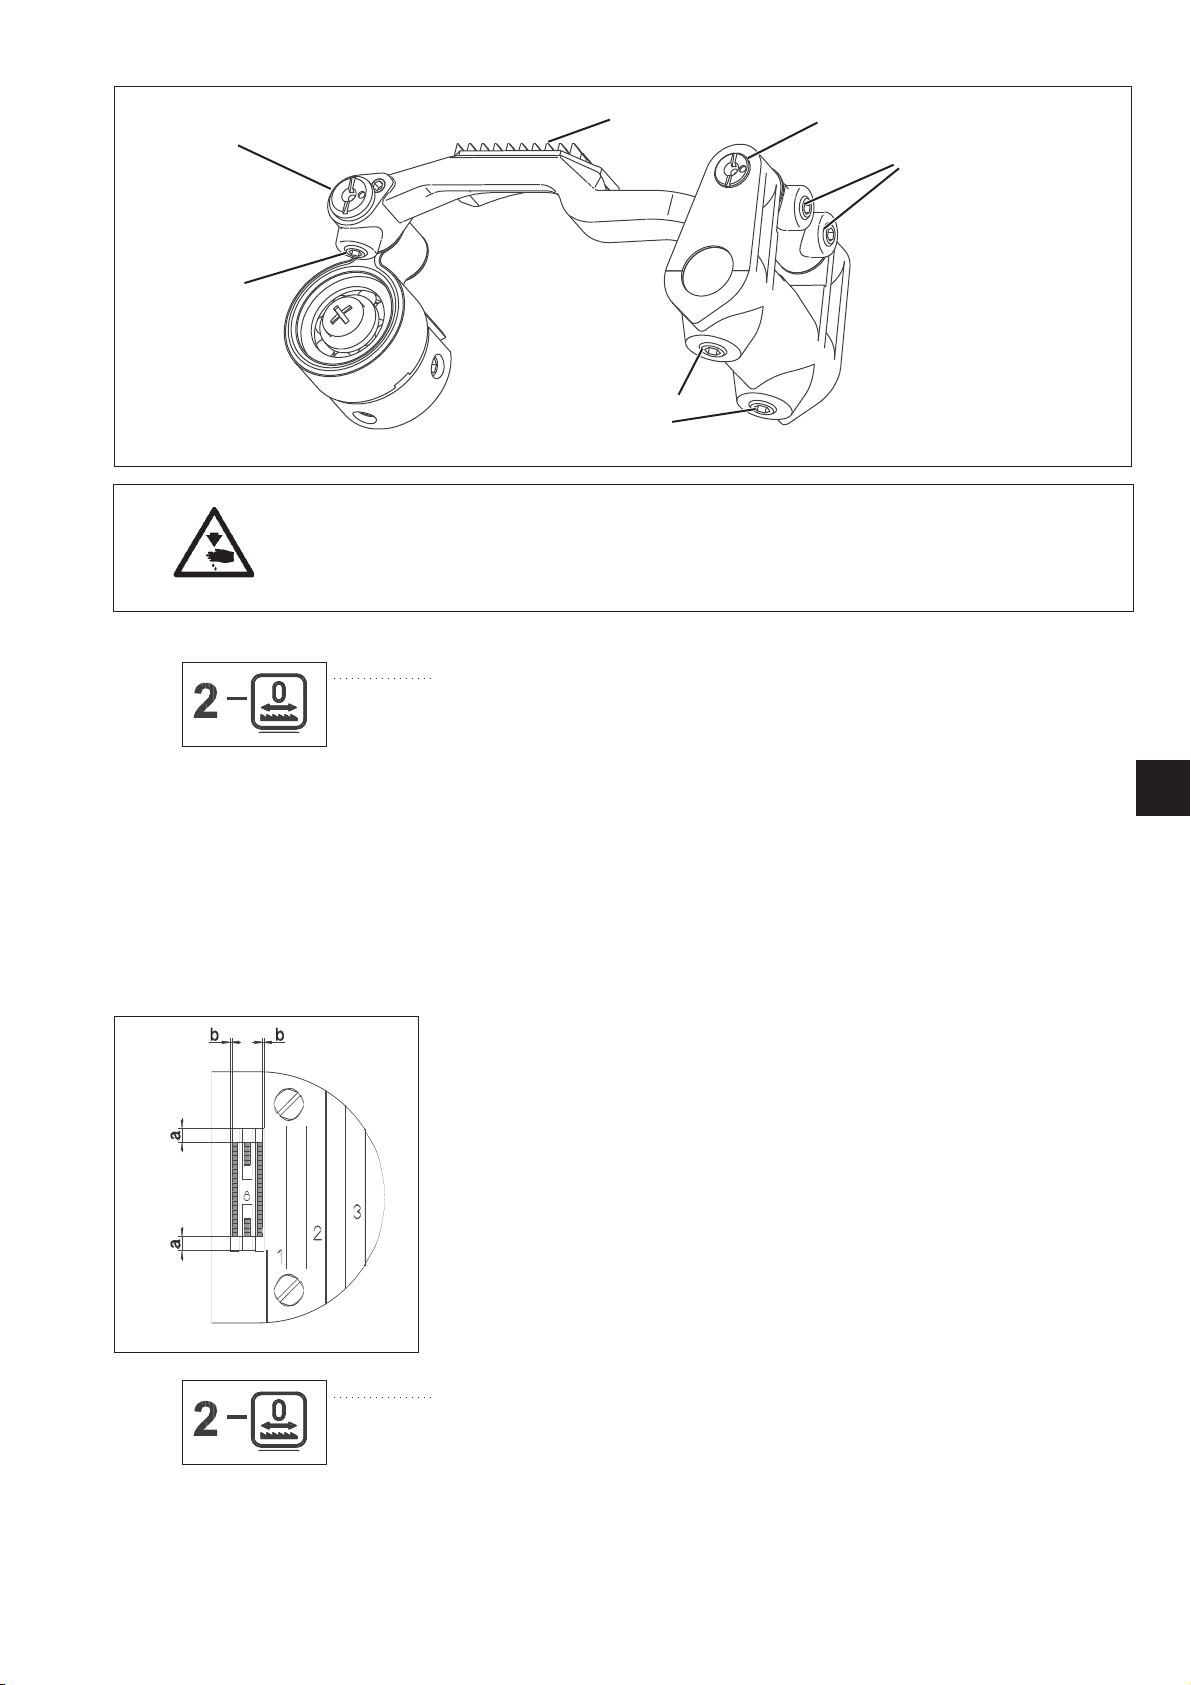
10
7
8
9
6
11
提醒:有人身伤害的危险!
Caution: Risk of injury !
切断主开关!
Turnthemainswitchoff!
只有在机器主电源切断时才能检查和设置送料牙高度和倾斜度
Check and set the feed dog height and inclination only with the sewing
machine switched off.
校正送料牙高度
Correction feed dog height
–
- 将机器锁定在2号位置。
Arrest the sewing machine at locking position “2".
–
- 松开螺钉6和9。
Loosen screws 6 and 9.
–
- 转动偏心销7和8。
Turn the eccentric bolts 7 and 8.
In its highest position, the feed dog should protrude
送料牙在最高位置时在针孔区域附近应高出针板 0.9( 1.1)mm。
by 0.9 (1.1) mm from the throat plate in the region of the needle hole.
- 通过偏心销7和8来调节送料牙高度和倾斜度。
–
Adjust the height and the inclination via the eccentrics 7 and 8.
需要注意的是两个偏心销在调节时是相互联系的。
Keep in mind that the adjusting of both eccentrics are
interdependent from each other.
- 重新拧紧螺钉6和9。
–
Fasten screws 6 and 9 again.
CN
2.4 Feed dog position within the throat plate
2.4 送料牙在针板槽内的位置
规则
Rule
将机器锁定在2号位置时, 送料牙在针板槽内应对称,
With the sewing machine arrested at locking position “2", the feed dog
should be symmetric.
前后间隙也基本相同。
The distance is similar at the front and the rear.
Correction
校正
–
Arrest the sewing machine at locking position “2".
- 将机器锁定在2号位置。
–
Loosen screw 11.
- 松开螺钉11。
–
Adjust the symmetry.
- 调节对称性。
–
Fasten the screws 11.
- 拧紧螺钉11。
The lateral clearance b must still be kept.
必须有侧隙b。
9
Page 14

2.5 针距限
位
2.5 Stitch length limitation
5
423
1
Caution: Risk of injury!
提醒:有人身伤害的危险!
Turn off the main switch!
切断主开关!
Check and set the stitch length limitation only with the sewing machine
只有在机器主电源切断时才能检查和设置针距限位。
switched off.
Standard checking
标准检查
The maximum stitch length for the sewing machine is 4.5 mm.
机器的最大针距4.5mm。
With sewing equipment designed for smaller stitch length, the stitch
用为较小针距设计的缝纫附件时,该针距也必须有对应的限位,
length must also be limited accordingly, in order to avoid damaging the
以防止机头或缝纫附件受到损坏。
sewing machine or the sewing equipment.
最大针距的限制
Limiting the maximum stitch length
- 将针距旋钮1设定在允许的最大针距位置。
–
Set the allowed maximum stitch length for the sewing equipment on
- 松开限制块2上的螺钉3。
the setting wheel 1.
–
- 顺时针转动限制块使其靠着螺纹销5。
Loosen both screws 3 of the limiting block 2.
–
- 重新拧紧两颗螺钉3。
Turn the limiting block clockwise against the threaded pin 5.
–
Fasten both screws 3 again.
10
Page 15

2.6 Stitch length symmetry
标
查
性
2.6 针距对称
2
3
4
1
5
提醒:有人身伤害的危险!
Caution: Risk of injury!
切断主开关!
Turn off the main switch! Check and set the stitch length symmetry
只有在机器主电源切断时才能检查和设置针距对称性
only with the sewing machine switched off.
Standard checking
准检
The forward and reverse stitch length (4.0 mm) are already set ex
出厂时已经将正送料和倒送料针距设置成( 4.0mm)。
factory.
可以用一张纸板作为缝纫材料来验证,以最低速度不穿线
A verification can be done by using a cardboard as a sewing material
正缝 10个针距( 即11针),然后在旁边倒缝 10个针距( 即11针)
and sewing 10 stitch length (11 stitching) forward and next to it 10
在两个方向上的10个针距总的长度应该一样。
stitch length (11 stitching) reverse without thread with the slowest
speed.
对机器修理后,可能有必要对针距对称性重新调节。
The total length of the 10 stitches in both directions should be the
same.
校正
It may be necessary to re-adjust the symmetry of the stitch length after
- 将针距旋钮1设置到最大针距位置。
repairs.
- 松开曲柄4上的螺钉3。
- 转动曲柄4中的轴2。
Correction
- 拧紧螺钉3。
–
Set the maximum stitch length on the setting wheel 1.
- 再检查针距是否对称,如果有必要再重新调整。
–
Loosen the screw 3 in the clamping block 4.
–
Turn the shaft 2 in the clamping block 4.
请注意:
–
Fasten the screw 3.
对该轴甚至一个很小的转动也会引起针距很大的变化。
–
Check the stitch length again and set it anew if necessary.
该调整工作必须小心翼翼地进行。
此外,很重要的是要确保在最大针距位置时,倒送料电磁铁 5动
Please note:
作时既不碰内端也不碰外端,以防止产生击打噪音或零件磨损。
Even a slight twisting of the shaft leads to an essential change of the
stitch length.
This task must be carried out meticulously.
Furthermore it is important to make sure that when latching (with the
greatest stitch length set), the latch solenoid 5 does not hit its inside or
outside end position in order to avoid knocking noises or to prevent
from wearing out.
CN
11
Page 16

3. 压脚高度和抬压脚
3. Sewing foot height and sewing foot lifting
最大抬压脚行程为:
The maximum sewing foot lifting stroke amounts to:
● 通过自动电磁铁抬压脚: 12mm。
12 mm with machines with electromagnetic sewing foot lifting.
·
● 用膝提抬压脚: 14mm。
14 mm with machines with knee lever.
● 出厂设置: 9mm。
·
9 mm factory setting.
·
3.1 Pressure-bar height
3.1 压杆高度
1
2
3
Caution: Risk of injury!
提醒:有人身伤害的危险!
Turn off the main switch!
切断主开关!
Check and set the pressure-bar height only with the sewing machine
只有在机器主电源切断时才能检查和设置压杆高度。
switched off.
Standard checking
When the sewing foot sole 4 rests on the throat plate, a gap of 0.5 mm
should be available between the block 2 and the traction bracket 1.
标准检查
Correction
当压脚压住针板时,压杆导架 2与压杆提升架3之间应有0.5mm
–
Remove the face cover.
的间隙。
–
Loosen the screw 3.
校正
–
Press the sewing foot downward against the throat plate.
- 拆下面板。
This setting should not take place against the emerging feed dog!
- 松开螺钉3。
–
Shift the block 2 in a way that a gap of 0.5 mm is available between
- 压脚往下压使其压住针板。
the block 2 and the draw angle 1.
–
此时要求送料牙不能露出针板。
Align the sewing foot so that the needle can stitch in the middle of
the slit of the sewing foot and fasten the screw 3 again.
- 移动压杆导架2,使压杆导架 2与压杆提升架3之间有0.5mm的
–
Fix the face cover again.
间隙。
- 校正压脚,以致针能在压脚槽的中间缝纫,然后重新拧紧螺钉 3.
4
- 重新装上面板。
12
Page 17

3.2 机械式抬压脚
3.2 Mechanical sewing foot lifting
3.2.1 抬压脚动作和抬压脚高度
3.2.1 Lifting motion and lifted sewing foot height
5
2
34
Caution: Risk of injury!
提醒:人身伤害的危险!
Turn off the main switch! Check and set the knee lever only with the
切断主开关!
sewing machine switched off.
只有在机器主电源切断时才能检查和调节膝提曲柄连杆
Standard checking
标准检查
With the sewing foot resting on the throat plate, before the lifting
压脚压住针板,在抬压脚运动开始前,在膝提连杆处能感到
movement begins a lost motion should be perceptible at the knee lever.
有一空行程。
The sewing foot lifting should be set so high in a way that the needle
压脚提升高度至在机器锁定位置3时使针尖5必须不能高出压
point 5 in arrested position (locking position 3) must not come above
the slit of the sewing foot 6.
脚6上的槽口面。
Correction lifter motion (low er position)
校正抬压脚动作( 下位)
–
Loosen the nut 3.
- 松开螺母3。
–
Adjust the screw 4.
- 调节螺钉4。
With the sewing foot resting on the throat plate, a lost motion
压脚压住针板,在抬压脚运动开始前,在膝提连杆处能感到
should be perceptible at the knee lever.
有一空行程。
–
Fasten the nut 3 again.
1
6
CN
-重新拧紧螺母3。
Correction lifted sewing foot height
校正抬压脚高度
–
Arrest the sewing machine at locking position “3".
- 将机器锁定在3号锁定位置。
–
Loosen the nut 1.
- 松开螺母1。
–
Adjust the lifting height through stop screw 2.
- 通过螺钉2来调整抬压脚高度。
–
Fasten the nut 1 again.
- 重新拧紧螺母1。
13
Page 18

3.3 Electromagnetic sewing foot lifting
3.3 电磁铁抬压脚
3.3.1 抬压脚电磁铁定位
3.3.1 Sewing foot lifter solenoid position
2
4
1
3
Caution: Risk of injury!
提醒:有人身伤害的危险!
Turn off the main switch!
切断主开关!
Check and set the sewing foot lifting only with the sewing machine
只有在机器主电源切断时才能检查和调节抬压脚。
switched off.
Standard checking
标准检查
When operated, the anchor 2 of the solenoid 1 must always reach its
操作时,电磁铁 1中的铁芯2总须到达内部的最终位置,因为在
internal final position, because its power consumption will be reduced
抬压脚抬起后,其能耗降到 30%。
to 30% after a sewing foot lifting.
压脚提升高度至在机器锁定位置3时使机针尖5必须不露出压脚
The sewing foot lifting should be set so high in a way that the needle
point 5 in arrested position (locking position 3) must not come above
6上的槽口平面。
the slit of the sewing foot 6.
校正
- 松开螺钉3。
Correction
- 通过孔4插入一把螺丝刀,使其插到抬压脚电磁铁支架座内。
–
Loosen screw 3.
- 通过向上或向下扳动螺丝刀来改变电磁铁的位置:
–
Introduce a screw driver through the hole 4 and put it in the bracket
● 螺丝刀的柄部向上扳= 抬牙脚行程变小
of the sewing foot lifting solenoid.
● 螺丝刀的柄部向下扳= 抬牙脚行程变大
–
Change the position of the solenoid by swivelling the screw driver
- 重新拧紧两颗螺钉3。
upwards or downwards:
® Swivel the screwdriver handle upwards = smaller stroke
® Swivel the screwdriver handle downwards = greater stroke
–
Fasten both screws 3 again.
14
5
6
Page 19

3.3.2 Mounting the sewing foot lifting solenoid
装抬
3.3.2 安
压脚电磁铁
3
2
10
1
654
–
Unscrew the handwheel 3, covering 2 and cover 1.
- 拧下手轮3、皮带防护罩2和后盖板1上的螺钉。
–
Unclamp the spring 4.
- 卸下弹簧4。
–
Loosen the screws 6 and remove the mounting flange 5.
- 松开螺钉6和拆下连接板5。
7
CN
11
6a
9
8
–
Screw the holder 10 to the solenoid 8 using the screws 9 provided.
- 用提供的螺钉9把支架10固定到电磁铁8上。
–
Fit the push rod 7 to the solenoid.
- 安装顶杆7到电磁铁上。
–
Screw the mounting flange 11 that has been removed to the holder
- 用其中一颗螺钉6把已经拆下的连接板11固定到支架10上。
10 using one of the screws 6.
10
15
Page 20

14 13 8 18 17 16 15
- 将机头向后翻倒。
–
Tilt the machine head backwards.
- 松开螺钉14
–
Loosen screw 14.
- 用安装辅助工具13,向上托起抬压脚电磁铁,使得顶杆 15
–
Using the mounting aid 13, push the pre-assembled sewing foot
插入上导向孔中。
lifting solenoid upwards in a way that the push rod 15 gets engaged
in the upper guide bore hole.
- 用螺钉14固定安装辅助工具13。
–
Fasten the mounting aid 13 with the screw 14.
- 拧出螺纹销17
–
Unscrew the threaded pin 17.
- 把所有的电线都拨向螺纹销17上轴位16的左边然后重新拧紧
–
Push all the cables to the left of the shaft 16 of the threaded pin 17
螺纹销。
and fasten the threaded pin again.
- 把抬压脚电磁铁的电线穿过孔18引到机器的后端。
–
Lead the cable of the sewing foot lifting solenoid to the rear side of
the machine through the drilled hole 18.
16
66a4
–
Tilt the sewing machine head to the front.
- 将机头向前翻正。
–
Screw the holder 10 to the housing using one of the screws 6.
- 用其中一颗螺钉6把支架10安装到机壳上。
–
Unscrew the screw 6a and screw it into the second mounting hole
- 松开螺钉6a然后将其拧到支架上第二个安装孔中。
of the holder.
- 松开螺钉14,拆下安装辅助工具 13后,重新拧上螺钉 14。
–
Loosen the screw 14, remove the mounting aid and fasten the
- 装上弹簧4。
screw 14 again.
–
Put in the spring 4.
Page 21

1-3
5
–
Connect the cable of the sewing foot lifting solenoid to the terminal
- 将抬压脚电磁铁上导线与终端接线盒相连接,一根导线接到
blocks, one wire to one of the terminal from 1 to 3 and the second
接线端子1-3中的其中一个,第二根接到接线端子 5。
one to the terminal 5.
- 如果有必要,可重新设置压脚高度(见章 3.3.1)
–
If necessary, set the sewing foot height anew (see chapter 3.3.1).
- 如果有必要,可使抬压脚电磁铁动作(见电控箱操作说明书)。
–
If necessary activate the sewing foot lifting solenoid (see operating
instructions for the control unit).
请注意!
拆下抬压脚电磁铁的步骤与其安装步骤相反。
Please note!
The removal of the sewing foot lifting solenoid is the reverse of the
mounting procedure.
3.3.3 Replacing the shock absorbing washer of the sewing foot lifter solenoid
3.3.3 更换抬压脚电磁铁上的缓冲垫圈
Caution: Risk of injury!
提醒:有人身伤害的危险!
Turn off the main switch!
切断主开关!
Proceed to the removal of the sewing foot lifting solenoid with the
只有在机器主电源切断时才能移走抬压脚电磁铁。
sewing machine switched off!
After years of intensive use, a dimensional change of the shock
经过几年高强度的使用,缓冲垫圈 5的尺寸可能会发生变化。
absorbing washer 5 may occur.
此时可以注意到当电磁铁动作时,压脚放下速度减慢或有
This is noticeable by the slower lowering of the sewing foot or an
6
5
冲击噪音。
impact noise when the solenoid is operated.
It may signify that before the foot has reached the material to be sewn
这可能意味着在压脚没完全压住缝料之前,缝纫机就已经开始
completely it has already started to sew (risk of skipped stitches at the
缝纫(这可能会引起缝纫开始阶段跳针)。
seam beginning).
- 拆下电磁铁1。
4
3
1
2
- 拆下卡圈6。
–
Remove the lifting solenoid 1.
- 拆下弹簧4和轴套5。
–
Remove the lock washer 6.
- 将铁芯2从电磁铁中拆下。
–
Remove spring 4 and bush 5.
- 更换缓冲垫圈3 (0271 001767)。
–
Remove the anchor 2 from its housing.
- 装上弹簧4和轴套5。
–
Replace the shock absorbing washer 3 (0271 001767).
- 重新装上锁紧卡圈6。
–
Put on spring 4 and bush 5.
- 重新安装电磁铁(见章 3.3.2)。
–
Fix the lock washer 6 again.
–
Mount the lifting solenoid again (see chapter 3.3.2).
CN
17
Page 22

3.4 压脚压力
3.4 Sewing foot pressure
1
标准检查
Standard checking
压力调节手轮1上的数字给出了压脚以牛为单位的压力
The figures on the setting wheel 1 gives the sewing foot pressure
in “N”.
( 1kp=大约10N)
(1kp = approx. 10N).
所要求的压脚压力大小取决于下列参数:
The required sewing foot pressure depends on the following
● 缝纫速度
parameters:
● 要缝制材料的阻尼特性
Sewing speed
● 面料的层数(要缝纫材料的层数)
·
缝纫时面料不能游动。
Damping characteristics of the material to be sewn
·
缝纫压脚的压力也不应该比需要的大,否则就会产
Number of plies (layers forming the material to be sewn)
·
生层移(起皱)。
The material that is to be sewn must not “swim”.
However, the sewing foot should not exert more pressure than
校正
necessary, otherwise a strong shifting of the ply occurs (ruffling).
- 通过转动手轮1可设置压脚压力。
增加压力= 顺时针转动
Correction
减少压力= 逆时针转动
–
Set the sewing foot pressure by turning the handwheel 1.
Increase the pressure = Turn it clockwise.
Decrease the pressure = Turn it counter-clockwise.
18
Page 23

4. Thread-guiding parts
件
能
4. 过线
4.1 夹线器松线功
4.1 Releasing the needle thread tension
3
1
2
Caution: Risk of injury!
提醒:有人身伤害的危险!
Turn off the main switch!
切断主开关!
Check and set the releasing of the needle thread tension only when
只有在机器主电源切断时才能检查和设置夹线器松线功能。
the machine is switched off.
标准检查
Standard checking
压下松线钉3打开夹线器,使两夹线板间距大 约1mm.
Pressing on the axle 3 opens the thread tensioner by approx. 1 mm.
合上夹线器且在夹线板间无线时,松线钉 3应该有约0.3毫米的
With the thread tensioner closed and with no thread between the
tension discs the axle 3 should have a clearance of approx. 0.3 mm.
间隙。
Correction
校正
–
Loosen the threaded pin 2.
- 松开紧定螺钉2。
–
Move the solenoid 1 axially.
- 轴向移动电磁铁1。
Check the following: distance approx. 1.0 mm / clearance 0.3 mm.
检查如下:大约 1.0毫米间距 / 0.3毫米间隙。
–
Fasten the threaded pin 2 again.
- 重新拧紧紧定螺钉2。
CN
19
Page 24

4.2 挑线
簧
标
查
4.2 Thread take-up spring
2
6
5
1
4
4
3
2
提醒:有人身伤害的危险!
Caution: Risk of injury!
切断主开关!
Turn off the main switch!
只有在机器主电源切断时才能检查和设置挑线簧。
Check and set the thread take-up spring only with the sewing
machine switched off.
Standard checking
准检
The thread take-up spring 2 should keep the needle thread under
挑线簧2应该至少保持线的张力直到针尖穿进缝料为止。
tension at least until the needle point has penetrated the material to be
sewn.
校正挑线簧张力
在拆下整个夹线器时,必须绝对保证不能丢失松线钉 6,以便
Correction spring tension
重新安装夹线器再将其装上。
When removing the complete thread tension unit, please make
- 松开紧定螺钉4。
absolutely sure not to lose the release pin 6 and to include it again
when mounting the thread tension unit.
- 拆下整个夹线器。
–
Loosen the threaded pin 4.
- 松开紧定螺钉3。
–
Unscrew the complete thread tension unit.
- 转动夹线螺钉1可调整挑线簧张力。
–
Loosen the threaded pin 3.
挑线簧张力大小取决于所要缝的面料和所用的缝线,其值范围
–
Adjust the tension strength by turning the tension bolt 1.
20~50cN( 1cN=1g)
The tension of the thread take-up spring depends on the material
- 拧紧紧定螺钉3。
being sewn and the thread used. The value should be between 20
- 重新装入含松线钉6的夹线器。
and 50 cN (1 cN = 1 g).
–
Fasten the threaded pin 3.
校正挑线簧行程
–
Insert again the complete thread tension unit including the release
pin 6.
- 松开紧定螺钉4。
- 旋转套5。
Correction spring travel
挑线簧2应该至少保持线的张力直到针尖穿进缝料为止。
–
Loosen the threaded pin 4.
推荐弹簧行程: 6.5毫米
–
Twist the bush 5.
- 重新拧紧紧定螺钉4。
The spring 1 must should keep the needle thread under tension at
least until the needle point has penetrated the material to be sewn.
Recommended spring travel: 6.5 mm.
–
Fasten the threaded pin 4 again.
20
Page 25

4.3 Thread regulator
标
4.3 面线线量调节器
1
2
3
Caution: Risk of injury!
提醒:有人身伤害的危险!
Turn off the main switch!
切断主开关!
Check and set the thread regulator only when the machine is switched
只有在机器主电源切断时才能检查和设置面线线量调节器。
off.
Standard checking
准检验
The setting of the thread regulator 2 depends on:
线量调节器2的调节取决于:
缝料的厚度
Material thickness
·
线规格
Thread size
·
针距
Stitch length.
对线量调节器进行设置,使面线按导向绕过旋梭并处于受
·
控状态。
It has to be set that the thread is guided around the hook and kept
under control.
在“0”号位置,最大面线供应量要满足特大针距和粗缝线
In the position “0” occurs the highest thread output as needed with
的需要。
particularly large stitch lengths and thick sewing threads.
线量调节器出厂时设置在位置2和3之间。
The thread regulator is set ex factory between position “2" “ and “3”
- 放入布
–
Insert a fabric.
- 穿好针线和底线。
–
Thread the needle and hook thread.
- 向后翻倒机头。
–
Tilt the machine head backwards.
- 慢慢转动手轮,检查面线绕过旋梭的松紧程度。
–
Turn the handwheel slowly and check how tight the thread is
如果线量调节器设置正确,线环会平滑地绕过旋梭(没有
guided around the hook.
If the thread regulator is set correctly the thread looping will run
多余面线),绕过旋梭最大直径处不发生跳动。
smoothly (without surplus), without jumping over the largest hook
在此过程中挑线簧最多移动0.5mm。
diameter.
In the process the thread take-up spring moved at most 0.5 mm.
校正
- 松开螺钉1。
Correction
- 移动线量调节器2。
–
Loosen screw 1.
往左移动= 线量多
–
Shift the thread regulator 2.
Thread regulator to the left = more thread.
往右移动= 线量少
Thread regulator to the right = less thread.
- 拧紧螺钉1。
–
Fasten screw 1.
CN
21
Page 26

5. Needle bar height
标
查
5. 针杆高度
1
4
2
3
Caution: Risk of injury!
提醒:有人身伤害的危险!
Turn off the main switch!
切断主开关!
Check and set the needle bar height only with the sewing machine
只有在机器主电源切断时才能检查和设置压杆高度。
switched off.
注意:防止损坏!
ATTENTION RISK OF BREAKAGE!
在281机型针杆上不允许固定调节块,否则会损坏针杆表面。
It is not permitted to fix an adjusting block on the needle bar of
the class 281. Doing so may damage the surface of the needle bar.
Standard checking
准检
There are two types of needle bar for the class 281:
281机型有两种针杆:
● 针柄直径1.62mm, 机针规格: DBx1
Needle shank diameter 1.62 mm, needle system DB x1
·
● 针柄直径2.0mm, 机针规格: 134
Needle shank diameter 2.0 mm, needle system 134
·
如果设置针杆高度时没有安装量具,则需使用下面的参考值:
Should a setting of the needle bar height occur without using the
旋梭尖(下边)和针眼(上边)之间的距离应该 为0.8mm。
gauge, use the following reference value: 0.8 mm distance between
the hook point (lower edge) and the needle eye (upper edge).
校正
- 拆下针板和压脚。
Correction
- 把量具4放在针板槽平面上。
–
Remove the throat plate and the sewing foot.
- 用量具3代替机针插到针杆内到底,然后拧紧支针螺钉。
–
Place the gauge 4 on the surface of the throat plate.
量具0281 801819适用于针柄直径1.62mm的针杆高度调整。
–
Fit the gauge 3 as far as it will go into the needle bar instead of a
needle and fix it by tightening the fastening screw.
量具0281 800300适应于针柄直径2.00mm的针杆高度调整。
Gauge 0281 801819 Needle bar height for
- 将机器锁定在锁定位置“6”。
Gauge 0281 800300 Needle bar height for
- 松开螺钉1。
–
Arrest the sewing machine at locking position “6".
- 往下拉下针杆2。
–
Loosen the screw 1.
量具3的底面须触到量具4,不得有间隙。
–
Push the needle bar 2 downwards.
- 重新拧紧螺钉1。
The foot of the gauge 3 must rest on the gauge 4 without a gap.
注意!
–
Fasten the screw 1 again.
支针螺钉必须指向右边(从操作者的角度看)。
ATTENTION !
The screw retaining the needle must point to the right (seen from
- 重新装上针板和压脚。
the operator’s side).
–
Fix the throat plate and the sewing foot again.
needle diameter 1.62 mm
needle diameter 2.00 mm
22
Page 27

6. 装旋梭
6. Hook setting
6.1 形成线环所需的机针行程、旋梭尖与机针间间隙
6.1 Looping stroke and distance between the hook point and needle
2
3
2
3
1
Caution: Risk of injury!
提醒:有人身伤害的危险!
Turn off the main switch!
切断主开关!
Check and set the looping stroke and the distance between the hook
只有在机器主电源切断时才能检查和调整形成线环所需的机针
point and needle only with the sewing machine switched off.
行程、旋梭尖与机针间间隙。
Standard checking
The loop stroke is the distance covered by the needle bar from the
bottom dead center up to the point where the hook tip 2 coincides with
标准检查
the middle of the needle
形成线环所需的机针行程是指针杆从最低点回升到旋梭尖 2和
(line A-A).
机针中心线( 线A-A)重合时所走过的行程。
The looping stroke amounts to 1.8 mm.
形成线环所需的机针行程大约为1.8毫米。
With the sewing machine arrested at locking position “1", the hook
point 2 should be at the center of the needle.
将机器锁定在锁定位置“1”,旋梭尖 2应该在机针的中心线上。
The lateral distance between the hook point 2 and the needle scarf 3
在旋梭尖2和机针缺口平面3之间的侧面间隙应该在0.05到0.1
should amount between 0.05 to 0.1 mm.
毫米之间。
1
Correction
校正
–
Remove the sewing foot, the throat plate and the feed dog.
- 拆下压脚、 针板和送料牙。
–
Insert a new needle.
- 换上一根新机针。
–
Arrest the sewing machine at locking position “1".
- 将机器锁定在锁定位置“1”。
–
Loosen the fastening screw 1 of the hook.
- 松开旋梭紧定螺钉1。
–
The distance between the hook point 2 and the needle scarf 2
- 旋梭尖2和针缺口平面2间的间隙应调节到0.05与0.1毫米之间。
should amount between 0.05 to 0.1 mm.
- 重新拧紧旋梭紧定螺钉1。
–
Fasten the fastening screw 1 of the hook again.
- 重新装上压脚、针板和送料牙。
–
Fix the sewing foot, the throat plate and the feed dog again.
CN
23
Page 28

6.2 旋梭定位钩
6.2 Bobbin case support
23
1
2
4
3
提醒:有人身伤害的危险!
Caution: Risk of injury!
切断主开关!
Turn off the main switch!
只有在机器主电源切断时才能检查和调整旋梭定位钩。
Check and set the bobbin case support only with the sewing machine
switched off.
Standard checking
标准检查
The bobbin case support is factory set.
旋梭定位钩出厂时已调整好。
After a replacement of the support, the new support may eventually
如果更换新的旋梭定位钩,最后需要对其进行重新调整。
need to be adjusted.
ATTENTION RISK OF BREAKAGE!
注意有断的风险
The adjustment can only be carried out within the hatched area 4.
只允许对阴影区域内进行调整(见草图)。
(see sketch)
因为在定位钩止扣区1硬度很高,在那儿折弯存在断的风险。
Due to the extreme hardness within the area of the retaining tab 1, a
risk of breakage is there.
校正
Correction
- 拆下旋梭定位钩1。
–
Remove the bobbin case support 1.
- 校直旋梭定位钩1。
–
Align the bobbin case support 1.
The distance between the retaining tab 2 of the bobbin case
旋梭定位钩上止扣头2和梭芯套座3上凹口下平面的距离
support and the lower part of the bobbin case 3 should be 0.6 mm.
应为0.6毫米。
–
Mount the bobbin case support 1.
- 安装固定旋梭定位钩1。
24
Page 29

7. 剪线机构
7. Thread trimmer
The control cam 3 determines the stroke and the timing of the knife
控制凸轮3控制动刀行程及其动作的同步性,由此要求动刀的
motion. The timing thus coincides with the motion of the needle.
动作要与机针的动作相匹配,剪线机构由电磁铁自动控制。
The thread trimmer is switched on electromagnetically.
7.1 动刀动作控制凸轮
7.1 Control cam for the knife motion
7.1.1 控制凸轮定位
7.1.1 Control cam position
2
3
4
321
提醒:有人身伤害的危险!
Caution: Risk of injury!
切断主开关!
Turn off the main switch!
只有在机器主电源切断时才能检查和调整控制凸轮。
Check and set the control cam only with the sewing machine
switched off.
Standard checking
标准检查
With the sewing machine arrested at locking position “4", the roller 1
must engage in the indentation 4 of the control cam 3 when manually
将机器锁定在锁定位置“4”,手动按下滚柱 1,滚柱 1必须进入控
pressed downwards.
制凸轮3的缺口4内。
Correction
校正
–
Arrest the sewing machine at locking position “4".
- 将机器锁定在锁定位置“4”。
–
Loosen the fastening screws 2 of the control cam 3.
- 松开控制凸轮上的紧定螺钉2。
–
Turn the control cam of the lower shaft.
- 转动下轴上的控制凸轮。
The roller 1 must engage in the indentation 4 of the control cam 3
when manually pressed downwards.
手动按下滚柱1,滚柱 1必须进入控制凸轮3的缺口4内。
–
Tighten the fastening screws 2 again.
- 重新拧紧紧定螺钉2。
1
CN
25
Page 30

7.1.2 滚柱和剪线凸轮间间隙
标
查
7.1.2 Distance between the roller and thread trimmer cam
2
3
7
5761
Caution: Risk of injury!
提醒:有人身伤害的危险!
Turn off the main switch.
切断主开关!
Check and set the control cam only with the sewing machine
只有在机器主电源切断时才能检查和调整控制凸轮。
switched off.
Standard checking
准检
At the external end position of the thread trimmer lever 5 there should
当剪线连杆5在外端位置时,控制凸轮 3的外径与滚柱1之间的间
be a distance of 0,2 + 0,1 mm between the external diameter of the
隙应为0.2+0.1毫米。
control cam 3 and the roller 1.
It must be checked in a position of the cam between both fastening
必须在控制凸轮两个紧定螺钉2之间的某一位置检查上述间隙。
screws 2.
Correction
校正
–
Turn the handwheel until the roller 1 stands between both screws 2
- 转动手轮直到滚柱1位于剪线控制凸轮的两个紧定螺钉2之间。
of the thread trimmer control cam.
- 松开紧定螺钉6。
–
Loosen the fastening screw 6.
- 围绕轴7转动剪线连杆5使滚柱1与控制凸轮3的外径间的间隙
–
Turn the lever 5 on the shaft 7 so that the roller 1 has a distance of
为 0.2+0.1mm。
0,2 + 0,1 mm to the external diameter of the control cam 3.
- 拧紧紧定螺钉6。
–
Tighten the fastening screw 6.
6
1
5
26
请注意:
Please note:
如果此处间隙太大, 可能会有如下风险:
The following risks may be encountered if a greater clearance is set
here:
● 线捕捉不到
● 线剪不断
The thread cannot be caught
·
The thread cannot be cut
·
Page 31

7.2 装动刀
7.2 Hooked knife
4
1
2
3
提醒:有人身伤害的危险!
Caution: Risk of injury!
切断主开关!
Turn off the main switch.
只有在机器主电源切断时才能检查和调整动刀。
Check and set the hooked knife only with the sewing machine
switched off.
5
Standard checking
标准检查
The hooked knife 2 must lie against both screws 1 in the direction of
动刀2必须按箭头方向靠紧两颗螺钉1,
the arrow.
这样通过动刀刀尖的剪线才能得到保证。
Hereby the cut through the tip of the hooked knife is ensured.
同时,动刀刀尖在轴向定位正确。
At the same time, the tip of the hooked knife has the correct position in
过动刀刀尖的虚拟线位于机针中心和旋梭尖之间的中间。
the axial direction.
A virtual line lengthening the hooked knife point will then be in the
center between the needle center and the hook tip.
校正
- 通过调节紧定螺钉5来调节动刀和定刀之间的压力。
Correction
- 手动转动动刀2。
–
Unwind the clamping pressure of the fixed knife against the hooked
- 松开动刀上的夹紧螺钉1。
knife through loosening the set screws 5.
- 移动动刀2使其按箭头方向靠紧螺钉1。
–
Manually swivel in the hooked knife 2.
- 重新拧紧螺钉1。
–
Loosen the fastening screws 1 of the hooked knife.
- 检查动刀应偏心升高。
–
Shift the hooked knife 2 against the fastening screws 1 in the
- 调整定刀(见章 7.3)。
direction of the arrow.
–
Tighten the fastening screws 1 again.
–
Check the eccentrically rising of the hooked knife.
–
Set the counter knife (see chapter 7.3).
CN
27
Page 32

7.3 Setting the cutting pressure
7.3 调整剪线压力
321
提醒:有人身伤害的危险!
Caution: Risk of injury!
切断主开关!
Turn off the main switch.
只有在机器主电源切断时才能检查和调整剪线压力。
Check and set the cutting pressure only with the sewing machine
switched off.
1
4
在旋梭区域执行相关调整任务时,两把剪线刀最好都保留在机器
When performing setting tasks within the hook area, both knives
should preferably remain in the machine. Thus avoiding unnecessary
上,这样可避免不必要的调整工作。
adjustment work.
标准检查
必须能在最低的剪线压力下可靠地剪断缝线,剪线压力越低,
Standard checking
剪刀磨损越小!
The threads must reliably be cut with the lowest pressure possible.
要求两根最粗的缝线也能同时可靠地被剪断。
Low cutting pressure reduces the wear!
Two of the thickest threads to be sewn must reliably be cut
校正
simultaneously.
- 拧松剪线压力调节螺钉1。
- 向前转动动刀3。
Correction
- 通过调节剪线压力调节螺钉1使定刀2正好碰到动刀3。
–
Turn back the cutting pressure screws 1.
- 交替把线放在左边或者右边检查剪线性能。
–
Swivel forwards the hooked knife 3.
- 调整剪线螺钉到适宜位置。
–
Set the fixed knife 2 against the hooked knife 3 by screwing in the
cutting pressure screws 1.
- 如果复位簧4不再使剪线机构回到初始位置,则剪线压力太大,
–
Alternately lay the thread to be cut to the right and to the left.
需要重新更换一把新定刀。
–
Adjust appropriate cutting pressure screw.
–
If the return spring 4 does no longer bring the cutting mechanism to
请注意!
its starting position, then the cutting pressure is too high!
允许对定刀作微量重磨!但如果定刀磨得太短,就 不能再剪线了,
The fixed knife must be replaced against a new one.
这时对动刀重新调整也补偿不了。
Please note!
A regrinding of the fixed knife is allowed to a minor degree!
If the knife loses a lot of its length, it can no longer cut.
A new setting of the hooked knife cannot compensate it.
28
Page 33

8. 绕线器的调整
松
8. Setting the bobbin winder
8.1 关绕线器
8.1 Switching off the bobbin winder
2
1
3
4
+
+
-
提醒:有人身伤害的危险!
Caution: Risk of injury!
切断主开关!
Turnthemainswitchoff!
只有在机器主电源切断时才能检查和调整绕线器。
Check and set the bobbin winder only with the sewing machine
switched off.
CN
Standard checking
标准检查
The bobbin winder should stop automatically, when the bobbin is filled
梭芯上的线量绕到离梭芯外径边缘0.5mm处,绕线器应该自动
up to approx. 0.5 mm below the edge of the bobbin.
开停止。
Correction
校正
1. Minor changes of the bobbin wind-on quantity
1. 对绕线器绕线量的微量调节
–
Bend the thread guide tab 3.
- 弯满线跳板3可微量调节绕线量。
2. Major changes of the bobbin wind-on quantity
2. 对绕线器绕线量的大调节
–
Loosen the screw 2.
- 松开螺钉2。
–
Adjust the thread guide tab 3.
- 调节满线跳板3,
In the direction of the arrow - :
向箭头-方向调:线量减少
less quantity
向箭头+方向调:线量增加
In the direction of the arrow + :
more quantity
- 重新拧紧螺钉2。
–
Fasten the screw 2 again.
After a removal of the release lever 4, a pre-setting at the clamping
拆下满线跳板4后,对夹紧螺钉 1必须先作预设置。
screw 1 must be done first.
注意防止损坏!
ATTENTION RISK OF BREAKAGE!
不缝纫时绕线,要用手动抬压脚扳手抬起压脚,并从旋梭中
Lift the sewing foot with the hand lever and remove the bobbin case
from the hook when winding without sewing.
拆下梭芯套。
29
Page 34

8.2 梭芯绕线形式
标
查
标
查
8.2 Winding form of the bobbin
4
1
3
2
提醒:有人身伤害的危险!
Caution: Risk of injury!
切断主开关!
Turnthemainswitchoff!
只有在机器主电源切断时才能检查和调整绕线器。
Check and set the bobbin winder only with the sewing machine
switched off.
8.3 绕线张力
8.3 Winding tightness
准检
Standard checking
绕线形式取决于两个夹线导套之间夹缝3所在位置, 在梭芯的整个
The winding form depends on the position of the gap 3 between both
thread guide sleeves. It should be cylindrical in order to evenly fill the
宽度上均匀地绕线使其形成柱状。
bobbin to its whole width.
In the case a the gap is set too low.
● 情况a:夹缝 3位置太低
·
● 情况c:夹缝 3位置太高
In the case c the gap is set too high.
·
校正
Correction
- 松开滚花螺母2
–
Loosen the knurled nut 2.
- 用一把螺丝刀转动导向销1使之轴向移动,确保不改变调节
–
Shift the guide bolt 1 axially through turning it with a screw driver.
旋钮 4的位置。
Make sure not to alter the position of the adjusting knob 4.
- 重新锁紧螺母2。
–
Tighten the knurled nut 2 again.
Standard checking
准检
A minimum pretension of the bobbin thread is required in order to get a
为了获得正常的绕线效果(对梭芯正确绕线),要求梭芯线有一
regular winding result (accurate winding on the bobbin).
最小的预紧力。该预紧力大小取决于线的光滑程度和粗细,绕线太
This depends on the sliding qualities and the thickness of the thread.
紧极易使缝纫时起皱。
A too strong tightness of the winding is favourable to the formation of
ruffs.
校正
Correction
- 顺时针转动调节旋钮4 = 增加预紧力
–
Turn the adjusting knob 4 clockwise = increase the pretension
- 逆时针转动调节旋钮4 = 减少预紧力
–
Turn the adjusting knob 4 counter-clockwise = decrease the
pretension
30
Page 35

9. ( 齿轮箱)加油
9. Filling up oil (gear box)
提醒: 有人身伤害危险!
油会引起皮肤过敏。
避免长时间接触皮肤。
一旦接触皮肤,用水充分冲洗接触部位。
1
2
Caution: Risk of injury!
Oil can cause skin eruptions.
Avoid protracted contact with the skin.
In event of contact, thoroughly wash the affected area.
注意!
ATTENTION !
处理和使用润滑油要依据法律法规。
The handling and disposal of mineral oils is subject to legal regulation.
要将废弃的润滑油送到指定回收点。
Deliver used oil to an authorised collection point.
保护环境。
Protect your environment.
注意不要将润滑油溢出。
Take care not to spill oil.
规则
Rule
将机器往后翻倒,检查油位。
Check the oil level with the machine tilted to the back.
将机头翻倒放在机头支撑上,要求底板平面与台板垂直。
The machine head rest on the machine head support and the surface
机器在使用寿命内,要有意检查是否需加油。
of the base plate is vertical to the table top.
交货时油位在油位观察窗1的中位。
The filling up check is intended for lifetime.
Upon delivery the oil level is in the middle of the monitor window 1.
(齿轮箱)加油
- 将机头向后翻倒。
Filling up oil (gear box)
- 拧下带密封圈的加油螺钉2。
–
Tilt the machine backwards.
- 将DA32油注入齿轮箱至油位观察窗1的中线位置。
–
Unscrew the plug screw 2 with its seal ring.
为了方便加油,请用一根软管接到油壶嘴上。
–
Fill up with DA 32 oil up to the middle of the monitor window 1.
For this purpose use a hose connected to a oil can nozzle.
所用润滑油的等级
专用的润滑油DA32/耐光照和抗老化/高磨损保护
Oil grade being used
粘度/40℃: 32mm2/s - ISO VG32
Special lubricating oil DA 32 / resistant to light and ageing resistant /
该润滑油可从杜克普爱华公司购得,
high wear protection
零件号为 9401 000032,一壶0.9升。
Viscosity / 40°C: 32 mm²/s - ISO VG32
The oil can be obtained from Dürkopp Adler under the part number
9047 000032 in a 0.9l container.
CN
31
Page 36

说
10. 旋梭润滑
注意不要将润滑油溢出
10. Hook lubrication
2
(only subclasses with oil lubricated hook)
( 只适用于旋梭微油润滑分机型产品)
1
提醒: 有人身伤害危险!
Caution: Risk of injury!
油会引起皮肤过敏。
Oil can cause skin eruptions.
避免长时间接触皮肤。
Avoid protracted contact with the skin.
In event of contact, thoroughly wash the affected area.
一旦接触皮肤,用水充分冲洗接触部位。
ATTENTION !
注意!
The handling and disposal of mineral oils is subject to legal regulation.
处理和使用润滑油要依据法律法规。
Deliver used oil to an authorised collection point.
要将废弃的润滑油送到指定回收点。
Protect your environment.
保护环境。
Take care not to spill oil.
保护你的环境。 注意不要将润滑油溢出。
Maintenance work Explanation Operating
要做的保养工作
to be carried out hours
Lubrication of
旋梭的润滑
the hook
明
The oil level shall not fall below the MIN level of the oil
油位不能低于油箱1的MIN线(最低油位)。
reservoir 1.
通过加油孔2加入DA10润滑油达到油箱刻度线Max位
置。
Fill up the DA 10 oil through the bore hole 2 up to the
marking line “Max”.
Oil grade being used
所用润滑油的等级
Special lubricating oil DA 10 / colourless / resistant to light and ageing
专用润滑油DA10/耐光照和抗老化/高磨损保护
resistant / high wear and corrosion protection
粘度/40℃:10mm2/s - ISO VG10
Viscosity / 40°C: 10 mm²/s - ISO VG10
该油可从杜克普爱华公司购得,零件号如下:
The oil can be obtained from Dürkopp Adler with the following parts
● 1升油壶: 9047 000012
numbers:
。
操作小时数
8
● 5升油壶 :9047 000014
1 litre container 9047 000012
·
请注意!
5 litre container 9047 000014
·
如果机器配置无油旋梭(机型281-140442),就不必加油。
Please note !
In the machine equipped with an oil-free hook (subclass 281-140442)
no oil filling up is necessary.
32
Page 37

10.1 旋梭油量调节
10.1 Setting the oil quantity for the hook
1
The hook lubrication is insured by the oil wick inside a silicone rubber
旋梭润滑是由硅软管中的油线将油从旋梭润滑油油箱引到旋梭后
hose, going from the hook oil reservoir to the spray cone on the back of
面的锥形零件飞溅到旋梭而实现。
the hook.
该油量可以通过调节螺钉1来调小,调节螺钉通过压住软管,象
The oil quantity can be reduced through the adjustment screw 1.
节流阀一样调节旋梭供油量。
By pressing the hose, the adjustment screw throttles the oil quantity for
the hook.
1
规则
Rule
拿一张纸代替针板,将其放在针板槽处,使机器以最大速度运行
Put a piece of paper instead of the throat plate above the throat plate
15秒钟,应该有微量油溅在该纸上。
cutout, and sew with the machine with the maximum speed for 15 sec.
The paper should have a fine oil sprayed on it.
校正
— 拆下针板。
Correction
— 拆下送料牙。
–
Remove the throat plate.
— 取出梭芯套。
–
Remove the feed dog.
— 转动调节螺钉1
–
Take out the bobbin case.
按顺时针方向= 油量调小
–
Turn the adjustment screw 1.
按逆时针方向= 油量调大
Clockwise = less oil for the hook
— 再把针板、送料牙和梭芯套装好。
Counter-clockwise = more oil for the hook
–
Fix the throat plate, the feed dog and the bobbin case again.
请注意:
转动调节螺钉后油量减少不会立即发生,这是因为还有剩余
Please note:
的油在调节节流阀和旋梭间的油线中,首先需要将其用完为止。
The reduction of the desired oil flow-rate does not happen instantly
after the turning of the adjustment screw, this is because the residual
调整后运行了几个小时,才有意义进行油量验证。
oil in the wick between the throttle and the hook needs to be used up
first.
A verification makes only sense if carried out a couple of hours later.
CN
33
Page 38

11. 维护保养
11. Maintenance
提醒:有人身伤害的危险!
Caution: Risk of injury!
切断主开关!
Turnthemainswitchoff!
只有在机器主电源切断时才能对机器进行维护保养。
The maintenance of the sewing machine must only be done when the
machine is switched off.
The daily or weekly maintenance work (cleaning and oiling) to be
carried out by the operators of the sewing machine is described in the
在操作说明书(第一部分)中描述的由操作工进行每天或每周的
operating instructions (part 1). It is only listed in the following table for
维护保养工作(清洁和加油)。为了完整起见,也将其列在下表
the sake of completeness.
中。
Maintenance work to be carried out Operating hours
8 40 160 500
Sewing machine head
- Remove dust in the area under the throat plate .................... X
- Removedust frombetweenthe feeddog elements................. X
(remove the throat plate)
- Remove dust in the area under the bobbin brake spring............. X
- Check oillevel.................................................. X
- Check oil level in oil reservoir for the hook lubrication .............. X
- Check hook lubrication .......................................... X
- Check toothedbelt.............................................. X
Sewing motor
- Cleanthemotoraeratorfilter .................................... X
34
Page 39

法
匀
电源开关
三相电源接
有几台控制箱时,要求各相电分配均
缝纫灯
缝纫机头
接线图
选购设备
Page 40

Page 41

法
匀
电源开关
三相电源接
有几台控制箱时,要求各相电分配均
缝纫机头
接线图
选购设备
 Loading...