

Duel Systems DuelAdapter, DL-0002 Installation Manual


Installation Guide
English
Compatible With
- Windows Vista (New!)
- Windows XP
- Mac OS X
Bridging PCMCIA to ExpressCard
Designed to connect the latest generation of notebook computers with existing PCMCIA cards
DuelAdapter Install Guide 2
Duel Adapter Install Guide 3
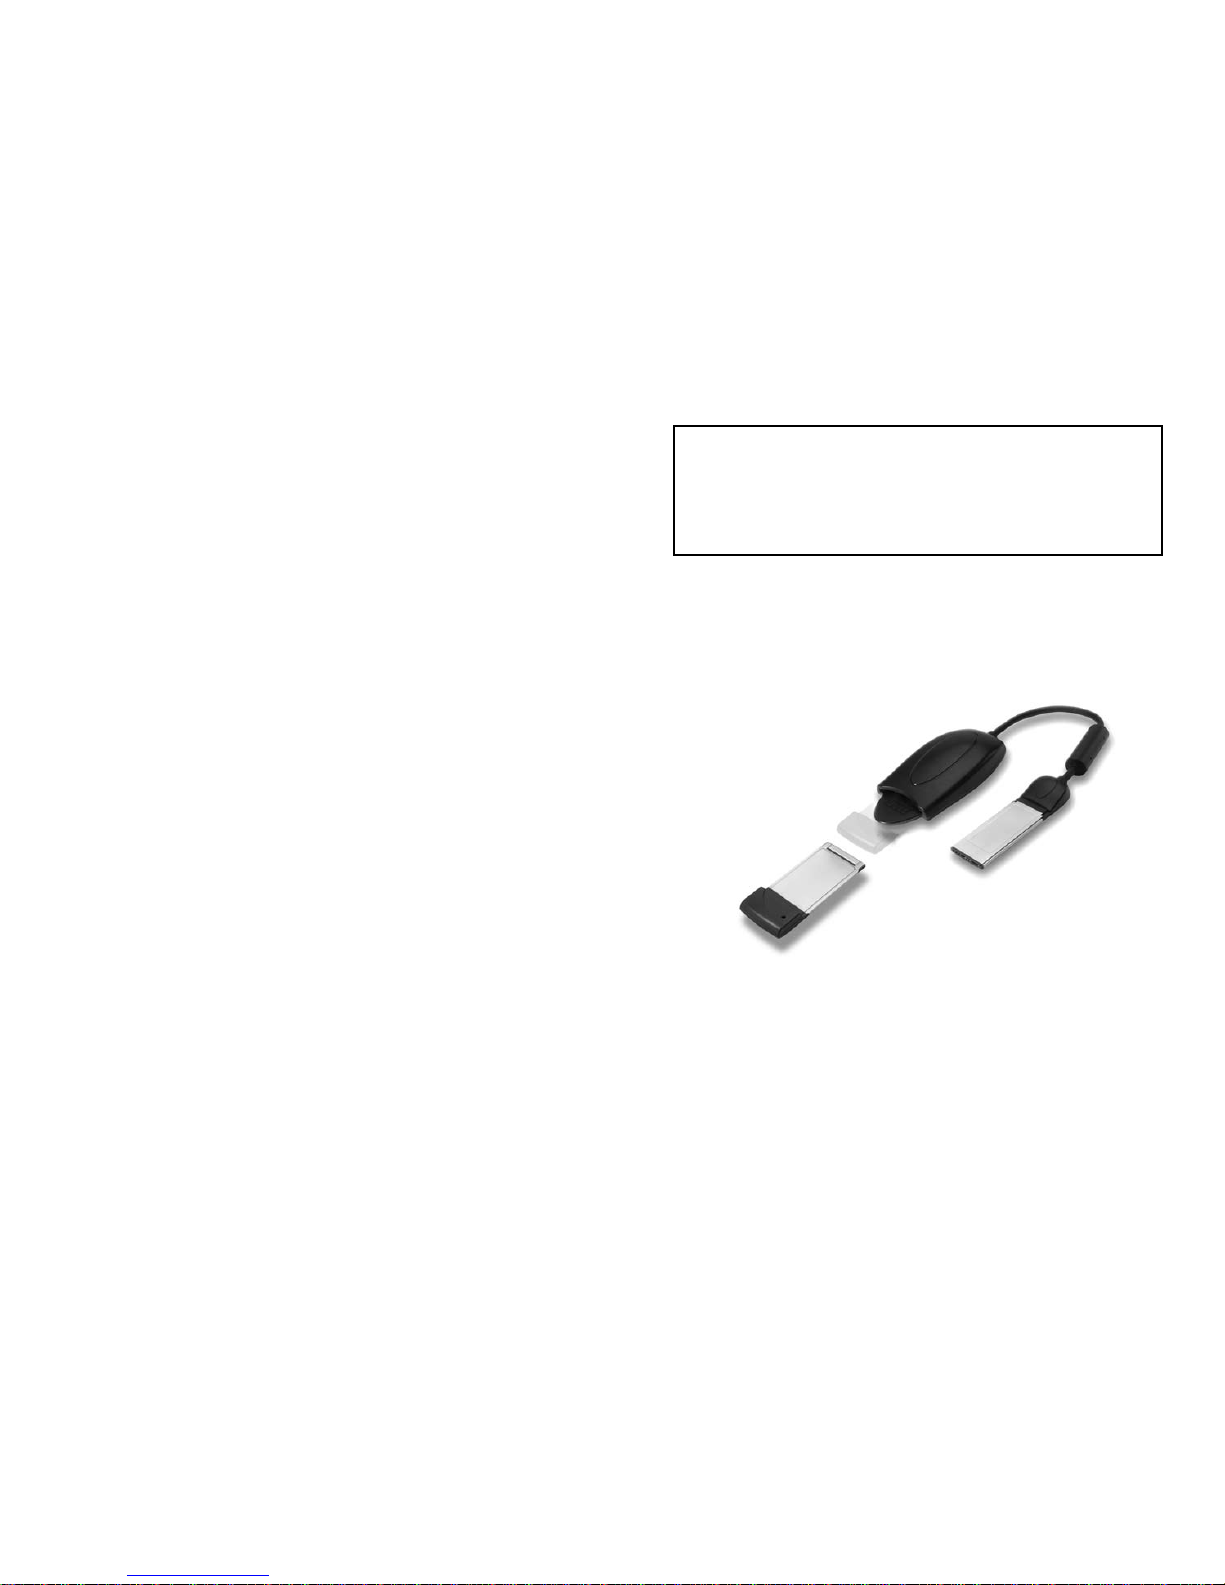
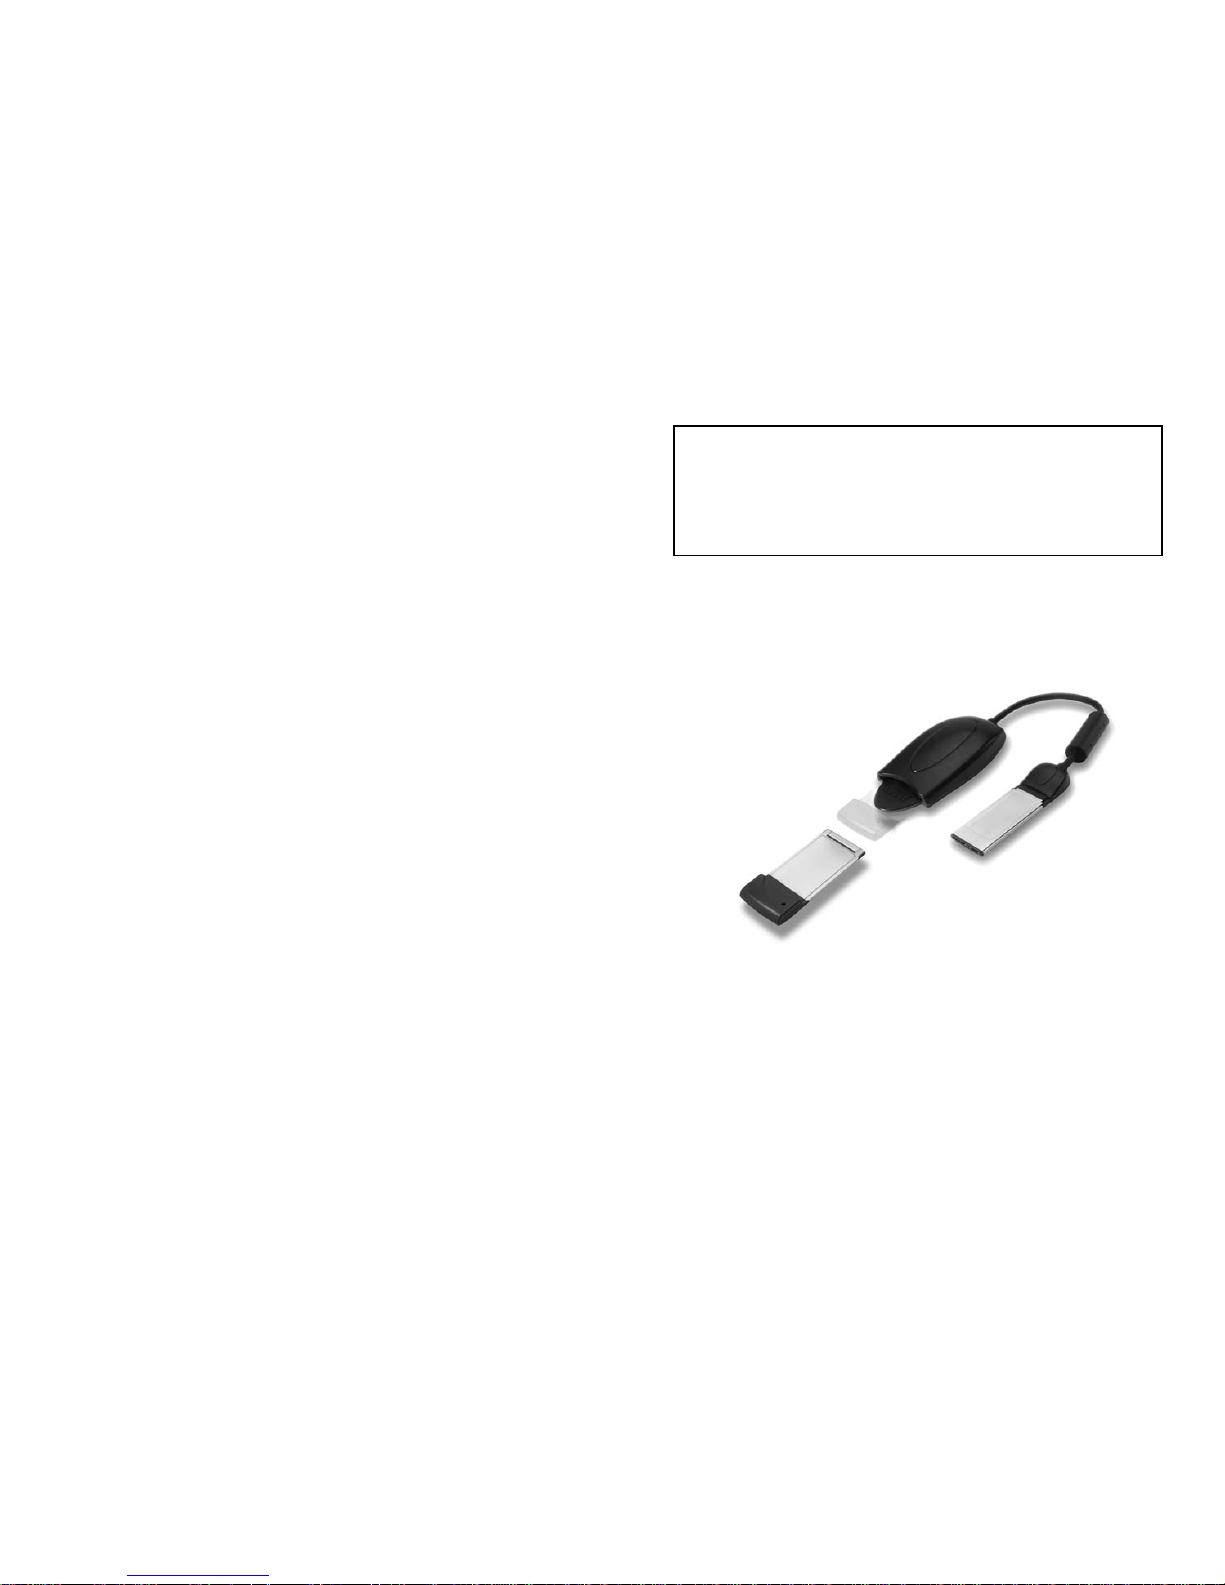
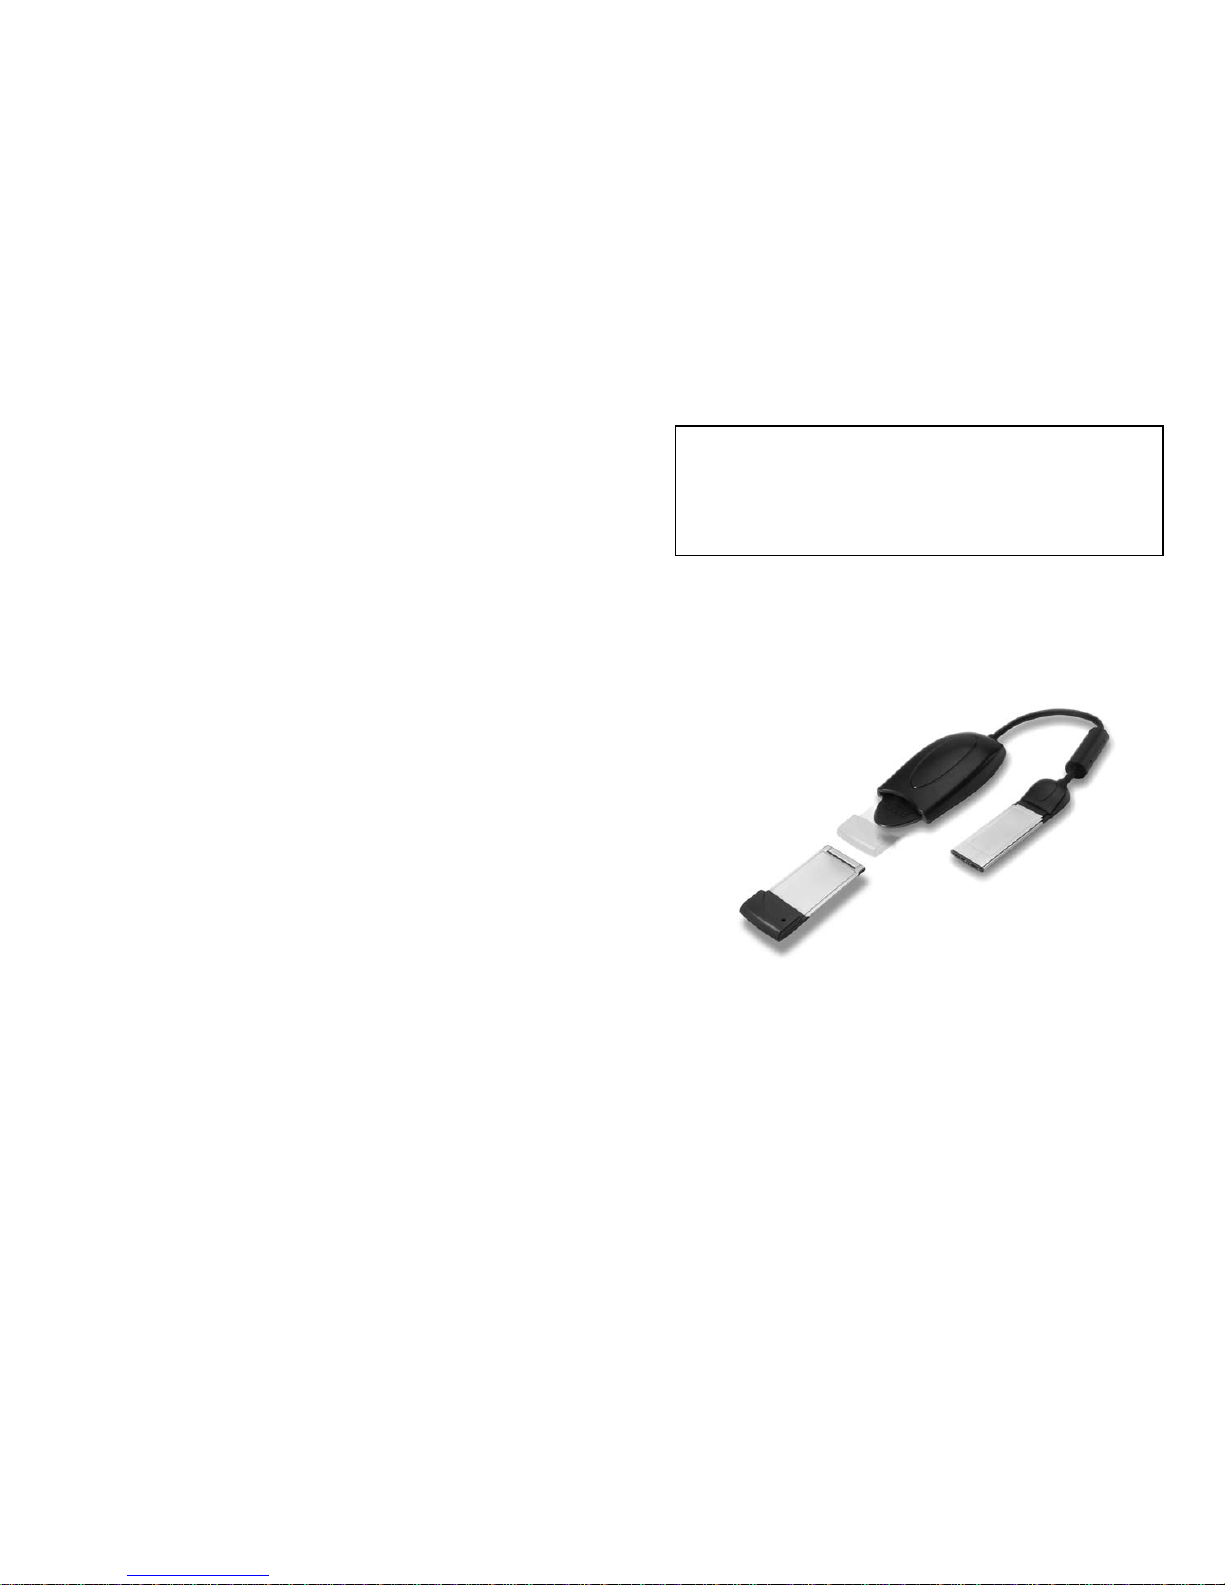
DuelAdapter Components
1. PCMCIA interface
2. Cable
3. ExpressCard interface to computer
4. PCMCIA card (not included)
1
2
4
Installing the Windows XP or Vista Driver
The following steps describe how to install the DuelAdapter driver software.
Note: Do not insert the adapter until software installation is complete.
3
IMPORTANT NOTE:
For the latest software drivers check our website
[http://www.duel-systemsadapters.com/] under the “Product
Support” section.
Overview
This guide will walk you through the DuelAdapter™ driver software
installation and set up for the Windows XP, Vista and Mac OS X operating systems.
Contents
Overview 3
Windows XP and Vista Driver Install 3
Using the DuelAdapter on Windows XP and Vista 6
Uninstalling on Windows XP and Vista 8
Mac OS X Driver Install 8
Using the DuelAdapter on Mac OS X 11
Uninstalling on Mac OS X 12
Troubleshooting 13
©2007 Duel Systems. All rights reserved.
Information in this document is subject to change without notice.
Duel is a registered trademark and DuelAdapter is a trademark of Duel Systems. Windows is a
registered trademark of Microsoft Corporation in the United States and other countries. Mac is a
trademark of Apple Computer, Inc, registered in the U.S. and other countries. All other registered and
unregistered trademarks are the property of their respective owners.
DL-0002

DuelAdapter Install Guide 4
Duel Adapter Install Guide 5
Step 3
Specify a folder in which to install the driver or accept the default location. Click
Next to proceed. Then click Next again to finish the installation.
Step 4
When installation is complete, you’ll be prompted to click Close. You may now
use your DuelAdapter. The next section will help you get started.
Step 1
Insert the DuelAdapter CD-ROM into your computer’s CD-ROM drive. The
installer will launch automatically. Click Next on the Welcome dialog to
begin installation
Step 2
You’ll be prompted to accept the License Agreement. If you agree with the
terms click I Agree and then click Next to proceed.
DuelAdapter Install Guide 6
Duel Adapter Install Guide 7
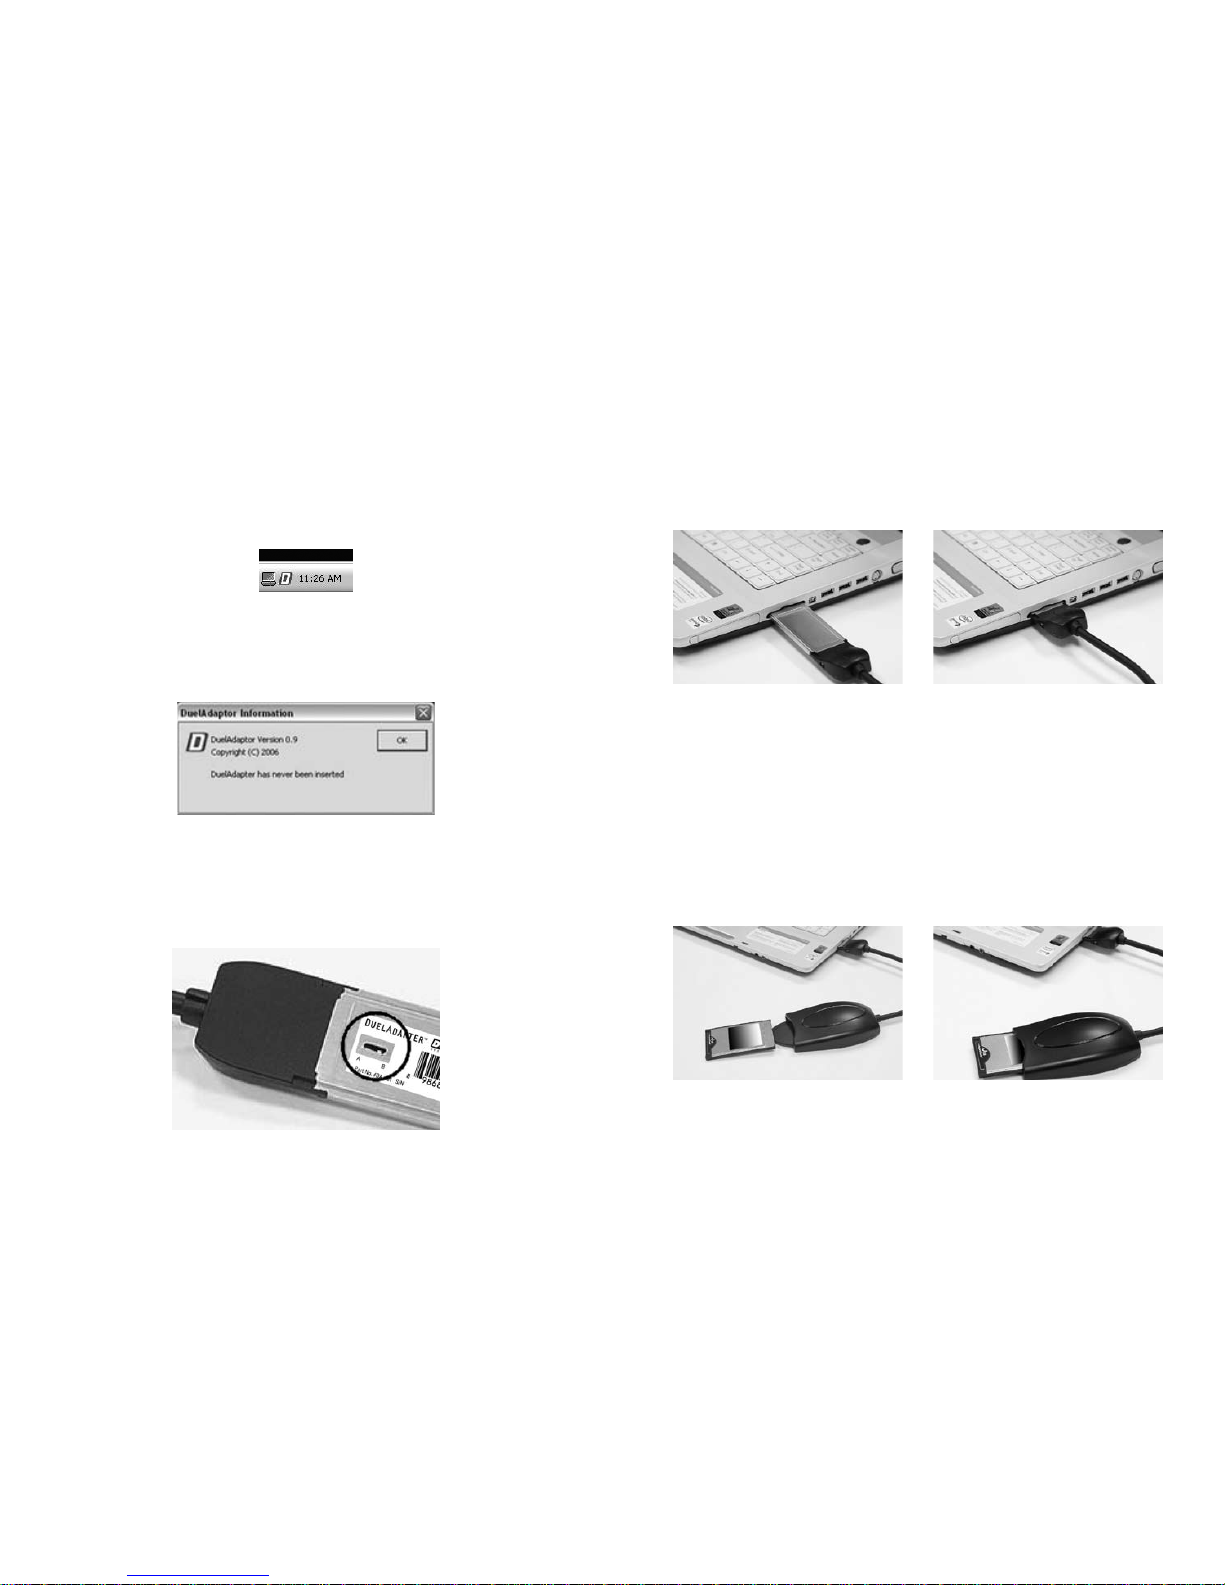
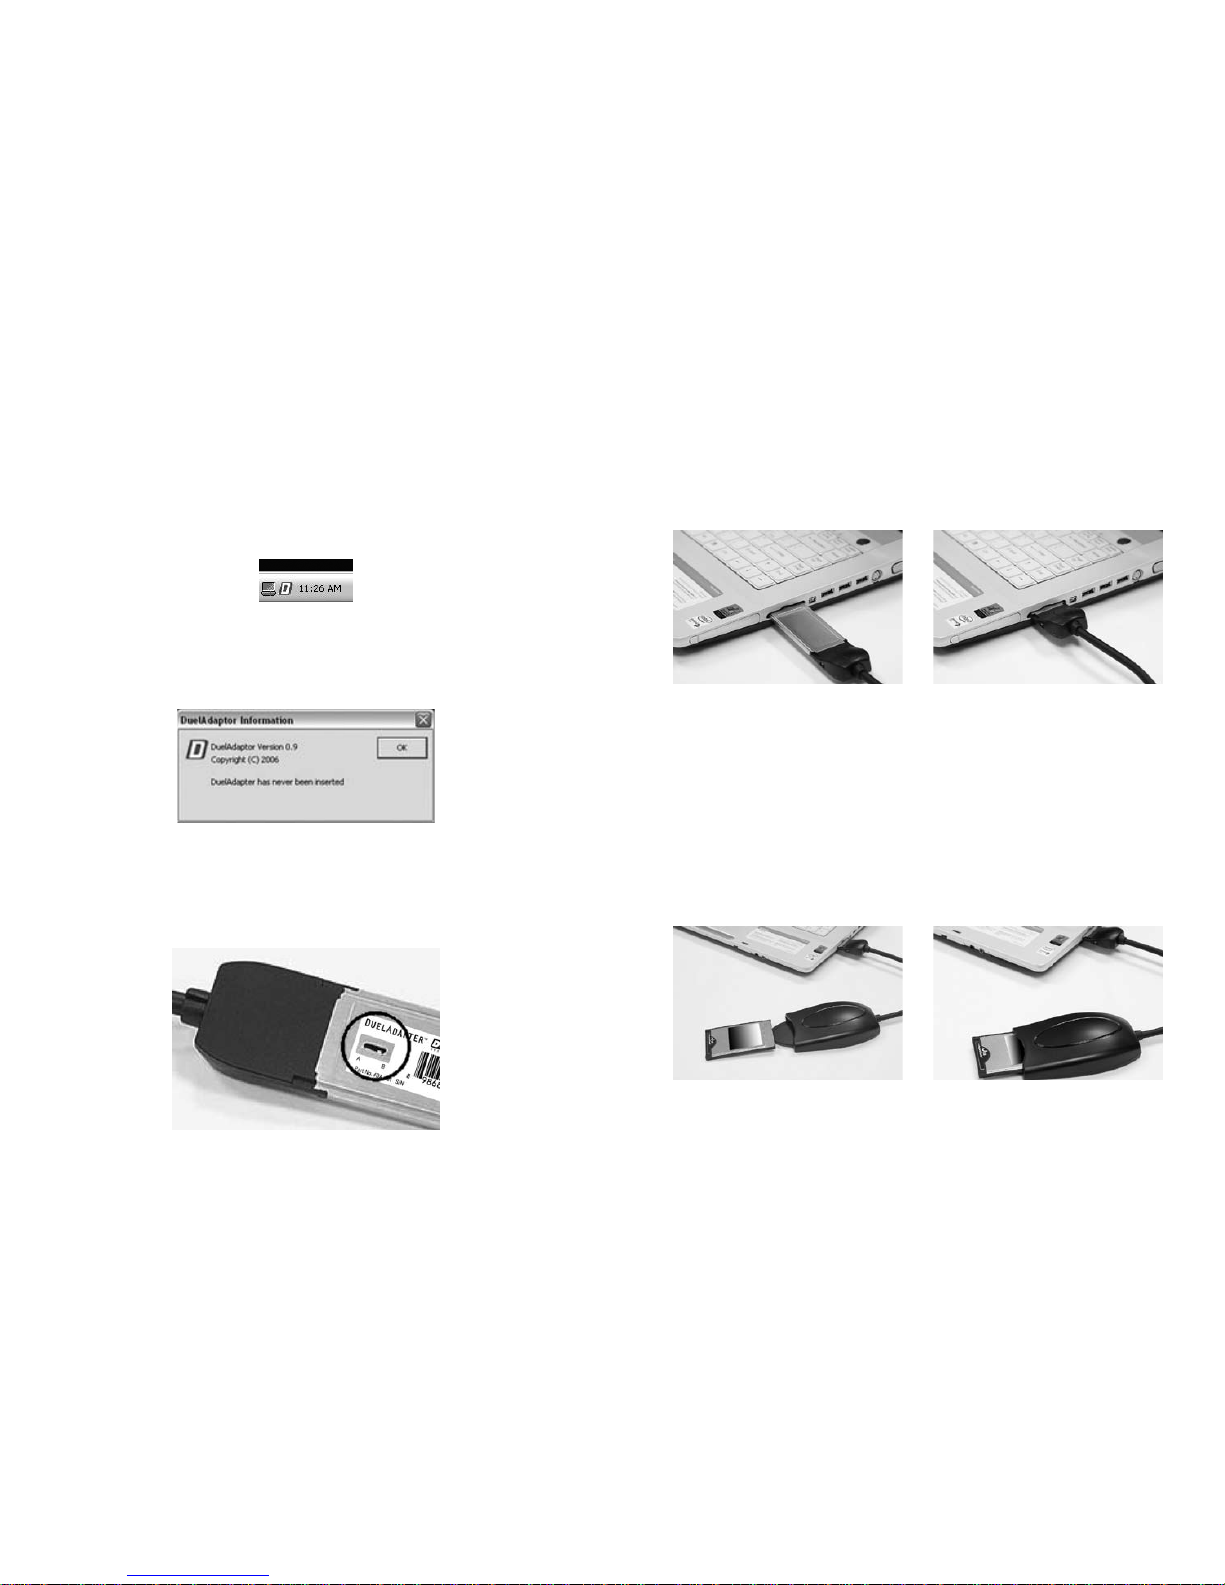
Step 3
Insert the DuelAdapter ExpressCard interface into the ExpressCard slot on your
computer. The add/remove hardware wizard will pop-up in the system tray.
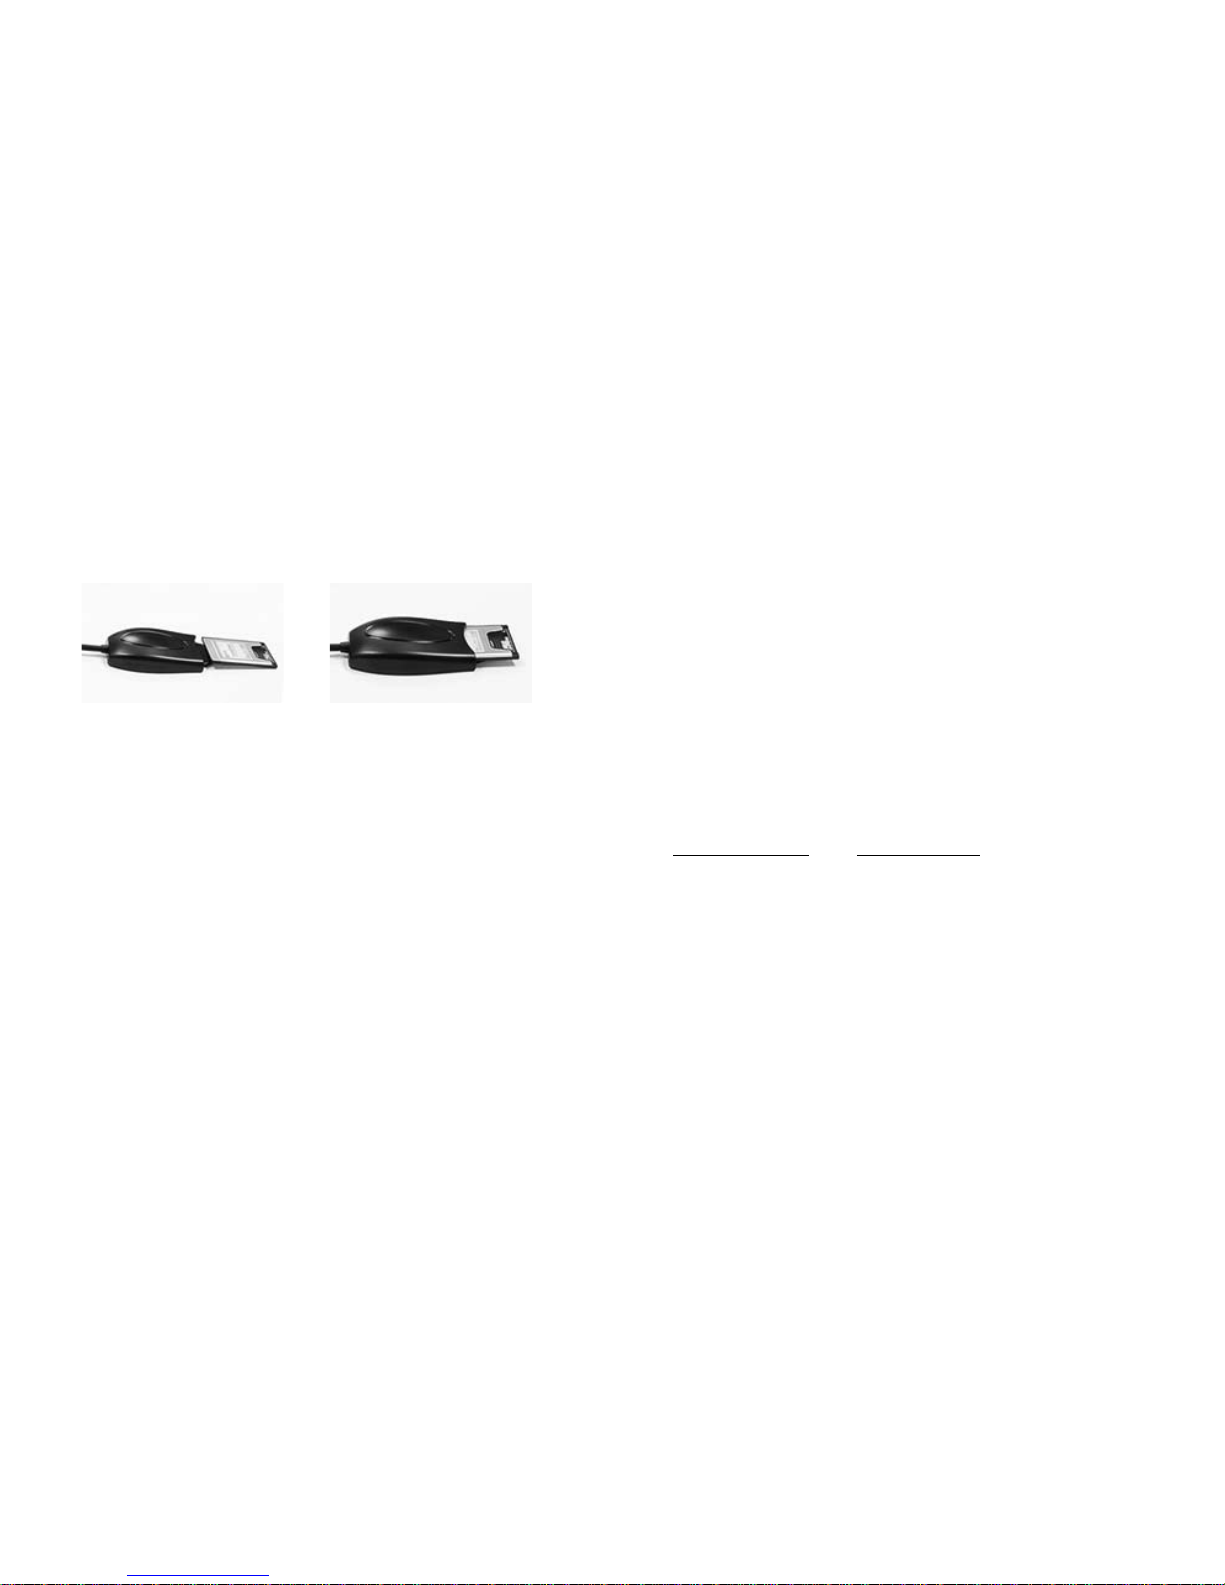
Step 4
Insert your PCMCIA card, or card adapter and card, into the DuelAdapter. You
may now use the card application.
Note: For further support or installation instructions for your PCMCIA card, please consult your
PCMCIA card manufacturer.
Using the DuelAdapter With Windows XP or Vista
Step 1
After the DuelAdapter driver software installation is complete confirm the Duel
Systems D icon is visible in the system tray.
Left or right mouse click on the D icon to bring up the status dialog for the
DuelAdapter. Because the adapter has not been inserted into the ExpressCard
slot on your computer the following status will be displayed.
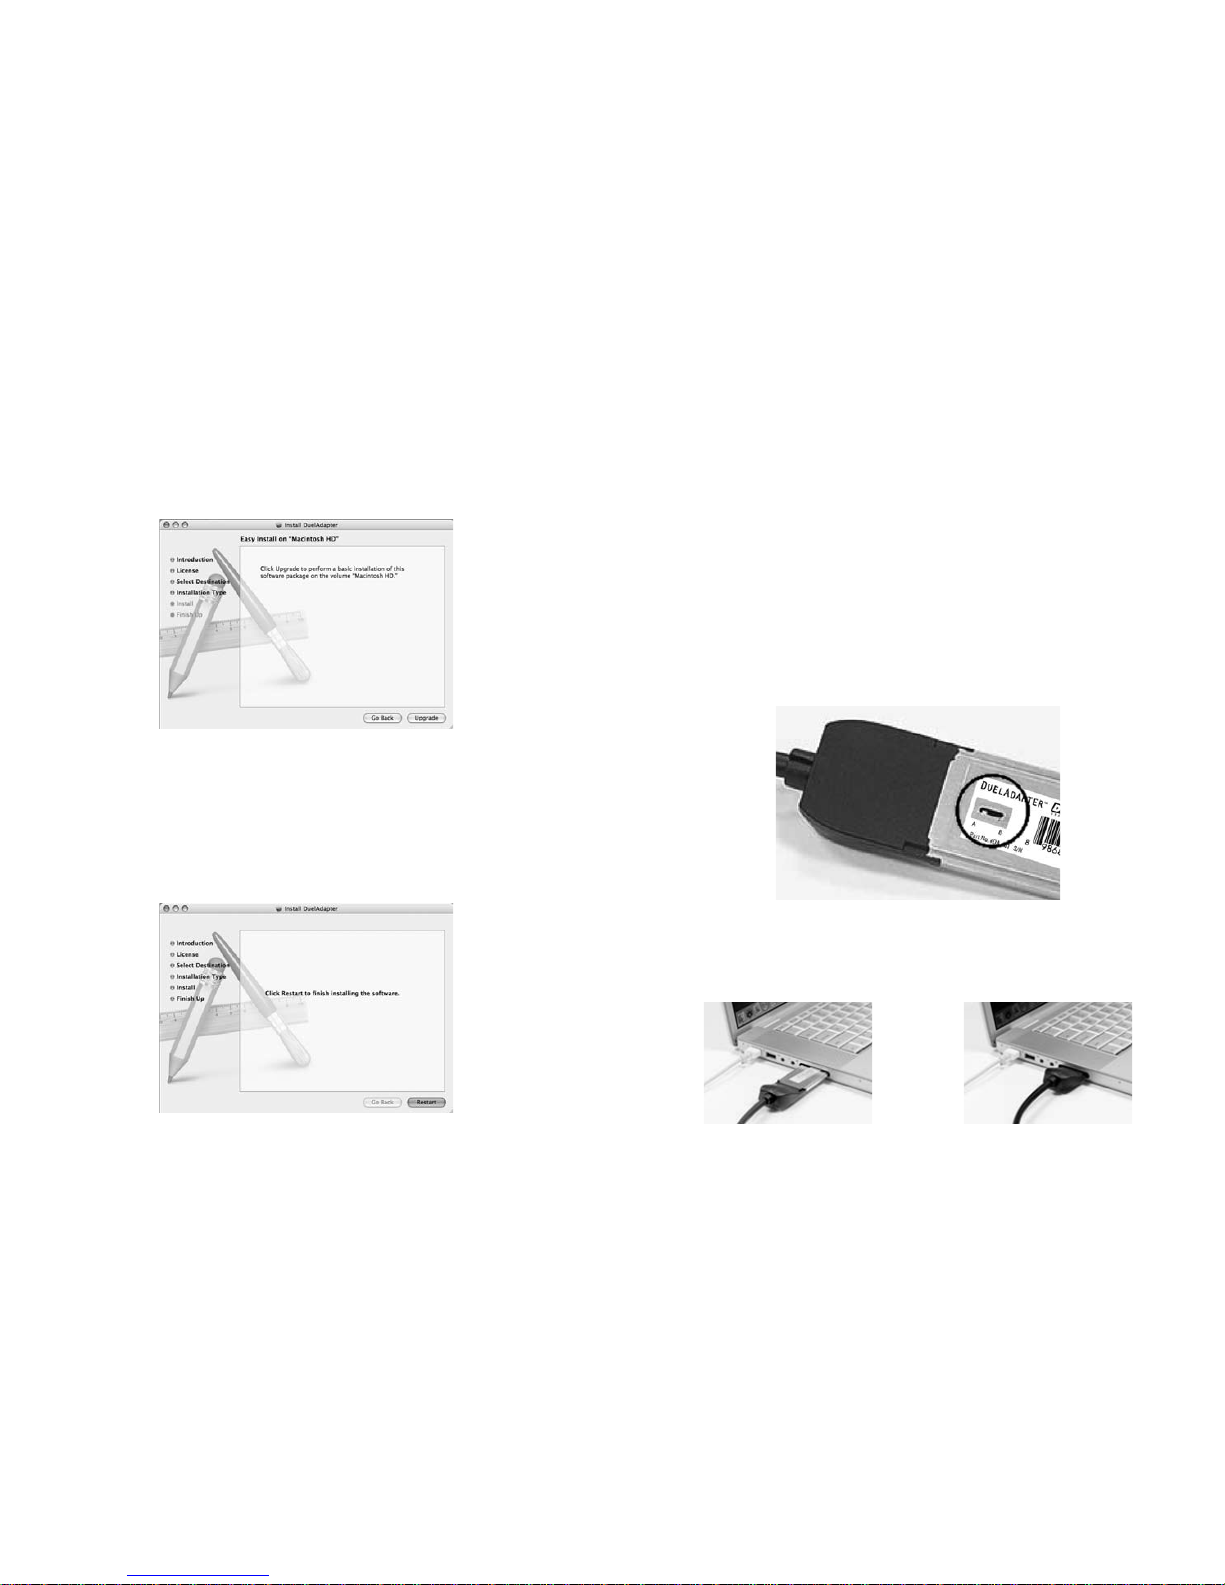
Step 2
For computers running Windows XP or Vista make sure the DuelAdapter switch
is in the “B” position as shown. Use a small screwdriver or paperclip to change
the switch position to ‘B’ as required.

DuelAdapter Install Guide 8
Duel Adapter Install Guide 9
Step 2
You’ll be prompted to accept the license agreement. If you agree with the
terms, click Continue. Then click Agree on the confirmation screen.
Step 3
Specify a location in which to install the software or accept the default location.
Click Continue to proceed.
Uninstalling the DuelAdapter Driver On Windows XP or Vista
To uninstall the DuelAdapter software driver running on Windows XP or Vista:
1. Ensure all applications using the DuelAdapter are closed and that the
DuelAdapter is safely removed from your computer.
2. Select
Add or Remove Programs in the Control Panel window. Scroll down
to the DuelAdapter driver listing and click
Remove.
3. Click
Yes to confirm you want to remove the DuelAdapter driver. Once the
removal process is complete the progress dialog will close itself.
Installing the Mac OS X Driver
IMPORTANT NOTE: For the latest software drivers check our website [http://
www.duel-systemsadapters.com/] under the “Product Support” section.
The following steps describe how to install the DuelAdapter driver software.
Note: Do not insert the adapter until software installation is complete.
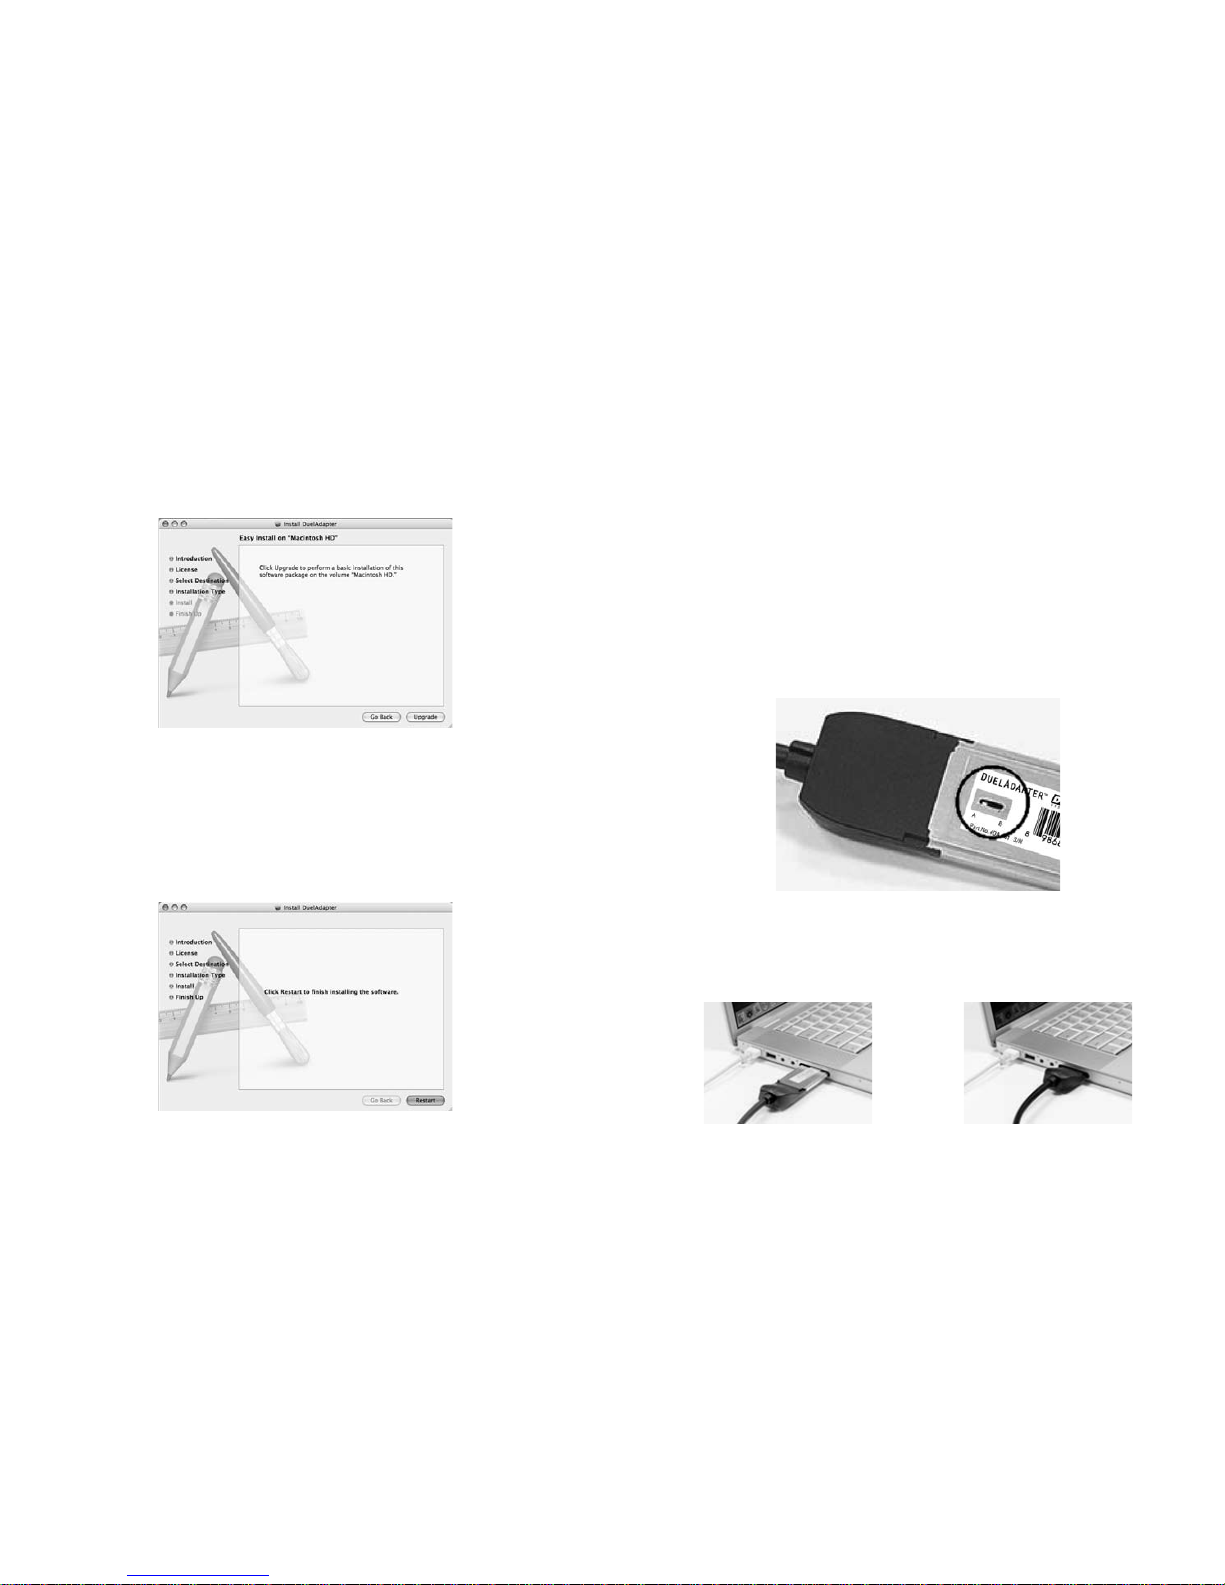
Step 1
Insert the DuelAdapter CD-ROM into your computer’s CD-ROM drive. The
installer will launch automatically. Click Continue on the Introduction dialog to
start installation.
DuelAdapter Install Guide 10
Duel Adapter Install Guide 11
Using the DuelAdapter With Mac OS X
Step 1
Due to a peripherals management limitation in Mac OS X, your computer
must be restarted before reinserting the DuelAdapter into the ExpressCard
card slot on your computer. We expect to have this situation corrected in a
future Mac OS X release. Please check the DuelAdapter web site for updated
drivers: www.duel-systemsadapters.com
Before using the DuelAdapter verify the switch located on the bottom of the
DuelAdapter ExpressCard interface is in the “A” position as required for the
Mac OS X operating system. Use a small screwdriver or paperclip to change the
switch position to ‘A’ as required.
Step 2
Firmly insert the DuelAdapter ExpressCard interface into the ExpressCard slot
on the side of your computer. It will click into place.
Step 4
Click Install to begin installing the driver software. When the Authentication
dialog appears, enter your user name and password and click OK.
Once the installation process is finished you will be required to restart your
computer. If you want to proceed click Continue Installation. When the
installation is completed click Restart. After restarting your computer you may
begin using the DuelAdapter. The next section will help get you started.
DuelAdapter Install Guide 12
Duel Adapter Install Guide 13
Troubleshooting
IMPORTANT NOTE: Please be sure to check our website [http://www.duel-systems
adapters.com/] under the “Product Support” section for these additional support tools.
For Technical Support
You may contact a technical support representative 24 hours a day, 7 days a week.
You may call:
1-888-227-7004, US and Canada. English only.
1-661-367-2215, International. English only.
Alternatively, you may fill out the web form at www.duel-systemsadapters.com, or
email at support@duel-systemsadapters.com.
Here are answers to some commonly asked questions about using the DuelAdapter. A
more complete set of “Frequently Asked Questions” can be found on the”Product Support” section of the web site at www.duel-systemsadapters.com.
1. How can I get the latest version of the DuelAdapter driver software?
To download the latest driver software, click on the “Downloads & Guides” link in the
“Product Support” section of the web site at www.duel-systemsadapters.com.
2. What is the purpose of the ‘A-B’ switch?
The DuelAdapter was designed to work with both Mac OS X and Windows XP or Vista
operating systems. The switch enables the adapter to work in either environment.
Switch Position Operating System
A Mac OS X
B Windows XP or Vista
3. Windows XP or Vista doesn’t seem to recognize that the DuelAdapter is plugged in.
First check to make sure the A-B switch on the underside of the ExpressCard insert is
set to the B position. If it is set in the B position and the adapter is still not recognized
by the operating system, then try the following:
1. Unplug the DuelAdapter. The adapter must remain unplugged until after
Windows XP or Vista launches
2. Change switch setting to the A position using the tip of a pen or a paperclip
3. Reboot your computer
4. Plug in the adapter
5. Check adapter status with D logo in the system tray
6. Insert your PCMCIA card
4. I’ve installed the DuelAdapter driver software, but my PCMCIA card doesn’t
work. What are my options?
Contact your PCMCIA manufacturer and see if there is an updated driver for your
PCMCIA card for Windows XP, Vista or Mac OS X.
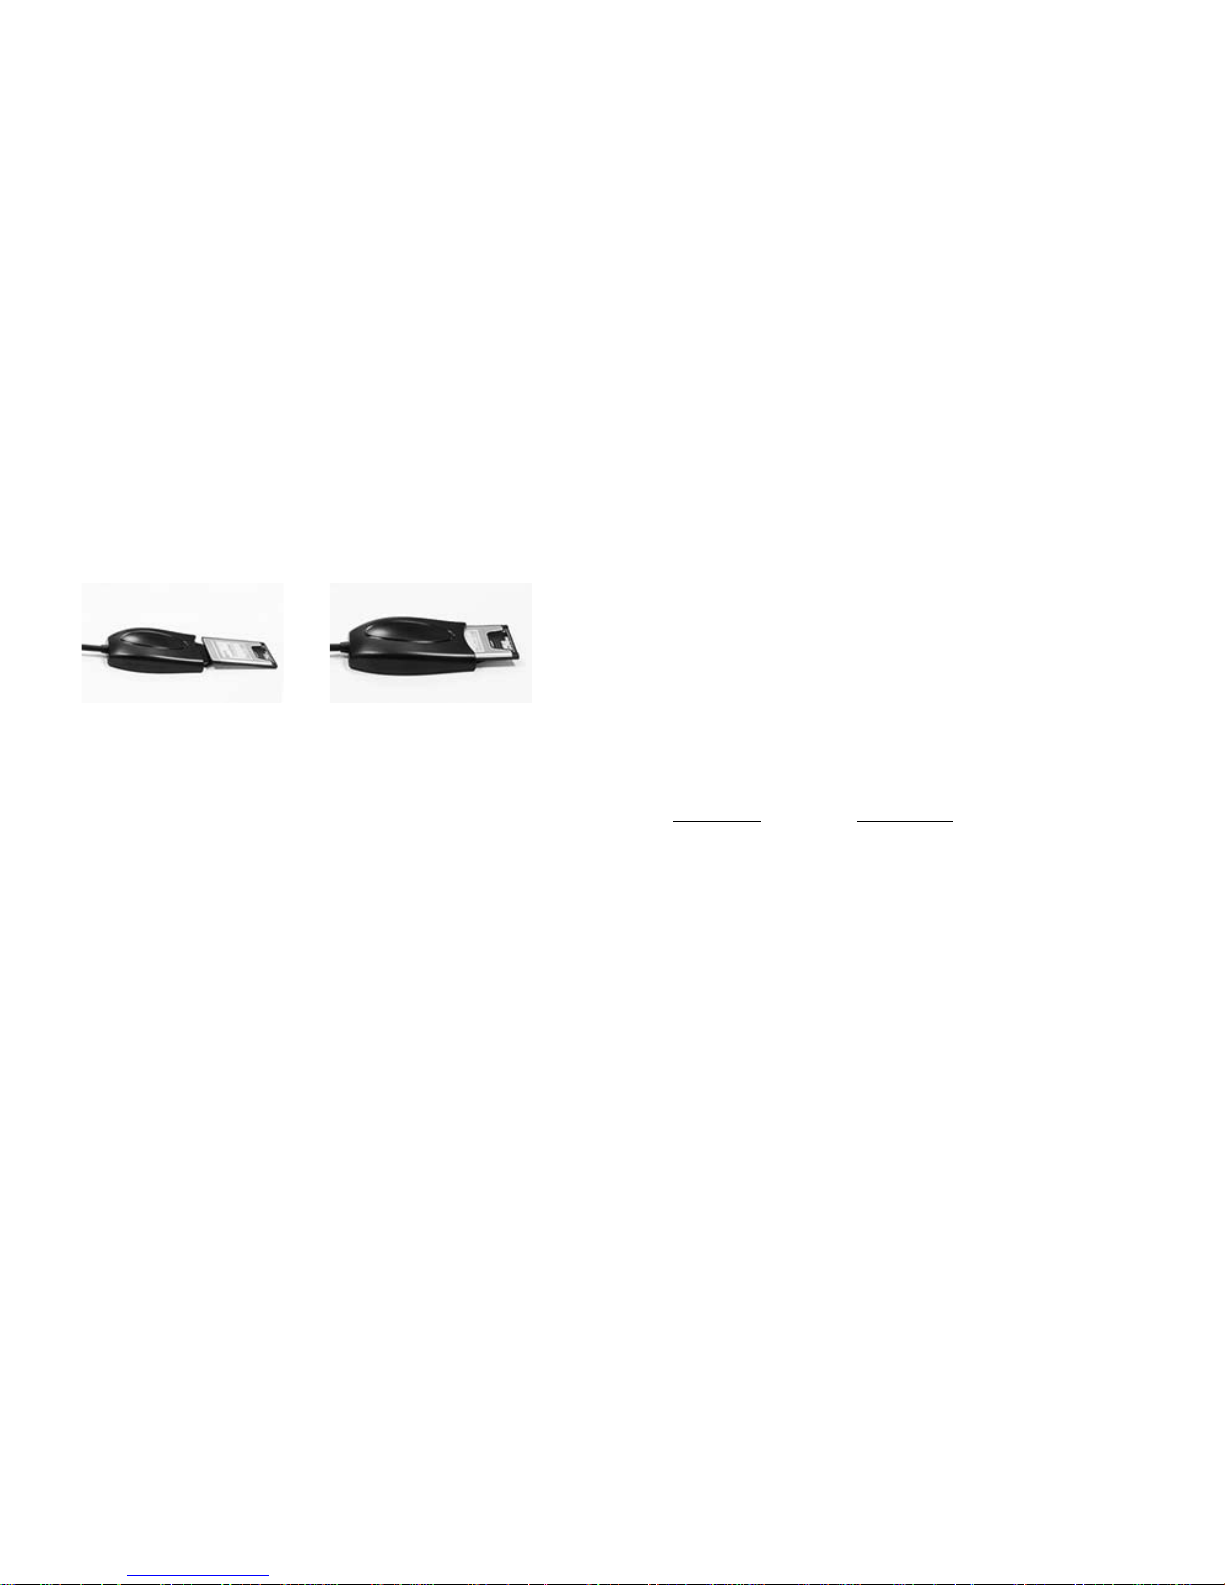
Step 3
Insert your PCMCIA card, or card adapter and card, into the DuelAdapter
PCMCIA interface. An icon for your PCMCIA card will appear on the Desktop.
You may now use the card application.
Note: For further support or installation instructions for your PCMCIA card, please consult your
PCMCIA card manufacturer.
Uninstalling the DuelAdapter Driver On Mac OS X
To uninstall the DuelAdapter software driver running on Mac OS X:
1. Ensure that all applications using the DuelAdapter are closed and that the
DuelAdapter is safely removed from your computer.
2. During the DuelAdapter driver software installation a special uninstall
application was placed in the Applications folder. In the Applications folder
double click
DuelAdapter driver Uninstall.pkg. The uninstaller will remove
the DuelAdapter driver software from the operating system.

DuelAdapter Install Guide 14
Notes
Guide d’installation
Français
Compatible avec :
- Windows Vista (nouveau !)
- Windows XP
- Mac OS X
Bridging PCMCIA to ExpressCard
Designed to connect the latest generation of notebook computers with existing PCMCIA cards
Guide d’installation de DuelAdapter F2
Guide d’installation de DuelAdapter F3
1
2
4
3
Généralités
Ce guide passe en revue l’installation du logiciel de commande de
DuelAdapter™ et de sa configuration pour les systèmes d’exploitation
Windows XP, Vista et Mac OS X.
Éléments de DuelAdapter
1. Interface PCMCIA
2. Câble
3. Interface de l’ExpressCard à l’ordinateur
4. Carte PCMCIA (non comprise)
Installation du pilote sur Windows XP ou Vista
Les étapes suivantes décrivent l’installation du logiciel de commande de DuelAdapter.
Remarque : N’insérez pas l’adaptateur avant que l’installation du logiciel soit
terminée.
REMARQUE IMPORTANTE :
Pour les tout derniers pilotes de logiciel, visitez notre site web
[http://www.duel-systemsadapters.com/] à la rubrique « Product
Support ».
Table des matières
Généralités F3
Installation du pilote sur Windows XP et Vista F3
Utilisation de DuelAdapter sur Windows XP et Vista F6
Désinstallation sur Windows XP et Vista F8
Installation du pilote sur Mac OS X F8
Utilisation de DuelAdapter sur Mac OS X F11
Désinstallation sur Mac OS X F12
Dépannage F13
©2007 Duel Systems. Tous droits réservés
Les renseignements dans ce document font l’objet de changement sans préavis.
Duel est une marque de commerce déposée et DuelAdapter est une marque déposée de Duel Systems.
Windows est une marque de commerce déposée de Microsoft Corporation aux États-Unis et dans
d’autres pays. Mac est une marque déposée d’Apple Computer, Inc. enregistrée aux États-Unis et dans
d’autres pays. Toutes les autres marques de commerce appartiennent à leurs propriétaires respectifs.
DL-0002

Guide d’installation de DuelAdapter F4
Guide d’installation de DuelAdapter F5
Étape 3
Spécifiez un dossier dans lequel vous désirez installer le pilote ou acceptez
l’emplacement par défaut. Cliquez sur Next (suivant) pour continuer. Puis
cliquez sur Next (suivant) de nouveau pour terminer l’installation.
Étape 4
Quand l’installation est terminée, on vous demande de cliquer sur Close (fermer). Vous pouvez à présent utiliser votre DuelAdapter. La section suivante vous
permettra de commencer son utilisation.
Étape 1
Insérez le CD-Rom de DuelAdapter dans le lecteur de CD de votre ordinateur. Le
programme d’installation démarre automatiquement. Cliquez sur Next (suivant)
dans la boîte de dialogue pour commencer l’installation.
Étape 2
On vous demandera d’accepter le contrat de licence. Si vous acceptez les modalités, cliquez sur I Agree (j’accepte) et puis sur Next (suivant) pour continuer.
Guide d’installation de DuelAdapter F6
Guide d’installation de DuelAdapter F7
Étape 3
Insérez l’interface d’ExpressCard de DuelAdapter dans la fente ExpressCard de
votre ordinateur. L’assistant ajouter/supprimer du matériel apparaît dans la zone
de notification.
Étape 4
Insérez la carte PCMCIA ou l’adaptateur de carte et la carte, dans le DuelAdapter. Vous pouvez à présent utiliser l’application de carte.
Remarque : Pour une assistance supplémentaire ou des instructions d’installation de votre carte
PCMCIA, veuillez consulter le fabricant de la carte PCMCIA.
Utilisation de DuelAdapter avec Windows XP ou Vista
Étape 1
Une fois que l’installation du logiciel de commande de DuelAdapter est terminée, confirmez que l’icône D de Duel Systems est présente dans la zone de
notification.
Cliquez avec le bouton droit ou le bouton gauche de la souris sur l’icône D
pour faire apparaître la boîte de dialogue d’état pour DuelAdapter. Comme
l’adaptateur n’a pas encore été inséré dans la fente ExpressCard de votre ordinateur, l’état suivant sera affiché.
Étape 2
Pour les ordinateurs avec Windows XP, veillez à ce que le commutateur de
DuelAdapter se trouve dans la position « B », comme indiqué. Au besoin, utilisez
un petit tournevis ou un trombone pour changer la position du commutateur sur
« B ».

Guide d’installation de DuelAdapter F8
Guide d’installation de DuelAdapter F9
Étape 2
On vous demandera d’accepter le contrat de licence. Si vous acceptez les
modalités, cliquez sur Continue (continuer). Puis cliquez sur Agree (accepter)
ans l’écran de confirmation.
Étape 3
Spécifiez un emplacement dans lequel vous désirez installer le logiciel ou accepter l’emplacement par défaut. Cliquez sur Continue pour continuer.
Désinstallation du pilote DuelAdapter sur Windows XP ou Vista
Pour désinstaller le logiciel de commande DuelAdapter sur Windows XP ou Vista :
1. Veillez à ce que toutes les applications utilisant DuelAdapter soient fermées
et que le DuelAdapter soit retiré de votre ordinateur.
2. Sélectionnez Add or Remove Programs (Ajouter ou supprimer des
programmes) dans la fenêtre du Panneau de contrôle. Faites défiler jusqu’au
pilote DuelAdapter et cliquez sur
Remove (Supprimer).
3. Cliquez sur
Yes (Oui) pour confirmer que vous voulez supprimer le
pilote DuelAdapter. Quand le processus est terminé, la boîte de dialogue se
fermera automatiquement.
Installation du pilote sur Mac OS X
REMARQUE IMPORTANTE: Pour les tout derniers pilotes de logiciel, visitez
notre site web [http://www.duel-systemsadapters.com/] à la rubrique « Product
Support ».
Les étapes suivantes décrivent l’installation du logiciel de commande de DuelAdapter.
Remarque : N’insérez pas l’adaptateur avant que l’installation du logiciel soit terminée.
Étape 1
Insérez le CD-Rom de DuelAdapter dans le lecteur de CD de votre ordinateur.
Le programme d’installation démarre automatiquement. Cliquez sur Continue
(continuer) dans la boîte de dialogue pour commencer l’installation.
Guide d’installation de DuelAdapter F10
Guide d’installation de DuelAdapter F11
Utilisation de DuelAdapter sur Mac OS X
Étape 1
À cause de la limite de gestion des périphériques sur Mac OS X, votre
ordinateur doit être remis en marche avant l’insertion de DuelAdapter dans
la fente ExpressCard sur votre ordinateur. Nous pensons que cette situation
sera corrigée sur une édition future de Mac OS X. Veuillez consulter le site web
de DuelAdapter pour des mises à jour des pilotes.
www.duel-systemsadapters.com
Avant d’utiliser le DuelAdapter, vérifiez que le commutateur dans le bas de
l’interface ExpressCard de DuelAdapter est dans la position « A » comme exigé
pour le système d’exploitation Mac OS X. Au besoin, utilisez un petit tournevis
ou un trombone pour changer la position du commutateur sur « A ».
Étape 2
Insérez fermement l’interface d’ExpressCard de DuelAdapter dans la fente ExpressCard sur le côté de votre ordinateur. Elle se mettra en place avec un clic.
Étape 4
Cliquez sur Install (installer) pour commencer l’installation du logiciel de
commande. Quand la boîte d’authentification apparaît, saisissez votre nom
d’utilisateur et mot de passe et cliquez sur OK.
Une fois que l’installation est terminée, on vous demandera de redémarrer votre
ordinateur. Si vous voulez continuer, cliquez sur Continue Installation. Quand
l’installation est terminée, cliquez sur Restart (redémarrer). Après la remise en
marche de votre ordinateur, vous pouvez commencer à utiliser le DuelAdapter.
La section suivante vous permettra de commencer son utilisation.
Guide d’installation de DuelAdapter F12
Guide d’installation de DuelAdapter F13
Dépannage
REMARQUE IMPORTANTE : N’oubliez pas de visiter notre site web [http://www.duel-system
sadapters.com/] à la rubrique « Product Support » pour ces moyens d’assistance supplémentaires.
Pour assistance technique
Vous pouvez contacter un représentant d’assistance technique 24 heures sur 24, 7 jours sur 7.
Vous pouvez appeler le :
1-888-227-7004, États-Unis et Canada. Anglais seulement.
1-661-367-2215, International. Anglais seulement.
Ou bien, vous pouvez remplir un formulaire web à www.duel-systemsadapters.com, ou
envoyer un courriel à suuport@duels-systemsadapters.com.
Veuillez trouver ci-dessous les réponses à quelques questions posées fréquemment au
sujet de l’utilisation de DuelAdapter. Une liste plus complète de « Foire aux questions » se
trouve dans la section « Product Support » de notre site web
1. Comment puis-je obtenir la dernière version du logiciel de commande de DuelAdapter ?
Pour télécharger le plus récent logiciel de commande, cliquez sur le lien « Drivers » dans
la section « Product Support » de notre site web www.duel-systemsadapters.com.
2. À quoi sert le commutateur « A-B » ?
Le DuelAdapter est conçu pour être utilisé avec les systèmes d’exploitation Mac OS X
et Windows XP. Ce commutateur permet à l’adaptateur de fonctionner dans les deux
environnements.
Positon du commutateur Système d’exploitation
A Mac OS X
B Windows XP ou Vista
3. Windows XP (ou Vista) ne semble pas reconnaître que le DuelAdapter est branché.
Tout d’abord, vérifiez que le commutateur A-B sur le dessous de l’adaptateur ExpressCard
est dans la position B. S’il est dans la position B et que l’adaptateur n’est toujours pas vu
par le système d’exploitation, essayez les étapes suivantes :
1. Débranchez le DuelAdapter. L’adaptateur doit rester débranché tant que Windows
XP ou Vista n’est pas démarré
2. Placez le commutateur dans la position A à l’aide d’un stylo ou d’un trombone
3. Redémarrez votre ordinateur
4. Branchez l’adaptateur
5. Vérifiez l’état de l’adaptateur à l’aide du logo D dans la zone de notification
6. Insérez la carte PCMCIA
4. J’ai installé le logiciel de commande de DuelAdapter, mais ma carte PCMCIA ne
fonctionne pas. Quelles sont mes options ?
Contactez le fabricant de la carte PCMCIA et voyez s’il existe une mise à jour du pilote
pour votre carte PCMCIA pour Windows XP ou Vista, ou Mac OS X.
Étape 3
Insérez la carte PCMCIA ou l’adaptateur de carte et la carte, dans l’interface
PCMCIA de DuelAdapter.Une icône pour votre carte PCMCIA apparaîtra sur
votre desktop.Vous pouvez à présent utiliser l’application de carte.
Remarque : Pour une assistance supplémentaire ou des instructions d’installation de votre carte
PCMCIA, veuillez consulter le fabricant de la carte PCMCIA.
Désinstallation du pilote de DuelAdapter sur Mac OS X
Pour désinstaller le logiciel de commande de DuelAdapter sur Mac OS X :
1. Veillez à ce que toutes les applications utilisant DuelAdapter soient fermées
et que le DuelAdapter soit retiré de votre ordinateur.
2. Lors de l’installation du logiciel de commande de DuelAdapter, une
application spéciale de désinstallation a été placée dans le dossier
Applications. Dans ce dossier Applications, cliquez deux fois sur
DuelAdapter driver Uninstall.pkg. Le programme de désinstallation
supprimera le logiciel de commande de DuelAdapter de votre système
d’exploitation.

Guide d’installation de DuelAdapter F14
Remarques
Installationsanleitung Seite
Deutsch
Kompatibel mit
-Windows Vista (Neu!)
-Windows XP
-Mac OS X
Überbrückung des PCMCIA auf die ExpressCard Karte
Zur Verbindung der neusten Generation von Notebooks mit vorhandenden PCMCIA Karten
DuelAdapter Installationsanleitung Seite D2
DuelAdapter Installationsanleitung Seite D3
Überblick
Diese Installationsanleitung zeigt Ihnen, wie Sie die DuelAdapter
Treiber Software mit Windows XP, Vista und Mac OS X Betriebsystemen
installieren und einrichten.
DuelAdapter Bestandteile
1. PCMCIA Schnittstelle
2. Kabel
3. ExpressCard-Computer Schnittstelle
4. PCMCIA Karte (nicht mitgeliefert)
1
2
4
Windows XP oder Vista Treiber Installation
Die folgenden Schritte beschreiben, wie Sie die DuelAdapter Treiber Software
installieren.
Hinweis: Schliessen Sie den Adapter erst dann an den Computer an, wenn die
Software Installation vollständig abgeschlossen wurde.
3
WICHTIGER HINWEIS:
Sie finden auf unserer Webseite [http://www.duel-systemsadapt
ers.com/] in der Sektion “Product Support” die neusten Softwaretreiber.
Inhaltsverzeichniss
Überblick D3
Windows XP und Vista Treiber Installation D3
Benutzung des DuelAdapters mit Windows XP und Vista D6
Deinstallation des DuelAdapter mit Windows XP und Vista D8
Mac OS X Treiber Installation D8
Benutzung des DuelAdapters mit Mac OS X D11
Deinstallation des DuelAdapter mit Mac OS X D12
Problemlösungen D13
©2007 Duel Systems. Alle Rechte vorbehalten.
Informationen in diesem Dokument sind Änderungen vorbehalten.
Duel ist ein registriertes Warenzeichen und DuelAdapter ist ein registriertes Warenzeichen von Duel
Systems. Windows ist ein registriertes Warenzeichen von Microsoft Corporation in den Vereinigten
Staaten und anderen Ländern. Mac ist ein registriertes Warenzeichen von Apple Computers, Inc,
eingetragen in den USA und anderen Ländern. Alle anderen registrierten und unregistrierten Warenzeichen sind Eigentum ihrer jeweiligen Besitzer.
DL-0002

DuelAdapter Installationsanleitung Seite D4
DuelAdapter Installationsanleitung Seite D5
3. Schritt
Bestimmen Sie in welchen Ordner Sie den Treiber installieren möchten oder
akzeptieren Sie die Grundeinstellung. Klicken Sie Next (Weiter) um fortzufahren. Dann klicken Sie nochmals auf Next (Weiter) um die Installation zu
vervollständigen.
4. Schritt
Wenn die Installation beendet worden ist, werden Sie aufgefordert auf Close
(Schliessen) zu klicken. Sie können nun Ihren DuelAdapter verwenden. Im
nächsten Abschnitt wird die Benutzung des DuelAdapters beschrieben.
1. Schritt
Legen Sie die DuelAdapter CD-ROM in das CD-ROM Laufwerk Ihres Computers.
Das Installationsprogramm wird automatisch starten. Klicken Sie Next (Weiter)
im Welcome Dialog (Willkommensdialogfenster) um den Installationsprozess zu
starten.
2. Schritt
Sie werden aufgefordert den License Agreement (Nutzungsvertrag) zu akzeptieren. Wenn Sie damit einverstanden sind, klicken Sie auf I Agree (Bestätigen)
und klicken Sie Next (Weiter) um fortzufahren.
 Loading...