

Page 1
VENUS-DV01
INSTALLATION & USER INSTRUCTIONS
DISHWASHER
Page 2

Page 3

JJ Contents
Safety Warnings ..................................................................................1
Safety Information to be Followed while Using the Appliance .......1
Safety Information to be Followed During Installation ................... 5
Water Connections
7
Placing the appliance under the counter ........................................... 9
Safety Information to be Followed During Cleaning and Maintenance ... 11
Limitation of Liability ........................................................................... 12
Technical Specifications .......................................................................13
General Appearance ...........................................................................14
BeforeInitial Use ................................................................................. 15
Preparing The Machine For Use ....................................................... 15
Importance of the water softening
system
..........................................
15
Adjusting the Water Hardness .......................................................... 16
Detergent Use ......................................................................................17
Filling and Adjusting Rinse Aid .......................................................... 19
Placing the Dishes in the Dishwasher ............................................... 20
Upper Basket ........................................................................................ 21
Lower Basket ...................................................................................... 22
Alternative Basket Placement Meth
ods ...........................................24
Programme Definition
......................................................................... 25
Programme Selection and Operating the Machine ...........................27
Programme Selection and Operating the Machine ....................... 28
Programme Monitoring ........................................................................ 30
Changing-Cancelling the Programme ............................................ 32
Page 4

JJ Contents
Cleaning and Maintenance ......................................................................38
Recommendations for Energy Saving ..................................................... 38
Troubleshooting ..........................................................................................40
Things to Do In Case of Simple Failures ................................................43
Page 5

1
JJ Safety Information
Safety Information
to be Followed while
Using the Appliance
• Please keep this user manual
with your appliance at all times.
Give this manual with your
appliance when you lend it to
someone.
• Read the user manual carefully
and follow the instructions.
• This device has been designed
to be used indoors in houses
and similar places. For example;
–
Staff kitchens of stores, offices
and other working environments;
– Farm houses;
– Use in rooms of hotels, motels
and other accommodation facilities by customers;
– Places offering bed and break-
fast service,
– In bed-breakfast hostel environ-
ments.
• The device is not suitable for
commercial or public use.
• Use your appliance according
to the stated intended use only.
Follow the instructions provided in this user manual.
• WARNING: Failure to use
the appliance according to its
intended use may cause damage and dangerous conditions
and voids the warranty of the
appliance. User shall pay for
damages occurred under these
circumstances.
• If your supply cable is not
compliant with the socket, the
supply cable must be replaced
by the authorised service to
prevent possible dangers.
• Connect the appliance to AC
current and a grounded socket. Manufacturer shall not be
responsible for damages that
may result from usage without
grounding.
• Make sure that the grounding
line in the electricity socket of
your appliance and the electricity leakage protection circuit are
in good condition to prevent a
potential electric shock.
• Regularly check the power cable for damages. Do not force
the power cable of the appliance by pulling it. Do not place
any items on the power cable.
Page 6

2
• Make sure that the power supply cable is not crushed under
the appliance.
• If the power cable is damaged,
it must be replaced by an authorised service recommended
by the manufacturer to prevent
possible dangers. Please contact an authorised service or a
customer contact centre.
• Do not use your appliance in
the following situations:
-If the appliance, the plug or the
power cable is damaged,
-If the appliance is dropped, if it
has signs of visible damage or it
does not work properly,
-If the appliance and the electrical
parts are visibly damaged,
-If the appliance is wet, has been
dropped in water or other liquids,
subjected to flood and if its electrical parts have contacted water,
-If a strange noise, smoke or odour
is observed.
If one of the above conditions is
detected, turn off your appliance,
disconnect the power immediately
and contact an authorised service.
A damaged appliance or its parts
can cause severe injuries or fire.
• If your appliance has any malfunction, do not attempt to
repair the appliance yourself.
Do not dismantle the appliance; it may cause the risk of
electric shock when using if it
is reinstalled improperly. The
appliance has no user-serviceable parts.
• Switch off the fuse or unplug
the appliance before performing any repair on the appliance.
Never forget to turn off the
water tap.
• Using accessories and replacement parts not recommended by the manufacturer may
cause appliance damage and
injuries.
• This appliance can be used
by children at the age of 8 or
above and people with limited
physical, hearing or mental
abilities or experience and
knowledge only when they are
supervised or when relevant
instructions are provided and
the dangers are understood.
• Children should not play with
the appliance. Do not allow
children to operate the appliance.
Page 7

3
• Cleaning or user maintenance
should not be performed by
children without supervision.
• Keep the detergent and rinse
aid away from your children.
• Keep your children away from
the appliance when it is open
since there might be residues
of cleaning agents.
• Make sure your old appliances
do not pose any risks for your
children. It is a known fact that
children were locked in old appliances before. Break the lock
of your old appliances, cut the
power cable and remove the
plug from the cable to avoid
such situations.
• Do not use your appliance
outdoors or on wet surfaces
to prevent the risk of electric
shock.
• Hold the plug when unplugging your device and pull out.
Do not pull the cable.
• The appliance must be supplied through a residual current
device (RCD) with a rated
residual operation current not
exceeding 30 mA.
• Do not use a multiple outlet or
extension cord.
• Do not use plugs that have
damaged, torn or worn cables.
Never pull, bend or damage
the cable.
• Do not climb, sit or place loads
on the appliance door when it
is open.
• Do not plug or unplug the
plug with wet hands to avoid
electric shock.
WARNING: Packaging materials
are dangerous for children. Store
all packing material away from
children.
• Check your appliance and its
packaging for damages. Never
operate an appliance with any
kind of damage. Consult an
authorised service immediately.
• Open the packaging material as stated and dispose as
described in the packaging
information section.
• Unplug the appliance if it will
not be used for a long time.
• Make sure you have unplugged
the appliance and disconnected it from the power supply in
the following cases:
Page 8

4
- Before installation,
- Before cleaning and maintenance,
- Before repairing.
• Do not fill detergent and rinse
aid sections with substances
other than detergents and
rinse aid produced specifically
for dishwashers. Otherwise,
the manufacturer will not be
responsible for any damages
that may occur on your appliance.
• Water in the washing section
is not drinking water. Do not
drink it.
• Do not place solvent chemicals in the washing section of
your appliance as there is a risk
of explosion.
• Before washing plastic objects
in your appliance, check if they
are suitable for washing in
dishwashers.
• Do not place objects that are
not suitable for washing in
dishwasher in your appliance.
Also, do not overload the baskets. Otherwise, the manufacturer will not be responsible for
scratches and corrosion on the
internal body of your appliance
occurred as a result of basket
movements.
• When the appliance is running,
do not open its door since hot
water may splash out. The
safety system will stop your
appliance if you open the door.
• Do not leave the door of your
appliance open. Leaving the
door open may cause accidents.
• Do not install other appliances
emitting heat, such as stove,
on or near the appliance. Heat
emitted from the stove or similar appliances may damage the
dishwasher.
• Place dishes such as bowls,
glasses and pots in the dishwasher with their openings
facing down.
• Do not load your appliance
with dishes different or more
than those specified.
• For safety reasons, unplug
the device when the washing
programme is over.
• Your dishwasher is not suitable
for use by people with limited
physical and mental abilities,
Page 9

5
children and people with insufficient knowledge and experience on using the appliance
without supervisors that can
ensure their safety.
• Sheet surfaces of the appliance
are sensitive. They need to be
cleaned with special cleaning
substances. Sheet surfaces
cleaned with unsuitable cleaners can be scratched, damaged
or their appearance may go
bad in time. Use cleaning substances recommended by our
Authorised Service to avoid
such situations.
• If the energy saving option is on,
the door will automatically open
at the end of the programme. In
order not to damage automatic
door opening mechanism, do
not attempt to close the door
for a minute. The door must be
open for 30 min. for an effective drying performance (only
in products with an automatic
door opening mechanism).
WARNING: Do not stand in
front of the door after hearing
the automatic door opening
signal.
Safety Information to be Fol-
lowed During Installation
• Installation and repair procedures must always be performed by an Authorised Service. Manufacturer will not be
responsible for damages that
may occur due to operations
performed by unauthorised
people. The power plug must
be easily accessible after installation.
• You can call the call centre
before starting to use your
appliance to reach the closest
authorised service and request
assistance for installation, operation and usage of your
device.
• Select a suitable, safe and level
spot for the installation.
• Make sure the installation
and electricity and water connections of the appliance are
performed according to the
instructions.
• Consult an expert electrician
to make sure that the fuse
system in your house is in compliance with the regulations.
• The appliance must only be
connected and operated in
Page 10

6
accordance with the details
on the type plate. Check if the
voltage value of your electricity network is compliant with
the value stated on rated value
plate of the appliance before
using the appliance.
• Manufacturer will not be responsible for any damages that
may occur due to unsuitable
connections and/or failure to
provide grounding.
• Never use extension cables or
multiple sockets to connect
your appliance to the electricity network. These connections
may result in overheating.
• The fuse current value in your
house must be 10-16 Amps.
• Your appliance is set to 220 –
240 Volts. If the mains voltage
in your area is 110 Volts, have a
110/220 Volts and 3000 Watts
transformer connected on the
line. The appliance must not
be plugged in during installation.
• Always use the covered plug
supplied with the appliance.
• Washing efficiency of your
appliance will decrease in low
voltage.
• While determining the location
to install your appliance, make
sure that it is a location where
you can easily load and unload
your dishes after washing.
• Do not install your appliance
in spaces where temperature
might drop below 0°C.
• Operate your appliance empty during the initial use after
installing it at a suitable place.
• Place this appliance in a suitable place to protect from humidity, oil, dust, direct sunlight
or exposure to water/humidity.
Do not use the device outdoors, in humid environments
or under rain.
• Before installation, unpack
your appliance according to
the warnings on the cardboard.
• Place the appliance near the
tap and waste water outlet.
Consider that the location
cannot be changed after the
connections have been made.
• Do not hold the door or the
control panel to move the
appliance.
• Make sure there is enough
Page 11
7
clearance around the appliance to easily move the appliance forward-backward during
cleaning.
• Make sure the water inlet-outlet hoses do not get crushed
when placing the appliance.
Also, make sure that the power
cable does not get stuck under
the appliance.
• Adjust the feet for the appliance to be level and stable.
The door can be opened and
closed with not problems if the
appliance is installed correctly.
• If the door of the appliance
cannot be closed correctly,
check if the appliance is level
on the floor. If not, use the
adjustable feet to balance it.
Water Connections
• Make sure that the water installation in your house is compliant with the dishwasher. We
recommend you to install a
filter to the entrance of your
house or building to prevent
damage to the appliance by
contamination (sand, clay, rust,
etc.) that may come from the
city mains or your water installation at times and to avoid
complaints such as yellowing,
sediment, etc. as a result of
washing.
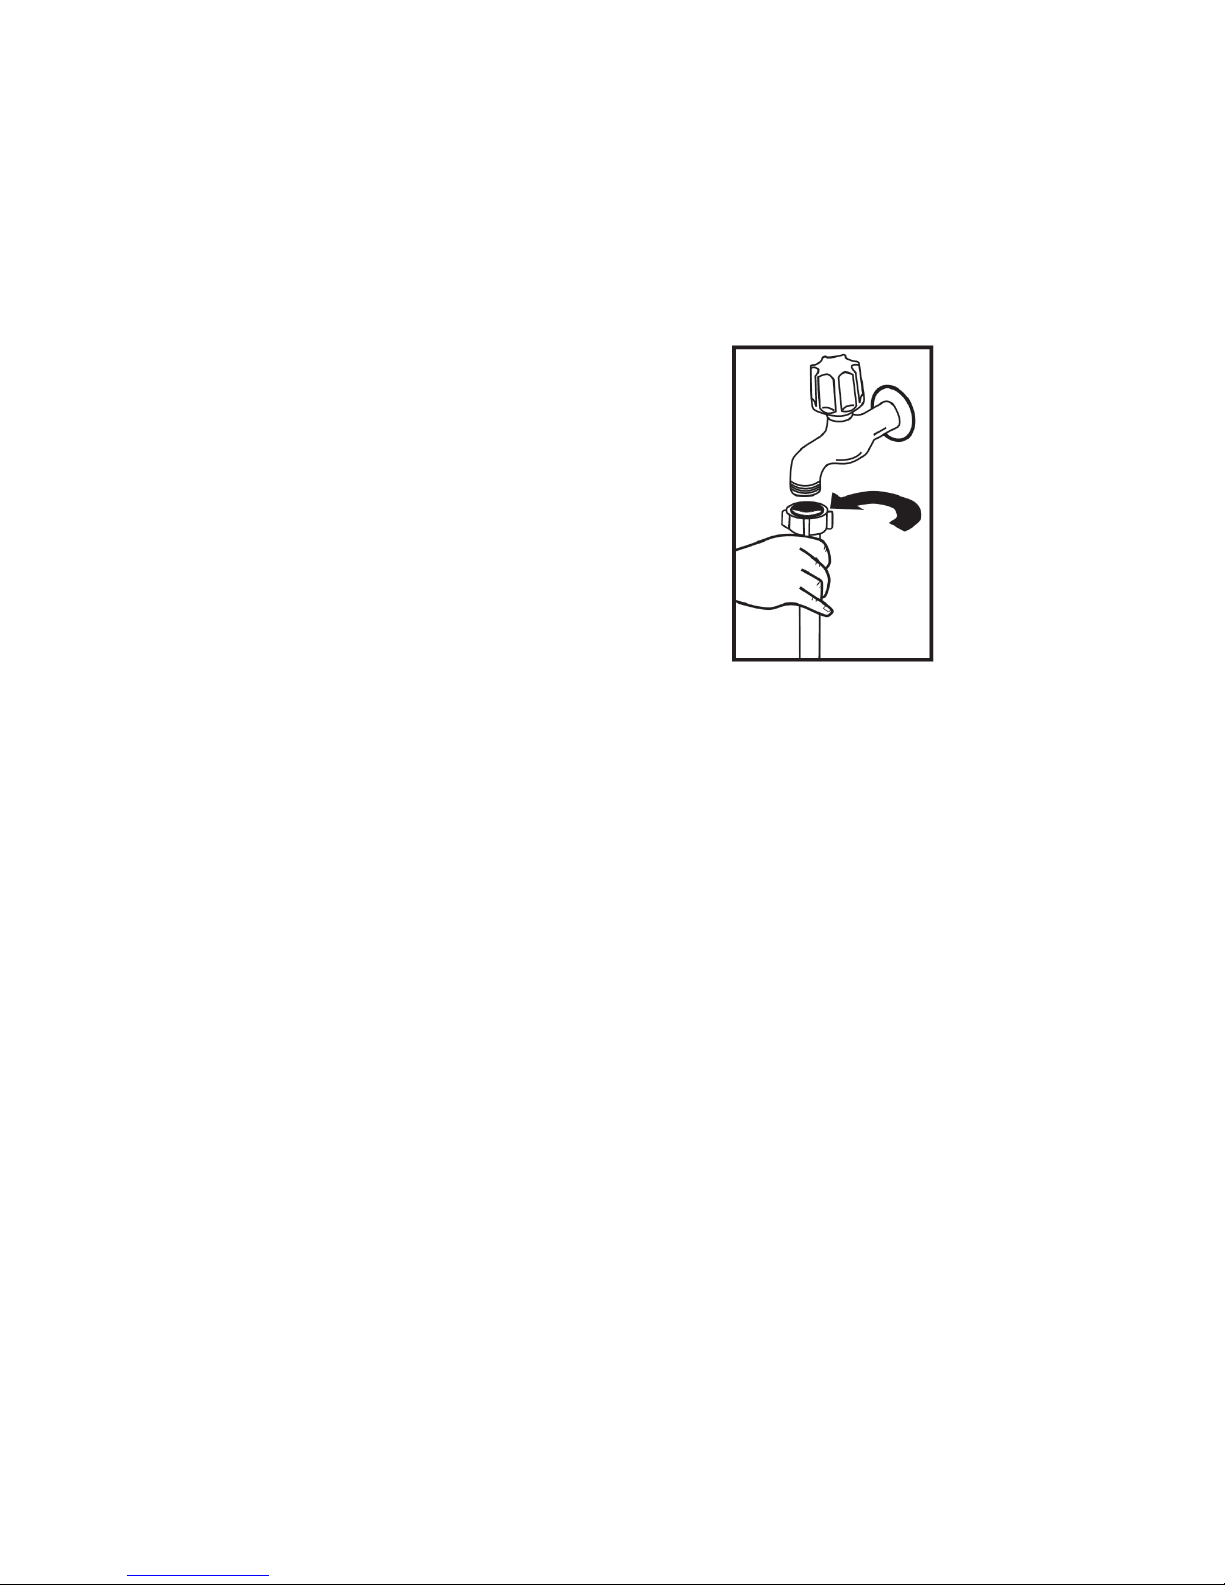
Water Inlet Hose
• Do not use the water inlet hose
of your old appliance (if any).
Instead, use the new water
inlet hose supplied with your
appliance.
• Run some water inside the
hose if your are going to use
a new hose or a hose not used
for a long time.
• Connect the water inlet hose
directly to the water inlet tap.
• Pressure from the tap must be
0.03 MPa (0.3 bar) minimum,
and 1 MPa (10 bar) maximum.
If the water pressure is above
1 MPa (10 bar), use a pressure
Page 12
8
reduction valve in between.
• Open the tap completely to
check water tightness after
making all the connections.
• Turn off the water inlet tap after
each washing programme for
the safety of your appliance.
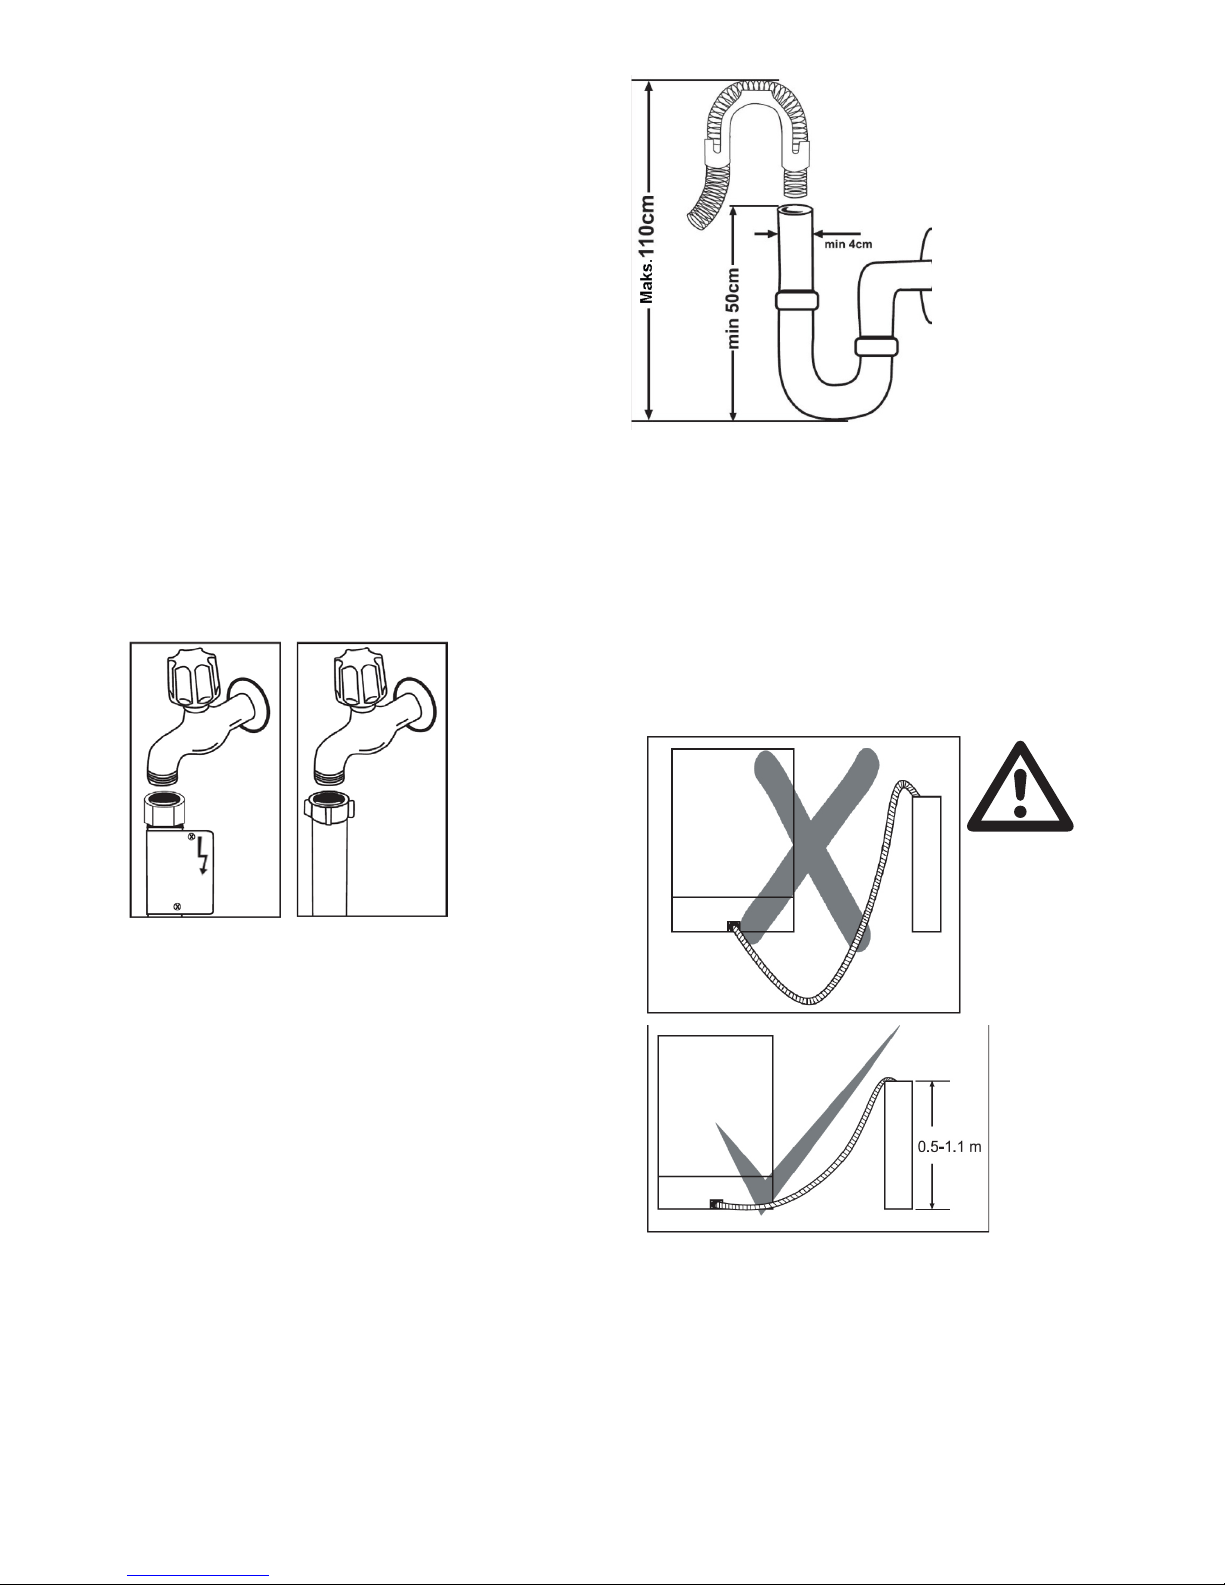
NOTE: Safety hoses are used in
some models. Safety hoses contain dangerous voltage levels. Do
not cut safety hoses. Do not bend
or twist them
.
Water Discharge Hose
Water discharge hose can be
directly connected to the waste
water hole or to the waste water
outlet of the sink. A specially
twisted elbow (if any) can be used
to attach the hose to the edge of
the sink to directly discharge into
the sink.
This connection must be min. 50
cm and max. 110 cm higher than
the floor.
WARNING: Do not use a discharge hose longer than 4m. This
might cause insufficient cleaning
on your dishes. Manufacturer will
not accept any responsibility in
this case.
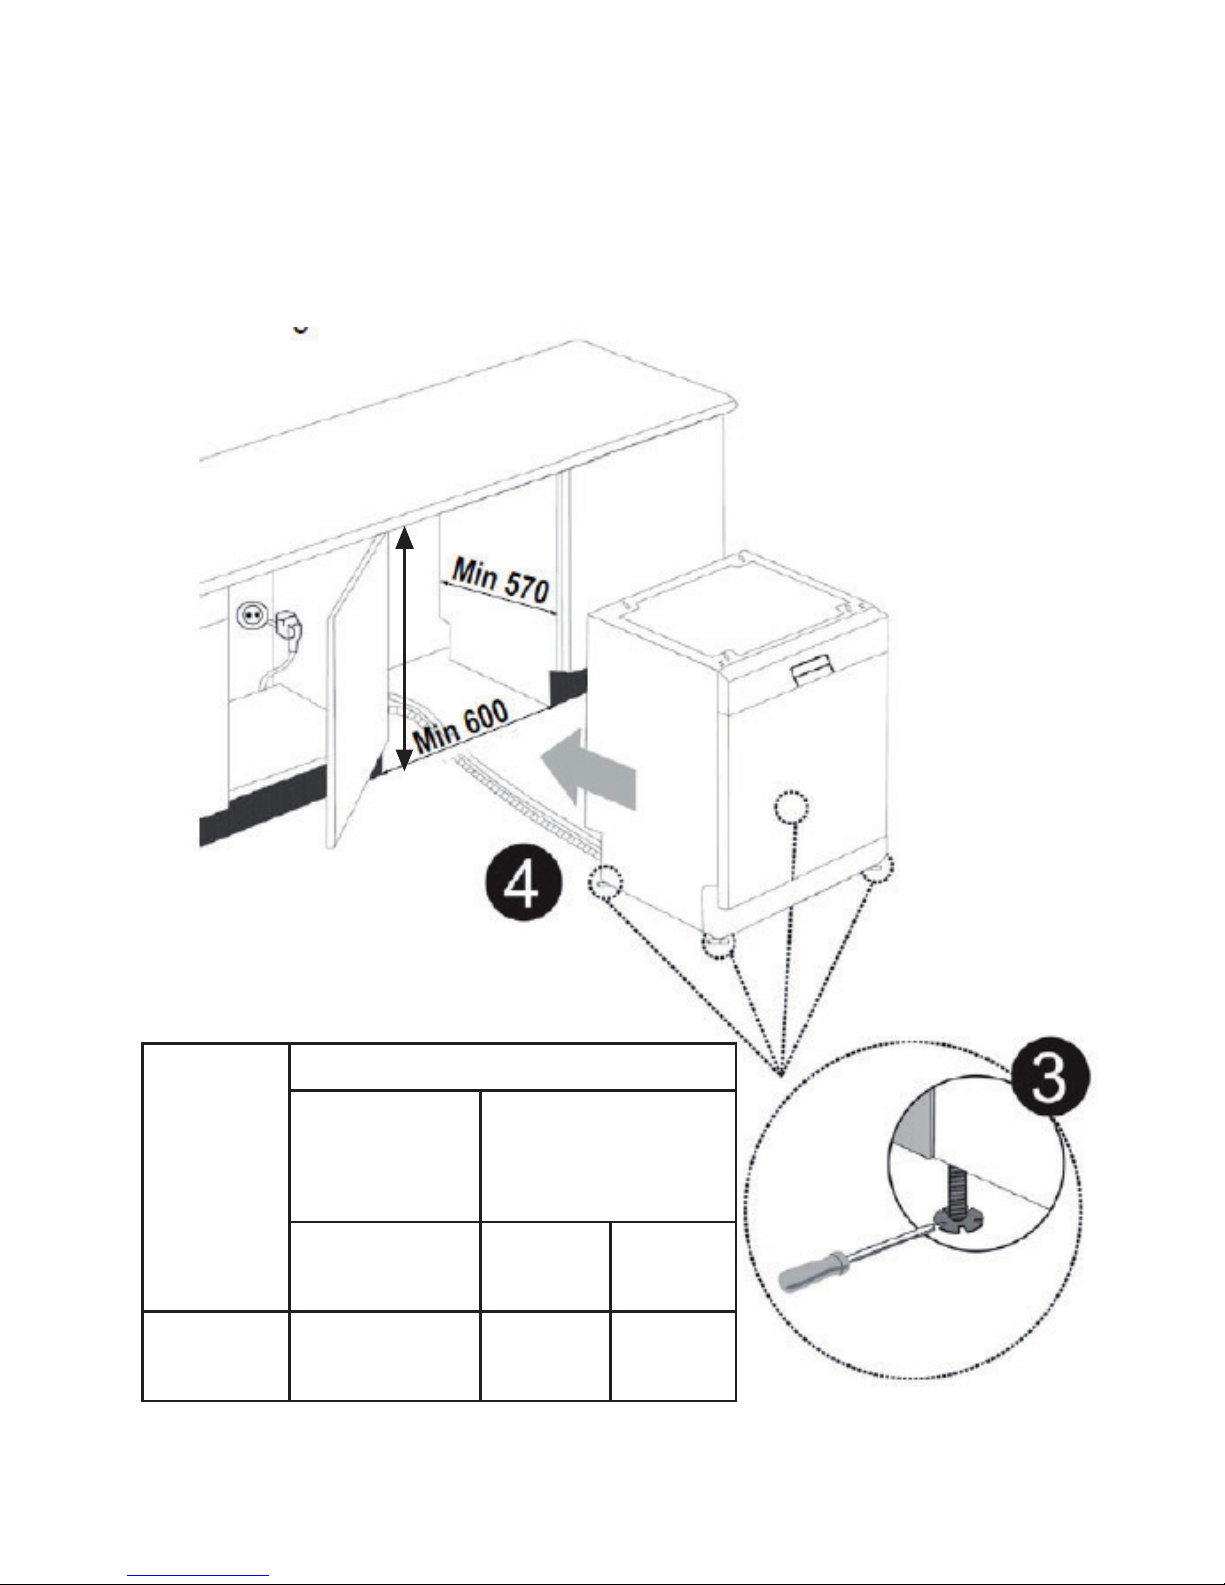
Placing the appliance under
the counter
If you want to place the appliance
under the counter, check if the
clearance under the counter is
Page 13
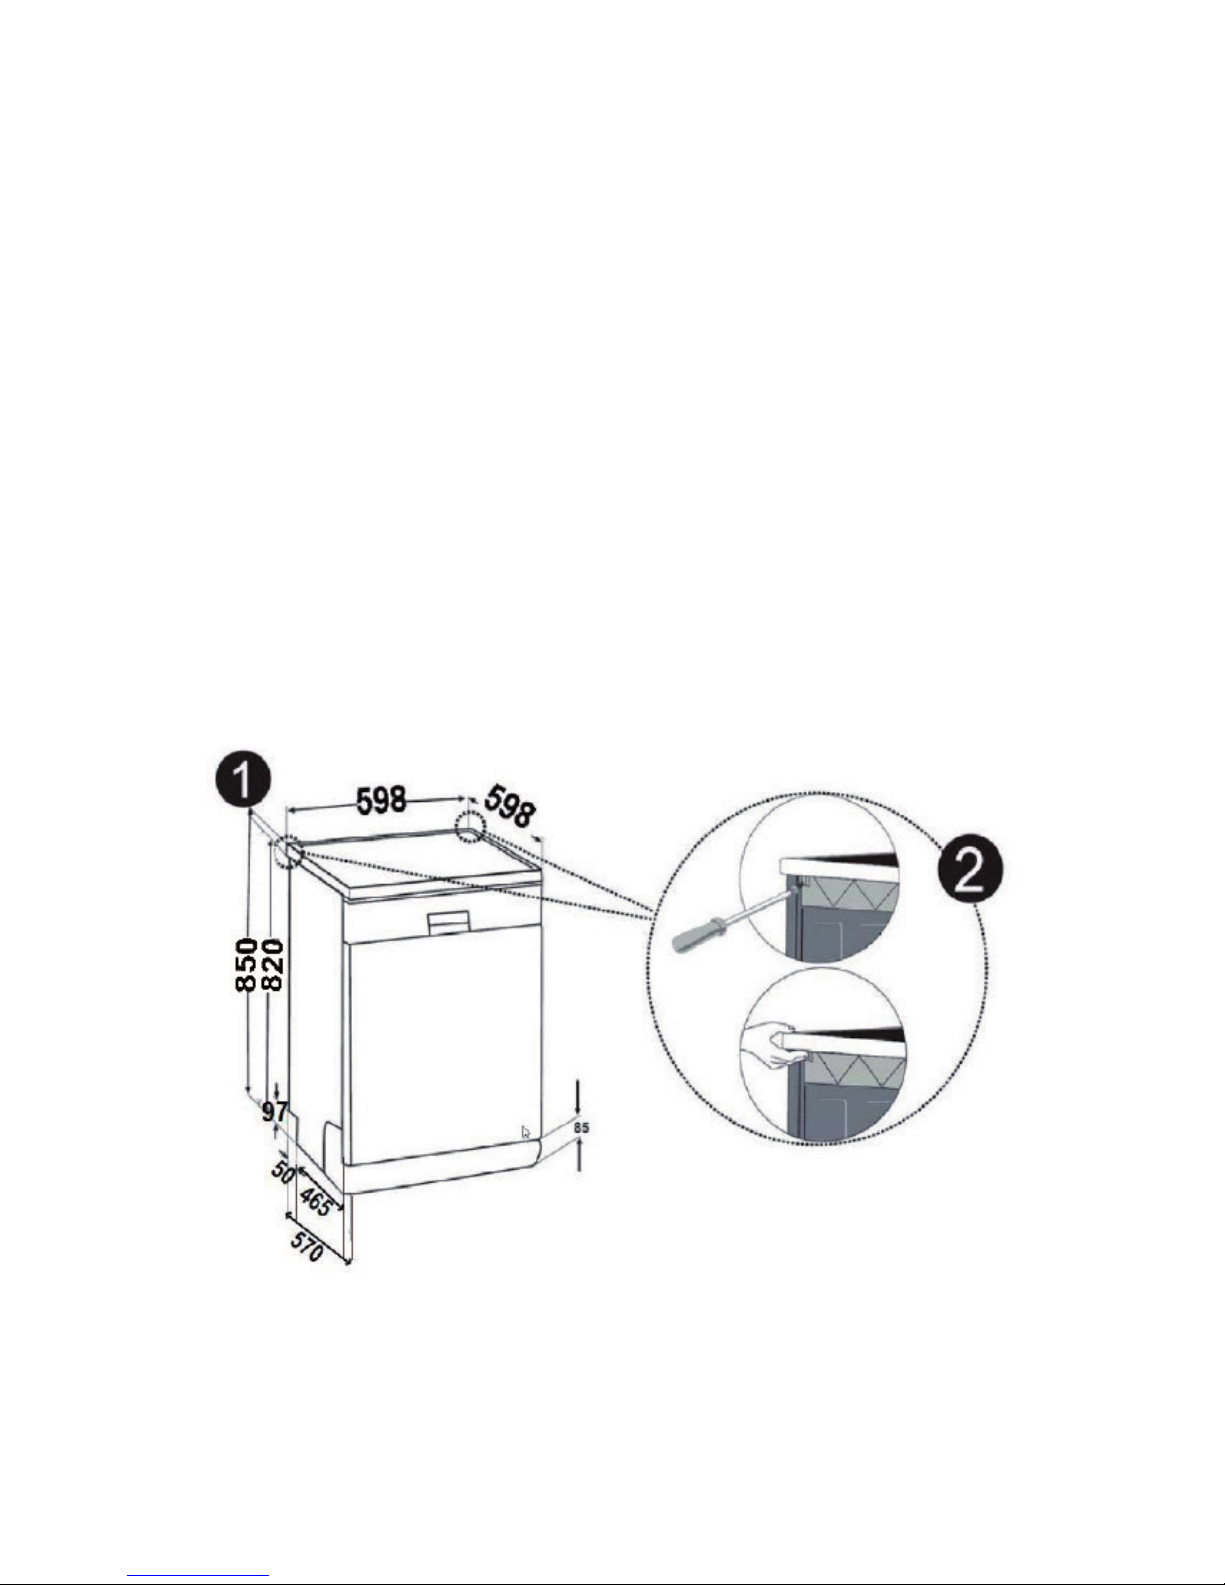
9
sufficient for the appliance and if
the electricity-water installation is
suitable.
1. If the clearance under the count-
er is suitable for the appliance,
remove the upper plate of the
appliance as shown in the figure.
2. In order to remove the upper
plate, remove the upper plate
screws behind the appliance that
are fixing the upper plate, push the
upper plate from the front towards
back for 1cm, lift and remove.
WARNING: The counter section
that you will place your appliance
by removing the upper plate must
be stable not to allow the appliance to be off-balance.
Page 14
10
3. Adjust the appliance feet ac-
cording to the inclination of the
floor. 4. Push the appliance to
place it under the counter by making sure that hoses are not bent or
twisted.
WARNING: Place the upper
plate in a closed space that has
the dimensions specified in the
figure after removing it from the
appliance.
H
Product Height
Without
insulation
material
With insulation
material
All products With 2
baskets
With 3
baskets
Height
(mm)
820mm 830mm 835mm
Page 15

11
Safety Information to be Followed During Cleaning and
Maintenance
• Clean your appliance regularly
as explained in "Cleaning and
Maintenance" chapter. Unplug
the appliance and close the tap
before starting maintenance
and cleaning.
• Don not wash your appliance
by pouring water over it.
Safety Information to be Followed During Handling and
Transport
• The appliance must be in its
original packaging during handling and transport to prevent
damage to its components.
• Do not drop the appliance
and protect it against impacts
during transport.
• Failures and damages occurred during handling after
delivery of the product to the
customer are not covered by
the warranty.
• If you need to carry the product, keep it in upright position
and hold it from the rear side.
Tilting the appliance forward
may cause its electronic parts
to get wet and damaged.
• Before you move the product,
disconnect the power plug
from the mains.
• Remove the water outlet and
water mains connections.
• Completely discharge the remaining water in the product.
Objects Not Suitable For
Washing in Dishwasher
• Cigarette ash, wax residue,
polish, oil, paint, dishes with
chemicals and steel and iron
alloy materials.
• Ivory with wood or bone handle, mother-of-pearl coated
forks, spoons, knives, glued
parts and abrasive, acidic or
alkaline chemicals and contaminated parts.
• Aluminium and silver materials
(matting and discolouring may
occur.)
• Some types of sensitive glass,
porcelain with decorative
prints, crystals, non-heat-resistant adhesive forks and knives,
lead crystal glasses, kitchen
boards, objects manufactured
with synthetic fibre.
Page 16

12
• Objects with absorbing properties such as sponge or cloth
cannot be washed in dishwasher.
WARNING: Make sure dinnerware that you will buy in the future
are suitable for washing in the
dishwasher.
Limitation of Liability
All technical information, operating instructions, operation and
maintenance of the device sections in this manual contain the
latest information about your
appliance. Manufacturer will not
accept any responsibility for any
damages and injuries caused by
failure to observe the instructions
in this manual, using the appliance
for purposes other than its intended use, repairing operations
by unauthorised persons, making
modifications on the appliance
without permission and using replacement parts not approved by
the manufacturer.
Important note for users:You
can access the digital version of
this manual via the address below:
"dishwasher@standardtest.info”.
Please add the model name and
serial number (20 digits) written
on the door of the product in the
subject of the e-mail.
Page 17

13
• The manufacturer reserves the right to make changes in design or
technical specifications.
Compliance with standards and test information/EC declaration
of conformity
All processes of the machine are carried out in accordance with the
rules stated in all directives of the European Union.
It is PCB-free. IEC 436/DIN 44990, EN 50242.
This product is compliant with the European CE Directives
No 2014/30/EU (Electromagnetic Compatibility Directive)
and 2014/35/EU (Low Voltage Directive-LVD).
It is in compliance with the WEEE Regulation.
Model VENUS-DV01
Washing Capacity Standard dinnerware for 14 people
Height 850mm
Height (Without table) 820mm
Width 598mm
Depth 598mm
Net Weight 62Kg
Power Inlet 220–240V, 50Hz
Total Power 1900W
Heater Power 1800W
Pump Power 100W
Drain Pump Power 30W
Water Pressure 0.03MPa (0.3 bar) - 1MPa (10 bar)
Current 10A
Technical Specifications
Page 18

14
JJ General Appearance
1
2
3
7
8
9
10
11
5
6
4
12
13
14
1. Upper table
2. Upper basket with racks
3.Upper spray arm
4.Lower basket
5.Lower spray arm
6. Filter Assembly
7.Information label
8.Control Panel
9.Detergent and Rinse Aid Container
10.Salt container
11.Upper basket stopper
12.Upper cutlery basket
13. Turbo drying unit:
The turbo drying system ensures more
ecient drying for your dishes.
14. Upper water jet:
Provides a better washing performance
for your dishes in the upper basket.
This image is only for information about the parts of the appliance. Parts may vary
according to the model of the appliance. Images are representative.
Page 19

15
Before Initial Use
• Check if electricity and supply water prop-
erties are in compliance with the values
specified in the installation instructions.
• Remove all packaging material in the ap-
pliance.
• Adjust the amount of softener according
to the hardness of the water.
• Add 1 kg of salt and water into the salt
container until it overflows.
• Fill the rinse aid container.
Preparing the Machine for Use
Importance of the water softening system
For a good washing function, your dishwasher needs soft water, i.e. water with less
lime. Otherwise white lime deposits will be
observed on internal components of your
appliance and on your dishes.
This will negatively aect the washing,
drying and rinsing performance of your
appliance. Water is cleaned of ions causing hardness when they pass through the
system and the water reaches the softness
required for the best washing result. Depending on the hardness level of the inlet
water, ions causing this hardness accumulate in the water softener system quickly.
Therefore, the softener system must be
cleaned to get the same performance
from the next wash. Dishwasher salt is used
for this purpose.
Filling the salt
Use special softening salt produced only for
use in dishwashers in your appliance. To add
the softening salt, first of all, remove the lower
basket
and rotate the cap of the salt container anti-clockwise (Figures 1 and 2) to remove it.
Fill the container with 1 kg salt and water until
it overflows in the initial use (Figure 3).You
can use a salt cone (if any) for an easier filling
process (Figure 4). Attach the cap again and
close it tightly by turning.
If the insucient salt warning lamp on the
control panel is lit, add salt into the container
again. Fill the salt container with water only
for the initial use. It is recommended to use
powder softening salt or salt with small granules. Do not use table salt in your appliance.
Otherwise, the softener container may lose
its function in time. When you operate your
dishwasher, the salt container and the internal container that includes the salt container
will be filled with water. Therefore, add the
softening salt before starting the dishwasher.
If you are not going to wash the dishes right
away, run a short washing programme when
the appliance is unloaded to prevent damage
to appliance by the salt overflowed when filling the salt container (to prevent corrosion).
Page 20

16
Test strip
Washing eciency of your appliance depends on the softness of the washing water.
Therefore, your appliance has a system that reduces the hardness of the mains water.
Washing eciency will increase if the system is set correctly. Find out the hardness of the
mains water by using the test strip (if available) to set the system.
Water Softening Adjustment
Water Hardness Level Adjustment Table
If the hardness of the water you use is more than 90dF (French hardness) or you are using
well water, it is recommended to use a filter and water purification devices.
NOTE: Water hardness level is 3 by default.
Water
hardness
degree
German
hardness
dH
French
hardness
dH
British
hardness
dH
Hardness level indicator
1 0-5 0-9 0-6 L1 will be displayed on the indicator.
2 6-11 10-20 7-14 L2 will be displayed on the indicator.
3 12-17 21-30 15-21 L3 will be displayed on the indicator.
4 18-22 31-40 22-28 L4 will be displayed on the indicator.
5 23-31 41-55 29-39 L5 will be displayed on the indicator.
6 32-50 56-90 40-63 L6 will be displayed on the indicator.
Open the
test strip.
Flow water
from your tap
for 1 minute.
Hold the
test strip
under
running
water for
1 second.
Shake the strip
after taking it
off the water.
Wait for 1
minute.
Adjust the water hardness level of your
appliance according to the test strip result.
1 min
1 second
1 minute
1 minute
1.Level
2.Level
3.Level
Soft
4. Level
5.Level
6.Level
Slightly hard
Hard
Medium
Highly hard
Extremely hard
Page 21

17
In accordance with the degree identified
on the test track, perform the water hardness setting of your machine as indicated
below.
Enter the settings menu to change the water hardness setting.
Use forward/backward keys to select the
Salt Level menu in the Settings and press
confirm. The water hardness level seen
in blue on the screen is the level that has
been saved the last.
SETTINGS MENU
WATER HARDNESS
To save a new key, select the desired level using forward/backward keys and press
confirm. The new level will be blue. Press
back to exit salt level setting.
Detergent use
Use detergents produced only for dishwashers.
Powder, liquid and tablet detergents produced specially for dishwashers are commercially available.
Detergent must be added to the container
before starting the appliance. Store detergents in a cool and dry place with their
packaging closed, away from children. Do
not fill the detergent container with detergent more than needed. This can cause
scratches on glasses and prevent complete
dissolution of the detergent. If your need
more information about the detergent to
you are going to use, consult detergent
manufacturers.
Filling the detergent container
To open the lid, the push detergent container latch as shown in the figure. 1
There are lines inside the detergent container
that show the levels. Use these lines to
determine the right amount of detergent.
Detergent container can take 40 cm3 detergent in total.
SETTINGS MENU
SALT LEVEL
Page 22

18
Open the detergent container of your dishwasher and fill detergent in the large section
b (section shown with b) of the detergent
container up to 25 cm3 if your dishes are heavily soiled and the machine is completely full, or
up to 15 cm3 if they are lightly soiled and the
machine is not completely full. 2 If your dishes
have waited for a long time, food residues dried
on them and the dishwasher is overloaded, add
5 cm3 detergent in the container marked with
a and start your machine. You can add more
detergent in your machine depending on the
soiling level of your dishes and the hardness of
the water in your area.
Combined detergents
Detergent manufacturers produce combined
detergents called 2 in 1, 3 in 1, 5 in 1, etc. 2 in
1 detergents include detergent + salt or rinse
aid. You must pay attention to the functions of
the tablet when using 2 in 1 detergents. Other
detergent tablets have extra functions such as
detergent+rinse aid+salt, etc. In general, combined detergents provide satisfying results in
certain conditions of use. These detergents
contain rinse aids and/or salt in pre-determined
amounts.
Things to consider when using such products:
• Check the properties of the product you will
use or check if it is a combined product.
• Check if the detergent used is suitable
for the
hardness of the mains water that the appliance
is connected to.
• Follow instructions on the packaging when using these products.
•
If these detergents are tablets, do not place
them inside the dishwasher or in the cutlery basket
Place tablets in the detergent section inside the
detergent container.
• These detergents provide good results only
for certain uses. If you use this type of detergent, you need to consult detergent manufacturers and find out the appropriate conditions
of use.
• These products oer savings in salt and/or
rinse aid consumption when usage conditions
and machine setting are correct.
• If you cannot achieve successful washing by
using 2-in-1 or 3-in-1 detergent (if your dishes
end up with lime deposits and are wet), consult
detergent manufacturers. Appliance warranty
does not cover complaints caused by the use of
these detergents.
Recommended usage; if you want to obtain
better results by using combined detergents,
add salt and rinse aid to your appliance, set water hardness and rinse aid settings to the lowest
(1) level.
Solubility of detergents produced as various
tablets by dierent manufacturers varies
depending on temperature and time. There-
fore, it is not recommended to use these
detergents in short programmes. It is more
suitable to use powder detergents in these
programmes.
Page 23

19
WARNING: If you experience a problem
you have not encountered before due to
use of such detergents, contact the detergent manufacturer. You can find contact
details on the packaging. When you give
up using combined detergents;
• Fill salt and rinse aid containers.
• Set the water hardness to the highest
(6) level and operate the machine with no
load.
• Adjust water hardness according to the
hardness of the mains water.
• Make suitable rinse aid setting.
Filling and adjusting rinse aid
Rinse aid is used to prevent formation of white
water drops, lime marks and stains in the form of
white layer on dishes and to improve drying performance. Contrary to popular belief, it is used
not only for dishes to be more shiny but also
to achieve sucient level of drying. Therefore,
make sure there is rinse aid in rinse aid container
and use rinse aids produced specially for use in
dishwashers.
If the rinse aid insucient warning lamp on the
control panel is lit, add rinse aid to the section
in the detergent container. Remove the rinse aid
section lid by turning it to add rinse aid. (Figure 1)
Add rinse aid until the rinse aid level indicator a b on rinse aid container becomes
dark (Figure 2), attach the lid again and
close it by turning it until the tabs face each
other.
You can also tell if your appliance requires additional rinse aid by checking the rinse aid indicator on the detergent container. Dark rinse
aid indicator b means there is sucient rinse aid
and light indicator a means it requires addition.
Rinse aid level setting can be set between 1-6
positions. Rinse aid is set to 3 by default. You can
use a flat screwdriver to set the rinse aid.
If water marks are observed on the dishes after washing, you need to increase the level. If
a blue mark is observed when wiped by hand,
you need to decrease the level. (Figure 3)
1
3
Page 24

20
WARNING: Only use rinse aids that are
approved for the machine. Wipe the overflowed rinse aid since it will reduce
the washing performance by creating excessive foam due to rinse aid residues.
Placing the Dishes in the
Dishwasher
Placing the dishes correctly will allow you
to get the best of your appliance in terms
of energy consumption, washing and drying performance. Your appliance has two
baskets where you can place your dishes.
You can place large and deep dishes such
as long-handled pots, pot covers, plates,
salad plates and cutlery in the lower basket. The upper basket has been designed
for tea saucers, dessert plates, salad bowls,
cups and glasses. Place glasses with long
handles and wine glasses at the edge of
the basket and against the rack, not on
other objects. Do not lean long glasses on
each other. They might get damaged by
hitting each other.
It is better to place objects with thin, narrow bodies in the middle of the baskets.
Place spoons among forks and knives to
prevent them from sticking to each other.
It is recommended to use the cutlery grid
for the best results. Place long and sharp
dishes such as serving forks, bread knives,
etc. with their sharp tips facing down or
horizontally on the dish baskets to prevent
possible injuries.
Unloading Washed Dishes
It is recommended to unload the lower
basket at first in order to prevent water
droplets to drop on dishes on the lower
basket while unloading the dishwasher.
After the washing programme, start unloading the dishwasher when the dishes are
cool enough so that you can touch them.
WARNING: Place your dishes in the machine so that they do not prevent rotation
of the upper and lower spray arms.
Page 25

21
Upper Basket
Rack with Height Adjustment
These racks have been designed to increase
the capacity of the upper basket. You can place
your cups and glasses on these racks. Thanks
to the adjustability of the racks, you can place
glasses of dierent sizes under the racks.
Height adjustment wire mounted on the basket
allows racks to be used in 2 dierent positions.
You can also place long knives, forks and
spoons on these racks horizontally for them not
to block the movement of spray arms.
Top basket height adjustment
The top basket of machine is in the upper
position.When you set the top basket to
the lower position, you can
place and wash big sized plates on the top
basket.
Open the basket retaining parts at the end
of top basket rails by turning them to the
sides, and take the basket
out. Change the position of the wheels;
reinstall the basket to the rail, and close
basket retainer parts. In this way,
you take the top basket to the lower po-
sition.
Upper Basket Horizontal Wire
The horizontal wire located on the upper
basket allows you to place your plates and
bowls when required. Moreover, you can
wash kitchenware such as pan or pot by
closing the horizontal wires.
Page 26

22
Lower Basket
Folding Wires
Folding wires consisting of four parts located in the lower basket of your machine
have been designed for you to place large
objects such as pots, bowls, etc. comfortably. You can create large spaces by folding each part one by one or all at once. You
can use folding wires by lifting them up or
folding them.
Page 27

23
Upper Cutlery Basket
The Upper Cutlery Basket has been designed for you to place forks, spoons,
knives, long scoops and small dishes.
Thanks to the fact that it can be easily
removed from the machine, you can take
o your dishes from the machine together
with the basket after they are washed.
The upper cutlery basket consists of two
parts. When you need to create a larger
space for dishes placed on the upper basket, you can obtain a larger volume by removing the left or right part of the upper
cutlery basket.
WARNING: Knives and other sharp objects must be placed in the cutlery drawer
in horizontal position.
Page 28

24
Alternative Basket Placement Methods
Lower Basket
Upper Basket
Wrong Placement Methods
Important Note For Test Organisations
For detailed information about performance tests, you can send a request e-mail
to the address below:
dishwasher@standardtest.info
Please include the model name and serial
number (20 digits) of the appliance to be
tested in your request e-mail. You can find
this information on the plate label attached
on the side of the door. You can ask for an
electronic copy of this manual via the same
e-mail above.
Page 29

25
Programme no 1 2 3 4 (reference) 5
Programme name Pre-wash Jet Wash 18 ' Quick 30 ' Eco 50°C ** Dual Pro Wash
Washing Temperature - 35°C 40°C 50°C 65°C
Food residue type Slightly soiled;
coffee, milk, tea
(not left for a
long time).
Slightly soiled;
coffee, milk, tea
(not left for a
long time).
Slightly soiled;
coffee, milk,
tea, cold meat,
vegetables
(not left for a
long time).
Slightly soiled;
coffee, milk,
tea, cold meat,
vegetables (not left
for a long time).
Soups, sauces,
pastries, eggs,
pilaf, potatoes
and oven dishes,
fries (left for a
long time).
Soil level Light Light Light Medium Heavy
Detergent amount
B:25 cm3 / A : 5 cm3
- A B A+B A+B
Detergent Type Detergent
cannot be used.
Powder: 25 cm3
Gel
Powder: 25 cm3
Gel
Powder: 25+5 cm3
Tablet
Capsule
Powder:
25+5 cm3
Tablet
Capsule
Pre-wash 35°C Wash 40°C Wash 50°C Wash 40°C Wash
End Warm Rinse Cold Rinse Cold Rinse 65°C Wash
End Warm Rinse Warm Rinse Lukewarm Rinse
End Drying Warm Rinse
End Drying
End
Program duration (min) 15 18 30 207 116
Power Consumption
(kWh/h)
0.02 0.57 0.74 0.66 1.43
Water Consumption (l) 4.2 7.7 10.9 9.0 15.4
When 1/2 Half load function is selected, values will be as follows;
Program duration (min) 15 18 30 156 96
Power Consumption
(kWh/h)
0.02 0.57 0.74 0.61 0.97
Water Consumption (l) 4.2 7.7 10.9 9.0 11.1
WARNING: Jet Wash 18’, Quick 30’ and Super 50’ programmes do not have a drying step. Tests in Off mode
and Left On modes must be carried out when brightness is set to "Energy Save" according to EN 62301. The
values declared above are values obtained in laboratory setting according to relevant standards. These values
may vary depending on the product use and the environmental (mains voltage, water pressure, water inlet
temperature and ambient temperature) conditions. **Energy Save option is ON for the Eco 50°C programme
Programme Definition
Page 30

26
Programme no 6 7 8 9 10
Programme name Super 50 ' Auto Sensitive
30-50°C
Auto Normal
50-60°C
Auto Intensive
60-70°C
Steam Wash 65°C
Washing
Temperature
65°C 30-50°C 50-60°C 60-70°C 65°C
Food residue type Soups, sauces, pastries,
eggs, pilaf potatoes,
oven dishes, and fries
left for a long time.
Temperature and amount of the washing water and the
washing duration are automatically adjusted by detecting
the soil level of the dishes.
Soil level Medium Light Heavy Heavy Heavy
Detergent amount
B:25 cm3 / A : 5 cm3
A+B A A+B A+B A+B
Detergent Type Powder: 25 cm3
Capsule
Powder: 25 cm3
Gel
Powder:
25+5 cm3
Tablet
Powder:
25+5 cm3
Tablet
Powder: 25+5 cm3
Tablet
Capsule
65°C Wash Washing steps are determined automatically based on
the soil level.
Pre-wash
Lukewarm Rinse 65°C Wash
Warm Rinse Cold Rinse
End Lukewarm Rinse
Warm Rinse
Drying
End
Program
duration (min)
50 79-93 102-124 107-182 144
Power
Consumption
(kWh/h)
1.29 0.92 1.18 1.58 1.30
Water
Consumption (l)
10.7 10.6-17.7 10.9-18.5 12.3-24.6 20.3
When 1/2 Half load function is selected, values will be as follows;
Program
duration (min)
46 70-81 87-104 92-162 124
Power
Consumption
(kWh/h)
1.23 0.87 1.11 1.28 1.28
Water
Consumption (l)
10.7 9.9-13.7 10.5-14.3 11.9-19.9 15.6
Programme Definition
Dual Pro Wash: This program can wash sensitive/slightly soiled dishes and heavily soiled
dishes at the same time. In this program, the upper spray arm rotates with low speed and the
lower spray arm rotates with high speed. In this way, you can wash sensitive/slightly soiled
dishes in the upper basket and heavily soiled dishes in the lower basket at the same time.
Page 31

27
When you operate your machine for the
first time, the following menus will be
shown on the display of the machine for
you to make your initial settings:
• Language Selection
• Hour
• Minute
• Year
• Month
• Day
• Salt Level
Language Selection
Language at the center of the screen is
the one ready for selection. Use forward/
backward keys located at the left and right
hand sides of the display to change your
selection. Press the confirm key ( ) on
the bottom-right corner to save the language ready for selection.
Hour
00:00 will be shown on the display. Change
the first two digits from the left that are
blue using forward/backward keys to set
the hour. Press confirm to save the hour
setting. Press the back ( ) key found at
the bottom-left corner of the display if you
do not want to save. You will be redirected
to the previous screen.
Minute
Change the first two digits from the right
that are blue using forward/backward keys
to set the minute. Press confirm to save
the minute setting. Press the back key if
you do not want to save. You will be redirected to the previous screen.
Preparing the Machine for Use and Installation
Year
Factory setting of your machine on the
screen will be 2016. Press the forward key
to change this selection. Press confirm
to save the selection at the center of the
screen or press back to return to previous
screen without saving.
Month
Factory setting of your machine on the
screen will be 01. Press the forward key to
change the month selection. Press confirm
to save the selection or press back to return to the previous screen without saving.
Day
Factory setting of your machine on the
screen will be 01. Press the forward key to
change the day selection. Press confirm to
save the selection or press back to return
to the previous screen without saving.
Salt Level
Salt level of your machine will be 3 by
default. Use forward/backward keys to
change this setting. Press confirm to save
the blue selection at the center of the
screen or press back to return to the previous screen without saving.
The startup screen will be displayed for 5
seconds when you have saved your salt
level setting.
Page 32

28
Programme Selection and
Operating the Machine
1. On/O Key
The machine will be energised when the
On/O key is pressed and held for 3 seconds and the screen will be turned on with
the Eco 50°C programme. The machine
will be switched o when you press and
hold the On/O key for 3 seconds again
and the display will turn black.
2. Programme Key P
It allows you to select the appropriate program.
3. Option Key
It allows you to use the functions in the additional functions menu.
4. Time Delay Key
It allows you to delay the starting time of
the selected programme for a period between 30 minutes to 24 hours. You can see
the delay time on the Remaining Time/
Delay Time Indicator. "DELAY ACTIVE!"
will be shown on the display when the delay function is selected.
5. Settings Key
You can navigate the settings menu by
pressing the settings key before starting
the programme.
6. Favourites Key
It allows you to enter the "FAVOURITES" menu that includes 5 favourite programmes you have previously saved.
7. Start/Pause Key
When you press the Start/Pause key, the
programme you have selected will start
and the washing bar will be shown on the
display. You can track the time remaining
until the end of the washing on the display. If you press this key during an active
program, the program will pause and the
remaining time will stop. The program will
resume when you press this key again.
Additional Options
Extra Hygiene Option
You can select the hygiene option for dishes requiring extra hygiene and achieve
a more hygienic wash by changing the
washing temperature and duration of the
current programme.
Detergent Tablet Option
Please use the Detergent Tablet option
when using combined detergents containing salt, rinse aid and extra features.
Half Load Option
With the half load option, three dierent
washes can be performed, namely in the
upper basket, lower basket and both baskets. If you have a small amount of dishes
you need to wash in the machine, you can
activate the half load option as an addition to some programs. If you have dishes
in both baskets, select the icon that lights
both figures by selecting the half load option .
If you have dishes in the upper basket only,
select the icon where the figure above is
lit . Therefore, only the upper basket of
your machine will perform washing. For
Page 33

29
this reason, make sure you do not have
dishes in the lower basket. If you have dishes in the lower basket only, select the icon
where the figure below is lit . Therefore,
only the lower basket of your machine will
perform washing. Make sure that there are
no dishes in the upper basket while using
this feature.
Extra Quick Option
It increases the pressure of the selected
programme, thus shortens its duration and
reduces the amount of water.
Extra Silent Option
Allows for a sensitive and silent washing
cycle by making the programme wash the
dishes with lower pressure.
Extra Drying Option
Using the extra drying option, you can have
drier dishes by adding extra drying steps to
the programme you have selected.
Energy Save Option
Thanks to the energy save option, the automatic door opening mechanism will be
activated when the programme is complete. Door will open for 10 cm when drying and rinsing is complete and the steam
in the machine will be released for a better
drying performance.
Warning Indicators
Salt Refill Warning Indicator
"Salt refill" warning will be displayed when
the softening salt in your machine is insufficient. When you the see salt refill warning
indicator, fill the salt compartment.
Rinse Aid Refill Warning Indicator
"Rinse Aid Refill" warning will be displayed
when the rinse aid in your machine is insucient. When you see the rinse aid refill
warning indicator, fill the rinse aid compartment.
Programme Selection and
Operating the Machine
1. Press and hold the On/O key for 3
seconds.
NOTE: Select the washing programme
according to your dishes, using the programme report page provided in the user
manual.
2. According to the eco design requirements, Eco 50°C program will be selected
and the energy saving function will be active every time your machine is energised.
03 : 27
23 : 46
P
AUTO
DOOR
Eco
3. Select the desired programme by pressing the programme key successively.
NOTE: You can follow the programme
duration from the time indicator.
4. You can use the options key to select
additional options for your programmes.
5. You can start the programme by pressing the Start/Pause key. "WASHING"
will be shown on the display and the programme you have selected will start.
Page 34

30
00:44
...
1
4
3
2
03:27
AUTO
DOOR
WASHING
Eco
When the programme starts working, you
can track the name of the programme on
the display information line (1), the remaining time on the remaining time indicator
(2), the progress of the programme on the
washing bar (3), the options you have selected on the options indicator (4).
NOTE: Be careful not to open the door of
the machine while it is running. If you need
to open, pause the programme by pressing the Start/Pause key. "PROGRAMME
STOPPED!" warning will be shown on the
display. You can open the door after you
have seen this warning.
00:44
PROGRAM DURDURULDU
...
03:27
AUTO
DOOR
PROGRAM PAUSED
Eco
Steam may be released when you open
the door of your machine. Be careful. Press
the Start/Pause key again after closing the
machine door. The programme will resume and the screen will display "WASHING" warning.
Programme Monitoring
You can track the progress of the programme using the washing bar, remaining
time and program tracking expressions
(washing, program finished) on the display.
Do not open the door before you see the
"PROGRAM FINISHED!" warning.
NOTE: If the door of the machine is
opened or power gets disconnected
during washing, the programme will resume when the door is closed or the power
is supplied again.
NOTE: In order for the drying process
to be performed more quickly, you may
slightly open the machine door after a few
minutes when the programme has ended and you have seen the "PROGRAM
ENDED" warning.
NOTE: Water softening process is performed in your machine depending on the
hardness level of the mains water. Therefore, the remaining time on the display
towards the end the programme in some
washes can be dierent from the time
shown at the beginning. Total duration
of the washing programme may change
during the programme depending on the
room temperature, mains water temperature and the amount of dishes in the machine.
Page 35

31
Adding Additional Options to the Programme
You can change the programme you have selected according to your preferences by
adding additional options. Washing programmes have been designed to achieve the best
cleaning performance considering the soil type and the amount of your dishes and properties of the dishes. Additional options in the washing programmes have been created for
you to save water and electricity and achieve a more comfortable washing according to
the conditions specific to you. For example, if you think your dishes are slightly soiled, you
can make the selected programme more economical using the Extra Quick Option and
achieve time and water savings.
If you are going to use multipurpose detergent, you'll get a better drying performance
when you use the detergent tablet option. If you are living in an area where power consumption is cheaper at night, you can achieve a more economical wash without the disturbing noise by setting your machine to the Extra Silent Option. Extra Silent Option has
also been designed to perform a more sensitive washing for your dishes.
Additional Options are not suitable for all washing programmes. You can find the suitableoptions for the programmes below. You will notice that the option indicator will turn o
if the option cannot be selected.
Programmes Functions
Time
Delay
Half
load
Tablet Child
lock
Extra
Quick
Extra
Hygiene
Extra
Silent
Extra
Drying
Energy
Saving
Pre-wash - - - - -
Jet Wash 18’ - - - - -
Quick 30 ' - - - -
Economical
50°C
Dual Pro
Wash
Super 50 ' - -
Auto Sensitive
30-50°C
- -
Auto Normal
50-60°C
- -
Auto Intensive
60-70°C
- -
Steam Wash - - -
Page 36

32
"-" Function cannot be selected " " function can be selected.
To Add Additional Options to the Programme;
1. Select the desired washing programme suitable for your dishes by pressing the pro-
gramme key successively.
2. Press the options key to access the "OPTIONS" menu. The option icon at the center
of the display is the one ready for selection. Bring the option you want to add to the
programme using the Forward/Backward keys and press the confirm key. Icons of the
selected additional option will turn blue.
3.
Return to the ready position screen by pressing the backward key. This screen that shows
the selected programme and options indicates that the machine is ready for washing.
4. You can start the programme by pressing the Start/Pause key. The screen will display
"WASHING" warning. Some functions cannot be selected at the same time. You can
check the chart below for this.
Options
Time
Delay
Half
load
Tablet Child
lock
Extra
Quick
Extra
Hygiene
Extra
Silent
Extra
Drying
Energy
Saving
Time Delay
Half load
Tablet
Child lock
Extra Quick - -
Extra Hygiene - - -
Extra Silent - -
Extra Drying -
Energy Saving
If you want to return to the ready position screen without selecting an additional programme, you can press the back key.
"-" Function cannot be selected " " function can be selected.
Cancelling the Programme
1. Press the cancel key located on the left-hand side of washing bar to cancel a pro-
gramme in progress.
2. The display will show "Programme will be cancelled. Confirm?" warning.
Page 37

33
CONFIRMATION OF CANCELLATION
Programm will be canceled.
Could you confirm please ?
3. The programme will be cancelled when
you press the confirm key on the bottom-right corner of the display and the
display will show "CANCELLING".
00:01
CANCELLING
AUTO
DOOR
Eco
4. 1 minute after the process begins,
"PROGRAMME FINISHED" warning
will be displayed.
5. After this warning, you can select a new
programme, additional options or time
setting by pressing the back key.
NOTE: Detergent or rinse aid residues
may be present in the machine or on the
dishes being washed depending on the
washing step of the programme you have
canceled.
Settings Menu
Press the settings key to access the settings menu. Menu contents are as follows;
1. Salt level
2. Economical time
3. Economical mode
4. Hour setting
5. Date setting
6. Volume setting
7. Display brightness
8. Language Selection
9. Factory settings
Press back to exit the menu.
NOTE: You can access the short details of
the related menu by pressing the info key
on the top right corner of the screen.
1. Salt Level
This is the first setting you will see when
you access menu settings. Salt Level icon
is at the center of the screen and "Salt Level" expression is below it. Press confirm to
enter the salt level menu. Salt Level is "3",
shown in blue when you first start your machine. 1 is the lowest salt level and 6 is the
highest. Select the new salt level by pressing the forward/backward key and press
confirm. The new salt level selected will be
saved to memory.
2. Economical time
Economical time indicator shows the timeline when energy usage is ecient. Press
the confirm key to access the Economical Time menu. Economical time range is
between 22:00-06:00 when you first start
your machine. Time on the left -hand side
of the display shows the starting time and
the one on the right-hand side shows the
finishing time. Select the starting time section to set the starting time. Then press
confirm. Starting time will turn blue. Select
the new time by increasing/decreasing by
one hour using the forward/backward key.
Setting will not be saved when you press
back key and the new starting time will be
saved when you press confirm. Switch to
the end time setting by pressing the forward key. Select the end time section to
set the end time. Then press confirm. End
Page 38

34
time will turn blue. Select the new time by
increasing/decreasing by one hour using
the forward/backward key. Setting will not
be saved when you press the back key and
the new end time will be saved when you
press confirm. Thus, economical time interval setting will be completed.
3. Economical mode
The internal illumination that is lit when you
open the door of the machine when eco
mode is active will turn o 4 minutes later
and the machine will switch o 2 minutes
after the program ends, in order to provide
energy saving. The latest selected setting
is blue in the eco mode menu. Select "Yes"
with the forward/backward key to activate
the eco mode and press confirm. Select
"No" with the forward/backward key to
deactivate the eco mode and press confirm. In this case, internal illumination will
be lit as long as the door is open.
4. Hour setting
Switch to "HOUR SETTING" menu using the Forward/backward keys. When you
enter the "HOUR SETTING" by pressing
confirm, hour section is selected. New
hour can be set when you press confirm.
You can select the desired hour by pressing Forward/Backward. The new hour is
set by pressing confirm. The hour set will
not be saved if you press back instead of
confirm. Switch to the minute setting section by pressing forward. New minute can
be set when you press confirm. You can
select the desired minute by pressing Forward/Backward. The new minute is set by
pressing confirm and the new hour setting
will be saved. The minute set will not be
not saved if you press back instead of con-
firm.
5. Date setting
Switch to the "DATE SETTING" menu
using the Forward/backward keys. When
you enter "DATE SETTING" by pressing
confirm, "DAY" section will be shown at
first. Press confirm to change the day on
the display. Change the selection using the
"Forward/Backward" keys and press confirm to save.
Secondly, "MONTH" section will be
shown when you press forward. Follow the
steps you followed during the day setting
to change the selection.
Finally, move to the "YEAR" section. Follow the steps you followed during day and
month settings to change the selected
year.
6. Volume setting
You can set the level of the audio warnings
that your machine emits. Volume level is
"2", shown in blue when you first start your
machine. 0 is the silent level and 5 is the
highest volume level. Select the desired
volume level using forward/backward keys
after entering the menu, and the newly selected volume level will be saved by pressing confirm.
7. Display brightness
You can adjust the display brightness of
your machine here. Display brightness level is "2", shown in blue when you first start
your machine. 0 is the lowest brightness
level and 5 is the highest . Select the desired brightness level using forward/backward keys after entering the menu, and
the newly selected level will be saved by
pressing confirm.
Page 39

35
8. Language Selection
Switch to the "LANGUAGE SELECTION" menu using Forward/backward
keys. Press confirm to enter the Language
Selection menu. Language selected in
blue shows the selected language. Select
the new language using forward/backward
keys, and the newly selected language will
be saved by pressing confirm.
9. Factory settings
Move to the "FACTORY SETTINGS"
section using forward/backward keys.
Press confirm to enter the "FACTORY
SETTINGS" menu.
When you enter the menu, "Yes" will be
selected and "All your settings will be reset. Do you confirm?" expression will be
displayed when you confirm with the confirm key. Press cancel if you do not confirm. Press confirm if you confirm and your
machine will return to the Factory settings.
Factory settings menu will appear again.
Your machine's factory settings are as follows;
• Favourite programmes are deleted
• Eco-mode is active
• Volume level is 2
• Display brightness level is 2
• Economical time interval is between
22:00-06:00
• Hour is 00:00
• Date is 01.01.2016
Your settings will not be changed if you select "No" and press confirm.
Favourite Programme Setting
You can add the programmes and options
that you consider are best for your dishes
and you frequently use to the programmes
list in the favourites menu. To set your fa-
vourite programme;
1. Select the programme that you want to
select with the programme key.
2. Add the suitable options for the wash
using the options key if you want to add
additional options to this programme.
3. When you press the favourites key after
completing your programme and option selection, the screen below will be displayed.
Favorite 1
Favorite 1
FAVORITE PROGRAM SELECTION
OK
4. Use forward/backward keys to save
the selection in any of the selections (Favoruite1, Favourite2, Favourite3, Favourite4 and Favourite5).
5. Move Favourite1 to the center of the
screen using forward/backward keys if
your are going to save the selection to Favourite1.
6. Press the back key if you do not want
to save.
7. If you want to save, press confirm. "Favourite created" warning will appear on the
display.
Favorite 1
Favorite 1
FAVORITE PROGRAM CREATED
OK
8. You will be redirected to the favourite
Page 40

36
programme selection menu when you
press confirm again.
9. Press "OK" in the following screen to
start the favourite programme you have
set.
Favorite 1
Favorite 1
FAVORITE PROGRAMME SELECTION
OK
10. After you press "OK", your favourite
programme and options you have added
will be displayed on the screen.
Child (Key) Lock
You can prevent others from changing
your settings while your machine is operating. Press and hold the child lock key on
the top left corner of the screen for 3 sec
after the program has started.
YIKIYOR...
AUTO
DOOR
03:27
WASHING
Eco
The child lock will be activated at the end
of this time and the screen will show "Child
lock active" and warning will be heard for 3
seconds.
CHILD LOCK
ACTIVE
Child lock indicator on the top left corner
of the screen will turn to the locked position. All keys are non-functional when the
child lock is active.
"Child lock" active warning will be displayed and a warning tone will be heard
when you press a key when the
child lock is active.
Press and hold the child lock key for 3 seconds to cancel the child lock. "Child lock
disabled" warning will be displayed on the
screen and a warning tone will be heard.
Child lock indicator will turn to unlocked
position.
CHILD LOCK
CANCEL
Time Delay for Wash Programme
(Delay):
You can delay the starting time of the selected programme up to 24 hours. Delay
setting cannot be made after the programme has started. The selected programme should not be started for you to
set the delay dime.
Page 41

37
1. Press the delay key and increase delay
for the time required for the delay.
2. Set the delay time to the desired time
using forward/backward keys. Delay time
is increased for 30 minutes with the forward key and decreased for 30 minutes
with the backward key. Select the delay
time by pressing the confirm key. You can
start the delay time countdown by pressing the start/pause key. The display will
show "Delay active", and the delay time
and the programme time will be alternately shown on the display until the end of this
time. The selected programme will start
when countdown ends. The time required
for the started programme to end will be
shown on the indicator display. All keys
except for On/O and Delay keys will be
disabled when delay is active.
If you want to cancel or set a new time
when the machine is in delay
Press the delay key to cancel the delay and
press confirm by selecting "00:00" as the
delay time. The display will show the latest
selected programme and options. Delay
time will not be shown.
Press the delay key again to set a new
delay time. Select the new time using forward/backward keys and press the start/
pause key to start the delay time.
Warning Messages
Your machine gives some feedback
through warning messages during operation;
When you see "Open the tap" warning;
1. Make sure water is not cut o.
2. Make sure the tap is open.
3. Call the authorised service if there is wa-
ter and the tap is open.
When you see the messages above, error
codes are stated before definitions. You
can find these details in "Things to be
Done in Case of Simple Failures" section
of your manual.
Page 42

38
Cleaning and Maintenance
When the appliance is regularly cleaned,
its service life will increase and the possibility of frequently experienced problems
will be minimized.
Oil and lime may accumulate in the washing area of the appliance. In case of such
accumulation,
— Fill the detergent section before
placing dishes in the appliance and run
the appliance by selecting a high temperature programme. Use special cleaning
products available in the market if it is not
sucient. (Special cleaning products produced for these appliances by detergent
manufacturers.)
Cleaning door seals of the appliance
— Wipe the door seals using a damp cloth
to clean deposits accumulated on door
seals.
Cleaning the Appliance
Clean filters and spray arms at least once
a week. Unplug your device and close the
tap before cleaning your appliance.
Do not use abrasive materials (powder
detergent, hard sponges) while cleaning
your appliance. Wipe using a soft cleaning
product and a damp cloth. Use a damp
cloth to wipe the control panel.
Filters
Check if there are food residues on thick
and thin filters. If there are food residues,
remove filters and wash them under the
tap thoroughly.
a. Micro Filter
b. Coarse Filter
c. Metal/Plastic Filter
Turn the filter assembly counter-clockwise
to remove and clean. (picture 1 ) Pull and
remove metal/plastic filter. (picture 3)
Then, pull and remove coarse filter from
the inside of micro filter. (picture 2) Wash
these three filters under the tap thoroughly. Replace metal/plastic filter. Place
the coarse filter inside the micro filter by
aligning the marks. Insert the micro filter
inside metal/plastic filter, turn it in the
direction of the arrow. Micro filter will be
locked when the arrow on it is seen when
looked straight. (picture 4)
Page 43

39
Never use the dishwasher without filters.
• Failure to install filters correctly will reduce the eectiveness of washing.
• Filter cleaning is very important in terms
of proper functioning of the appliance.
Spray Arms
Check if top and bottom spray arm holes
are clogged. If there is clogging
remove spray arms and clean them under
running water.
Remove the lower spray arm by pulling
it up and the upper spray arm by turning
the arm nut left.
When installing the top spray arm, make
sure the nut is securely tightened.
Hose Filter
The filter on water inlet hose will prevent
contamination (sand, clay, etc.) that may
come from city network or your plumbing.
Check the filter and the hose regularly
and clean if required. Close the tap first
and remove the hose to clean the filter.
Remove the filter from the hose and clean
it under running water. Replace the clean
filter in its place in the hose. Replace the
hose.
Page 44

40
Troubleshooting
When you notice an abnormal situation in your appliance, you may attempt to troubleshoot according to the following descriptions. If your appliance does not still operate
properly, contact to Vestel Call Center. You may access the authorized services list from
the web site.
PROBLEM CAUSE SOLUTION
Programme does not
start.
Power outage.
Wait for the power to
come.
On/off switch is not on.
Switch on your dishwasher.
Fuse is burnt. Replace the fuse.
It is not plugged in. Plug in the appliance.
Appliance door is open. Close the appliance door.
Water inlet tap is closed. Open the water inlet tap.
Water inlet and appliance
filters are clogged.
Clean water inlet and
appliance filters.
There is still water in the
appliance after programme ends.
Water discharging hose
may be clogged or bent.
Clean objects causing the
clogging and restart the
appliance.
Filters are clogged.
Program has not ended.
Wait for the end of the
program.
Detergent residues in
detergent container.
Detergent may be placed
when the container is still
wet.
Dry the detergent container by wiping with a dry
cloth.
Page 45

41
PROBLEM CAUSE SOLUTION
Vibration and impact
sounds during washing.
Dishes are not placed
correctly.
Place dishes correctly.
Spray arm hits dishes.
Spray arms may not be
installed.
Install spray arms.
There are food residues
on dishes.
Sprayed water does not
reach these areas.
Place dishes properly for
them not to block each
other.
Dishes are leaning against
each other.
Dishwasher basket is
overloaded.
Place dishes properly,
remove excessive dishes.
Filters are clogged.
Open the filters by
cleaning.
Filters are not installed
properly.
Install filters properly.
Water discharge pump
may be clogged.
Consult a service agent.
Too little detergent.
Put the amount of
detergent specified in the
manual.
Unsuitable detergent is
used.
Use a different detergent
brand.
Spray arm is clogged with
food residues.
Clean the spray arm.
An unsuitable, insufficient
wash program is selected.
Select the programme
suitable for your dishes
referring to programme
chapter in the manual.
Page 46

42
PROBLEM CAUSE SOLUTION
Appliance stops during
washing.
Power cut. Wait for the power to come.
Program may be in standby mode.
Start the program by cancelling the standby mode.
Problem in water inlet.
Check if water hose is clogged, clean the clogging.
Dishes have whitish spots.
Too little detergent.
Use required amount of
detergent.
Rinse aid setting is too
low.
Increase rinse aid setting.
Special salt is not used
although water hardness
is high.
Fill the appliance with salt
produced specially for your
dishwasher.
Salt section cover is not
closed.
Close the salt section cover.
Make sure it is closed properly.
Dishes do not dry.
A programme with no
drying process is selected.
Check the programme
chapter in the manual and
select a programme with
drying process.
Rinse aid dose is too low. Increase rinse aid setting.
Dishes have rust marks.
Mains grounding is not
proper.
Have an electrician check
your mains grounding.
Dishes have low stainless
steel quality.
Make sure kitchenware used
in the dishwasher have sufficient stainless steel quality.
Washing water salt level
is high.
Lower value of salt setting.
Salt section cover is not
closed.
Close the salt section cover.
Make sure it is tightly closed.
Salt might be overflown
inside the appliance
during filling.
Make sure salt does not
overflow during filling. Clean
the excessive salt by wiping
with a cloth.
Page 47

43
Things To Be Done In Case Of Simple Failures
Your appliance will report the cause of the error as an error code if it is in failure
mode. Error codes will be displayed on the screen of your appliance. Following
chart shows these error codes, their definitions and points to be checked.
ERROR
CODE
ERROR DEFINITION CONTROL
F5 Water inlet is inadequate
Make sure that the water inlet tap is completely turned on and
the water is not cut off.
Turn off the water inlet tap and clean the filter on the connecting terminal of the hose by removing the water inlet hose from
the tap.
Switch on your machine again and if the failure persists, consult
a service agent.
F3
Continuous water intake
failure
Close the tap
Consult a service agent.
F2
The machine can no longer
discharge the water.
The water discharging hose may be clogged.
The filters of your machine may be clogged.
Switch your machine off and on and enable the programme
cancellation command
If the failure persists, consult a service agent.
F8 Heater failure
Consult a service agent.
F1
The anti-overflowing alert
is active
Turn off the appliance and close the tap.
Consult a service agent.
F7
Overheating failure (the
temperature inside the
machine is too high)
Consult a service agent.
F9 Divisor position error
Consult a service agent.
F6
Temperature sensor is
faulty
Consult a service agent.
FE
Electronic card parameter
identification failure
As a result of very sudden and sustained voltage dips, the electronic card cannot keep the software variables in the memory.
The programme will resume after being re-operated. The mains
voltage must be checked.
Page 48

44
Manufacturer's name or trademark DUDOFF
Product model
VENUS-DV01
Standard nominal capacity 14
Energy efficiency class A+++
Annual energy consumption (AEC) (kWh/year) * 189
Energy consumption of the standard
cleaning cycle (EC)
0.66
Off mode power consumption (W) 0.10
On mode power consumption (W) 1.00
Annual water consumption (AWC) (l/year) ** 2520
Drying efficiency class *** A
Standard program name **** Economical 50°C
Standard program duration (min) 207
Acoustic noise emission dB (A) 44
Freestanding/Built-in Freestanding
* Calculated based on 280 standard cleaning cycles in cold water and energy consumption
in low power modes is 189 kWh/year. Actual energy consumption may vary according to
the use of the appliance.
** Annual water consumption calculated based on 280 standard cleaning cycles is 2520
litres. Actual water consumption may vary depending on the use of the appliance.
*** Drying efficiency class is within the range from A, G (lowest efficiency) to A (most
efficient).
**** Economical 50°C programme is suitable to clean averagely dirty kitchenware and it
is the most efficient programme with combined energy and water consumption.
Product Information Slip
Page 49

Kılavuz Kodu
 Loading...