

Page 1
MIXED
INDUCTION / HI-LIGHT
VITROCERAMIC HOB
MH-F3BS
User Instructions
C
Page 2
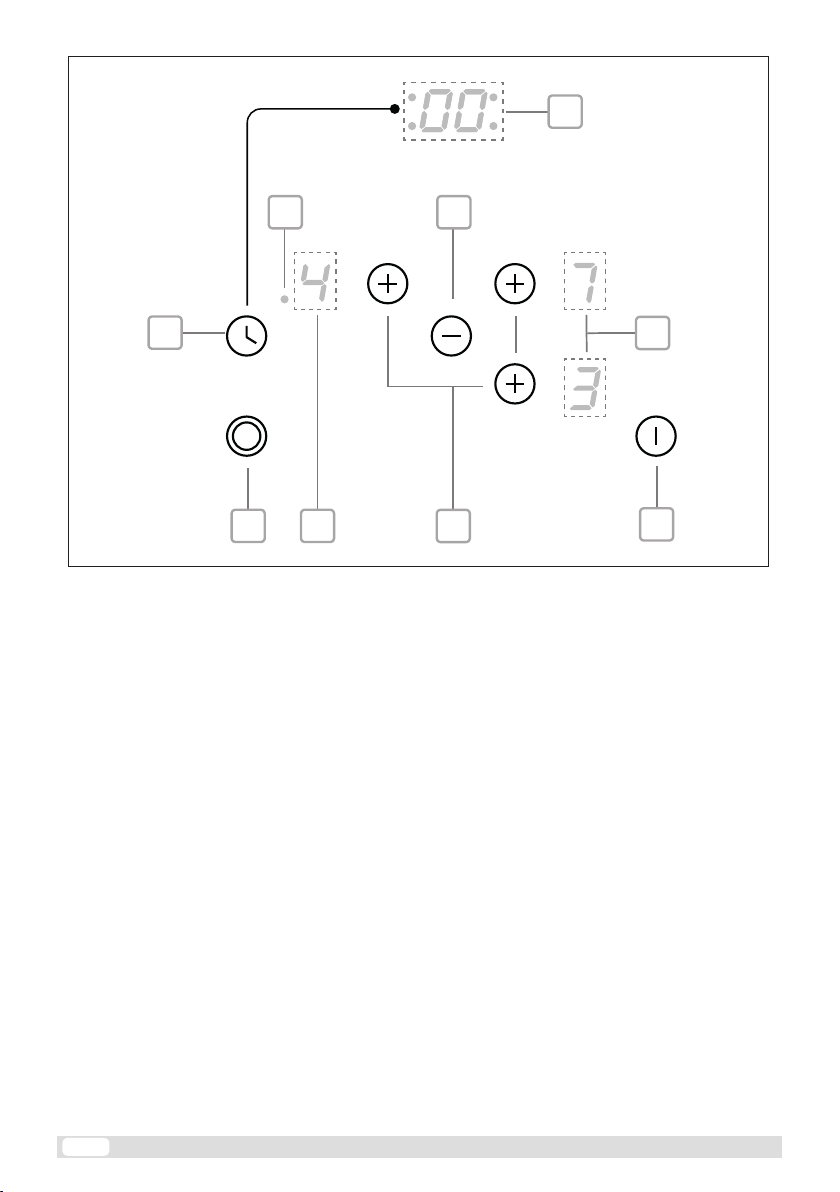
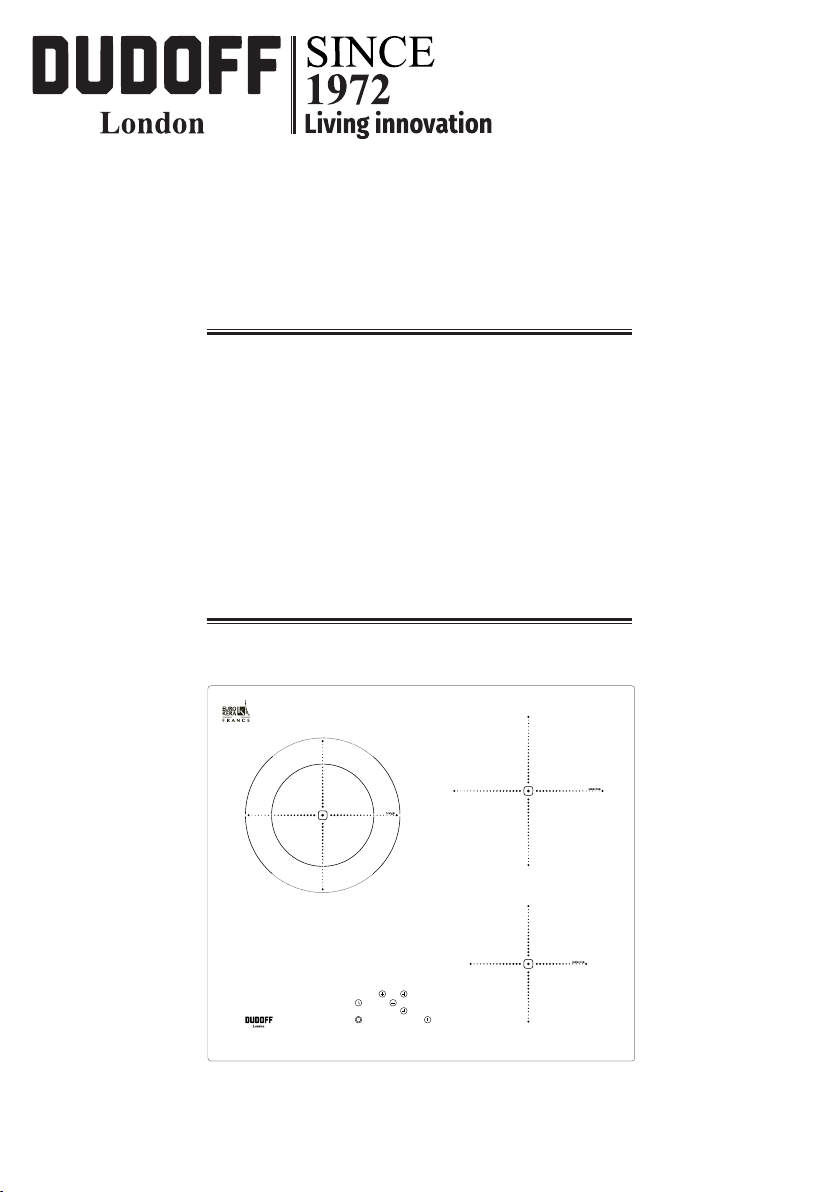
Fig.1
F
D1
E
D
C
G
B
C
A
2
Page 3
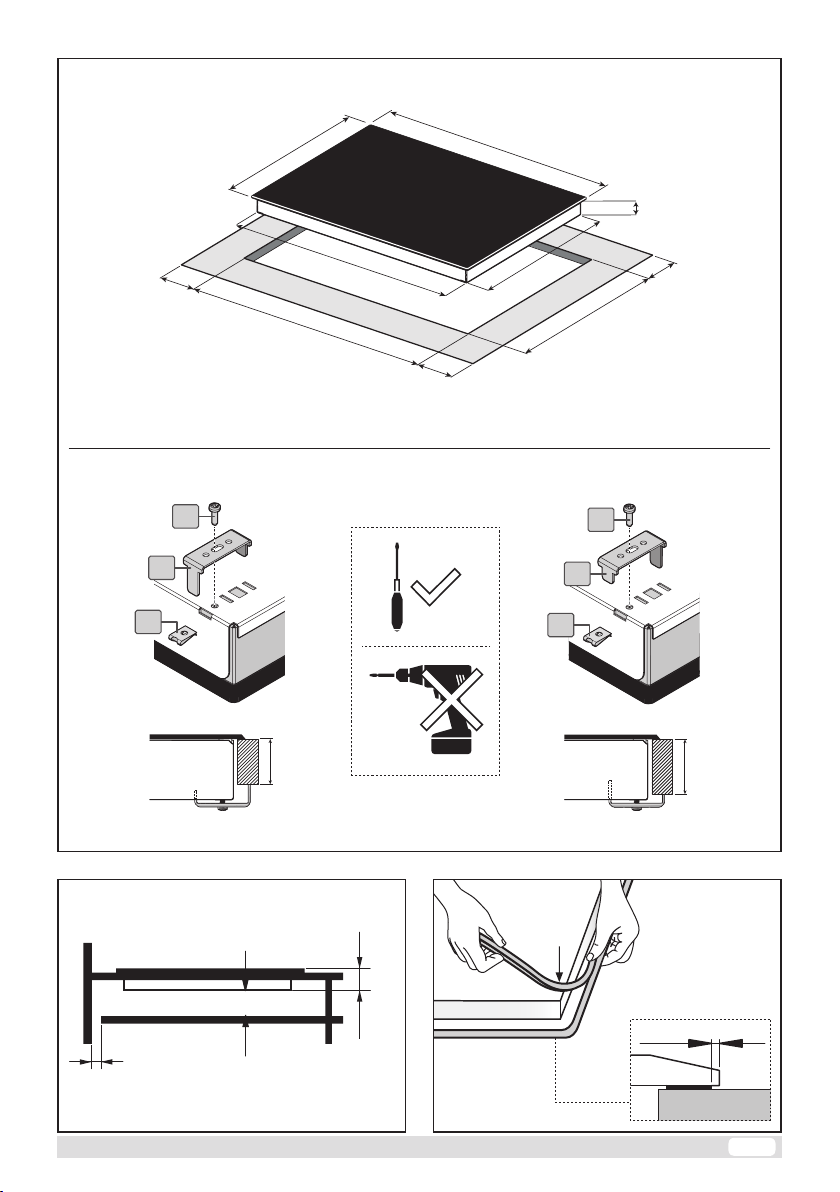
Fig.2
50
Min
510 mm
560 mm
548 mm
50
Min
580 mm
478 mm
52 mm
50
Min
490 mm
Fig.3
20 mm
3
2
1
mm 03
3
2
1
mm 04
Fig.4
40
mm
min. 50 mm
~ 2 mm
3
Page 4
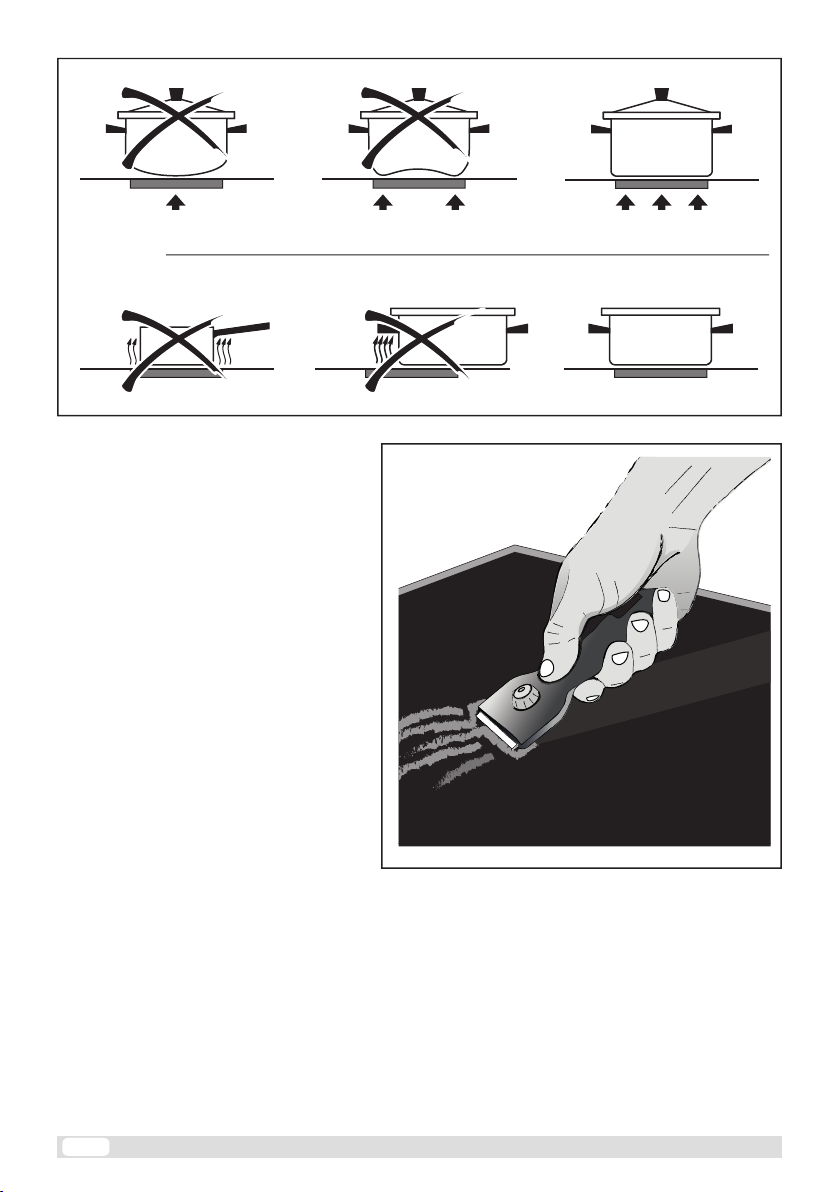
Fig.5
Fig.6
4
Page 5

Fig.7
3 24 1
N L2 L1
3 24 1
230V
L2
3 24 1
N
L1
L1
2P+N
2P
1P+1N
L2
L1
L1
L1
3
4
2
1
3
4
2
1
3
4
2
1
N
L2
N
2 Ph + N
4 x 1.5 mm²
H 05 V2V2 - F
2 Ph
3 x 2.5 mm²
H 05 V2V2 - F
1 Ph + N
3 x 2.5 mm²
H 05 V2V2 - F
5
Page 6

GENERAL INFORMATION
Carefully read this use and maintenance manual, where important information about installation, use and
maintenance safety is provided. Keep
this manual for future reference. Any
installation operation (electric connections) shall be performed by specialized
personnel, in compliance with all standards and regulations in force.
INTENDED USE
• This cooktop is intended for use in
households and similar environments.
• This cooktop is not intended for outdoor
use.
• This cooktop is not to be used in mobile
locations such as ships.
• Use the cooktop only in householdtype situations for the preparation and
warming of food. All other types of use
are not permitted.
• Individuals who are incapable of
using the appliance safely because
of their physical, sensory or mental
capabilities or their lack of experience or
knowledge must not use this appliance
without supervision or instruction by a
responsible person.
SAFETY INSTRUCTIONS
• Children under 8 years of age must be
kept away from the cooktop unless they
are under constant supervision.
• Children 8 years and older must only be
allowed to use the cooktop if they have
been given supervision or instruction
concerning use of the appliance in a
safe way and understand the hazards
involved.
• Children shall not play with the appliance.
• Cleaning and user maintenance shall not
be made by children without supervision.
• WARNING: The appliance and its
accessible parts become hot during use.
6
Care should be taken to avoid touching
heating elements.
• WARNING: Unattended cooking on
a hob with fat or oil can be dangerous
and may result in re. NEVER try to
extinguish a re with water, but switch off
the appliance and then cover ame e.g.
with a lid or a re blanket.
• WARNING: The cooktop is hot during
use and remains so for some time after
being switched off. The risk of burns
remains until the residual heat indicators
have gone out.
• CAUTION: The cooking process
has to be supervised. A short term
cooking process has to be supervised
continuously.
• DANGER OF FIRE: Do not store items
on the cooking surfaces!
• Metallic objects such as knives, forks,
spoons and lids should not be placed on
the hob surface since they can become
hot.
• Always switch the cooking zones off
after use!
• The appliance is not intended to be
operated by means of an external timer
or separate remote-control system.
• RISK OF ELECTRIC SHOCK! If the
cooktop is defective or chipped, cracked
or broken in any way, immediately
switch it off and do not continue to use
it. Disconnect it from the electrical power
supply.
• For users who wear a pacemaker: When
the cooktop is in use it is surrounded by
an electromagnetic eld. It is unlikely that
this will affect a pacemaker. However, if
in doubt consult the manufacturer of the
pacemaker or your doctor.
Objects affected by electromagnetic
elds, for instance credit cards, CDs and
calculators, should be kept away from
the cooktop when it is on.
• This hob is equipped with a fan placed in
Page 7

its lower part. Do not store small objects
or pieces of paper in the drawer found
under the hob, since they could break
the fan and affect cooling in case they
are sucked. There must be a minimum
distance of 2cm between the drawer
contents and the fan inlet.
INSTALLATION INSTRUCTIONS
These installation instructions are
intended for a specialized installer
and are meant as guidelines for the
hob installation, adjustment and
maintenance, in compliance with any
regulations and standards in force. If
a built-in oven or any other appliance
generating heat is to be mounted directly
under the vitro-ceramic hob, IT IS
NECESSARY THAT SUCH AN APPLIANCE
(the oven) AND THE VITRO-CERAMIC
HOB ARE PROPERLY INSULATED. Failure
to comply with this precaution might
result in the incorrect operation of the
TOUCH CONTROL system.
POSITIONING
This household appliance has been designed for built –in installation onto a
worktop, as shown in the figure (Fig.2).
Use sealing material along the whole
perimeter - Fig.4 (Cut dimensionsFig.2). This operation is necessary in
order to prevent any liquid from entering
inside the hob, being that the flatness
of the top, the glass and their coupling
cannot be assured. Fix the appliance
on the worktop by using the 4 supports,
taking the work top thickness into account (Fig.2). If, after installation, the
lower part of the appliance is accessible
from the lower part of the cabinet, it will
be necessary to mount a spacing panel
at the distances given (Fig.3). If the appliance is installed under an oven, this
step will not be necessary. The appli-
ance is not intended to be operated by
an external timer or a separate remote
control system.
VENTILATION
(Fig.5)
The distance between the cooktop and
built-in kitchen’s furnitures or cooking
apparatuses must guarantee sufcient
ventilation of the air. Not to use the
cooktop if in the oven is in course the
pyrolysis process.
ELECTRIC CONNECTIONS
(Fig.7)
Before carrying out any electric
connections, please make sure that:
- the ground electric cable is 2 cm. longer
than the other cables;
- the electrical system meets any
requirement mentioned in the rating
label found on the underside of the
work top;
- the electrical system is equipped with
an efficient grounding system and
compliant with any standards and law
directives in force.
In the case the appliance is not equipped
with a power cord and/or the related
plug, please use a material suitable for
the power absorption value mentioned
in the rating label and for the operating
temperature. If a direct connection to
the electric network is required, you
need to use an omnipolar power switch
with a switch-contact gap of at least 3
mm, suitable for the value mentioned
in the label, and compliant with the
related standards in force (the yellow/
green ground connection shall not be
interrupted by the change-over switch).
Once the appliance installation is
completed, the omnipolar switch shall be
easily accessible.
WARNING! THIS APPLIANCE MUST
BE GROUNDED
7
Page 8

The electrical safety of this appliance
can only be guaranteed when continuity
is complete between it and an effective
earthing system, which complies
with current local and national safety
regulations.
It is most important that this basic safety
requirement is present and regularly
tested and, where there is any doubt,
the electrical wiring in the home should
be inspected by a qualied electrician.
The manufacturer cannot be held liable
for the consequences of an inadequate
earthing system such as an electric
shock.
The manufacturer cannot be held
liable for damage which is the direct or
indirect result of incorrect installation
or connection.
CLEANING AND MAINTENANCE
(Fig.6)
• Remove any residues of food and
drops of grease from the cooking
surface by using the special scraper
supplied on request.
• Clean the heated area as thoroughly
as possible using suitable products,
and a cloth/paper, then rinse with
water and dry with a clean cloth.
• Using the special scraper immediately
remove any fragments of aluminium
and plastic material that have
unintentionally melted on the heated
cooking area, or residues of sugar
or food with a high sugar content. In
this way, any damage to the cooktop
surface can be prevented.
• Under no circumstances should
abrasive sponges, or corrosive
chemical detergents, such as oven
sprays or stain removers, be used.
• Do not use water spray and steam to
clean the appliance.
8
COOKING TECHNOLOGY
This hob combines the convenient
qualities of hi-light (radiant) cooking
with the benets of induction
technology.
Both hi-light and induction cooking
zones rely on electricity for power.
With a hi-light cooking zone, a heating
element warms the burner, which then
transfers heat energy to the pan for
cooking.
With a magnetic induction cooking
zone, an electric current passes
through a coil, which generates a
magnetic eld in the burners. This
magnetic eld excites electrons in the
pan itself, causing the pan to heat up.
The burner itself is not designed to
warm up the way it would on a standard
electric stove.
NOTE: Only ferromagnetic cookware
can be used with induction technology,
including cast iron and stainless steel.
To determine whether the cookware is
suitable for induction cooking, check
whether the base of the pot or pan
attracts a magnet.
It is recommended to use at-bottom
pans with a diameter equal to or
slightly larger than that of the heated
area (Fig.6).
Do not use pans with a rough base in
order to prevent scratching the heat
surface of the cooking hob.
• Empty or thin base cookware:
Do not place any empty cookware on
the hob while it is functioning and do
not use thin base cookware. Even if the
hob is equipped with a safety system ,
an empty piece of cookware will heat up
so rapidly that the ‘ automatic switch-off
‘ function cannot be activated in time,
thus causing the cookware to reach a
very high temperature. In addition , the
Page 9

cookware base could melt down and
damage your hob. In such a case, do
not touch the cookware and switch the
cooking zone off.
If the hob does not work properly after
cooling down, please contact our Technical Assistance Service.
• Cookware detection:
Each induction cooking zone has a cookware detection minimum limit, which
varies according to the material of the
cookware being used . For this reason,
you should use the cooking zone which
is most suitable for the diameter of the
cookware you are going to use.
If the symbol appears on the cooking
zone C display, it means that :
1) the cookware used is not suitable for
induction cooking.
2) the cookware diameter is smaller
than the one allowed by the hob.
3) No cookware is on the cooking zone.
COOKING ZONE
DIAMETER
Ø 160 mm 110 mm
Ø 200 mm 145 mm
MINIMUM
DIAMETER POT
USE
Use the touch control system, related
to the position corresponding to your
cooking needs, taking into account that
the higher the number, the more the
heat released.
TOUCH CONTROL
(Fig.1):
A - On/Off key
B - Cooking zone selection / Increment
“+” key
C - Cooking zone display
D - Double cooking zone / Booster
E - Timer key
F - Timer display
G - Decrement key “-”
D1 - Double cooking zone indicator
• Switching the cooking top on:
Press A key to switch the top on.
All the displays C relative to the cooking
zones switch on in the standby position
.
The control unit remains active for 20
seconds.
If no cooking zone is selected within this
time, the ccoking top switches off automatically.
• Switching cooking zones on :
Press key A to switch the hob on.
Select the desired cooking zone, by
pressing one of the B keys.
Press the B or G keys to increase or
decrease the power of the cooking
zone .
The power of each single cooking zone
can be set in 9 different positions and
will be shown in the C display with a
number ranging from to .
• Booster function ( Induction zone):
This function further reduces the cooking time of a certain zone, by bringing
the temperature to the maximum power
for 10 minutes . At the end of these timeframe, the cooking zone power will
automatically go back to level .
The use of this function is recommended for heating large quantities of liquids ( e.g. water to cook pasta) or food
in a very short time.
To activate this function, select your
cooking zone and press the D key until
you reach level . Then press the D
key again . An acoustic signal will be
heard, and the symbol will be shown
on the cooking zone display.
9
Page 10

• Parboiling function:
This function allows you to set the maximum power for some minutes, and then
to go back to a set power value. Select
the desired cooking zone by pressing
one of the B keys.
Press the B key to increase the cooking
zone power, up to value ; by pressing
the B key again, the symbol will be
displayed. .
Then, the desired power level can be
set by pressing the G key . The set
power value and the symbol will appear alternately on the C display of the
cooking zone selected. After a few minutes, the function is deactivated and
only the power level is displayed.
• Disabling the dual cooking zone:
- To disable this feature, select the
zone with the dual cooking zone B.
- Press again the D button (Double
zones), the LED on the display (D1)
will go off.
• Enabling the dual cooking zone:
- To enable this feature, select the zone
with the dual cooking zone B.
- Press again the D button (Double
zones), the LED on the display (D1)
will illuminate.
• Residual Heat:
If the temperature of the cooking zone
is still high (over 50°) after it has been
switched off, the relative display will
indicate the symbol (residual heat).
The symbol will only switch off when the
burn risk in no longer present.
the B keys and set the power by pressing the B or G keys.
Press the E keys to start the timer (the
F display will be activated ), set the time
by pressing the E or G keys and then
press the key B again to conrm your
selection. .
When the timer function elapses, the
cooking zone will automatically switch
off and an acoustic signal will be heard,
which can be deactivated by pressing
any key on the control panel.
To disable the timer function, press the
B key on the cooking zone previously
started, then press the E key (the F
display will be activated), and bring the
timer value back to by using the G
key and then press the B key again to
conrm your selection.
• Egg timer/reminder:
This function allows you to set an acoustic reminder. This function can only
be activated with all the cooking zones off.
Switch on the hob by pressing key A,
activate the timer zone by pressing the
E key, and set the time , ranging from
and minutes, by pressing the E
or G keys . When cooking is completed,
switch off the hob by pressing key A,
(or wait for 5’’ for the automatic conrmation ).
When the timer function elapses, an
acoustic signal will be heard which can
be deactivated by pressing any key on
the control panel.
When the reminder function is active ,
the timer function cannot be selected.
• Timer:
This function allows you to set the time
(from to minutes) for the automatic turn off of the cooking zone selected.
Start a cooking zone by pressing one of
10
• Control lock:
Switch on the hob by pressing key A.
Controls can be locked in order to prevent any risk of unintentional changes
to the setting ( children, cleaning opera-
Page 11

tions , etc.); this function can only be
activated with all the cooking zones
off . Press the D key within 10” from the
hob switching on , then simultaneously
press the G key and the B key found on
the right lower side , then again press
the B key , the symbol will appear on
the C displays to conrm your selection.
When the control lock is activated you
can switch the hob off. In this case, the
control lock is still activated, even when
the hob is switched on again.
To unlock the hob permanently , press
the D key within 10” from the hob switching on , then simultaneously press
the G key and the B key found on the
right lower side , then again press the G
key , the symbol will appear on the C
displays to conrm your selection.
• Switching cooking zones off:
To switch a cooking zone off , press
the key B related to this zone , bring the
power level back to by pressing the G
key, then press the B key related to this
zone to conrm your selection.
• Switching the cooking top off:
To turn off the cooking top entirely hold
down the A key.
DISPOSAL OF OLD ELECTRICAL
APPLIANCES
• Old electrical and electronic appliances
often still contain valuable materials.
However, they also contain harmful
substances that were essential for the
proper functioning and safe use of the
equipment. Handling these materials
improperly or disposing of them in your
household waste can be harmful to your
health and the environment. Therefore,
please do not dispose of your old
appliance with regular household waste.
• Old appliances may contain materials
that can be recycled. Please contact
your local recycling authority about the
possibility of recycling these materials.
• Please be sure that your old appliance
does not pose a danger to children while
being stored for disposal.
THE MANUFACTURER DECLINES
ALL RESPONSIBILITY FOR
EVENTUAL DAMAGES CAUSED BY
BREAKING THE ABOVE WARNINGS.
THE WARRANTY IS NOT VALID IN
THE CASE OF DAMAGE CAUSED
BY FAILURE TO COMPLY WITH THE
ABOVE-MENTIONED WARNINGS.
• Safety switch:
The appliance has a safety switch that
automatically switches off the cooking
zones when they have been operating
for a certain amount of time at a given
power level.
POWER
LEVEL
OPERATING TIME
LIMIT (hours)
1- 2 6
3 - 4 5
5 4
6 - 7 - 8 - 9 1,5
11
Page 12

3PCLIOBIH600TDD 15 novembre 2016
 Loading...