

© 2015 Thomas Dudley Ltd SISLF323990 | 11644 iss D
Thomas Dudley Ltd, P.O.Box 28, Birmingham New Road, Dudley, West Midlands, DY1 4SN
www.dudleybathroomproducts.co.uk
sales@thomasdudley.co.uk
0121 557 5345
0121 530 7000
4
TROUBLESHOOTER
Ensure collet is fully engaged.Collet not located correctlyButton sticking on Vantage with
Niagara valve.
Re-connect weight.
Substitute pipes.
Adjustable weight not retained on locating studs
Wrong position of pneumatic pipes
Full flush volume when operating
partial flush button.
Substitute pipes.Wrong position of pneumatic pipesPartial flush volume when
operating full flush button.
Replace ‘O’ rings.
Trim seam with knife.
Replace flush pipe and cut square.
Replace flush pipe.
Damaged ‘O’ rings on cistern outlet
Flush pipe seam protruding
Flush pipe cut at angle
Flush pipe cracked
Leaking from flush pipe
connection.
Re-connect pipes.
Push-fit bellows into lever mount.
Replace bellows.
Replace push button.
Pneumatic pipes not connected
Bellows poorly fitted to lever mount
Bellows leaking
Push button leaking
Outlet valve not operating with
push button.
Check for leaks on bellows and push button.
Check push button for leaks.
Replace push button.
Push-fit bellows into lever mount.
Seal not clearing window
Lack of air to inflate bellows
Push button leaking
Bellows poorly fitted to lever mount
Outlet valve closing before full
volume delivered.
Relieve by removing pipe to valve.
Clean surfaces.
Bellows not evacuating all air
Build up of debris on seal face of housing or seal
Outlet valve not closing. (Water
continually running into pan).
See ‘B’ above.
Lower float on inlet valve.
Inlet valve not shutting off
Water level set too high
Internally overflowing.
Fit blue restrictor.
Replace lay flat tube.
Re-fit lay flat tube.
Blue restrictor not fitted when water supply is
mains fed
Lay flat tube missing
Lay flat tube not hanging vertically
Turbulent and noisy flow from
inlet valve.
Remove blue restrictor.
Clean filter.
Blue restrictor fitted when water supply is tank fed
Filter blocked
Low flow from inlet valve.
Replace seal in arm.
Replace filter and ‘O’ ring.
Re-engage valve in bracket.
Adjust float chamber/float position.
Re-fit or replace lever arm.
Tighten nut.
Fit blue restrictor.
Replace diaphragm assembly.
Seal missing on float lever arm
Filter and ‘O’ ring missing
Valve has become dislodged from mounting
bracket
Float chamber/float set too high
Float lever arm dislodged from mounting
Front nut loose
Blue restrictor not fitted at very high mains pressure
Monitoring pin seized
Inlet valve not shutting off.
Open supply tap.
Open isolating valve.
Remove filter and clean.
Mount valve correctly, straighten bent float stem.
Adjust float/float chamber height (ensure float
remains inside float chamber at all times).
Mains supply tap not open.
Isolating valve not open
Filter blocked
Float arm not free to move
Float stuck on/in float chamber
No water flow from inlet valve.
RemedyPossible CauseSymptom
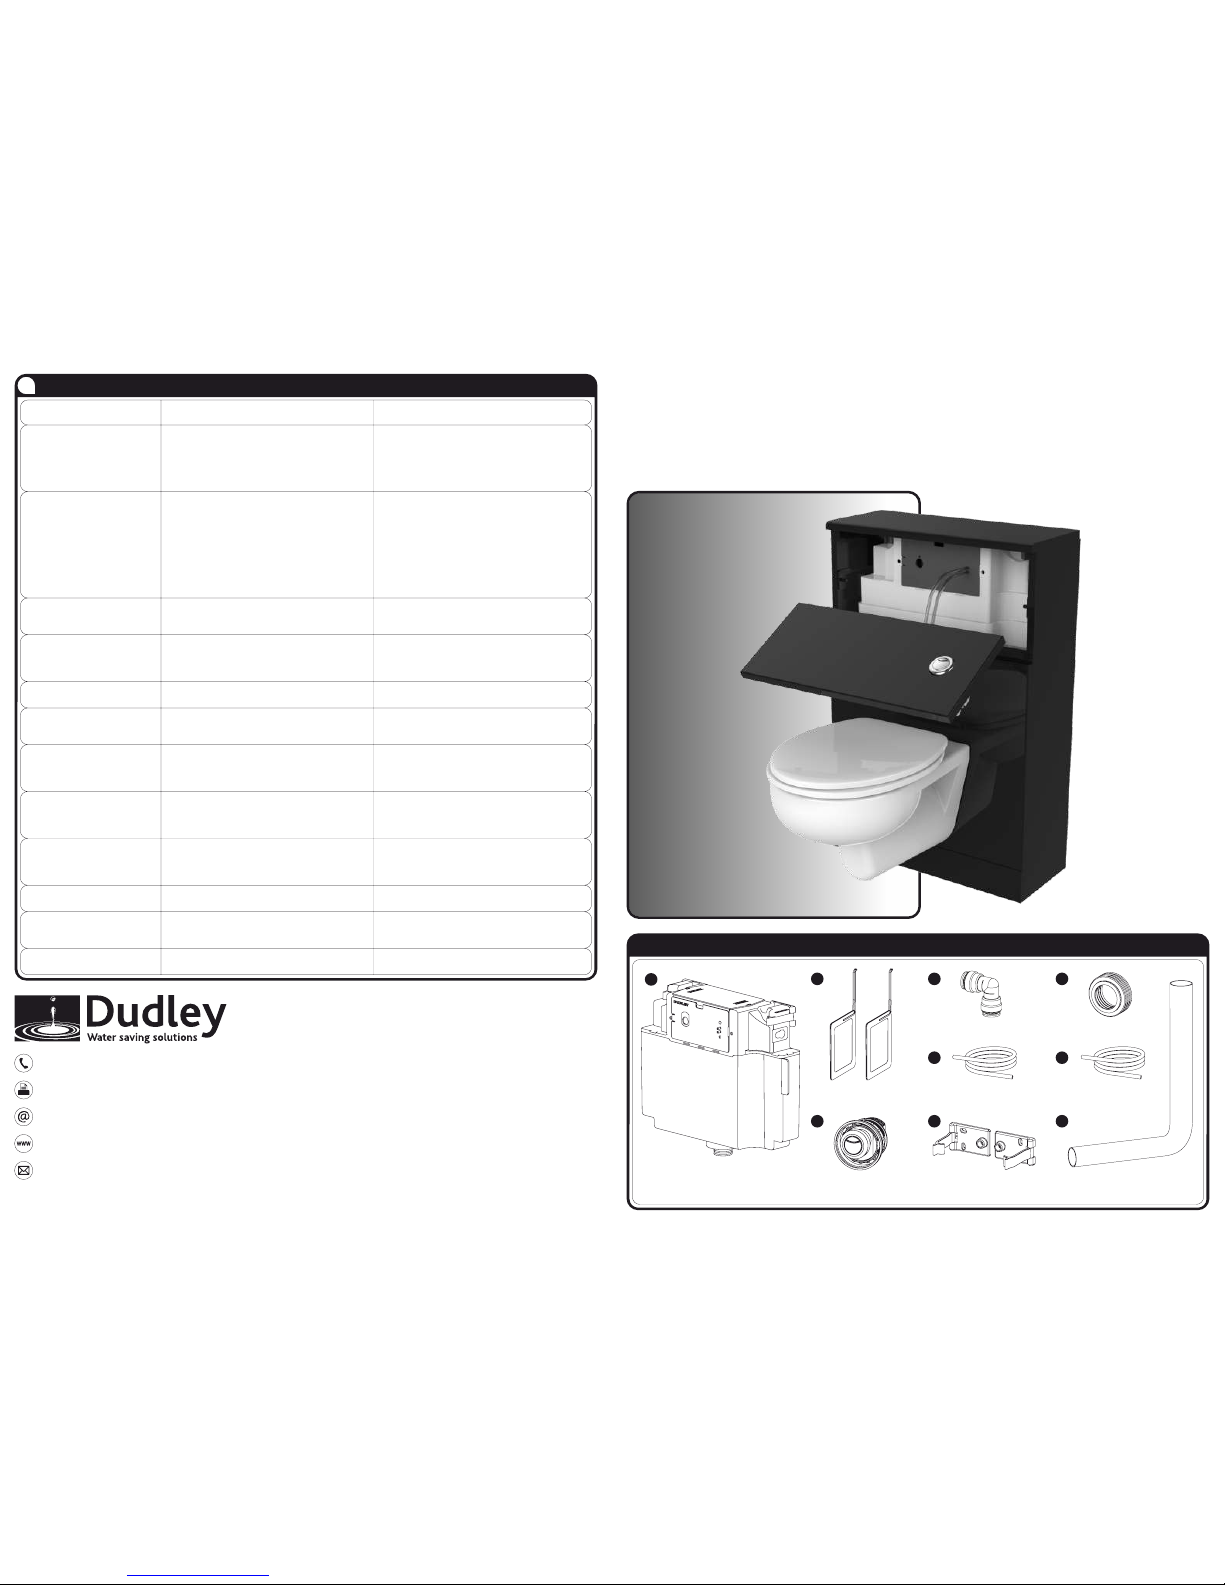
PACK CONTENTS
Push-fit flushpipe
9
2 x Mounting bracket
8
Push button
(Style may vary)
7
750mm Clear tube
6
750mm Green tube
(Dual Flush Only)
5
Pan Connector
4
Push-fit elbow
3
2 x Partition
(Not supplied with 6L Mono)
2
Vantage cistern
Complete with flush valve, inlet valve,
isolating valve and flow restrictor.
1
Concealed WC Cistern
Installation Instructions
Vantage
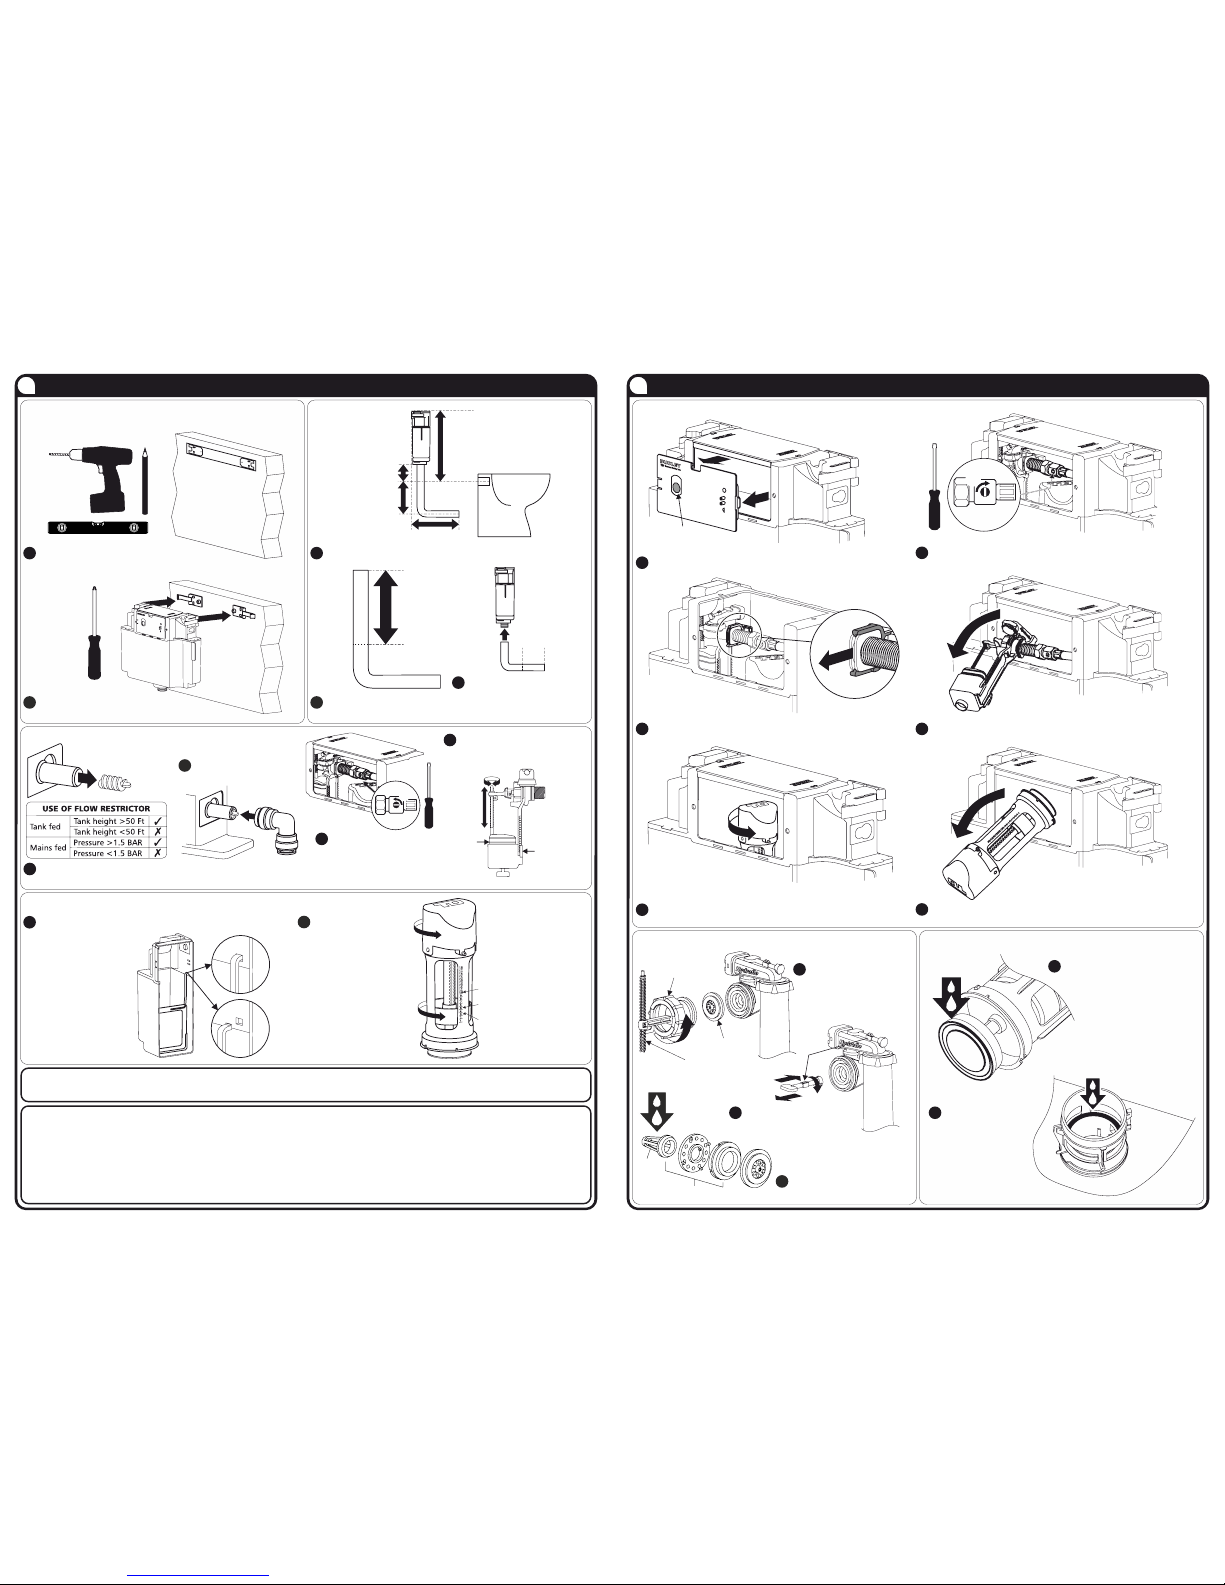
Clean the sealing face of
the valve body that is
located in the bottom
of the cistern
2
Carefully clean the outlet valve
seal under cold running water
Important:
Take care not to damage the seal
1
Niagara outlet valve maintenance
Filter Assembly
Filter
Clean the diaphragm and filter
assy under cold running water
3
2
Remove filter assembly
using filter removal tool
Diaphragm
Float Assembly
Front Nut
Carefully remove front nut,
pressure chamber and
diaphragm
1
Hydroflo inlet valve maintenance
Remove the Niagara valve through the service aperture
6
Twist the Niagara valve anti-clockwise to release
5
Remove the Hydroflo valve through the service aperture
4
Remove the Hydroflo valve from mounting clip
3
Close
90°
Close isolation valve and flush to empty cistern
2
Pull here to remove
PULL
Remove front service cover
1
Removal of internal components
2
VANTAGE CISTERN MAINTENANCE
Technical Help @ Thomas Dudley Ltd on 0121 530 7000
FINAL INSTALLATION CHECK LIST:
Check all moving components operate freely and the inlet valve shuts off correctly.
If overflowing or poor flushing subsequently occurs, check that the float and arm move freely up and down and that the water level is correct.
Check all joints are tightened correctly.
Check carefully for leaks.
Hold the inlet valve float down, causing the cistern to internally overflow. Ensure the overflow pipe is capable of discharging all incoming water
without the cistern overflowing. If water overflows the cistern make sure that the flow restrictor is fitted. If overflowing persists contact:
WARNING: No sealing compound, paste, flux or solvent to be used in contact with plastic or rubber surfaces to avoid damage. Rubber washers
or ‘O’ rings should provide an adequate seal. PTFE tape may be used on threads. Do not over tighten plastic nuts.
No chemical block or additive is to be used in this cistern.
Level 3: 6/4L Dual flush
Level 5: 5/3.3L Dual flush
Level 10: 4/2.6L Dual flush
Slide to required level and
relock into position
Twist adjustable weight
anti-clockwise to unlock
Adjust weight
Reverse operation to re-fit
Twist Niagara valve
anti-clockwise to release
from Vantage cistern
Remove Niagara Valve
Configure Niagara valve
2
Mono Flush
6 Litre - No Partitions
5 Litre - One Partition
4 Litre - Two Partitions
Dual Flush
6/4 Litre - No Partitions
5/3 Litre - One Partition
4/2.6 Litre - Two Partitions
Fit or remove partitions as required
1
Converting the Vantage cistern flush capacity (if required)
Check water level and adjust if
necessary by rotating float
adjuster stem
4
Water
Level
Set chamber
to lowest
position
Open
90°
Open isolation valve
(factory set to closed)
Note: Bottom entry cisterns
require an external isolation
valve (not supplied)
3
Push-fit the elbow and
connect the mains supply
2
Remove factory fitted flow restrictor
if necessary (See table above)
1
Connect inlet and check water level
Trim
Trim horizontal section of flush
pipe to suit WC pan installation.
Re-fit flush pipe to Vantage
cistern and connect to WC pan
3
Distance A
Cut Line
Cut Distance A from larger
diameter section of flush pipe
2
328mm MAX
70mm MIN
740mm MAX
440mm MIN
Distance A
Fit flush pipe to Vantage cistern and measure Distance A
1
Fit flush pipe
Fit the mounting brackets and secure the
cistern to the wall (screws not supplied)
2
TEMPLA
TE
Use provided hole guide to mark and drill holes
to suit No.8 CSK screws ensuring template is level
(Guide located on front flap of box)
1
Fit Vantage cistern to wall
Note: Prior to installation ensure there is sufficient space
for the Vantage to be installed
1
VANTAGE CISTERN INSTALLATION
 Loading...