

Dudek Paragliders Optic 2 Light air, Optic 2 Light earth, Optic 2 Light water, Optic 2 Light fire User Manual
user manual
V 26.06.2017
index
2
INDEX page:
introduction 3
the wing 4
design 5
before first use 8
take-off 11
flight 13
landing 15
speed modes 16
winching and powered paragliding 17
quick descent methods 19
extreme manoeuvres 21
paraglider care 23
warranty and aerocasco 26
environmental care 28
what have you bought 29
technical data 3 0
rigging scheme 32
summary 34
Congratulations!
We are pleased to welcome you among the growing number of
DUDEK PARAGLIDERS pilots. You’ve become a proud owner of a
sport paraglider, designed according to recent trends.
Intensive development, application of the modern production
methods and thorough testing resulted in a friendly behaving
paraglider, offering the pilot a lot of fun combined with great
performance.
We wish you many enjoyable and safe flying hours.
Please read this manual carefully and note following details:
< The purpose of this manual is to offer guidelines to the pilot
using the paraglider. By no means it is intended to be used as a
training manual for this or any other paraglider.
< You may only fly a paraglider when qualified to do so or when
undergoing training at an accredited school.
< Pilots are personally responsible for their own safety and their
paraglider's airworthiness.
< The use of this paraglider is solely at the user's own risk! Neither
the manufacturer nor dealer do acceptany liabilities involved.
< This paraglider on delivery meets all the requirements of the EN
926-1 and 926-2 regulations or has an airworthiness certificate
issued by the manufacturer. Any alterations to the paraglider
will render its certification invalid.
< Other documents concerning this paraglider can be found on
attached pendrive or on our website: www.dudek.eu.
NOTE: Dudek Paragliders warns that due to the constant
process of development the actual paraglider may differ
slightly from the one described in the manual.
However, those differences must not affect the basic design
parameters: technical data, flight characteristics or strength.
In case of any doubts contact us please.
3
introduction
!

on the wing
4
For whom the Optic 2 Light?
Optic 2 Light is a three-row cross-country/recreational paraglider of
5,50 aspect ratio and 51 cells. It is recommended for pilots who
want to fly a lot and grow, capitalizing on its outstanding
performance. The paraglider offers EN/LTF B class safety, confirmed
by according certificates.
DESIGN
The canopy structure is reinforced with rigid rods (Flexi Edge
Technology) as well as mini-ribs on the trailing edge, truly representing,
smoothing and stabilizing the airfoil at all speeds. Another solution
improving both the aerodynamics and stability is the Shark Nose.
Stabilo has been modified too. All these technologies come from the
racing canopies and combined with 3-row rigging give the paraglider
large passive safety margin and exceptional aerodynamic performance.
The airfoil used in Optic 2 Light has some reflex traits. The wing is tuckresistant, comes up easily and is perfectly steerable. Worth a special
praise is its great lateral and longitudinal stability.
As in other our paragliders, the risers of the Optic 2 Light constitute a
complete, comfortable and carefully thought out control panel, where
each instrument is placed exactly where it should be and works as it
should. Modern risers of 20 mm width feature ball-bearing
SmartPulleys, made on special order along with our indigenous design.
Versatile and comfortable ACT brakes with neodymium magnets can be
adjusted to individual preferences.
As a result, you got the wing that will easily float in a slightest lift, and
covering long distances in typical turbulence of a thermally active day
won’t be a problem. Speed-system operation is safe and comfortable
even in rough air. Optic 2 Light has lots of speed, great deal of lift, and
In generally simply wants to fly – so don’t be selfish and take it with you
for a long XC ;)
We are positively sure that the Optic 2 Light is one of the best
canopies in its class.
5
paraglider design
Optic 2 Light is produced in new technology, utilizing capabilities of
precise laser cutter. All stages of the production process take place as
our Polish plant under close supervision of the designer himself, thus
ensuring highest European quality.
Careful selection of modern fabrics and design solutions brings
about great strength and durability of the canopy. All materials used
come from marked production batches, and each production step
can be verified down to identification of individual worker and
controller.
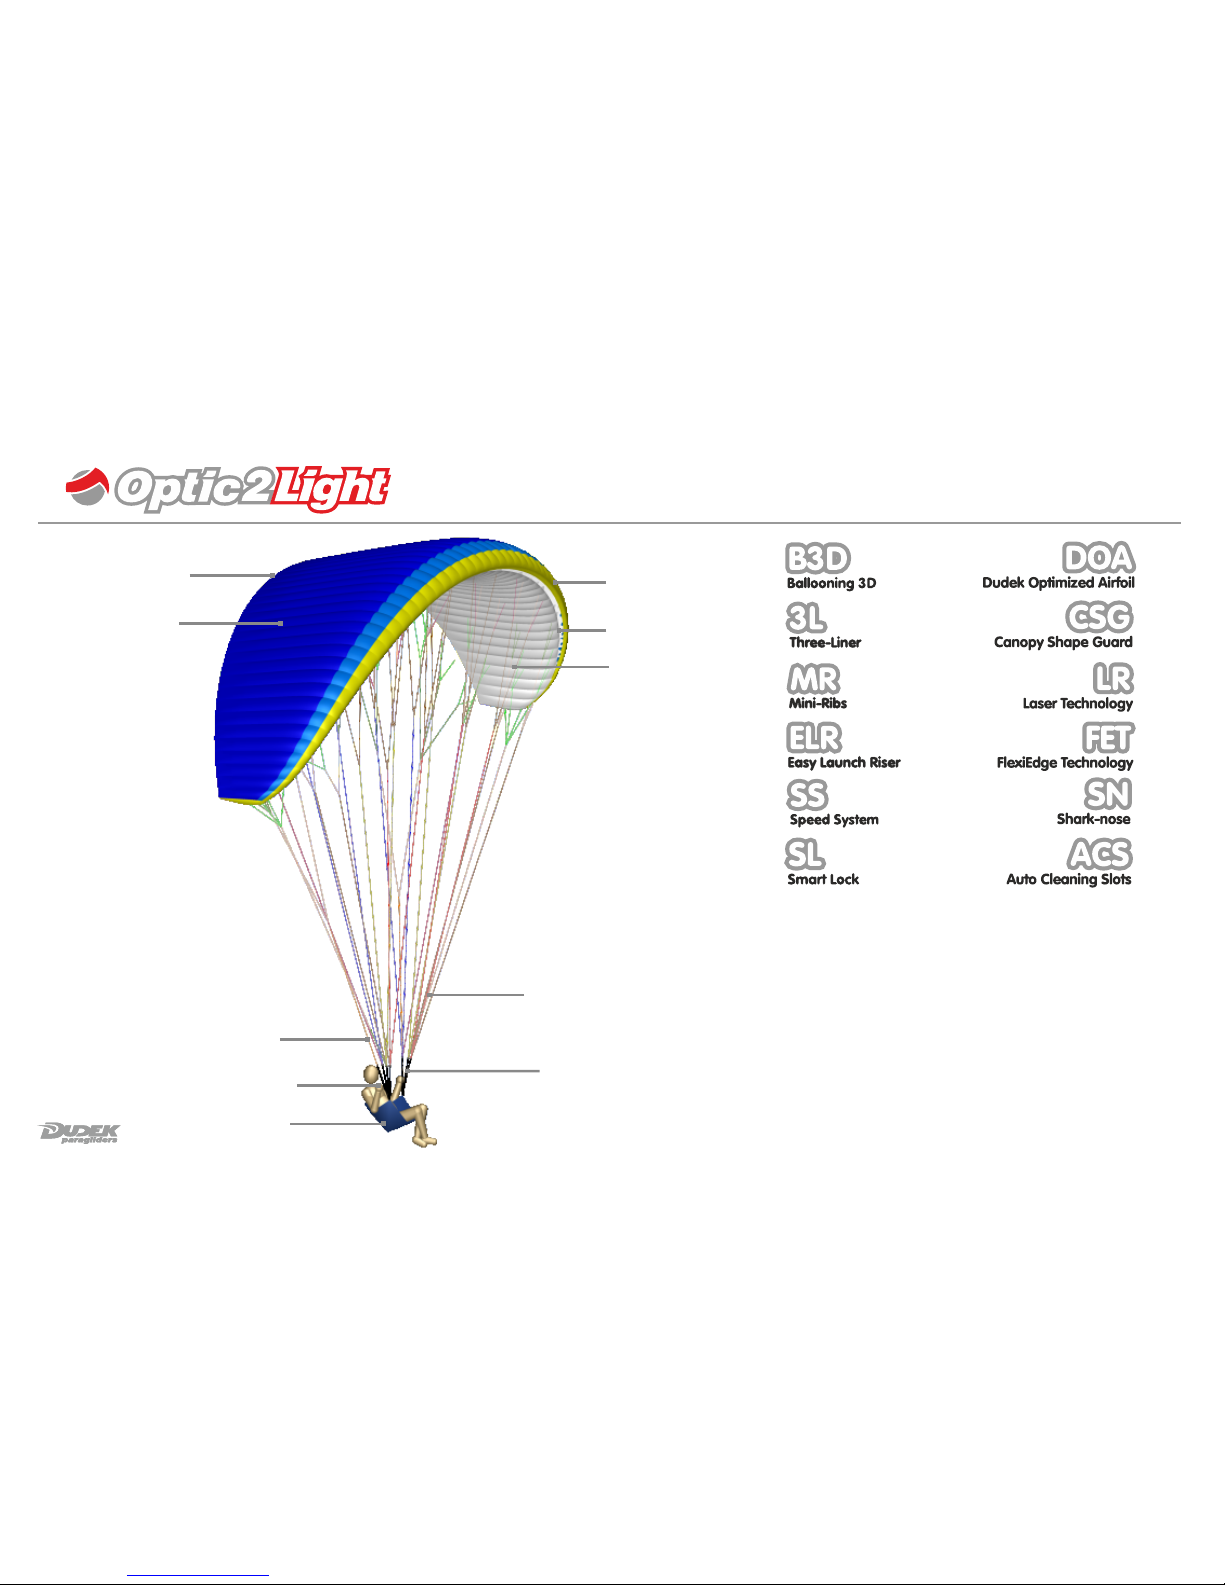
harness
rib
trailing edge
brake handle
steering line
cell
suspension lines
risers
intakes
leading edge
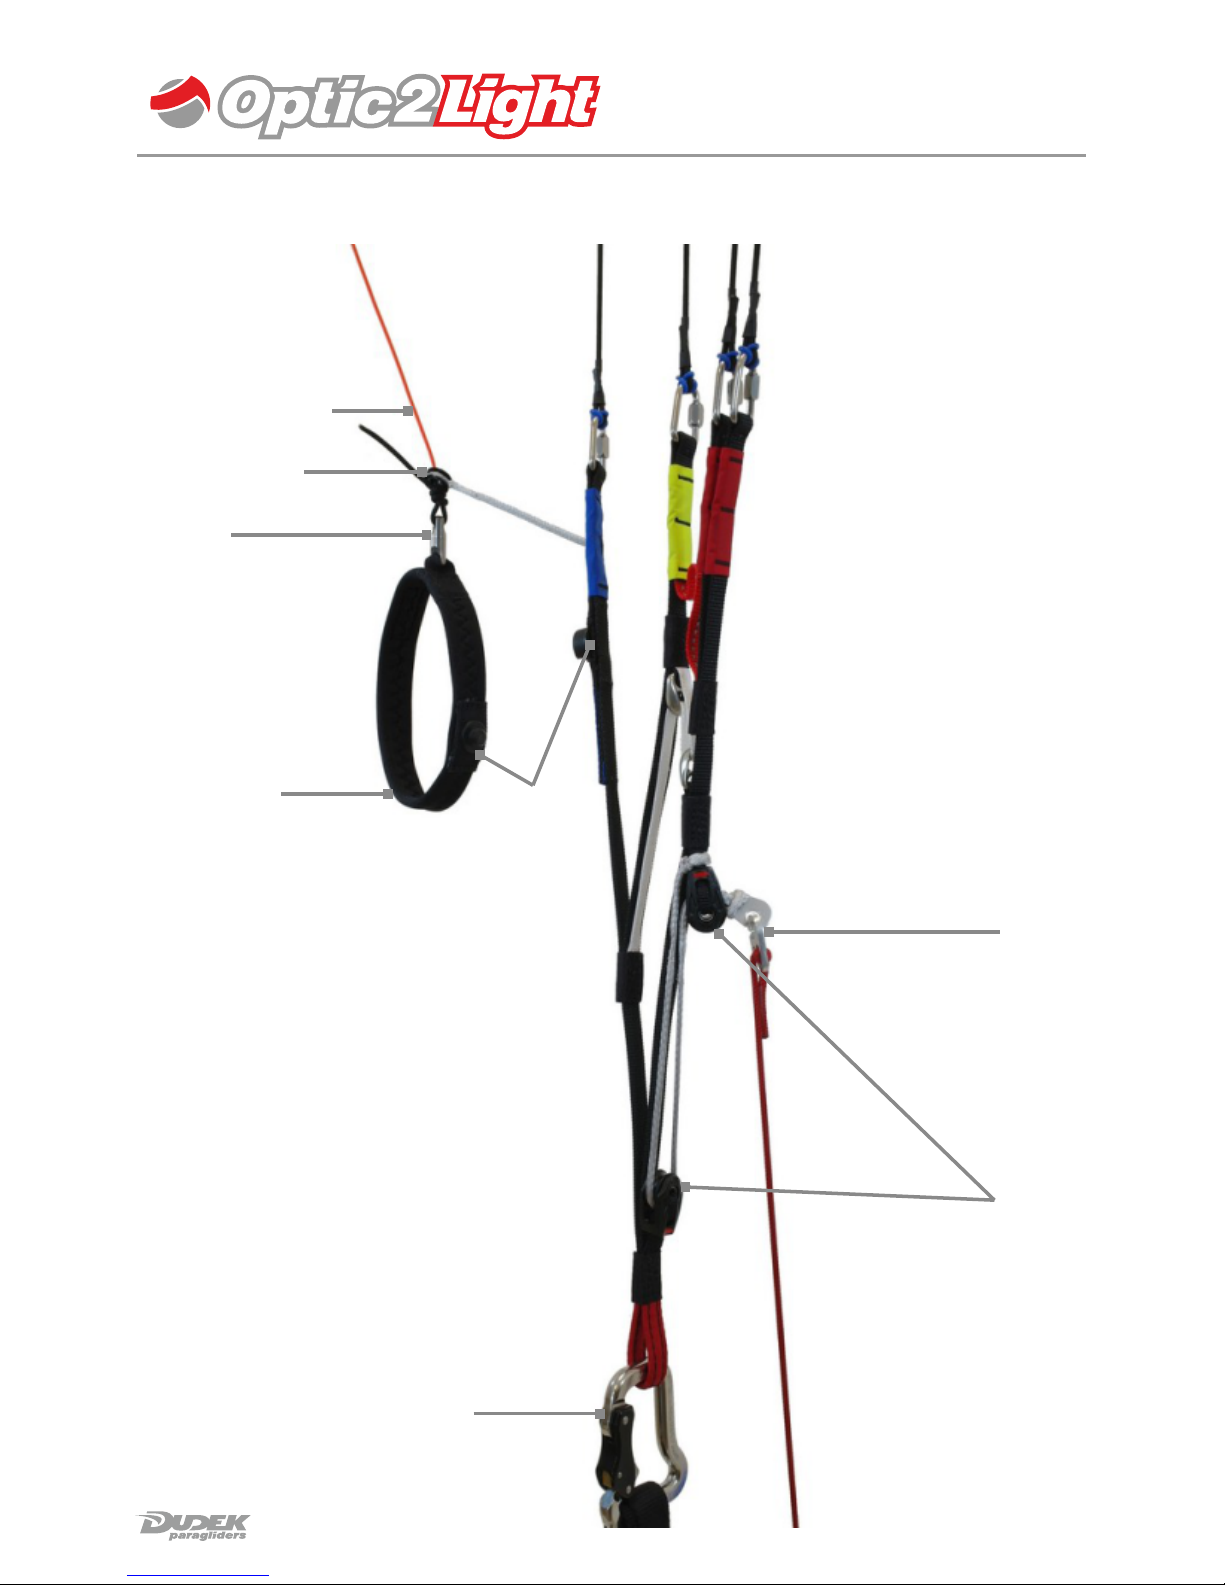
riser scheme
steering line
swivel
speed
system
pulleys
carabiner
speed system
hooks
brake ferrule
brake handle
Smart Lock
BCA'A
6
7
riser scheme
For the Optic 2 Light we have chosen three-way risers equipped
with:
<
ELR (Easy Launch Riser) - system. It is a
specially marked A riser (with red cover)
<
speed-system affecting A and B risers when
ngaged, featuring ball-beared pulleys and
a dedicated cord.
Brake handles are attached to the steering lines at an optimal point,
guaranteeing safe and effective action.This point is marked on the
line with a black dot and this setting should not be altered.
Attaching the handles above factory markings will cause constant
braking of the paraglider, possibly cause
of an accident. Overly loose setting of the brake lines is not
advised too, since the much lower load on the trailing edge lines
can sometimes be dangerous too.
Our newest brake handle used in Optic 2 Light besides its
attractive, light design features:
<
ACT (Adjustable Comfort Toggle) system, with
adjustable loop,
<
a swivel – preventing possible twisting of the steering line,
For quick and easy recognition in emergency, some of the risers are
distinguished with coloured covers as follows:
A - red (used for launching)
A' – red (used for big ears),
B - yellow (used for B-stall),
D - blue (needed to keep the glider down in strong
wind – aborted launch ).
Operation
It’s pilot responsibility to choose a canopy matching his skills.
Dudek Paragliders cannot take responsibility for a wrong choice,
but we are always ready to advise you – just contact us.
Weight range
Each size of the canopy is certified for specific weight range,
meaning total take-off weight including the pilot, harness,
equipment and the canopy itself.
We advise flying the paraglider in the middle of weight range.
However, if you most often fly in weak winds you can consider
flying in lower part of the weight range, and in higher part when in
strong winds.
CAUTION: Check your real take-off weight! Some pilots
calculate their take-off weight by just summing up catalogue
numbers, e.g.: harness 5 kg + canopy 6 kg + pilot 89 kg =
ca. 100 kg. In reality your actual take-off weight can be
umpteen kilograms more. Most often we forget the clothing,
electronics, backpacks, sometimes even such basic things
like fuel or rescue chute weight are omitted!
What harness?
You can use any certified harness which has its hangpoints at 40-45
centimeters from the seatplate.The width between carabiners
should be somewhere between 37 cm and 45 cm.
CAUTION: Please note that any modification of seat/hang
point distance changes the position of the brakes as related
to pilot's body. You must remember that in each harness
your steering range will be different.
SPEED SYSTEM
Optic 2 Light is as standard equipped with a speed system. It
consists of a cord sewn into the A riser, leading through two pulleys
and finished with a loop and a hook. His is where you attach the
speedbar cord.
The speed system affects A (including A’) and B risers. Pressing the
speedbar shortens first the A risers, before first use then gradually
the A’ i B. C riser retains its original length.
CAUTION: Ill-adjusted speed system renders the
certification invalid!
before first use
8
!
!
!
9
How to adjust it?
Most of modern harnesses are equipped with speed system pulleys
and sometimes even its own integrated speedbar. The speed bar
cord must be firmly attached to it.
The other end of the cord must be ran upward through the harness
pulleys and attached to the hooks.With well adjusted speed system
you should see the pulleys on the risers touch each other at max
speedbar, meaning you are using the full range of speed system.
Caution: Make sure that both cords on the speed bar are
equal, as even slight difference can result in constant,
inadvertent turning of the paraglider.
Before take-off attach paraglider risers to the harness with the main
carabiners. Then connect the hooks of the speed system cords with
hooks at the A-risers.
Caution: Before launching make sure that the speed
system is not tangled and runs freely.
Other systems
This paraglider has no other systems which can be adjusted,
exchanged or removed.
!
!
before first use

Pre-flight check
Having chosen a place to launch accordingly to the terrain as well
as wind speed and direction clear it of any obstacles that could
damage your canopy or tangle in the lines.
After laying out your paraglider in a horseshoe directed against the
wind following checks must be made:
< canopy, lines and risers condition. Do not launch if the
slightest damage is noticed,
< the paraglider should be arranged so that the centre section
A-lines will strain earlier that the outer ones. This ensures
easy and symmetrical launch,
< the leading edge should stay taut and even,
< all lines and risers should be separated. Make sure they are
not tangled, and checked against catching anything. It is
equally important to check the brake lines. They must be
firmly attached to the brake handles and run freely through
the pulleys to the trailing edge,
< make sure the risers are not twisted,
< it is very important to check that no lines are looped around
the canopy. The so-called ”line-over ” may have disastrous
consequences during take off.
< always put on and fasten your helmet before clipping in to
the harness,
< make sure that all quick links (maillons) of the risers are tight,
< Check main carabiners. They must be properly mounted,
closed and locked.
pre-flight check
10

Classic (forward) launch
Should be used with little or no wind. Facing the wind place the
risers over your shoulders (A riser must lay on top).
Clip it into carabiners and lock them. Grip the brake handles and
A-risers, holding them at the stitching, just under the quick-links. To
make things easier, A-risers have been markedwith a red cover.
Spread out your slightly bent hands, keeping them down and back.
All other risers should be placed near your elbow joints.
Apply some tension to check if the A risers stay on top and the
lines are not tangled. Take a step back, bow down a little and run
forward. After the initial inflation smoothly move the hands with
the risers up and over your head until the wing will be directly
above you. Let the A risers loose and check the wing.
Pump out possible faults and keep an eye on position of the
paraglider. Side drift is corrected best by moving yourself always
under center of the canopy. In order to keep wing in the air the
suspension lines must stay taut all the time, so in light winds you
will have to run forward. With stronger winds you can control the
wing while standing still.
When leaving the ground apply some brakes, then release it after
gaining some distance from the ground. Keep your hands relaxed.
Reverse launch
To be used when wind speed exceeds 3 m/s.
After clipping the risers into carabiners as for the forward launch,
turn back to face the wing, moving one riser group over your head.
As a consequence, you will have the risers crossed.
Unclip the brake handles from rear risers and grip it outside of the
risers without crossing neither arms nor lines. In this way you steer
the left side with you left hand and vice versa. Now take
corresponding A risers on both sides (still keeping brake handles in
your hands).
Make sure that the wing inflates symmetrically and the lines are not
tangled. Building up tension with a few steps back and
simultaneously lifting the A risers (do not pull them towards you)
will make the paraglider rise.
When it arrives over your head, stabilize it with the brakes, check
again if all lines are clear and the cells inflated.
When turning into wind, remember to turn the right way
launch
11
 Loading...