

Page 1
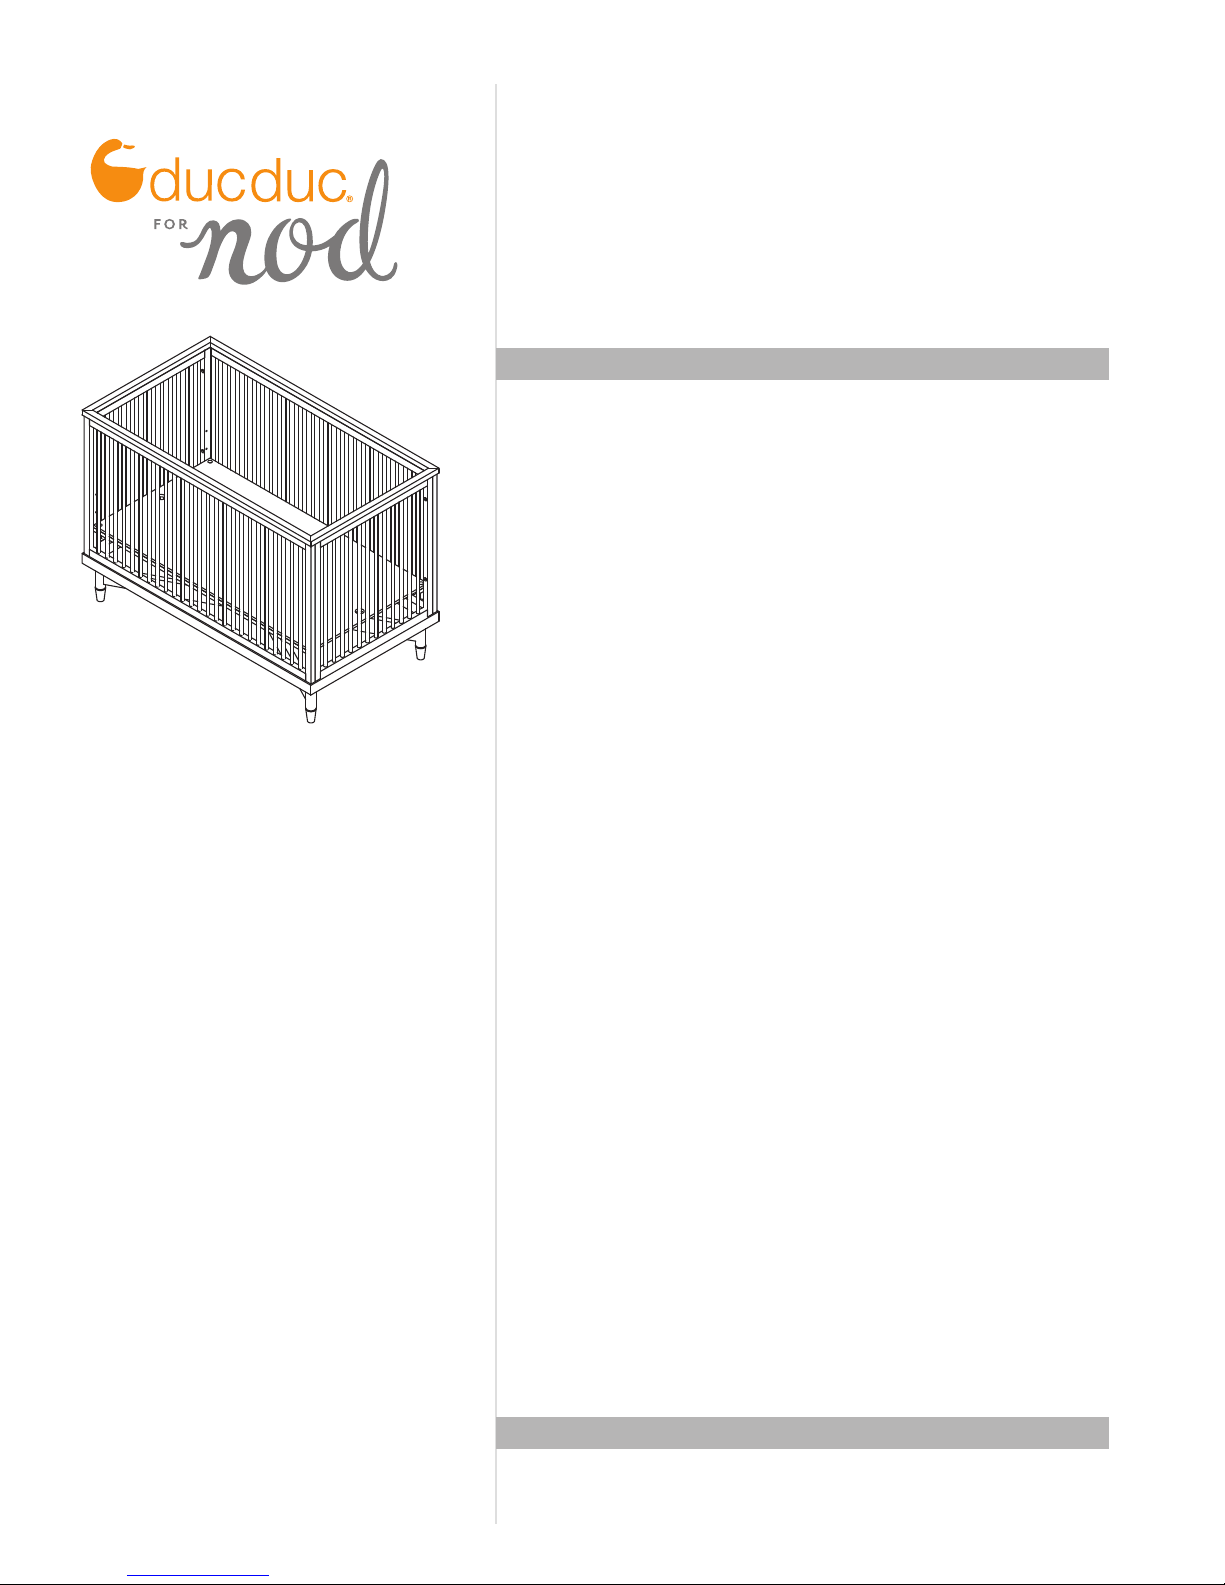
Thank you for selecting a ducduc for nod product.
Please check contents against the components list in these
instructions. Also, please ensure there was no damage that
may have occurred in shipping. If any components are
missing or you find any damage, please contact The Land
of Nod at 800-933-9904 before continuing.
Read all the instructions before use of the CRIB.
Please remember to securely tighten all bolts and fasteners
and periodically check to make sure every component is
properly and securely in place.
OSLO CRIB
Pay close attention to the safety warnings in these
instructions and on CRIB labels.
A minimum of two people is required to safely assemble
and move the CRIB. Do not attempt to move this CRIB
alone - dragging or sliding it across the floor may cause
structural damage.
CAUTION:
Any mattress
used in this CRIB must be at
least 27
1/4
inches by 51
5/8
inches with a thickness not
exceeding 6 inches.
Keep instructions for future use.
Page 2
pictures are not drawn to scale
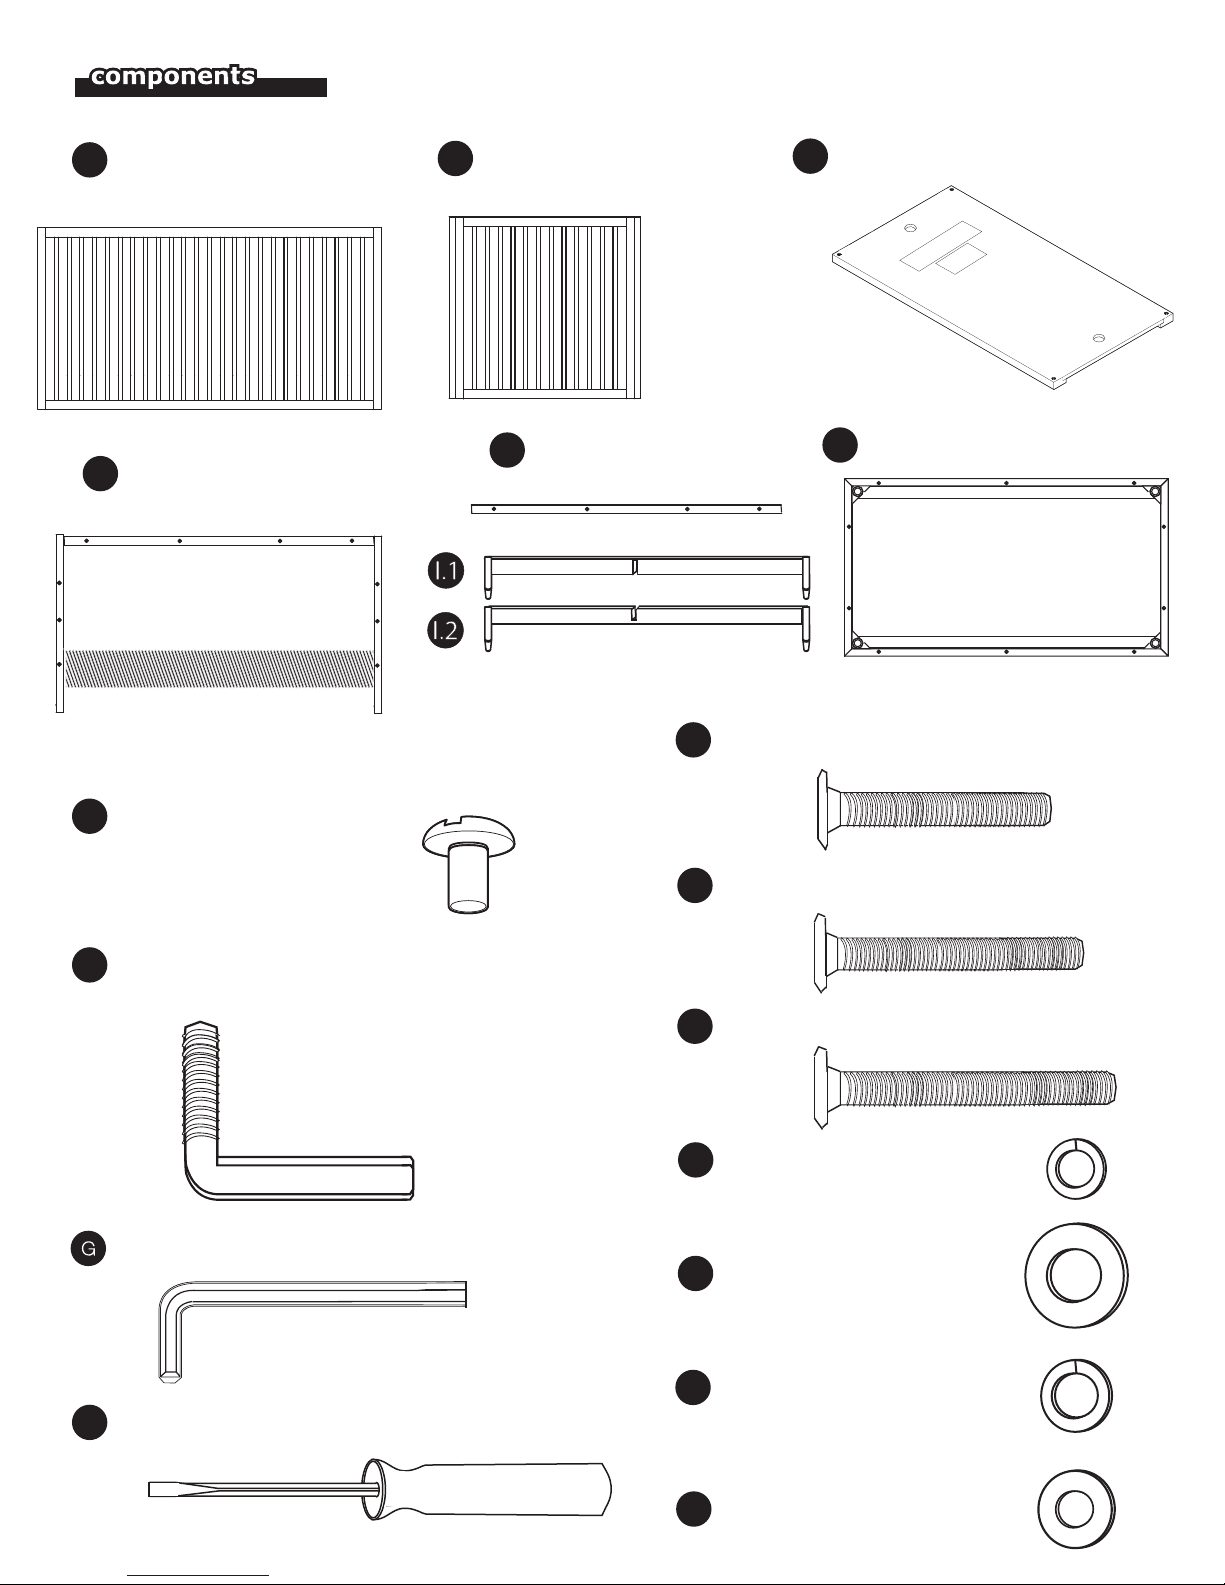
A SIDE RAIL
X 2
M TOP FRAME ASSEMBLY
X1
removable support
B END RAIL
X 2
M.1 TOP FRAME RAIL
X1
C MATTRESS SUPPORT PANEL
I BASE
D MATTRESS SUPPORT BOLT
X 4
E MATTRESS SUPPORT PIN
X 4
ALLEN WRENCH
RAIL CONNECTOR BOLT (40MM)F
X 12
J CONNECTOR BOLT (45MM)
X 14
P
BASE CONNECTOR BOLT (50MM)
X 10
K.1
LOCKING WASHER (5/16”)
X 4
L.1
REGULAR WASHER (5/16”)
X 4
H SCREWDRIVER (not included)
K.2
L.2
LOCKING WASHER (1/4”)
X 36
REGULAR WASHER (1/4”)
X 36
Page 3
assembly
1
rail connector holes
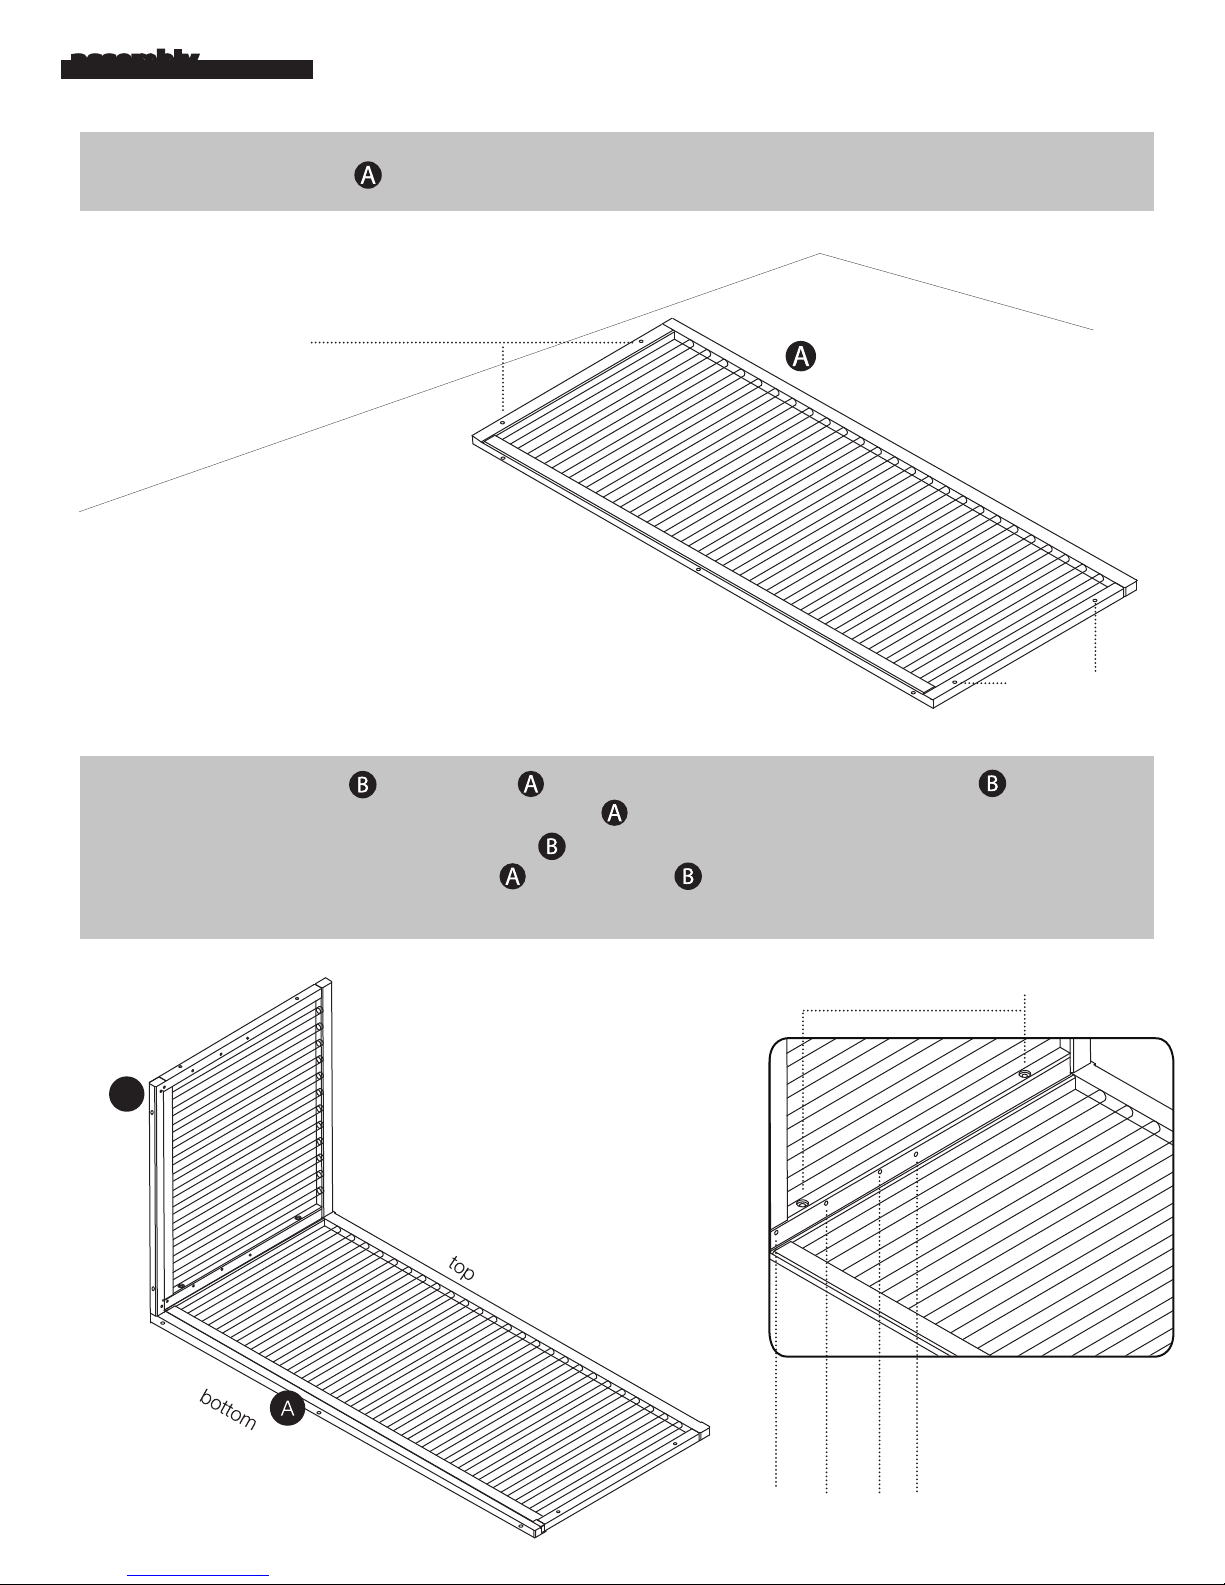
Lay SIDE RAIL on floor with rail connector holes facing up.
A
B
2
B
rail connector holes
Align END RAIL to SIDE RAIL so that the rail connector holes on END RAIL line up
with the rail connector holes on SIDE RAIL . Make sure the four mattress support holes face
the bottom and inside of END RAIL . Refer to diagram for correct orientation.
Labels on bottom of SIDE RAIL and END RAIL that read “Bottom” should be facing the
bottom of the crib.
rail connector holes
A
mattress support holes
Page 4
3
3
F
K.2
L.2
Do not tighten all the way.
3
Do not tighten all the way.
333
3
3
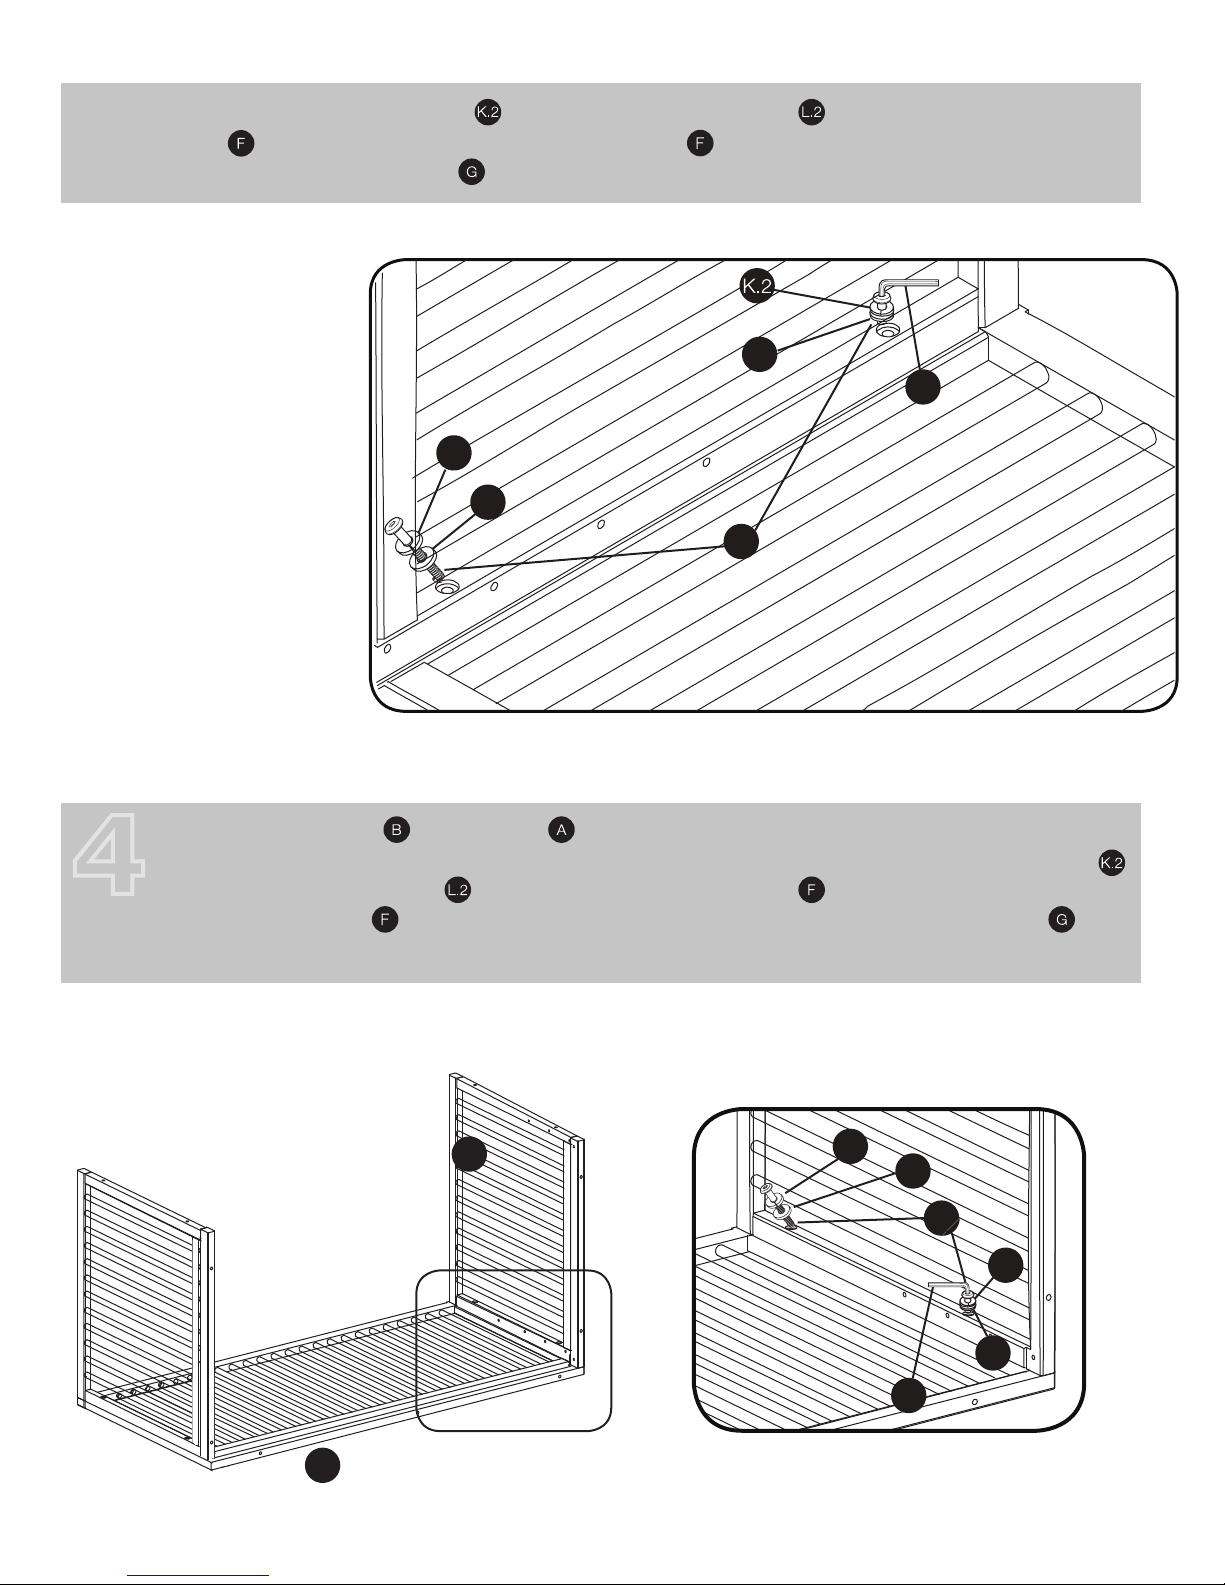
Attach one LOCKING WASHER and one REGULAR WASHER to two RAIL CONNECTOR
BOLT and insert each RAIL CONNECTOR BOLTS in rail connector holes and slightly
tighten with ALLEN WRENCH . Do not tighten all the way.
L.2
G
K.2
L.2
F
4
Align second END RAIL to SIDE RAIL making sure that mattress support holes face the
bottom and inside of CRIB. Refer to diagram for proper orientation. Attach one LOCKING WASHER
and one REGULAR WASHER to two RAIL CONNECTOR BOLT and insert each RAIL
CONNECTOR BOLTS in rail connector holes and slightly tighten with ALLEN WRENCH .
Do not tighten all the way.
B
K.2
L.2
F
K.2
L.2
G
A
Page 5
5
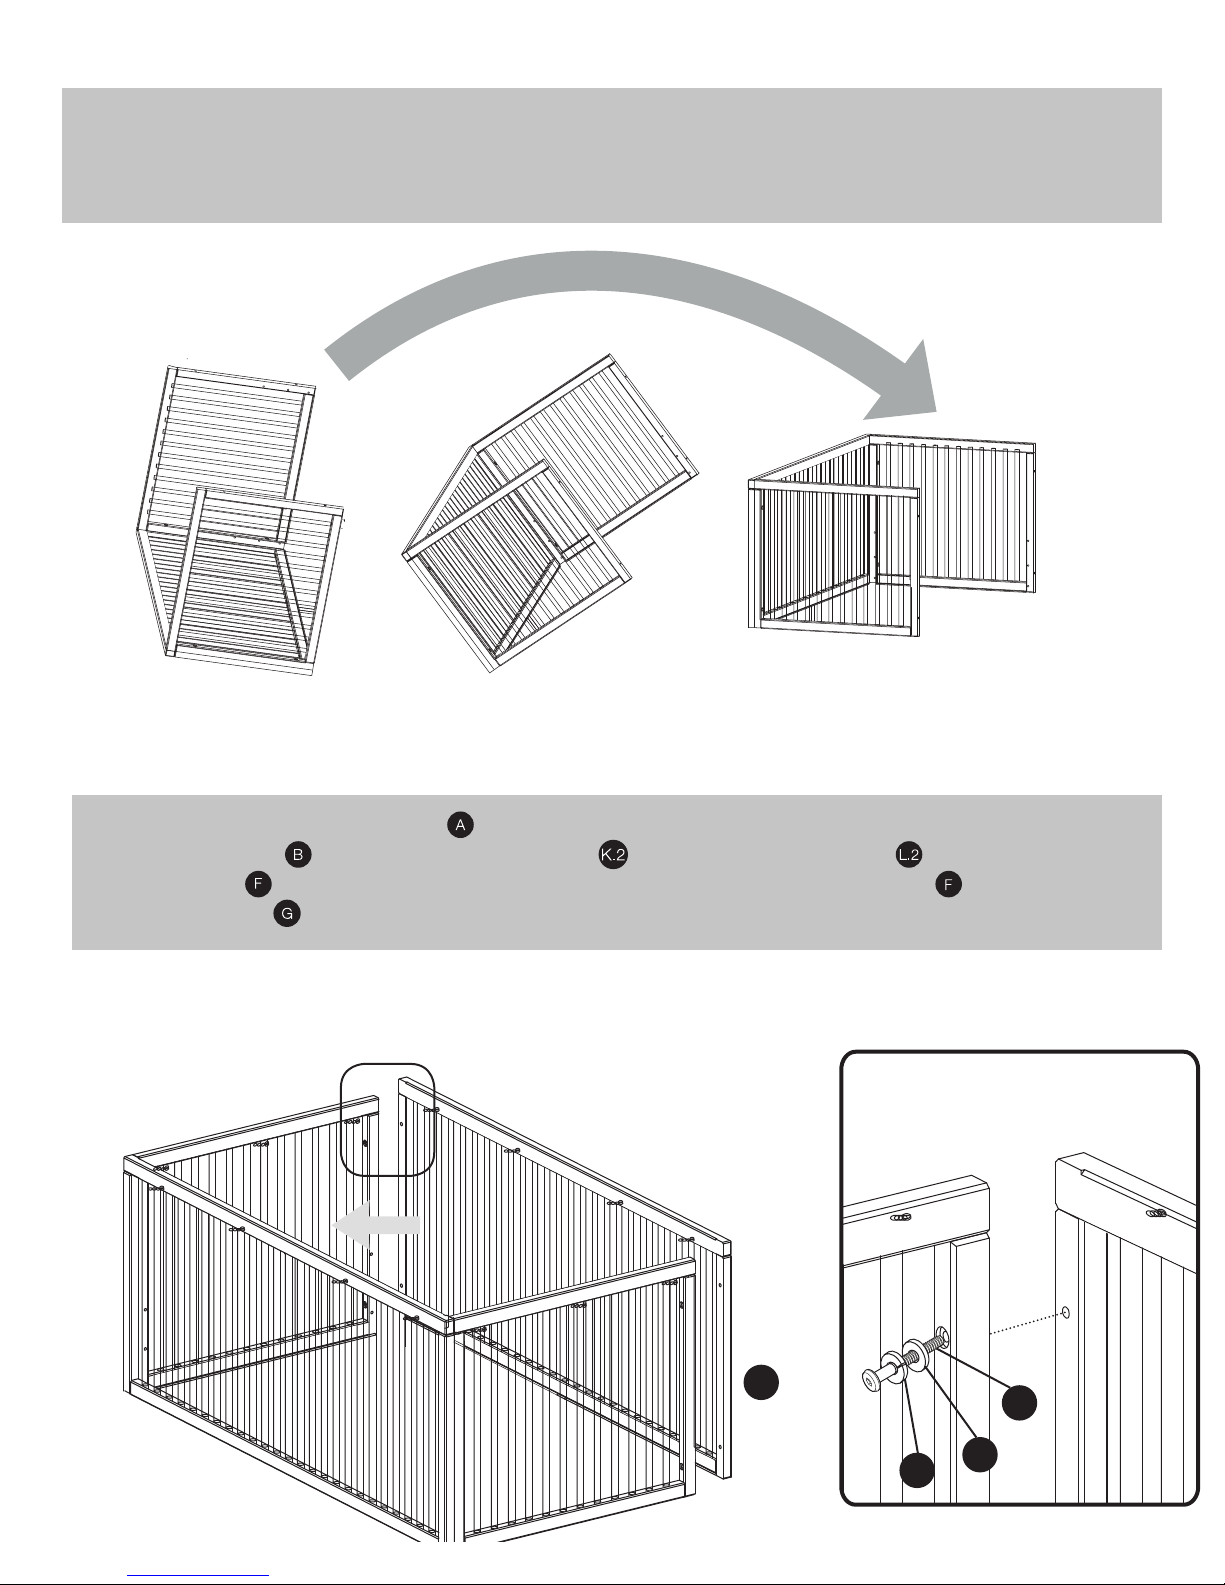
Line up remaining SIDE RAIL so its rail connector holes align with the rail connector holes on the
END RAILS . Attach LOCKING WASHERS and REGULAR WASHERS to RAIL CONNECTOR
BOLTS and insert and slightly tighten the four RAIL CONNECTOR BOLTS with ALLEN
WRENCH as in steps 3 and 4. Do not tighten all the way.
6
1
2
3
5
Carefully stand crib upright. This requires two people. One person holds onto crib to prevent it from
tipping over during assembly step 6.
1
2
3
Carefully stand crib upright. This requires two people.
One person holds onto crib to prevent it from tipping over during
assembly step 6.
5
6
A
B
F
K.2
L.2
F
G
Line up other SIDE RAIL so its rail-connector-holes
align with the rail-connector-holes on the END PANELS .
Attach LOCKING WASHERS and REGULAR WASHERS
to RAIL CONNECTOR BOLTS and insert and tighten
the four RAIL CONNECTOR BOLTS with
ALLEN WRENCH as in steps 3 and 4.
Line up remaining SIDE RAIL so its rail-connector-holes align with the rail-connector-holes on the
END RAILS . Attach LOCKING WASHERS and REGULAR WASHERS to RAIL CONNECTOR
BOLTS and insert and slightly tighten the four RAIL CONNECTOR BOLTS with ALLEN
WRENCH as in steps 3 and 4. Do not tighten all the way.
6
1
2
3
5
Carefully stand crib upright. This requires two people. One person holds onto crib to prevent it from
tipping over during assembly step 6.
Line up remaining SIDE RAIL so its rail connector holes align with the rail connector holes on the
END RAILS . Attach LOCKING WASHERS and REGULAR WASHERS to RAIL CONNECTOR
BOLTS and insert and slightly tighten the four RAIL CONNECTOR BOLTS with ALLEN
WRENCH as in steps 3 and 4. Do not tighten all the way.
6
1
2
3
5
Carefully stand crib upright. This requires two people. One person holds onto crib to prevent it from
tipping over during assembly step 6.
Line up remaining SIDE RAIL so its rail connector holes align with the rail connector holes on the
END RAILS . Attach LOCKING WASHERS and REGULAR WASHERS to RAIL CONNECTOR
BOLTS and insert and slightly tighten the four RAIL CONNECTOR BOLTS with ALLEN
WRENCH as in steps 3 and 4. Do not tighten all the way.
6
1
2
3
5
Carefully stand crib upright. This requires two people. One person holds onto crib to prevent it from
tipping over during assembly step 6.
Line up remaining SIDE RAIL so its rail connector holes align with the rail connector holes on the
END RAILS . Attach LOCKING WASHERS and REGULAR WASHERS to RAIL CONNECTOR
BOLTS and insert and slightly tighten the four RAIL CONNECTOR BOLTS with ALLEN
WRENCH as in steps 3 and 4. Do not tighten all the way.
6
1
2
3
5
Carefully stand crib upright. This requires two people. One person holds onto crib to prevent it from
tipping over during assembly step 6.
Line up remaining SIDE RAIL so its rail connector holes align with the rail connector holes on the
END RAILS . Attach LOCKING WASHERS and REGULAR WASHERS to RAIL CONNECTOR
BOLTS and insert and slightly tighten the four RAIL CONNECTOR BOLTS with ALLEN
WRENCH as in steps 3 and 4. Do not tighten all the way.
6
1
2
3
5
Carefully stand crib upright. This requires two people. One person holds onto crib to prevent it from
tipping over during assembly step 6.
Carefully stand crib upright. This requires two people. One person holds onto crib to prevent it from
tipping over during assembly step 6.
1
2
3
6
Line up remaining SIDE RAIL so its rail connector holes align with the rail connector holes on the
END RAILS . Attach LOCKING WASHERS and REGULAR WASHERS to RAIL CONNECTOR
BOLTS and insert and slightly tighten the four RAIL CONNECTOR BOLTS with ALLEN
WRENCH as in steps 3 and 4. Do not tighten all the way.
A
F
K.2
Do not tighten all the way.
Do not tighten all the way.
L.2
Page 6
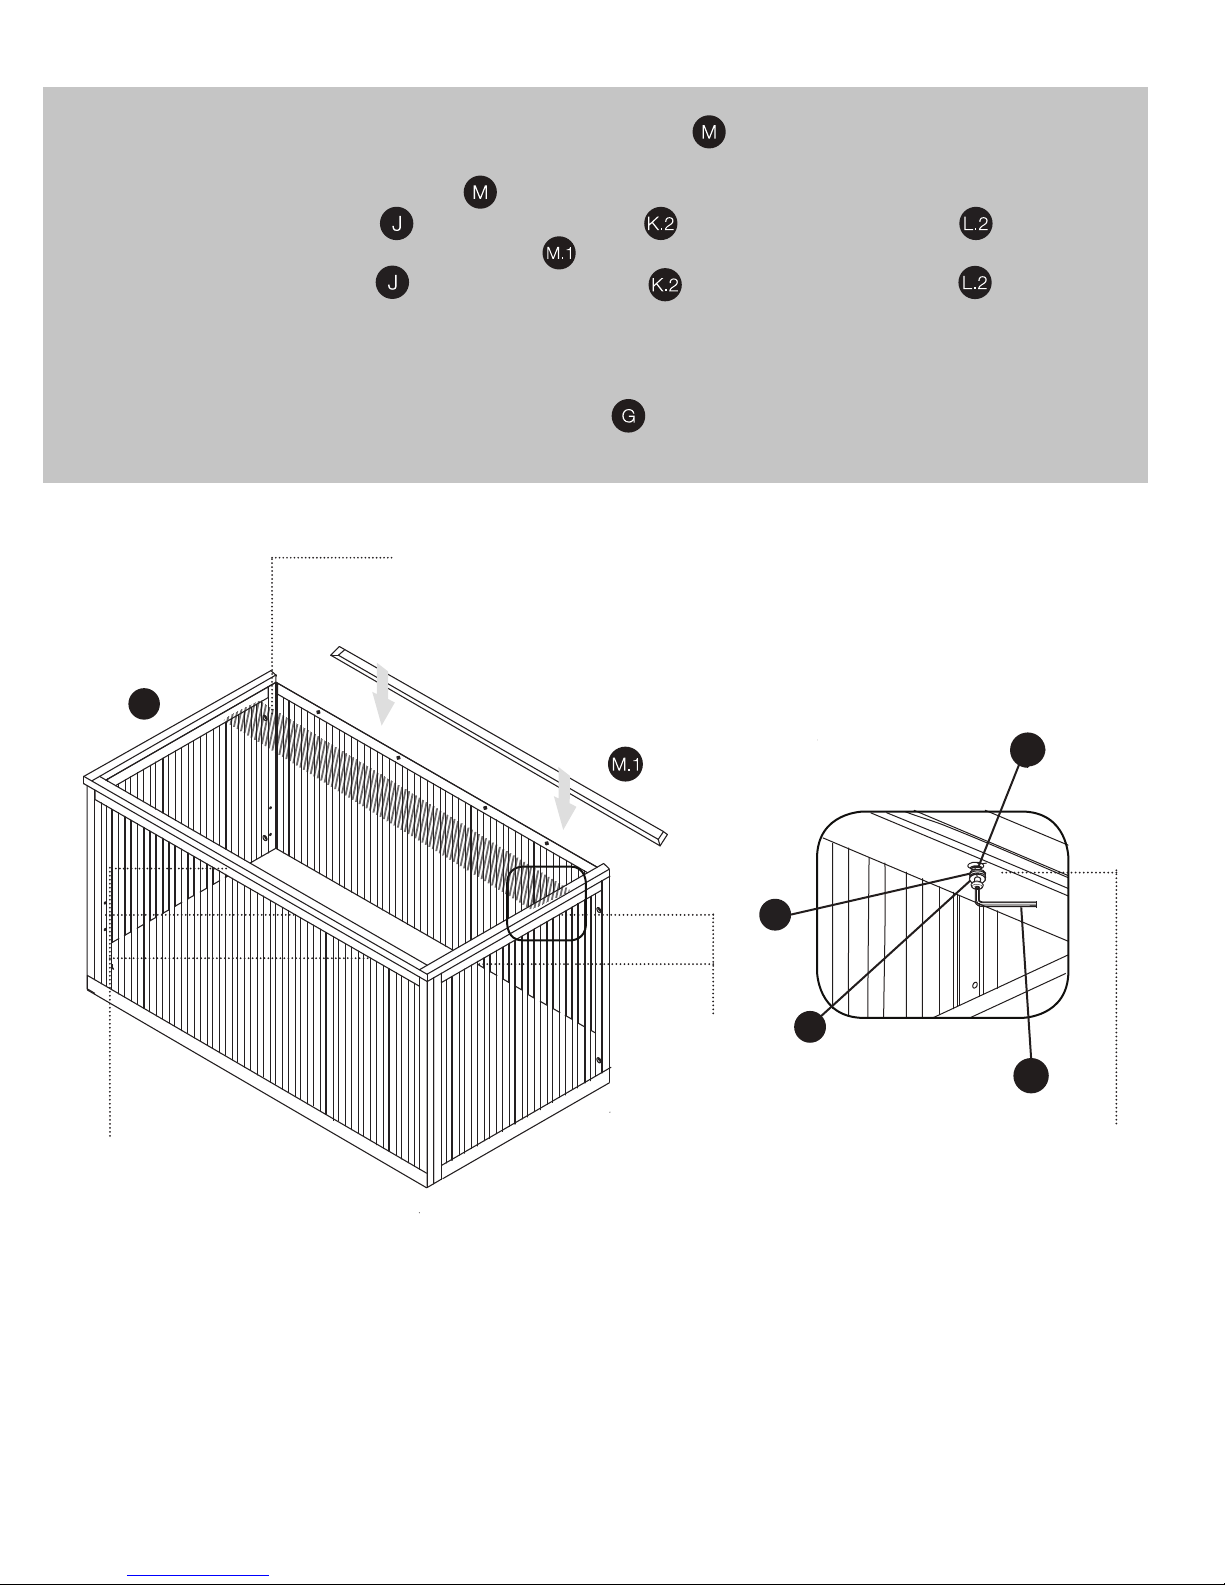
Remove support bracket from TOP FRAME ASSEMBLY .
7
Place TOP FRAME ASSEMBLY on top of crib rails and secure in place with ten
CONNECTOR BOLTS , LOCKING WASHERS , and REGULAR WASHERS as
shown below. Place TOP FRAME RAIL on top of crib rails and secure in place with four
CONNECTOR BOLTS , LOCKING WASHERS , and REGULAR WASHERS
as shown below.
It may be easier to access the top frame connector holes by laying the frame on its side (place on
a blanket to prevent scraping). Also, only slightly tighten bolts until all of them are in place and
aligned. Tighten all bolts with ALLEN WRENCH .
remove support bracket
M
J
top frame
connector holes
L.2
L.2
top frame
connector holes
K.2
G
top frame
connector holes
Page 7
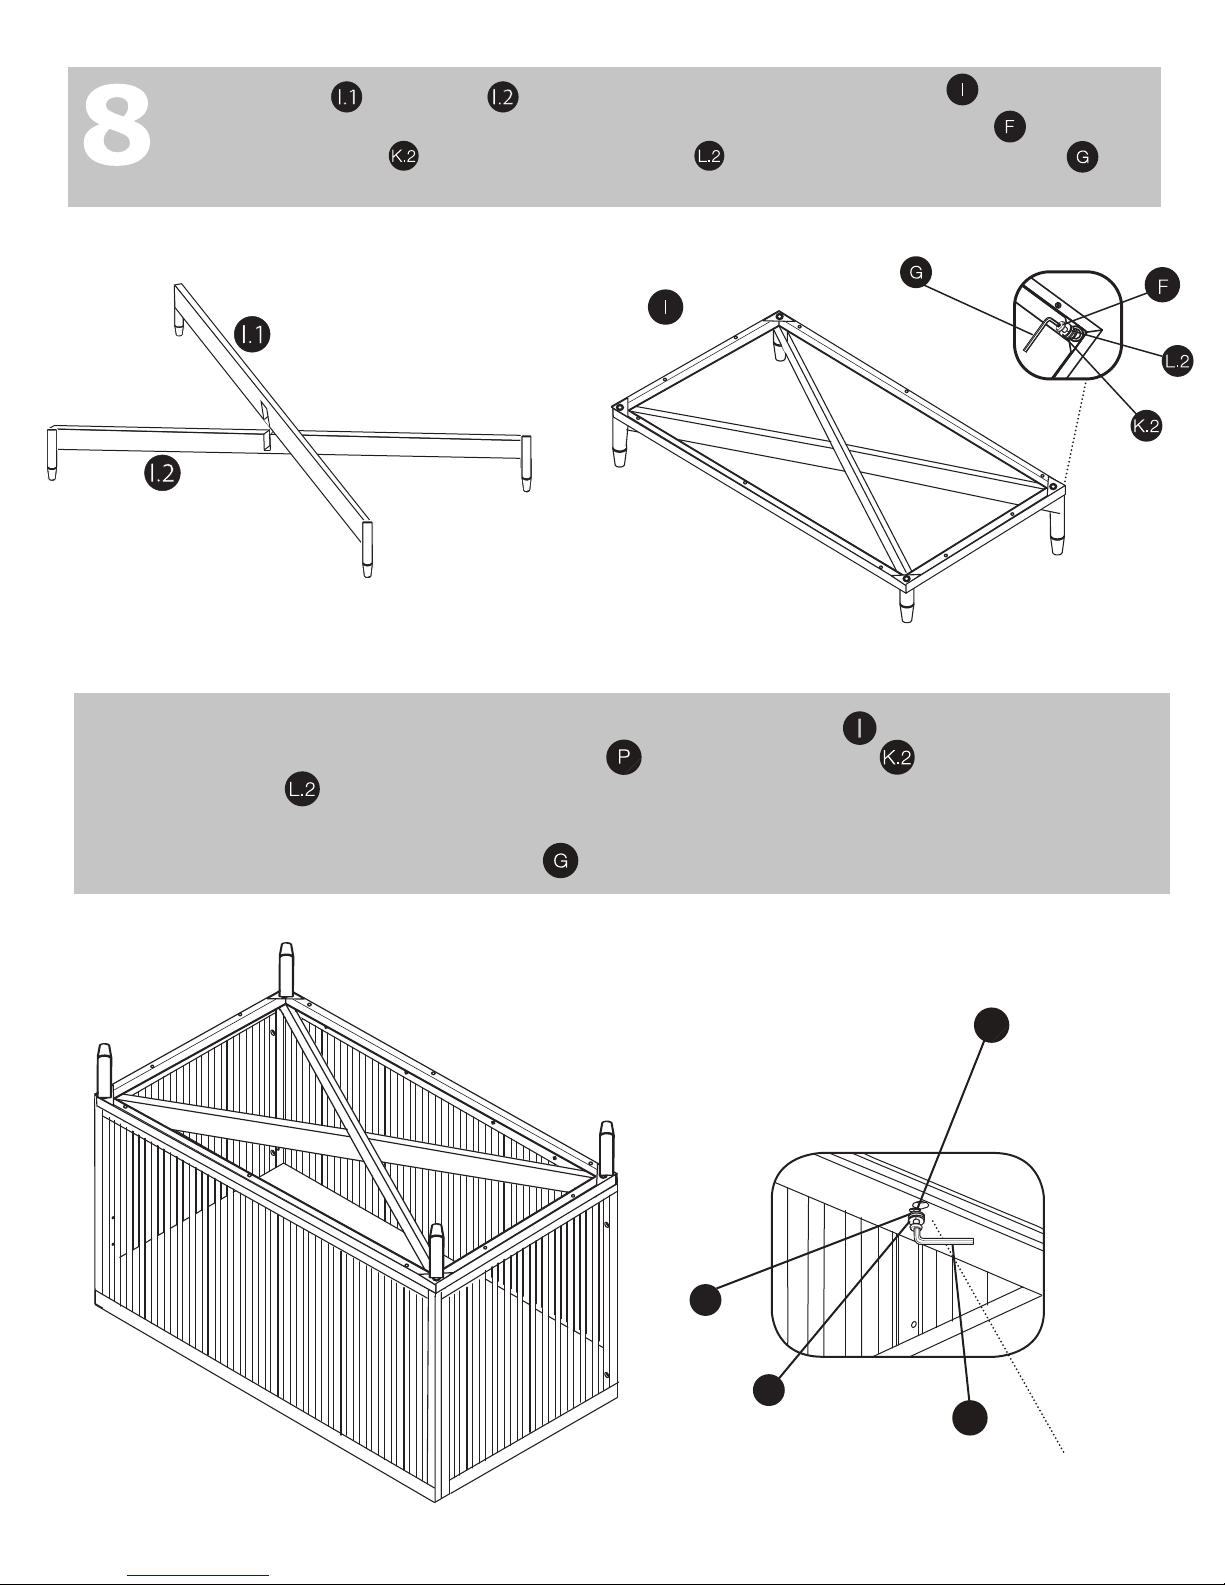
Attach X-FOOT to X-FOOT using notches to form X-frame. Place BASE on top of
X-frame. Attach each foot to corner bracket of base using RAIL CONNECTOR BOLTS ,
LOCKING WASHERS , and REGULAR WASHERS , and tighten with ALLEN WRENCH .
9
Flip crib rails over so top is on floor on a blanket or carpet. Place BASE on crib rails and secure
in place with ten BASE CONNECTOR BOLTS , LOCKING WASHERS , and REGULAR
WASHERS from underneath as shown below. Also, only slightly tighten bolts until all of them
are in place and aligned.
Tighten all bolts with ALLEN WRENCH .
P
L.2
K.2
G
base connector holes
Page 8
3
3
F
K.2
L.2
Do not tighten all the way.
3
Do not tighten all the way.
333
3
10
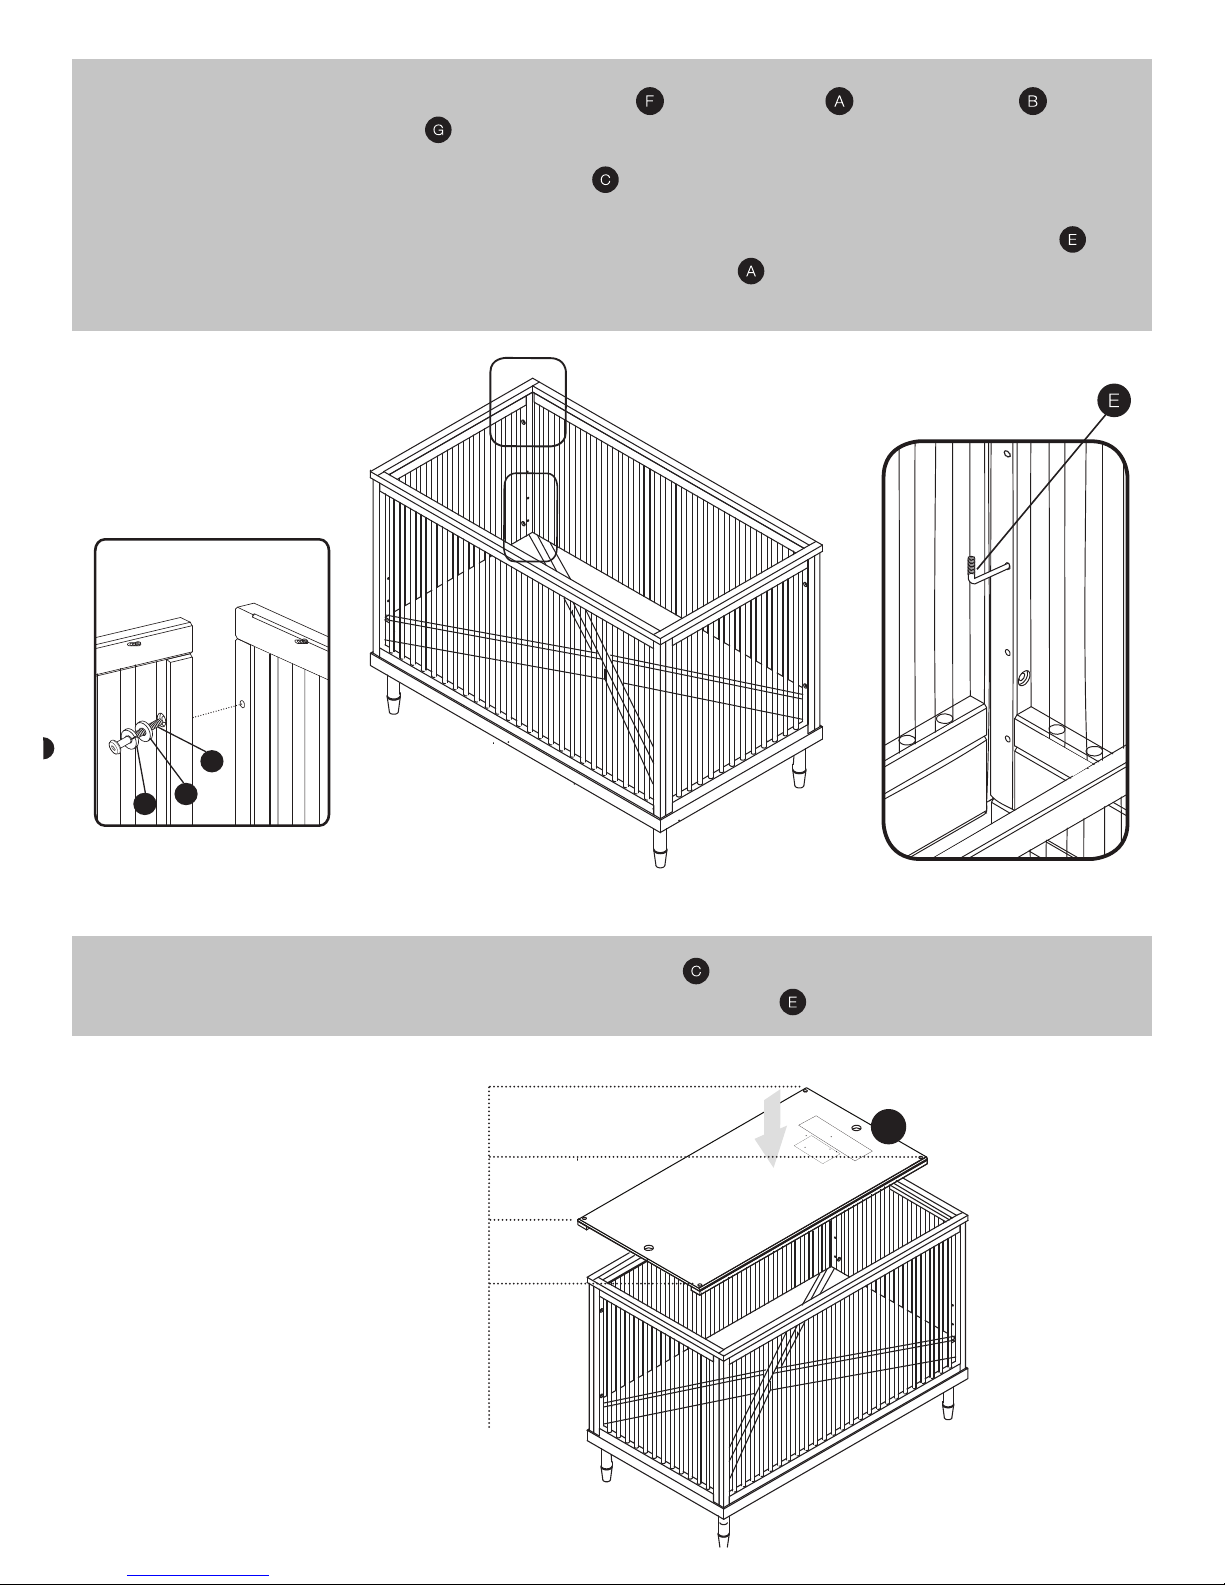
Tighten all RAIL CONNECTOR BOLTS on SIDE RAILS and END RAILS with
ALLEN WRENCH .
The MATTRESS SUPPORT PANEL may be installed in one of four positions.
See the four different mattress support holes in each corner of the CRIB. First, select the
desired mattress height. Insert the smooth ends of each MATTRESS SUPPORT PIN in
the desired mattress support holes on SIDE RAILS .
See drawings for proper pin orientation.
11
Carefully lower MATTRESS SUPPORT PANEL with labels facing up.
Align corner holes to sit on MATTRESS SUPPORT PINS .
C
corner holes
Page 9
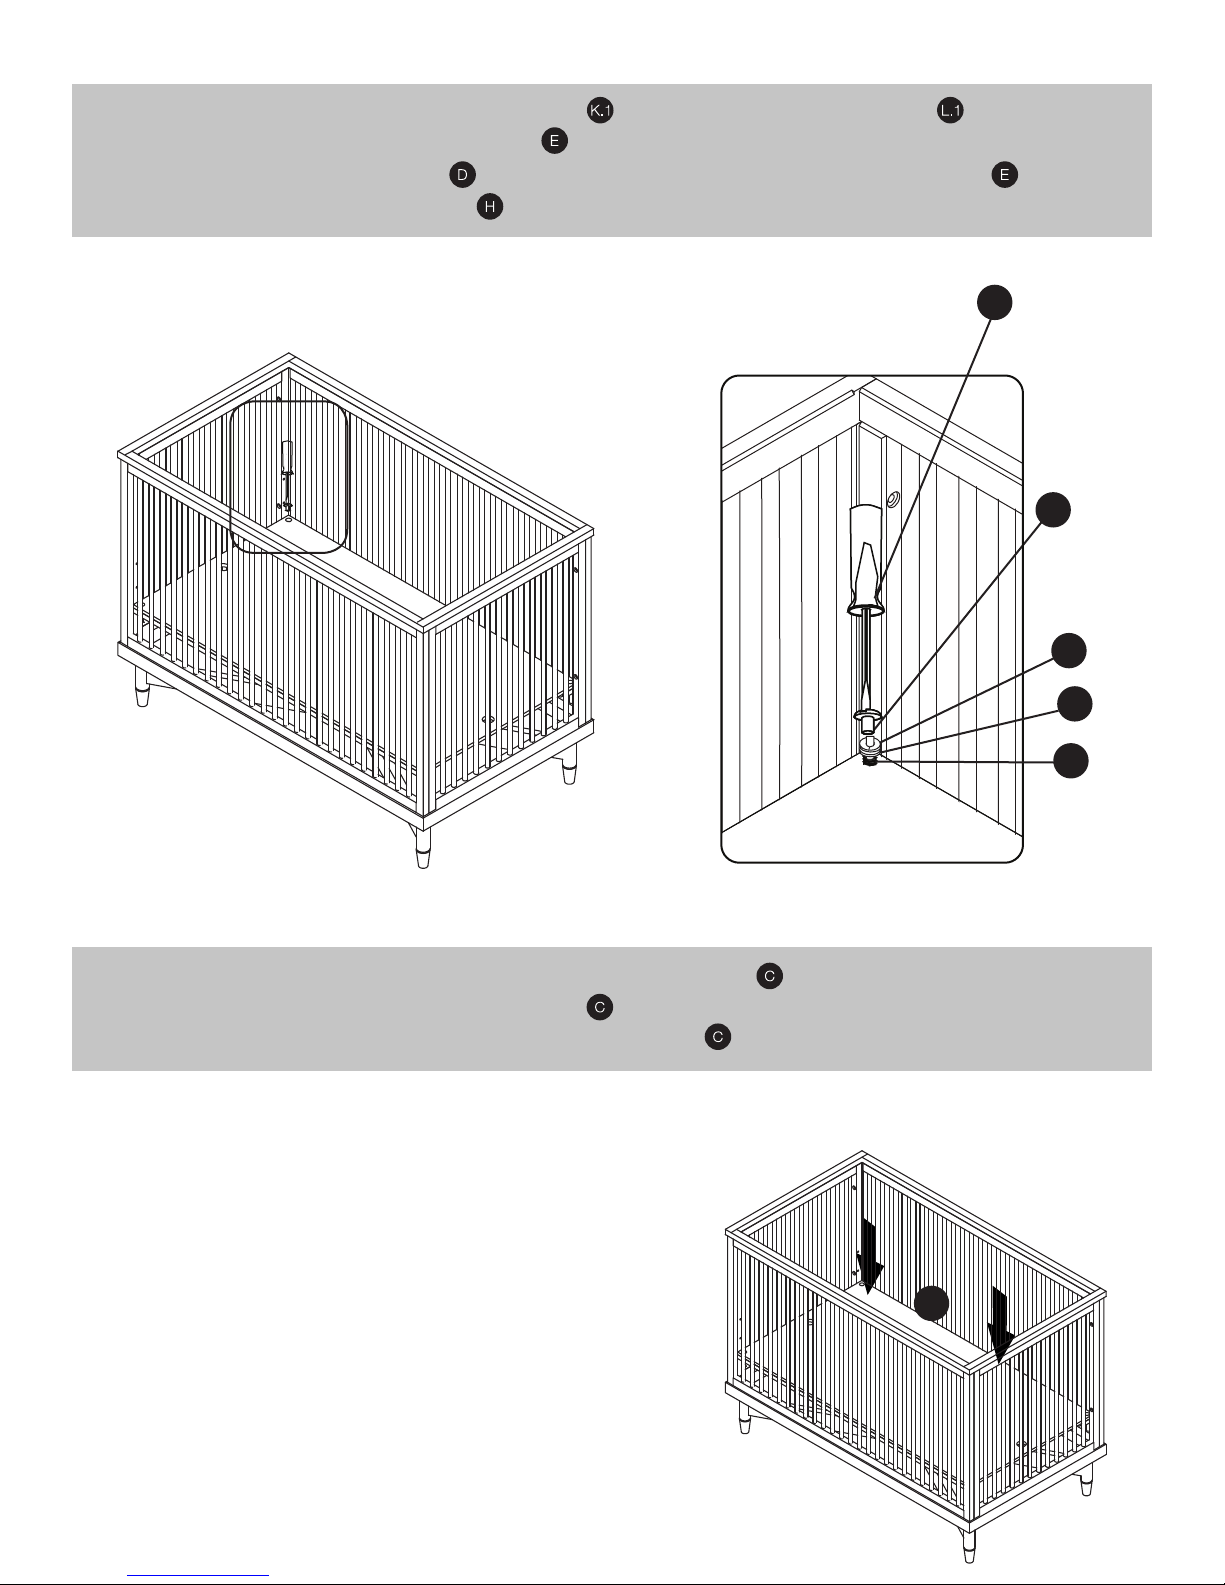
12
Attach one LOCKING WASHER and one REGULAR WASHER on top of each
MATTRESS SUPPORT PIN . Secure and tighten each of the four MATTRESS
SUPPORT BOLTS to each of the four MATTRESS SUPPORT PINS .
Use SCREWDRIVER to tighten securely.
H
D
K.1
13
L.1
E
Press firmly in center of MATTRESS SUPPORT PANEL to ensure proper placement. In the
event MATTRESS SUPPORT PANEL does not appear to be secure remove and repeat
steps 9 to 11. The MATTRESS SUPPORT PANEL must be firmly attached at all four corners.
C
C
Page 10

operation
The mattress height should be lowered as your baby grows to ensure that he/she does
not climb out of the CRIB. When child is able to pull to standing position, set mattress to
lowest position and remove bumper pads, large toys and other objects that could serve as
steps for climbing out. Regularly assess your baby’s abilities and make adjustments
accordingly.
To adjust the height of the mattress support, remove the mattress from the crib.
Unscrew all four MATTRESS SUPPORT BOLTS , remove all LOCKING WASHERS
and REGULAR WASHERS and remove MATTRESS SUPPORT PANEL . Remove
and reinsert the smooth ends of each MATTRESS SUPPORT PIN in mattress support
holes on SIDE RAILS at desired height. Refer to steps 9 through 11 for reinserting
MATTRESS SUPPORT PANEL and reattaching REGULAR WASHERS , LOCKING
WASHERS , and MATTRESS SUPPORT BOLTS .
Periodically check to make sure every component is properly and securely in place and all
bolts and fasteners are tight.
Do not scratch or chip the finish. Do not use abrasive chemicals for cleaning. Clean with
mild soap on a soft rag. Rinse and dry thoroughly. If you ever re-finish this furniture, be
sure to use only a non-toxic finish specified for children’s furniture.
Store crib in a dry area.
Page 11

Failure to follow these warnings and the assembly instructions could result in serious
injury or death.
Read all instructions before assembling crib. KEEP INSTRUCTIONS FOR FUTURE USE.
Infants can suocate on soft bedding. Never add a pillow or comforter. Never place
additional padding under infant.
To reduce the risk of SIDS, pediatricians recommend healthy infants be placed on their backs
to sleep, unless otherwise advised by your physician.
Strangulation Hazard:
Strings can cause strangulation! Do not place items with a string around a child’s neck, such as
hood strings or pacier er cords. Do not suspend strings over a crib or attach strings to toys.
To help prevent strangulation tighten all fasteners. A child can trap parts of the body or
clothing on loose fasteners.
DO NOT place crib near window where cords from blinds or drapes may strangle a child.
Fall Hazard:
When child is able to pull to a standing position, set mattress to lowest position and remove
bumper pads, large toys and other objects that could serve as steps for climbing out.
Stop using crib when child begins to climb out or reaches the height of 35 in. (89 cm.).
Check this product for damaged hardware, loose joints, loose bolts or other fasteners,
missing parts, or sharp edges before and after assembly and frequently during use.
Securely tighten loose bolts and other fasteners. DO NOT use crib if any parts are
missing, damaged or broken. Contact ducduc for replacement parts and instructional
literature if needed. DO NOT substitute parts.
If renishing, use a non-toxic nish specied for children’s products.
Follow warnings on all products in a crib.
Never use plastic shipping bags or other plastic lm as mattress covers because they can
cause suocation.
Infants can suocate in gaps between crib sides and a mattress that is too small.
ducduc llc 524 broadway no. 206 ny ny 10012 t 212.226.1868 f 212.226.5504 www.ducducnyc.com
 Loading...