

Page 1
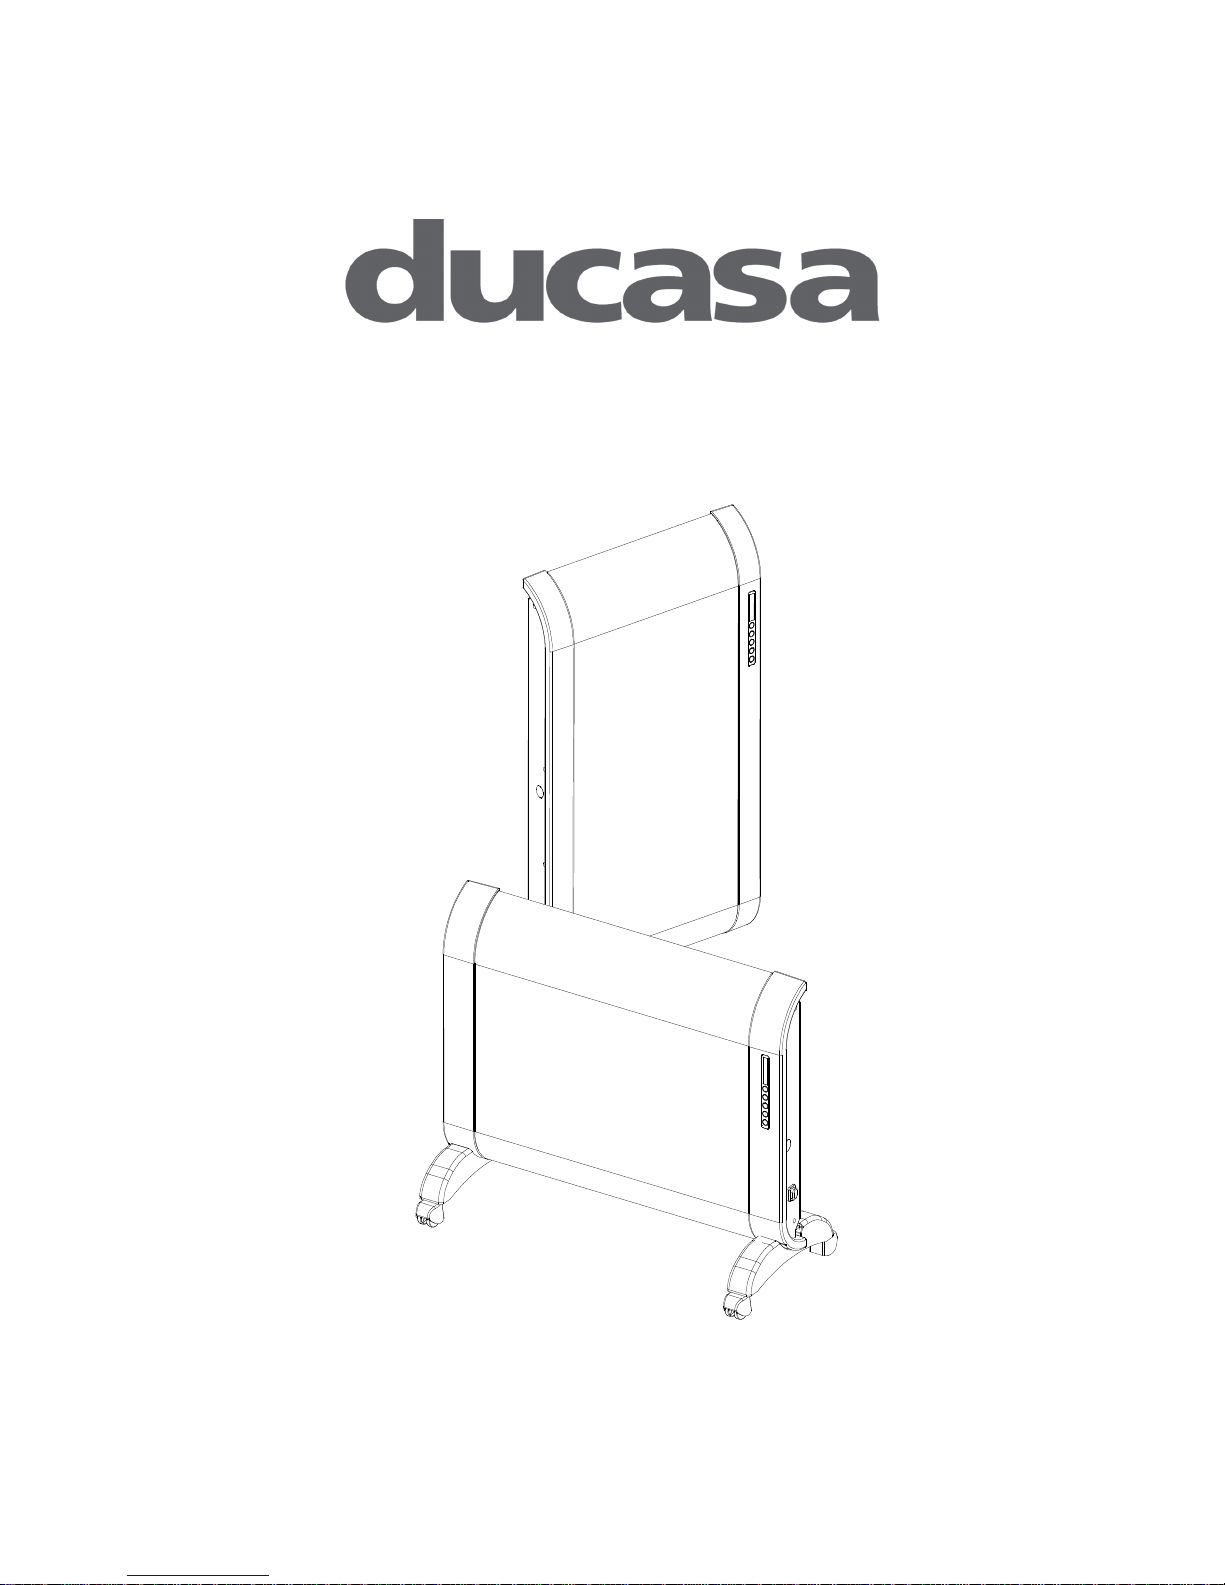
Models: Sunray RFV15 - RF15
User Manual
Page 2

UK Distributor of Ducasa Products:
Heattend Products Ltd
Web: www.heattend.co.uk
Email: [email protected]
Page 3

2
Contents
Thank you for purchasing the Ducasa Sunray Fan Assisted Radiant Panel Heater.
Safety Precautions & Important Safeguards: .................................................................. 3
Specifications: ................................................................................................................. 5
Features: ......................................................................................................................... 5
Remove Packaging: ........................................................................................................ 5
Installation Kit: ................................................................................................................. 6
Heater Layout: ................................................................................................................ 6
Control Panel: ................................................................................................................. 7
Installation Precautions and Installation: ......................................................................... 8
Bathroom Use: ............................................................................................................... 11
Operation: ...................................................................................................................... 11
Cleaning: ....................................................................................................................... 13
Storage: ........................................................................................................................ 13
Fault Finding: ................................................................................................................ 13
WARNINGS: ................................................................................................................. 13
Recycling: ..................................................................................................................... 14
KEEP THESE INSTRUCTIONS
Page 4
3
Safety Precautions & Important Safeguards:
Please read all the instructions before using this heater.
Don’t do any modification to the Heater.
Children should be supervised to ensure that they do not play with
the appliance.
Do not use the Heater outdoors.
If using the heater in a bathroom see ‘Bathroom Use’ section on
page 11.
This Heater has hot parts inside. Please do not place combustible
or chemical items near the Heater.
Children of less than 3 years should be kept away unless
continuously supervised.
Children aged from 3 years and less than 8 years shall only switch
on/off the appliance provided that it has been placed or installed in
its intended normal operating position and they have been given
supervision or instruction concerning use of the appliance in a safe
way and understand the hazards involved. Children aged from 3
years and less than 8 years shall not plug in, regulate and clean
the appliance or perform user maintenance.
This appliance can be used by children aged from 8 years and
above and persons with reduced physical, sensory or mental
capabilities or lack of experience and knowledge if they have been
given supervision or instruction concerning use of the appliance in
a safe way and understand the hazards involved. Children shall
not play with the appliance. Cleaning and user maintenance shall
not be made by children without supervision.
CAUTION: Some parts of this product can become very hot and
cause burns. Particular attention has to be given where children
and vulnerable people are present.
The Heater must not be located immediate below a socket outlet.
WARNING! To avoid over-heating since a fire risk exists, do
not cover the Heater.
To avoid burns, do not touch the hot surfaces of the heater when it
is in use.
Do not insert or allow foreign objects to enter any ventilation or
exhaust opening as this may cause an electric shock or fire, or
damage the Heater.
Always unplug the Heater when not in use. To disconnect the
Heater, remove the plug from the outlet.
Page 5

4
Never use a damaged cord or plug. If the supply cord is damaged,
must be replaced by the manufacturer, an affiliate agent or a
qualified person in order to avoid hazard.
Using an extension cord is not recommended as it may overheat
and cause a risk of fire. However, if an extension cord has to be
used, the conductor wire inside the cord must be at least 1mm2 in
size and rated no less than 13Amp.
Do not run cord under carpet and do not cover cord with throw rugs,
runners, or the like. Place the cord away from traffic area and
where it will not be tripped over.
Use this Heater only as described in this manual. Any other use
not recommended by the manufacturer may cause fire, electric
shock, or injury to persons.
Only qualified service representative should perform repairing and
maintenance services.
If you are away for several hours, consider reducing the
temperature setting.
If you have several appliances in one room, let them operate
simultaneously. In doing so you will obtain a more uniform
temperature without increasing your electricity consumption.
Page 6
5
Specifications:
Model RFV15
RF15
Voltage rating 230V AC, 50Hz
230V AC, 50Hz
Power Consumption (W)
1500W
1500W
Unit Size (cm) 43(L) x 8(D) x 75(H)
65(L) x 8(D) x 49.5(H)
Unit Weight (kg) 6.50kg
6.70kg
Class II
II
Features:
Comfortable radiant heat
Fan assisted
Electronic control with automatic power adjustment
Frost Protection function
Variable outputs.
IP24
Blue backlight for LCD display with 2 automatic level of brightness
Safety thermal cut off
Safety tip-over cut-out switch only for RF15
Fast heat up times.
No dehumidifying
Remove Packaging:
1. Remove the heater and fixtures from the box.
2. Remove the polystyrene and polythene bags.
3.
Save the packaging to store the heater while it is not being used.
Keep the original box! It can be used for storage in Summer season and if the
heater needs to be sent for repair.
Page 7
6
Installation Kit:
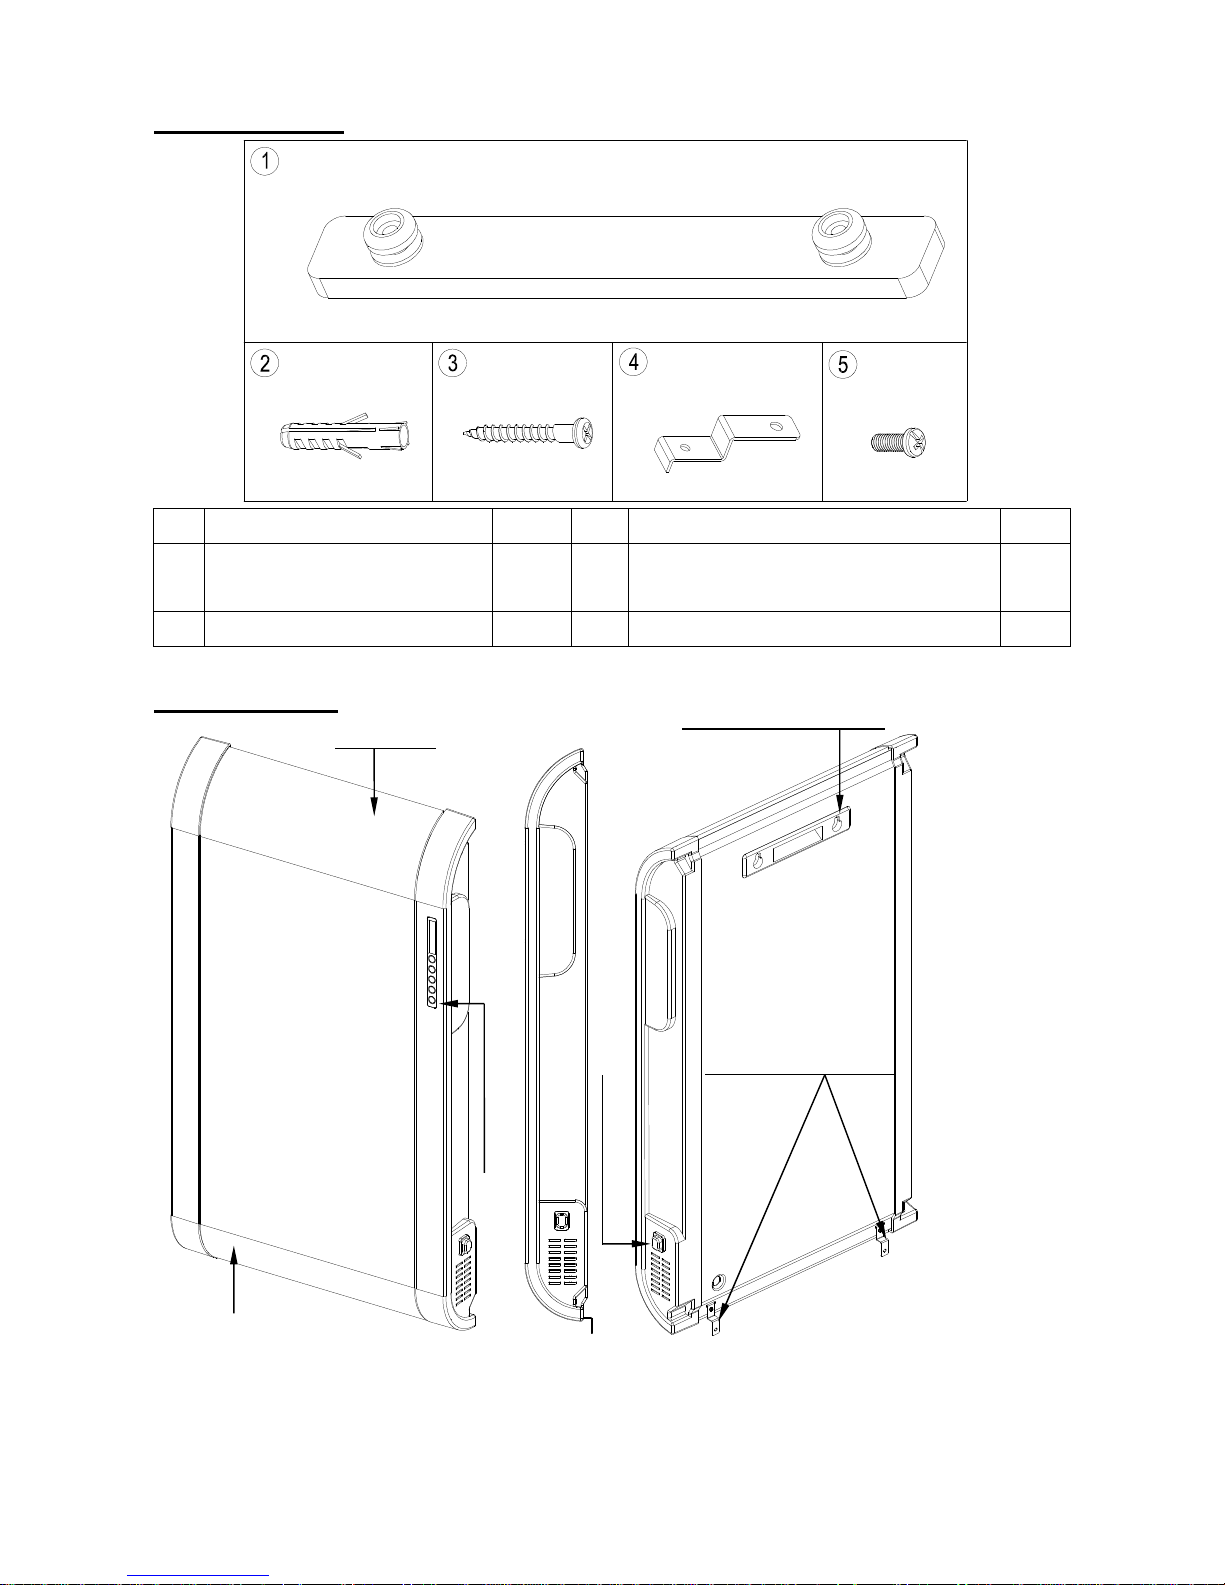
1. Wall Mounting Bracket
1pc 4. Lower Wall Mounting Bracket
2pcs
2. Wall plug
4pcs 5. Screw for lower wall mounting
Bracket
2pcs
3. Screw for Wall Mounting
4pcs
Heater Layout:
Rear
Side
Air Inlet
Front
Top Wall Mounting
Bracket with Handle
Power Switch
Control Panel
Air Outlet
Lower Wall Mounting
Brackets
Page 8
7
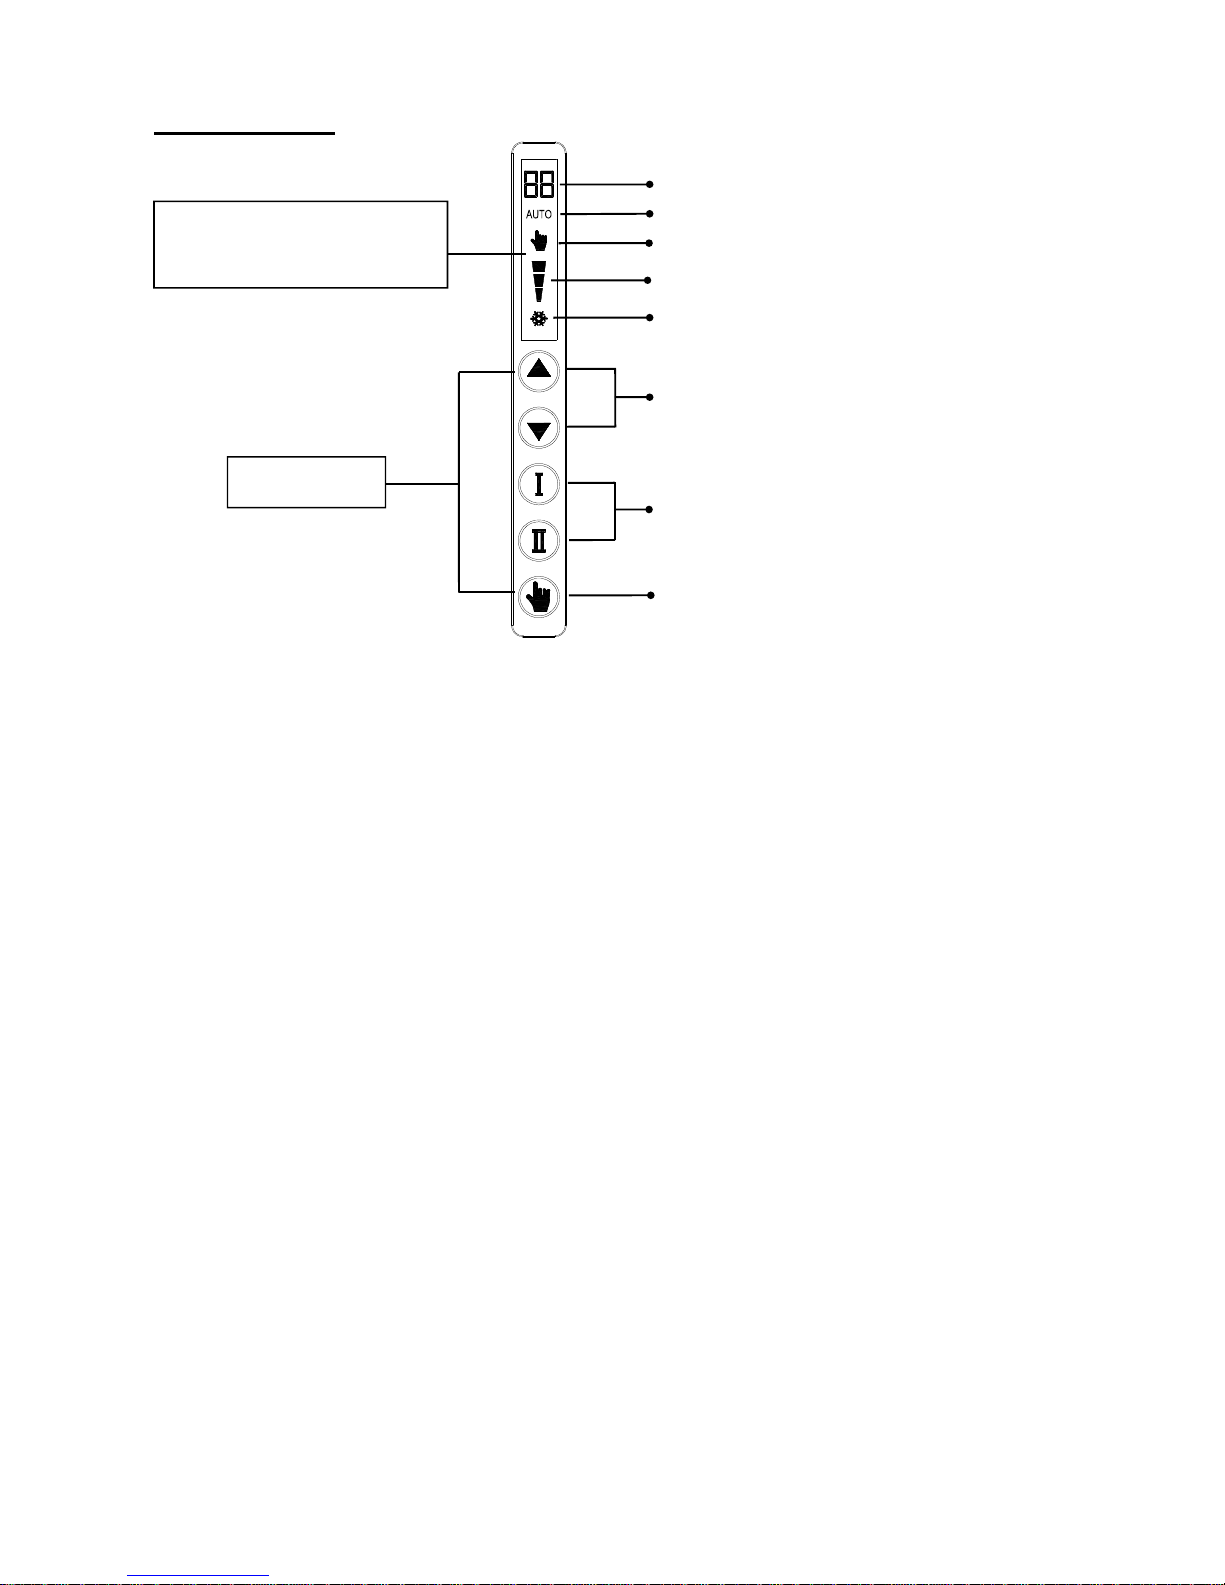
Control Panel
:
LCD display with two automatic
levels of brightness (High/Low)
Control Buttons
2 Digit Temperature Display
AUTO Mode
Frost Protection Mode
Manual Mode
Power light indicator
Auto / Manual Toggle Button
Temperature Setting Buttons
Power selection Buttons
(manual mode only)
Page 9
8
Installation Precautions
and Installation:
Switch Off the power before installing Plug to electrical outlet.
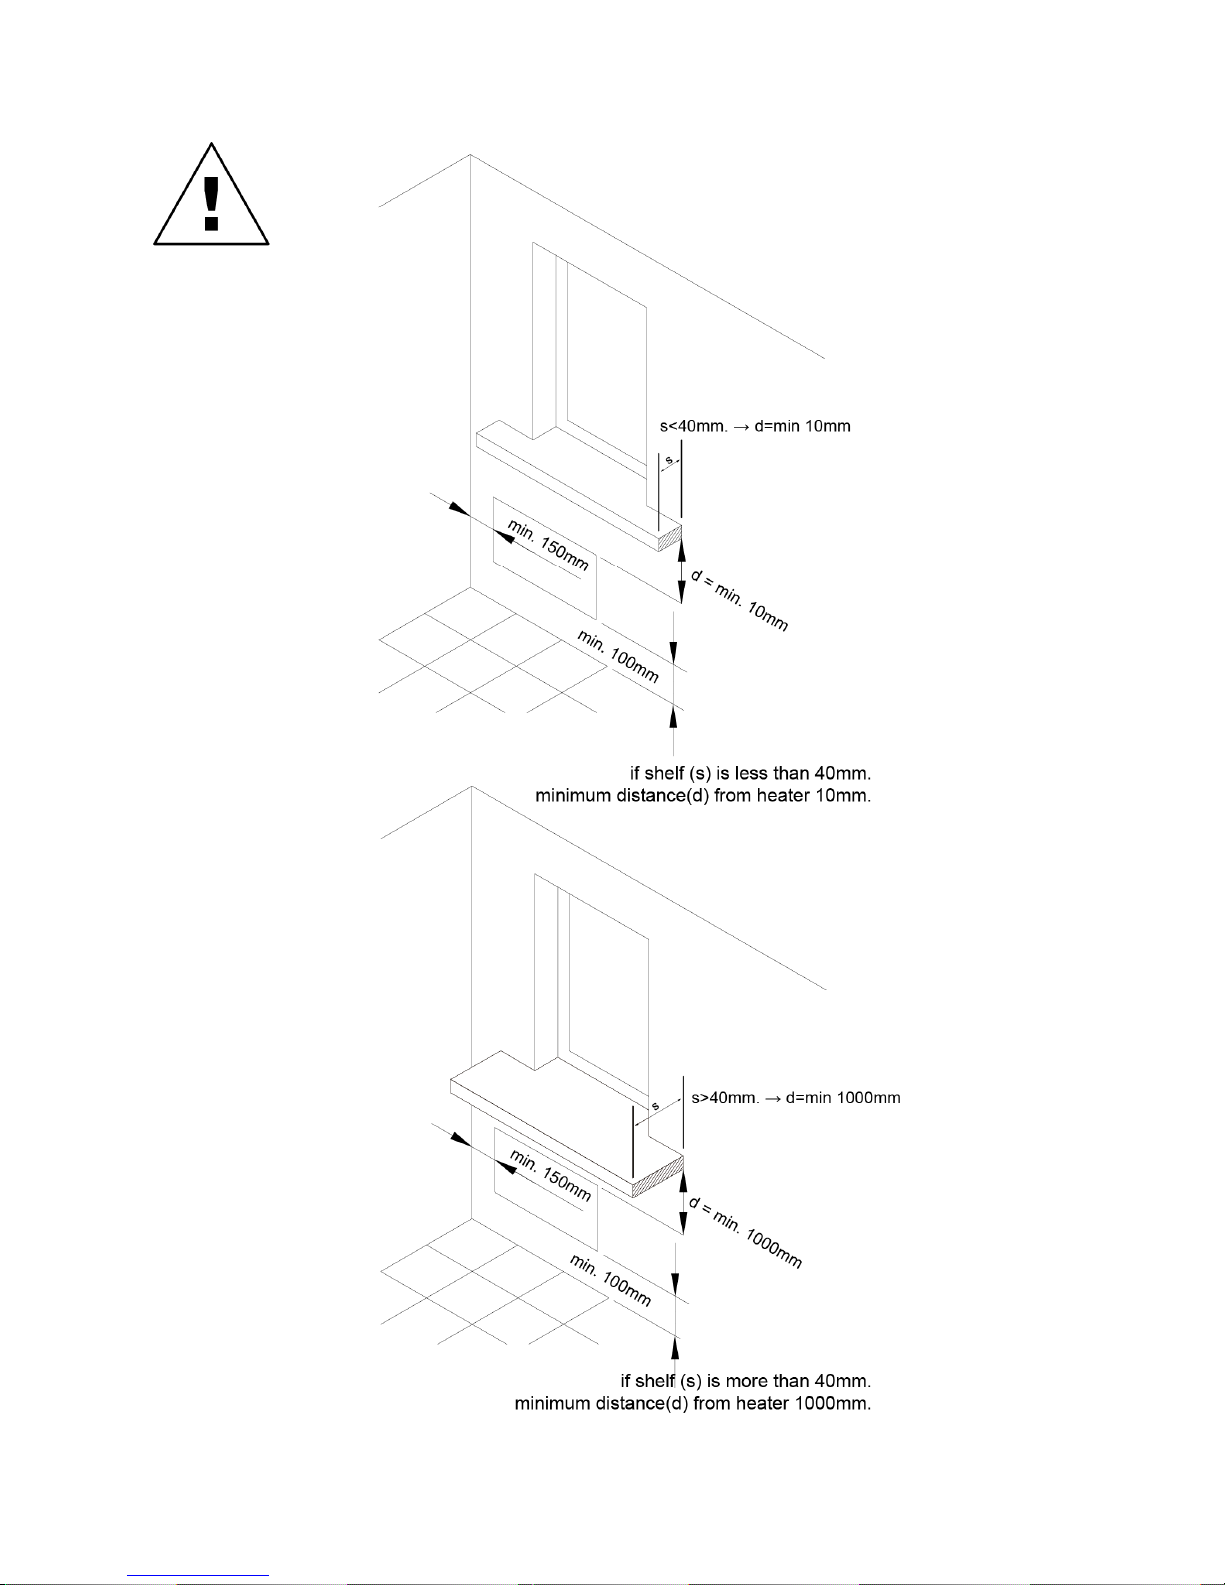
Heater has to be mounted minimum 10cm from the floor and no object (e.g. Shelf, see
graphic) should be placed within 1m from the top of the heater.
Keep combustible materials, such as curtains and other furnishings at least 0.5 meters
from the front of the heater and away from the side.
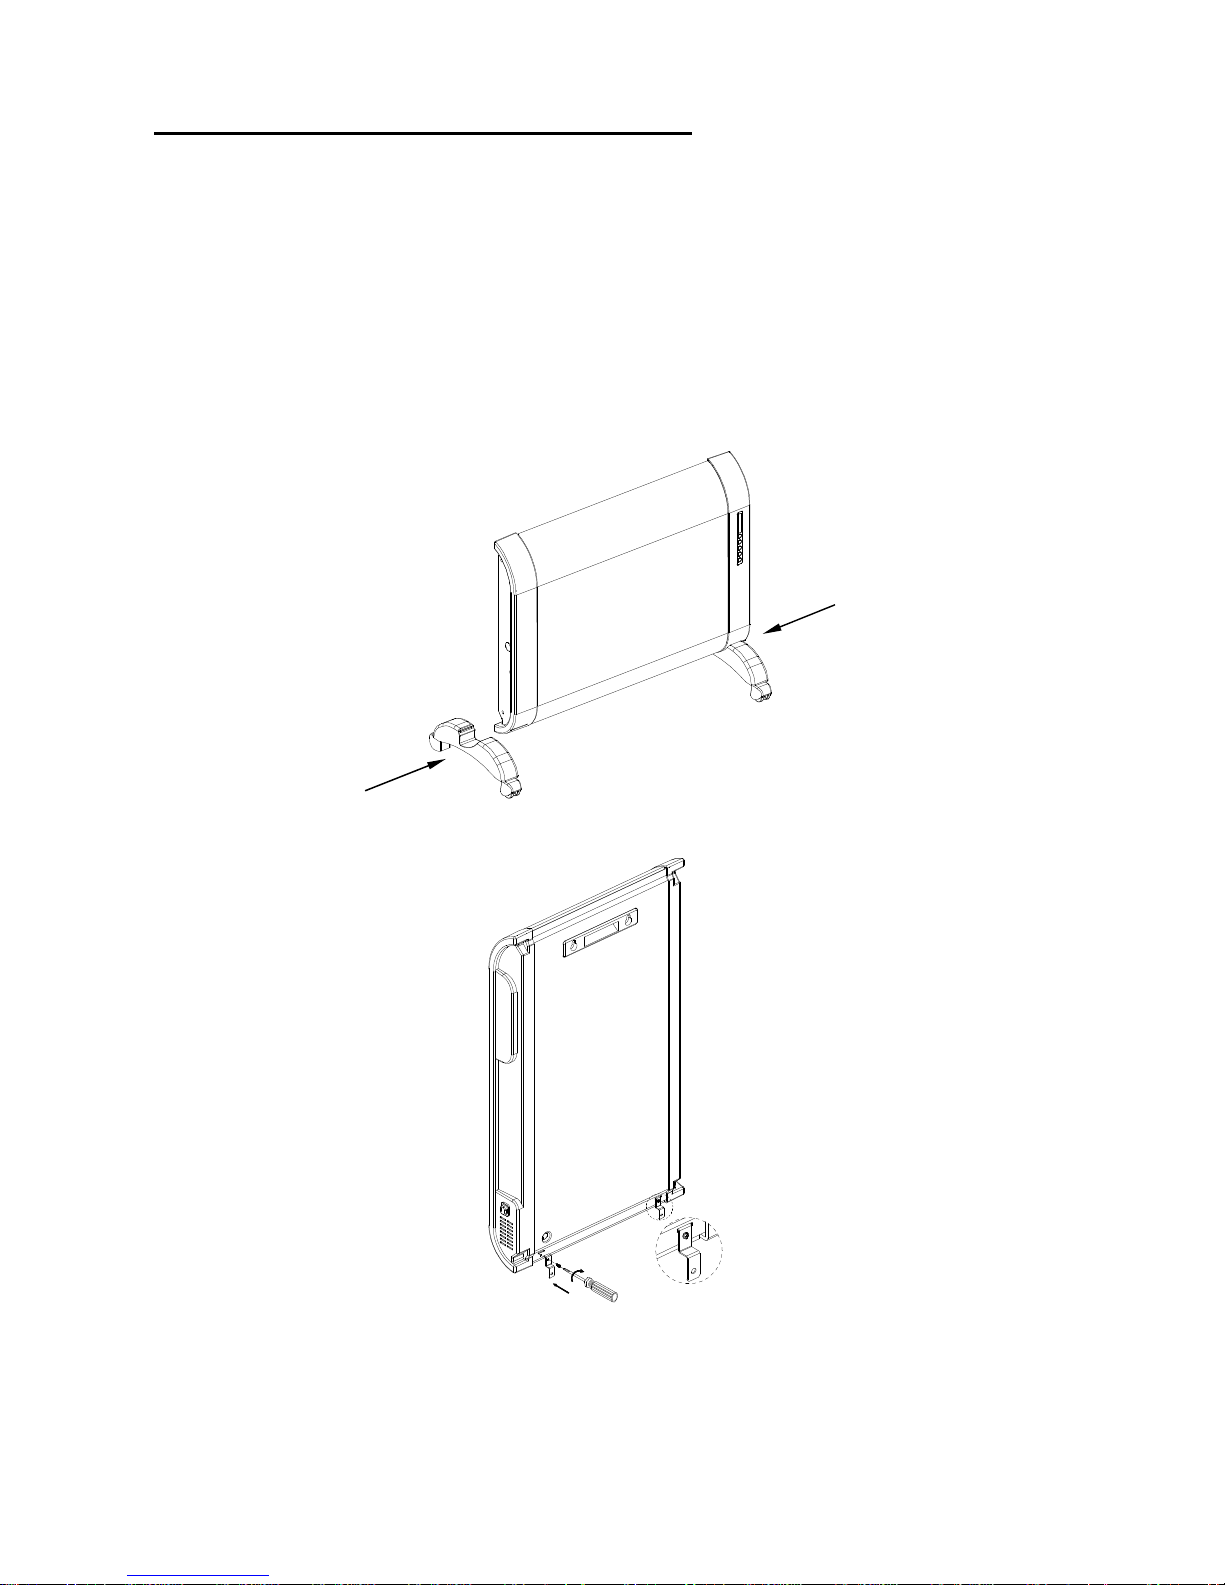
A. Floor Standing Installation instruction: (ONLY for RF15)
Insert the feet in the bottom part of the plastic end caps using the special built-in slots. This
built in system is enough to fix the feet tightly, screws are not required.
B. Wall Mounting Installation instruction:
Fix the 2 lower wall mounting brackets to the Heater by using the 2 lower wall mounting
bracket screws.
Page 10
9
Shelf distances
Page 11
10
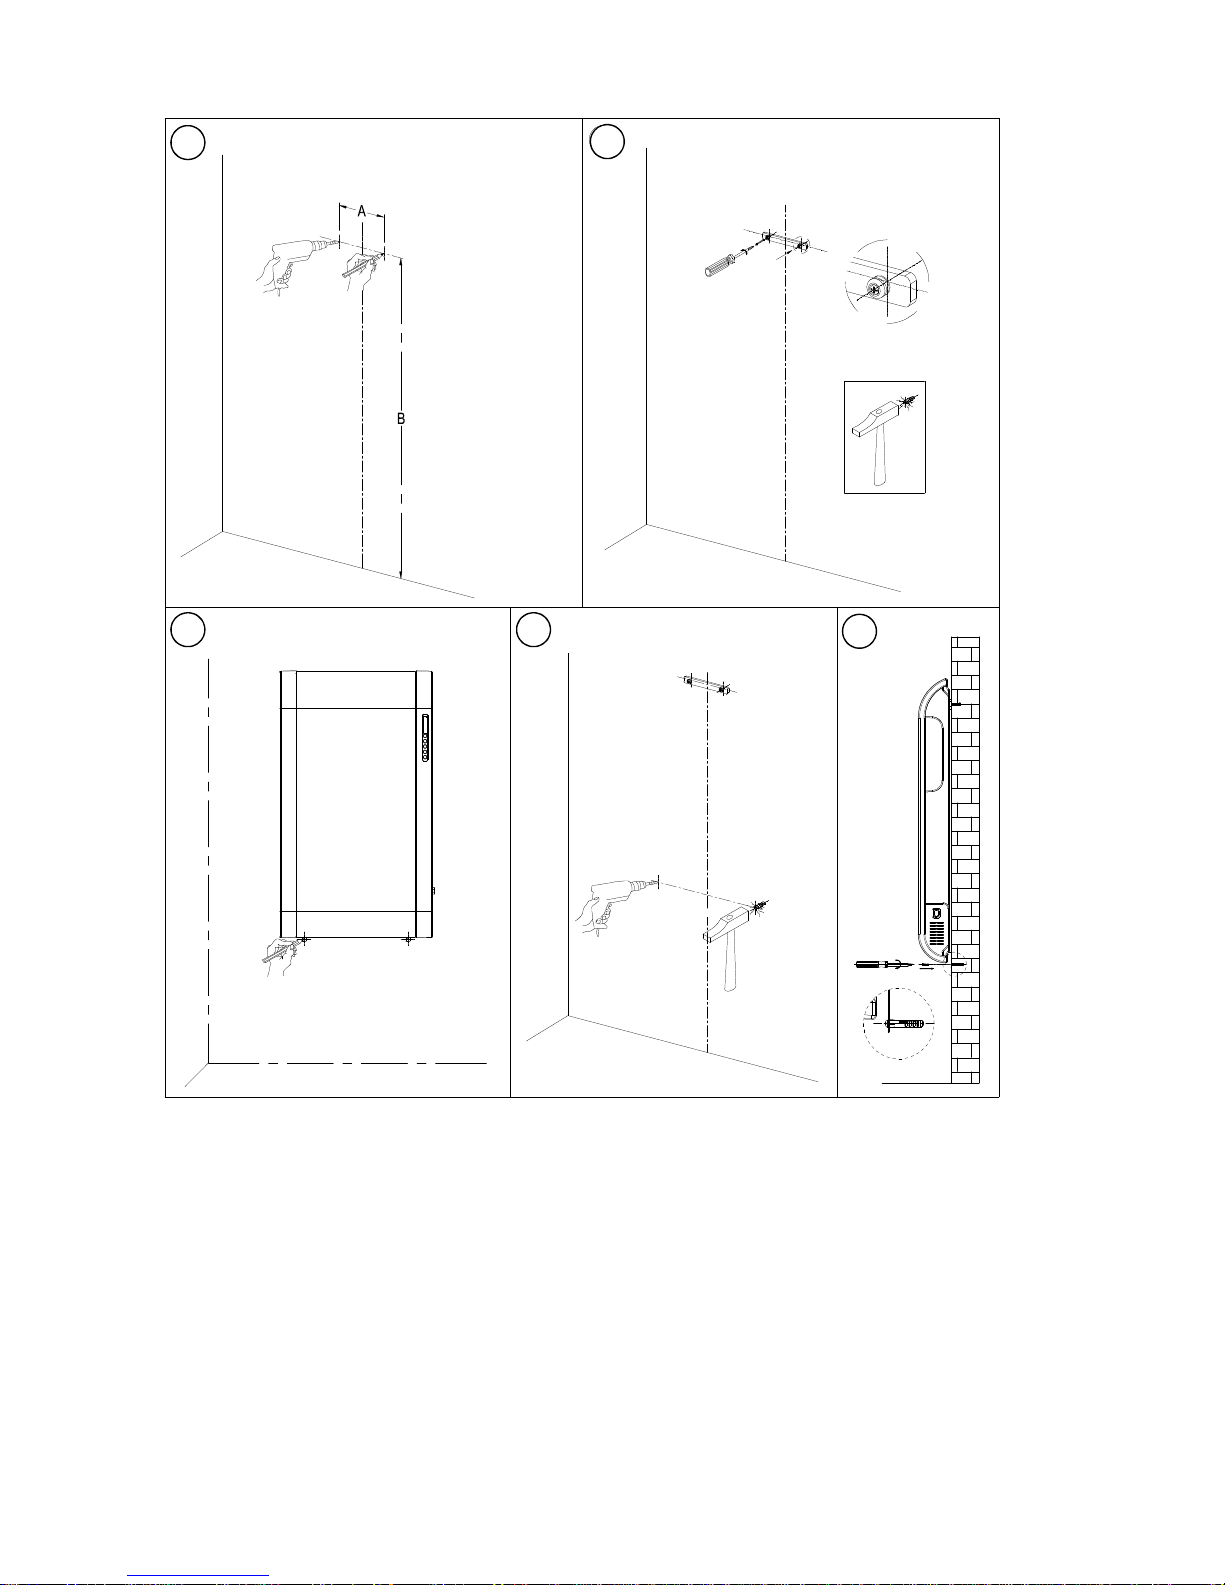
1. Follow these dimensions to drill 2 holes on the wall. A=13.8cm, B=51.5cm (RF15),
78.4cm (RFV15) – Bottom of the heater will be 100mm from the floor when fitted.
2. Fit 2 wall plugs into the wall by hammer. Fix Top wall mounting support on the wall by
screw.
3. Install the Heater on the top wall mounting support and remaining two screws holes
from lower wall mounting support.
4. Drill 2 holes on the wall from the marking and fit 2 wall plugs into the wall.
5. Install the Heater on the top wall mounting support and fix it by two screws on the
bottom of the Heater.
3
1
2
4
5
Page 12
11
Bathroom Use:
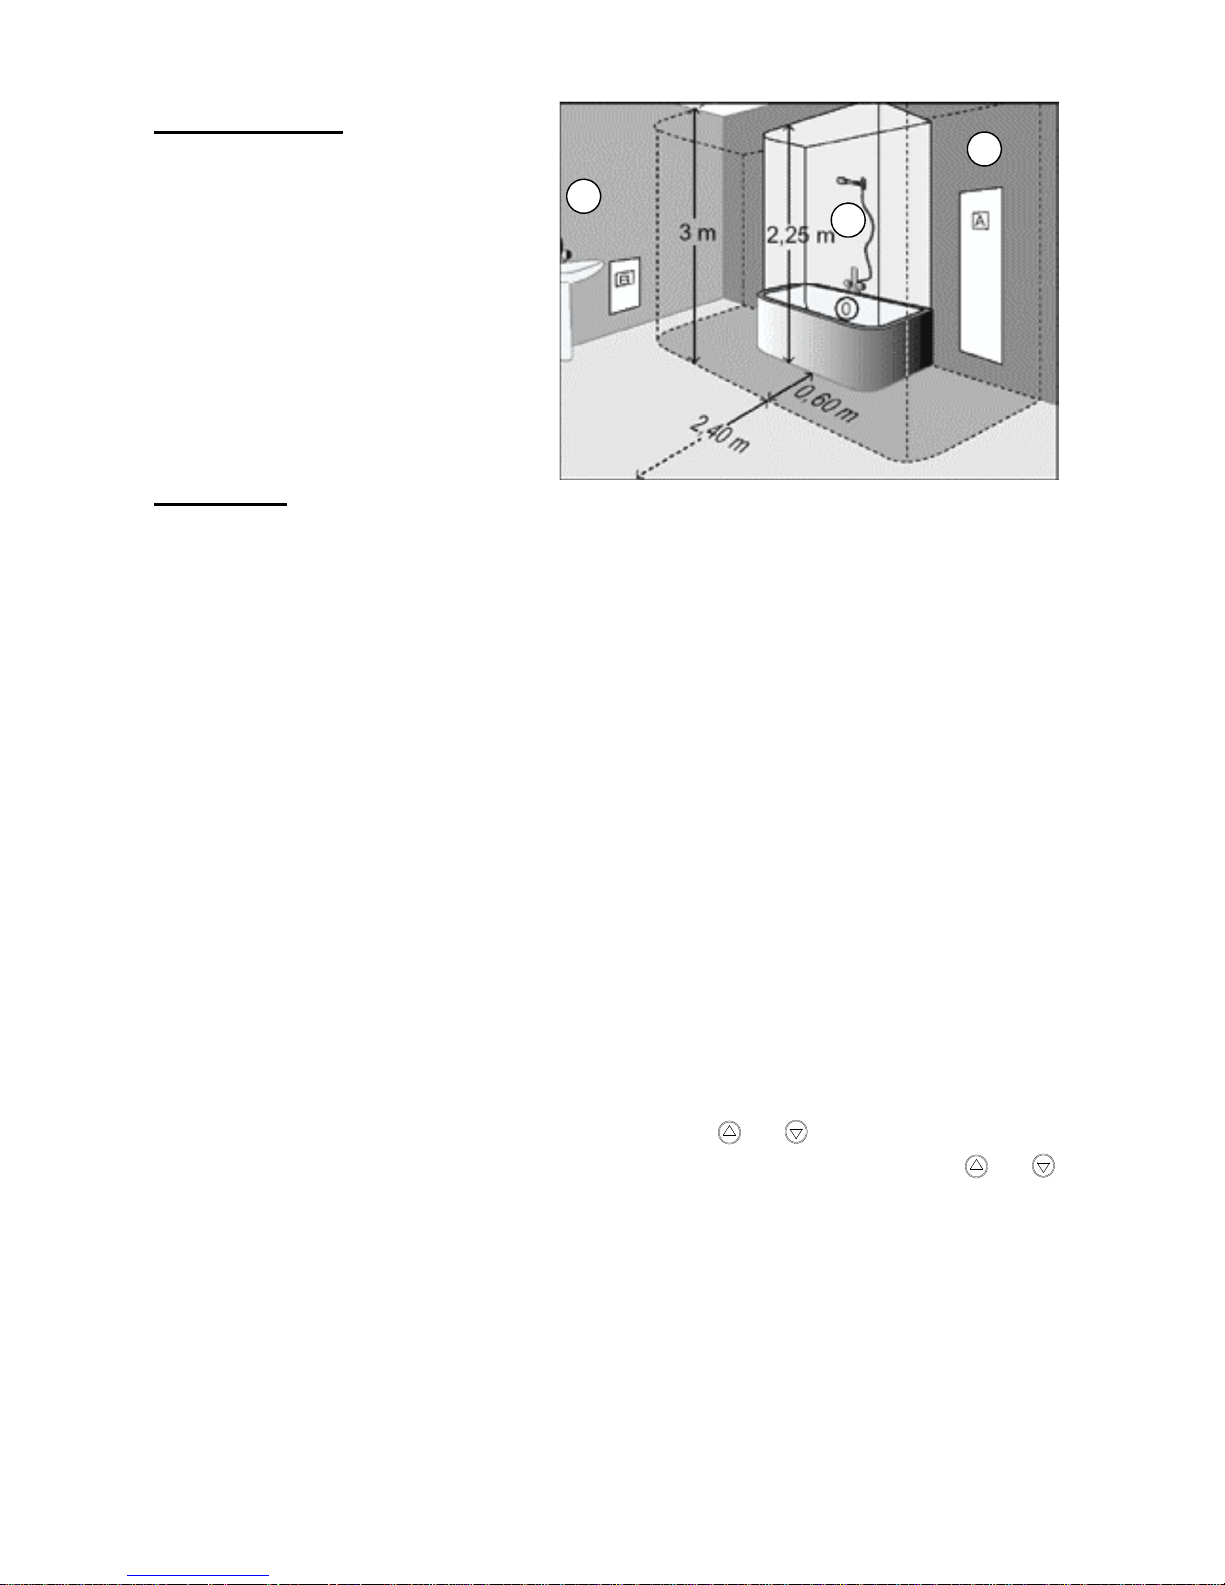
We recommend to install the heater in
the bathroom area at least 0.6m away
from shower OR bathtub as shown in
the picture (Zone 3). The figure 0.6m is
a suggested distance; the actual
distance from the shower and bathtub
should follow national standard in each
country.
Operation:
Automatic mode:
1.
Make sure the power switch is at “OFF” position. Plug the power cord into a suitable
electrical outlet. Switch “ON” the heater and the indicating light is on at the same time.
2. The “AUTO” symbol will show “ON”. The thermostat default temperature 25 will flash
for few seconds and then stop. The display will change to show the room temperature.
3. The thermostat default temperature is 25˚C. If the room temperature is over 25˚C, the
heater will not heat. If the room temperature is below 25˚C, the heater will start heating
up selecting automatically the most efficient power based on the room temperature and
your needs. If the difference of the required room temperature and the actual room
temperature is less than 1˚C, the power setting used will be PI. If the difference is
between 2˚C to 3˚C, the power setting used will be PII. And if the difference is over 4˚C,
the power setting used will be PI+II.
For Example:
The user is setting the thermostat to 26˚C.
If the room temperature is 16˚C, the heater will use power settings I+II until the room
temperature reaches 22˚C. If the room temperature is between 22˚C to 25˚C, the
heater will use Power II. If the room temperature is 25˚C, the heater will use power I
4. To adjust the thermostat temperature, first press the or button once, it will show
the pre-set temperature. To select a new thermostat temperature, press or
again. The new pre-set temperature will flash for few seconds then the display will
show the room temperature.
5. When PII or PI+II are on, the fan is on simultaneously. If the heater is switched off or if
the power is switched to PI (manually or automatically), the fan continues to run for one
more minute then stops.
6. When the room temperature reaches the pre-set temperature, the power supply is cut
to the heating settings and the power light indicators turn off. The power resumes
when the room temperature drops below the pre-set temperature.
3
1
2
Page 13

12
Manual mode:
1. By pressing , or buttons, the heater will switch from automatic mode to
manual mode. The mode symbol remains on. The AUTO symbol is off.
2. Select Power I, II, I+II manually. The corresponding indicator light will turn on.
3. When the room temperature reaches the set temperature, the power supply is cut to
the heating settings but the selected power light remains on. The power resumes when
the room temperature drops below the pre-set temperature.
4. To change manual mode to automatic mode, press the mode button again, and the
mode symbol is off. The AUTO symbol is on.
Frost Protection mode:
When the set temperature is 5ºC, the heater is in Frost Protection mode. The Frost
Protection symbol will be on. In this mode, when the room temperature drops down
lower than 5ºC, the heater will automatically turn on, using power I+II. Once the
temperature comes back to 5℃ or higher the heater will turn off.
Page 14

13
Cleaning:
1. Please turn off the heater, unplug the power cord and allow the heater to cool down
before cleaning.
2. Do not immerse the power cord and plug or the heater into water or other liquid. Do not
pour water or other liquid over the heater.
3. Use a vacuum cleaner to remove dust and lint from the metal grille of the heater.
4. Wipe the heater with a dry cloth to remove dust and a damp cloth (not wet) to clean
any stains.
5. Do not use detergents, abrasive cleaning powder or polish of any kind on the body of
the heater, as these can damage the finish.
Storage:
Store the heater in a cool dry place when not in use. To prevent dust and dirt getting into
the heater, use the original box to repack the unit.
Fault Finding:
Heater not warm or not operating:
1. Check if the electrical supply in the house or the main fuse is working?
2. Check if the power cord is plugged into an electrical outlet?
3. Check if the heater is switched on?
4. Check if the Temperature Control set higher than the current room temperature.
5. Check if any objects are covering the unit or not? This will cause the overheat
cut out to activate.
6. Check that the heater is upright.
7. If the heater fails to work when using with a plug in timer, ensure the appliance
has not overheated. Then remove the timer and retest.
If the heater is still not operating after these checks, please contact the supplier. All
repairs must be carried out by an authorised repairer.
Important: Any tampering with the appliance will invalidate the warranty. Repairs carried
out improperly and by unqualified persons may have serious consequences for the user.
WARNINGS
:
Please do not attempt to repair the heater, as it is potentially
hazardous and will void the heater’s warranty. Only authorised
personnel may repair the heater.
Plastic bags are not toys. Keep them away from infants and
children as they represent risk of suffocation and other hazards.
Page 15
14
Recycling:
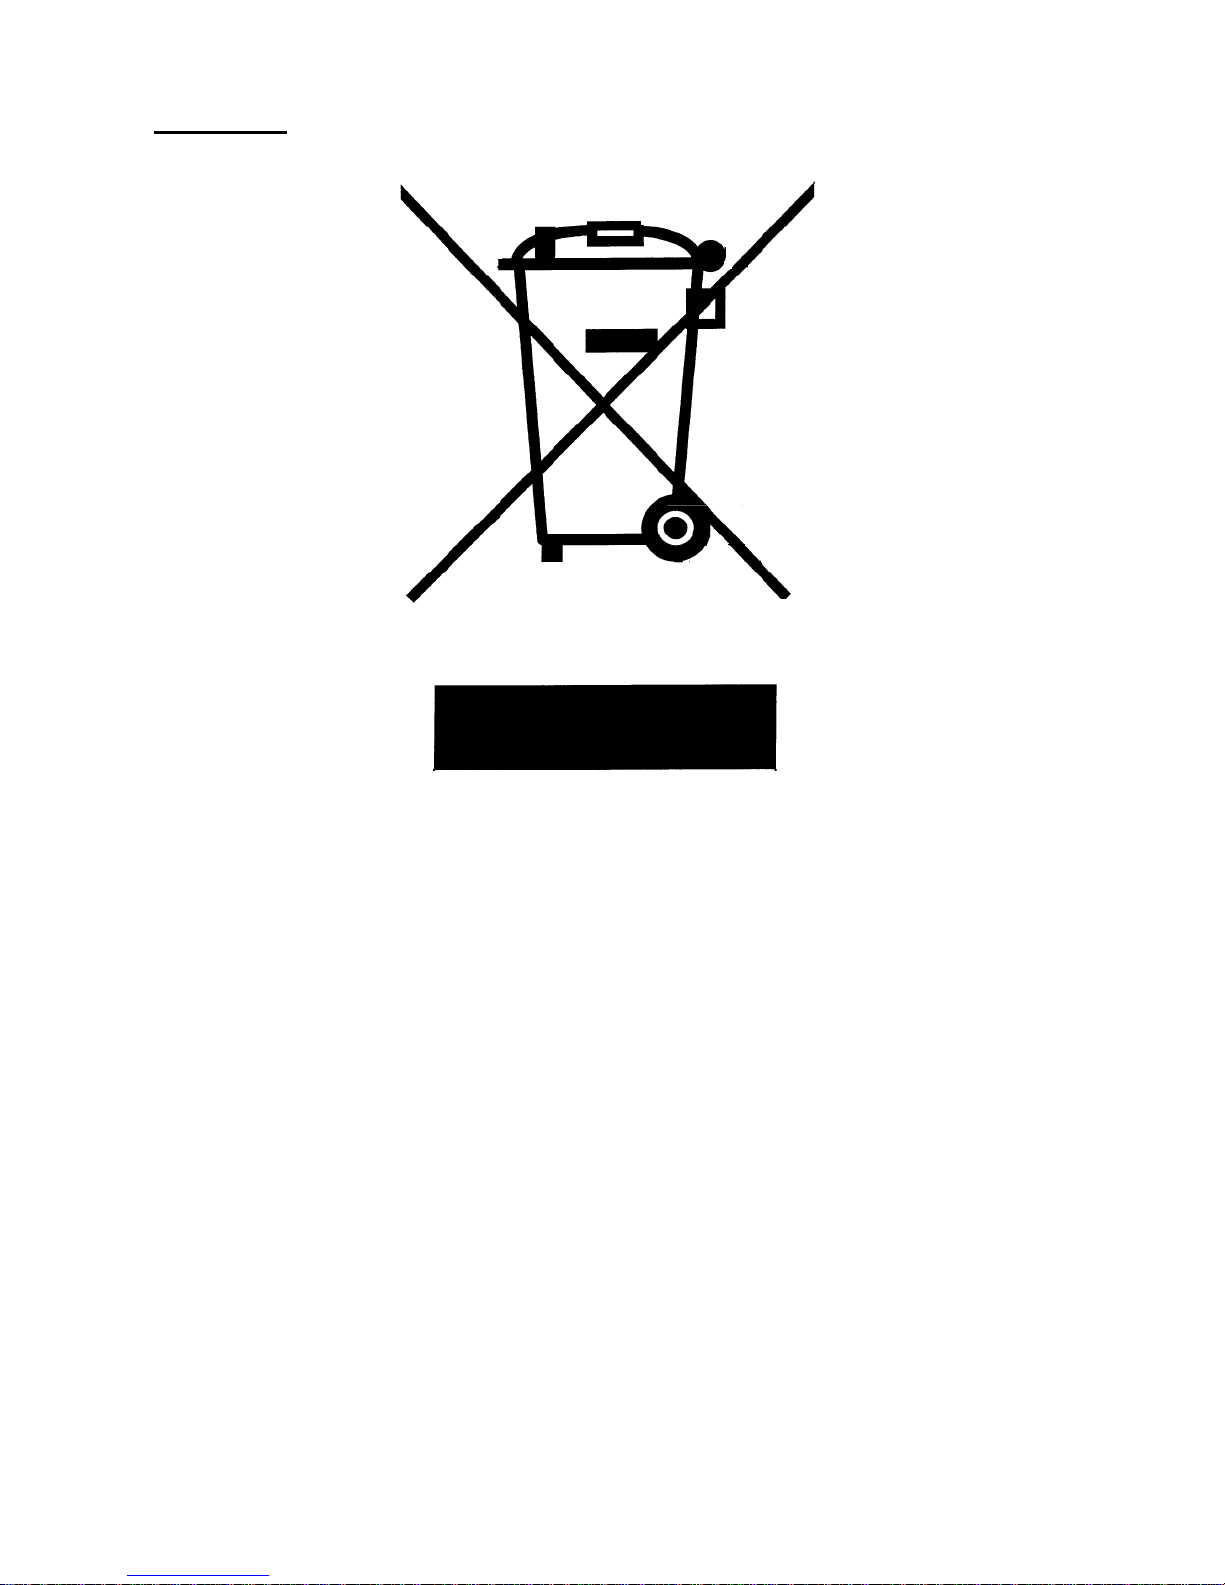
For electrical products sold within the European Community.
At the end of the electrical products useful life it should not be disposed of with household
waste. Please recycle where facilities exist. Check with your Local Authority or retailer for
recycling advice in your country.
KEEP THESE INSTRUCTIONS
Page 16

15
NOTES
 Loading...