

Page 1
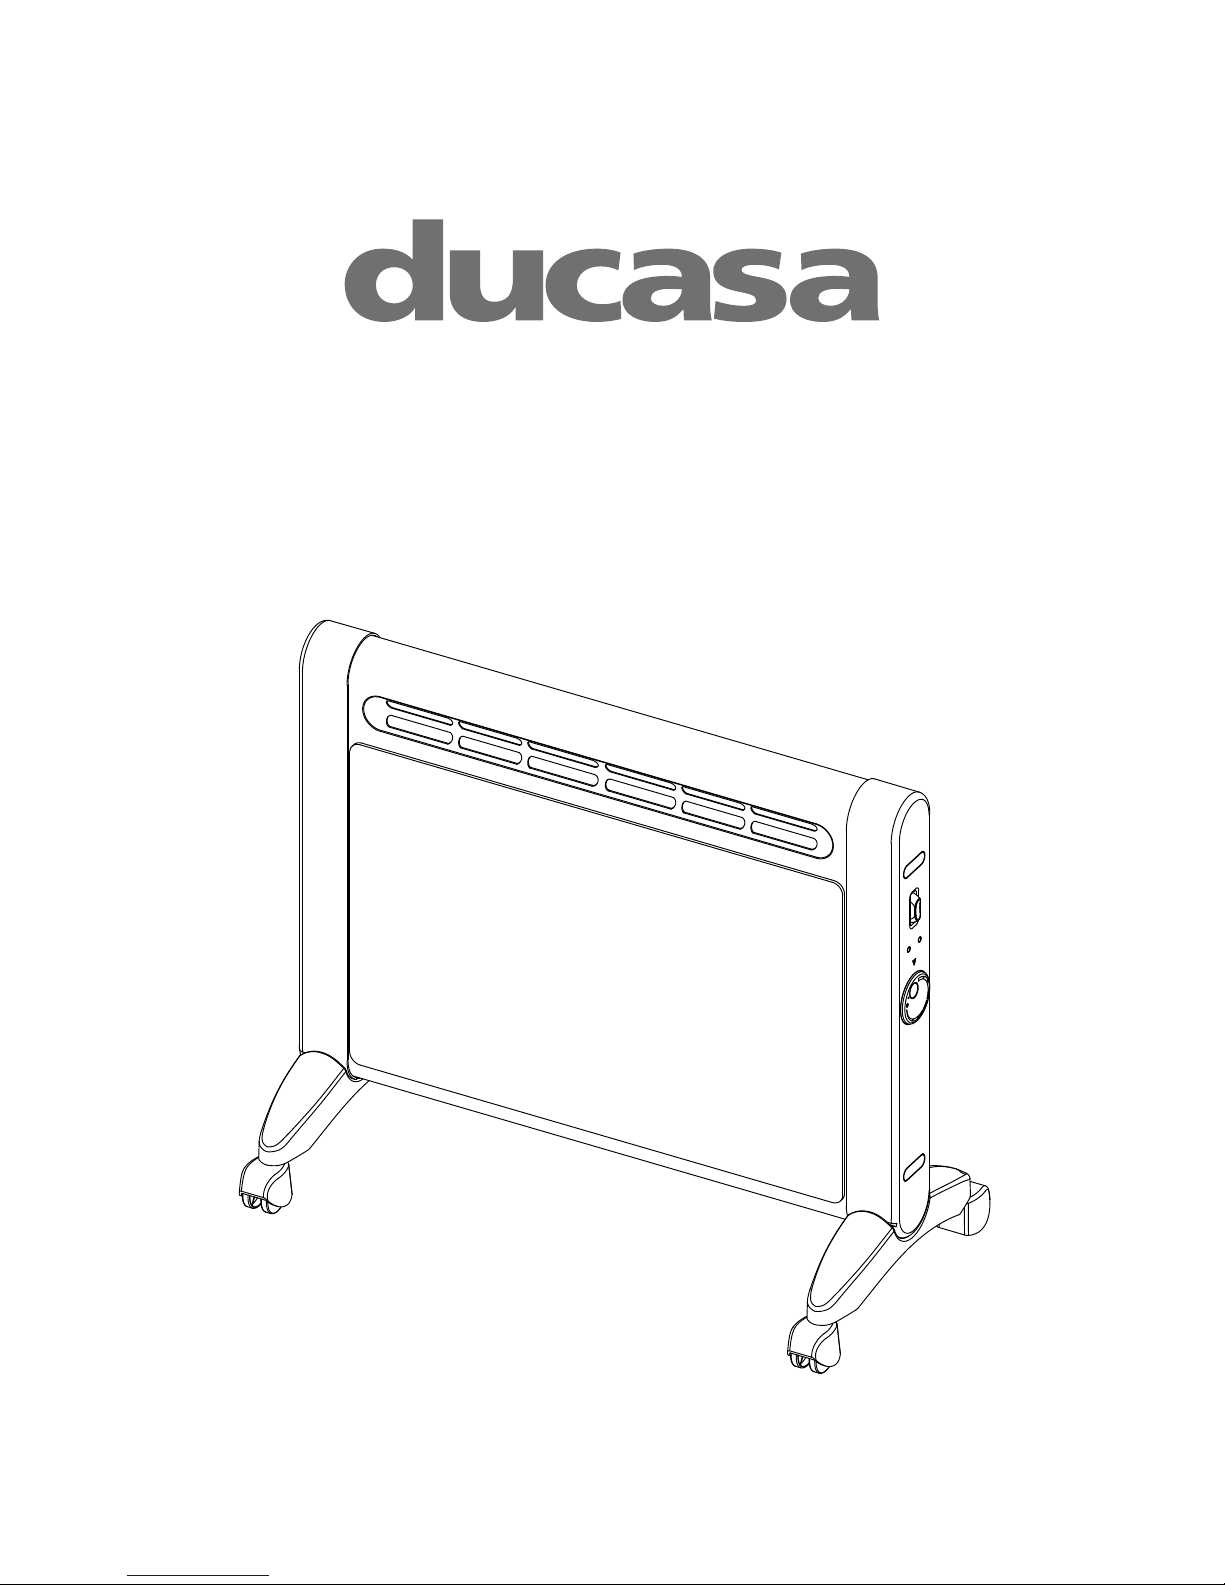
Models: RP-10, RP-15, RP-20
User Manual
Page 2

2
Contents
Thank you for purchasing the Ducasa Sunburst Radiant Panel
Heater.
Index
Safety Precautions & Important Safeguards: ...................................................................... 3
Specifications: .................................................................................................................... 5
Features ............................................................................................................................. 5
Removal of Packaging ........................................................................................................ 5
Controls & Features ............................................................................................................ 6
Control Panel ...................................................................................................................... 6
Installation Kit ..................................................................................................................... 7
Installation Precautions....................................................................................................... 8
Heater for Bathroom Area ................................................................................................... 9
Installation instruction ....................................................................................................... 10
A. For free-standing use: ...................................................................................................... 10
B. For wall mounting: ............................................................................................................ 11
Operation ................................................................ ................................ .......................... 12
Cleaning ........................................................................................................................... 12
WARNING ........................................................................................................................ 14
KEEP THESE INSTRUCTIONS
Page 3

3
Safety Precautions & Important Safeguards:
The appliance must only be used as described in the instructions for use! Use for
any other purpose is forbidden! Any damage resulting from improper use and nonobservance of the safety information will invalidate any liability and warranty!
All liability is disclaimed for any frost damage caused by a heating capacity that
is insufficient for the room size, bad heat insulation of the room, incorrect use or
force majeure (e.g. power failure).
Only connect the appliance to A.C. mains as specified on the rating plate!
Never touch live parts! Danger to life!
Never operate the appliance with wet hands! Danger to life!
The appliance must be placed in a way that the control elements cannot be
touched by persons who are in bath, shower, or any other water-filled receptacle.
The appropriate regulations of the country regarding installation of electrical
equipment in such areas must be adhered to!
The appliance is splash-proof and may be used in bathrooms, however, not in the
immediate vicinity of baths, showers, water connections, washbasins or
swimming pools.
The appliance is not for outdoor use.
The appliance must only be stored indoors!
Never use the appliance if the appliance or cord is damaged. Risk of injury!
Check the power cord regularly for damage.
If the power cord or if the appliance is damaged to the extent that electrical parts
are exposed, disconnect it immediately from the mains and see your authorised
retailer!
The appliance may only be opened up and repaired by authorised qualified
personnel.
Do not store or use any flammable materials or sprays in the vicinity of the
appliance when the appliance is in use. Fire hazard!
Do not use the appliance in flammable atmospheres (e.g. in the vicinity of
combustible gases or spray cans)! Explosion and fire hazard!!
The appliance should not be used in areas which are a fire risk, such as garages,
stables, or wooden sheds.
Page 4

4
Important! Do not insert any foreign objects into the appliance openings! Risk of
injury (electric shock) and damage to the appliance!
Place the appliance so that it cannot be touched by accident. Risk of burns!
The appliance will cool down gradually after being switched off.
Do not place any items of clothing, towels or similar on the appliance to dry!
Overheating and fire hazard!
If the appliance is connected to permanent wiring a qualified electrician must be
consulted to ensure all relevant regulations are adhered to.
The appliance is not intended for use by young children or infirm persons without
supervision!
Young children should be supervised to ensure that they do not play with the
appliance!
The socket-outlet must be accessible at all times to enable the mains plug to be
disconnected as quickly as possible!
The appliance is not suitable for animal breeding purposes!
The instruction leaflet belongs to the appliance and must be kept in a safe place.
When changing owners, the leaflet must be surrendered to the new owner!
Page 5
5
Specifications:
Model
RP-10
RP-15
RP-20
Voltage Rating
230V AC, 50Hz
230V AC, 50Hz
230V AC, 50Hz
Power Consumption (W)
650W / 1000W
900W / 1500W
1300W / 2000W
Unit Size (cm)
72 x 12.5 x 49
92 x 12.5 x 49
112 x 12.5 x 49
Unit Weight (kg)
4.4kg
5.4kg
6.4kg
IP Rating
IP24
IP24
IP24
Features:
Two Power Settings
Thermostatic Temperature Control
Power Indicator Light
Safety Thermal Cut-Off
Frost Protection
IP24
Quiet Operation
No Dehumidifying
Removal of Packaging:
1. Remove the heater and fixtures from the box.
2. Remove the polystyrene and polythene bags.
3. Save the packaging to store the heater while it is not being used.
Keep the original box! It can be used for storage in summer season.
Page 6
6
Controls & Features:
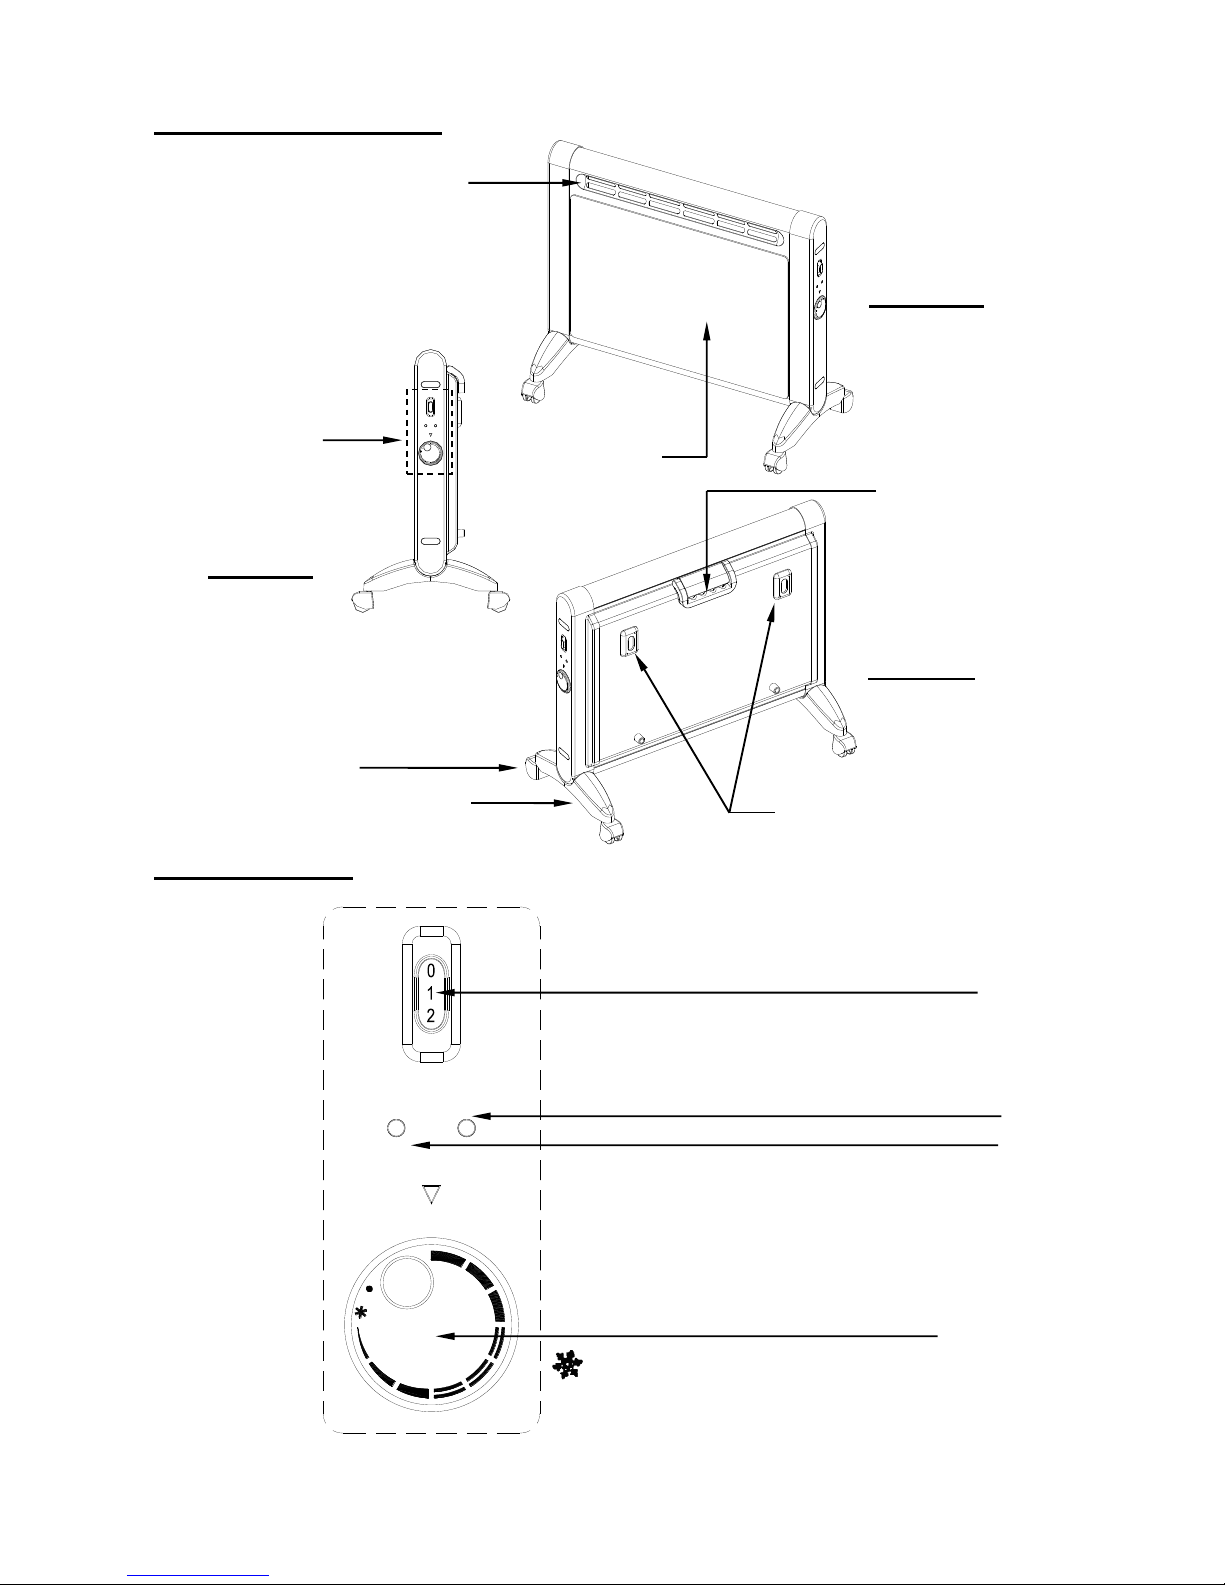
Control Panel:
Temperature Control Knob
Control Panel
Power Indicator Light (Green)
Rear View
Air Outlet
Wall mounting support
Power Selection
Front View
Side View
Carrying
Handle
Feet
Heating Indicator Light (Orange)
Castors
OFF Mode (Dot Position)
Frost protection (Snowflake Position)
Front Grille
Page 7
7
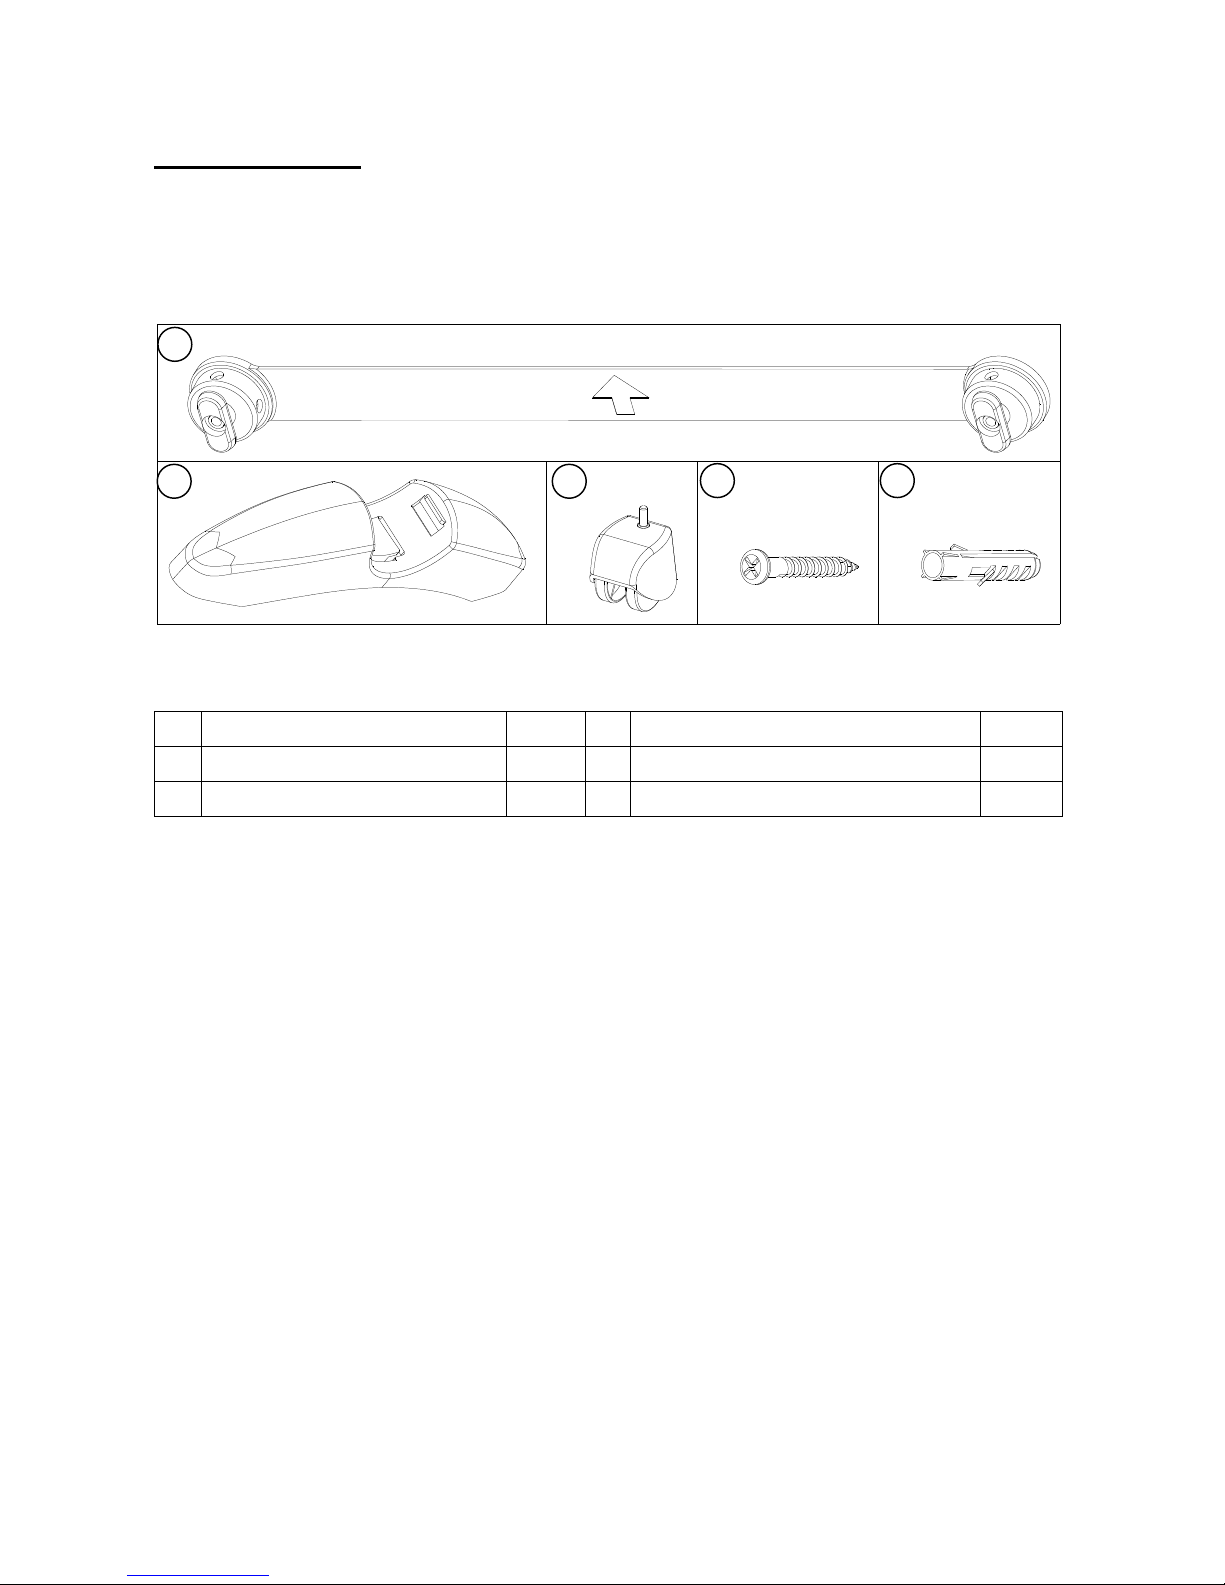
Installation Kit:
Carefully unpack the components and check that no damage occurred during
transportation. If any damage is apparent or any component is missing, please
contact the dealer immediately.
1.
Wall mounting bracket
1pc
4.
Screw for wall mounting
2pcs
2.
Feet
2pcs
5.
Wall plugs
2pcs
3.
Castors
2pcs
1 2 3 4 5
Page 8
8
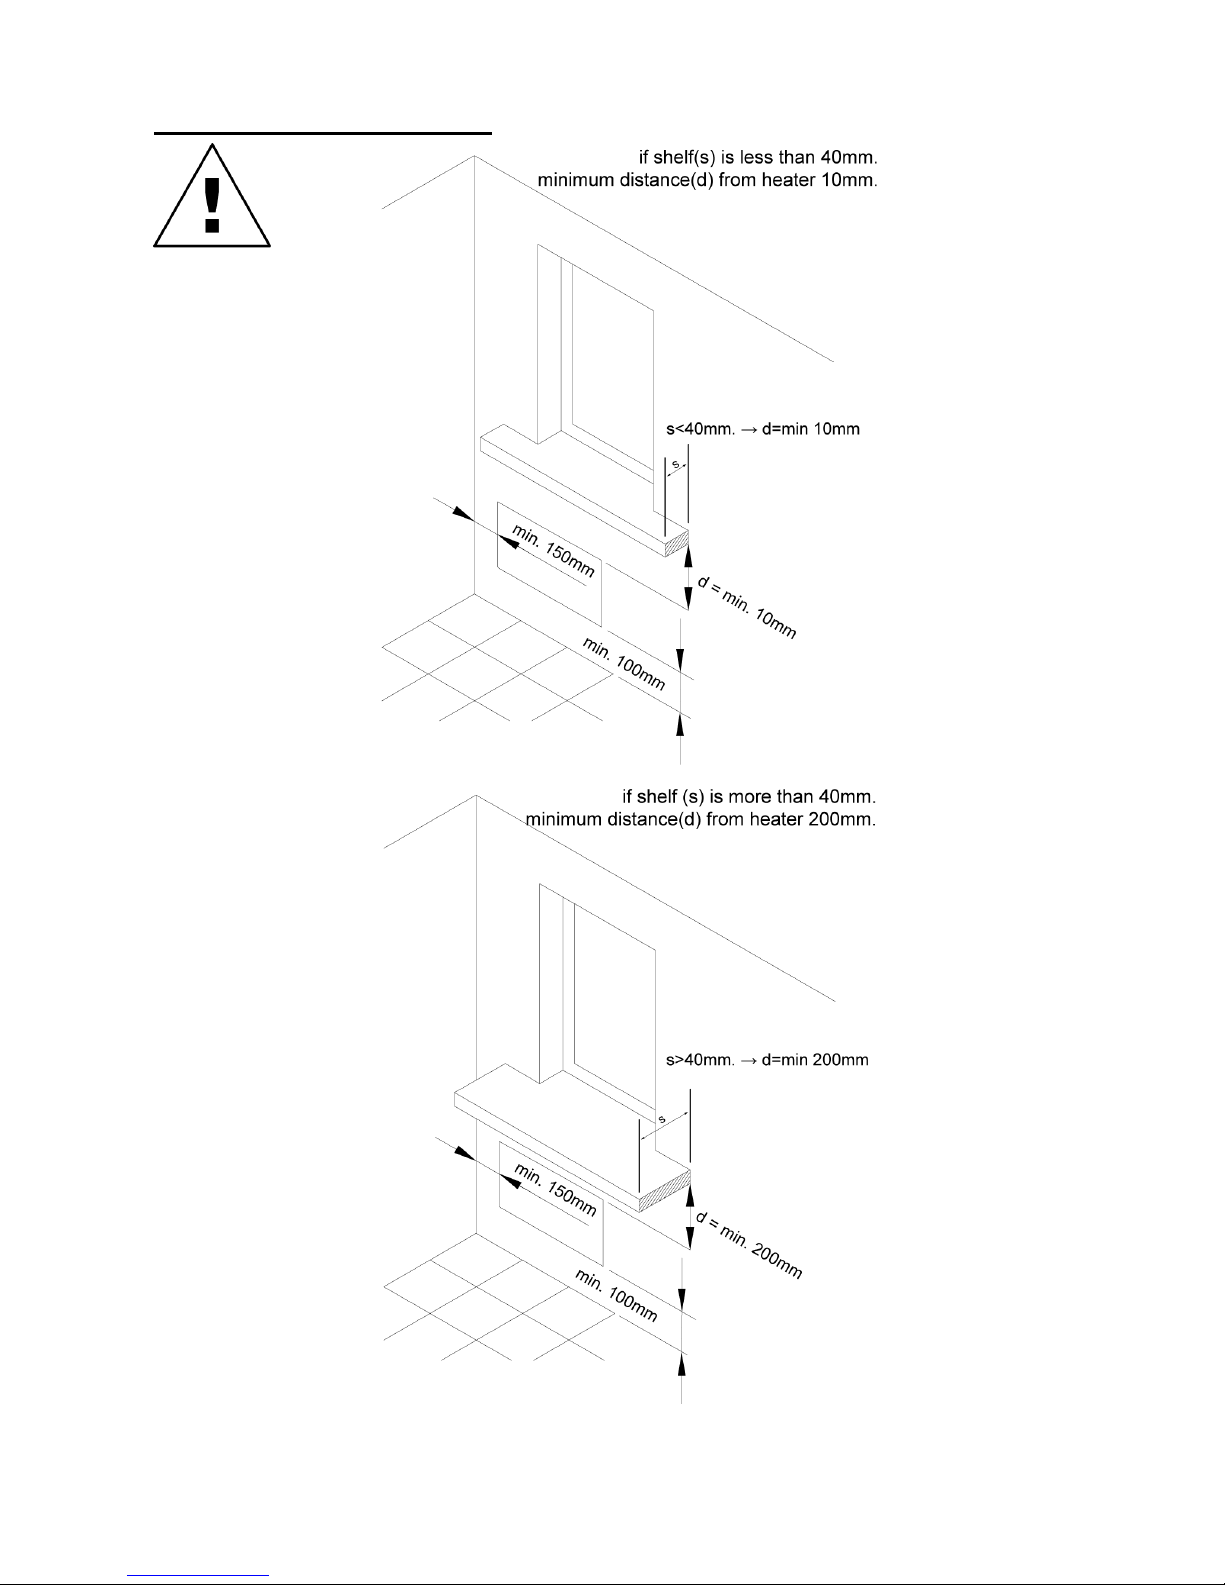
Installation Precautions:
Page 9
9
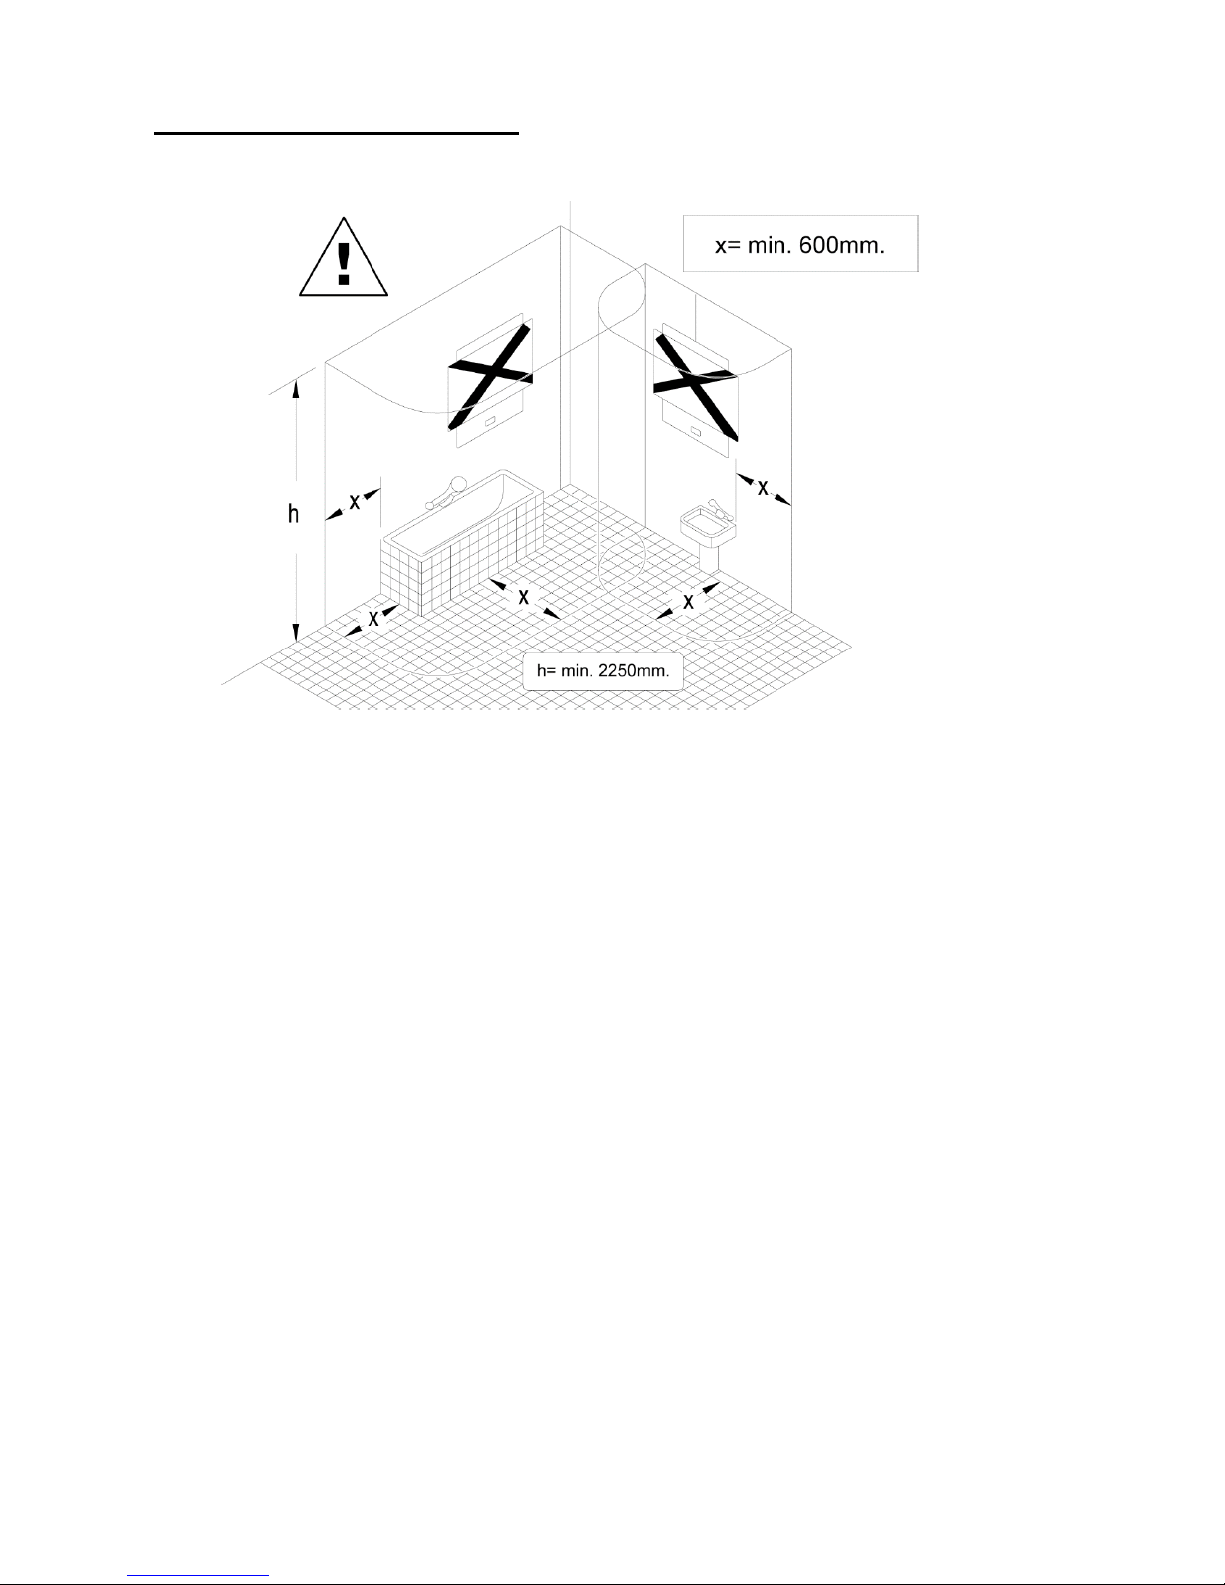
Heater for Bathroom Area:
We recommend to install the heater in the bathroom area at least 0.6m away from
shower OR bathtub as shown in the picture. The figure 0.6m is a suggested distance;
the actual distance from the shower and bathtub should follow national standard in
each country.
Page 10
10
Installation instruction:
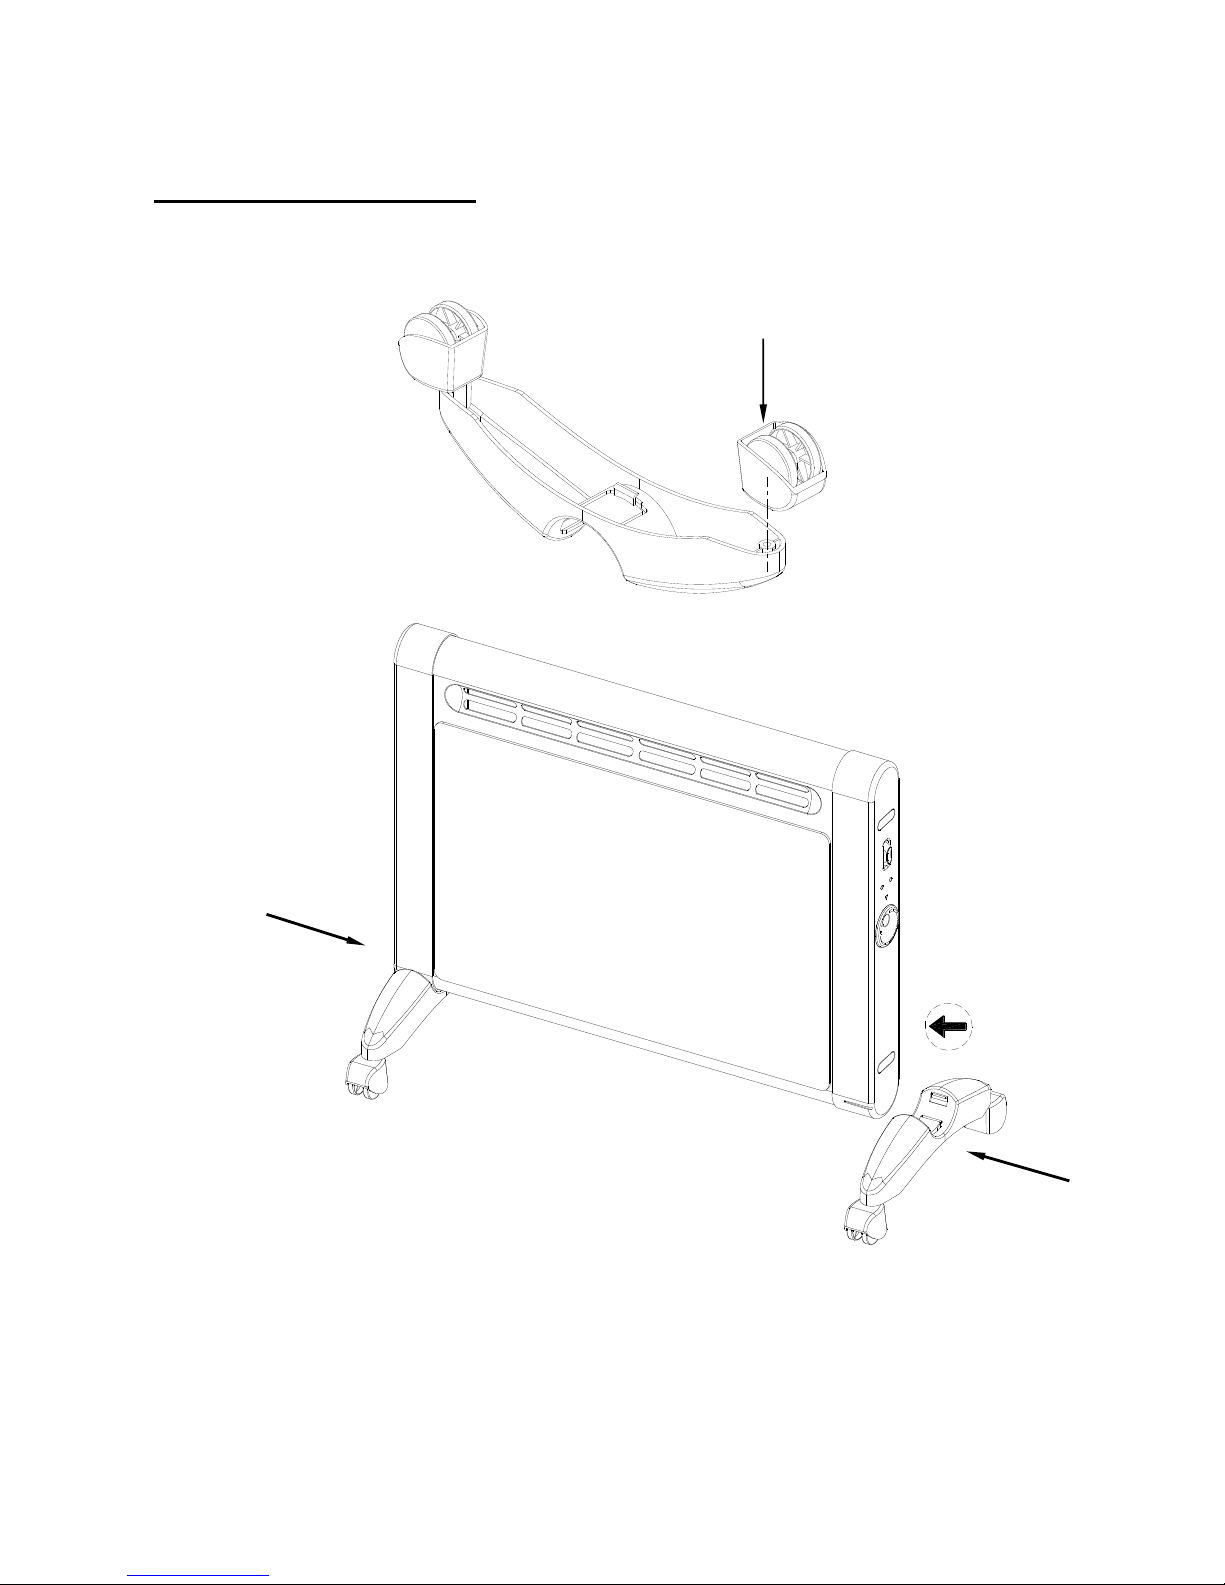
A. For free-standing use:
1. Fix 2 castors to the feet.
2. Push feet onto heater until
they click into place.
Page 11
11
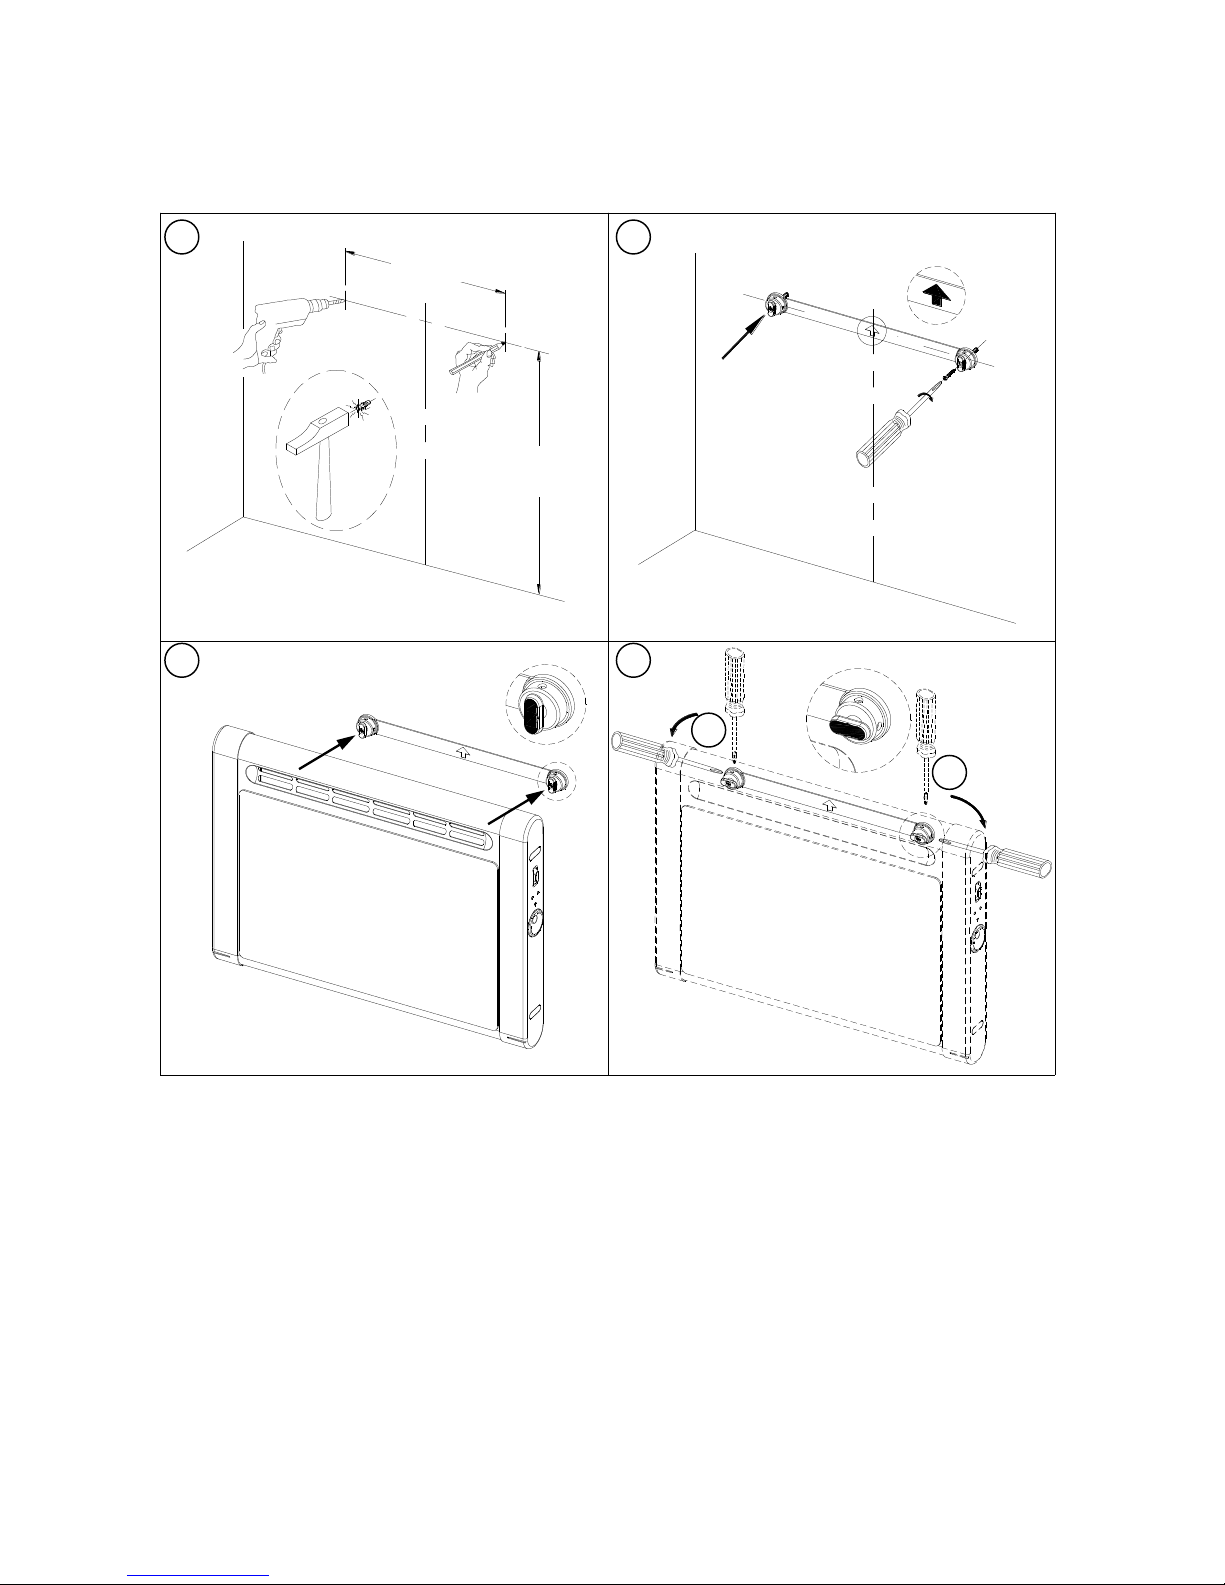
B. For wall mounting:
1. Follow the dimension to drill 2 holes on the wall. Fit 2 wall plugs into the wall.
2. Fix the wall-mounting bracket on the wall with the screws provided.
3. Hang the heater on the wall mounting support.
4. Insert the screwdriver in the upper-hole of both wall support and turn the
screwdriver 90o as shown in fig.4
400mm.
405mm.
1 3 4
2
R
L
Page 12

12
Operation:
1. Ensure that the Temperature Control Knob is in the Off position (the Dot on the
Temperature Control). Also, make sure the electric socket is switched off.
2. Plug the power cable into the electrical socket. (Rated not less than 13A) then
switch the socket on.
3. Turn ON the heater (P1 or P2) and the relevant power indicator light will be ON
at the same time.
4. To adjust the temperature, turn the temperature control knob clock-wise until the
heating indicator light is ON indicating the product is heating.
5. According to the personal needs, you can adjust the temperature control knob
to increase or decrease the room temperature in a clock-wise or anti-clockwise
direction.
6. When the room temperature reaches the pre-set temperature the power will cut
off. The heating resumes when room temperature drops below the pre-set
temperature.
7. Frost protection function will keep the surrounding area above Freezing Point.
To do this turn the temperature control knob to the Snowflake position.
Please Note: When your room reaches temperature and the thermostat switches the
heater switches off and then back on, you may experience a some noise due to the
expansion and contraction of the casing and element. This is normal, is not a safety
issue and does not affect the quality of the heater or the heat that it produces.
Cleaning:
1. Please switch off the heater, unplug the power cord and allow the heater to cool
down before cleaning.
2. Do not immerse the power cord, plug or heater into water or other liquid. Do not
pour water or other liquid over the heater.
3. Use a vacuum cleaner to remove dust and lint from the metal grille of the heater.
4. Wipe the heater with a dry cloth to remove dust and a damp cloth (not wet) to
clean any stains.
5. Do not use detergents, abrasive cleaning powder or polish of any kind on the
body of the heater, as these can damage the finish.
Page 13

13
Storage:
Store the heater in a cool dry place when not in use. To prevent dust and dirt getting
into the heater, use the original box to repack the unit.
Fault Finding:
Heater not warm or not operating:
1. Check if the electrical supply in the house or the main fuse is working?
2. Check if the power cord is plugged into an electrical outlet?
3. Check if the heater is switched on?
4. Check if the Temperature Control set higher than the current room temperature.
5. Check if any objects are covering the unit or not? This will cause the overheat
cut out to activate.
If the heater is still not operation after these checks, please contact the supplier. All
repairs must be carried out by an authorised repairer.
Page 14
14
WARNING:
Please do not attempt to repair the heater, as it is potentially hazardous and will
void the heater’s warranty. Only authorised personnel may repair the heater.
Plastic bags are not toys. Keep them away from infants and children as they
represent risk of suffocation and other hazards.
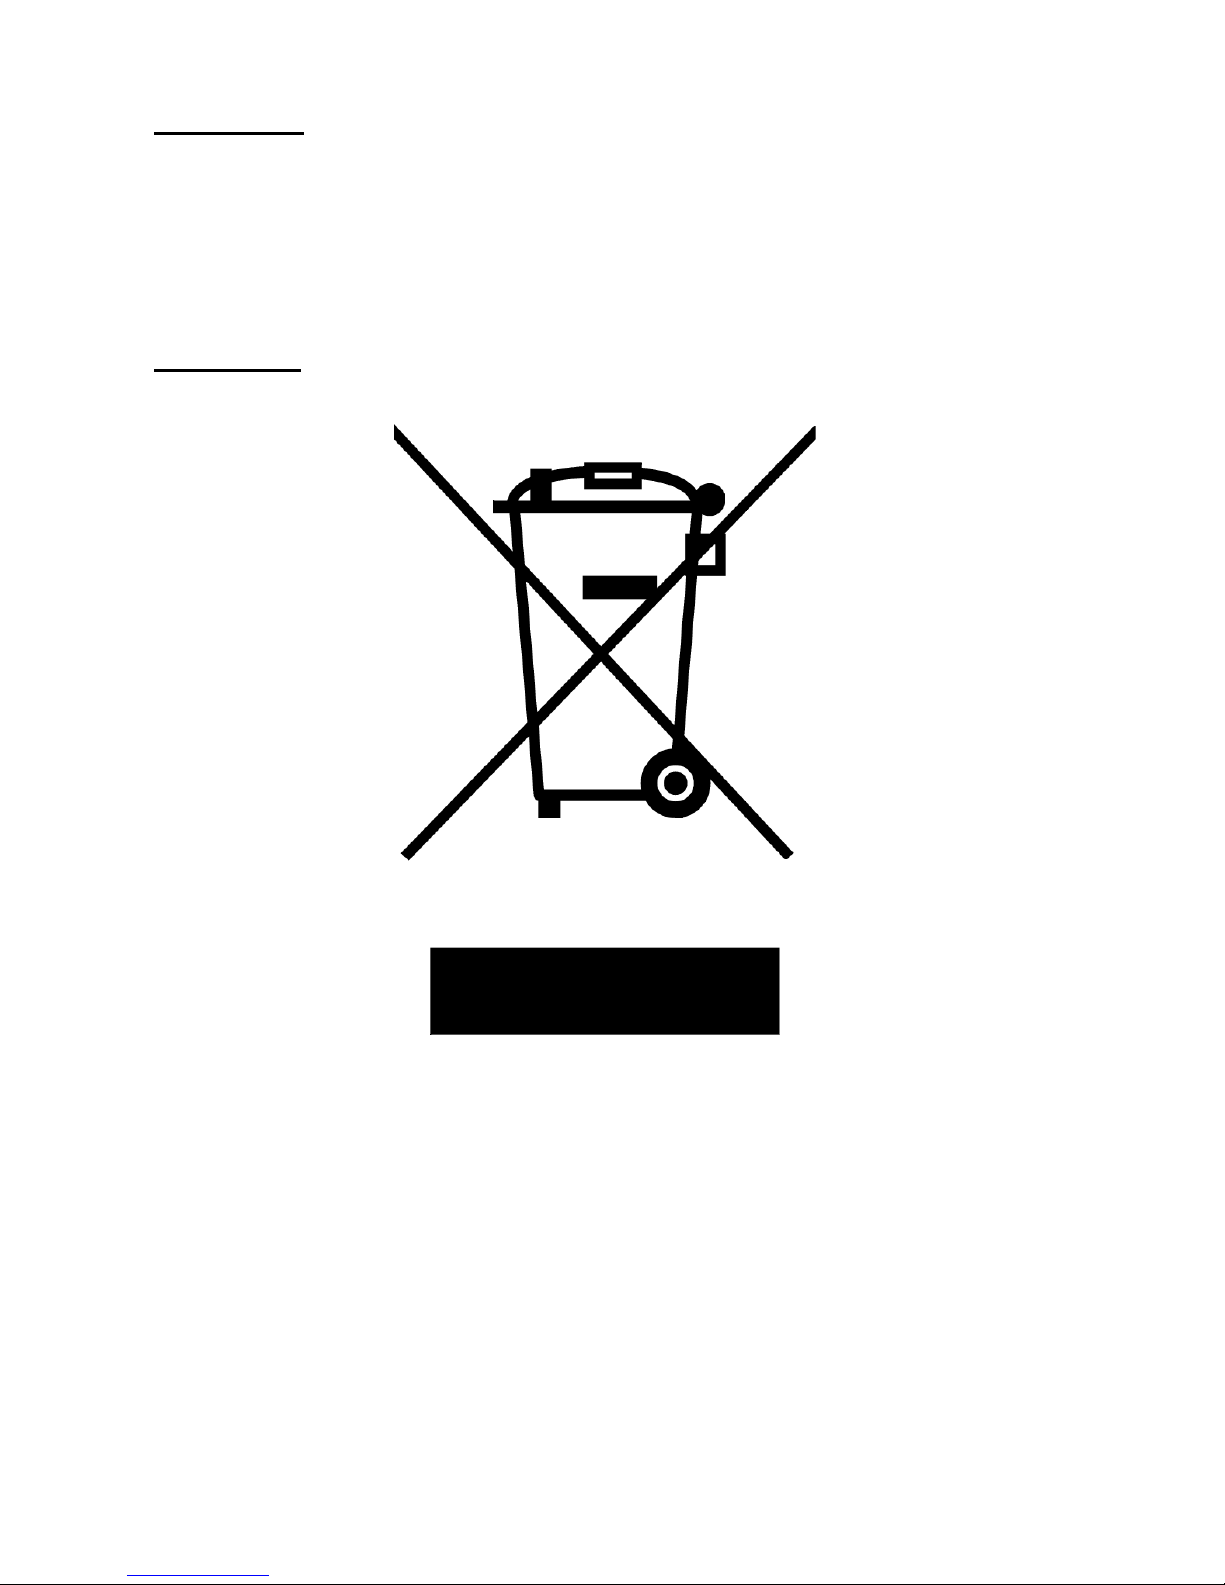
Recycling:
For electrical products sold within the European Community.
At the end of the electrical products useful life it should not be disposed of with
household waste. Please recycle where facilities exist. Check with your Local
Authority or retailer for recycling advice in your country.
PLEASE KEEP THESE INSTRUCTIONS
Page 15

15
Installation Notes
--------------------------------------------------------------------------------
--------------------------------------------------------------------------------
--------------------------------------------------------------------------------
--------------------------------------------------------------------------------
--------------------------------------------------------------------------------
--------------------------------------------------------------------------------
--------------------------------------------------------------------------------
--------------------------------------------------------------------------------
--------------------------------------------------------------------------------
--------------------------------------------------------------------------------
--------------------------------------------------------------------------------
--------------------------------------------------------------------------------
--------------------------------------------------------------------------------
--------------------------------------------------------------------------------
--------------------------------------------------------------------------------
--------------------------------------------------------------------------------
--------------------------------------------------------------------------------
Page 16

UK Distributor of Ducasa Products:
Heattend Products Ltd
Web: www.heattend.co.uk
Email: [email protected]
 Loading...