

USER
MANUAL

IMPORTANT
PLEASE READ THIS INSTRUCTION MANUAL
BEFORE USE AND KEEP FOR FUTURE REFERENCE
CONTENTS
WARNING
If operating the unit with
headphones, earbuds or
similar: To prevent possible
hearing damage, do not
listen at high volume levels
for long periods.
WARNING
This product contains
ashing lights.
WARNING
CHOKING HAZARD
Product contains small parts
– not suitable for children
under 3 years old.
WARNING
RISK OF ELECTRIC SHOCK
If appliance or power supply
becomes damaged, do
not use.
The appliance must only
be used with the power
supply provided – Fidus
EDA1812-C14
The appliance should
be placed on a at and
stable surface.
• Keep these instructions for
reference as they contain
important safety and
operating information.
• Do not allow liquids to spill
into the appliance or subject
the appliance to excessive
smoke, dust, mechanical
vibration or shock.
• The appliance and power
supply are only intended for
indoor use.
• Do not tamper with any
internal components. There
are no serviceable parts
inside the unit and opening
the unit will invalidate the
warranty.
• If the appliance malfunctions,
do not attempt to repair
yourself. Contact your retailer
or our customer service
department.
• Clean the appliance with a dry
soft cloth. Do not clean with
liquids or solvents.
• This appliance meets all
appropriate compliance
directives regarding safety
and performance when used
correctly with the appropriate
approved accessories.
IMPORTANT
The plug severed from the mains lead must be destroyed, as
plugs with bared exible cords are hazardous if engaged in a
live socket outlet.
The wires in the mains lead are coloured in accordance with
the following code:
Green and Yellow – Earth
Blue – Neutral
Brown – Live
As the colour of the wiring in the mains lead may not
correspond with the coloured markings identifying the
terminals in your plug, proceed as follows:
• The green and yellow wire must be connected to the terminal
in the plug marked as ‘E’ or by the earth symbol.
• The blue wire must be connected to the terminal in the plug
marked as ‘N’.
• The brown wire must be connected to the terminal in the
plug marked as ‘L’.
OVERVIEW
KEYBOARD
CONTROL
OSCILLATORS
LFO
FILTER
ENVELOPE
DELAY
MIXER
SEQUENCER
DRIVE
REAR CONNECTORS
DIP SWITCHES
SPECIFICATIONS
BATTERY INFORMATION
ACKNOWLEDGEMENTS
01
02
03
04
05
06
07
08
09
10
11
12
12
12
13
14
Power Supply
AC Input Rating: 90 – 264VAC
AC Input Frequency: 47 - 63Hz
DC Output Voltage: 12VDC
DC Output Power: 19.2W
Stylophone Unit
DC Input: 12VDC (Centre pin positive)
Operating Temperature: 0-60°C
Relative Humidity: 20-80%
Battery operation: 4 x AA non-rechargeable
USER NOTES
MADE IN GREAT BRITAIN
15
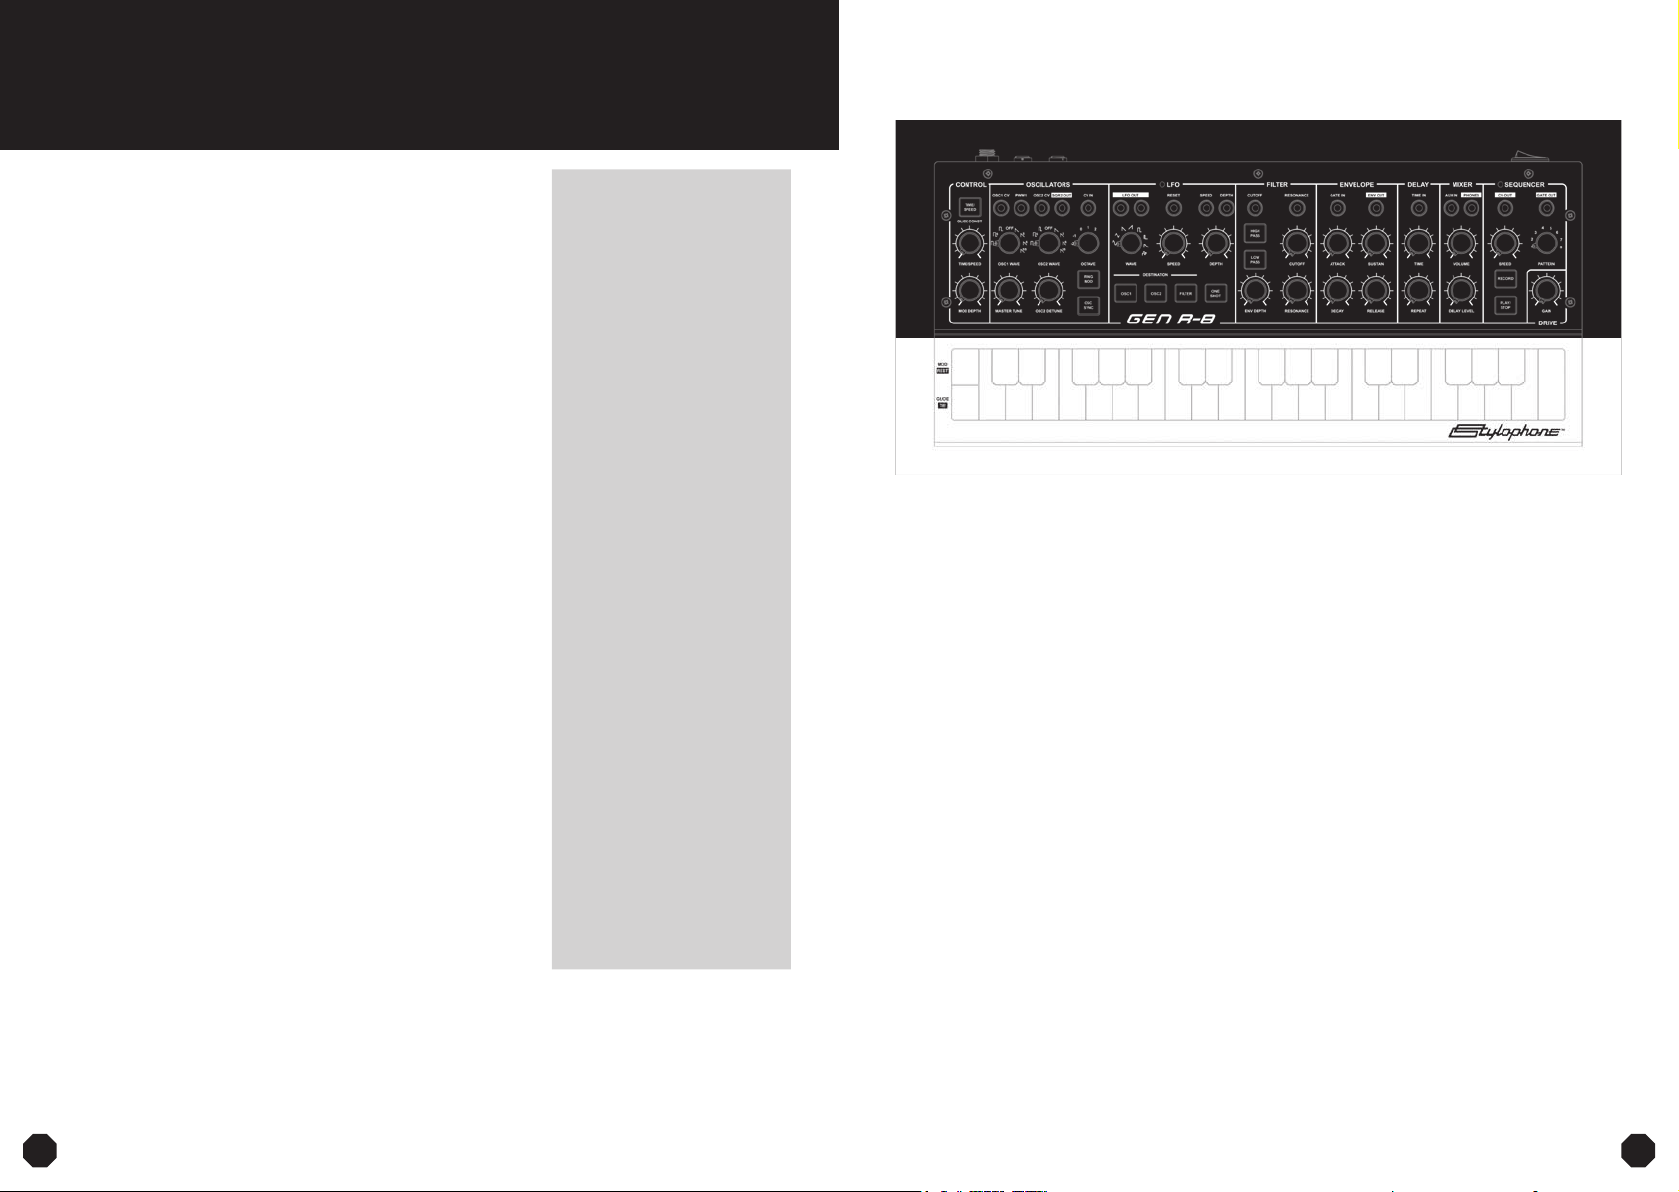
OVERVIEW KEYBOARD
The Stylophone GEN R-8 is
QUICK
a dual VCO British made
boutique synthesizer with a
fully analog signal path.
Both VCOs have “divide-down analog” sub-oscillators (one
octave down) and subsub oscillators (two octaves down)
that all can be switched on at the same time for a total of six
oscillators sounding at once.
Self-oscillating proprietary British design 12 dB state
variable lter with Low Pass, High Pass, Band Pass and Wide
Notch modes.
LFO with eight waveforms including Sample & Hold, and
dual CV outputs for maximum patching exibility.
ADSR envelope with exponential response, augmented with a
short hold stage at the Attack/Decay peak for a punchier sound.
Analog style Delay modulatable with a Time CV input.
Mixer section with a unity AUX input which allows external
sound sources to be processed through the GEN R-8s Filter/
Delay/Drive audio chain.
Classic British silicon diode Drive circuit with an added
JFET boost stage, custom designed for synths as it retains
the low end.
Step sequencer with 8 banks and 16 steps per sequence that
can play the GEN R-8 synthesizer engine or external
synthesizers through the CV/Gate or MIDI outputs.
DAW integration and MIDI controller keyboard exibility with
MIDI Local on/o.
CV/Gate controller keyboard feature where the CV/Gate
outputs on the sequencer doubles as keyboard CV/Gate
outputs when the sequencer is not playing.
3-octave touch keyboard with two additional momentary
performance keys for Glide and Modulation.
Line Out is transformer isolated with an iron core transformer
imparting transformer saturation on the low end when the
volume is cranked up.
01 02
START
The Stylophone GEN R-8’s
analog oscillators need to
warm up for a few minutes
after you’ve switched it on.
When there’s no detectable
drift in the oscillators,
press and hold the RING
MOD and OSC SYNC keys
simultaneously for a few
seconds. The GEN R-8
will enter the oscillator
calibration mode that tunes
the oscillators so that they
track correctly over the
keyboard range.
The oscillators will sound as
they’re being calibrated so
you can monitor progress.
When the calibration cycle
comes to an end, the GEN
R-8 will automatically exit
calibration mode.
You can perform this
calibration as often as you
like, and the shorter it takes,
the closer the GEN R-8 was
to optimal calibration.
The keyboard is a 3-octave
touch keyboard that you
can play with your nger. It
has two extra performance
keys on the left, MOD and
GLIDE that allows the player
to instantly add deeper
modulation from the LFO,
and glide between notes.
MOD
This key adds extra
modulation depth from the
LFO, the level of which is set
with the MOD DEPTH knob
in the CONTROL section.
The MOD key is momentary
just like the note keys, so
when you let go, the depth
goes back to normal as set
with the DEPTH knob in the
LFO section.
GLIDE
This key adds a glide between two notes, it’s momentary like
the MOD key, so the Glide function is only active as long as the
GLIDE key is held down. With this performance control you can
not only perform traditional glides, but also precise pitch bends
making it a very powerful performance tool.
The way the GLIDE key behaves is set with the GLIDE
CONSTANT button and the TIME/SPEED knob in the
CONTROL section.
NOTE! The MOD and GLIDE keys double as REST and TIE keys
when the sequencer is in Record mode, more on this in the
Sequencer section in this manual.
FIRST/LAST NOTE PRIORITY
DIP switch 5 on the side switches between rst and last
note priority.
LEGATO MODE ON/OFF
DIP switch 6 on the side switches Legato mode on and o.
MIDI CONTROLLER (MIDI LOCAL ON/OFF)
DIP switch 3 on the side switches MIDI local on and o. This
is useful if you wish to integrate the GEN R-8 into your DAW
setup as a MIDI controller keyboard.
CV/GATE CONTROLLER
The CV/Gate outputs on the sequencer doubles as keyboard
CV/Gate outputs when the sequencer is not playing.
CONTROL OSCILLATORS
The CONTROL section on
the front panel is for setting
the behaviour of the MOD
and GLIDE performance keys
on the keyboard.
GLIDE CONSTANT
This button determines which parameter is held constant
when performing a glide using the GLIDE key on the keyboard.
The button toggles between TIME and SPEED as the constant
parameter. The default is SPEED being held constant and the
button is dimmed to signify this. When the button is lit, TIME is
the glide parameter that is held constant.
TIME/SPEED
This is the only dual function knob on the GEN R-8, it either
controls the constant length of time a glide takes or the
speed of the glide. When TIME is selected as the GLIDE
CONSTANT parameter, use this knob to set the time, or when
SPEED is selected as the GLIDE CONSTANT, use this knob to
set the speed.
MOD DEPTH
This knob sets the amount of extra LFO modulation
depth that is applied to a sound when using the MOD key
on the keyboard.
03 04
The OSCILLATOR section
is where you select
waveforms and tune the
oscillators. RING MOD and
OSC SYNC are also found
here, and you also use
these keys to engage the
oscillator calibration mode.
OSC SYNC
This button engages the
Osc Sync mode where the
two oscillators are synced
to each others frequency,
or their harmonics in
the case of detuning to
an interval. It syncs the
oscillators in perfect tune
with each other removing the
“beating” chorus eect of
two oscillators, and instead
creates a new waveform
with new harmonic content
for single oscillator sounds.
If one of the oscillators is
frequency modulated, weird
pitch stepping eects can
be achieved as one oscillator
latches on to the harmonics
of the other.
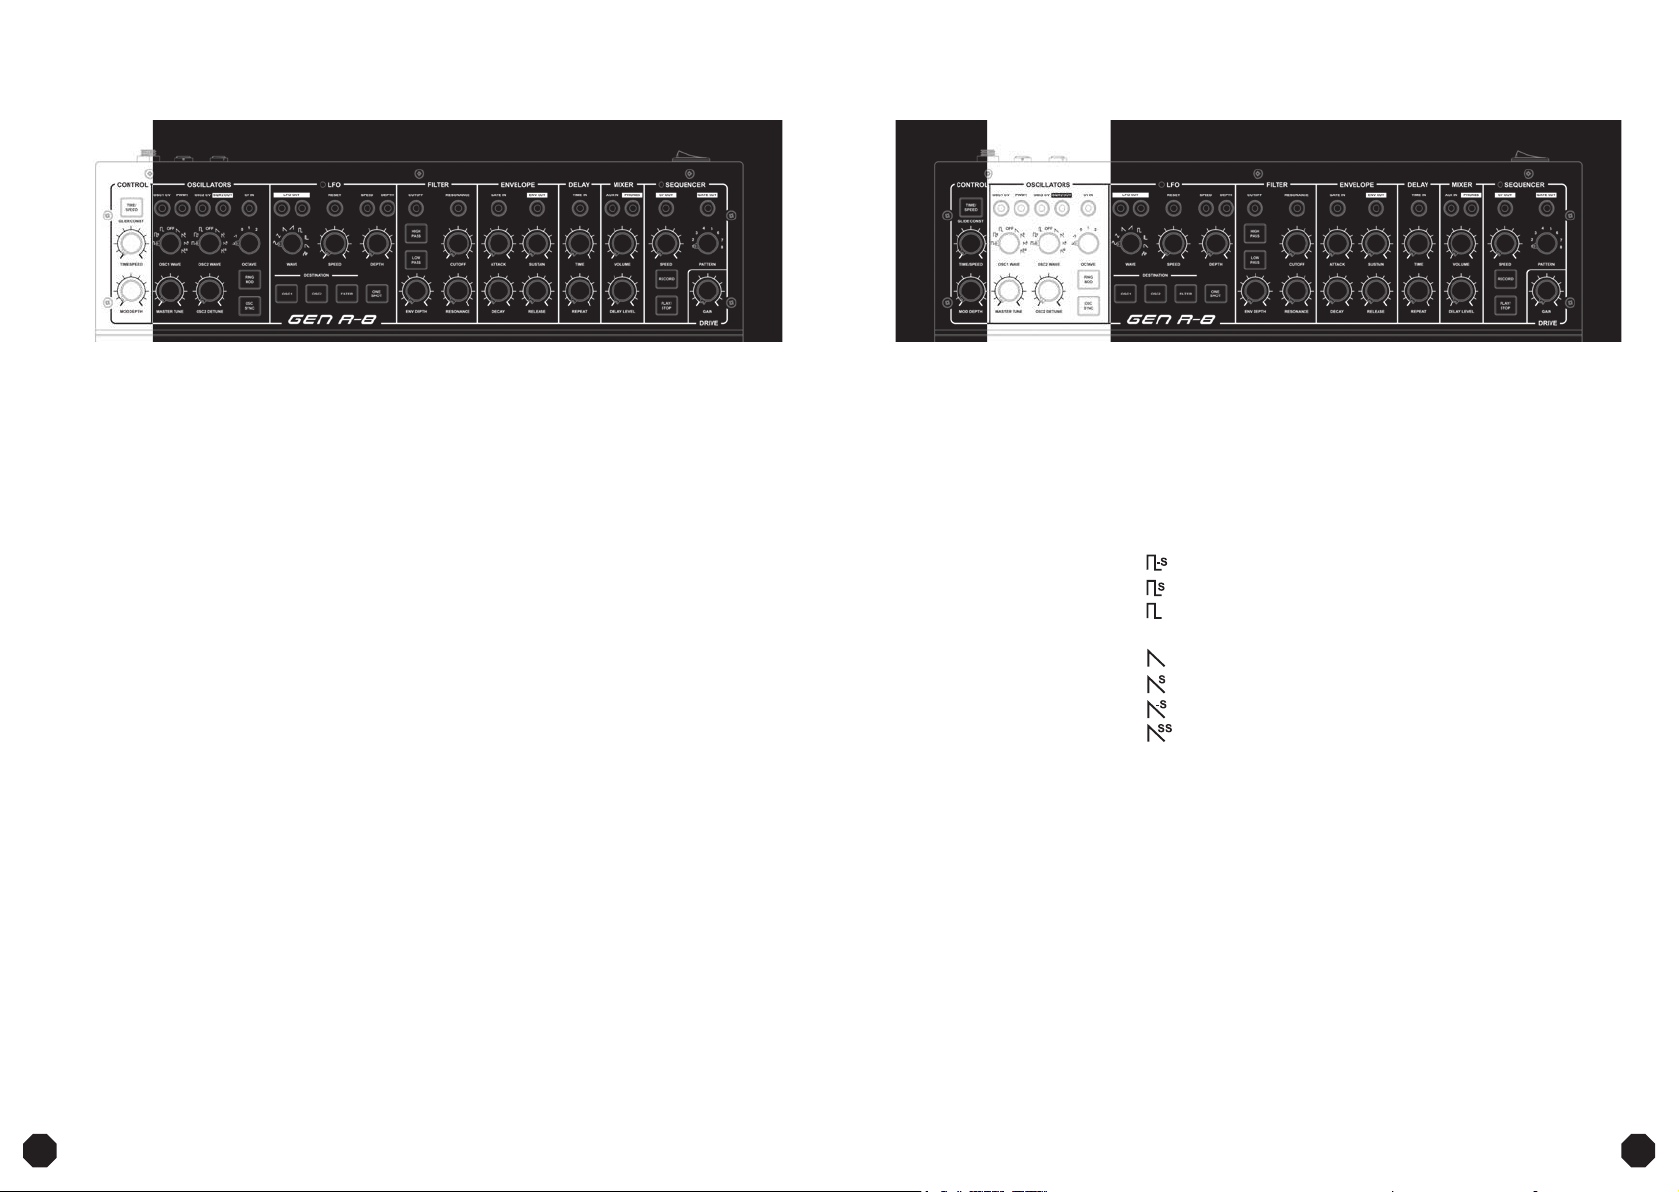
OSC1 WAVE
Oscillator 1 has two basic waveforms, sawtooth and square.
In addition, it also has a square sub-oscillator (one octave
down) and a subsub-oscillator (two octaves down). The audio
of the oscillator can also be switched to OFF using this knob.
The combination of the basic waveform and sub/subsuboscillators are denoted as follows:
square + subsub-oscillator
square + sub-oscillator
square
OFF oscillator audio switched o
sawtooth
sawtooth + sub-oscillator
sawtooth + subsub-oscillator
sawtooth + sub-oscillator + subsub-oscillator
OSC2 WAVE
As OSC1 WAVE, see above.
MASTER TUNE
Tunes both oscillators up or
down by seven semi-tones.
OSC2 DETUNE
Detunes oscillator 2 only,
to a tuning oset of up to
one octave up or down. This
tuning oset is maintained
when using the MASTER
TUNE knob.
OCTAVE
Transposes both oscillators
up or down by one or two
octaves. When using the GEN
R-8 as a MIDI controller, this
knob also transposes the
keyboard up or down by one
or two octaves.
RING MOD
This button engages
oscillator Ring Modulation,
it can produce atonal clangy
and bell like sounds when the
oscillators are detuned.

OSCILLATOR CALIBRATION
Press and hold the RING MOD and OSC SYNC
keys simultaneously for a few seconds. The
GEN R-8 will enter the oscillator calibration
mode that tunes the oscillators so that they
track correctly over the keyboard range.
The oscillators will sound as they’re being
calibrated so you can monitor progress. When
the calibration cycle comes to an end, the GEN
R-8 will automatically exit the calibration mode.
You can perform this calibration as often as
you like, and the shorter it takes, the closer the
GEN R-8 was to optimal calibration.
LFO
CV PATCH POINTS FOR
THE OSCILLATORS
OSC1 CV CV input for oscillator 1 FM
PWM1 CV input for Pulse Width
Modulation of oscillator 1
OSC2 CV CV input for oscillator 2 FM
SQR2 OUT CV output of square
waveform from oscillator 2
as an FM source
CV IN Calibrated 1V/OCT CV input
for pitch of both oscillators
(use this to control pitch in a
standard CV/Gate setup)
DESTINATION
These buttons route the LFO to the most common
destinations. They are on/o latching buttons, so all three
can be on at the same time. The available destinations are:
OSC1 oscillator 1 pitch
OSC2 oscillator 2 pitch
FILTER lter cutto frequency
CV PATCH POINTS FOR THE LFO
LFO OUT CV outputs for the LFO modulation signal, the
two outputs are identical
RESET CV input for LFO reset, LFO cycle resets to start
when receiving a gate signal
SPEED CV input for control of LFO speed
DEPTH CV input for control of LFO depth
FILTER
ONE SHOT
This button resets the LFO
cycle to it’s starting point
whenever a note is played,
and it also limits the LFO to
one cycle only. This makes
it possible to use the LFO
as a second envelope. For
example it can be used for
auto pitch bends at the start
of a note or to control the
lter cuto seperately from
the main envelope. Sample &
Hold in One Shot mode plays
a little cycle of random values
before settling.
The LFO section on the
front panel is home to the
GEN R-8’s most advanced
modulation source and
is where you select
LFO waveforms and set
speed and depth. Use the
DESTINATION buttons
to route the modulation,
or patch it out from the
LFO OUT patch points to
anywhere you desire.
05 06
WAVE
The LFO has eight waveforms that are selected with this
knob. The waveforms are as follows (going around the knob
clockwise): Sine, triangle, sawtooth, ramp, square, narrow
pulse, falling staircase, sample & hold.
SPEED
This knob sets the speed of the LFO, the range is from slow
undulating sweeps to low frequency audio spectrum rate.
DEPTH
This knob sets the depth of the LFO modulation. It has a wide
range for deep modulation eects. (Even deeper modulation
can be achieved with the MOD key by setting the MOD DEPTH
in the CONTROL section for extra modulation depth.)
The lter section is where
you select what type of
lter you want and set
lter Cuto frequency and
Resonance. The inuence
of the envelope on the lter
is also controlled from here
with the Envelope Depth.
LOW PASS / HIGH PASS
Use these buttons to select the Low Pass or High Pass lter.
They’re latching buttons that can be switched on at the same
time. If both the LOW PASS and HIGH PASS buttons are
switched on it will result in a Band Pass lter. If both LOW PASS
and HIGH PASS buttons are switched o it will result in a wide
Notch lter that scoops out the mid frequencies.
CUTOFF
This knob sets the cuto frequency of the lter. When the Low
Pass lter has been selected, frequencies above the cuto
point will be rolled o by 12 dB per octave, and when the lter
is set to High Pass, frequencies below the cuto point will be
rolled o by 12 dB per octave. It’s a full audio range cuto so
for example if it’s set to max in Low Pass mode chances are
you won’t hear the lter working and if it’s set to min you
might not hear any sound at all.

RESONANCE
This knob determines the amount of lter emphasis around
the cuto frequency. Use it sparingly to sculpt the timbre
of a sound, or go wild and crank it all the way up until it selfresonates, you’ll then hear a distinct whistling sound where the
pitch is set by the cuto frequency.
CV PATCH POINTS FOR THE FILTER
CUTOFF CV input for control of the lter cuto
frequency
RESONANCE CV input for control of the lter resonance
ENVELOPE
ENV DEPTH
Use this knob to set the
eect of the envelope on
the lter cuto frequency. If
it’s set to zero the envelope
will have no eect on the
lter, you may want that
so that the cuto can be
controlled by the LFO only,
or you may want to turn up
the level of envelope depth
to let the envelope control
the cuto frequency.
CV PATCH POINTS FOR THE ENVELOPE
GATE IN CV input for a gate signal to trigger the envelope
and holding it open in the Sustain stage until
the gate signal goes low (use this to control the
envelope in a standard CV/Gate setup)
ENV OUT CV output of the envelope signal as set up with
the ADSR knobs
DELAY
RELEASE
This knob sets the last time
parameter which determines
how long it takes the sound
to fade away after you have
released the key.
The analog style delay is
based on the popular lo-
Princeton PT2399 Delay
chip and is implemented
with a CV input for
The envelope controls
the loudness of the
sound as it’s hardwired
to the amplier stage.
There are four knobs
that determine the
shape of the envelope,
where Attack, Decay
and Release are time
parameters, while Sustain
is a volume parameter.
Collectively they’re often
referred to as ADSR.
07 08
ATTACK
This knob sets the amount of time it takes for the envelope
to ramp up the sound, if you want a snappy sound that starts
straight away when you press a key, set it to zero.
DECAY
After the Attack portion of the envelope has played out, this
knob sets the time it takes the sound to come down to the
Sustain level. Most of the time you don’t want this set to zero.
SUSTAIN
This knob sets the volume parameter that determines how
loud the sound is as long as you keep holding down a key.
time modulation, it’s
also capable of innite
regeneration.
TIME
This knob sets the length of time between each delay repeat.
The maximum is around 750ms and the longer the delay is, the
more grungy it becomes.
REPEAT
This knob sets the number of repeats of the delay. At
maximum it can self-oscillate and keep repeating forever,
but the sound gets more and more mangled the longer it
goes on for.
CV PATCH POINT FOR THE DELAY
TIME CV input for control of the delay time

MIXER SEQUENCER
The mixer section adds
together the dierent
audio sources within the
GEN R-8.
VOLUME
This knob sets the level of the direct sound from the
analog synthesizer engine.
DELAY LEVEL
This knob sets the level of the Delay signal that is mixed in
with the direct signal.
AUX IN
Unity gain input for an external sound source that is processed
through the GEN R-8s FILTER/DELAY/DRIVE audio chain.
PHONES
This is an audio output on a 3.5mm jack designed
for headphones.
09 10
The step sequencer is used
to play a repeated sequence
of programmed notes on
the GEN R-8. The sequence
is also transmitted to the
MIDI OUT socket on the rear
and the CV/GATE sockets
at the top of the sequencer
section. The sequencer has
two modes, Record mode
and Play mode respectively
for recording a sequence
and for playing it back.
PLAY/STOP
This button activates the
Play mode, when pressed
once it becomes lit and the
sequencer starts playing
the sequence of recorded
notes in the selected pattern
memory. Press it again to
stop the sequence playing.
RECORD
This button activates the Record mode and becomes lit
when pressed once, press it again to exit Record mode and
it goes dim.
When in Record mode, up to 16 steps can be input
by pressing a key, which then advances the sequence
programming one step and waits for the next key. When
you reach the maximum of 16 steps, the sequencer
automatically exits Record mode and the RECORD button
goes dim. You can also program sequences shorter than
16 steps, just exit Record mode at any time by pressing the
RECORD button.
When in Record mode, pressing the REST key on the
keyboard inserts a rest (silent note) and advances the
sequence one step. Pressing and holding the TIE key on the
keyboard while pressing a note key will “tie” the note with
the previous note, meaning the gate is held open between
the two notes so the envelope doesn’t retrigger.
When Record mode is activated it deletes the existing
sequence in the selected pattern memory as soon as
the rst key is pressed, until then it’s only “armed”, so if
RECORD was pressed in error, you can come out of Record
mode and the old sequence will be intact.
GATE TIME
DIP switch 1 on the side sets gate time, you can choose
between long or short gate times.
SPEED
This knob sets the speed at which the sequence is played
back in Play mode. It has no function in Record mode.

SEQUENCE TRANSPOSE AND RESET
The sequencer is a powerful performance tool with which you
can improvise sequence variations while it’s playing in time.
When the sequencer is playing you can transpose the
sequence seamlessly up and down by using the keyboard.
Middle F is the original pitch, pressing any other keyboard
key instantly transposes the sequence up or down while still
playing in time.
You can also choose to have the sequence reset to the
beginning every time you press a key, this feature is set with
DIP switch 2 on the side.
CV PATCH POINTS FOR
THE SEQUENCER
CV OUT CV output for pitch to control an external
instrument
GATE OUT Gate output to trigger the envelope of an
external instrument
NOTE!
When the sequencer is not playing, the CV/GATE outputs
will transmit the notes that are played on the keyboard.
DRIVE
PATTERN
This knob selects which of the
8 pattern memories that is
active in both Play mode and
Record mode.
In Play mode the GEN R-8
will play back the sequence
stored in the selected pattern
memory. You can switch
patterns seamlessly with this
knob while the sequencer
is playing and it will keep
playing in time and pick up the
sequence in the new pattern
memory that is selected.
In Record mode, the newly
recorded sequence will be
stored in the selected pattern
memory. Switching patterns
will have no eect, the new
sequence will be stored in
the pattern memory that
was selected when activating
Record mode.
MIDI PROGRAMMING
MIDI CHANNEL PROGRAMMING
DIP switch 4 engages the MIDI Channel Programming mode. This alters the functionality of the
note keys and you use them to program the MIDI channel number and more as laid out in the
graphic below.
2 147
4 169 11
1 3 5 6 128 1310 15
OMNI
OFF
OMNI
ON
MIDI
SLAVE
MIDI
MASTER
REAR CONNECTORS
LINE OUT
Output socket for the audio line level signal.
This is a transformer isolated output.
MIDI IN
Input socket for a MIDI in signal. If the
instrument or device you’re connecting
has an old type 5-pin DIN MIDI socket,
you’ll need a converter cable to the 3.5mm
(stereo) socket on the GEN R-8. Our MIDI
cable adheres to the ocial MIDI standard.
MIDI OUT
Output socket for the MIDI out signal from the
GEN R-8. If the instrument or device you’re
connecting has an old type 5-pin DIN MIDI
socket, you’ll need a converter cable to the
3.5mm (stereo) socket on the GEN R-8.
POWER SOCKET
Input socket for the power. Connect only a
grounded 12V DC power supply as the ground
connection aects the ability to properly
trigger the keys.
DIP SWITCHES
DIP 1 – Sequencer gate time, short/long
DIP 2 – Sequencer transpose reset on/o
DIP 3 – MIDI local on/o
DIP 4 – MIDI channel programming mode on/o
DIP 5 – First/last note priority
DIP 6 – Legato on/o
SPECIFICATIONS
The Drive is a diode-clipping overdrive circuit with an
added JFET transistor boost stage. It has been designed
specically for synthesizer sounds and is dierent from
many other overdrive/distortion circuits, in that it retains
the low end while still being able to mangle the sound.
11 12
GAIN
This knob sets the level of
the Drive eect, the further
clockwise you turn it, the
more severe the Drive
eect becomes.
Power Supply Voltage: Grounded 12V DC
Dimensions (HxWxD): 58mm Height x 366mm Width X 167mm Depth
Weight: 2.5kg
Output Impedances: LINE OUT 200 Ohm
PHONES 60 Ohm
Input Impedance: AUX IN 10k Ohm

IMPORTANT: Battery Information
IMPROPER BATTERY USE MAY RESULT IN A FIRE, EXPLOSION, OR OTHER HAZARD
• Only adults should handle batteries.
• Keep batteries from children and pets.
• Do not mix old and new batteries or batteries of dierent types: alkaline, lithium,
standard(carbon-zinc), or rechargeable (nickel-cadmium, nickel metal-hydride).
• Use only batteries of the same or equivalent types as recommended.
• Insert the batteries observing the proper polarity (+/-) as illustrated or indicated inside the
battery compartment.
• Exhausted batteries are to be removed from device. Depleted batteries may cause the unit
to malfunction.
• Remove the batteries when the product will not be used for an extended period.
• The supply terminals are not to be short-circuited.
• Do not use rechargeable batteries.
• Non-rechargeable batteries ate NOT to be recharged.
• Never throw batteries into a re or other hear sources.
• Do not overtighten battery compartment screw.
BATTERY DISPOSAL:
Spend or discharged batteries must be properly disposed of and recycled in compliance with
all applicable national legislation.
ACKNOWLEDGEMENTS
Like any project this couldn’t be done without a group of dedicated, talented and
enthusiastic people. It’s been a pleasure and a privilege to work with you
We would like to thank:
Jorn Bilse – Head of Design & Concept Design
Louis Norwood – Head of Technical Design & Development
Alex, Marco and Mark from GBE
Jon Collyer from Meanred
Kate at Katielove Design
For creating something we can all be proud of:
Dubreq
John Simpson
Marcella Kavanagh
The symbol on
the product, packaging or
accompanying documents
indicates that this product must
not be disposed of with your other
general household waste.
Instead, it is your responsibility to
dispose of your waste equipment
by handing it over to a designated
collection point for the proper
FCC Statement
This equipment has been tested and found to comply with the limits for a Class B digital device, pursuant
to Part 15 of the FCC rules. These limits are designed to provide reasonable protection against harmful
interference in a residential installation. This equipment generates, uses, and can radiate radio frequency
energy and, if not installed and used in accordance with the instructions, may cause harmful interference
to radio communications. However, there is no guarantee that interference will not occur in a particular
installation. If this equipment does cause harmful interference to radio or television reception, which can be
determined by turning the equipment o and on, the user is encouraged to try to correct the interference
by one or more of the following measures:
Reorient or relocate the receiving antenna.
Increase the separation between the equipment and receiver.
Connect the equipment into an outlet on a circuit dierent from that to which the receiver is connected.
Consult the dealer or an experienced radio/TV technician for help.
The user is cautioned that changes and modications made to the equipment without the approval of the
manufacturer could void the user’s authority to operate this equipment.
13 14
treatment, recovery and
recycling of waste electrical and
electronic equipment.
The separate collection and
recycling of your waste equipment
at the time of disposal will help
conserve natural resources and
ensure that it is recycled in a
manner that protects human
health and the environment.
For more information about
where you can take your waste
equipment for recycling, please
contact either your Local
Authority, or where you purchased
your product.
Penalties may be applicable for
incorrect disposal of this waste,
in accordance with your national
legislation.
@stylophoneofcial
@the_stylophone
stylophone_ofcial
www.dubreq.com
+44 1424 439 151
For all enquiries: info@dubreq.com

USER NOTES
THE
ORIGINAL
POCKET
SYNTHESIZER
PORTABLE
ANALOG
SYNTHESIZER
15

 Loading...