

Page 1
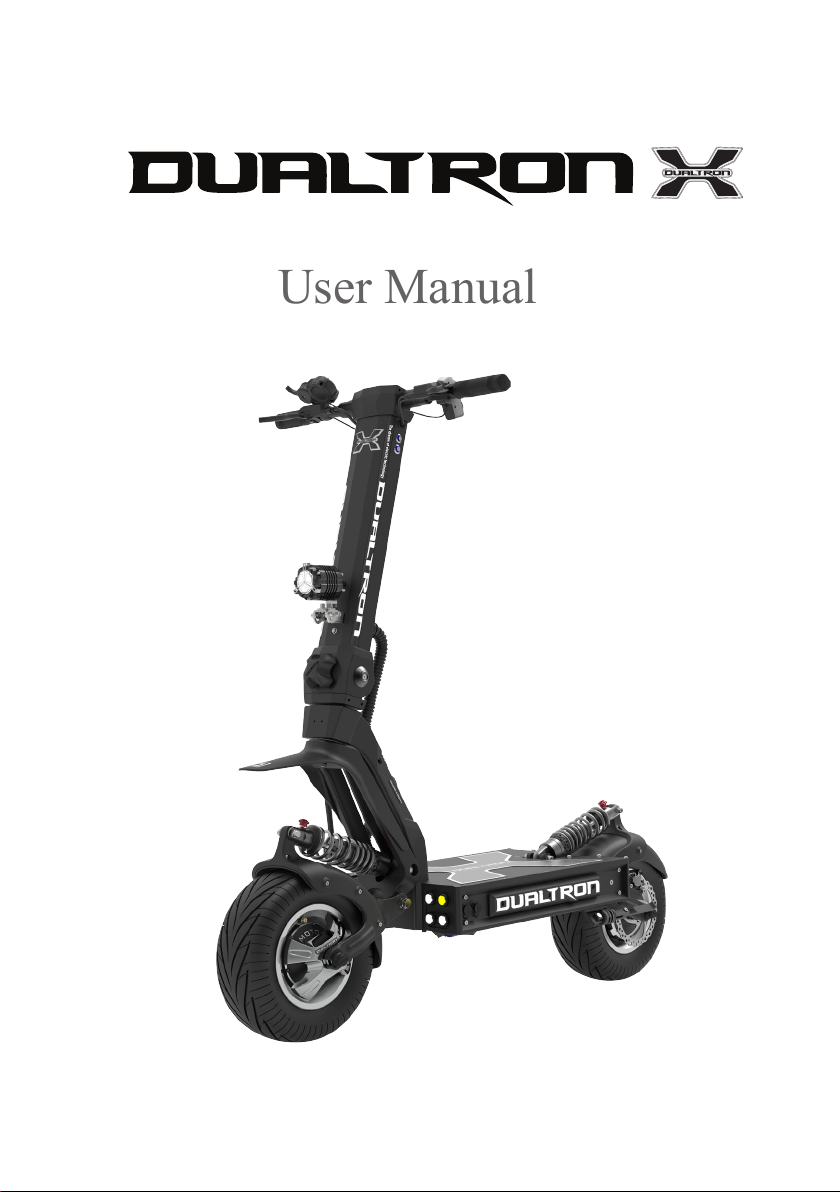
PERSONAL MOBILITY
User Manual
* This product is always two-wheel drive.
Page 2
Company Introduction
Minimotors Inc. is a company which manufactures and distributes personal
mobility with a professional production system since 1999.
Minimotors Inc. created the electric mobility brand 'DUALTRON' to meet the world’s
needs by making personal mobility more innovative, reliable , and convenient from 1999 to
the present and making a product that is loved by people all over the globe.
Minimotors Inc. is doing its best to become the world’s best electric mobility company.
MINIMOTORS
Inc.
Brand Introduction
‘DUALTRON’ brand is a worldwide electric scooter brand name that
Minimotors Inc. designed.
'DUALTRON' is a breakthrough product that combines the world's first dual drive system
with new rubber suspension technology (patent application).
It is a proud Korean luxury brand that has dominated the world’s electric scooter market
and is currently being exported to more than 30 countries.
®
Please read the user manual carefully.
Do not use the product until you understand its functions.
Do not rent the product to anyone who cannot operate the product.
*For the first time, the user should use it with a slow speed for safety.
Page 3
Dualtron X user manual contents
DANGER
DANGER
WARNING
01. Safety guidelines and restrictions ·······································································
02. Product structure ··································································································
03. Name of each part ·································································································
04. Product components ····························································································
05. How to use the product·························································································
06. How to use the instrument panel ··········································································
07. Product functions guide ·························································································
08. How to use the charger correctly ··········································································
09. Safety precautions for Lithium battery ··································································
10. Safety guidelines before driving ·············································································
11. Check and maintenance ·························································································
12. Important checklist ································································································
04
06
07
08
09
12
15
16
17
18
19
20
13. Product specifications ···························································································
Before Reading the Manual
This manual contains important information to help you to use your product more safely.
For your safety, there are warnings of 'Danger', 'Warning', and ‘Caution’
depending on the degree of danger and the meanings are below.
Indicates a hazardous situation that will result in serious injury.
Indicates a hazardous situation that could result in serious injury.
Indicates a hazardous situation that could result in minor or moderate injury.
DANGER
WARNING
CAUTION
22
Page 4
Before Reading Manual
관계법 준수
Comply with
the related laws
Comply with
the related laws
Slow mode is recommended
ElderlyNovice
Comply with
the related laws
Slow mode is recommended
ElderlyNovice
Comply with
the related laws
Slow mode is recommended
ElderlyNovice
DANGER
WARNING
CAUTION
Please read this manual carefully
before using this product
1) Safety guidelines and restrictions
* Even if the product is within the warranty period, you may be liable for any accident caused by any of the following causes.
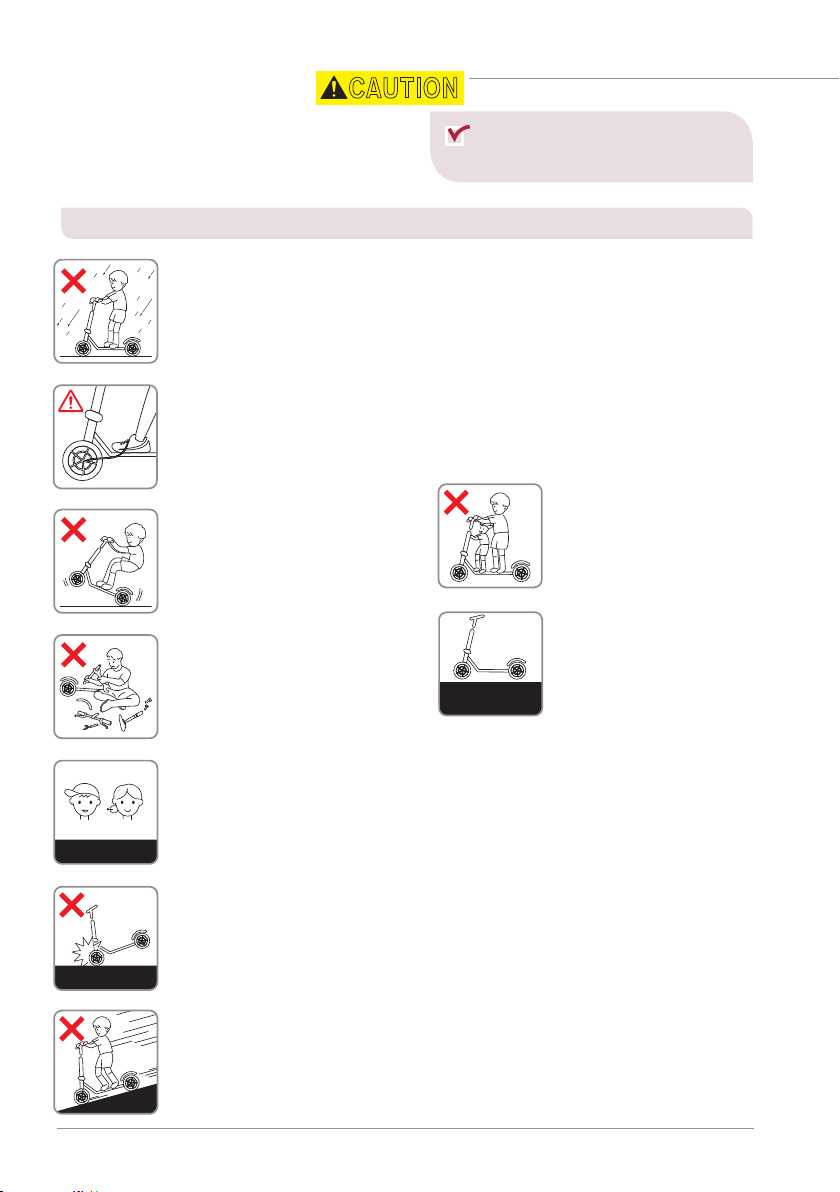
1. Be careful of water!
This product and its components are not waterproof.
Do not let any water get into the product and its components.
*Never use it, if the road is wet due to the rain, snow, or hail.
*If you attempt to wash or spread water to any electric devices, it can result in malfunction or fire.
2. Beware of the folding and spinning parts!
If any body part, such as a finger or hair, gets caught in the spinning or folding
parts of the product, this may lead to severe injuries. Please be careful.
Slow mode is recommended
Do not sudden brake
3. No acrobatics
Stunts such as jumping and
dropping are prohibited as they
can cause a large impact on
the product and can lead to
malfunction and accidents.
5. Do not tune by yourself
Do not open or tune the electric
parts (battery, controller or
motor system).
7. Beginners and seniors are encouraged to
use at low speed
SeniorBeginner
Beginners who are not accustomed to using the product, seniors, and others should
avoid high-speed mode driving and are recommended to use low-speed driving.
In addition, please use after practicing how to ride safely in an open space.
8. Do not suddenly brake with front brake
If there is a risk of overturning, sudden deceleration should be done safely.
Do not apply any unusual behaviors or artificial force, such as stopping with
your feet.
9. Do not accelerate downhill. Slow mode is recommended
Slow down when going downhill. When reducing the speed, use the
brakes properly to reduce the heat on the disk and prevent brake
overheat.
4. No companion boarding
This product is intended for
one adult only, so children,
infants, or two people are
prohibited from boarding.
6. Comply with the related laws
Driving without a license,
under the influence, or with
Comply with
the related laws
cargo on the scooter is
prohibited. (More than bike or
bicycle license is required)
Please comply with the Road Traffic
Act and related laws and regulations
according to the place of use.
Dualtron X User Manual
04
Page 5
관계법 준수
고속모드(L3) 사용금지
여성/노약자초보자
Comply with
the related laws
Slow mode is recommended
ElderlyNovice
Comply with
the related laws
2) Precaution before driving
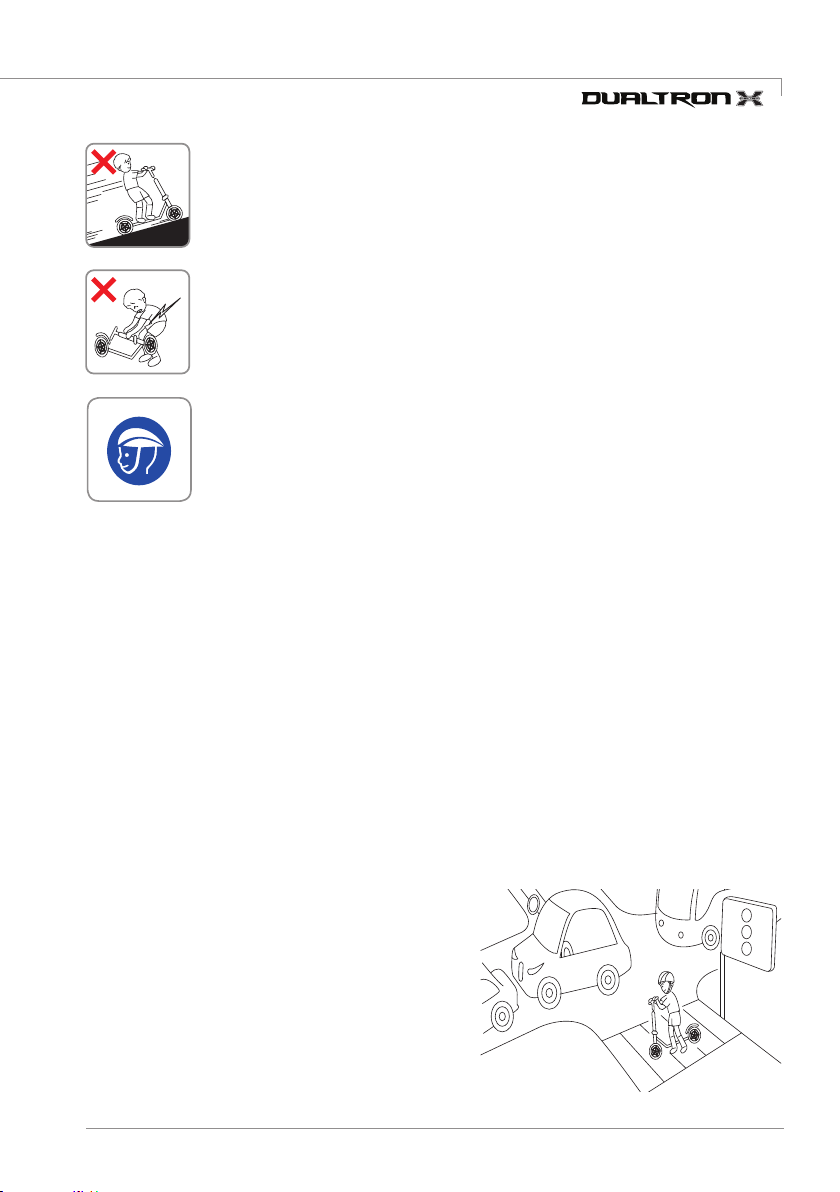
1. Night driving should be avoided at all times. Always wear helmets and other body guards and
2. Select the mode that suits you and drive. In order to cope with sudden situations, be prepared
3. When turning left / right, slow down to avoid the danger of overturning or slipping, then slowly
4. To go backwards safely, get off the product only after coming to a complete stop.
5. It is prohibited to use in any places that are slippery, crowded, have a steep slope, or are
6. When crossing a pedestrian crossing, get off from the product for pedestrian safety.
7. Do not drive in a way that threatens any other means of transport, such as animals,
8. When passing speed bumps and road obstacles,
9. When decelerating or braking, do not stop with
10. Be careful as there is a risk of burns due to heat
11. It is prohibited to drive by holding the handle with
12. Do not ride or drive when the kick stand is down.
10. Do not drive on steep slopes
Acceptable gradeability is different for each product. Excessive hill roads
exceeding the specification may cause damage to the product (parts) due
to temperature cut, overcurrent, or low voltage cut, which may cause the
product to malfunction.
11. Safety warning when lifting the product
Please always lift the product with at least one other person.
When lifting the product, please be careful not to damage your back or
knees.
12. Be sure to wear safety equipment
For the safety of passengers, be sure to wear a full face helmet and the
other protective gear (for knees, elbows, hands, upper body) and do not wear
shoes such as slippers or high heels that can interfere with driving.
drive safely.
to slow down by holding the brake at all times.
turn safely.
uneven.
pedestrians, bicycles, motorcycles, cars, etc.
be sure to slow down.
your foot, but by using the brake appropriately.
from the motor and brake (especially disk rotor)
after driving.
one hand; please use both hands at all times.
Dualtron X User Manual 05
Page 6
Product structure
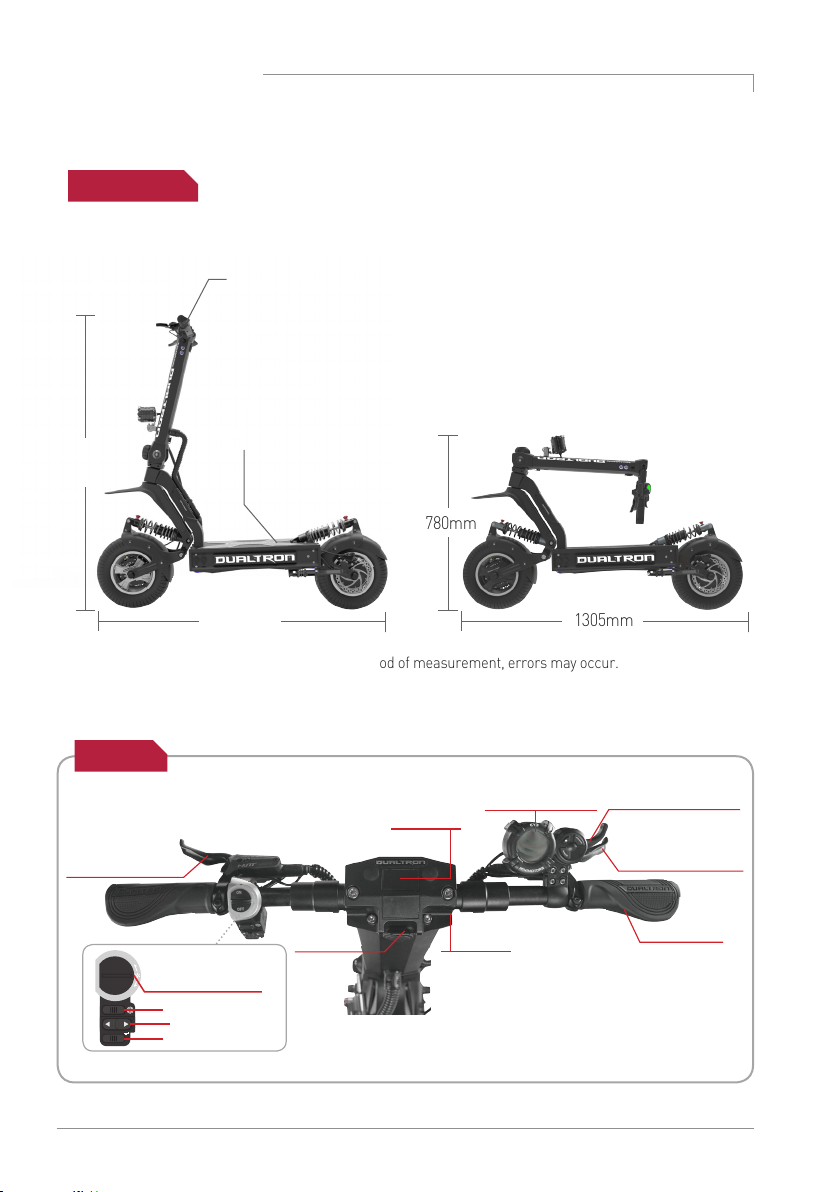
Product size
Unfolded Folded
Standard handle
width 632mm
Footrest width 350mm
1214mm
780mm
1305mm 1305mm
* Depending on the method of measurement, errors may occur.
Handle
Main battery
volt meter
(Green)
Brake lever
(+Electronic brake)
EYE throttle LCD
instrument panel
Index finger throttle
(Accellerator)
Brake lever
(+Electronic brake)
ON
Front high power
LED light switch
OFF
Emergency Light
Turn Signal
Horn
Dualtron X User Manual
06
Bracket
Handle grip
Sub battery
volt meter
(Blue)
Page 7
Name of each part
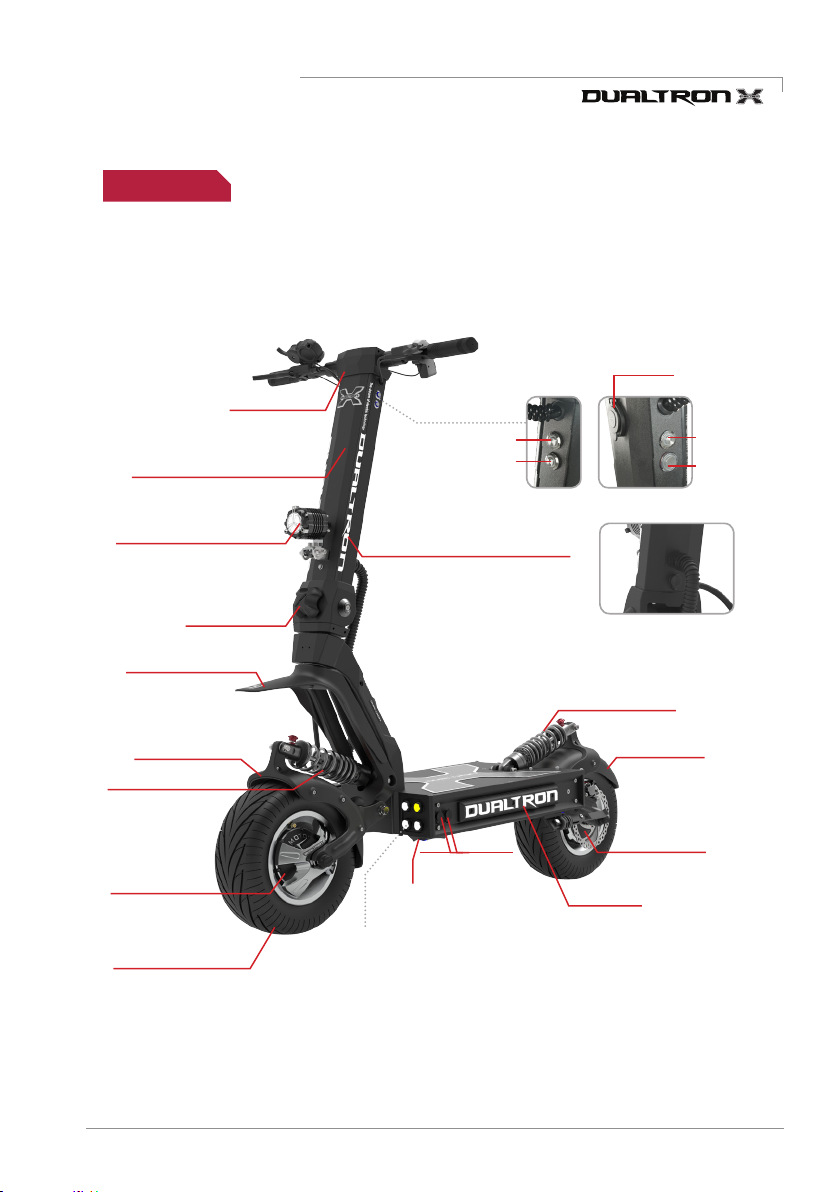
Body frame
USB port
Handle body
Handle post(Steering tube)
Front high power LED
Folding Knob
Swing arm fender
Front fender
Front suspension
Front motor
13inch ultra wide
tubeless tire
Spare
button
[Left] [Right]
Steering tube LED bar (White)
[Handle post(Steering tube)
Charging port]
Rear suspension
Rear fender
Charging port
Bottom mood LED
Front ang rear LED
(Front LED 6EA, Brake LED 2EA, Turn signal LED 4EA)
Logo LED
LED light
button
Sub battery
power button
Rear motor
Dualtron X User Manual 07
Page 8

Product components
DANGER
WARNING
Checking the components inside of the box
Body, Default battery charger 2EA (6.5A, 1.75A), Basic tool, Swing arm fender, User manual
Assembling of the instrument
Unboxing the product
This unit is secured to the steel frame in the
box. When lifting the product out of the box,
make sure that at least two people open it
safely, taking into account the weight of the
product.
* There is a risk of accident and/or body injury
from the folding parts, getting cut by the sharp
edges of the steel frame, and by the product
falling on the user.
CAUTION
-Locate the instrument panel and tighten
the fixing bolts.
panel, brake
Make a note of the serial number.
The serial number can be used to check
information such as date of purchase, warranty
period, etc., and product information can be
checked even if the product is lost or stolen.
(May vary depending on branch office situation.)
Dualtron X User Manual
08
-Adjust the position of the brake and
tighten the fixing bolts with a 4mm
hexagon wrench.
Page 9
How to use the product
DANGER
WARNING
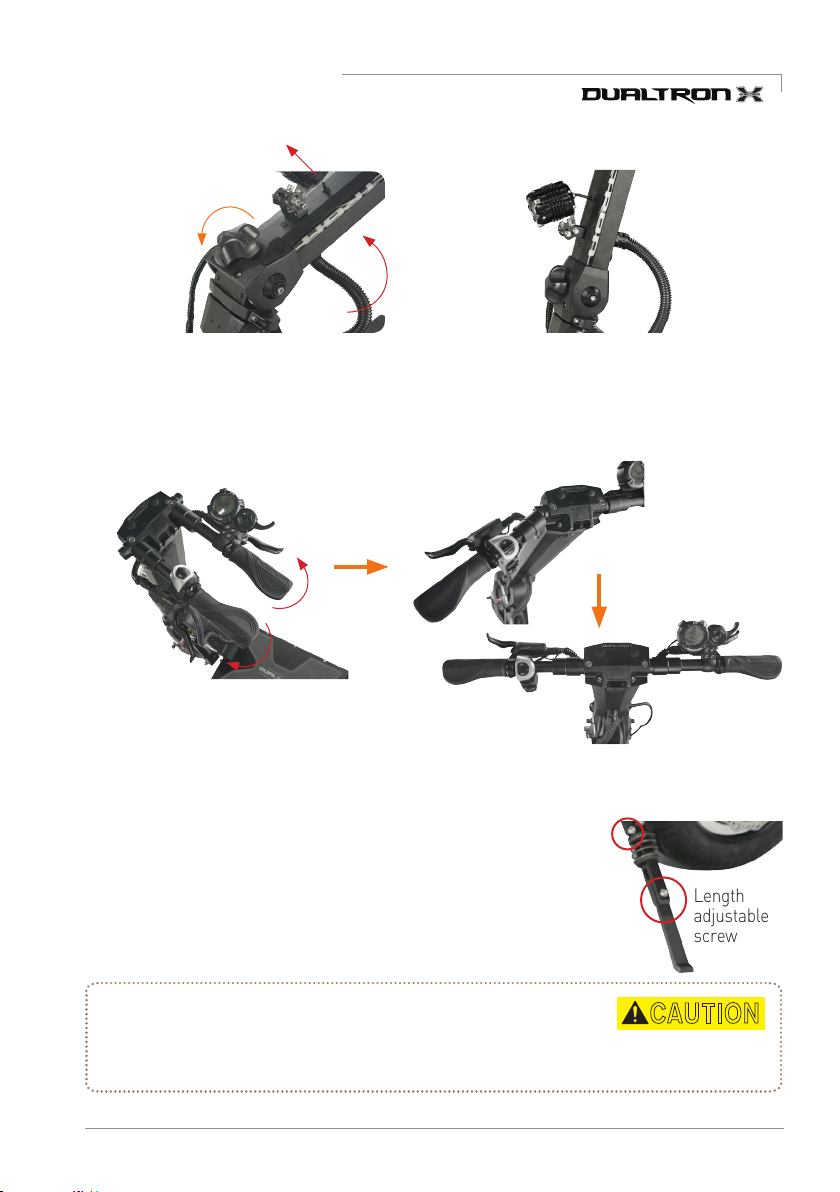
1) Product unfolding
folding knob
1. Raising handle post (Steering tube)
Release the folding knob and push handle
post all the way end to raise up.
3. Expand handlebar
Push both handlebars out to the end and expand.
4. Length adjustable side stand
The length of the side stand can be adjusted according to the
height of the product.
Loosen the side stand's length adjustment screw, slide the side
stand to the left or right, adjust it to the height of the product, and
tighten the length adjustment screw.
2. Set up folding part
Lock the folding knob firmly and check for
slack or loosening during the drive.
Anti-reverse
bending screw
Length
adjustable
screw
Side stand stability check and length adjustment are required for
safe positioning of the product.
* Pay attention to loosening and breaking of the anti-reverse bending screws located at the
top of the side stand.
CAUTION
Dualtron X User Manual 09
Page 10
How to use the product
DANGER
WARNING
2) How to start
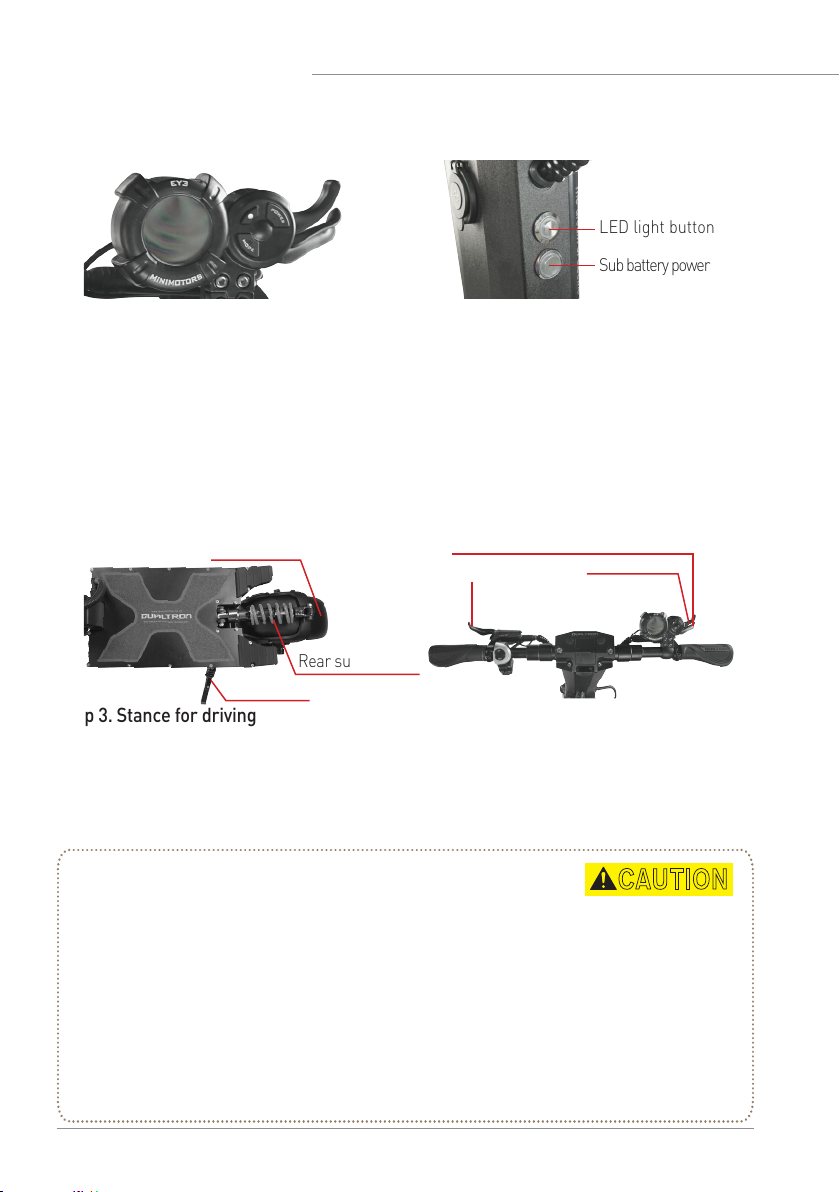
LED light button
Sub battery power button
Step 1. Turning on the main switch
To turn on the product, press the power button on
the instrument panel for 2 seconds to turn on the
instrument panel.
You can set the start mode, cruise mode, electronic
brakes, and ABS function.
When driving is finished, turn off the LCD panel and
turn off the light power.
* The power of the instrument panel will turn off
automatically after a few minutes of inactivity.
Rear fender
Rear suspension
Kickstand
Step 3. Stance for driving
After tilting the kickstand, find a stable
position on the footrest and then hold the
handle grip comfortably.
Be careful not to raise your foot on the rear
fender and rear suspension.
Before driving, be sure to check the folding part, the handle part,
folding knob,the part where the main fixing part of the product is fastened well.
You must check before board to prevent accidents, check the damage and the position of the
suspension fixing bolt which is connecting suspension arm and swing arm.
Throttle malfunction caution
Regardless of whether the throttle is operated or not, the motor sensor may continue to operate,
causing malfunctions such as sudden acceleration.
In this case, hold the brake lever to cancel the operation.
This phenomenon may be caused by corrosion of the throttling, immersion of the throttle,
disconnection of the magnet, broken off levers, or breakage of the spring.
Do not bounce the throttle lever strongly.
Step2. Turning on the LED lights
Pressing the sub-battery power button on the
right side of the steering tube will energize
the handle.
At this time, when the top of the LED light
button is pressed, high power headlights and
steering tube lights are illuminated.
Brake
Index finger
throttle
Step 4. Acceleration and deceleration
Acceleration can be performed by using
the throttle of the instrument panel while
driving, and the deceleration or stop can
be performed by holding the brakes on the
handle.
CAUTION
Dualtron X User Manual
10
Page 11
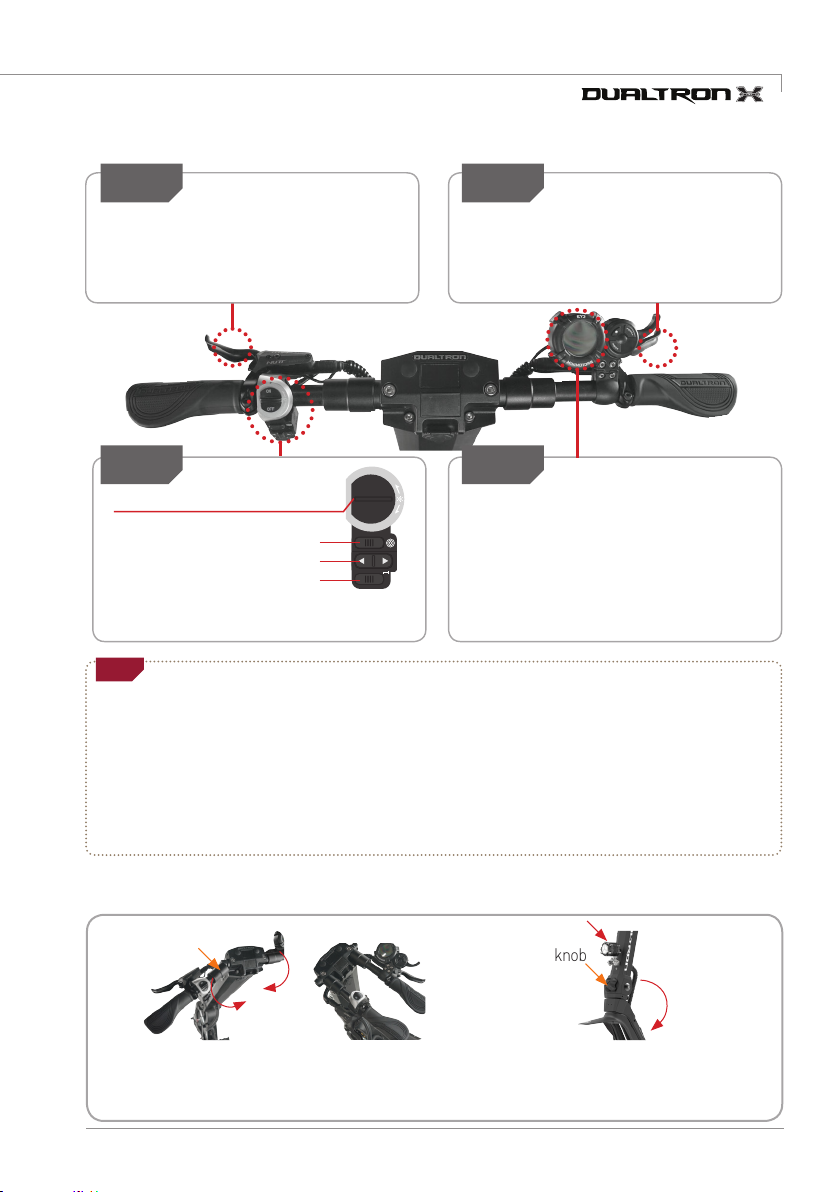
3) How to stop
Step1 Step2
Be sure to use the rear brake first for
decelerating when stopping while driving. For
a safe stop, it is necessary to practice slowing
down after deceleration with rear brake.
Step3
Front high power LED light switch
Emergency Light (Press - Blink)
Turn Signal (Left, Right Blink)
* Additional functions : Switch off and on the front high-power
LED switch within 1 second the high-power LED will blink.
Tip
•For safe braking, check whether the brake lever and disc caliper connection (wire damage, external breakage, etc.) are
damaged before and after driving, and check brake wear and looseness of brake inner core (inner wire).
In the case of hydraulic brakes, it is also necessary to check the oil leakage or deficiency and always check that the braking
force is sufficient.
•Due to various factors such as road surface condition and speed, it may not always be possible to come to a complete stop
even when the brake is operated as expected.
The electronic brake and ABS functions are auxiliary functions to further increase the braking force.
The user should understand the function and expect the operation timing when using this function.
Rear brake use Front brake use
Always use the front and rear brake
levers together to stop smoothly and
safely after decelerating with the rear
brake.
Multy Switch
Horn (Press Honk)
ON
OFF
Step4
Deceleration and braking using
electronic brake
Set the use and strength of the electronic
brake among the detailed functions of the
instrument panel before driving. When the
brake lever works, the electronic brake
works together to increase the braking
force.
Check for safe braking
4) Product Folding
Handlebar slider
1. Releasing fixed handlebar 2. Folding Steering Tube
Pull both side handlebar slider,
and fold forward
Folding knob
Unlock folding knob and press the knob
hard then folding the steering tube.
Dualtron X User Manual 11
Page 12
P
O
W
E
R
E
Y
E
M
O
D
E
00
00 : 00
Km/h
3
TIME
98
%
PAS
P
O
W
E
R
E
Y
E
M
O
D
E
00
00 : 00
Km/h
3
TIME
98
%
PAS
E
Y
E
00
00 : 00
Km/h
VOL
3
TRIP ODO DST TIME CHA
98
%
PAS
P
O
W
E
R
M
O
D
E
P
O
W
E
R
E
Y
E
M
O
D
E
00
00 : 00
Km/h
3
TIME
98
%
PAS
E
Y
E
00
00 : 00
Km/h
VOL
3
TRIP ODO DST TIME CHA
98
%
PAS
E
Y
E
88
98
%
00 : 0088888
Km/h
VOL
TRIP ODO DST TIME CHA
SET RPM OFF
PAS
Mp/h
8
[ M ]
⑥
⑦
⑨
①
②③④ ⑤
⑧
P
O
W
E
R
M
O
D
E
P
O
W
E
R
P
O
W
E
R
P
O
W
E
R
P
O
W
E
R
P
O
W
E
R
How to use the instrument panel
DANGER
WARNING
CAUTION
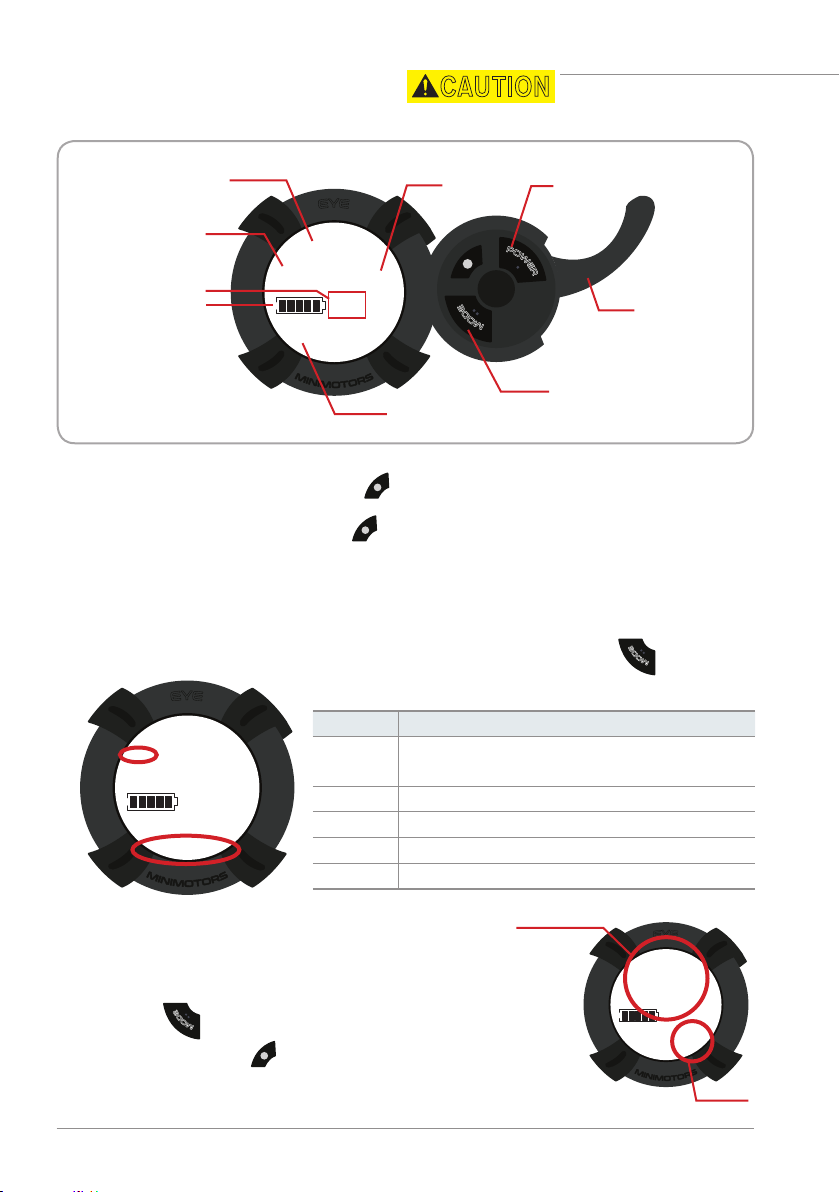
Speed
Speed step Power button
Speed unit
Battery balance
Driving time
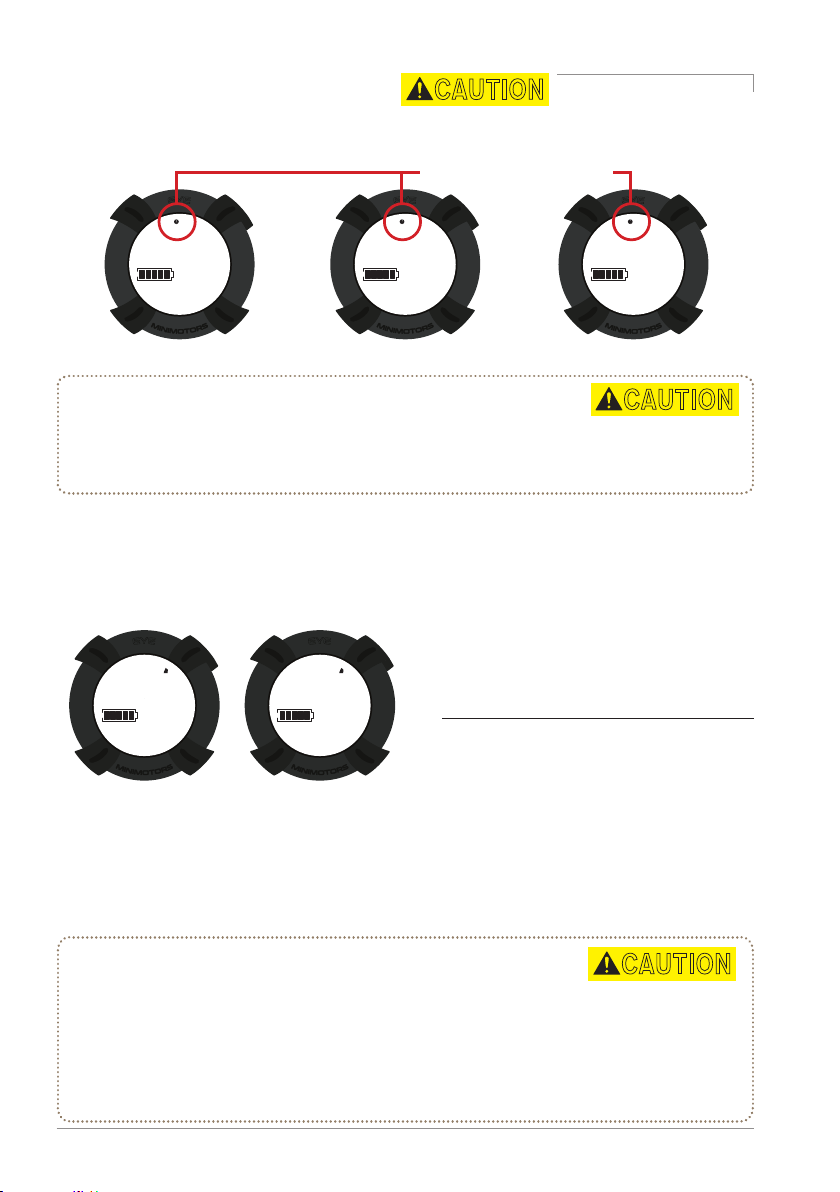
1) Speed step setting
Can adjust with button.
While the instrument panel is on, press to set the speed step.
The setting is completed when the selected speed step value is selected.
* Blinks 3 times per 10 seconds when the remaining battery power is 10%.
It blinks continuously when the remaining battery power is 10%.
2) Functions and settings for each main screen
12
3) Instrument panel detailed function
You can change the setting mode by turning on the power of the dashboard and
pressing for 2~3 seconds.
In the setting mode, press once to change the internal setting value
* If you change default setting value P0(13), P1(60), 3 P2(15), P3(0) the exact
Dualtron X User Manual
information is not displayed.
Mode
TRIP
ODO
CHA
VOL
TIME
mode can adjust with button.
Current mileage
(Press and hold mode button to reset to '0')
Accumulated mileage
Current voltage
Setting mode
E
D
O
M
Mode button
Discription
Not in use
Drive time
Accelerator
index finger
throttle
E
D
O
M
E
Y
E
Km/h
P3
98
SET
Setting value
PAS
3
%
0
Page 13
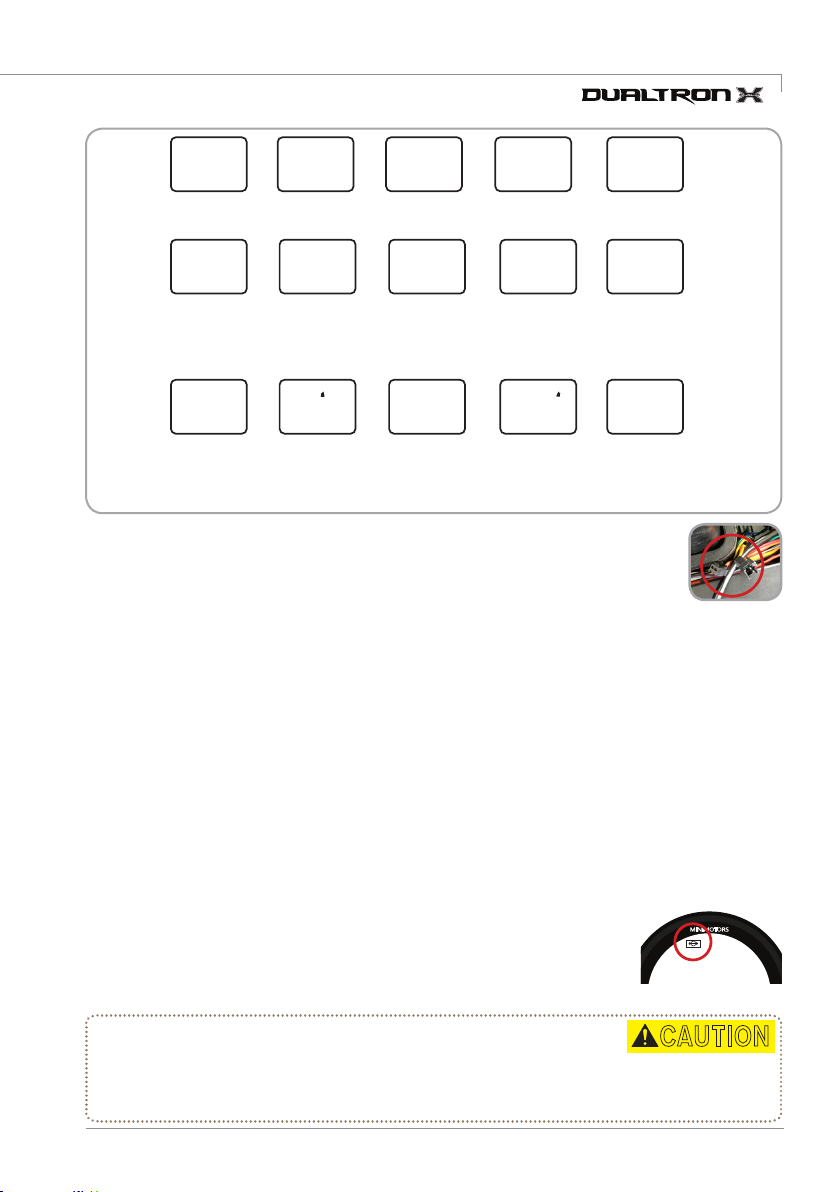
P0 P 1 P2 P3
Pb
P0
00
00 : 00
Km/h
VOL
3
TRIP ODO DST TIME CHA
P3
0
Km/h
SINCE 1999
MINIMOTORS
98
%
TRIP ODO DST TIME CHA
SET RPM OFF
SINCE 1999
MINIMOTORS
98
%
DANGER
WARNING
13(Fixed)
60(Fixed) 15(Fixed)
0(Fixed)
P4
Speed unit
0(Km/h), 1(mp/h)
Start method
0(Acceleration start),
1(Kick start)
Cruise mode
PA PCPb
Electronic
brake power
0(Off)
~5(Powerful)
LCD brightness
0(Back light off)
0(OFF)
1(ON)
control
~5(Brightest)
P7
Slow start
0(Off:Power start)
~5(Slow start)
Auto off
time setting
5~30 minutes
Max output
5~100%
(User adjust)
ABS setting
0(OFF),
1(ON)
P9P5 P6 P8
Battery save
1(MAX SAVE)
2(MID SAVE)
3(NO SAVE)
PE
Rear motor
lock setup
0(UNLOCK),
1(LOCK)
4) PE function (Rear motor lock setup)
The rear wheel motor locking function (Throttle: PE) is not activated when the product is shipped from the factory.
•
How to activate PE function (Rear motor locking setting)
1. When the footrest of the product is opened, the rear wheel motor sensor (white) is located in the right-hand
space connecting the stem headset to the vehicle and connects the disconnected connector when activating the function.
2. After connecting the connector, reassemble the footrest and select the Throttle PE function as the value of 1 (LOCK) to activate.
(The connectors of the rear wheel motor sensor must be disconnected if storing for a long period of time in
order to prevent product discharge.)
*
When connecting the rear wheel motor sensor connector, turning off the throttle PE function will consume the standby current.
(The connectors of the rear wheel motor sensor must be disconnected if storing for a long period of time in
order to prevent product discharge.)
* PE function operates when power is turned off after setting PE function and PE function is automatically
canceled when power on again. (Reset is required when using PE function.)
* Part color and specifications may be changed without notice to improve the quality and safety of the
connector and rear motor locking sensors.
5) Features of cruise mode (automatic driving)
The cruise control function allows you to maintain the driving speed automatically.
Take advantage of cruise features to reduce fatigue when traveling long distances and to increase mileage
of driving due to constant speed driving.
•
The start of the cruise function
Select the Cruise function section of the dashboard under 'Settings' and maintain
the throttle to the same Acceleration for 7 seconds the cruise function will start.
•
End of cruise function
When you hold and release the brake while cruise mode is in effect, the cruise mode is automatically released.
•
Precautions when using the cruise function
1.
In case of cruise function, please ride in a position where brake can be used
immediately so that cruise function is canceled and braking is possible in preparation for safety situation while driving.
2. It is permanently dual drive mode and can be released via throttle and brakes.
* It is not recommended that cruise function is disabled via the throttle.
MINIMOTORS
Km/h
CAUTION
Dualtron X User Manual 13
Page 14
How to use the instrument panel
E
Y
E
1
Km/h
SET
98
%
Pb
P0
Pb
P0
Pb
P0
P
O
W
E
R
E
Y
E
M
O
D
E
00
00 : 00
Km/h
3
TIME
98
%
PAS
E
Y
E
00
00 : 00
Km/h
VOL
3
TRIP ODO DST TIME CHA
98
%
PAS
E
Y
E
PA
3
Km/h
SET
98
%
E
Y
E
PA
5
Km/h
SET
98
%
E
Y
E
P3
0
Km/h
3
SET
98
%
PAS
E
Y
E
88
98
%
00 : 0088888
Km/h
VOL
TRIP ODO DST TIME CHA
SET RPM OFF
PAS
Mp/h
8
[ M ]
⑥
⑦
⑨
①
②③④ ⑤
⑧
P
O
W
E
R
M
O
D
E
P
O
W
E
R
M
O
E
Y
E
PA
5
Km/h
SET
98
%
E
Y
E
88
98
%
00 : 0088888
Km/h
VOL
TRIP ODO DST TIME CHA
SET RPM OFF
PAS
Mp/h
8
[ M ]
⑥
⑦
⑨
①
②③④ ⑤
⑧
P
O
W
E
R
M
O
D
E
E
Y
E
88
98
%
00 : 0088888
Km/h
VOL
TRIP ODO DST TIME CHA
SET RPM OFF
PAS
Mp/h
8
[ M ]
⑥
⑦
⑨
①
②③④ ⑤
⑧
DANGER
WARNING
DANGER
WARNING
DANGER
WARNING
CAUTION
6) Setting of Electronic brake
E
Y
E
Km/h
PA
%
98
0
SET
Electronic brake off Moderate intensity
* Precautions when using electronic brake after a full battery charge
The electronic brakes do not operate when the battery is fully charged, so be sure to check and
operate this device.
When the battery is used a little, the electronic brake will operate normally.
Y
98
E
%
0
7) ABS function setting guide
All electric scooters are subject to sudden braking, causing the wheels to stop spinning (Tire Lock).
As a result, the slip of tire can cause the driver to fall down, which can cause accidents.
This product is equipped with ABS brake function to reduce the tire lock, enabling more secure braking.
E
Km/h
SET
ABS OFF
* ABS brake is an abbreviation of Anti-Lock Brake System. It uses the principle that maximum static
friction force is larger than kinetic friction, so that braking distance (distance from breaking to stopping)
is shorter than the normal brake. It has the advantage that the vehicle does not slip well when wheel is
rotating. And it is a brake assist system that can stop more safely without tire lock and slip.
Electric scooter Anti-Lock Brake System Patent pending : 10-2018-0045825
* Precautions when using the ABS function
ABS has the advantage of being able to stop at the shortest braking distance that can be
obtained from the tires and road conditions.
However, due to the principle of repeatedly holding and releasing the brake several times
in a second, a lot of vibration occurs in the motor and the body.
Repetitive vibration caused by this may cause frequent loosening of the motor, rim, fixing
part, and body fixing bolt.
Dualtron X User Manual
14
Km/h
E
Y
E
%
98
SET
ABS ON
1
Displayed when the brake
lever is operated
Km/h
PA
SET
E
Y
E
%
98
3
Km/h
PA
SET
E
Y
E
%
98
5
Maximum intensity
CAUTION
(1) ABS function ON
Set the ABS function part Pd of the dashboard to 1.
(2) ABS function OFF
Set the ABS function part Pd of the dashboard to 0.
* If Pd - ABS function 1 (ON), PA - electronic brake
function will operate maximum,
when the ABS function is disabled, the previously set
electronic brake actuation value is applied.
CAUTION
Page 15
Product functions guide
①
①
②
③
①
②
③
④
①
②
③
④
⑤
⑥
①
②
③
④
⑤
①
②
③
DANGER
WARNING
DANGER
WARNING
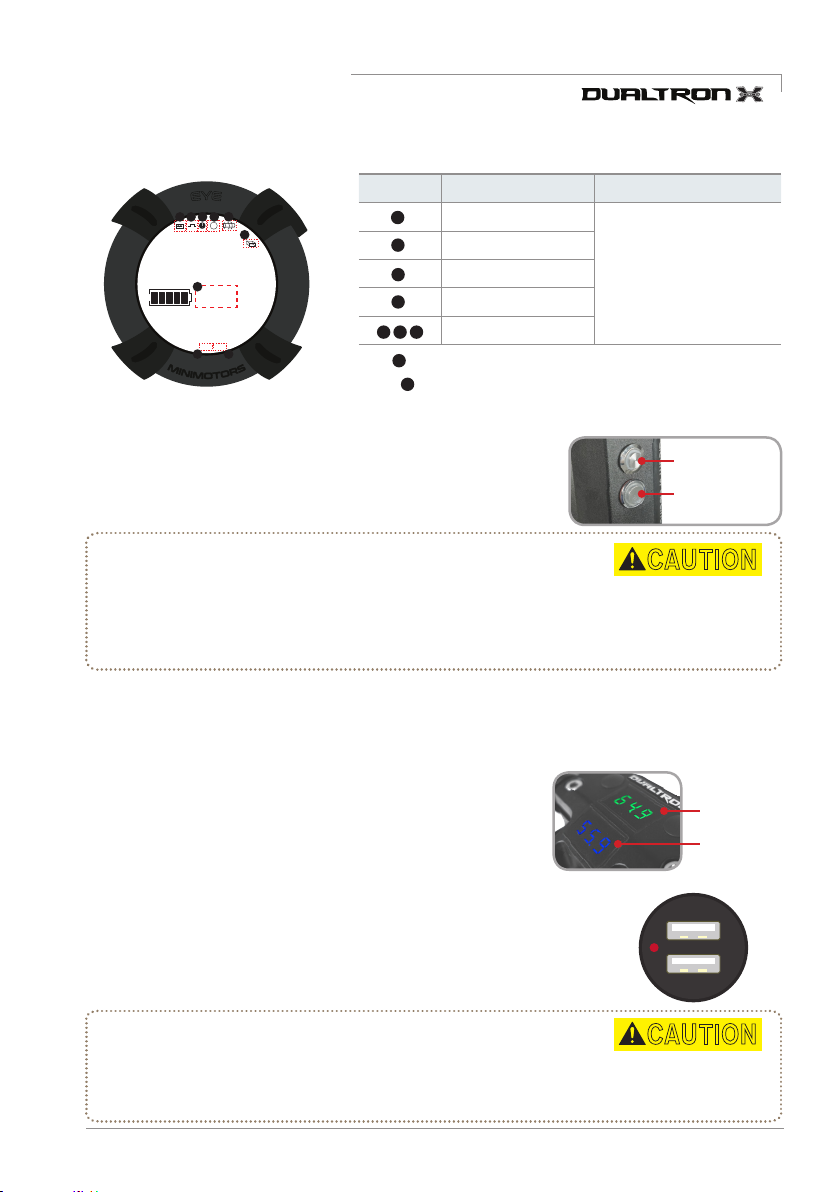
8) Self-diagnosis through dashboard
Y
E
②③④ ⑤
①
[ M ]
VOL
Km/h
Mp/h
88
⑦
98
00 : 0088888
TRIP ODO DST TIME CHA
SET RPM OFF
⑧
E
⑥
PAS
%
8
⑨
Fault type Diagnosis Solution
②
④
⑤
⑥
⑦ ⑨
⑧
*
The number is displayed when the cruise function is executed at a constant speed.
①
* The number is displayed when the brake lever is operated.
(When the indicator lights, the accelerator does not operate.)
System error
Motor error
Accelerator error
Controller error
None
* If the error information
appears, immediately stop
using the product and take the
scooter to the service center
before use. Excessive use
can result in damage to the
product and safety accidents.
1) LED function guide
When the LED is turned on, the main power is turned on and the
LED bar is lit when the throttle power is turned on. Make sure that
the LED lamp button on the right side of the deck is turned on.
* LED Light Emitting System Cover Precautions
Cracks in the LED cover can be caused by direct sunlight or by polish, oil,
LED light button
Sub battery
power button
CAUTION
wax etc. used for product maintenance. When using and servicing the product, always be careful not to
contact the LED cover with direct sunlight, polish or alcohol.
*Solvent crack is a fine crack that occurs when a solvent touches the surface of a resin molding product. Solvents
include not only chemicals such as alcohol, but also oils, waxes and cosmetics that are commonly used in everyday life.
2) Voltmeter function guide
Battery Voltmeter is basic mounted and can check real-time battery voltage.
█
Main battery voltmeter
Battery volts are displayed when power on main battery
█
Sub battery voltmeter
Sub battery voltmeter displayed when press power button located
on handle steering tube right side.
Main battery
voltmeter
Sub battery
voltmeter
5V 1A
3) How to use USB Charging Terminal
The USB charger operates as a sub-battery power source and can easily
charge mobile phones, action cams, etc. within the allowed output range.
* Precautions when using USB charging terminals
USB charging terminals and products may be damaged when connecting high-power devices
that are not allowed to USB charging terminals.
*
To prevent infiltration of moisture and outside substances, always close the USB protective cap after use.
Dualtron X User Manual 15
5V 2.1A
CAUTION
Page 16
How to use the charger correctly
DANGER
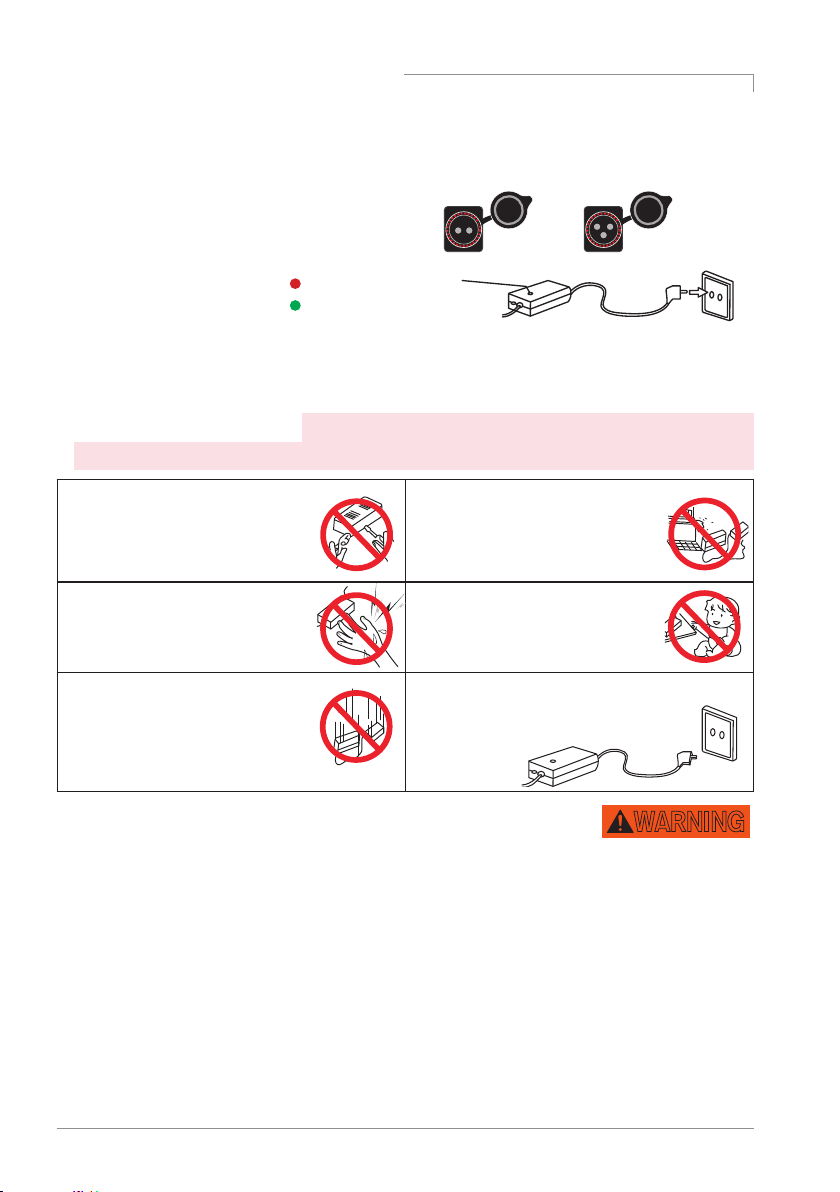
1) Basic charging method
1. Open the charger port cap and connect
it to the connector of the charger and
connect it to the household outlet.
2. Charging status indicator
3. Be sure to close the charger port cap when driving or storing except when charging.
4. When connecting the connector to the charger port, there may be metallic sparks due to
voltage difference, but this is normal.
2) Basic charging method
electric shock and fire. Learn the correct usage and prevent safety accidents in advance.
1. Manufacturers and sellers are not
responsible for any problems
arising from any disassembly,
modification, or mixing with other
chargers.
3. The charger is not waterproof. It is
thoroughly controlled to prevent
moisture from entering the
charger.
5. If the charger lamp does not light,
charger fall down, strong external
shock, long time charge, or cable
cover damage, discontinue use
immediately and contact the service
center
2P charger connector
(Handle part 1ea, main frame 1ea)
(Red) Charging
(Green) Charging complete
* Failure of the charger and abnormal conditions can cause
2. The charger is forbidden to be used
in places subject to high humidity,
heat, flammable materials,
confined spaces, or where there
is no ventilation such as in a car.
4. Children and pets should not be
allowed to approach the charger
when they come into contact
with them, as they may cause an
electric shock.
6. Unplug the charger when you are away from
the home for long periods.
3P fast charger connector
(Main frame right side 2ea)
7. Use only genuine charger.
8. Do not insert conductors into the charging port.
9. Do not touch the plug for about 10 seconds after unplugging the charger. There is a risk of
electric shock from instantaneous discharge.
10. Do not remove the terminal during charging. Otherwise you may charge the internal circuit
of the charger and cause malfunction.
11. Do not operate the product during charging.
12. Charging terminals should be firmly contacted during charging and should not be used if
terminals are corroded or damaged.
13. When disconnecting the charger from the product, it is safe to hold the terminal without
holding the wire.
14. Be sure to keep the charger disconnected from the product after the charging is complete.
The charger must be disconnected if it is not used for longer than a few days, as there is a risk
of overcharging when charging more than the time indicated on the product specifications.
Dualtron X User Manual
16
WARNING
Page 17
Safety precautions for Lithium battery
1) Care
2) Performance
2. Lithium battery has a characteristic that discharge performance is reduced by more
3) Charging
This is to prevent condensation from occurring inside the product due to the temperature difference.
4) Storage
Do not store or charge them in a trunk or hot room.
Select a dry place and store at room temperature (10 ~ 20 ℃ ).
2.
5) Trouble symptom, safety
6) Misuse
7) Water inflow
8) Caution
9) Disposal
Lithium batteries should be protected from direct exposure to children and pets.
1. Lithium battery is affected by external temperature. In the winter,
when the temperatures are low, the performance of the battery may be temporarily
deteriorated and the mileage and power output is reduced.
than 15% when charging / discharging 300 times or more. If usage time is shortened due
to long usage, it should be replaced with a genuine one through the nearest point.
supplied from the manufacturer. Any problems caused by use of battery made by the manufacturer,
mixed use, or using the charger are not covered by the manufacturer.
2. Charging the lithium battery with a non-genuine charger may cause malfunction or fire.
3. The lithium battery should be charged in a well-ventilated, dry place and around the charger in a
place where there is no flammable material.
4. Lithium battery should be charged at 0 ~ 45°C and discharged within -10 ~ 60°C .
The sub-battery must be charged at 0 to 50°C and discharged within -20 to 75°C.
Charging or discharging at a temperature outside this range may cause malfunction, fire or explosion.
5. In case of moving from cold outside to warm indoor, please charge it after 1 ~ 2 hours.
When storing for more than 3 months, charge the remaining battery level to 70 ~ 80% (do not store full charge).
or there is leakage of battery, sour odor, appearance deformation, etc. Please contact the place of
purchase to get technical support and service.
2. If overheat, smoke, or ignition is detected in a product with lithium battery, immediately stop charging
and use, move the product outdoors as soon as possible, and then use a fire extinguisher to extinguish
flames. Do not spray water or immerse the product in any situation, which can lead to more danger.
3. Lithium battery pack has very high energy density, so if you charge the battery for a long time and
there is a case of short-circuit, leakage, bad battery, etc., it can lead to ignition.
Therefore, you should avoid charging for a long time without a person being present to avoid the risk of unexpected fire.
malfunction or fire may result.
If you think that the battery has been impacted, you should stop charging and using it and visit the
nearest service center for inspection.
There is a risk of fire or electric shock if the charger is connected while moisture is present.
Do not use for any other purpose.
the point of purchase or near the service center and the charge and discharge terminals are not shortcircuited. Dispose of it as industrial waste.
1. Lithium battery should be used only with genuine battery and charger
1. Lithium batteries should be kept away from snow, rain and direct sunlight.
1. Lithium battery should be discontinued immediately if it is damaged
If the lithium battery is short-circuited, the polarity is changed, or if the battery is impacted,
It should be controlled to prevent water inflow into the lithium battery.
Disconnect the battery from the main unit except when recharging and reinstalling.
When disposing of the lithium battery, the battery should be separated from the product at
Lithium
DANGER
Battery disassembly prohibited
Battery disassembly, modification, and repair are not covered under warranty.
Dualtron X User Manual 17
Page 18
Safety guidelines before driving
1) Required checking before use
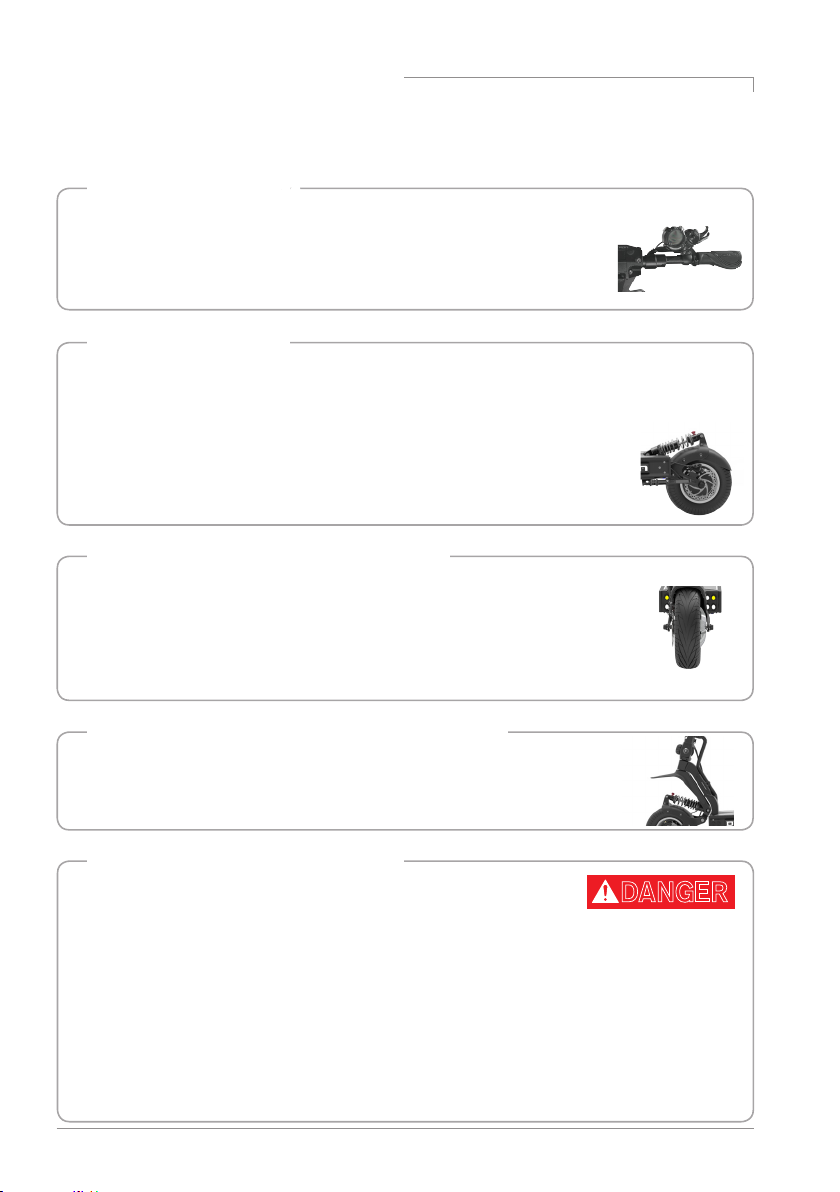
1. Check throttle and handle
• Operate the accelerator throttle lever about 2 ~ 3 times to check whether it returns
to the home position.
• Be careful that excessive throttle leaning and manipulation of the throttle can cause
malfunction due to internal parts damage.
• Check for free gap in the handlebars before using.
2. Check brake and cable
• The brake braking force is sufficient to check the operating condition.
If the braking force is significantly lowered, use it immediately after inspection and action.
• Check that the brake pad is not worn, that the cable is not loose, that the cable is not damaged, and that
there is no leakage in the case of hydraulic brakes.
• If there is an unusual feeling or noise during operation, check for breakage, wear, and
deformation of the inner wire of the brake cable.
• Check that the bolts and nuts of the brake fixing parts are not loose and that the disc is
not deformed or damaged.
3. Check tire pressure and abnormal tread wear
• Check the front and rear tires for wear and punctures and check the value marked on
the surface of the tire.
When the air pressure is shortened, the possibility of puncture increases, so check
always.
• It is necessary to judge the replacement time by observing the appearance of the tire
such as tire damage, uneven wear.
4.Tightening check such as folding part and handle part
• Make sure that the bolts and nuts of all parts of the product are tight and safe from
loosening. Check the fastening condition and clearance of the folding and fixing
parts of the handle (folding knob, swing arm, etc. folding related parts, suspension
arm bolt, swing arm bolt).
* In these cases, stop driving immediately.
If you encounter any of the following situations while driving, stop driving
DANGER
immediately and contact your nearest branch or service center for proper
measures.
If you provide pictures and videos to get an accurate diagnosis, professional counseling is available.
Unusual heating of the motor
●
Brake braking status error
●
Error messages on the instrument panel
●
When the throttle is not returned to its original position
●
When the battery doesn't fully charge and shorter riding distance after a full charge
●
(Battery explosion may cause due to faulty battery cell or battery cell breakdown)
Dualtron X User Manual
18
Abnormal noise is generated
●
Product smoke, ignition, sour odor
●
When rain or wet with water or in a similar situation
●
When other driving is judged to be unreasonable
●
Page 19
Check and Maintenance
DANGER
WARNING
2) Maintenance and self-maintenance
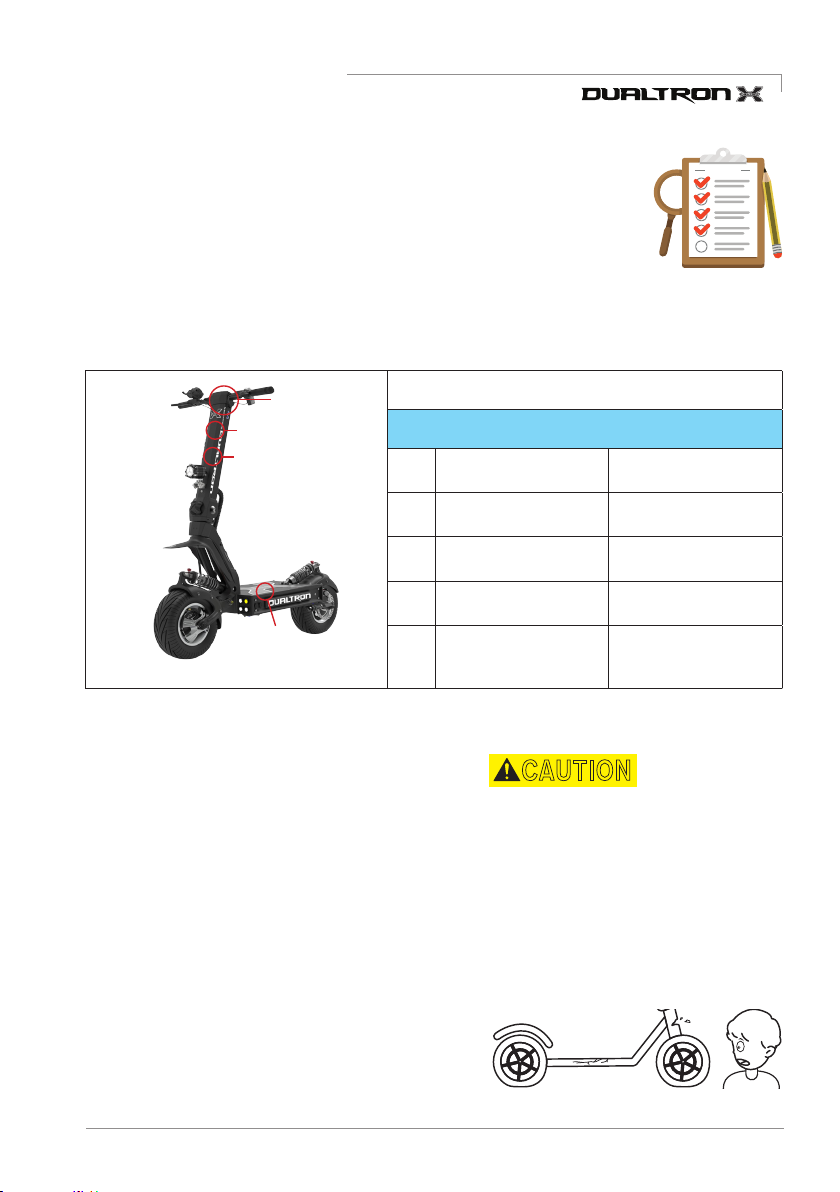
Electric products can be damaged by various factors.
CHECK LIST
The life span of each part varies depending on driving habits and driving environment.
Parts that exceed the service life may cause accidents.
Let's manage various parts and prevent safety accidents in advance.
1. Check the replacement timing of consumable parts
① The components and suspension parts of the swing arm, tires, wheels, bearings, discs, brake pads,
cables and folding parts, various brackets and other consumable parts require periodic inspection
and must always be checked.
Parts Replacement Schedule
DUALTRON X
components
damaged or deformed
If the exterior is
②
③ inside
③ inside
①
No. Parts name Replacement cycle / km
1 HANDLE BODY 3YEARS / 20,000
2 STEERING TUBE 3YEARS / 20,000
3 BATTERY 2YEARS / 20,000
4 Other chassis
2. External damage inspection by driving environment
① Replace parts that may be damaged by the external driving environment, such as deformation of
parts or tiny cracks due to pressure.
② If the product is exposed to strong sunlight for a long time, discoloration may occur.
③ In case of jumps, slight impacts such as turning, collision, etc., when driving frequently or for a long
time in a poor road condition or driving for thousands of kilometers or more, fatigue breakdown
phenomena may happen so please check the parts replacement schedule for each product and
replace accordingly for safety.
④ Fatigue breakdown and maintenance parts may differ from the example conditions depending on
the driving environment and the operating conditions.
Also check parts other than the replacement cycle
(maintenance parts) at all times to check for any
signs of abnormality.
CAUTION
Dualtron X User Manual 19
Page 20
Important check list
Important notice
* Metal vibration may occur due to motor vibration and the vibration of the brake disc and pad during the load
section that accelerates during driving. (About 15 ~ 30Km, different for each product)
This is a phenomenon in which all rotations (fans, automobiles, ships, etc.) are vibrating at a specific rotational
frequency (rpm) rather than the product.
However, if the continuous noise or metal noise is large, there is a possibility that the disk will become bent
and deformed.
* Please note that after running, there is a risk of burns due to the heat on the motor and brake (especially
disk rotor) side.
* Be careful that the bolts of the motor, rim, and motor shaft may become loosened due to the ABS function.
* For inspection and repair, remove the side cover, attach the power switch, and attach it with the product's
standard bolt. When tightening, carefully remove the cover of the wiring. Bolts other than the rule bolts (long
bolts) can cause serious damage to the battery casing (battery cells), which can cause fire or safety accidents.
Folding parts and joints where movement occurs due to product characteristics can naturally damage
※
the surface or paint surface during use, especially when operating in incorrect operation and form.
When inspecting the product, keep two wheels away from the ground and work on a safe workstation.
※
3) Maintenance by self-maintenance
1. Brake adjustment method
As you continue to use the brakes, the brake pads will become worn out
and the gap between the pads and the brake disc will become wider.
If the braking force drops, use a 5mm hexagon wrench to loosen the brake
arm wire bolt, then lift the brake arm upwards to adjust the braking force.
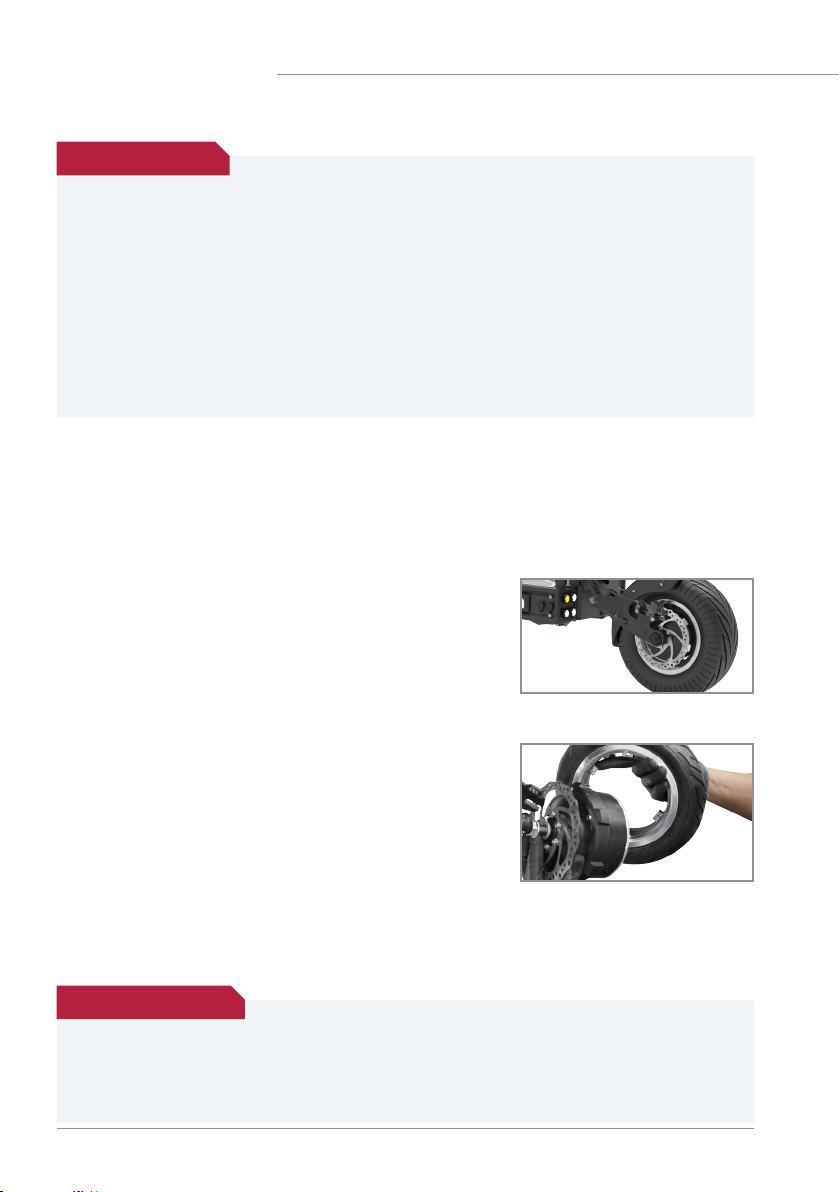
2. How to replace a tire
1. Remove the motor shaft nut (18 mm) after removal of the caliper
bracket and the brake caliper, and release the tightening bolt to
which the motor and wheel are connected.
2.
After deflating the tire, press the tire to separate it from the wheel.
3. After replacing the tire, complete the assembly of the tire in
reverse order. After assembly, apply a good fit to the main frame
and tighten the screws and bolts to secure.
※ •
After the tire has been replaced, run a simple test drive to match the pressure marked on the side of the tire.
•
Patch seal (worm) can be used for repair in case of a puncture. Use tires for continuous inspection and check.
Easywheel System
• Full removable hub motor design
By designing rims and hub motors to enable complete separation, we have greatly improved the
maintenance and maintenance of products by allowing only rims to be replaced without replacing the motor
in the event of rim failure (Patent pending).
Dualtron X User Manual
20
Page 21
3. Causes and countermeasures of disc brake noise
DANGER
WARNING
The disc braking have good braking power so many electric scooters use the disc brake.
However, you may hear a sharp hissing sound when you hold the disc
brake because of dust or sand particles on the ground popping up on
the surface of the disc, causing foreign substances to be on the brake
pads or disc surface, or bending due to heat or external impact.
If that happens, clean the inner surface of the disc by turning the
wheels with a clean, dry cloth and straighten any bent discs.
CAUTION
4. How to adjust handlebar gap
If there is a free gap on the handle, use a 2.5mm or 3mm hexagon wrench to fine-tune the adjustment bolt that is visible when the
handle is folded, then extend the handle to check the free gap condition. If there is a gap, rotate it a little until there is no gap.
* CAUTION : When adjusting for free gap, do not fully unfold the handle when the bolt is protruding more than
necessary, and excessive coupling may cause external damage to the handlebars. If the handlebars are not
normally combined with the handlebars, tighten the adjusting bolts clockwise again to reduce the protrusion.
5. How to adjust the gap in the folding section
If there is a free gap in the folding part, tighten the folding knob completely to clear the free gap.
If product folding is not required (always unfolding)
Remove the bolt protection caps on both sides of the front folding hanger and
tighten the bolts to ensure that they are un-folding at all the time.
If you work in reverse order, you can do folding.
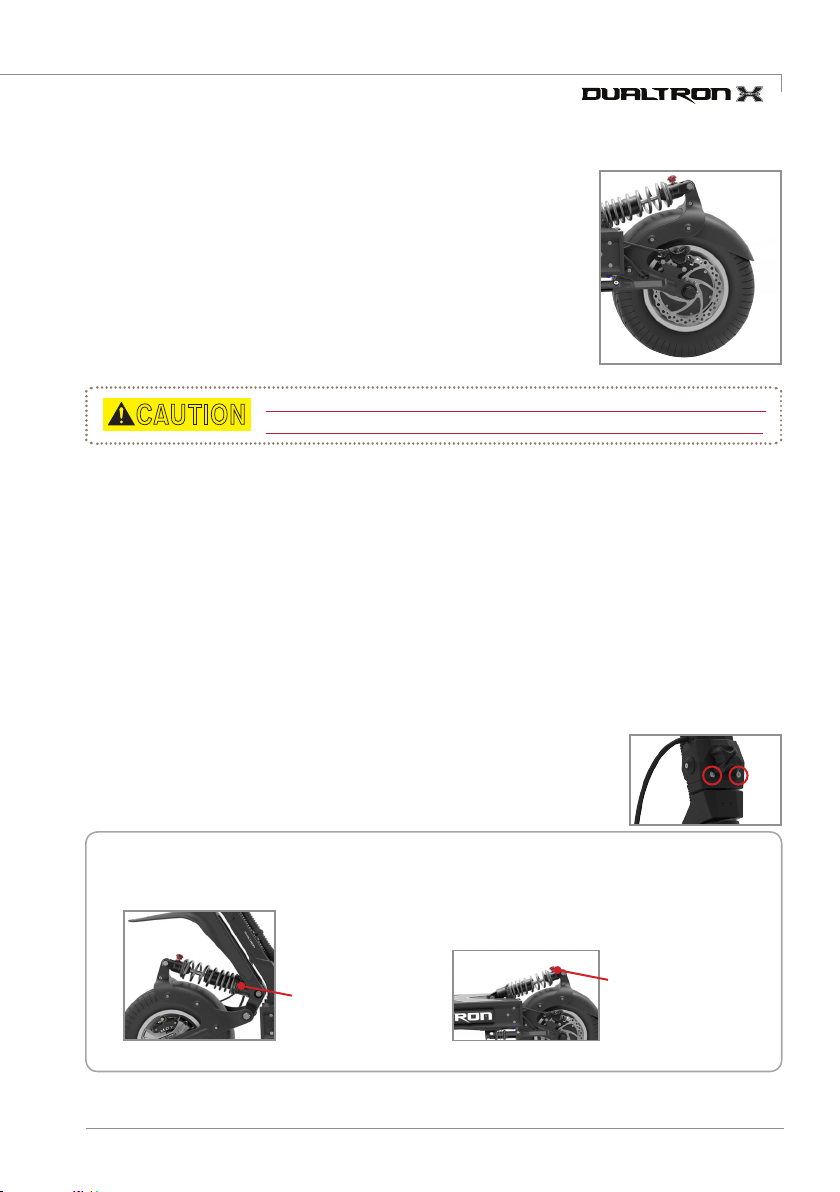
• Adjust the height (by weight)
You can adjust the height by turning the ring.
If you maintain the product using the above methods, please visit the
nearest branch and get a safety check as there may be another problem.
• Suspension strength control
Turning the hydraulic control lever to adjust the
suspension strength. (You can adjust it according
to your weight and personal softness preferences.)
suspension
control ring
Hydraulic
control lever
* When adjusting the suspension ring, the wheels must be raised from the ground before adjusting.
Dualtron X User Manual 21
Page 22

Product Specication
Product Name
Motor
Battery type
Battery capacity
Battery capacity
Charging time (1.75A)
Charging time (6.5A)
Charging time (8.25A)
Max mileage
Max Speed
Folding
Gradeability
Max load
Product weight
Unfolding size
Folding size
Dashboard
Light
Brake
Suspension
Tire
Product material
DUALTRON X Note
MAX 6720W BLDC DUAL HUB MOTOR
Li-Ion battery pack
60V 49Ah
60V 3Ah 180Wh
28hr+(Main battery)
/ 1.7hr+(Sub battery)
7.5hr+
5.9hr+
150km+
60km/h
Turn & Push Release Patent pending
Around 70% (35°)
120kg
Around 64.5kg
1305 x 632 x 1240mm Length x Width x Height
1305 x 350 x 780mm Length x Width x Height
EYE throttle
(Battery level, TRIP, ODO, Time,
Speed display and mode change.)
Dual LED front lamp + Steering tube
illuminate LED bar +Side deck LED
light, built in bottom mood LED
& taillight, brake light is built in
Hydraulic brake+160mm rotor Common use for front and rear wheel
Hydraulic bike tunning 19step
13inch ultra wide tubeless tire
(Maximum air pressure is marked
on the side of the tire)
Frame and handle: Aviavion aluminum forging alloy,
Shaft: SCM, Covers: Polypropylene
60V standard charger(1.75A) (2P use)
60V quick charger(6.5A)
+60V standard charger(1.75A)
75±5kg load, 25km/h flat road continuous riding
Weight, road condition, battery status, tem-
perature can af fect to the gradeabilit y
DC to DC converter is built in
Fully detachable Hub Motor design
2940Wh
(3P use)
60V quick charger(6.5A)
Cruise / Electronic brake
/ Auto save function / ABS
(Main - 12V 7A output)
(Sub - 12V 3A output)
(Patent pending)
*The specification can be changed by manufacturer without notice to improve the quality and safety for users.
*The distance can be affected by loaded weight, wind direct (wind speed), road condition, slope
and tire condition.
Dualtron X User Manual
22
Page 23
MEMO
Dualtron X User Manual 23
Page 24

DUALTRON X
Electric Scooter
User Manual
Zhejiang Minimotors Bike Co., Ltd.
No.1, Baolong road, Lanjiang Street,
Lanxi Economic development zone,
Jinhua city, Zhejiang province, China
Tel : +86-177-0657-4477
www.dual-tron.com
Since 1999
 Loading...