

Page 1

FOOD PROCESSOR
INSTRUCTION MANUAL
Page 2

CONTENTS
IINNTTRROODDUUCCTTIIOONN....................................................................................................................
SSAAFFEETTYY PPRREECCAAUUTTIIOONNSS..................................................................................................
UUNNPPAACCKKIINNGG YYOOUURR DDUUAALLIITT FFOOOODD PPRROOCCEESSSSOORR....................
GGEETTTTIINNGG TTOO KKNNOOWW YYOOUURR FFOOOODD PPRROOCCEESSSSOORR....................
UUNNDDEERRSSTTAANNDDIINNGG WWHHIICCHH BBOOWWLL((SS)) AANNDD
AACCCCEESSSSOORRIIEESS YYOOUU NNEEEEDD........................................................................................
AASSSSEEMMBBLLIINNGG AANNDD UUSSIINNGG YYOOUURR PPRROOCCEESSSSOORR..........................
CCLLEEAANNIINNGG AANNDD CCAARREE..................................................................................................
33
44
66
77
1100
1133
2211
Page 3

INTRODUCTION
Dualit’s stylish food processor is versatile and hard
working, making it the perfect food preparation
assistant.
With clever features that bring maximum benefits to
you, including a powerful heavy-duty induction motor
and interchangeable long-life stainless steel blades and
discs, the range of practical applications is unbeatable!
Plus a number of multiple safety features like the non-slip
sucker feet gives you peace of mind while you work.
You will be amazed at the features offered with the
Food Processor such as the special design dough blade
and emulsifying disc, which creates a perfect finish with
every mix. The three extra thick multi purpose bowls
- each with their own blade - provide additional
efficiency, avoiding the chore of washing up between
recipes and the large bowl with its unique sealed drive
system offers a greater capacity of 2.1L for liquids and
3.25L for dry, this radically increases the practical
working volume.
With its unique design and heavy-duty professional
parts, your Dualit Food Processor will provide you with
years of reliable use. Take inspiration from the Cookbook
provided and create your own culinary masterpieces.
Enjoy!
3
Page 4

SAFETY PRECAUTIONS
IMPORTANT SAFEGUARDS
READ ALL THE INSTRUCTIONS CAREFULLY
BEFORE USING YOUR DUALIT FOOD
PROCESSOR. KEEP THESE INSTRUCTIONS
SAFE FOR FUTURE REFERENCE.
Always follow these safety precautions when using your
food processor, for your own safety and to avoid
damaging the processor.
• This appliance is designed to operate with an AC
power supply. Make sure your network voltage
corresponds to the voltage shown on the rating
plate underneath the food processor
• Do not use the food processor if the cord or plug is
damaged, it must be replaced by a special cord
avalable from Dualit or Authorised service agent. For
more information, call the Dualit customer care line
on 01293 652 500
• Never use a plug without the fuse cover fitted.
Always make sure a replacement fuse is the same
rating as the original
• Replacement fuses should be approved to BS 1362
and are available from Dualit
NNOOTTEE:: AAnnyy pplluugg ccuutt ffrroomm iittss ppoowweerr ssuuppppllyy ccoorrdd
•
sshhoouulldd bbee ddiissppoosseedd ooff iimmmmeeddiiaatteellyy.. IInnsseerrttiin
ccuutt--ooffff pplluugg iinnttoo aann eelleeccttrriiccaall ssoocckkeett iiss ddaannggeerroouuss
• Unplug the unit when not in use, before fitting or
removing parts and before cleaning. To unplug it,
hold the plug and pull it out of the socket. Never
pull it out by the power cord
• Do not use the food processor outdoors
• This product is for domestic use only
ngg aannyy
• Do not use the processor on a sloping surface
• Make sure the power cord doesn’t hang over the
edge of the table or countertop
• Make sure it isn’t in contact with anything hot or
wet
• Never leave the processor unattended when it is
plugged into a wall socket or switched on
• Children should be supervised to ensure that they
do not play with the appliance
• This appliance is not intended for use by persons
(including children) with reduced physical, sensory
or mental capabilities, or lack of experience and
knowledge, unless they have been given supervision
or instruction concerning use of the appliance by a
person responsible for their safety
• Ensure that the processor, the toolbox and all
accessories are always kept well out of reach
• When moving the processor, use both hands and lift
holding the base unit. Never lift the processor using
the bowl handle
• Never tamper with the safety systems. They are
included for your personal safety
• The blades and discs are extremely sharp; take extra
care when handling these parts, especially when
removing from the bowl, emptying the bowl and
during cleaning.
• The use of attachments not recommended or sold by
Dualit may cause fire, electric shock or injury to the
user or the appliance
• Use the spatula only when the unit is turned off, the
blade or discs are removed and the processor is
unplugged
• Store the toolbox out of reach of children
AAvvooiidd ttoouucchhiinngg tthhee
sshhaarrpp eeddggeess
4
Page 5

SAFETY PRECAUTIONS
• Never operate the processor with the bowls empty.
• Do not misuse the processor; it is designed for use
with food items only
• Before each use, check that the bowls contain only
the ingredients and nothing else
• Do not process boiling or hot liquids
• Bowls and attachments are not suitable for
microwave use
• Ensure the bowl(s), accessory(s), lid and food
pusher are all securely in place before turning the
processor on. It will not work without the large bowl
and lid in place and locked
• Only use the food pusher supplied to insert and push
ingredients down the feeder tube. Never use your
fingers or utensils; this could cause severe injury and
also damage the appliance
• Do not overfill the bowls; ingredients need room to
move around. Use the maximum loading chart on
page 11 for reference
• Always turn the power off via the control knob
before opening the lid
• Do not submerge the motor housing, cord or plug in
water or any other liquids
• Clean all parts after each use; please refer to the
cleaning instructions on page 21
• If your ingredients include raw meat, make sure the
bowls and attachments are cleaned thoroughly,
immediately after use
• When using a dishwasher, always set it to the lowest
setting (max 40ºC) and keep bowls and accessories
well away from the heating elements. Avoid the
drying cycle.
SAVE THESE INSTRUCTIONS
• Switch off the appliance before changing accessories
or approaching moving parts while in use
• Never remove the bowl or lid until the blades or
discs have come to a complete stop
• Never touch moving parts or insert your hand or
utensils into the bowl. Use the food pusher provided
to guide ingredients through the feed tube
• The processor features an overheat cut-out that cuts
the power if it becomes too hot for any reason. If
this occurs turn the control knob to the off
position. Once it cools down, the safety cut-out will
automatically reset itself within 1 hour and the
power will be restored
In the interest of improving products, Dualit Ltd. reserves the
right to change the product specification without prior notice.
5
Page 6
Cookbook
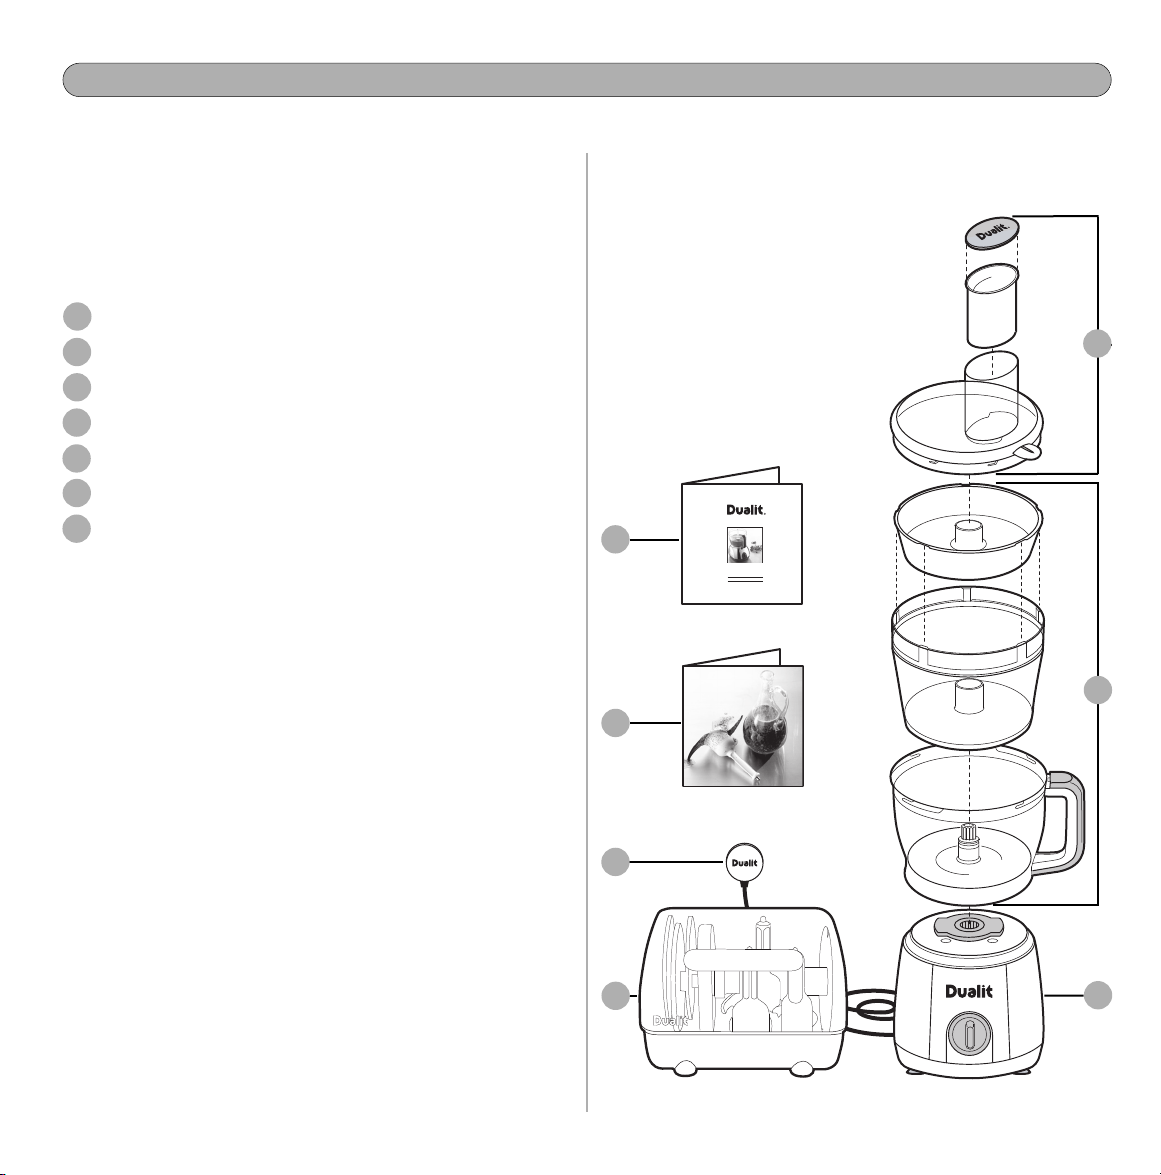
UNPACKING YOUR DUALIT FOOD PROCESSOR
Unpack the box with care, keeping all the packaging
materials until you are satisfied that everything you
need is there and in working order.
In your box you should find:
instruction booklet
1
food processor cookbook
2
power cord, with plug
3
toolbox of accessories
4
processor lid with food pusher & lid
5
6
large bowl, with medium and small bowls inside
main body: motor housing with bowl drive on top
7
5
1
Read this instruction manual before you start. It gives
you important safety information and also ensures you
get the most out of your Dualit food processor.
Keep the manual, and your proof of purchase, in a
safe place.
If you find there are any missing or damaged parts
when you unpack your box, contact the retailer or call
the Dualit customer care line on 01293 652500.
Before you use your processor for the first time, wash
all parts as per the cleaning and care instructions on
pages 21 to 23.
6
2
3
4
7
6
Page 7
GETTING TO KNOW YOUR FOOD PROCESSOR
Your food processor is designed to create great results
and to make life easy for you, but it is important that
you get to know what it can do and why it is designed
in this way.
MAIN BODY AND CONTROL KNOB
Deliberately weighty, the commercial grade induction
motor adjusts power to keep the speed constant, at the
setting you have selected.
Non-slip sucker feet keep the processor firmly in place.
The control knob has three settings: Off
continuously On
The fixing on top of the main body is the bowl drive.
The large bowl locates on the bowl drive and locks in
place. The medium and small bowls then fit inside the
large bowl.
The lid locates on the large bowl, rotates through 30°
and locks in place (the processor won’t start unless the
lid is locked on).
A large feeder tube makes it easy to add ingredients
whilst the motor is running. Use the food pusher when
doing this; it also doubles as a liquid measure with lid.
‘‘II’’
and intermittent Pulse
LID AND FOOD PUSHER
‘‘OO’’
,
‘‘PPUULLSSEE’’
.
7
Page 8

GETTING TO KNOW YOUR FOOD PROCESSOR
LID AND FOOD PUSHER
A key feature of the Dualit processor, the three
different-sized bowls give you maximum flexibility and
convenience. Using an appropriate sized bowl for the
quantity of ingredients gives a better result, whether
blending or chopping.
It also means that if you need different sized bowls, you
won’t always have to wash the bowl between tasks.
Large bowl
Use this bowl for all liquids (it has
a sealed drive). It offers the
maximum working capacity, and
needs to be in place before you
can use either of the other two
bowls.
Air vol: 3.25L.
Medium bowl
Use this as a secondary bowl, to
keep the large bowl clean and
ready for your next job. This is also
the best bowl when using slightly
smaller quantities.
(see chart on page 11)
Air vol: 2.6L.
8
Small bowl
Perfect for everyday processing
tasks like chopping herbs or
puréeing baby food. The small
bowl must sit inside the medium
bowl.
Air vol: 1.0L.
Page 9

GETTING TO KNOW YOUR FOOD PROCESSOR
ACCESSORIES
Your Dualit food processor comes with a range of
attachments, each perfect for a particular task. They fit
neatly inside the toolbox, for safe and convenient
storage. Inside the box you will find:
Drive shaft
You will need to use this on the
bowl drive to attach some of the
accessories.
Grating & shaving disc
The grating and shaving disc is
perfect for grating hard cheeses and
ingredients like ginger.
Adjustable slicing disc
Small, medium and large
chopping blades
There are three different sized
chopping blades, one for each bowl.
Shredding disc
The shredding disc makes perfect
shredded cabbage or grated cheese
E-disc
Dough blade
The bakery grade dough blade is the
perfect workhorse for making bread
dough and pastries.
Chipping disc
The chipping disc is ideal for making
homemade chips or quick preparation
for stir-fry.
Spatula
The adjustable slicing disc is useful
when you need to vary the size of
your slices (from 0.5mm to 7.5mm).
The e-disc is a great alternative to the
more traditional wire balloon whisk,
for emulsifying liquids (e.g. salad
dressings) or whisking egg whites.
9
Made from durable silicon, the
spatula is flexible enough to scrape
your bowls clean.
Page 10

UNDERSTANDING WHICH BOWLS AND ACCESSORIES YOU NEED
USING THE RIGHT ACCESSORIES FOR THE TASK
Your Dualit bowls and accessories will not work in every
permutation:
• You must always start your assembly with the large
bowl – neither the medium or small bowls will fit
directly onto the main body
• The small bowl must be used in conjunction with the
large and medium bowls.
• Each bowl has its own sized chopping blade; you
must choose the right one for the bowl you are
using
• The e-disc and dough blade will only work inside the
large bowl
• The adjustable slicing disc will work with the large
and or medium bowl
• The chipping disc will work with the large or
medium bowl
• All other discs will work with all three bowls
• You will need to attach the drive shaft to the bowl
drive in order to use certain accessories (for more
details, see the assembly instructions on page 14).
Large bowl &
attachments
Medium bowl
& attachments
Small bowl &
attachments
This illustration summarises which accessories can be
used with which bowl, and the order of assembly.
10
Page 11

Bread Dough
Shortcrust Pastry
Minced Meat
Grated Soft Cheese
Grated Carrots
Sliced Tomatoes
Sliced Cucumber
Soup
Victoria sponge mix
Ingredients Large Bowl
1.4Kg
1.4Kg
1.45Kg
1.2Kg
1.36Kg
1Kg
1.36Kg
1.3L Thin - 2.1L Thick
8 eggs - 4lbs
UNDERSTANDING WHICH BOWLS AND ACCESSORIES YOU NEED
CHOOSING THE RIGHT BOWL FOR THE TASK
Your food processor will produce the best results if you
use the bowl size that best matches the quantity and
type of food you are processing.
The large bowl has a sealed drive; use this bowl for all
liquid mixtures. Small quantities of ingredients like herbs
or garlic are best chopped in the small bowl.
The table guides you on the maximum quantities of
different types of food for the large bowl.
Never exceed the maximum shown and make sure that
your ingredients have room to move around.
11
Page 12

UNDERSTANDING WHICH BOWLS AND ACCESSORIES YOU NEED
CHOOSING THE RIGHT BOWL FOR THE TASK
Using the quantities given on page 11 as a guide, you
now need to decide what you want to do, and what
bowls and accessories you will need.
The table below should get you started.
Task
Small quantity of baby food
Small quantity of liquids
Chopping herbs
Slicing apple
Bread dough
Beating egg whites
Home-made chips
It is important to remember to use the right accessories
with the right bowl. Some accessories will only work
with one bowl. It is also important to assemble the
processor correctly.
• Handwash all bowls and accessories before use
(See diagram on page 21)
Parts you will need, in the order of assembly
Large & medium bowl + drive shaft + small bowl + small chopping blade + lid+ food pusher
Large bowl (always use the large bowl for liquids) + e-disc + lid + food pusher
Large & medium bowl + drive shaft + small bowl + small chopping blade + lid+ food pusher
Large bowl + medium bowl + drive shaft + adjustable slicing disc set to 3mm
Large bowl (can’t use dough blade with any other bowl) + dough blade + lid + food pusher
Large bowl (can’t use e-disc with any other bowl) + e-disc + lid+ food pusher
Large bowl + drive shaft + chipping disc + lid + food pusher
PREPARATION
+ lid.
• Position the processor close to a power socket with
enough space around it for ingredients, bowls and
accessories. It must be at least 15cm from the edge
of the table or counter, with the control knob facing
you. Press down on the main body so that the
sucker feet hold it securely in position.
12
Page 13

ASSEMBLING AND USING YOUR PROCESSOR
ASSEMBLING BOWLS
• You will always need to put the large bowl in place
first, no matter what you intend to do. Hold the
large bowl with the handle pointing to the right
(3 o’clock), position it onto the bowl drive and
turn it clockwise by 90° (6 o’clock) until you hear
and feel it lock in place
• If you want to use the medium bowl, insert this into
the large bowl; it will self-locate
• If using the small bowl, you will also need to use the
medium bowl & drive shaft. These must be put onto
the bowl drive before the small bowl is inserted
• The small bowl fits into the medium bowl. When
inserting it into the bowl you will need to rotate the
small bowl until the tabs on the medium bowl locate
in the slots on the small bowl (See diagram on
page 14)
• Always try and start with the tasks that require the
smallest bowl first, so that you are removing the
used bowls instead of putting clean bowls inside
dirty ones
REMOVING BOWLS
THE LARGE BOWL CAN BE REMOVED FROM THE
MAIN BODY WITH OR WITHOUT THE LID LOCKED
IN PLACE.
• Rotate the control switch to the ‘Off’ position
• Unlock the lid prior to removing the large bowl
• Hold the large bowl with the handle pointing to the
right (6 o’clock), turn it anti-clockwise by 90°
(3 o’clock) until you hear and feel it unlock.
RRoottaattee tthhee bboowwll
aannttii--cclloocckkwwiissee
ttoo uunnlloocckk ffrroomm
tthhee mmaaiinn bbooddyy
13
Page 14

ASSEMBLING AND USING YOUR PROCESSOR
DRIVE SHAFT
The drive shaft locates on the bowl drive on the main
body. With some permutations you will need the drive
shaft; with others you won’t.
If you need to use the drive shaft, locate it on the bowl
drive first, then attach the accessory (e-disc excluded –
see e-disc assembly instructions on page 18)
YYoouu wwoonn’’tt nneeeedd tthhee ddrriivvee sshhaafftt wwiitthh::
• the large bowl & chopping blade
• the medium bowl & chopping blade
• the large bowl & dough blade
YYoouu wwiillll nneeeedd iitt wwiitthh::
• large bowl & any cutting disc
• the large bowl & e-disc
• medium bowl & any cutting disc
• small bowl & all attachments
When using the drive shaft, locate this on the bowl drive
first, then attach the relevant blade or disc.
Large
bowl
Medium
bowl
Small
bowl
14
Page 15

ASSEMBLING AND USING YOUR PROCESSOR
HANDLE BLADES USING ONLY THE CENTRE
PLASTIC SECTION.
CHOPPING BLADES
There is a different sized chopping blade for each bowl;
make sure you choose the right one.
• The large chopping blade locates directly onto the
bowl drive, once the large bowl is locked in place
• The medium chopping blade also locates directly
onto the bowl drive, once both large and medium
bowls are in place
• The small chopping blade needs to be used with the
drive shaft. This must be attached to the bowl drive
once the large and medium bowls are in place, but
before the small bowl is inserted
• Always hold chopping blades by the plastic centre
section, being careful not to touch the sharp edges
• Don’t add your ingredients until your chopping
blade is in place
• Cut large ingredients into uniform pieces no larger
than 2.5cm
• Ensure meat is very cold but not frozen and use
short pulses for greater control whilst chopping.
2
DOUGH BLADE
Small
blade
Small &
medium
bowl
+
Drive shaft
Medium
blade
Medium
bowl
Large
blade
Large
bowl
The dough blade can only be used with the large bowl.
It has a mixing/kneading action.
• Place the dough blade directly onto the bowl drive,
once the large bowl is in place
• Add dry ingredients to the bowl
• Liquids can be added in a controlled way via the
feeder tube
• Be careful not to exceed the maximum quantities
indicated on page 11.
Dough blade
Large bowl
15
Page 16

ASSEMBLING AND USING YOUR PROCESSOR
USING YOUR CUTTING DISCS
ONLY USE THE FOOD PUSHER TO PUSH
INGREDIENTS DOWN THE FEEDER TUBE.
NEVER USE YOUR HANDS.
• When using these discs, the orientation of the
ingredients in the feeder tube will determine the way
they cut. Stacking items vertically will produce
discs and horizontal stacking will produce the
longest strips or slices
• If you position the disc so that the cutting edge is
away from the feeder tube, then the disc will start
cutting as soon as you turn the processor on
• Apply a gentle downward pressure on the pusher to
guide food onto the cutting disc. Too much pressure
will lead to uneven cutting.
• The cut ingredients may build up on one side of the
bowl, in which case stop the processor and use the
spatula to distribute them evenly
• Occasionally small pieces of your ingredients may be
left on the disc, uncut. These can be hand chopped
and added to your mixture
• You cannot grate soft ingredients. Chill chocolates
and cheeses before using in the processor.
VVeerrttiiccaall ssttaacckkiinngg
wwiillll pprroodduuccee ddiissccss
HHoorriizzoonnttaall ssttaacckkiinngg
wwiillll pprroodduuccee ssttrriippss
16
Page 17

ASSEMBLING AND USING YOUR PROCESSOR
GRATING & SHAVING, SHREDDING AND CHIPPING DISCS
ONLY HANDLE DISCS BY THE PLASTIC
CENTRE SECTION.
The shaving and shredding discs can be used with all
bowls. The chipping disc can be used with the large and
medium bowls only. They always need to be attached to
the bowl drive via the drive shaft. Add your Ingredients
via the feeder tube after the lid is locked in position.
• Discs must be inserted with the cutting face
upwards (the chip is a single sided disc check it is
the correct way up). Attach the disc directly onto the
drive shaft, gently push down and twist until
securely in position
• Align and lock the lid into position
• Pack the ingredients into the feeder tube
• When using the processor with these discs, push the
ingredients down the feeder tube using the food
pusher.
ADJUSTABLE SLICING DISC
HANDLE WITH CARE WHEN ADJUSTING,
THE BLADE IS EXTREMELY SHARP
The adjustable slicing disc can only be used with the
large and medium bowls. It creates any slice thickness
between 0.5mm and 7.5mm. It must be attached to the
drive shaft.
• To adjust the slicing thickness, rotate the outer
spindle on the underside of the disc anti-clockwise to
make the slices thicker, or clockwise to make them
thinner
• The adjustable slicing disc is then attached to the
drive shaft with the cutting edge uppermost
• The lid is locked on, the ingredients gently packed
into the feeder tube and the food pusher used to
push the ingredients through the cutter.
17
Page 18

ASSEMBLING AND USING YOUR PROCESSOR
The e-disc can only be used with the large bowl, and
only with liquids (including egg whites).
For best results use a minimum of two/three egg whites.
To emulsify liquids successfully, add additional liquids
slowly through the feeder tube.
• Attach the drive shaft onto the centre of the e-disc
with a push and twist action making sure it’s securely
in place
• Place the e-disc assembly directly onto the bowl
drive
• Put liquid ingredients into the bowl
• Close and lock the lid
• Additional ingredients can be added through the
feeder tube with the processor running.
E-DISC
SPATULA
Use the spatula to redistribute ingredients that have built
up around the sides of the bowls, or to help decant
ingredients from bowls to other containers.
AALLWWAAYYSS TTUURRNN TTOO ‘‘OO’’ PPOOSSIITTIIOONN TTOO SSTTOOPP TTHHEE PPOOWWEERR
TTHHEENN UUNNPPLLUUGG TTHHEE PPRROOCCEESSSSOORR BBEEFFOORREE UUSSIINNGG TTHHE
SSPPAATTUULLAA..
BBEE CCAARREEFFUULL NNOOTT TTOO TTOOUUCCHH TTHHEE CCUUTTTTIINNGG BBLLAADDEESS
WWIITTHH YYOOUURR HHAANNDDSS WWHHEENN YYOOUU UUSSEE TTHHEE SSPPAATTUULLAA TTOO
SSCCR
RAAPPEE TTHHEE IINNSSIIDDEE OOFF TTHHEE BBOOWWLL..
E
18
Page 19

ASSEMBLING AND USING YOUR PROCESSOR
YOUR FOOD PROCESSOR WON’T WORK UNLESS THE
LID IS LOCKED IN PLACE. DO NOT REMOVE THE LID
UNTIL THE BLADE OR DISC HAS STOPPED TURNING.
• When you have assembled the right bowl(s) and
accessories for the job you want to do, align the
locking pins in the lid with the slots on the rim of the
large bowl
• To lock, rotate the lid clockwise 30 degrees until the
tab aligns with the top of the bowl handle.
You will hear a click to confirm that the lid is now
locked on
• When opening the lid, ensure the blade or disc has
stopped turning, the control knob is in the off
position and the processor is unplugged at the
socket
• To remove, hold the bowl handle with one hand and
turn the lid anti-clockwise with the other hand. Lift it
up and off
LID
AAllwwaayyss ssttoorree tthhee pprroocceessssoorr wwiitthh tthhee lliidd uunnlloocckkeedd..
•
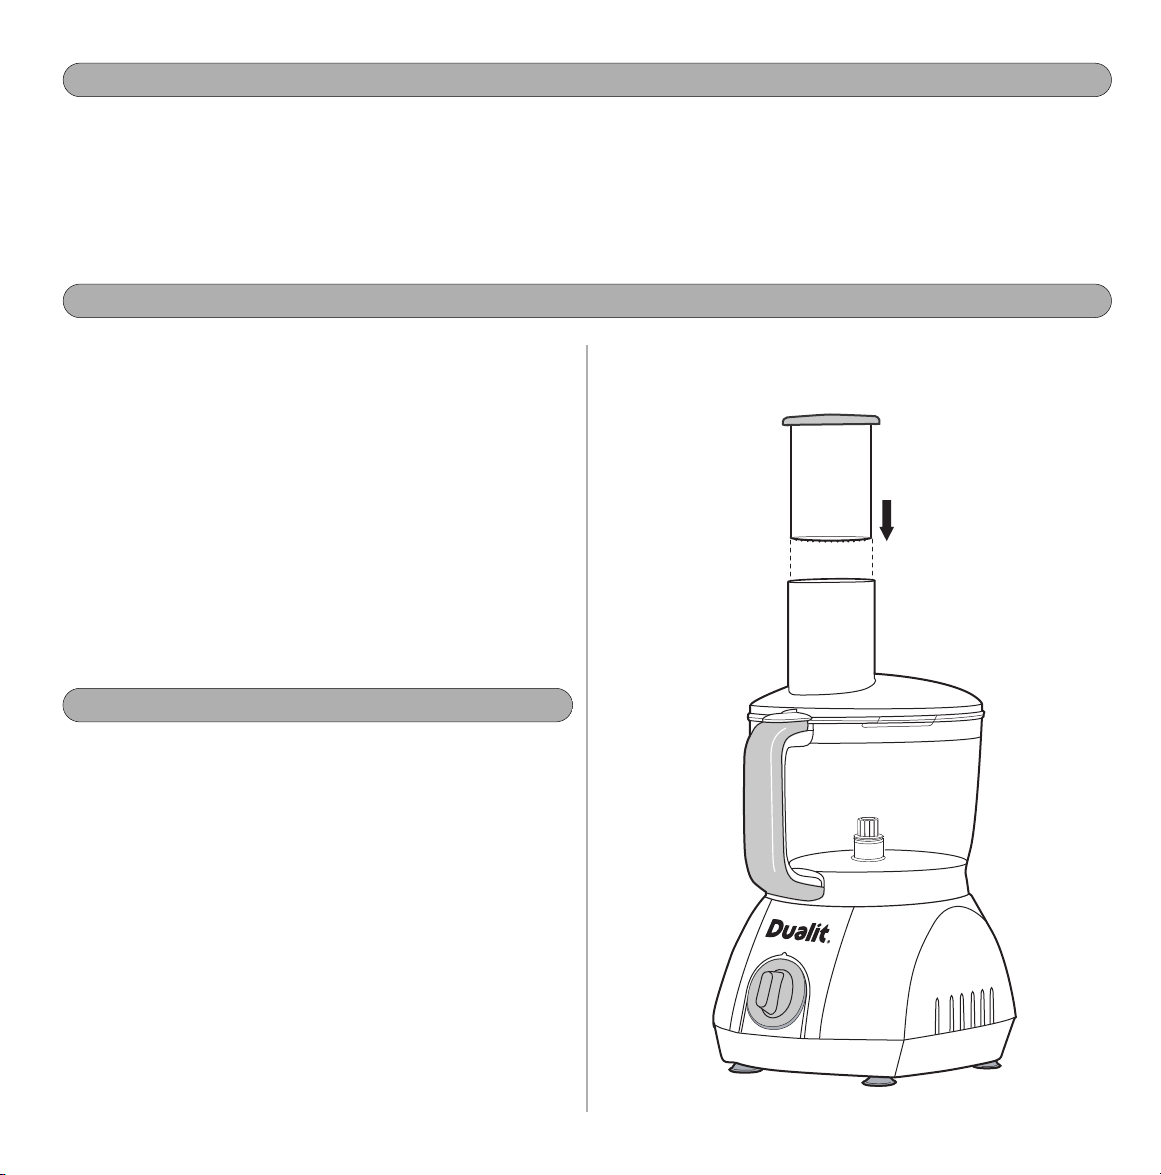
FEEDER TUBE AND FOOD PUSHER
OONNLLYY UUSSEE TTHHEE PPUUSSHHEERR TTHHAATT CCOOMMEESS WWIITTHH T
AAPPPPPPLLIIAANNCCEE;; DDOO NNOOTT UUSSEE AANNYYTTHHIINNGG EELLSSEE TTOO
PPUUSSHH FFOOOODD DDOOWWNN TTHHEE FFEEEEDDEERR TTUUBBEE..
Always ensure the food pusher is in place before you
start using your processor.
• Pack ingredients tightly in the feeder tube so that
they produce uniform pieces
• The food pusher doubles as a measure, with a lid for
your convenience.
THHIISS
19
Page 20

ASSEMBLING AND USING YOUR PROCESSOR
CONTROLS
The control knob has three settings: ‘Off’, continuous
‘On’ or intermittent ‘Pulse’.
• ‘Off’: the processor is ‘off’ when the control knob is
in the vertical position
• Continuous ‘On’: rotate the knob clockwise to
the ‘ I ’ symbol’. It will remain on until manually
turned back to the ‘Off’ position
• Intermittent ‘Pulse’: uses short pulses for more
control while processing. Rotate the knob
anti-clockwise to ‘Pulse’. When released it will
automatically return to the ‘Off’ position. Allow a
couple of seconds for the ingredients to drop before
pulsing again.
‘OFF’
‘ON’
The processor features an overheat cut-out that
Interrupts the power if the motor becomes too hot for
any reason. If this occurs turn the control knob to the off
position and unplug the power cord. Once it cools
down, the safety cut-out will automatically reset itself
within 1 hour and the power will be restored.
‘PULSE’
20
Page 21

CLEANING AND CARE
DISMANTLING
UNPLUG THE PROCESSOR BEFORE DISMANTLING.
ALWAYS WAIT FOR THE BLADES OR DISCS TO STOP
COMPLETELY BEFORE OPENING THE LID. WHEN
HANDLING THE BLADES OR DISCS, HOLD THEM BY
THE PLASTIC CENTRE SECTION. DO NOT TOUCH THE
CUTTING EDGES.
• Turn off the power and unplug the processor from
the socket when not in use
• Unlock and remove the lid
• Remove all attachments from the bowl; always
handle attachments using the centre plastic section
and lift straight up
• To unlock the bowl, hold the handle and rotate it
anti-clockwise 90° to the 3 o'clock position, then lift
the bowl straight up
• Decant your mixture.
BLADE MAINTENANCE
ALWAYS TAKE EXTRA CARE WHEN HANDLING THE
BLADES.
Over time the chopping blades will become less sharp,
you can use a knife sharpener to give them a new lease
of life. But this does depend on the design of sharpener.
CLEANING
It is important to clean the processor and all parts after
each use. This will prolong the life of your appliance.
ALWAYS SWITCH OFF AND UNPLUG BEFORE ANY
CLEANING. NEVER USE ABRASIVE CLEANERS ON ANY
OF THE PARTS. TAKE EXTRA CARE WHEN WASHING
BLADES, THEY ARE VERY SHARP. NEVER IMMERSE THE
MAIN BODY IN WATER OR OTHER LIQUIDS.
• Dismantle the attachments & bowls from the main
unit before you start cleaning
• Unplug and wipe the main body with a damp cloth.
Dry immediately
• Wash the bowl, lid, blades and discs immediately
after each use with warm soapy water. Use a small
brush to get to hard to reach areas
• Thoroughly rinse all parts and dry
• Some foods such as coffee beans or whole spices
may discolour the bowls. This is normal and will not
harm the plastic or affect the flavour of your food.
However, if you use these ingredients frequently, you
may wish to purchase additional bowls. Contact the
Dualit Customer Care line on +44 (0)1293 652 500
for more details.
USING A DISHWASHER
All attachments and bowls excluding the main body are
suitable for dishwasher use.
UUssee aa wwaasshh ccyyccllee bbeellooww 4400°°CC
•
• Only put the food processor parts on the
your dishwasher and keep them well away from the
heating elements. Remove prior to drying cycle.
• Unload the dishwasher carefully; the attachments are
sharp.
21
ttoopp
rack of
Page 22

CLEANING AND CARE
STORAGE
ENSURE THE PROCESSOR IS UNPLUGGED WHILST IN
STORAGE, WITH THE LID UNLOCKED. THOROUGHLY
CLEAN AND DRY YOUR PROCESSOR AND ALL
ATTACHMENTS FOLLOWING THE CLEANING
INSTRUCTIONS ON P 21. CHECK THE CONTROL KNOB
IS IN THE OFF POSITION BEFORE STORING. KEEP THE
TOOLBOX OUT OF REACH OF CHILDREN.
• Dismantle the processor, clean and dry all parts
• Store the: bowls, drive shaft, small blade and lid with
food pusher assembled on the processor body
• Do not lock the bowl lid whilst in storage. This can
damage the safety mechanism built into the bowl
• The large and medium blades, spatula and all discs
should be stored in the toolbox provided or in the
same manner you would store sharp knives. The
chipping disc will only fit in the second disc slot as
shown below
• Keep out of direct sunlight whist in storage.
Grating &
Shaving discs
Large
Blade
E-Disc
TROUBLESHOOTING
What do I do if my processor won’t turn on?
• Check the plug is correctly fitted in the outlet and
the power supply is switch on
• Check the power cord is securely attached to the
back of the processor
• Check the fuse in the plug. Ensure the new fuse
is the same current value as original
• Ensure the bowl and lid are locked in position
• Check that the small bowl has properly located onto
the medium bowl. If not the lid will not locate
properly and the processor will not turn on.
What if it switches itself off while I’m using it?
• The motor may have overheated. To prevent
damage, the unit will automatically cut all power. If
this happens: Turn switch to off, unplug and allow
the unit to cool for approximately 1 hour. Once
cool the overheat safety feature will reset and you
can carry on using the processor
• Check the lid or bowl has not become lose.
Chiping
disc
Adjustable
slicing disc
Medium
Blade
Spatula
Dough
Blade
What if it doesn’t chop uniformly?
• Blades or discs may not be attached properly
• You may be exerting too much force on the food
while pushing down the feeder tube.
What if my egg whites won’t stiffen up?
• You may not be using enough eggs (we recommend
a minimum of two eggs)
• You may be using the wrong accessory; for egg
whites you need the e-disc and the large bowl
• You may not be whisking for long enough
• Your bowl must be completely dry.
22
Page 23

CLEANING AND CARE
GUARANTEE
This appliance is of excellent quality and construction.
However, if any defects in materials or workmanship do
appear during the relevant guarantee period, we will, at
our discretion, either repair or replace the defective
parts, free of charge, subject to the terms and conditions
of our Guarantee shown below. This Guarantee covers
both parts and labour. Carriage is not included.
Your guarantee period is as follows:
• 3 years on parts • 12 years on the motor
This Guarantee provides benefits which are additional to,
and do not affect, your statutory rights. This guarantee
does not cover the cost of returning the product to the
dealer from whom it was purchased or to ourselves. This
guarantee applies only to products sold and located in
mainland Great Britain. It does not cover liability in
respect of or replacement of plugs, cables or fuses and
also does not cover defects due to:
• Failure to use or maintain product in accordance
with Dualit's instructions.
• The product being connected to an unsuitable
electricity supply.
• Accidental damage to or abuse or misuse of the
product.
• The product has not been modified except by Dualit
or approved agent.
• Dismantling of or interference with the product.
If you wish to claim under this guarantee you should:
• Send the product, postage or carriage paid, to the
dealer from whom it was purchased or to Dualit
direct.
• Ensure that the product is clean and packed carefully
(preferably in its original carton).
• Enclose details of your name, address and telephone
number and when and where the product was
purchased, together with proof of purchase
(e.g. a till receipt).
• Give exact details of the nature of the defect.
This Guarantee does not cover any other claims
whatsoever, including, without limitation, any liability for
incidental, indirect or consequential damage, nor does it
cover any claims for conversion or modification or for
the costs of repair carried out by any third party without
the prior consent of Dualit. If replacement parts are
fitted to the product this will not extend the period of
the guarantee.
For further advise on using your Dualit food processor
and other products in the Dualit range contact the
Dualit customer helpline on +44 (0) 1293 652 500
(09:00 to 17:00 Monday to Friday).
Alternatively, email Dualit at info@dualit.com
or visit www.dualit.com.
• Theft or attempted theft of the product.
Before returning any product under this guarantee,
please check that:
• You have followed the product instructions correctly.
• Your mains electricity supply is functional.
• The defect is not due to a blown fuse.
23
Page 24

DUALIT LIMITED COUNTY OAK WAY CRAWLEY WEST S USSEX RH11 7ST
T
ELEPHONE: +44 (0)
1293 652 500
FACSIMILE: +44 (0) 1293 652 555
EMAIL: info@dualit.com WEB: www.dualit.com
GB0209
 Loading...