

Page 1
DUALIT KITCHEN RADIO
INSTRUCTION MANUAL
GB 05/06
18 01 06_quark dualit kitchen radio.qxp 6/30/2006 15:29 Page 1
Page 2

SSAAFFEETTYY PPRREECCAAUUTTIIOONNSS
..................................
PPAACCKKAAGGEE CCOONNTTEENNTTSS
..................................
PPAARRTTSS AANNDD CCOONNTTRROOLLSS
..............................
RADIO HOUSING
CONTROLS
INPUTS AND OUTPUTS
QQUUIICCKK SSTTAARRTT
................................................
SSEETTTTIINNGG UUPP
....................................................
CLOCK AND DATE
ALARM
SNOOZE
KITCHEN TIMER
SLEEP
BBAATTTTEERRYY
..........................................................
BBAACCKKLLIIGGHHTT
....................................................
DDAABB MMOODDEE
.....................................................
AUTO DAB TUNING
MANUAL DAB TUNING
STORING PRESETS
DAB DISPLAY
STATION ORDER
CONTENTS
FFMM MMOODDEE
......................................................
FM TUNING
FM PRESETS
IINNPPUUTTSS AANNDD OOUUTTPPUUTTSS
..............................
AUX IN
SPEAKER OUT
HEADPHONE
DIGITAL OUT
TTRROOUUBBLLEESSHHOOOOTTIINNGG
....................................
SSEERRVVIICCIINNGG
.....................................................
RESET TO FACTORY SETTINGS
REPLACING THE BATTERY
REPLACEMENT PARTS
CLEANING
FAULTS
GUARANTEE
PPRROODDUUCCTT SSPPEECCIIFFIICCAATTIIOONN
..........................
SSOOFFTTWWAARREE VVEERRSSIIOONN
.....................................
33 // 44
44
44 // 55
66
66 // 77
77
77
88 // 99
1100
1100
1111
1111 1122
1133
1133
18 01 06_quark dualit kitchen radio.qxp 6/30/2006 15:29 Page 2
Page 3

The Dualit Digital Kitchen Radio
offers the most advanced sound
quality. The extra large screen makes
navigating easy from a choice of DAB
and FM. The internal NiMH
rechargeable battery pack means
you can enjoy your Dualit radio
anywhere in the home.
CAREFULLY READ ALL
THE INSTRUCTIONS
BEFORE USING THE
RADIO. KEEP THESE
INSTRUCTIONS IN A
SAFE PLACE FOR
FUTURE REFERENCE.
AAllwwaayyss ffoollllooww tthheessee ssaaffeettyy gguuiiddeelliinneess
aanndd wwaarrnniinnggss wwhheenn uussiinngg tthhee rraaddiioo
ttoo aavvooiidd ppeerrssoonnaall iinnjjuurryy oorr ddaammaaggee
ttoo tthhee rraaddiioo..
• Do not remove metal castings or
any other parts, this will invalidate
your warranty and is dangerous
• Never use abrasive, liquid, aerosol
cleaners or brushes on the radio
• Do not use the radio charger if
the power cords are defective
• To reduce the risk of fire or
electric shock, do not expose the
radio or charger to water or
moisture
• Inside the radio there are
hazardous voltages and non-user
serviceable parts
• If removed, keep the battery pack
out of reach of small children
• The radio is sensitive to
electrostatic discharges
• Do not plug the appliance in
before checking the voltage
indicated on the charger label is
the same as the mains voltage
• Ensure liquids and foreign objects
do not get into the radio housing
• Keep radio away from heat
sources and direct sunlight
• Use only the charger supplied to
charge the battery or to use
mains power
• Do not use outside with charger
• Always unplug the mains supply
cord prior to cleaning the radio
• Allow a 2cm clearance around
the radio housing when in use
THE DUALIT KITCHEN RADIO
3
SAFETY PRECAUTIONS
SAFETY PRECAUTIONS
18 01 06_quark dualit kitchen radio.qxp 6/30/2006 15:29 Page 3
Page 4
Before using the radio, check the following items are in the box:
• Dualit Kitchen Radio
• 10.5V AC/1.8A Power adaptor, cord and plug
• Instruction manual
If above items are missing or damaged, please contact place of purchase.
SAFETY PRECAUTIONS
4
PARTS AND CONTROLS
• No naked flame, such as lit
candles, should be placed on
or near the radio
• Misuse of the radio may result in
hazardous radiation exposure
•
DDoo nnoott hhaannddllee aa ddaammaaggeedd oorr
lleeaakkiinngg bbaatttteerryy ppaacckk..
Contact
with the material can result in
injury or burns to the eyes or skin.
Even if foreign substances are not
immediately visible, chemical
changes in the material can result
in injuries at a later date
• Do not disassemble or tamper
with the battery pack.
Save these Instructions
PACKAGE CONTENTS
1
3
2
5
4
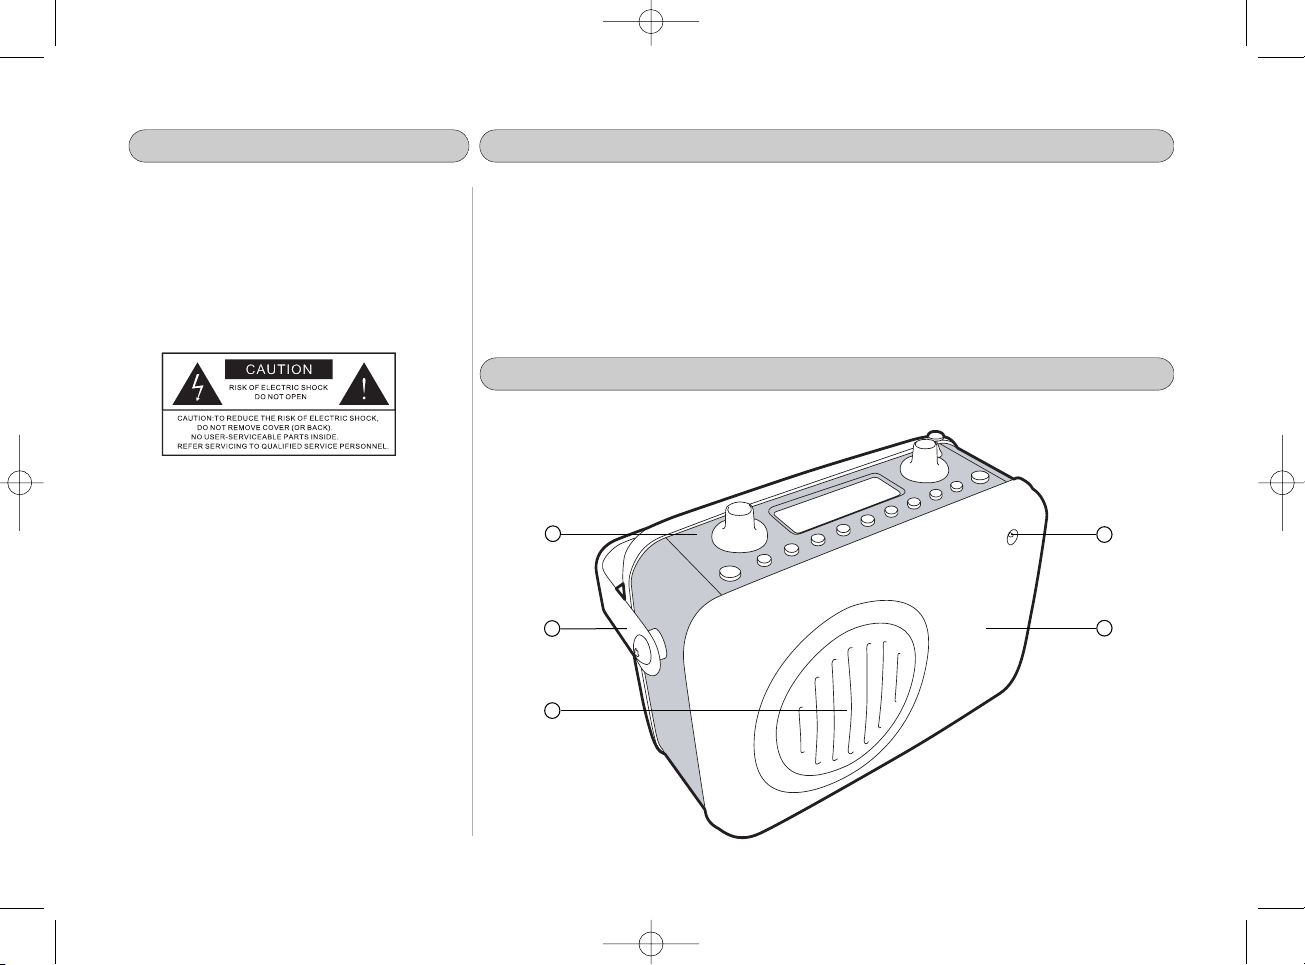
Radio housing:
18 01 06_quark dualit kitchen radio.qxp 6/30/2006 15:29 Page 4
Page 5
Radio housing
1. Soft Touch central body
2. Carry Handle
3. Speaker
4. Power LED
5. Cast metal body
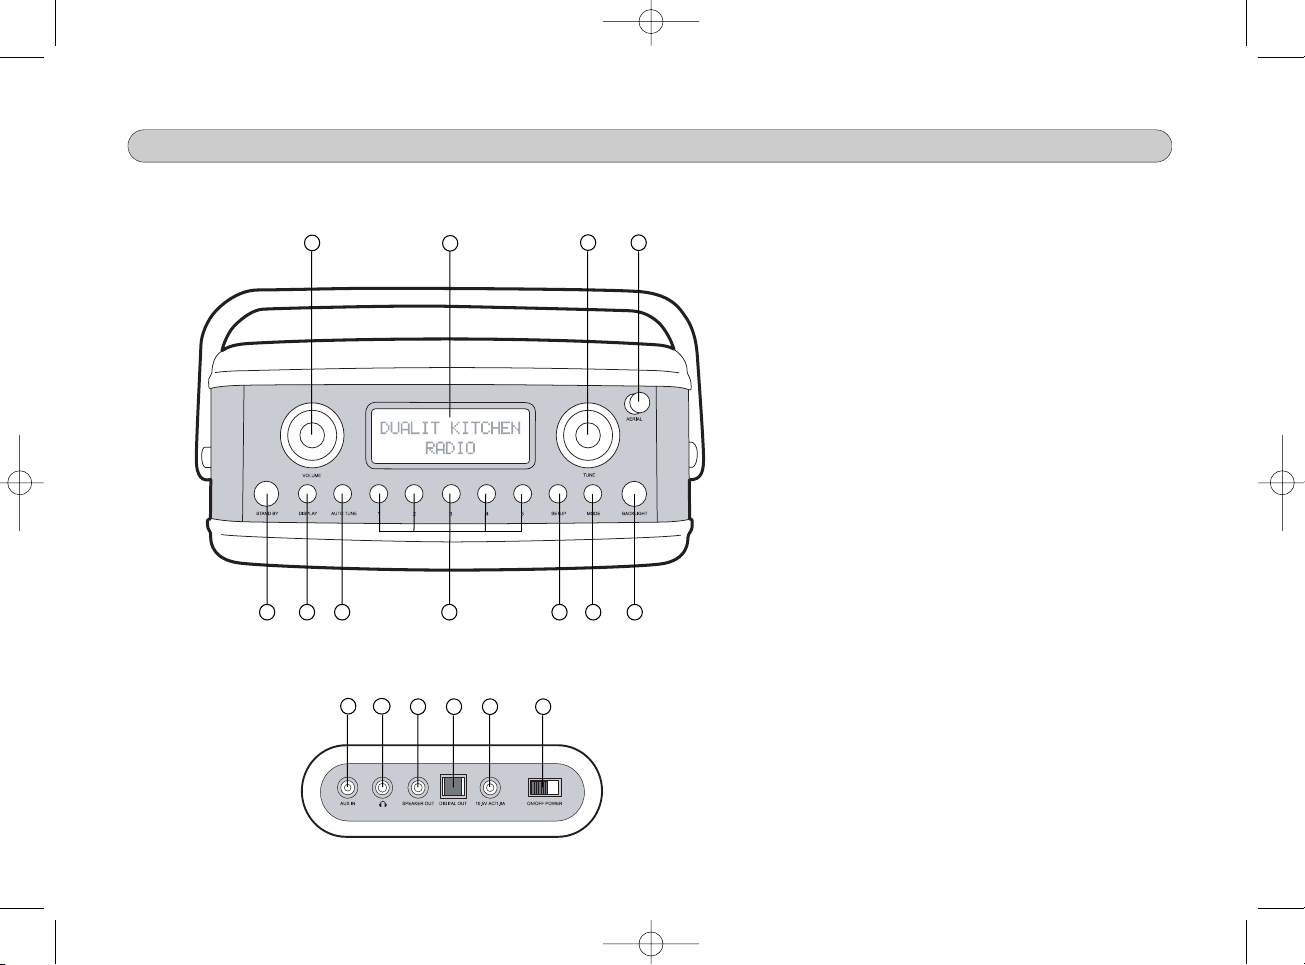
Controls
6. Volume
7. LCD display
8. Tuning
9. Aerial
10. Backlight
11. Mode
12. Set up
13. Presets
14. Autotune
15. Display
16. Standby
Inputs and outputs
17. Aux in
18. Headphone
19. Speaker out
20. Digital out
21. 10.5V AC/1.8A
22. ON/OFF Power switch
5
PARTS AND CONTROLS
17
11 101213141516
6
7
8
9
18
19 20 21 22
Controls - Top view
Inputs and outputs - Rear view
18 01 06_quark dualit kitchen radio.qxp 6/30/2006 15:29 Page 5
Page 6

Select the alarm type: ‘
DAB/FM’
radio,
‘Buzzer’
or
‘Off’
using the ‘TUNE’ knob
(8). To deactivate the alarm feature, set
the alarm type to the
‘off’
position.
Once the alarm type is selected it will exit
setup and a bell symbol will appear
on the top right of the screen.
To turn off the alarm or to activate the
snooze feature press ‘STANDBY’ (16).
Tuning into a DAB station will
automatically set the clock and date.
Alternatively, to manually set, press and
hold ‘SETUP’ button (12) for 2 seconds .
Select
‘Set Clock’
using ‘TUNE’ knob (8).
You will be asked for the
Year, Month,
Day, Hour and Minutes.
Using the ‘TUNE’ knob (8) select and set
the correct time and date.
SETTING UPQUICK START
6
ALARM
Here's a quick guide to get you started
while you read the rest of the manual and
familiarise yourself with the many features
of your Dualit Kitchen Radio.
• Connect the mains power adaptor to
the the back of the radio (21)
• Fully extend the ‘AERIAL’ (9) as far as
it will go
••
SSLLIIDDEE TTHHEE MMAAIINN ‘‘OONN//OOFFFF’’ ((2222)) IINN
TTHHEE BBAACCKK OOFF TTHHEE RRAADDIIOO TTOO TTHHEE
‘‘OONN’’
PPOOSSIITTIIOONN
• Press ‘STANDBY’ (16) to turn on the
radio. It will default to
‘DAB’
mode
• The radio will automatically perform a
quick tune for available stations
• Turn the ‘TUNE’ knob (8) to cycle
through stations. Push down on this
knob to select the new station
• Adjust ‘VOLUME’ (6) to the desired
level
• Press the ‘MODE’ Button (11) to
change to
‘FM’or‘AUX IN’
modes.
CLOCK AND DATE
To set alarm, hold ‘SETUP’ for 2 seconds.
Cycle through the options using the
‘TUNE’ Knob (8) and select
‘Alarm’
.
Using the ‘TUNE’ knob (8) set the
‘Hour’
and
‘Minutes’
to required time.
Select how often you would like the alarm
to sound:
Once
only,
Daily
or
Weekdays.
ALARM
Hold ‘SETUP’ (12) for 2 second. Select the
‘Snooze’
feature using ‘TUNE’ knob (8).
Select the snooze time required between
‘0-9 Minutes’. ‘0’
being the off setting.
Press the ‘STANDBY’ button (16) to
activate snooze once the alarm sounds.
‘z’ will flash on screen when this is active
SNOOZE
PPrreessss aanndd hhoolldd ‘‘SSEETTUUPP’’ ((1122)) ffoorr 22 sseeccoonnddss ttoo aacccceessss sseettuupp mmeennuu,, tthheenn rroottaattee tthhee
‘‘TTUUNNEE’’ kknnoobb ((88)) ttoo ssccrroollll tthhrroouugghh tthhee ooppttiioonnss ddiissppllaayyeedd oonn ssccrreeeenn,, tthheenn ppuusshh tthhee
kknnoobb ddoowwnn ttoo sseelleecctt tthhaatt ooppttiioonn..
References to the ‘TUNE’ knob (8), unless otherwise
stated, requires use of this action. Once you have completed setting up your radio,
press ‘SETUP’ (12) to exit and return to radio mode.
18 01 06_quark dualit kitchen radio.qxp 6/30/2006 15:29 Page 6
Page 7

The display will read
‘Battery Charge’
when charging and
‘Full Battery’
once
fully charged.
The ‘LCD DISPLAY’ (7) will flicker between
‘Battery Charge’
and
‘Full Battery’
while
the battery charge status is determined.
When the NiMH battery requires charging
‘Low Battery’
will flash on the screen
UUssee oonnllyy tthhee DDuuaalliitt ssuupppplliieedd AACC ppoowweerr
aaddaappttoorr pprroovviiddeedd wwiitthh tthhee rraaddiioo ffoorr
cchhaarrggiinngg aanndd mmaaiinnss ppoowweerr
ooppeerraattiioonn
.
The lifespan of the battery will vary with
product usage and storage conditions.
See ‘Replacing the battery’ in the
servicing section on page 9.
The kitchen timer feature will countdown
from a desired time and sound a buzzer.
Press and hold ‘SETUP’ (12) for 2 seconds.
Cycle through the options using the
‘TUNE’ Knob (8) and select the
‘Timer’.
Firstly select the approximate time for
countdown
5,10, 30 Mins or2, 12 Hours.
Then using the ‘TUNE’ knob (8) set the
exact time delay from the starting points.
The buzzer will activate once the timer
has countdown to zero. Press ‘STANDBY’
button (16) to switch off the buzzer.
Radio turns off after a set period of time.
Press and hold ‘SETUP’ (12) for 2 seconds.
Select
‘Sleep’
option using the ‘TUNE’
Knob (8) Choose the number of minutes
from ‘
1 - 90’
and set to the
‘On’
position.
You can turn off sleep mode anytime by
setting to
‘Off’
position in this menu.
A
‘S’
will flash in the top right corner of
the screen when this feature is activate.
KITCHEN TIMER
SETTING UP
7
BACKLIGHT
BATTERY
Your Dualit radio includes a rechargeable
NiMH battery for portable listening.
TThhee bbaatttteerryy iiss ssuupppplliieedd uunncchhaarrggeedd..
TThhee bbaatttteerryy rreeqquuiirreess aa 1166 hhoouurr cchhaarrggee
bbeeffoorree ffiirrsstt uussee.. TThhee s
swwiittcchh ((2222)) oonn tthhee
bbaacckk ooff tthhee rraaddiioo mmuusstt bbee
‘‘OOnn’’
ttoo cchhaarrggee..
Connect the adaptor and charge until
‘Full battery’
is displayed. This will take
approximately 10 - 13 hours with a
partially charged battery.
A new battery will allow 3 - 4 hours
listening time in DAB mode, 7 - 8 hours
in FM mode.
Battery times are approximates only and
vary depending on the volume and mode
the radio is used in.
NNoottee:: IIff tthhee bbaatttteerryy iiss nneeww oorr uunnuusseedd ffoorr
sseevveerraall wweeeekkss,, iitt mmaayy ttaakkee uuppttoo 44
cchhaarrggee//ddiisscchhaaggee ccy
ycclleess bbeeffoorree tthhee
bbaatttteerryy iiss aatt ffuullll ccaappaacciittyy..
Charging the battery while in
‘standby’
position will achieve fastest charge time.
SLEEP MODE
There is 3 brightness levels for the LCD
display (7) and ‘POWER LED’ (2)
Press the ‘BACKLIGHT’ button (10) to
cycle through the 3 levels.
18 01 06_quark dualit kitchen radio.qxp 6/30/2006 15:29 Page 7
19:30:49
Battery Charge
22:38:17
Low Battery
Page 8

You can manually tune DAB frequencies
to get the best possible signal and will
aid in determining the best position for
the radio.
Momentarily press the ‘SETUP’ button
(12) and cycle through the options until
you reach
‘Manual tune’
.
You will now see the numerical DAB
frequencies.
A signal strength bar will appear next to
the radio station. The hollow block is the
minimum signal required.
Move the radio or aerial until the solid
blocks are on or above the hollow block.
You can view this signal bar anytime
while listening in DAB mode by clicking
down on the ‘TUNE’ Button (8).
You can store up to 5 DAB presets.
Tune into the station you wish to store.
Then press and hold one of the five
corresponding ‘PRESET’ buttons (13) for
5 seconds.
The above display will show if successfully
saved to presets.
Your DAB radio tunes and sets up with
minimal effort. All available frequencies
are automatically picked up by the radio.
When you turn on the radio, it will
perform a Auto tune. All available stations
will display alphanumerically.
You can change the display order setting,
See ‘Station order’ on page 7.
If no stations are found during the
autotune
‘No stations available’
will be
displayed.
Ensure the ‘AERIAL’ (9) is fully extended
and move the radio to a different
location and press the ‘AUTOTUNE’
button (16).
IIff tthhiiss ffaaiillss yyoouu mmaayy iinn aann aarreeaa wwiitthh nnoo
ddiiggiittaall rraaddiioo ccoovveerraaggee.. VViissiitt ssiitteess ssuucchh aass
hhttttpp::////wwwwww.
.bbbbcc..ccoo..uukk//ddiiggiittaallrraaddiioo ffoorr
ccoovveerraaggee..
DAB MODE
8
MANUAL DAB TUNING
STORING PRESETS
AUTO DAB TUNING
DAB DISPLAY
DAB transmits a range of text information
along with its audio broadcast.
Momentarily press the ‘DISPLAY’ button
(15) while in DAB mode will cycle
through the information.
•
DDLLSS ((SSccrroolllliinngg TTeexxtt))
- Dynamic label
segment is a scrolling text display
that the broadcaster may include
18 01 06_quark dualit kitchen radio.qxp 6/30/2006 15:29 Page 8
Scanning...
BBC Radio 4
BBC RADIO 4
Preset 1 saved
Page 9

9
Changes the order of the DAB station list.
Momentarily press the ‘SETUP’ button
(12) and scroll to
‘Station Order’
.
••
FFaavv ssttaattiioonn
--
This displays the 10 most
recently listened too stations
A heart symbol & favourite number is
displayed beside each fav station
••
AAuuttoo PPrreesseettss
--
Only active when ‘
Fav
station’
setting is selected. When
selected the top 5 favourite
stations will automatically be set to
the button presets (4)
••
AAllpphhaannuummeerriicc
--
Alphabetical order
••
AAccttiivvee SSttaattiioonn
--
Working stations are
listed at the beginning of the station
list with remainder following
alphanumerically
••
PPrruunnee
--
Removes stations in list with
no reception in you current location.
••
SSiiggnnaall ffrreeqquueennccyy
--
Current station
channel and frequency is displayed
•
SSiiggnnaall iinnffoo
- Information on the
signal. Is it Mono or Stereo and the
transmission bit-rate. The higher the
bit-rate the better the sound quality
•
SSiiggnnaall eerrrroorr
--
This shows a real time
view of your current signal status.
You can use this feature to locate the
best possible signal by moving the
radio or aerial (9).
The lower the signal error the better
the signal strength. 0-20 is a good
signal, 21-40 is a borderline signal,
40-99 requires moving radio to a
better position.
DAB DISPLAY
with transmissions. This text may
include current song playing, text
numbers for competitions, etc
•
PPrrooggrraammmmee ttyyppee
- This shows the
type of station e.g. ‘Pop Music’
•
EEnnsseemmbbllee ((GGrroouupp NNaammee))
--
DAB
signals are broadcast in groups at
local and national levels. The group
layering is called Multiplex and
displays what signal you are receiving
and from whom. e.g. BBC range of
stations
••
TTiimmee aanndd DDaattee
--
The current time and
date is sent by the broadcaster. The
clock automatically sets to this time
when listening in DAB mode
STATION ORDER
DAB MODE
18 01 06_quark dualit kitchen radio.qxp 6/30/2006 15:29 Page 9
BBC Radio 4
e Archers: featu
BBC Radio 4
SIGNAL ERROR 18
Page 10

An additional speaker may be added to
listen in stereo sound.
Connect a secondary speaker for stereo
sound.
The internal radio ‘SPEAKER’ (4) will work
along side the external speaker or device.
For private listening, connect headphones
with a 3.5mm connector to socket (18).
The ‘SPEAKER’ (4) will be muted when the
‘HEADPHONE’ (18) socket is in use.
Your DAB radio is equipped with ‘S/PDIF’
(20) optical digital out.
DDAABB MMOODDEE OONNLLYY
This provides a digital signal to external
amplifiers or devices with an optical input
for clear sound without losing any of the
quality of the digital broadcast.
To listen to FM radio stations momentarily
press the ‘MODE’ button (11) until
‘FM’
is
displayed on the screen.
The first time you turn on the radio it will
start at ‘
87.5MHz’
otherwise it will tune
to the last station listened to.
You can manually tune or autotune to
find a FM station.
Manually by using the ‘TUNE’ Knob (8).
Rotate it to the desired frequency then
click down to select.
Momentarily press the ‘AUTO TUNE’
button (14) to scan to next available
station with good enough signal.
Moving the
‘
AERIAL’ (9) or radio may
improve signal strength and reception.
FM TUNING
10
FM MODE
FM PRESETS
You can store up to 5 FM presets.
Simply tune into the station you wish
to store.
Then press and hold the corresponding
preset button (13) for 5 seconds.
The station will be stored to this preset.
You can listen to auxiliary devices on your
radio speaker. Devices such as MP3
players, CD players, Laptops, etc.
Any device with
‘Audio out’
or
‘Headphone’
socket can be used.
You will require a 3.5mm to 3.5mm or
dual phono stereo cable to connect.
Momentarily press the ‘MODE’ button
(11) until you reach
‘Aux in’
.
Plug in the auxiliary device using a
3.5mm cable into socket (17).
AUX IN
DIGITAL OUT
HEADPHONE
SPEAKER OUT
INPUTS AND OUTPUTS
INPUTS AND OUTPUTS
18 01 06_quark dualit kitchen radio.qxp 6/30/2006 15:29 Page 10
FM 98.8MHz
Page 11

SERVICING
11
This will remove all favourites, presets
and all settings will reset to default.
Press and hold the ‘DISPLAY’ button
(15) for 2 seconds to reset to factory
settings.
TThhiiss ccaannnnoott bbee uunnddoonnee..
Disconnect the mains adaptor before
attempting to change the battery.
Remove screws holding the battery
cover in place with a screwdriver.
Lift the battery cover off, Remove
battery from recess, disconnect the
lead from the battery pack and
replace with the new battery pack,
ensuring it is correctly connected.
Replace the battery cover by inserting
bottom lip first, then screw back on.
EEnnssuurree tthhee bbaatttteerryy ddiissppoossaall iiss ccaarrrriieedd
oouutt iinn aa eennvviirroonnmmeennttaallllyy ffrri
ieennddllyy wwaayy,,
iinn aaccccoorrddaannccee wwiitthh llooccaall gguuiiddeelliinneess..
REPLACING THE BATTERY
TROUBLESHOOTING
11.. MMyy rraaddiioo wwiillll nnoott sswwiittcchh oonn
aa))
Ensure the plug is correctly
inserted in the mains socket and
check the main ‘ON/OFF’ switch
(22) located on the back of the
radio is in the
‘ON’
position.
bb))
If not using the mains supply,
check the battery is charged.
22.. II hheeaarr aann eelleeccttrroonniicc ssoouunndd
aa))
This is when the signal is nearly
lost or borderline. Ensure the
‘AERIAL’ (9) is fully extended or try
relocating the radio using
‘Signal error’
feature, page 9.
33.. TThhee ddiissppllaayy rreeaaddss
‘‘NNOO SSTTAATTIIOONNSS
AAVVAAIILLAABBLLEE’’
iinn DDAABB mmooddee
aa))
The DAB signal is not strong
enough. Ensure the ‘AERIAL’ (9) is
fully extended. Try Manually
tuning the station frequency.
bb))
If this fails move the radio to a
location with better signal.
44.. TThhee cclloocckk rreesseettss oorr iiss wwrroonngg
aa))
The clock may reset if the power
adaptor is disconnected and the
battery is flat. Connect the power
adaptor and tune into a DAB
station which auto sets the time or
manually re-set the time, Page 5.
bb))
The time broadcasted by the DAB
station may be incorrect. Tune into
another DAB station.
55.. AA ‘‘??’’ iiss ddiissppllaayyeedd nneexxtt ttoo tthhee
ssttaattiioonn nnaammee iinn DDAABB mmooddee
aa))
You are outside the broadcast
area or the station is inactive.
66.. II sseeee ‘‘<<<<’’ oorr ‘‘>>>>’’ nneexxtt ttoo tthhee DDAABB
ssttaattiioonn nnaammee
aa))
The broadcaster has a secondary
service broadcasting. The next
station on the list will be the
secondary service. This can be
alternative music or an information
service. Transmission times vary.
RESET TO FACTORY SETTING
18 01 06_quark dualit kitchen radio.qxp 6/30/2006 15:29 Page 11
Page 12

The service technician should ensure
only batteries specified by Dualit are
used when repairing the radio.
CCAAUUTTIIOONN:: TToo rreedduuccee tthhee rriisskk ooff ffiirree
oorr ppeerrssoonnaall iinnjjuurryy,, uussee aann eexxaacctt
rreeppllaacceemmeenntt DDuuaalliitt KKiittcchheenn RRa
addiioo
bbaatttteerryy ppaacckk,, aavvaaiillaabbllee ffrroomm DDuuaalliitt
oorr oouurr aauutthhoorriisseedd ddeeaalleerrss,, ddiissppoossee ooff
tthhee uusseedd bbaatttteerryy iinn aa eennvviirroonnmmeennttaallllyy
ffrriieennddllyy && ccoorrrreecctt mmaannnneerr..
The radio is sensitive to electrostatic
discharges and may not function
properly as a result. In this case
please disconnect the device from its
mains supply and reconnect shortly
thereafter. You can then continue to
use the radio normally.
Unplug the radio and wipe with a
damp soft cloth.
If your radio fails within one year
from date of purchase we will repair
or replace it free of charge provided:
• You have not misused, neglected
or damaged it
• It has not been modified
• You supply your receipt to show
when you bought radio
The guarantee does not affect your
statutory rights.
Further advice on using your Dualit
radio and other products in the Dualit
Range is always available:
Contact the Dualit customer careline
on
++4444
(0) 1293 652 500 (09:00 to
17:00 Monday to Friday) or,
alternatively email your enquiry to
info@dualit.com.
GUARANTEE
CLEANING
12
SERVICING
Never use abrasive, liquid, aerosol
cleaners, brushes or scouring pads.
This radio must not be immersed in
water or cleaned with a water jet.
FAULTS
REPLACEMENT BATTERY
CLEANING
ELECTROSTATIC DISCHARGE
Call Dualit careline or service agent
for further assistance. If you
encounter any of the following
problems with your radio:
• The power cord or plug is
damaged
• Objects have fallen through or
liquids have been spilled into the
radio openings
• The product has been exposed to
moisture or water
• The product does not operate
normally when following the
operating instructions.
18 01 06_quark dualit kitchen radio.qxp 6/30/2006 15:29 Page 12
Page 13

PPoowweerr::
• Built in NiMH rechargeable
battery with 3 - 4 hours battery
life in DAB mode and 7 - 8 hours
in FM mode.
• Adaptor:230V/10. 5V a.c,1800mA
Battery:9.6V d.c, 2200mAh.
13
PRODUCT SPECIFICATION
OOuuttppuuttss::
• Stereo Headphone 3.5mm
• Optical SPDIF Digital Output
UUnniitt ccoonnttrroollss aanndd ffeeaattuurreess::
• Standby, Display, Auto tune,
5 preset buttons, Backlight,
Rotary volume, Rotary
tune/select, Main On/Off. Clock,
Alarm, Snooze, Sleep mode and
Kitchen timer
DDiissppllaayy::
• Oversize LCD white on blue
easy view display 75 x 25 mm
• 3 Brightness levels
• Blue LED Power indicator
WWeeiigghhtt aanndd ddiimmeennssiioonnss::
• 2.55 Kg
• 275 x 180 x 135 mm
FFrreeqquueennccyy rraannggee::
• DAB: Band III 174 ~ 240 MHz
• FM: 87.5 ~ 108 MHz /
step 0.1 MHz
TTuunniinngg::
• Auto station search and tune
• Manual DAB / FM tuning
• 5 station presets for each mode
AAccoouussttiiccss
:
• 4” Full Range Mono Speaker
• 8 WRMS @10%THD
• Frequency: 80 Hz ~ 18 kHz
• Bass port
IInnppuuttss::
• DAB / FM Telescope antenna
• AUX IN.
SOFTWARE VERSION
To view the software version installed
on your radio, momentarily press
‘SETUP’ (12) and cycle through to
‘Sw version’
.
The software version number is
displayed on the screen.
This number is is for your reference
only and cannot be altered.
YYoouu mmaayy bbee aasskkeedd ffoorr tthhiiss nnuummbbeerr
wwhheenn ccoonnttaaccttiinngg oouurr ccuussttoommeerr
ccaarreelliinnee ffoorr tteecchhnniiccaall ssuuppppoorrtt..
18 01 06_quark dualit kitchen radio.qxp 6/30/2006 15:29 Page 13
Page 14

DUALIT LIMITED COUNTY OAK WAY C RAWLEY WEST SUSSEX RH11 7ST
TELEPHONE: +44 (0)
1293 652 500
FACSIMILE: +44 (0) 1293 652 555
E
MAIL: info
@
dualit.com WEB: www.dualit.com
18 01 06_quark dualit kitchen radio.qxp 6/30/2006 15:29 Page 14
 Loading...