

DTVPal TV Converter Box User Manual
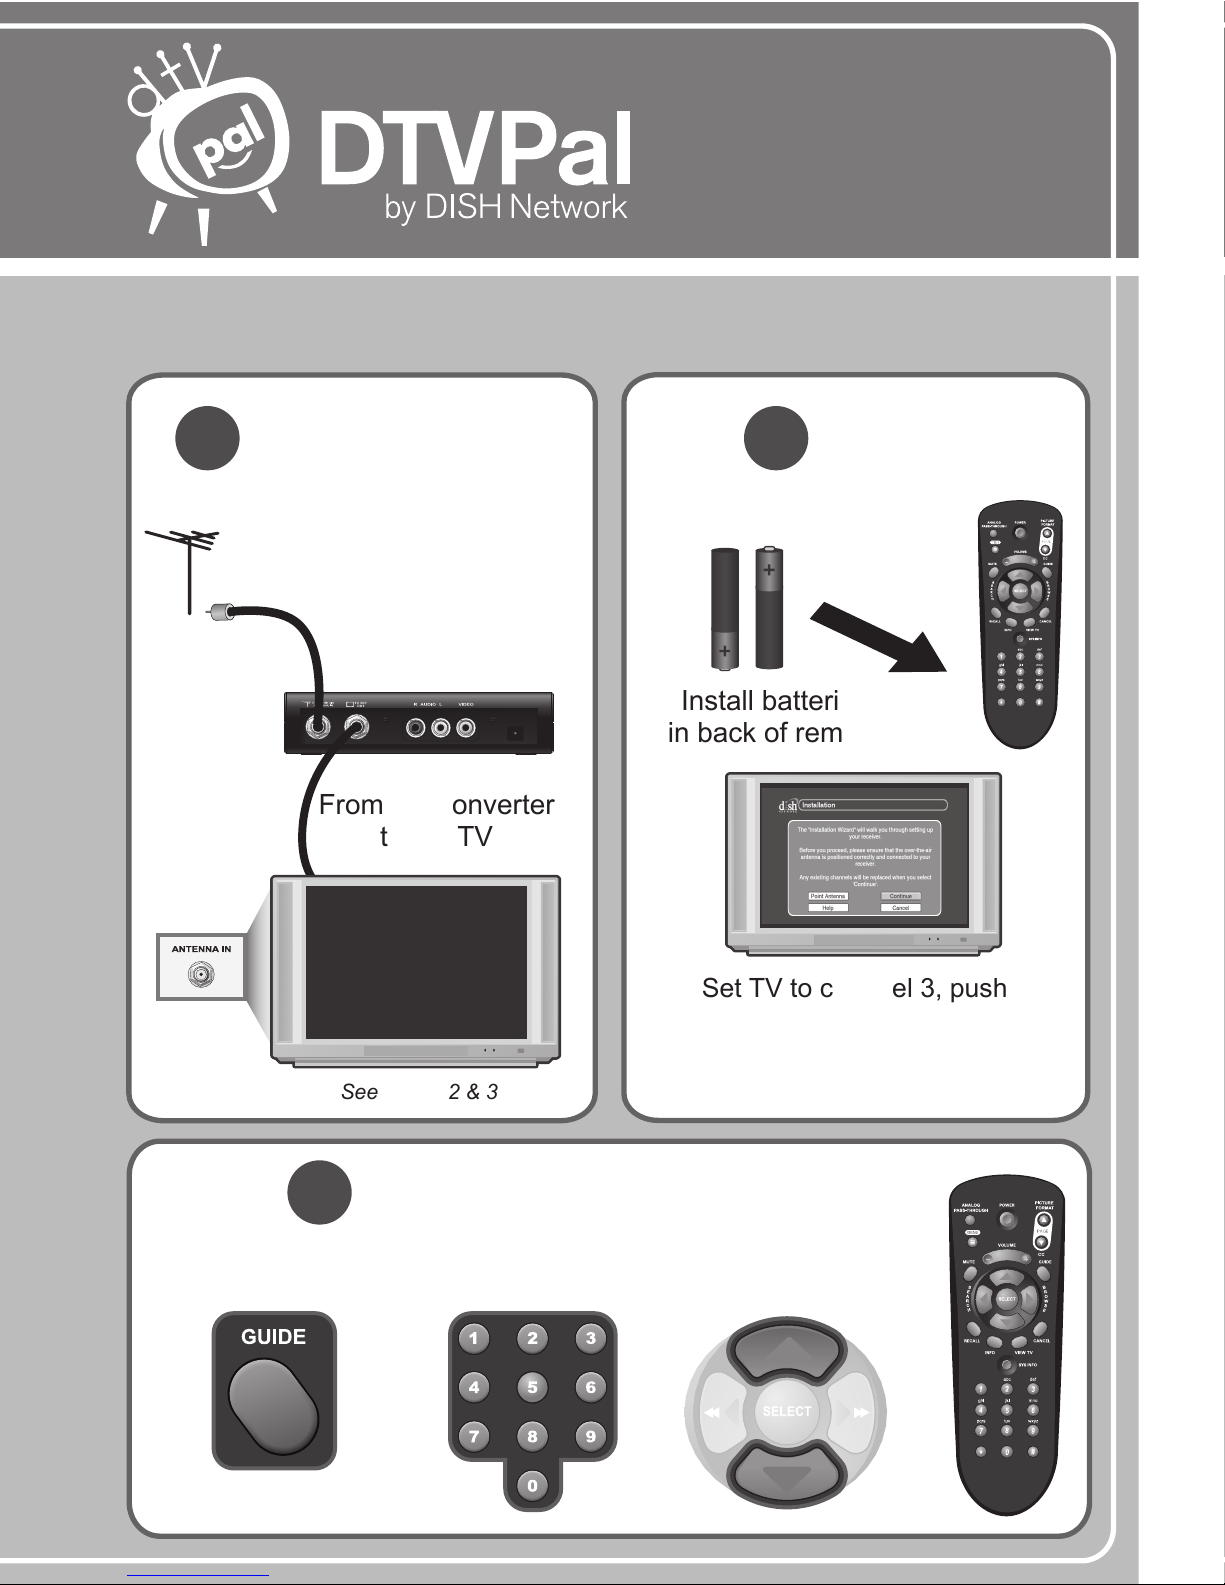
Enjoying your converter is as easy as 1-2-3!
CONNECTIONS
1
From the antenna
to the converter
From the converter
to the TV
See pages 2 & 3
Set TV to channel 3, push
POWER on the DTVPal remote,
and follow the on-screen instructions
Install batteries
in back of remote
SET UP
2
See pages 3 & 4
FINDING A CHANNEL
3
Program Guide
Channel Up/DownNumber Pad
See pages 5-7
User Guide
Enjoying your converter is as easy as 1-2-3!
Warning and Attention Symbols
You must be aware of safety when you install and use this system. This User Guide
provides various procedures. If you do some of these procedures carelessly, you could
injure or kill yourself or damage equipment or property. Some other procedures require
special attention.
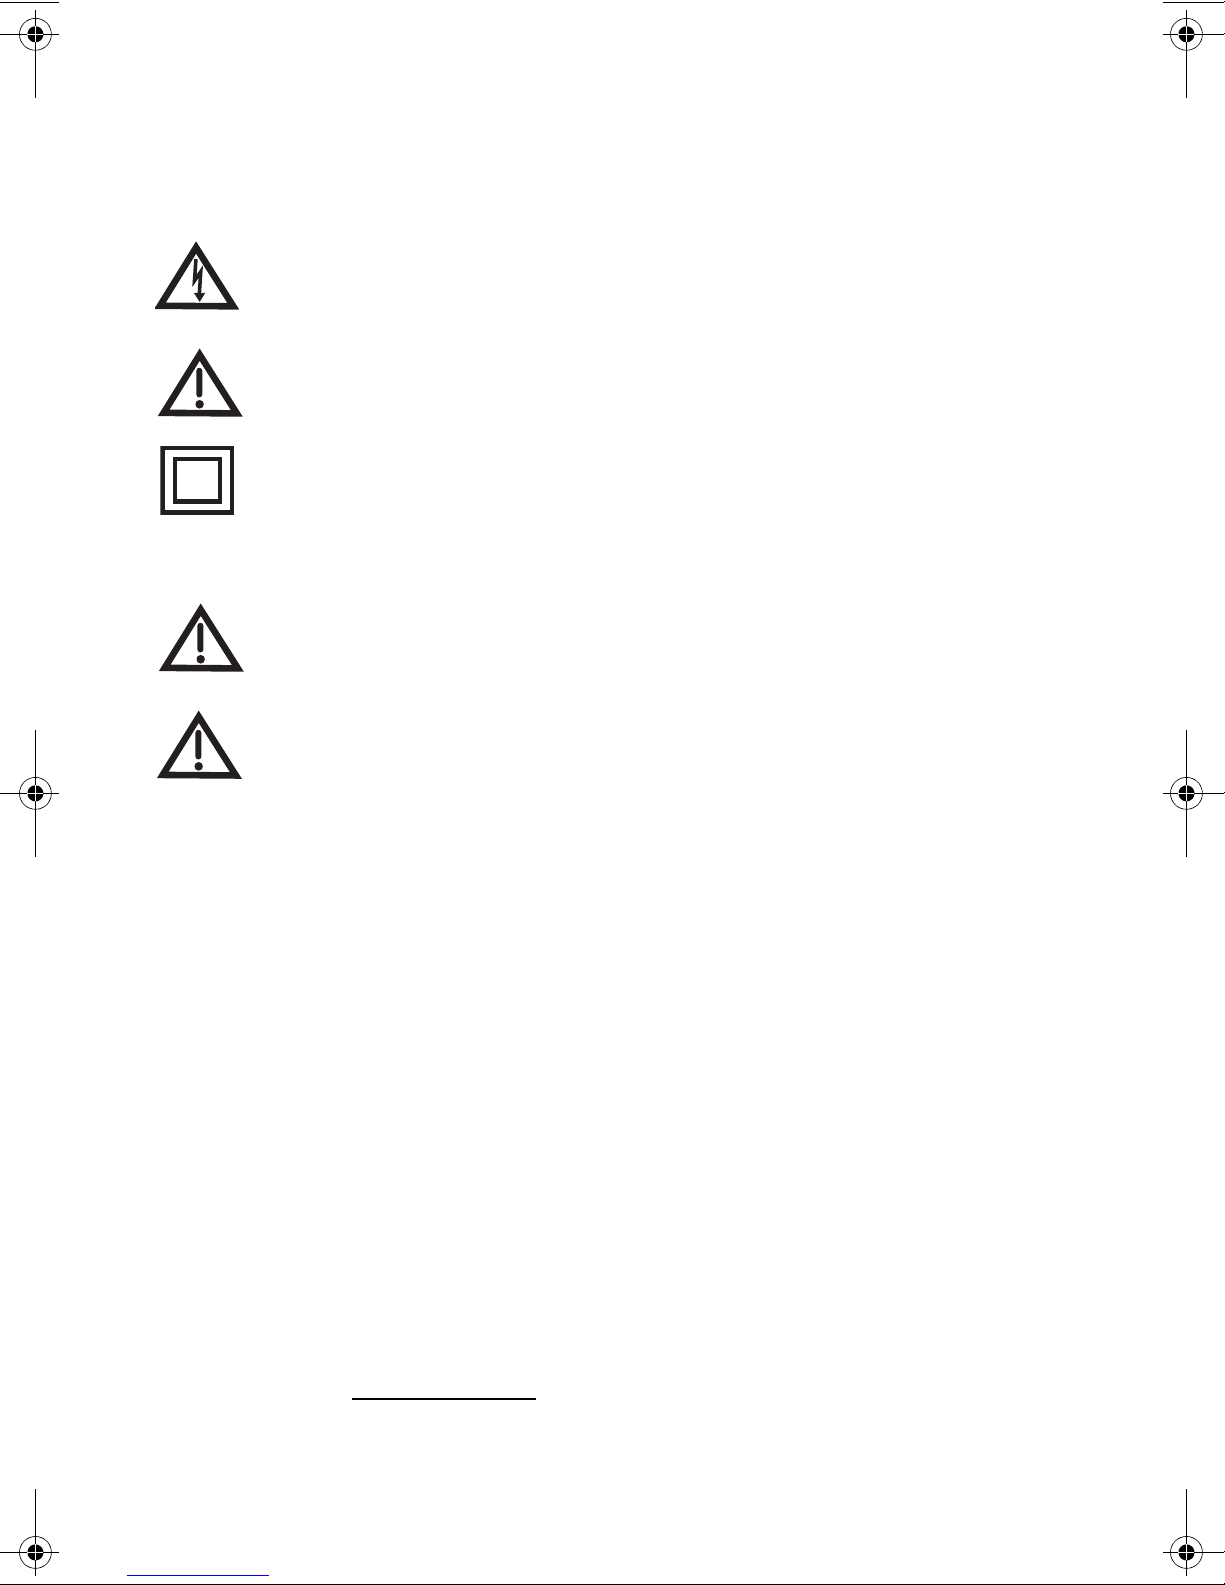
The lightning flash with arrowhead symbol, within an equilateral triangle, is
intended to alert the user to the presence of uninsulated “dangerous voltage”
within the product’s enclosure that may be of sufficient magnitude to
constitute a risk of electric shock to persons.
The exclamation point within an equilateral triangle is intended to alert the
user to the presence of important operating and maintenance (servicing)
instructions in the literature accompanying the apparatus.
The class II equipment symbol means that the equipment has additional
insulation and does not need to be grounded.
For Your Safety
Do not try to open the case of the power adapter or receiver. There is risk of
electrical shock, which may cause damage to the apparatus and/or personal
injury or death to you. There are no user-serviceable parts inside. Opening
the case or making unauthorized changes will void the warranty.
Warning: To reduce the risk of fire or electric shock, do not expose this
apparatus to rain or moisture.
Important Software Notice
As with all software controlled products, unexpected behavior could arise if the user
tries to perform operations in a non-routine manner. This product, like almost any other
high tech product, is subject to bugs and hence DISH Network CANNOT AND DOES
NOT GUARANTEE OR WARRANT THAT ALL FEATURES, SUCH AS PARENTAL
CONTROL, WILL WORK AS INTENDED UNDER ALL CIRCUMSTANCES. In
compliance with the terms of the GNU Public License (GPL), DISH Network is making
some source code available to the public to download from www.dishnetwork.com.
Equipment and Software Covered by this Guide
This User Guide covers the DTVPal Digital-to-Analog TV Converter. This Guide may
cover other devices, not listed here. The information in this User Guide may change
without notice. We may issue revisions to tell you about such changes.
Copyright Notice
Part Number: 159336
Copyright © 2008 EchoStar Technologies L.L.C., Englewood, Colorado 80112. All
rights reserved.
The software embedded in this product includes code that is copyright © 2005 the
FreeType Project (www.freetype.org
Project Licence of January 27, 2006.
Manufactured under license from Dolby Laboratories. “Dolby” and the double-D
symbol are trademarks of Dolby Laboratories.
) and which is licensed under the FreeType

YOUR DTVPAL DIGITAL-TO-ANALOG TV CONVERTER
Table of Contents
CONTENTS C
Important Safety Instructions........................... ii
DTVPal Top Tips................................................ v
Introduction........................................................ 1
Guide Conventions.................................. 1
Getting Started......................................... 1
Installation................................................ 2
The Remote Control ......................................... 5
Remote Control Buttons......................... 6
Using the Menus................................................ 9
Watching TV........................................... 10
Finding Programs.................................. 10
Using Event Timers............................... 12
Customizing Your DTVPal .............................. 13
Locks ...................................................... 14
System Setup......................................... 16
Audio Setup ........................................... 18
Closed Caption ...................................... 18
Troubleshooting .............................................. 19
TV Guide On Screen or Guide Plus Setup .... 23
Limited Warranty ............................................. 31
FCC Compliance.............................................. 34
FCC Digital Television Transition Notice ...... 37
Page i
YOUR DTVPAL DIGITAL-TO-ANALOG TV CONVERTER
IMPORTANT SAFETY INSTRUCTIONS
Important Safety Instructions
SAFETY S
IMPORTANT SAFETY INSTRUCTIONS
1 Read these instructions.
2 Keep these instructions.
3 Heed all warnings.
4 Follow all instructions.
5 Do not use this apparatus near water.
6 Clean only with a dry cloth.
7 Do not block any ventilation openings. Install in accordance with the manufacturer’s
instructions.
8 Do not install near any heat sources such as radiators, heat registers, stoves, or other
apparatus (including amplifiers) that produce heat.
9 Do not defeat the safety purpose of the polarized or grounding-type plug. A polarized
plug has two blades with one wider than the other. A grounding-type plug has two
blades and a third grounding prong. The wide blade or the third prong are provided for
your safety. If the provided plug does not fit into your outlet, consult an electrician for
replacement of the obsolete outlet.
10 Protect the power cord from being walked on or pinched, particularly at plugs,
convenience receptacles, and the point where they exit from the apparatus.
11 Use only attachments/accessories specified by the manufacturer.
12 Unplug this apparatus during lightning storms or when unused for long periods of time.
13 Refer all servicing to qualified service personnel. Servicing is required when the
apparatus has been damaged in any way, such as the power supply cord or plug is
damaged, liquid has been spilled or objects have fallen into the apparatus, the
apparatus has been exposed to rain or moisture, does not operate normally, or has
been dropped.
Apparatus shall not be exposed to dripping or splashing and no objects filled
with liquids, such as vases, shall be placed on the apparatus.
Page ii

YOUR DTVPAL DIGITAL-TO-ANALOG TV CONVERTER
IMPORTANT SAFETY INSTRUCTIONS
IMPORTANT SAFETY INSTRUCTIONS
• Only connect the original power adapter to the TV converter. Other power adapters
may damage the TV converter and cause a fire risk.
• Do not install the power adapter or TV converter in any area where the temperature
can be less than 40°F or more than 113°F, and do not cover them.
• Connect the power adapter only to the type of power source indicated on its label. The
power adapter must be readily accessible so that the equipment can be easily
disconnected from the AC power. Unplug the power adapter by gripping the power
adapter, not the cable.
• Do not overload wall outlets or extension cords; this can result in a risk of fire or
electrical shock.
• Do not attempt to service the power adapter or TV converter yourself, as opening or
removing covers may expose you to dangerous voltage, and will void the Limited
Warranty.
• Unplug the power adapter from the AC power outlet before cleaning. The power
adapter is still connected to the AC power whenever it is plugged in to a live power
outlet, even if the TV converter is turned off.
• Do not place naked flame sources such as lighted candles on or near the TV converter
or power adapter.
• Do not expose the remote control batteries to excessive heat or fire.
Page iii
YOUR DTVPAL DIGITAL-TO-ANALOG TV CONVERTER
IMPORTANT SAFETY INSTRUCTIONS
Note to Installer: This reminder is provided to call the installer's attention to Article
810 section II of the National Electrical Code (NEC) that provides guidelines for proper
grounding and, in particular, specifies that the cable ground shall be connected to the
grounding system of the building as close to the point of cable entry as practical.
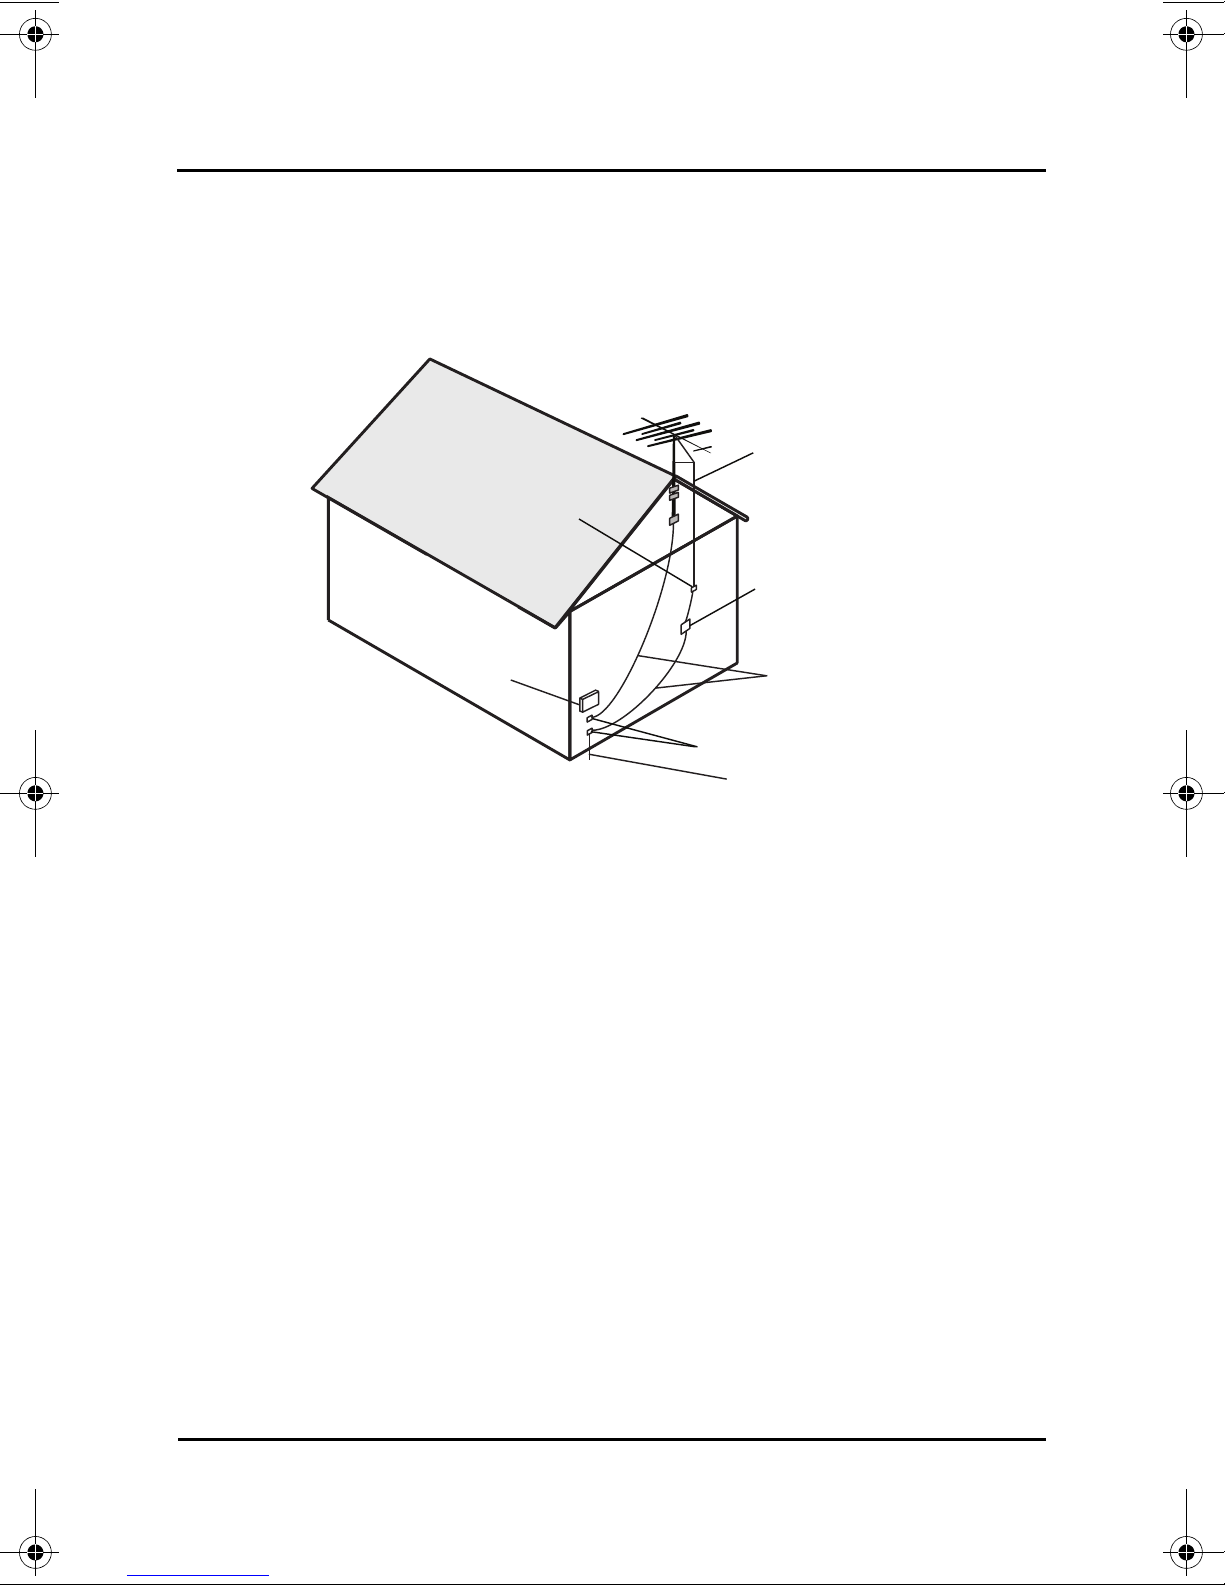
Example of Antenna Grounding
National Electrical Code, 2008
Antenna
Lead in Wire
Ground Clamp
Antenna
Discharge
Unit
(NEC Section 810-20)
Electric
Service
Equipment
Grounding
Conductors
(NEC Section 810-21)
Ground Clamp
Power Service Grounding
Electrode System
(NEC Art. 250, Part H)
• Do not locate the antenna near overhead light or power circuits, or where it can fall into
such power lines or circuits. When installing the antenna, take extreme care to avoid
touching such power lines or circuits, as contact with them can be fatal.
Proper Care of Your Equipment
• Locate the TV converter in an open, well-ventilated area.
• If the TV converter is cold to the touch, do not plug it in immediately. Let it sit unplugged
at room temperature for at least 30 minutes before plugging it in.
• Always handle the TV converter and power adapter carefully.
• Unplug the power adapter from the AC power outlet before cleaning.
• Always turn the TV converter off and unplug it before moving it.
• The use of accessories or attachments not recommended by the TV converter
manufacturer will void the Limited Warranty.
• Use an outlet that contains surge suppression or ground fault protection. During an
electrical storm or when the TV converter is left unattended and unused for long
periods of time, unplug the adapter from the wall outlet, and disconnect the lines
between the TV converter and the antenna. This will provide additional protection
against damage caused by lightning or power line surges.
Page iv
YOUR DTVPAL DIGITAL-TO-ANALOG TV CONVERTER
DTVPAL TOP TIPS
DTVPal TOP TIPS
Quick Tips to Get You Started
The DTVPal converts your local digital over-the-air TV broadcasts into a format
that can be viewed on your analog TV so you will be able to continue to watch
your local TV channels after the FCC-mandated digital transition.
The DTVPal is easy-to-use and takes your TV to the next level with built-in
features to make your life easier. Get the most out of your DTVPal with these
helpful tips.
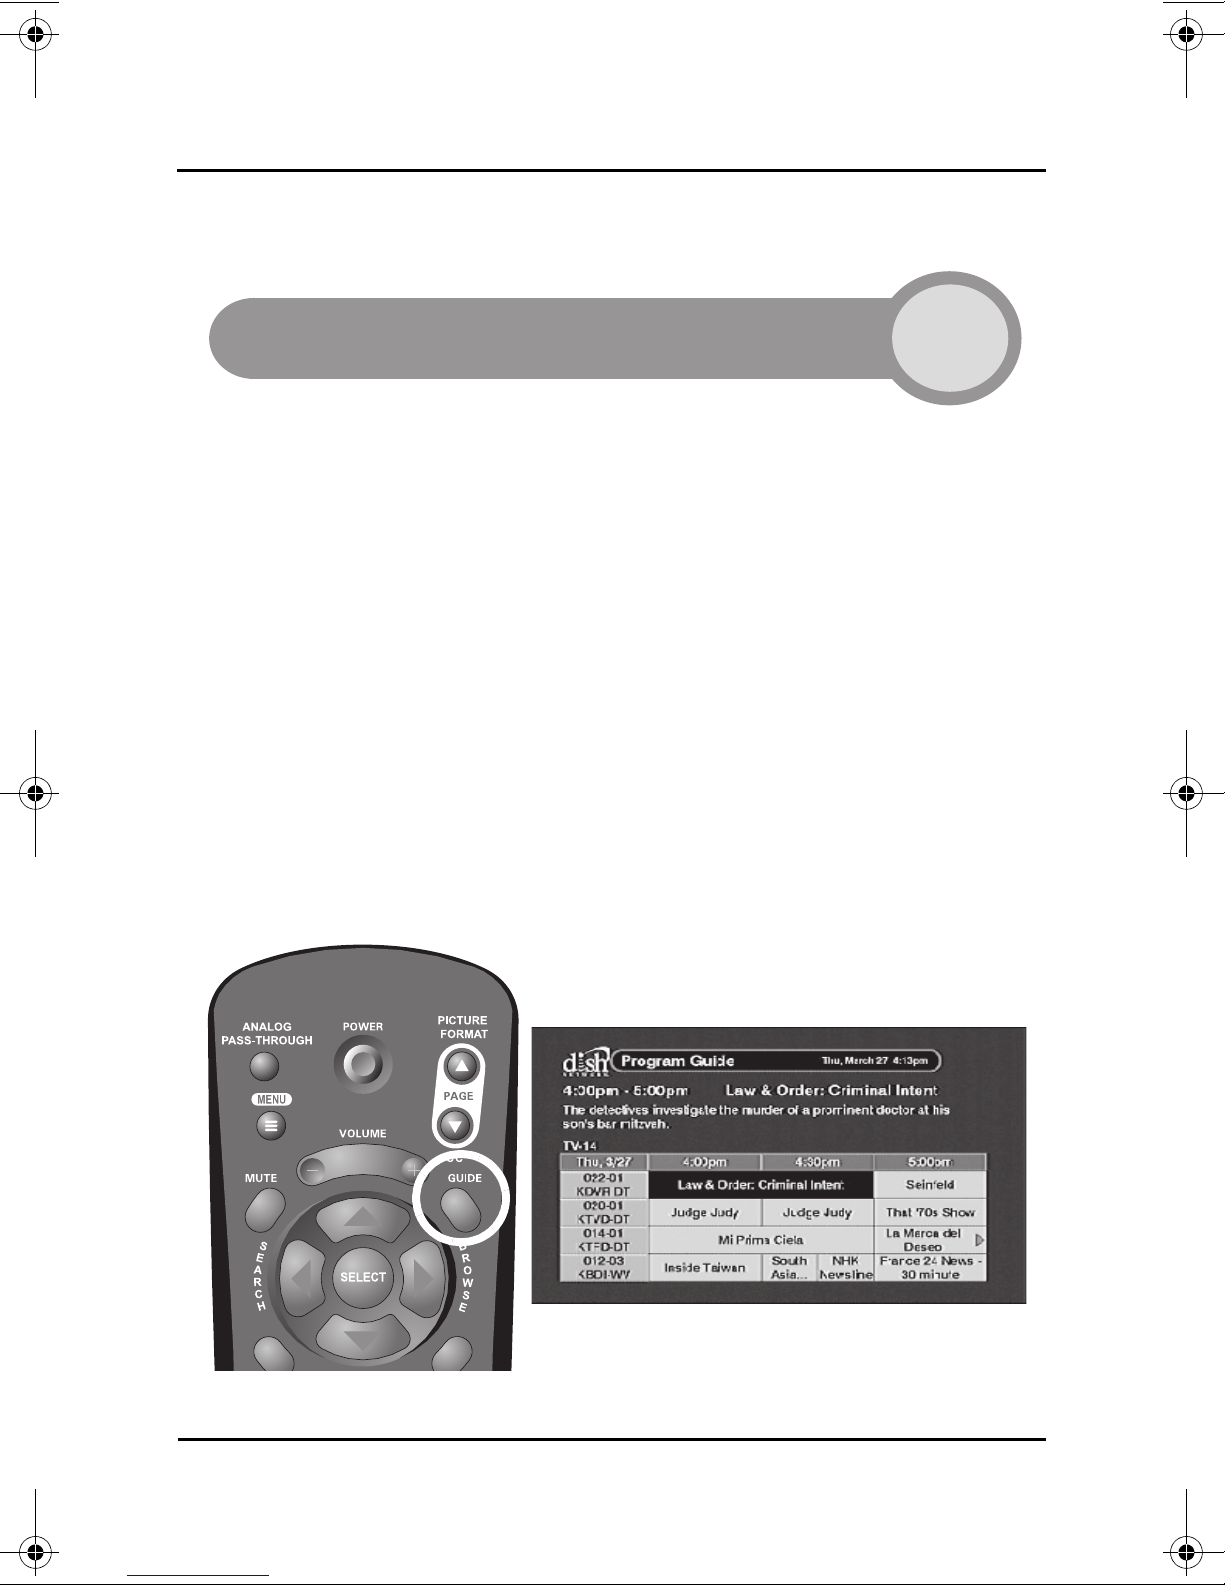
USING YOUR ON-SCREEN PROGRAM GUIDE
The DTVPal’s easy-to-use Program Guide is a great source of programming
information displaying a complete list of available channels and programs.
Press GUIDE on the DTVPal remote control to open the Program Guide and
browse programs many hours in advance. Use the ARROW buttons on the
remote control to move through the Program Guide.
See page 10 for more information on the Program Guide.
Page v
YOUR DTVPAL DIGITAL-TO-ANALOG TV CONVERTER
DTVPAL TOP TIPS
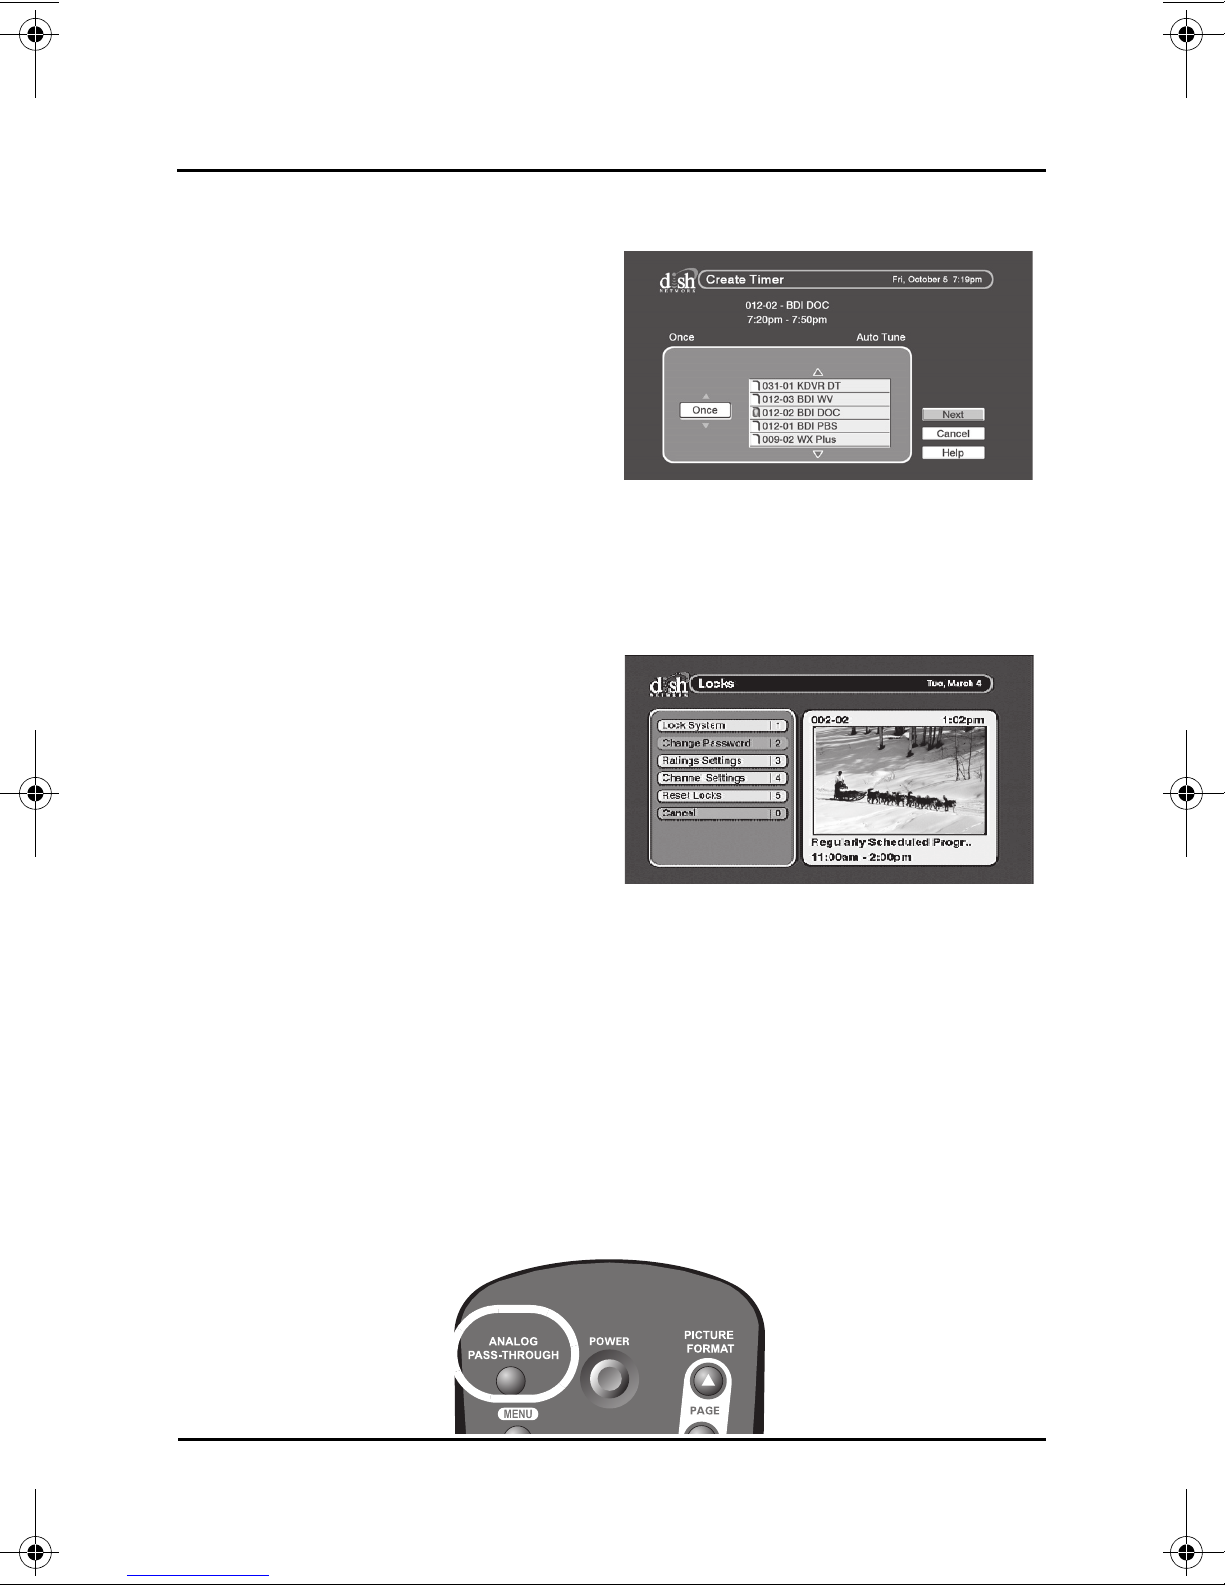
EVENT TIMERS
Never worry about having to
remember when your favorite shows
start! DTVPal’s Event Timer feature
automatically changes the channel to
your favorite program at the time it is
scheduled to begin. While in the
Program Guide, press SELECT on a
future program to create an event
timer. Timers can be created to tune
to a channel one-time, daily, Monday-Friday, or weekly. See page 12 for more
information on Event Timers.
PARENTAL CONTROL
Block content you believe is
inappropriate for your household by
creating Locks. The Locks feature
requires a password to view content
you deem inappropriate. Access the
Locks menu by pressing MENU on
the remote control, selecting Setup,
then selecting Locks. See page 14
for more information on DTVPal’s
Locks.
ANALOG PASS-THROUGH
Your DTVPal supports analog pass-through, allowing you to easily view
channels that still broadcast using an analog signal. To view analog over-the-air
channels, simply press the ANALOG PASS-THROUGH button on the remote
control, then change channels using the remote control for your TV.
To resume viewing digital over-the-air channels, turn your TV back to channel 3,
4 or the alternate video input used to view your DTVPal, then press the
ANALOG PASS-THROUGH button on the DTVPal remote control again. See
pages 2 and 7 for more information on analog pass-through.
Page vi
YOUR DTVPAL DIGITAL-TO-ANALOG TV CONVERTER
DTVPAL TOP TIPS
QUICK TROUBLESHOOTING TIPS
If You Get a Black or Blank Screen
• Make sure your DTVPal is powered on. There should be a green light on
the front panel of your DTVPal. If not, press the POWER button on your
DTVPal remote control.
• Make sure your TV is on the correct channel for viewing your DTVPal. Your
TV needs to be on either channel 3 or 4 (if connected using coax cable) or
a video input (if connected using RCA cables).
• Your DTVPal might need a simple "reset". Simply unplug the DTVPal from
your power outlet for 30 seconds and then plug it back in. Your DTVPal will
reset and should be ready to use again within minutes.
Not Receiving a Digital Signal During Your Installation/
Set Up
Please note: Not all broadcasters are currently broadcasting a digital signal and
the source of the digital signal may move at any time. Go to
www.antennaweb.org
channels in your area are broadcasting a digital signal.
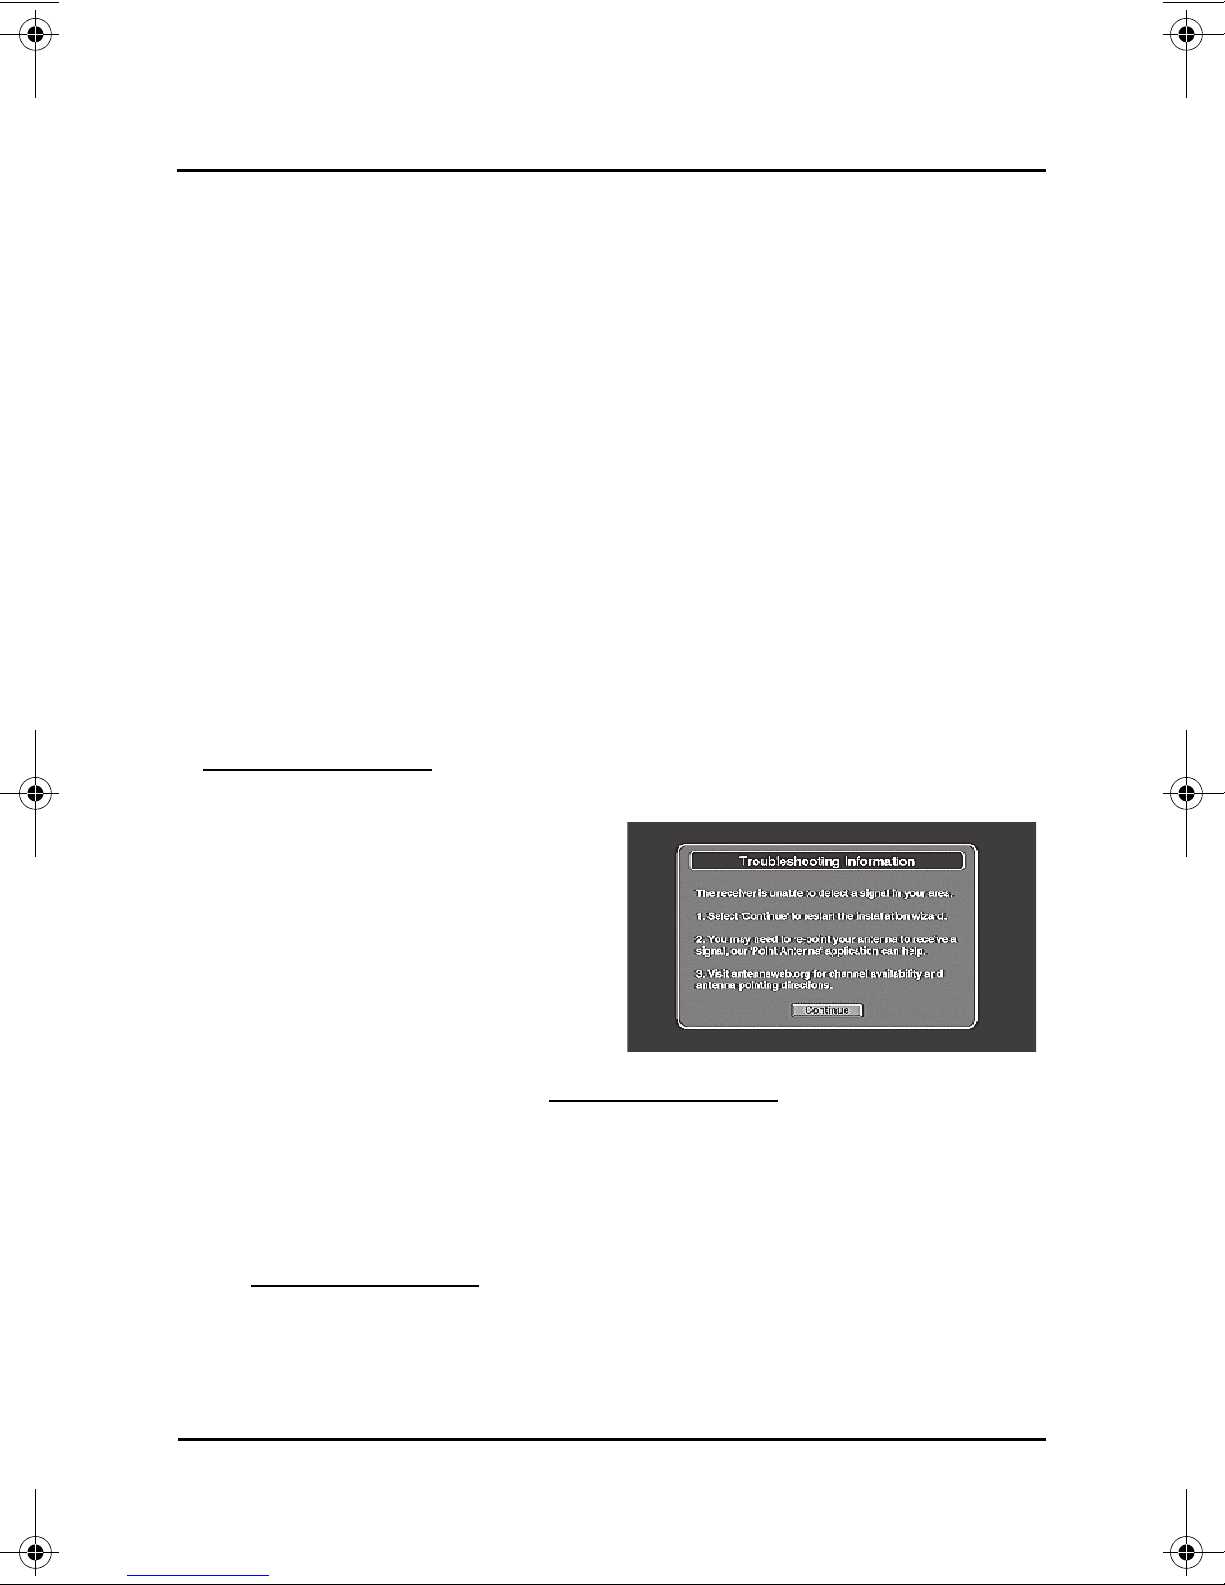
• If you are not able to receive a
digital TV signal for ANY of your
local channels and you see "The
receiver is unable to detect a
signal in your area" message on
your screen, it is possible that
you do not have the correct overthe-air antenna to receive a
digital signal or are out of range
for digital broadcasts. Go to www.antennaweb.org
which over-the-air antenna is best for your area or visit your nearest
electronics retailer.
• If you are not able to receive a digital TV signal for SOME of your local
channels you may simply need to adjust your over-the-air antenna or get
an over-the-air antenna that is optimized for your area. Go to
www.antennaweb.org
is correct for your area or visit your nearest electronics retailer.
or contact your local broadcaster to find out which
for more information on
for more information on which over-the-air antenna
Page vii
YOUR DTVPAL DIGITAL-TO-ANALOG TV CONVERTER
DTVPAL TOP TIPS
No Longer Receiving a Digital Signal After Your Installation/Set Up
• If you are no longer able to receive a digital TV signal for some or all of your
local channels and your DTVPal is hooked up correctly, it is possible that
you will need to adjust your over-the-air antenna or get an over-the-air
antenna that is optimized for your area as the source of the digital signal
may have moved. Go to www.antennaweb.org
which over-the-air antenna is best for your area or visit your nearest
electronic retailer.
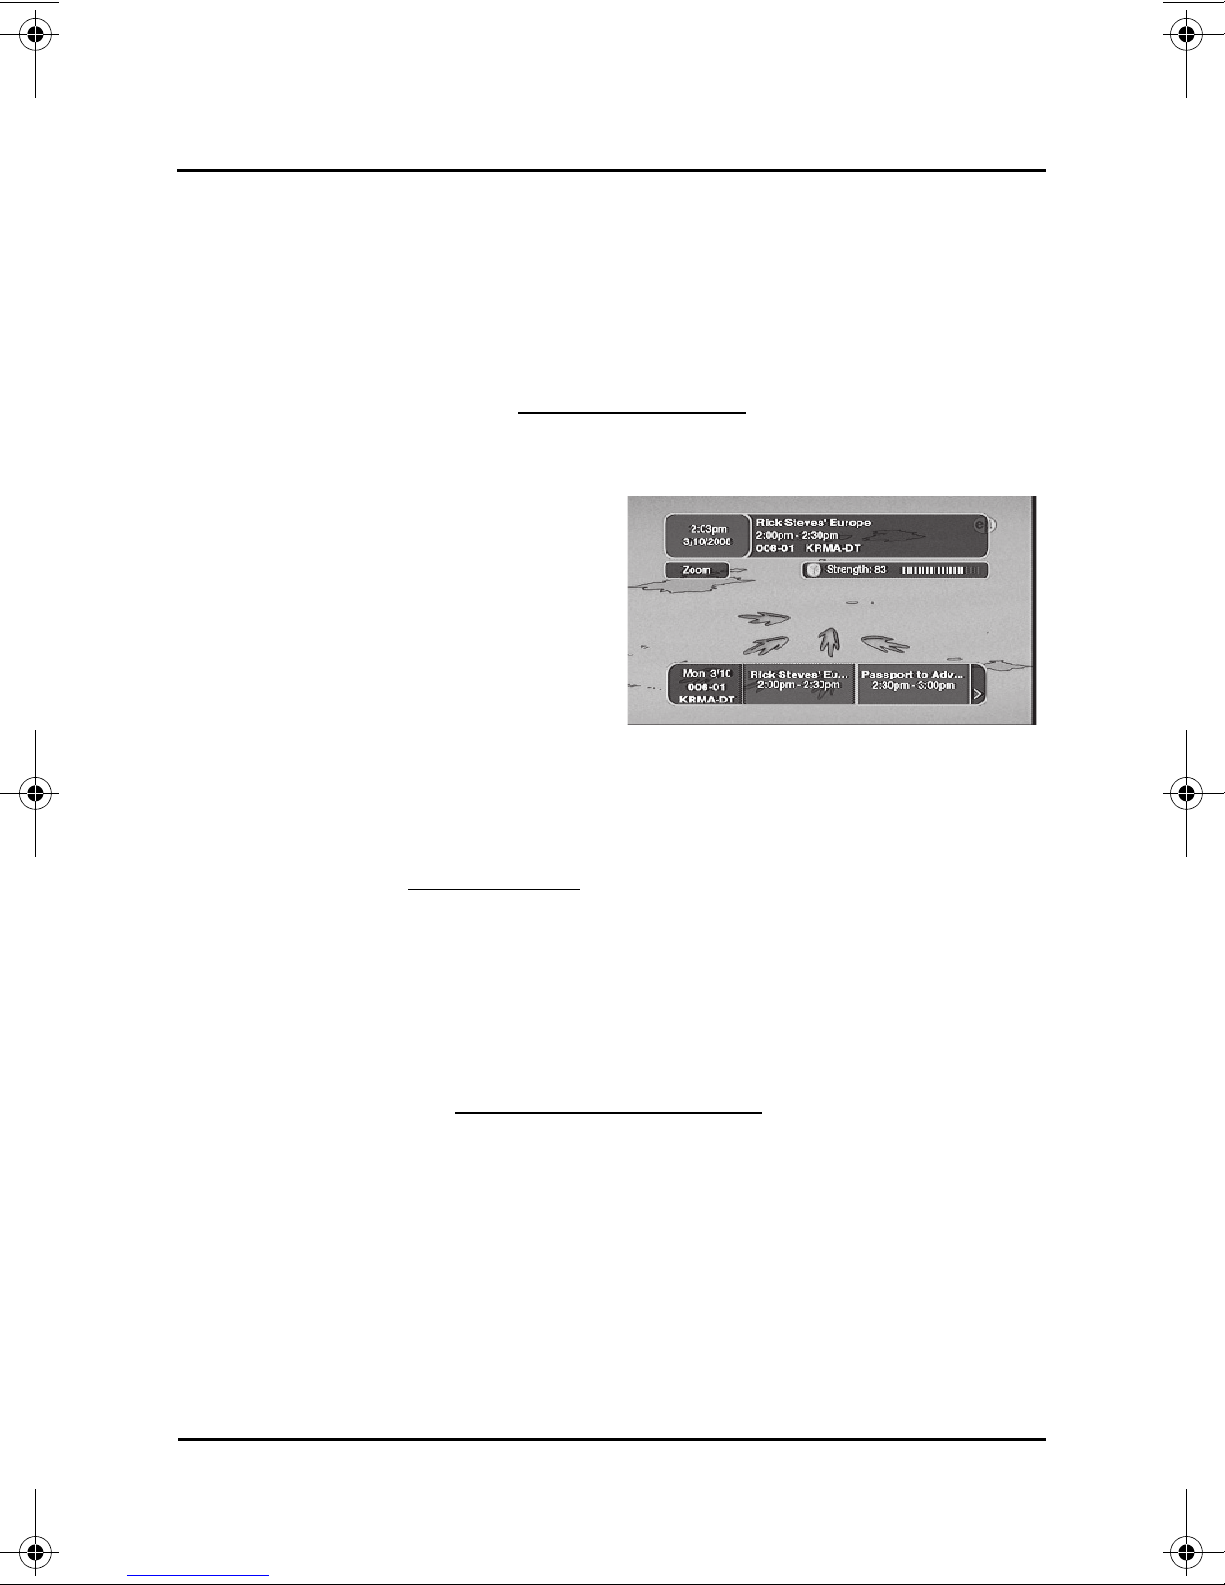
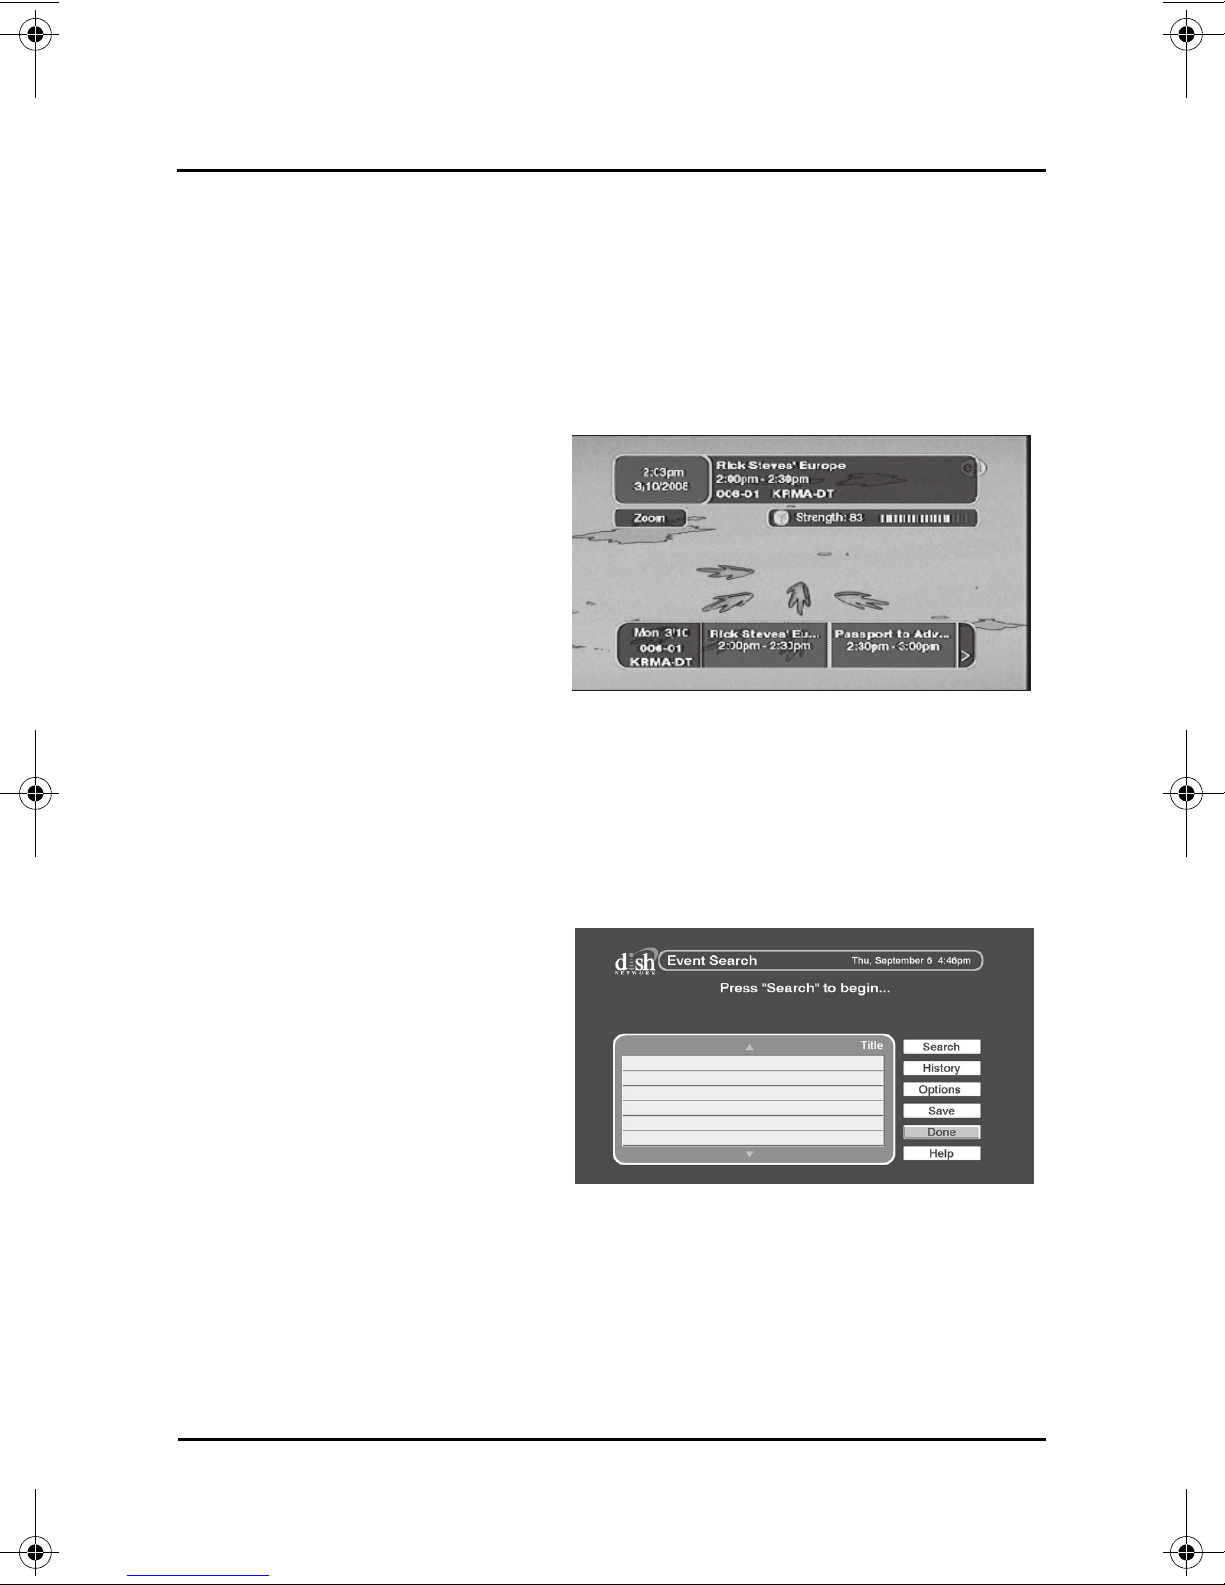
• You can easily check the signal
strength of a local channel by
pressing BROWSE on your
remote control when tuned to the
channel on your DTVPal. The
signal strength for that channel
appears in the upper right hand
corner of your TV screen.
for more information on
For more helpful troubleshooting
information go to page 19 in this manual.
MORE INFORMATION/CUSTOMER SUPPORT
1-888-667-0633 or www.dtvpal.com.
UPGRADE TO DISH NETWORK
Although the DTVPal is a great digital-to-analog converter box, you may not be
able to receive any or all digital over-the-air signals. Get over 100 or more of
the most popular national channels, such as Discovery, CNN, and ESPN, and
your local channels* by getting your programming through DISH Network. Call
1-888-638-9912 or visit www.dishnetwork.com/dtvpal
Network for the lowest all-digital price nationwide...every day!
*where available
today and get DISH
Page viii

YOUR DTVPAL DIGITAL-TO-ANALOG TV CONVERTER
INTRODUCTION
Introduction and Installation
CHAPTER 1
Getting to Know Your DTVPal and Connecting Your DTVPal
INTRODUCTION
Welcome and thank you for choosing the DTVPal by DISH Network Digital-toAnalog TV Converter!
Your DTVPal is a TV converter that connects between your new or existing
over-the-air antenna and TV. The DTVPal converts your local digital over-the-air
TV broadcasts into a format for viewing on your standard-definition analog TV.
This chapter walks you through connecting your DTVPal to your TV and
provides an introduction to the DTVPal’s features. If you experience any issues
connecting the DTVPal, refer to Troubleshooting on page 19 for assistance.
GUIDE CONVENTIONS
• The names of remote control buttons are all uppercase.
Example: Press SELECT.
• On-screen menu options are bold.
Example: Choose the Setup option.
• “Select” means to move the on-screen highlight using the remote control’s
ARROW buttons then press SELECT on the remote control.
Example: Select the Locks option.
GETTING STARTED
• To learn about the remote control, refer to Chapter 2 on page 5.
• To learn about using the features of your DTVPal, refer to Chapter 3 on
page 9.
• If you experience any issues using your DTVPal, refer to the
Troubleshooting steps on page 19.
• If your analog TV supports TV Guide On Screen or Guide Plus, refer to
page 23 for setup instructions.
Page 1
YOUR DTVPAL DIGITAL-TO-ANALOG TV CONVERTER
INSTALLATION
INSTALLATION
Note: These instructions assume you already have an over-the-air antenna
installed. If you need help choosing or installing an over-the-air antenna, refer to
www.antennaweb.org
Connecting Your DTVPal to Your TV
Important Safety Note: Do not connect your TV or your DTVPal to a
power supply until after you have properly connected all of the cables
using the following instructions.
or your local retailer.
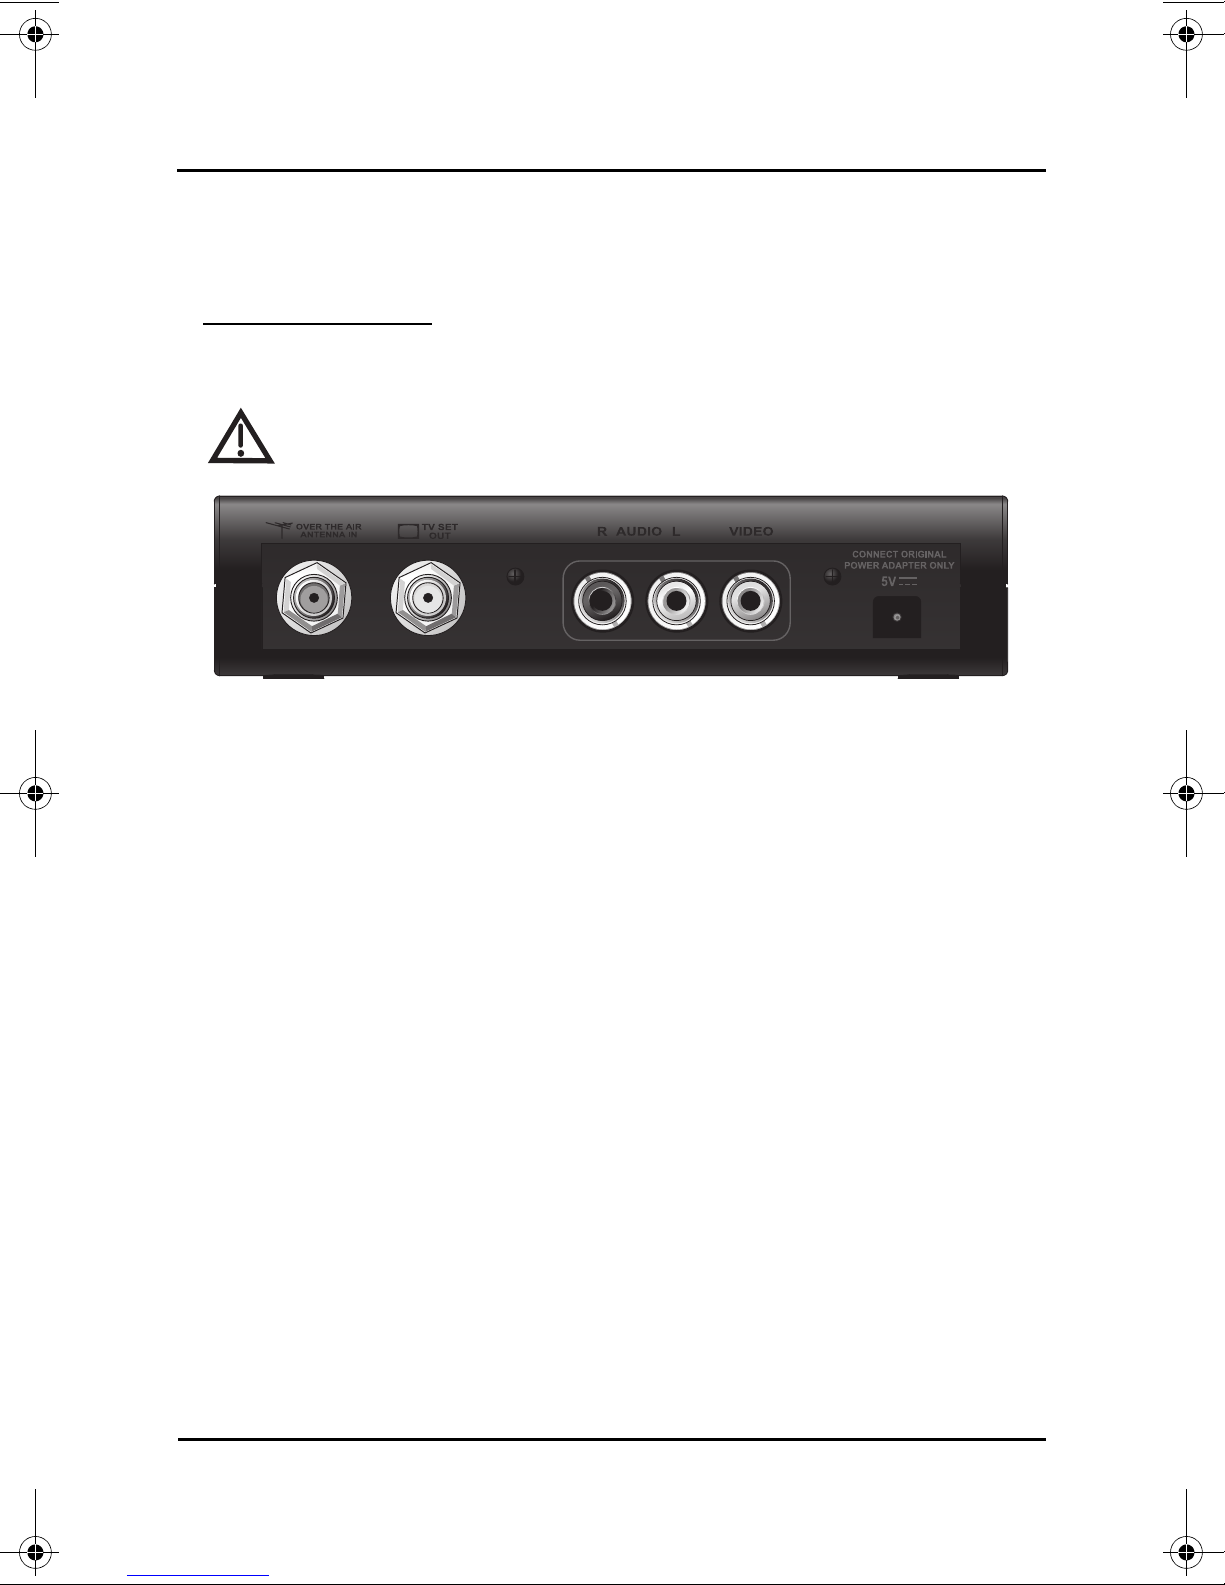
DTVPal Back Panel Connections
1 On the back of your TV, locate the ANTENNA IN connection, which connects
your TV to your over-the-air antenna. This connection may be labeled
VER-THE-AIR ANTENNA IN, CABLE IN, COAX IN, or another name. Refer to
O
your TV’s User Guide for help locating this connection.
2 Disconnect the coaxial cable from your TV’s ANTENNA IN connection.
Note: If your TV uses twin-lead (300 ohm) connections, you will need to
obtain and install a 75 ohm to 300 ohm converter on your TV. This
converter can be found at most consumer electronics stores.
3 Look at the back of your DTVPal, and locate the OVER-THE-AIR ANTENNA IN
connection (refer to image above). Connect the coaxial cable from step 2
to your DTVPal’s O
wrench to tighten this connection, as you may damage your DTVPal.
Note: The DTVPal includes only a digital over-the-air tuner. If channels in
your area are still broadcasting in analog signals, you can view these
channels by pressing the ANALOG PASS-THROUGH button on the
DTVPal remote, and changing channels using the TV’s remote control.
4 Determine the connection type you’ll use to connect your DTVPal to your
TV. The TV SET OUT connection uses a coaxial cable to connect to the
TV’s ANTENNA IN connection, and carries video and mono audio on RF
channels 3 or 4 (step 5). Alternatively, if your TV has RCA connectors for
audio and video, you can use RCA cables to connect from the A
connection (RCA-type) of your DTVPal to your TV’s video input (go to
step 6).
VER-THE-AIR ANTENNA IN connection. Do not use a
UDIO/VIDEO
Page 2
YOUR DTVPAL DIGITAL-TO-ANALOG TV CONVERTER
Installation Wizard
INSTALLATION
5 To connect your DTVPal using a coaxial cable:
a Connect one end of the coaxial cable to the TV’s A
b Connect the other end of the coaxial cable to your DTVPal’s TV S
connection.
6 To connect your DTVPal using composite cables (red, white, and yellow
RCA-type).
a Connect the composite cables to the TV’s RCA-type composite input.
b Connect the other end of the cables to the AUDIO/VIDEO connections on
your DTVPal.
7 Plug your DTVPal’s power adapter into the power adapter plug on the back
of your DTVPal. Plug the other end into an electrical outlet. Make sure your
TV is connected to power.
NTENNA IN connection.
ET OUT
Using the Installation Wizard
8 Install the two included AAA batteries in your DTVPal’s remote control. Be
sure to follow the battery installation diagram on the remote control.
9 Turn on your TV using the TV’s remote control or front panel.
10 Change your TV to the correct channel or input to view your DTVPal.
a If your TV is connected to your DTVPal using the coaxial connection
(step 5), set the TV to channel 3, which is the default output channel for
the DTVPal.
Note: If you have a local or cable channel that broadcasts on channel 3,
you can change your DTVPal’s output setting to channel 4 during the
Installation Wizard, below.
b If your TV is connected to your DTVPal using the RCA-type connection
(step 6), you will need to set the TV to a video input or source. Most TV
remote controls have a VIDEO, INPUT, or SOURCE button that you can
use to change the TV’s video input or source. Refer to your TV’s user
guide for additional help changing the TV’s input or source.
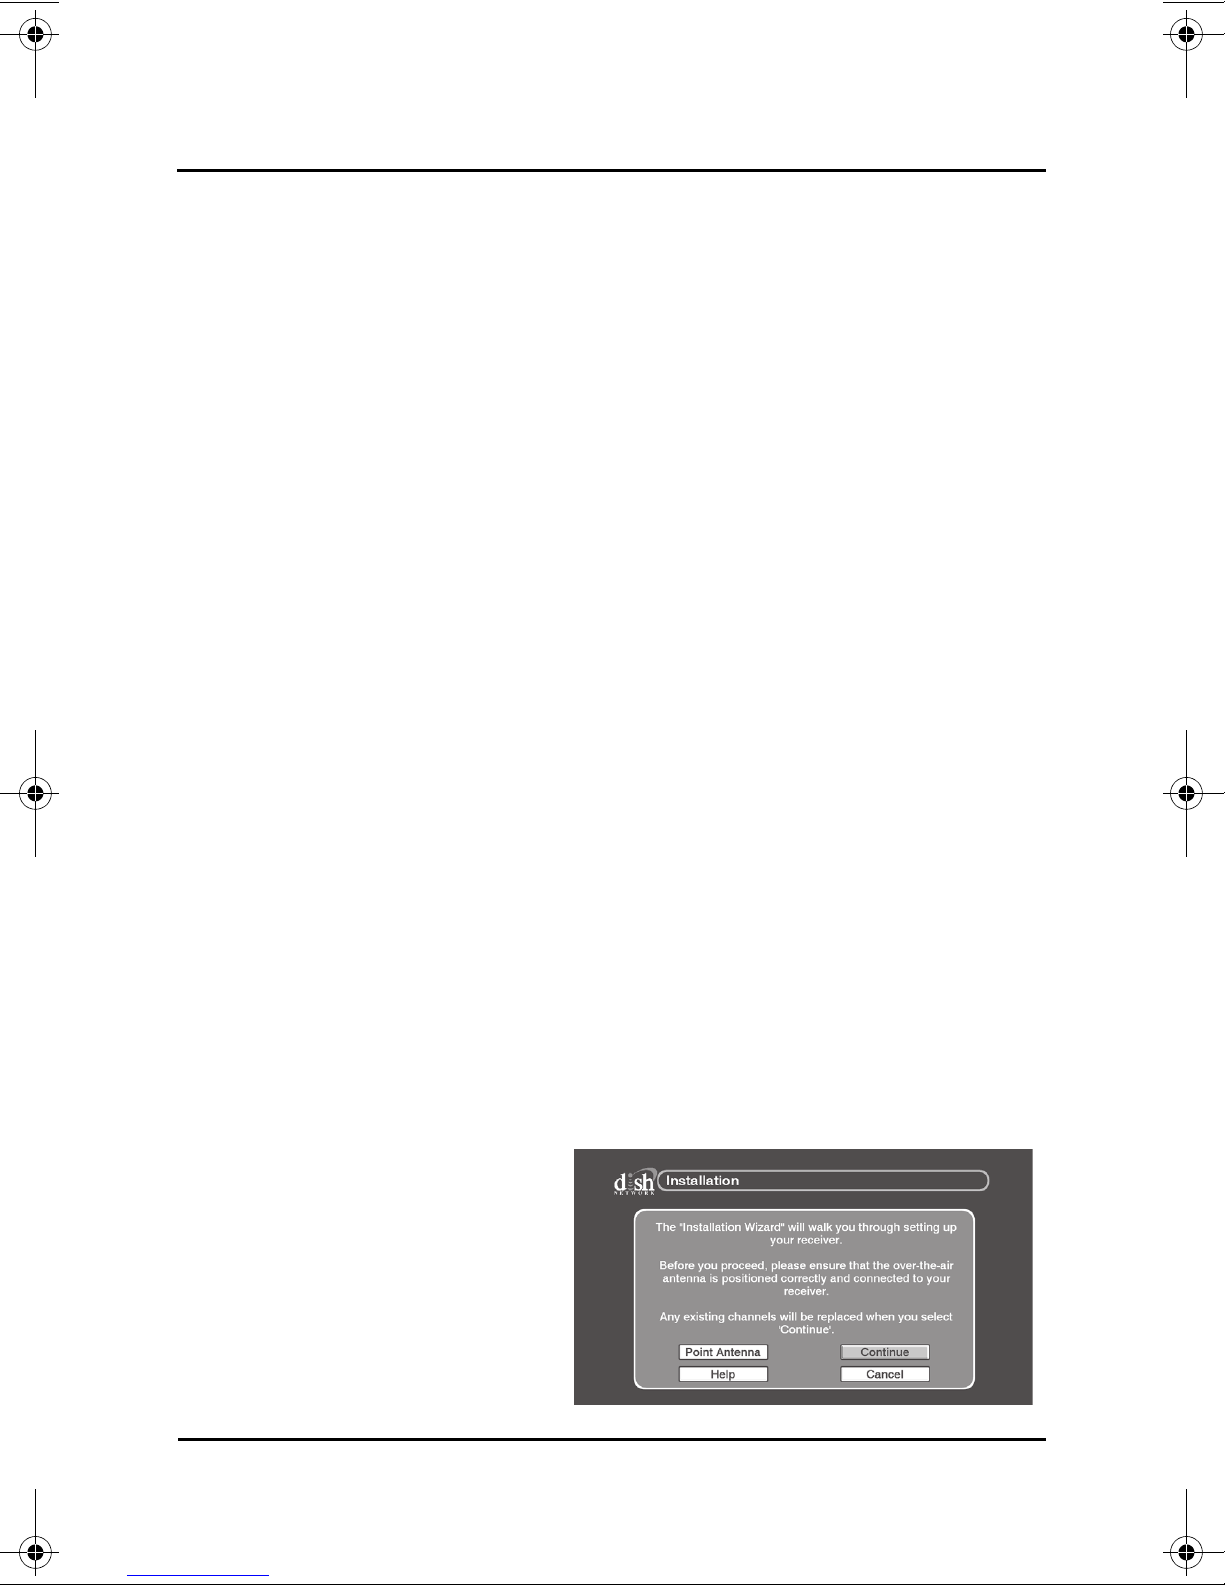
11 The first time your DTVPal
turns on, an Installation
Wizard screen appears
and guides you through the
setup process. The
Installation Wizard scans
for local digital over-the-air
channels, and helps you
set up the time zone and
TV display settings.
Page 3
YOUR DTVPAL DIGITAL-TO-ANALOG TV CONVERTER
Navigation Buttons
Downloading Guide
INSTALLATION
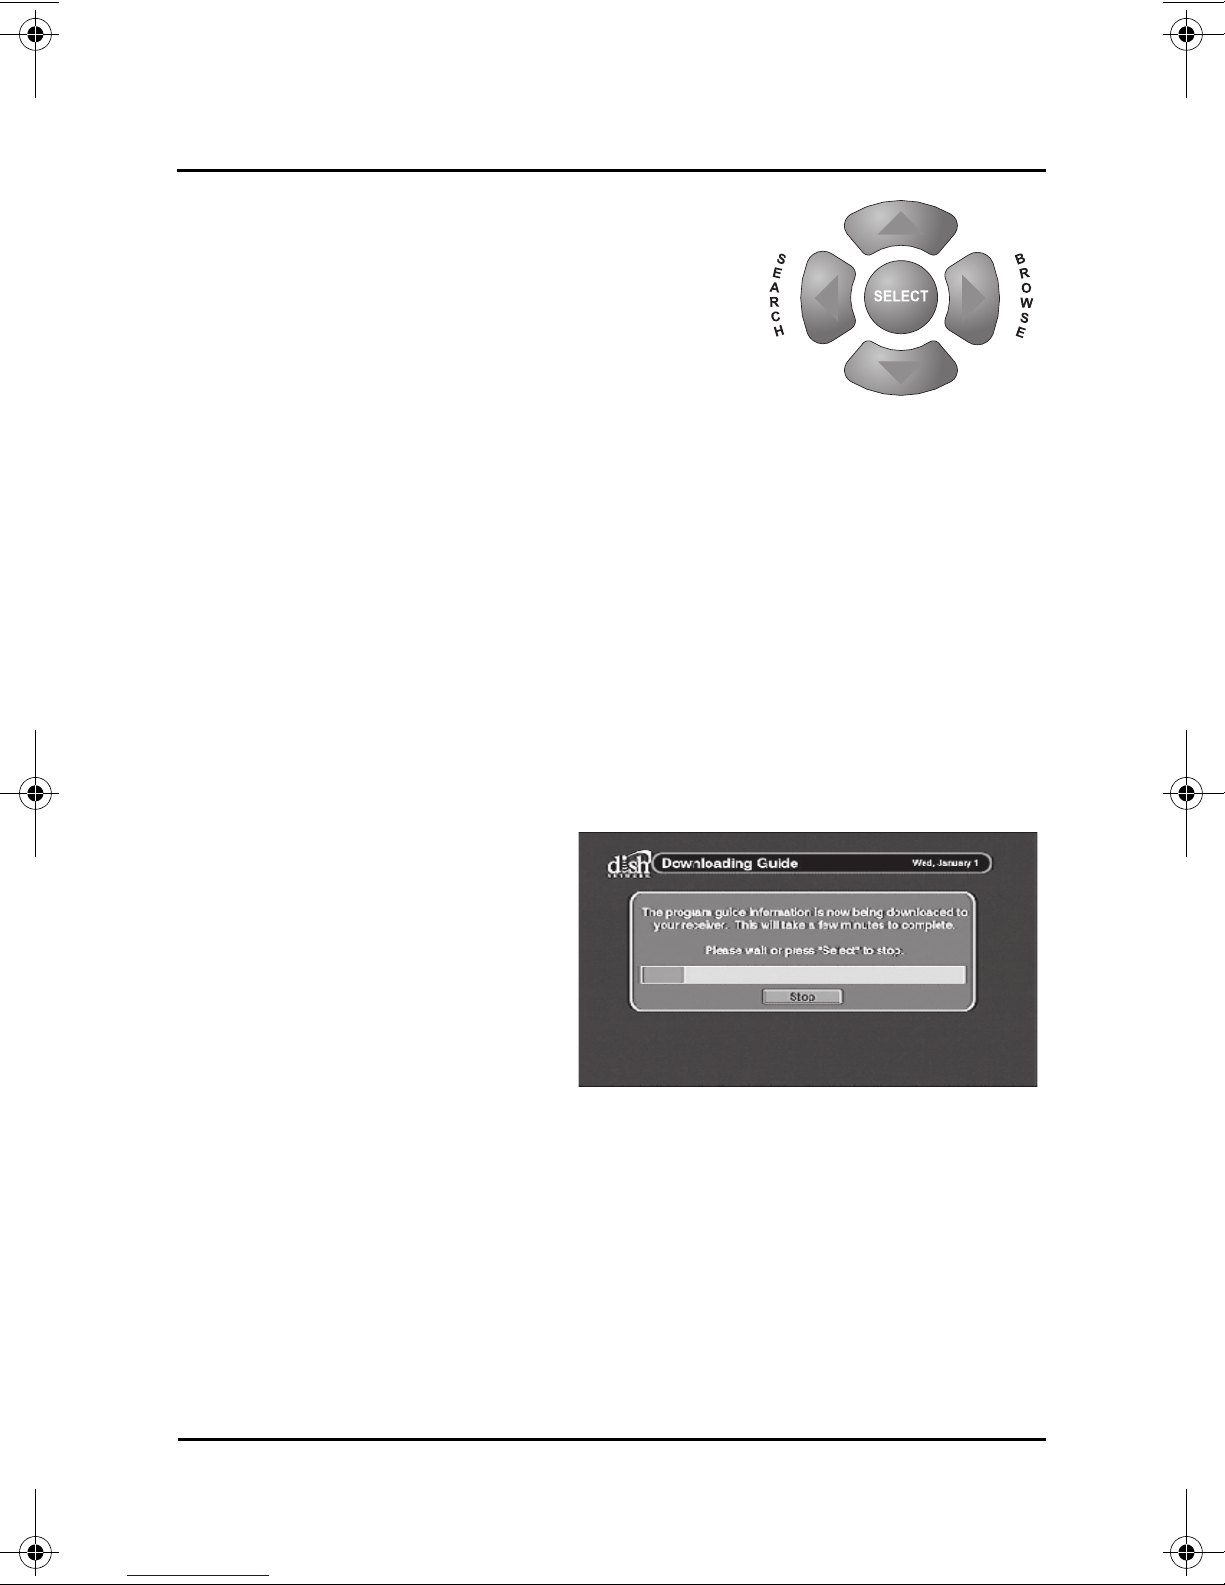
12 To navigate through the Installation Wizard,
use the SELECT button on your DTVPal
remote control to choose the highlighted
(orange) on-screen option. To highlight other
options, use the ARROW buttons.
13 Select Continue to begin the Installation
Wizard.
14 The Installation Wizard scans for local digital
over-the-air channels.
15 After the channel scan completes, you will be taken to the Set Time Zone
screen. Use the UP and DOWN ARROW buttons to find your time zone
and to set if your area follows Daylight Savings time. Select Next once
you’ve made these settings and to go to the next step.
16 The Channel 3-4 Setup screen is used to change the output channel of the
DTVPal’s TV S
Setup screen must match your TV’s channel. If you have a local or cable
channel that broadcasts on channel 3, be sure to change this setting to
channel 4. If you do this, you will also need to change your TV channel to 4.
Select Next.
ET OUT connection. The channel setting on the Channel 3-4
17 Use the ARROWS or NUMBER PAD to enter your ZIP code. Select Next.
18 The DTVPal begins to
download the Program
Guide information. This
takes a few minutes. After
the Program Guide has
downloaded, the DTVPal
will exit out to a channel.
19 Congratulations! Your
DTVPal is now installed and
ready to use! To start
watching TV, press either
the UP or DOWN ARROW buttons to change channels, or enter the
channel number using the NUMBER PAD.
Note: Some broadcasters choose to send several channels in their
broadcast range rather than just a single channel. These additional
channels are referred to as sub-channels, and are identified by a dash and
then a number (for example, channel 9-2 is a sub-channel of channel 9). To
change to a sub-channel, enter “0” before entering the channel number.
For example, to change to channel 9-2, enter “0092” on the NUMBER PAD.
Page 4
YOUR DTVPAL DIGITAL-TO-ANALOG TV CONVERTER
CHAPTER 2
THE REMOTE CONTROL
Remote Control
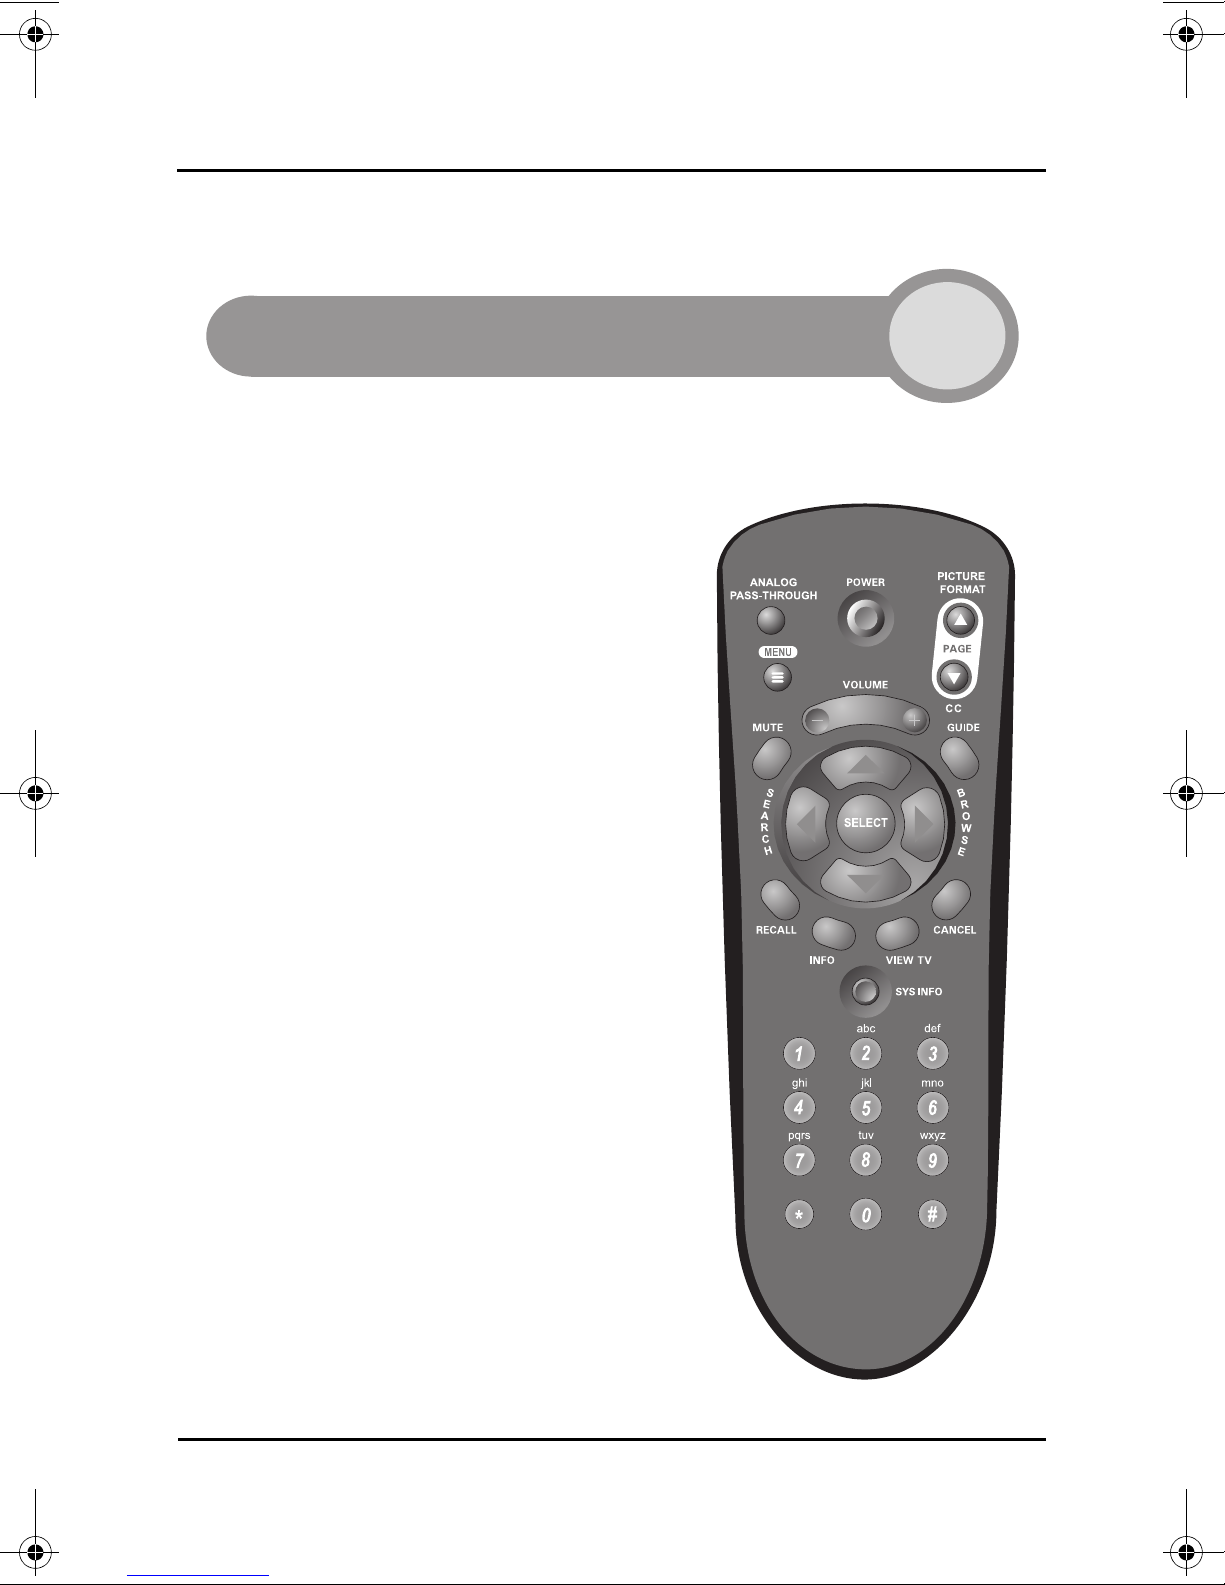
Using Your DTVPal Remote Control
THE REMOTE CONTROL
The remote control that came with your
DTVPal will operate only your DTVPal
Digital-to-Analog Converter. If you own a
universal remote control, you may be able to
program your universal remote control to
operate your DTVPal. Review the device
codes provided in your universal remote
control’s User Guide. Look for the codes
listed for EchoStar, EchoSphere, or DISH
Network.
Page 5
YOUR DTVPAL DIGITAL-TO-ANALOG TV CONVERTER
REMOTE CONTROL BUTTONS
REMOTE CONTROL BUTTONS
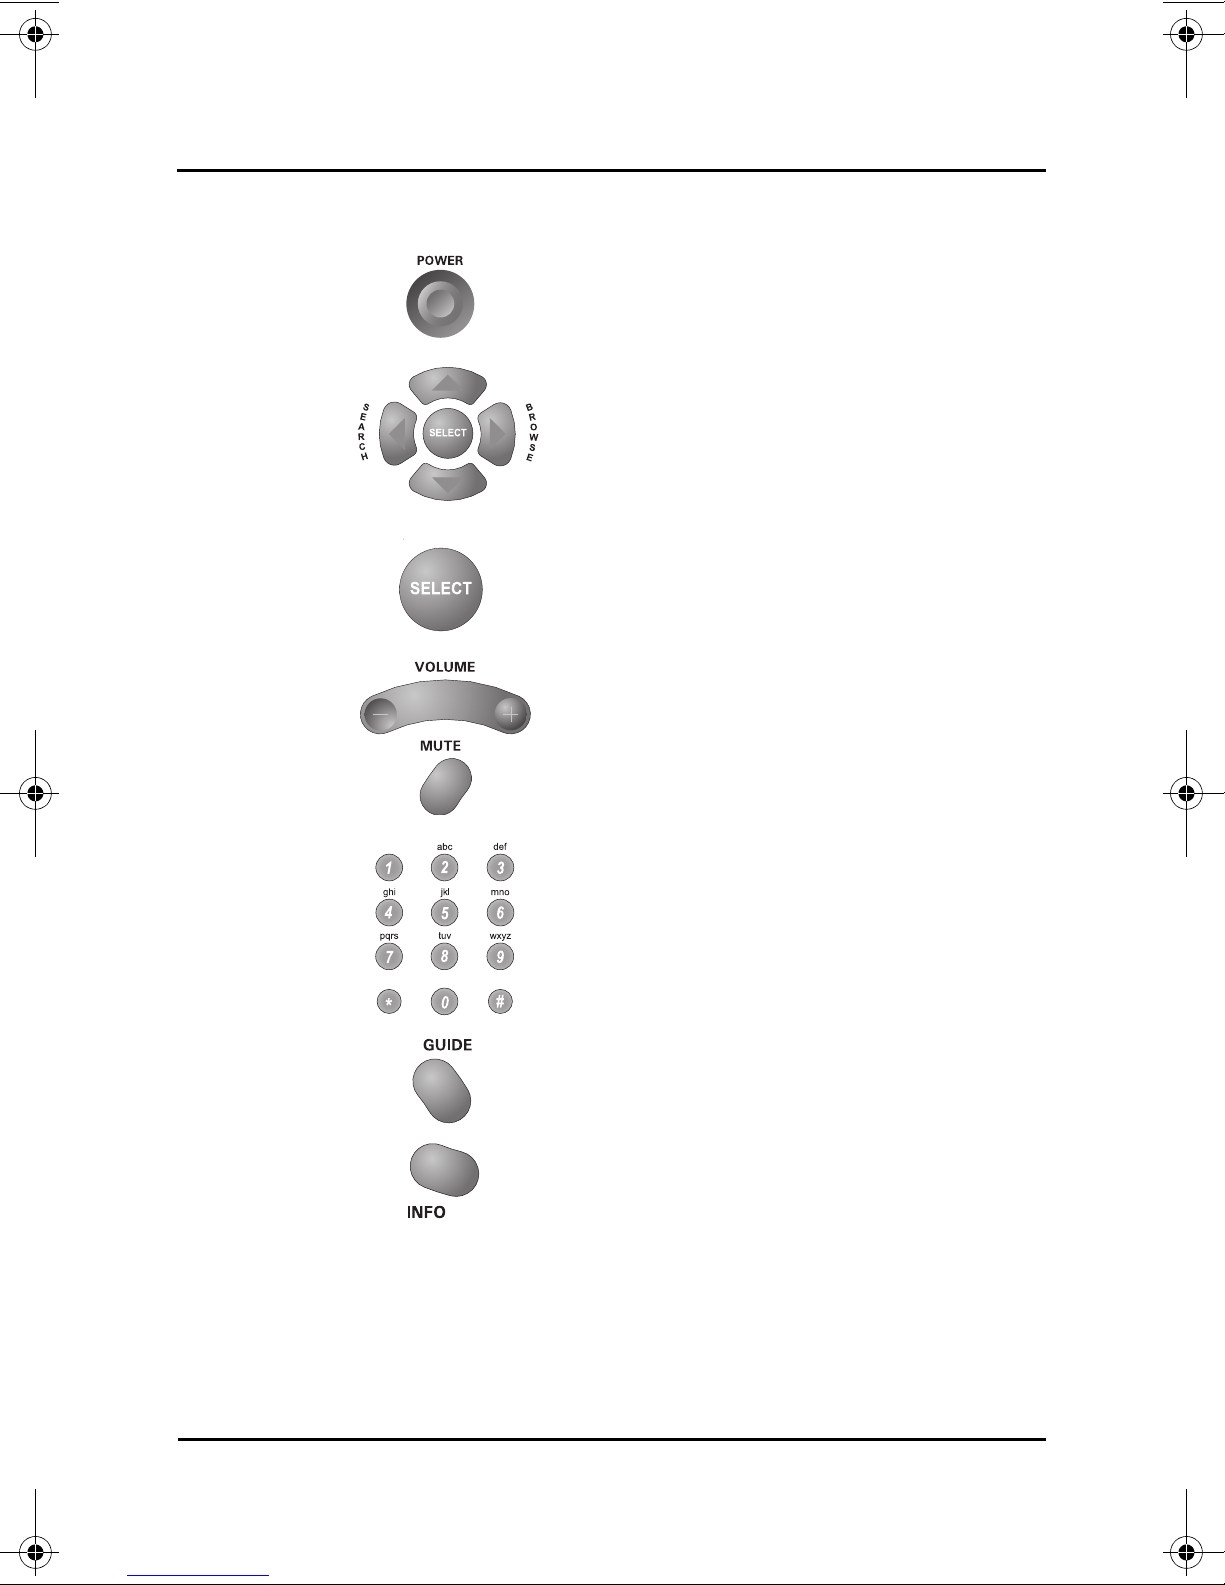
POWER Turns your DTVPal on or off.
Use the UP and DOWN ARROWS to
quickly change channels. The ARROW
ARROWS
SELECT
buttons also allow you to move through onscreen menus and highlight different
options.
Selects a highlighted on-screen option or, if
pressed while viewing a channel, displays
the program information banner.
VOLUME
and MUTE
NUMBER
PAD
GUIDE
INFO Displays program information.
Adjusts the volume level of the DTVPal or
mutes the DTVPal’s volume.
Quickly change channels by entering the
channel number, or choose numbered onscreen options.
Note: The STAR (*) and POUND (#)
buttons are not used by the DTVPal.
Opens the on-screen Program Guide,
which displays this list of available channels
and programs.
Page 6
YOUR DTVPAL DIGITAL-TO-ANALOG TV CONVERTER
REMOTE CONTROL BUTTONS
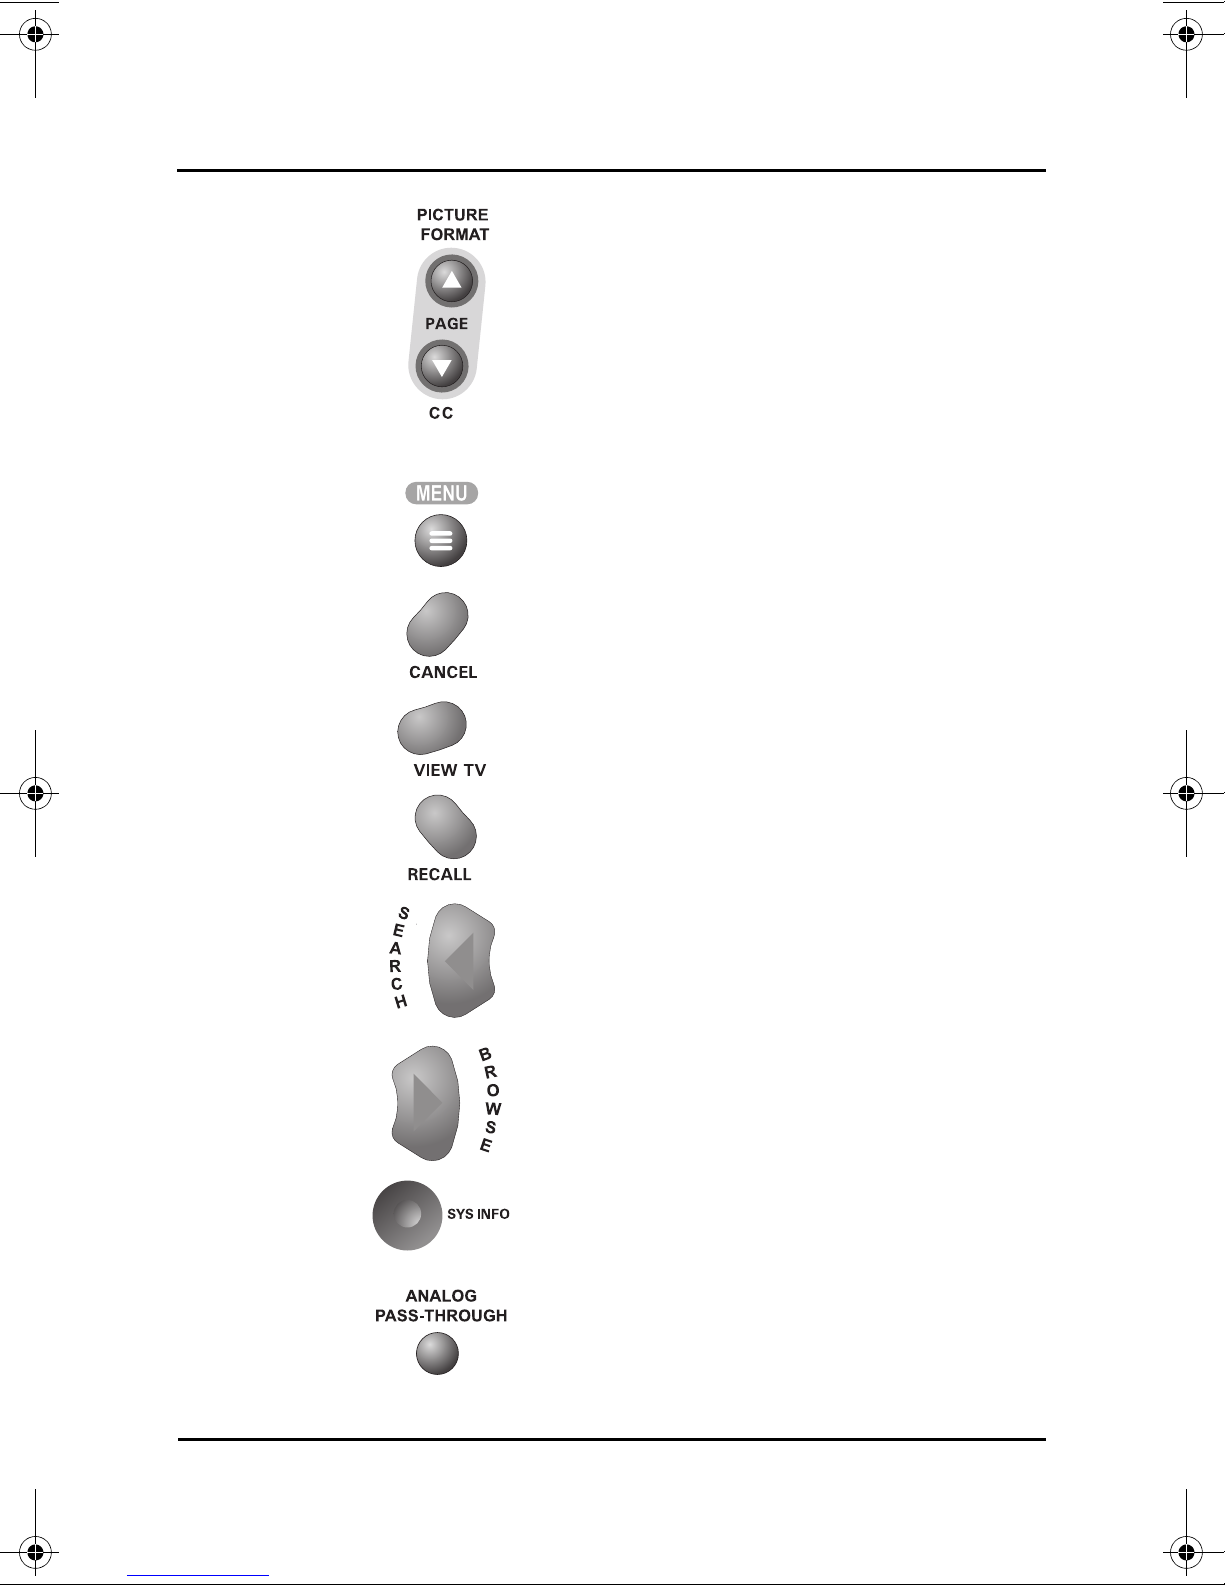
Up PAGE UP or PAGE DOWN while in the
Program Guide and other menus to move
PAGE UP
and DOWN
(PICTURE
FORMAT
and CC)
through the menus one page at a time.
While watching TV, pressing PAGE UP/
PICTURE FORMAT adjusts formatting of
programs to fit your TV screen.
Pressing PAGE DOWN/CC while watching
TV turns closed captioning on or off.
MENU
CANCEL
VIEW TV
RECALL Returns you to the previous channel.
SEARCH
BROWSE
Opens your DTVPal main menu, which
allows you to open all other DTVPal menus.
Allows you to exit out of any menu without
saving changes.
Quickly exits you all the way out of menus
to return to viewing TV.
Quickly opens the Event Search screen.
See page 11 for more details on Event
Search.
Displays the Browse Banner, allowing you
to see what is showing on other channels.
See page 11 for more details on the Browse
Banner.
SYS INFO
ANALOG
PASSTHROUGH
Opens the System Information screen,
which provides technical details on your
DTVPal.
Provides the ability to pass-through the
analog antenna signal directly to the TV,
allowing the TV’s tuner to be used for
analog channels.
Page 7

YOUR DTVPAL DIGITAL-TO-ANALOG TV CONVERTER
NOTES
NOTES
Page 8

YOUR DTVPAL DIGITAL-TO-ANALOG TV CONVERTER
CHAPTER 3
DTVPal Main Menu
USING THE MENUS
Features and Menus
Using Your DTVPal Menus and Features
USING THE MENUS
Opening the Menus
• Press the MENU button on the remote control to open your
DTVPal’s Main Menu. You can open all other menus and options
from the Main Menu.
• While watching TV, other remote control buttons provide quick access to
certain menus of your DTVPal.
– GUIDE opens the Program Guide.
– SEARCH opens the Event Search screen.
– BROWSE opens the Browse Banner.
Navigating the Menus and Selecting Options
• Use the remote control ARROW buttons to move the highlight to your
desired option. The option that is highlighted will be orange in color. In the
Program Guide, the highlighted program is dark blue.
• To choose a highlighted option, press SELECT.
• If the option has a number on it, you can quickly select the option by
pressing that number on the NUMBER PAD.
Page 9
YOUR DTVPAL DIGITAL-TO-ANALOG TV CONVERTER
Program Guide
WATCHING TV
Closing the Menus
There are several ways to exit out of the on-screen menus.
• Select Done to save any changes you’ve made in a menu.
• Press CANCEL (or select Cancel) to exit a menu without saving changes.
• Press VIEW TV to exit out of all the menus and return to watching TV.
• Menus will automatically close after several minutes of inactivity.
WATCHING TV
Press the UP or DOWN ARROWS to move through the available channels one
channel at a time. If you know the channel’s number, you can enter the channel
number using the remote control’s NUMBER PAD.
To change to a sub-channel, enter “0” before entering the channel number. For
example, to change to channel 9-2, enter “0092” on the NUMBER PAD. See
page 4 for an explanation of sub-channels.
Press INFO while watching TV or while in the Program Guide to view additional
information on the program.
Note: To view Closed Captioning information, you must either enable Closed
Captions through your DTVPal menus (press the CC button on the remote
control or see page 18), or enable the display of Closed Captioning using your
TV’s menus (refer to your TV’s user guide).
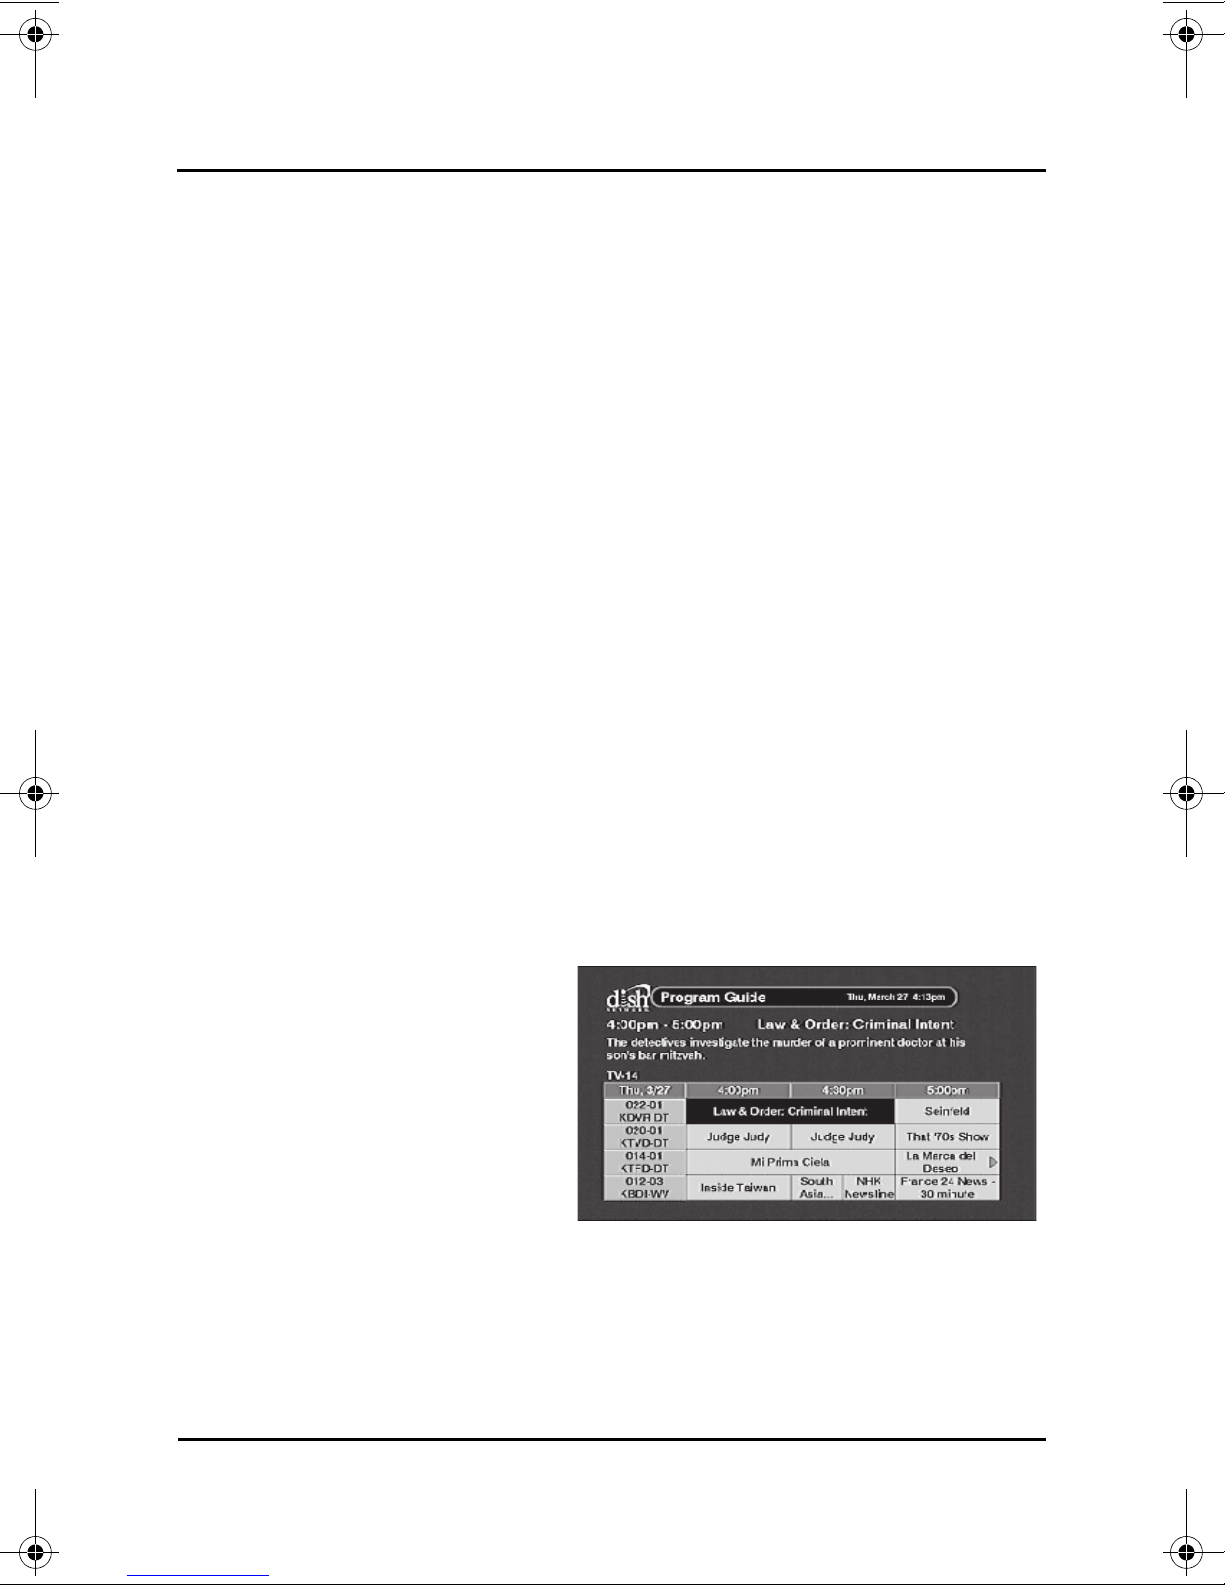
FINDING PROGRAMS
Finding Programs Using
the Program Guide
The Program Guide displays the
list of digital over-the-air channels
and programs. The top of the
Program Guide displays the date,
time, and title of the program that
is highlighted.
Note: Program Guide information
is provided by the local channel
broadcasters. The amount of guide information available varies by channel.
• Use the ARROW buttons to move through the Program Guide.
• Use the PAGE UP or PAGE DOWN buttons to move through the Program
Guide one page at a time.
Page 10
YOUR DTVPAL DIGITAL-TO-ANALOG TV CONVERTER
Browse Banner
Event Search
FINDING PROGRAMS
• Press SELECT on a highlighted program to view program. Press SELECT
on a future program to create an event timer for the program.
• Press INFO to view additional information about the highlighted program.
• Use the NUMBER PAD to quickly move to a specific channel.
• Exit the Program Guide by pressing VIEW TV or CANCEL.
Finding Programs using Browse
You can see what’s showing on
other channels without having to
use the Program Guide by
opening the Browse Banner.
Press the BROWSE (RIGHT
ARROW) button on the remote
control. You can see the current
and upcoming programs on
other channels at the bottom of
the screen. The information for
the channel you are currently
watching appears at the top of the screen.
To view what’s showing on other channels, press the UP or DOWN ARROW
while the Browse Banner is open.
Finding Programs Using Event Search
Event Search lets you search for
programs by a specific name or
description. Open Event Search
by pressing SEARCH (LEFT
ARROW), or press MENU, then
select Event Search.
• Search lets you enter a
program name or
description using the onscreen keypad.
• History displays previous searches you have saved.
• Options lets you narrow your search by title, description, or both.
• Save lets you store a search so you can search using the same keyword in
the future without having to re-enter it.
• Select Done to exit when you’ve finished searching for programs.
Page 11
YOUR DTVPAL DIGITAL-TO-ANALOG TV CONVERTER
Timers List
Create Timer Screen
Reminder Popup
USING EVENT TIMERS
USING EVENT TIMERS
You can create a timer to automatically change channels at a certain time.
Creating an Event Timer
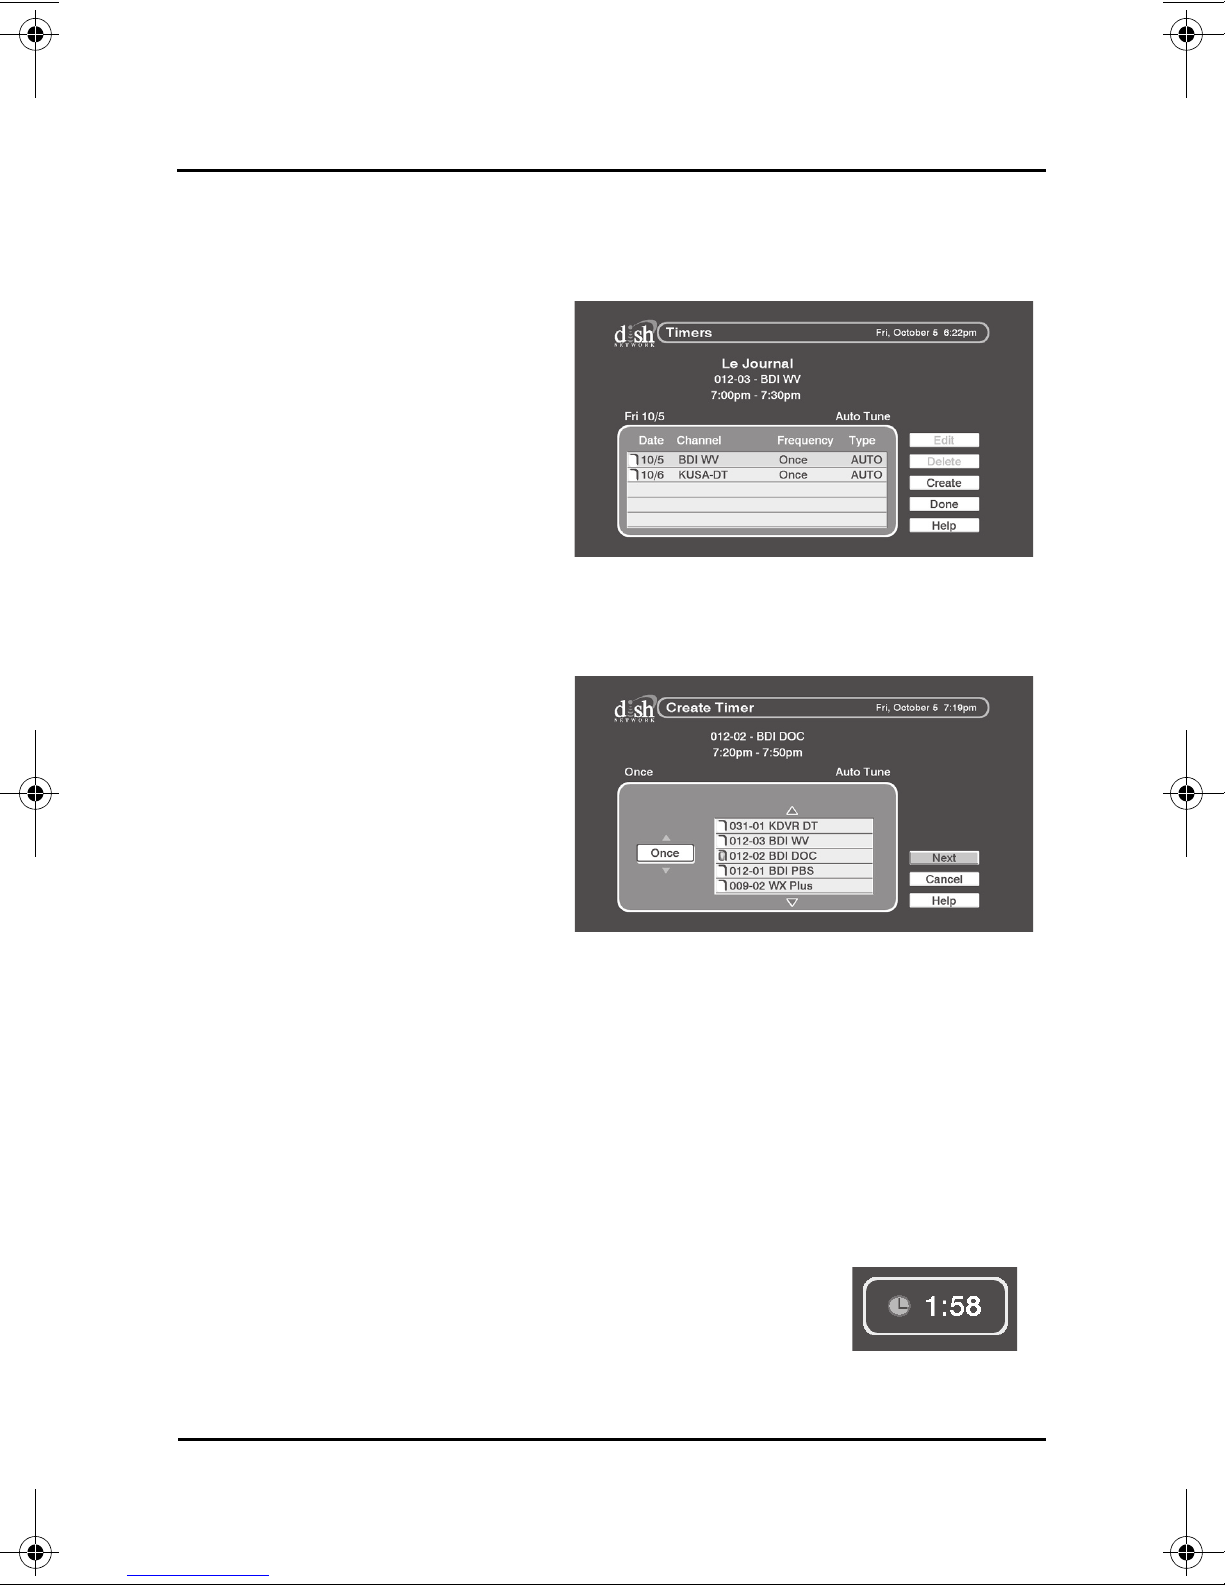
1 Select a program coming on
in the future from the
Program Guide, Browse
Banner, or the Event
Search results. Or, to create
a timer from the Timers
menu, press the MENU
button, select Setup, then
select Timers.
Note: From the Timers screen, you can delete existing timers by selecting
them from the Timers List, then selecting Delete.
2 For a new timer, select
Create. To edit an existing
timer, select it from the list of
timers, then select Edit.
3 Select how often you want
the timer to occur under
Repeat. Choose Once for
one-time events (this is the
default choice if creating a
timer through the Program
Guide), Daily for programs
on at the same time every day, Weekly for programs on once a week, or
Mon-Fri for programs on Monday through Friday.
4 Select the channel you want to change to when the event timer occurs,
then select Next.
5 Choose the Time and Date for when you want the timer to occur. Select
Done to create the event timer.
When the Event Timer Occurs
A few minutes before the event timer occurs, you will
receive a reminder popup. If you press SELECT on the
popup, a menu appears where you can select the Timer
Icon to dismiss the popup (the timer will still occur), select
Watch to change to the channel right away, or select
Stop Timer to dismiss the popup and ignore the timer.
Page 12
YOUR DTVPAL DIGITAL-TO-ANALOG TV CONVERTER
Setup Menu
CUSTOMIZING YOUR DTVPAL
Customizing Your DTVPal
CHAPTER 4
Customizing Your DTVPal Settings to Fit Your Needs
CUSTOMIZING YOUR DTVPAL
There are several options to customize your DTVPal. This chapter walks you
through setting up preferences on your DTVPal to match your viewing needs.
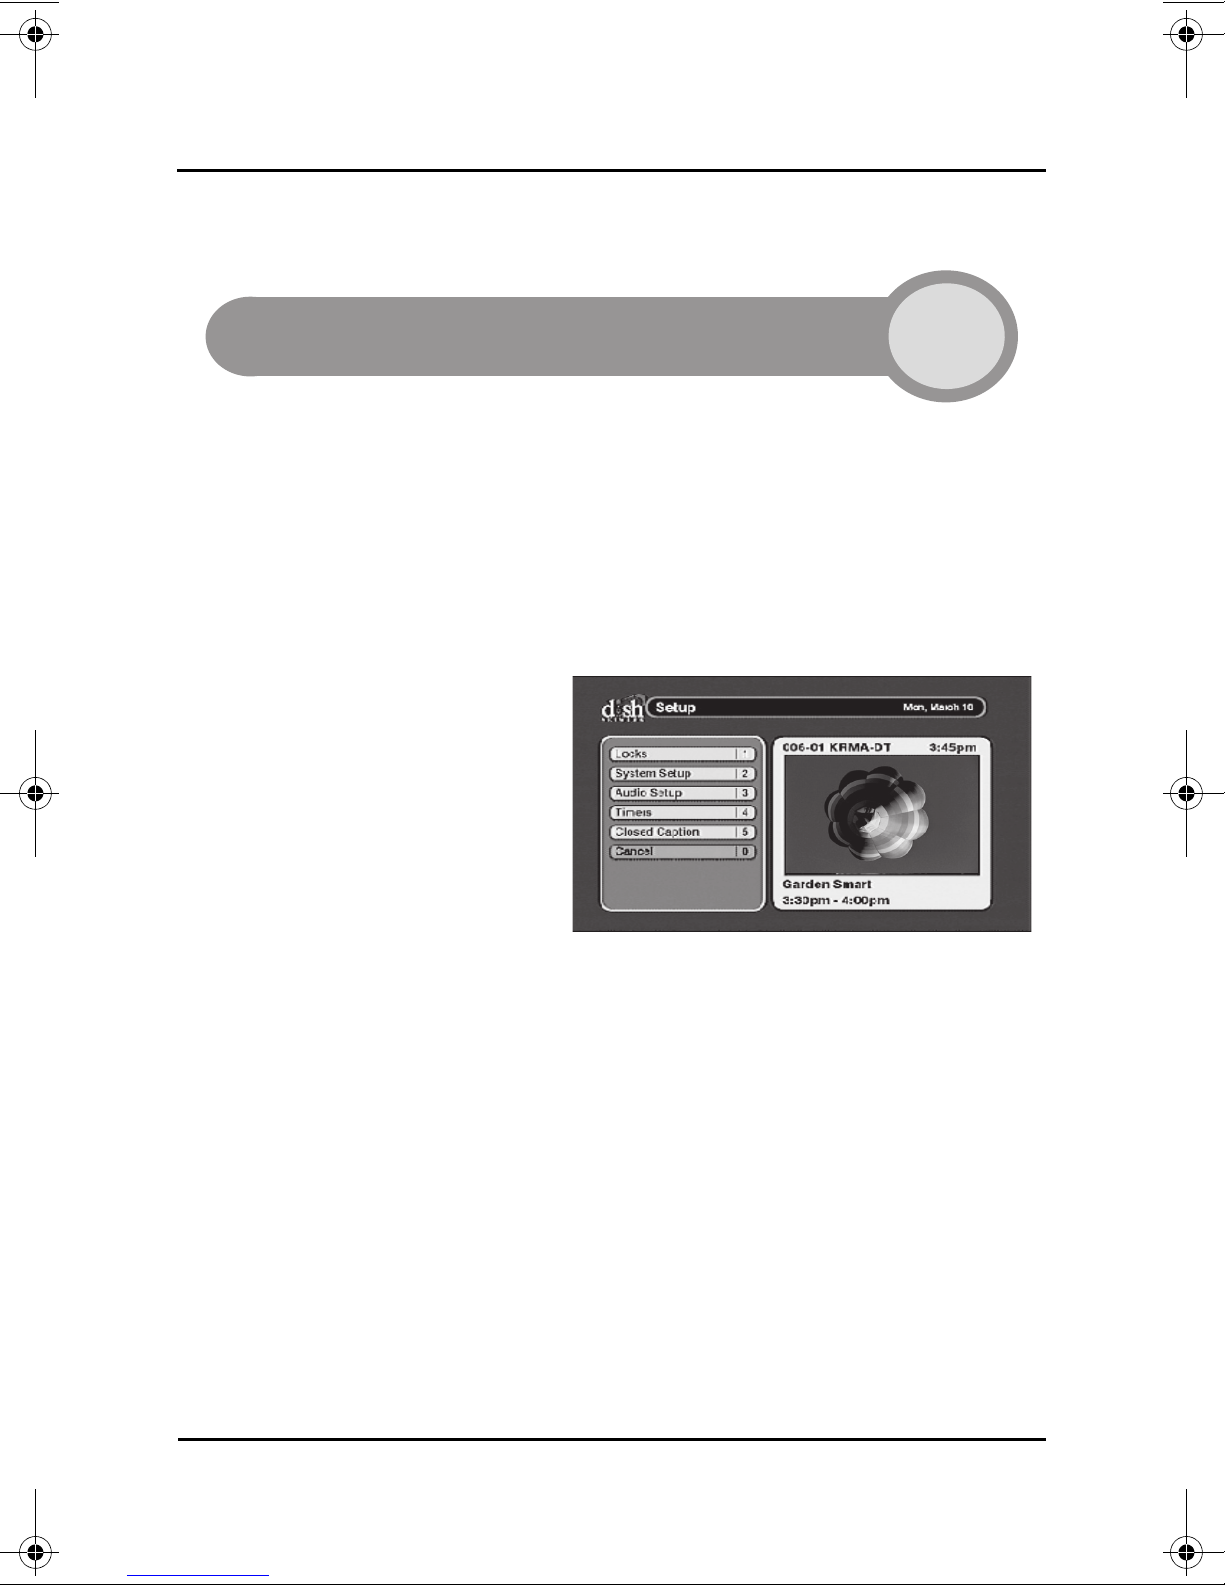
Setup Menu
Access the Setup menu by
pressing MENU on the remote
control and selecting Setup from
the DTVPal main menu.
The Setup menu includes the
following options:
• Locks—prevent specific
channels or programs from
being viewed based on
settings you choose. See
the Locks section on
page 14.
• System Setup—includes additional menus for customizing your receiver.
See the System Setup section on page 16.
• Audio Setup—allows you to choose the language and the audio output
type (mono or stereo) for your DTVPal’s composite (RCA-type)
connections.
• Timers—allows you to create an event timer. See Using Event Timers on
page 12.
• Closed Captions—enables display of closed captions through your
DTVPal. See Closed Caption on page 18.
Page 13
YOUR DTVPAL DIGITAL-TO-ANALOG TV CONVERTER
Locks Menu
Channel Settings
LOCKS
LOCKS
Locks allow you to block channels or programs by requiring a password to be
entered before they can be viewed.
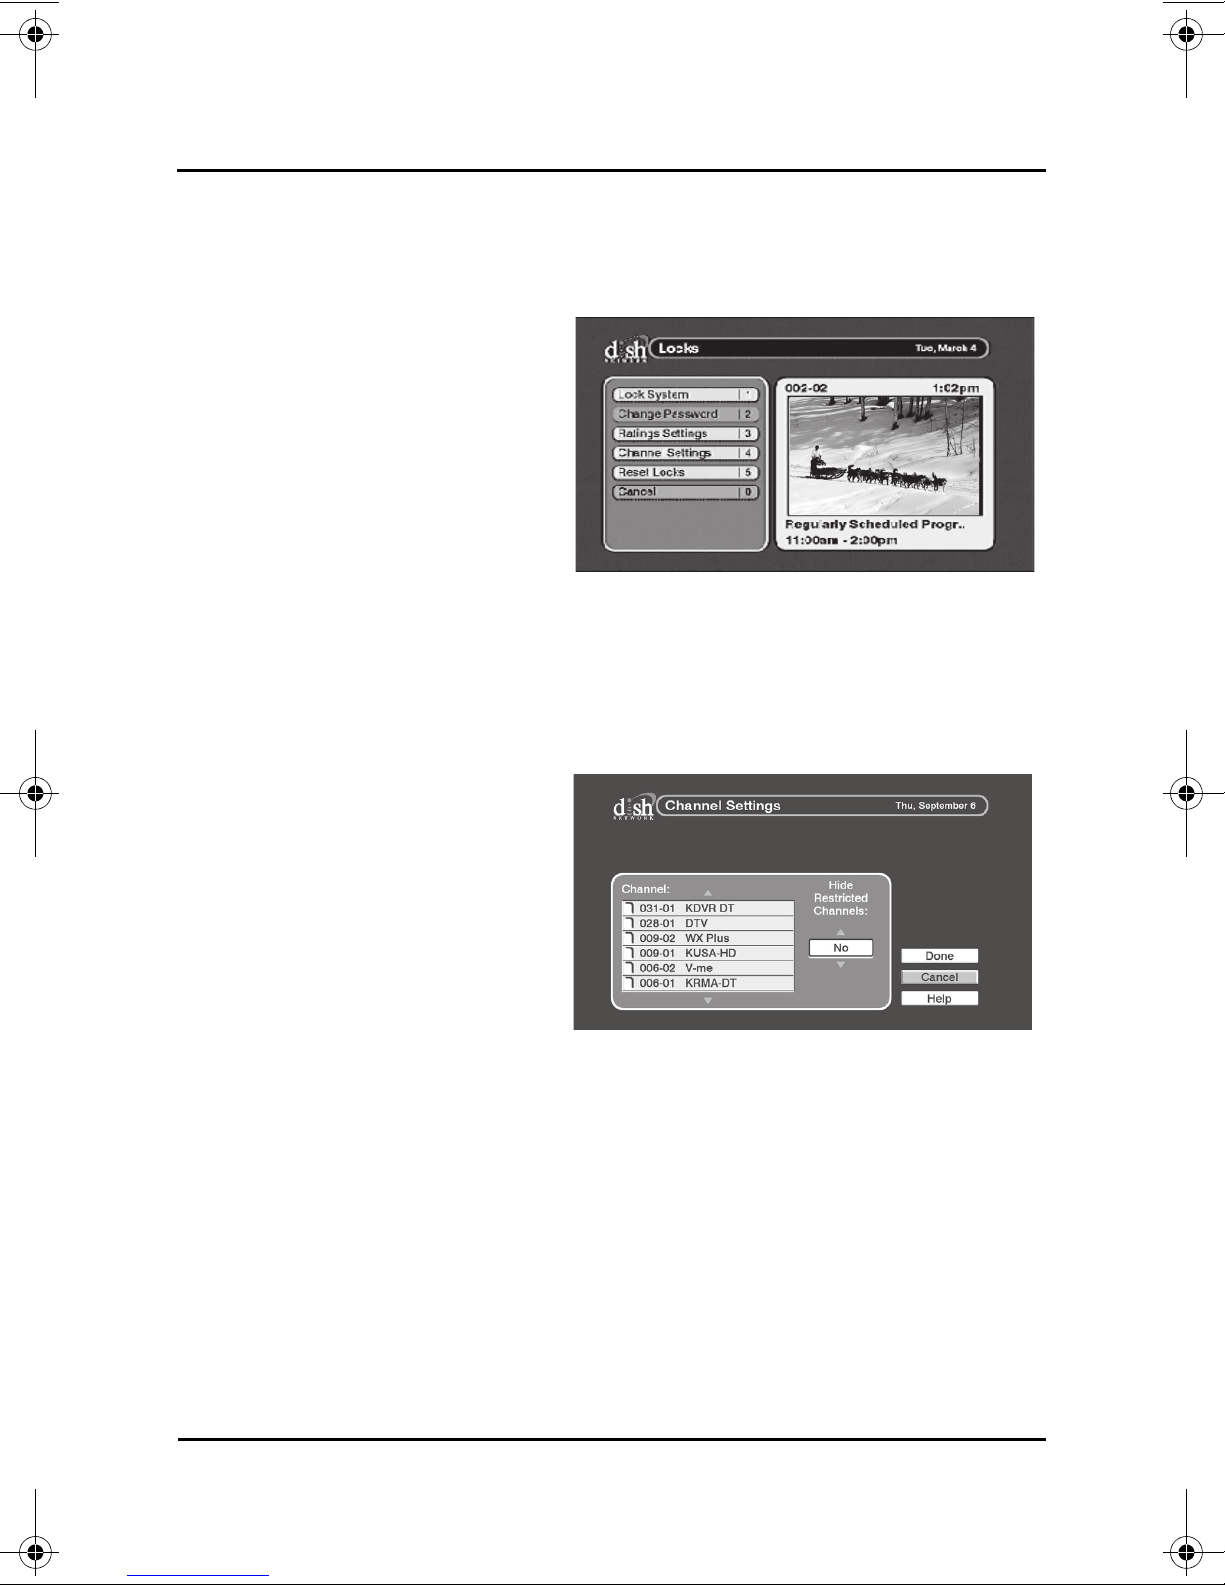
Access the Locks menu by
pressing MENU on the remote
control, selecting Setup, then
selecting Locks, then following
the steps below. If you previously
set a password, you’ll need to
enter the password to access the
Locks menu. After you choose
your Locks settings, you’ll need
to create a password and lock
the system for the Locks to take
effect.
Locking Specific Channels
To require a password to be entered to view specific channels:
1Select Channel Settings
from the Locks menu.
2 Use the UP and DOWN
ARROWS to find the
channels you want to block.
Press SELECT to include
the channel in the list of
locked channels. A channel
is selected when it has a
filled-in box next to it.
3 If you want to hide the
selected channels from being displayed in the Program Guide and other
channel lists, select Yes under Hide Restricted Channels. Select Done to
save your changes.
4 Follow the steps in Locking the Receiver to apply the channel locks.
Locking Programs Based on Ratings
Your DTVPal supports a variety of ratings categories. These ratings depend on
information about the program included by the broadcaster. Broadcasters may
use the Age and Content Guidelines, or the MPAA (Motion Picture Association
of America) Guidelines.
Page 14
YOUR DTVPAL DIGITAL-TO-ANALOG TV CONVERTER
Ratings Settings
System Lock Password
LOCKS
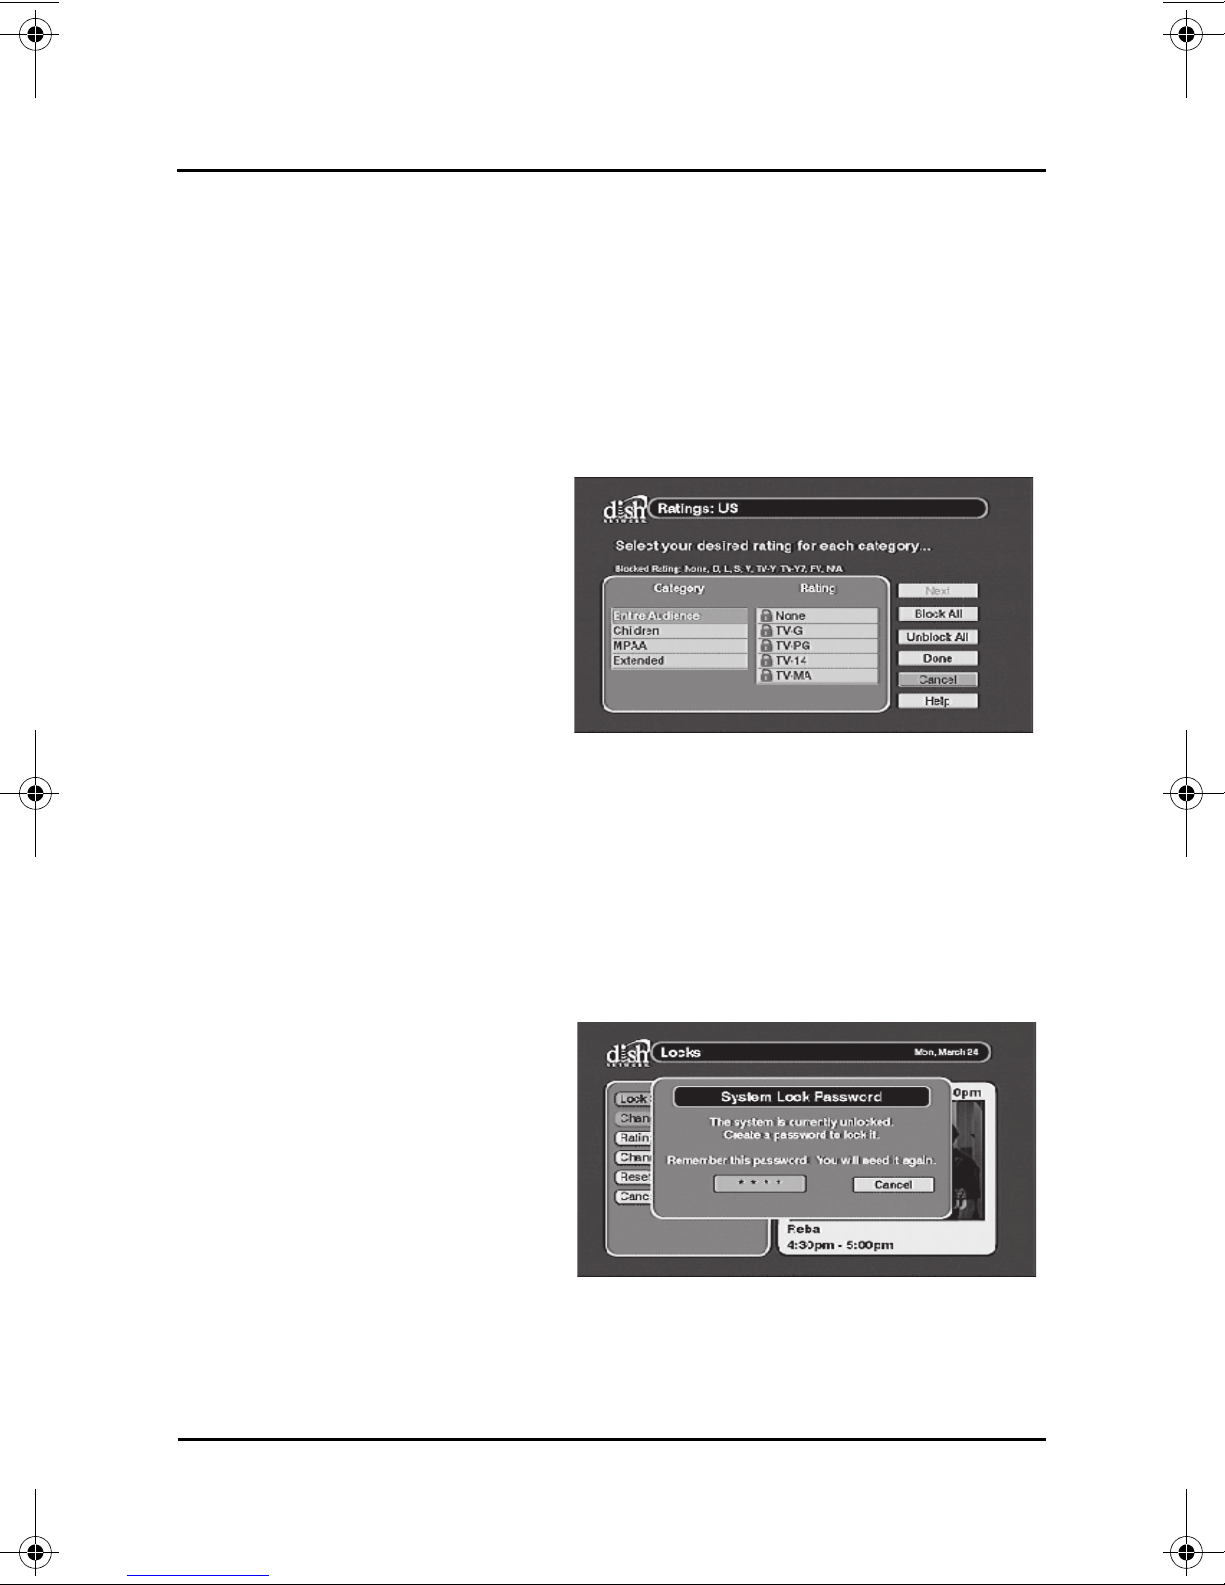
• Entire Audience—Includes rating categories None, TV-G, TV-PG, TV-14,
and TV-MA.
• Children—Includes rating categories TV-Y and TV-Y7.
• MPAA (Motion Picture Association of America)—Includes rating categories
N/A, G, PG, PG-13, R, and NC-17.
• Extended—Includes rating categories Dialog, Language, Sex, Violence,
and Fantasy Violence.
To block programs based on rating, use the following steps:
1Select Ratings Settings
from the Locks menu.
2 To easily lock (or unlock) all
categories select Block All
or Unblock All.
3 To edit a specific category,
highlight the category.
4 For that Category, press
SELECT on the highest
Rating you want to be
viewed without a password. Anything with a rating higher than that will
require entering your password before viewing. For example, if you select
TV-G, programs with None or TV-G can be viewed without a password.
5Select Done to save your changes.
6 Follow the steps in Locking the Receiver to apply the ratings locks.
Locking the Receiver
After you set the channel locks
and the ratings locks, you must
lock the receiver for the settings
to take effect. To lock the
receiver, select Lock System on
the Locks menu.
• If you already have a
password, enter it using the
remote’s NUMBER PAD.
• Enter a password using the
NUMBER PAD on the remote control in the Password field.
• Enter the new password again when prompted. Your DTVPal is now
locked.
Page 15
YOUR DTVPAL DIGITAL-TO-ANALOG TV CONVERTER
System Setup Menu
Installation Menu
Channel Setup
SYSTEM SETUP
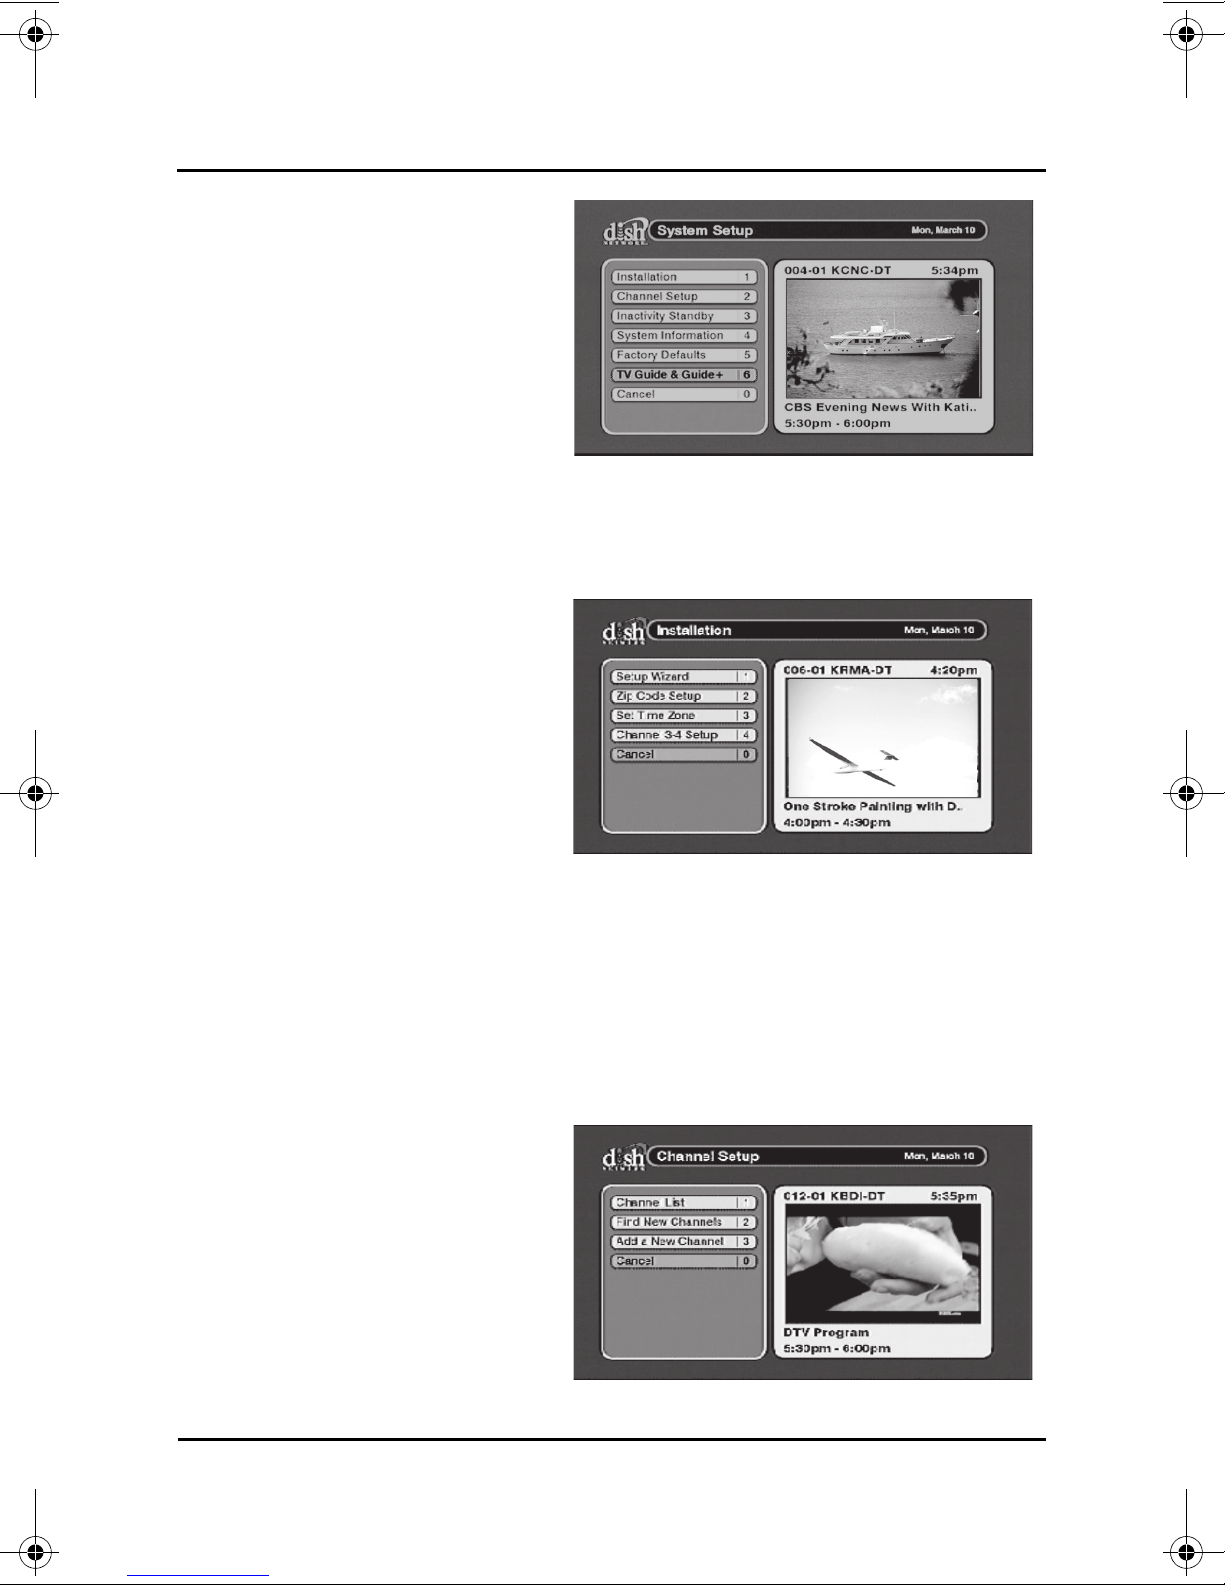
SYSTEM SETUP
The System Setup menu has
additional customization options.
Open the System Setup menu
by pressing MENU on the
remote control, selecting Setup,
then selecting System Setup.
System Setup—
Installation
The Installation menu contains the menus for the settings that were chosen
during the Installation Wizard initial setup.
• Select Setup Wizard to run
the Installation Wizard
again.
• Select ZIP Code Setup to
change or enter your ZIP
code.
• Select Set Time Zone to
change or enter your time
zone.
• Select Channel 3-4 Setup
to change the output channel of the TV S
needs to be tuned to the same channel set here (either 3 or 4).
ET OUT connection. Your TV
System Setup—Channel Setup
The Channel Setup menu provides several options to manage the channels in
your program guide. Select Channel Setup from the System Setup menu.
• Select Channel List to
rename or delete channels
in your Program Guide.
• Select Find New Channels
to have your DTVPal scan
for new channels.
• Select Add a New Channel
to add an over-the-air
channel by entering specific
channel information.
Page 16
YOUR DTVPAL DIGITAL-TO-ANALOG TV CONVERTER
Inactivity Standby
System Information Screen
Resetting Factory Defaults
SYSTEM SETUP
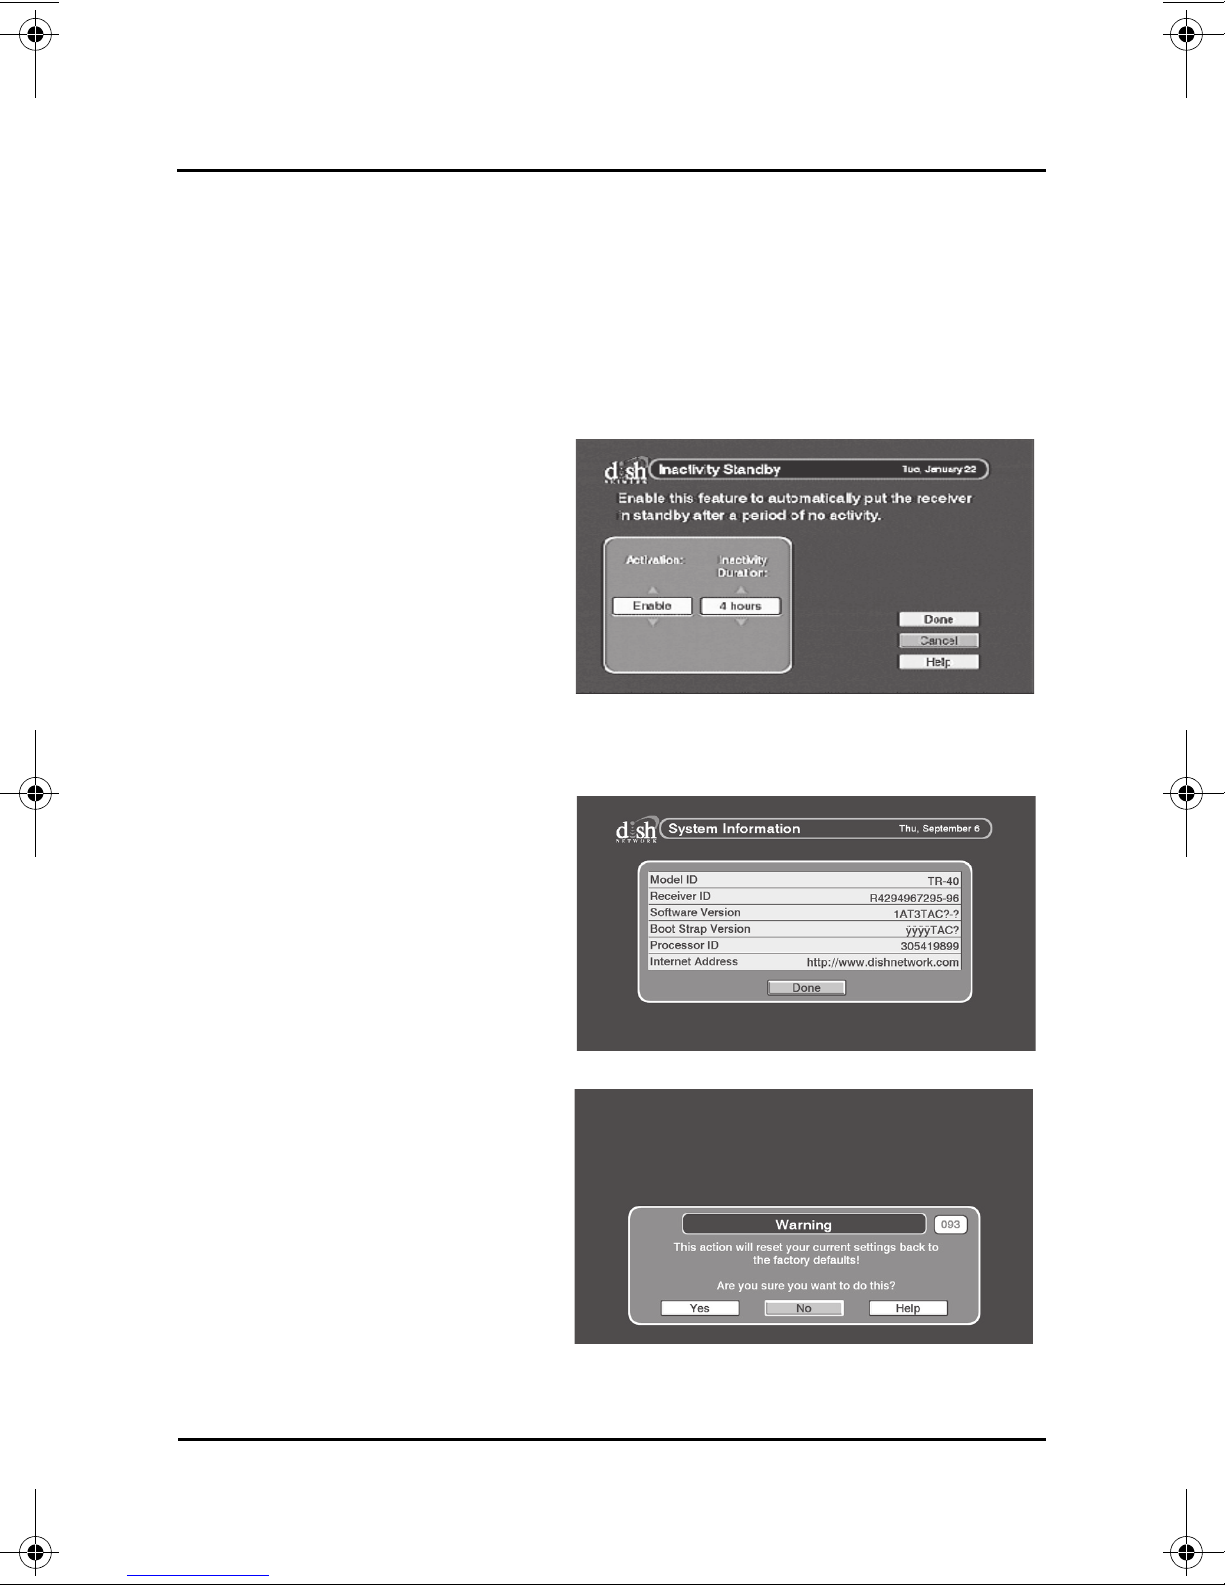
System Setup—Inactivity Standby
Inactivity Standby automatically turns your DTVPal off when it has not been
used for a specified number of hours (default is four hours). It is recommended
to leave this setting on Enable, as it allows the receiver to perform basic
maintenance.
To change or disable this feature, select Inactivity Standby from the System
Setup menu.
• Select Enable to turn this
feature on or Disable to turn
this feature off.
• Adjust how long your
DTVPal waits before
automatically turning off by
changing the setting under
Inactivity Duration.
System Setup—System
Information
The System Information screen
displays technical information
about your DTVPal. To open the
System Information screen,
select System Information from
the System Setup menu, or
press the SYS INFO button on
the remote control.
System Setup—Factory
Defaults
Use the Factory Defaults option
to reset your DTVPal to the
settings it had when you first got
it. Select Factory Defaults from
the System Setup menu. A popup window appears—select Yes
to reset to Factory Defaults.
Note: You will need to rescan
your channels (see page 16) after resetting factory defaults.
Page 17
YOUR DTVPAL DIGITAL-TO-ANALOG TV CONVERTER
Audio Setup Screen
Closed Caption Setup
AUDIO SETUP
System Setup—TV Guide Setup
If your analog TV supports TV Guide On Screen or Guide Plus, use this option
to set up your DTVPal to continue using the TV Guide On Screen and Guide
Plus listings. See page 23 for detailed setup instructions.
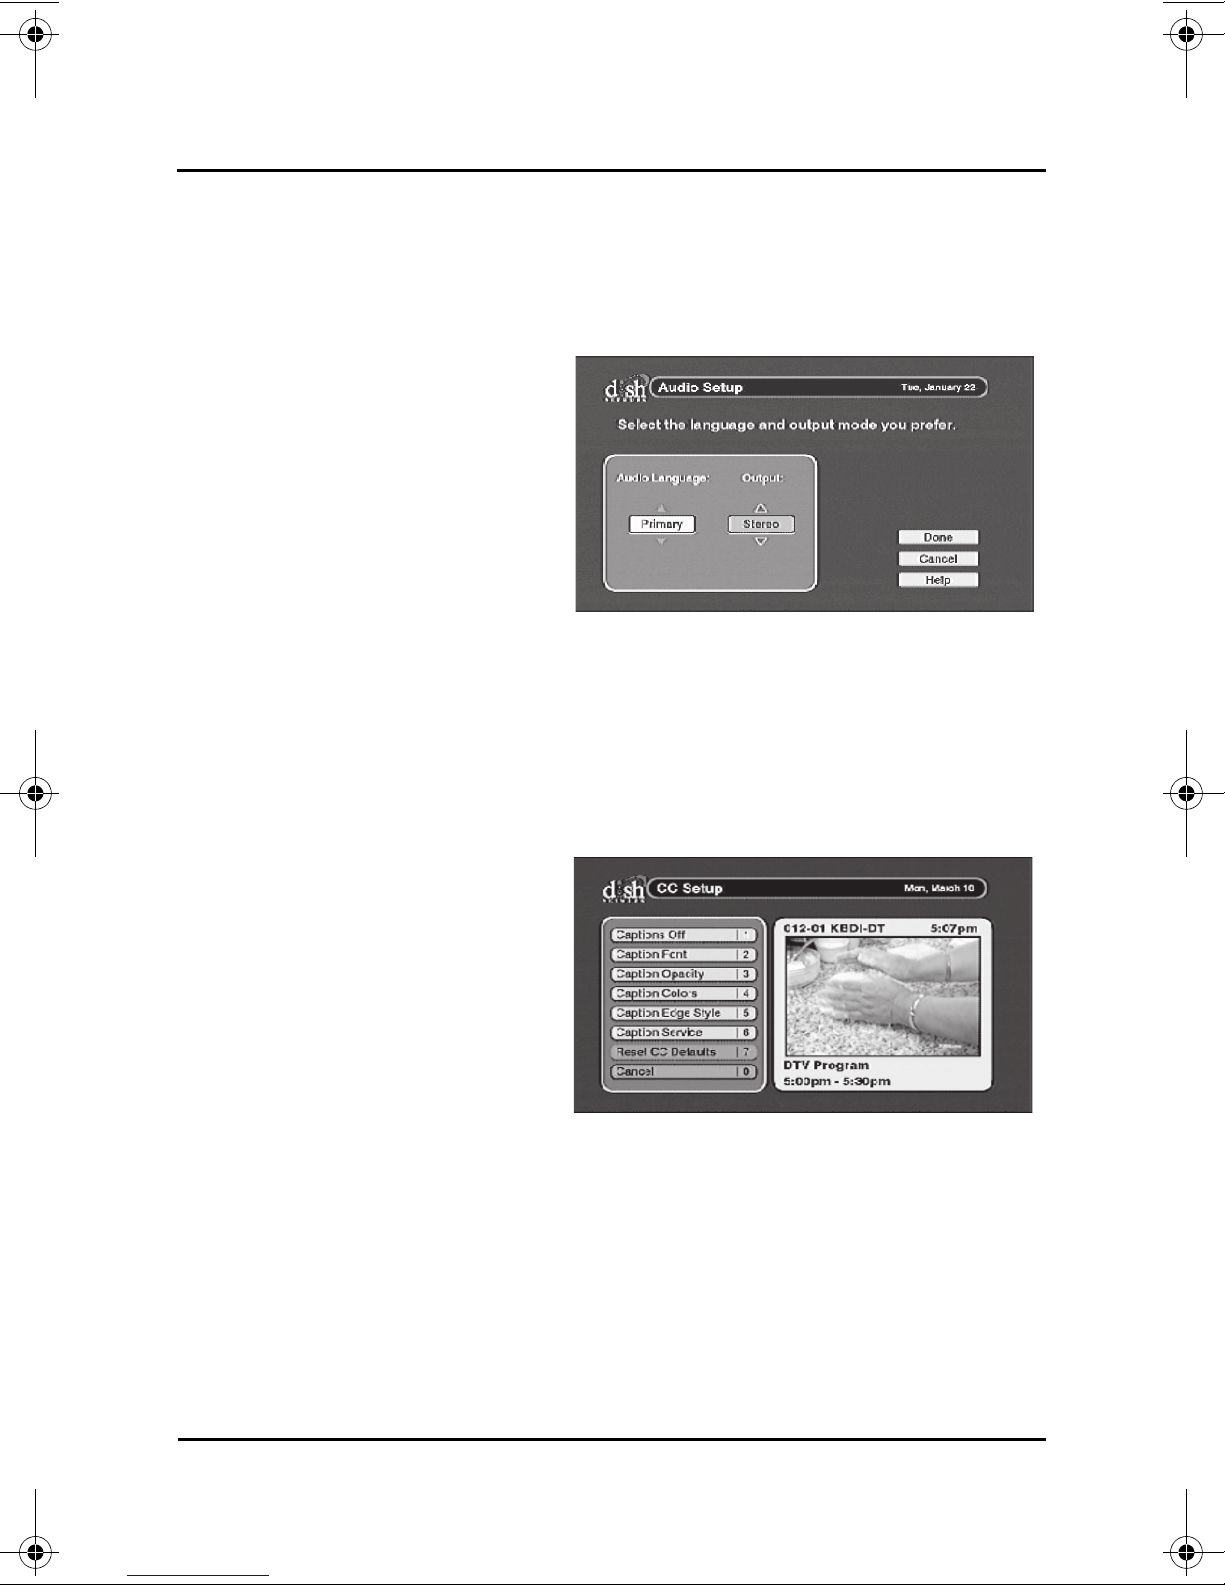
AUDIO SETUP
Use the Audio Setup menu to
choose the language setting and
the audio output mode.
• Audio Language: Choose
Primary to hear the primary
audio language. Choose
Alternative to hear the
alternate audio, which may
include an alternate
language, if provided by the broadcaster.
• Output: Sets the audio output type for the composite (RCA-type) audio
outputs. Choose Stereo if you have a stereo TV. Choose Mono if your TV
only supports mono audio output. Refer to your TV’s User Guide to
determine if your TV supports mono or stereo audio.
CLOSED CAPTION
Use the Closed Caption menu to
use your DTVPal to display
closed captions, if available on
that channel.
• Captions Off (or On):
Choose On to display
closed captions or Off to
disable closed captions.
• Caption Font: Select a desired font size and style.
• Caption Opacity: Set the background and foreground opacity of closed
captions.
• Caption Colors: Choose the background and foreground colors of closed
captions.
• Caption Edge Style: Set the edge style and color of closed caption text.
• Caption Service: Select the service you want to use.
• Reset CC Defaults: Reset all closed caption settings to the default setting.
Page 18
YOUR DTVPAL DIGITAL-TO-ANALOG TV CONVERTER
TROUBLESHOOTING
Troubleshooting & Reference
CHAPTER 5
Solving Common Problems
TROUBLESHOOTING
If you experience a problem while using your DTVPal, review these
troubleshooting tables. Look under the Symptom column, and find a description
that matches your problem. Then, follow the steps for that issue under
Troubleshooting Steps.
Symptom Troubleshooting Steps
The remote
control doesn’t
work.
The DTVPal
won’t turn on.
1 Verify the batteries are installed according to the battery
diagram on the remote control.
2 Try changing batteries in your DTVPal remote control.
3 Make sure you are pointing the remote control directly at
the front panel of your DTVPal. The remote control uses
infrared (IR) signals to operate the DTVPal, and must
have line of sight to the DTVPal.
1 Ensure the DTVPal power cord is plugged into a working
electrical outlet.
2 Ensure the power cord is plugged fully into the DTVPal’s
power converter port.
3 Put new batteries in your DTVPal remote control, and try
pressing POWER on the remote control.
4 Try plugging the DTVPal’s power cord into a different
electrical outlet.
Page 19
 Loading...