

PlaybackPro 2.2
DT
Videolabs
User Guide
Version 2.2c

PlaybackPro User Guide
Table of Contents
OPERATION ................................................................................. 2
........................................................................... Before You Begin 2
............................................................................... Getting Started 3
............................................................................................ Layout 4
......................................................................... Preview / Program 4
........................................................................................... Playlist 5
................................................................................. Clip Playback 5
............................................................. Transformational Controls 6
.................................................................... Navigational Controls 6
............................................................................... Show Controls 7
....................................................................... Looping and Fading 8
KEYBOARD SHORTCUTS......................................................... 9
SYSTEM SETTINGS.................................................................. 10
Page 1

PlaybackPro User Guide
Operation
Before You Begin:
PlaybackPro requires Mac OSX 10.4 (Tiger), or OSX 10.5 (Leopard). 3GB of RAM is
required.
PlaybackPro scales to any hardware, but may be limited by the computer’s processor speed,
disk bandwidth and graphics power.
PlaybackPro is designed to run on a system with two outputs (or a laptop with an external
output). The primary screen (the one with menus) is for the interface. The secondary output
(which can be reordered under Displays, in the Hardware Section of System Preferences) is
for playback.
PlaybackPro automatically adjusts to the aspect ratio of the external display. To manually
change the output resolution (or aspect ratio if no external display is present), click Setup in
the top right corner of the Program Section.
When a Show File is opened, the application looks for the USB Enabler Key. If not found, a
dialog box will be displayed. If you have an Enabler Key, insert it and click Okay. If you
do not have a key, click Run As Demo. Demo mode is fully-functional, except for a
watermark that is displayed on the output. Demo mode is generally used for setting up a
show off-line, or learning the application.
Page 2

PlaybackPro User Guide
Getting Started:
PlaybackPro saves shows as individual documents. Multiple shows can be created and
switched between.
Clips are not stored internally within the Show File, they are simply references of clips on a
hard drive or network. For best results, store on a drive other than where the operating
system and application reside.
PlaybackPro is based on the QuickTime Framework. Any video file that runs smoothly in
full screen mode in QuickTime Player should run in PlaybackPro (however -- PlaybackPro
uses approximately 10% more peak processing and graphics power). Virtually any file type
can be played by installing third-party QuickTime plug-ins.
Page 3

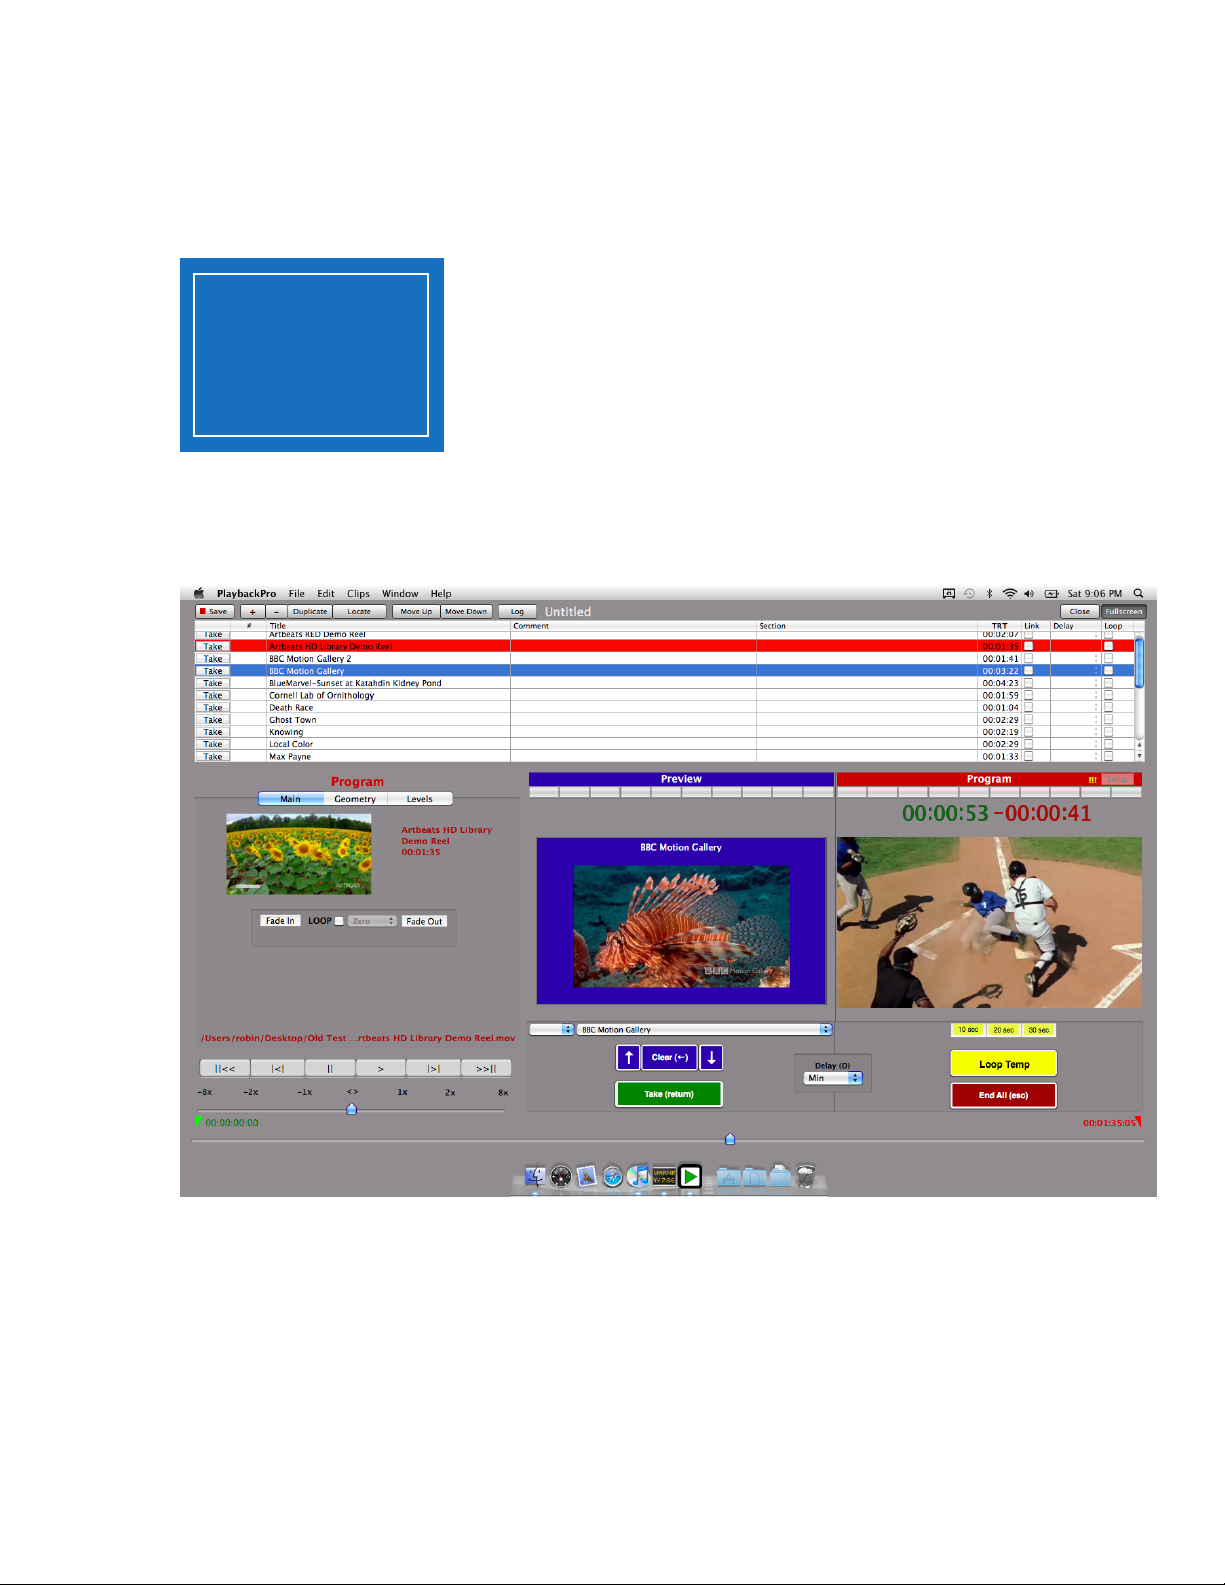
Layout:
Transformation
Controls
PlaybackPro User Guide
Playlist
Preview Program
Show
Controls
Navigation
Controls
Preview / Program:
PlaybackPro is designed on a Preview/Program paradigm, similar to a production switcher.
Program is what’s going to the output, and Preview is what will play next. Preview is
always in blue. Program is always in red.
When a clip is selected from the playlist, it is shown in Preview. Preview is used to set up
levels, fades,, in/out points and geometry, as well as for modifying the order of the
Playlist.... and allows you to select the next clip to send to the output (Program). When a
clip in Program ends, whatever is in Preview will be Taken automatically (roll-through).
When a clip is Taken from Preview, it moves to Program and plays to the output with any
attributes that you’ve set (In/Out Points, fades, geometry, levels, etc). Clips are shown in
Program exactly as they appear on the external output.
There are counters over Preview and Program for reference and easy count-outs. The green
counter shows the time elapsed relative to the In Point. The red counter shows the time
remaining relative to the Out Point.
The aspect ratio of the output is reflected in the Preview and Program sections.
Page 4

PlaybackPro User Guide
Playlist:
The Playlist shows referenced video clips. Clips can be reordered by dragging and
dropping, or by using the Move Up and Move Down buttons. The Clip Number field is for
operator convenience and does not effect the actual order of clips. Since clips are only
referenced, clicking Duplicate only creates a new reference, and does not copy the clip. If a
clip has been moved or is off-line, its text will be grayed out. The Relocate button can be
used to redirect the reference to a new location (the clip must have the same name).
Changing the highlighted selection in the playlist always affects what is being seen in
Preview.
Preview clips are always in blue. Program clips are always in red.
Link puts the next clip in the Playlist into Preview when this one is taken to Program (after
any delay specified in the Delay pop-up menu).
The playlist can easily be printed or saved as a PDF file.
Clip Playback:
Place a clip in Preview by selecting it from the Playlist, or by using the Quick Select pop-up
menus (by number or name) under the Preview section in Show Controls.
Click Take or press return. The audio and video will fade out if there is a clip already in
Program, and playback will begin after the time specified in the Delay pop-up menu.
Page 5

PlaybackPro User Guide
Transformation Controls:
The Transformation Controls determine how a clip is played back in Program, and only
affects the selected clip (whether in Preview or Program). All settings are saved
automatically when the Show File is saved.
Main Tab
Set In - Sets where clip will begin Playback.
•
Set Out - Sets where clip ends Playback.
•
Set Slate - Used to set the Slate image for that clip.
•
Fade-In - Tells clip to Fade-In on start.
•
Fade-Out - Tells clip to Fade-Out on end.
•
Loop - By enabling, Loops the clip indefinitely (see the Show Controls section for
•
further explanation on how to end a loop).
Loop Delay - Changes the amount of time that should elapse between loops. (For
•
additional looping and fading controls see the Looping and Fading section).
Shuttle - Temporarily changes the playback speed. Primarily used to set up a clip in
•
Preview, however it can be used in Program. Clips in Program always begin playback
at normal speed.
Scrubber - Used to find specific parts of a clip so that In, Out and Slates can be set.
•
Primarily used in Preview, however if needed, can be used while in Program..
Geometry
Controls the size, aspect ratio and positioning of the clip being previewed and will be
stored as altered. If the clip is in Program, changes are seen on the video output (as well as
in the Program section).
Levels
Affects the black level, gain, gamma, color and volume of the current clip. If the clip is in
Program, changes are seen on the video output (as well as in the Program section).
Navigation Controls:
These are used for finding specific parts of a clip to set In, Out and Slate points. Although
they control the clip while in Program, they are primarily used to set up a clip in Preview. To
Take a clip to Program, please see the Show Controls section.
Page 6

PlaybackPro User Guide
1
2
4
5 6
3
7
8
9
Show Controls:
Used for controlling Program, Show Control settings are not saved and have no permanent
effect on a clip.
(1) Quick Select - For clip Selection by number or name.
(2) Select Previous - Selects Previous clip in playlist.
(3) Select Next - Selects Next clip in playlist.
(4) Clear - Clears anything loaded in Preview.
(5) Take - Takes Preview clip to Program.
(6) Delay - Changes the amount of time that should elapse between Preview and Program
clip.
(7) Goto Buttons: The 10 seconds / 20 seconds / 30 seconds buttons are for viewing
transitions from one clip to another and for technical rehearsals. Sets the Playback
position to 10, 20 or 30 seconds from the Out Point.
(8) Loop Temp - Temporarily Loops or Un-loops Program clip. Click End All (esc) to
immediately end a loop, or Take if a clip is loaded in Preview. This does not affect the
clip’s permanent Loop setting.
(9) End All (esc) - Audio and video of the Program clip will fade, and will not play a clip
loaded in Preview. This is similar to the fade-to-black button found on many production
switchers.
Page 7

PlaybackPro User Guide
Looping and Fading:
PlaybackPro gives you advanced control over looping and fading. The Fade In Each and
Fade Out Each buttons are only visible when Loop is selected. To end a loop while in
Program, click Loop Temp in Show Controls. It’s best to experiment with these controls to
master them. Here are a few typical examples:
Clip will neither Loop nor Fade. Clip will Fade-In and Fade-Out, but will not
Loop.
For true loops when the last frame is
designed to match the first, clip will:
1. Fade-In then loop without delay or fades.
2. Then Fade-Out on the last iteration.
Loops and Fades
First Iteration Last IterationLoops
Clip will Fade-in and Fade-Out on each loop
-- with a Delay between each.
Delay
Page 8

PlaybackPro User Guide
KEYBOARD SHORTCUTS:
Clips can be loaded into Preview by typing in the Roll Number. If a mistake is made while
entering, the Delete key will cancel it.
Show Files
............................New Show shift command(⌘) N
...................................Open Show command(⌘) O
..................................Close Show command(⌘) W
.....................................Save Show command(⌘) S
.....................Save Show As shift / command(⌘) S
...........................Page Setup shift /command(⌘) P
...............................................Print command(⌘) P
Show Controls
..............................................Select Previous Clip ↑
....................................................Select Next Clip ↓
......................................................Clear Preview ←
...............................................................Take return
............................End All Playback to Program esc
.............................................Toggle Delay option D
.....................................Toggle LoopTemp option L
......................................................Goto 10 option 1
......................................................Goto 20 option 2
......................................................Goto 30 option 3
Clips
..............................................New Clips command(⌘) N
......................................Delete Clip command(⌘) delete
.......................................Duplicate Clip command(⌘) D
......................................................Select Previous Clip ↑
.............................................................Select Next Clip ↓
...................................................Mark In command(⌘) [
.................................................Mark Out command(⌘) ]
...............................................Mark Slate command(⌘) \
..........................Toggle Fade In option / command(⌘) [
........................Toggle Fade Out option / command(⌘) ]
Edit
.........................................................Cut command(⌘) X
......................................................Copy command(⌘) C
.......................................................Paste command(⌘) V
...............................................Select All command(⌘) A
Navigation Controls
.........................................Toggle Play option space
...........................................Step Forward option →
.........................................Step Backward option ←
.................................................Play Faster option ↑
................................................Play Slower option ↓
option
Window
.................................Toggle Full Screen command(⌘) F
.................................Minimize to Dock command(⌘) M
Help
............................................Display Help command(⌘) ?
Show Controls
return esc ↑ ↓ ←
Take End
Playback
Select
Previous
Select
Next
Clear
Preview
Navigation Controls
+
space →← ↑ ↓
Toggle
Play
Step
Backward
Page 9
Step
Forward
Play
Faster
Play
Slower

PlaybackPro User Guide
Screensaver
Sleep
SYSTEM SETTINGS:
When using PlaybackPro in a show, it is important to set a few global system settings.
All of the following settings are found in System Preferences:
Set Start Screen Saver to never
Set Sleep to never
Uncheck: Put the hard disks to sleep when possible. THIS IS IMPORTANT!
Page 10

PlaybackPro User Guide
Sound
CDs and DVDs
Set Alert Volume to zero
Uncheck: Play user interface sound effects
Uncheck: Play feedback when volume is changed
Set Output Volume to full.
CDs and DVDs: Set everything to Ignore
Although it is not in System Preferences, it’s best to unmount any network shares
before going into show.
Page 11
 Loading...