


InstaCue 1.2
DT
Videolabs
User Guide
Version 1.2b

InstaCue 1.1 Users Guide
Table of Contents
OPERATION ................................................................................. 2
................................................................................. Playback Tips 2
............................................................................... Getting Started 2
.................................................................................. Clip Controls 3
.................................................................... Single Clip Edit Sheet 5
................................................................ Multiple Clip Edit Sheet 6
.................................................................... Curbing and Ramping 7
................................................................................. Roll-Through 8
........................................................................ Keyboard Shortcuts 9
SYSTEM SETTINGS.................................................................. 10
Page 1

InstaCue 1.1 Users Guide
Playback Tips:
InstaCue preloads and cues all clips in a Show File for instantaneous playback. This may require a
large memory footprint and may also cause Show Files to take a while to load... so more memory is
always recommended. We highly recommend that you test your machine prior to using in a show.
Set Screensaver and Sleep in System Preferences to Never (see System Settings Section).
Getting Started:
InstaCue is organized into Clips and Panels. A Clip represents an individual audio file. A Panel is a
grouping of Clips. Clips can be selected by mouse (Apple key or Option for multiple), or by
keyboard (see the Keyboard Shortcuts Section). Clips and Panels can be renamed via the Single
Clip Edit Sheet or Multiple Clip Edit Sheet. A detailed explanation of their features are in the Single
Clip Edit Sheet and Multiple Clip Edit Sheet sections. Clips and Panels can be reordered via Drag
and Drop. Multiple clips can be played simultaneously.
The basic functions of each clip are:
Take - Begins Playback
Kill - Fades out and ends Playback.
Kill Duration - Determines how long the clip fades.
Crush - Fades out and ends Playback of all other playing clips.
Crush Duration - Determines Fade Duration of other clips.
Loop - Loops the current clip indefinitely.
Curb - Lowers the Playback level of all other Clips by a percentage. (An in-depth explanation of
this feature is listed in the Curbing and Ramping Section).
Ramp - (Please refer to the Curbing and Ramping Section for a detailed explanation of this
feature).
Roll-Through - Causes the next clip to Play when the current one ends - thereby creating a sequence
of clips that will Playback in order. This sequence may be changed on-the-fly. (Please refer to the
Roll-Through Section for additional information on its usage and features).
Page 2
InstaCue 1.1 Users Guide
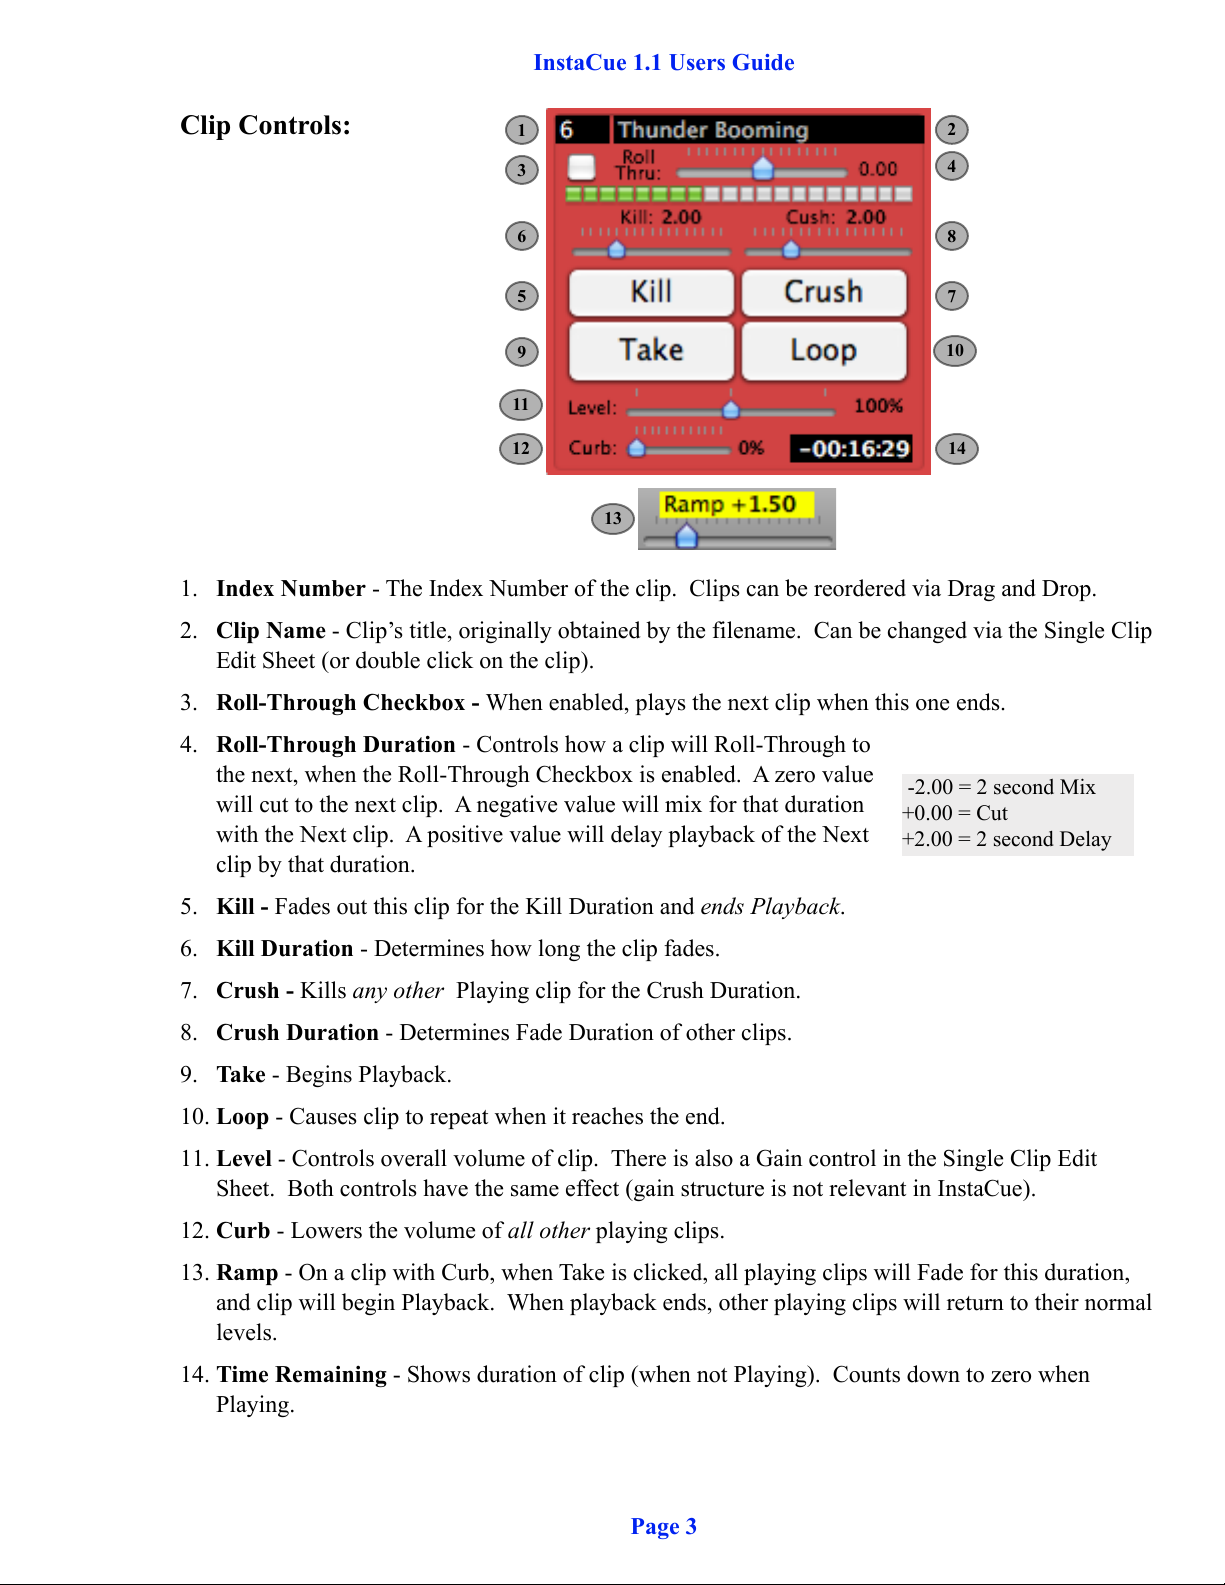
Clip Controls:
1
3
6
5
9
11
12
13
2
4
8
7
10
14
1. Index Number - The Index Number of the clip. Clips can be reordered via Drag and Drop.
2. Clip Name - Clip’s title, originally obtained by the filename. Can be changed via the Single Clip
Edit Sheet (or double click on the clip).
3. Roll-Through Checkbox - When enabled, plays the next clip when this one ends.
4. Roll-Through Duration - Controls how a clip will Roll-Through to
the next, when the Roll-Through Checkbox is enabled. A zero value
will cut to the next clip. A negative value will mix for that duration
with the Next clip. A positive value will delay playback of the Next
-2.00 = 2 second Mix
+0.00 = Cut
+2.00 = 2 second Delay
clip by that duration.
5. Kill - Fades out this clip for the Kill Duration and ends Playback.
6. Kill Duration - Determines how long the clip fades.
7. Crush - Kills any other Playing clip for the Crush Duration.
8. Crush Duration - Determines Fade Duration of other clips.
9. Take - Begins Playback.
10. Loop - Causes clip to repeat when it reaches the end.
11. Level - Controls overall volume of clip. There is also a Gain control in the Single Clip Edit
Sheet. Both controls have the same effect (gain structure is not relevant in InstaCue).
12. Curb - Lowers the volume of all other playing clips.
13. Ramp - On a clip with Curb, when Take is clicked, all playing clips will Fade for this duration,
and clip will begin Playback. When playback ends, other playing clips will return to their normal
levels.
14. Time Remaining - Shows duration of clip (when not Playing). Counts down to zero when
Playing.
Page 3

InstaCue 1.1 Users Guide
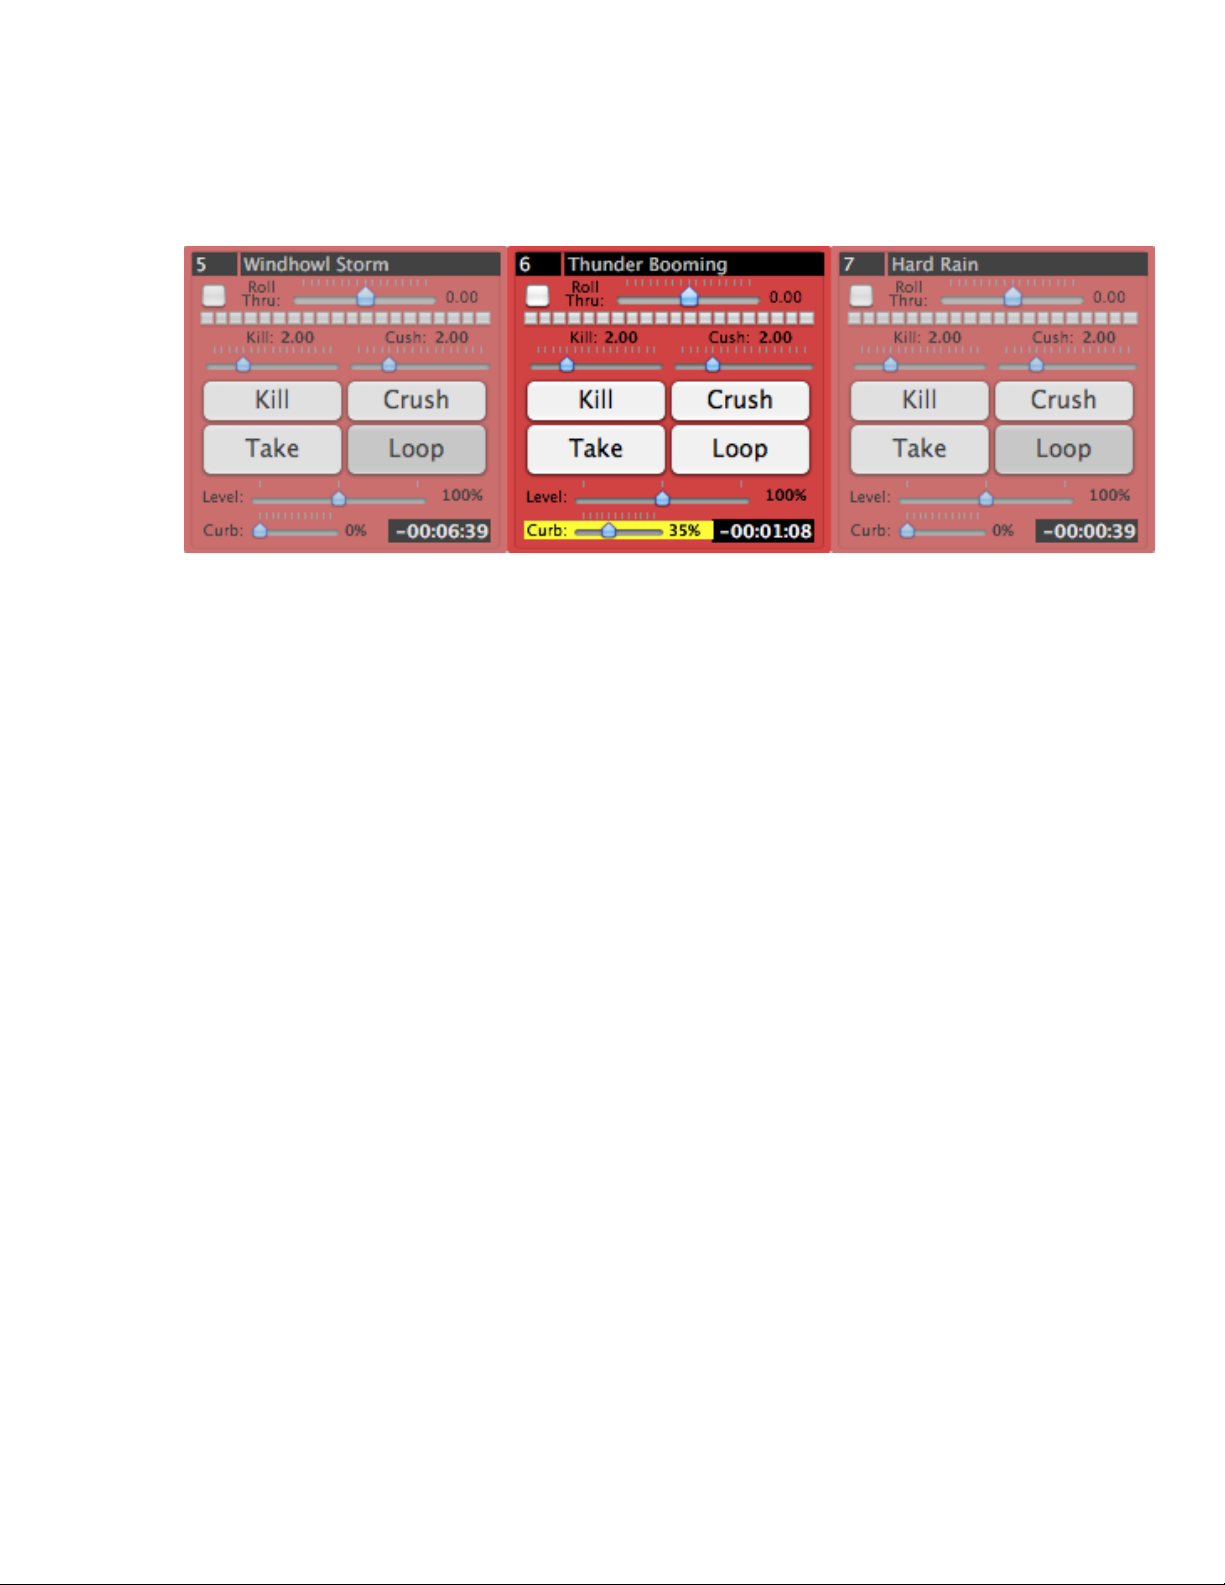
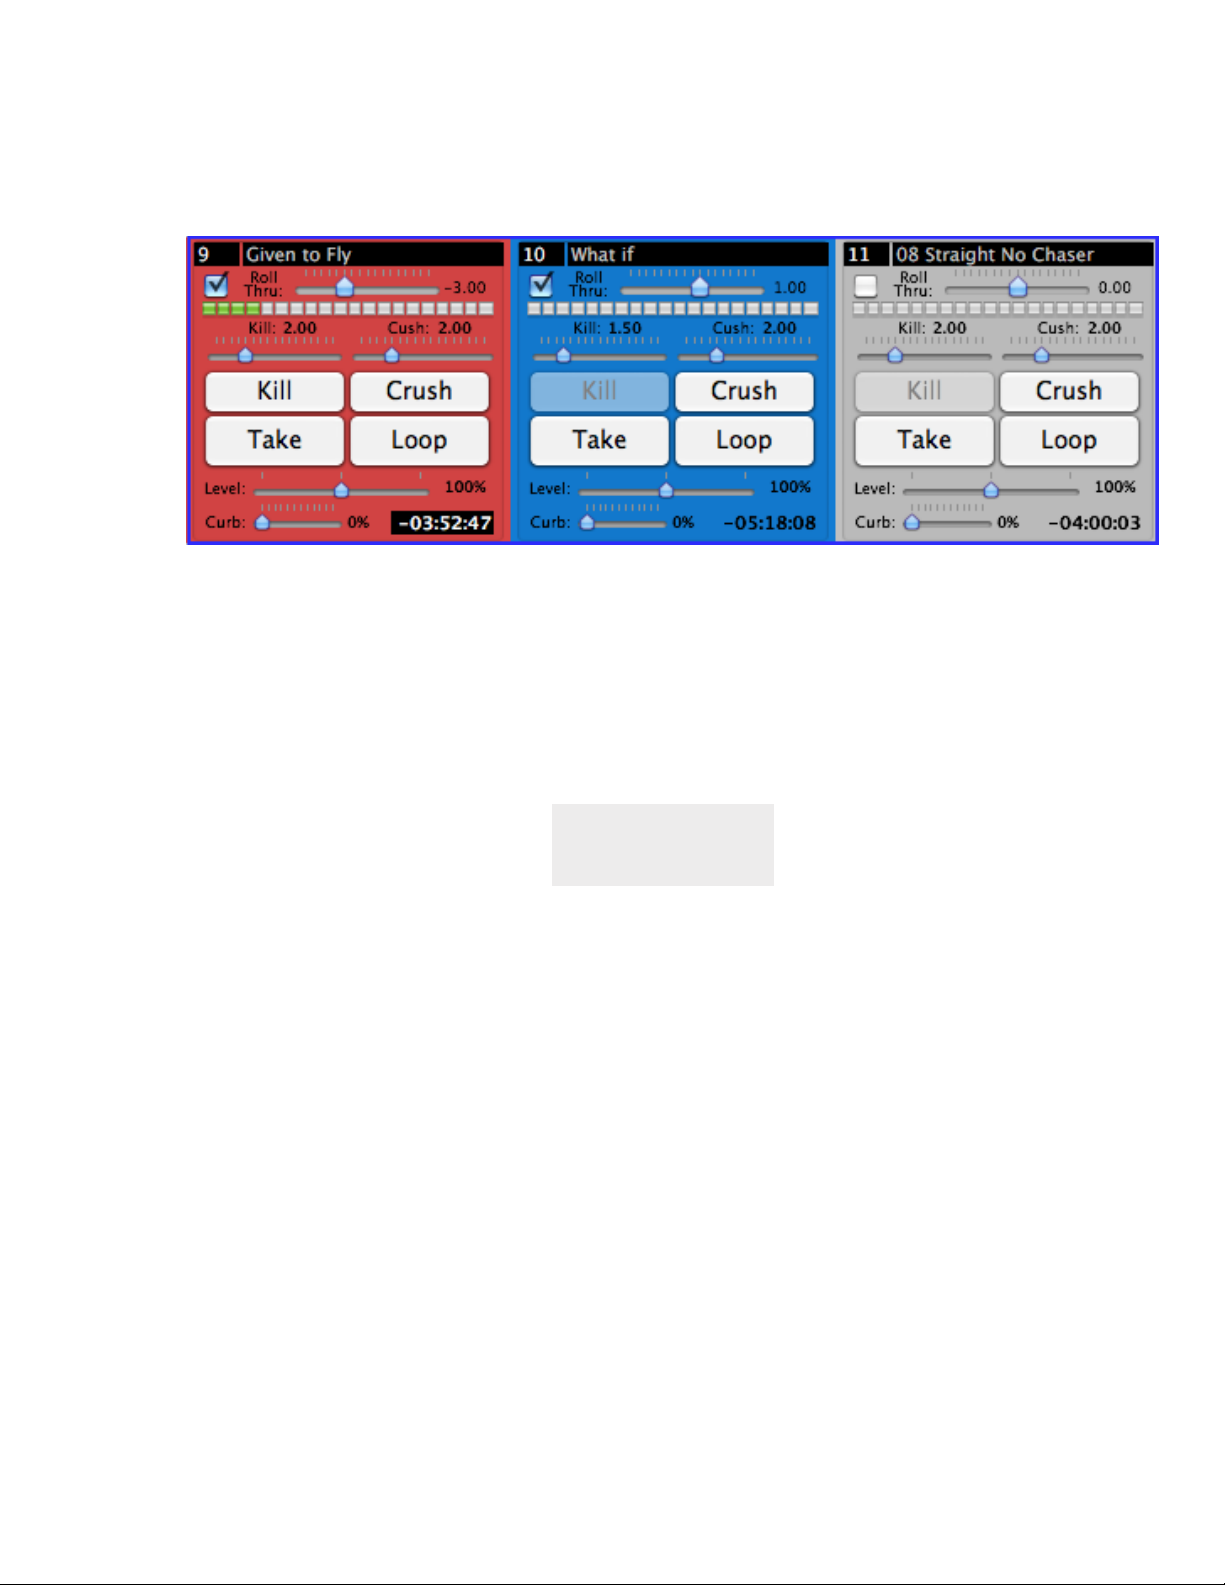
Clip Controls continued:
Color Coding/Red - Indicates clip is in Playback.
Color Coding/Blue - Indicates clip is next in a Roll-Through.
Color Coding/Yellow - Indicates clip is either Curbing, Ramping or waiting to start from a Delay
Roll-Through.
A clip will get darker when selected.
Page 4

InstaCue 1.1 Users Guide
Single Clip Edit Sheet:
The Single Clip Edit Sheet comes up when one clip is selected and you click Edit (⌘E), or when
you double click on a clip.
1
2
3
4
7
8
9
6
5
10
1. Clip Name - Clip’s title, originally obtained by the filename.
2. Scrubber - Sets the In and Out Points for the clip. The green triangle indicates the In Point, and
the red triangle indicates the Out Point.
3. Shuttle - Temporarily sets clip’s Playback speed. Use it to find In and Out Points.
4. Set In - Sets where clip begins Playback.
5. Set Out - Sets where clip ends Playback.
6. Counters - The green counter shows the time elapsed relative to the In Point. The red counter
shows the time remaining relative to the Out Point.
7. Navigation Controls
8. Show Controls
9. Goto Buttons - Sets the Playback position to 10, 20 or 30 seconds from the Out Point.
10. Gain - Sets clip’s overall level.
Page 5

InstaCue 1.1 Users Guide
Multiple Clip Edit Sheet:
The Multiple Clip Edit Sheet comes up when multiple clips are Selected and you click Edit (⌘E),
or when you double click the selection.
The Multiple Clips Edit Sheet allows control of common settings across
multiple clips.
Page 6
InstaCue 1.1 Users Guide
Curbing and Ramping:
The Curb setting allows one clip to fade the audio level of all other playing clips. It can be used for
voice overs and announcements that play over other audio. It can also be used to isolate one clip
when doing layered sound effects.
The Ramp setting determines how long clips will take to fade (both in and out) when a Curbed clip
begins or ends playback.
Page 7
InstaCue 1.1 Users Guide
Roll-Through:
A Roll-Through (think playlist) is easily created by enabling the Roll-Through checkbox on any clip.
When a clip finishes playback it will Roll-Through to the next clip. A clip will display a blue
background when it is linked by a Roll-Through.
The Roll-Through Duration (the slider next to the Roll-Through checkbox) determines how the clip
transitions. A zero value cuts to the next clip. A negative value mixes for that duration with the next
clip. A positive value will delay playback of the next clip by that duration.
-2.00 = 2 second Mix
+0.00 = Cut
+2.00 = 2 second Delay
A clip will only Roll-Through if it completely reaches its Out Point. It will not Roll-Through if a
clip is Killed, Crushed, or if the first clip is Looped.
Clips can be reordered during Playback for dynamic control of Roll-Throughs.
Page 8

InstaCue 1.1 Users Guide
Keyboard Shortcuts:
There are three modes for using keystrokes to select and cue clips.
Key Select - Allows you to select clips with the keyboard, mapped with the ‘1’ key for the top-left
clip. Multiple clips may be selected by holding down more than one key simultaneously.
Index Select - Best for shows that are called by cue number. Clips are selected individually by
typing in the Index Number of the clip. Return will Take any selected clips. Escape will Kill any
selected clips. Shift-Escape will Crush any other selected clips that are playing.
Key Direct - Allows you to Play clips with the keyboard, mapped with the ‘1’ key for the top-left
clip. Pressing any mapped key will cause it to Take immediately. Use with the Option key to Kill,
‘Option-Shift’ to Crush, and ‘Option + Function’ to toggle Loop.
Return - Begins playback of Selected clips.
Escape - Kills playback of Selected clips.
Shift-Escape - Crushes all Non-Selected clips.
Shift-Return - Toggles the Loop setting on Selected clip.
Arrow Keys - Used to change the selection in the direction of the Arrow Key.
Dragging - Moves clip or panel to another location.
Page 9

Screensaver
InstaCue 1.1 Users Guide
Sleep
System Settings:
When using InstaCue in a show, it is important to set a few system settings.
The following settings are under Energy Saver in the Hardware Section of System Preferences:
Set Start Screen Saver to Never
Set Sleep to never
Uncheck: Put the hard disks to sleep when possible. THIS IS IMPORTANT!
Page 10
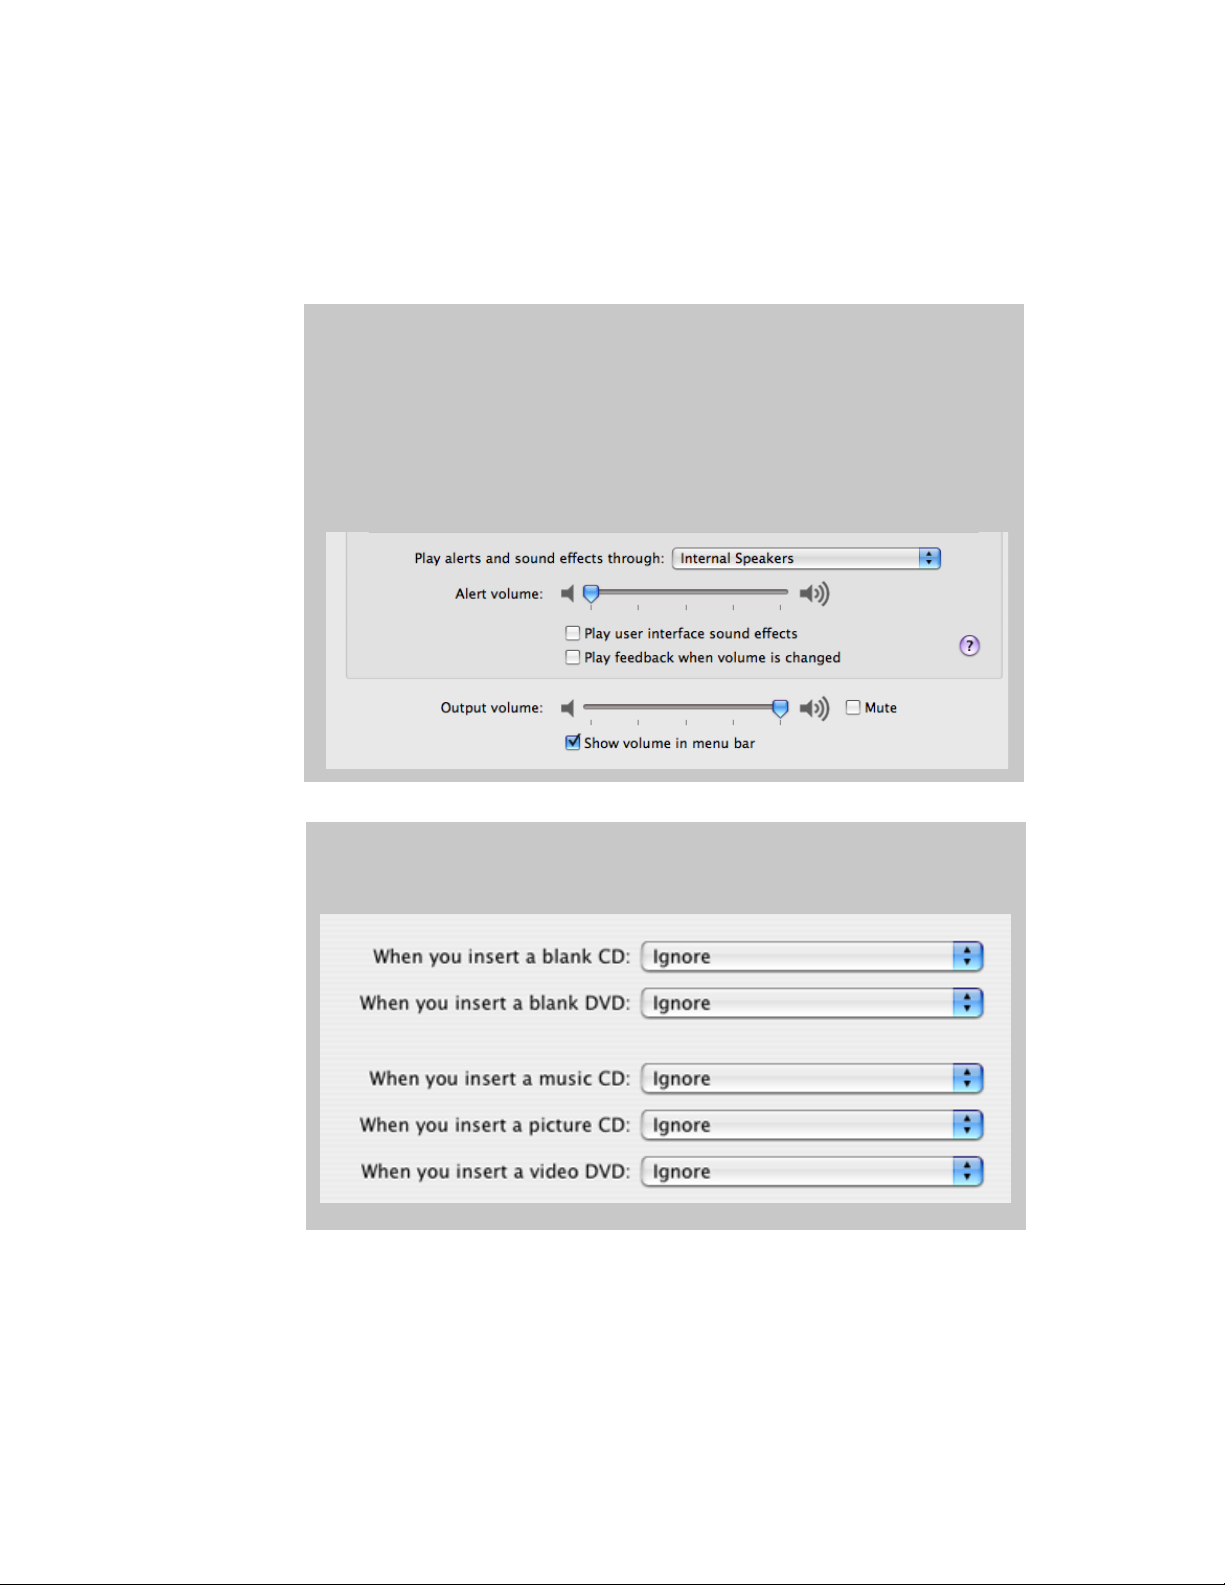
Sound
CDs and DVDs
InstaCue 1.1 Users Guide
The following settings are under Sound and ‘CDs and DVDs’ in the Hardware Section of System
Preferences:
Set Alert Volume to zero
Uncheck: Play user interface sound effects
Uncheck: Play feedback when volume is changed
Set Output Volume to full.
CDs and DVDs: Set everything to Ignore
Although not in System Preferences, it’s best to unmount any network shares before going into show.
Page 11
 Loading...