

DT Swiss SPLINE Service Manual

WHEELS
SPLINE
Technical Manual
V2017.07

1 General 3
1.1 Safety. . . . . . . . . . . . . . . . . . . . . . . . . . . . . . . . . . . . . . . . . . . . . . . . . . . . . . . . . . . . . . 3
1.2 Information on Using this Manual . . . . . . . . . . . . . . . . . . . . . . . . . . . . . . . . . . . . . . . 4
1.3 Warranty (Europe). . . . . . . . . . . . . . . . . . . . . . . . . . . . . . . . . . . . . . . . . . . . . . . . . . . . 5
1.4 Limited Equipment Warranty USA . . . . . . . . . . . . . . . . . . . . . . . . . . . . . . . . . . . . . . . 5
1.5 General Maintenance Information . . . . . . . . . . . . . . . . . . . . . . . . . . . . . . . . . . . . . . . 6
2 Safety 7
3 Conversion of the Hub 8
3.1 SPLINE® Wheels 2016 . . . . . . . . . . . . . . . . . . . . . . . . . . . . . . . . . . . . . . . . . . . . . . . . . 8
3.2 SPLINE® Wheels 2017 . . . . . . . . . . . . . . . . . . . . . . . . . . . . . . . . . . . . . . . . . . . . . . . . 10
3.3 Converting the Hub [Inserted Adapters] . . . . . . . . . . . . . . . . . . . . . . . . . . . . . . . . . 12
3.4 Converting the Hub [Pressed on End Caps] . . . . . . . . . . . . . . . . . . . . . . . . . . . . . . . 14
3.5 Converting the Hub [Screwed on End Caps] . . . . . . . . . . . . . . . . . . . . . . . . . . . . . . 18
3.6 Converting the Hub [Rear Wheel] . . . . . . . . . . . . . . . . . . . . . . . . . . . . . . . . . . . . . . 23
4 Maintenance of the Hub 26
4.1 Hub Technologies . . . . . . . . . . . . . . . . . . . . . . . . . . . . . . . . . . . . . . . . . . . . . . . . . . . 26
4.2 Service Intervals . . . . . . . . . . . . . . . . . . . . . . . . . . . . . . . . . . . . . . . . . . . . . . . . . . . . 27
4.3 Safety. . . . . . . . . . . . . . . . . . . . . . . . . . . . . . . . . . . . . . . . . . . . . . . . . . . . . . . . . . . . . 27
4.4 Maintenance of the Rear Wheel Hub [Ratchet System] . . . . . . . . . . . . . . . . . . . . . 28
4.5 Maintenance of the Rear Wheel Hub [Three Pawl System] . . . . . . . . . . . . . . . . . . 34
5 Maintenance of the Wheel 40
5.1 Safety. . . . . . . . . . . . . . . . . . . . . . . . . . . . . . . . . . . . . . . . . . . . . . . . . . . . . . . . . . . . . 40
5.2 Special Tools . . . . . . . . . . . . . . . . . . . . . . . . . . . . . . . . . . . . . . . . . . . . . . . . . . . . . . . 41
5.3 Truing the Wheel. . . . . . . . . . . . . . . . . . . . . . . . . . . . . . . . . . . . . . . . . . . . . . . . . . . . 42
5.4 PHR System . . . . . . . . . . . . . . . . . . . . . . . . . . . . . . . . . . . . . . . . . . . . . . . . . . . . . . . . 44
5.5 Changing a Single Spoke [MTB] . . . . . . . . . . . . . . . . . . . . . . . . . . . . . . . . . . . . . . . . 46
5.6 Rebuilding the Wheel [MTB] . . . . . . . . . . . . . . . . . . . . . . . . . . . . . . . . . . . . . . . . . . 50
5.7 Changing a Single Spoke [ROAD]. . . . . . . . . . . . . . . . . . . . . . . . . . . . . . . . . . . . . . . 53
5.7.1 Loosening the Spoke . . . . . . . . . . . . . . . . . . . . . . . . . . . . . . . . . . . . . . . . . . . . . . . . . . 53
5.7.2 Changing a Single Spoke on the Front Wheel [Slotted Hub] . . . . . . . . . . . . . . . . . . . . . 54
5.7.3 Removing a Single Spoke on the Front Wheel [Non-Slotted Hub]. . . . . . . . . . . . . . . . . . 56
V2017.07
SPLINE® - Technical Manual
1

5.7.4 Changing a Single Spoke on the Rear Wheel . . . . . . . . . . . . . . . . . . . . . . . . . . . . . . . . 58
5.8 Rebuilding the Wheel [ROAD] . . . . . . . . . . . . . . . . . . . . . . . . . . . . . . . . . . . . . . . . . 60
5.8.1 Putting on the Spokes on the Front Wheel . . . . . . . . . . . . . . . . . . . . . . . . . . . . . . . . . . 60
5.8.2 Putting on the Spokes on the Rear Wheel . . . . . . . . . . . . . . . . . . . . . . . . . . . . . . . . . . . 61
5.8.3 Connecting the «Spoke Tree» to the Rim . . . . . . . . . . . . . . . . . . . . . . . . . . . . . . . . . . . 62
6 Technical Data 64
6.1 Spoke Tension . . . . . . . . . . . . . . . . . . . . . . . . . . . . . . . . . . . . . . . . . . . . . . . . . . . . . . 64
6.2 Tolerances . . . . . . . . . . . . . . . . . . . . . . . . . . . . . . . . . . . . . . . . . . . . . . . . . . . . . . . . . 64
V2017.07
SPLINE® - Technical Manual
2
1General
DANGER
CAUTION
NOTICE
Ge n er a l
This manual describes the component specified on the front page and the footer. Deviations are possible
and all items are subject to technical changes.
1.1 Safety
The safety instructions are classified as follows:
...indicates a hazardous situation that, if not avoided, will result in death or serious injury.
...indicates a hazardous situation that, if not avoided, could result in a minor or moderate injury.
...indicates information considered important, but not hazard-related.
...characterizes further information, or information which supplement the respective steps.
V2017.07
Ratchet Hubs - Technical Manual
3

1.2 Information on Using this Manual
Target Group
This manual is intended for end users and dealers.
It offers the possibility for experienced users to carry out small maintenance works on their own. If there are
any doubts concerning the own skills, a DT Swiss service center should be contacted.
Warranty will expire if works are not done properly.
Layout
Information on Using this Manual
The cover page and the footing provide information about the type of product and manual as well as the
version of the manual.
The backside provides a list of the DT Swiss service centers. A list of all DT Swiss service centers can be
found at www.dtswiss.com.
This manual is intended for being printed as an A5 booklet. Only print this manual if electronic usage is not
possible.
DT Swiss Manual Concept
The DT Swiss manuals are split into the following types of manuals:
•User Manual
Information for the end user on how to install and use the component.
• Technical Manual
Detailed information for the end user and the dealer on how to maintain the component, spare parts
and technical data.
How to Use this Manual
The steps described in this manual must be carried out in the order they are shown. If steps are ignored or
executed in a wrong order, the function of the component cannot be guaranteed.
Instructions begin with the table «Preparatory Steps» and end with the table «Closing Steps». The instructions in these tables must be carried out.
Moving parts, threads, O-rings and sealings must be greased before assembling.
Cross References
To simplify the use of this manual, some text is edited as hypertext. Whenever the text is formatted blue and
underlined, it is a reference to a chapter. If the text is formatted black and underlined, it is a reference to a
figure. After clicking you will be automatically redirected to the target of the reference.
Example: Click here:
chap. 1, page 3 to jump to the beginning of this chapter.
V2017.07
Ratchet Hubs - Technical Manual
4

1.3 Warranty (Europe)
In addition to the general guarantee required by law, DT Swiss AG based in Biel/Switzerland, provides a
guarantee for 24 months from the date of purchase. DT Swiss AG shall reject any liability for both indirect
damage caused by accidents and consequential damage.
Warranty (Europe)
Any contradictory or extended national rights of the purchaser are not affected by this warranty. Place of
performance and jurisdiction is Biel/Switzerland. Swiss law shall apply.
Submit any warranty claims to your retailer or a DT Swiss service center. Any defects recognized by DT
Swiss AG as a warranty claim will be repaired or replaced by a DT Swiss service center.
Warranty and guarantee claims can only be made by the original purchaser with a valid sales receipt.
There shall be no claim under the guarantee for:
• Normal wear and tear caused by use of the components
• Incorrect assembly
• Incorrect or nonexistent maintenance
• Incorrectly completed repairs
• Use of unsuitable products
• Modification of components
• Incorrect use or misuse
• Carelessness
• Leasing, commercial use or use in competitions
• Damage caused by accidents
• Delivery and transport damage
• Modification, defacing or removal of the serial number
1.4 Limited Equipment Warranty USA
DT Swiss LTD makes every effort to assure that its product meets high quality and durability standards and
warrants to the original retail consumer/purchaser of our product that each product is free from defects in
materials and workmanship as follows:
2 YEAR LIMITED WARRANTY ON THIS DT SWISS PRODUCT. This warranty does not apply to defects due
directly or indirectly to misuse, abuse, negligence or accidents, repairs or alterations outside our facilities
or to a lack of maintenance.
DT SWISS LTD LIMITS ALL IMPLIED WARRANTIES TO THE PERIOD OF TWO YEARS FROM THE DATE OF
INITIAL PURCHASE AT RETAIL. EXCEPT AS STATED HEREIN, ANY IMPLIED WARRANTIES OF MERCHANTABILITY AND FITNESS ARE EXCLUDED. SOME STATES MAY NOT ALLOW LIMITATIONS ON HOW LONG THE
IMPLIED WARRANTY LASTS, SO THE ABOVE LIMITATION MAY NOT APPLY TO YOU. DT SWISS LTD SHALL IN
NO EVENT BE LIABLE FOR DEATH, INJURIES TO PEOPLE OR PROPERTY OR FOR INCIDENTAL,
CONTINGENT, SPECIAL OR CONSEQUENTIAL DAMAGES ARISING FROM THE USE OF OUR PRODUCTS.
SOME STATES MAY NOT ALLOW THE EXCLUSION OR LIMITATION OF INCIDENTAL OR CONSEQUENTIAL
DAMAGES, SO THE ABOVE LIMITATION OR EXCLUSION MAY NOT APPLY TO YOU.
To take advantage of this warranty, the product or part must be returned for examination, postage prepaid,
to the dealer where you bought the product or to a DT Swiss service center. Proof of purchase date and an
explanation of the complaint must accompany the product. If our inspection discloses a defect, DT Swiss will
either repair or replace the product or refund the purchase price, if we cannot readily and quickly provide a
repair or replacement. DT Swiss will return repaired product or replacement at DT Swiss expense, but if it
is determined there is no defect, or that the defect resulted from causes not within the scope of this
warranty, then the user must bear the cost of shipping. This warranty gives you specific legal rights, and you
may also have other rights which vary from state to state. Legal venue and place of performance is Biel
(Switzerland). Swiss law shall apply. Subject to technical changes. Please keep the user manual and
warranty for future use.
V2017.07
Ratchet Hubs - Technical Manual
5

1.5 General Maintenance Information
Cleaning
For an optimal result of the maintenance works, every component that will be disassembled must be
cleaned. Only cleaners which do not damage the components may be used. Especially the cleaning of Orings and sealings requires mild cleaners. Always consider the instructions of the respective cleaner.
DT Swiss recommends the following cleaners:
• Motorex Rex
• Motorex Swissclean
General Maintenance Information
• Motorex OPAL 2400, OPAL 3000, OPAL 5000
Use soap water or similar mild cleaners for external cleaning.
Tools
If special materials like grease or oil are needed, they will be specified in the table «Required Material» at
the beginning of a chapter.
Environmental Protection
Whenever possible, waste should be avoided. Waste, especially carbon, lubricants, cleaners and any other
fluids must be disposed in an environmentally compatible manner.
Only print this manual if electronic usage is not possible.
Disclaimer
The operations described in this manual should only be performed by experts. The user is liable for any
damage or consequential damage caused by wrong maintained or wrong installed components. If you have
doubts, please contact a DT Swiss service center.
V2017.07
Ratchet Hubs - Technical Manual
6

2Safety
DANGER
DANGER
Safety
Incorrect handling, installation, maintenance or servicing can lead to accidents causing severe
injuries or death!
• Compliance with the following provisions is a prerequisite for accident-free use and faultless functioning.
• Assembly and maintenance of the component requires a basic knowledge of handling bicycle components. If in any doubt, consult your retailer.
• Components should only be used in accordance with their intended use, otherwise the user shall
assume full responsibility.
• The component must be compatible with all parts of the bicycle.
• Only use original spare parts.
• The components must not be changed or modified.
• The component must not be used if it is damaged or there are any signs of damage. If in any doubt,
consult a DT Swiss service center.
Risk of death caused by incorrectly assembled or faulty wheels and hubs!
• Check that the wheel is connected correctly before each ride.
• Before every use, check the function of the rear wheel hub. Make sure that the freewheel and engagement connection function impeccably. Should there be any malfunction, the rear wheel hub
must not be used.
• Check the wheel for damage before and after each ride.
• Regularly check the spoke tension, rotation and wear of the wheel.
V2017.07
SPLINE® - Technical Manual
7
3Conversion of the Hub
The hubs can be converted to the following axle version:
3.1 SPLINE® Wheels 2016
®
SPLINE
Conversion of the Hub
ROAD 2016
Front Wheel Option Rear Wheel Option
RC 28
RC 28 db
RC 38
RC 38 db
RC 55
RC 55
Track
RC 46
R23
R23db
R24
5/100 mmQR9/100 mm
Link
Thru Bolt
12/100 mm
RWS road
15/100 mm
Thru Axle
100 mm
Bolt On
5/130 mmQR5/135 mmQR10/135 mm
Thru Bolt
12/135 mm
Thru Axle
12/142 mm
Thru Axle
120 mm
Link
Bolt On
●●
◐◐◐●
chap. 3.3,
page 12
◐◐○●
●●
◐◐◐●
chap. 3.3,
page 12
◐◐○●
●●
●●
●●
chap. 3.6,
page 23
●●
◐◐◐●
chap. 3.3,
page 12
◐◐○●
●●
V2017.07
R24db
R32
R32db
Standard
●
◐◐◐●
chap. 3.3,
page 12
◐◐○●
●●
◐◐◐●
Option
○
chap. 3.3,
page 12
Convertible with included accessories
◐
◐◐○●
SPLINE® - Technical Manual
8

SPLINE® MTB 2016
Front Wheel Option Rear Wheel Option
SPLINE® Wheels 2016
XRC 1200
XR 1501
X1700
X1900
XMC 1200
XM 1501
M 1700
M 1900
5/100 mmQR15/100 mm
Thru Axle
15/110 mm
Thru Axle PS
15/110 mm
○●●* ● *
○●●* ● *
◐●●* ● *
◐● ●*
○●●* ● *
○●●* ● *
○●●* ● *
◐● ●*
Link
Thru Axle Boost
20/110 mm
Thru Axle
chap. 3.3,
page 12
chap. 3.3,
page 12
chap. 3.4,
page 14
chap. 3.4,
page 14
chap. 3.3,
page 12
chap. 3.3,
page 12
chap. 3.4,
page 14
chap. 3.4,
page 14
5/135 mmQR12/142 mm
Thru Axle
○●●*
○●●*
◐●●*
◐●●*
○●●*
○●●*
◐●●*
◐●●*
12/148 mm
Link
Thru Axle Boost
chap. 3.6,
page 23
EX 1501
E1700
E1900
Standard
●
○● ●* ●
○● ●* ● *
○● ●* ● *
○
Option
Convertible with included accessories * Not convertible
◐
chap. 3.3,
page 12
chap. 3.4,
page 14
chap. 3.4,
page 14
○●●*
◐●●*
◐●●*
V2017.07
SPLINE® - Technical Manual
9
3.2 SPLINE® Wheels 2017
®
SPLINE
SPLINE® Wheels 2017
ROAD 2017
Front Wheel Option Rear Wheel Option
Link
Link
RC 28 Mon
Chasseral
RC 38 Mon
Chasseral
RC 28
RC 28 db
RC 38
RC 38 db
RC 55
R23
R23db
R24
5/100 mmQR9/100 mm
Thru Bolt
12/100 mm
RWS road
15/100 mm
Thru Axle
100 mm
Bolt On
5/130 mmQR5/135 mmQR10/135 mm
Thru Bolt
12/135 mm
Thru Axle
12/142 mm
Thru Axle
120 mm
Bolt On
●●
●●
●●
◐◐◐●
chap. 3.3,
page 12
◐◐○●
●●
◐◐◐●
●●
chap. 3.3,
page 12
◐◐○●
chap. 3.6,
page 23
●●
◐◐◐●
chap. 3.3,
page 12
◐◐○●
●●
R24db
R32
R32db
Standard
●
◐◐◐●
chap. 3.3,
page 12
◐◐○●
●●
◐◐◐●
Option
○
chap. 3.3,
page 12
Convertible with included accessories
◐
◐◐○●
V2017.07
SPLINE® - Technical Manual
10

SPLINE® MTB 2017
Front Wheel Option Rear Wheel Option
SPLINE® Wheels 2017
XRC 1200
XMC 1200
XR 1501
XM 1501
22,5 mm
XM 1501
25, 30, 35, 40 mm
EX 1501
25 mm
EX 1501
30 mm
X1700
M 1700
22,5 mm
Link
5/100 mmQR15/100 mm
○●●* ● *
Thru Axle
15/110 mm
Thru Axle PS
15/110 mm
Thru Axle Boost
20/110 mm
Thru Axle
5/135 mmQR12/142 mm
Thru Axle
12/148 mm
○●●*
○●●* ● * ○●●*
○●●* ● * ○●●*
○●●* ● * ○●●*
chap. 3.3,
page 12
○● ●* ○●●*
○● ●* ●○●●*
○● ●* ○●●*
◐●●* ● *
◐●●*
◐●●* ● * ◐●●*
Link
Thru Axle Boost
chap. 3.6,
page 23
M 1700
30 mm
E1700
X1900
M 1900
E1900
●
Standard
◐● ●* ◐●●*
chap. 3.4,
○● ●* ● * ◐●●*
page 14
◐● ●* ◐●●*
◐● ●* ◐●●*
○● ●* ● * ◐●●*
○
Option
Convertible with included accessories * Not convertible
◐
V2017.07
SPLINE® - Technical Manual
11
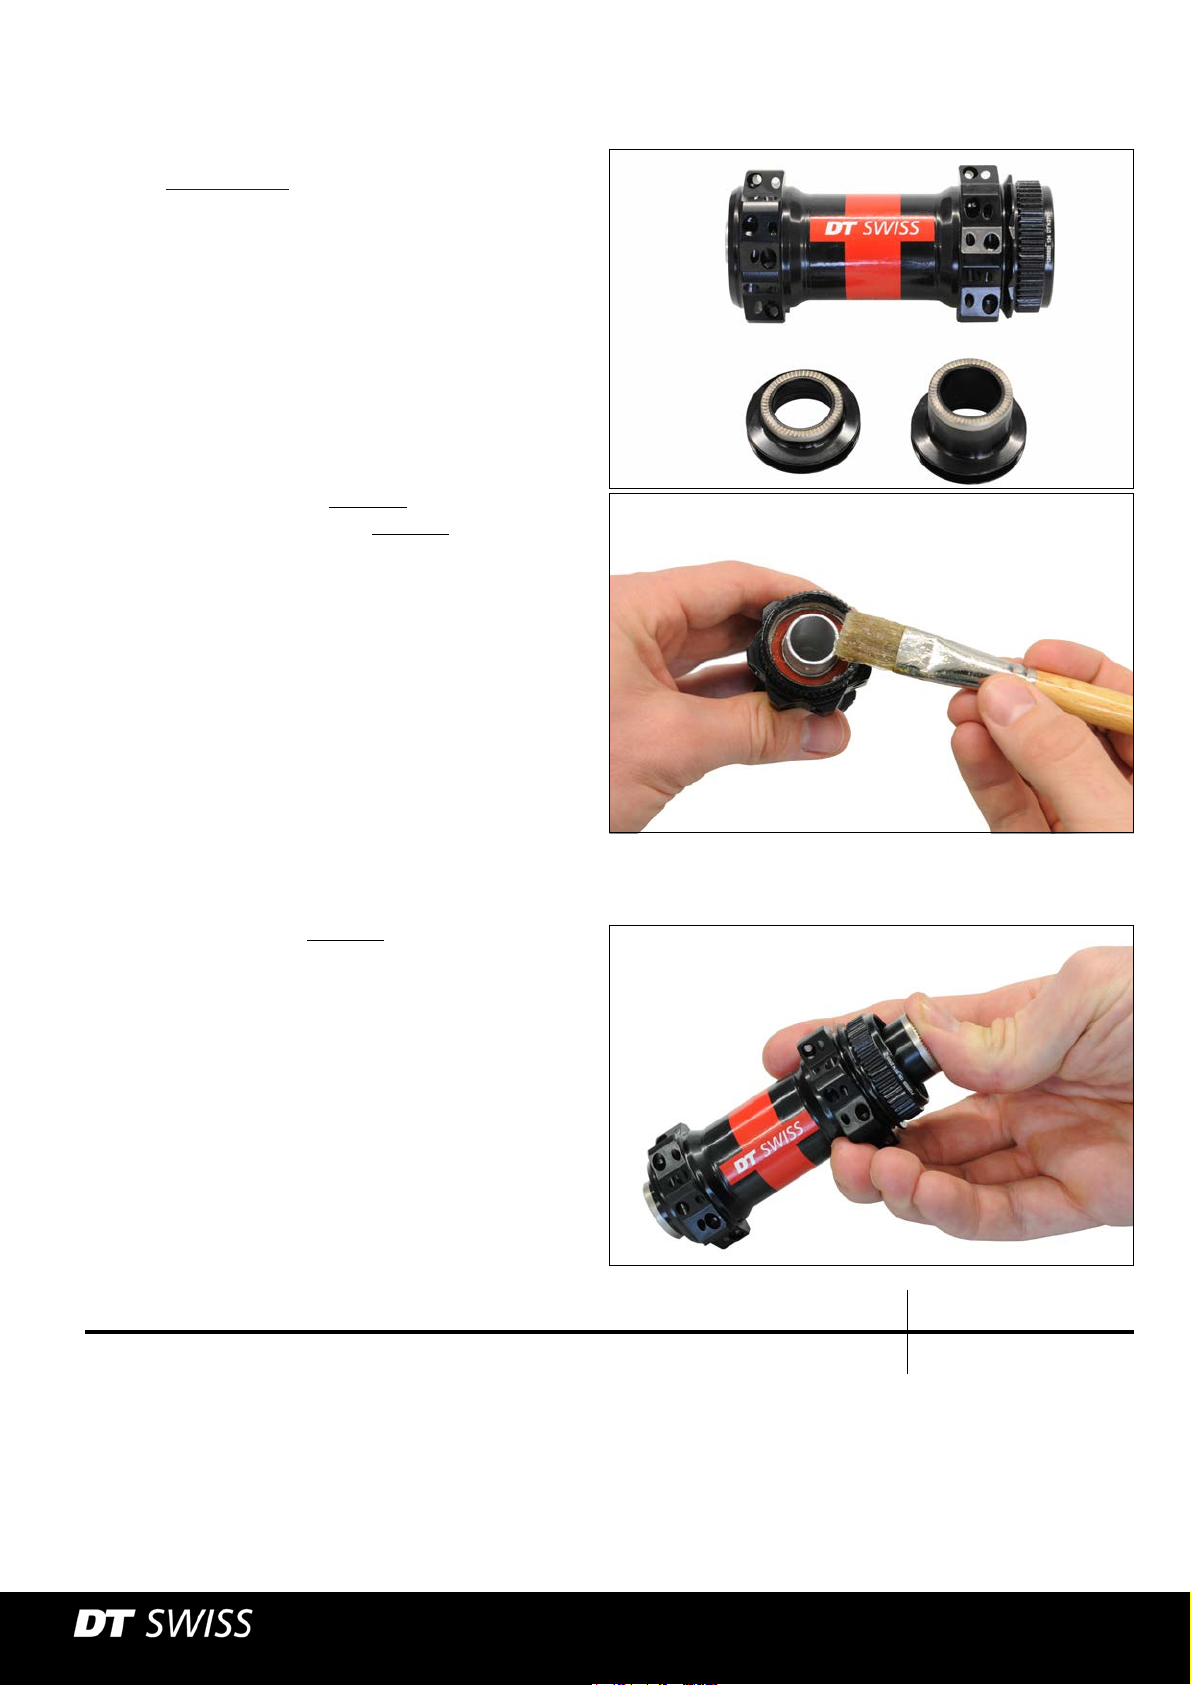
3.3 Converting the Hub [Inserted Adapters]
NOTICE
Converting the Hub [Inserted Adapters]V2017.07
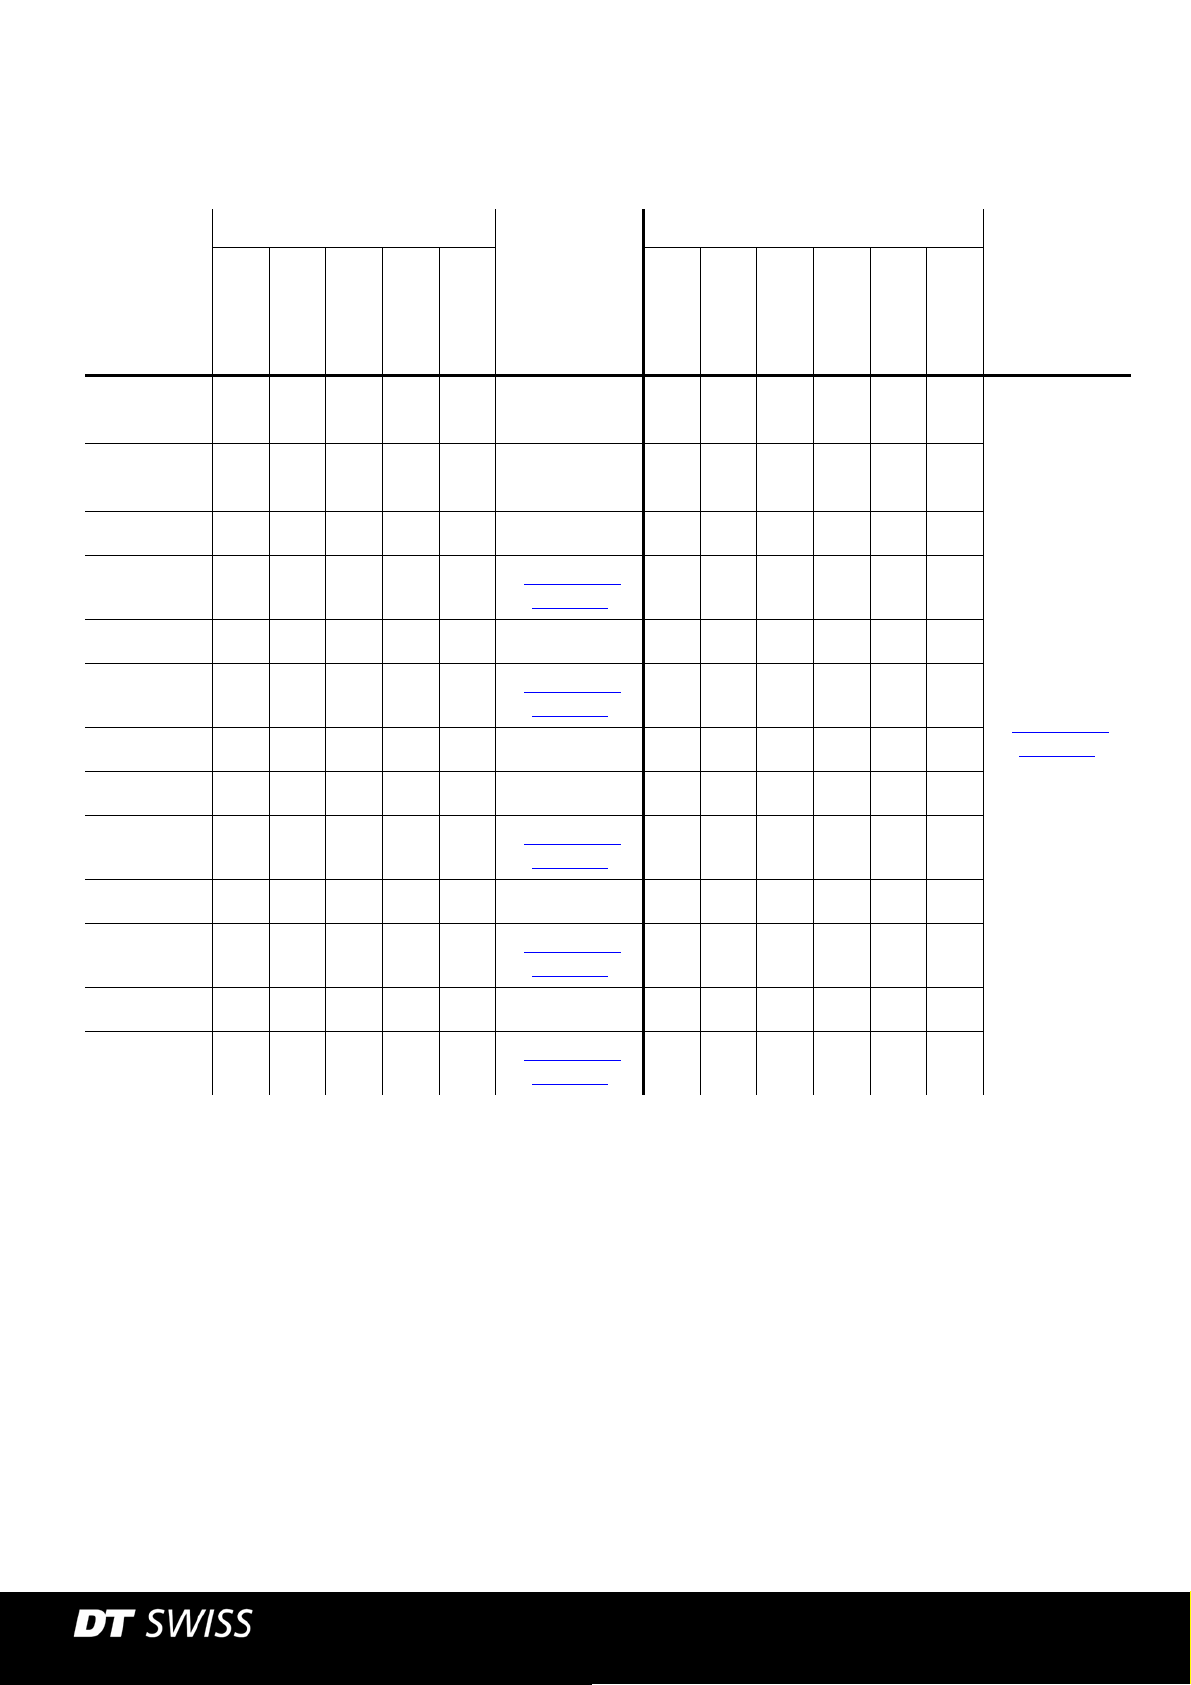
Figure 3-1: Overview: front wheel with inserted adapters
1 adapter left 3 axle 5 adapter right
2 ball bearing 4 hub shell
Preparatory Steps Link
not required
Required Material Specification Amount
multipurpose grease as required
Risk of damaging the adapters!
To avoid damages, only use grind clamping jaws, aluminium clamping jaws or special tools to clamp
the adapters.
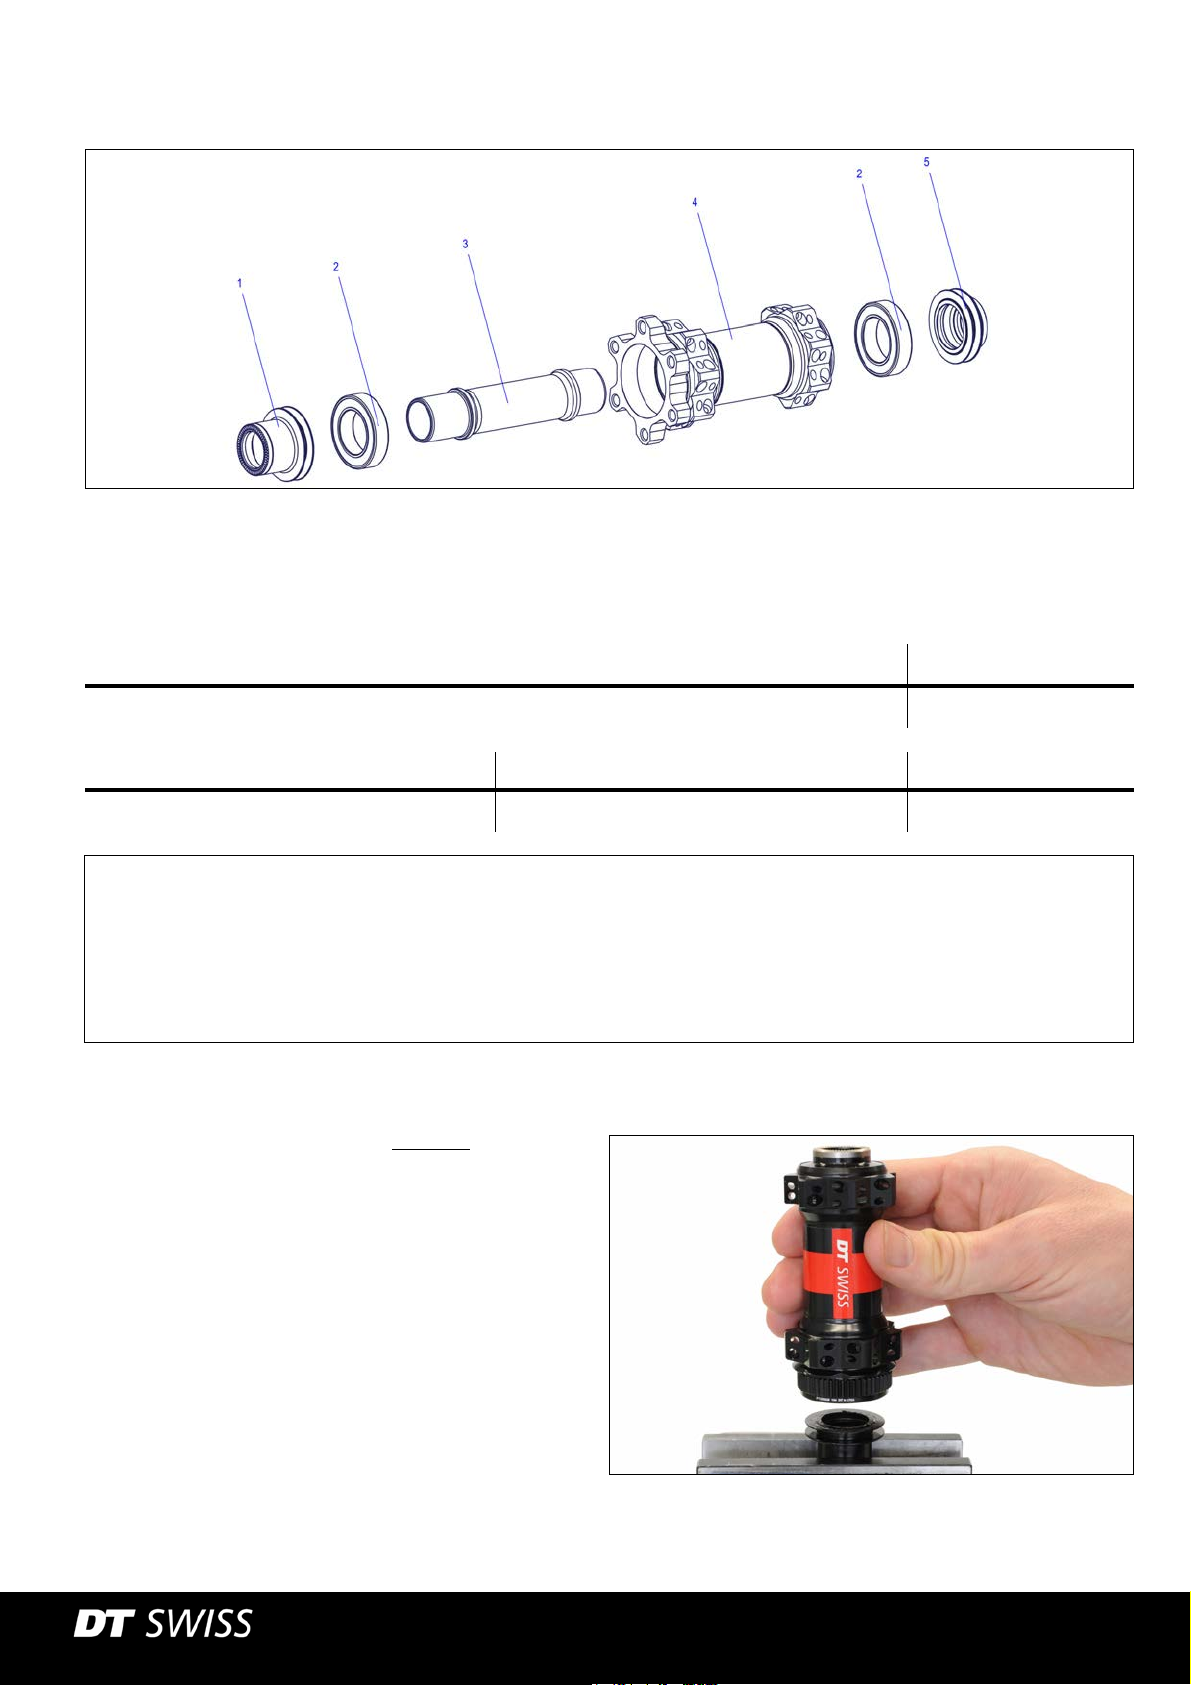
Removing the Adapters
1. Clamp one of the adapters (Abb.3-1
vice.
2. Pull off the wheel, respectively the hub.
3. Clamp the second adapter into the vice.
4. Pull off the wheel, respectively the hub.
/1, 5) into a
Single Shot 2® Technical Manual 12
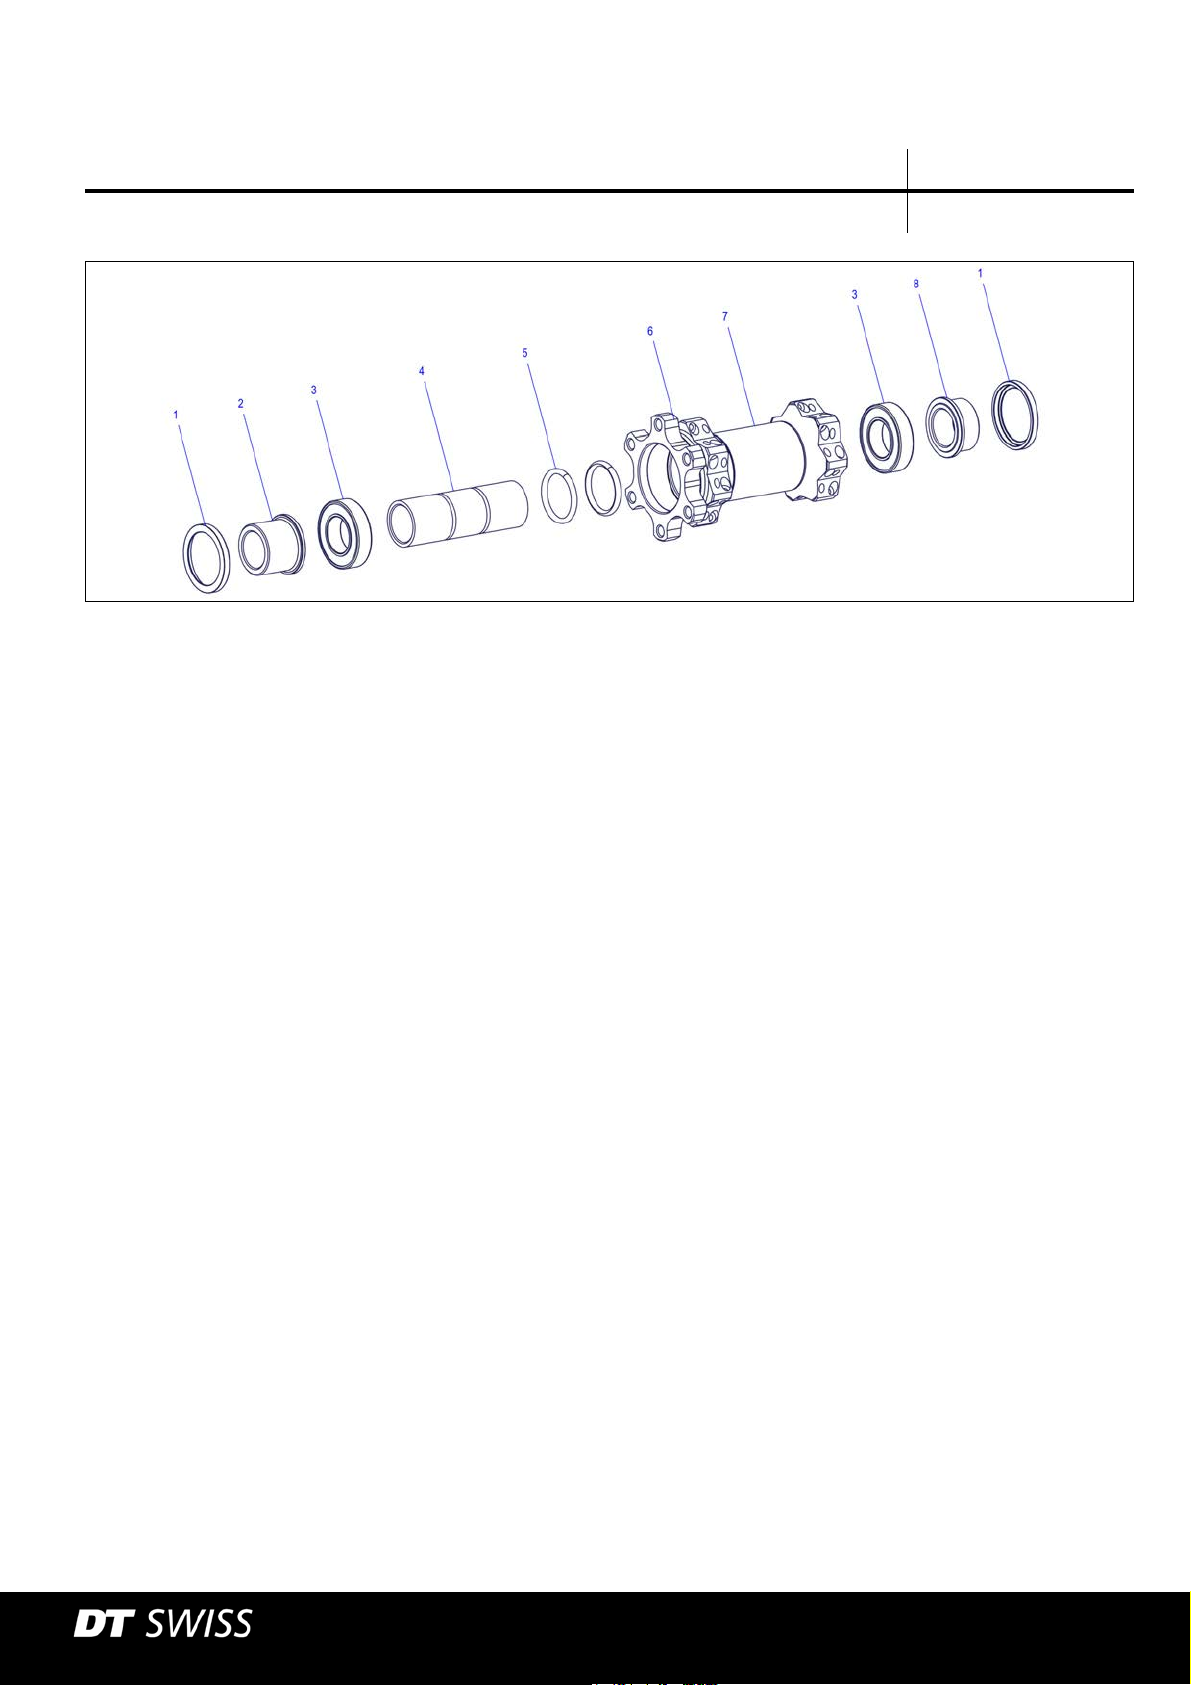
Cleaning and Greasing the Parts
1. Clean the hub, the bearings and the adapters
(see
Cleaning, S.6).
2. Check the bearings.
If the hub doesn‘t turn smoothly, change the
bearings (see Technical Manual at
www.dtswiss.com).
Converting the Hub [Inserted Adapters]V2017.07
3. Grease the bearings (Abb.3-1
surface of both adapters (Abb.3-1
multipurpose grease.
/2) and the contact
/1, 5) with
Putting on the Adapters
1. Put both adapters (Abb.3-1
hand.
Caution: If the adapters have different lengths, the
shorter adapter must be put to the drive side.
/1, 5) onto the hub by
Closing Steps Link
not required
Further information can be found in the Technical Manual of the respective hub at dtswiss.com.
Single Shot 2® Technical Manual 13
3.4 Converting the Hub [Pressed on End Caps]
This is an universal drawing. Details may differ slightly.
Preparatory Steps Link
Clean the hub.
Converting the Hub [Pressed on End Caps]
Figure 3-2: 350 thru axle front wheel hub
1cover 4spacer 7sticker
2 adapter left 5 O-ring 8 adapter right
3 ball bearing 6 hub shell
V2017.07
SPLINE® - Technical Manual
14
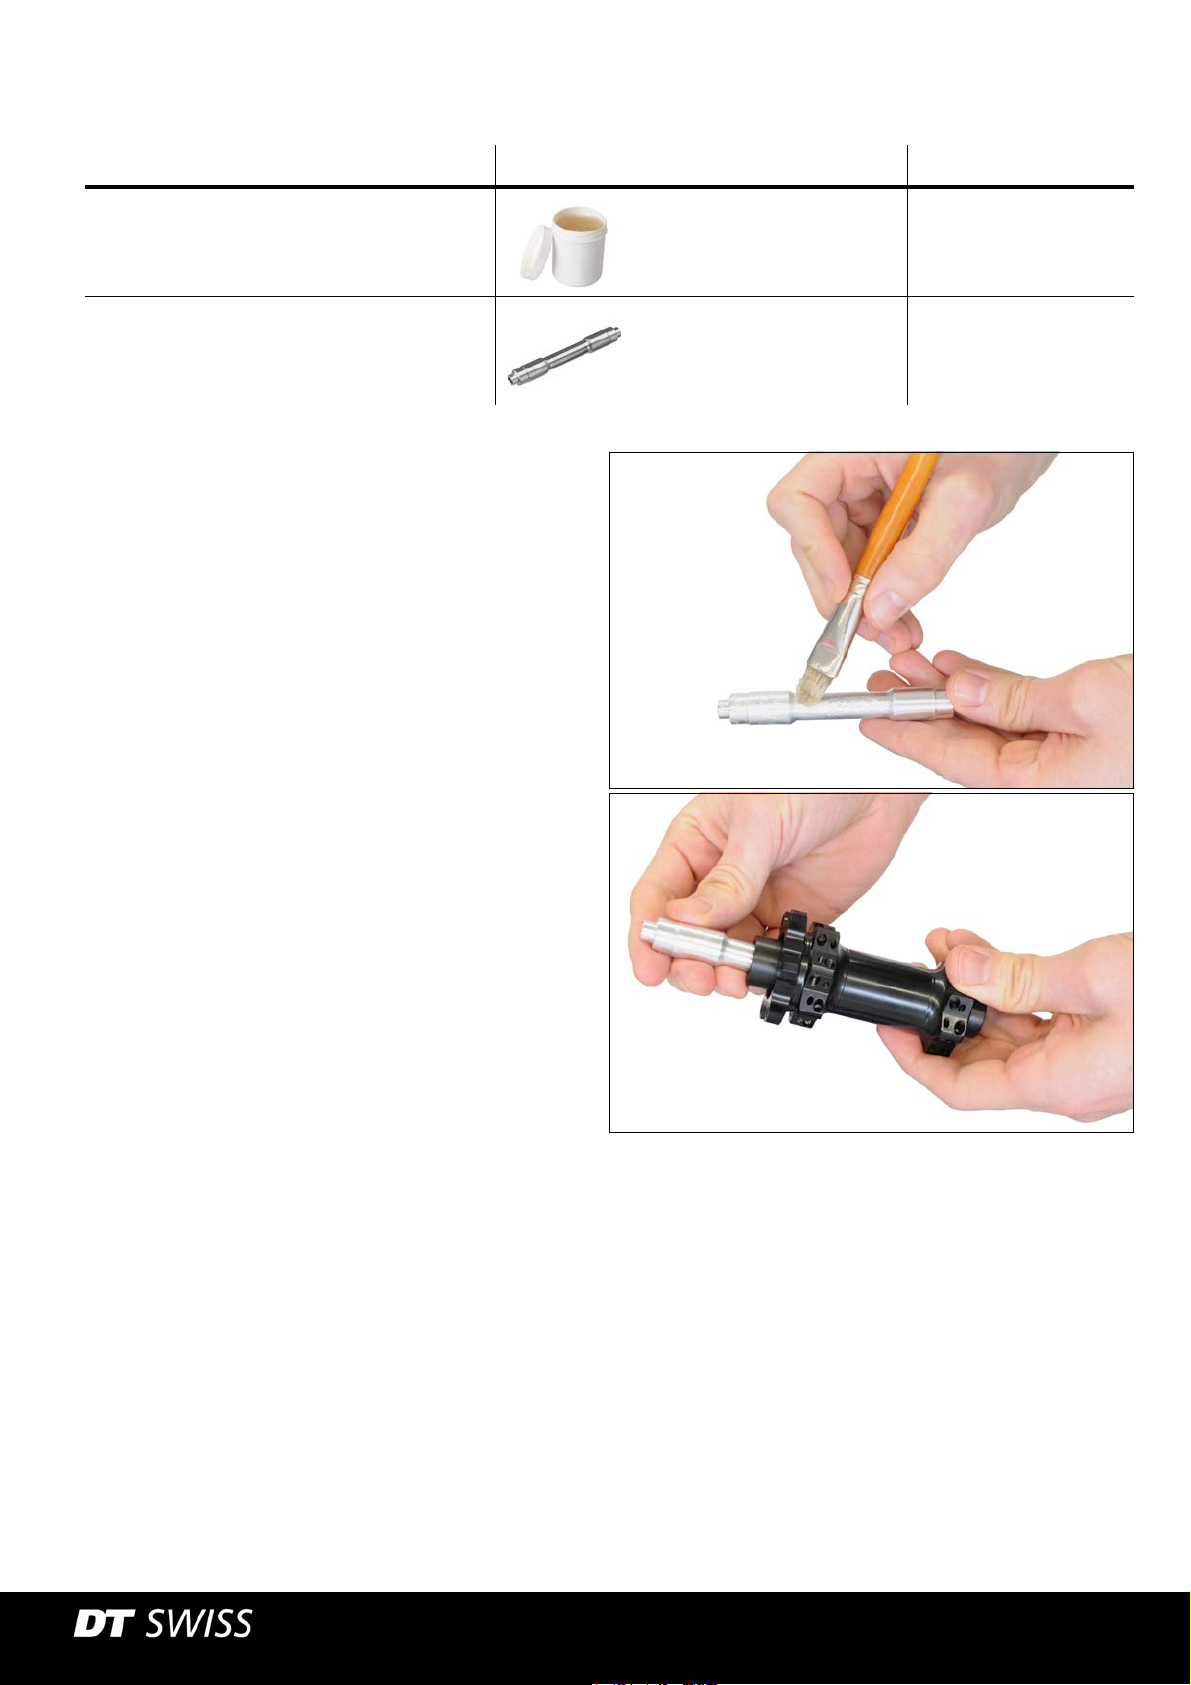
Converting Ø15 mm into Ø5 mm with Axle Adapter
Required Material Specification Amount
DT Swiss multipurpose grease HXTXXX00NMG20S as required
adapter 15 mm/QR HRCXXX00N4369S 1
1. Grease the adapter with multipurpose grease.
Converting the Hub [Pressed on End Caps]
2. Slide the adapter into the hub.
V2017.07
SPLINE® - Technical Manual
15

Converting by Changing the End Caps
NOTICE
Required Material Specification Amount
mounting pin Ø15 mm HWTXXX00N5290S 1
DT Swiss multipurpose grease HXTXXX00NMG20S as required
adapter 100/QR HWGXXX00S3801S 1
Converting the Hub [Pressed on End Caps]
adapter 100/Ø9 HWGXXX00S3803S 1
adapter 100/Ø12 HWGXXX00S6885S 1
Risk of damaging the adapters and the ball bearings!
The mounting pin must not touch the ball bearing while disassembling the adapters.
1. Plug the mounting pin into one of the adapters.
2. Push the mounting pin downwards (see picture).
3. Remove the adapter and the cover.
V2017.07
SPLINE® - Technical Manual
16
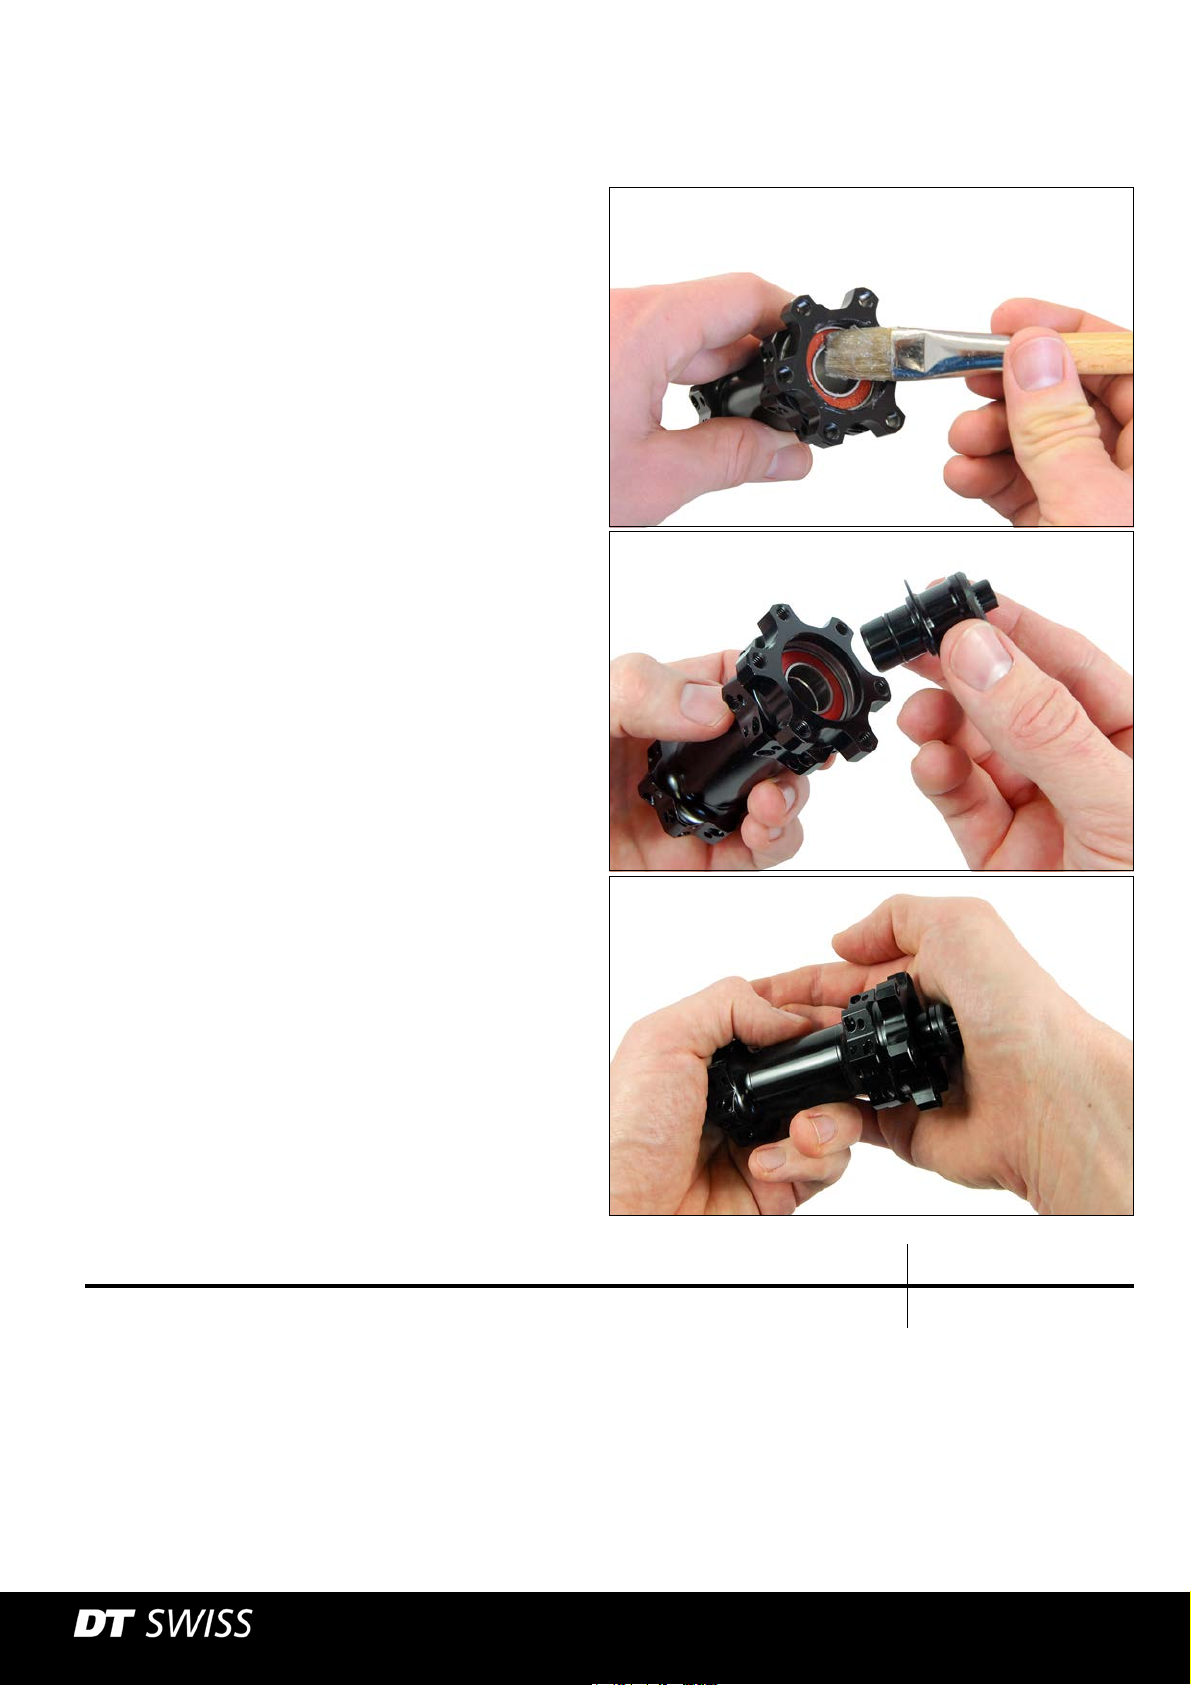
4. Repeat steps on the second adapter.
5. Clean and grease both bearings.
Converting the Hub [Pressed on End Caps]
6. Put on the end caps.
The longer end cap must be put on the brake
side!
7. Completely push on both end caps by hand.
Closing Step Link
not required
Further information can be found in the Technical Manual of the respective hub at dtswiss.com.
V2017.07
SPLINE® - Technical Manual
17

3.5 Converting the Hub [Screwed on End Caps]
Preparatory Steps Link
Remove the brake disc. see instructions of the manufacturer
Clean the hub.
Converting the Hub [Screwed on End Caps]
Figure 3-3: 240 Oversize
1end cap 3axle
2 ball bearing 4 hub shell
Required Material Specification Amount
DT Swiss multipurpose grease HXTXXX00NMG20S as required
tool kit set front wheel oversize
HWTXXX00NTKFRS
1 *
HXTXXX00N5046S
HXTXXX00N5038S
* Only required, if the end caps cannot be dismounted without dismounting the axle.
V2017.07
SPLINE® - Technical Manual
18
Removing the End Caps
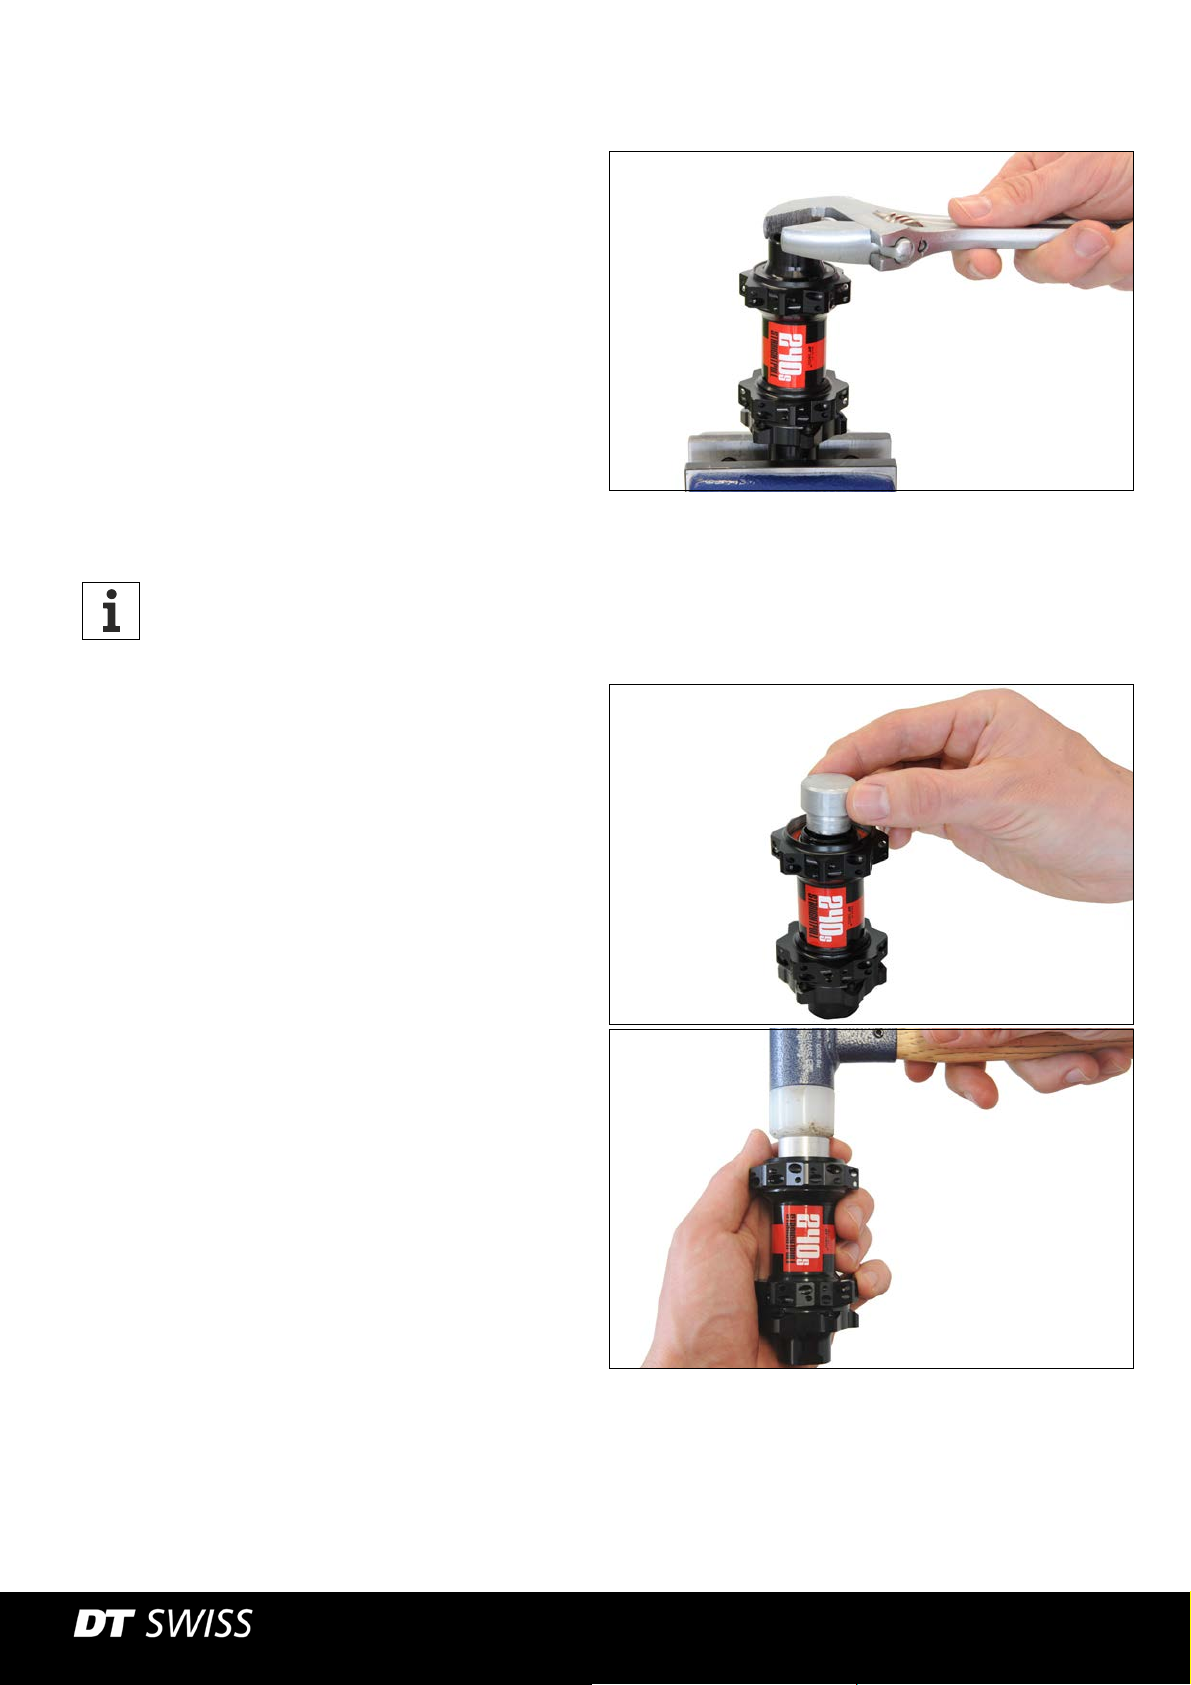
1. Loosen the end caps (fig. 3-3/1) using a wrench
and remove it from the axle.
20 mm, 15 mm und 9 mm end caps: 22 mm
open-end wrench
QR end caps: 5 mm Allen key
2. If the end caps cannot be loosened this way, the
axle must be dismounted (see following).
Converting the Hub [Screwed on End Caps]
Dismounting the Axle
The axle only must be dismounted, if the end caps cannot be dismounted like shown in the
previous section.
1. Slide the disassembly tool onto the axle
(fig. 3-3/3).
2. Tap the bearing (fig. 3-3/2) and the axle out of the
hub shell using the disassembly tool and a
hammer.
V2017.07
SPLINE® - Technical Manual
19
 Loading...